


Duet WFW9400SWA10
Whirlpool Duet WFW9400SWA10, Duet WFW9400STA10, Duet WFW9400SU01, Duet WFW9400VE01, Duet WFW9400SBA10 Use & Care Manual
...
®
FRONT.LOADING
AUTOMATICWASHER
For questions about features, operation/performance,
parts, accessories or service call: 1-800-253-1301
In Canada, call: 1-800-807-6777
www.whirlpool.com or www.whirlpool.ca
AUTOMATICADECARGA
Si tiene preguntas respecto alas caracterfsticas, funcionamiento,
rendimiento, pares, accesorios o servicio tecnico, Ilame al:
www.whirlpool.com o www.whirlpool.ca
or visit our website at
]_AVADO]_
FRONTAL
1-800-253-1301
En Canad& Ilame al: 1-800-807-6777
o visite nuestro sitio web en
461970235721
,/8183052
LAVEUSE
AUTOMATIQUEA
CHARGEMENTFRONTAL
Au Canada, pour assistance, installation ou service, composez le :
Table of Contents/Indice/Table des matieres ....... 2
1-800-807-6777
ou visitez notre site internet h
www.whirlpool.ca
Designed to use only HE
High Efficiency Detergent
Disefiada para utilizar
solamente detergente de
alto rendimiento
Concue pour I'utilisation
d'un detergent haute
efficacite seulement

TABLEOFCONTENTS
INSTALLATION REQUIREMENTS ................................................ 4
Tools and Parts ............................................................................ 4
Options ......................................................................................... 4
Location Requirements ................................................................ 5
Drain System ................................................................................ 6
Electrical Requirements ............................................................... 7
INSTALLATION INSTRUCTIONS .................................................. 7
Remove Transport System .......................................................... 7
Connect the Inlet Hoses ............................................................... 8
Route the Drain Hose ................................................................... 8
Secure the Drain Hose ................................................................. 9
Level the Washer .......................................................................... 9
Complete Installation ................................................................... 9
FEATURES AND BENEFITS ........................................................ 10
WASHER USE............................................................................... 11
Starting Your Washer ................................................................. 11
Using the Proper Detergent ....................................................... 11
Using the Dispenser ................................................................... 12
Pausing or Restarting ................................................................. 13
Changing Cycles, Options and Modifiers .................................. 13
Status Lights .............................................................................. 13
Cycles ......................................................................................... 14
Normal Washer Sounds ............................................................. 16
Options ....................................................................................... 16
Modifiers ..................................................................................... 17
Laundry Guide ............................................................................ 17
LAUNDRY TIPS ............................................................................ 18
Loading ....................................................................................... 18
WASHER CARE ............................................................................ 19
Cleaning Your Washer ............................................................... 19
Water Inlet Hoses ....................................................................... 20
Vacation, Storage, and Moving Care ......................................... 20
TROUBLESHOOTING .................................................................. 21
ASSISTANCE OR SERVICE ......................................................... 24
WARRANTY .................................................................................. 25
J
INDICE
SEGURIDAD DE LA LAVADORA ................................................. 26
REQUlSITOS DE INSTALACION ................................................. 27
Piezas y herramientas ................................................................ 27
Opciones .................................................................................... 27
Requisites de ubicaci6n ............................................................. 28
Sistema de desagiie .................................................................. 29
Requisites electricos .................................................................. 30
INSTRUCCIONES DE INSTALACION ......................................... 30
Eliminaci6n del sistema protector de transporte ....................... 30
Conexi6n de las mangueras de entrada .................................... 31
Tendido de la manguera de desag0e ........................................ 31
Fijacidn de la manguera de desag0e ......................................... 32
Nivelaci6n de la lavadora ........................................................... 32
Complete la instalaci6n .............................................................. 32
CARACTER|STICAS Y BENEFICIOS .......................................... 33
USO DE LA LAVADORA ............................................................... 34
Puesta en marcha de la lavadora .............................................. 34
Use del detergente adecuado ................................................... 34
Use del depdsito ........................................................................ 35
Pausa o reanudaci6n de la marcha ........................................... 37
Cambio de ciclos, opciones y modificadores ........................... 37
Luces de estado ......................................................................... 37
Ciclos .......................................................................................... 38
Sonidos normales de la lavadora ............................................... 40
Opciones .................................................................................... 40
Modificadores ............................................................................. 41
Guia para el lavado ..................................................................... 42
CONSEJOS DE LAVANDER|A ..................................................... 43
C6mo cargar ............................................................................... 43
CUIDADO DE LA LAVADORA ..................................................... 44
C6mo limpiar su lavadora .......................................................... 44
Mangueras de entrada de agua ................................................. 45
Cuidado para las vacaciones, el almacenaje o
en case de mudanza .................................................................. 45
SOLUClON DE PROBLEMAS ...................................................... 46
AYUDA O SERVIClO T¢CNICO ................................................... 49
GARANT|A .................................................................................... 50
TABLEDESMATIERES
SI_CURITI_ DE LA LAVEUSE ........................................................ 51
EXIGENCES D'INSTALLATION ................................................... 52
Outillage et pieces ...................................................................... 52
Options ....................................................................................... 52
Exigences d'emplacement ......................................................... 53
Systeme de vidange ................................................................... 54
Specifications electriques .......................................................... 55
INSTRUCTIONS D'INSTALLATION ............................................. 55
Elimination des accessoires de transport .................................. 55
Raccordement des tuyaux d'alimentation ................................. 56
Acheminement du tuyau de vidange ......................................... 56
Immobilisation du tuyau de vidange .......................................... 57
Reglage de I'aplomb de la laveuse ............................................ 57
Achever I'installation .................................................................. 57
CARACTC:RISTIQUES ET AVANTAGES ..................................... 58
UTILISATION DE LA LAVEUSE ................................................... 5g
Mise en marche de la laveuse .................................................... 59
Utilisation du detergent approprie ............................................. 59
Utilisation du distributeur ........................................................... 60
Pause ou remise en marche ....................................................... 62
Changement des programmes, options et modificateurs .........62
Temoins lumineux ...................................................................... 62
Programmes ............................................................................... 63
Sons normaux emis par la laveuse ............................................ 65
Options ....................................................................................... 65
Modificateurs .............................................................................. 66
Guide de lessivage ..................................................................... 67
CONSEILS DE LESSIVAGE .......................................................... 68
Chargement ................................................................................ 68
ENTRETIEN DE LA LAVEUSE ..................................................... 69
Nettoyage de la laveuse ............................................................. 69
Tuyaux d'arrivee d'eau ............................................................... 70
Precautions & prendre avant les vacances, un entreposage
ou un demenagement ................................................................ 70
DCPANNAGE ................................................................................. 71
ASSISTANCE OU SERVICE ......................................................... 74
GARANTI E ..................................................................................... 75
Wh_'l ol °
TODO LO OUE IMAGINAS'*

WASHERSAFETY
Your safety and the safety of others are very important.
We have provided many important safety messages in this manual and on your appliance. Always read and obey all safety
messages.
This is the safety alert symbol.
This symbol alerts you to potential hazards that can kill or hurt you and others.
All safety messages will follow the safety alert symbol and either the word "DANGER" or "WARNING."
These words mean:
You can be killed or seriously injured if you don't immediately
follow instructions.
You can be killed or seriously injured if you don't follow
instructions.
All safety messages will tell you what the potential hazard is, tell you how to reduce the chance of injury, and tell you what can
happen if the instructions are not followed.
IMPORTANT SAFETY INSTRUCTIONS
WARNING: To reduce the risk of fire, electric shock, or injury to persons when using the washer follow basic precautions,
including the following:
[] Read all instructions before using the washer.
[] Do not wash articles that have been previously cleaned
in, washed in, soaked in, or spotted with gasoline,
dry-cleaning solvents, other flammable, or explosive
substances as they give off vapors that could ignite or
explode.
[] Do not add gasoline, dry-cleaning solvents, or other
flammable, or explosive substances to the wash water.
These substances give off vapors that could ignite or
explode.
[] Under certain conditions, hydrogen gas may be
produced in a hot water system that has not been used
for 2 weeks or more. HYDROGEN GAS IS
EXPLOSIVE. If the hot water system has not been
used for such a period, before using the washing
machine, turn on all hot water faucets and let the water
flow from each for several minutes. This will release
any accumulated hydrogen gas. As the gas is
flammable, do not smoke or use an open flame during
this time.
SAVE THESE INSTRUCTIONS
[] Do not allow children to play on or in the washer. Close
supervision of children is necessary when the washer is used
near children.
[] Before the washer is removed from service or discarded,
remove the door or lid.
[] Do not reach into the washer if the drum, tub or agitator is
moving.
[] Do not install or store the washer where itwill be exposed to
the weather.
[] Do not tamper with controls.
[] Do not repair or replace any part of the washer or attempt any
servicing unless specifically recommended in this manual or in
published user-repair instructions that you understand and
have the skills to carry out.
[] See "Electrical Requirements" for grounding instructions.

INSTALLATIONREQUIREMENTS
Gather the required tools and parts before starting installation.
The parts supplied are in the washer drum.
Tools needed for connecting the water inlet hoses
• Pliers (that open to 1%6" [39.5 mm])
• Flashlight (optional)
Tools needed for installation
• Open end wrenches 17 mm and 13 mm
• Level
• Wood block
• Ruler or measuring tape
Parts supplied:
A B
O
A. Drain hose form
B. Inlet hose (2)
C. Inlet hose washer (4)
Alternate Parts
Your installation may require additional parts. Ifyou are interested
in purchasing one of the items listed here, call the toll-free
number on the cover or in the "Assistance or Service" section.
If You Have You Will Need to Buy
Laundry tub or Sump pump system (if not already
standpipe taller available)
than 96" (2.4 m)
Overhead sewer Standard 20 gal. (76 L), 30" (76.2 cm) tall
drain tub or utility sink and sump pump
(available from local plumbing suppliers)
Floor drain Siphon break, Part Number 285834;
additional drain hose
Part Number 8318155; and connector kit,
Part Number 285835
Drain hose too 4 ft (1.2 m) drain hose extension kit,
short Part Number 285863
D. Transport bolt hole plug (4)
E. Beaded strap
Pedestal
You have the option of purchasing pedestals of different heights
separately for this washer. You may select a 10" (25.4 cm) or a
15.5" (39.4 cm) pedestal. These pedestals will add to the total
height of the washer for a total height of approximately
48" (121.9 cm) or 53.5" (135.9 cm), respectively.
A
A. 10" (25.4 cm) pedestal
B. 15.5" (39.4 cm) pedestal
To order, call the dealer from whom you purchased your washer
or refer to the "Assistance or Service" section of this manual.
Pedestal Color Part Number
Height
10" (25.4 cm) White WHP1000SQ
10" (25.4 cm) Biscuit WHP1000ST
10" (25.4 cm) Black WHP1000SB
10" (25.4 cm) Diamond Dust (Silver) WHP1000SU
15.5" (39.4 cm) White WHP1500SQ
15.5" (39.4 cm) Biscuit WHP1500ST
15.5" (39.4 cm) Black WHP1500SB
15.5" (39.4 cm) Diamond Dust (Silver) WHP1500SU
Stack Kit
Are you planning to stack your washer and dryer? To do so you
will need to purchase a Stack Kit.
To order, call the dealer from whom you purchased your dryer or
refer to the "Assistance or Service" section of this manual. Ask
for Part Number 8541503.
Water faucets 2 longer water fill hoses:
beyond reach of fill 6 ft (1.8 m) Part Number 76314,
hoses 10 ft (3.0 m) Part Number 350008

Selectingtheproperlocationforyourwasherimproves
performanceandminimizesnoiseandpossiblewasher"walk."
Yourwashercanbeinstalledunderacustomcounter,orina
basement,laundryroom,closet,orrecessedarea.See"Drain
System."
Companionappliancelocationrequirementsshouldalsobe
considered.Properinstallationisyourresponsibility.
You will need
• A water heater set to deliver 120°F (49°C) water to the
washer.
• A grounded electrical outlet located within 6 ft (1.8 m) of
where the power cord is attached to the back of the washer.
See "Electrical Requirements."
• Hot and cold water faucets located within 4 ft (1.2 m) of the
hot and cold water fill valves, and water pressure of
20-100 psi (137.9-689.6 kPa).
A level floor with a maximum slope of 1" (2.5 cm) under
entire washer. Installing the washer on soft floor surfaces,
such as carpets or surfaces with foam backing, is not
recommended.
• A sturdy and solid floor to support the washer with a total
weight (water and load) of 400 Ibs (180 kg).
Do not operate your washer in temperatures below 32°F (0°C).
Some water can remain in the washer and can cause damage in
low temperatures.
Installation clearances
• The location must be large enough to allow the washer door
to be fully opened.
• Additional spacing should be considered for ease of
installation and servicing.
• Additional clearances might be required for wall, door, and
floor moldings.
• Additional spacing of 1" (2.5 cm) on all sides of the washer is
recommended to reduce noise transfer.
• Companion appliance spacing should also be considered.
Washer Dimensions
56W'
(128.3crn)
27"
(68.6era)
Recommended installation spacing for custom
undercounter installation
The dimensions shown are for the recommended spacing.
Custom undercounter installation - Washer only
t
39" rain.
(99.0 cm)
+
(2.5 crn) (68.6 cm) (2.5 cm)
Recommended installation spacing for recessed or
closet installation, with or without a pedestal
The dimensions shown are for the recommended spacing.
Recessed area or closet installation
_f 3"
(7.6crn}
48 in.2*_ _-
(310cm2)
24 in.2. _ __
(180cm2)
I1"I-_-31y2"-_14"1_-
(2.8 cm) (80 cm) (10.2 crn)
A B
A. Side view - closet or confined area
B. Closet door with vents
*Min. top and bottom air openings for closet door.
Recessed or closet installation - Washer on pedestal
I__ (40.7cm)
_- 3"
(7.6cm)
+
18"rain."1_
31Y2"
(60,6era)
38"
(96.5cm)
1"--_ _--- 1"
(2.0 crn} (2.0 cm)(68.0cm)
(2.0 crn) (80 crn) (10,2 cm)
A
A. Recessed area
B. Side view - closet or confined area
I1"t<-31,/2"_,-I4"1
B

Recommended installation spacing for recessed or
closet installation, with stacked washer and dryer
The dimensions shown are for the recommended spacing.
46in?*
(310cm2)
3" (7.6cm)
T
o
!
3" (7.6 cm)
24in? _
(166crn2)
6"(_m)
C111)" .
The washer can be installed using the standpipe drain system
(floor or wall), the laundry tub drain system, or the floor drain
system. Select the drain hose installation method you need. See
"Tools and Parts."
Standpipe drain system - wall or floor (views A & B)
The standpipe drain requires a minimum diameter standpipe of
2" (5 cm). The minimum carry-away capacity can be no less than
17 gal. (64 L)per minute.
The top of the standpipe must be at least 30" (76.2 cm) high and
no higher than 96" (2.4 m) from the bottom of the washer.
-- (163 cm)
5Y2"** _ _ 1"***
(14crn) 2.6crn
*Min. top and bottom air openings for closet door.
**External exhaust elbow requires additional space.
***Wall, door and floor molding may require additional spacing.
Recommended installation spacing for cabinet
installation
The dimensions shown are for the recommended spacing.
For cabinet installation, with a door, the minimum ventilation
openings in the top are required.
" • ) 7"(17.8cm)
76"
F (68.6 cm) _ 2.6 cm
I,
B
Laundry tub drain system (view C)
The laundry tub needs a minimum 20 gal. (76 L) capacity. The top
of the laundry tub must be at least 30" (76.2 cm) above the floor.
Floor drain system (view D)
The floor drain system requires a siphon break that may be
purchased separately. See "Tools and Parts."
The siphon break must be a minimum of 28" (71 om) from the
bottom of the washer. Additional hoses might be needed.
L ....... i "¸i; __,__
U
C
4 31_/2 I
(lO.2crn) (80,Ocm) (2,6cm) (2.6crn)(68.6crn) (2.6cm)
1 I

• Do not ground to a gas pipe.
• Check with a qualified electrician if you are not sure the
washer is properly grounded.
• Do not have a fuse in the neutral or ground circuit.
GROUNDING INSTRUCTIONS
Electrical Shock Hazard
Plug into a grounded 3 prong outlet.
Do not remove ground prong.
Do not use an adapter.
Do not use an extension cord.
Failure to follow these instructions can result in death,
fire, or electrical shock.
A 120 volt, 60 Hz., AC only, 15- or 20-amp, fused electrical
supply is required. A time-delay fuse or circuit breaker is
recommended. It is recommended that a separate circuit
serving only this appliance be provided.
This washer is equipped with a power supply cord having a
3 prong ground plug.
To minimize possible shock hazard, the cord must be
plugged into a mating, 3 prong, ground-type outlet, grounded
in accordance with local codes and ordinances. If a mating
outlet is not available, it is the personal responsibility and
obligation of the customer to have the properly grounded
outlet installed by a qualified electrician.
If codes permit and a separate ground wire is used, it is
recommended that a qualified electrician determine that the
ground path is adequate.
For a grounded, cord-connected washer:
This washer must be grounded. In the event of a malfunction
or breakdown, grounding will reduce the risk of electrical
shock by providing a path of least resistance for electric
current. This washer is equipped with a cord having an
equipment-grounding conductor and a grounding plug. The
plug must be plugged into an appropriate outlet that is
properly installed and grounded in accordance with all local
codes and ordinances.
WARNING: Improper connection of the equipment-
grounding conductor can result in a risk of electric shock.
Check with a qualified electrician or serviceman if you are in
doubt as to whether the appliance is properly grounded.
Do not modify the plug provided with the appliance - if it will
not fit the outlet, have a proper outlet installed by a qualified
electrician.
For a permanently connected washer:
This washer must be connected to a grounded metal,
permanent wiring system, or an equipment grounding
conductor must be run with the circuit conductors and
connected to the equipment-grounding terminal or lead on
the appliance.
INSTALLATIONINSTRUCTIONS
Excessive Weight Hazard
Use two or more people to move and install washer.
Failure to do so can result in back or other injury.
IMPORTANT: Position the washer so that the rear of the washer
is within approximately 3 ft (90 cm) of its final location.
suspension system during transportation. These bolts also retain
There are 4 bolts in the rear panel of the washer that support the
the power cord inside the washer until the bolts are removed.
1. Using a 13 mm wrench, loosen each of the bolts.
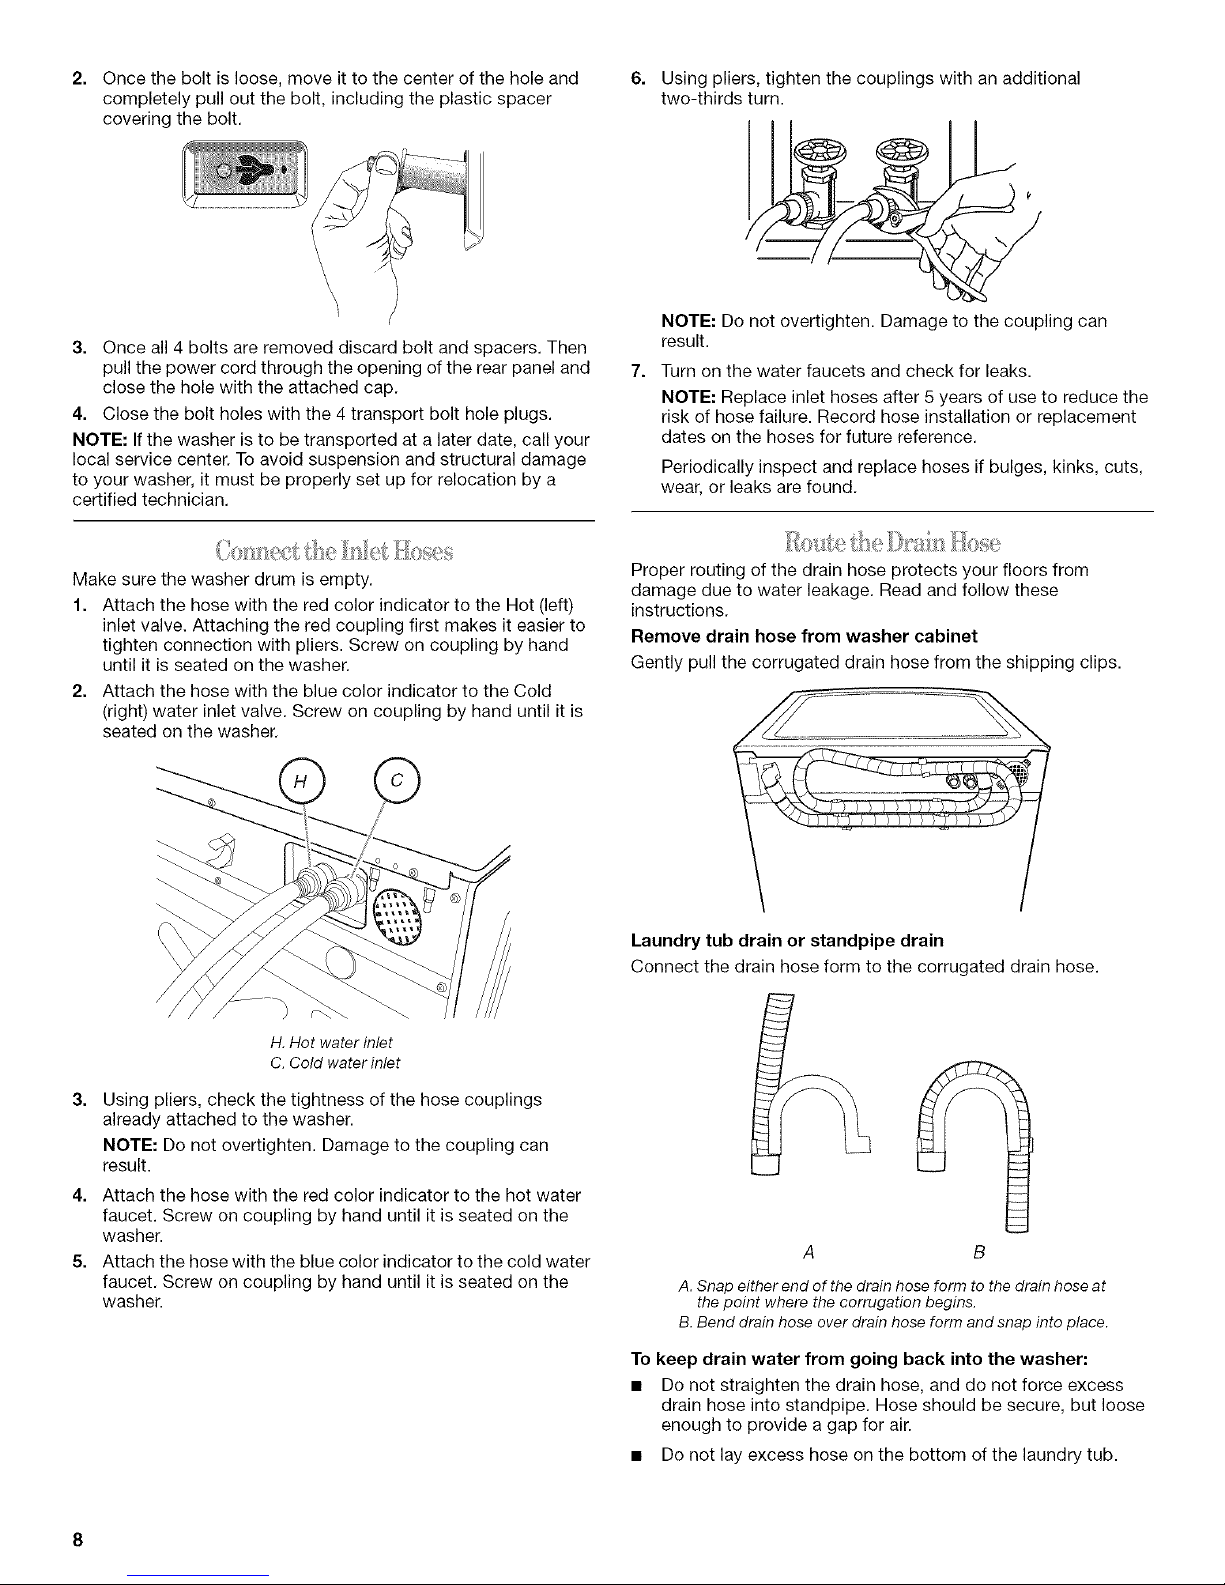
2. Oncetheboltisloose,moveittothecenteroftheholeand
completelypulloutthebolt,includingtheplasticspacer
coveringthebolt.
3. Onceall4boltsareremoveddiscardboltandspacers.Then
pullthepowercordthroughtheopeningoftherearpaneland
closetheholewiththeattachedcap.
4. Closetheboltholeswiththe4transportboltholeplugs.
NOTE:Ifthewasheristobetransportedatalaterdate,callyour
localservicecenter.Toavoidsuspensionandstructuraldamage
toyourwasher,itmustbeproperlysetupforrelocationbya
certifiedtechnician.
6. Usingpliers,tightenthecouplingswithanadditional
two-thirdsturn.
NOTE: Do not overtighten. Damage to the coupling can
result.
7.
Turn on the water faucets and check for leaks.
NOTE: Replace inlet hoses after 5 years of use to reduce the
risk of hose failure. Record hose installation or replacement
dates on the hoses for future reference.
Periodically inspect and replace hoses if bulges, kinks, cuts,
wear, or leaks are found.
Makesurethewasherdrumisempty.
1. AttachthehosewiththeredcolorindicatortotheHot(left)
inletvalve.Attachingtheredcouplingfirstmakesiteasierto
tightenconnectionwithpliers.Screwoncouplingbyhand
untilitisseatedonthewasher.
2. AttachthehosewiththebluecolorindicatortotheCold
(right)waterinletvalve.Screwoncouplingbyhanduntilitis
seatedonthewasher.
H. Hot water inlet
C. Cold water inlet
3=
Using pliers, check the tightness of the hose couplings
already attached to the washer.
NOTE: Do not overtighten. Damage to the coupling can
result.
4. Attach the hose with the red color indicator to the hot water
faucet. Screw on coupling by hand until it is seated on the
washer.
5. Attach the hose with the blue color indicator to the cold water
faucet. Screw on coupling by hand until it is seated on the
washer.
Proper routing of the drain hose protects your floors from
damage due to water leakage. Read and follow these
instructions.
Remove drain hose from washer cabinet
Gently pull the corrugated drain hose from the shipping clips.
Laundry tub drain or standpipe drain
Connect the drain hose form to the corrugated drain hose.
B
A. Snap either end of the drain hose form to the drain hose at
the point where the corrugation begins.
B. Bend drain hose over drain hose form and snap into place.
To keep drain water from going back into the washer:
• Do not straighten the drain hose, and do not force excess
drain hose into standpipe. Hose should be secure, but loose
enough to provide a gap for air.
• Do not lay excess hose on the bottom of the laundry tub.
 Loading...