


SAFETY PRECAUTIONS
•Do not install the appliance if it is connected to the power supply.
•The Installation and service/repair must be performed by a qualified technician, in compliance with the producer's instructions and following local safety norms. Do not repair or replace any parts of the appliance unless it is specifically written in the user instructions.
•The grounding of this appliance is compulsory.
•Make sure that the power supply cord is long enough to allow the right connection. Do not use any extension cord for power supply.
•Do not pull the power supply cord to remove it from the socket.
•Do not twist or press the power supply cord, and make sure it is not broken.
•Once installation is completed, the electric components must not be accessible to the users.
•Do not touch the operation buttons when your hands are wet and don't use the appliance when you are barefoot.
•Physically or mentally disabled people, children and people without any experience with the product are only allowed to use the appliance if they have had specific training on how to operate the appliance by a person responsible for their security and well-being. The appliance is not intended for use by disabled people and very young children without supervision.
AIR CONDITIONER PRECAUTIONS
Please strictly follow the below instructions:
•Long and direct exposure to cool air might be harmful to health. It is advisable to set the louvers in order to avoid direct cool air and deflect it within the room.
•Prevent the air flow from reaching the gas burners and stoves.
•Upon malfunctioning first turn the appliance off by pressing the ON/OFF button on the remote control, then disconnect it from the mains.
•This product contains Fluorinated Greenhouse Gases covered by the Kyoto Protocol, the refrigerant gas being in a hermetically sealed system. Refrigerant gas: R410a has a Global Warming Potential (GWP) 1975.
SAFEGUARDING THE ENVIRONMENT
•This appliance has been made of recyclable or re-usable material. Scrapping must be carried out in compliance with local waste disposal regulations. Before scrapping it, make sure to cut off the mains cord so that the appliance cannot be re-used.
•For more detailed information on handling and recycling of this product, contact your local authorities who deal with the separate collection of rubbish or the shop where you bought the appliance.
SCRAPPING OF PACKAGING
•The packaging can be 100% recycled as confirmed by the recycling symbol  . The various parts of the packaging must not be
dispersed in the environment, but must be scrapped in line with local authority regulations.
SCRAPPING OF APPLIANCE
•This appliance is marked according to the European Directive 2002/96/EC, Waste Electrical and Electronic Equipment (WEEE).
•By ensuring that this product is disposed of correctly, you will help to prevent potentially negative consequences for the environment and for human health.
•The symbol  on the product or on the documents accompanying the product indicates
that this appliance should not be treated as household waste, but must be given to the appropriate local gathering place where electric and electronic appliances are stored and recycled.
19
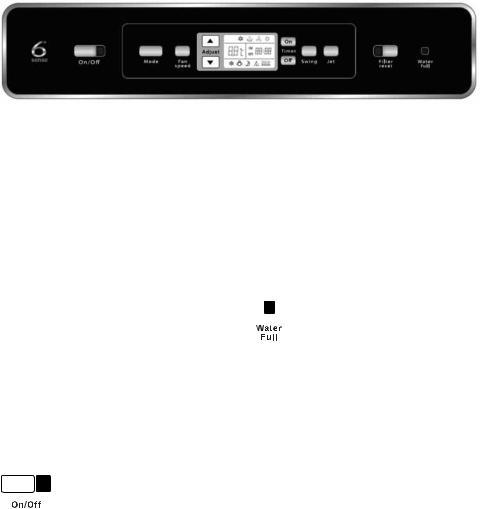
STARTING YOUR PORTABLE AIR CONDITIONER
This section explains proper portable air conditioner operation.
IMPORTANT:
•The air conditioner display shows the current room temperature and 24-hour clock.
•When changing modes while the air conditioner is operating, the compressor will stop for 3 to 5 minutes before restarting.
If a button is pressed during this time, the compressor will not restart for another 3 to 5 minutes.
•In Cooling or Dry mode, the compressor and condenser fan will stop when the room temperature reaches the set temperature.
NOTE: In the event of a power failure, your air conditioner will operate at the previous settings when the power is restored.
1.Select the mode. See "Mode."
2.Select the fan speed. See "Fan Speed."
3.Set the temperature. See "Temperature."
4.Press ON/OFF button to start the air conditioner.
NOTE: When the air conditioner is turned on for the first time after it is plugged in, it will run in the 6th Sense Mode control.
When the air conditioner is turned on at all other times, it will run according to the previous settings. 6th Sense Mode can be selected with the remote control only.
5.When WATER FULL indicator light glows red, air conditioner will turn off automatically. See "Portable Air Conditioner Care" for directions on draining the air conditioner.
20

STORAGE AND TIPS FOR USING THE RC
How to insert the batteries
Remove the battery cover in the direction of the arrow.
Insert new batteries making sure that the (+) and (-) of battery are matched correctly.
Refit the cover by sliding it back into position.
Note:
• Use 2 LR03 AAA (1.5volt) batteries. Do not use rechargeable batteries.
Replace batteries with new ones of the same type when the display becomes dim.
•If the replacement is done within 1 minute, the remote control will keep original presetting. However, if you replace batteries taking more than 3 minutes, all presetting will be cancelled and timer will display Zero.
How to remove the batteries
Remove the battery cover in the direction of the arrow.
Press the positive pole of the battery softly with your fingers, then draw the batteries out of the compartment.
All this should be done by adults, children are forbidden to remove the batteries from the remote control in order to avoid danger of swallow.
Disposal of the batteries
Please discard the batteries as sorted municipal waste at the accessible collection point.
21

OPERATING MODE DESCRIPTION
Operating modes:
1.Press and release MODE until you see the symbol glow for the desired setting
2.Choose Cooling, Dry, Fan Only or Heating.
•Cooling-Cools the room. Press FAN SPEED to select Auto, High, Mid or Low. Press the up or down Adjust button to adjust the temperature.
•Dry-Dries the room. The air conditioner automatically selects the temperature. The fan
runs on Low speed only.
NOTE: Dry mode should not be used to cool the room.
•Fan Only-Only the fan runs. Press FAN SPEED to select High, Mid or Low.
NOTE: Auto fan speed cannot be selected in Fan Only mode.
•High-for maximum cooling
•Mid-for normal cooling
•Low-for minimum cooling
Filter Reset
1.When the Filter Reset indicator light is lit, remove, clean and replace the air filter. See "Cleaning the Air Filter."
2.Press and release FILTER RESET after replacing the air filter.
NOTE: Auto fan speed cannot be selected in Fan Only mode.
•Heating-Heats the room. Press FAN SPEED to select Auto, High, Mid or Low. Press the up or down Adjust button to adjust the temperature.
Fan Speed
1.Press and release FAN SPEED to choose the desired fan speed.
2.Choose Auto, High, Mid or Low.
•Auto-automatically controls the fan speed depending on the current room temperature and temperature control setting.
NOTE: After 360 hours of fan operating time, the Filter indicator light will turn on. It will remain on for 180 hours or until you press FILTER RESET.
After 180 hours, it will turn off automatically.
Temperature
•Press the up Adjust button to raise the temperature. Press the up Adjust button once to increase the set temperature by 1°C or press twice to increase the set temperature by 2ºC.
•Press the down Adjust button to lower the temperature. Press the down Adjust button once to decrease the set temperature by 1ºC, or press twice to decrease the set temperature by 2ºC.
NOTES:
•In the Cooling and Heating mode, the temperature can be set between 18ºC and 32ºC.
•In Fan Only mode, the temperature cannot be set.
22

•To change the temperature display between ºC and ºF, press both the up and down Adjust buttons at the same time.
Clock function
You can adjust real time clock by pressing Timer On and Timer Off buttons at same time on control panel or Clock button on the remote. Press up or down Adjusting button to get the correct time. Press Timer On and Timer Off at the same time again, and then the real time is set.
Timer On/Off
Set the real time to turn on the conditioner.
1.Press Timer On, Timer "On 12:00" indicator will flash.
2.Press the up or down Adjust button to get your desired time to turn on the appliance.
•Press the up or down Adjust button once to increase or decrease the time setting by 1 minute.
•Press and hold the up or down Adjust button for one and a half seconds to increase or decrease the time setting by 10 minutes.
•Press and hold the up or down Adjust button for
a longer time to increase or decrease the time setting by 1 hour.
3.When your desired time displayed on LCD, press the TIMER ON button and confirm it, then Timer "ON" indicator stops flashing and your desired time remains on.
4.After your desired time displayed for 5 seconds, the clock will be displayed on the LCD.
NOTE: If you don't set the time in 10 seconds after you press TIMER ON button, the controller will exit the TIMER ON mode automatically.
How to cancel Timer On
Press Timer On again, the indicator disappears and the Timer On is canceled.
NOTE: It is similar to set Timer Off, you can make the appliance unit switch off automatically at your desired time.
23
 Loading...