

Whirlpool Ad35dss1, Ad35uss1, Ad35uss0, Ad25dss0 Owner's Manual

®
DEHUMIDIFIER
Use & Care Guide
For questions about features, operation/performance, parts,
accessories or service call: 1-800-253-1301
or visit our website at... www.whirlpool.com
DESHUMIDIFICADOR
Manual de uso y cuidado
Si tiene preguntas respecto a las características, funcionamiento,
rendimiento, partes, accesorios o servicio técnico,
o visite nuestro sito web en... www.whirlpool.com
Table of Contents/Índice ..................................... 2
llame al: 1-800-253-1301
1188826
TABLE OF CONTENTS
DEHUMIDIFIER SAFETY ...............................................................2
INSTALLATION REQUIREMENTS................................................3
Electrical Requirements ...............................................................3
Location Requirements................................................................3
DEHUMIDIFIER USE......................................................................4
Setting the Controls (Control types 1 and 2 only) .......................4
Setting the Controls (Control type 3 only) ...................................5
Draining the Dehumidifier............................................................. 6
ÍNDICE
SEGURIDAD DEL DESHUMIDIFICADOR ....................................9
REQUISITOS DE INSTALACIÓN.................................................10
Requisitos eléctricos..................................................................10
Requisitos de ubicación.............................................................10
CÓMO USAR EL DESHUMIDIFICADOR....................................11
Ajuste de los controles (Soló para modelos
con controles tipo 1 y 2 )............................................................11
Ajuste de los controles (Soló para modelos con control 3).......12
DEHUMIDIFIER SAFETY
Normal Sounds.............................................................................7
DEHUMIDIFIER CARE ...................................................................7
Cleaning the Air Filter (on some models) .....................................7
Cleaning the Dehumidifier............................................................8
TROUBLESHOOTING ....................................................................8
ASSISTANCE OR SERVICE...........................................................9
In the U.S.A. .................................................................................9
Cómo desaguar el deshumidificador.........................................13
Sonidos normales.......................................................................14
CUIDADO DEL DESHUMIDIFICADOR .......................................14
Limpieza del filtro de aire (en algunos modelos) .......................14
Limpieza del deshumidificador ..................................................15
SOLUCIÓN DE PROBLEMAS......................................................15
AYUDA O SERVICIO TÉCNICO...................................................16
En los EE.UU. .............................................................................16
Your safety and the safety of others are very important.
We have provided many important safety messages in this manual and on your appliance. Always read and obey all safety
messages.
This is the safety alert symbol.
This symbol alerts you to potential hazards that can kill or hurt you and others.
All safety messages will follow the safety alert symbol and either the word “DANGER” or “WARNING.”
These words mean:
You can be killed or seriously injured if you don't immediately
DANGER
WARNING
All safety messages will tell you what the potential hazard is, tell you how to reduce the chance of injury, and tell you what can
happen if the instructions are not followed.
IMPORTANT SAFETY INSTRUCTIONS
WARNING:
basic precautions:
Plug into a grounded 3 prong outlet.
Do not remove ground prong.
Do not use an adapter.
To reduce the risk of fire, electrical shock, injury or sickness when using your dehumidifier, follow these
follow instructions.
can be killed or seriously injured if you don't
You
instructions.
Do not use an extension cord.
Unplug dehumidifier before servicing.
Do not drink water collected in the water bucket.
follow
SAVE THESE INSTRUCTIONS
2
INSTALLATION REQUIREMENTS
Electrical Requirements
WARNING
It is the customer's responsibility:
■ To contact a qualified electrical installer.
■ To assure that the electrical installation is adequate and in
conformance with National Electrical Code, ANSI/NFPA 70 -
latest edition, and all local codes and ordinances.
Copies of the standards listed may be obtained from:
National Fire Protection Association
One Batterymarch Park
Quincy, MA 02269
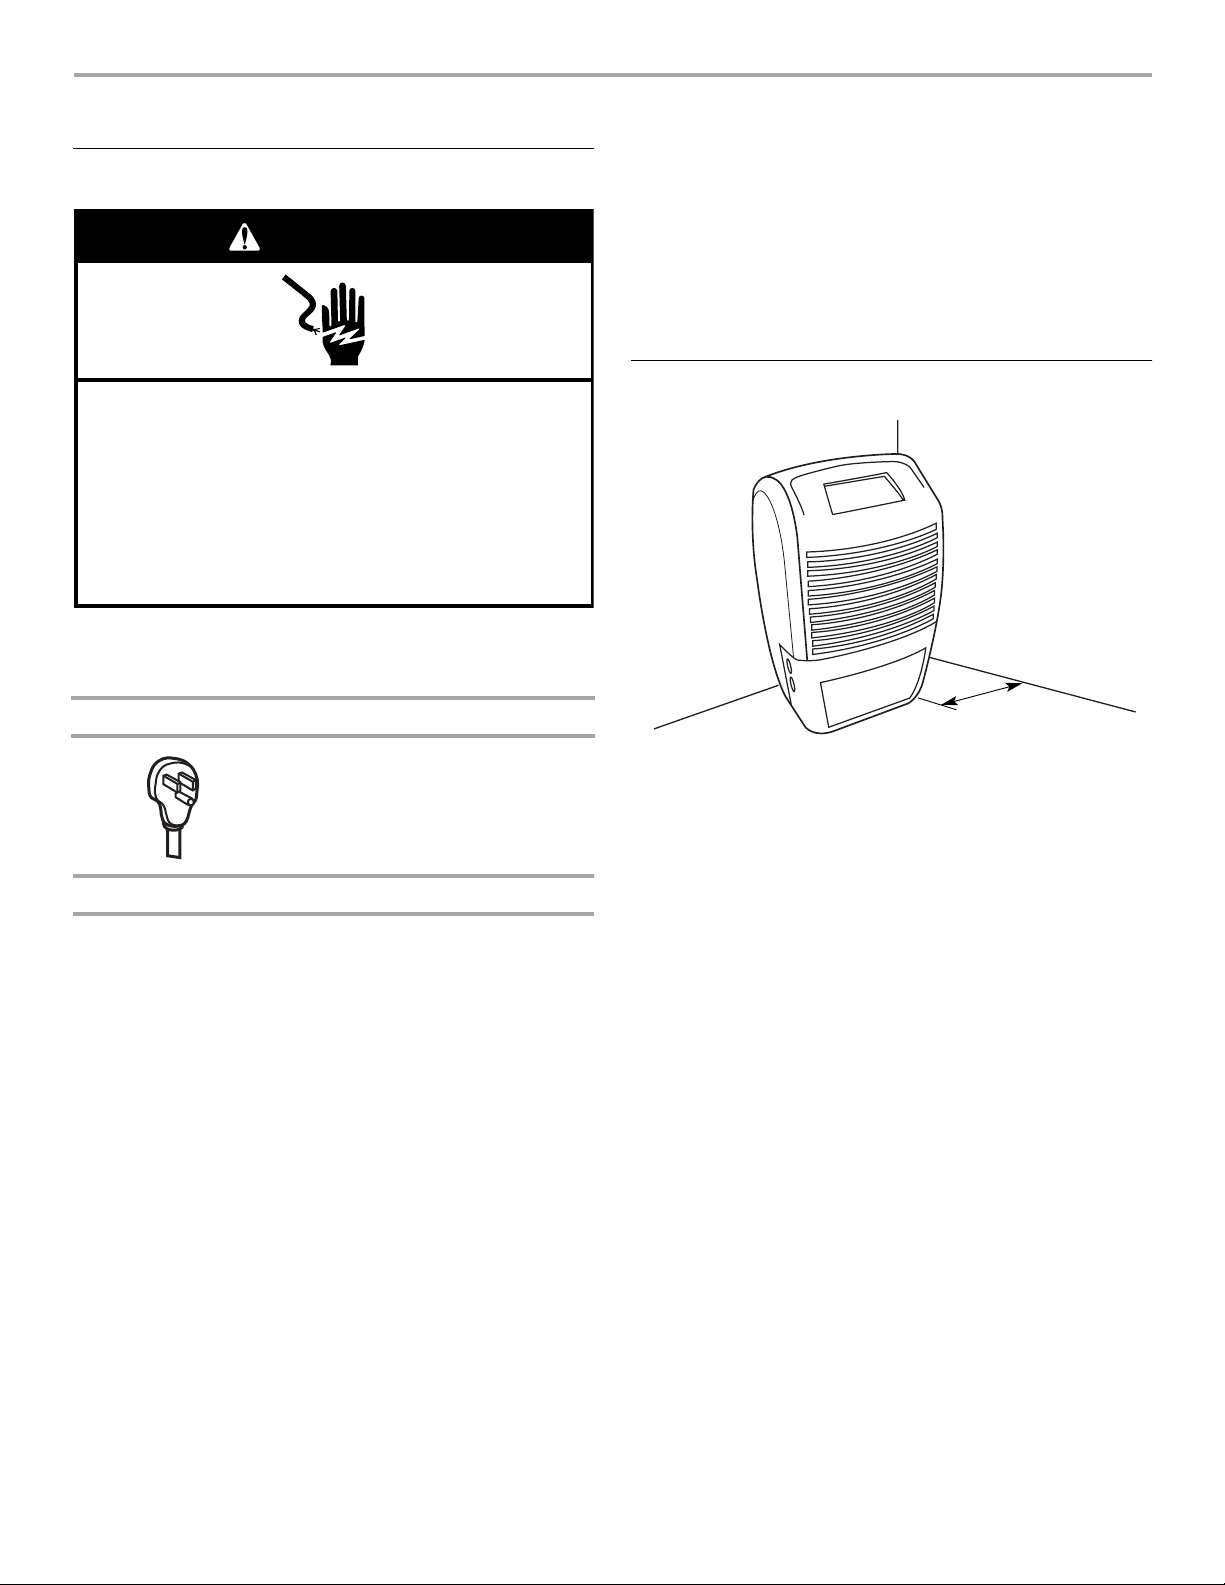
Electrical Shock Hazard
Plug into a grounded 3 prong outlet.
Do not remove ground prong.
Do not use an adapter.
Do not use an extension cord.
Failure to follow these instructions can result in death,
fire, or electrical shock.
Specific electrical requirements are listed in the chart below.
Follow the requirements for the type of plug on the power supply
cord.
Power supply cord Wiring requirements
■ 115 volt (103.5 min. - 126.5 max.)
■ 15-amp time-delay fuse or
circuit breaker
Recommended grounding method
This dehumidifier must be grounded. This dehumidifier is
equipped with a power supply cord having a grounded 3 prong
plug. To minimize possible shock hazard, the cord must be
plugged into a mating, grounded 3 prong outlet, grounded in
accordance with all local codes and ordinances. If a mating outlet
is not available, it is the customer's responsibility to have a
properly grounded 3 prong outlet installed by a qualified electrical
installer.
Location Requirements
A
A. Allow at least 12" to 18" (30.5 to 45.7 cm) of air space.
■ You will need a level surface strong enough to support the
dehumidifier when its bucket is full of water.
■ Keep all outside doors, windows and other openings closed
when you are operating dehumidifier. Humid outdoor air will
increase dehumidifier workload.
■ Install dehumidifier in an area where the temperature will not
fall below: 65ºF (18ºC) for Control Type 1 (model AD25B),
55ºF (13ºC) for Control Type 1 (model AD25D) and Control
Type 2, 3 8ºF (3ºC) for Control Type 3. Lower temperatures will
cause your performance to drop.
■ Do not block the louvers on the front panel.
3
DEHUMIDIFIER USE
Setting the Controls (Control types 1 and 2 only)
Starting/Stopping the Dehumidifier
NOTE: Before turning on the dehumidifier, be sure that the
bucket is empty and fits all the way into the dehumidifier.
Control Type 1
NOTES:
■ Minimum operating temperature is 65ºF (18ºC) for model
AD25B.
■ Minimum operating temperature is 55ºF (13ºC) for model
AD25D.
A
A. Light glows, indicating the bucket is full or is not in correct position.
B. Adjusts amount of moisture removed from room.
B
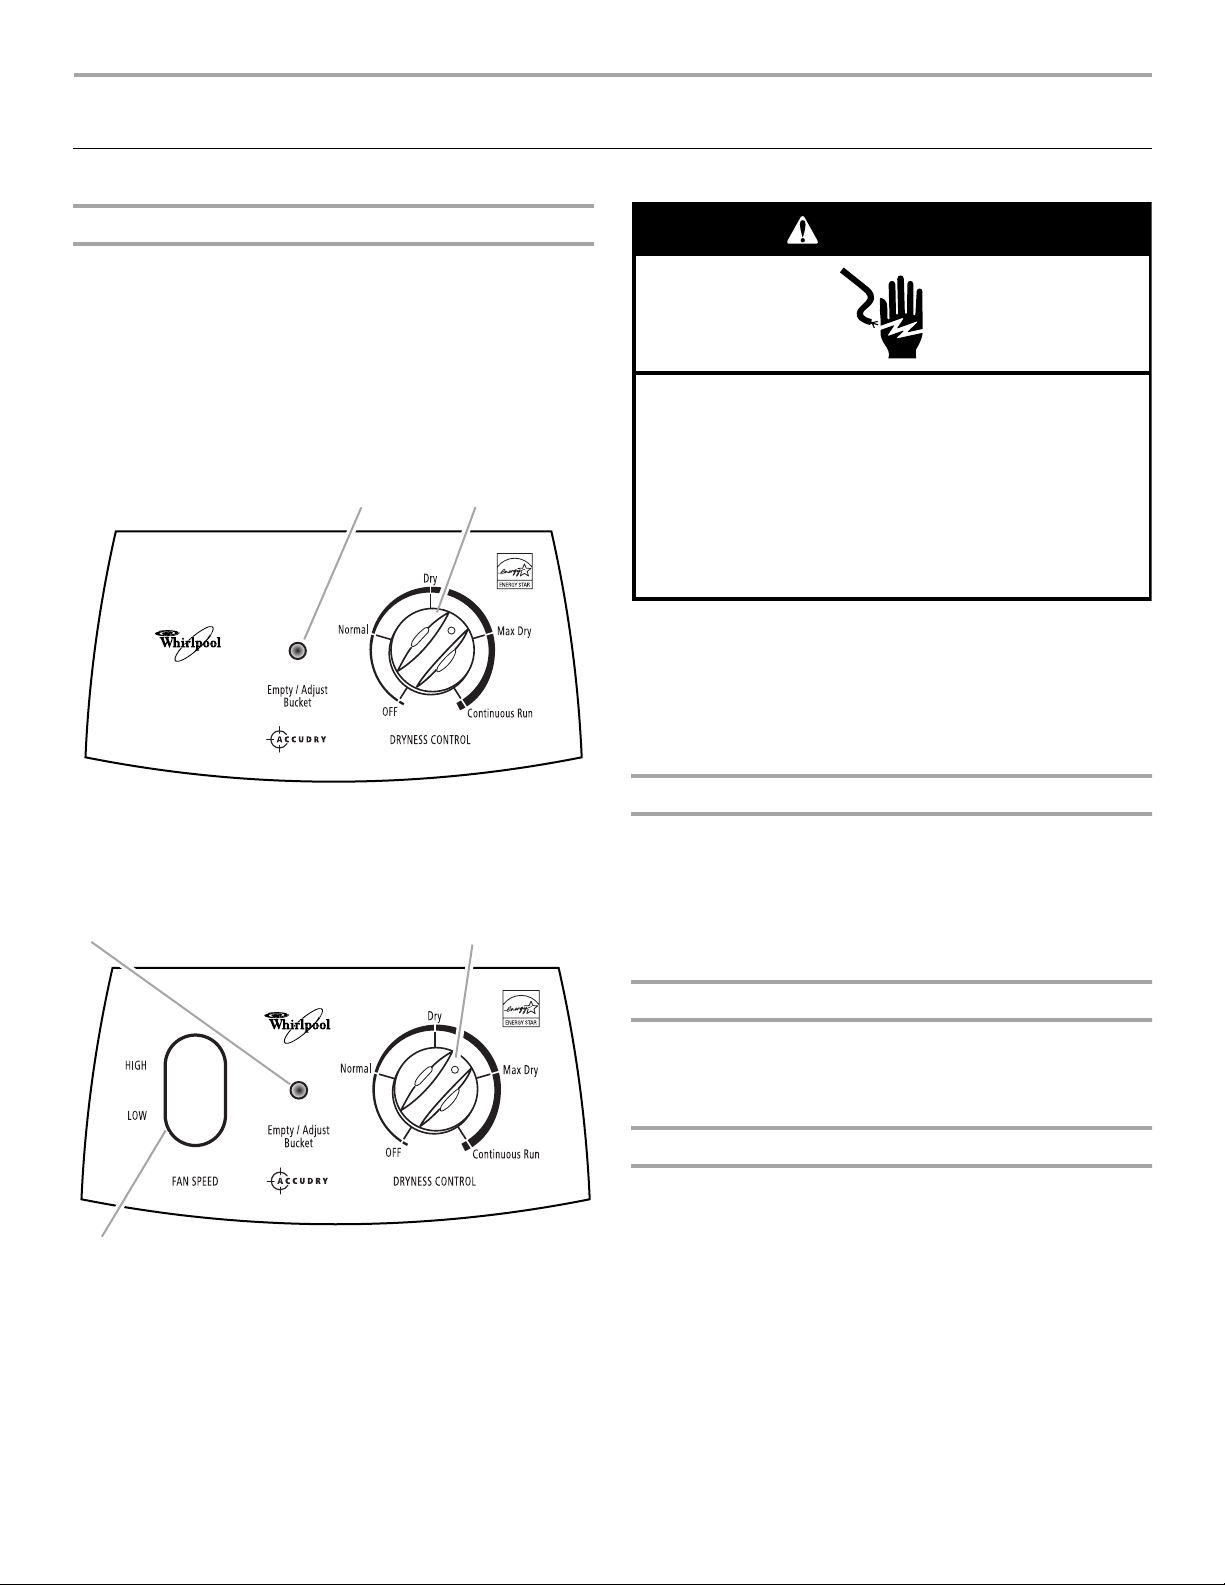
Control Type 2
NOTE: Minimum operating temperature is 55ºF (13ºC).
A
B
WARNING
Electrical Shock Hazard
Plug into a grounded 3 prong outlet.
Do not remove ground prong.
Do not use an adapter.
Do not use an extension cord.
Failure to follow these instructions can result in death,
fire, or electrical shock.
1. Plug into a grounded 3 prong outlet.
2. To turn on dehumidifier, turn DRYNESS CONTROL clockwise.
IMPORTANT: If the Empty/Adjust Bucket light comes on, the
dehumidifier will not operate. Empty or adjust bucket.
3. To turn off dehumidifier, turn DRYNESS CONTROL
counterclockwise to OFF.
Empty/Adjust Bucket Light
If this light is on, the dehumidifier is not running. This light
indicates that you need to check:
■ If the bucket is full, empty and reinstall bucket.
■ If the bucket is not in position, remove the bucket and
reinstall. Make sure the bucket fits all the way into the
dehumidifier and the light is off, or dehumidifier will not run.
C
A. Light glows, indicating the bucket is full or is not in correct position.
B. Adjusts amount of moisture removed from room.
C. Selects fan speed.
4
Fan Speed (Control Type 2 Models Only)
The Fan Speed controls fan operation
■ High—for faster moisture removal
■ Low—for quieter moisture removal
Dryness Control
The Dryness Control regulates the amount of moisture in the
room. Turn the control knob clockwise for more drying. Turn the
control knob counterclockwise for less drying. Turn the control
knob to “Dry” to maintain average humidity conditions.
NOTES:
■ For the first few days of use, turn the DRYNESS CONTROL
clockwise to CONTINUOUS RUN to remove extra moisture
from the furnishings as well as the room air.
■ For all models except AD25B, the Deicer will turn off the
compressor if a low temperature condition exists. Turning the
Dryness Control will not increase or decrease the amount of
moisture removed. Compressor operation will resume when
the low temperature condition no longer exists.
Setting the Controls (Control type 3 only)
Starting/Stopping the Dehumidifier
NOTES:
■ Before turning on the dehumidifier, be sure that the bucket is
empty and fits all the way into the dehumidifier.
■ Each time you unplug the dehumidifier or power is
interrupted, the control will return to your previous settings
when power is restored.
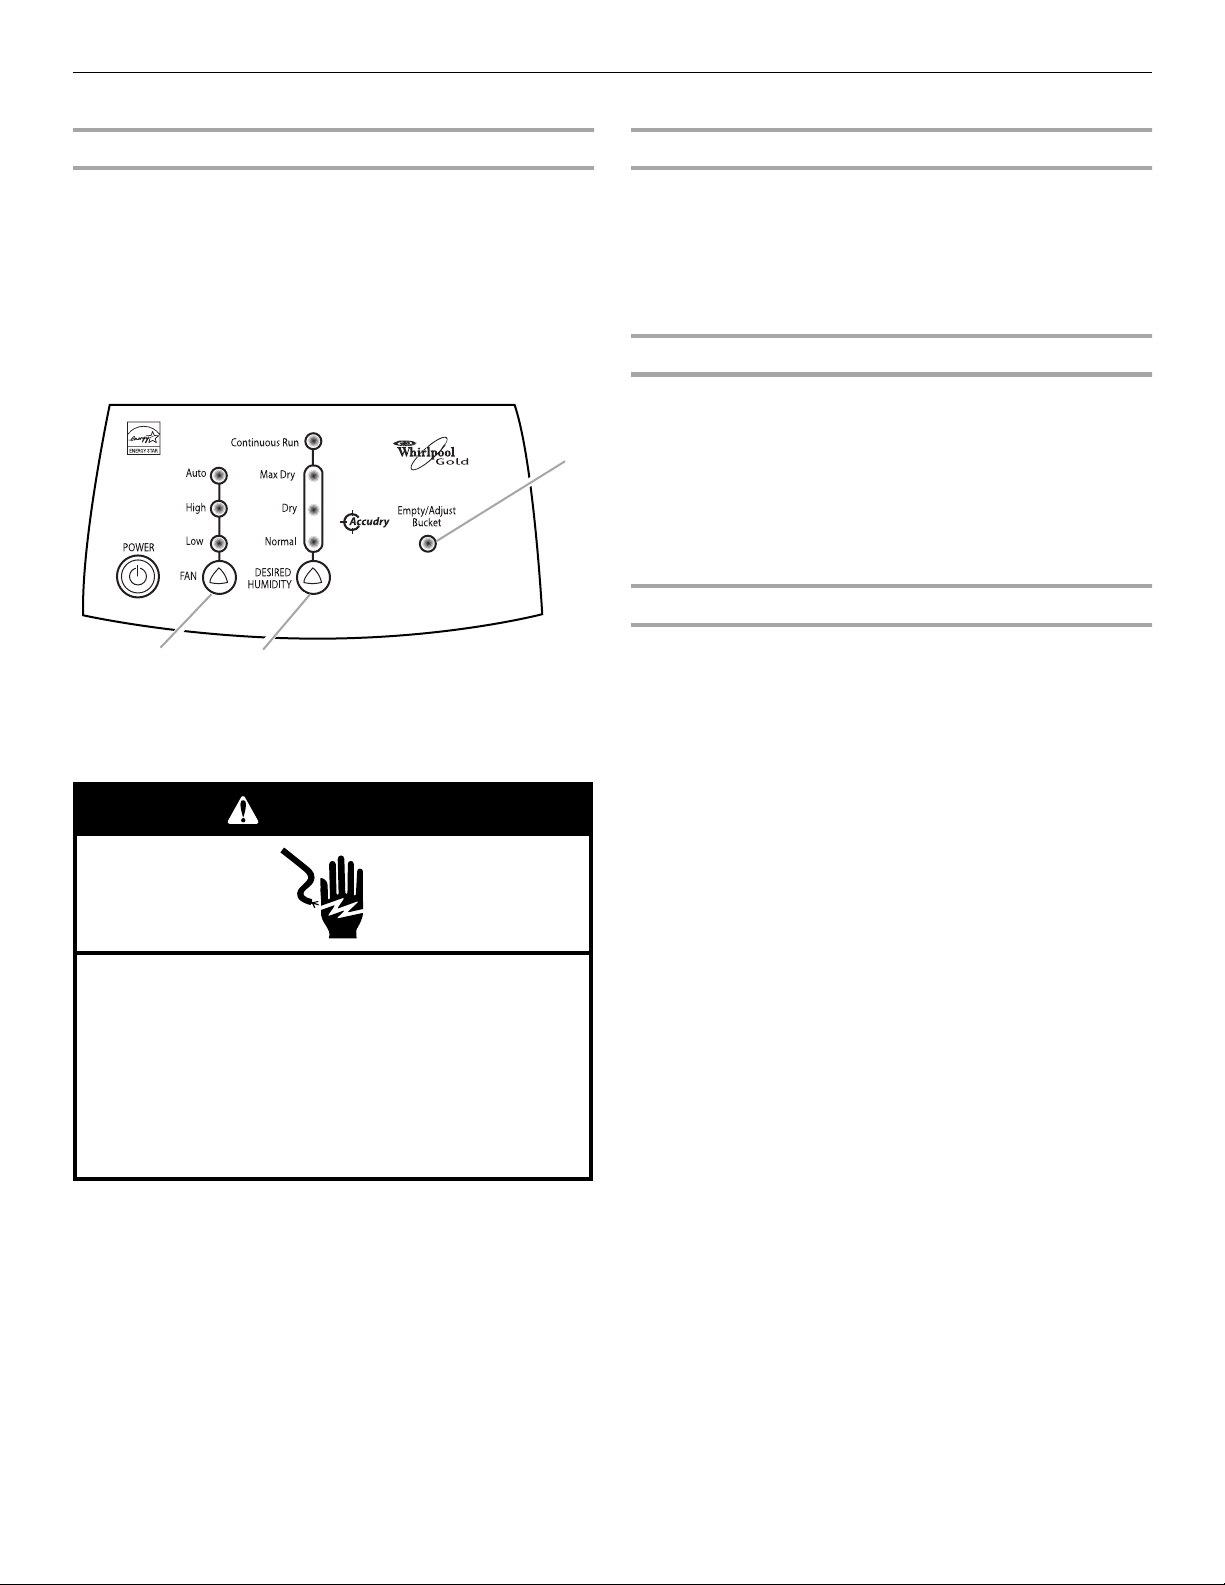
Control Type 3
NOTE: Minimum operating temperature is 38ºF (3ºC).
A
C
A. Light glows, indicating the bucket is full or is not in correct position.
B. Adjusts amount of moisture removed from room.
C. Selects fan speed.
B
WARNING
Electrical Shock Hazard
Plug into a grounded 3 prong outlet.
Do not remove ground prong.
Do not use an adapter.
Do not use an extension cord.
Failure to follow these instructions can result in death,
fire, or electrical shock.
Empty/Adjust Bucket Light
If this light is on, the dehumidifier is not running. This light
indicates that you need to check:
■ If the bucket is full, empty and reinstall bucket.
■ If the bucket is not in position, remove the bucket and
reinstall. Make sure the bucket fits all the way into the
dehumidifier and the light is off, or dehumidifier will not run.
Fan Speed (Control Type 3 Models Only)
1. Press FAN to select fan speed.
2. Choose Low, High or Auto.
■ Low—Will reach the desired humidity setting slower with
lower sound level.
■ High—Will reach the desired humidity setting faster.
■ Auto —Will provide the maximum humidity control by
automatically adjusting the fan speed and/or turning the
dehumidifier on and off to maintain humidity setting.
Desired Humidity (Control Type 3 Models Only)
1. Press DESIRED HUMIDITY to select the desired humidity
setting.
2. Choose Normal, Dry, Max Dry or Continuous Run.
■ Normal—Will operate the dehumidifier at the selected fan
speed until the humidity levels are lowered.
■ Dry—Will operate the dehumidifier at the selected fan
speed until the humidity levels are lowered more than the
Normal setting.
■ Max Dry—Will operate the dehumidifier at the selected
fan speed until the humidity levels are lowered to the
maximum level.
■ Continuous Run—Will operate the dehumidifier
continuously at the selected fan speed regardless of
humidity level. The dehumidifier will turn off only if the
bucket is full or removed.
NOTE: The electronic control will cycle the compressor
on and off if a low temperature condition exists.
Pressing the Desired Humidity arrow will not increase
or decrease the amount of moisture removed during a
low temperature condition. Normal compressor operation
will resume when the low temperature condition no
longer exists.
1. Plug into a grounded 3 prong outlet.
2. Press POWER to turn on dehumidifier.
IMPORTANT: If the Empty/Adjust Bucket light comes on, the
dehumidifier will not operate. Empty or adjust bucket.
3. Press POWER to turn off dehumidifier.
NOTE: The dehumidifier will retain your last settings.
5
 Loading...