

Whirlpool ACS102PP, ACS082PP, ACS088GPW Use And Care Manual

®
ROOM AIR
CONDITIONERS FOR
SLIDER AND
CASEMENT WINDOWS
Use & Care Guide
For questions about features, operation/performance, parts accessories
In Canada, call for assistance 1-800-461-5681, for installation
or service call: 1-800-253-1301
and service, call: 1-800-807-6777
or visit our website at... www.whirlpool.com
or...www.whirlpool.com/canada
CLIMATISEUR DE
23-11-2112N-005/1187617
PIÈCE POUR FENÊTRE
COULISSANTE OU À
BATTANTS
Guide d’utilisation et d’entretien
Au Canada, pour assistance composez le : 1-800-461-5681, pour
installation ou service, le : 1-800-807-6777
ou visitez notre site web à... www.whirlpool.com/canada
Table of Contents/Table des matières ............2

TABLE OF CONTENTS
TABLE DES MATIÈRES
AIR CONDITIONER SAFETY .........................................................3
INSTALLATION REQUIREMENTS................................................3
Tools and Parts ............................................................................3
Location Requirements................................................................4
Electrical Requirements ............................................................... 4
INSTALLATION INSTRUCTIONS..................................................5
Unpack the Air Conditioner.......................................................... 5
Metal or Wood Sliding Window Installation................................. 5
Metal or Wood Casement Window Installation ...........................6
Complete Installation ...................................................................8
AIR CONDITIONER USE................................................................8
Starting Your Air Conditioner.......................................................9
Changing Air Direction ...............................................................10
Saving Energy ............................................................................11
Normal Sounds ..........................................................................11
AIR CONDITIONER CARE...........................................................11
Cleaning the Air Filter.................................................................11
Cleaning the Intake Grille...........................................................11
Paint Damage Repair .................................................................11
TROUBLESHOOTING ..................................................................12
ASSISTANCE OR SERVICE.........................................................13
In the U.S.A. ...............................................................................13
In Canada ...................................................................................13
WARRANTY ..................................................................................14
SÉCURITÉ DU CLIMATISEUR ....................................................16
SPÉCIFICATIONS D’INSTALLATION..........................................16
Outils et pièces...........................................................................16
Exigences d’emplacement.........................................................17
Spécifications électriques ..........................................................17
INSTRUCTIONS D'INSTALLATION.............................................18
Déballage du climatiseur............................................................18
Installation dans une fenêtre coulissante
en métal ou en bois....................................................................18
Installation dans une fenêtre à battants
en métal ou en bois....................................................................20
Pour compléter l’installation.......................................................21
UTILISATION DU CLIMATISEUR................................................22
Mise en marche du climatiseur ..................................................22
Changement de direction de l'air...............................................24
Économie d'énergie ...................................................................24
Bruits normaux ...........................................................................24
ENTRETIEN DU CLIMATISEUR ..................................................24
Nettoyage du filtre à air ..............................................................24
Nettoyage du grille d’entrée d’air...............................................25
Remise en état de la peinture ....................................................25
DÉPANNAGE.................................................................................25
ASSISTANCE OU SERVICE.........................................................26
GARANTIE.....................................................................................27
2
®
AIR CONDITIONER SAFETY
Your safety and the safety of others are very important.
We have provided many important safety messages in this manual and on your appliance. Always read and obey all
safety messages.
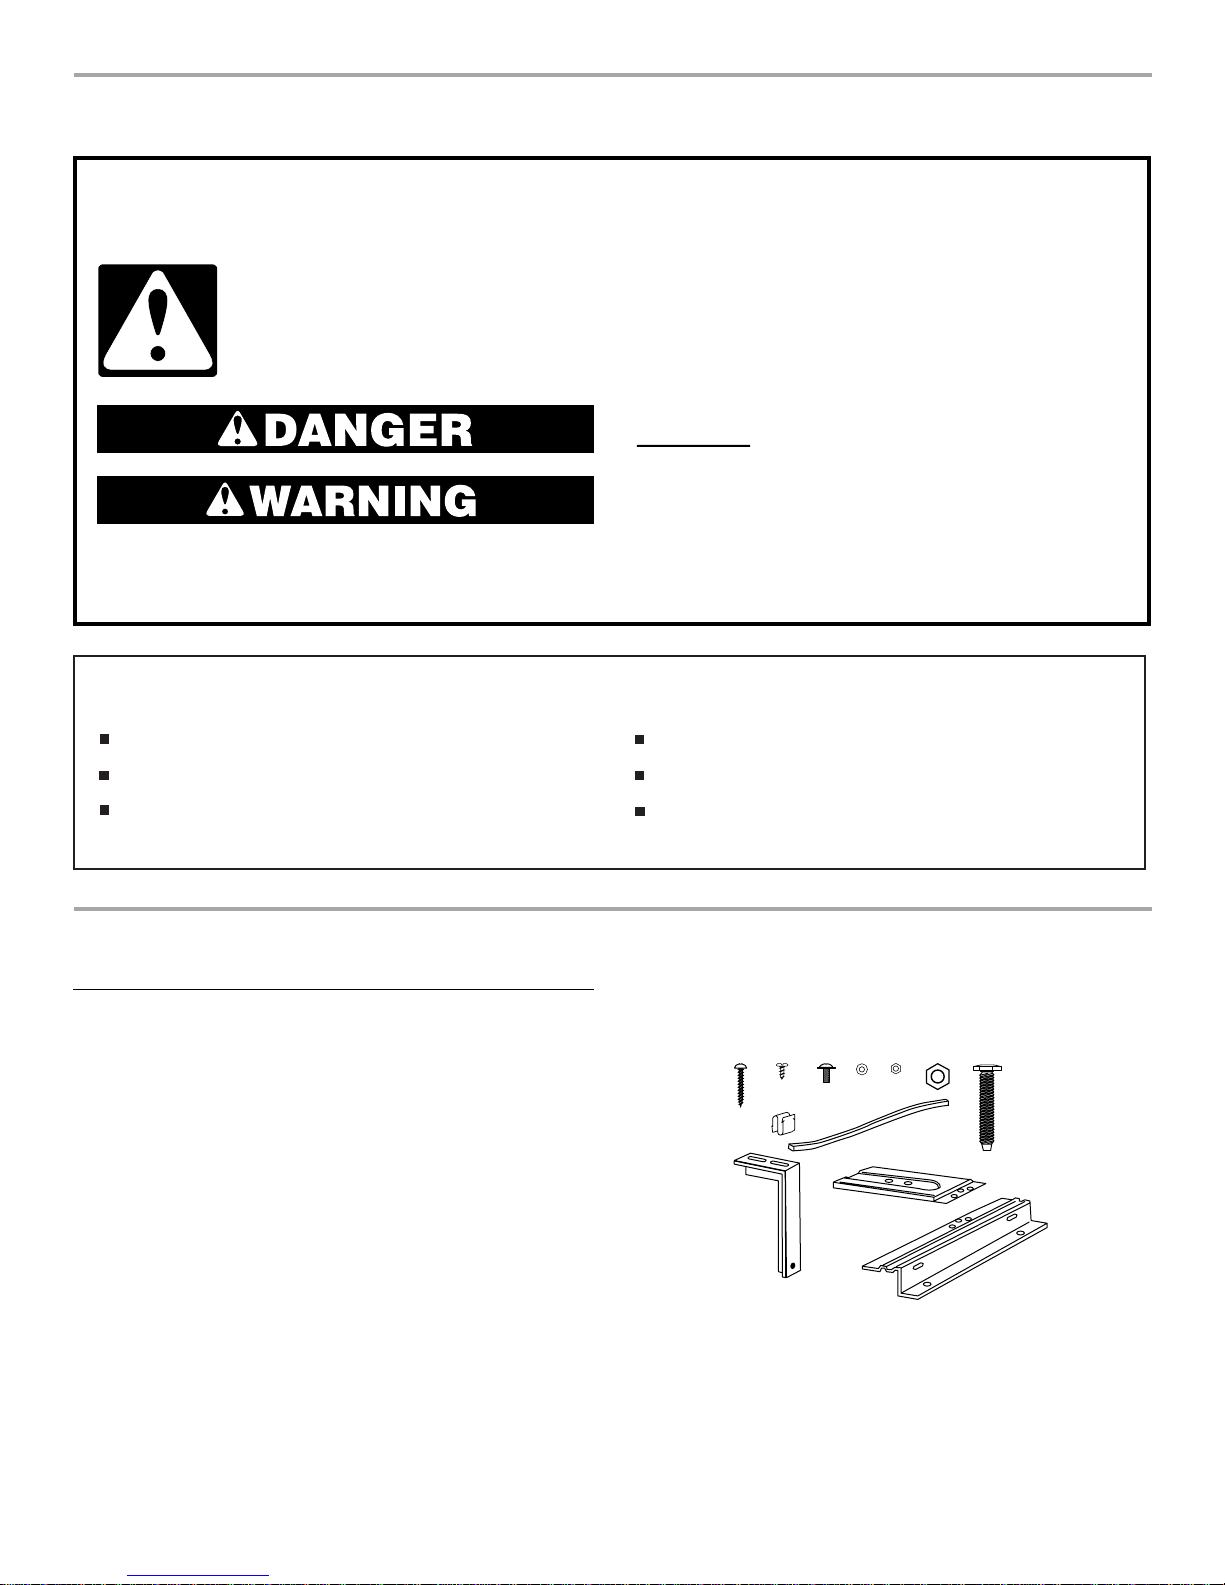
This is the safety alert symbol.
This symbol alerts you to potential hazards that can kill or hurt you and others.
All safety messages will follow the safety alert symbol and either the word “DANGER” or
“WARNING.” These words mean:
You can be killed or seriously injured if you don't
immediately follow instructions.
can be killed or seriously injured if you don't
You
follow instructions.
All safety messages will tell you what the potential hazard is, tell you how to reduce the chance of injury, and tell you
what can
WARNING:
happen if the instructions are not followed.
IMPORTANT SAFETY INSTRUCTIONS
To reduce the risk of fire, electrical shock or injury when using your air conditioner, follow these basic precautions:
Plug into a grounded 3 prong outlet.
Do not use an extension cord.
Do not remove ground prong.
Do not use an adapter.
SAVE THESE INSTRUCTIONS
INSTALLATION REQUIREMENTS
Tools and Parts
Check that you have everything necessary for correct installation.
Proper installation is your responsibility.
Too ls ne eded
■ Gloves
■ Safety glasses
■ Flat-blade and Phillips
screwdrivers
■ Tape measure
■ Level
■ Drill
■ ¹⁄₈ in. drill bit
Unplug air conditioner before servicing.
Use two or more people to move and install air conditioner.
Parts supplied
Check that all parts are included in parts package.
45 6 7321
8
10
1. 1 in. wood screws (2)
2.
³⁄₈
in. self-tapping screws (7)
⁷⁄₁₆
in. machine screws (2)
3.
⁷⁄₁₆
in. flat washers (2)
4.
5.
⁷⁄₁₆
in. nuts (2)
6. Leveling locknut (1)
9
11
12
7. Leveling bolt (1)
8. Speed clips (2)
9. Foam seal (1)
10. Support angle (1)
11. Support platform (1)
12. Sill plate (1)
3
Parts needed
■ If metal casement window installation, a ³⁄₄ in. (19 mm) wood
filler panel will be needed for opening greater than 15¹⁄₂ in.
(39.4 cm) wide. See “Metal and Wood Casement Window
Installation.”
■ If wood casement window installation, a 1 in. (2.5 cm) wood
frame will be needed. See “Metal and Wood Casement
Window Installation.”
NOTE: The installation of this air conditioner is intended to be
permanent. When installed in an apartment or rental property,
permission to make modifications should be obtained from
owner or landlord of building prior to installation of unit.
Electrical Requirements
WARNING
Location Requirements
IMPORTANT: Observe all governing codes and ordinances.
Check the location where the air conditioner will be installed.
Proper installation is your responsibility. Make sure you have
everything necessary for correct installation.
The location should provide:
■ A horizontal sliding or casement type window with a minimum
width of 15¹⁄₂ in. (39.4 cm).
■ Grounded electrical outlet within 4 ft (122 cm) of where the
power cord exits the air conditioner.
NOTE: Do not use an extension cord.
■ Free movement of air to rooms to be cooled.
■ Adequate window frame assembly and side of structure
support for weight of air conditioner. Air conditioner weighs
approximately 82 lbs (37.2 kg) to 100 lbs (45 kg).
NOTE: Do not install the air conditioner in an area where the front
panel will be exposed to heat sources that will raise the panel
surface temperature above 120°F (50°C).
Window Installation
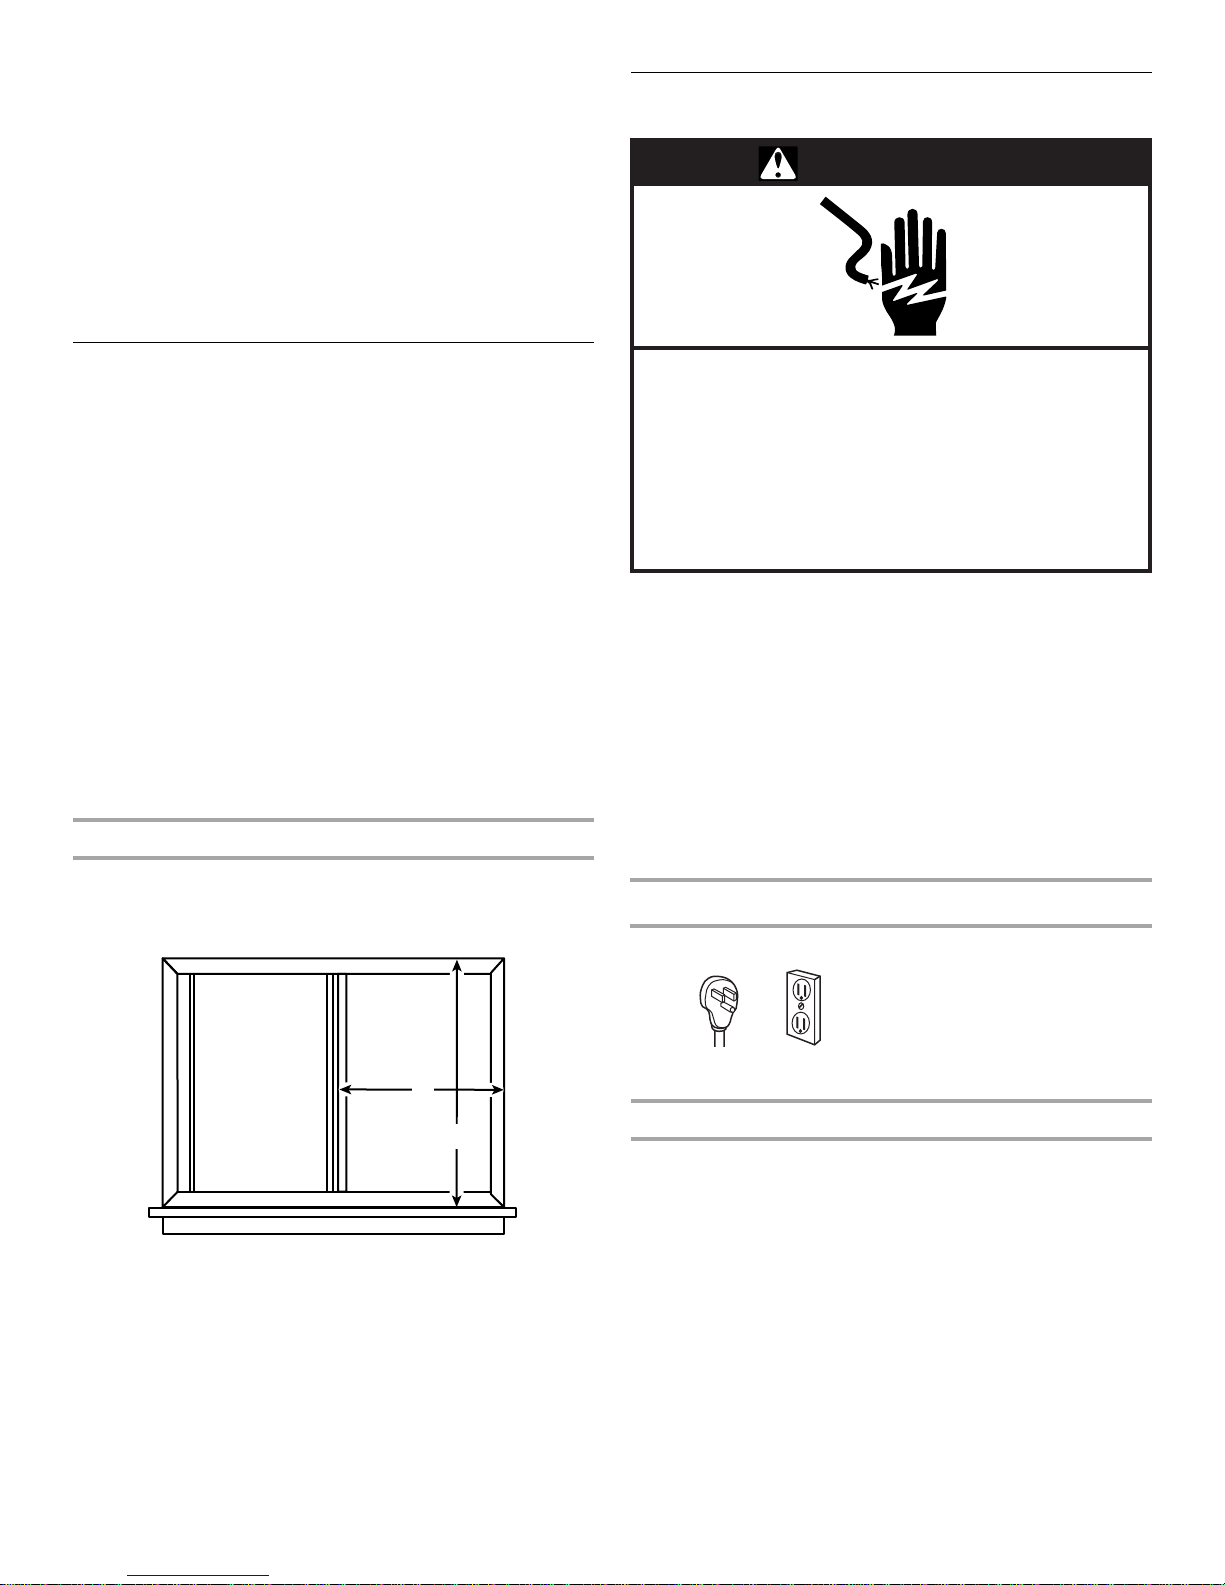
Window opening measurements:
■ 15¹⁄₂ in. (39.4 cm) minimum opening width
■ 42 in. (106.9 cm) minimum opening height
A
B
A. 15
¹⁄₂
in. (39.4 cm) minimum
B. 42 in. (106.9 cm) minimum
Electrical Shock Hazard
Plug into a grounded 3 prong outlet.
Do not remove ground prong.
Do not use an adapter.
Do not use an extension cord.
Failure to follow these instructions can result in
death, fire, or electrical shock.
In the U.S. only: If codes permit and a separate ground wire is
used, it is recommended that a qualified electrician determine
that the ground path is adequate.
Check with a qualified electrician if you are not sure air
conditioner is grounded.
A three-wire, single-phase, 60-Hz, AC-only, electrical supply is
required on a separate circuit. A 15-amp time-delay fuse or
circuit breaker is required. Copper wire (14 gauge) is required.
The fuse size must not exceed the circuit rating specified on the
model and serial number label. The model and serial number
label is located on the right-hand side of the cabinet.
Specific electrical requirements are listed in the chart. Follow the
requirements for the type of plug on the power supply cord.
Power supply cord
plug outlet
Wiring requirements
■ 115 volt (103.5 min. -
126.5 max.)
■ 0-12 amperes
■ 15-amp time-delay fuse or
circuit breaker
■ 14 gauge copper wiring
Recommended ground method
For your personal safety, this air conditioner must be grounded.
This air conditioner is equipped with a power supply cord having
a grounded 3 prong plug. To minimize possible shock hazard, the
cord must be plugged into a mating, grounded 3 prong outlet,
grounded in accordance with all local codes and ordinances. If a
mating outlet is not available, it is the customer's responsibility to
have a properly grounded 3 prong outlet installed by a licensed
installer.
4
It is the customer's responsibility:
2
3
5
6
7
4
5
■ To contact a qualified electrical installer.
■ To assure that the electrical installation is adequate and in
conformance with National Electrical Code, ANSI/NFPA 70 -
latest edition, and all local codes and ordinances.
Copies of the standards listed may be obtained from:
National Fire Protection Association
Batterymarch Park
Quincy, Massachusetts 02269
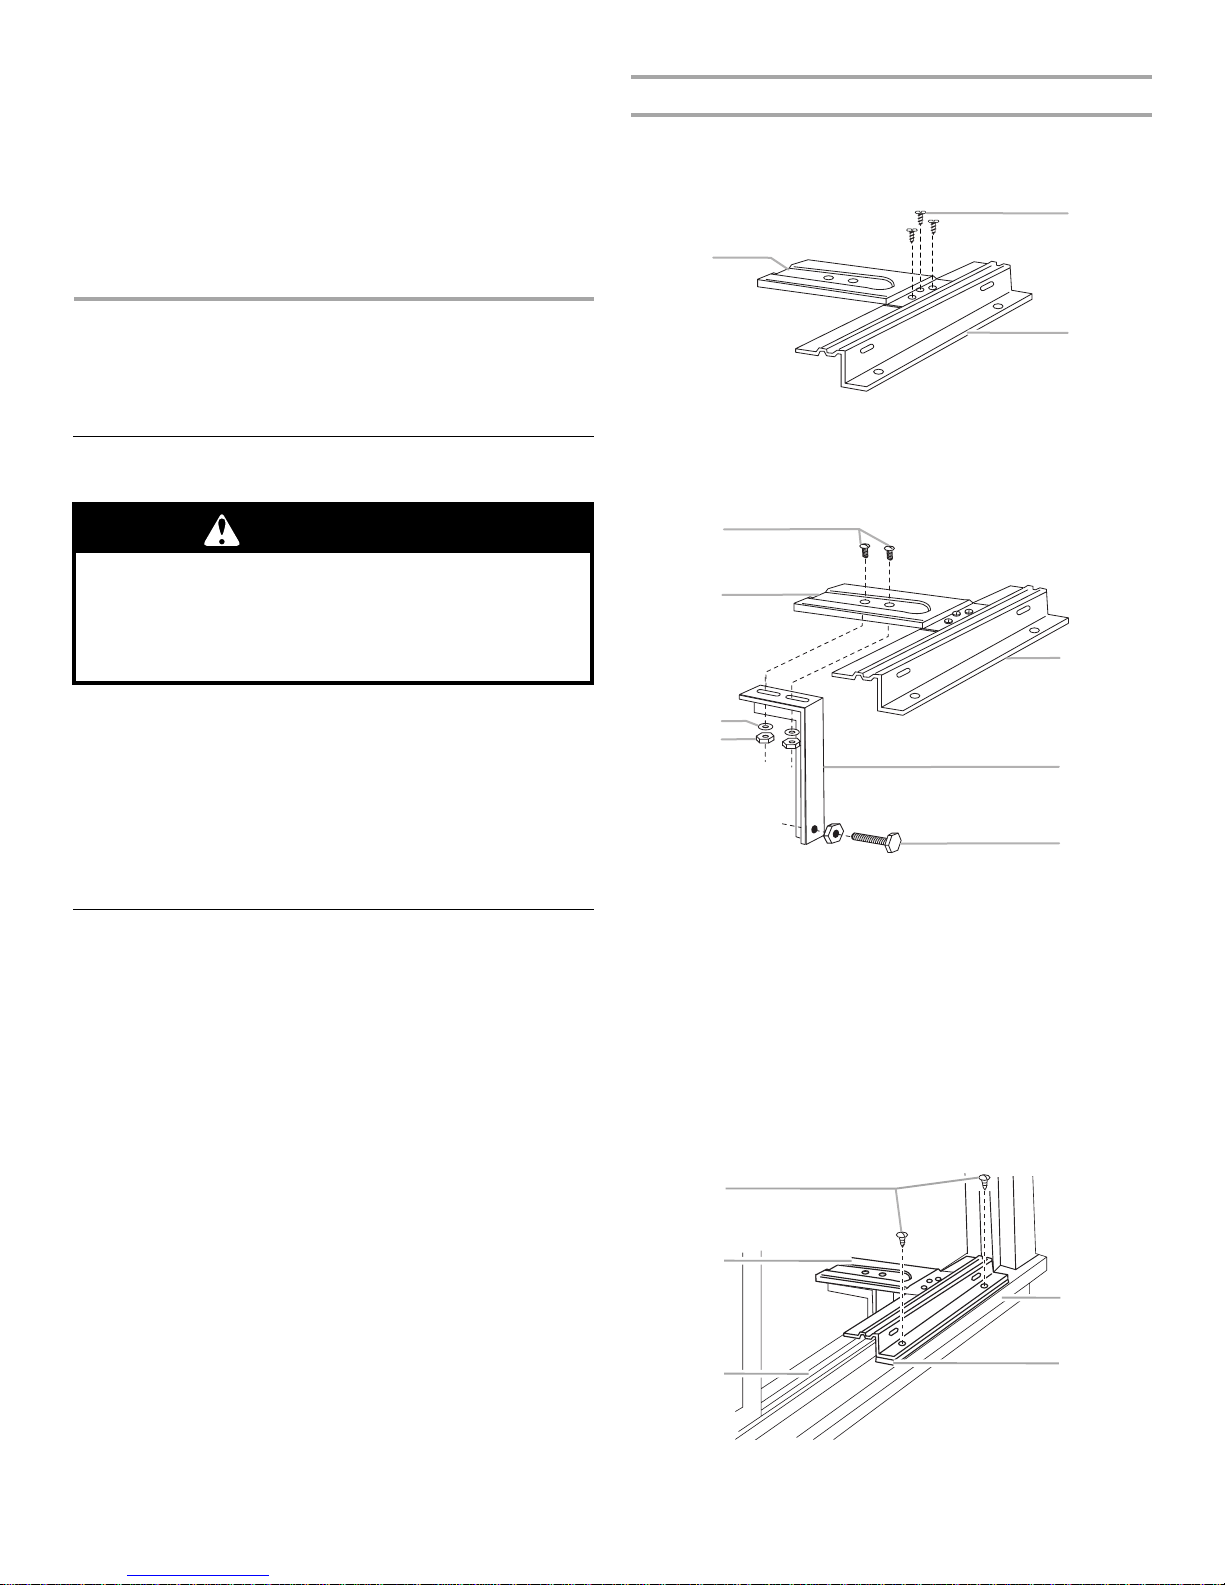
INSTALLATION
Install support platform
1. Slide open one window sash to install support platform.
2. Attach support platform to sill plate with three ³⁄₈ in. self-
tapping screws.
1
INSTRUCTIONS
Unpack the Air Conditioner
WARNING
Excessive Weight Hazard
Use two or more people to move and install
air conditioner.
Failure to do so can result in back or other injury.
Remove packaging materials
■ Remove and properly dispose of packaging materials.
Remove tape and glue residue from surfaces before turning
on the air conditioner. Rub a small amount of liquid dish soap
over the adhesive with your fingers. Wipe with warm water
and dry.
■ Do not use sharp instruments, rubbing alcohol, flammable
fluids, or abrasive cleaners to remove tape or glue. These
products can damage the surface of your air conditioner.
Metal or Wood Sliding Window Installation
■ Handle air conditioner with care. Watch out for sharp metal
fins on the rear coil.
■ Be sure your air conditioner does not fall out of the opening
during installation or removal.
■ The place where the power cord exits the air conditioner
should be no more than 4 ft (122 cm) from a grounded outlet.
■ Do not block the louvers on the front panel.
■ Do not block air movement on the outside of the air
conditioner.
■ The window frame assembly and side of structure must be
adequate to support weight of air conditioner.
1. Support plate
³⁄₈
in. self-tapping screws
2.
3. Sill plate
3. Loosely attach support angle to bottom of support platform
using two ⁷⁄₁₆ in. machine screws, flat washers and nuts.
1
2
3
4
1.
⁷⁄₁₆
in. machine screws
2. Support plate
3. Flat washer
4. Nut
4. Place support platform against lower window track and firmly
against vertical edge of window frame.
5. Attach support platform to windowsill using two 1 in. wood
screws.
If required, overcome interference of support platform with
window track or storm windows by securely attaching a shim
strip to the windowsill. Shim strip should be as long as width
of support platform and flush with back edge of sill.
Thickness of shim strip should be controlled by amount of
interference.
1
5. Sill plate
6. Support angle
7. Leveling bolt and
locknut
2
3
1. 1 in. wood screws
2. Support plate
3. Lower window track
4. Windowsill
5. Shim strip
5
6. Pull support angle against outside of structure. Tighten two
3
4
⁷⁄₁₆ in. machine screws on top of support platform.
7. Adjust leveling bolt to level support angle. Tighten leveling
bolt locknut.
NOTE: Air conditioner must tilted back slightly to facilitate
proper condensate disposal.
8. Cut 2 pieces of foam seal to height of window opening.
Remove backing and apply to window frame and sliding sash
that will rest against air conditioner cabinet.
5. Using supplied plastic foam seal, cut to proper length, insert
between inside window sash and outside window.
1
2
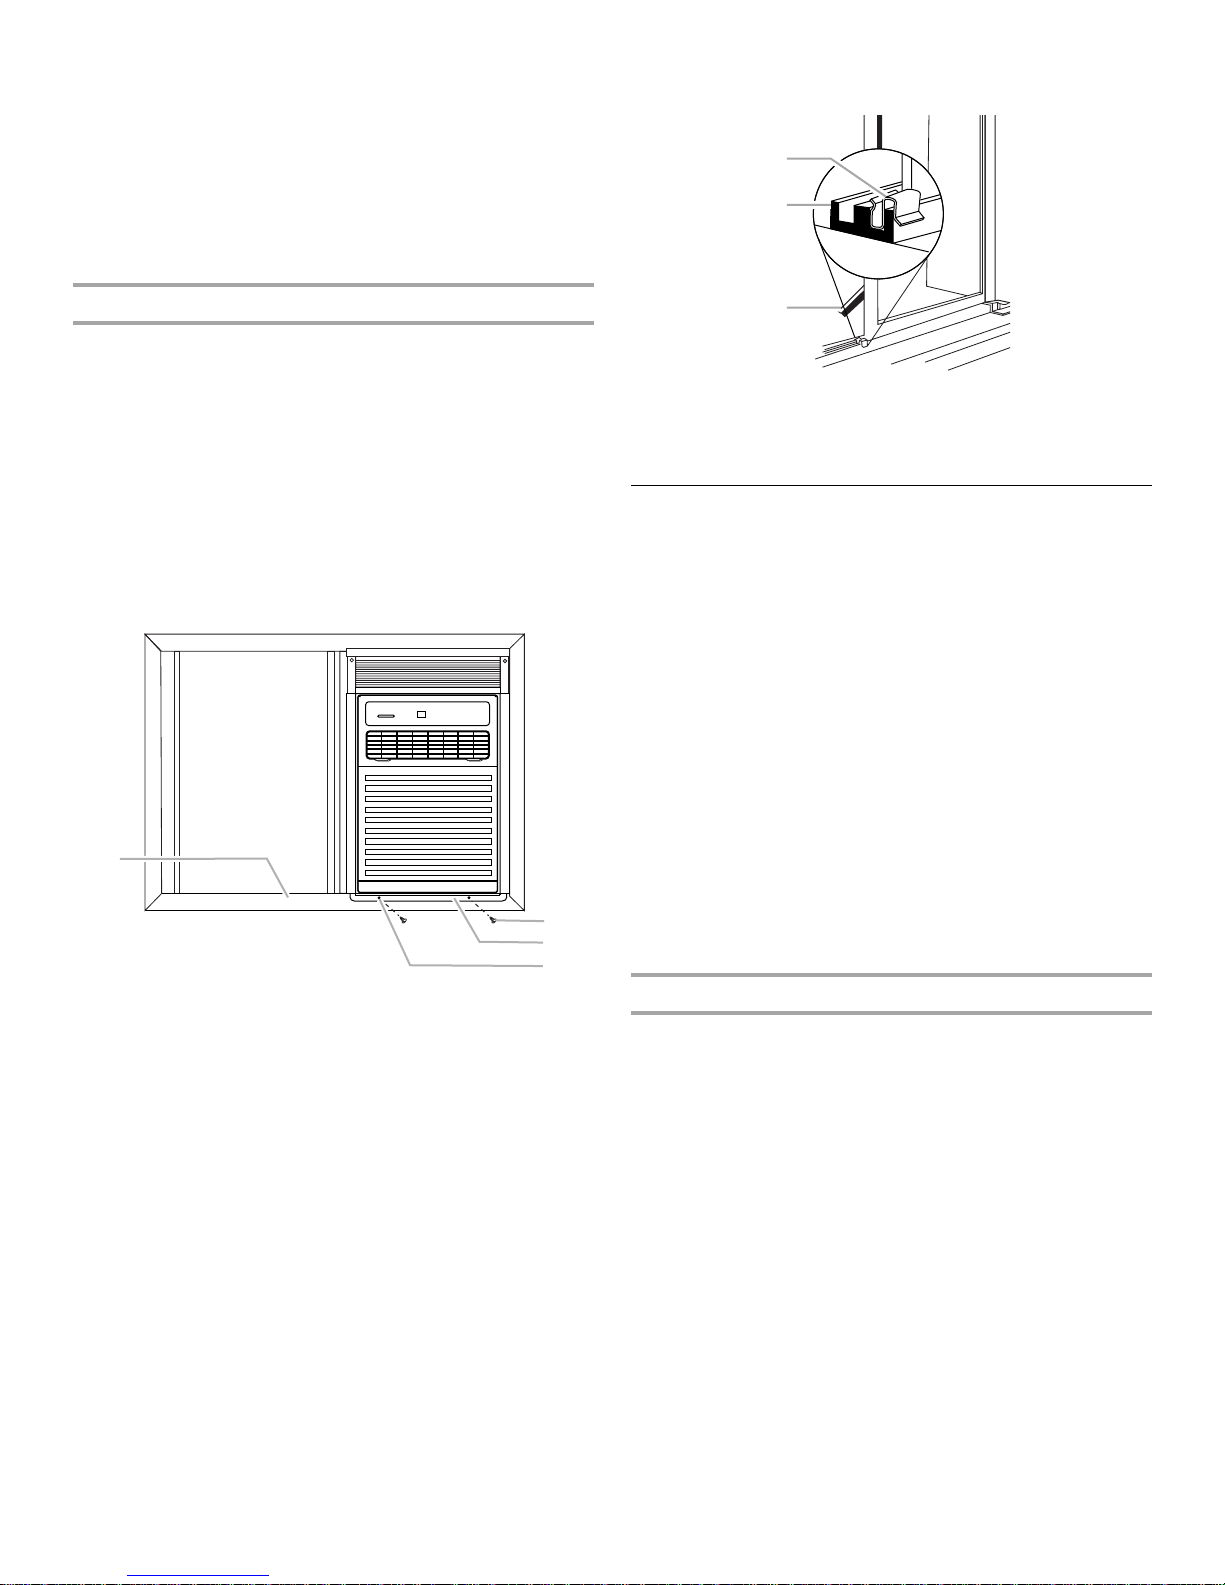
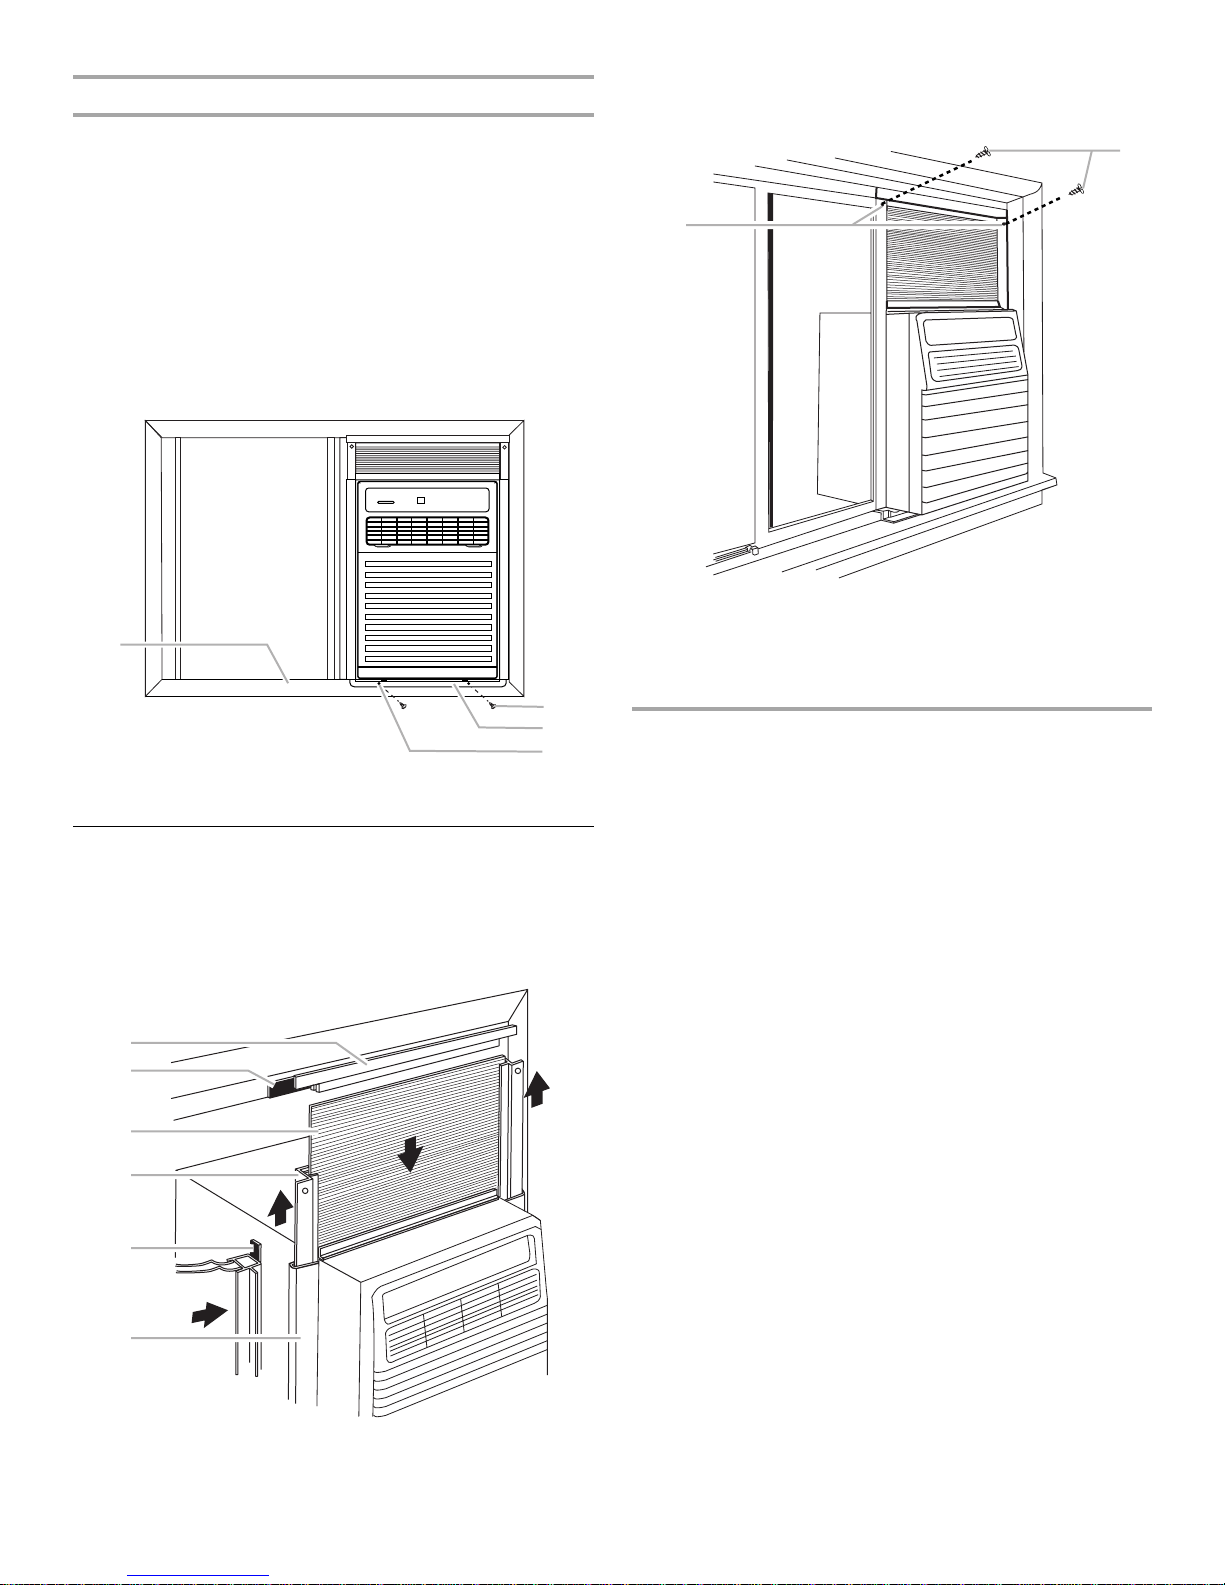
Install air conditioner in window
1. Slide unit onto support platform. Check to be sure air
conditioner side channel fits securely against vertical edge of
window frame.
NOTE: If air conditioner side channel does not fit securely
against window frame, remove unit and readjust leveling bolt.
2. Drill two ¹⁄₈ in. holes through the window channel frame in
alignment with existing holes in bottom bracket. Install two
³⁄₈ in. self-tapping screws through these holes.
NOTE: If window channel frame is not tall enough to use
existing holes, drill 2 new holes off to the side of the existing
holes to attach the air conditioner bottom bracket to the
support platform. Air conditioner should be firmly anchored to
window channel frame or support platform.
1
2
3
1. Speed clip
2. Window channel
3. Plastic foam seal
6. See “Complete Installation.”
Metal or Wood Casement Window Installation
■ Handle air conditioner with care. Watch out for sharp metal
fins on the rear coil.
■ Be sure your air conditioner does not fall out of the opening
during installation or removal.
■ The place where the power cord exits the air conditioner
should be no more than 4 ft (122 cm) from a grounded outlet.
■ Do not block the louvers on the front panel.
■ Do not block air movement on the outside of the air
conditioner.
■ The window frame assembly and side of structure must be
adequate to support weight of air conditioner.
This air conditioner is designed to fit into most casement-type
windows. As shipped from factory, unit will fit into a minimum
window opening 15¹⁄₂ in. (39.4 cm) wide and 21 in. (53.3 cm) high.
The preferred method of installation is through a closed or
stationary window. Installation in an open window frame is also
possible where open window can be secured to outside of
building or removed completely.
1. Window channel frame
2.
³⁄₈
in. self-tapping screw
3. Bottom bracket
¹⁄₈
in. drilled hole
4.
3. Slide inside window sash closed. Check to be sure vertical
edge of inside window sash is pressed firmly against side of
air conditioner cabinet. Cut remaining foam seal to width of
window opening. Remove backing and apply to top inside
edge of window frame.
4. Install speed clips on top and bottom inside edge of window
to provide locking.
6
Closed or stationary window
Install unit in stationary sash to avoid crank handles or window
latches. If unit is to be installed in or next to a movable sash, it
may be necessary to remove catch, handle or both.
■ Remove crank handle and secure window in closed position.
Remove glass panes and separating strips to a height
sufficient to mount air conditioner.

Open window frame
2
3
5
6
7
4
5
2. Loosely attach support angle to bottom of support platform
using two ⁷⁄₁₆ in. machine screws, flat washers and nuts.
1. Remove crank mechanism and catch handles.
2. Fold window sash back against exterior wall of building and
secure, or remove completely where possible.
Wood casement window installation
1. Construct a frame, using at least 1 in. (2.5 cm) thick wood
panel with a 15¹⁄₂ in. (39.4 cm) wide opening.
2. Paint frame and fasten it securely, sealing it into window
opening.
If window opening width is greater than 15¹⁄₂ in.
(39.4 cm):
1. Measure from side of window opening 15¹⁄₂ in. (39.4 cm).
From this point, measure to opposite side of window opening
to find width of filler panel. Measure height of window. Cut a
³⁄₄ in. (19 mm) thick wood filler panel this width and the full
height of the window opening.
2. Attach securely to side of opening.
15 1/2" (39.4 cm)
1
2
3
4
1.
⁷⁄₁₆
in. machine screws
2. Support platform
3. Flat washer
4. Nut
5. Sill plate
6. Support angle
7. Leveling bolt and locknut
3. Place support platform against lower window track and firmly
against vertical edge of window frame.
4. Attach support platform to windowsill using 2 - 1 in. wood
screws.
If required, overcome interference of support platform with
window track or storm windows by securely attaching a shim
strip to the windowsill. Shim strip should be as long as width
of support platform and flush with back edge of sill.
Thickness of shim strip should be controlled by amount of
interference.
15
¹⁄₂
in. (39.4 cm) from side of window to wood filler panel
3. Paint to desired color.
Install support platform
1. Attach support platform to sill plate with three ³⁄₈ in. self-
tapping screws.
1
1. Support platform
2.
³⁄₈
in. self-tapping screws
3. Sill plate
1
2
3
1. 1 in. wood screws
2. Support platform
3. Lower window track
4. Windowsill
5. Shim strip
5. Pull support angle against outside of structure. Tighten two
⁷⁄₁₆ in. machine screws on top of support platform.
6. Adjust leveling bolt to position support angle in a level plane.
This will allow for proper angle. Tighten leveling bolt nut.
NOTE: Air conditioner must tilted back slightly to facilitate
proper condensate disposal.
7. Cut 2 pieces of foam seal to height of window opening.
Remove backing and apply to window frame on both sides.
7
Install air conditioner in window
3
4
2
1. Slide unit onto support platform. Check to be sure air
conditioner side channel fits securely against vertical edge of
window frame.
NOTE: If air conditioner side channel does not fit securely
against window frame, remove unit and readjust leveling bolt.
2. Drill two ¹⁄₈ in. holes through the window channel frame in
alignment with existing holes in bottom bar. Install two ³⁄₈ in.
self-tapping screws through these holes.
NOTE: If window channel frame is not tall enough to use
existing holes, drill 2 new holes off to the side of the existing
holes to attach the air conditioner bottom bar to the support
platform. Air conditioner should be firmly anchored to window
channel frame or support platform.
1
2
2. With sliders up against top retainer, drill ¹⁄₈ in. hole through
window frame in alignment with existing hole in slider. Install
³⁄₈ in. self-tapping screw in hole. Repeat for other slider.
1
1.
¹⁄₈
in. drilled hole
³⁄₈
in. self-tapping screw
2.
3. Check all seals and plug all air leaks around unit. Use sealant
to fill any minor openings.
1. Window channel frame
³⁄₈
in. self-tapping screw
2.
3. Bottom bracket
4.
¹⁄₈
in. drilled holes
Complete Installation
1. Place top retainer on top edge of filler panel, then place the
bottom edge of filler panel into groove of bottom retainer
(mounted on unit). Filler panel may be trimmed with knife or
scissors to fit window height. Slide sliders upward making
sure filler panel aligns in sliders.
1
2
3
4
5
6
AIR CONDITIONER USE
Operating your air conditioner properly helps you to obtain the
best possible results.
This section explains proper air conditioner operation.
IMPORTANT:
■ If you turn off the air conditioner, wait at least 3 minutes
before turning it back on. This prevents the air conditioner
from blowing a fuse or tripping a circuit breaker.
■ Do not try to operate your air conditioner in the cooling mode
when outside temperature is below 66°F (19°C). The inside
evaporator coil will freeze up, and the air conditioner will not
operate properly.
NOTES:
■ In the event of a power failure, your air conditioner will not
automatically turn back on.
■ If the electronic control will not respond to touch pad or
remote control commands, it is necessary to unplug the unit
from the electrical outlet for 5 seconds before plugging
back in.
1. Top retainer
2. Foam seal under
top retainer
3. Filler board
4. Slider
5. Foam seal between side of cabinet and
sliding sash (sliding window installation only)
6. Side channel
8
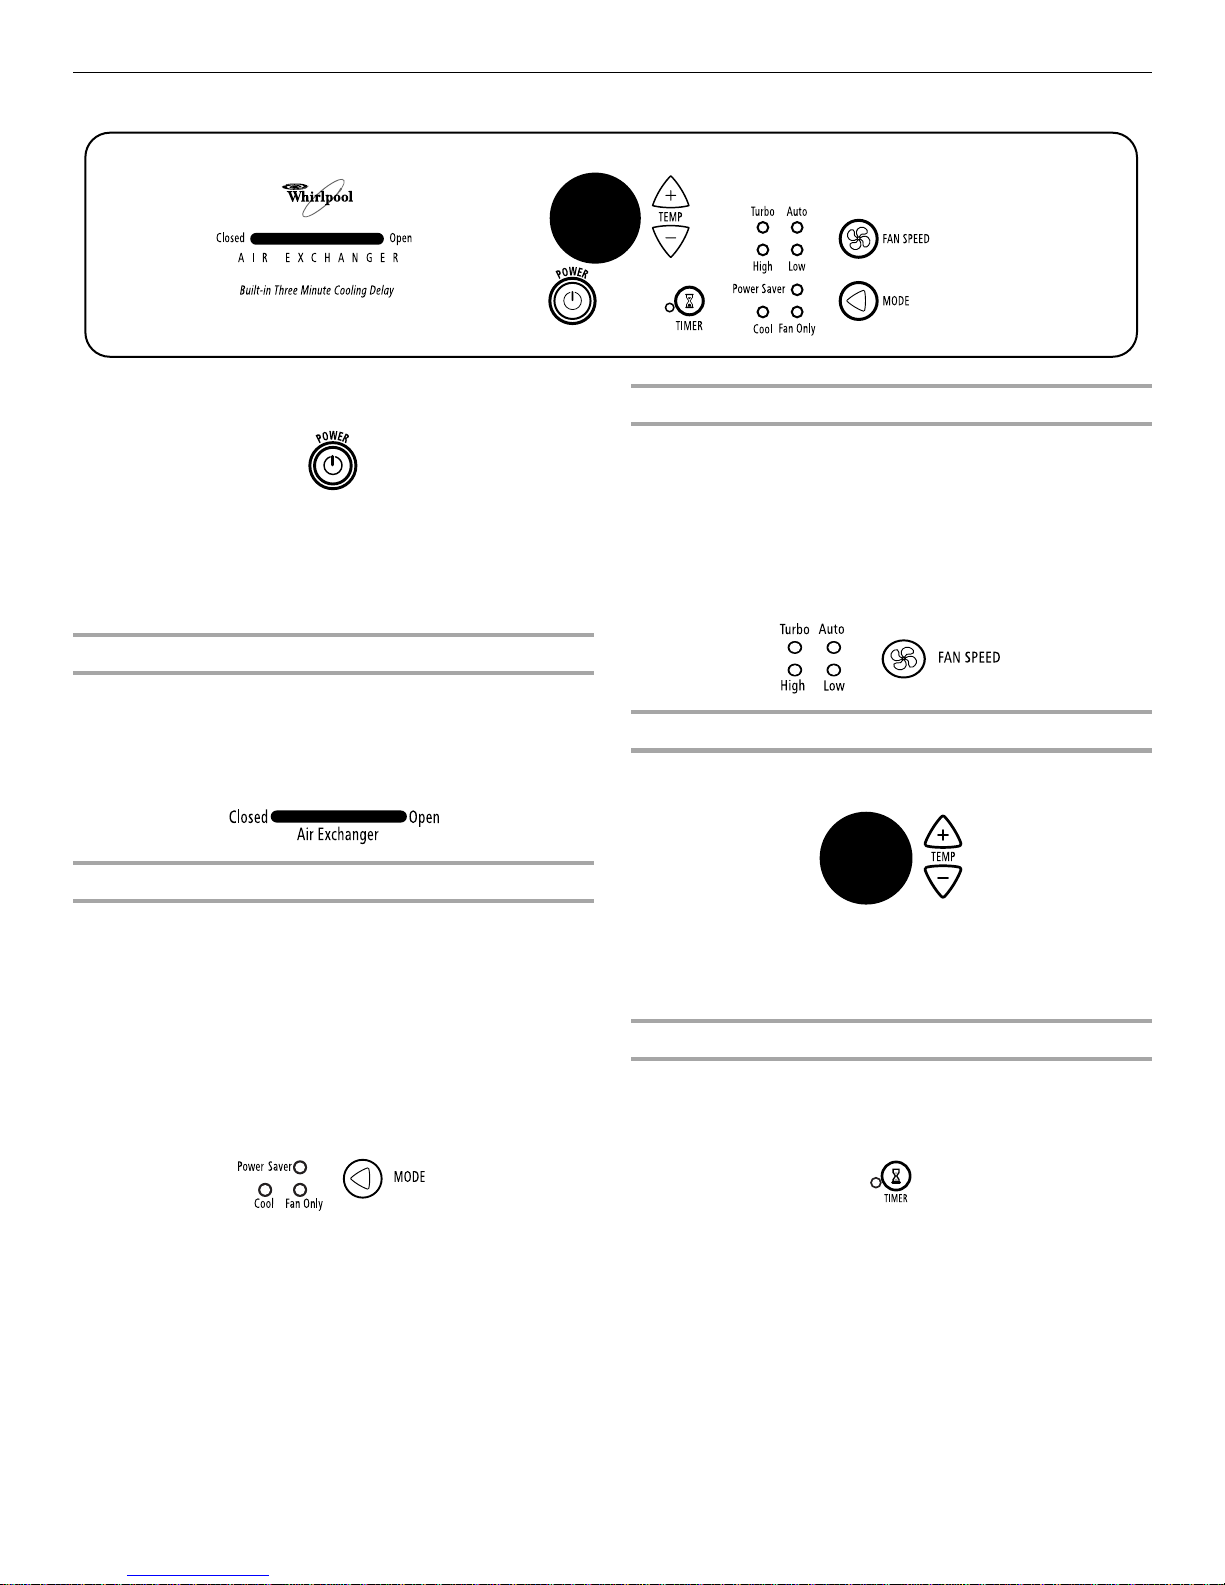
Starting Your Air Conditioner
1. Set air exchanger. See “Air Exchanger.”
2. Press POWER to turn on air conditioner.
NOTE: When the unit is turned on, it will display the previous
settings for the Mode, Fan Speed and temperature.
3. Choose mode. See “Mode.”
4. Choose fan speed. See “Fan Speed.”
5. Choose temperature. See “Temperature.”
Air Exchanger
Set the Air Exchanger control to CLOSED for maximum
continuous cooling. The Air Exchanger set to OPEN circulates
fresh air and draws stale or smoky air from the room.
■ Open - to exhaust room air to the outside
■ Closed - maximum air circulation and cooling
Mode
1. Press and hold MODE.
2. Choose COOL, FAN ONLY or POWER SAVER.
■ Cool - Cools room. Press FAN SPEED to choose fan
speed. Then adjust the temperature by pressing the up or
down arrow buttons.
■ Fan Only- Operates the fan at Low, High or Turbo speed,
without cooling.
■ Power Saver - The fan will switch from the set fan speed
to LOW whenever the compressor turns off in response to
the set temperature. When the compressor cycles back
on, the fan will return to the set fan speed.
Fan Speed
1. Press and hold FAN SPEED.
2. Choose AUTO, TURBO, HIGH or LOW.
When Auto is selected, the fan speed will change
automatically as the temperature in the room changes.
■ 7º or more above the set temperature will use Turbo.
■ 4º - 7º above the set temperature will use High.
■ 4º or below the set temperature will use Low.
Temperature
■ Press the TEMP plus pad to raise the temperature 1º until it
reaches 88ºF (31ºC).
■ Press the TEMP minus pad to lower the temperature 1º until it
reaches 66ºF (19ºC).
NOTE: By pressing both pads at once, the display will switch
from ºF to ºC.
Timer Delay
To set the Timer for a 1- to 24-hour delay until the air
conditioner turns on (the air conditioner must be Off):
1. Press TIMER. Indicator light remain on.
2. Press the plus or minus pad to change the delay time from
1 to 24 hours.
3. To turn Timer off, press TIMER again.
9
 Loading...