

Page 1
Page 2

Welltech Computer Co., Ltd.
Contents
Chapter 1 IP Centrex 6850 Introduction ....................................................... 4
1.1 Welltech IP Centrex 6850 Features ........................................................ 4
1.2 Welltech IP Centrex 6850 Appearance Description ................................ 6
Chapter 2 Welltech IP Centrex 6850 Quick Start ......................................... 8
2.1 Logon IP Centrex 6850 ........................................................................... 8
2.2 Network ................................................................................................... 9
2.3 System Time ......................................................................................... 11
2.4 Apply Change ....................................................................................... 13
Chapter 3 Configuration Setting ................................................................. 14
3.1 System Configuration ............................................................................ 14
3.2 Centrex Configuration ........................................................................... 14
3.3 Interface ................................................................................................ 16
3.3.1 Channel Status ............................................................................... 17
3.4 SIP Setting ............................................................................................ 18
3.4.1 Advance SIP Configuration ............................................................. 19
Chapter 4 Service ......................................................................................... 22
4.1 Company Profile ................................................................................... 22
4.2 Station Profile ........................................................................................ 24
4.3 Massage Box ........................................................................................ 25
4.4 CRBT .................................................................................................... 26
4.5 Library ................................................................................................... 27
4.6 Announcement Manager ....................................................................... 27
4.7 Channel Manager ................................................................................. 28
4.8 Config Manager .................................................................................... 30
4.9 Report ................................................................................................... 30
Chapter 5 System Monitor........................................................................... 33
5.1 Event Log .............................................................................................. 33
5.2 Debug Information ................................................................................ 34
5.3 Ping ....................................................................................................... 35
Chapter 6 System Control ........................................................................... 36
6.1 System .................................................................................................. 36
6.2 Prompt Manager ................................................................................... 36
IP Centrex 6850 2
Page 3

Welltech Computer Co., Ltd.
6.3 Account Management ........................................................................... 37
6.4 File Manager ......................................................................................... 37
6.5 Upgrade ................................................................................................ 38
6.6 Relogin .................................................................................................. 39
Chapter 7 Company Administrator Operation ........................................... 40
Chapter 8 Station Subscriber Operation .................................................... 43
Chapter 9 Telnet & RS-232 Configuration .................................................. 45
Chapter 10 LCD Display Configuration ...................................................... 50
Appendix 1 Time zone to Country Mapping List ....................................... 53
Appendix 2 System Voice File .................................................................... 55
Appendix 3 Local Disk Directory Structure ............................................... 58
Appendix 4 How to Config SIP Proxy (6500) ............................................. 59
Appendix 5 Call Flow ................................................................................... 63
Quick Function Reference .......................................................................... 77
Index ............................................................................................................. 82
IP Centrex 6850 3
Page 4

Welltech Computer Co., Ltd.
Chapter 1 IP Centrex 6850 Introduction
1.1 Welltech IP Centrex 6850 Features
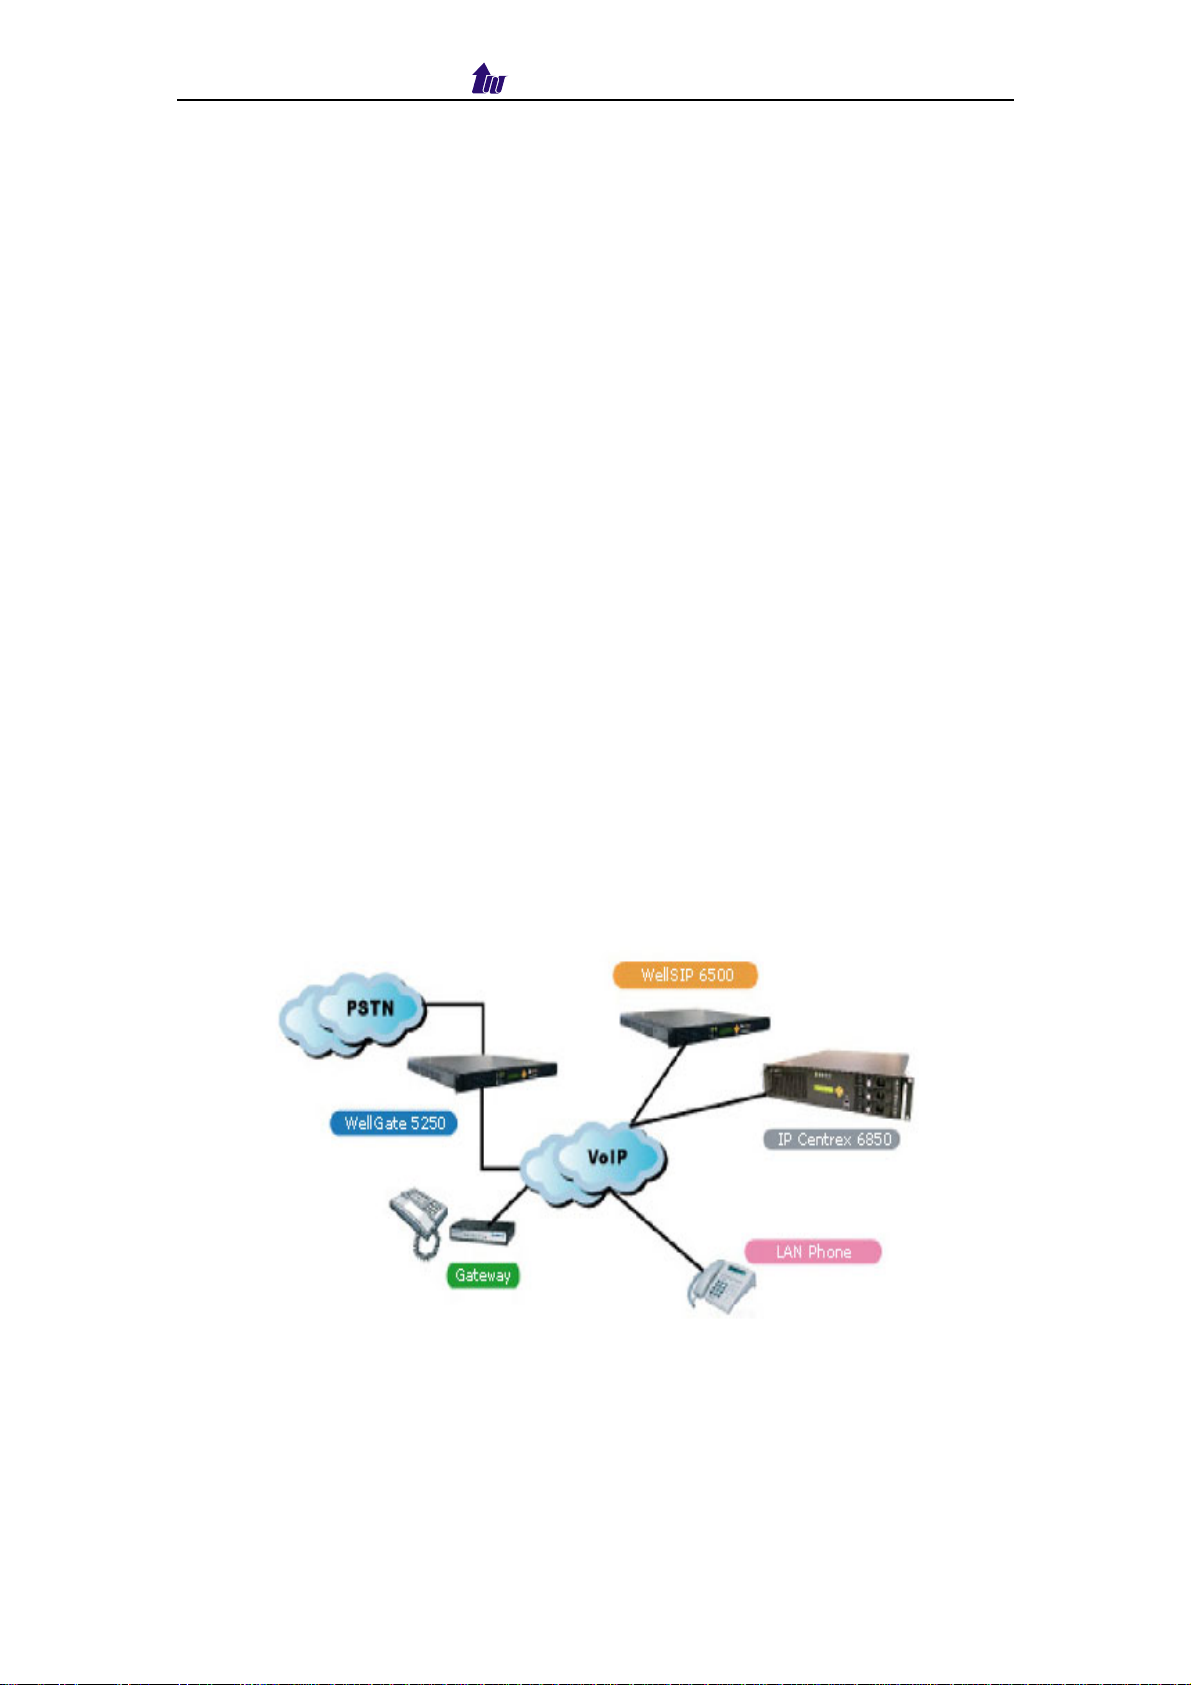
The IP Centrex 6850 is based on powerful Welltech SIPivr 6800 to provide the
customer a quick time to market and easy to customize their needs’ solution.
With built-in pre-designed Auto Attendant, Voice Mail, Coloring Ring Back Tone
and Announcement service, IP Centrex 6850 fulfils the requirements of service
provider.
Key Features:
Based on SIPivr 6800
Auto-attendant
− Time-based Greeting (3 segments)
− Multi-languages Support (Built-in Mandarin and English)
− Special Greeting
− Multi-company
− Customizable Greeting
− Customizable Call Flow
Voice Mail System
− Customizable Personal Greeting
− Distinct Busy or no Answer Voice Mail Process
− Up-to 20 voice messages per mail box
− Multi-language (Mandarin and English TTS are included)
− Subscriber based Keeping Days
− IVR and Web Voice Mail Access
− Email Forward
− Customizable Call Flow
Color Ring Back Tone
− Caller based & default CRBT
− Up-to 10 caller setting per subscriber
Announcement
− Full Integrated with WellSIP 6500
− Reason-Code Mapped Announcement
System Administrator Management
− System User Login
− Company & Subscriber Management
− CRBT Library Management.
− Import/Export
Company Administrator Management
IP Centrex 6850 4
Page 5
Welltech Computer Co., Ltd.
− Company Administrator Login
− Company Profile Management.
− Company owned Subscriber Management.
Subscriber Management
− Subscriber login
− Voice messages retrieve and forward
− Personal CRBT management
Fully Web Management Interface
HTTP SSL Support
Physical Dimension
− 19" Rack Mount 2U
− 483mm/88mm/450mm(W/H/D)
Processor and Storage
− CPU: Intel P4 2.4GHz
− RAM: 1G Bytes
− HD: SATA 120G Bytes * 3 (RAID 5)
System Capacity
− Max 10,000 subscribers.
− 30/120 channels
Applications
IP Centrex 6850 5
Page 6
Welltech Computer Co., Ltd.
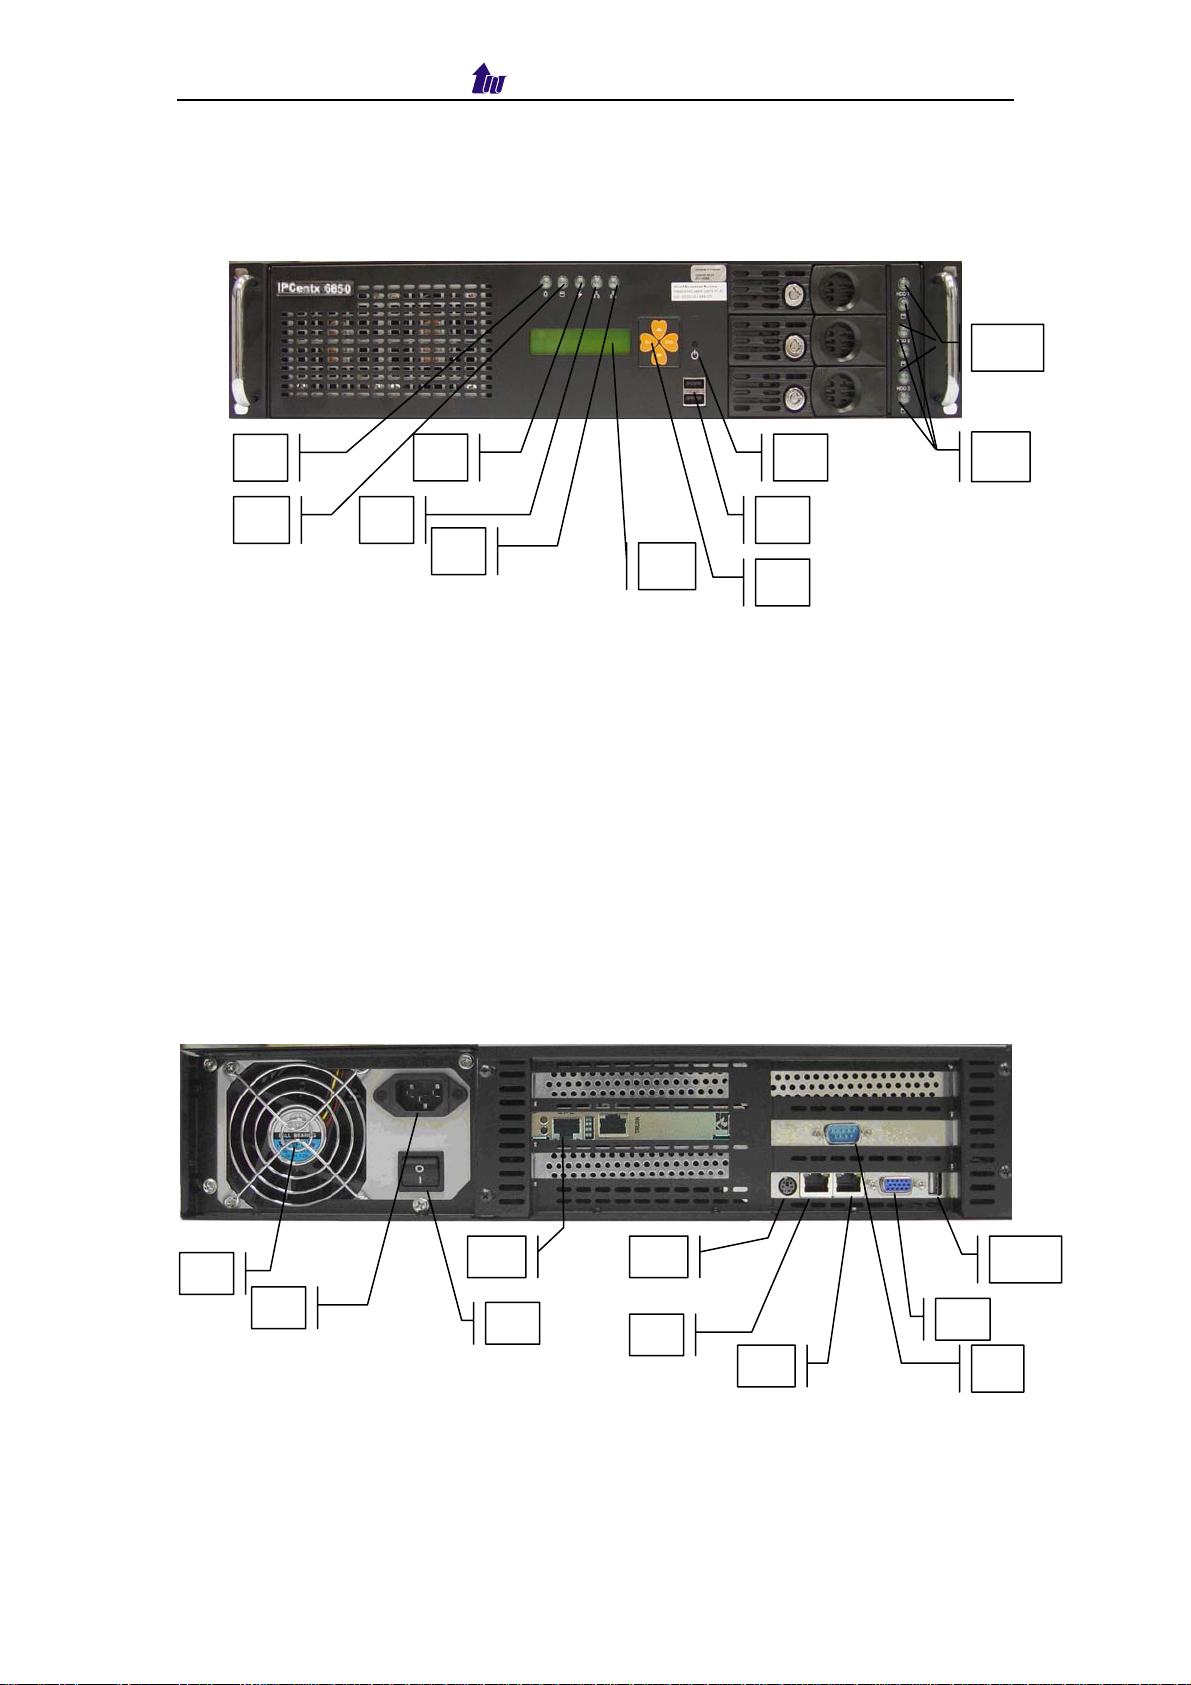
1.2 Welltech IP Centrex 6850 Appearance Description
IP Centrex 6850 Front Panel:
1
2
3
4
5
Functions:
1: Power LED
2: H/D LCD
3: System Status LED
4: Network1 Interface LED
5: Network2 Interface LED
6: Power Switch
7: LCD Panel
8: LCD Touch Panel
9: USB (not used)
10: HD Power Indicator
11: HD Access Indicator
IP Centrex 6850 Rear Panel:
7
6
9
8
10
11
1
2
7
3
Functions:
1: Electric Fan
2: AC Power outlet
3: AC Power switch
4: Keyboard/Mouse
5: Management Ethernet port (please don’t plug cable on it)
IP Centrex 6850 6
4
5
6
10
8
9
Page 7

6: Service Ethernet port
7: VOIP Ethernet port
8: External Monitor Connector
9: Console port
10: USB (not used)
Welltech Computer Co., Ltd.
IP Centrex 6850 7
Page 8

Welltech Computer Co., Ltd.
Chapter 2 Welltech IP Centrex 6850 Quick Start
After connected Ethernet cables into the Welltech IP Centrex, turned on the
power. The first step is to logon the system and set up the IP address.
Before you can use the browser to config Welltech IP Centrex, you need
to install Java Plug-in. Please confirm your JRE version is 1.4.2(preferred &
tested), if your PC has already installed Java.
You also need to set newer versions of stored pages in Internet Explorer to
“Every visit to the page.” Click Tool > Internet Option > General > Setting.
After success, restart your browser to take effect.
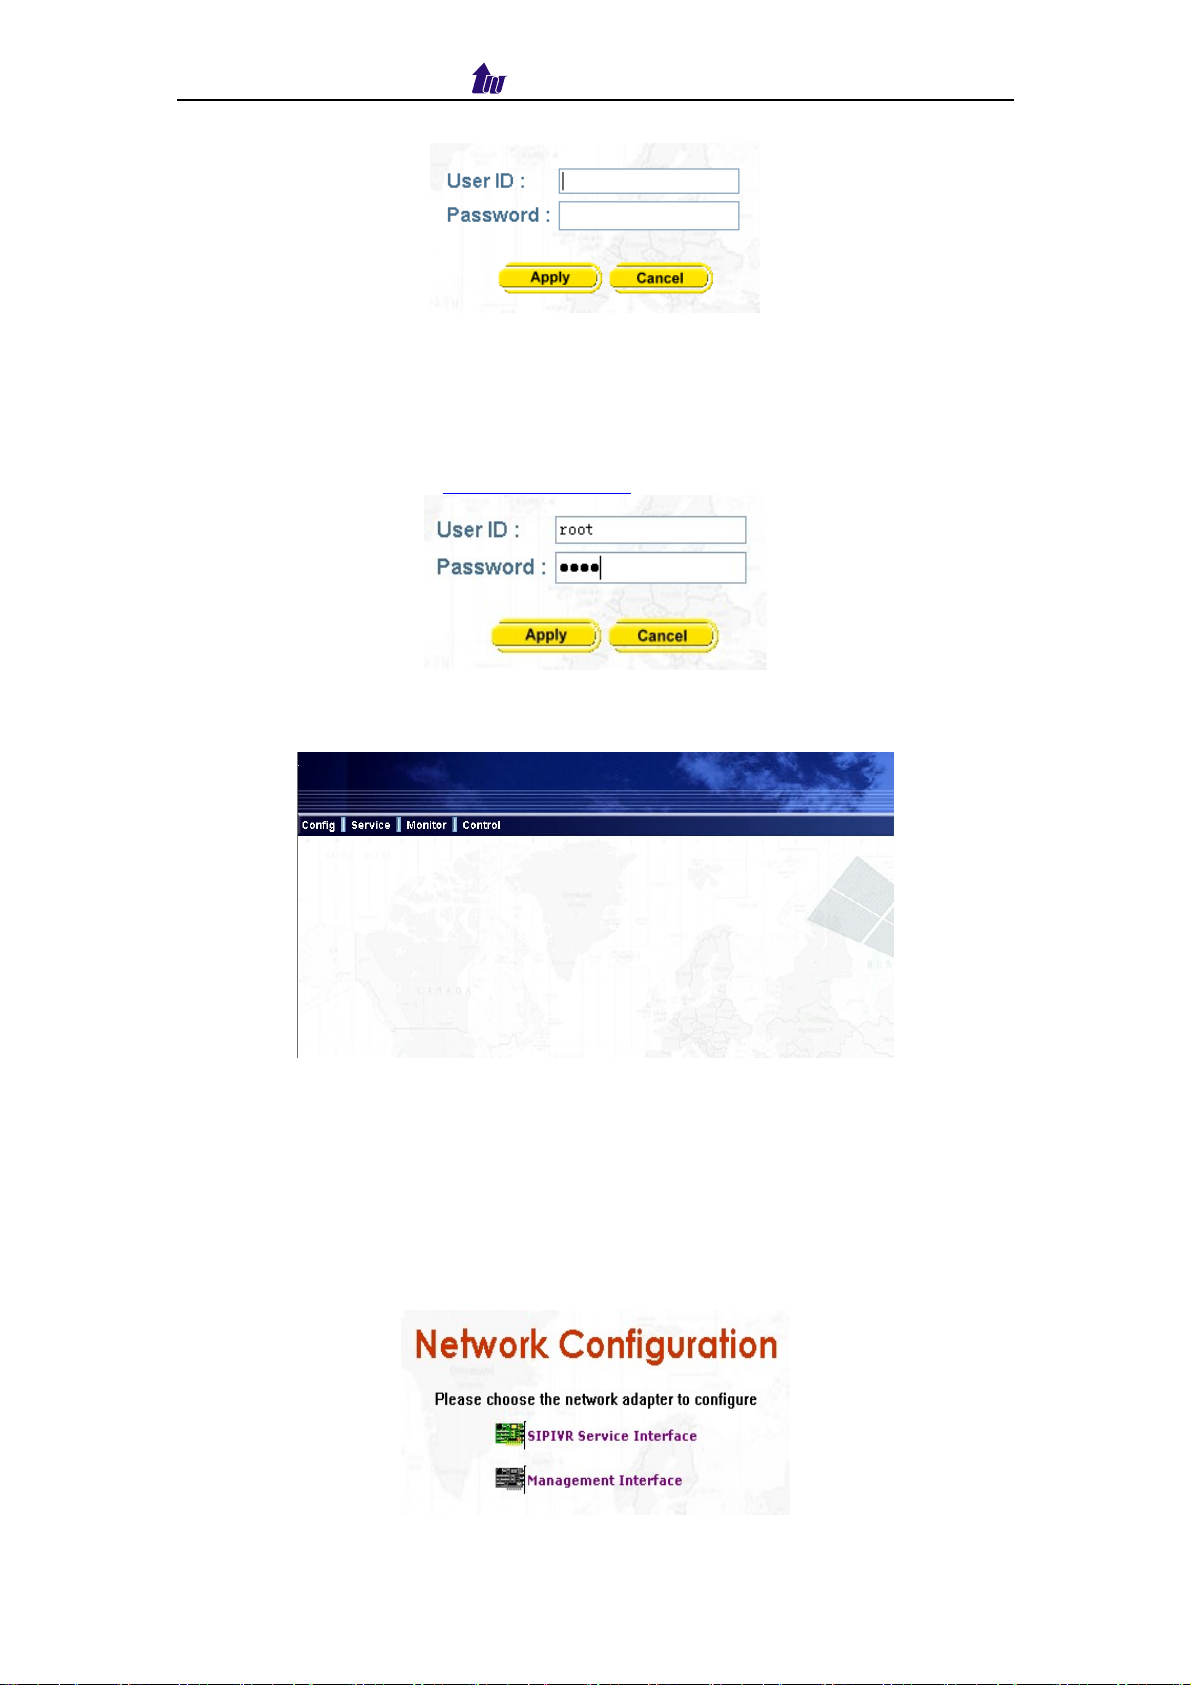
2.1 Logon IP Centrex 6850
Step 1: Start IE 6.0 (or later version) to navigate SIP IVR Management System
by typing the default IP address (the default URL is
http://192.168.111.171:10097. The screen will display User ID and
Password as figure 1-1.
IP Centrex 6850 8
Page 9
Welltech Computer Co., Ltd.
Figure 2.1-1
☺Note: The default network IP address is 192.168.111.171 and subnet mask is
255.255.255.0
Step 2: Enter login user name and password (the default user id is root and
user password is root). You can manage your user account via web
(refer to section Account Manager) later.
Figure 2.1-2
Step 3: The screen shows the Home Page of IP Centrex 6850 as Figure 2.1-3.
Figure 2.1-3
2.2 Network
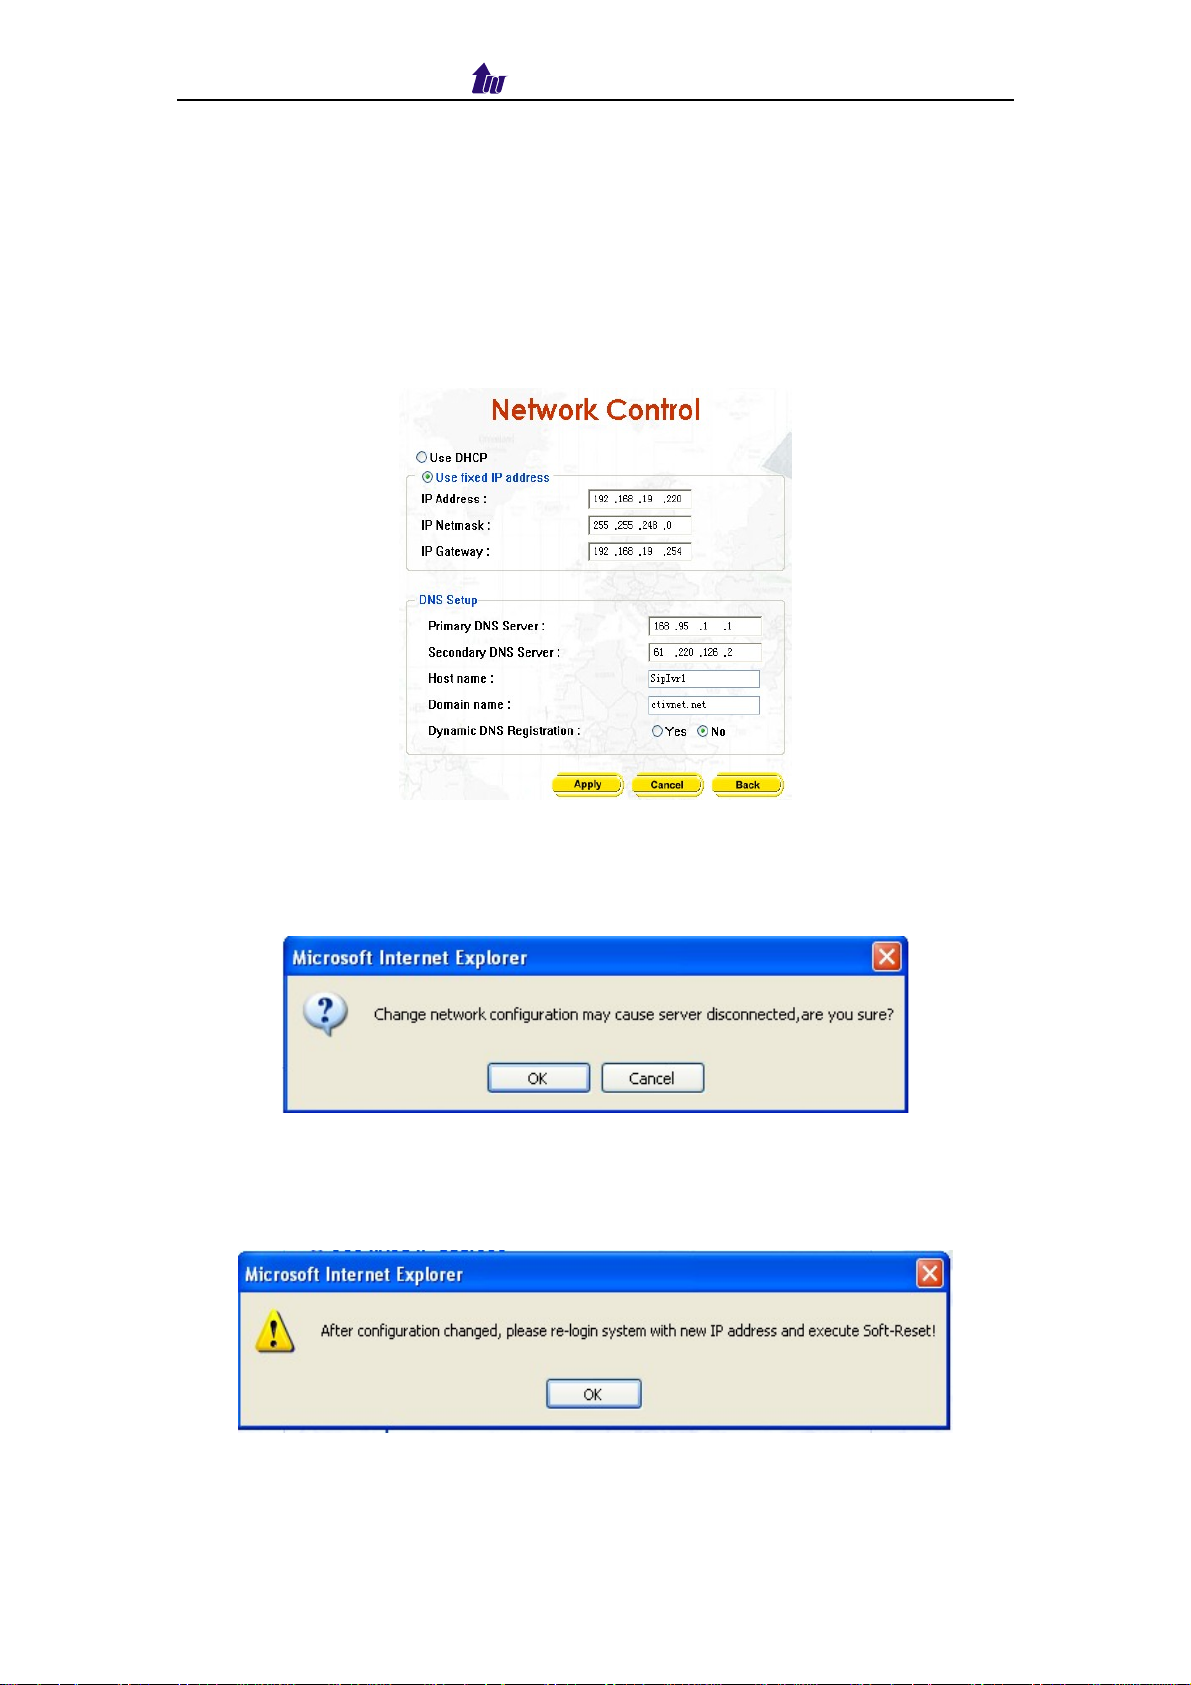
Step 1: After successfully logon to the system, we need to change the network
configuration. Click Control→Network, the screen will display as
figure 2.2-1.Choose the interface to be modified.
IP Centrex 6850 9
Page 10
Welltech Computer Co., Ltd.
Figure 2.2-1
Description:
SIPIVR Service interface: provide service over this network. If you have
DNS record, also you must be setup DNS server to effect.
Management interface: it is used for management purpose
Step 2: Choose Service Interface, enter the deserved IP address, Submask
and default gateway or selected to “Use DHCP”. Apply the change by
clicking Apply button as figure 2.2-2.
Figure 2.2-2
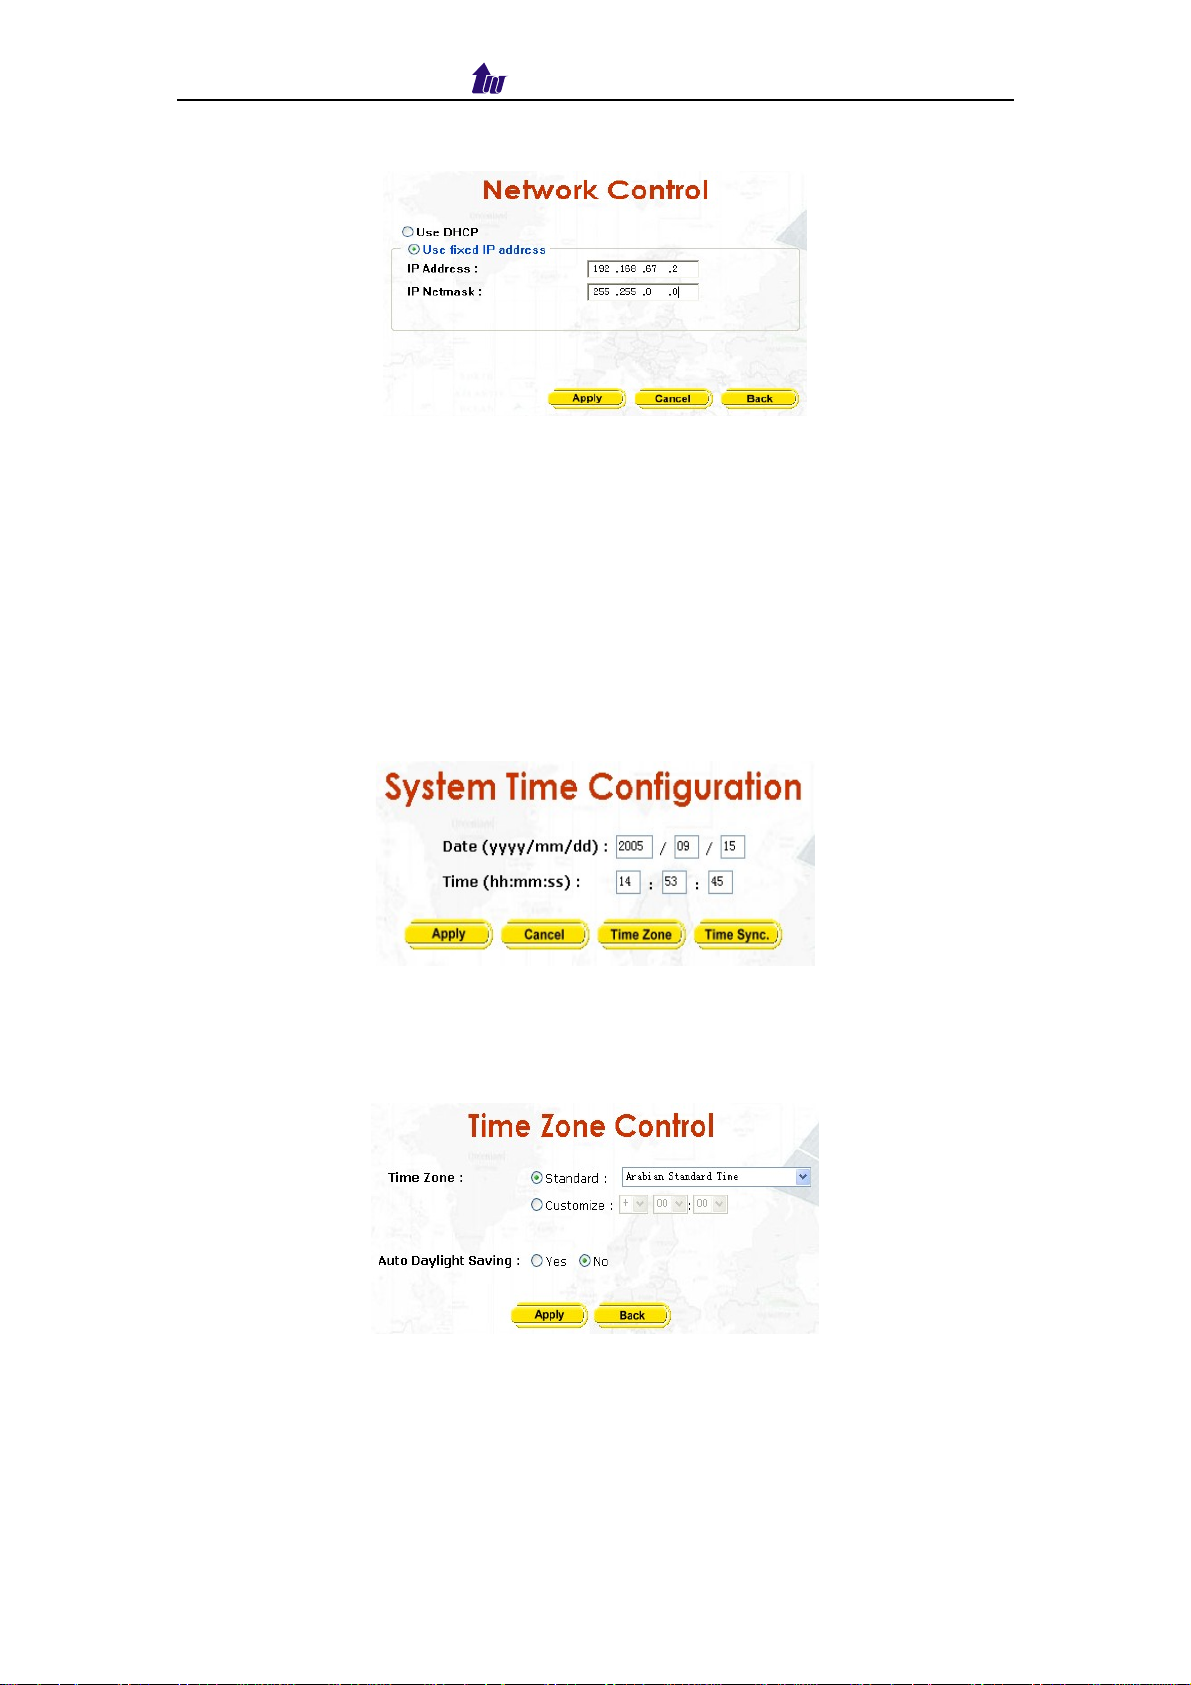
Step 3: When screen shows “Change network configuration may cause
server disconnected, are you sure?” click on OK button to changes
IP address as figure 2.2-3.
Figure 2.2-3
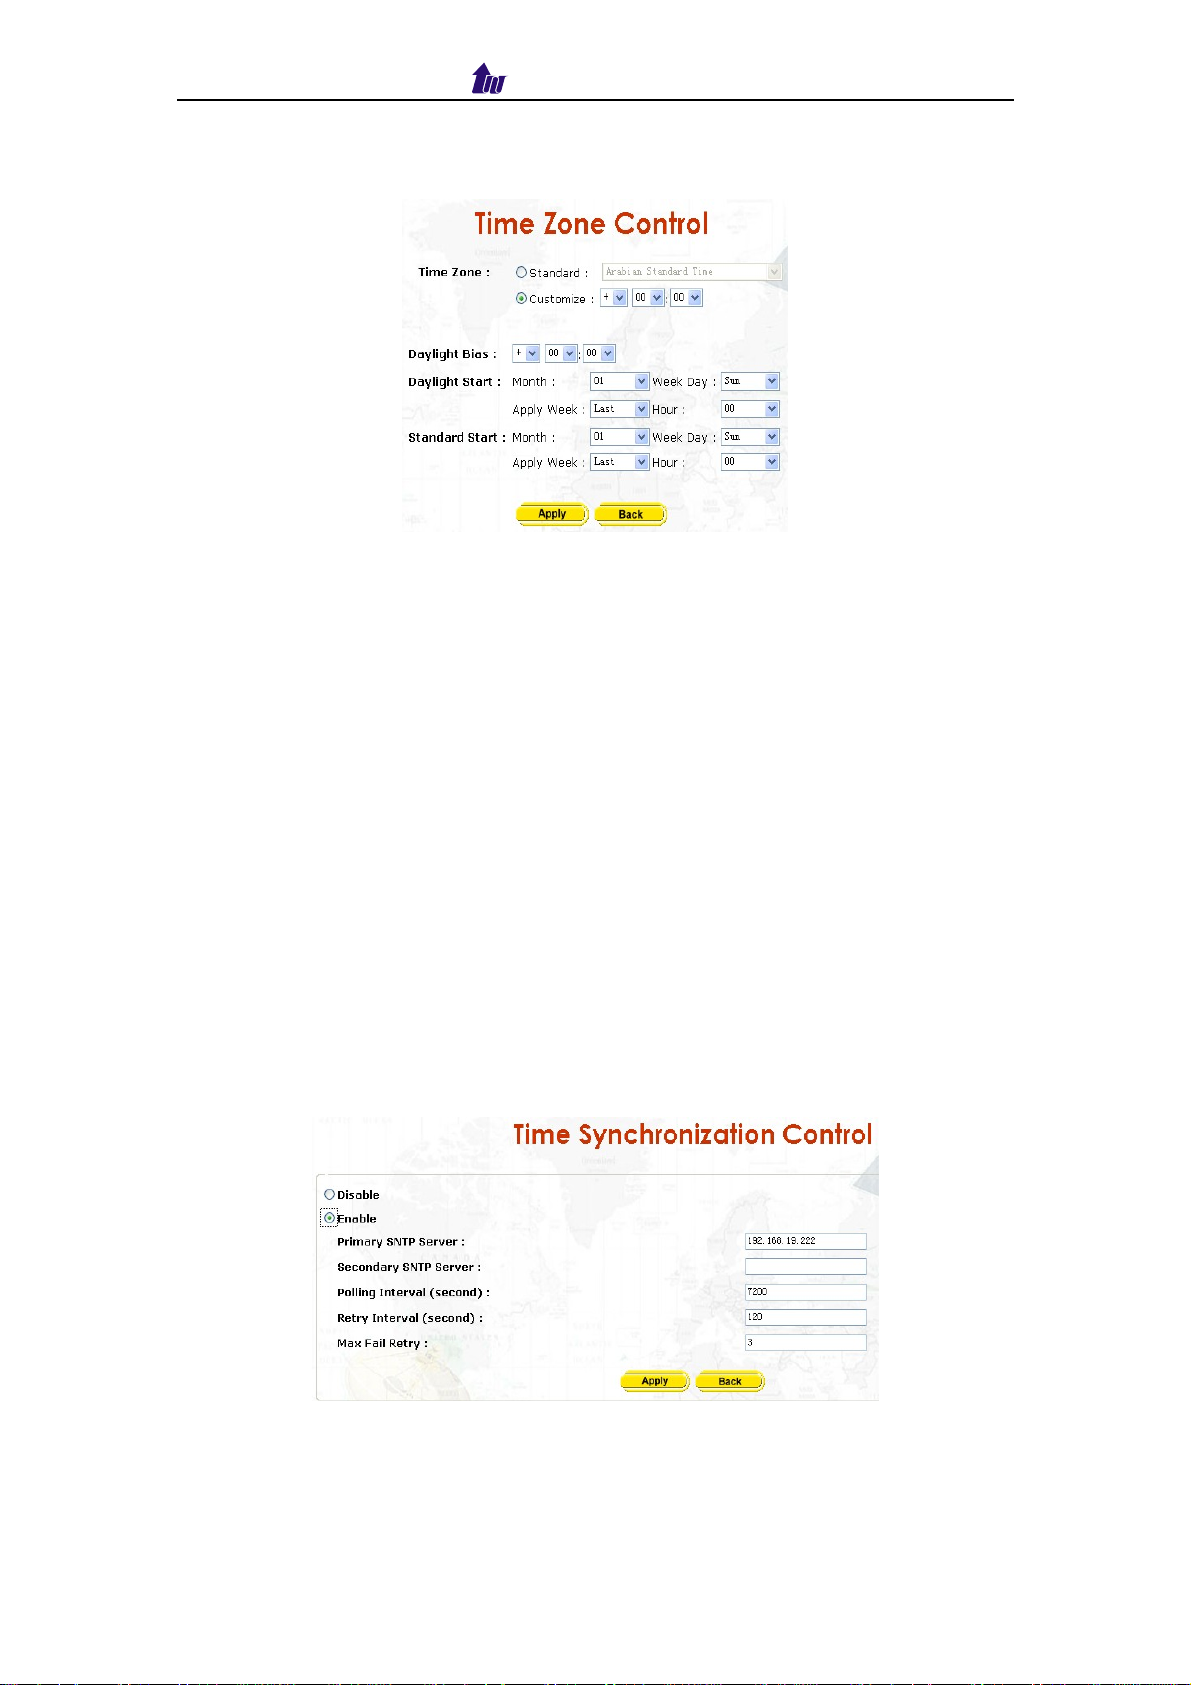
Step 4: When screen shows “After configuration changed, please re-login
system with new IP address and execute Soft-Reset!” click OK
button as figure 2.2-4.
Figure 2.2-4
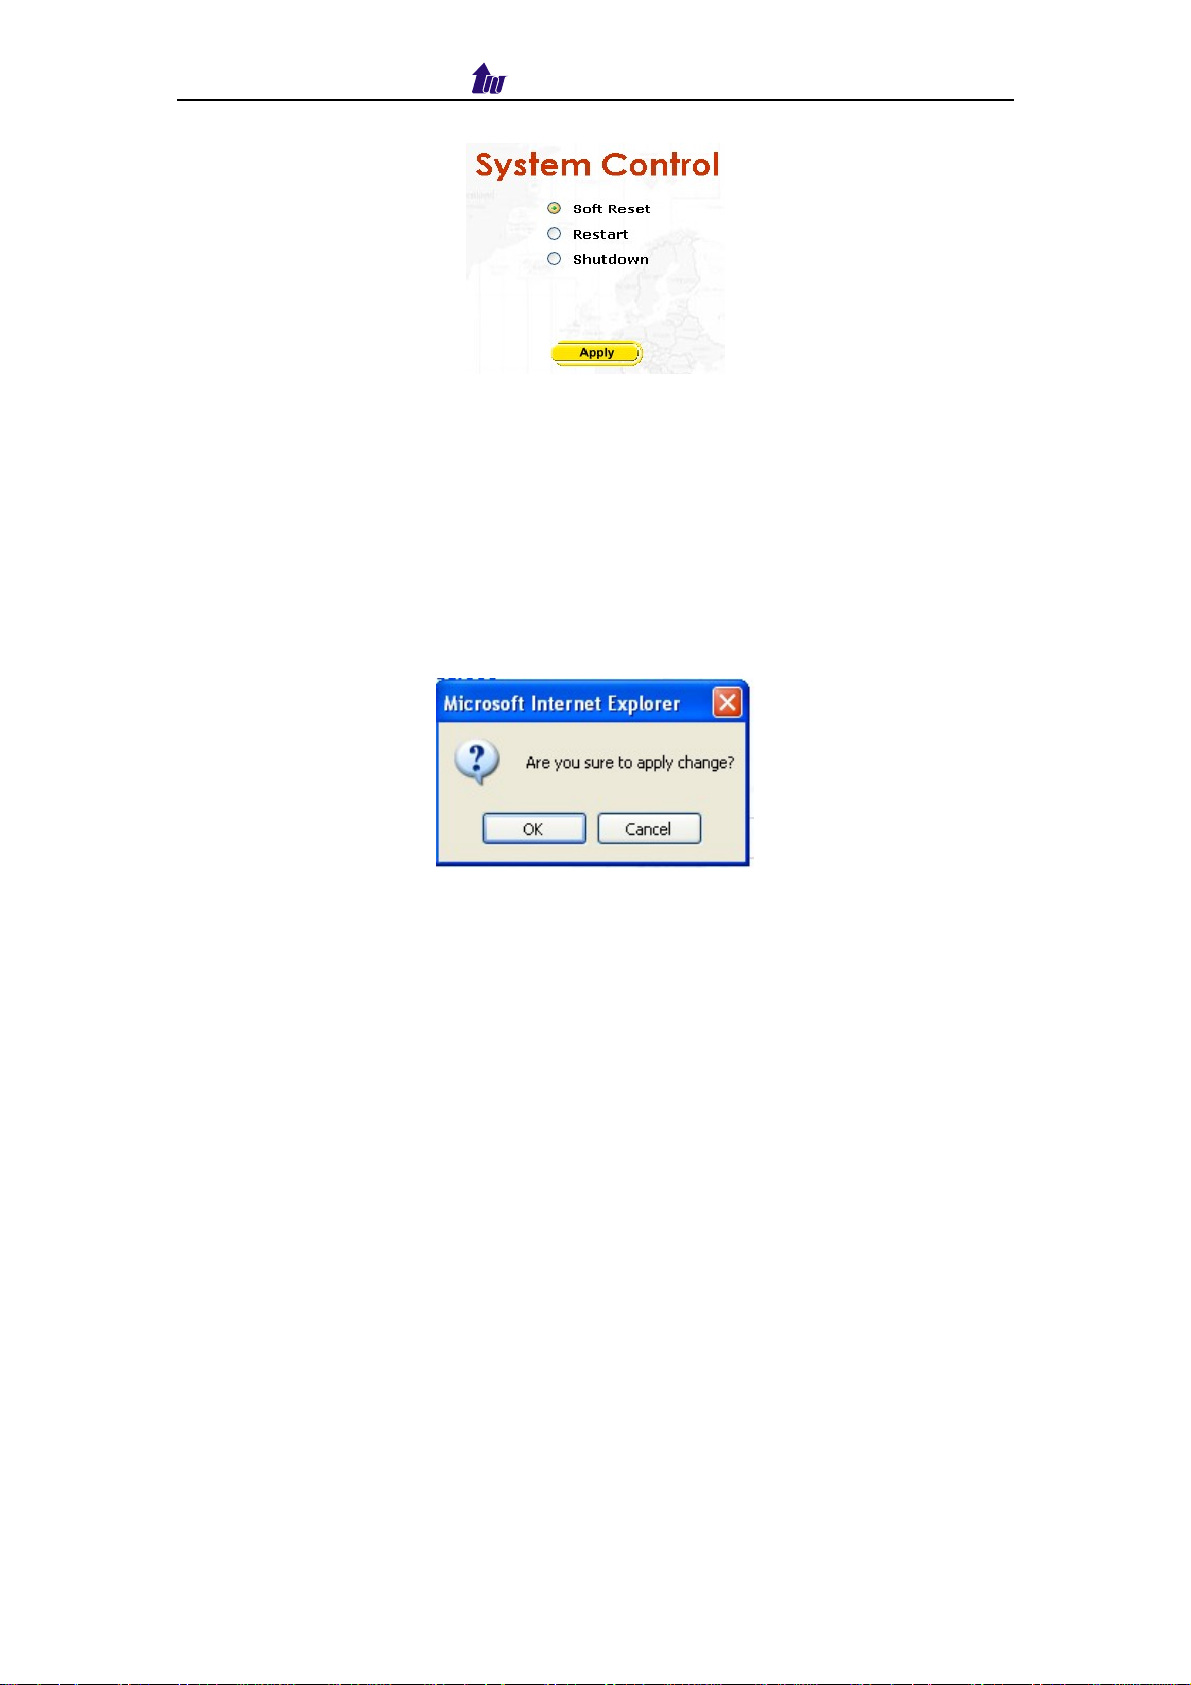
Step 5: Follow Step 1 to 4 to change management interface network
IP Centrex 6850 10
Page 11
Welltech Computer Co., Ltd.
configuration as figure 2.2-5.
Figure 2.2-5
☺Note: Network control takes around 5-second to apply the new network
configuration. Please logon again with new IP address after 5 seconds.
2.3 System Time
Step 1: When relogon to the new IP address; the next is to setup the system
time zone. Click Control > System Time to setup the system. Enter
current date and time. Apply the change by clicking Apply button as
figure 2.3-1.
Figure 2.3-1
Step 2: Time zone Setting
Standard: Select the Standard option to setup the system-predefined time
zone as figure 2.3-2
Figure 2.3-2
Parameter:
Time Zone:
− Standard: Use a predefined standard time zone (Refer to section “Time
zone to Country Mapping List”)
− Customize: Use a user defined time zone
Auto Daylight Saving: Auto adjust daylight saving time or not
IP Centrex 6850 11
Page 12
Welltech Computer Co., Ltd.
User defined time zone: Select the customized option and enter the time
zone bias to set a user-defined time zone as figure 2.3-3
Figure 2.3-3
Parameter:
Daylight Bias: The offset added to the Bias when the time zone is in
daylight saving time
Daylight Start: The date that a time zone enters daylight time
− Month: 01 to 12
− Week Day: Sunday to Saturday
− Apply Week (Day:01 to 05, Specifies the occurrence of day in the month;
01 = First occurrence of day, 02 = Second occurrence of day, ...and 05 =
Last occurrence of day)
− Hour: 00 to 23
Standard Start: The date that a time zone enters daylight time
− Month: 01 to 12
− Week Day: Sunday to Saturday
− Apply Week (Day:01 to 05, Specifies the occurrence of day in the month;
01 = First occurrence of day, 02 = Second occurrence of day, ...and 05 =
Last occurrence of day)
− Hour: 00 to 23
Step 3: If you would like to use SNTP to sync time with a SNTP V4 Server,
click Time Sync button to setup it as figure 2.3-4.
Figure 2.3-4
Step 4: After successfully base setup; click Control > System to restart IP
Centrex 6850 to take effect as figure 2.3-5.
IP Centrex 6850 12
Page 13
Welltech Computer Co., Ltd.
Figure 2.3-5
2.4 Apply Change
Start Path: Config > Apply Change
When you loaded a new working configuration or changed any configuration,
you need click “Apply Change” to take effect as figure 2.4-1.
Figure 2.4-1
IP Centrex 6850 13
Page 14
Welltech Computer Co., Ltd.
Chapter 3 Configuration Setting
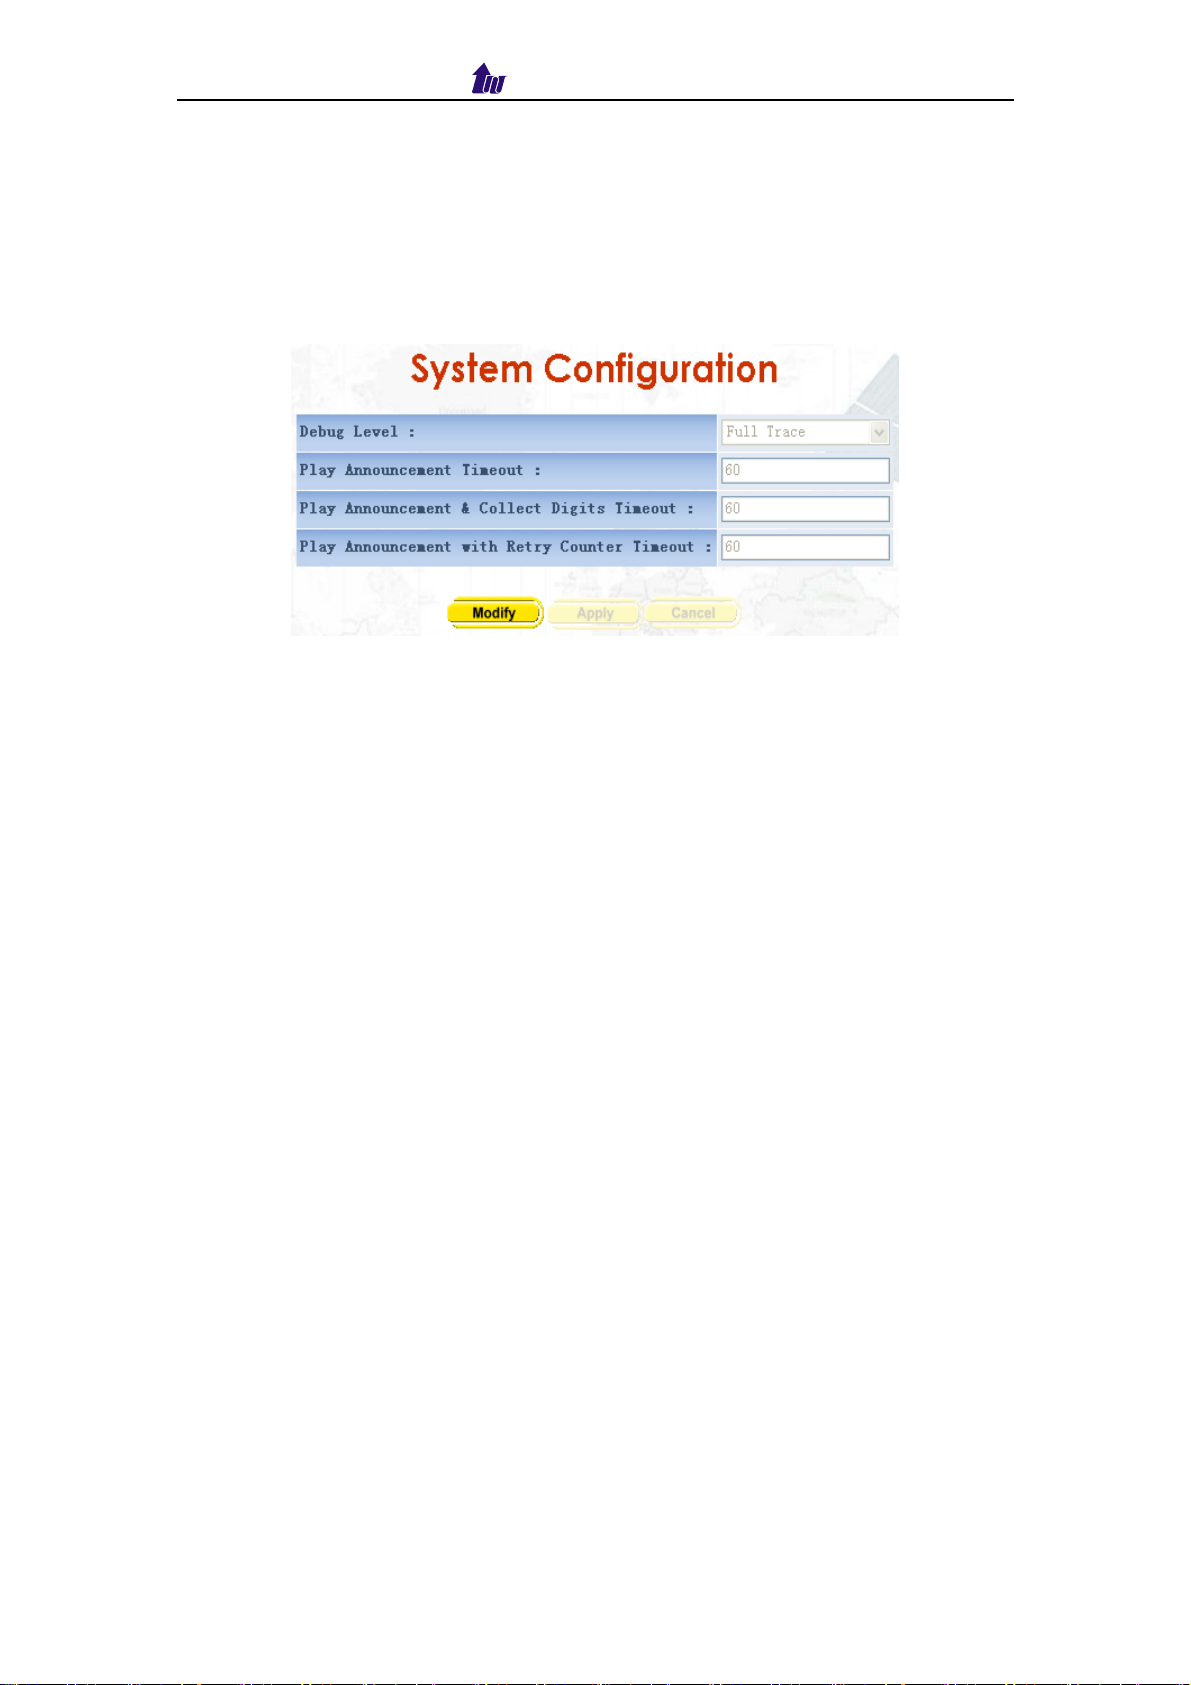
3.1 System Configuration
Start Path: Config > System Config
Figure 3.1-1
Parameter Description:
Debug Level: The debug level
− Critical: Show critical error messages only
− Warning: Show warning message only
− Information: Show information message only
− Debug: Show debug message only
− Full Trace: Show all status and debug messages
Play Announcement Timeout: The maximum time to execute for Play
Announcement in seconds(def: 600 seconds)
Play Announcement &Collect Digits Timeout: The maximum time to
execute for Play Announcement & Collect DTMF Digit in seconds (def: 600
seconds)
Play Announcement with Retry Counter Timeout: The maximum time to
execute for play Announcement with Retry Counter in second (def:
600seconds)
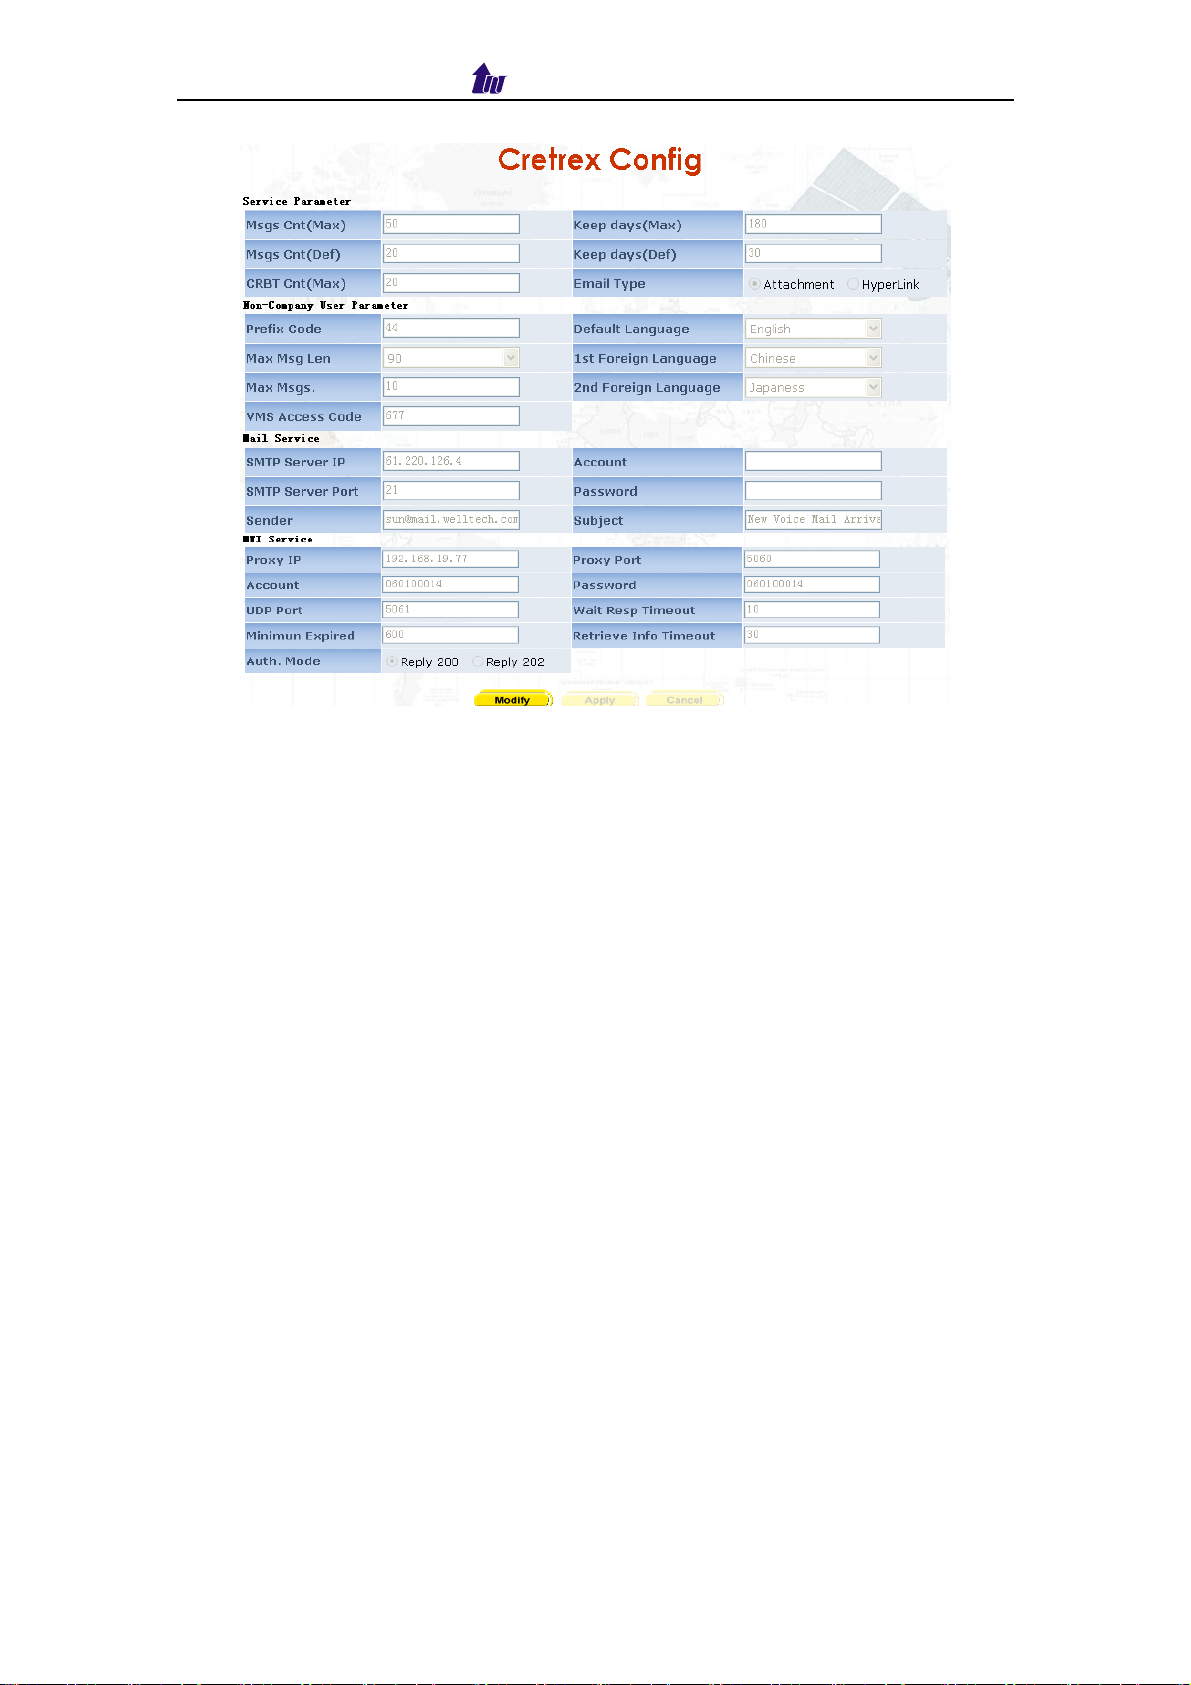
3.2 Centrex Configuration
Start Path: Config > Centrex Config
IP Centrex 6850 14
Page 15
Welltech Computer Co., Ltd.
Figure 3.2-1
Parameter Description:
Service Parameter
Msgs Cnt (Max): The max messages count for each mail box(def: 30)
Msgs Cnt (Def): The default messages count for each mail box (def: 20)
CRBT Cnt (Max): The max CRBT(Coloring Ring Back Tone) count for each
station (def: 20)
Keep days (Max): The max messages remain days (def: 180)
Keep days (Def): The default messages remain days (def: 30)
Email Type: Email notice for new voice mail, attachment or hyperlink type
Non-Company User Parameter:
Prefix Code: Global prefix call for CRBT, Announcement and
non-Company user VMS users. Need set this prefix in WellSIP 6500 group
prefix for CRBT, Announcement prefix.
Max Msg Len: The max messages length for subscriber (def: 120sec)
Max Msgs: The max messages count for subscriber (def: 20)
VMS Access code: VMS access code for non-company
Default Language: Default language
st
1
2
Foreign Language: The first foreign language
nd
Foreign Language: The second foreign language
Mail Service
SMTP Server IP: The SMTP Server IP
SMTP Server Port: The SMTP Server Port
Sender: The mail sender address
Account: The sender account
Password: The sender password
Subject: The subject of the mail
MWI Service
Proxy IP: The Proxy IP which MWI Server register to
Proxy Port: The Proxy port
IP Centrex 6850 15
Page 16
Welltech Computer Co., Ltd.
Account: The MWI Server account
Password: The MWI Server password
UDP Port: SIP Service local Listen UDP port
Minimum Expired: The minimum expired allowed for MWI subscription in
seconds (def: 600)
Auth. Mode: Reply 200 or 202 when receive an MWI subscription.
Wait Resp Timeout: Wait Notify OK timeout in seconds (def: 10)
Retrieve Info Timeout: Internal VMS retrieve timeout in seconds(def: 30
seconds)
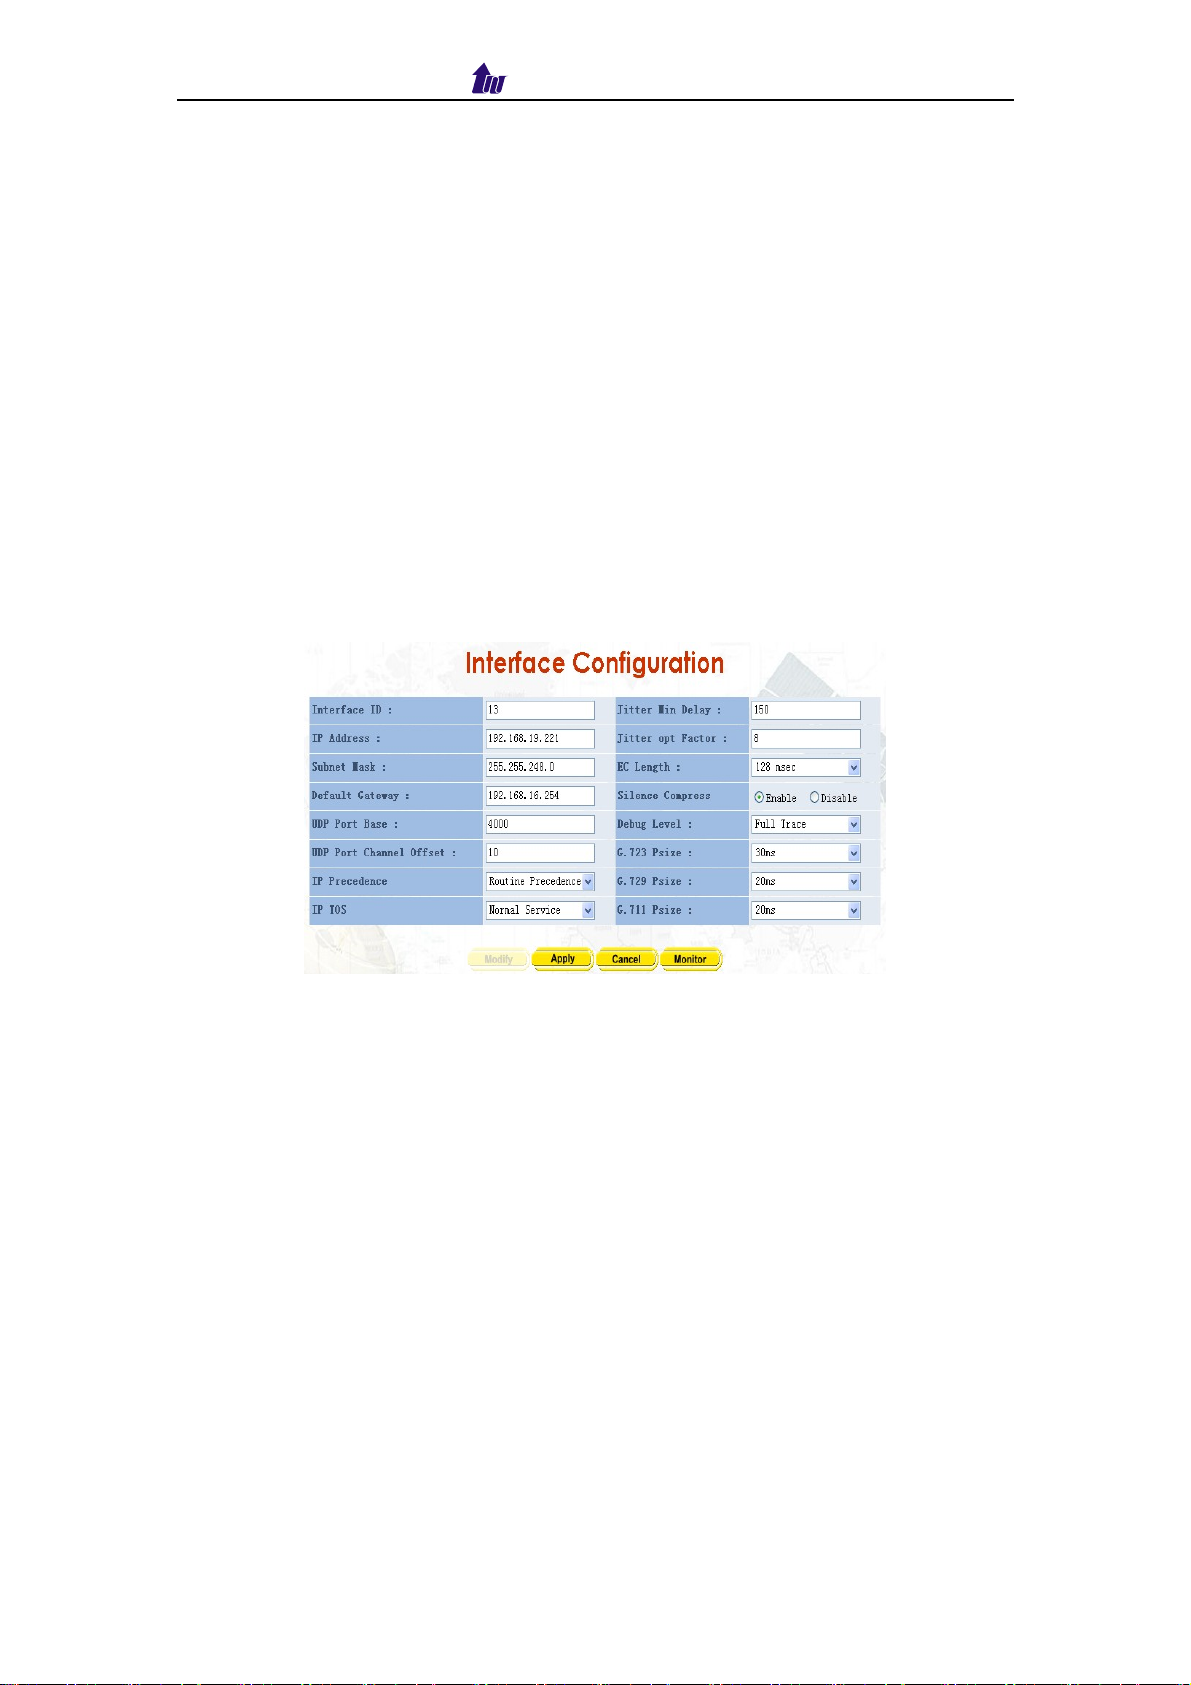
3.3 Interface
The resource setting of voice RTP DSP
Start Path: Config > Interface
Figure 3.3-1
Parameter Description:
Interface ID: System interface ID
ID Address: IP address used for system
Subnet Mask: submask
Default Gateway: Default gateway for routing
UDP Port Base: UDP port used for RTP stream, each channel needs 3 RTP
ports, and must be started by a multiple of 10.
UDP Port Channel Offset: UDP port used for channel offset
IP Precedence: Voice package priority setting
− Routine Precedence
− Priority Precedence
− Immediate Precedence
− Flash Precedence
− Flash Override Precedence
− Critical Precedence
− Internet work Precedence
− Network Precedence
IP TOS: Type of Service with the following priority selection
− Normal Service
IP Centrex 6850 16
Page 17
Welltech Computer Co., Ltd.
− Minimize Monetary
− Maximize Reliability
− Maximize Thought
− Minimize Delay
Jitter Min Delay: The minimum delay time of Jitter buffer. The range is 0 to
150ms. Default value is 150 ms, which has better voice quality, but the
delay time will be longer.
Jitter opt Factor: Jitter buffer optimization factor from 0 to 12. The default
value is 7. Set to 0 will have lowest voice delay but have bad voice quality.
Set to 12 will have long voice delay but with better voice quality.
EC length: Echo Cancellation Length
Silence Compress: Enable silence compress or not
Debug Level: The debug level
− Critical: Show critical error messages only
− Warning: Show warning message only
− Information: Show information message only
− Debug: Show debug message only
− Full Trace: Show all status and debug messages
G.723 Psize: G.723 packet size
G.729 Psize: G.729 packet size
G.711 Psize: G.711 packet size
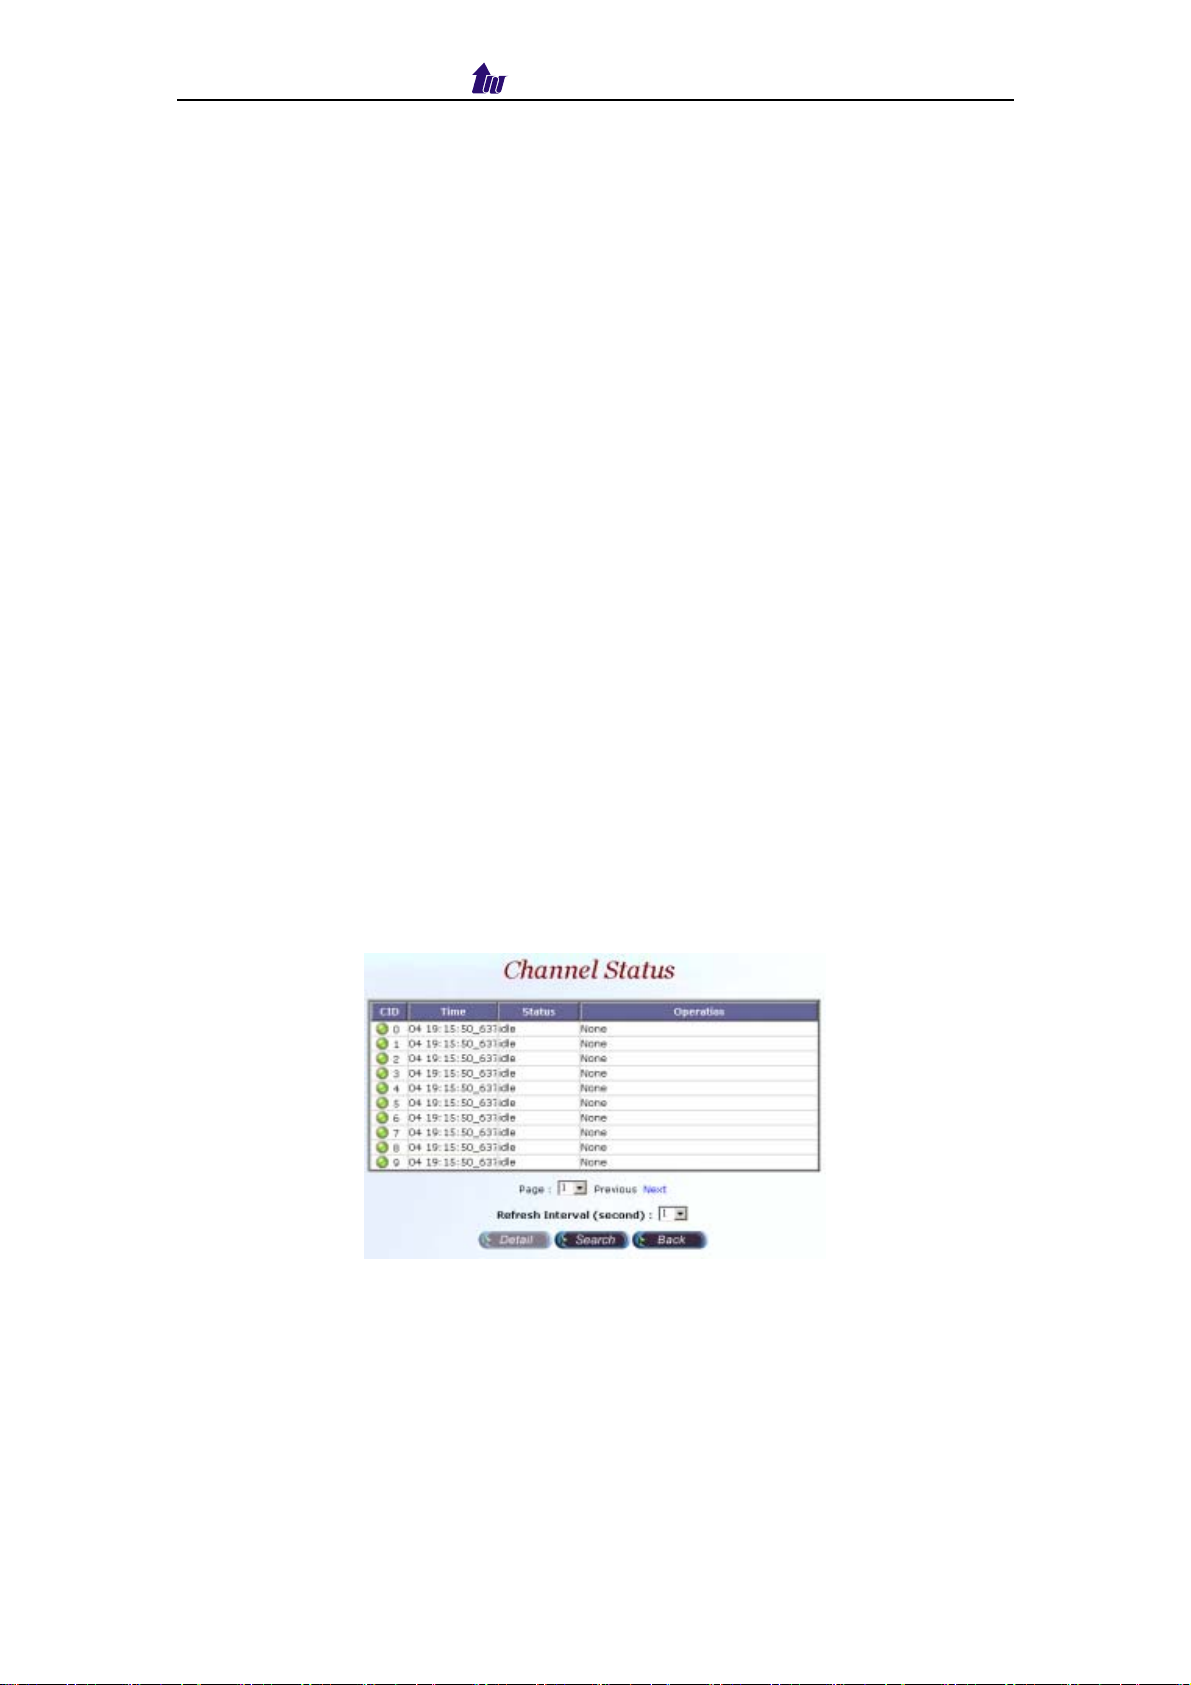
3.3.1 Channel Status
Click Monitor button, the Channel Status screen displayed as figure 3.3-2.
After select the channel as you need view, click the Detail button.
Figure 3.3-2
The Channel Detail screen displayed as figure 3.3-3, click the Back button to
back the Channel Status screen.
IP Centrex 6850 17
Page 18

Welltech Computer Co., Ltd.
Figure 3.3-3
Description:
Refresh Interval (Second): Refresh interval time (1, 5, 10 seconds)
CID: Channel ID
Time: Updated status time
Status: Channel Status
Operation: Current operation is running for the interface
Codec: Current codec
ANI: Calling number
DNIS: Called number
Source IP: Source IP Address
Destination IP: Destination IP Address
Source RTP IP: Source RTP IP
Source RTP Port: Source RTP Port
Source RTCP Port: Source RTCP Port
Source T.38 Port: Source T.38 Port
Destination RTP IP: Destination RTP IP
Destination RTP Port: Destination RTP Port
Destination RTCP Port: Destination RTCP Port
Destination T.38 Port: Destination T.38 Port
3.4 SIP Setting
Start Path: Config > SIP Setting
IP Centrex 6850 18
Page 19

Welltech Computer Co., Ltd.
Figure 3.4-1
Parameter Description:
Registrar Server: SIP register proxy server IP address
Registrar Port: SIP register proxy server port number (default: 5060)
Registrar User: SIP register proxy server user ID
Registrar Password: SIP register proxy server user password
Registrar TTL: The maximum time to live setting when registered to the SIP
proxy server
Outbound Proxy Server: The IP address of an outbound Proxy
Outbound Proxy Port: The port of an outbound Proxy
Outbound Proxy User: The User ID of an outbound Proxy
Outbound Proxy Password: The password of an outbound Proxy
Local Codec 1-4: Codec selection priority (1 to 4) (1: highest, 4: lowest)
DTMF Relay Method: DTMF transport type selection
− SIP INFO
− Transparent (not recommended for real implementation)
− RFC2833
RFC2833 Payload Type: RTP payload type used for RFC2833 DTMF relay
(def: 101)
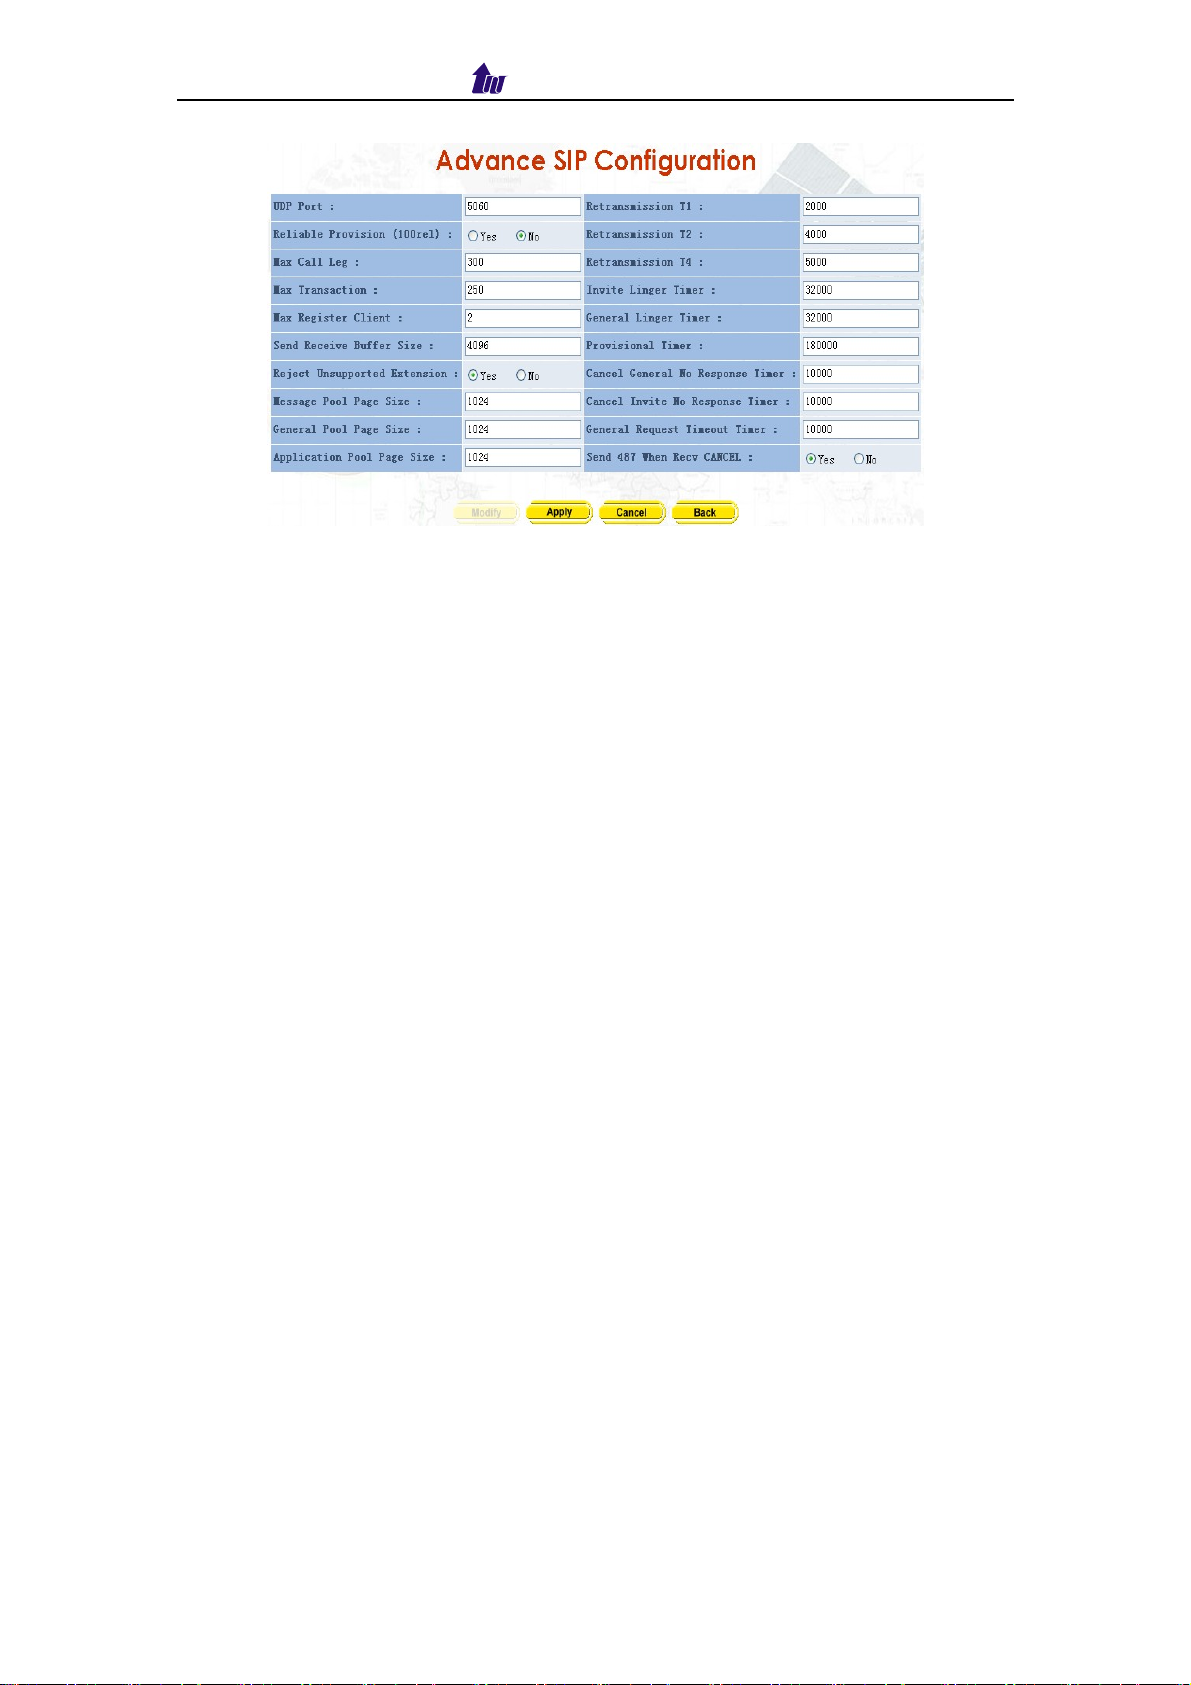
3.4.1 Advance SIP Configuration
Click Advance button, the Advance SIP Configuration screen displayed as
figure 3.4-2. Click Modify button to setup the Advance SIP Configuration.
IP Centrex 6850 19
Page 20
Welltech Computer Co., Ltd.
Figure 3.4-2
Parameter Description:
UDP Port: The local UDP port on which the SIP Stack listens.
Reliable Provision (100rel): Requited PRACK or not (100rel)
Max Call Leg: The maximum number of call-legs the SIP Stack allocates.
You should set this value to the maximum number of call you expect the
SIP Stack to handle simultaneously.
Max Transaction: The maximum number of transactions the SIP Stack
allocates. You should set this value to the maximum number of call you
expect the SIP Stack to handle simultaneously.
Max Register Client: The maximum number of Register-Clients the SIP
Stack allocates. You should set this value to the maximum number of call
you expect the SIP Stack to handle simultaneously.
Send Receive Buffer Size: Set the size of message buffer. The buffer used
by SIP Stack for receiving and sending SIP messages.
Reject Unsupported Extension: Yes or No
Message Pool Page Size: Used to hold and process all incoming and
outgoing message in the coming of encoded messages or message objects.
It is recommended that you configure the page size to the average
message size your system is expected to message.
General Pool Page Size: Used by SIP Stack objects, such as call-legs and
transaction, to store the internal fields. For example, the call-legs object will
store the going, coming and Call-ID headers and the local and the remote
contact addresses on the general pool pages. The general pool is also used
from other activities that demand memory allocation.
Application Pool Page Size: The size of page in the application pool.
Retransmission T1: T1 determines several timers as defined in RFC3261.
For example, when an unreliable transport protocol is used, a Client Invite
transaction retransmits requests at an interval that start at T1 seconds and
doubles after every retransmission. A Client General transaction
retransmits requests at an interval that starts at T1 and doubles until it
reaches T2. (Default Value: 500)
Retransmission T2: Determines the maximum retransmission interval as
defined in RFC3261. For example, when an unreliable transport protocol is
used, general requests are retransmitted at an interval, which starts at T1
and doubles until reaches T2. If a provisional response is received,
IP Centrex 6850 20
Page 21

Welltech Computer Co., Ltd.
retransmission continue but at an interval of T2. (Default Value: 4000)
Retransmission T4: T4 represents the amount of time the network takes to
clear message between client and server transactions as defined in
RFC3261. For example, when working with an unreliable transport protocol,
T4 determines the time that UAS waits after receiving an ACK message
and before terminating the transaction. (Default Value: 5000)
Invite Linger Timer: After sending an ACK for an INVITE final response, a
client cannot be sure that the server has received the ACK message; the
client should be able to retransmit the ACK upon receiving retransmissions
of the final response for inviteLingerTimer milliseconds.
General Linger Timer: After a server sends a final response, the server
cannot be sure that the client has received the response message. The
server should be able to retransmit the response upon receiving
retransmissions of the request for generalLingerTimer milliseconds.
(Default Value: 32000)
Provisional Timer: When a client receives a provisional response, it
continues to retransmit the request, but with an interval of provisionalTimer
milliseconds.
Cancel General No Response Timer: When sending a CANCEL request on
a General transaction, the User Agent waits
cancelGeneralNoResponseTimer milliseconds before timeout termination if
there is no response for the cancelled transaction.
Cancel Invite No Response Timer: When sending a CANCEL request on a
Invite transaction, the User Agent waits cancelInviteNoResponseTimer
milliseconds before timeout termination if there is no response for the
cancelled transaction.
General Request Timeout Timer: After sending a General request, the User
Agent waits for a final response generalRequestTimeoutTimer milliseconds
before timeout termination (in this time the User Agent retransmits the
request every T1, 2*T1,…T2,…milliseconds)
Send 487 When Recv CANCEL: When receive CANCEL form remote site,
send “487 Request canceled”or not
IP Centrex 6850 21
Page 22
Welltech Computer Co., Ltd.
Chapter 4 Service
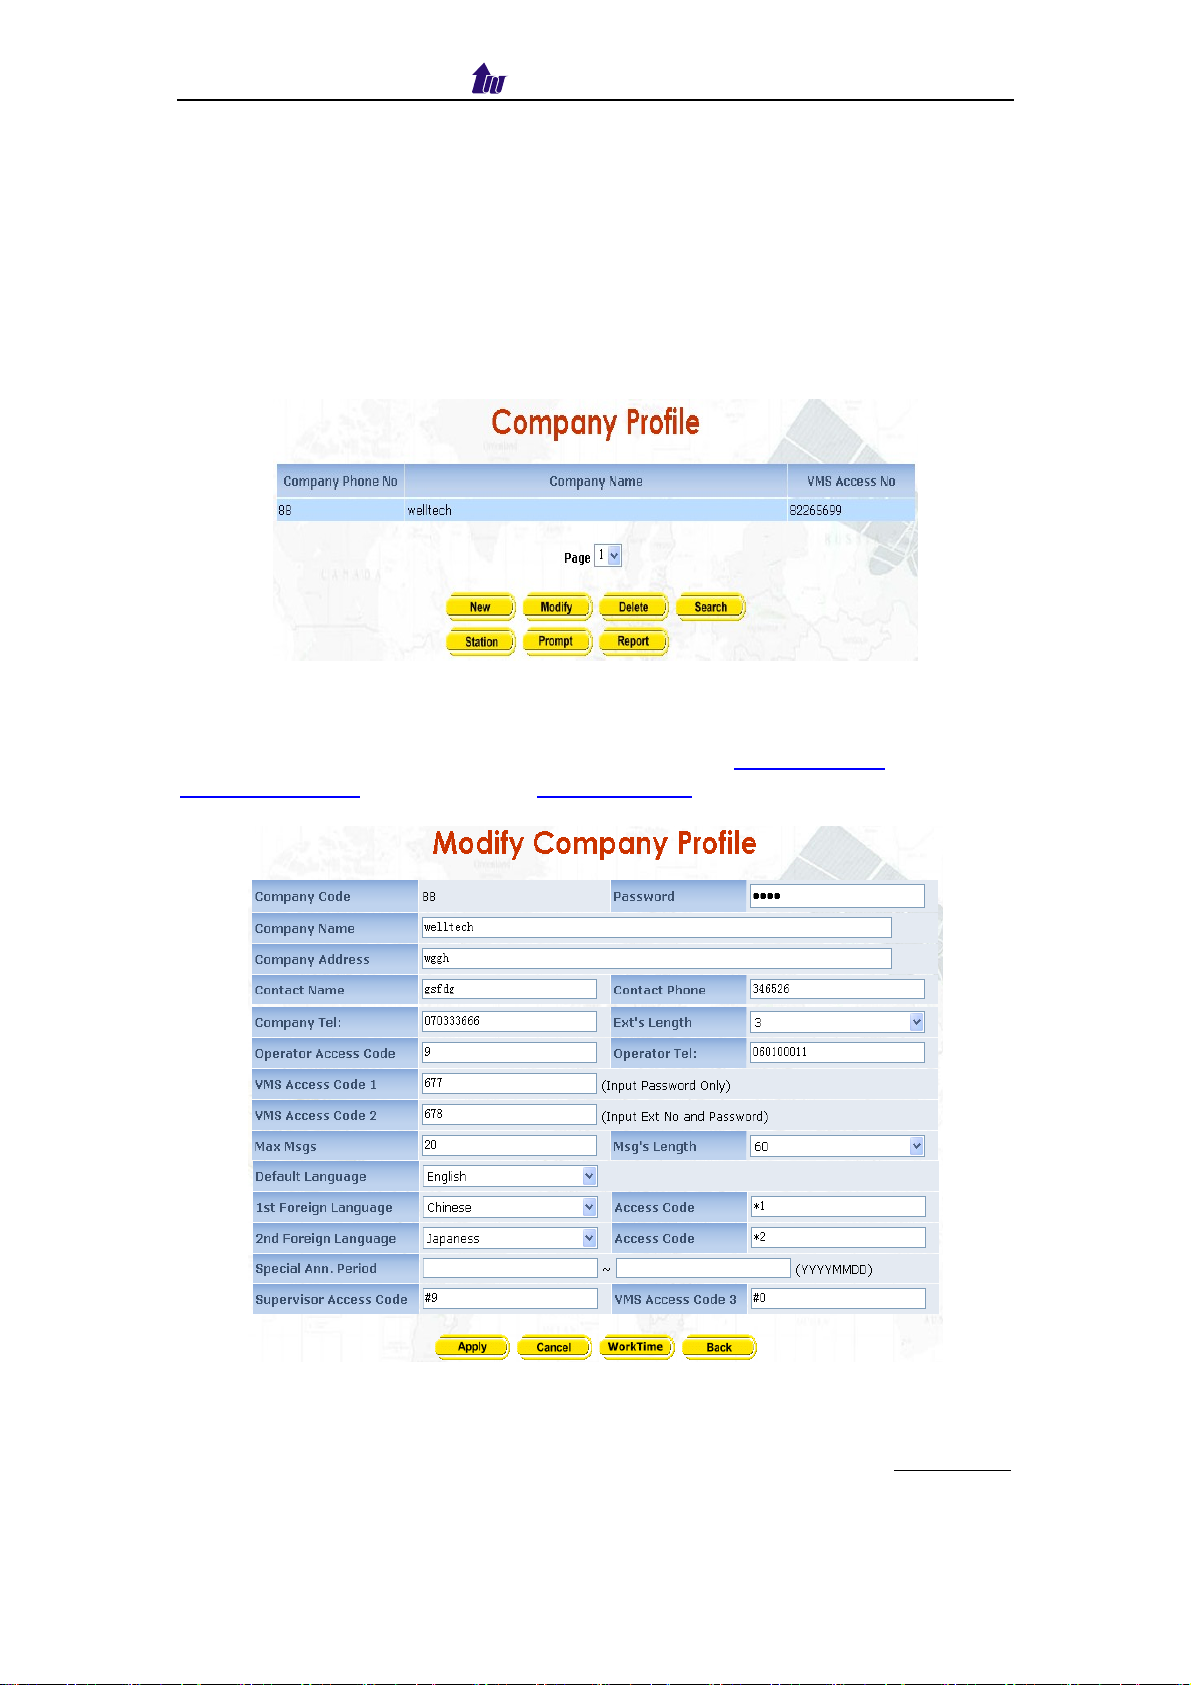
4.1 Company Profile
Welltech IP Centrex 6850 can support multiple companies.
Start Path: Service > Company Profile
Figure 4.1-1
Click Station, Prompt, Report button can check the company’s
information about the three items. Please refer to Station Profile (Page 24),
Prompt Manager (Page 36), and Report Setting (Page 30). And Click modify
button to setup Company Profile as figure 4.1-2.
Figure 4.1-2
Parameter Description:
Company Code: The Company identify code (2 digits). You need to set the
corresponding prefix call in WellSIP 6500 group. Please refer to appendix 4
Password: Administrator password. The user ID is company code.
Company Name: The company name
IP Centrex 6850 22
Page 23
Welltech Computer Co., Ltd.
Company Address: The company address
Contact Name: The company supervisor contact name
Contact Phone: The company supervisor contact phone
Company Tel: Company telephony number. It will be derived to Auto
Attendant.
Ext’s Length: The length of ext. number (def: 3)
Operator Access Code: In the call flow, this access code will be replaced by
the operation phone number. (default: 9)
Operator Tel: Operator phone number. If you need group, please setup a
hunting group in 6500.
Access VMS Code 1: Use SIP caller ID as the VMS user ID. No extension
input is required.
Access VMS Code 2: Will ask for extension number and password
authentication to access VMS.
Max Msgs: The max messages per mail box (def: 10)
Msg’s Length: The length of message (def: 30s)
Default Language: The default language
1st Foreign Language: The first foreign language
Access Code: The access code for 1st foreign language (def: *1)
2nd Foreign Language: The second foreign language
Access Code: The access code for 2nd foreign language (def: *2)
Special Ann. Period: The period to play prior announcement.
(YYYYMMDD). It can be used for holiday announcement.
Supervisor Access Code: Dial this access code in Auto Attendant flow will
allow company supervisor to management the company profile through
telephone set.
VMS Access Code 3: Dial this access in Auto Attendant flow will allow
external user to access their voice mail remotely.
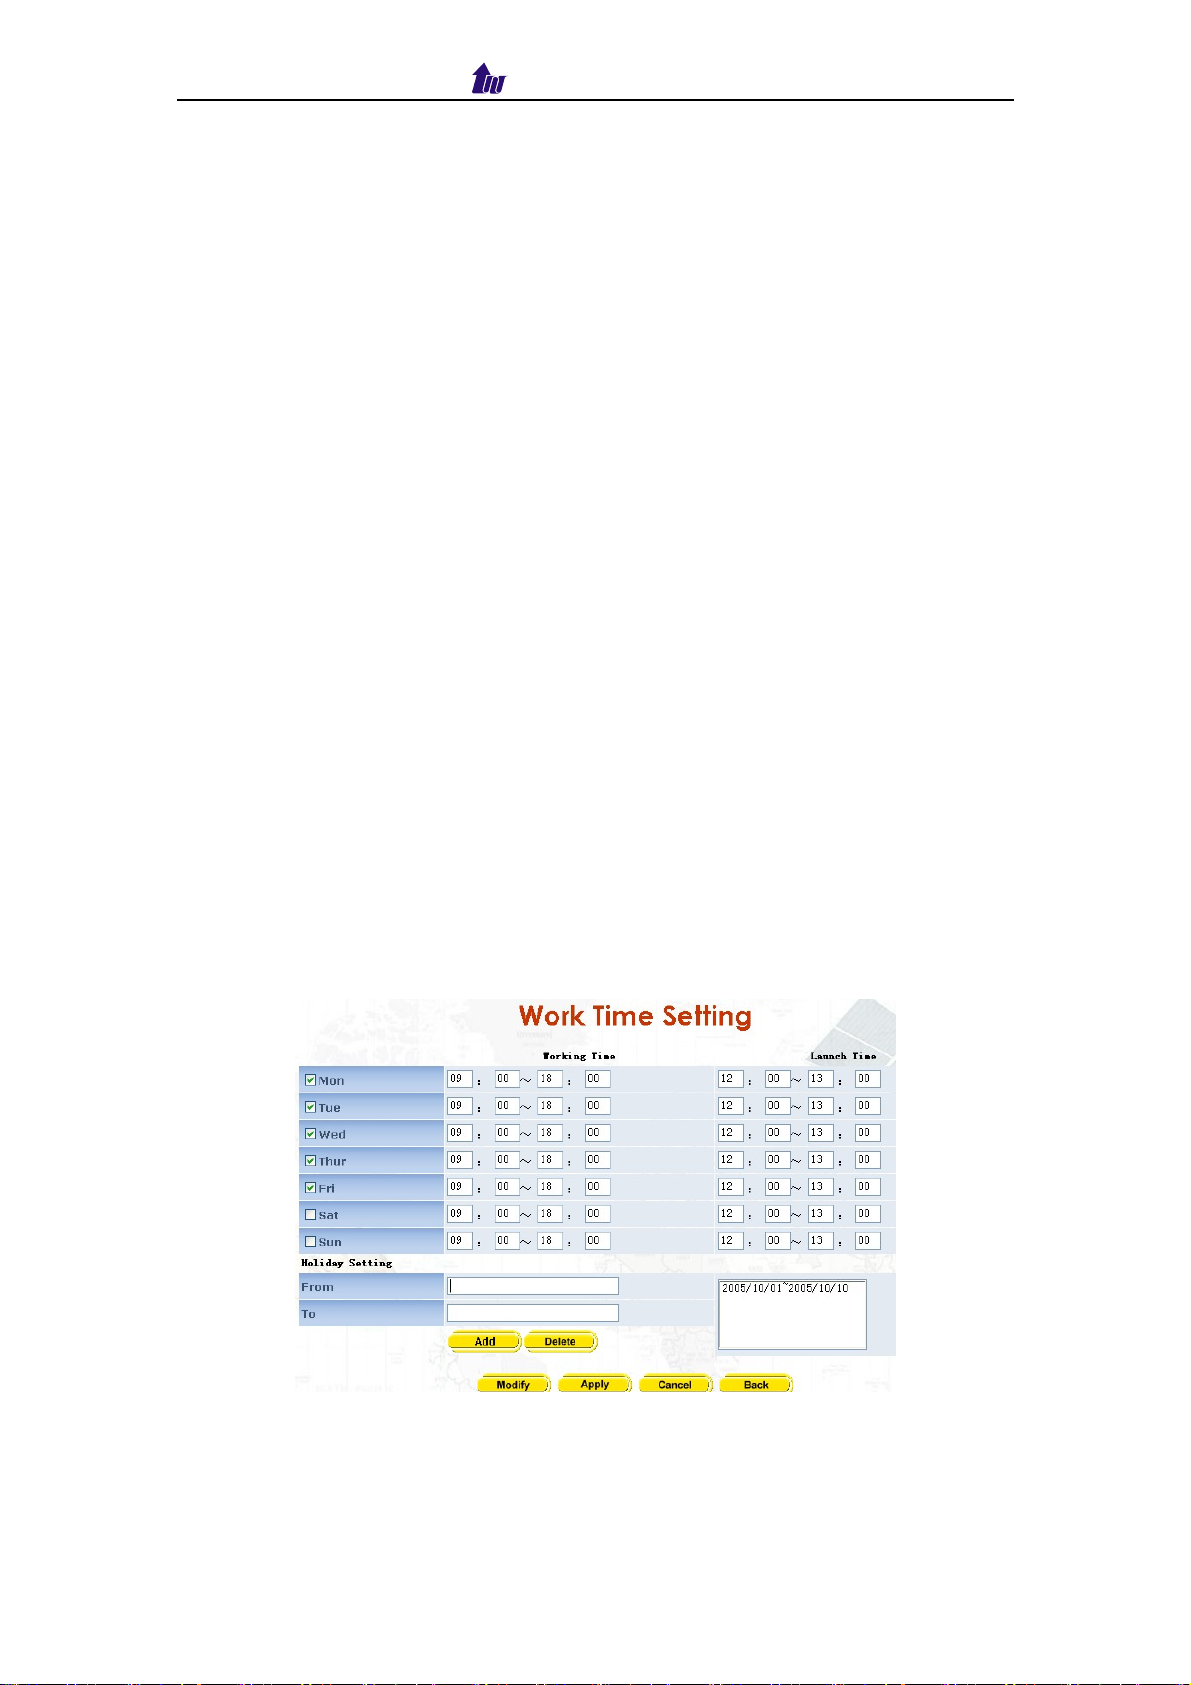
Click Work Time button, you can setup the work time, launch time and
holiday for AA service.
Figure 4.1-3
Parameter Description:
Working Time: The working time setting for a week
Launch Time: The launch time setting for a week
Holiday Setting: Add holiday period into holiday list or remove holiday from
IP Centrex 6850 23
Page 24
Welltech Computer Co., Ltd.
holiday list.
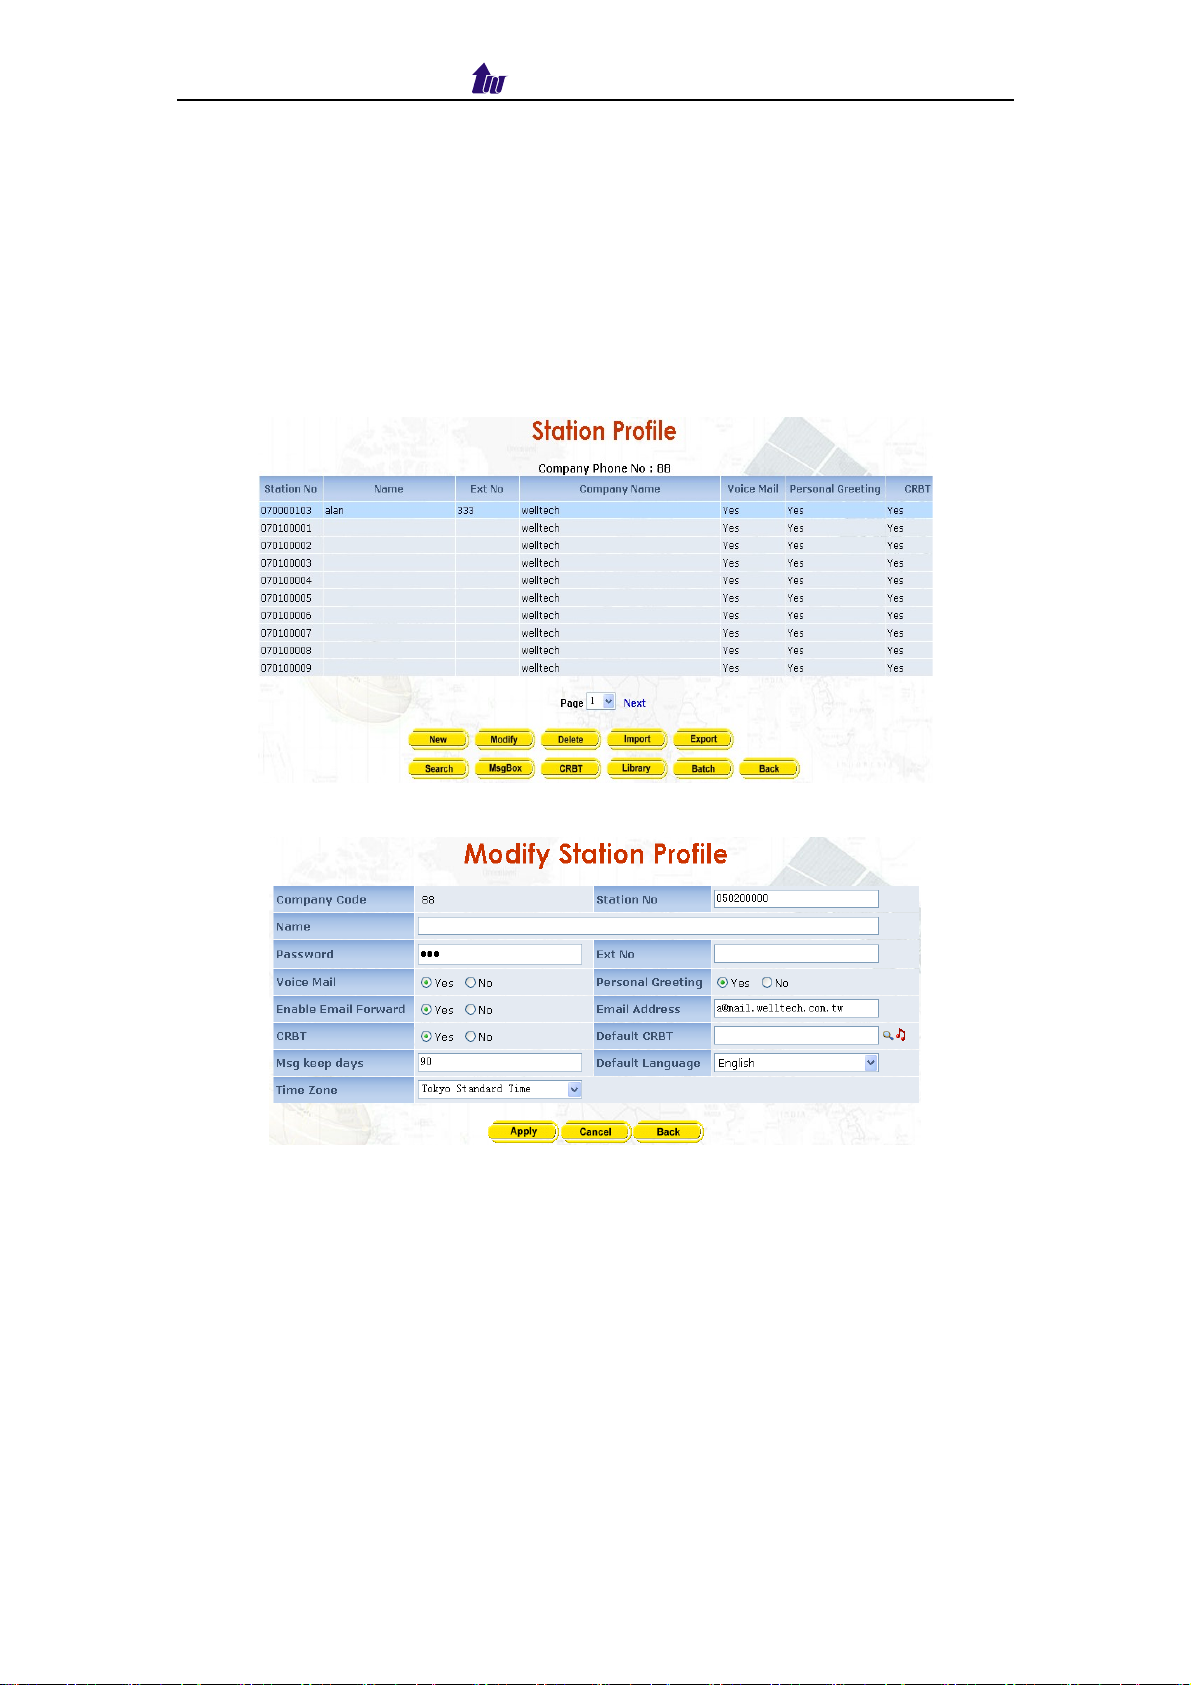
4.2 Station Profile
You can manage the company extension project here.
Start Path: Service > Station Profile
Figure 4.2-1
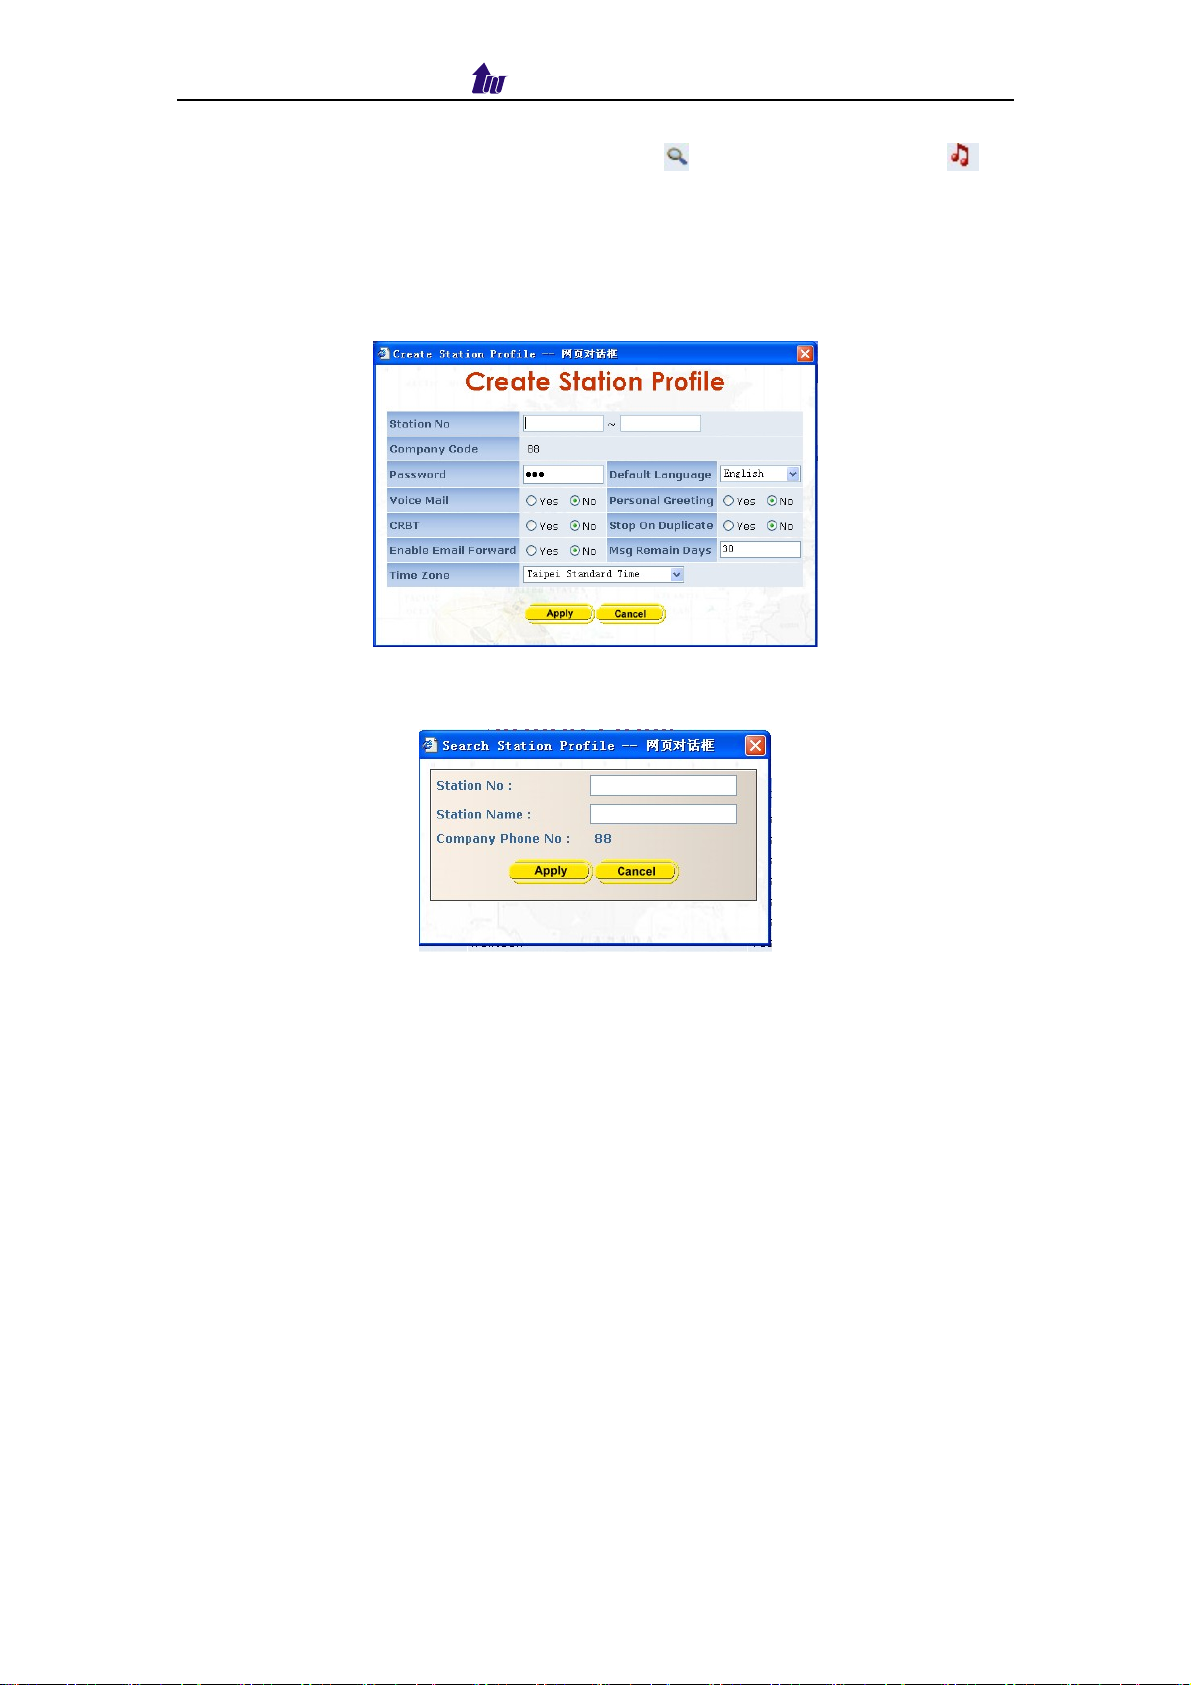
Click modify button to setup Station Profile as figure 4.2-2
Figure 4.2-2
Parameter Description:
Company Code: The company identify code
Station No: Subscriber phone number set in WellSIP 6500
Name: Description or name
Password: Station Password
Ext No: The extension number which will be used in AA or VMS. It is
recommended to make this short code to same as WellSIP 6500’s short
code.
Voice Mail: The voice mail system enable or not
Personal Greeting: Personal greeting enable or not
Enable Email Forward: Email forward enable or not
Email Address: The Email address
CRBT: Enable Coloring Ring Back Tone service
IP Centrex 6850 24
Page 25
Welltech Computer Co., Ltd.
Default CRBT: The default CRBT, click to find music ID and to
check and play music
Msg Keep Days: Message keep days for the station
Default Language: Default language, English, Chinese or Japanese
Time Zone: Time zone setting
Click on the Batch Button, you can create station by batch.
Figure 4.2-3
Click on the Search button to search the station:
Figure 4.2-4
4.3 Massage Box
Massage management can be set here.
Start Path: Service > Massage Box
IP Centrex 6850 25
Page 26

Welltech Computer Co., Ltd.
Figure 4.3-1
Parameter Description:
Station No: The station No
Message Time: The time of leaving message
From: Caller ID
State: The state of the message ,read or not
You can click Play to listen to the message on net, or click Mail to mail the
message.
4.4 Coloring Ring Back Tone (CRBT)
The CRBT service detail information has been shown here. And you can set
CRBT service for each station.
Start Path: Service > CRBT
Figure 4.4-1
Parameter Description:
Station No: The station No
Caller No: The caller telephone number used for this CRBT music
Music ID: The music ID dedicated for this caller
Music Title: The music title
IP Centrex 6850 26
Page 27

Welltech Computer Co., Ltd.
4.5 Library
The CRBT music library has been shown here.
Start Path: Service > CRBT Library Manager
Figure 4.5-1
You can click Play to listen to the CRBT over network, or click Search to
search the CRBT. Click on the Modify button:
Figure 4.5-2
Parameter Description:
Music ID: The music ID
Title: The music title
Artist: The artist
Album Title: The album title
Publisher: The publisher
Source: The source of music (Client, Service Provider or Music Company)
Music File: Upload another music file from your local disk
4.6 Announcement Manager
The mapped reason code Announcement information has been shown here.
Start Path: Service > Announcement Manager
IP Centrex 6850 27
Page 28

Welltech Computer Co., Ltd.
Figure 4.6-1
You can click Play to listen to the Announce here. Click on the Modify button:
Figure 4.6-2
Parameter Description:
ID: The announce ID
Description: The announce description
1st an 2nd Language File: Upload the announce file from your local disk for
this reason code
4.7 Channel Manager
Channels mapping have been shown here. You can use the channel manager
to decide the resource running for each company or service.
Start Path: Service > Channel Manager
IP Centrex 6850 28
Page 29

Welltech Computer Co., Ltd.
Figure 4.7-1
Parameter Description:
State: The channel state, enable or not
Channel: The channel number
Time: The operation time for the channel
Flow Name: The flow name on the channel
Status: The concurrent status of the state, stopped, loaded or ready
Right click on one channel, and then you will see the figure as follow:
Figure 4.7-2
Choose the company and its call flow in boldface you want to check and apply
it, the channel status will show as Loaded. Go on right clicking on the channel,
click Run and the status will show as Ready. If you want to stop it, also just
right click on the channel and choose Stop. You can also operation all the
channels by clicking Control.
IP Centrex 6850 29
Page 30

Welltech Computer Co., Ltd.
4.8 Config Manager
IP Centrex provides system backup management here.
Start Path: Service > Config Manager
Figure 4.8-1
The Index 7-10 is used internally daily backup. Index 1-3 can be used by
Administrator to backup when need. Click Load button to use the backup to
recover the system. And you need to soft-reset or restart to take effective. If
you want to backup the system anytime, click on the Save button.
4.9 Report
IP Centrex 6850 supports complimentary reports for Administrator to manage
their traffic.
Start Path: Service > Report Setting
Figure 4.9-1
Parameter Description:
Report Type: The report type to be selected
♦ CDR: Call Detail Record
IP Centrex 6850 30
Page 31

Welltech Computer Co., Ltd.
Figure 4.9-2
Description:
Caller ID: The caller ID
Callee ID: The called ID
Start Time: The start time for the call
End Time: The end time for the call
Duration: The duration for the call
Company Name: The company name
Chan No: The channel No for the call
Flow Name: The flow name
♦ Daily Statistic Report: The daily report by channel or by call flow
Figure 4.9-3
Figure 4.9-4
♦ Monthly Statistic Report: The monthly report by channel or by flow
Figure 4.9-5
Figure 4.9-6
Report Timeframe: The report time setting to be query
Other:
IP Centrex 6850 31
Page 32

Welltech Computer Co., Ltd.
− Company: Report can be mapped by company
− By channel: Daily and Monthly report can be sorted by channel
− By call flow: Daily and Monthly report can be sorted by call flow
IP Centrex 6850 32
Page 33

Welltech Computer Co., Ltd.
Chapter 5 System Monitor
5.1 Event Log
Start Path: Monitor > Event Log
Figure 5.1-1
Field Description:
Type: Event Log type
− Information
− Warring
− Error
Date: Event created date
Time: Event created time
Source: Executable program
Event ID: Event Log
Double click the log or select the log and click detail to see the log detail.
Figure 5.1-2
Event Description:
Event
Source Type Description
ID
9500 IVRMGR Information
8000 IVRMGR Error
IP Centrex 6850 33
IVRMGR Sip proxy Registed,Proxy
IVRMGR Failed to Register to Sip
proxy,reason=TERMINATED,Proxy
Ip=xxx.xxx.xxx.xxx
Page 34

Welltech Computer Co., Ltd.
Ip=xxx.xxx.xxx.xxx
8011 VMNotifier Error
8012 VMNotifier Error
9501 IVRRunner Information
Connect SMTP Server Fail(xxx.xxx.xxx.xxx)
RUNNER: Service Started, Channel
Connect DB Server Fail
Count=120
9510 VMNotifier Information VMNotifier
Started[Version=X.X.X]
9511 VMNotifier Information
9512 VMNotifier Information
Connect DB Server Success
Connect SMTP Server
Success(xxx.xxx.xxx.xxx)”
9520 AutoBackup Information AutoBackup
Started[Version=X.X.X]
9530 Report Information Report Started[Version=X.X.X]
9540 MWI Notifier Information MWI Notifier
Started[Version=X.X.X]
9550 MWI Proxy Information MWI Proxy
Started[Version=X.X.X]
5.2 Debug Information
Start Path: Monitor > Debug Info
Figure 5.2-1
Filed Description:
Get Log: Get previous debug log (0 for none) by Back To field
Search: Search debug logs
IP Centrex 6850 34
Page 35

Welltech Computer Co., Ltd.
Clear: Clear log
5.3 Ping
Start Path: Monitor > Ping
You can use the Ping to check an IP is active or not. Enter Target IP or Host
Name and click Ping button, and then the screen will show the ping
information as figure 5.3-1
Figure 5.3-1
Field Description:
Host IP Address: The IP address to ping
IP Centrex 6850 35
Page 36

Welltech Computer Co., Ltd.
Chapter 6 System Control
6.1 System
Start Path: Control > System
Figure 6.1-1
Parameter Description:
Soft Reset: Soft reset the system
Restart: Restart the system
Shutdown: Shutdown the system
System Time and Network please refer to System Time (Page 11), Network
(Page 9).
6.2 Prompt Manager
Start Path: Control > Prompt Manager
Figure 6.2-1
Description:
Stop, Pause, Play: Click Stop or Pause button to stop record, and
click Play button to listen the voice prompt.
IP Centrex 6850 36
Page 37

Welltech Computer Co., Ltd.
Save: Click Save button to saving the voice. Save the file to a new name
can be use Save As ( )
Save Remote File: Click Save Remote File to saving the voice file to
remote server. Save the file to a new name can be use Save Remote File As
( )
Open Remote File: Click Open Remote File button to open voice file
Open: Click Open button to open local host voice file
Close: Click Close button to close the voice file
Copy: Select the desired voice range and click Copy button
Paste: Click Paste button to paste the voice range
Cut: Select the desired voice range and click Cut button
Undo: Click Undo button to return modification
Redo: Refer Section “Undo”
Zoom Zoom in Zoom Out: Select the desired voice range click
Zoom button, it will show the zoom out voice file range
Delete Remote file: Click Delete Remote file button to delete remote
voice file.
6.3 Account Management
Start Path: Control > Account Management
Figure 6.3-1
Field Description:
User ID: Login User ID
Password: Login Password
6.4 File Manager
Start Path: Control > File Manager
IP Centrex 6850 37
Page 38

Welltech Computer Co., Ltd.
Figure 6.4-1
Toolbar Description:
Commands:
− To download file from IP Centrex, click Commands→Download. Or
right click the download file and select Download.
− When download is started, a progress box will be display to indicate the
download result. Download As can be used for saving into a new file.
− To upload the file, click Commands→Upload. Or right click the upload
file and select Upload
− When upload is started, a progress box will be display to indicate the
upload result. Upload As can be used for saving into a new file.
− To delete the file, click Commands→Delete (Or right click the file and
select Delete ).
− To add a new folder, click Commands→New Folder ( Or right click the
file and select New Folder ).
: Refresh File Manager
: Toggle on/off the gridlines
6.5 Upgrade
Start Path: Control > Upgrade
Welltech IP Centrex provide upgrade new version at remote side. You can
upgrade it from Welltech technical support web page by yourself.
IP Centrex 6850 38
Page 39

Welltech Computer Co., Ltd.
Figure 6.5-1
Field Description:
File Name: Upload the software file name
Upload: Remote Upload the software at IP Centrex 6850
6.6 Relogin
Start Path: Control > Relogin
Click Control > Relogin to relogon by another user account as figure 6.6-1
Figure 6.6-1
IP Centrex 6850 39
Page 40

Welltech Computer Co., Ltd.
Chapter 7 Company Administrator Operation
This Chapter is dedicated for Company Administrator operation. It has limited
access compared to System Administrator. After enter company ID and
password, the screen shows the Home Page as figure 7.1-1 which is different
from the Home Page of system administrator logon.
Figure 7.1-1
Control > Relogin please refer to Relogin (Page 39)
Modify:
Click on the Modify button
Figure 7.1-2
Company Administrator can modify its information here, please refer to
Company Profile (Page 22)
IP Centrex 6850 40
Page 41

Welltech Computer Co., Ltd.
Station:
Company administrator can only manage those stations belonged to him.
Figure 7.1-3
Please refer to Station Profile
(Page 24)
Prompt:
Figure 7.1-4
Company Administrator can manage prompt, please refer to Prompt Manager
(Page 36)
Report:
Figure 7.1-5
IP Centrex 6850 41
Page 42

Welltech Computer Co., Ltd.
Company Administrator can check its call log, daily and monthly report.
Parameter description please refer to Report (Page 30)
IP Centrex 6850 42
Page 43

Welltech Computer Co., Ltd.
Chapter 8 Station Subscriber Operation
Station subscriber can login the web entering its user name and password
Figure 8.1-1
Modify:
Click on the modify button, subscriber can modify his information.
Figure 8.1-2
Please refer to Station Profile (Page 24)
Message Box:
Subscriber can listen to his message here.
Figure 8.1-3
Please refer to Massage Box (Page 25)
CRBT:
Subscriber can modify CRBT settings here.
IP Centrex 6850 43
Page 44

Welltech Computer Co., Ltd.
Figure 8.1-4
Please refer to CRBT (Page 26)
Library:
Here subscriber can query his CRBT library.
Figure 8.1-5
Please refer to Library (Page 27)
IP Centrex 6850 44
Page 45

Welltech Computer Co., Ltd.
Chapter 9 Telnet & RS-232 Configuration
IP Centrex 6850 also can support to be managed by Telnet or Console
port (RS-232) for basic operations.
Interface:
Network:TCP/IP Telnet (i.e. telnet 192.168.111.161 10086)
RS232:
- Connect using: COM1
- Baud Rate:9600
- Data bits:8
- Parity:None
- Stop bits:1
- Flow Control: None
- Wire: Null modem line (crossed)
Logon IP Centrex 6850 by Telnet
Use Windows build-in Hyper Terminal or other telnet terminal emulator
to login (e.g. telnet 192.168.67.1:10086). User ID & password will be required
for login (default login user id: admin, password: admin & user id: root,
password: root).
Command List:
Command Description
echo Auto echo on or off
eventlog Clean or show system log message
exit Quit the current session
ipconfig Configure or show network1,2 information
ping Check an IP address is available or not
reboot Reboot
reset Soft-reset
shutdown Shutdown
time Reset or show system time.
timezone Setup or show system timezone
useradmin Manage user account.
Help &? View command list
Echo: auto echo on or not
Command
Purpose
[Root#] echo? Usage: echo on/off
Example: echo on
[root#]echo on Echo is on
[root#]echo off Echo is off (default ralue)
IP Centrex 6850 45
Page 46

Welltech Computer Co., Ltd.
Eventlog: show system log message
Command Purpose
[Root#]eventlog ? Usage: eventlog [-clear]
Example: eventlog
eventlog -clear
[root#]eventlog
Show system eventlog:
Eventlog example:
Time: 2003-06-19 20:15:17
Event ID: 8700
Type: Warning
Source : wellgate5x00
Description: [0]: evt: TRUNK ALARM: TrunkId=3
Time: 2003-06-19 20:15:17
Event ID: 8700
Type: Warning
Source : wellgate5x00
Description: [0]: evt: TRUNK ALARM: TrunkId=2
Time: 2003-06-19 20:15:14
Event ID: 9501
Type: Information
Source : wellgate5x00
Description: [0]: evt: BOARD STARTED: SLOT:8
Press any key to continue or press 'Q' to quit
[root#]eventlog
Clear all event log
-clear
Exit: Quit the current session
Command Purpose
[root#]exit Quit the current session
Ipconfig: Configuration or show network information
Command Purpose
[Root#] ipconfig? Usage: ipconfig [-network boardno][-delete dns] [-dhcp]
[-dns IPAddress1 IPAddress2 ] [-ip IPAddress -mask
Mask -gateway Gateway]
Example:
ipconfig -network 1 -ip 192.168.67. 1 -mask
255.255.0.0 -gateway 192.168.5.254
ipconfig -network 1 -dhcp
ipconfig -network 1 -dns 192.168.1.1
ipconfig -network 1 -delete dns
[root#]ipconfig
Show current network configuration
[Network 1] Local Area Connection
USE FIXED IP (or DHCP)
IP Address : 192.168.5.7
IP Centrex 6850 46
Page 47

Welltech Computer Co., Ltd.
Subnet Mask : 255.255.0.0
DefaultGateway : 192.168.5.254
DNS Servers :
[Network 2] Local Area Connection 2
USE FIXED IP
IP Address : 192.168.5.8
Subnet Mask : 255.255.0.0
Default Gateway :
DNS Servers :
[root#]ipconfig
network 1 –delete
dns
Delete the DNS servers setting
[Network 1] Local Area Connection
USE FIXED IP
IP Address : 192.168.5.113
Subnet Mask : 255.255.0.0
Default Gateway : 192.168.1.254
DNS Servers :
[root#]ipconfig
network 1–dhcp
Enable DHCP
[Network 1] Local Area Connection
USE DHCP
IP Address : 192.168.5.10
Subnet Mask : 255.255.0.0
Default Gateway : 192.168.1.254
DNS Servers : 192.168.5.1
168.95.1.1
[root#]ipconfig
network 1–ip
61.220.126 28
–mask
255.255.0.224
–gateway
61.220.126.1
[root#]ipconfig
network 1–ip
61.220.126.115
Use fixed network configuration
[Network 1] Local Area Connection
USE FIXED IP
IP Address : 61.220.126.28
Subnet Mask : 255.255.255.1
Default Gateway : 61.220.126.254
DNS Servers :
Changes IP address only.
[Network 1] Local Area Connection
USE FIXED IP
IP Address : 61.220.126.115
Subnet Mask : 255.255.255.1
Default Gateway : 61.220.126.254
DNS Servers :
[root#]ipconfig
network 1–dns
210.59.126.53
Changes DNS configuration only.
[Network 1] Local Area Connection
USE FIXED IP
IP Address : 61.220.126.115
Subnet Mask : 255.255.255.1
Default Gateway : 61.220.126.254
DNS Servers : 210.59.126.53
Ping: Check an IP address is available or not
Command Purpose
[Root#] ping? Usage: ping IP
Example: ping 127.0.0.1
IP Centrex 6850 47
Page 48

Welltech Computer Co., Ltd.
[root#]ping
61.220.126.1
Ping result
Reply from 61.220.126.1 bytes=64 time=1ms TTL=29
Reply from 61.220.126.1 bytes=64 time=1ms TTL=29
Reply from 61.220.126.1 bytes=64 time=1ms TTL=29
Reply from 61.220.126.1 bytes=64 time=1ms TTL=29
Reboot:
Command Purpose
[Root#] reboot?
Reboot System
Are You Sure? (Y/N)
[root#]reboot
Are You Sure?(Y/N)y
IP Centrex 6850 are rebooting
Shutdown:
Command Purpose
[Root#] shutdown?
Shutdown System
Are You Sure? (Y/N)
[root#]shutdown
Are You Sure?(Y/N)y
IP Centrex 6850 are shutting down
Reset:
Command Purpose
[Root#] reset?
Soft reset System
Are You Sure? (Y/N)
[root#]reset
Are You Sure?(Y/N)y
Time: Reset or show system time
Command Purpose
[Root#] time? Usage : time YYYY-MM-DD HH:NN:SS
Example : Time 2002-01-01 12:00:00
[root#]time
[root#]time 2003-07-29
Show current time
The current time is 2003-06-20 15:17:30
Change system bios time
23:14:53
IP Centrex 6850 48
Page 49

Welltech Computer Co., Ltd.
Useradmin: Manager User account
Command Purpose
[Root#] useradmin? Usage: useradmin [-add User] [-delete User]
[-password User]
Example: useradmin -add Irene
[root#]useradmin
[root#]useradmin -list
Show the current login user account
root
Show the current user account list
Admin
Root
Irene
[root#] useradmin -add Irene
Add the new user account: Irene
Password : Irene
Confirm : Irene
Add user Success.
[root#] useradmin -delete
Delete the user: 1111
1111
Are You Sure?(Y/N)y
[root#] useradmin -password
Change the user: root’s password.
root
New Password : 1234
Confirm : 1234
IP Centrex 6850 49
Page 50

Welltech Computer Co., Ltd.
Chapter 10 LCD Display Configuration
IP Centrex 6850 provides a front panel LCD for basic operations.
Button List:
Button List Description
When the IP Centrex 6850 is ready, the LCD screen
shows as blow
Ready |
04-03-03
16:40
Press Enter to select command
Enter
Event Log
IP Config
ESC Quit the current command
▲ Up or previous edit mode
▼ Next or previous edit mode
Command Tree:
Main Menu
Event Log
Show system log message
IP Config
Network 1
Network 2
Reboot
Reset
PWD
Soft
Reset
No
Shut
Down
Yes
No
Yes
No
Yes
No
Yes
Show IP Info
Use DHCP
Use
Fixed IP
IP Centrex 6850 50
Page 51

Welltech Computer Co., Ltd.
Event Log:
Configure LCD Display
▲ Previous event log
▼ Next event log
Enter Show detail event log
▲ Previous line
▼ Next line
ESC Quit detail event log viewing
ESC Quit to main menu
IP Config:
Configure LCD Display
▲ Select Network1 or Network2 configuration
▼ Select Network1 or Network2 configuration
Enter Configure Network1 or Network2
▲ Select Network configuration
▼ Select Network configuration
Enter Configure Network
▲ Increase the digit apply to network setting
▼ Decrease the digit apply to network setting
Enter Apply change to network information
ESC Quit network setting
ESC Quit to main menu
Reboot:
Configure LCD Display
▲ Select Reboot or not
▼ Select Reboot or not
Enter Reset user: root’s (or admin) user password
ESC Quit Reboot configure
ESC Quit to main menu
Reset:
Configure LCD Display
▲ Select user to change password
▼ Select user to change password
Enter Change user password
▲
▼
Increase the alphabet apply to user password
setting
Decrease the alphabet apply to user password
setting
ESC Quit Reset configure
ESC Quit to main menu
Soft Reset:
Configure LCD Display
▲ Select Reset or not
▼ Select Reset or not
IP Centrex 6850 51
Page 52

Welltech Computer Co., Ltd.
Enter Reset or not
ESC Quit Reset configure
ESC Quit to main menu
Shutdown:
Configure LCD Display
▲ Select Shutdown or not
▼ Select Shutdown or not
Enter Shutdown or not
ESC Quit Shutdown configure
ESC Quit to main menu
IP Centrex 6850 52
Page 53

Welltech Computer Co., Ltd.
Appendix 1 Time zone to Country Mapping List
Greenwich Mean Time & Country List Time Zone
(GMT-12:00) International Date Line West 21. Dateline Standard Time
(GMT-11:00) Midway Island, Samoa 58. Samoa Standard Time
(GMT-10:00) Hawaii 35. Hawaiian Standard Time
(GMT-09:00) Alaska 02. Alaskan Standard Time
(GMT-08:00) Pacific Time (US & Canada);
Tijuana
(GMT-07:00) Mountain Time (US & Canada) 43. Mountain Standard Time
(GMT-07:00) Chihuahua, La Paz, Mazatlan 41. Mexico Standard Time 2
(GMT-07:00) Arizona 68. US Mountain Standard Time
(GMT-06:00) Saskatchewan 10. Canada Central Standard Time
(GMT-06:00) Guadalajara, Mexico City,
Monterrey
(GMT-06:00) Central Time (US & Canada) 19. Central Standard Time
(GMT-06:00) Central America 14. Central America Standard Time
(GMT-05:00) Indiana (East) 67. US Eastern Standard Time
(GMT-05:00) Eastern Time (US & Canada) 26. Eastern Standard Time
(GMT-05:00) Bogota, Lima, Quito 56. SA Pacific Standard Time
(GMT-04:00) Santiago 51. Pacific SA Standard Time
(GMT-04:00) Caracas, La Paz 57. SA Western Standard Time
(GMT-04:00) Atlantic Time (Canada) 06. Atlantic Standard Time
(GMT-03:30) Newfoundland 48. Newfoundland Standard Time
(GMT-03:00) Greenland 32. Greenland Standard Time
(GMT-03:00) Buenos Aires, Georgetown 55. SA Eastern Standard Time
(GMT-03:00) Brasilia
(GMT-02:00) Mid-Atlantic 42. Mid-Atlantic Standard Time
(GMT-01:00) Cape Verde Is. 11. Cape Verde Standard Time
(GMT-01:00) Azores 09. Azores Standard Time
(GMT) Greenwich Mean Time: Dublin,
Edinburgh, Lisbon, London
(GMT) Casablanca, Monrovia 33. Greenwich Standard Time
(GMT+01:00) West Central Africa
(GMT+01:00) Sarajevo, Skopje, Warsaw,
Zagreb
(GMT+01:00) Brussels, Copenhagen, Madrid,
Paris
(GMT+01:00) Belgrade, Bratislava, Budapest,
Ljubljana, Prague
(GMT+01:00) Amsterdam, Berlin, Bern, Rome,
Stockholm, Vienna
(GMT+02:00) Jerusalem 38. Israel Standard Time
(GMT+02:00) Helsinki, Kyiv, Riga, Sofia,
Tallinn, Vilnius
(GMT+02:00) Harare, Pretoria 61. South Africa Standard Time
(GMT+02:00) Cairo 27. Egypt Standard Time
(GMT+02:00) Bucharest 24. E. Europe Standard Time
52. Pacific Standard Time
40. Mexico Standard Time
25. E. South America Standard
Time
31. GMT Standard Time
71. W. Central Africa Standard
Time
17. Central European Standard
Time
53. Romance Standard Time
16. Central Europe Standard Time
72. W. Europe Standard Time
30. FLE Standard Time
IP Centrex 6850 53
Page 54

Welltech Computer Co., Ltd.
(GMT+02:00) Athens, Istanbul, Minsk 34. GTB Standard Time
(GMT+03:00) Nairobi 22. E. Africa Standard Time
(GMT+03:00) Moscow, St. Petersburg,
Volgograd
54. Russian Standard Time
(GMT+03:00) Kuwait, Riyadh 03. Arab Standard Time
(GMT+03:00) Baghdad 05. Arabic Standard Time
(GMT+03:30) Tehran 37. Iran Standard Time
(GMT+04:00) Baku, Tbilisi, Yerevan 12. Caucasus Standard Time
(GMT+04:00) Abu Dhabi, Muscat 04. Arabian Standard Time
(GMT+04:30) Kabul 01. Afghanistan Standard Time
(GMT+05:00) Islamabad, Karachi, Tashkent 73. West Asia Standard Time
(GMT+05:00) Ekaterinburg 28. Ekaterinburg Standard Time
(GMT+05:30) Chennai, Kolkata, Mumbai, New
Delhi
36. India Standard Time
(GMT+05:45) Kathmandu 46. Nepal Standard Time
(GMT+06:00) Sri Jayawardenepura 62. Sri Lanka Standard Time
(GMT+06:00) Astana, Dhaka 15. Central Asia Standard Time
(GMT+06:00) Almaty, Novosibirsk 45. N. Central Asia Standard Time
(GMT+06:30) Rangoon 44. Myanmar Standard Time
(GMT+07:00) Krasnoyarsk 50. North Asia Standard Time
(GMT+07:00) Bangkok, Hanoi, Jakarta 59. SE Asia Standard Time
(GMT+08:00) Taipei 63. Taipei Standard Time
(GMT+08:00) Perth 70. W. Australia Standard Time
(GMT+08:00) Kuala Lumpur, Singapore 60. Singapore Standard Time
(GMT+08:00) Irkutsk, Ulaan Bataar 49. North Asia East Standard Time
(GMT+08:00) Beijing, Chongqing, Hong Kong,
Urumqi
20. China Standard Time
(GMT+09:00) Yakutsk 75. Yakutsk Standard Time
(GMT+09:00) Seoul 39. Korea Standard Time
(GMT+09:00) Osaka, Sapporo, Tokyo 65. Tokyo Standard Time
(GMT+09:30) Darwin 07. AUS Central Standard Time
(GMT+09:30) Adelaide 13. Cen. Australia Standard Time
(GMT+10:00) Vladivostok 69. Vladivostok Standard Time
(GMT+10:00) Hobart 64. Tasmania Standard Time
(GMT+10:00) Guam, Port Moresby 74. West Pacific Standard Time
(GMT+10:00) Canberra, Melbourne, Sydney 08. AUS Eastern Standard Time
(GMT+10:00) Brisbane 23. E. Australia Standard Tim
(GMT+11:00) Magadan, Solomon Is., New
Caledonia
18. Central Pacific Standard Time
(GMT+12:00) Fiji, KamChapterka, Marshall Is. 29. Fiji Standard Time
(GMT+12:00) Auckland, Wellington 47. New Zealand Standard Time
(GMT+13:00) Nuku'alofa 66. Tonga Standard Time
IP Centrex 6850 54
Page 55

Welltech Computer Co., Ltd.
Appendix 2 System Voice File
0001 Thank you for calling Welltech. Please dial extension number or 9 for
operator.中文服務請按*1
0002 Thank you for calling Welltech. Now is launch time, please dial extension
number or 9 for operator.中文服務請按*1
0003 Thank you for calling Welltech. Now is off duty, please dial extension number
or 9 for operator.中文服務請按*1
0004 Prior Announcement
0010 Sorry, this extension number does not exist.
0011 Please try later.
0020 Please wait.
0021 Sorry, the operator is busy.
0030 Please wait.
0031 The extension you dialed is busy.
0032 The extension you dialed is no answer.
0033 Please dial other extension number or 9 for operator. To leave message, press
star.
0040 The extension you dialed is busy.
0041 The extension you dialed is no answer.
0042 Please dial other extension number or 9 for operator. To leave message, press
star.
0050 This is voice mail system. Please leave your message after beep. To skip
prompt press star.
0051 Mail Box is full. Thanks for your calling.
0052 The number is busy.
0053 The number is no answer.
0060 Please input password, then press # (pound).
0061 Please press 1 to record voice file, 2 to change password
0070 Please input voice announcement code, the first digit is language code. 0 for
default, 1 for first foreign language, and so on. Last 4 digits is announcement
file code.
0071 The current announcement is
0072 The file does not exist.
0073 The file had been changed.
1000 Please input mailbox number, then press pound.
1001 Input error! Thanks for your calling. Please try later.
1002 Please input your password, then press pound.
1003 Please press 1 to listen message, 2 to change personal greeting, 3 to change
password
1004 You have stayed too long. Thanks for your calling. Please try later.
IP Centrex 6850 55
Page 56

Welltech Computer Co., Ltd.
1005 Please input telephone phone number, then press pound.
1006 Please input mailbox number, then press pound.
1010 You have no message.
1011 You have
1012 record
1013 New message.
1014 Old message.
1015 Please press 1 to replay 2 to next message,3 to delete message,9 to return to
main menu
1016 All messages had been played.
1017 Please press 1 to listen message, 2 to delete all message, 9 to return to main
menu.
1020 Please press 1 to record the greeting, 2 to delete the greeting
1021 Personal greeting had been deleted.
1022 Please leave your message after beep and press pound when finish.
1023 correct press 1, re-record press 2
1024 The greeting had been changed.
1030 Please input new password and press pound.
1031 Please input new password again and press pound.
1032 The password had been changed.
2101 The number is busy.
2102 The number is no answer.
2103 The number does not exist.
2104 The number is not unavailable.
2105 The number is busy.
2106 The number is busy.
2107 The number is busy.
2108 System service time out, please contact your service provider.
2120 This is an invalid account.
2121 This is an invalid PIN Code.
2122 The account is in use.
2123 The account has zero balance.
2124 The account is expired.
2125 The account has over credit limit.
2126 The account has been denied.
2127 The number is busy.
IP Centrex 6850 56
Page 57

Welltech Computer Co., Ltd.
2128 You have over the max number of retries.
2129 Your balance is Insufficient to make the call.
2130 This is an invalid account. Please contact your service provider.
2131 The number had been changed to
2132 The Call will forward to
2133 Music or Announce for Call Park (Don't record)
2199 System service error. Please contact your service provider.
4001~4012 January ~ December
4101~4131 First,Second,third,4th,5th,….31st(For Date)
4140 Today
4141 Yesterday
4200~4223 zero ~ eleven(For Time-hour)
4300~4359 zero,o1,o2,…o9,10~59(For Time-minute)
4360 AM
4361 PM
5000~5050 0~50
9994 Input error.
9995 You are not a subscriber; please contact your service provider.
9996 System internal error, please contact your service provider.
9997 (Ring Back Tone)
9998 Your profile does not exist; please contact your service provider.
9999 System internal error, please contact your service provider.
IP Centrex 6850 57
Page 58

Welltech Computer Co., Ltd.
Appendix 3 Local Disk Directory Structure
E: \ Root of Raid Hard Drive
\Centrex
\AA
\Personal
\Temp
\Company Code
\Template
\VM Voice message
\YYYY\MM\DD\hh\mm Sub-directory by data time
\CRBT CRBT Voice Files
\ANN System Announcement voice files
\Data Backup storage directory
\Backup The Backup of Service
\MWI Event Files of MWI Service
\MusicID three prefix
digits
System voice files of AA and AAR call
flow
Personal voice files of Announcement
Messages
Temporary files for non-company
message or record
System voice files of company AA and
VMS call flow
System Voice Template of AA and
VMS call flow
Sub-directory by prefix
IP Centrex 6850 58
Page 59

Welltech Computer Co., Ltd.
Appendix 4 How to Config SIP Proxy (6500)
IP Centrex 6850 needs to work with WellSIP 6500 to provide the
enhanced service. It is recommended to have same company users in the
same user group. Please follow the following steps to configure WellSIP 6500.
It is recommended to have same company users in the same user group.
Step 1: Create a subscriber for IP Centrex 6850. You can use any
available Tel No here. This information will be used on 6850 SIP
settings.
Click [Subscriber] -> [Subscriber] -> [New]
TEL NO: 6850
User Account: 6850
User Group: 1 (Don’t Care)
Device Type: IVR/VMS
Click [Apply]
Step 2: Setup for AA & VMS users.
If the information of company in Centrex is as follow:
Company Profile:
Company Code: 77
Company Tel No: 060123555
VMS Access Code 1: 666
VMS Access Code 2: 667
Station Profile:
Station No: 060000001
Ext No: 601
WellSIP 6500 Procedures
(a) Create DM for the company:
Click [Digit Manipulation] -> [New]
Group ID: 77
Description:
Click [Apply]
(b) Click [Digit Manipulation] -> [77] -> [Detail] -> [New]
Match Prefix: 666
Match Target: DNIS
OP Target: DNIS
Start Position: 0
Stop Position: 0
Replace Value: 772 (Company Code+2)
Click [Apply]
(c)Click [Digit Manipulation] -> [77] -> [Detail] -> [New]
Match Prefix: 667
Match Target: DNIS
IP Centrex 6850 59
Page 60

Welltech Computer Co., Ltd.
OP Target: DNIS
Start Position: 0
Stop Position: 0
Replace Value: 772 (Company Code+2)
Click [Apply]
(d) You need to add the IP Centrex 6850 in detail in order to route the
call correctly.
Click [Prefix Routing] -> [New]
Prefix Matched: 77 (Company Code)
Description:
Matched Length: 0
Matched User Group: 77
Hunting Method: Round Robin
No Answer Timeout: 0
First Response Timeout: 0
Remove Prefix: Disable
Click [Apply]
(e) Add the User Group of new company and assign the group ID to
those company subscribers in 6500.
Click [Subscriber] -> [Group] -> [New]
User Group ID: 77 (Company Code)
Dm Group ID: 0
Description:
SMTP Host IP: ¯
Miss Call Subject: ¯
CRBT Prefix: ¯
Announcement Prefix: ¯
VMS Prefix: 771
Click [Apply]
(f) Create company representative telephone number for the company.
Click [Subscriber] -> [Subscriber] -> [New]
TEL NO: 060123555
User Account: 060123555
User Group: 77
Device Type: Subscriber
Click [Apply]
(g) Setup the virtual company telephony to IP Centrex 6850 by using
unconditional forward.
Click [Subscriber] -> [Subscriber] -> [060123555] -> [Modify] ->
[Service]
V Unconditional:
Unconditional URI: 771060123555
(Company Code + 1 + Company Tel No)
Click [Apply]
IP Centrex 6850 60
Page 61

Welltech Computer Co., Ltd.
Setup [Forward Caller ID] for correct ANI number.
Click [System] -> [Advance]
Forward Caller ID: Caller
Click [Apply]
(h) Add the extension numbers which belonged to the new company:
Click [Subscriber] -> [Subscriber] -> [New]
TEL NO: 060000001
User Account: 060000001
User Group: 77
Device Type: Subscriber
Click [Apply]
(i) Enable the short code and VMS service for the company users.
Click [Subscriber] -> [Subscriber] -> [060000001] -> [Modify] -> Service]
V Short Code: 601
V VMS URI: 6850
Click [Apply]
Step 3: Setup for the CRBT users
If the Centrex setting is as follow:
Centrex Config->Non Company User Parameter->Prefix Code: 44
Station telephone (Company Code: 77) requests for CRBT:
Station No: 060000001, Ext No: 601
(a) Add CRBT prefix which is “non-company user group prefix” +3 to the
subscriber
Click [Subscriber] -> [Group] -> [77] -> [Modify]
User Group ID: 77 (Company Code)
CRBT Prefix: 443 (Prefix Code + 3)
Click [Apply]
(b) Enable CRBT URI to IP Centrex 6850:
Click [Subscriber] -> [Subscriber] -> [060000001] -> [Modify] ->
[Service]
V Color Ring Back
CRB URI: 6850
Click [Apply]
Step 4: Setup for Announcement Service
For instance:
Centrex Config->Non Company User Parameter->Prefix Code: 44
Subscriber (Company Code: 77) requests for Announcement Service (e.g.
for number change).
Tel No: 060123551 change into 060123456
(a) Add Announcement prefix for the company group:
Click [Subscriber] -> [Group] -> [77] -> [Modify]
IP Centrex 6850 61
Page 62

Welltech Computer Co., Ltd.
User Group ID: 77 (Company Code)
Dm Group ID:
Description: 0
SMTP Host IP: ¯
Miss Call Subject: ¯
CRBT Prefix: 443 (Prefix Code + 3)
Announcement Prefix: 444 (English) OR
445 (Chinese)
VMS Prefix: 771
Click [Apply]
(b) Enable number change service or announcement service. Put URI to IP
Centrex 6850:
Click [Subscriber] -> [Subscriber] -> [060123551] -> [Modify] ->
[Service]
V Number Change
New Number: 060123456
URI: 6850
Click [Apply]
For non-company user’s Announcement service settings:
(a) Station No: 060345002 requests for Announcements service
Click [Subscriber] -> [Group] -> [44] -> [Modify]
User Group ID: 44 (Prefix Code)
Dm Group ID: 44 (Recommend)
Description:
SMTP Host IP: ¯
Miss Call Subject: ¯
CRBT Prefix: 443 (Prefix Code + 3)
Announcement Prefix: 444 (English) OR
445 (Chinese)
VMS Prefix: 441 (Prefix Code + 1)
Click [Apply]
(b) Enable Announcement Service for the user:
Click [Subscriber] -> [Subscriber] -> [060345002] -> [Modify] ->
[Service]
V Announcement Service
Announcement URI: 6850
Click [Apply]
IP Centrex 6850 62
Page 63

Appendix 5 Call Flow
Welltech Computer Co., Ltd.
IP Centrex 6850 63
Page 64

Welltech Computer Co., Ltd.
IP Centrex 6850 64
Page 65

Welltech Computer Co., Ltd.
IP Centrex 6850 65
Page 66

Welltech Computer Co., Ltd.
IP Centrex 6850 66
Page 67

Welltech Computer Co., Ltd.
IP Centrex 6850 67
Page 68

Welltech Computer Co., Ltd.
Incoming
N
N
Subscriber?
Y
Company User?
Y
1
(9998)
Your profile does not
exist, please contact
your service provider.
掛斷
(1001)
Input error! Thanks for
your calling. Please try
later.
Hang Up
(1001)
Input error! Thanks for
your calling. Please try
later.
Hang Up
VMS
Access Code 1?
N
Please input mailbox number,
N
YN
Retry 3
times?
message,2 to change personal
N
Y
Retry 3
times?
greeting,3 to change password
other
1
Access
VM
(1000)
then press pound.
Digit be
press?
N
PW correct?
Y
(1003)
Please press 1 to listen
Digit?
23
Modify
Greeting
Y
Y
Please input your
password, then press
Change
Password
Change
language
Y
*1 or *2 ?
N
(1002)
pound.
Retry 5 times?
You have stayed
too long. Thanks
for your calling.
Please try later.
N
Y
(1004)
Main
Menu
IP Centrex 6850 68
Hang Up
Page 69

Welltech Computer Co., Ltd.
IP Centrex 6850 69
Page 70

Welltech Computer Co., Ltd.
IP Centrex 6850 70
Page 71

(1001)
Input error! Thanks for
your calling. Please try
later.
Welltech Computer Co., Ltd.
1
Incoming
(1005)
Please input telephone
phone number, then
press pound.
N
Y
Retry 3
times?
N
Digit be
press?
Y
Change
Language
Y
*1 or *2?
N
Hang Up
(1001)
Input error! Thanks for
your calling. Please try
later.
Hang Up
(1002)
N
PW correct?
Y
(1003)
Please press 1 to listen
message,2 to change personal
N
Y
Retry 3
times?
greeting,3 to change password
other
1
AccessVMModify
23
Greeting
Change
Password
Please input your
password, then
press pound.
Retry 5 times?
You have stayed too
long. Thanks for your
calling. Please try later.
Hang Up
N
Main
Menu
Y
(1004)
IP Centrex 6850 71
Page 72

Welltech Computer Co., Ltd.
IP Centrex 6850 72
Page 73

Welltech Computer Co., Ltd.
IP Centrex 6850 73
Page 74

Welltech Computer Co., Ltd.
IP Centrex 6850 74
Page 75

Welltech Computer Co., Ltd.
IP Centrex 6850 75
Page 76

Welltech Computer Co., Ltd.
IP Centrex 6850 76
Page 77

Welltech Computer Co., Ltd.
Quick Function Reference
A
Account Management…………………………………………………………..37
Password…………………………………………………………………… 37
User ID……………………………………………………………………… 37
Advance SIP Configuration…………………………………………………….19
Application Pool Page Size…………………………………………………20
Cancel General No Response Timer………………………………………20
Cancel Invite No Response Timer………………………………………… 20
General Linger Timer ……………………………………………………… 19
General Pool Page Size……………………………………………………..20
General Request Timeout Timer……………………………………………20
Invite Linger Timer……………………………………………………………20
Max Call Leg………………………………………………………………….19
Max Register Client
Max Transaction
Message Pool Page Size……………………………………………………19
Provisional Timer……………………………………………………………..20
Reject Unsupported Extension…………………………………………….19
Reliable Provision…………………………………………………………….19
Retransmission T1…………………………………………………………...20
Retransmission T2…………………………………………………………...20
Retransmission T4…………………………………………………………...20
Send 487 When Recv CANCEL…………………………………………….20
Send Receive Bufer Size……………………………………………………19
UDP Port………………………………………………………………………19
Announcement Manager……………………………………………………….27
1st and 2nd Language File…………………………………………………28
Description……………………………………………………………………28
………………………………………………………………………………28
ID
C
Centrex Configuration
1st Foreign Language……………………………………………………….15
2nd Foreign Language
Account
Account
Auth Mode
……………………………………………………………………....16
……………………………………………………………………….15
……………………………………………………………………16
CRBT Cnt (Max)……………………………………………………………..15
Default Language……………………………………………………………15
Email Type……………………………………………………………………15
Keep days (Def)………………………………………………………………15
Keep days (Max)……………………………………………………………..15
Max Msg Len…………………………………………………………………15
Max Msgs
……………………………………………………………………..15
Minimum Expired
Msgs Cnt (Def)………………………………………………………………..15
Msgs Cnt (Max)………………………………………………………………15
Password……………………………………………………………………...15
…………………………………………………………..19
……………………………………………………………...19
…………………………………………………………..14
……………………………………………………...15
…………………………………………………………….16
IP Centrex 6850 77
Page 78

Welltech Computer Co., Ltd.
Password…………………………………………………………………….16
Prefix Code…………………………………………………………………..15
Proxy IP………………………………………………………………………15
Proxy Port…………………………………………………………………....15
Retrieve Info Timeout ……………………………………………………….16
Sender…………………………………………………………………………15
SMTP Server IP………………………………………………………………15
SMTP Server Port……………………………………………………………15
Subject………………………………………………………………………...15
UDP Port………………………………………………………………………16
VMS Access Code……………………………………………………………15
Wait Resp Timeout…………………………………………………………...16
Channel Status
…………………………………………………………………….17
ANI……………………………………………………………………………..18
CID
…………………………………………………………………………….18
Codec………………………………………………………………………….18
Destination IP…………………………………………………………………18
Destination RTCP Port………………………………………………………18
Destination RTP IP…………………………………………………………..18
Destination RTP Port………………………………………………………..18
Destination T.38 Port………………………………………………………...18
DNIS…………………………………………………………………………...18
Operation……………………………………………………………………...18
Refresh Interval (Second)…………………………………………………...17
Source IP…………………………………………………………………….. 18
Source RTCP Port……………………………………………………………18
Source RTP IP………………………………………………………………..18
Source RTP Port……………………………………………………………..18
Source T.38 Port……………………………………………………………..18
Status………………………………………………………………………….18
……………………………………………………………………………18
Time
Company Profile
1st Foreign Language
…………………………………………………………………..22
………………………………………………………..23
2nd Foreign Language………………………………………………………23
Access Code
………………………………………………………………….23
Access VMS Code…………………………………………………………..23
Access VMS No 2……………………………………………………………23
Company Address
Company Code
……………………………………………………………23
……………………………………………………………….22
Company Name………………………………………………………………22
Company Tel………………………………………………………………….23
Contact Name………………………………………………………………..23
Contact Phone………………………………………………………………..23
Default Language…………………………………………………………….23
Ext's Length…………………………………………………………………..23
Max Msgs……………………………………………………………………..23
Msg's Length………………………………………………………………….23
Operator Access Code
Operator Tel
…………………………………………………………………..23
………………………………………………………23
Password……………………………………………………………………..22
IP Centrex 6850 78
Page 79

Welltech Computer Co., Ltd.
Special Ann Period…………………………………………………………...23
Supervisor Access Code…………………………………………………….23
VMS Access Code 3…………………………………………………………23
Config Manager…………………………………………………………………...30
CRBT………………………………………………………………………………26
Caller No…………………………………………………………………….26
Music ID……………………………………………………………………..26
Music Title………………………………………………………………….. 26
Station No……………………………………………………………………26
D
Debug Information
………………………………………………………………34
Clear………………………………………………………………………….34
Get Log
……………………………………………………………………….34
Search………………………………………………………………………..34
E
Event Log………………………………………………………………………….33
Date……………………………………………………………………………33
Event ID……………………………………………………………………….33
Source…………………………………………………………………………33
Time……………………………………………………………………………33
Type……………………………………………………………………………33
F
File Manager……………………………………………………………………….37
I
Interface…………………………………………………………………………….16
Debug Level
Default Gateway
EC Length
…………………………………………………………………..17
……………………………………………………………...16
……………………………………………………………………..17
G.711 Psize……………………………………………………………………17
G.723 Psize
…………………………………………………………………..17
G.729 Psize…………………………………………………………………..17
ID Address…………………………………………………………………….16
Interface ID
IP Precedence
……………………………………………………………………16
………………………………………………………………..16
IP TOS…………………………………………………………………………16
Jitter Min Delay……………………………………………………………….16
Jitter Opt Factor………………………………………………………………17
Silence Compress……………………………………………………………17
Subnet Mask………………………………………………………………….16
UDP Port Base………………………………………………………………..16
UDP Port Channel Offset……………………………………………………16
L
Library………………………………………………………………………………27
Album………………………………………………………………………….27
IP Centrex 6850 79
Page 80

Welltech Computer Co., Ltd.
Artist…………………………………………………………………………...27
Music ID……………………………………………………………………….27
Publisher………………………………………………………………………27
Music File……………………………………………………………………..27
Source…………………………………………………………………………27
Title…………………………………………………………………………...27
M
Massage Box……………………………………………………………………...25
From…………………………………………………………………………..26
Message Time………………………………………………………………..26
State….………………………………………………………………………..26
Station No……………………………………………………………………..26
N
Network……………………………………………………………………………..9
P
Ping………………………………………………………………………………….34
Host IP Address………………………………………………………………34
Prompt Manager…………………………………………………………………..36
R
Relogin……………………………………………………………………………..39
Report………………………………………………………………………………30
CDR…………………………………………………………………………..30
Daily Statistic Report………………………………………………………..31
Monthly Statistic Report…………………………………………………….31
S
SIP Setting…………………………………………………………………………18
DTMF Relay Method………………………………………………………..19
Local Codec1-4
……………………………………………………………...19
Outbound Proxy Password………………………………………………….19
Outbound Proxy Port
………………………………………………………..19
Outbound Proxy Server……………………………………………………..19
Outbound Proxy User………………………………………………………..19
REC 2833 Payload Type
Registrar Password
…………………………………………………….19
…………………………………………………………..19
Registrar Port…………………………………………………………………19
Registrar Server………………………………………………………………19
Registrar TTL…………………………………………………………………19
Registrar User………………………………………………………………..19
Station Profile……………………………………………………………………..24
Company Code………………………………………………………………24
CRBT………………………………………………………………………….24
Default CRBT
Default Language
…………………………………………………………………24
…………………………………………………………….25
Email Address………………………………………………………………..24
IP Centrex 6850 80
Page 81

Welltech Computer Co., Ltd.
Enable Email Forward……………………………………………………….24
Ext No………………………………………………………………………….24
Msg Keep Days………………………………………………………………24
Name………………………………………………………………………….24
Password……………………………………………………………………..24
Personal Greeting………………………………………………………….24
Station No…………………………………………………………………..24
Time Zone…………………………………………………………………..25
Voice Mail……………………………………………………………………24
System…………………………………………………………………………….36
Restart……………………………………………………………………….36
Shutdown……………………………………………………………………36
Soft Reset……………………………………………………………………36
System Configuration…………………………………………………………..14
Debug Level………………………………………………………………….14
Play Announcement &Collect digits Timeout……………………………..14
Play Announcement Timeout……………………………………………….14
Play Announcement With Retry Counter Timeout………………………..14
System Time……………………………………………………………………….11
U
Upgrade…………………………………………………………………………….38
File Name……………………………………………………………………..39
Upload…………………………………………………………………………39
IP Centrex 6850 81
Page 82

Welltech Computer Co., Ltd.
Index
A
Account Management………………………………………………………37
Advance SIP Configuration……………………………………………….19
Announcement Manager…………………………………………………..27
C
Centrex Configuration………………………………………………………14
Channel Manager…………………………………………………………….28
Channel Status………………………………………………………………..17
Company Profile………………………………………………………………22
Config Manager……………………………………………………………….30
CRBT……………………………………………………………………………26
D
Debug Information…………………………………………………………..34
E
Event Log……………………………………………………………………..33
F
File Manager………………………………………………………………….37
I
Interface……………………………………………………………………….16
L
Library…………………………………………………………………………27
M
Massage Box…………………………………………………………………25
N
Network…………………………………………………………………………9
P
Ping……………………………………………………………………………34
Prompt Manager…………………………………………………………….36
R
Relogin………………………………………………………………………..39
Report…………………………………………………………………………30
S
SIP Setting……………………………………………………………………18
Station Profile………………………………………………………………..23
System
System Configuration
System Time…………………………………………………………………..11
…………………………………………………………………………36
……………………………………………………….14
IP Centrex 6850 82
Page 83

Welltech Computer Co., Ltd.
U
Upgrade………………………………………………………………………38
IP Centrex 6850 83
 Loading...