

Page 1
Tycos Hand Aneroid
Sphygmomanometer
Instructions
TR-2 Hand Aneroid
Page 2
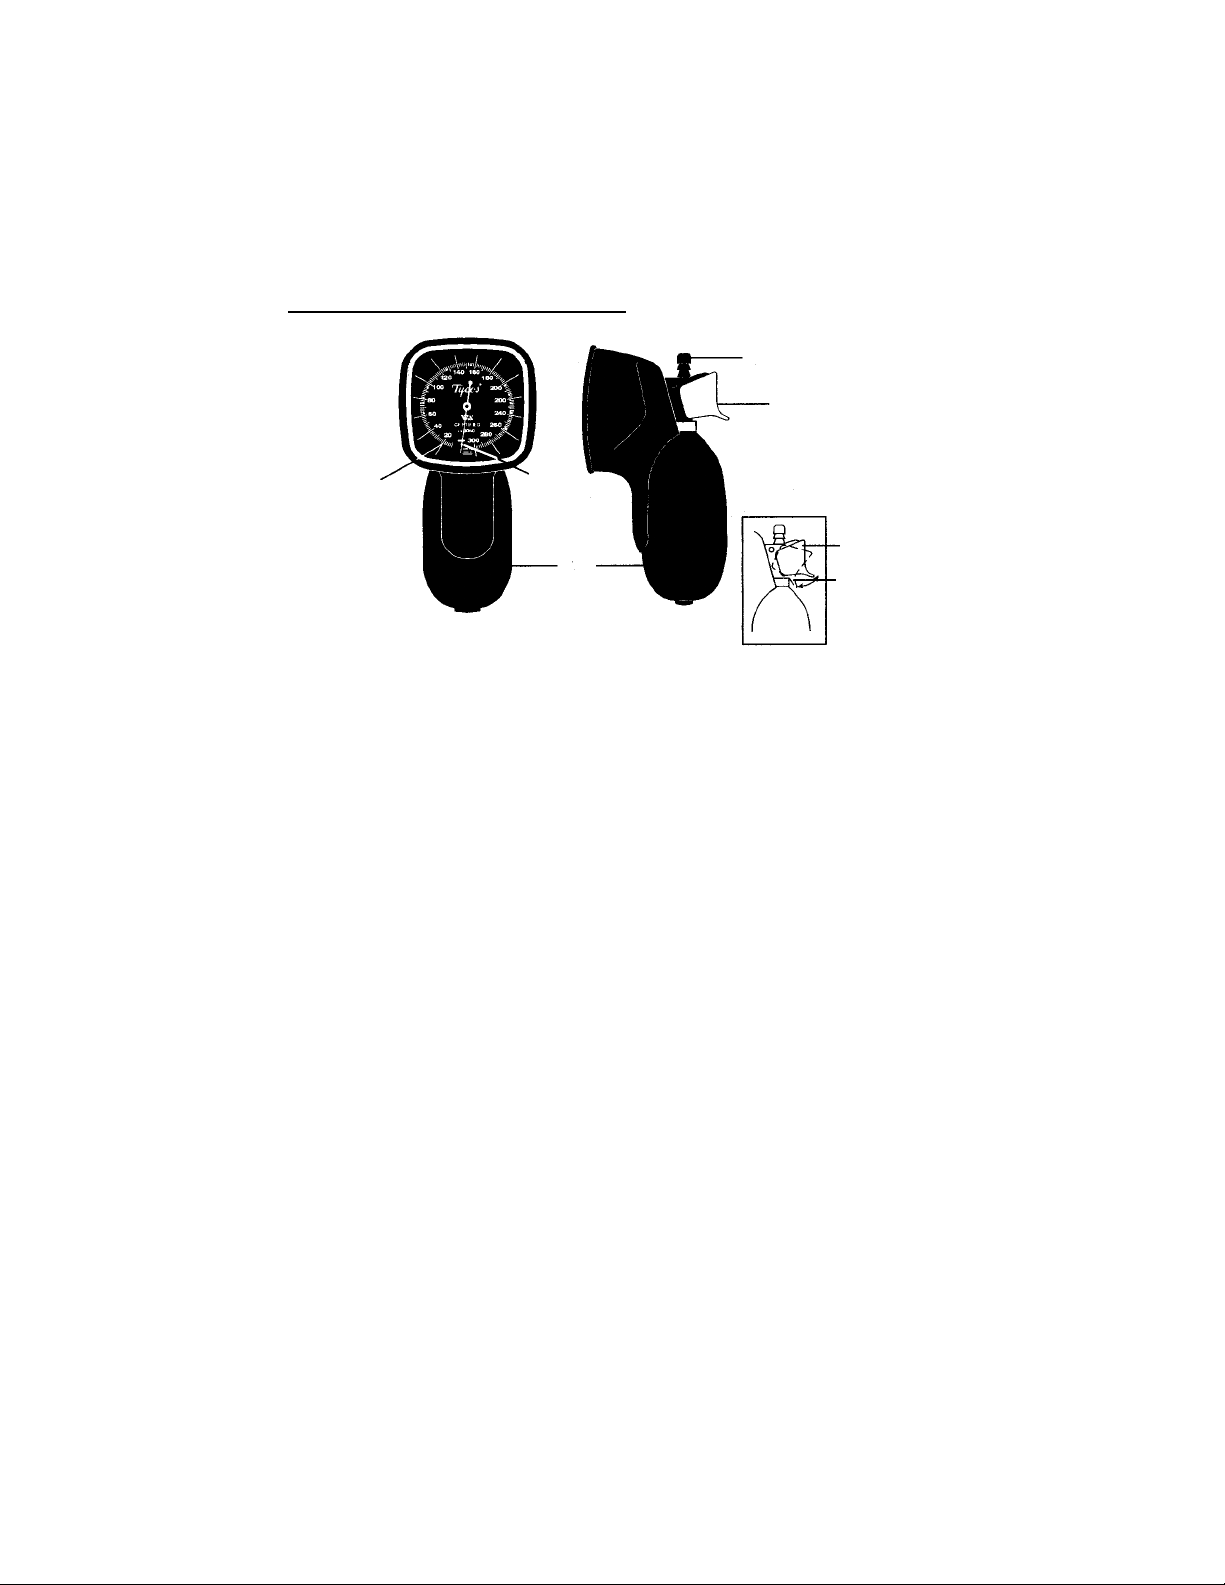
Operating Instructions
CUFF HOSE
CONNECTOR
AIR RELEASE
VALVE
SPHYGMOMANOMETER
SECTION
FRONT
1. Seat the patient and make him/her as relaxed and comfortable as possible with the arm free of clothing. Rest arm on a steady, smooth surface at heart level and slightly flex the elbow.
2. Check to see that the pointer rests within the zero (oval) indicator on the dial face. If not, return the unit to Tycos for recalibration.
3. Select the appropriate cuff size for patient’s arm. NOTE: Index line on cuff should
fall within the double arrow range. If index line falls short of range, use a larger cuff
to insure accurate results, If the index line is past the range, use a smaller cuff to
insure accurate results.
4. Wrap cuff around arm with “artery” symbol located over the brachial artery and with lower border about 2.5 cm above antecubital crease.
5. With trigger in “out” or “pump” position (see Diagram A), rapidly pump bulb to inflate cuff. Inflate to about 30 mmHg above the estimated (or palpatory) systolic pressure. NOTE: Verify the trigger is in “out” position or cuff will not inflate.
6. With the bell or diaphragm of a stethoscope (not included with this sphygmomanometer) lightly applied over the brachial artery, watch manometer, and deflate cuff
by pressing lightly on trigger until tension is felt. Bleed rate increases dramatically
as trigger is depressed beyond “tension point”. During the measurement phase,
attempt to keep the deflation rate at 2 to 3 mmHg per second. NOTE: Inflate the
cuff rapidly then quickly begin pressure deflation to avoid hazards that may occur
due to prolonged overinflation of the cuff.
7. As the pressure falls, note systolic pressure at the first appearance of repetitive
sounds (Phase 1)1.
8. Note diastolic pressure at the point when Korotkoff sounds disappear (Phase V)2.
9. Pull trigger in fully to lock it in maximum bleed or “dump” position (see Diagram A). This allows for complete deflation of cuff.
10.Push index finger upward to return trigger to “out” or “pump” position.
¹ Perloff, D., et al, Human Blood Pressure Determination by Sphygmomanometry, Dallas: 1994, pp 16-17.
² IBID, p.17.
CAUTION - Do not allow the cuff to remain on a patient for more than 10 minutes
when inflated above 10 mmHg. This may cause patient distress, disturb blood circulation, and contribute to the injury of peripherial nerves.
ZERO
RANGE
BULB
SIDE
TRIGGER
DIAGRAM A
OUT
(PUMP)
IN
(DUMP)
Page 3

Interchanging Inflation Systems
1. To remove the attached inflation system, hold the cuff tubing near the connector and pull gently until the tubing slips free.
2. To attach a new or different size inflation system, push the tubing onto the connector until the tubing is snug.
NOTE: Replacement cuffs come standard with a metal luer fitting which is utilized
with many Tycos sphygmomanometers. Remove this fitting for use with the TR-2
Hand Aneroid.
Bulb Replacement
1. Grasp the sphygmomanometer in one hand and gently pull on the bulb until it comes free.
2. Press the new bulb onto the valve
stem. Make sure the top of the bulb
slips under the retaining ring and is
pressed up flush with the base of
the trigger valve. If the bulb will not
slip under the retaining ring, slightly
loosen the ring for better access.
3. If the assembly will not seal completely, gently tighten the retaining
ring with pliers.
SPHYGMOMANOMETER
VALVE
STEM
RETAINER
RING
BULB
Aneroid Gauge Accuracy
This instrument meets the AAMI accuracy standard for Aneroid Sphygmomanometers which is ± 3 mmHg. Aneroid Calibration Check - Welch Allyn, Inc., recommends
checking the calibration of mechanical sphygmomanometers on an annual basis.
Standard check accuracy pressures are 300, 250, 200, 150, 100, 60, and 0 mmHg. Pressurize gauge above 300 mmHg and bleed gauge down no faster than 10 mmHg per
second to the proper points to perform check. If using a mercury column or another
aneroid gauge to check calibration, verify the accuracy of the gauge in question is
within ±6 mmHg. If using a digital pressure standard, the accuracy of this standard is
within ± 1 mmHg. Verify the accuracy of the gauge in question is ± 4 mmHg. This
product will maintain the safety and performance characteristics specified at temperatures ranging from 0°c (32°F) to 46°C (115°F) at a relative humidity not to exceed 85%.
Page 4

Cleaning and Sterilization
Gauge: Wipe the sphygmomanometer clean with a slightly dampened cloth or alcohol wipe.
Cuff: Safely clean cuffs with a damp cloth or washed in water with soap or detergent.
After washing, allow the cuff to air dry.
Sewn Cuff and Bladder - Before washing the cuff, remove the inflation bulb and
tube fitting(s), close off tube(s) with plug*, and place the hook & loop fasteners in the
closed position. After washing, allow the cuff to air dry. Re-assemble the tube fitting(s).*Plug availabie as accessory #5082-163.
DO NOT PRESS WITH HOT IRON.
Sterilization: Do not use steam or heat to sterilize the cuff, bulb, or tubing. Use gas
sterilization, if necessary. Use glutaraldehyde type liquid disinfectants on durable
cuffs. Prolonged use of these disinfectants at full strength may cause discoloration of
the white cuff markings.
Warranty
Sphygmomamometer
Your Tycos sphygmomanometer is covered by a 5 year warranty against original
defects in material or workmanship. If the sphygmomanometer is found to be defective or at variance from the manufacturer’s specifications, Tycos will repair or replace
the instrument or component(s) at no cost to the purchaser.
Calibration
Should the sphygmomanometer deviate from the ± 3 mmHg accuracy specification,
Welch Allyn will recalibrate the sphygmomanometer at no charge for a period of 5
years from the date of purchase.
Accessories
The Welch Allyn One-Piece Blood Pressure Cuff is covered by a three year warranty
against original defects in material, or workmanship.
This warranty does not cover breakage or failure due to tampering, misuse, neglect,
accidents, modification or shipping, and is void if the blood pressure cuff is not used
in accordance with manufacturer’s recommendations or if repaired or serviced by
other than Welch Allyn or a Welch Allyn authorized representative.
All repairs should be sent prepaid to:
Welch Allyn, Inc. Repair Dept.
4341 State Street Road
Skaneateles Falls, NY 13153
Phone: 315-685-4560
800-535-6663
Warning to users - If luer lock connectors are used in the
construction of tubing, there is a possibility that they might
be inadvertently connected to intravascular fluid systems,
allowing air to be pumped into a blood vessel.
The CE mark on this product indicates that
it is in conformity with the provisions
of Council Directive 93/42/EEC
95P458-1 Rev C
European Regulatory Manager
Medical Division, Welch Allyn, Ltd.
Navan, CO. Meath, Republic of Ireland.
This product conforms to applicable sections of European Standard’s
EN 1060-1, Non-invasive Sphygmomanometers, Part 1. General
Requirements and EN 1060-2, Part 2. Supplementary requirements
for mechanical sphygmomanometers.
 Loading...