

Welch Allyn To The Use Of Diagnostic Instruments In Eye And Ear Examinations Quick Reference Guide
Page 1

Advancing Frontline Care
TM
4341 State Street Road, P.O. Box 220, Skaneateles Falls, NY 13153-0220 USA
(P) 800-535-6663 (F) 315-685-3361 www.welchallyn.com
Advancing Frontline Care
TM
©2004, Welch Allyn, Inc. Printed in USA SM2815 Rev B
A Guide to the Use of
Diagnostic Instruments in Eye and Ear Examinations
Page 2
Contents
The Eye
4
The PanOptic Ophthalmoscope 6
The Coaxial Ophthalmoscope 7
How to Conduct a PanOptic Ophthalmologic Exam 8
How to Conduct a Coaxial Ophthalmologic Exam 10
Common Pathologies of the Eye 12
The Ear
18
The Otoscope 20
How to Conduct an Otoscopic Examination 22
Pneumatic Otoscopy 24
Common Pathologies of the Ear 25
Other Ear Care 31
32
Advancing Frontline Care
TM
About Welch Allyn: Welch Allyn, Inc. was founded in 1915 and is today a leading manufacturer of innovative
medical diagnostic and therapeutic devices, cardiac defibrillators, patient monitoring systems, and miniature
precision lamps. Headquartered in Skaneateles Falls, New York, USA, Welch Allyn employs more than 2,300
people and has numerous manufacturing, sales, and distribution facilities located throughout the world.
Additional information on Welch Allyn and its products may be found at www.welchallyn.com.
Sponsored by
Page 3

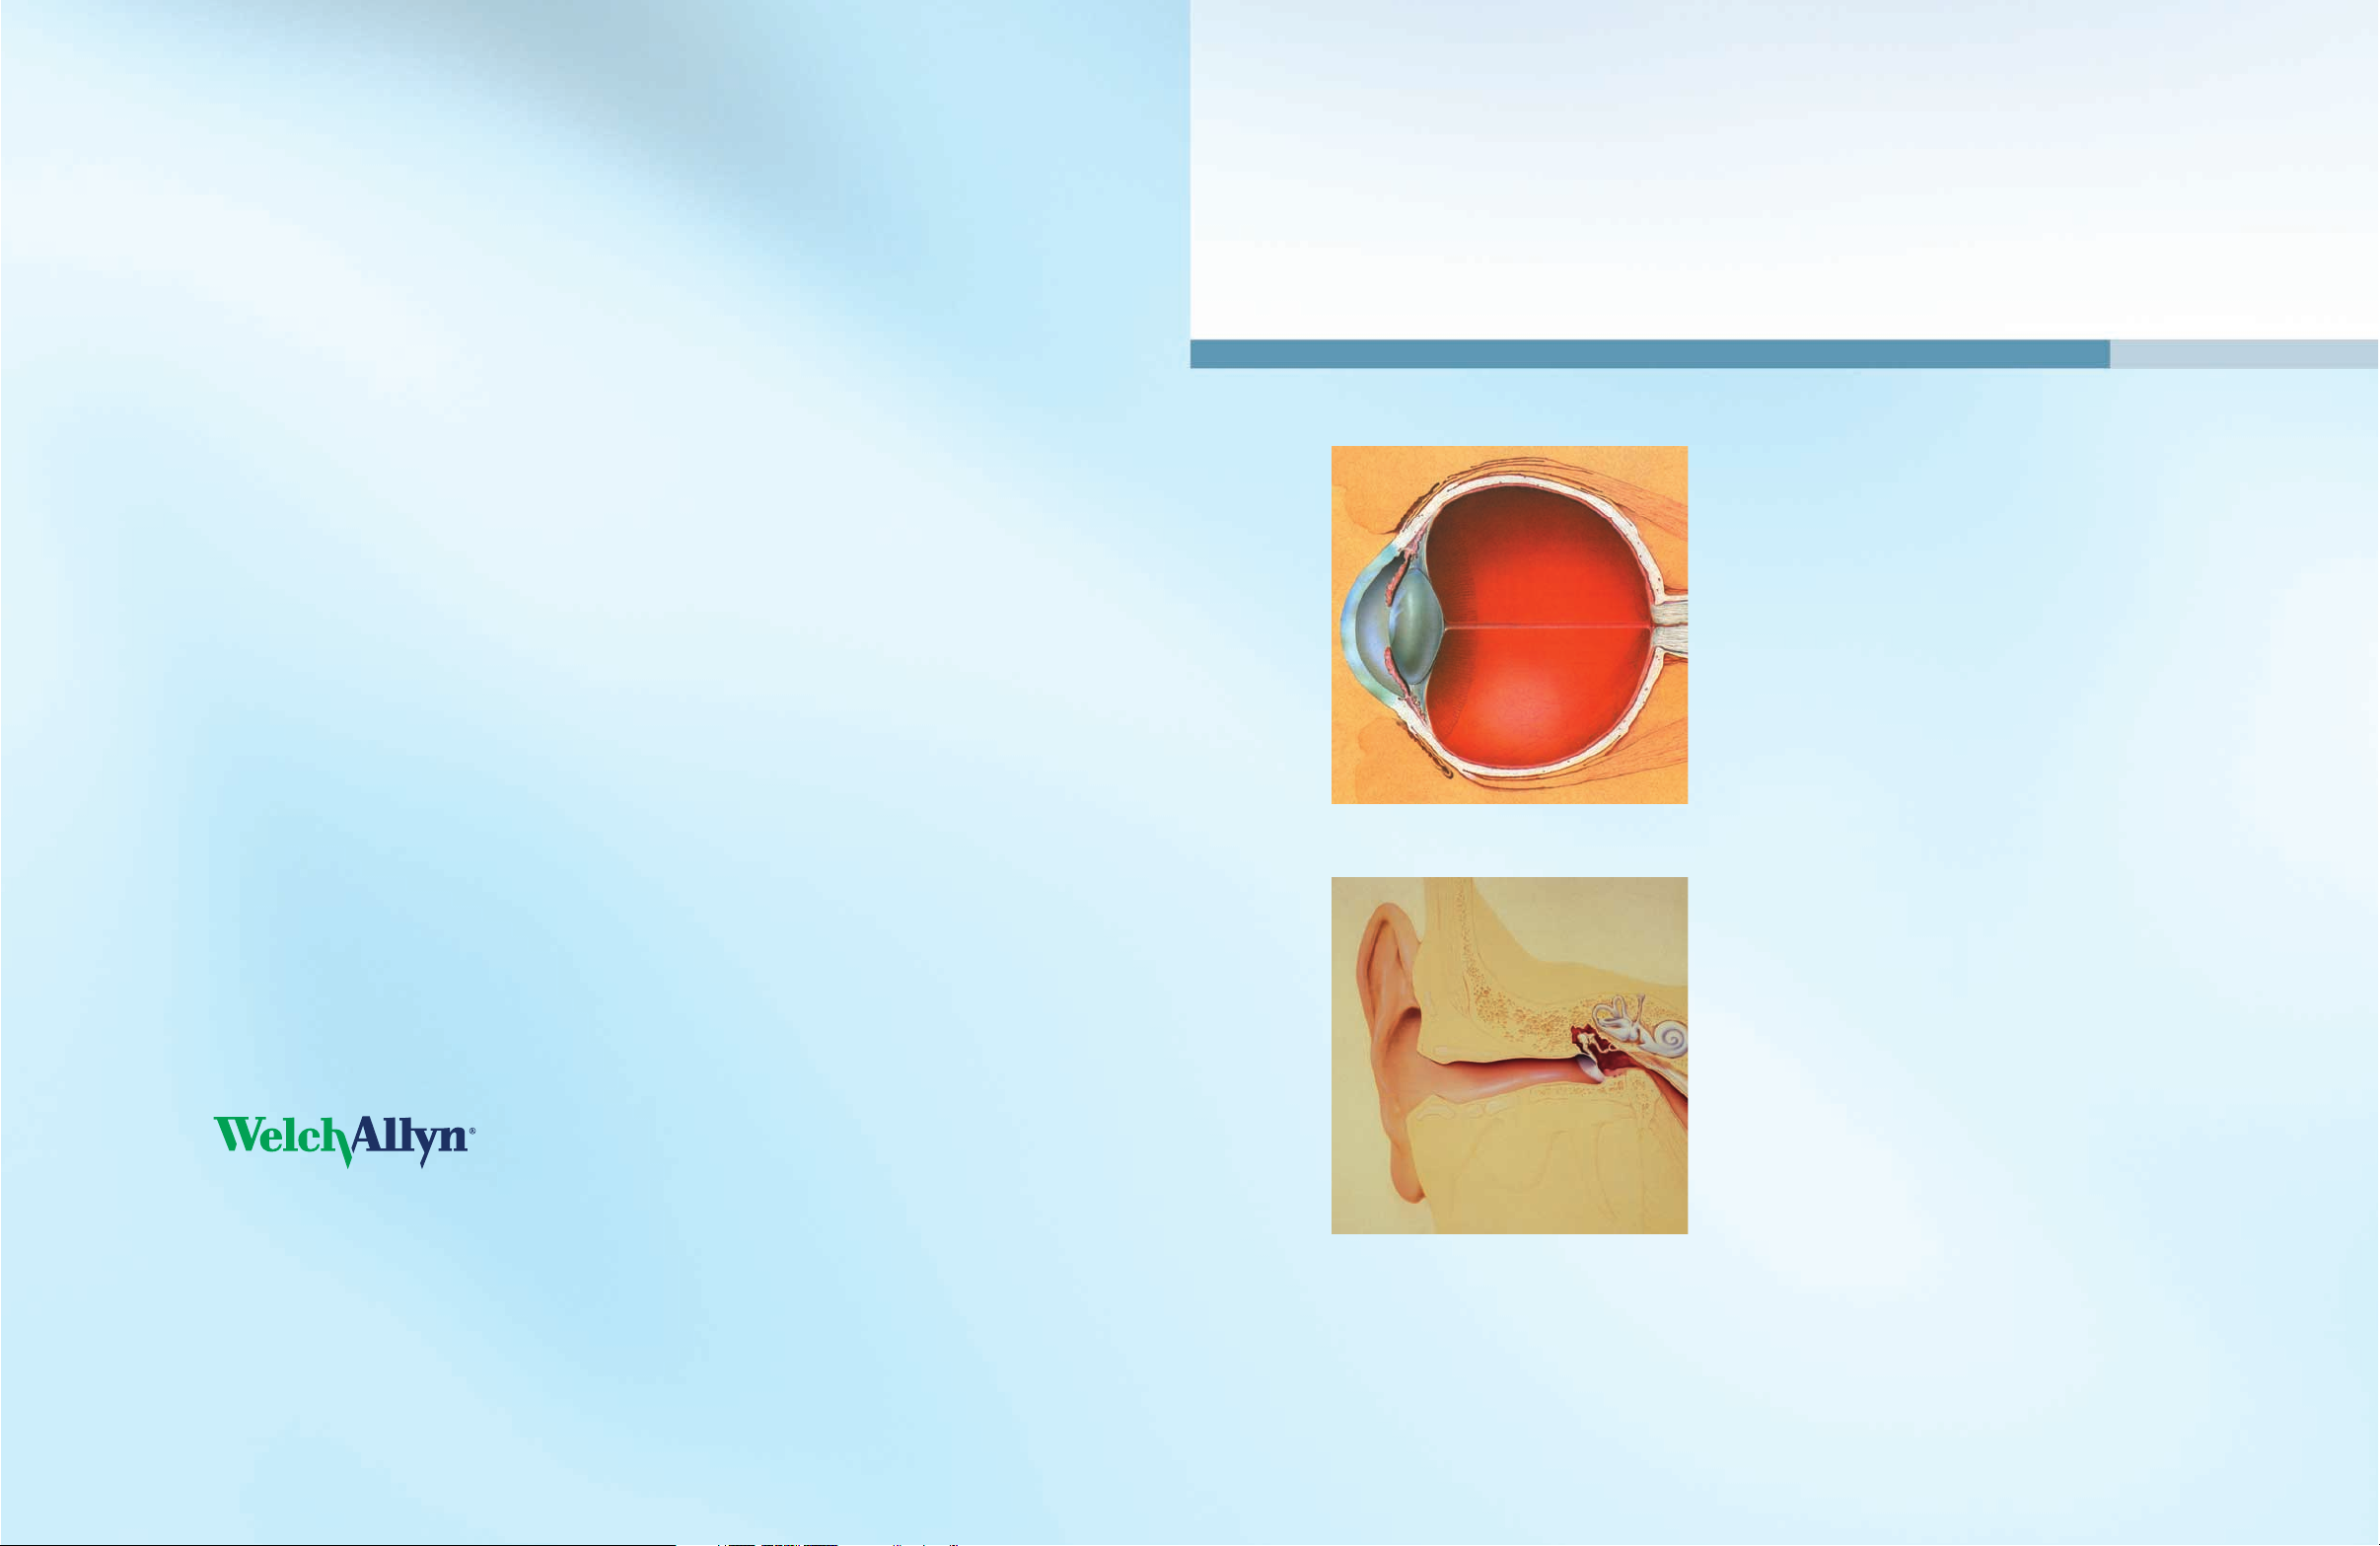
The Eye
Transparency of the cornea, lens and vitreous humor permits the
practitioner to directly view arteries, veins, the optic nerve and
the retina.
Direct observation of the structures of the fundus through an
effective ophthalmoscope may show disease of the eye itself or
may reveal abnormalities indicative of disease elsewhere in the
body. Among the most important of these are vascular changes
due to diabetes or hypertension and swelling of the optic nerve
head due to papilledema or optic neuritis. In this sense, the eye
serves as a window through which many valuable clinical
evaluations may be made.
When a preliminary diagnosis of an imminently dangerous eye
condition, such as acute glaucoma or retinal detachment, is made
by the examiner, prompt referral to an ophthalmologist may
prevent irreversible damage. Or, when distressing but less urgent
conditions, such as visual impairment due to cataract or vitreous
floaters are recognized, the patient can be reassured and referred.
Welch Allyn ophthalmoscopes, with their bright, white halogen
illumination coupled with their patented optical system, allows
the examiner to clearly see these important structures of the eye
to aid in making the correct diagnosis.
Little has been written giving the practitioner detailed instructions
on the use of the ophthalmoscope. Because the examination can
give so much information about a patient’s well being, correct use
of the ophthalmoscope makes it one of the most valuable tools
available for diagnostic use. The following pages in this section
contain information on ophthalmoscopes, how to conduct an
ophthalmic exam, and what to look for while examining the eye.
NORMAL FUNDUS
Optic Disc
Physiological Cup
Macula
Vein
Artery
54
A- Macula
B- Vitreous Humor
C- Sclera
D- Choroid
E- Retina
F- Ora Serrata
G- Canal of Schlemm
H- Anterior Chamber
I- Iris
J- Cornea
K- Ciliary Body
L- Zonule (suspensory Ligament)
M- Conjuctiva
N- Lens
O- Hyaloid Canal
P- Central Retinal Vein
Q- Optic Nerve
R- Central Retinal Artery
Page 4
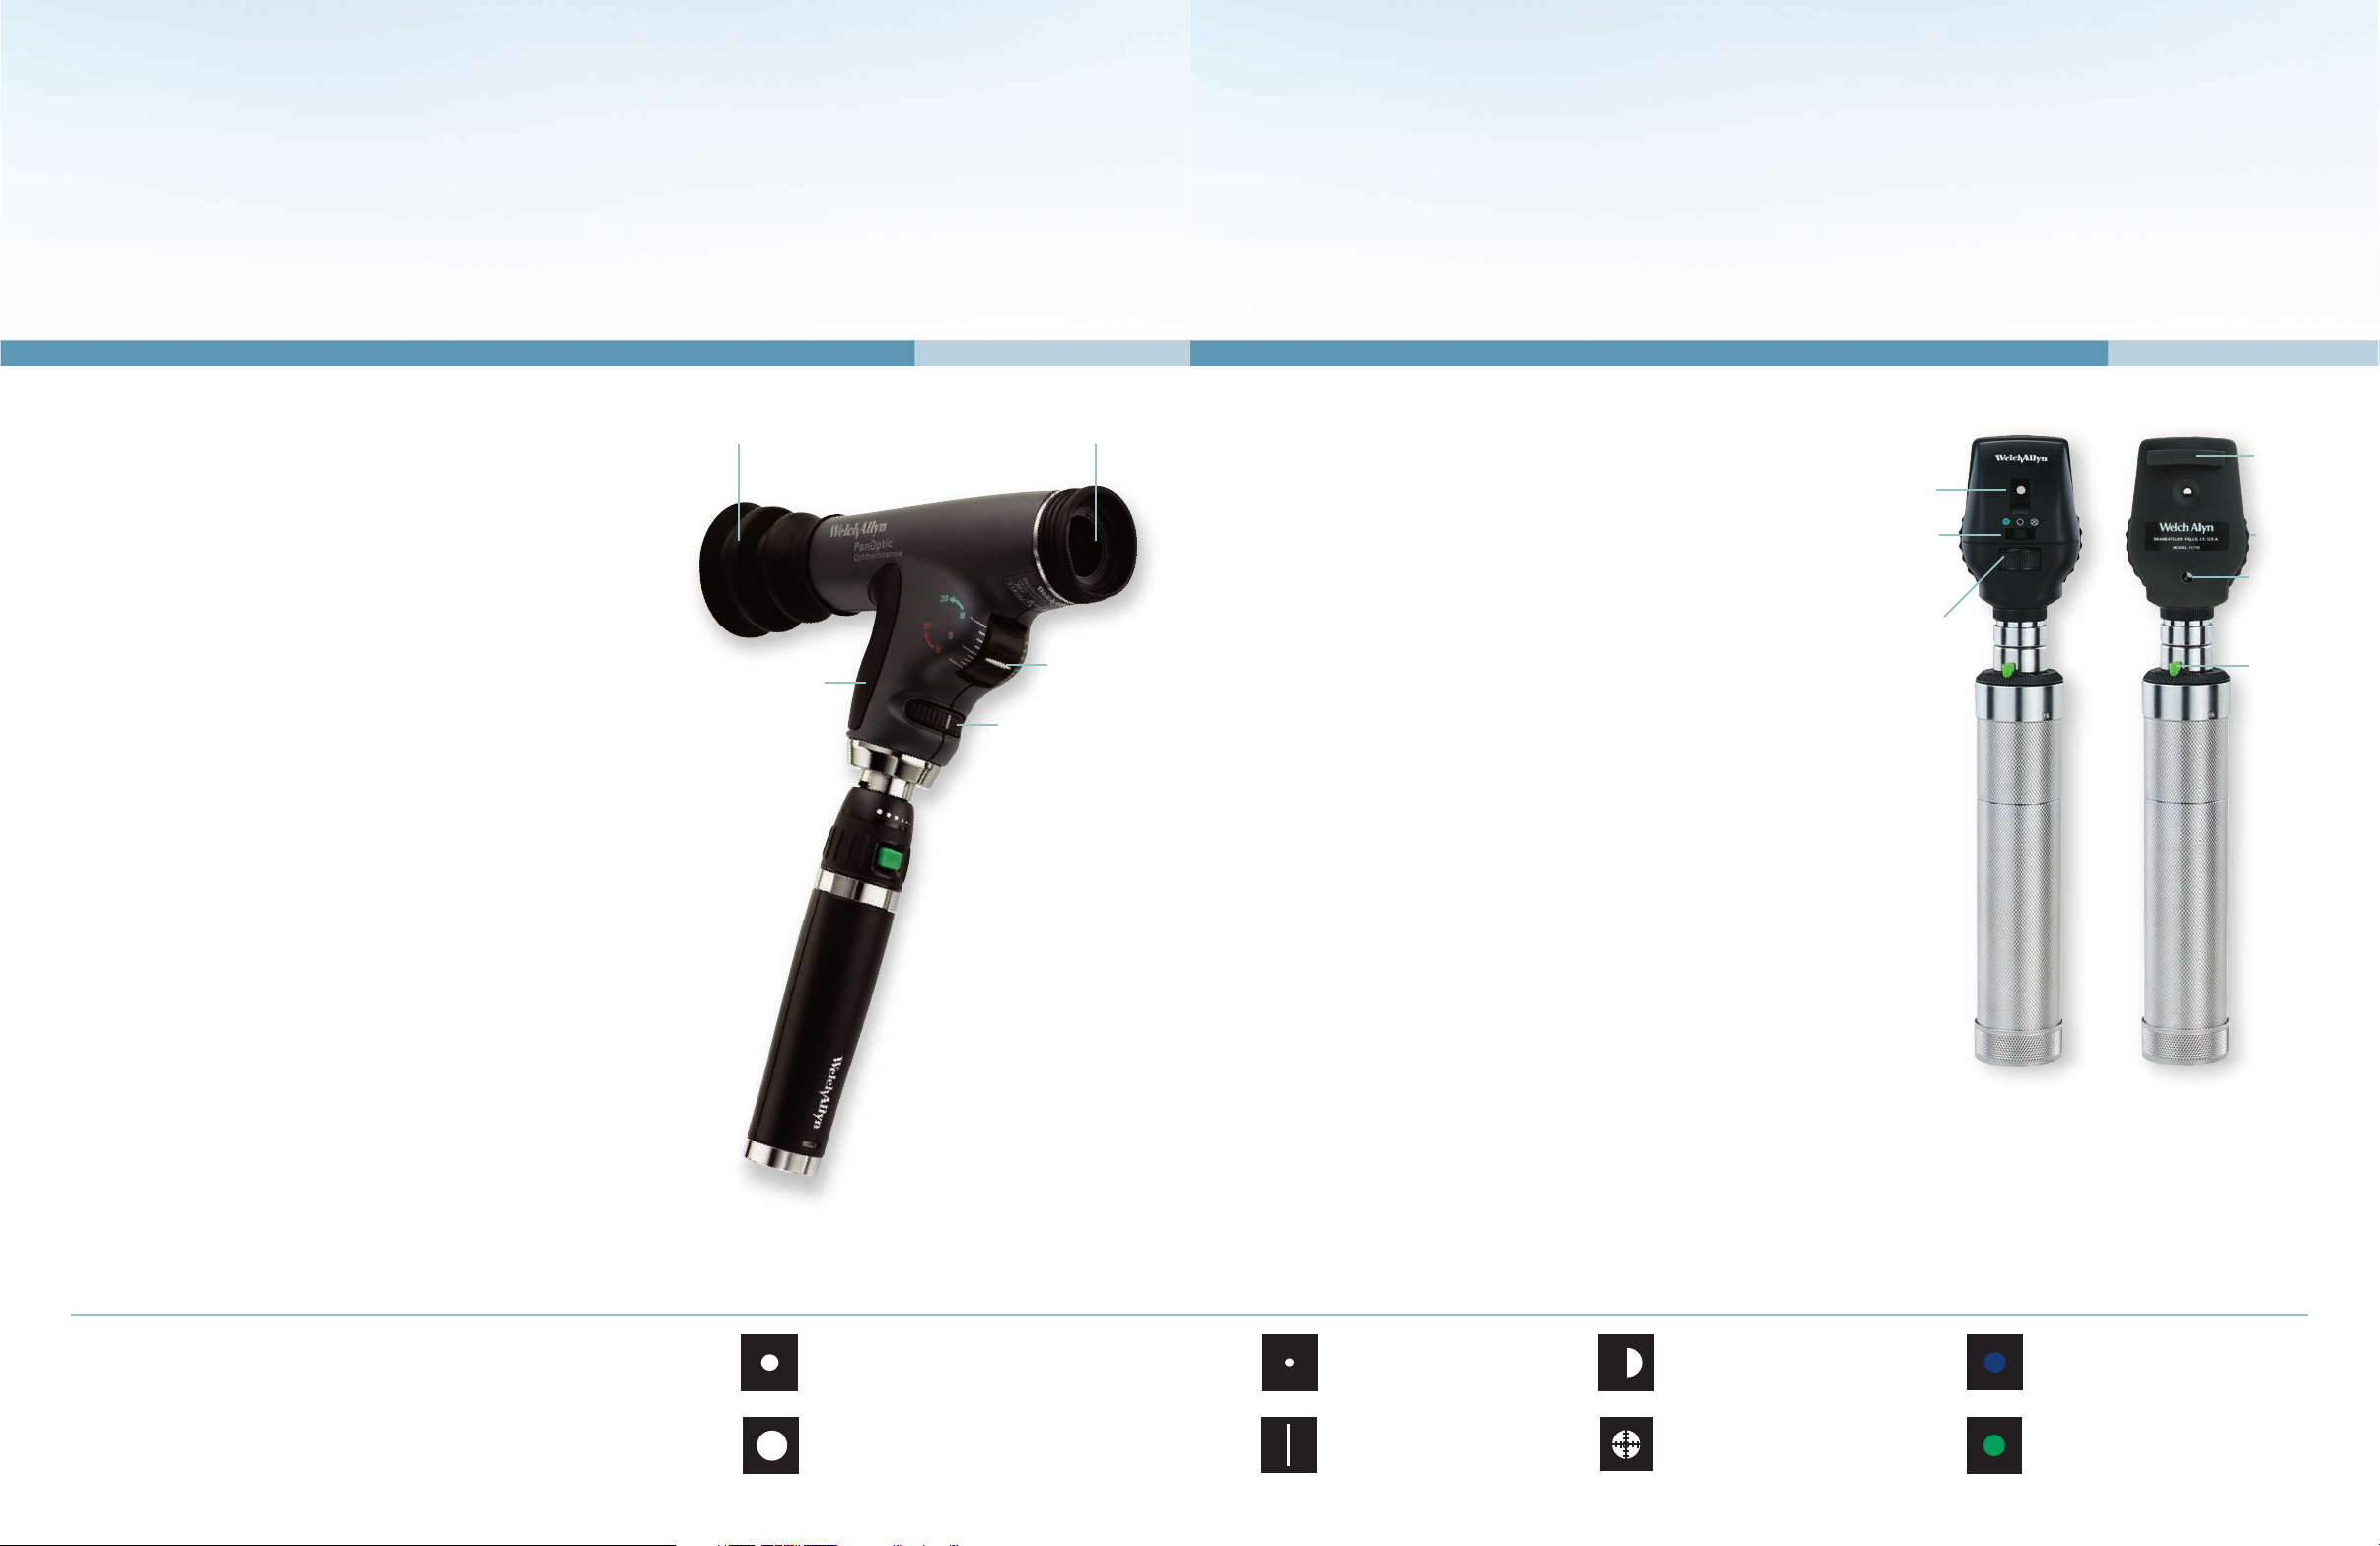
Welch Allyn PanOptic
TM
Ophthalmoscope Welch Allyn Coaxial Ophthalmoscope
76
The Welch Allyn PanOptic Ophthalmoscope described in this section
incorporates a patented* Axial PointSource™ optical system. The
new optics system converges the light to a point at the cornea which
allows the practitioner easy entry into small pupils. The illumination
pathway then diverges to the retina, illuminating a very wide area
of the fundus. The viewing system enables the operator to view the
illuminated area on virtually the same axis, thus creating the widest
field of view attainable in undilated ophthalmoscopy.
The PanOptic has a focusing range from -20 to +20 diopters. The
Dynamic Focusing Wheel adjusts the focus in a continuous, smooth
action for more precise control and optimum view. This helps compensate for patient or examiner refractive error, the position of the
ophthalmoscope and the changes in viewing requirements necessitated
by focusing on different points within the eye.
The patient side eyecup helps the practitioner establish and maintain the
proper viewing distance and provides stabilization for the view during the
exam. It also serves as the pivoting point for leverage in panning around the
retina. While in contact with the patient, the eyecup occludes ambient light,
eliminating interference from other light sources.
ADDITIONAL USES FOR THE PANOPTIC OPHTHALMOSCOPE
In addition to examination of the fundus, the ophthalmoscope is a useful
diagnostic aid in studying other ocular structures. The light beam can be
used to illuminate the cornea and the iris for detecting foreign bodies in
the cornea and irregularities of the pupil.
The PanOptic Ophthalmoscope features a Cobalt Blue Filter and add-on
Corneal Viewing Lens (model 11820 only), which together can be used
along with fluorescein dye applied to the cornea to look for abrasions
and foreign bodies on the cornea.
To attach the Corneal Viewing Lens:
1. Remove the patient eyecup.
2. Push and twist on the lens in place of the eyecup, until the
bottoms ribs catch.
Refer to Pages 8 and 9 to learn how to conduct an ophthalmic
exam with the PanOptic ophthalmoscope.
*U.S. PATENT NOS. 6,637,882; 6,527,390
Welch Allyn Coaxial ophthalmoscopes incorporate a patented* coaxial
optical system, allowing the axis of illumination to be coincidental
with the axis of vision into the retina, thereby eliminating annoying
shadows and facilitating examination through virtually any size pupil
or vitreous disorder. The fundus and interior anatomy of the eye are
viewed with precision and clarity.
Welch Allyn scopes offer a wide choice of 28 viewing lenses, ranging
from –25 to +40 diopters, with fast, accurate one-hand selection.
This helps compensate for patient or examiner refractive error, the
position of the ophthalmoscope and the changes in viewing requirements necessitated by focusing on different points within the eye.
Some coaxial models offer an additional crossed linear polarizing
filter/ red-free filter switch increases the versatility of this instrument.
When used in conjunction with available apertures, the coaxial ophthalmoscope yields 15 possible apertures.
The illuminated lens dial enables the practitioner to check the lens being
used for a particular examination even in a darkened examination room.
The brow rest allows the practitioner to use his/her own eyeglasses
comfortably and safely. It also steadies the instrument while in use.
ADDITIONAL USES FOR THE COAXIAL OPHTHALMOSCOPE
In addition to examination of the fundus, the ophthalmoscope is a useful
diagnostic aid in studying other ocular structures. The light beam can
be used to illuminate the cornea and the iris for detecting foreign bodies
in the cornea and irregularities of the pupil.
Refer to Pages 8 and 9 to learn how to conduct an ophthalmic examination
with the Coaxial ophthalmoscope.
When used correctly and regularly, the Welch Allyn ophthalmoscope is
one of the most effective diagnostic instruments available.
*U.S. PATENT NOS. 4,998,818; 4,526,449
APERTURES AND FILTERS
There is a wide range of practical apertures and filters to select from on
both the PanOptic and Coaxial ophthalmoscopes: small spot, large spot,
micro spot, slit aperture, red-free filter, cobalt blue filter, half-moon, and
fixation aperture. This selection of apertures covers all the practitioner’s
basic needs in an ophthalmoscope.
Micro Spot Aperture: Allows easy
entry in very small, undilated pupils.
Slit Aperture: Helpful in determining
various elevations of lesions, particularly tumors and edematous discs.
Aperture Dial
PanOptic Soft Grip
Front
surface
mirror
Crossed
linear
polarizing
filter/red-free
filter switch
Aperture
selection dial
Dynamic
Focusing Wheel
Patented* Glare
Extinguishment
Patient Eyecup
Rubber
brow rest
Lens
selection
disc
Illuminated
lens indicator
On/Off switch
and rheostat
control
Practitioner SidePatient Side
Small Aperture: Provides easy view of the fundus
through an undilated pupil. Always start the examination with this aperture and proceed to micro aperture
if pupil is particularly small and/or sensitive to light.
Large Aperture: Standard aperture for dilated pupil
and general examination of the eye.
Half-Moon Aperture (PanOptic Model
11810 only): Provides a combination of
depth perception and field-of view.
Fixation Aperture
(Coaxial Model only):
The pattern of an open center and thin
lines permits easy observation of eccentric fixation without masking the macula.
Cobalt Blue Filter: Blue filter used
with fluorescein dye permits easy
viewing of small lesions, abrasions,
and foreign objects.
Red-Free Filter:
Excludes red
rays from examination field for
easy identification of veins,
arteries, and nerve fibers.
Page 5

How to Conduct an Ophthalmologic Examination
with the PanOptic
TM
Ophthalmoscope
1. Take the PanOptic ophthalmoscope in your right hand with the
Practioner’s Side facing you and place your thumb on the Focusing
Wheel. Hold the instrument up to your right eye and look through
the eyepiece. By rotating the Focusing Wheel with your thumb,
focus the instrument on an object approximately 20 feet away.
2. Set the Aperture/Filter Dial to the small spot (green line).
3. Dim the room lights. Instruct the patient to look straight ahead
at a distant object.
4. Hold the PanOptic up to your eye and position the ophthalmoscope about 6 inches (15cm) in front and at a slight angle (15 to
20 degrees) on the temporal side of the patient. Direct the light
beam into the pupil. A red “reflex” should appear as you look
through the pupil.
5. Rest your left hand on the patient’s forehead and hold the upper
lid of the eye near the eyelashes with your thumb. While the patient
is fixating on the specified object, keep the red “reflex” in view and
slowly move toward the patient. Follow the red reflex into the pupil
until the PanOptic eyecup rests on the orbit of the patient’s eye. The
trip from 6 inches away to making contact must be one that is slow,
deliberate, and steady.
98
The optic disc should come into view when you are about 1 to 2 inches (3-5cm)
from the patient. Gentle compression of the eyecup will maximize the field of view.
If the optic disc is not focused clearly, rotate the Dynamic Focusing Wheel with
your thumb until the optic disc is as clearly visible as possible. The hyperopic,
or far-sighted, eye requires more “plus” (rotation towards green) focus for
clear focus of the fundus; the myopic, or near-sighted, eye requires “minus”
(rotation towards red) focus for clear focus.
If you lose the view of the optic disc while approaching the patient’s eye, pull
back slowly, relocate the red reflex, and try again.
6. Now examine the disc for clarity of outline, color, elevation and condition
of the vessels. Follow each vessel as far to the periphery as you can.
7. To view the macula, instruct your patient to look directly into the light of
the ophthalmoscope. This will automatically place the macula in full view. An
alternative technique is to have your patient fixate straight ahead. Attain the
red reflex from a 15º angle at 6 inches away from the patient’s eye. When the
PanOptic is 3 inches from contact, instruct the patient to look into the light
while the patient is still facing straight ahead. Continue moving towards the
patient until the eyecup reaches the orbit of the patient.
Look for abnormalities in the macula area. The red-free filter facilitates
viewing of the center of the macula.
8. To examine the extreme periphery, instruct the patient to fixate straight
ahead while performing the examination. Pivot around the eye by leveraging
the eyecup against the orbit of the patient’s eye to achieve the desired view. It
is important to compress the eyecup to maximize this technique. Without full
compression, the chances of losing your view increase significantly.
This routine will reveal almost any abnormality that occurs in the fundus.
9. To examine the left eye, repeat the procedure outlined above.
ADDITIONAL EXAMS WITH
THE PANOPTIC
OPHTHALMOSCOPE
To look for abrasions and foreign bodies
on the cornea with the corneal viewing
lens, no contact is made between the
ophthalmoscope and the patient.
Begin the exam about 6 inches from the
patient with the focus wheel in the neutral position.
Look through the scope at the patient’s
cornea to direct the light at the target area.
Adjust the focus wheel into the green
(plus) diopters while moving slightly in
(closer) or out (further) until a comfortable working distance and magnification
of the cornea is achieved.
The following steps will help the practitioner obtain satisfactory results with the PanOptic Ophthalmoscope:
Page 6

8. To examine the extreme periphery, instruct the patient to:
• Look up for examination of the superior retina
• Look down for examination of the inferior retina
• Look temporally for examination of the temporal retina
• Look nasally for examination of the nasal retina.
This routine will reveal almost any abnormality that occurs in
the fundus.
9. To examine the left eye, repeat the procedure outlined above but
hold the ophthalmoscope in your left hand, stand at the patient’s left
side and use your left eye.
OVERCOMING CORNEAL REFLECTION
One of the most troublesome barriers to a good view of the retina
is the light reflected back into the examiner’s eye from the patient’s
cornea – a condition known as corneal reflection. There are three
ways to minimize this nuisance:
• The Coaxial ophthalmoscope features a crossed linear polarizing filter
that may be used. The filter reduces corneal reflection by 99%. It is recommended that the polarizing filter be used when corneal reflection is present.
•
Use the small aperture. However, this reduces the area of the
retina illuminated.
• Direct the light beam toward the edge of the pupil rather than directly
through its center. This technique can be perfected with practice.
USE OF FIXATION TARGET
Direct the patient to focus on the center of the fixation target projected
within the light beam. Simultaneously check the location of the pattern
on the fundus. If the center of the pattern does not coincide with the
macula, eccentric fixation is indicated. In this procedure, the crossed
linear polarizing filter is especially useful since it dramatically reduces
reflections caused by the direct corneal light path.
ADDITIONAL EXAMS WITH COAXIAL OPHTHALMOSCOPE
By selecting the +15 lens in the scope and looking at the pupil as in
a fundus examination [2 inches (5 cm) distance from the patient],
the examiner may verify doubtful pupillary action.
One can also easily detect lens opacities by looking at the pupil
through the +6 lens setting at a distance of 6 inches (15 cm) from
the patient. In the same manner, vitreous opacities can be detected
by having the patient look up and down, to the right and to the left.
Any vitreous opacities will be seen moving across the pupillary area
as the eye changes position or comes back to the primary position.
1110
How to Conduct an Ophthalmologic Examination
with a Coaxial Ophthalmoscope
In order to conduct a successful examination of the fundus, the examining
room should be either semi-darkened or completely darkened. It is
preferable to dilate the pupil when there is no pathologic contraindication,
but much information can be obtained through the undilated pupil.
The following steps will help the practitioner obtain satisfactory results:
1. For examination of the right eye, sit or stand at the patient’s right side.
2. Select “0” on the illuminated lens disc of the ophthalmoscope and
start with the small aperture.
3. Take the ophthalmoscope in the right hand and hold it vertically in
front of your own right eye with the light beam directed toward the
patient and place your right index finger on the edge of the lens dial
so that you will be able to change lenses easily if necessary.
4. Dim room lights. Instruct the patient to look straight ahead at a
distant object.
5. Position the ophthalmoscope about 6 inches (15cm) in front and
slightly to the right (25º) of the patient and direct the light beam into
the pupil. A red “reflex” should appear as you look through the pupil.
6. Rest your left hand on the patient’s forehead and hold the upper lid of
the eye near the eyelashes with the thumb. While the patient is fixating on
the specified object, keep the “reflex” in view and slowly move toward
the patient. The optic disc should come into view when you are about
1 to 2 inches (3-5cm) from the patient. If it is not focused clearly, rotate
lenses with your index finger until the optic disc is as clearly visible as
possible. The hyperopic, or far-sighted, eye requires more “plus” (green
numbers) lenses for clear focus of the fundus; the myopic, or nearsighted, eye requires “minus” (red numbers) lenses for clear focus.
7. Now examine the disc for clarity of outline, color, elevation and
condition of the vessels. Follow each vessel as far to the periphery as
you can. To locate the macula, focus on the disc, then move the light
approximately 2 disc diameters temporally. You may also have the
patient look at the light of the ophthalmoscope, which will automatically
place the macula in full view. Look for abnormalities in the macula
area. The red-free filter facilitates viewing of the center of the macula.
Position the ophthalmoscope about 6 inches (15cm)
in front and 25º to the right side of the patient.
Examine the disc for clarity of outline, color,
elevation and condition of the vessels (Step 6).
Page 7

1312
Common Pathologies of the Eye
NORMAL FUNDUS
Disc: Outline clear; central physiological cup is pale
Retina: Normal red/orange color, macula is dark; avascular
area temporally
Vessels: Arterial/venous ratio 2 to 3; the arteries appear a bright
red, the veins a slightly purplish color
HYPERTENSIVE RETINOPATHY
Disc: Outline clear
Retina: Exudates and flame hemorrhages
Vessels: Attenuated arterial reflex
HYPERTENSIVE RETINOPATHY
(ADVANCED MALIGNANT)
Disc: Elevated, edematous disc; blurred disc margins
Retina: Prominent flame hemorrhages surrounding vessels
near disc border
Vessels: Attenuated retinal arterioles
CENTRAL RETINAL VEIN OCCLUSION
Disc: Virtually obscured by edema and hemorrhages
Retina: Extensive blot retinal hemorrhages in all quadrants
to periphery
Vessels: Dilated tortuous veins; vessels partially obscured
by hemorrhages
INFERIOR BRANCH RETINAL ARTERY
OCCLUSION DUE TO EMBOLUS
Disc: Prominent embolus at retinal artery bifurcation
Retina: Inferior retina shows pale, milky edema; superior
retina is normal
Vessels: Inferior arteriole tree greatly attenuated and irregular;
superior vessel is normal
NONPROLIFERATIVE DIABETIC RETINOPATHY
Disc: Normal
Retina: Numerous scattered exudates and hemorrhages
Vessels: Mild dilation of retinal veins
Page 8

1514
Common Pathologies of the Eye
PROLIFERATIVE DIABETIC RETINOPATHY
Disc: Net of new vessels growing on disc surface
Retina: Numerous hemorrhages, new vessels at superior
disc margin
Vessels: Dilated retinal veins
END STAGE DIABETIC RETINOPATHY
Disc: Partially obscured by fibrovascular proliferation
Retina: Obscured by proliferating tissue; small area of
retina with hemorrhage seen through “window” of
fibrovascular membrane
Vessels: Abnormal new vessels in fibrous tissue
Vitreous: Prominent fibrovascular tissue
ADVANCED HEMORRHAGIC
MACULAR DEGENERATION
Disc: Normal
Retina: Large macular scar with drusen; prominent
macular hemorrhage
Vessels: Normal
MACULAR DRUSEN (COLLOID BODIES)
Disc: Normal
Retina: Extensive white drusen of the retina
Vessels: Normal
INACTIVE CHORIORETINITIS (TOXOPLASMAS)
Disc: Normal
Retina: Well-circumscribed lesion with areas of hyperpigmentation
and atrophy of retina, white sclera showing through
Vessels: Normal
ADVANCED RETINITIS PIGMENTOSA
Disc: Normal
Retina: Scattered retinal pigmentation in classic bone
spicule pattern
Vessels: Greatly attenuated
Page 9

1716
Common Pathologies of the Eye
RETINAL DETACHMENT
Disc: Normal
Retina: Gray elevation in temporal area with folds in
detached section
Vessels: Tortuous and elevated over detached retina
BENIGN CHOROIDAL NEVUS
Disc: Normal
Retina: Slate gray, flat lesion under retina; several drusen
overlying nevus
Vessels: Normal
PAPILLEDEMA
Disc: Elevated, edematous disc; blurred disc margins;
vessels engorged
Retina: Flame retinal hemorrhage close to disc
Vessels: Engorged tortuous veins
OPTIC NEURITIS
Disc: Elevated with blurred margins
Retina: Mild peripapillary edema
Vessels: Mild dilation of vessels on disc
OPTIC ATROPHY
Disc: Margins sharp and clear; pale white color
Retina: Normal
Vessels: Arteries attenuated; veins normal
GLAUCOMATOUS CUPPING OF DISC
Disc: Large cup, disc vessels displaced peripherally;
pale white color; pigment ring surrounding disc
Retina: Normal
Vessels: Normal
Page 10

The Ear
Since symptoms of ear disease are relatively few in number
and frequently non-specific, a clinical examination of the ear
is important in the management of ear disorders.
When a patient complains of ear pain, examination of the ear is
indicated to differentiate whether the patient’s disorder is an ear
infection or a disorder originating in adjacent structures, such as
the tempomandibular joint, the teeth or the tonsils. As the only
window into the middle ear, the appearance and behavior of the
tympanic membrane offers valuable information about possible
disease within the middle ear.
Fortunately, the ear provides easy access for examining and
diagnosing disorders of the complex and interrelated ear, nose
and throat system. The Welch Allyn otoscope, when used
correctly, is the single most important diagnostic tool available
to the practitioner for determining whether the ear is the source
of the patient’s complaint.
Otoscopy is one of the primary methods a practitioner uses
for diagnosing patient complaints for the entire ear-nose-throat
complex. Use of a well-designed otoscope which provides illumination, magnification and air pressure capability for checking
tympanic membrane mobility is, therefore, essential, allowing
the practitioner to view the ear canal and, in particular, the
tympanic membrane with clarity.
The examination that follows this section uses the Welch Allyn
otoscope, which incorporates many features that aid in achieving
an accurate, thorough examination.
1918
Outer
Ear
Epitympanic
Recess
Tympanic Cavity
Stapes
Tympanic Membrane
Malieus
Incus
Semicircular Canals
Vestibule
Endolymphatic
Duct and Sac
Cochea
Eustachian
Tube
External Ear
Canal
Page 11
2120
2.5 mm 3 mm 4 mm 5 mm
3 mm 5 mm 7 mm
2.5 mm 4 mm
The Otoscope
THE WELCH ALLYN MACROVIEW
™
otoscope features a patented optical system that provides the
practitioner with an increased field of view and magnification
to get a large, clear image of the tympanic membrane. Welch
Allyn’s traditional diagnostic otoscopes feature a wide-angle
magnified viewing lense.
Fiber optics and halogen light
produce optimum illumination
The Welch Allyn otoscope uses both fiber optic technology
and HPX
™
halogen illumination. Fiber optic light transmission provides a 360º ring of light without visual obstruction
or specular reflection. This distal light results in glare-free
viewing and an easier examination.
Focusing capability (MacroView Otoscope Only)
The Welch Allyn MacroView otoscope has the capability to zoom
in or out on the area in view, resulting in a clearer image to aid
in diagnosis. A focusing wheel, conveniently located on each
side of the otoscope and the back eyepiece, is available to the
practitioner for adjusting the focal length. The adjustable focal
length can compensate for both the practitioner’s vision and
the length of the patient’s ear canal, thus creating the clearest
view of the tympanic membrane possible.
Pneumatic otoscopy capability
When examining tympanic membrane mobility, the
ability to perform pneumatic otoscopy is extremely
valuable. The Welch Allyn otoscope incorporates
a closed system and an airtight seal.
Specula attachment and removal
The Welch Allyn MacroView otoscope features a
unique specula attachment and removal design, the
TipGrip, which provides the practitioner with a secure attachment between
the specula and the otoscope during the exam. After the examination is
complete, the tip can be released from the otoscope by turning the TipGrip
counterclockwise or by simply twisting off the tip with one hand, as is the
technique with traditional otoscope models.
SPECULUM OPTIONS
The examiner can choose from three types of specula:
The first type of speculum is reusable and made of lightweight, durable
polypropylene. Reusable specula are available in four sizes: 2.5mm,
3mm, 4mm and 5mm.
The second type of speculum is the Universal KleenSpec
®
, a disposable,
economical and convenient tip. KleenSpec
®
tips are made of nontoxic
plastic and are available in two sizes: 2.75mm (pediatric) and
4.25mm (adult).
The third type of speculum exclusively available for traditional Welch
Allyn scopes is SofSpec
®
, designed with a rigid plastic base and a special
soft material at the distal end. SofSpec
®
fits snugly into the external
ear canal, providing the practitioner with the finest seal available for
pneumatic otoscopy. These specula are available in three sizes: 3mm, 5mm,
and 7mm and may be cleaned or sterilized by conventional methods.
In order to obtain the maximum field of view, the examiner should
always select the largest size speculum which fits comfortably into the
patient’s ear canal.
The following guidelines may be helpful:
REUSABLE
KLEENSPEC
®
SOFSPEC
®
Default Focus: Optimal setting for
most ear examinations.
Throat illuminator: Provides light in a
handy built-in penlight.
MacroView Otoscope
with Throat Illuminator
Patient Size
Adults 4 mm or 5 mm
Children 3 mm or 4 mm
Infants 2.5 mm or 3 mm
Adjustable Focus: Ability to zoom in
or out to fine tune view.
TipGrip: Ensures ear specula
is fastened securely and
easliy disposed
Insufflation Port: Creates closed
system for pneumatic otoscopy to
assess middle ear disorders. Apply
positive and negative air pressure
and view tympanic membrane.
Traditional
Otoscope
Page 12

2322
How to Conduct an Otoscopic Examination
1. Carefully inspect the pinna and post auricular skin. Gently palpate the pinna
to determine if any tenderness exists.
2. Inspect the entrance to the ear canal for debris or pus, which might interfere
with further examination.
3. Choose the largest speculum that can comfortably be inserted into the ear
canal. Straightening the outer ear canal makes insertion of the speculum easier.
For adults, this is accomplished by retracting the pinna upwards and backwards.
For children, this is accomplished by retracting the pinna horizontally backwards.
4. When using the MacroView
TM
otoscope, set the focusing wheel of the otoscope
to the default position by aligning the green line on the focusing wheel with the
corresponding green dot on the side of the instrument. You will feel the focusing
wheel settle into the default setting. The majority of the exams can be completed
at the default focusing position.
5. There are two common ways to hold the otoscope. The first way is
to hold the otoscope like a hammer by gripping the top of the power
handle between your thumb and forefinger, close to the light source. You
can conveniently hold the bulb of the pneumatic attachment between the
palm of the same hand and the power handle. It is recommended that
you extend the middle and ring finger outward so they come into contact
with the person’s cheek. This way, any sudden flinch by the patient will
not cause the otoscope to be jammed in the ear canal.
The otoscope can also be held like a pencil, between the thumb and the
forefinger, with the ulnar aspect of the hand resting firmly but gently
against the patient’s cheek. You can hold the bulb of the pneumatic
attachment in the palm of the same hand. If the patient turns or moves,
the otoscope will move in unison with the patient’s head. This will avoid
possible injury to the ear canal or even the tympanic membrane.
It is very important that the otoscope be held correctly, particularly
when examining children. A sudden movement by the patient could
cause the skin on the inside of the ear canal to be pierced by the end
of the speculum.
6. It may be necessary to adjust the line of sight and the position of the
speculum to get a complete view of the entire ear canal and all areas of
the tympanic membrane. This yields a composite view of the external
canal and the tympanic membrane.
7. If the tympanic membrane or desired area in view is not in focus, the
practitioner has the option to adjust the focal length of the optics system
of the MacroView otoscope. To adjust the focal length, place a finger on
either side of the focusing wheel or on the back eyepiece of the otoscope.
To shorten the focal length or zoom in, rotate the focusing wheel towards
the smaller dashes on the side of the otoscope. To increase the focal length
or zoom out, rotate the focusing wheel towards the longer dashes.
8. After the examination is complete, the used specula should be
removed from the otoscope. Simply twist the specula off or use the
TipGrip feature (MacroView only) by rotating the TipGrip counter
clockwise to disengage the specula.
Page 13

2524
Pneumatic Otoscopy
Pneumatic otoscopy provides practitioners with a simple method for
determining tympanic mobility and helps then recognize many middle
ear disorders.
It is the pneumatic capability and insufflator attachment of the otoscope which enables the examiner to
assess the mobility of the intact tympanic membrane.
This first requires that you use a speculum sufficiently
large to fit snugly into the ear canal in order to
establish an airtight chamber between the canal
and the interior of the otoscope head.
Gently squeezing the insufflator attachment produces small changes
in the air pressure of the canal. By observing the relative movements
of the tympanic membrane in response to the induced changes in
pressure, the practitioner can obtain valuable diagnostic information
about the mobility of the tympanic membrane. When fluid is present
in the middle ear, for example, movement of the tympanic membrane
is generally diminished or absent. The pneumatic otoscope may
also be useful in distinguishing between a thin atrophic intact
tympanic membrane adherent to the medial wall of the middle
ear, which can be made to move, and a large perforation, which
will not move. This procedure provides a simple method for
determining tympanic membrane mobility and is of value in
the recognition of many middle ear disorders.
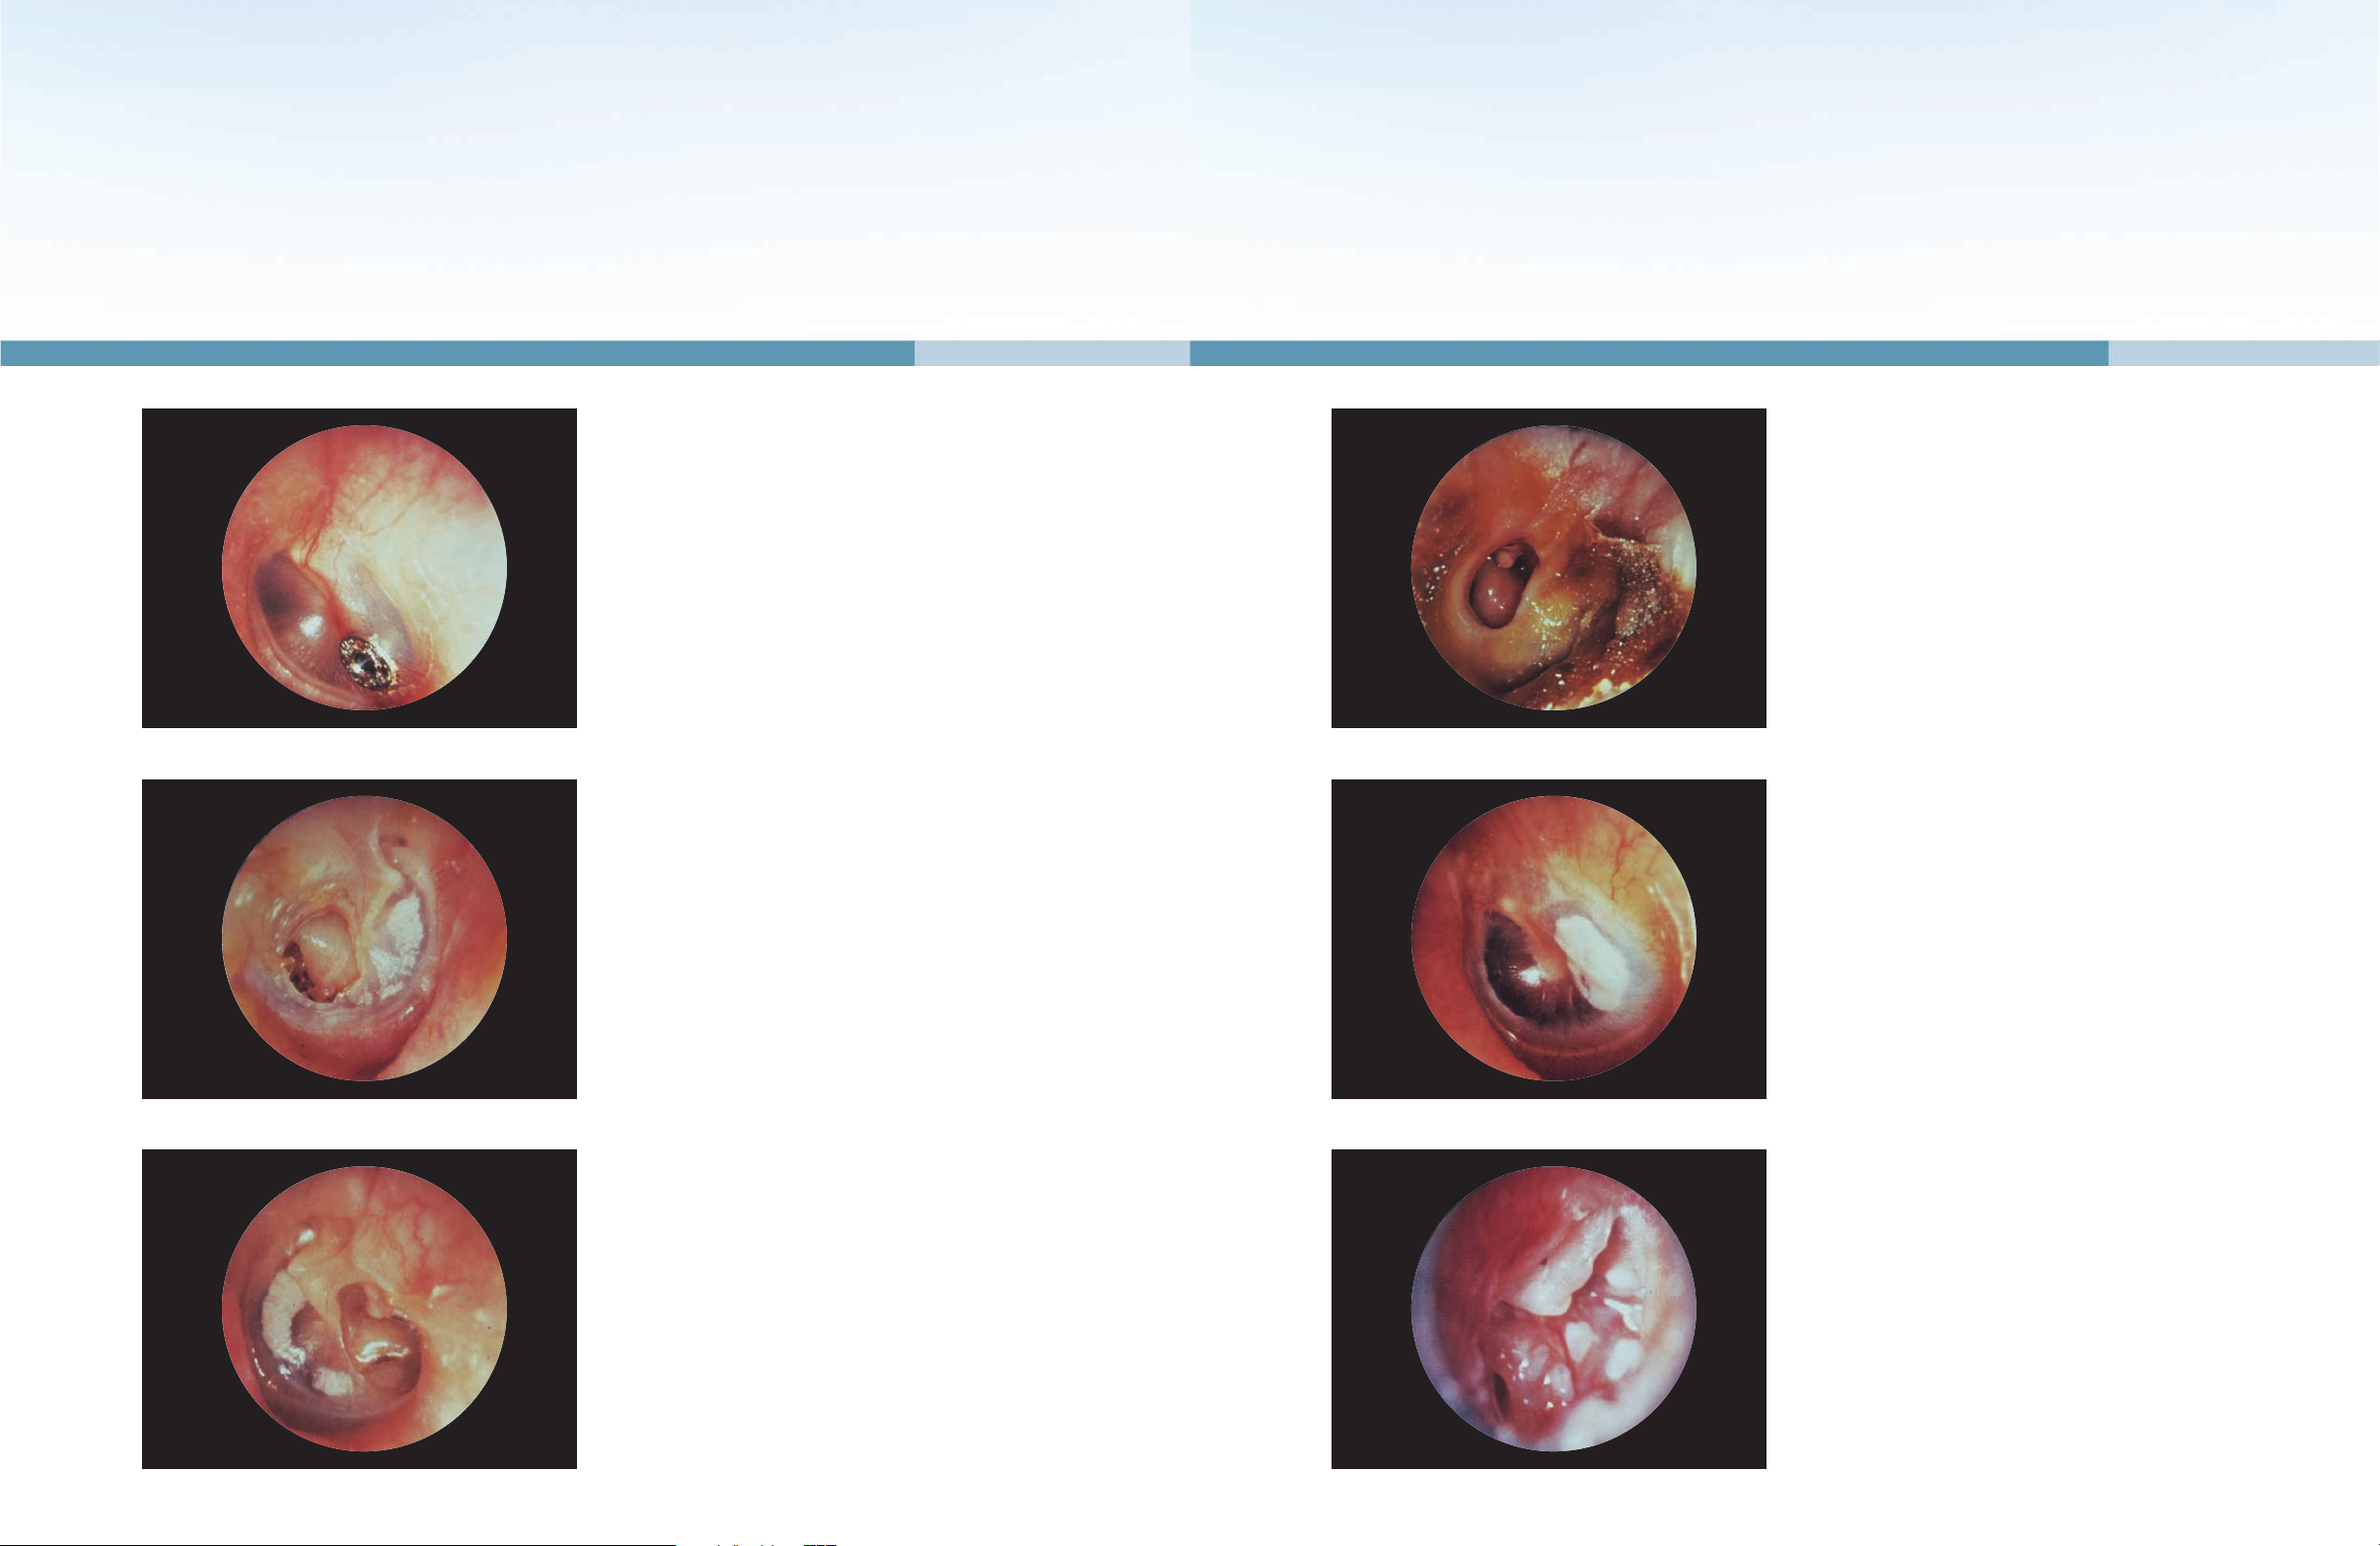
Common Pathologies of the Ear
NORMAL TYMPANIC MEMBRANE (LEFT EAR)
The normal tympanic membrane (TM) is a pale, gray, ovoid
semi-transparent membrane situated obliquely at the end of the
bony external auditory canal. The handle of the malleus is seen
extending downwards and backwards ending at the apex of the
triangular “cone of reflected light”. The long process of the incus
and its articulation with the head of the stapes may frequently be
seen through the postero-superior quadrant of a thin tympanic
membrane. The mobility of an intact TM can readily be assessed
by using the pneumatic attachment to the otoscope.
RED REFLEX (RIGHT EAR)
The introduction of a speculum into the external auditory canal
may cause a reflex dilatation of the circumferential and manubrial
blood vessels supplying the tympanic membrane.
Following a prolonged examination of the ear or in a crying child,
this vasodilatation may produce an appearance mimicking that of
an early acute otitis media.
EXOSTOSIS (LEFT EAR)
Exostoses appear as discreet, hard, round or oval outcroppings
which are sometimes pedunculated. Exostoses in the ear canal are
more often multiple than single and are usually bilateral. They are
usually asymptomatic, extremely slow growing and seldom enlarge
sufficiently to occlude the meatus. Multiple exostoses appear to
result from the prolonged stimulation of the bony external canal
with cold water and are consequently seen more commonly in
persons who swim frequently.
Page 14

2726
Common Pathologies of the Ear
FOREIGN BODY
A varied selection of foreign bodies has been discovered in the ear
canals of children. In this case, a large piece of sponge rubber was
removed. In adults, a forgotten piece of cotton wool is frequently
found. The foreign body or an unsuccessful attempt to remove
it can both product secondary otitis externa or damage to the
tympanic membrane and ossicles. In young children, it is sometimes
safer to administer a short, general anesthetic.
ACUTE OTITIS EXTERNA (LEFT EAR)
Trauma (fingernails, bobby pins, cotton tipped swabs) and moisture
(after showering or swimming) are the most common factors
responsible for the development of acute diffuse otitis externa.
The skin of the ear canal is painful, infected and swollen, and it
may be impossible to visualize the tympanic membrane. There is
often a considerable amount of keratin debris in the canal which
must be removed if local treatment is to be effective. Gram negative
and anaerobic bacteria are the most common pathogens; however,
a culture of material should be a clinical consideration.
KERATOSIS OBTURANS
In this condition of unknown etiology, the bony meatus is
totally occluded by a stony, hard plug of whitish keratin debris.
Keratosis obturans is more frequently seen in patients with
bronchiectasis and chronic sinusitis. Removal of this material is
extremely difficult because of its consistency and its frequent
adherence to the underlying canal skin; a general anesthetic
may be required in some patients.
OTOMYCOSIS
Otoscopic examination in cases of otomycosis reveals a white or
cream colored, thickish debris which may have a fluffy appearance due to the presence of tiny mycelia. When the infection is
caused by Aspergillus niger, it may be possible to identify the tiny
grayish-black conidiophores. The underlying external canal skin
is often inflamed and granular from invasion by fungal mycelia.
Otomycosis may follow the use of topical antibiotic ear drops.
ACUTE OTITIS MEDIA
This acute infection of the middle ear cleft frequently intensifies
upper respiratory tract infections and occurs more commonly
in children. In the early stages of acute otitis media, the tympanic
membrane varies according to the stage of the disease. In early
stages of acute otitis media, the tympanic membrane is retracted
and pink with dilatation of the manubrial and circumferential vessels.
Later, as the disease progresses, the tympanic membrane bulges,
becoming fiery red in color and may eventually perforate, releasing
pus into the external auditory canal.
SEROUS OTITIS MEDIA (RIGHT EAR)
In serous otitis media the tympanic membrane is retracted and
shows decreased mobility with pneumatic otoscopy. The handle
of the malleus is usually foreshortened, chalky-white in color, and
the lateral process is prominent. The presence of a thin, serous
effusion within the middle ear gives the tympanic membrane a
yellowish or even bluish appearance, and in cases of incomplete
eustachian tube obstruction, air bubbles or an air fluid level may
be seen.
Page 15
2928
Common Pathologies of the Ear
TYMPANOSTOMY TUBE (RIGHT EAR)
A tympanostomy tube is often inserted into the tympanic membrane to ventilate the middle ears in cases of chronic serous
otitis media. These tubes come in a variety of sizes, shapes and
materials. The tympanostomy tube should be seen to be in place
in the tympanic membrane with its lumen patent and free of any
exudate or debris.
CENTRAL PERFORATION OF THE
TYMPANIC MEMBRANE (LEFT EAR)
Perforations of the pars tensa of the tympanic membrane can
result from infection or trauma. In this case the large central
perforation resulted from repeated middle ear infections.
HEALED CENTRAL PERFORATION
(RIGHT EAR)
When a large perforation heals, the middle fibrous layer of
the tympanic membrane remains deficient so that a thin semitransparent pseudomembrane resembling an open perforation
may be seen. Gentle use of the pneumatic otoscope will, however,
demonstrate that the drum is intact. This thinned segment of a
healed tympanic membrane lacks the strength of a normal drum
and forceful syringing may result in reperforation.
CHRONIC SUPPURATIVE OTITIS MEDIA
(LEFT EAR)
Chronic suppurative otitis media is characterized by recurrent
painless otorrhea. The discharge may vary from mucoid to
frankly purulent. Pseudomonas, Proteus, and Coliforms are
the three most commonly isolated bacteria; however, fungal
organisms can also coexist.
TYMPANOSCLEROSIS (RIGHT EAR)
Tympanosclerotic plaques of varying sizes are seen as chalky
white deposits in the tympanic membrane. They occur as a
result of a post-inflammatory deposition of thickened hyalinized
collagen fibrils in the middle fibrous layer of the tympanic
membrane and indicate that the patient has had a previous
significant ear infection.
TYMPANOSCLEROSIS INVOLVING
THE OSSICLES (LEFT EAR)
Tympanosclerotic plaques may also occur within the middle
ear cavity. This photograph shows tympanosclerotic deposits
enveloping the incudostapedial joint. A few plaques are also
present on the promontory. Partial or total fixation of the
ossicular chain by tympanosclerosis is responsible for some
cases of acquired conductive hearing loss.
Page 16

3130
Common Pathologies of the Ear
ADHESIVE (ATROPHIC) OTITIS MEDIA
(LEFT EAR)
Following long-standing eustachian tube obstruction, the tympanic
membrane may become atrophic and retracted onto the medial
wall of the middle ear and ossicles, thereby obliterating the middle
ear space. In this case, a thin atrophic tympanic membrane
is draped over the head of the stapes and the tip of the long
process of the incus has been eroded. It can sometimes be
difficult to differentiate an atrophic, immobile, retracted tympanic
membrane from a large central perforation. In this circumstance,
pneumatic otoscopy is often of value.
TRAUMATIC PERFORATION (LEFT EAR)
These perforations result from a variety of causes, including a
blow to the ear, blast injury, the insertion of a cotton tipped swab
or bobby pin, but rarely follow forceful syringing. Traumatic
perforations generally involve the posterior part of the pars
tensa. While traumatic perforations may be of any shape or
size, they are usually small with clean-cut edges. Fresh blood
may be seen in the deep meatus. Most traumatic perforations
heal spontaneously, provided the ear canal is kept clean and
dry to prevent secondary infection.
CHOLESTEATOMA (RIGHT EAR)
A cholesteatoma is a slowly expanding and eroding cyst lined
with stratified squamous keratinizing epithelium which invades
the middle ear cleft. The presence of whitish keratin debris
within a postero-superior perforation indicates the presence of
an underlying epidermoid cholesteatoma. Serious intracranial
complications may result from the expansion and erosion of the
cholesteatoma sac.
Other Ear Care Products
EXTERNAL EAR CANAL
Otoscopy
Otoscopy is one of the primary methods a practitioner uses for diagnosing
patient complaints for the entire ear-nose-throat complex. The otoscope
provides the practitioner with a clear image of the ear canal and the
tympanic membrane to diagnose ear pathologies.
Ear Wash System
Some patients suffer from a build-up of cerumen in the ear canal, which can result in
reduced hearing and prevent the examiner from viewing the tympanic membrane. Ear
washing is a proven method to remove cerumen, and is one of the most commonly
performed procedures in the primary care office. The Welch Allyn Ear Wash System
provides an effective device using suction and irrigation to remove cerumen from
patients of all ages. This easy to use system allows for cleaner and safer irrigation
compared to other methods.
MIDDLE EAR: TYMPANOMETRY
A tympanometer provides the most accurate, objective means of determining
middle ear status. Tympanometric results can indicate otitis media with effusion,
perforated tympanic membrane, patent tympanostomy tube, ossicular disruption,
tympanosclerosis, cholesteatoma, as well as other middle ear disorders.
Welch Allyn MicroTymp 2: A portable and compact tympanometric instrument that
provides accurate, objective results and printed documentation in seconds.
Welch Allyn TM262: A three in one instrument that offers tympanometry and
ipsilateral acoustic reflex testing, with optional manual audiometry in one convenient,
compact design.
INNER EAR: AUDIOMETRY
An audiometer is an electronic instrument for generating sounds that can be used
to measure an individual’s hearing sensitivity. Audiometric measurement of auditory
function can determine the degree of hearing loss, estimate the location of the lesion
within the auditory system that is producing the problem, and can help establish the
cause of the hearing problem.
Welch Allyn AudioScope 3: A portable audiometer to quickly and accurately screen
patients at three different levels: 20, 25, and 40dB, allowing all patients to be
screened with a single instrument.
Welch Allyn AM232: A manual audiometer that has the ability to test hearing in ranges
beyond speech frequencies. With this instrument, the practitioner can obtain the precise
threshold of patients’ hearing to better identify specific patterns of hearing loss.
Inner Ear
Middle
Ear
External
Ear Canal
 Loading...