

Page 1
TM
R
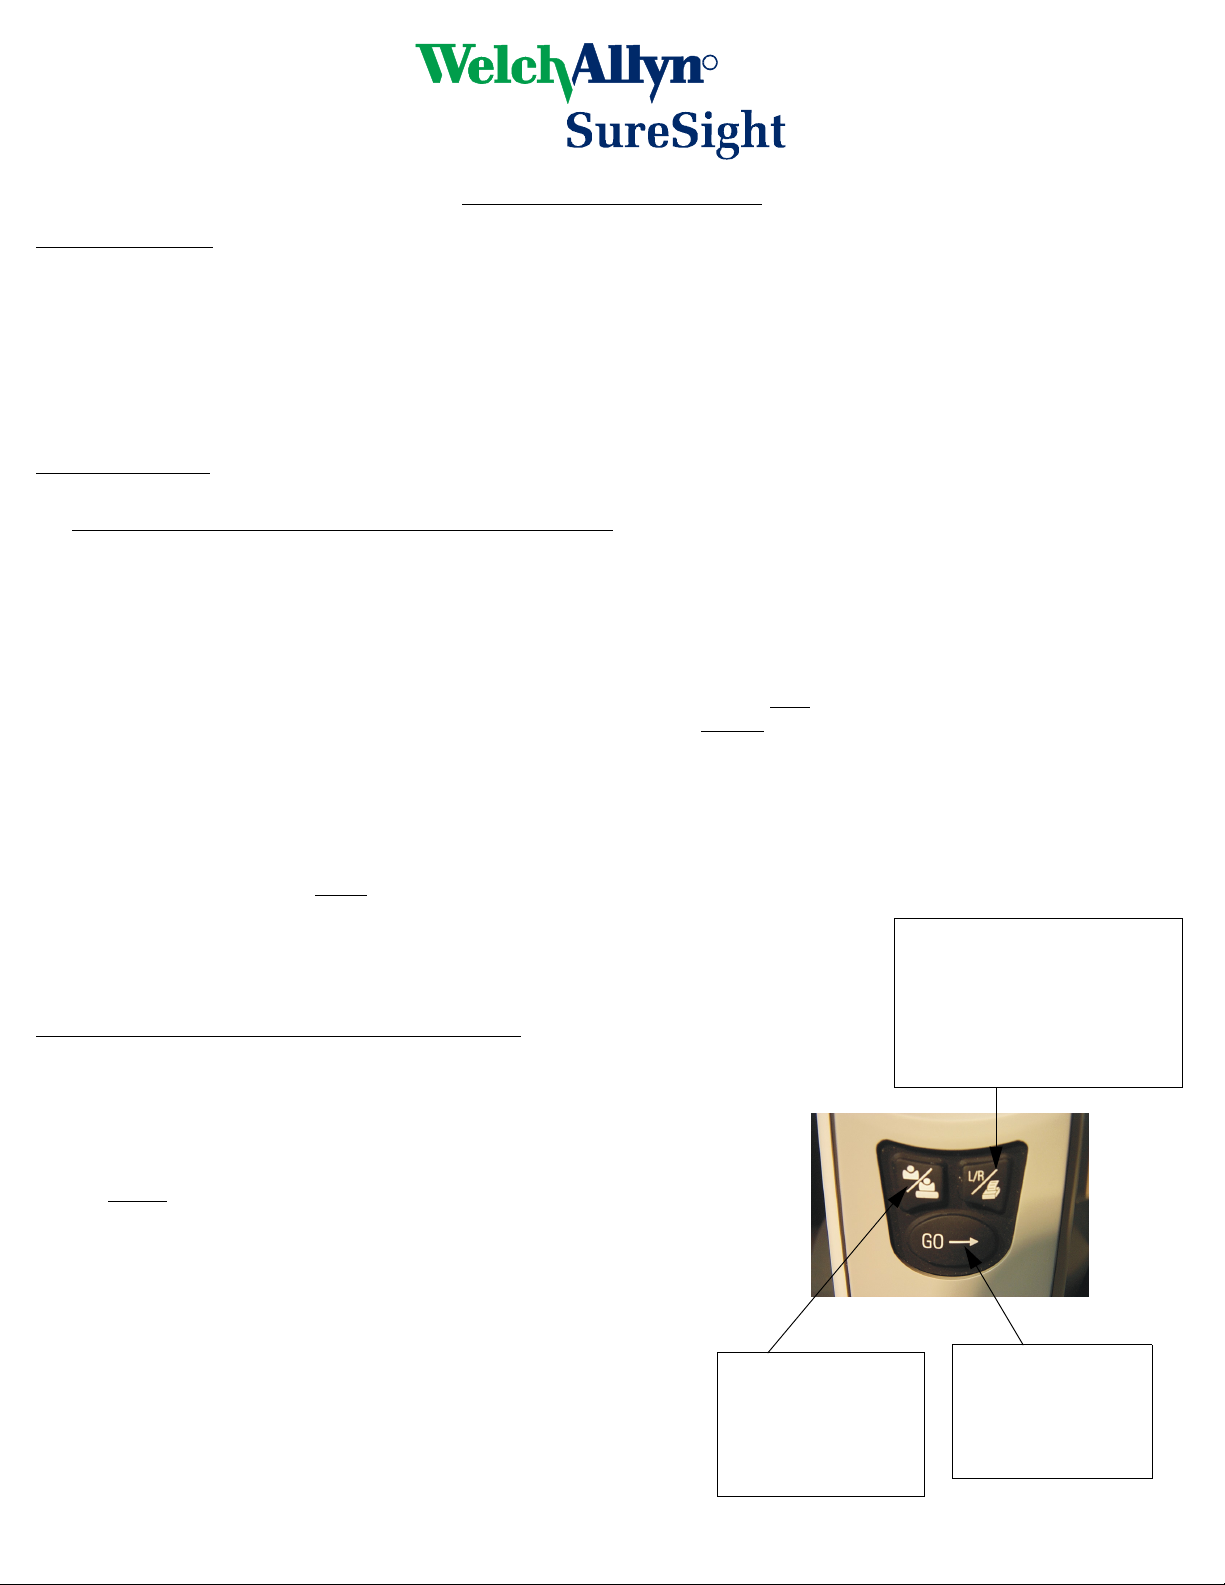
Left/Right Toggle & Print
• Selects eye to re-test
• Prints results (hold button down
while aiming patient side of
SureSight™ at printer until you
hear “tah-dah”)
Clear and Child/Adult
Calibration
• Clears readings
• Changes child/adult
(hold down)
“GO” Button
• Unit on: starts test
• Unit off: recalls old
readings
Quick Reference Guide
Pre-test Set-up:
• Push any button to turn the unit on.
• Position the patient so that the test can be conducted level with, and square to, patient’s eyes.
• Choose the appropriate mode using the child/adult button (child mode for 6 yr. and under). Hold button until you hear a double
beep and see the desired icon on the LCD.
• Explain the test procedure to the patient:
• “Now I will check your eyes. You will see a red light in the middle of the blinking green lights.”
• Position yourself at eye-level and square with the face of the patient.
Test Procedure:
• Push the “GO” button on the unit
• Check that the patient is fixated correctly throughout the test
• Position the unit at the correct distance from the patient:
• When the unit is too far away, you will hear slow, low-pitched beeps.
• Slowly move closer. At the correct distance (14”), you will hear a steady, low tone. ———
• When the unit is too close, you will hear quick, high-pitched beeps.
• The crosshair will flash in synch with the tones.
• Look through the peephole and align the crosshair on the pupil of the patient’s right
will hear a very high-pitched chirping sound over the steady low tone. ° ° ° ° °
• If you are not acquiring data (steady tone without acquiring data chirps):
• Scan around the pupil in an outward-moving spiral until chirps begin, then hold this location.
• Ask the patient if they can see the red light.
• When the test of the right eye is complete, you will hear the “tah-dah” sound. (Testing resumes after 1 second, so you do not
need to press any buttons for the left eye test.)
• Without changing position, rotate
the unit to the left eye and align the crosshair over the pupil. Repeat test.
• At the end of the test, you will hear the “tah-dah” sound again.
• If the unit has not gathered enough good readings from either eye, you
will hear 5 tones when the test stops. - - - - - You must re-test that eye.
• To stop a test at any time, hold any button until 5 tones sound.
Hints To Insure Good Results & Rapid Test:
• Ambient lighting:
• Don’t perform by uncovered windows
• Dimmed light can help for those with small pupils
• Too dim is difficult for those with dark irises
• Entry angle - straight and level
• Rotate
• Fixation: “Look at the red light”
• Remind and monitor
• Match patient age and mode
• These are noted on the print out
• Correct distance/Not taking readings (steady tone without chirps):
• Ensure you are level and square with the patient
• Scan the crosshair around the eye in an outward moving spiral until
chirps begin, hold this location
• Ask patient if they can see the red light
• Aim high if testing through glasses
• Make sure the patient’s eyelids are not occluding the pupil
unit to test left eye
.
• • • • • •
••••••
eye. While the unit is acquiring data, you
Page 2
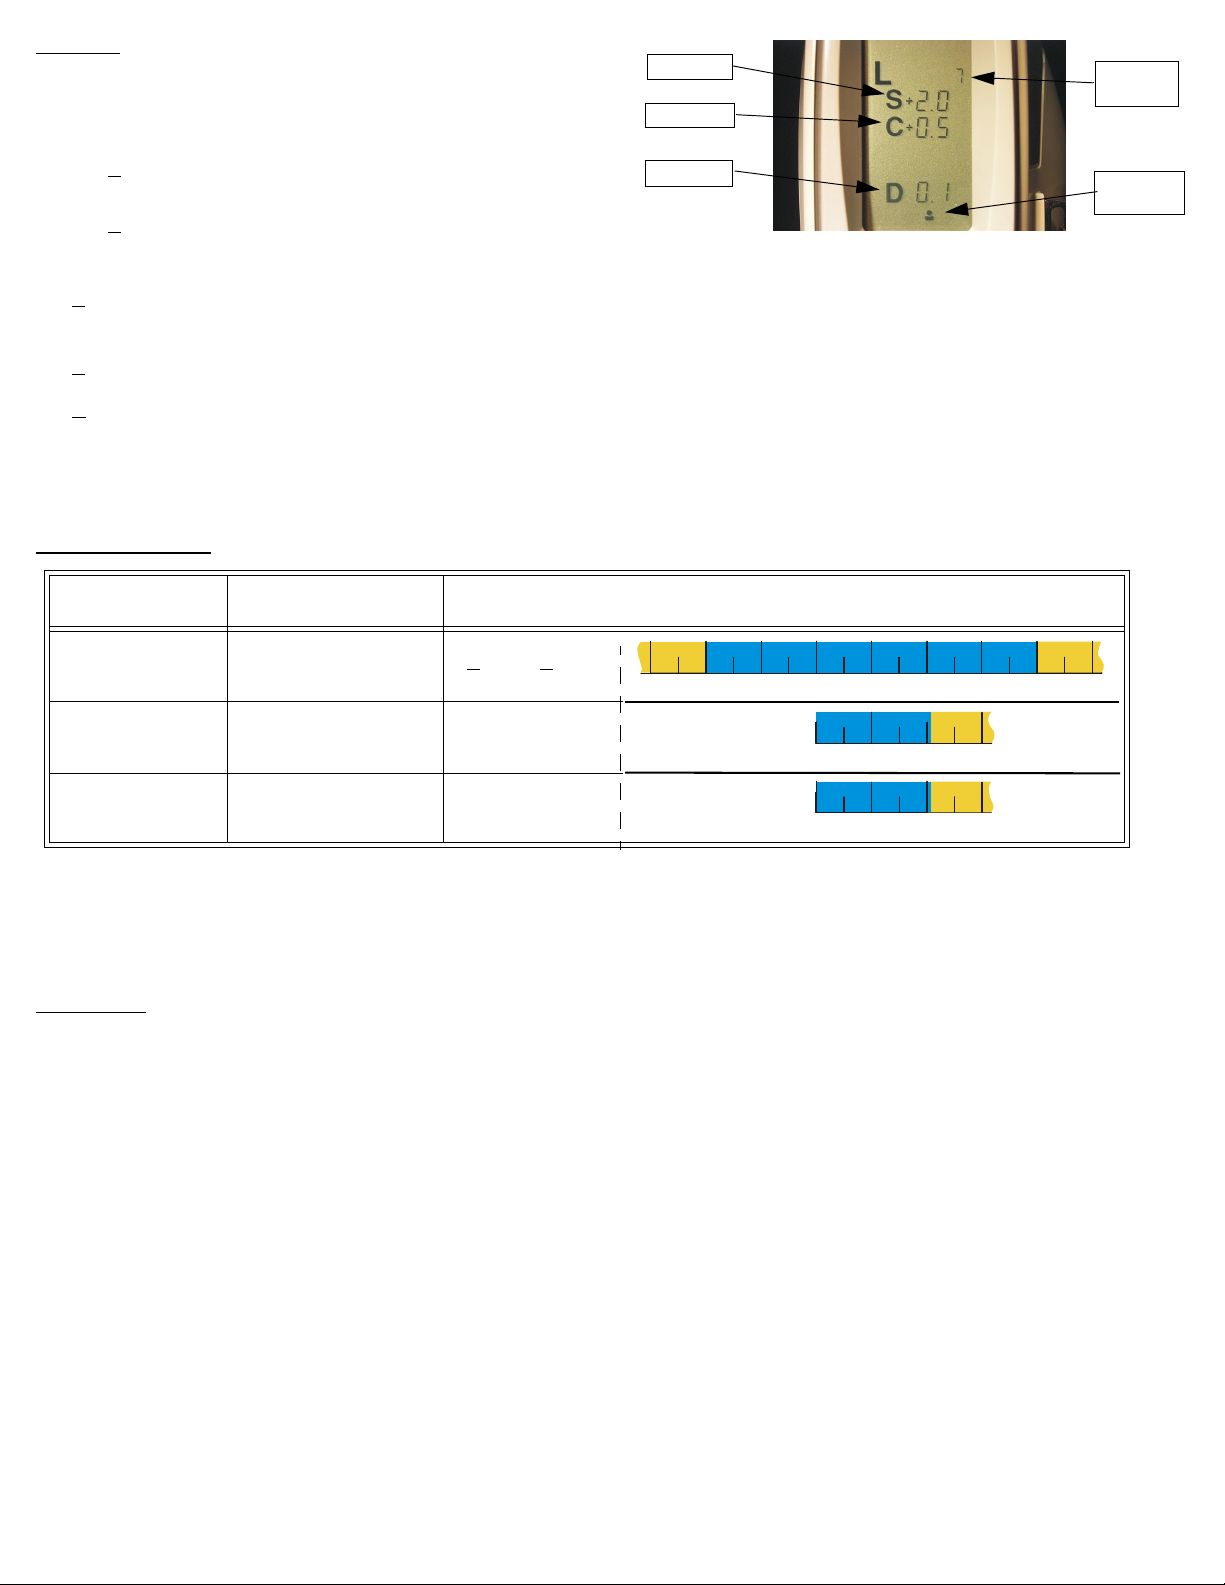
Results
Sphere
Cylinder
Difference
Reliability
Number
Child/Adult
Mode
6 Months 3-5 years*
Sphere <-2.0 or >+3.5 <
-1.0 or > +2.0
Cylinder ------- > 1.0
Difference >1.5 >1.0
0
+1.5-0.5 +0.5-1.5 +2.0+1.0-1.0 0
Within Normal Limits
Outside Normal Limits
Reliability Number indicates the number of good readings
obtained and their consistency, based on a 1 to 9 scale (higher
numbers are better).
6 is typically acceptable
•>
$
• 5 is marginal / repeat the test if possible
•<
4 is poor / repetition of the test is necessary
$
If the patient did not appear to fixate on the unit during data acquisition, repeat the test.
S
is the sphere, or power of the eye measured in diopters. Negative numbers indicate myopia (near-sightedness), positive
numbers indicate hyperopia (far-sightedness).
C
is the cylinder, a measure of astigmatism, or irregular focus of the eye.
D
is the difference in the mean spherical power between the two eyes (displayed in child mode only).
* An asterisk on a reading in child mode indicates the reading is in the referral range for a pre-schooler.
A +9.9 or -9.9 indicates a reading outside the unit’s measurement range.
Referral Criteria
+2.5
0.5 1.0
1.5
1.50.5 1.00
Readings outside the normal limits should be confirmed prior to referral.
It is recommended that referral criteria be agreed upon between you and the eye care specialist receiving your referrals.
Charging
• A charged unit can test patients for approximately 3 hours (continuous use).
• To charge, firmly place the unit into the stand.
• With 15 minutes of on-time remaining, the low-battery indicator will begin to flash on the display. When low-battery
indicator is steady, battery must be recharged.
Part Number 718447 Rev. A
 Loading...