

Page 1
Instrument Description and Operating Instructions
OXYMAT2
Its own oxygen source
Page 2
OXYMAT2
Fig. 1
1
15
5 6
2
8
15
7
13
3
11
Legends
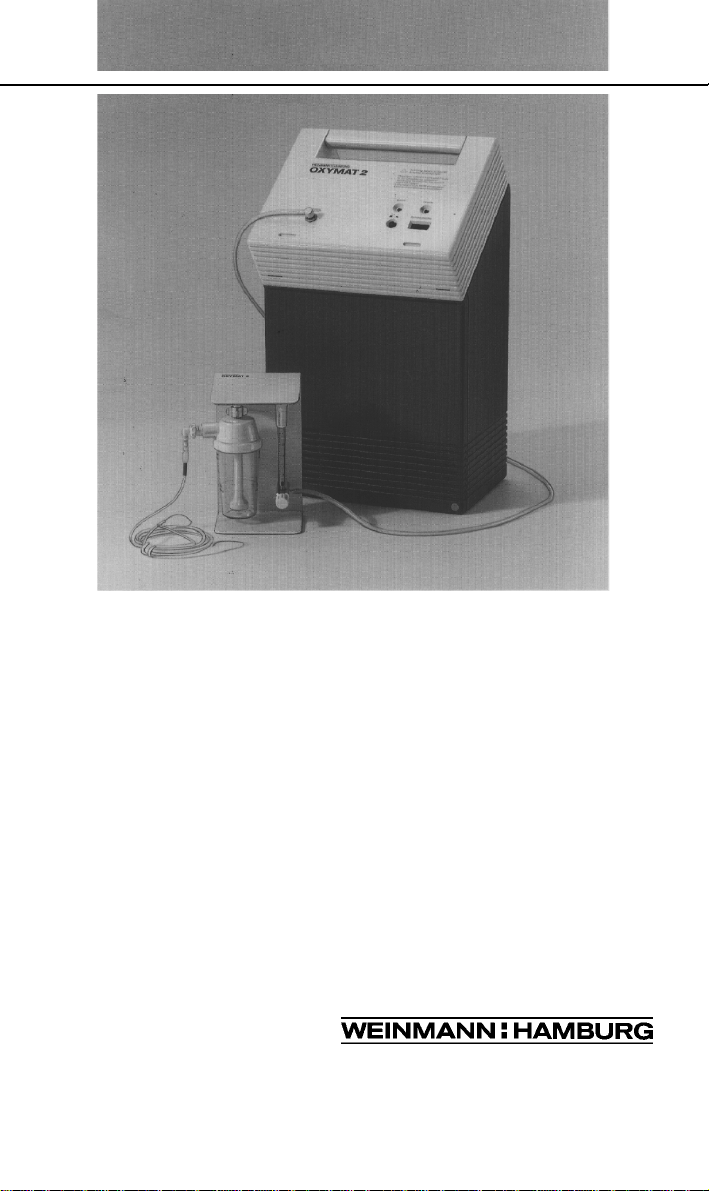
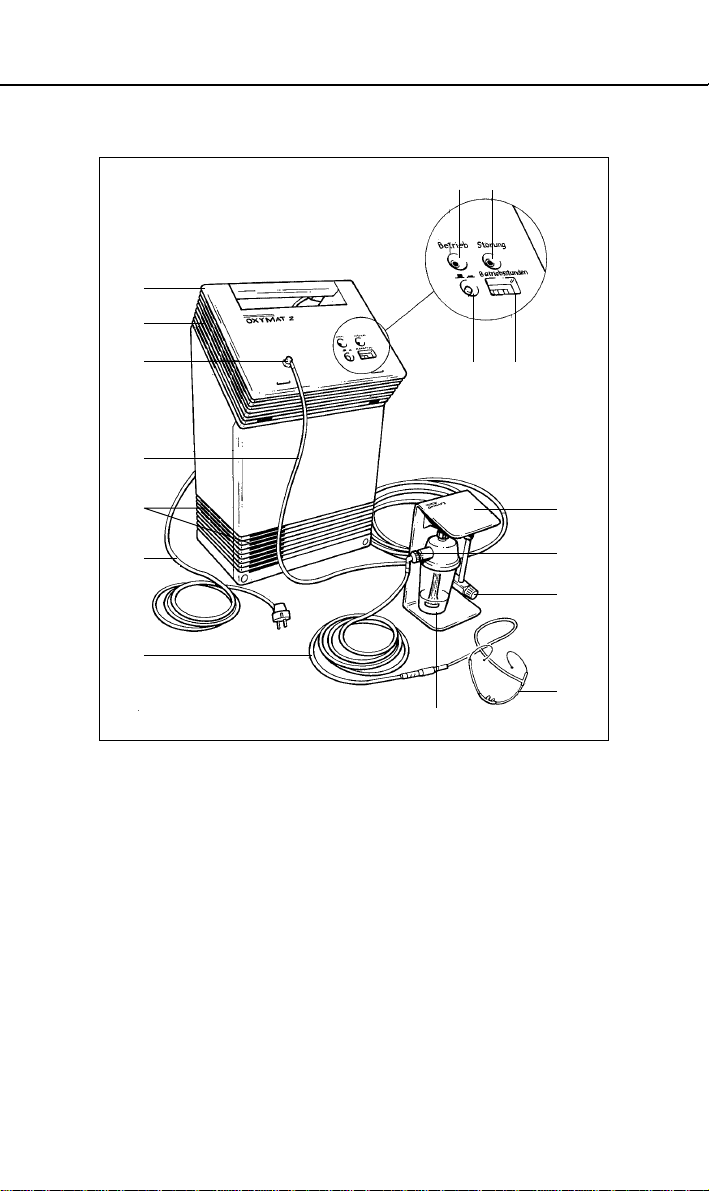
1 OXYMAT2 oxygen concentrator
2 Oxygen outlet
3 Main switch
4 Running time meter
5 On indicator (green)
6 Fault indicator (red)
7 Mains lead
8 Connecting hose, 20m
9 Flow monitor
10 Oxygen dosage control knob
11 Bubbler humidifier
12 Angled hose connection
13 Extension hose for oxygen nasal cannula, 3m
14 Oxygen nasal cannula
15 Air intake slots
4
9
12
10
14
Page 3

Contents
1 Instrument Description 2
1.1 Purpose 2
1.2 Function 2
1.3 Circuit diagram OXYMAT
2 Technical Data 4
3 Extent of Supply 5
4 Accessories and Spare Parts 5
5 Use 5
5.1 Setting up the instrument 5
5.2 Putting into use 6
5.3 After use 6
6 Cleaning and Disinfection 7
7 Checking the Function 8
8 Maintenance 8
9 Safety Precautions 9
10 Guarantee 10
11 Trouble-Shooting 10
2 oxygen concentrator 3
Page
Page 4

1 Instrument Description
1.1 Purpose
The OXYMAT2 oxygen concentrator is used to increase the
percentage of the oxygen volume in the inspired air.
Oxygen therapy is a clear indication in cardiac circulation
disturbances and diseases of the respiratory organs. It is the
most common prophylactic or therapeutic measure in cases of
existing or impending hypoxia.
Where patients who require continuous administration of a
higher oxygen content in the inspired air are treated with the
OXYMAT
made for emergency supply from an oxygen cylinder in the
case of instrument failure (e.g. as a result of power failure).
1.2 Function
An electrically operated compressor sucks-in ambient air
through dust- and fine-mesh filters and forces the slightly
compressed air into containers fitted with molecular filters.
Molecular filters work on the principle of absorption of the
nitrogen present in the air.
The oxygen-enriched air flows from the containers into the
oxygen tank, from which it passes through a pressure
controller and bacterial filter to the oxygen outlet of the
OXYMAT
The rate of flow required can be set on the oxygen dosage
control knob and read-off on the top of the flowmeter cone (see
circuit diagram in Fig. 2).
2 oxygen concentrator, provision must always be
2 oxygen concentrator.
2
Page 5
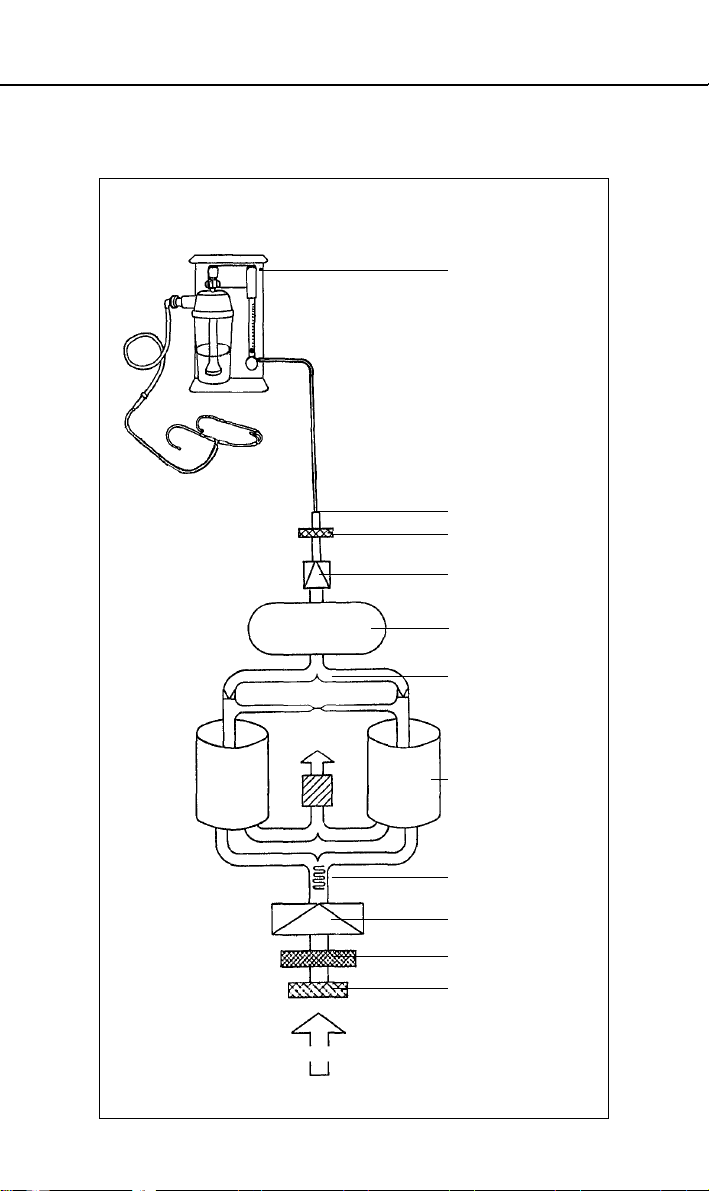
1.3 Circuit diagram
OXYMAT
2 oxygen concentrator
Fig. 2
Flow monitor with
oxygen nasal
cannula,
bubbler humidifier,
flowmeter
Oxygen outlet
Bacterial filter
Pressure controller
Oxygen tank
Nozzle
Exhaust air
Ambient air
III
Non-return valves
Molecular filters
I and II
Cooler
Compressor
Fine-dust filter
Dust filter
3
Page 6
2 Technical Data
G
e
p
r
ü
f
t
e
r
L
ä
r
m
s
c
h
u
t
z
G
e
r
ä
u
s
c
h
a
r
m
0197
Classification acc. to
EU-Guideline 93/42/EEC: II a
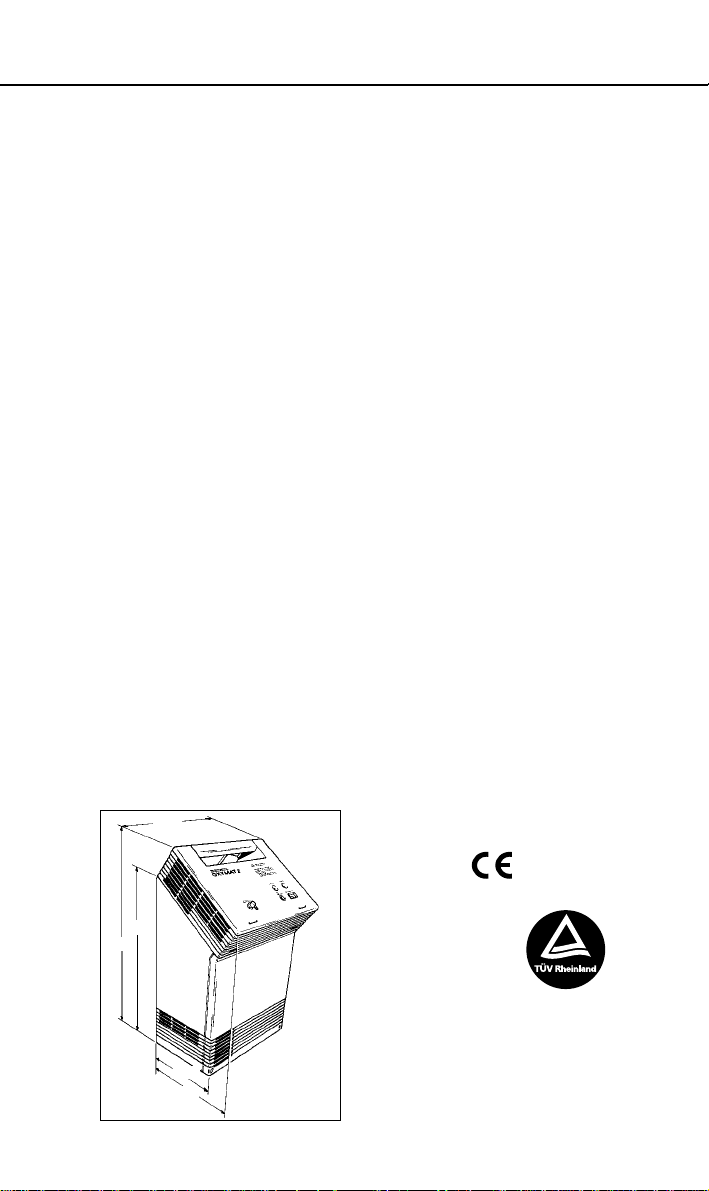
Dimensions: see Dimension Drawing (Fig. 3),
Weight: app. 19.5 kg
Ambient temperature
for operation: +10°C to +40°C
for storage: –20°C to +70°C
Electrical connection: 230 V ~, 50Hz
Wattage and current
consumption: 250 W, 1.4 A
Fuse: T 1.6 AL 250V acc. IEC 127-2
Classification acc. to EN 60601-1
Type of
electr. shock protection: Class II
Level of
electr. shock protection: Type B
Noise level: 50 dB (A) acc. ISO 3743
delivery: 95 ± 2 vol.% O2 to 2 l/min flow
O
2
(values after 10 minutes 93 ± 2 vol.% O
operation, at +20°C and min. 70 vol.% O
50% relative humidity and
1013 mbar)
Flow pressure nasal cannula: 0,05 bar at 4 l/min flow
Flow check: 0,4 – 4 l/min,
Fault warning: visible and audible
Electro magnetic compatibility
(EMC)
Interference suppression: EN 55011 (VDE 0875 T.11)
Interference resistance: IEC 801 part 2 to part 5
Maintenance: every 5.000 running hours
345
Fig. 3
dimensions in mm
to 3 l/min flow
2
to 4 l/min flow
2
surface flowmeter ball
(Subject to changes in construction)
590
4
505
230
286
Page 7

3 Extent of Supply
OXYMAT2 oxygen concentrator, complete WM 12300
Components:
OXYMAT2 oxygen concentrator WM 12301
Flow monitor, complete WM 12250
Extension hose for oxygen nasal cannula, 3 m WM 5720
Oxygen nasal cannula, double outlet,
with ear clips and connecting hose WM 1929
Oxygen nasal cannula, single outlet,
with silicone seal and connecting hose WM 1960
Connecting hose, 20 m WM 12330
4 Accessories and Spare Parts
Bubbler humidifier with angled hose connection WM 1375
Angled hose connection WM 1305
Oxygen nasal cannula, double outlet,
with ear clips and connecting hose WM 1929
Oxygen nasal cannula, single outlet,
with silicone seal and connecting hose WM 1960
Connecting hose, 20 m WM 12330
Extension hose for oxygen nasal cannula, 3 m WM 5720
Oxygen flow monitor without humidifier WM 12255
Gasket (for wing nut) WM 1145/31
Gasket for bubbler humidifier WM 1145/93
Transport-caddy WM 12305
WEINMANN:HAMBURG supplies portable oxygen therapy units
(e.g. OXYTRON
supply outside the home.
2 Mobile) as accessories and for oxygen
5 Use
5.1 Setting up the instrument
The OXYMAT2 oxygen concentrator should be located in a
fixed, not humid and not disturbing position, e.g. in a corridor.
We recommend placing it on a smooth floor, not on a deep-pile
carpet or rug, which might block the air circulation. It must not
be placed too close to a wall (at least 15 cm away, see page 9
Fig. 9).
Fit the 20m connecting hose (do not confuse with the 3 m
extension hose) at the oxygen outlet of OXYMAT2 (see Fig. 4)
and at the flowmeter-inlet of the flow monitor as well (see Fig. 5).
5
Page 8

Fig. 4
Fig. 5
5.2 Putting into use
● If the instrument prior use has been located in
environmental conditions below +10°C, wait for warming of
at least +10°C room temperature.
● Check that the mains voltage agrees with that given on the
instrument (see rating plate, Fig. 6).
● Push the mains lead connector into the instrument (Fig. 6)
and the mains plug into the mains socket.
● Unscrew the bubbler humidifier from the flow monitor, fill up
to the mark with distilled water (Aqua Dest.) and screw on
again.
● Fit the 3-m extension hose (WM5720) to the oxygen
nasal cannula and to the angled socket of the bubbler
humidifier (Fig. 7), ensuring that the connections are tight.
Fig. 6
Rating plate
● Switch on the instrument (green "On" light comes on
permanently, red fault light comes on briefly and an
audible signal sounds.
● Set the flow required on the oxygen dosage control knob
(see Fig. 8).
6
Fig. 7
Page 9
● The instrument is now ready
for use and the oxygen
nasal cannula can be put on.
Fig. 8
Top of
cone
5.3 After use
Switch off the instrument by pressing the main switch. The flow
setting can be left as it is. If no further therapy is to be carried
out that day, empty the bubbler humidifier.
6 Cleaning and Disinfection
The oxygen nasal cannula should never be used by more than
one patient. The bubbler humidifier can be autoclaved and
sterilised at 134°C. We recommend cleaning the oxygen
goggles, hoses, etc. under running water after each use.
The instrument casing and mains lead are kept clean simply by
wiping with commercial disinfectants (observing their
Instructions of Use). Do not allow water or disinfectant to
penetrate into the air intake slots.
The spray humidifier, oxygen nasal cannula and hoses should
be changed before use on a new patient.
For health reasons, the bubbler humidifier should be cleaned
daily and the distilled water (Aqua dest.) regularly changed. In
home therapy, where the bubbler humidifier is used by only
one patient, it is sufficient to use a disinfectant, rinsing the
parts with distilled water after disinfection and drying them.
The air intake slots of the OXYMAT
should be freed from dust every week using a soft brush or the
flexible tube of a vacuum cleaner. Do not probe into the air
intake slots (Fig. 9) with hard objects.
2 oxygen concentrator
7
Page 10

7 Checking the Function
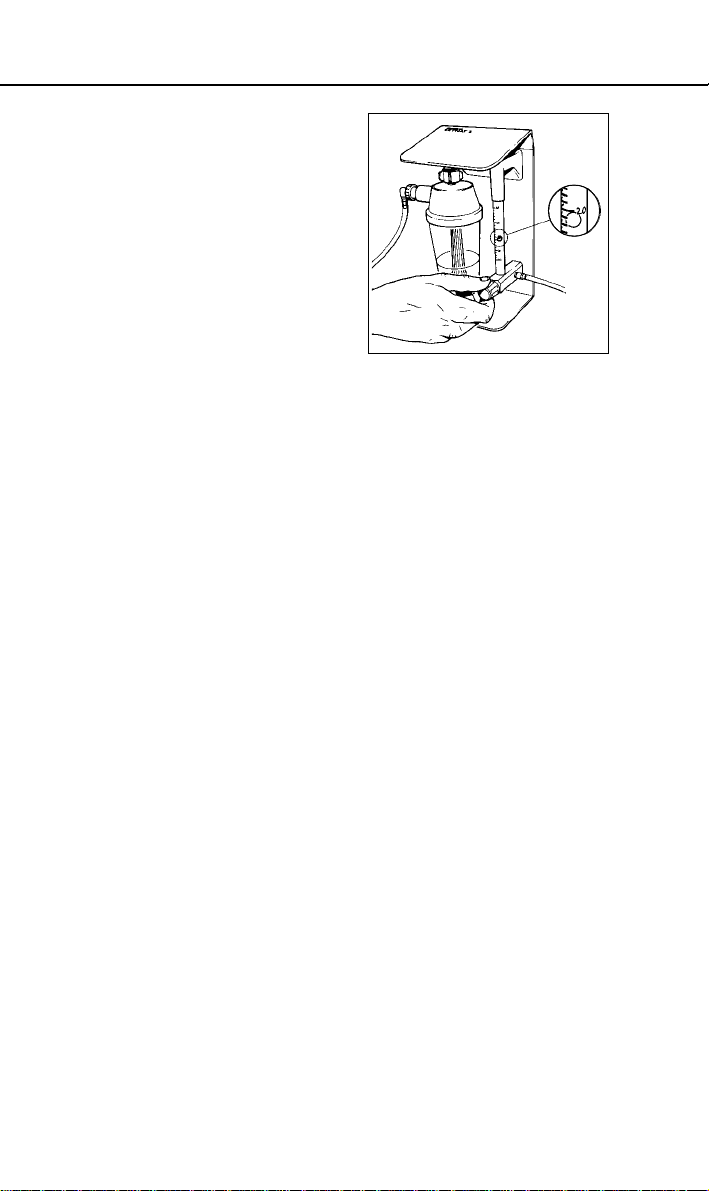
A function check must be carried out twice a year.
● Switch on the OXYMAT
Following:
– the green "On" light comes on
– the red fault light comes on briefly
– a short audible signal sounds.
● The red minute counter of the running time meter must
move round every 6 minutes.
● Check that the humidifier bottle cap and humidifier/flow
monitor connections are tight, retightening by hand if
necessary.
● Set a flow of 2 I/min. on the oxygen dosage control knob
(Fig. 8).
● To check that the dosage monitor is leak-tight, remove the
hose from the angled coupling of the bubbler humidifier
and seal-off the socket.
● The flow monitor system is tight if the flowmeter cone drops
down completely. Should a leak be present, change the
gaskets on the humidifier.
● Check the mains power failure alarm by removing the
mains plug. A continuous audible signal should sound.
● Switch the instrument off at the mains switch.
2 oxygen concentrator.
8 Maintenance
In addition to the function check, we recommend that the
OXYMAT2 oxygen concentrator is overhauled every 5,000
running hours (see running time meter). Once this is achieved
maintenance has to be carried out by specific shilled and
authorized personnel or return to the manufacturer
WEINMANN:HAMBURG.
For safety reasons, a check should be made every three
months to see whether the instrument has reached 5,000
running hours.
Do not despatch the hose systems and oxygen nasal cannula
with the instrument.
N.B.
Please store the original carton, since we recommend the
instrument should be packed in for transport.
8
Page 11

9 Safety Precautions
For your and your patient’s safety!
To conform with EU-Guidelines (93/42/EEC), we have to point
out the following:
● Observe the Operating lnstructions which is a component
of the instrument.
● Any use of or intervention with the instrument requires
accurate knowledge and observation of these Operating
Instructions. The instrument is intended only for the purpose
described.
● With exchange of accessories and spare parts recom-
mended in this operating instructions by using foreign items,
the function as well as the O
● The OXYMAT2 oxygen concentrator produces oxygen.
Items of clothing which come into contact with oxygenenriched air represent an increased fire risk! For this reason,
smoking, naked lights and fires are strictly prohibited in the
vicinity, even after therapy, until the high oxygen concentration in the clothing has dissipated .
● Check the mains voltage.
● Keep the instrument and the hoses free from grease and oil.
● Use the carrying handle to transport the instrument (Fig. 9).
● The left-hand side of the instrument with the air intake slots
(top and bottom)
must be at least 15
cm away from the
wall. The major part
the instrument must
not be located close
to a heat source
(Fig. 9).
● Air intake slots
weakly to clean.
● When red alarm light
and intermittent
sound comes up,
switch of the
instrument.
compatibility may be reduced.
2
Fig. 9
Carrying handle
9
Page 12

10 Guarantee
The instrument is guaranteed for one year from the date of
delivery for defects arising from material or manufacturing faults.
Defects covered by the Guarantee will be rectified under the
terms of our Guarantee Conditions. Plastic, glass and rubber
parts are not covered by the Guarantee. Transport to and from
our works for repair is at the cost of the customer.
WEINMANN:HAMBURG offers no guarantee when the user has
jeopardised the function of the instrument through nonobservation of these Operating Instructions, incorrect use or
handling or unauthorised interference with the instrument. In
such instances, responsibility passes to the user.
Important:
The guarantee is only valid when the purchase invoice is
produced.
11 Trouble-Shooting
Fault
No motor noise,
operating light
does not come
on, power failure
alarm sounds
(continuous
alarm).
Instrument
running, but intermitted audible
alarm and
flashing fault light.
After prolonged
use, instrument
emits audible
alarm, fault light
comes on, no
motor noise.
10
Cause
No mains power.
Faulty fuse.
Instrument overheated. Air intake
slots blocked or
covered.
Motor not
running.
Remedy
Check mains lead
connection. If necessary
check that socket has mains
power (e.g. plug in a lamp).
Remove mains lead plug
from socket and disconnect
mains lead from instrument!
Change fuse (T 1.6AL 250V
acc. IEC 127-2) by squeezing
together the two tongues of the
fuse cartridge, removing and
replacing the cartridge (Fig. 10).
Clean air intake slots.
Instrument too close to the
wall – provide minimum
distance of 15 cm. Allow
instrument to cool down.
Check that air intake slots are
not dirty and that instrument
is in correct distance from
wall. Allow instrument to cool
down, then restart. If alarm
sounds again after a short
time, instrument is faulty.
Notify manufacturer.
Page 13

Fault
No flow at
oxygen nasal
cannula. No
alarm given by
instrument.
Reduced flow.
Cause
Hose connection
interrrupted.
Hose kinked,
faulty gasket or
leaking screw
coupling.
Oxygen distributor
in humidifier
blocked.
Remedy
Check that there is a flow
indication on the flow
monitor. Check that all hose
connections and screw
couplings are tight and
change gaskets if necessary.
Clean oxygen distributor and
replace if necessary.
Should there are any faults be present which cannot be
rectified, contact the manufacturer or having the instrument
overhauled by the manufacturer. Do not continue to use the
instrument once the red fault light has come on.
WEINMANN:HAMBURG supplies various portable oxygen
therapy units suitable as emergency reserve for home use (e.g.
in case of power failure). For oxygen supply outside home,
WEINMANN:HAMBURG supplies the OXYTRON 2 Mobile,
which enables the patient to leave his home for fairly long
periods of time without having to interrupt oxygen therapy. Ask
your supplier or consultant for details.
Fig. 1 0
Spare fuse
Fuse holder
11
Page 14

Gottlieb Weinmann
Geräte für Medizin und Arbeitsschutz GmbH+Co.
P.O. Box 54 02 68 · D-22502 Hamburg
Phone 40/5 47 02- 0 · Telefax 40/54 70 24 61
Teletex 40 37 53 · Telex 17 40 37 53
WM 16091b – 05/95
Paper free of chlorine bleaching-agents
 Loading...