

Page 1
My Cloud™ Home & My Cloud™ Home Duo
Personal Cloud Storage
User Manual
Page 2

Accessing Online Support
▪ Online Learning Center – Start here to get the most out of your cloud storage device: www.wdc.com/setup
▪ Registration – Register your WD product to get the latest updates and special offers at: register.wdc.com
▪ Technical Support – Get technical and other support through email at: support.wdc.com/support
▪ Warranty & RMA Services – Get warranty, product replacement (RMA), RMA status, accessories, and data
recovery information at: support.wdc.com/warranty
▪ Knowledge Base – Search by keyword, phrase, or answer ID at: support.wdc.com/knowledgebase
▪ WD Community – Share your thoughts and connect with other WD users at: community.wdc.com
▪ Phone Support – Get phone numbers for contacting support by region at: support.wdc.com
Page 3

Table of Contents
_________
Accessing Online Support.................................................................................ii
_________
1 About Your My Cloud Home Device.............................................................1
Features.............................................................................................................................1
Kit Contents......................................................................................................................2
Requirements................................................................................................................... 3
Desktop and Mobile App Operating System Compatibility............................................3
Web Browser Compatibility...............................................................................................3
Internet Connectivity..........................................................................................................3
Product Description.........................................................................................................4
Front LED..............................................................................................................................4
Rear Layout..........................................................................................................................5
Power Button....................................................................................................................... 5
Reset Button........................................................................................................................ 6
USB Port(s)........................................................................................................................... 6
Ethernet Port........................................................................................................................6
Handling Precautions.......................................................................................................7
_________
2 Getting Started..............................................................................................8
Connecting a My Cloud Home Device...........................................................................8
Basic Hardware Connections.............................................................................................8
Software Set Up...............................................................................................................8
My Cloud Home Mobile App.............................................................................................. 9
MyCloud.com Web App....................................................................................................10
My Cloud Home Desktop App..........................................................................................10
Registering Your Device................................................................................................10
_________
3 Backup, Sync & Add Content.......................................................................11
Backup – Mobile Device Camera................................................................................... 11
Auto Camera Backup..........................................................................................................11
Backup – USB Device..................................................................................................... 12
My Cloud Home Mobile App.............................................................................................12
Sync Online Cloud Content...........................................................................................12
Sync Desktop Content................................................................................................... 13
Sync My Cloud Home Content......................................................................................13
Add Content – In-Real-Time.......................................................................................... 14
Add Content – Drag-and-Drop......................................................................................14
MyCloud.com Web App....................................................................................................14
My Cloud Home / My Cloud Home Duo
User Manual
i
Page 4

Desktop App.......................................................................................................................14
Apple® Time Machine® Backup.....................................................................................14
Microsoft® Windows® Backup...................................................................................... 15
_________
4 Search & Viewing Content.......................................................................... 16
Searching Content..........................................................................................................16
Content Viewing Options..............................................................................................16
_________
5 Deleting Content..........................................................................................17
My Cloud Home Mobile App..........................................................................................17
MyCloud.com Web App.................................................................................................17
_________
6 Sharing Content........................................................................................... 18
Mobile App......................................................................................................................18
Share Content - Mobile App............................................................................................. 18
Delete Share - Mobile App................................................................................................18
Web App.........................................................................................................................18
Share Content - Web App................................................................................................ 18
Delete Share - Web App................................................................................................... 19
Desktop App................................................................................................................... 19
Share Content - Desktop App...........................................................................................19
Delete Share - Desktop App.............................................................................................20
_________
7 Invite or Remove a User...............................................................................21
Invite a User - Mobile App............................................................................................. 21
Remove a User - Mobile App.........................................................................................21
_________
8 Device Settings............................................................................................22
My Cloud Home Mobile App.........................................................................................22
Modifying Device Name....................................................................................................22
Firmware Version...............................................................................................................22
Reboot Device...................................................................................................................22
Erase All Data & All Users..................................................................................................23
Remote Shut Down........................................................................................................... 23
MyCloud.com Web App................................................................................................24
Modifying Device Name....................................................................................................24
Firmware Version...............................................................................................................24
Users...................................................................................................................................24
Device
Reboot Device...................................................................................................................25
Remote Shut Down...........................................................................................................25
Configuration........................................................................................................ 25
My Cloud Home / My Cloud Home Duo
User Manual
ii
Page 5

Erase All Data & All Users..................................................................................................26
_________
9 Personal Settings......................................................................................... 27
My Cloud Home Mobile App.........................................................................................27
Edit Profile Picture.............................................................................................................27
Edit My Cloud Account Name.......................................................................................... 27
Change My Cloud Account Password.............................................................................28
Set Passcode..................................................................................................................... 28
MyCloud.com Web App................................................................................................28
Edit
Profile Picture.............................................................................................................29
Edit My Cloud Account Name..........................................................................................29
Change My Cloud Account Password.............................................................................29
_________
10 Managing Services.....................................................................................30
_________
11 Additional Features & Functions................................................................ 31
Remove a Device Owner............................................................................................... 31
App Permissions............................................................................................................. 31
Managing Storage...........................................................................................................31
RMA - Replacing a Drive................................................................................................32
Removing........................................................................................................................... 32
Adding................................................................................................................................33
_________
12 FAQ..............................................................................................................35
Power Adapter Compatibility.......................................................................................35
How to get an RMA to replace a defective product, or obtain a power supply
or USB cable for a WD product...............................................................................35
_________
13 Compliance and Warranty Information....................................................36
Regulatory Compliance.................................................................................................36
FCC Class B Information................................................................................................... 36
ICES-003/NMB-003 Statement........................................................................................36
Safety Compliance............................................................................................................ 36
CE Compliance For Europe.............................................................................................. 36
Power Mode.......................................................................................................................37
Environmental Compliance (China)..............................................................................37
Warranty Information.....................................................................................................37
Obtaining Service..............................................................................................................37
Limited Warranty...............................................................................................................38
Warranty Information (Australia/New Zealand).............................................................38
Obtaining Service..............................................................................................................39
My Cloud Home / My Cloud Home Duo
User Manual
iii
Page 6

Warranty............................................................................................................................ 39
GNU General Public License (“GPL”)............................................................................40
Third Party Notices – My Cloud Home..........................................................................41
MPEG-4 Visual – MPEG-LA................................................................................................. 41
H.264 AVC – MPEG-LA....................................................................................................... 41
Third Party Notices – My Cloud Home Duo..................................................................41
MPEG-2 - MPEG-LA.............................................................................................................41
MPEG-4 Visual – MPEG-LA................................................................................................. 41
H.264 AVC – MPEG-LA.......................................................................................................42
HEVC Advance...................................................................................................................42
My Cloud Home / My Cloud Home Duo
User Manual
iv
Page 7

1
About Your My Cloud Home Device
About Your My Cloud Home Device
▪ Features
▪ Kit Contents
▪ Requirements
▪ Product Description
▪ Handling Precautions
Welcome to your My Cloud Home device. Before you get started using your device,
please review the following features and descriptions to get better acquainted with
your product.
Features
One central place to store and organize everything — My Cloud
™
Home storage is
home to all your content. With enough space to keep all your photos, videos and
files in one place at home, you can organize it your way and access from anywhere
with an internet connection.
Quick and simple setup — Set up your My Cloud
™
Home device quickly. Just plug it
into your Wi-Fi router. Then, use your mobile device to visit MyCloud.com/hello to
set up your account, and start backing up, accessing and sharing. No computer
necessary and no monthly fee required!
Everything saved twice with Mirror Mode — My Cloud
™
Home Duo devices comes
equipped with two hard drives and is set to Mirror Mode (RAID 1)*, so all your
photos, videos and
the second drive for extra peace of mind.
files are stored on one drive and automatically duplicated onto
* This feature applies only to a My Cloud
Home Duo device, not a My Cloud Home single-drive device.
Mobile, on-the-go access — Use the My Cloud
™
Home mobile app, desktop app or
MyCloud.com to upload, access and share your favorite memories and stream
videos saved on your My Cloud™ Home device.
Auto backup for photos and videos on your phone — Automatically back up photos
and videos on your phone to the My Cloud™ Home device so you can make room
for more.
USB port to import photos and videos from all your devices — Quickly import photos
and videos from all the different devices scattered around your house, like USB
drives and external hard drives, using the USB port on the back of the My Cloud
flash
™
Home. Keep all your favorite moments, action shots and adventures stored in one
central, organized place.
File search to find content easily — Quickly find photos, videos, movies and docs
using easy-to-use search with the My Cloud™ Home mobile or desktop app, or on
MyCloud.com.
Individual, private spaces for each user — Invite family and friends to create individual
accounts. Each invited person can set up their own private space that only they
have access to on the device. They can manage, access and share their content as
they want.
Third-party applications to customize your way — Tailor your My Cloud
fit your personal needs and preferences using downloadable services, including
to
My Cloud Home / My Cloud Home Duo
User Manual
™
Home device
1
Page 8
About Your My Cloud Home Device
Plex™ Media Server, Dropbox™, Google Drive and more.
Cloud services may be
modified and vary by country.
Cloud account download to keep everything in one place — Store everything in one
place, even content in your favorite cloud accounts. Photos, videos and files from
your cloud accounts are automatically downloaded to your My Cloud™ Home
device, including Dropbox™, Box, Google Drive, Facebook and many more.
Auto backup for all PCs and Mac computers at home — The My Cloud
™
Home device
has enormous capacity and plugs into your network to wirelessly back up every
computer at home to one central place. It works seamlessly with Windows® Backup
and Time Machine software.
Smooth video playback anywhere — Stream your personal videos anywhere, on any
device, using the My Cloud™ Home mobile and desktop app or MyCloud.com.
Quick and easy sharing — Collect all your favorite memories and moments in one
place. With just a few clicks, share photos, videos, documents or entire folders with
friends and family, so nobody misses a thing.
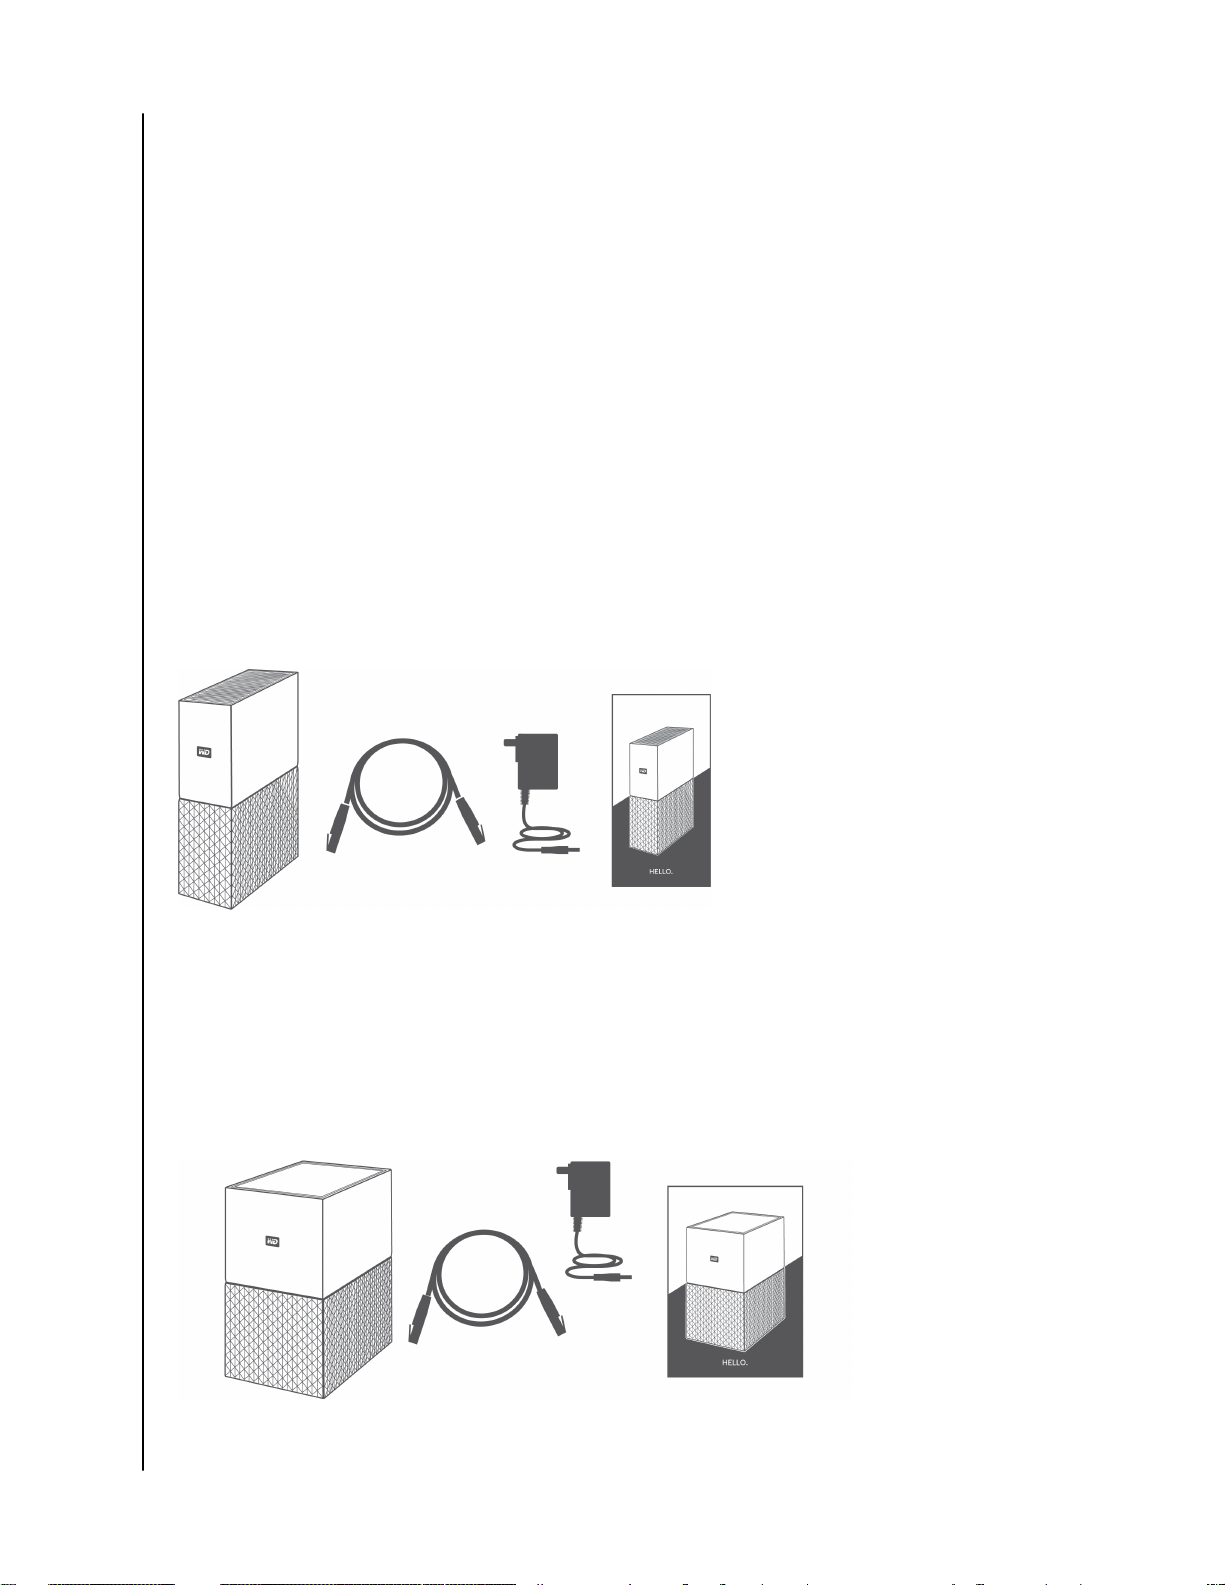
Kit Contents
The My Cloud Home kit includes the following items:
▪ My Cloud Home device (a single-drive unit)
▪ Ethernet Cable
▪ AC power adapter (FAQ: Power Adapter Compatibility)
▪ Quick Install Guide
The My Cloud Home Duo kit includes the following items:
▪ My Cloud Home Duo device (two-bay unit)
My Cloud Home / My Cloud Home Duo
User Manual
2
Page 9
About Your My Cloud Home Device
▪ Ethernet Cable
▪ AC power adapter (FAQ: Power Adapter Compatibility)
▪ Quick Install Guide
Requirements
Desktop and Mobile App Operating System Compatibility
The My Cloud Home desktop app is compatible with the following versions of the
Windows and macOS operating systems. The My Cloud Home mobile app is
compatible with the following versions of the iOS and Android operating systems.
Table 1.1
Windows
Windows 7 OS X Mavericks – 10.9 iOS 9 KitKat – 4.4
Windows 8.x OS X Yosemite – 10.10 iOS 10 Lollipop – 5.x
®
macOS® / OS X
®
iOS
®
Android
™
Windows 10 OS X El Capitan – 10.11 Marshmallow – 6.0
macOS Sierra – 10.12 Nougat – 7.x
When My Cloud Home devices are accessed from a personal computer system via the My
Cloud Home desktop app, a 64-bit operating system is required. Compatibility can vary,
depending on hardware
configuration and operating system. For highest
performance and reliability, always install the latest updates.
Web Browser Compatibility
The My Cloud Home device can be accessed with an Internet browser. Using the
most current, stable combinations of operating system and web browser will
provide the best results. At a minimum, use one of the following browser versions
applicable to your operating system:
▪ Google Chrome
operating systems
▪ Internet Explorer
Windows® 8.1 or Windows® 10 operating systems
▪ Microsoft
▪ Safari
▪ Firefox
®
®
9.0 or later on supported OS X and macOS operating systems
®
45 or later on supported Windows, macOS, Android or iOS operating
systems
▪ Samsung
®
Android KitKat 4.4 or later.
™
50 or later on supported Windows, macOS, Android or iOS
®
11 (11.0.9600.17843) or later on supported Windows
Edge (20.10514) or later on the Windows 10 operating system
Default Browser 1.5 or later on Galaxy S4 to Galaxy S7 devices using
®
7,
Internet Connectivity
▪ My Cloud Home devices must be connected to the Internet. They should be
connected to an available router through the included Ethernet connection. (This
is not a Wi-Fi® device.) Gigabit capability for the router or switch is
recommended to maximize performance. The router requires a Broadband
My Cloud Home / My Cloud Home Duo
User Manual
3
Page 10
About Your My Cloud Home Device
(WAN) Internet connection with an Internet Service Provider (ISP) for initial
setup, software downloads and for accessing the device.
Product Description
▪ Front LED
▪ Power Button
▪ Reset Button
▪ USB Port(s)
▪ Ethernet Port
Front LED
1. Front LED
The front LED on My Cloud Home devices is a single color, white. It is either on, off
or blinks with a certain rhythm to indicate a specific "System Condition". A "System
Condition" list is outlined below in Table 1.2.
Table 1.2
LED Behavior
No LED light illuminated Power is Off or Disconnected
Solid Light - no blinking Device is Ready
Solid Light - no blinking Firmware or Software Update in Progress
Solid Light - no blinking Data Transfer from a USB connected device
Slow "breathing" rhythm Powering Up or Initializing
Slow "breathing" rhythm Reset Button Pressed
Slow "breathing" rhythm Power Button Pressed - My Cloud Home Duo Only
Slow "breathing" rhythm Device Shutdown Sequence Activated Through Mobile App
Fast "breathing" rhythm Device Requires Attention - Device Encountered an Error
System Condition
My Cloud Home / My Cloud Home Duo
User Manual
4
Page 11
About Your My Cloud Home Device
LED Behavior System Condition
Fast "breathing" rhythm USB Device Connection Error
Fast "breathing" rhythm Ethernet Connection Not Available
"Heartbeat" rhythm File System Notification - Check if rebuild is needed - May require WD
Support Team.
"Rapid Blinking" rhythm Image Recovery Mode - Device is rebuilding from an unexpected
action; this process will take some time. May require WD Support
Team.
LED Table Note: Sometimes different 'System Conditions' result in identical "LED
Behavior". Therefore, view each "LED Behavior" within the context of your
operation.
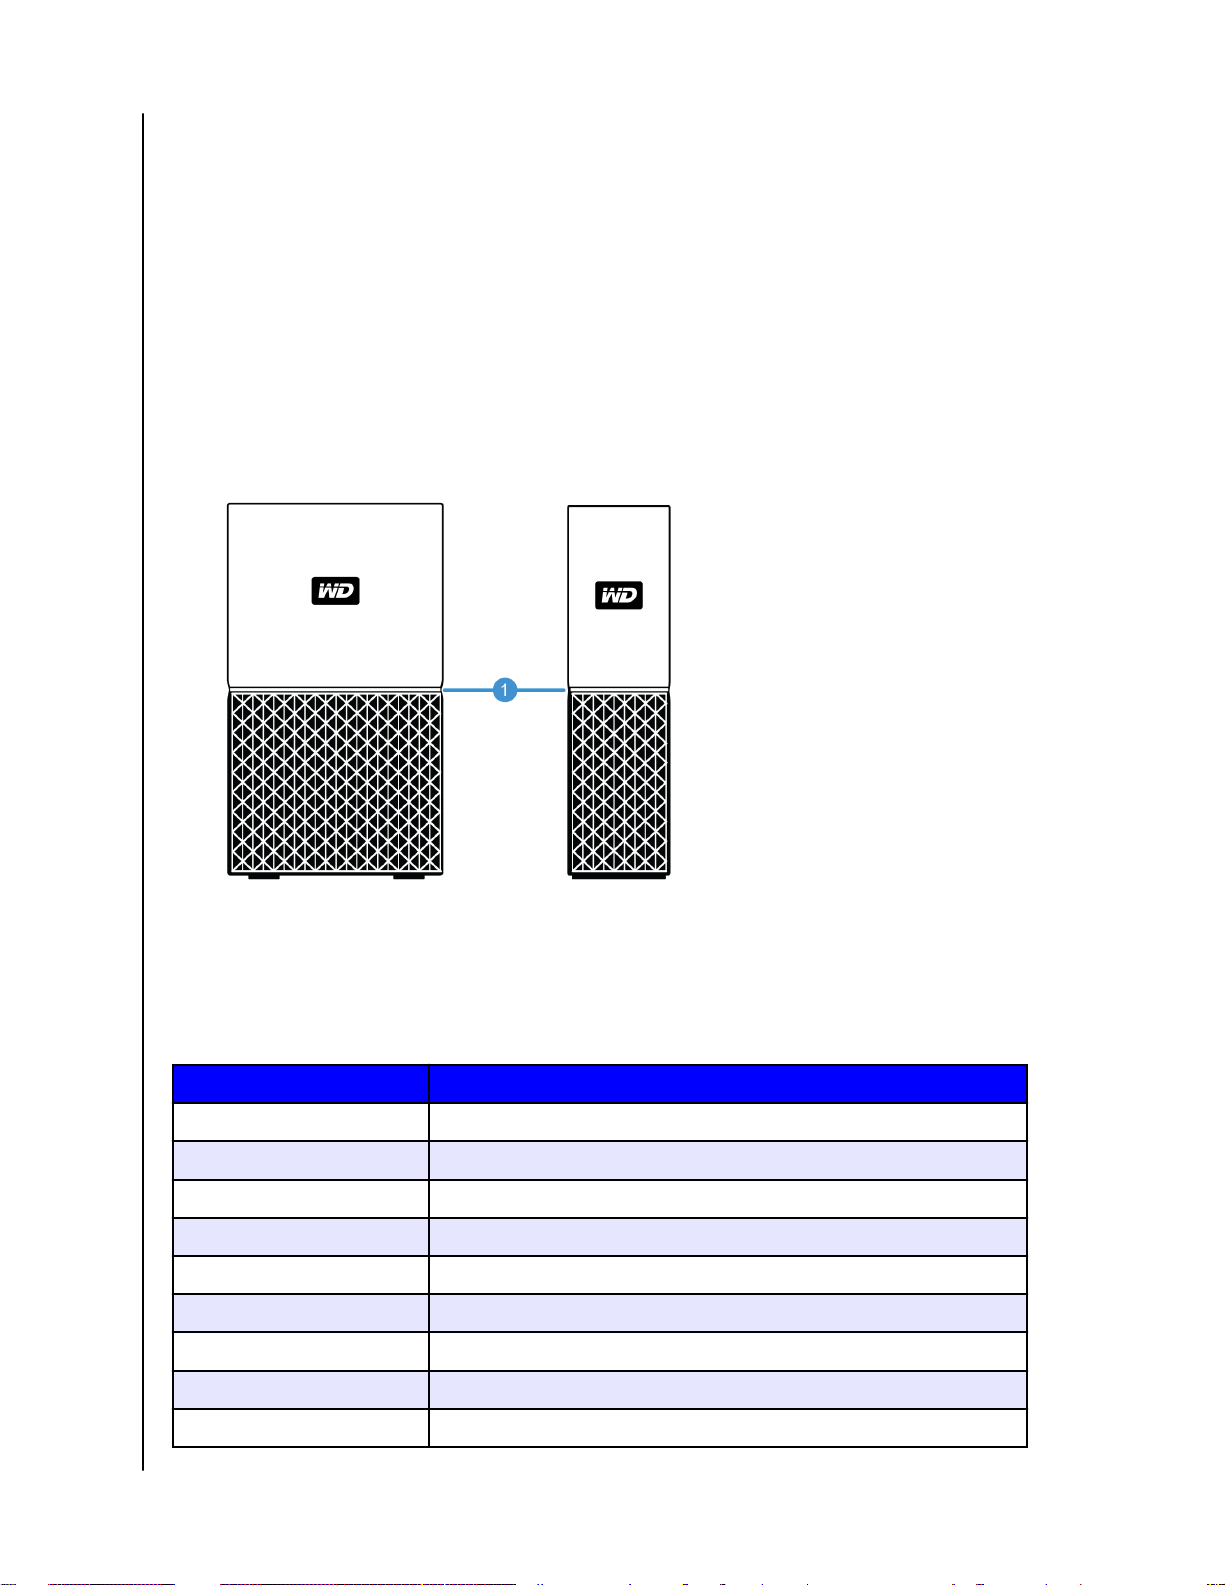
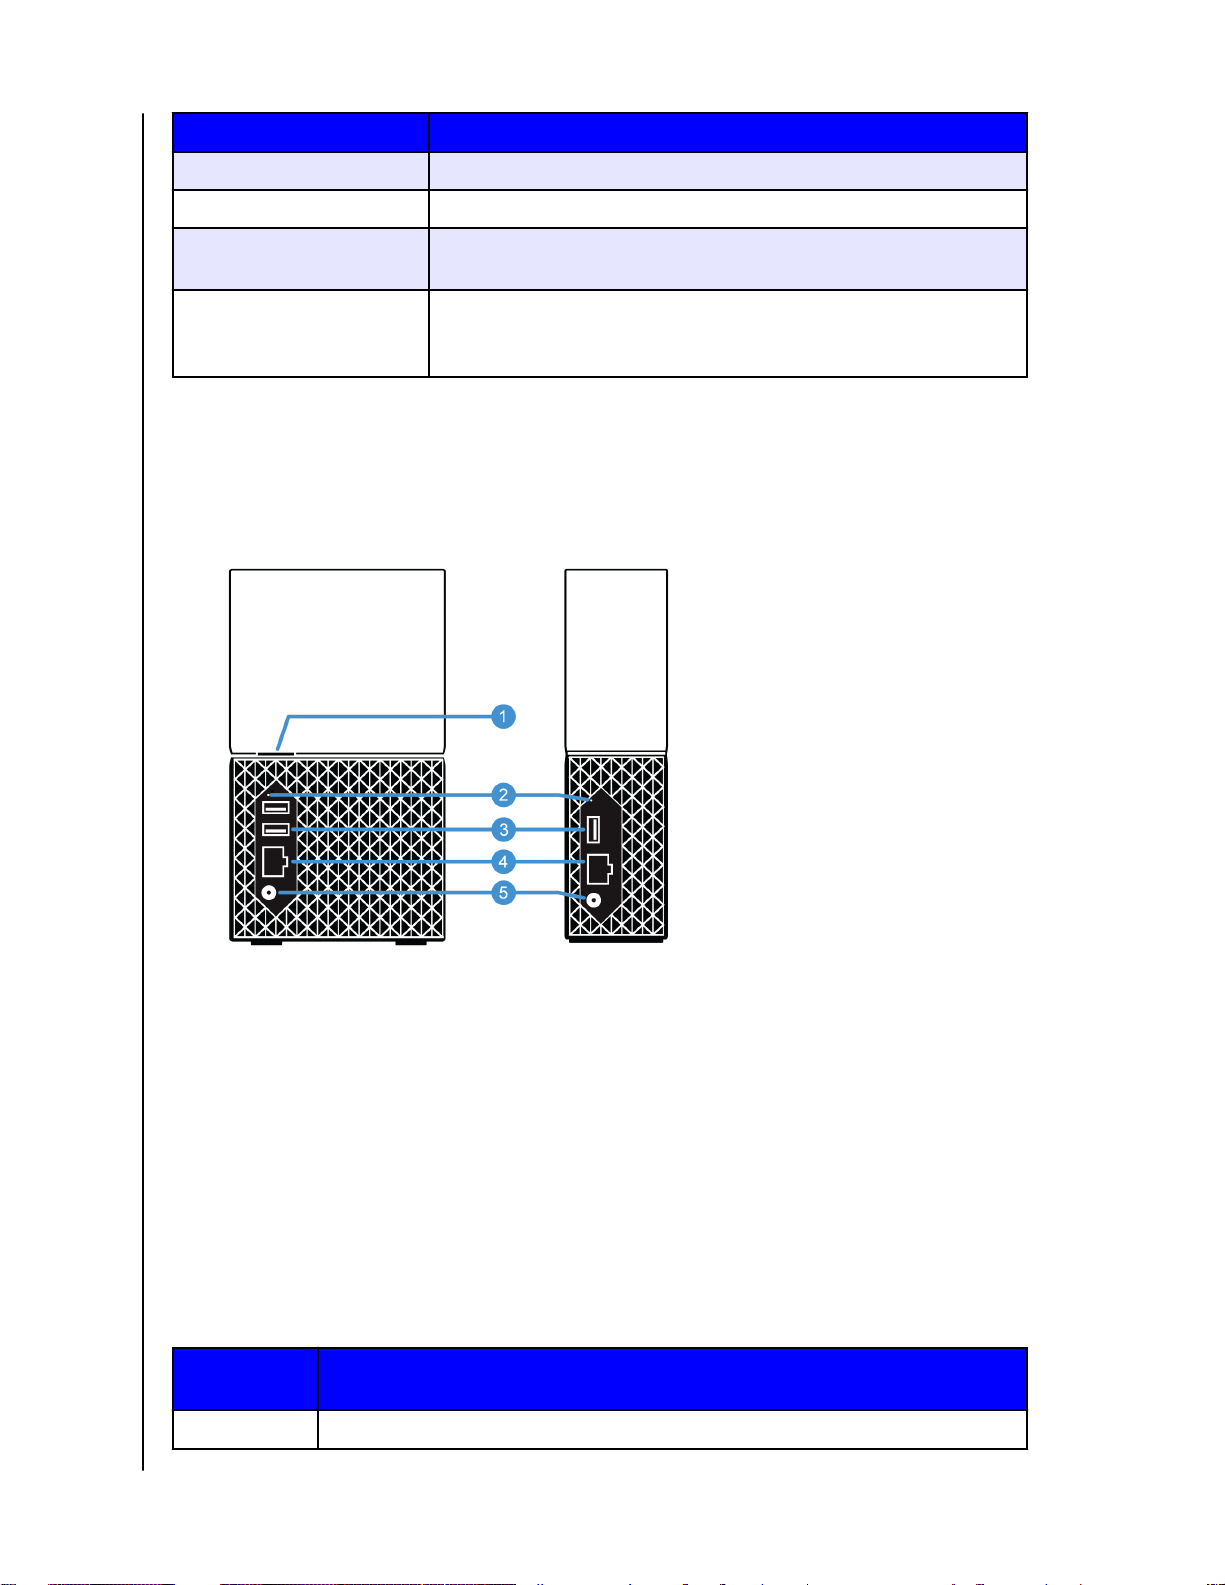
Rear Layout
Illustrated above are the various ports, connectors and buttons on the rear of a My
Cloud Home Duo device and My Cloud Home device.
1. Power Button
2. Reset Button
3. USB Port(s)
4. Ethernet Port
5. DC Power Connector
Power Button
My Cloud Home Duo (two-bay device) has a rear-facing power button. My Cloud
Home (single-drive device) does not have a power button.
Table 1.3
Power Button
Function
Press Once System will stop all services, clear cache and shut down gracefully.
My Cloud Home / My Cloud Home Duo
User Manual
Device Operation
5
Page 12
About Your My Cloud Home Device
Power Button
Function
Press and Hold
for 5 Seconds
Device Operation
When the power button is held for at least five seconds, the system will force a
shut down without any consideration for gracefully stopping services or clearing
cache.
Reset Button
On the rear panel of your My Cloud Home device, there is a Reset Button above the
USB port(s). This is a tiny recessed button that requires something similar to the
pointy end of a paper clip to be pressed.
Table 1.4
Reset Button
Function
Press for 1 to 29
seconds
Press for 30 to
50 seconds
Device Operation
During this function the My Cloud Home device will reboot, momentarily making it
inaccessible. This process does not delete data.
This function will demote the Device Owner to a Device User in order to change
ownership of the My Cloud Home device. This does not delete data and each user
still has access to their data. However, when this process occurs, the next user to
go through the setup process on the device becomes the device owner. The
remaining users on the device are unchanged.
Press for at
least 60
seconds
Caution! This process will delete all data, all Device Users and the Device Owner.
The unit will be reset to factory default settings and will need to be set up using
your online My Cloud Account (My Cloud Home Device Setup). A new Device
Owner will be set when the next person sets up the device through a My Cloud
account. Reset has completed once the LED has gone through a period of rapid
blinking and returned to a state of solid white.
USB Port(s)
These USB ports are not designed to connect a My Cloud Home device directly to a
host computer system.
My Cloud Home – This device comes with one USB Type-A port on the back panel
that supports USB 3.0.
My Cloud Home Duo – This device comes with two USB Type-A ports on the back
panel that support USB 3.0.
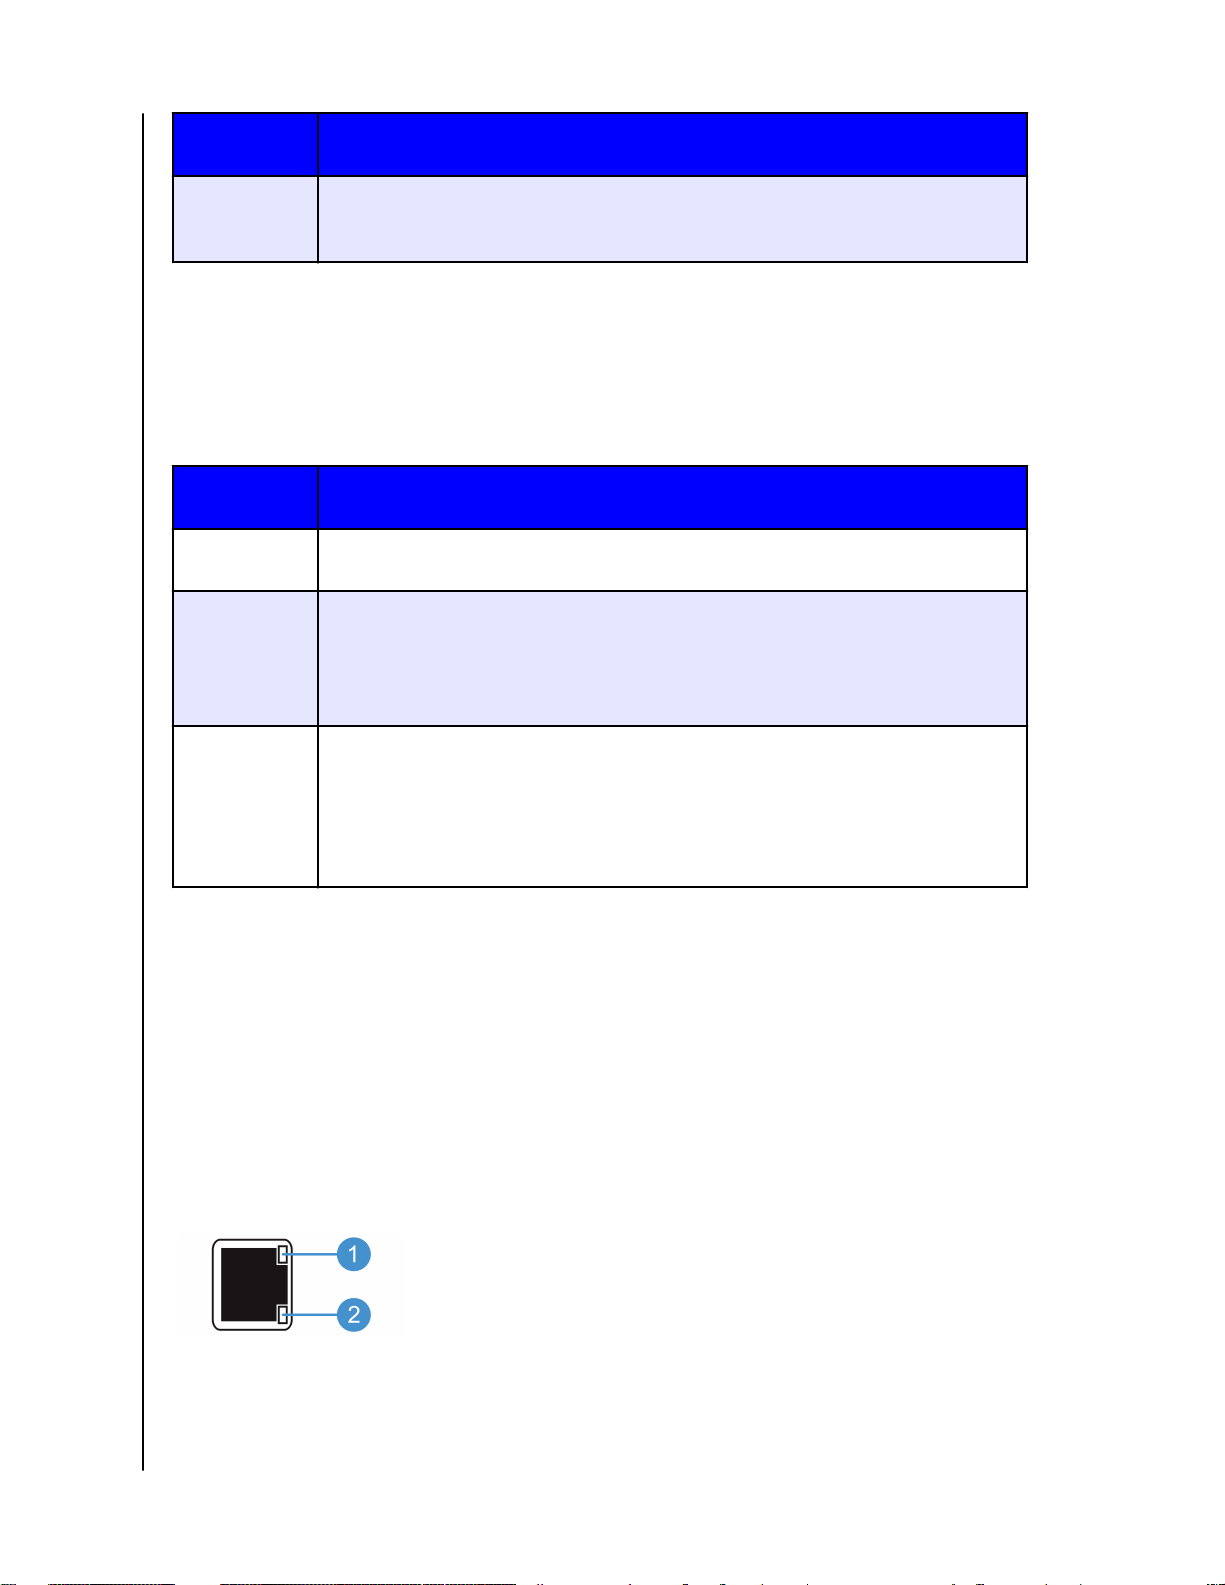
Ethernet Port
1. Activity LED: Looking at the Ethernet port, the LED on the top right is the
"Activity" LED. It describes the activity happening with your connection by
blinking or staying a solid color. When it is illuminated, the Activity LED is
always green in color.
My Cloud Home / My Cloud Home Duo
User Manual
6
Page 13

About Your My Cloud Home Device
2. Link LED: Looking at the Ethernet port, the LED on the lower right is the "Link"
LED. It describes if you have a network connection and at what possible speed,
which is measured in megabits per second (Mbps). When illuminated, the Link
LED may be amber (100 Mbps) or green (1000 Mbps) in color.
Handling Precautions
WD products are precision instruments and must be handled with care during
unpacking and installation. Drives may be damaged by rough handling, shock or
vibration. Always observe the following precautions when unpacking and installing
your external storage product:
▪ Do not drop or jolt the drive.
▪ Do not move the drive during activity.
▪ Do not use this product as a portable drive.
▪ To allow proper ventilation, do not block any of the drive enclosure’s air slots.
My Cloud Home / My Cloud Home Duo
User Manual
7
Page 14
2
Getting Started
Getting Started
Getting started involves connecting a My Cloud Home device to a network,
configuring software to access a My Cloud Home device and registering your
product.
Connecting a My Cloud Home Device
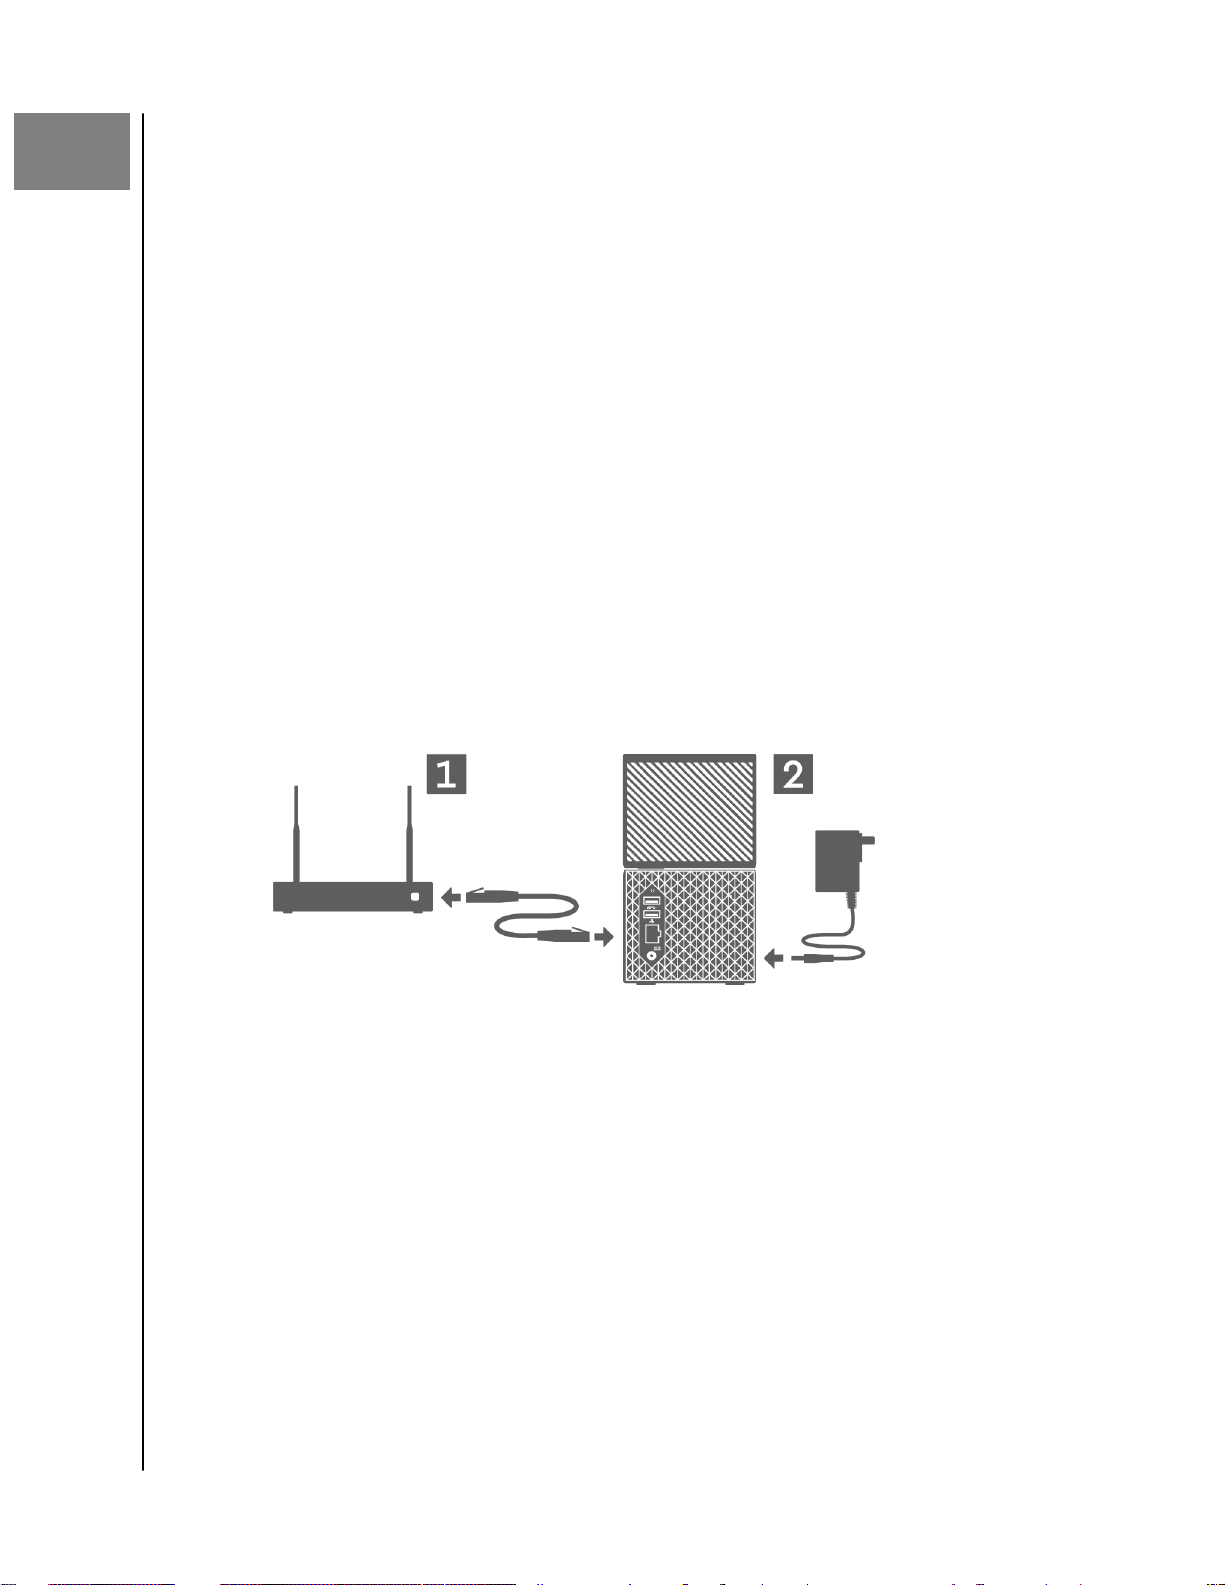
Basic Hardware Connections
Important: To avoid overheating, make sure the device is standing in an upright position
and nothing is blocking or covering the slots and openings on the top and bottom of the
device.
Follow these three basic steps for connecting your device:
1. Using the provided Ethernet cable, connect one end of the cable directly into a
port on your router and the other end of the Ethernet cable into the Ethernet
port on the My Cloud Home device.
2. Connect one end of the power adapter into the power supply socket on the
back of the device and the other end of the power adapter into a power outlet.
3. The unit will automatically power on. Continue with the next section, "Software
Set Up."
Software Set Up
The initial setup process for any My Cloud Home device requires an Internet
browser and Internet access as outlined in the Requirements section. Begin with
the following steps:
1. Access the Internet and go to mycloud.com/hello
2. Create a My Cloud account or login with an existing My Cloud account at
mycloud.com/hello. An email
created.
3. Allow the My Cloud website to
4. If the My Cloud Home device is automatically detected, Press the Connect
button that is associated with your My Cloud Home device.
My Cloud Home / My Cloud Home Duo
User Manual
confirmation is sent when a My Cloud account is
find your My Cloud Home device.
8
Page 15
▪ A picture of the My Cloud Home device and its corresponding Security Code
should be displayed. This Security Code is noted on the Quick Install Guide
and on the barcode label on the bottom of the unit.
Note: If your My Cloud Home device is not automatically detected, follow these 4 steps:
1.
Press the Enter Your Device Code option noted below the Desktop App and Mobile App
options.
2. Enter the Security Code from the Quick Install Guide that came with the My Cloud Home
device. The Security Code is also on the barcode label on the bottom of the unit.
3.
After entering the security code, Press Search.
4.
The One More Thing dialog box opens, Press Continue.
5. The All Done page now opens with the following options:
▪ Download the My Cloud Home mobile app from either the Apple® App
StoreSM or Google Play® store.
▪ Download the My Cloud Home Desktop App.
▪ To continue using the MyCloud.com Web App.
Now that the initial setup is done, the My Cloud Home device can be accessed and
configured using three different My Cloud tools:
Getting Started
▪ My Cloud Home Mobile App – provides robust access and product management on
Android and iOS platforms.
▪ MyCloud.com Web App – provides quick access via an Internet browser on
different operating systems and does not require software installation.
▪ My Cloud Home Desktop App – provides quick and basic folder access through a
Windows or Mac personal computer.
My Cloud Home Mobile App
Follow these steps to download and begin using the My Cloud Home mobile app:
1. The All Done page now opens with the option to get the My Cloud Home
mobile app from either the Apple® App StoreSM or Google Play® store. Select
which store is appropriate for your device.
2. Once installed, tap the My Cloud icon (illustrated below) created on your mobile
device.
3. When launching the App on a mobile device, the Welcome To My Cloud page
will launch. This page provides the options to Get Started or Sign In.
a. If the My Cloud Home mobile app is not 'Signed In', use your My Cloud
Account Username and Password to 'Sign In'.
b. If the My Cloud mobile app is still 'Signed In' from previous use, the My
Cloud mobile app will bypass the Sign In page and go directly to the Files
screen.
4. Content accessibility is now available through the My Cloud Home mobile app.
My Cloud Home / My Cloud Home Duo
User Manual
9
Page 16

MyCloud.com Web App
Follow these steps to access a My Cloud Home device with the MyCloud.com web app:
1. When presented with the option to download the Desktop App or Mobile App,
to continue using the web app, Click My Cloud Online listed below these other
options.
2. Your My Cloud Account is the MyCloud.com web app. Content accessibility is
now available through the web app.
My Cloud Home Desktop App
The My Cloud Home desktop app is a process that installs the WD Discovery software. A My
Cloud Home device is then accessed through the WD Discovery software. This process
requires access to the Internet and a 64-bit Operating System for the personal computer
(Reference Table 1.1). Follow these steps:
1. On the All Done page, select the My Cloud Home Desktop App option.
2. This will download the WD Discovery software, which is used to install the My
Cloud Home desktop app.
3. Install and setup the WD Discovery software with your My Cloud account
information.
4. From the WD Discovery menu, Click on Apps.
5. Click the My Cloud app option. This will begin the My Cloud Home desktop
installation in conjunction with the WD Discovery software.
6. When prompted, enter your My Cloud account information.
7. This will create a desktop icon. Use this icon to access the My Cloud Home
device.
8. When accessing and navigating the contents of a My Cloud Home device
detected in the WD Discovery software, Windows® will use Windows Explorer
and macOS® will use Finder®.
Getting Started
Registering Your Device
Register your My Cloud Home device to get the latest updates and special offers.
You can easily register your drive by visiting us online at: register.wdc.com.
My Cloud Home / My Cloud Home Duo
User Manual
10
Page 17

3
Backup, Sync & Add Content
Backup, Sync & Add Content
▪ Backup – Mobile Device Camera
▪ Backup – USB Device
▪ Sync Desktop Content
▪ Sync My Cloud Home Content
▪ Sync Online Cloud Content
▪ Add Content – In-Real-Time
▪ Add Content – Drag-and-Drop
▪ Apple Time Machine Backup
▪ Microsoft Windows Backup
Backup – Mobile Device Camera
The Camera Backup feature is a function of the My Cloud Home mobile app, and is
not available with the My Cloud Home desktop app or MyCloud.com web app. This
feature is enabled when setting-up the My Cloud Home mobile app or can be setup
manually.
Auto Camera Backup
To manually setup Auto Camera Backup for the iOS or Android operating system, follow
these steps:
1. Tap the Activity icon on the bottom menu bar.
2. Next, Tap the Photo Backup function.
3. The Backup screen will display.
a. If the Slider Button is slid to the right-hand position, this feature is already
enabled, and there are no further steps to follow.
b. If the Slider Button is slid to the left-hand position, this feature is not
enabled. Continue with the next step to enable this feature.
4. Tap the Auto Camera Backup Slider Button so that it is slid to the right-hand
position.
5. Tap the Use Cellular Data Slider Button if you want to use your data plan for the
backup process.
a. By default, the backup process uses only a Wi-Fi connection.
6. Tap the Background Uploading Slider Button to allow the My Cloud Home mobile
app to backup content in the background.
7. The backup process will automatically begin.
8. Tap the mobile device's Home button to view the progress of the Auto Camera
Backup.
a. Find the My Cloud Home mobile app icon.
b. The icon will show a red blurb with a numerical value that may be
increasing or decreasing. When the number is increasing, the backup
function is
pictures are being copied to the My Cloud Home device.
Note: The speed at which the red blurb counts is dependent on the size of
file(s) that are being copied, the speed of the mobile device and the
the
speed of the Internet connection.
c. If there is no red blurb with the My Cloud Home mobile app icon, then there
are no
needs to find your pictures, or the process has completed.
finding camera pictures. When the number is decreasing, the
files currently being copied – the process has either just started and
My Cloud Home / My Cloud Home Duo
User Manual
11
Page 18

Backup, Sync & Add Content
Backup – USB Device
The contents of a USB storage device can be backed-up to a My Cloud Home
device. This backup feature is only available through the My Cloud Home mobile
app.
USB Connectivity Note: Although My Cloud Home Duo has two USB ports, only one
USB attached device will be accessible for data transfer.
My Cloud Home Mobile App
After connecting a USB storage device, the My Cloud Home mobile app will display a
message that the device is connected. The My Cloud Home desktop app and the
MyCloud.com web app will not prompt for this action. To perform this mobile app process,
follow these steps:
1. Tap the Activity icon on the bottom menu bar.
2. Tap the USB Device Found function.
3. When prompted with the Copy USB Files dialog box, Tap the COPY ALL FILES
button.
a. To end this process now, Tap the large X in the upper left corner of the
Copy USB Files dialog box.
4. After agreeing to the USB copy process, the Copying from... dialog box will
open.
a. This dialog box will show the progress of the copy process. To close the
dialog box, Tap the OK button. The copy process will continue in the
background.
b. To re-open the copy process dialog box, Tap on the Home icon on the
bottom menu bar.
c. On the Home screen, Tap the option USB device plugged in. This will open
the Copying from... dialog box to show the current USB copy progress.
5. When the copy process is done, the contents will be in a new folder with the
date the contents were copied.
6. The contents of the USB copy can be viewed through the Files or Photos menu
options on the bottom menu bar.
Sync Online Cloud Content
The Social and Cloud Import is a process that syncs the contents from a cloud service, such
as Dropbox™, Google Drive™ or OneDrive® onto a My Cloud Home device. Social and Cloud
Import works in conjunction with the MyCloud.com web app. Before you begin this process
you must already have an account with the cloud service that you want to synchronize to
the My Cloud Home device.
To enable and
steps:
1. Access mycloud.com and sign-in to your My Cloud account.
2. On the left menu, Click the SERVICES option.
3. Under the Services section, Click the Enable button for the Social and Cloud
Import option. Then Click the I AGREE button for the Terms of Service.
4. Click the
Social and Cloud Import page.
My Cloud Home / My Cloud Home Duo
User Manual
configure Social and Cloud Import on a personal computer, follow these
Configure button for Social and Cloud Import. This will redirect to the
12
Page 19

Backup, Sync & Add Content
5. Click the slider button to the right of the corresponding service to synchronize.
This will redirect you to the login page for the service you have chosen.
6. After you login to the service you have chosen Click Allow to continue.
7. Once the sync has completed, under the Files section of your My Cloud
account, a folder will appear with the name of the service selected, such as
Dropbox, Google Drive or OneDrive.
a. This folder will contain a copy of the
files and folders from the selected
service.
Sync Desktop Content
You can sync content from a Windows or macOS / OS X system to a My Cloud
Home device with the Desktop Sync feature. This is a folder sync. Once the My
Cloud Home desktop app installation process is completed, follow these
instructions:
1. From within the operating system, Right-Click a folder and select the option
Sync to My Cloud.
2. This will create the WD Sync folder on the My Cloud Home device. Inside this
folder will be the folder chosen during Step 1.
3. Any content added or
Cloud Home device through the My Cloud Home Desktop App.
4. To stop the Desktop Sync process, Right-Click the folder and select the option
Unsync.
modified to this folder will automatically sync to the My
Note: If more than one folder have the same name on the My Cloud Home device, a number
will be added to the name to differentiate it from the other folders. For example: Test and
Test(1).
Sync My Cloud Home Content
This feature allows content currently saved on a My Cloud Home device to be made
available on Windows or macOS / OS X system for editing, adding or deleting. This
feature is implemented at the folder level and automatically syncs any changes.
Follow these steps to use this feature:
1. Access the content on a My Cloud Home device through the My Cloud Home
Desktop App. This is typically made available through the My Cloud Home icon
created on the systems desktop environment.
2. Right-Click a folder and select the Make Available
3. If one has not already been created, a new folder will appear on your desktop
with the name WD Sync.
4. Inside the WD Sync folder will appear the folder you selected for the Make
Available
Offline process.
5. You can now add, delete or modify content in this folder.
Note: Any changes made to content within the desktop folder will automatically change the
content on the My Cloud Home device when it is connected to the system.
Offline option.
My Cloud Home / My Cloud Home Duo
User Manual
13
Page 20

Backup, Sync & Add Content
Add Content – In-Real-Time
Through the My Cloud Home mobile app, content can be added to the My Cloud
Home device in real time. Follow these simple steps:
1. Tap the Actions option on the bottom menu.
2. Tap the Add option.
3. Tap Upload photos or videos to add existing content, or Tap Take a photo to add
new pictures.
Add Content – Drag-and-Drop
The drag-and-drop process can be performed with the MyCloud.com web app or
My Cloud Home desktop app.
MyCloud.com Web App
The drag-and-drop process for the MyCloud.com web app is a function of the personal
computer operating system and Internet browser. Follow these basic steps to perform this
function:
1. Through the MyCloud.com web app, navigate to the location within the Files
section that is to be the
2. Navigate to the location on the personal computer where the source file or
folder is located for the drag-and-drop process.
a. For Microsoft Windows use File Explorer, for macOS use Finder.
3. Click on the
4. Drag the selected
Cloud.com web app and let go of the mouse button.
5. The selected
file or folder to drag-and-drop, and hold down the mouse button.
file or folder to the destination selected within the My
file or folder should copy or move to the chosen destination.
file or folder destination for the drag-and-drop process.
Desktop App
The My Cloud Home desktop app uses the functionality within Windows Explorer and
macOS Finder to search, move and view
function of the Graphical User Interface (GUI) of Windows and macOS. These are the basic
steps to perform the drag-and-drop function:
1. Access the My Cloud Home device through the My Cloud Home desktop app
(My Cloud Home desktop icon or WD Discovery).
2. Access the location on your Windows or macOS / OS X system that will be
included in this copy process.
3. Click on the
4. Drag the
5. Your file or folder should copy or move to the chosen destination.
file or folder to drag-and-drop, and hold down the mouse button.
file or folder to the new location and let go of the mouse button.
files. Therefore, the the drag-and-drop process is a
Apple® Time Machine® Backup
Time Machine is the built-in backup feature of your Mac. Use the following
instructions from Apple for using this tool:
My Cloud Home / My Cloud Home Duo
User Manual
14
Page 21

Backup, Sync & Add Content
• HT 201250 | Use Time Machine to backup or restore your Mac
…………
Microsoft® Windows® Backup
The step-by-step instructions for the Windows back up and restore process varies
based on the version of the Windows operating system you have installed. Use the
following Microsoft Article to access these instructions:
• Article ID: 17127 | Back up and restore your PC
…………
My Cloud Home / My Cloud Home Duo
User Manual
15
Page 22

4
Search & Viewing Content
Search & Viewing Content
Searching Content
Through the My Cloud Home mobile app and MyCloud.com web app, content can
be accessed through the search feature. The search feature is highlighted with a
magnifying glass symbol.
1. Press the Files icon.
2. Press the magnifying glass icon.
▪ With the My Cloud Home mobile app, Tap Actions from the bottom menu,
then Tap Search.
▪ With the MyCloud.com web app, select the Search
top of the browser window.
3. Next, enter the letters, numbers or words you want to search.
field from the menu at the
Example: You may have a
each picture. You can enter part of those numbers to search for the file. For a photo with the file
name "IMG_0002.PNG" you can simply type "0002" to search for it.
4. After typing in the search phrase, the My Cloud Home mobile app will
automatically search; the MyCloud.com web app will require that you Click the
Enter key or Press the magnifying glass icon to execute the search.
5. Select the
file you want to view.
file that includes a name or numbers. Some camera systems number
Content Viewing Options
My Cloud Home Mobile App: The content on your My Cloud Home device can be
browsed or accessed through the Files and Photos menu options.
MyCloud.com Web App: The content on your My Cloud Home device can be
browsed or accessed through the Files and Photos menu options.
My Cloud Home Desktop App: The My Cloud Home desktop app uses the functionality
within Windows Explorer and macOS Finder to view
Home device through the My Cloud Home desktop icon or the WD Discovery
software and use these operating system tools based on the instructions from the
software vendor.
files. Access the My Cloud
My Cloud Home / My Cloud Home Duo
User Manual
16
Page 23

5
Deleting Content
Deleting Content
My Cloud Home Mobile App
Use the following steps to delete a
My Cloud Home mobile app.
1. In the My Cloud Home mobile app each file and folder has a three-dot icon
( ) to the right. This three-dot icon represents a collapsed menu.
2. Tap the three-dot icon to expand the menu.
3. When the menu expands, a list of options displays, including the Delete icon.
4. To delete the corresponding
confirmation box will open up, asking to confirm the choice to delete a file or
5. A
folder. Select either the Cancel or Delete option.
file or folder from a My Cloud Home device through the
file or folder, Tap the Delete icon.
MyCloud.com Web App
Use the following steps to delete a file or folder from a My Cloud Home device through the
MyCloud.com web app.
1. Through the MyCloud.com web app, navigate to and select the
that you choose to delete
2. After selecting the file or folder to delete, Press the Delete icon with a trash can
illustrated on it.
a. Note: When using a browser with Microsoft Windows or macOS, the Delete
icon can be accessed through the icon-menu in the upper right-hand corner
of the browser window, or by Right-Clicking the folder or
b. Note: When using a browser with Android or iOS, the Delete icon is
accessed by Selecting the three-dot icon ( ) to the right of the file or
folder.
confirmation dialog box opens with two options: Delete and Close.
3. A
a. Tap or Click Delete to delete the selected file or folder.
b. Tap or Click Close to end the process without deleting the selected
folder.
4. If the option to delete was performed, a small box will
lower left-hand corner of the browser window confirming the file or folder was
deleted.
briefly appear in the
file or folder
file.
file or
My Cloud Home / My Cloud Home Duo
User Manual
17
Page 24

6
Sharing Content
My Cloud Home devices allow for sharing or unsharing a file or folder with other
users through the following applications:
▪ My Cloud Home Mobile App
▪ MyCloud.com Web App
▪ My Cloud Home Desktop App
Mobile App
Share Content - Mobile App
A
file or folder can be shared through the My Cloud Home mobile app by following these
steps:
Sharing Content
1. Through the My Cloud Home mobile app, navigate to the
choose to share.
2.
To the right of the content that you choose to share, are three dots ( ).
These three dots represent a collapsed menu. Tap the dots to expand this
menu.
3. On the expanded menu Tap the Share icon.
4. Your mobile device will open a menu of apps that you can use to share content.
a. The apps listed under this menu are
your mobile device and the installed apps. This may include an email client,
social media apps and other apps for sharing content.
5. From the menu of apps that is presented, select a method to share your
content.
6. Follow the instructions for the app selected to share content. These
instructions are not part of the My Cloud Home mobile app.
specific to the operating system on
file or folder that you
Delete Share - Mobile App
A share created for a
the file or folder by following these steps:
1.
To the right of a shared
represent a collapsed menu. Tap the dots to expand this menu.
2. On the expanded menu Tap the Delete Shared Link icon.
3. A pop-up box will verify if you want to "Turn Link Sharing Off" for this
folder. Tap Turn Off.
4. The
file or folder selected is no longer shared.
file or folder can be deleted through the Mobile App without deleting
file or folder are three dots ( ). These three dots
file or
Web App
Share Content - Web App
A
file or folder can be shared through the MyCloud.com web app by following these steps:
My Cloud Home / My Cloud Home Duo
User Manual
18
Page 25

1. Through the MyCloud.com web app, navigate to and select the file or folder
that you choose to share.
2. Press the Share Link icon.
a. Note: When using a browser with Microsoft Windows or macOS, the Share
Link icon can be accessed through the icon-menu in the upper right-hand
corner of the browser window, or by Right-Clicking the folder or
file.
b. Note: When using a browser with Android or iOS, the Share Link icon is
accessed by Selecting the three-dot menu to the right of the file or folder.
3. This will open the Share Link dialog box. Press the Copy icon.
4. If the option to share was performed, a small box will
lower left-hand corner of the browser window
confirming the link was copied
briefly appear in the
to your Operating System Clipboard.
5. Go to your email client and paste the link into the body of an email.
6. Send the email to the user with whom you will share the item. Instructions for
using your email client are not part of the MyCloud.com web app.
Delete Share - Web App
Sharing Content
A share created for a
the file or folder by following these steps:
1. Through the MyCloud.com web app, navigate to and select the
file or folder can be deleted through the Web App without deleting
file or folder
that you choose to stop sharing.
2. Press the Delete Share Link icon.
a. Note: When using a browser with Microsoft Windows or macOS, the Delete
Share Link icon can be accessed through the icon-menu in the upper right-
hand corner of the browser window, or by Right-Clicking the folder or
file.
b. Note: When using a browser with Android or iOS, the Delete Share Link icon
is accessed by Selecting the three-dot menu to the right of the
file or
folder.
3. The Share Link is now deleted and the file or folder selected is no longer
shared.
Desktop App
Share Content - Desktop App
A file or folder can be shared through the Desktop App by following these steps:
1. Access the My Cloud Home device through the My Cloud Home desktop app
(My Cloud Home desktop icon or WD Discovery).
2. Right-Click the
Click the option Create Share Link.
3. This will open a dialog box that displays the link to the
shared. Click the Copy button. This will copy the link to the Operating System's
Clipboard.
4. Click the Close option on the dialog box.
5. Open the tool that will be used to send a user the link. For example, an email
application can be used.
a. If email is used, paste the link that was saved to the Clipboard into the body
of the email and send it. Instructions for using your email client are not part
of the My Cloud Home desktop app.
file or folder to share. This will open a small drop down menu.
file or folder that will be
My Cloud Home / My Cloud Home Duo
User Manual
19
Page 26

6. Once the recipient receives the link, they will be given access to the shared file
or folder through their My Cloud Account at mycloud.com.
Delete Share - Desktop App
A share created for a file or folder can be deleted through the Desktop App without
deleting the file or folder by following these steps:
1. Right-Click a shared file or folder. This will open a small drop down menu. Click
the option Delete Share Link.
2. The file or folder selected is no longer shared.
Sharing Content
My Cloud Home / My Cloud Home Duo
User Manual
20
Page 27

7
Invite or Remove a User
Invite or Remove a User
You can invite or remove a User to the My Cloud Home device. Once someone is
invited, they will set up their own My Cloud account to access the device. The
Device Owner will receive confirmation through email that a new Device User has
joined the device.
Note: These processes can only be done through the My Cloud Home mobile app.
Invite a User - Mobile App
To invite a user to the My Cloud Home device, follow these steps:
1. Open the My Cloud Home mobile app.
2. Tap the Settings icon on the right side of your bottom menu bar.
3. Tap the name listed under CURRENT DEVICE.
4. Tap the Users option.
5. Under DEVICE USERS, Tap the Invite user... option.
6. This will open the Invite Your Friends screen.
7. Enter the users email address on the Add emails section and then Tap the SEND
INVITES button.
8. Once the invitee receives the invitation by email, they will be prompted to
create a My Cloud account.
Remove a User - Mobile App
To remove a user from the My Cloud Home device, follow these steps:
1. Open the My Cloud Home mobile app.
2. Tap the Settings icon on the right side of your bottom menu bar.
3. Tap the name listed under CURRENT DEVICE.
4. Tap Users and then the name of the User to be removed.
5. Tap Remove User.... This will open a
6. The User is now removed from the My Cloud Home device.
confirmation dialog box. Tap Yes, Remove.
My Cloud Home / My Cloud Home Duo
User Manual
21
Page 28

8
Device Settings
Device Settings
You can alter the Device Settings for a My Cloud Home device through the
following two applications:
▪ My Cloud Home Mobile App
▪ MyCloud.com Web App
My Cloud Home Mobile App
▪ Modifying Device Name
▪ Firmware Version
▪ Reboot Device
▪ Erase All Data & All Users
▪ Remote Shut Down
Modifying Device Name
A My Cloud Home device selects a default name for itself. The name can be modified by
following these steps:
1. Access the My Cloud Home mobile app.
2. Tap the Settings icon on the right side of the bottom menu bar.
3. Tap the name listed under CURRENT DEVICE.
4. After the Device page opens, Tap the Name option.
a. This will place a blinking cursor at the end of the the device name.
5. Modify the My Cloud Home device name.
6. After modifying the device name, Tap the back arrow (<) at the top of the
Device page. This will open the Settings page.
7. Your new device name should now be visible under the section Current Device.
Firmware Version
To view the
firmware version of the My Cloud Home device, follow these steps:
1. Access the My Cloud Home mobile app.
2. Tap the Settings icon on the right side of the bottom menu bar.
3. Tap the name listed under CURRENT DEVICE.
4. The Firmware version is listed with a series of numbers that may appear similar
4.0.1–613.
to:
5. You have successfully viewed the firmware version for your My Cloud Home
device.
Reboot Device
To reboot a My Cloud Home device through the My Cloud Home mobile app, follow these
steps:
1. Access the My Cloud Home mobile app.
2. Tap the Settings icon on the right side of the bottom menu bar.
3. Tap the name listed under CURRENT DEVICE.
4. Go to the bottom of the Device Settings.
My Cloud Home / My Cloud Home Duo
User Manual
22
Page 29

5. Toward the bottom of the Device Settings list is the option Reboot. Tap this
option to remotely reboot the My Cloud Home device.
6. Your mobile device will prompt you if you want to reboot the My Cloud Home
device. Select the option to reboot.
7. The My Cloud Home device will now reboot. This process may take a few
minutes.
Erase All Data & All Users
Warning! Performing this function will delete all data, users and the owner on your My Cloud Home
device. The unit will be reset to factory default and will need to be setup using your online My Cloud
Account. (My Cloud Home Setup)
To perform this function on your My Cloud Home device from the My Cloud Home mobile
app:
1. Access the My Cloud Home mobile app.
2. Tap the Settings icon on the right side of the bottom menu bar.
3. Tap the name listed under CURRENT DEVICE.
4. Tap the Erase All Data & All Users option. This will open a
box. Tap Yes, proceed if you choose to continue with this process. Otherwise
Tap Cancel to end this process.
5. This will open a challenge page with a unique confirmation code. Follow the
on-screen instructions and enter the code provided on this page.
6. This will open the page
confirming that this process will delete all data, user
and owner content. Tap the Factory Reset button to continue.
7. The My Cloud Home device will take several minutes to go through the factory
reset process. During this process, the My Cloud Home mobile app redirects
you to the My Cloud sign in page to set up the My Cloud Home device. Follow
the My Cloud Home setup process.
confirmation dialog
Device Settings
Remote Shut Down
Note: Once the My Cloud Home device is shut down, it is no longer accessible and the
content on the device is not accessible until it is restarted. The My Cloud Home device
cannot be restarted remotely.
To shut down the My Cloud Home device through the My Cloud Home mobile app, follow
these steps:
1. Access the My Cloud Home mobile app.
2. Tap the Settings icon on the right side of the bottom menu bar.
3. Tap the name listed under CURRENT DEVICE.
4. Go to the bottom of the Device Settings.
5. At the bottom of the Device Settings list Tap the option Shut Down Device to
remotely shut down the My Cloud Home device.
6. The My Cloud Home device will shut down and its contents will not be available
until it is powered back on. To power on the My Cloud Home device, follow
these steps:
a. My Cloud Home: Unplug, wait 5 seconds, then plug-in the power connector
on the back of the unit.
b. My Cloud Home Duo: Press the power button on the back of the unit.
My Cloud Home / My Cloud Home Duo
User Manual
23
Page 30

MyCloud.com Web App
Device Settings
▪ Modifying Device Name
▪ Firmware Version
▪ Users
▪ Device Configuration
▪ Reboot Configuration
▪ Remote Shut Down
▪ Erase All Data & All Users
Modifying Device Name
A My Cloud Home device selects a default name for itself. The name can be modified by
following these steps:
1. Through the MyCloud.com web app, navigate to the menu on the left side of
the browser page and select the Settings option. This will open the Settings
window.
2. Click the CURRENT DEVICE section, this will open information
specific to this My
Cloud Home device, such as Name, Space Used and Firmware Version.
3. Select the Name option. This will allow you to edit the name and this will
expand the field to include a check mark (✔) or an X.
a. This will place a blinking cursor at the end of the the device name or
highlight the entire device name.
4. Edit either name and then select the check mark (✔) to save or the X to cancel.
Firmware Version
To view the
firmware version of the My Cloud Home device, follow these steps:
1. Through the MyCloud.com web app, navigate to the menu on the left side of
the browser page and select the Settings option. This will open the Settings
window.
2. Click the CURRENT DEVICE section, this will open information
specific to this My
Cloud Home device, such as Name, Space Used and Firmware Version.
3. Note the row Firmware Version and the sequence of numbers to the right of the
row – this is the current
through the MyCloud.com web app, since the automatic
firmware version. This cannot be manually updated
firmware update
feature manages this process.
Users
Through the MyCloud.com web app, you can view all Users connected to the My Cloud
Home device. However, you cannot use this to invite a user.
1. Through the MyCloud.com web app, navigate to the menu on the left side of
the browser page and select the Settings option. This will open the Settings
window.
2. Click on the CURRENT DEVICE section.
3. Click the Users option.
4. This will display a list of all Users for this device.
5. Select the X icon to close the Settings window.
My Cloud Home / My Cloud Home Duo
User Manual
24
Page 31

Device Configuration
Warning! Altering the Device Configuration or disk configuration will delete all data, users and the
owner on your My Cloud Home device. The unit will be reset to factory default and will need to be
setup using your online My Cloud Account. (My Cloud Home Device Setup)
To modify the disk configuration for a My Cloud Home Duo, follow these steps:
1. Through the MyCloud.com web app, navigate to the menu on the left side of
the browser page and select the Settings option. This will open the Settings
window.
2. Click on the CURRENT DEVICE section.
3. Click Device
option to change the disk
4. Click the disk configuration of choice you want to use.
a. See the Managing Storage section for more details on available disk
configurations.
5. After making a selection to change the disk configuration, a prompt will request
that a Factory Reset must be done. To continue with this process, Click the
Factory Reset button.
6. As
confirmation that you want to continue with this process, a confirmation
code box appears. Enter the provided confirmation code in the required fields.
Then Click the Confirm button.
7. A set of instructions will appear. Read the instructions, then Click the Factory
Reset button.
8. This will begin the Factory Reset process and change the disk
The MyCloud.com web app will exit you out of your My Cloud Account. Follow
the My Cloud Home setup process.
Configuration. This will display the current disk configuration and an
configuration.
configuration.
Device Settings
Reboot Device
1. Through the MyCloud.com web app, navigate to the menu on the left side of
the browser page and select the Settings option. This will open the Settings
window.
2. Click the CURRENT DEVICE section.
3. Select the Reboot Device option. This will open the Reboot Device menu.
4. Select the Reboot Device button.
5. The
notification "Please wait, rebooting in progress..." will appear. This
notification will disappear when the process has completed.
Remote Shut Down
Note: Once the My Cloud Home device is shut down, it is no longer accessible and the
content on the device is not accessible until it is restarted. The My Cloud Home device
cannot be restarted remotely.
To shut down the My Cloud Home device through the MyCloud.com web app, follow these
steps:
1. Through the MyCloud.com web app, navigate to the menu on the left side of
the browser page and select the Settings option. This will open the Settings
window.
2. Click the CURRENT DEVICE section.
3. Select the Shutdown Device option. This will open the Shutdown Device menu.
My Cloud Home / My Cloud Home Duo
User Manual
25
Page 32

4. Select the Shutdown Device button.
Erase All Data & All Users
Warning! Performing this function will delete all data, users and the owner on your My Cloud Home
device. The unit will be reset to factory default and will need to be setup using your online My Cloud
Account. (My Cloud Home Device Setup)
To perform this function on your My Cloud Home device from the MyCloud.com web app,
follow these steps:
1. Through the MyCloud.com web app, navigate to the menu on the left side of
the browser page and select the Settings option. This will open the Settings
window.
2. Click on the CURRENT DEVICE section.
3. Click the Erase All Data & All Users option.
4. As
5. A set of instructions will appear. Read the instructions, then Click the Factory
6. This will begin the Factory Reset process. The MyCloud.com web app will log
confirmation that you want to continue with this process, a confirmation
code box appears. Enter the provided confirmation code in the required fields.
Then Click the Confirm button.
Reset button.
you out of your account. Follow the My Cloud Home setup process.
Device Settings
My Cloud Home / My Cloud Home Duo
User Manual
26
Page 33

9
Personal Settings
Personal Settings
You can alter Personal Settings for your My Cloud Account and My Cloud Home
device through the following two applications:
▪ My Cloud Home Mobile App
▪ MyCloud.com Web App
My Cloud Home Mobile App
▪ Edit Profile Picture
▪ Edit My Cloud Account Name
▪ Change My Cloud Account Password
▪ Set Passcode
Edit
This process will affect the Profile Picture as seen through the My Cloud Home mobile app
and MyCloud.com web app.
To add or edit the Profile Picture for a My Cloud Home account through the My Cloud Home
mobile app, follow these steps:
1. Access the My Cloud Home mobile app.
2. Tap the Settings icon on the right side of your bottom menu bar.
3. Tap the name listed under ACCOUNT at the top of the More page.
4. This opens your My Cloud account information page.
5. Tap the word Change under your
6. Select one of the three following choices: Take Photo, Choose Photo or Cancel.
7. After selecting the picture to use as your
8. Your new Profile Picture should now be visible.
Profile Picture
Profile Abbreviation.
a. A
a. The Take Photo option allows you to take a photograph for use as a
b. The Choose Photo option allows you to choose a picture from your device's
c. The Cancel option cancels the process and redirects back to the Settings
in process to complete the task. This would include the option to resize the
picture and to
Profile Abbreviation of the name on your My Cloud account is used by
default until it is modified to an image.
Profile
Picture.
album collection for use as a Profile Picture.
page.
Profile Picture, use your device's built-
finalize the selection.
Edit My Cloud Account Name
1. Access the My Cloud Home mobile app.
2. Tap the Settings icon on the right side of your bottom menu bar.
3. Tap the name listed under ACCOUNT at the top of the More page.
4. This opens your My Cloud account information page.
My Cloud Home / My Cloud Home Duo
User Manual
27
Page 34

5. The My Cloud account name is separated into the first name and last name. Tap
either one edit.
6. When completed, Tap the back icon ( < ) at the top of the Account information
page.
Change My Cloud Account Password
Caution! Changing the password for a My Cloud account will affect the login password for
the My Cloud Home mobile app, My Cloud Home desktop app and the MyCloud.com web
app. This process is not the same as the Set Passcode feature in the My Cloud Home mobile
app.
1. Access the My Cloud Home mobile app.
2. Tap the Settings icon on the right side of the bottom menu bar.
3. Tap the name listed under ACCOUNT at the top of the More page.
4. This opens your My Cloud account information page.
5. Tap the Change Password option. This will open the Change Password feature.
6. Enter the new password in the New and
7. If the passwords entered into the two fields match, Tap the Change Password
button.
a. If the passwords entered into the two fields do not match, the Change
Password button will not be visible.
8. The My Cloud account password has successfully been changed.
Confirm fields.
Personal Settings
Set Passcode
The Set Passcode feature only access to the My Cloud Home mobile app. This does not
change the login password used for accessing your My Cloud account. To set a passcode
follow these steps:
1. Access the My Cloud Home mobile app.
2. Tap the Settings icon on the right side of the bottom menu bar.
3. The Set Passcode option is listed under the section SECURITY. This option uses a
slider button.
4. Tap the slider button to enable or disable the Set Passcode feature.
5. When enabled, this feature prompts you to enter a 4-digit passcode or uses the
home-button
fingerprint authentication process for your mobile device.
a. The 4-digit passcode chosen will become the passcode for accessing the
My Cloud Home mobile app.
6. When disabling this feature, a prompt to enter the 4-digit passcode or use of
the home-button
fingerprint authentication process is required as confirmation.
MyCloud.com Web App
▪
Edit Profile Picture
▪ Edit My Cloud Account Name
▪ Change My Cloud Account Password
My Cloud Home / My Cloud Home Duo
User Manual
28
Page 35

Edit Profile Picture
This process will affect the Profile Picture as seen through the My Cloud Home mobile app
and MyCloud.com web app.
To add or edit the Profile Picture for a My Cloud Home account through the MyCloud.com
web app, follow these steps:
1. Through the MyCloud.com web app, navigate to the menu on the left side of
the browser page and select the Settings option. This will open the Settings
window.
2. Under the PERSONAL SETTINGS section, your
Picture currently being used will display.
a. A
Profile Abbreviation of the My Cloud account name is used by default
until it is modified to an image.
3. Select the pencil icon that overlaps the Profile Abbreviation or Profile Picture.
file explorer window from the operating system will open. Navigate to the
4. A
image file that will be used as the new Profile Picture.
a. Note: The image file must be less than 30KB in size.
5. Select the image
file.
6. After making the selection, the file explorer window will close, and the new
image will be visible as the
Profile Picture within the MyCloud.com web app
and the My Cloud Home mobile app.
7. Select the X icon to close the Settings window.
Profile Abbreviation or the Profile
Personal Settings
Edit My Cloud Account Name
1. Through the MyCloud.com web app, navigate to the menu on the left side of
the browser page and select the Settings option. This will open the Settings
window.
2. Under the PERSONAL SETTINGS section, the My Cloud account name is separated
into two
fields: First Name and Last Name.
3. Select either the current First Name or Last Name. This will expand the field to
include a check mark (✔) or an X.
4. Edit either name and then select the check mark (✔) to save or the X to cancel.
5. Select the X icon to close the Settings window.
Change My Cloud Account Password
Caution! Changing the password for a My Cloud account will affect the login password for
the My Cloud Home mobile app, My Cloud Home desktop app and the MyCloud.com web
not
app. This process is
app.
To change the password for your My Cloud account, follow these steps:
1. Through the MyCloud.com web app, navigate to the menu on the left side of
the browser page and select the Settings option. This will open the Settings
window.
2. Under the PERSONAL SETTINGS section, My Cloud account information will
display. Select the Change Password option.
3. Under the Change Password section, enter the new password in the New
and Confirm field. Then Select the Change Password button.
4. The My Cloud account password has been updated.
5. Select the X icon to close the Settings window.
the same as the Set Passcode feature in the My Cloud Home mobile
field
My Cloud Home / My Cloud Home Duo
User Manual
29
Page 36

10
Managing Services
Managing Services
Extra services are made available for My Cloud Home devices. To access these
services, use the My Cloud Home mobile app or MyCloud.com web app.
My Cloud Home Mobile App:
1. Access the My Cloud Home mobile app.
2. Tap the More icon on the right side of the bottom menu bar.
3. Under the SERVICES section, Tap Manage Services. This will list the available
services you can enable and configure.
4. Tap the service you want to enable, then Tap the ENABLE button. This will begin
the installation process for this service. Follow the on-screen prompts to
continue.
MyCloud.com Web App:
1. Through the MyCloud.com web app, navigate to the menu on the left side of
the browser page and select the Services option. This will open the Services
menu.
2. Select the ENABLE button next to the service you want to install. This will begin
the installation process for this service. Follow the on-screen prompts to
continue.
My Cloud Home / My Cloud Home Duo
User Manual
30
Page 37

11
Additional Features & Functions
Additional Features & Functions
▪ Remove a Device Owner
▪ App Permissions
▪ Managing Storage
▪ RMA - Replacing a Drive
Remove a Device Owner
The removal of a Device Owner can only be done through the Reset Button on the
device – this cannot be done through software. This process does not delete data
and each user still has access to their content.
1. Press and hold the Reset button for a duration of 30 to 50 seconds.
Warning! Holding the Reset button for 60 seconds or more will delete all data, all Device Users
and the Device Owner!
2. This function will demote the Device Owner to a Device User.
3. The next new user to go through the software setup process becomes the
device owner.
App Permissions
By default, the My Cloud Home mobile app enables access to the following features
of your mobile device:
▪ iOS: Photos, Notifications, Background App Refresh and Cellular Data.
▪ Android: Camera, Contacts, Location, Phone, Storage and
Important Note: By default Cellular Data is not used for transferring content. The My
Cloud Home mobile app uses a Wi-Fi® connection for this purpose.
To access these settings, follow these steps:
1. Access the My Cloud Home mobile app.
2. Tap the More icon on the right side of the bottom menu bar. Then Tap the
Settings icon.
3. Under the APP SETTINGS section, Tap the option Manage Settings.
4. This will open the My Cloud Home mobile app permissions section of the
operating system
operating system to change these settings.
specific to your mobile device. Follow the directions from the
Notifications.
Managing Storage
The My Cloud Home Duo device allows for disk configuration changes through the
MyCloud.com web app - this functionality is not available through the Mobile App
or Desktop App.
Caution! Any change to the disk configuration will erase all data on the device.
▪ My Cloud Home device does not support any special disk configurations.
My Cloud Home / My Cloud Home Duo
User Manual
31
Page 38

Additional Features & Functions
▪ My Cloud Home Duo device supports the following disk configurations for data
storage:
Table 11.1
Supported Storage Mode 1 Disk 2 Disks
Max Capacity (JBOD) Yes Yes
Mirror (RAID 1) No Yes (Default Setup)
My Cloud Home – Disk Errors: If you receive an email from the My Cloud Team or your
mobile device displays a message stating "Disk errors were detected on your disk"
this means that the device needs to be replaced. Use the instructions from
Answer ID 8 noted in our FAQ to get a replacement unit.
My Cloud Home Duo – Disk Errors: If you receive an email from the My Cloud Team or
your mobile device displays a message stating "Disk errors were detected on your
disk" this means that one of the drives in your My Cloud Home Duo device may
need to be replaced. Use the following steps for the replacement process.
▪ The error message will indicate which drive is the problem, Disk1 or Disk2.
▪ Use the following section "RMA - Replacing a Drive" to remove the drive in
question.
▪ The drives are numbered. After removing the top lid, the enclosure has a number
embossed into the ledge. When looking at the unit from the front of the device,
Disk 1 is on the left and Disk 2 is on the right.
▪ Use the instructions from Answer ID 8 noted in our FAQ for the RMA or
replacement process.
RMA - Replacing a Drive
My Cloud Home device is not a user serviceable device. No drives can be added or
removed from the device. If it is faulty, it must be returned to WD as a complete
unit.
My Cloud Home Duo device is a user serviceable device for RMA purposes only – you
have the option to replace the drives in the device with a replacement from WD. If
the entire device is faulty, it can be returned to WD as a complete unit. The unit
must be powered off when removing a drive for RMA. The My Cloud Home Duo device
does not support hot-swap capability.
Removing
If your My Cloud Home Duo device still contains the drive you want to replace, you
first remove it before you can insert the new one.
must
My Cloud Home / My Cloud Home Duo
User Manual
32
Page 39

Additional Features & Functions
1. As is illustrated above, reveal the hard drives by opening the top lid from the
rear edge.
2. Each hard drive is latched in place by an attached tray and the tray has a plastic
latch on one end.
▪ Gently press down on the plastic latch with your index
finger so that it
unlatches from the metal frame of the device.
▪ While gently pressing down on the plastic latch, grab the plastic tray with
fingertips and gently pull. The tray and hard drive should easily lift up or
your
slide out.
3. Once the hard drive and tray combination are completely removed from the
unit, remove the plastic tray from the hard drive.
▪ The tray is attached to the hard drive with four pins.
▪ As is illustrated above, gently
flex the tray so that the pins come out of the
sides of the hard drive. Remove and save the tray. Do not return a hard drive
to WD with the tray. The tray will not be returned to you.
Adding
Before adding a hard drive to your My Cloud Home Duo device, make sure there is
no hard drive in the slot where it will be installed. If you need to
drive, follow the instructions above.
first remove a hard
My Cloud Home / My Cloud Home Duo
User Manual
33
Page 40

Additional Features & Functions
1. Attach to your hard drive, the plastic tray that was included and designed for
the My Cloud Home Duo device.
▪ This plastic hard drive tray fits on the underside or circuit board side of the
hard drive.
▪ The end of the tray that is closed and has the latch, must be on the side of
the hard drive with the narrow serial number barcode label.
▪ As is illustrated above, gently
flex the plastic tray so that the tiny pins on the
insides of the tray go into the four holes on the sides of the hard drive. Make
sure the pins remain
firmly connected to the tray.
2. Once the tray is attached, slide the drive into the My Cloud Home Duo device.
▪ Orientation Note: The tray should slide in easily. Do not force it. The side of
the hard drive with the SATA connector and power connector, must point
down into the unit. The side of the hard drive with the small serial number
barcode label must face up. The latch must be on the side of the tray that is
closest to the rear panel of the unit.
▪ The drive is completely inserted once the plastic latch connects or latches
into the metal chassis of the unit.
3. Re-attach the top cover of the My Cloud Home Duo device.
▪ Note that one end has curved hinges that go in
first – then press down on
the other side of the lid until it is flush with the top of the My Cloud Home
Duo unit.
My Cloud Home / My Cloud Home Duo
User Manual
34
Page 41

12
FAQ
FAQ
All WD Knowledge Base references listed below can be viewed at:
support.wdc.com/knowledgebase. Enter the below listed Answer ID in the search
field. You can also Click on the Answer ID listed below for a direct link.
Power Adapter Compatibility
Use the charts below (Table 12.1 and 12.2) to determine the power requirement and
compatible power adapter for your My Cloud Home or My Cloud Home Duo device.
The Regulatory Number (R/N) located on the product's barcode label can be used
as a reference.
Table 12.1
My Cloud Home
Up to 6 TB G1C 12VDC 1.5A - 18 watt
For 8 TB and higher G7C 12VDC 3A - 36 watt
Table 12.2
My Cloud Home Duo
Up to 12 TB G2C 12VDC 3A - 36 watt
For 16 TB and higher G6C 12VDC 4A - 48 watt
Note: It is important that these devices use a 12VDC power adapter (using more or less voltage
(VDC) will damage the device), and are provided the minimum amperes (A) noted above. If the hard
disk drives in the unit are upgraded in capacity, the power adapter must meet the new requirement
as noted on the charts above.
R/N Power Adapter Specification
R/N Power Adapter Specification
How to get an RMA to replace a defective product, or obtain a power supply or USB cable for a WD product
Answer ID 8 | This answer explains how to create an RMA (Return Merchandise
Authorization) to replace a defective product with Western Digital, or obtain a
power supply or interface cable for a WD product.
My Cloud Home / My Cloud Home Duo
User Manual
35
Page 42

13
Compliance and Warranty Information
Compliance and Warranty Information
Regulatory Compliance
FCC Class B Information
Operation of this device is subject to the following conditions:
▪ This device may not cause harmful interference.
▪ This device must accept any interference received, including interference that
may cause undesired operation.
This device has been tested and found to comply with the limits for a Class B digital
device, pursuant to Part 15 of the FCC Rules. These limits are designed to provide
reasonable protection against harmful interference in a residential installation. This
device generates, uses, and can radiate radio frequency energy and, if not installed
and used in accordance with the instructions, may cause harmful interference to
radio or television reception. However, there is no guarantee that interference will
not occur in a particular installation. If this equipment does cause harmful
interference to radio or television reception, which can be determined by turning
the equipment off and on, you are encouraged to try to correct the interference by
one or more of the following measures:
▪ Reorient or relocate the receiving antenna.
▪ Increase the separation between the equipment and the receiver.
▪ Connect the equipment into an outlet on a circuit different from that to which
the receiver is connected.
▪ Consult the dealer or an experienced radio/television technician for help.
Any changes or
authority to operate this device.
modifications not expressly approved by WD could void your
ICES-003/NMB-003 Statement
Cet appareil numérique de la classe B est conforme à la norme NMB-003(B) du
Canada.
This device complies with Canadian ICES-003 Class B.
Safety Compliance
Approved for US and Canada. CAN/CSA-C22.2 No.
Information Technology Equipment.
Approuvé pour les Etats-Unis et le Canada. CAN/CSA-C22.2 No.
60950–1: Sûreté d'équipement de technologie de l'information.
60950–1, UL 60950–1: Safety of
60950–1, UL
CE Compliance For Europe
Marking by the CE symbol indicates compliance of this system to the applicable
Council Directives of the European Union, including the EMC Directive (2014/30/
EU), the Low Voltage Directive (2014/35/EU), ErP Directive (2009/125/EC), and
My Cloud Home / My Cloud Home Duo
User Manual
36
Page 43

Compliance and Warranty Information
RoHS Directive (2011/65/Eu). A “Declaration of Conformity” in accordance with the
applicable directives has been made and is on file at Western Digital Europe.
Power Mode
My Cloud Home devices act as a small scale server. As such, they do not support
standby mode. The off-mode power consumption is <0.5 watts when the unit is
turned off.
Environmental Compliance (China)
Warranty Information
Obtaining Service
WD values your business and always attempts to provide you the very best of
service. Should you encounter any problem, please give us an opportunity to
address it before returning this Product. Most technical support questions can be
answered through our knowledge base or e-mail support service at
http://support.wdc.com. If the answer is not available or, if you prefer, please
contact WD at the applicable telephone number shown in the front of this
document. If you wish to make a claim, you should initially contact the dealer from
whom you originally purchased the Product. If you are unable to contact the dealer
from whom you originally purchased the Product, please visit our product support
Web site at http://support.wdc.com for information on how to obtain service or a
Return Material Authorization (RMA). If it is determined that the Product may be
defective, you will be given an RMA number and instructions for Product return. An
unauthorized return (i.e., one for which an RMA number has not been issued) will be
returned to you at your expense. Authorized returns must be shipped in an
approved shipping container, prepaid and insured, to the address provided with
your RMA number. If following receipt of a qualifying claim under this warranty, WD
or the dealer from whom you originally purchased the Product determines that
your claim is valid, WD or such dealer shall, at its discretion, either repair or replace
the Product with an equivalent or better Product or refund the cost of the Product
My Cloud Home / My Cloud Home Duo
User Manual
37
Page 44

Compliance and Warranty Information
to you. You are responsible for any expenses associated with a claim under this
warranty. The benefits provided to you under this warranty are in addition to other
rights and remedies available to you under the Australian Competition and
Consumer Act or the New Zealand Consumer Guarantees Act. Your original box and
packaging materials should be kept for storing or shipping your WD product. To
conclusively establish the period of warranty, check the warranty expiration (serial
number required) via http://support.wdc.com.
Limited Warranty
WD warrants that the Product, in the course of its normal use, will for the term
defined below, be free from defects in material and workmanship and will conform
to WD’s
country in which your Product was purchased. The term of your limited warranty is
for 2 years in the North, South and Central America region, 2 years in the Europe,
the Middle East and Africa region, and 2 years in the Asia
otherwise required by law. The term of your limited warranty period shall
commence on the purchase date appearing on your purchase receipt. WD may at
its discretion make extended warranties available for purchase. WD shall have no
liability for any Product returned if WD determines that the Product was stolen
from WD or that the asserted defect a) is not present, b) cannot reasonably be
rectified because of damage occurring before WD receives the Product, or c) is
attributable to misuse, improper installation, alteration (including removing or
obliterating labels and opening or removing external enclosures, including the
mounting frame, unless the product is on the list of limited user-serviceable
products and the
instructions, as found at http://support.wd.com), accident or mishandling while in
the possession of someone other than WD. Subject to the limitations
above, your sole and exclusive warranty shall be, during the period of warranty
specified above and at WD’s option, the repair or replacement of the Product with
an equivalent or better Product. The foregoing warranty of WD shall extend to
repaired or replaced Products for the balance of the applicable period of the
original warranty or ninety (90) days from the date of shipment of a repaired or
replaced Product, whichever is longer.
specification therefor. The term of your limited warranty depends on the
Pacific region, unless
specific alteration is within the scope of the applicable
specified
The foregoing limited warranty is WD's sole warranty and is applicable only to
products sold as new. The remedies provided herein are in lieu of a) any and all
other remedies and warranties, whether expressed, implied or statutory, including
but not limited to, any implied warranty of merchantability or
fitness for a particular
purpose, and b) any and all obligations and liabilities of WD for damages including,
but not limited to accidental, consequential, or special damages, or any
loss, lost profits or expenses, or lost data arising out of or in connection with the
purchase, use, or performance of the Product, even if WD has been advised of the
possibility of such damages. In the United States, some states do not allow
exclusion or limitations of incidental or consequential damages, so the limitations
above may not apply to you. This warranty gives you
specific legal rights, and you
may also have other rights which vary from state to state.
Warranty Information (Australia/New Zealand)
Nothing in this warranty modifies or excludes your legal rights under the Australian
Competition and Consumer Act or the New Zealand Consumer Guarantees Act.
This warranty
which is likely to be quick and simple for all parties.
My Cloud Home / My Cloud Home Duo
User Manual
identifies WD’s preferred approach to resolving warranty claims
financial
38
Page 45

Compliance and Warranty Information
No other warranties either express or implied by law, including but not limited to
those contained in the Sale of Goods Act, are made with respect to the Product. If
you purchased your Product in New Zealand for the purposes of a business, you
acknowledge and agree that the New Zealand Consumer Guarantees Act does not
apply. In Australia, our goods come with guarantees that cannot be excluded under
the Australian Consumer Law. You are entitled to a replacement or refund for a
major failure and compensation for any other reasonably foreseeable loss or
damage. You are also entitled to have the goods repaired or replaced if goods fail
to be of acceptable quality and the failure does not amount to a major failure. What
constitutes a major failure is set out in the Australian Consumer Law.
Obtaining Service
WD values your business and always attempts to provide you the very best of
service. Should you encounter any problem, please give us an opportunity to
address it before returning this Product. Most technical support questions can be
answered through our knowledge base or e-mail support service at
http://support.wdc.com. If the answer is not available or, if you prefer, please
contact WD at the applicable telephone number shown in the front of this
document. If you wish to make a claim, you should initially contact the dealer from
whom you originally purchased the Product. If you are unable to contact the dealer
from whom you originally purchased the Product, please visit our product support
Web site at http://support.wdc.com for information on how to obtain service or a
Return Material Authorization (RMA). If it is determined that the Product may be
defective, you will be given an RMA number and instructions for Product return. An
unauthorized return (i.e., one for which an RMA number has not been issued) will be
returned to you at your expense. Authorized returns must be shipped in an
approved shipping container, prepaid and insured, to the address provided with
your RMA number. If following receipt of a qualifying claim under this warranty, WD
or the dealer from whom you originally purchased the Product determines that
your claim is valid, WD or such dealer shall, at its discretion, either repair or replace
the Product with an equivalent or better Product or refund the cost of the Product
to you. You are responsible for any expenses associated with a claim under this
warranty. The
rights and remedies available to you under the Australian Competition and
Consumer Act or the New Zealand Consumer Guarantees Act. Your original box and
packaging materials should be kept for storing or shipping your WD product. To
conclusively establish the period of warranty, check the warranty expiration (serial
number required) via http://support.wdc.com.
benefits provided to you under this warranty are in addition to other
Warranty
WD warrants that the Product, in the course of its normal use, will for the term
defined below, be free from defects in material and workmanship and will conform
to WD’s specifications. The term of your warranty is 2 years in Australia and New
Zealand, unless otherwise required by law. The term of your warranty period shall
commence on the purchase date appearing on your purchase receipt from an
authorized distributor or authorized reseller. Proof of purchase shall be required to
be eligible for this warranty and to establish the commencement date of this
warranty. Warranty service will not be provided unless the Product is returned to
an authorized distributor, authorized reseller or regional WD return center where
the Product was
warranties available for purchase. WD shall have no liability for any Product
returned if WD determines that the Product was (i) not purchased from an
authorized distributor or authorized reseller, (ii) not used in accordance with WD
My Cloud Home / My Cloud Home Duo
User Manual
first shipped by WD. WD may at its discretion make extended
39
Page 46

Compliance and Warranty Information
specifications and instructions, (iii) not used for its intended function, or (iv) stolen
from WD, or that the asserted defect a) is not present, b) cannot reasonably be
rectified because of damage occurring before WD receives the Product, or c) is
attributable to misuse, improper installation, alteration (including removing or
obliterating labels and opening or removing external enclosures, including the
mounting frame, unless the product is on the list of limited user-serviceable
products and the
specific alteration is within the scope of the applicable
instructions, as found at http://support.wdc.com), accident or mishandling while in
the possession of someone other than WD.
PRODUCTS ARE COMPLEX AND FRAGILE ITEMS THAT MAY OCCASSIONALY FAIL
DUE TO (A) EXTERNAL CAUSES, INCLUDING WITHOUT LIMITATION, MISHANDLING,
EXPOSURE TO HEAT, COLD, AND HUMIDITY, AND POWER FAILURES, OR (B)
INTERNAL FAULTS . SUCH FAILURES CAN RESULT IN THE LOSS, CORRUPTION,
DELETION ALTERATION OF DATA. NOTE THAT YOU SHALL BE RESPONSIBLE FOR
THE LOSS, CORRUPTION, DELETION OR ALTERATION OF DATA HOWSOEVER
CAUSED, AND FOR BACKING UPAND PROTECTING DATA AGAINST LOSS,
CORRUPTION, DELETION OR ALTERATION. YOU AGREE TO CONTINUALLY BACK UP
ALL DATA ON THE PRODUCT, AND TO COMPLETE A BACKUP PRIOR TO SEEKING
ANY GENERAL SERVICE AND TECHNICAL SUPPORT FROM WD.
In Australia, if the Product is not of a kind ordinarily acquired for personal, domestic
or household use or consumption, provided it is fair and reasonable to do so, WD
limits its liability to replacement of the Product or supply of equivalent or better
Product.
This warranty shall extend to repaired or replaced Products for the balance of the
applicable period of the original warranty or ninety (90) days from the date of
shipment of a repaired or replaced Product, whichever is longer. This warranty is
WD’s sole manufacturer’s warranty and is applicable only to Products sold as new.
GNU General Public License (“GPL”)
Firmware incorporated into this product may include third party copyrighted
software licensed under the GPL or Lesser General Public License (“LGPL”)
(collectively, “GPL Software”) and not Western Digital’s End User License
Agreement. In accordance with the GPL, if applicable: 1) the source code for the
GPL Software may be downloaded at no charge from http://support.wdc.com or
obtained on CD for a nominal charge from http://support.wdc.com or by calling
Customer Support within three years of the date of purchase; 2) you may re-use, redistribute, and modify the GPL Software; 3) with respect solely to the GPL Software,
no warranty is provided, to the extent permitted by applicable law; and 4) a copy
of the GPL is included herewith, may be obtained at http://www.gnu.org, and may
also be found at http://support.wdc.com.
Modification of or tampering with the Software, including but not limited to any
Open Source Software, is solely at your own risk. Western Digital is not responsible
for any such
modification or tampering. Western Digital will not support any
product in which you have or have attempted to modify the Software supplied by
Western Digital.
My Cloud Home / My Cloud Home Duo
User Manual
40
Page 47

Compliance and Warranty Information
Third Party Notices – My Cloud Home
MPEG-4 Visual – MPEG-LA
THIS PRODUCT IS LICENSED UNDER THE MPEG-4 VISUAL PATENT PORTFOLIO
LICENSE FOR THE PERSONAL AND NON-COMMERCIAL USE OF A CONSUMER FOR (i)
ENCODING VIDEO IN COMPLIANCE WITH THE MPEG-4 VISUAL STANDARD ("MPEG-4
VIDEO") AND/OR (ii) DECODING MPEG-4 VIDEO THAT WAS ENCODED BY A
CONSUMER ENGAGED IN A PERSONAL AND NONCOMMERCIAL ACTIVITY AND/OR
WAS OBTAINED FROM A VIDEO PROVIDER LICENSED BY MPEG LA TO PROVIDE
MPEG-4 VIDEO. NO LICENSE IS GRANTED OR SHALL BE IMPLIED FOR ANY OTHER
USE. ADDITIONAL INFORMATION INCLUDING THAT RELATING TO PROMOTIONAL,
INTERNAL AND COMMERCIAL USES AND LICENSING MAY BE OBTAINED FROM
MPEG LA, LLC. SEE HTTP://WWW.MPEGLA.COM.
H.264 AVC – MPEG-LA
THIS PRODUCT IS LICENSED UNDER THE AVC PATENT PORTFOLIO LICENSE FOR
THE PERSONAL USE OF A CONSUMER OR OTHER USES IN WHICH IT DOES NOT
RECEIVE REMUNERATION TO (i) ENCODE VIDEO IN COMPLIANCE WITH THE AVC
STANDARD (“AVC VIDEO”) AND/OR (ii) DECODE AVC VIDEO THAT WAS ENCODED
BY A CONSUMER ENGAGED IN A PERSONAL ACTIVITY AND/OR WAS OBTAINED
FROM A VIDEO PROVIDER LICENSED TO PROVIDE AVC VIDEO. NO LICENSE IS
GRANTED OR SHALL BE IMPLIED FOR ANY OTHER USE. ADDITIONAL INFORMATION
MAY BE OBTAINED FROM MPEG LA, L.L.C. SEE HTTP://WWW.MPEGLA.COM
Third Party Notices – My Cloud Home Duo
MPEG-2 - MPEG-LA
ANY USE OF THIS PRODUCT IN ANY MANNER OTHER THAN PERSONAL USE THAT
COMPLIES WITH THE MPEG-2 STANDARD FOR ENCODING VIDEO INFORMATION
FOR PACKAGED MEDIA IS EXPRESSLY PROHIBITED WITHOUT A LICENSE UNDER
APPLICABLE PATENTS IN THE MPEG-2 PATENT PORTFOLIO, WHICH LICENSE IS
AVAILABLE FROM MPEG LA, LLC, 6312 S. Fiddlers Green Circle, Suite 400E,
Greenwood Village, Colorado 80111 U.S.A.
MPEG-4 Visual – MPEG-LA
THIS PRODUCT IS LICENSED UNDER THE MPEG-4 VISUAL PATENT PORTFOLIO
LICENSE FOR THE PERSONAL AND NON-COMMERCIAL USE OF A CONSUMER FOR (i)
ENCODING VIDEO IN COMPLIANCE WITH THE MPEG-4 VISUAL STANDARD ("MPEG-4
VIDEO") AND/OR (ii) DECODING MPEG-4 VIDEO THAT WAS ENCODED BY A
CONSUMER ENGAGED IN A PERSONAL AND NONCOMMERCIAL ACTIVITY AND/OR
WAS OBTAINED FROM A VIDEO PROVIDER LICENSED BY MPEG LA TO PROVIDE
MPEG-4 VIDEO. NO LICENSE IS GRANTED OR SHALL BE IMPLIED FOR ANY OTHER
USE. ADDITIONAL INFORMATION INCLUDING THAT RELATING TO PROMOTIONAL,
INTERNAL AND COMMERCIAL USES AND LICENSING MAY BE OBTAINED FROM
MPEG LA, LLC. SEE HTTP://WWW.MPEGLA.COM.
My Cloud Home / My Cloud Home Duo
User Manual
41
Page 48

Compliance and Warranty Information
H.264 AVC – MPEG-LA
THIS PRODUCT IS LICENSED UNDER THE AVC PATENT PORTFOLIO LICENSE FOR
THE PERSONAL USE OF A CONSUMER OR OTHER USES IN WHICH IT DOES NOT
RECEIVE REMUNERATION TO (i) ENCODE VIDEO IN COMPLIANCE WITH THE AVC
STANDARD (“AVC VIDEO”) AND/OR (ii) DECODE AVC VIDEO THAT WAS ENCODED
BY A CONSUMER ENGAGED IN A PERSONAL ACTIVITY AND/OR WAS OBTAINED
FROM A VIDEO PROVIDER LICENSED TO PROVIDE AVC VIDEO. NO LICENSE IS
GRANTED OR SHALL BE IMPLIED FOR ANY OTHER USE. ADDITIONAL INFORMATION
MAY BE OBTAINED FROM MPEG LA, L.L.C. SEE HTTP://WWW.MPEGLA.COM
HEVC Advance
My Cloud Home / My Cloud Home Duo
User Manual
42
Page 49

Index
A
Accessories - Cables and Power Supply Units 35
Actions - Add Content 14
Add Content In Real Time 14
Adding USB Content 12
Additional Features & Functions 31
App Permissions 31
Auto Camera Backup - Mobile App 11
B
Backup - Mobile Device Camera 11
Backup - USB Device 12
Browser Compatibility 3
C
Change My Cloud Account Password - Mobile App
28
Change My Cloud Account Password - Web App
29
China RoHS, environmental compliance 37
Compatibility with Internet Browsers 3
Compliance, regulatory 36
Connectors - Back Panel 5
Firmware Version - Mobile App 22
Firmware Version - Web App 24
Front LED Description 4
G
GNU general public license 40
GPL software 40
H
H.264 AVC - MPEG License Agreement 41, 42
Handling Precautions 7
HEVC Advance 42
I
ICES-003/NMB-003 compliance 36
Internet Requirements 3
Invite a User - Mobile App 21
K
KB 8 - Replace a WD Product 35
Kit Contents 2
D
Delete Share - Desktop App 19
Delete Share - Mobile App 18
Delete Share - Web App 18
Deleting Content - Mobile App 17
Deleting Content - Web App 17
Desktop App Setup 10
Device Owner - Remove 31
Disk Configuration 25
Disk Configurations 31
Disk Error Message 31
Drag-and-Drop - Desktop App 14
Drag-and-Drop - Web App 14
Drive Handling Precautions 7
E
Edit My Cloud Account Name - Mobile App 27
Edit My Cloud Account Name - Web App 29
Profile Picture - Mobile App 27
Edit
Edit Profile Picture - Web App 29
Environmental compliance, China RoHS 37
Erase All Data & All Users - Mobile App 23
Erase All Data & All Users - Web App 26
Ethernet Port 5, 6
F
FCC Class B information 36
L
Limited Warranty 38
M
Make Available
Manage Settings - Mobile App 31
Managing Services 30
Managing Storage 31
Mobile App Setup 9
Modifying Device Name - Mobile App 22
Modifying Device Name - Web App 24
MPEG-2 License Agreement 41
MPEG-4 Visual - MPEG License Agreement 41
Offline 13
O
Operating System Compatibility 3
P
Ports - Back Panel 5
Power Adapter Compatibility 35
Power Button Description 5
Power Connector 5
Power Mode 37
Precautions for Drive Handling 7
Product Description 4
Product Features 1
My Cloud Home / My Cloud Home Duo
User Manual
43
Page 50

Product Requirements 3
R
Reboot Device - Mobile App 22
Reboot Device - Web App 25
Regulatory compliance 36
Remove a Device Owner 31
Remove User - Mobile App 21
Replace a WD Product 35, 37
Reset Button 5, 6
RMA 35, 37
RMA - Replacing a Drive 32
S
Safety compliance 36
Searching Content 16
Services 30
Set Passcode for Mobile App 28
Share Content - Desktop App 19
Share Content - Mobile App 18
Share Content - Web App 18
Share Device - Mobile App 21
Shut Down Device - Mobile App 23
Shut Down Device - Web App 25
Social and Cloud Import 12
Software Set Up 8
Software, GPL 40
Sync Desktop Content 13
Sync My Cloud Home Content 13
Sync Online Cloud Content 12
Sync to My Cloud 13
T
Transfer USB Content 12
U
USB Port(s) 5, 6
Users - Web App 24
V
View Content 16
W
Warranty Information 37–39
WD Service, obtaining 37, 39
Web App Setup 10
My Cloud Home / My Cloud Home Duo
User Manual
44
Page 51

WD, the WD logo and My Cloud are registered trademarks or
trademarks of Western Digital Corporation or its affiliates in the U.S.
and/or other countries. All other marks are the property of their
respective owners. Pictures shown may vary from actual product.
Product specifications subject to change without notice. Android,
Chrome, Google Drive and Google Play are trademarks of Google Inc.
Apple, iPhone, Mac, OS X, macOS, Safari and Time Machine are
trademarks of Apple Inc., registered in the U.S. and other countries.
App Store is a service mark of Apple Inc. Dropbox and the Dropbox
logo are trademarks of Dropbox, Inc. Firefox is a registered trademark
of the Mozilla Foundation. IOS is a trademark or registered trademark
of Cisco in the U.S. and other countries and is used under license by
Apple Inc. Microsoft, Internet Explorer, OneDrive and Windows are
either registered trademarks or trademarks of Microsoft Corporation in
the United States and/or other countries. Samsung and Galaxy S are all
trademarks or registered trademarks of Samsung Electronics Co., Ltd.
Plex and Plex Media Server are trademarks of Plex and used under a
license. Wi-Fi is a registered trademark of Wi-Fi Alliance. As used for
storage capacity, one gigabyte (GB) = one billion bytes and one
terabyte (TB) = one trillion bytes. Total accessible capacity varies
depending on operating environment.
©
2018 Western Digital Corporation or its
Western Digital
5601 Great Oaks Parkway
San Jose, California 95119 U.S.A.
affiliates. All rights reserved.
4779–705163-A03
Page 52

 Loading...