

Page 1
1
USER GUIDE
Page 2

SoundGrid Studio
Table of Contents
1. Soundgrid and soundgrid studio................................................................................................................................................4
1.1 Welcome to SoundGrid Studio .............................................................................................................................................4
1.1.1 Typical Uses .......................................................................................................................................................................5
1.1.2 How to Use This Manual ...............................................................................................................................................5
1.2 SoundGrid Tools .........................................................................................................................................................................8
1.2.1 StudioRack ........................................................................................................................................................................8
1.2.2 eMotion ST Mixer ............................................................................................................................................................9
1.2.3 MultiRack ......................................................................................................................................................................... 10
2. Using SoundGrid Studio ............................................................................................................................................................... 11
2.1 Getting Started ......................................................................................................................................................................... 11
2.1.1 Hardware Installation .................................................................................................................................................. 11
2.1.2 Software Installation .................................................................................................................................................... 12
2.2 Automatic Conguration ...................................................................................................................................................... 14
2.3 Manually Conguring a SoundGrid Studio Network .................................................................................................. 16
2.3.1 Connecting and Conguring I/Os ........................................................................................................................... 17
2.3.2 Device Racks ................................................................................................................................................................... 19
2.3.3 Adding a Server ............................................................................................................................................................. 23
2.3.4 Adding Computers to a SoundGrid Network...................................................................................................... 25
2.3.5 Clock Basics ..................................................................................................................................................................... 27
2.3.6 I/O Device Control Panels ...........................................................................................................................................28
2.3.7 Patching SoundGrid Studio Inputs and Outputs ............................................................................................... 31
2.3.8 Conguration Review .................................................................................................................................................. 32
Page 3

SoundGrid Studio
3. SoundGrid Studio Workows and Congurations ..............................................................................................................33
3.1 One DAW, One Computer, One I/O .................................................................................................................................. 34
3.2 One DAW, Two or More I/O Devices .................................................................................................................................. 35
3.3 One Computer, Two I/O and DSP Server, One DAW .................................................................................................... 36
3.4 Project Studio: One Computer, DSP Server, Pro Tools HD/HDX or HD Native System .................................... 37
3.5 Two Native DAWs, Two or More I/O Devices .................................................................................................................. 38
3.6 Sharing Drivers in a Studio Environment ........................................................................................................................ 39
3.7 HD Mix Room and Several Smaller Recording/Editing Rooms................................................................................ 40
3.8 Integrating Avid Hardware Devices .................................................................................................................................. 42
3.9 Large Studio ............................................................................................................................................................................... 43
3.10 Live Sound: MultiRack and SoundGrid Studio ............................................................................................................ 45
4. SoundGrid Studio Components ................................................................................................................................................ 46
4.1 Startup and Navigation ......................................................................................................................................................... 46
3
4.2 SoundGrid Studio Interface ................................................................................................................................................. 47
4.2.1 Top Bar............................................................................................................................................................................... 48
4.2.2 SoundGrid Studio Sections ....................................................................................................................................... 49
4.2.3 SoundGrid Studio: System Inventory Page .......................................................................................................... 50
4.2.4 Device Racks ................................................................................................................................................................... 56
4.2.5 Settings Page .................................................................................................................................................................. 66
4.2.6 Session Info Page .......................................................................................................................................................... 68
4.2.7 Patch Page ....................................................................................................................................................................... 69
5. Further Learning ............................................................................................................................................................................. 76
Page 4

SoundGrid Studio
1. SOUNDGRID AND SOUNDGRID STUDIO
Thank you for choosing SoundGrid Studio from Waves. In order to get the most out of this unique product, please take some time to
read this manual. We suggest that you also become familiar with the Waves support site: www.waves.com/support.
There you will nd an extensive answer base, the latest tech specs, detailed installation guides, software updates, and current
information about authorization and registration.
1.1 Welcome to SoundGrid Studio
SoundGrid Studio is a new way of thinking for recording studios. It brings exibility, quality, and economy to workplaces ranging
from simple project studios to complex networked recording or broadcast companies. The SoundGrid infrastructure is open to thirdparty hardware and software developers; SoundGrid Studio thus oers studios a wide range of solutions. Streamlined workow,
sharing of assets, and extremely low latency are some of its benets. SoundGrid Studio brings a new world of productivity and
freedom to sound production.
SoundGrid is an audio processing and networking protocol for real-time, low-latency audio processing. It enables applications
such as MultiRack and SoundGrid Studio and DAW plugins such as StudioRack to share and control I/O devices and servers across a
4
network. It also allows recording and monitoring in near-zero latency.
The SoundGrid Studio Application congures and controls the devices in a SoundGrid network. Using SoundGrid Studio,
users can set up and manage I/Os, patch between drivers and devices, and manage the network.
Most Waves plugins are SoundGrid-compatible. The SoundGrid protocol is open to development by all manufacturers of audio
hardware and plugins.
Page 5

SoundGrid Studio
1.1.1 Typical Uses
■
Use SoundGrid I/O devices with any DAW.
■
Ooad plugin processing to a server to increase the number of plugins you can use simultaneously.
■
Stream audio between DAWs from the same manufacturer or from dierent manufacturers.
■
Use SoundGrid I/O devices and servers from anywhere in a SoundGrid network with almost any DAW.
■
Use a DSP server, the StudioRack plugin, and the eMotion ST mixer to record and monitor with very low latency.
■
Integrate Pro Tools HD/HDX or HD Native systems into the SoundGrid Studio system.
1.1.2 How to Use This Manual
This manual serves both as a step-by-step “how-to” guide and as a reference to answering your questions. It is divided into four
major sections:
Welcome to SoundGrid Studio is an introduction to SoundGrid Studio: what it does, how it ts together, how it can grow.
Using SoundGrid Studio provides the essentials for installing software and hardware, setting up a network, conguring I/O
devices, adding a server and streaming audio within a network.
5
SoundGrid Studio Workows and Congurations presents several audio production workows and describes how to use
SoundGrid Studio in these environments.
SoundGrid Studio Components is a reference chapter that explains the details of connecting, conguring and using SoundGrid
Studio.
Read the rst two major sections and you will know most of what you need to get up to speed. Then use SoundGrid Studio
Components to ll in the gaps. Some critical information is repeated in several places throughout this manual, so that no matter
how you use it, you will not miss important concepts and instructions. SoundGrid Studio Workows and Congurations is helpful
when considering which conguration best suits your needs.
Page 6
SoundGrid Studio
1.1.3 SoundGrid Essentials
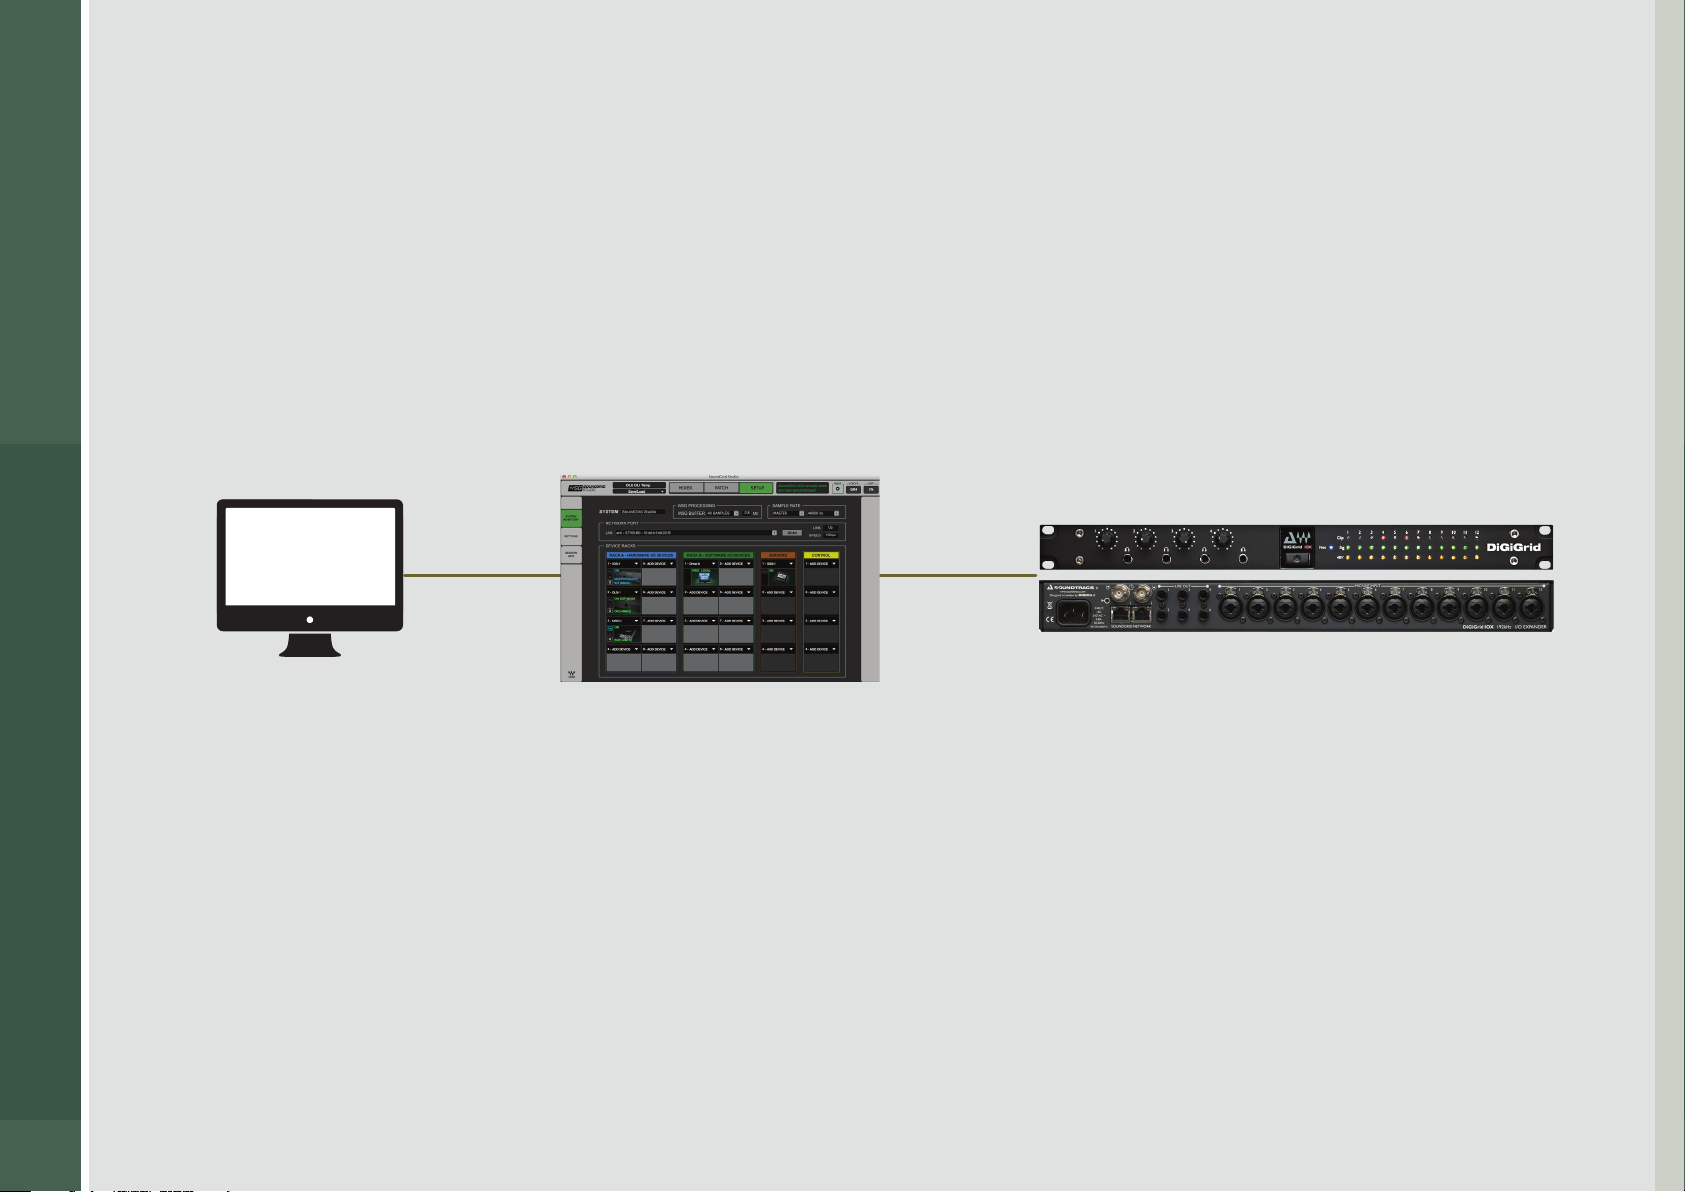
Any SoundGrid Studio system, no matter how large or small, how simple or complex, consists of three basic elements:
■
Waves SoundGrid ASIO/Core Audio driver
■
SoundGrid Studio Application
■
One or more SoundGrid I/Os
The Waves SoundGrid ASIO/Core Audio driver enables you to connect your DAW to the SoundGrid Studio system. This allows
your workstation to communicate with devices on the SoundGrid network. The I/Os move sound in and out of the network. The
SoundGrid Studio Application manages all these devices.
DiGiGrid IOX
Host Computer
6
SoundGrid Studio Application
congures and manages devices
on the network. Users assign
I/O, control preamps, and patch
devices from this page
SoundGrid protocol enables
devices to connect to the network
and to stream audio via Ethernet
Connects SoundGrid
network with analog
and digital sources,
and with other devices
A SoundGrid network is completely scalable, so this basic conguration can grow. SoundGrid is compatible with most popular DAWs
and combinations of dierent DAWs, as well as with Pro Tools HD/HDX and HD Native systems.
Page 7
SoundGrid Studio
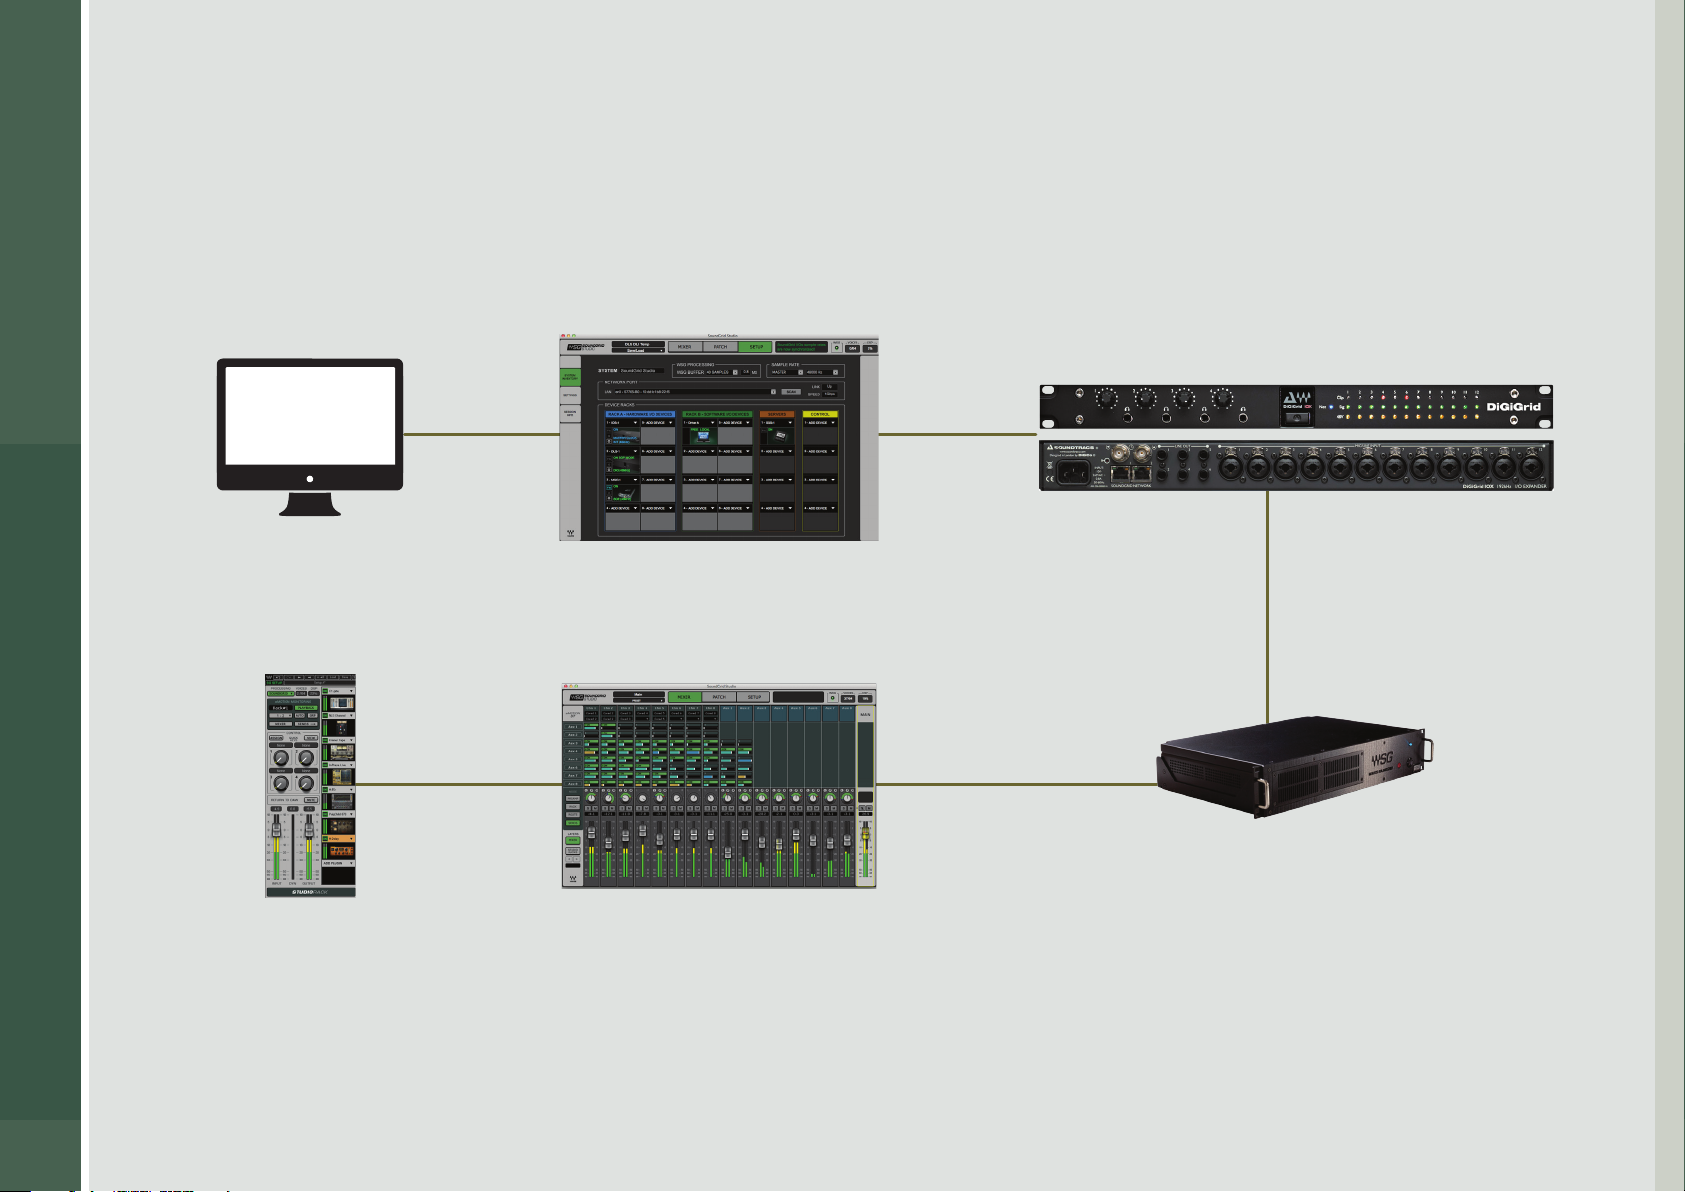
Once you learn how the basic setup works, it is not hard to build a more powerful system.
Adding a DSP server ooads plugin processing from your DAW. This enables you to use the eMotion ST mixer and StudioRack
plugins, add additional plugins, and record and monitor with very low latency.
DiGiGrid IOX
Host Computer
SoundGrid Studio
7
StudioRack
Server
eMotion ST
Page 8

SoundGrid Studio
1.2 SoundGrid Tools
SoundGrid Studio works in conjunction with other systems to deliver extra DSP processing, low-latency recording and monitoring,
and live sound streaming.
1.2.1 StudioRack
StudioRack is a plugin software rack that runs chains of up to eight plugins each. It enables a greater
number of plugins per DAW channel and, with certain congurations, recording and monitoring with very
low latency.
Insert StudioRack in the host DAW as you would any plugin. Any SoundGrid Studio-compatible plugin can
be added to StudioRack. All parameters can be automated in the host DAW, controlled by Quick Keys, or
assigned to control surfaces. StudioRack can operate in Local mode, where processing is carried out in the
1
local CPU, or in SoundGrid mode, where processing takes place on a DSP server.
For more information, please refer to the StudioRack user manual.
8
1. DSP processing, whether in StudioRack HD or StudioRack in DSP mode, requires a SoundGrid I/O, a SoundGrid server and a StudioRack SoundGrid license.
Page 9
SoundGrid Studio
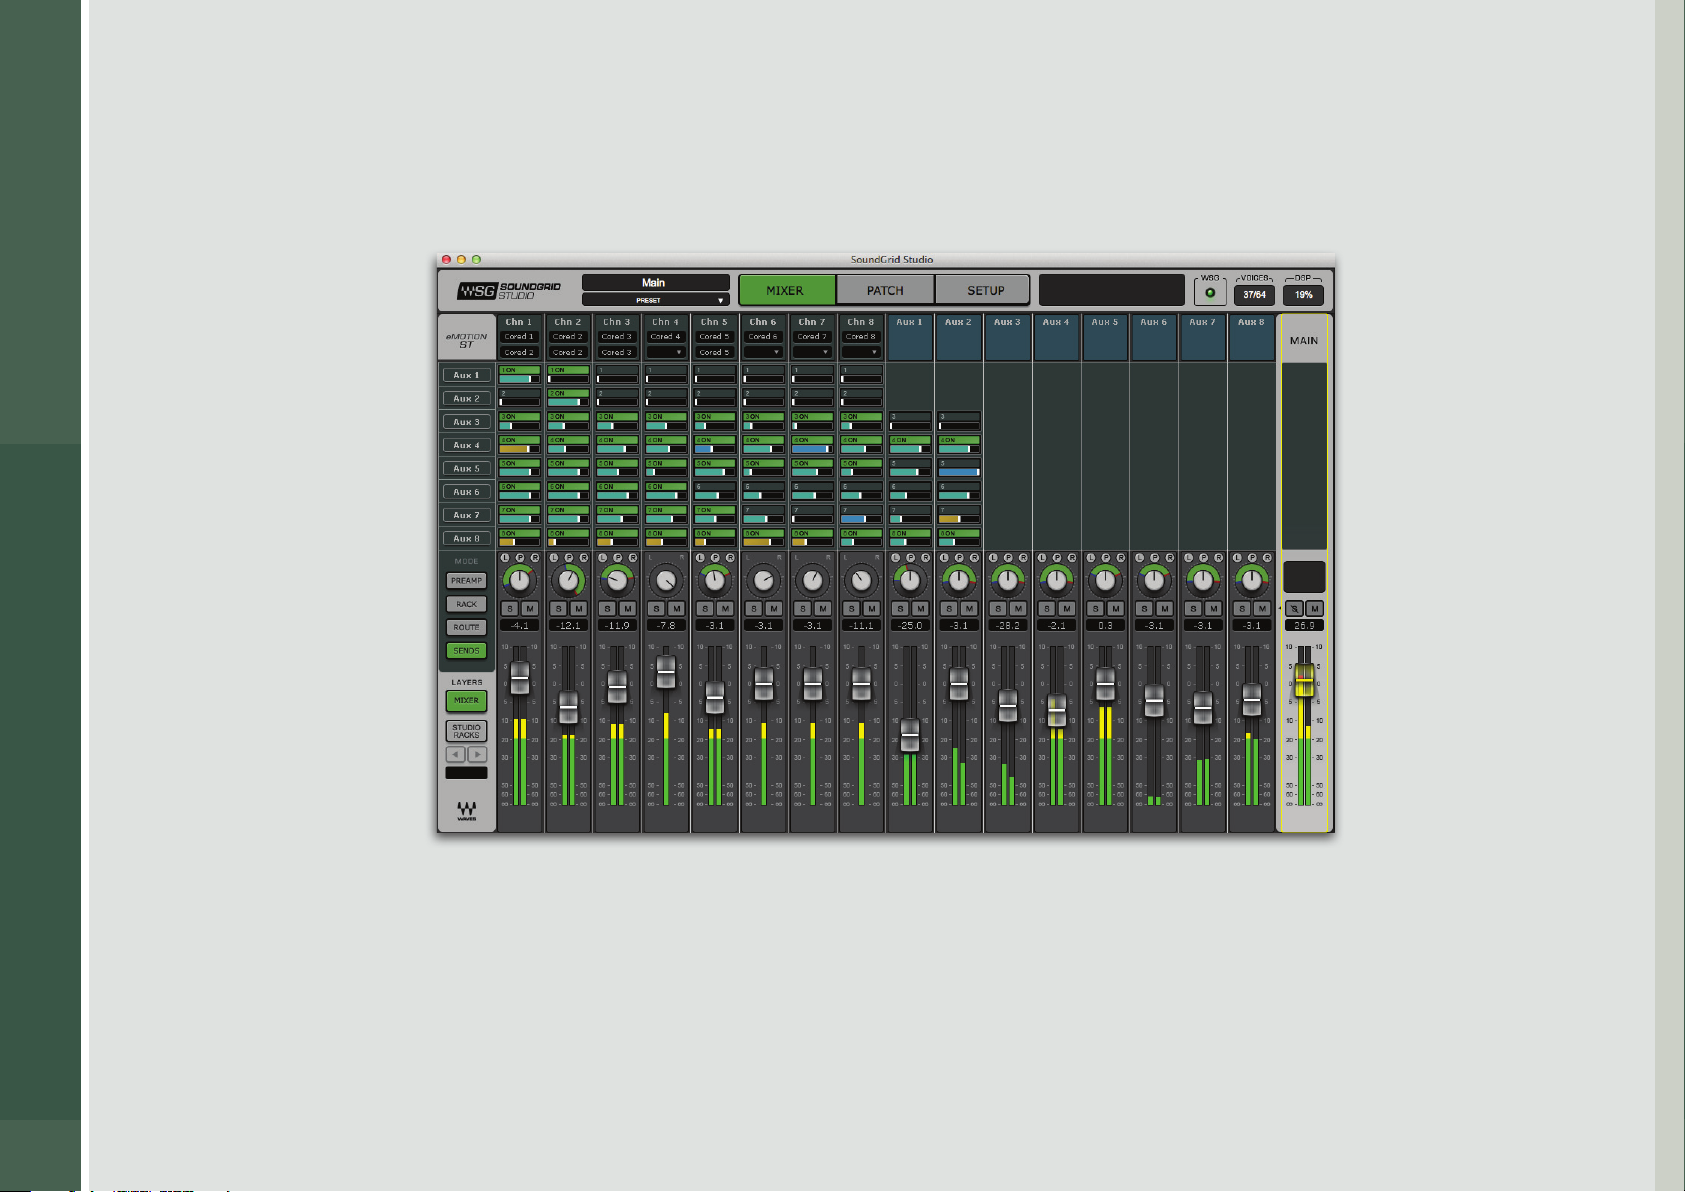
1.2.2 eMotion ST Mixer
eMotion ST is a utility mixer that enables mixing and monitoring in extremely low latency. It is therefore well suited for monitor mixing.
It also serves as the audio engine and mixer for the StudioRack plugin. It is available only with SoundGrid DSP server systems.
9
The eMotion ST mixer has two layers: Mixer and StudioRack. The Mixer layer accepts audio from any source on the network: DAW
output, microphone preamps, digital audio—anything you can plug into a SoundGrid Studio I/O device. The StudioRack layer
connects to up to 64 StudioRack plugins outputs for low-latency monitoring.
Page 10
SoundGrid Studio
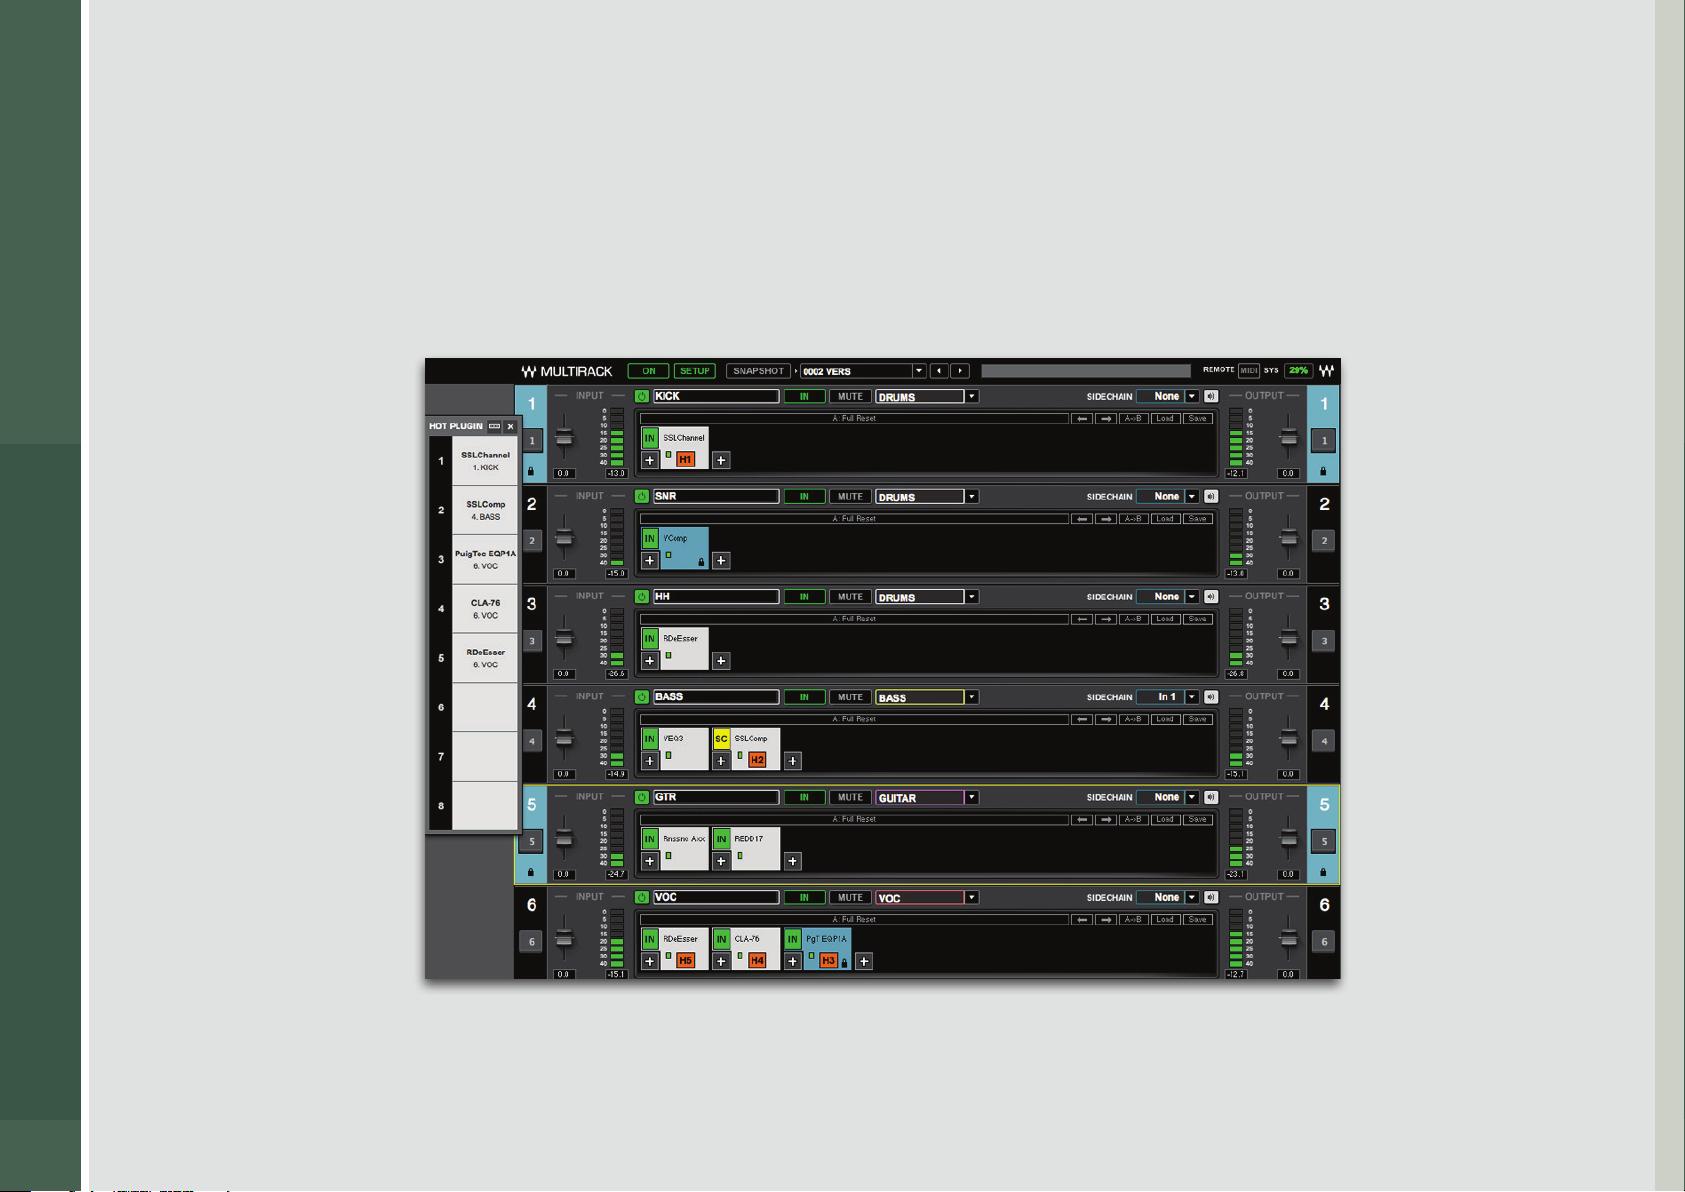
1.2.3 MultiRack
MultiRack is a host platform for Waves audio processing plugins, designed especially for live sound applications. It provides a
software rack equivalent to outboard hardware processing racks. Signal ow to and from a console is similar to that of traditional
hardware racks.
MultiRack can be integrated into a SoundGrid Studio system in order to stream audio between drivers.
10
Page 11

SoundGrid Studio
2. USING SOUNDGRID STUDIO
A SoundGrid network consists—at a minimum—of a host driver (a computer with the Waves SoundGrid ASIO/Core Audio driver
installed) and one or more hardware devices. From the simplest setup to the most complex, the process of connecting and
conguring devices is based on the same principles. This section looks at the most common congurations and shows you how to
set them up. Since SoundGrid is an open protocol available to all manufactures of audio hardware and software, you may encounter
setups not specically described in this section. Once you understand the basics of using SoundGrid Studio to create and manage a
SoundGrid network, integrating other devices should not be dicult.
This section provides a general overview of the SoundGrid Studio system. Specic components are discussed in greater detail in the
chapter SoundGrid Studio Components. The specics of connecting, conguring and using hardware devices and DAWs vary among
manufactures and models. Please refer to the user manuals of your hardware devices for product-specic information.
2.1 Getting Started
Setting up a SoundGrid network involves three steps:
■
Connect the hardware devices.
■
Install the SoundGrid software.
■
Choose a SoundGrid Studio conguration template that describes your equipment and suits your needs.
11
2.1.1 Hardware Installation
Connecting SoundGrid hardware is quite simple:
■
Use a Cat 5e or Cat 6 Ethernet cable to connect computers to devices.
■
SoundGrid I/O devices have more than one network connector, so you can chain them together. If you prefer, you can use
an approved 1GB network switch. Some hardware units use other connectors, such as MADI or DigiLink. To learn more about
connecting these devices, refer to their user manuals.
■
Power up (we have to say that).
Page 12
SoundGrid Studio
2.1.2 Software Installation
■
Register your SoundGrid product at www.waves.com. Log on to your Waves account and select Register New Product. If you do
not have a Waves account, you need to create one at this time.
■
Use the SoundGrid Studio Installer to load SoundGrid software to all computers that will be on the network. Reboot each
computer after the software is installed.
■
Use the Waves License Center to authorize the related Waves products (such as Waves plugins). SoundGrid Studio operates
without a license. Adding a DSP server requires a license from Waves.
The Waves License Center is an application included with the Waves Installer (v9 and above).
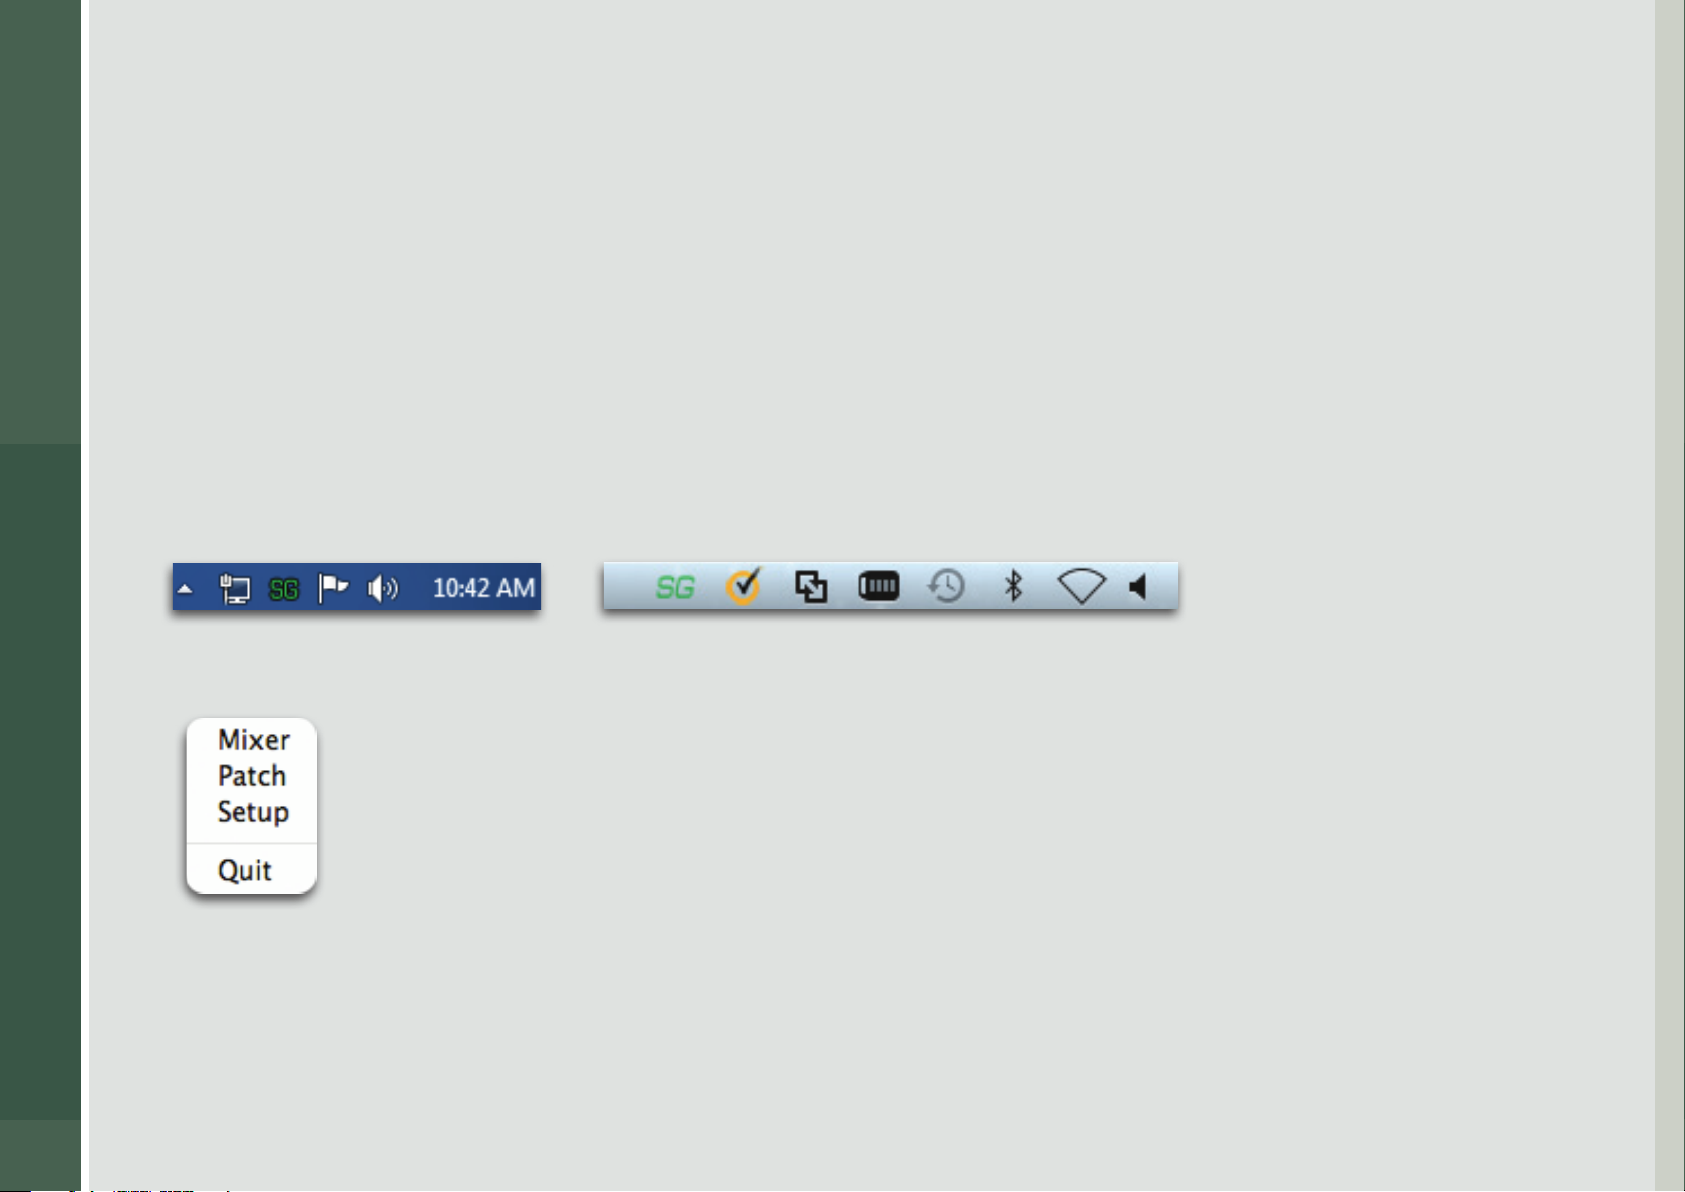
SoundGrid Studio is an application that launches at computer startup and is always available. The green SG logo on the top Menu
Bar (Mac) or System Tray (Windows) indicates that SoundGrid Studio is running.
MacPC
12
Click on the SG icon to bring eMotion ST and SoundGrid Studio to the
front. You can also quit the SoundGrid Studio Application from this menu.
If the application closes, you can restart it from the Mac Dock or the Windows Start menu, or by double-clicking on the original
application icon. The SoundGrid Studio Application can be found at these locations:
Windows: C/Program les (x86)/Waves/SG Studio
Mac: Sys HD/Applications/Waves/ SG Studio
Page 13
SoundGrid Studio
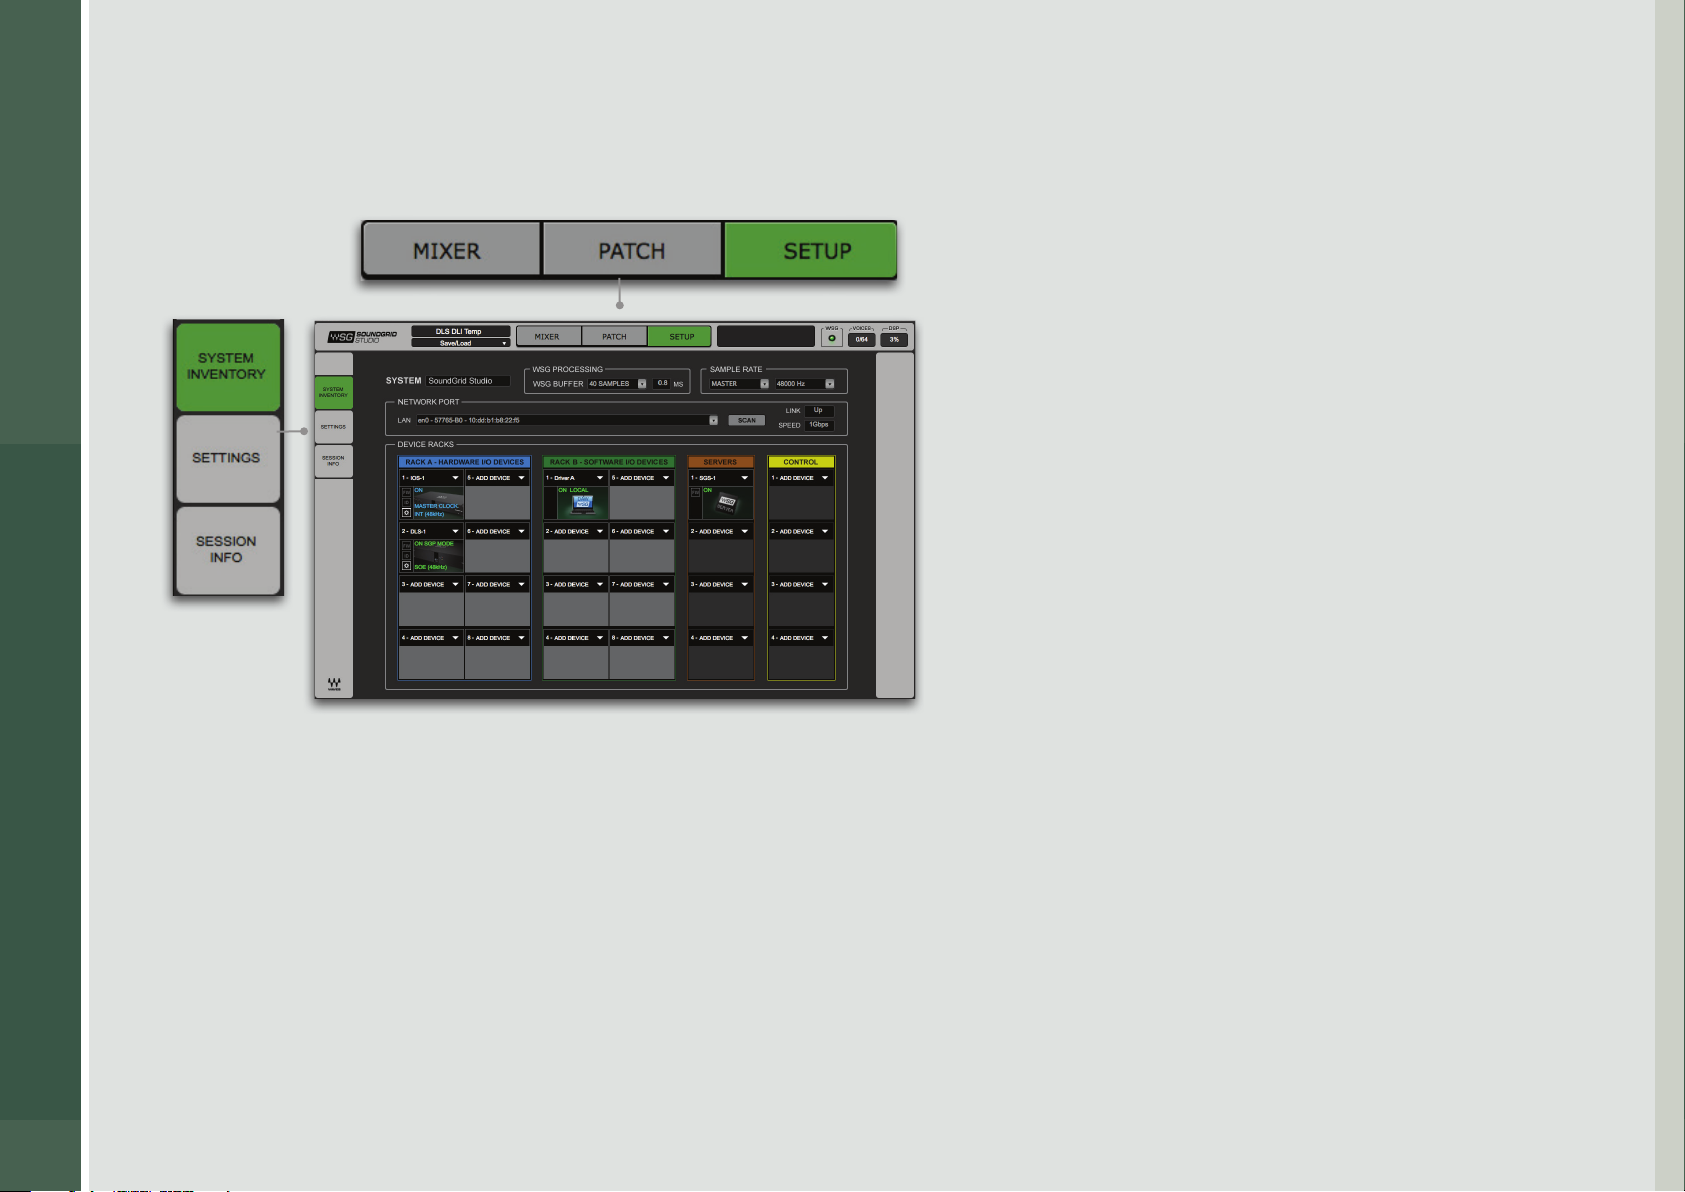
To navigate to the System Inventory page from other sections of the SoundGrid Studio interface, select the Setup tab at the top of
the page and then click the System Inventory tab on the left sidebar.
Navigation tabs at the top of each page take you to the
three SoundGrid Studio sections:
The eMotion ST mixer: A multi-purpose mixer, designed
primarily for monitor mixes.
An audio Patch section that connects physical and virtual
I/O devices.
A Setup page for allocating hardware and software I/O
devices, servers and controllers and for managing the
network.
13
Page 14

SoundGrid Studio
2.2 Automatic Configuration
The Auto Cong Wizard is a utility that scans the SoundGrid network and then allocates hardware and other devices. The rst time
you launch SoundGrid Studio, the Wizard will open. It scans the network, inventories its assets, and then congures the devices
Choose “NEXT” to start automatic conguration. This will take a few moments. Choose “CANCEL” to congure manually
Pressing the Auto Cong button will also trigger the Wizard
The Wizard assigns devices, congures and patches your system automatically.
If a SoundGrid Server is found on the network the Wizard will patch IO and Drivers to the
eMotion ST.
All connections can be viewed in the SoundGrid Studio Patch page
When the Wizard scans the system, it will automatically run essential rmware updates.
14
If the Wizard cannot locate the requested SoundGrid network devices, this means the devices
might be o or not connected properly. In such a case the Wizard will allow you to rescan the
network or work as a Driver node slaved to another system.
Selecting Driver Only will close the SoundGrid Studio application and allow the Local Core
Audio Driver be assigned on a secondary “Master system”.
It is not essential to scan when adding a device. When you connect a new device to the
network, it will appear in the drop-down menu in Rack A (I/O devices) or Rack B (drivers),
or in the Servers rack. The devices can then be assigned and congured manually.
Page 15
SoundGrid Studio
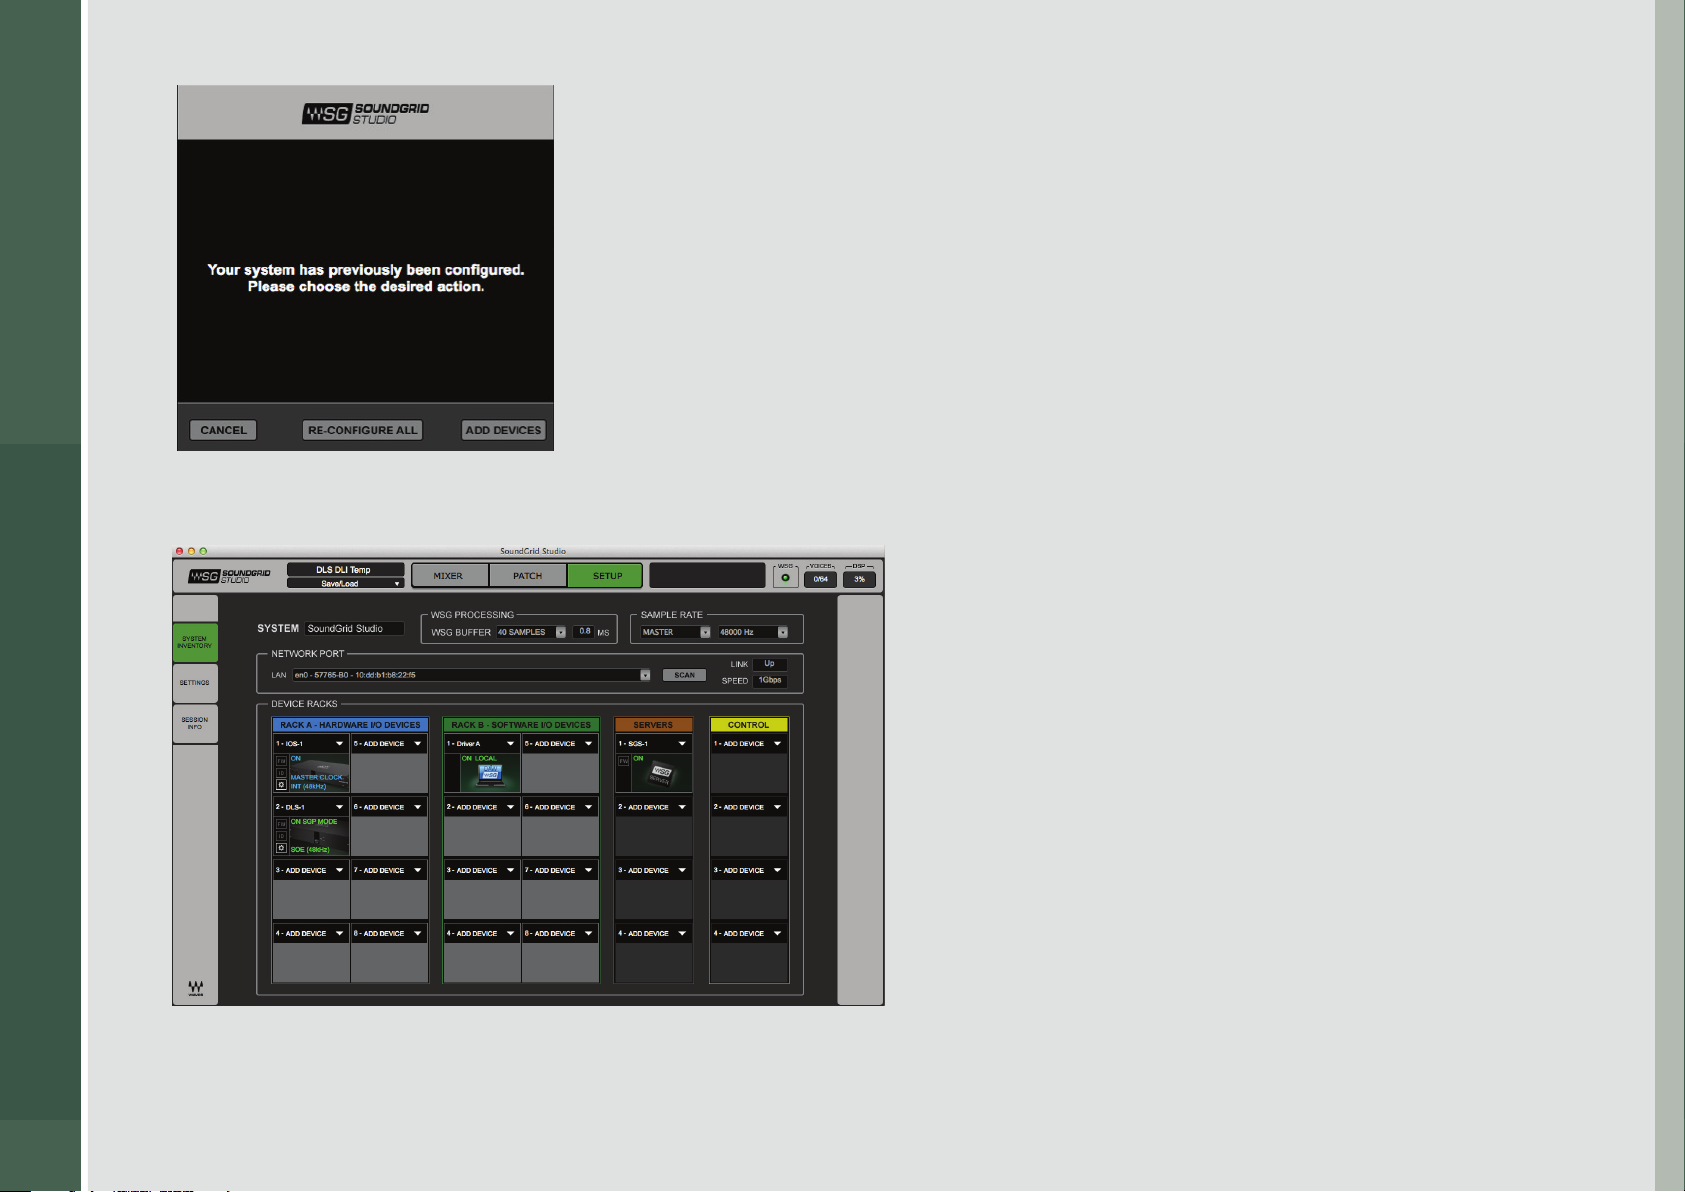
However, If you choose to run the “Auto Cong” a second time, you will have 2 options.
Recongure All – This will reset and rescan your network and reassign All found devices.
Important: This will reset all custom patches and congurations.
Add Devices – This will preserve current Assignments and patches and will add new devices to
your inventory.
Once the Wizard nishes, All devices assigned to you—whether manually or by the Wizard—
will appear in the System Inventory page. Audio to and from these devices will be patched, Go
to the Patch page to review or change I/O patching.
All devices assigned to you—whether manually or by the Wizard—will appear in the System Inventory page.
15
Audio to and from these devices will be patched based on the template you choose.
Use the Device Racks to control devices. Go to the Patch page to change I/O patching.
Page 16
SoundGrid Studio
2.3 Manually Configuring a SoundGrid Studio Network
The Wizard will congure a SoundGrid Studio network that reects your available devices and desired use. However, there are times
when you will want to change the network’s conguration: assign devices, set mic preamps, enable audio streaming between
computers, change network parameters, etc.
Use the System Inventory page (see below) to congure and manage the SoundGrid network
and your hardware and software devices:
■
Network status
■
Clock
■
Hardware and software I/Os
■
Waves SoundGrid ASIO/Core Audio drivers (the computers on the SoundGrid network)
■
Servers
■
Controllers
Session name
16
9
SoundGrid Studio section tabs
Messages
Network use status
Network and system sections
Server and controller Racks
Hardware I/O devices
Software I/O devices
9
Page tabs
Page 17
SoundGrid Studio
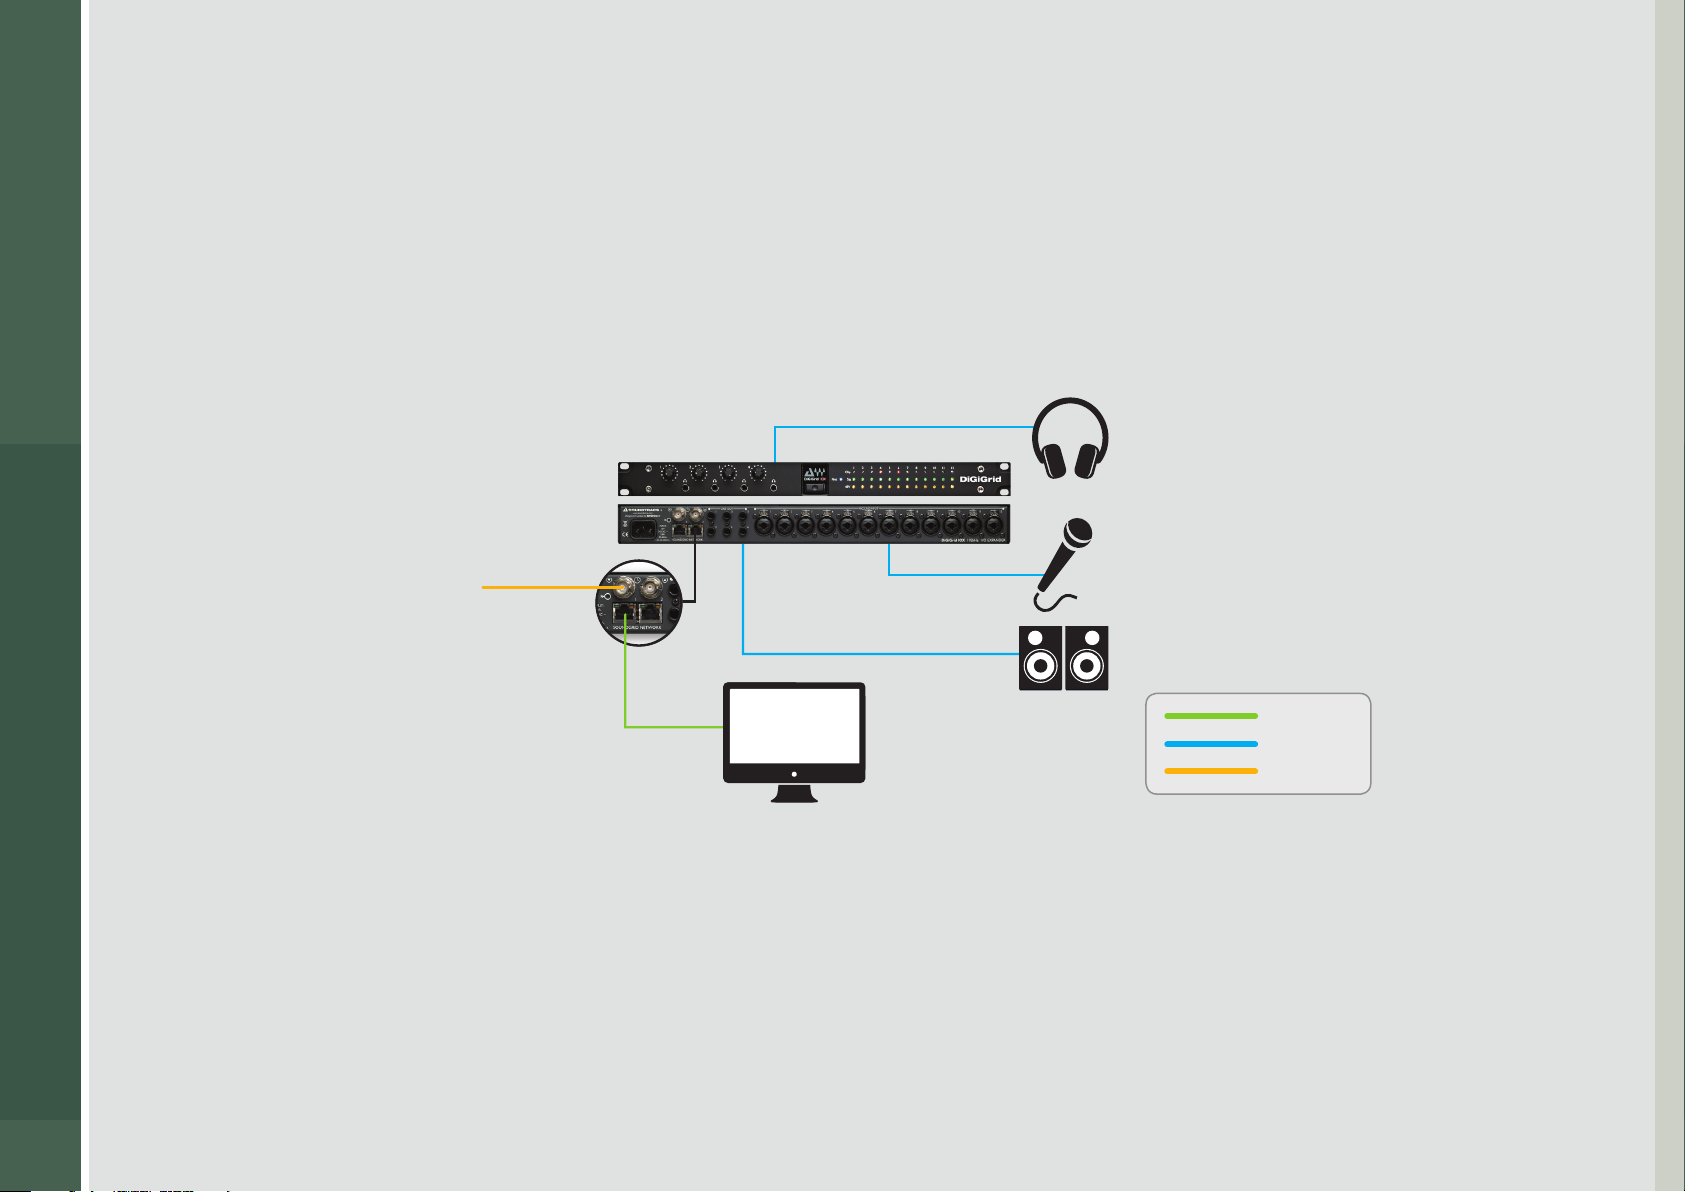
2.3.1 Connecting and Configuring I/Os
Adding hardware I/O devices to a SoundGrid network is quite simple: attach, congure, and set up preamps. Generally, Native
systems are linked solely by Ethernet. DigiLink-enabled hardware (i.e. 96, 192 I/O) requires a combination of DigiLink and Ethernet
cables. Outboard hardware that is not SoundGrid-compatible connects to a networked device via AES/EBU.
Basic Configuration
Almost any Native DAW can easily be incorporated into a SoundGrid network. With or without a server, and regardless of the
number of hardware I/O devices, Native systems are built around an Ethernet network infrastructure.
External
Word Clock
■
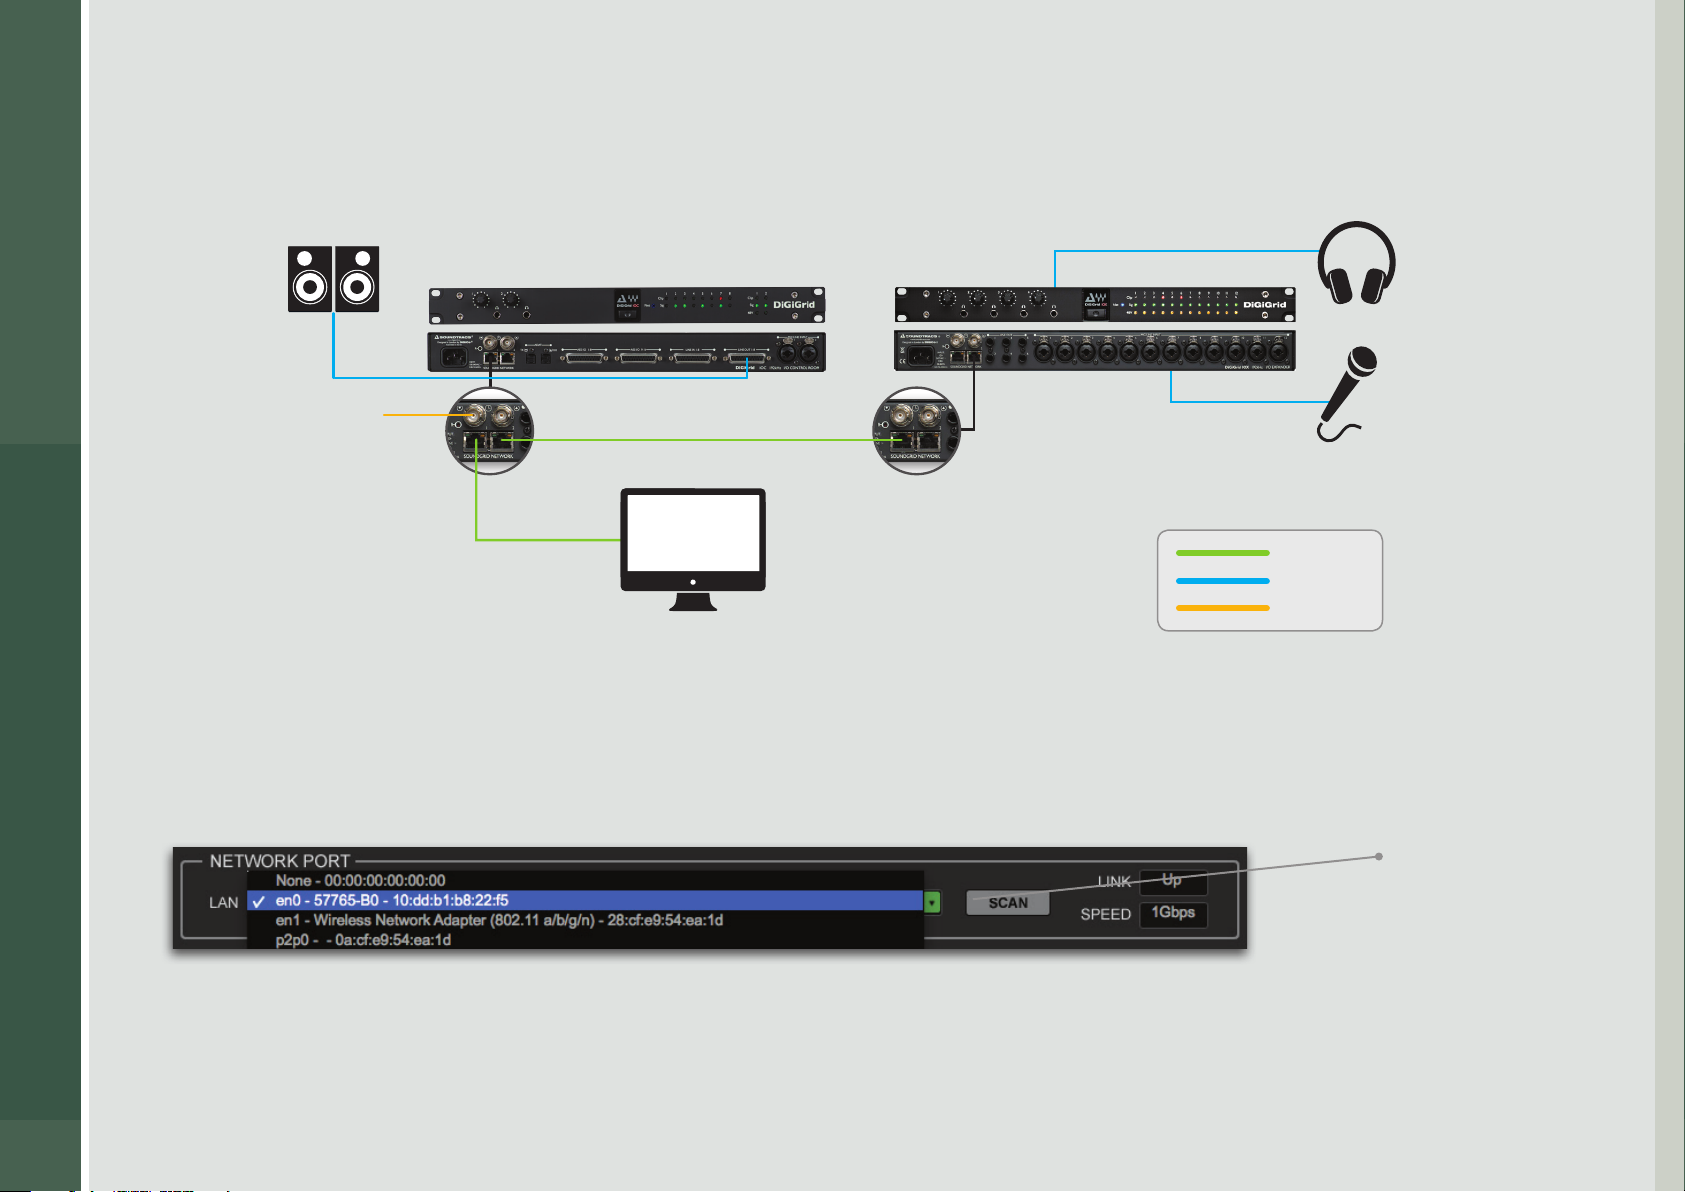
Connect the computer network port to an approved I/O device using a Cat 5e or Cat 6 Ethernet cable
DiGiGrid IOX
Ethernet
Analog
Clock
(maximum cable run between devices is 70 m/230 ft).
■
Click SCAN to trigger the Wizard.
■
Attach analog and/or digital connections to the I/O.
■
If other applications are running, bring the SoundGrid Studio Application to the front so that it’s visible. The interface will likely
open to the System Inventory page. If not, then navigate to it as described above.
You will now see the Device Racks, further described on page 20.
17
Page 18

SoundGrid Studio
Connecting Pro Tools HD/HDX and HD Native Systems
Avid I/O hardware and Pro Tools HD/HDX and HD Native DAWs cannot be integrated directly into a SoundGrid network. The Pro
Tools driver is not compatible with the SoundGrid driver, so a “bridge” device is needed. The DLI/DLS interfaces give SoundGrid users
access to Avid HD interfaces and enable Pro Tools HD/HDX and HD Native workstations to join a SoundGrid network. Once bridged
to a SoundGrid network, Pro Tools HD/HDX and HD Native DAWs have complete access to I/O devices anywhere on the network.
To learn how to integrate Pro Tools HD/HDX and HD Native DAWs into a SoundGrid network, refer to the user manuals for the
StudioRack plugin and the DLI/DLS interface devices.
18
Page 19
SoundGrid Studio
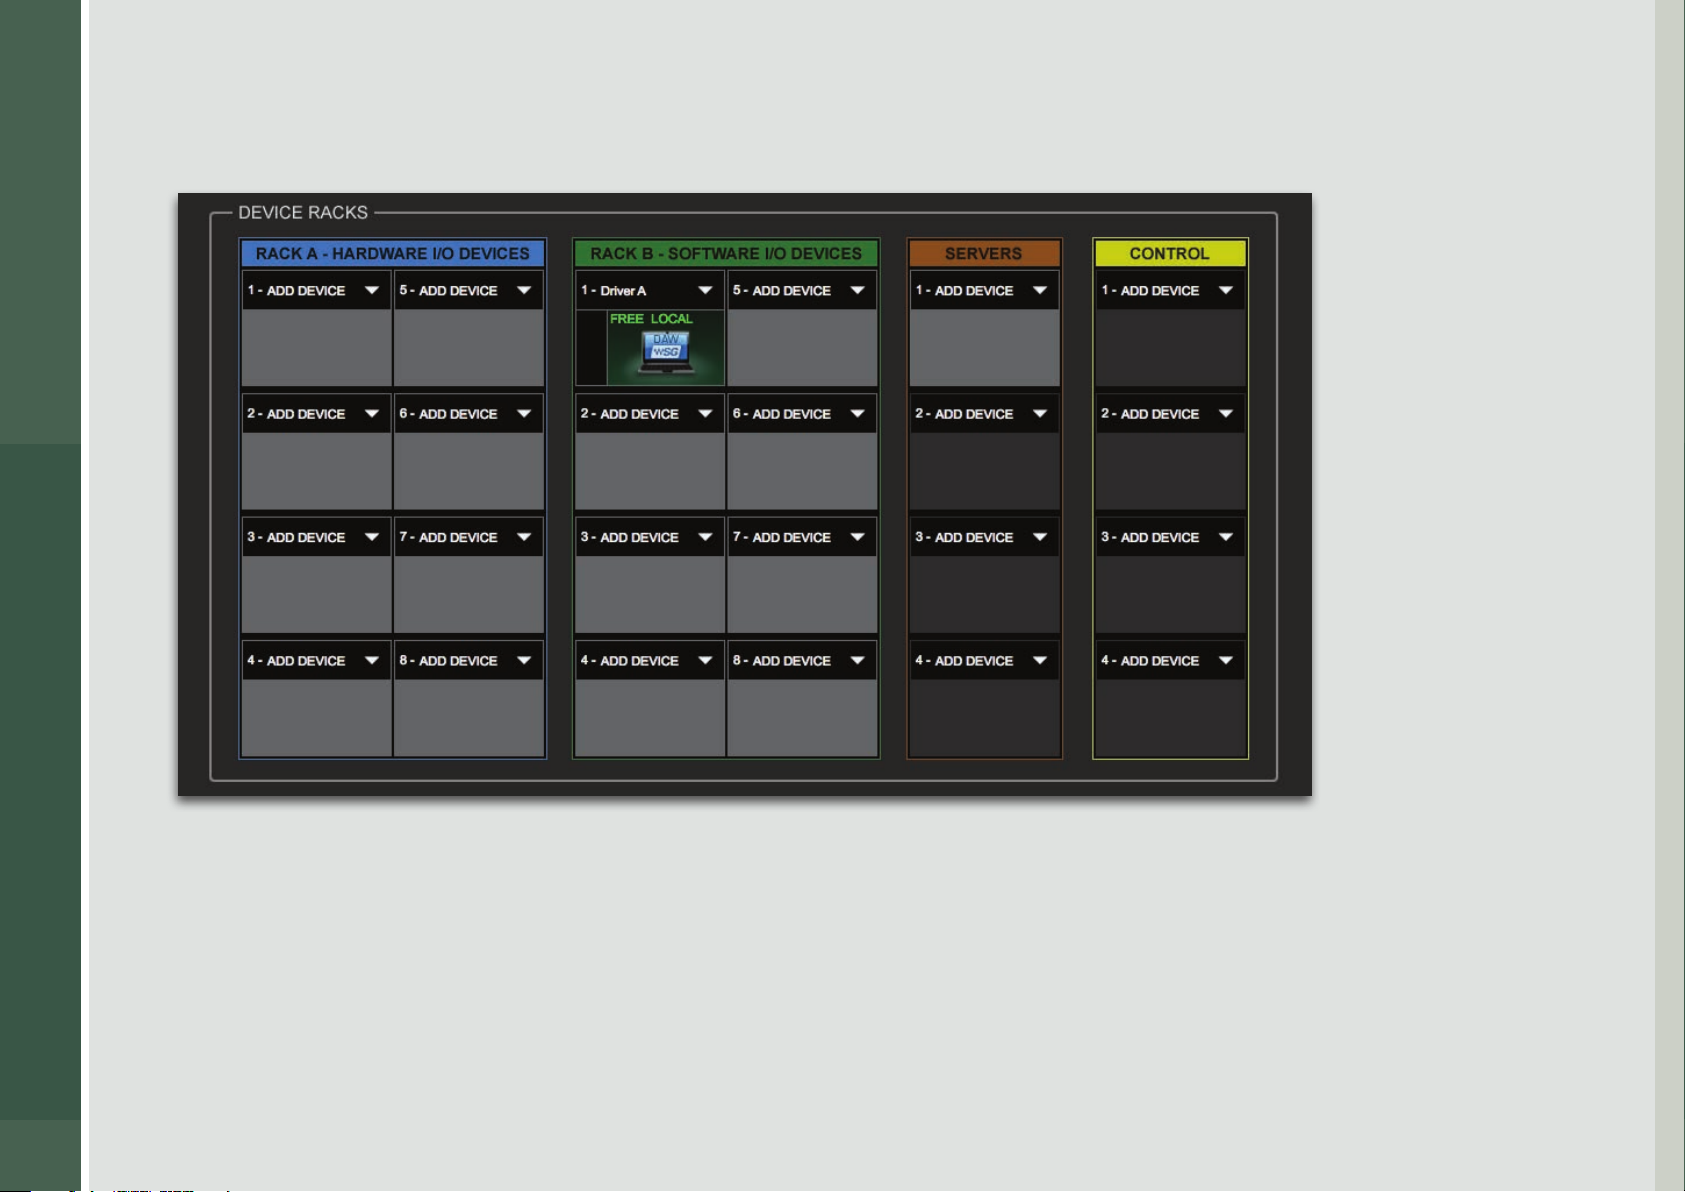
2.3.2 Device Racks
Use the Device Racks to assign I/Os, drivers, servers and control devices. Most setup activities are done from this page.
19
There are four Device Racks for assigning dierent types of resources.
■
Rack A: Hardware I/O Devices
■
Rack B: Software I/O Devices (drivers, virtual I/Os)
■
Servers
■
Control devices
For now we will focus on I/O Rack A, since this is where you assign and congure your I/O devices.
Page 20
SoundGrid Studio
I/O Rack A: Hardware I/O Devices
Rack A can host up to eight I/O hardware devices. You can load devices in any order. By default,
the device in the rst slot—typically, the rst device loaded—will be the clock master.
When you connect a device and then run the Wizard, the device will appear in I/O Rack A
and will be assigned to you. All users will see the device in their Device Racks menu, but will not
be able to assign it.
Manually assigning an I/O device involves three steps:
■
Choose a device and assign it to an I/O slot.
■
If multiple devices are assigned, determine which is the clock master.
■
Open the device’s control panel to congure I/O, preamp parameters and clock.
If you add a device manually, it will appear
in the
but it will not be assigned. You must
manually claim the device as your own.
Device Racks
drop-down menu,
20
When you assign an I/O using the Wizard, its audio input and output are patched automatically.
To change these connections, go to the Patch page.
Page 21
SoundGrid Studio
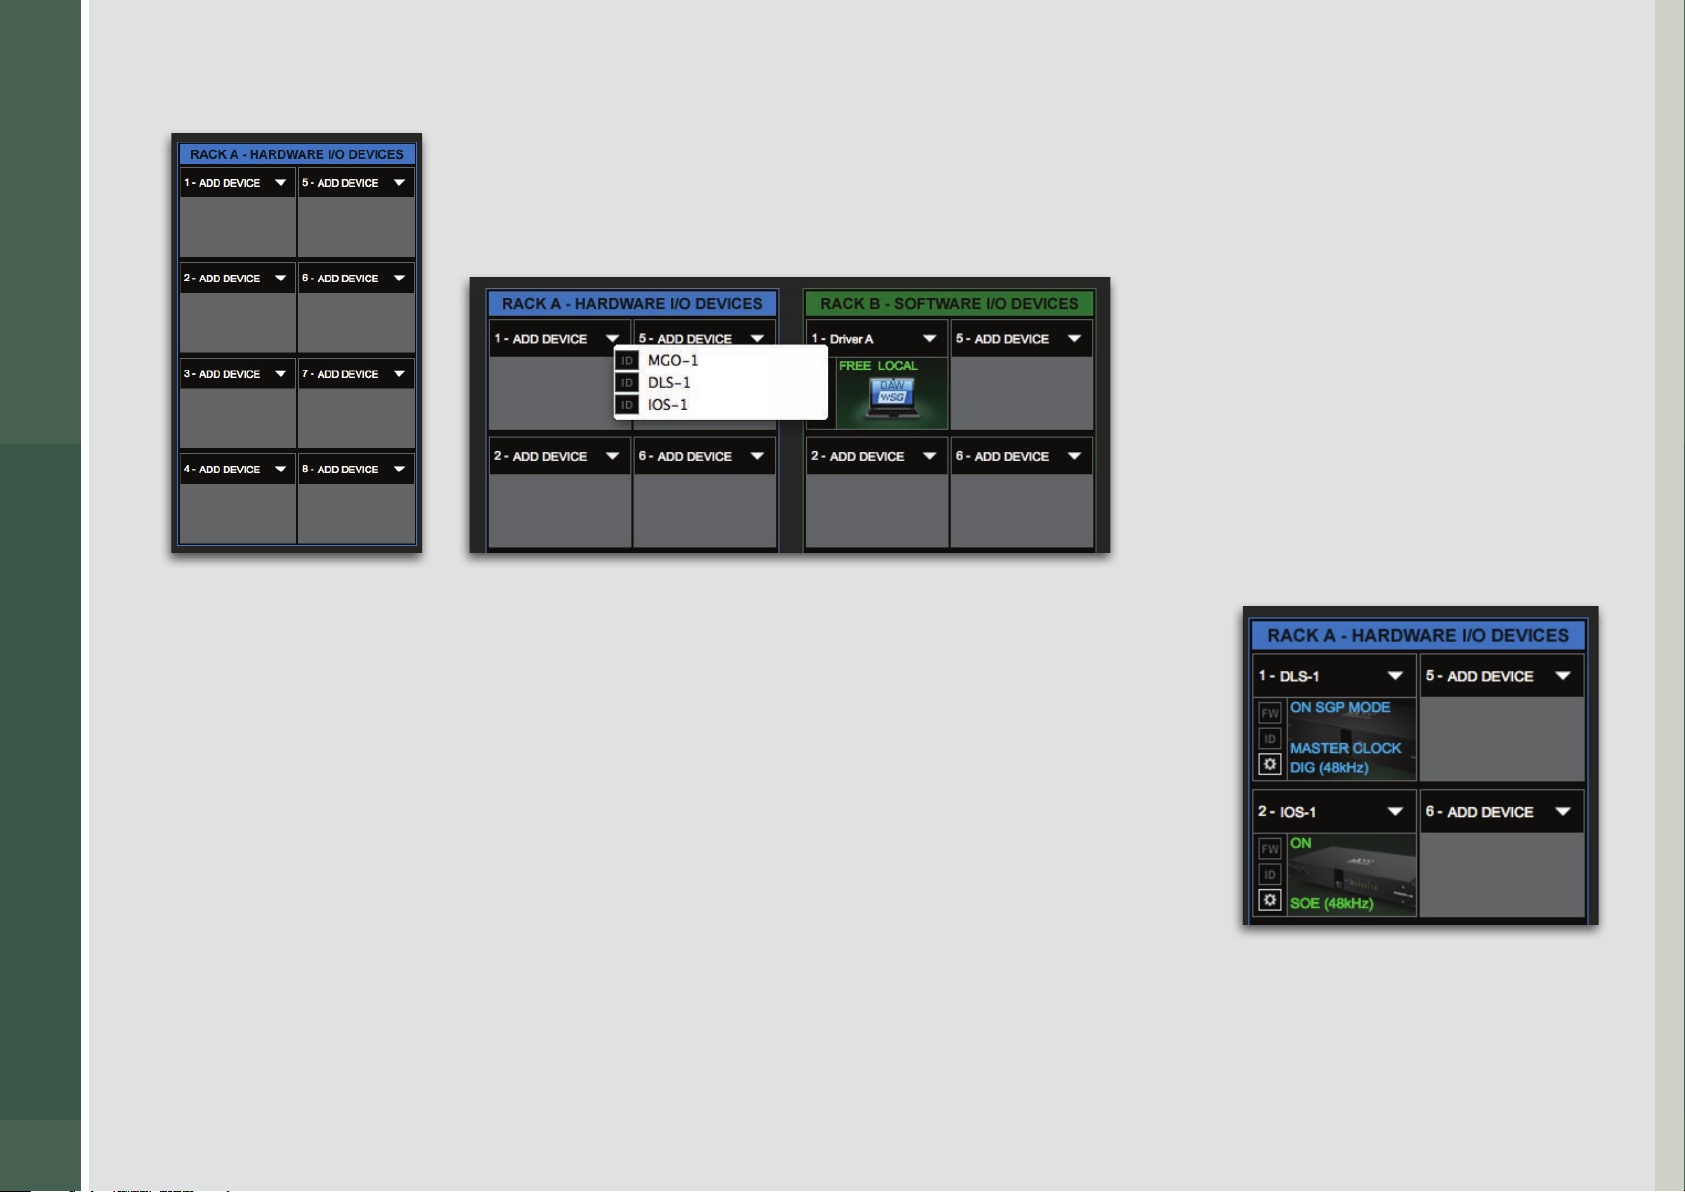
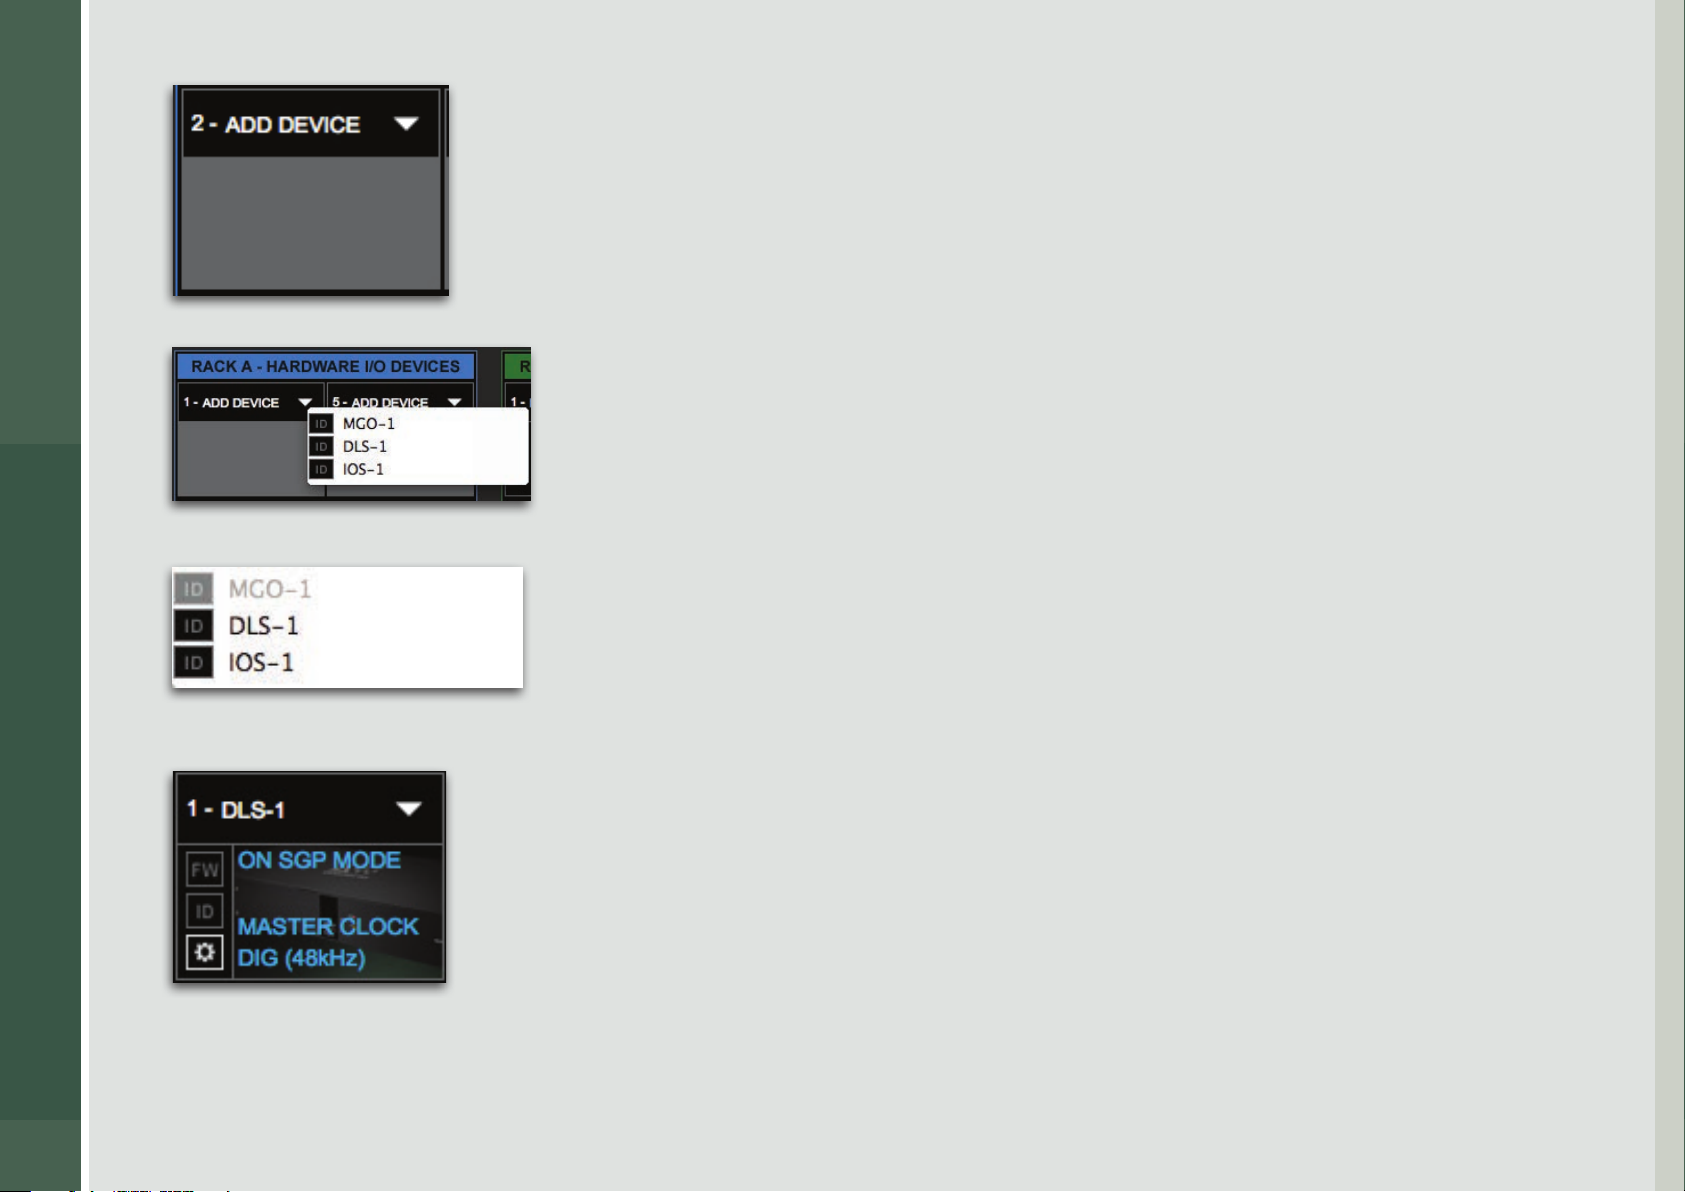
If no device has been assigned, the slot will appear empty.
To add an I/O to an empty slot or to replace an existing one, click on the arrow next
to ADD DEVICE. A drop-down menu will appear with a list of
SoundGrid-compatible I/O devices on your SoundGrid network.
A drop-down menu indicates which I/Os are currently available to you.
If a device has already been claimed by you or someone else, its name
21
will be grayed out and unavailable to select.
The I/O appears as an icon in the rst slot of Rack A.
Text on the icon indicates the device name, status, sample rate and clock information.
Pro Tools HD/HDX and HD Native DAWs, as well as Avid hardware interfaces, will appear in the device slot under the name “DLI” or “DLS.”
Page 22
SoundGrid Studio
Native DAW: Adding More I/O Devices
Additional SoundGrid-compatible I/Os can be added to the old one via an Ethernet cable. Run the Wizard to set up the new
conguration. SoundGrid-approved devices can accept clock via SoE (Sync over Ethernet).
External
Word Clock
DiGiGrid IOC DiGiGrid IOX
Ethernet
Analog
Clock
Host Computer
SoundGrid I/O devices have internal Ethernet switches. Some have four ports, others two. This enables you to add devices by
chaining several units together. If you prefer, you can use an approved external 1GB switch.
Add the new device to your network by clicking the SCAN button.
SCAN button
22
Open the System Inventory section of SoundGrid Studio to conrm and modify the conguration of your devices. By default, the
rst I/O device in a rack will be the clock master. To assign another device as clock master, click on the device menu and select
Set as Master
Page 23

SoundGrid Studio
2.3.3 Adding a Server
Adding a SoundGrid DSP server to a SoundGrid Studio system provides the processing power for the eMotion ST mixer and the
2
StudioRack plugin in DSP mode.
use simultaneously.
External
Word Clock
This enables low-latency recording and monitoring, and increases the number of plugins you can
DiGiGrid IOX DiGiGrid IOX
DiGiGrid IOC DiGiGrid IOX
23
Host Computer
2. eMotion ST SoundGrid and StudioRack SoundGrid licenses are required.
Server
Ethernet
Analog
Clock
Page 24

SoundGrid Studio
Go to the SoundGrid Studio Setup page and use the Wizard to scan your network. The new server will appear in the Server rack of
the Device Racks page.
Some SoundGrid I/O devices are equipped with internal servers. With these devices, the server will appear under the Servers section
and the I/O under the Rack A: Hardware I/O Devices section. Congure these I/Os as you would any similar I/O device. All servers
initially appear as “SGS.” Once assigned, a server can be renamed.
DiGiGrid IOS
24
Ethernet
External
Clock
Host Computer
Analog
Clock
Page 25

SoundGrid Studio
2.3.4 Adding Computers to a SoundGrid Network
Every computer in a SoundGrid network must have the SoundGrid driver installed. When a new computer is
added to the network, run the SoundGrid Studio Installer. This will install the necessary elements for the
computer to function in a SoundGrid Studio environment. We recommend that all computers use the same
software version. Download the latest SoundGrid Studio software at www.waves.com.
Each driver in the network will appear in an I/O Rack B slot unless there is no assigned network port. With a
local driver assigned to your computer, you can freely assign I/Os and servers and adjust preamps. If another
user is using your driver, only they can assign devices to you.
When rst creating a network, use the Wizard to assign the SoundGrid driver to your local computer. The computer’s icon and name
will be visible in slot 1 of Rack B - Software I/O Devices.
There are two status indicators visible on the icon itself:
25
ON/FREE/BUSY ON Driver is owned by your computer
FREE Driver is not owned by any computer
BUSY Driver is owned by another computer
LOCAL This driver is assigned to the local host
computer (you).
If no network drivers are available, then you will see only your local driver. Select a driver. The menu oers three actions:
OWN Assigns the driver to your computer
FREE Releases the local driver, making it available to other users.
REMOVE Removes the non-local driver from I/O Bank B
Page 26

SoundGrid Studio
Assigning Drivers in a Studio Environment
To stream audio between DAWs, one computer must own the drivers of all involved computers. For a computer to claim a remote
driver, the secondary computer needs to release ownership of it’s local driver. To release a driver, select Free in the device’s dropdown menu. Users who have released their drivers can continue to work as usual, but there are certain workow issues to consider:
■
All users have uninterrupted access to available I/O devices and servers. Network devices will appear in the System Inventory
page. However, once you free your driver, you cannot connect devices to your local driver. Only the user who currently owns your
driver can assign it.
■
You are not able to patch your inputs and outputs.
DiGiGrid IOS
Reclaiming your driver takes a few seconds:
26
The administrator Frees it, and you then select Own.
You’re back to normal.
A server is not necessary to stream audio.
Patching between hardware and/or software I/Os
is discussed in the section SoundGrid
Studio Components.
Host Computer Computer 3
Computer 2
External
Clock
Computer 4
Ethernet
Analog
Clock
Page 27

SoundGrid Studio
2.3.5 Clock Basics
When you add the rst I/O to a rack, it will, by default, become the clock master for the SoundGrid
network and all its devices. Any new device added to your system will automatically slave to the
network master.
Sample rate and clock source are displayed on the device’s icon in the rack slot.
SoundGrid distributes clock to network devices using conventional Word Clock or Digital streams
sources. It can also use its own sync protocol _ SoE (Sync over Ethernet) _ which uses the same
Ethernet cable that carries the audio and other network information for sync.
The SoundGrid network clock master device uses one of its clock sources to generate the network clock. Typically these sources can
be an Internal clock generator, Word Clock input or an incoming digital stream.
Refer to the Clock section of your I/O device for more information and clocking options.
SoundGrid Studio can control the sample rate of the network. The network sample rate
27
is set and displayed in the upper right corner of the SoundGrid Studio Setup Inventory
page.
When set as Sample Rate Master, the sample rate can be changed through the pull down menu or by the local DAW (loading a
session or changing DAW preferences). This will change the sample rate of the I/O device clock master.
When set as Slave, the SoundGrid network will adjust to the sample rate of the I/O device clock master’s source.
When there is a mismatch between the sample rate of the clock master device and the
expected system sample rate, there will be a warning in the Message window. When the
mismatch is resolved and the devices are successfully locked, the message will turn green
before disappearing.
Page 28

SoundGrid Studio
2.3.6 I/O Device Control Panels
Every SoundGrid I/O device has a control panel that is used to determine its clock status, control preamps, congure physical inputs,
and report rmware model and hardware ID. Control and Clock page setups are loaded when opened from any saved session or
session template.
Double-click on a device’s gear symbol
to access its control panel.
Each device has its own control panel, since each I/O has its own features and behaviors. The example below shows a typical I/O
control panel. For the purpose of this manual, we are only focusing on the Controls and Clock pages.
Pressing the “Hardware Control Panel” button on the Driver Control Panel app will
open the control panels of all I/O devices assigned to your SoundGrid application. If
28
none are assigned, nothing will happen.
The Driver Control Panel app is located here:
PC: C:\Program Files (x86)\Waves\SoundGrid\Driver Control Panel
Mac: System HD/Applications/Waves/SoundGrid
Page 29

SoundGrid Studio
I/O Device Control Panel: Clock Page
This is the clock control page for a DiGiGrid IOS I/O + server. Other devices have similar pages, depending on manufacturer and
model.
Use this page to set clock source and sample rate and to monitor clock status.
If there is only one device on the SoundGrid network, it will, by default, be set to Internal clock and will serve as the clock master.
Clock Source selects clock for this device
Sample Rate
Sync Status
SoE ON (master) SoE OFF (slave)
Displays Current Clock. “Fallback” clock, used if the selected
5
clock fails.
29
When you add another device and congure it in the SoundGrid Studio Device Rack—whether with the Wizard or manually—you
must decide which device will be the clock master and how the slave devices will receive clock (Word Clock or SoE).
Information concerning master/slave status, clock source, and sample rate is displayed on the device icon in Rack A:
Hardware I/O devices.
For further information on the above issues, consult the relevant device’s user manual.
Page 30

SoundGrid Studio
I/O Device Control Panel: Controls Page
This is where you congure preamps, set levels, and choose monitoring preferences.
Most I/Os oer a means of controlling preamp levels, determining metering options, and conguring physical inputs and outputs.
All this is done from the device’s control panel.
Shown here is a DiGiGrid IOS, which combines an I/O with a DSP server.
I/O devices vary by manufacturer and model, but all SoundGrid-approved control panels are organized in the same manner.
Highlighted channel is focused here
Selected channel reected in image of rear panel
Select clip threshold for meters and indicators
Select an input/output connection
30
You can also control preamps from the eMotion ST mixer’s Preamp control mode.
For more information on controlling preamps, refer to the eMotion ST user manual.
3
Page 31

SoundGrid Studio
2.3.7 Patching SoundGrid Studio Inputs and Outputs
A template contains device-to-device and physical I/O patching that suits your equipment and your way of working.
Once it congures your session, you may not need to re-patch anything. But you may chose to modify patches between
your DAW, your devices, and SoundGrid Studio tools such as the eMotion ST mixer. For this, use the Patch page, which is
accessed through the tab at the top of each page of SoundGrid Studio.
Use the four buttons on the left of the page to select what you want to patch. Page layout changes depending on what
is being patched: eMotion ST input, eMotion ST output, or device-to-device connections.
The Patch page is described in detail in the section “SoundGrid Studio Components.”
31
Page 32

SoundGrid Studio
2.3.8 Configuration Review
Now you know how SoundGrid Studio works. Here’s a review of the steps:
■
Decide which SoundGrid conguration best suits your needs, then connect all SoundGrid-approved hardware devices (SoundGrid I/Os
and servers, controllers, and other computers) using standard Cat 5e or Cat 6 Ethernet cables. Use a 1 GB network switch as needed.
■
Run the SoundGrid Wizard to congure the network. Alternatively, you can congure your network manually in the System
Inventory page.
■
When changing your network device conguration, go to the SoundGrid Studio Setup page and use the I/O Device Racks to
allocate resources as you need.
■
Patch between I/Os, ASIO/Core audio drivers and eMotion ST mixer
■
Use the I/O Control Panels to adjust preamps, clocking and levels.
■
Assign additional drivers and servers if desired.
For more detailed information, refer to the section of this manual titled “SoundGrid Studio Components.”
32
Page 33

SoundGrid Studio
3. SOUNDGRID STUDIO WORKFLOWS AND CONFIGURATIONS
A SoundGrid network is completely scalable: adding more devices is usually just a matter of connecting them, running the Wizard,
and setting up the preamps. A SoundGrid network is platform-independent. You can work in Windows or Mac, running almost any
DAW application.
Each SoundGrid Studio user has unique needs, so conguration will vary depending on the equipment you use and what you want
to accomplish. This chapter oers examples of SoundGrid Studio congurations and what you need in order to set them up. These
examples are intended to help you nd and understand the conguration that works for you.
From small to gigantic, simple to complex, all SoundGrid Studio congurations use the same devices, the same connections,
and the same SoundGrid Studio interface. The dierence is just a matter of scale – the basics of setting up a SoundGrid network
remain the same:
■
Decide how you want to work
■
Add devices
■
Scan and congure
the network
■
Set up clock and preamps
DiGiGrid IOS
33
External
Clock
Computer
Host
Secondary
Computer
DiGiGrid IOX
Ethernet
Analog
Clock
Page 34

SoundGrid Studio
3.1 One DAW, One Computer, One I/O
This simple setup is appropriate for small project studios and for portable multitrack recording to a laptop. It’s also good for
multitrack editing and mixing. Use this conguration as you would any other I/O device. The dierence is that from this point on,
you can easily expand your SoundGrid network system.
Inventory
■
Audio workstation (Pro Tools, Nuendo, Cubase, Logic, etc.)
■
SoundGrid Studio installed
■
Multi-input SoundGrid I/O device, such as IOX
DiGiGrid IOX
External
Word Clock
34
Ethernet
Analog
Clock
Host Computer
Page 35

SoundGrid Studio
3.2 One DAW, Two or More I/O Devices
As your studio grows you may need more I/Os and converters. This will allow you to record larger ensembles and to mix with more
physical outputs.
Inventory
■
Audio workstation (Pro Tools, Nuendo, Cubase, Logic, etc.)
■
SoundGrid Studio installed
■
Two or more multi-input SoundGrid I/O devices, for example IOX
DiGiGrid IOC DiGiGrid IOX
External
Word Clock
35
Ethernet
Analog
Host Computer
Clock
To add a SoundGrid I/O device, connect it to your present I/O device with an Ethernet cable. Most SoundGrid-compatible devices
have a built-in Ethernet switch, so you can chain together several units. Click SCAN if you want the Wizard to recongure the
SoundGrid Studio system. Set up mic preamps if necessary.
Page 36

SoundGrid Studio
3.3 One Computer, Two I/O and DSP Server, One DAW
You probably want to run more plugins. Perhaps you want to record small ensembles and then mix with a large number of plugins,
or record and monitor with very low latency.
Inventory
■
Audio workstation (Pro Tools, Nuendo, Cubase, Logic, etc.)
■
SoundGrid Studio installed
■
Multi-input SoundGrid I/O device with server – DiGiGrid IOS
SoundGrid expansion I/O – DiGiGrid IOX
DiGiGrid IOS
DiGiGrid IOX
36
External
Clock
Ethernet
Analog
Clock
Host Computer
By adding a server to your SoundGrid network you can ooad audio processing. This greatly increases the number of plugins you
can use simultaneously. Plus, it enables you to use the eMotion mixer, which lets you create personalized monitor mixes from your
DAW mix and outside sources, and allows you to open 64 StudioRacks.
Page 37

SoundGrid Studio
3.4 Project Studio: One Computer, DSP Server, Pro Tools HD/HDX or HD Native System
You may have a Pro Tools HDX system and want to take advantage of the extra power of a SoundGrid network, with real-time
plugins processing and access to multiple I/O devices across the network.
Inventory
■
Pro Tools HD/HDX or HD Native system
■
Avid I/O hardware (96, 192, OMNI, etc.)
■
SoundGrid network with one or more Native DAWs
■
DLI/DLS interface
DiGiGrid DLS
WC / Loopsync*
In Out
37
DigiLink Interface
Primary Port
Expansion Port
Ethernet
DL1
DL2
Ethernet
DigiLink
Clock
Analog
1 2
* Dependent on Clock
Mode setting in the
DLS/DLI control panel
Page 38

SoundGrid Studio
3.5 Two Native DAWs, Two or More I/O Devices
Let’s say you mix and master on a Pro Tools Native system, but your colleague records and edits on Cubase or Logic. You want the
exibility of sharing your I/Os between systems, and you also want to stream audio between all DAWs. By adding another computer
(with a DAW) and an I/O, you can do all this.
DiGiGrid IOS
DiGiGrid IOX
External
Clock
38
Host
Computer
Secondary
Computer
Ethernet
Analog
Clock
Page 39

SoundGrid Studio
3.6 Sharing Drivers in a Studio Environment
In any SoundGrid network, audio streams between DAWs and the assigned I/O devices. You can also stream audio between
computers. This enables you to send mixes and other audio streams to or from another computer, without interfering with the
functionality of any of the computers.
DiGiGrid IOS
External
Clock
39
Ethernet
Analog
Computer 4Computer 2Host Computer Computer 3
Clock
To stream between two or more computers, one host computer must control the drivers of all other computers on the network.
This “administrator” computer controls assignments and patching as long as it is assigned all drivers. All users can work as usual while
eaming occurs. Reclaiming your driver takes a few seconds: The administrator Frees it and you then select Own. You’re back to normal.
str
Page 40

SoundGrid Studio
3.7 HD Mix Room and Several Smaller Recording/Editing Rooms
Let’s say you need lots of channels of audio between the control room and the live room. And you need exibility.
■
You record and mix with a large HDX system, and you’re happy with your present workow.
■
You want to be able to easily add I/O devices without signicant conguration changes.
■
Your studio is part of a large facility, and you’d like to have access to available I/O devices throughout the facility.
■
You want to move your local processing from your Pro Tools system to a DSP server in order to allow a greater plugin count.
Inventory
■
Pro Tools HD/HDX or HD Native system
■
Avid HD I/O (96, 192, Omni, etc.)
■
Four IOX or IOC I/O devices
■
1 GB network switch
■
Other Native devices on the SoundGrid network
The DLI serves as a bridge between a SoundGrid network and the control room’s Pro Tools HD. Once this link is established, Pro Tools
can access any device on the network.
40
In this example, Studio A’s control room uses a Digilink I/O interface for monitoring, but additional I/O channels can be added by
connecting one or more IOX interfaces to the DLS.
The live room is equipped with two input-rich DiGiGrid I/Os. This results in a large number of lines between the live room and the
control room over a single Ethernet Cable.
This conguration is part of a larger facility-wide network, so the control room’s Pro Tools HD has access to I/Os throughout the building.
The SoundGrid Studio Application on Studio A’s control room computer is used to manage all the Hardware I/Os on the network and to
connect them to the software I’Os (ASIO/Core Audio drivers) in Studios B, C, D.
Page 41

SoundGrid Studio
HD Mix Room and Several Smaller Recording/Editing Rooms
DiGiGrid DLS
WC / Loopsync*
Out
DigiLink Interface
Primary PortInExpansion Port
Live Room 1 Live Room 2
DL1Ethernet
DL2
Studio A
1 2
DiGiGrid IOXDiGiGrid IOX
41
Ethernet
Analog
Clock
DiGiGrid IOCDiGiGrid IOC DiGiGrid IOC
Studio B
* Dependent on Clock Mode setting in the DLS/DLI control panel
Studio DStudio C
Page 42

SoundGrid Studio
3.8 Integrating Avid Hardware Devices
A large facility may have an inventory of older or unused Digilink I/O devices. You can add these devices to a SoundGrid network
in order to pick up extra I/O and A/D/A capacity.
Inventory
■
Digilink I/O hardware (96, 192, OMNI, etc.)
■
SoundGrid network with one or more native DAWs
■
DLI/DLS interface
DiGiGrid DLS
WC / Loopsync*
In Out
DigiLink Interface
Primary Port Expansion Port
DL1 DL2
42
* Dependent on Clock Mode setting
in the DLS/DLI control panel
Ethernet
DigiLink
Clock (optional)
Analog
Page 43

SoundGrid Studio
3.9 Large Studio
This conguration adds eciency to a large mix environment. In this conguration, a SoundGrid network delivers exibility to a
control room equipped with a large Pro Tools HD/HDX system. DiGiGrid DLI/DLS interfaces provide 112 driver channels to the HD
system and a DSP server for plugin processing. An Avid Omni is the I/O for control room mixes. All these devices are joined via
DigiLink and clocked with Sync Lock.
Everything else in the network is connected with Ethernet. A DiGiGrid IOX supplies analog input with preamps, plus 4 separate
headphone outs. This serves a voice-over booth, a broadcast stage, a live room, and more. A secondary DAW system can be a
backup recorder, an editing room DAW, and a recording station for the voice-over booth. Its DiGiGrid IOC provides many channels of
I/O, which can be allocated to the main DAW.
A DiGiGrid MGB/MGO interface connects this network to a MADI source, for instance a console or a MADI distribution system. Audio
can be routed to the main or secondary systems.
Inventory
■
Pro Tools HD/HDX or HD Native system
■
Avid HD I/O (96, 192, Omni, etc.)
■
IOX, IOC and MGB/MGO I/O devices
■
1 GB network switch
43
Page 44

SoundGrid Studio
Large Studio
WC / Loopsync*
Out
DigiLink Interface
Primary PortInExpansion Port
DiGiGrid DLS
A
1 2
B
1 2
DiGiGrid MGB/MGO
Digilink
MADI
Ethernet
Analog
Clock
DiGiGrid IOX
DL1Ethernet DL2
DiGiGrid DLI
DL1Ethernet DL2
DAW / SG Studio
MADI Matrix
DiGiGrid IOC
* Dependent on Clock Mode setting in the DLS/DLI control panel
44
Page 45

SoundGrid Studio
3.10 Live Sound: MultiRack and SoundGrid Studio
You’re part of a team that provides FOH and monitor mixes and recordings for large concerts. You need ample DSP power for
plugins.
MultiRack stations use the SoundGrid protocol to communicate with each other, so it’s simple to integrate the two. Stage, monitor
mixer, FOH mixer, and OB van or radio feed share resources and stream audio over Ethernet. A SoundGrid DSP server provides
outboard processing. An oine sound check session made with a SoundGrid Studio setup can serve as the basis of the real thing—
including all plugin and patching presets.
MultiRackDAW / SG Studio
45
SoundGrid Server
Ethernet
SoundGrid Server
Page 46

SoundGrid Studio
4. SOUNDGRID STUDIO COMPONENTS
If you have read the “Using SoundGrid Studio” section in the rst part of this manual, Using SoundGrid Studio, then you’re well
equipped to congure a SoundGrid network and run SoundGrid Studio. But you may still have questions.
This section is for reference. It’s here to provide more detail than is available in earlier parts of this guide. Much of the content in this
chapter is new; some appeared earlier. The chapter can thus aid those who like to read manuals, as well as those who use them only
as a last resort.
If you can’t nd what you need in this section, then refer to the user manual for a specic application, such as StudioRack or eMotion
ST, or the manual for your hardware I/O or server.
4.1 Startup and Navigation
46
MacPC
The SoundGrid Studio Application launches on computer boot-up, so it is always available.
To bring it to the front, click on the SG icon in the Top Toolbar (Mac) or System Tray (Windows).
The SoundGrid icon is color-coded to indicate network status: Green indicates an active LAN connection. This means that the
hardware or driver is assigned, as is the network port. Red indicates a network fault condition.
If the SoundGrid Studio Application quits or needs restarting, it can be found at these locations:
Windows: C/Program les (x86)/Waves/SG Studio
Mac: Sys HD/Applications/Waves/SG Studio
Page 47

SoundGrid Studio
4.2 SoundGrid Studio Interface
The SoundGrid Studio interface is divided into three sections. All sections have an identical Top Bar.
Top Bar
System
WSG buer
Sample Rate section
Network and System sections
Hardware I/O devices
47
Software I/O devices
Servers
Control Protocols
Page tabs
Page 48

SoundGrid Studio
4.2.1 Top Bar
At the top of every view of the SoundGrid Studio is the Top Bar, which provides important information at a glance. Alerts from
SoundGrid, DSP network resources used, and session information are always visible.
SoundGrid
network voices
DSP usage
Session name Page navigation tabs Messages Network
status
A SoundGrid server has multiple processing cores. The DSP monitor displays the current average consumption of all
cores and the highest CPU peak reading consumption in all cores. The average is displayed as a green Bar and the
peak as an orange line. Both the average meter and peak meter will turn red in case of an audio drop out. In such a
case we recommend that that you modify your processing chain in order to avoid potential audio dropouts. If no DSP
server is available, the DSP monitor will read N/A.
The name of the current SoundGrid Studio session is indicated in the
48
SESSION NAME box. To load and save sessions, click on the small arrow in the
cell below. In the Mixer section, the large cell on top displays the selected
mixer channel. The cell below shows the current preset for that channel.
The MESSAGES window reports SoundGrid Studio status.
Messages may include indications of sample rate mismatch (and matches), general change in
network status, buer overload, etc.
WSG reports the status of the SoundGrid network. Green indicates OK. Red indicates an error state, such as lost
connection to network. Every SoundGrid system, regardless of size and complexity, is a network as long as it comprises
at least one I/O and driver.
Page 49

SoundGrid Studio
VOICES displays the number of SoundGrid Studio channels being used between the StudioRack and the eMotion
mixer. This applies only to server-based systems and is independent of the voices used in the DAW. Refer to the
StudioRack user manual for more information.
4.2.2 SoundGrid Studio Sections
SoundGrid Studio has three sections, which are accessed by tabs in the Top Bar.
■
The eMotion ST Mixer is a multi-purpose mixer, designed primarily for monitor mixes. It has 8 freely assignable inputs, up to 64
StudioRack channels, and 8 aux sends. Up to 8 plugins can be chained in each channel strip. Used together with StudioRack, it
yields near-zero latency by providing direct patch I/O-to-I/O connections for recording and monitoring. For more information,
please refer to the eMotion ST user guide. The Mixer tab will not be available if a server is not assigned to the system or if an
eMotion ST license is missing.
■
An audio Patch section that connects physical and virtual devices (SoundGrid ASIO/Core Audio drivers) with eMotion ST channels.
49
There is also a page for direct patching between devices.
■
A Setup page for allocating hardware and software I/O devices, servers and controllers, and for managing the network.
MacPC
You can also access SoundGrid Studio sections from the drop-down
menu on the Top Toolbar or System Tray.
Page 50

SoundGrid Studio
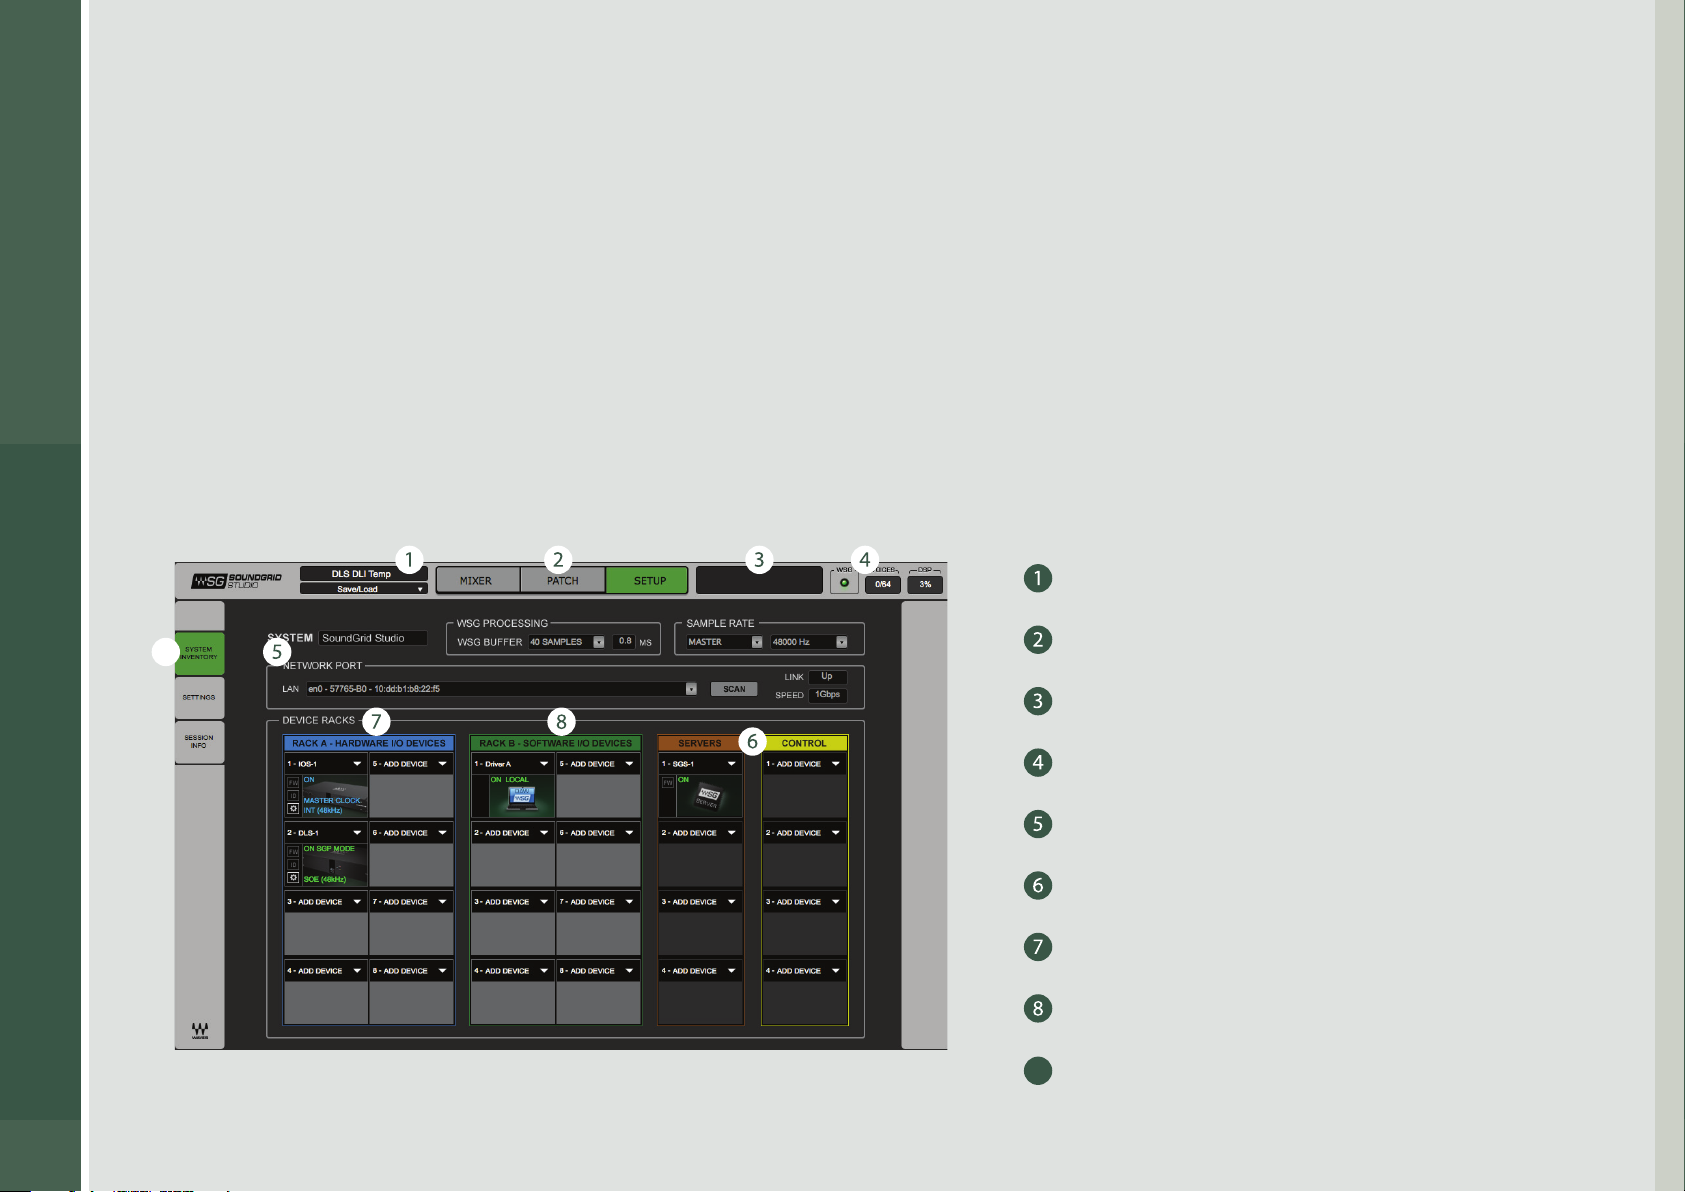
4.2.3 SoundGrid Studio: System Inventory Page
Use the Setup section to manage your SoundGrid network resources, save and load sessions, and set system preferences. The Setup
section has a sidebar with three tabs: System Inventory, Settings, and Session Info.
50
The System Inventory page is used to congure SoundGrid hardware and software I/Os, Waves SoundGrid ASIO/Core Audio drivers
(the computers on the SoundGrid network), and servers. Here you see all available resources and assign them to your computer. This is
also where you access a hardware device’s Control Panel and manage the network. This is a very important page. All SoundGrid Studio
systems (regardless of size and complexity) have the same user interface, which is divided into several sections. These sections are
discussed below.
Page 51

SoundGrid Studio
System Section
Reports essential information concerning the SoundGrid network.
SYSTEM displays the SoundGrid host application for this inventory.
Network Port - This is the network port that connects your computer to the SoundGrid network for conguration, patching and
ASIO/Core Audio driver streaming.
LAN Port Identies the current port used in the LAN MAC address of the user’s computer. Click the arrow on the right side of the
LAN Port window to reveal the available ports. The list displays the network adaptor name, followed by the MAC address. Selecting a
port will initiate the SG Studio Wizard that will look for devices connected to that port and will oer to congure them.
51
SoundGrid currently supports physical Ethernet connections only: WiFi is not supported.
Auto Cong - Launches the SoundGrid Studio Wizard.
Network Status - Two network status indicators are on the right-hand side of the Network Port window.
LINK Indicates the status of the Ethernet Connection. Possibilities: UP / DOWN / INVALID
SPEED Indicates the local area network speed. Possibilities: 100 Mb/sec, 1000 Mb/sec, N/A
Page 52

SoundGrid Studio
Sample Rate
SoundGrid I/Os connect to the SoundGrid driver in order to communicate with a DAW, local or remote. SoundGrid Studio controls
the sample rate of the network and the SoundGrid driver. The SoundGrid Studio system sample rate is displayed in the Sample Rate
section of the Setup page. The sample rate indicated in this window mirrors that shown in the Clock page of the control panel.
When an I/O’s clock is set to Internal, the sample rate can be set from this drop-down
Sample Rate menu. Sample rate can also be changed by the DAW (when creating or
opening a session, for example).
Next to the Sample Rate window is the Sample Rate Master/Slave control, which determines SoundGrid Studio’s role in changing
the sample rate.
52
Page 53

SoundGrid Studio
Setting the Sample Rate in Master Sample Rate Mode
SoundGrid Studio and the SoundGrid driver can set the sample rate of the clock master I/O
device. For example, when you open a DAW session at sample rate dierent from the current
SoundGrid Studio sample rate:
■
DAW requests SoundGrid driver to change sample rate.
■
The SoundGrid driver instructs SoundGrid Studio. When SoundGrid Studio is set as the Sample Rate Master, the SoundGrid driver
requests the master clock I/O to change its sample rate.
■
All slaved I/O devices adjust their sample rates accordingly.
Use the SoundGrid Studio Setup page sample rate drop-down menu to select
a sample rate. The sample rate can also be changed through the master device’s
control panel.
When the device locks successfully to the requested sample rate, its icon will turn
blue. Slave devices will become green. If the master I/O device cannot lock to the
requested sample rate with it’s current clock source it will fall back to an alternative
clock source. This is displayed in the device control panel in the clock status section.
53
If there are no alternative clock sources that can provide the requested sample rate,
its icon in the Device Rack will turn red. You may need to choose a dierent I/O
device as your network clock master.
Page 54

SoundGrid Studio
Setting the Sample Rate in Slave Sample Rate Mode
SoundGrid Studio and the SoundGrid driver will follow the I/O device sample rate, as set by
the selected clock source.
The same request is made as above, but SoundGrid Studio is set to Sample Rate Slave:
■
DAW requests SoundGrid driver to change sample rate.
■
The SoundGrid driver instructs SoundGrid Studio. When SoundGrid Studio is set as the Sample Rate Slave, neither SoundGrid
Studio nor the SoundGrid driver can request the master clock I/O to change its sample rate.
■
All slaved I/O devices follow the master and do not change sample rate.
In Slave mode, all sample rate changes must originate from the clock master device.
54
Page 55

SoundGrid Studio
WSG PROCESSING BUFFER
The Waves SoundGrid Buer sets the amount of time it takes for audio to stream
from the I/O to the server and back. This is relevant when using the eMotion ST mixer
for monitoring or I/O processing. This value also aects the latency introduced by
the StudioRack in I/O insert mode. Lower settings result in lower system latency and
greater responsiveness. Higher settings yield more stability but greater latency. If you encounter pops or similar errors, increase the
buer setting. This buer size is set in samples, but is also displayed in milliseconds for user convenience.
This setting is independent of I/O, driver, or host latencies, all of which are controlled in the Settings page of the Setup section.
55
Page 56

SoundGrid Studio
4.2.4 Device Racks
Use the device racks to assign I/Os, drivers, servers, and control devices. You can add a device to a rack slot manually—without the
Wizard—but you will need to assign it to your computer.
Think of a SoundGrid Studio rack as a traditional 19” outboard cabinet. Just as outboard hardware racks are lled with processing gear,
so are SoundGrid Studio racks populated with devices. While a traditional equipment rack is limited to the physical devices immediately
at hand, SoundGrid Studio device racks can allocate resources to any computer on a SoundGrid network regardless of their physical
location.
SoundGrid Studio has four racks for assigning dierent types of resources.
■
I/O Rack A (Hardware devices)
■
I/O Rack B (Software devices)
■
Servers
■
Control protocols
56
Page 57

SoundGrid Studio
I/O Racks
The two leftmost racks are used to assign I/O devices. I/O Rack A is used to assign
hardware I/O devices, while I/O Rack B is used to assign drivers. You can congure
the network manually, add or delete devices, and modify the conguration created
by the Wizard.
I/O Rack A: Hardware I/O Devices
Rack A can host up to eight I/O devices and load devices in any order. By default,
the rst device in the rack is the clock master, but you can choose another device
to serve this purpose.
Manually assigning an I/O device involves just a few steps:
■
Choose an I/O device and assign it to a slot. If this is the only device in the rack, it will be named the clock master.
■
As you add devices to the rack, they will normally be designated as clock slaves. To designate one of these devices as the clock
master, choose Set Master from the device’s drop-down menu.
■
Open the device’s control panel to congure I/O, preamp parameters, etc.
■
Check the information in the device’s slot to conrm that it is locked correctly.
57
If no device has been assigned to a slot, the slot will appear empty.
A populated slot shows the default name of the I/O device. Edit its name by double-clicking on
the area above the icon.
To add an I/O device to another rack slot, click and hold on the arrow in the upper right corner
next to ADD DEVICE. Add more I/Os in the same manner.
The menu indicates which I/O devices are connected to the network, which devices are
unassigned, and which device serves as the clock master.
Note that DLS-1, the device in this slot, is grayed out. This indicates that the device is unavailable
because it is already assigned (in this case to you, the host computer).
“Master Clock,” displayed in Slot 1, conrms that DLI-1 is the clock master. Any digital audio
Page 58

SoundGrid Studio
system with more than one device must be synchronized to a common clock. This is the clock
master. All other devices are locked to the master and are referred to as slaves.
Once an I/O has been assigned to a computer, no other computer can access and use the device
until it is released by that user. To release an I/O from your computer, select Remove.
To congure hardware I/Os, learn about the device’s rmware version, and set up clocking, go to
the device’s Control page by double-clicking on the gear symbol.
58
DiGiGrid IOS Control Panel: Preamp controls (left); clock controls (right)
The process of conguring I/O devices varies by manufacturer and
model. Generally, you will use the device’s Controls page to set I/O preamps, and the Clock page to set clock rates and assign master
status. When SoundGrid Studio is in the Master Sample Rate mode, settings made in the Sample Rate window will be reected
here. When SoundGrid Studio is set to the Slave Sample Rate mode, changes made in the device’s Control Panel will change
SoundGrid Studio’s sample rate.
Refer to the device’s user manual for details about its control panel.
Page 59

SoundGrid Studio
Firmware Status and Updates
A populated slot contains useful information about the device.
FW indicates status of the device’s rmware.
ID activates LEDs on the front panel of the hardware device. This identies which physical device the slot is
controlling.
GEAR SYMBOL click to access device’s control panel.
The user is given the choice to update. Status indications are color-coded:
Grey Compatible rmware.
Blue Compatible rmware, but a newer version exists.
Red Firmware not compatible. Must be updated in order to use.
Click on the FW button to launch the Reasher. This will initiate a scan of the hardware and then oer options. Do not disconnect the
device or turn o the computer until you see the message Done.
59
Page 60

SoundGrid Studio
Status indicators also appear on the icon itself:
On/NA/Mode ON Blue/ Green Device is active (Blue=Master; Green=Slave)
NA Red Device is unavailable. Likely causes:
1. Device is assigned to another system.
2. Device or rmware is incompatible with
current SoundGrid Studio software.
3. Device was previously assigned to this
user, but is currently not connected.
Mode of Operation I/O, SGP
Clock Status Master/Slave
60
Clock Source INT, SoE, AES, WC, DigiLlink
Sample Rate 44.1, 48, 88.2, 96 kHz
Page 61

SoundGrid Studio
I/O Rack B: Software I/O Devices
I/O Rack B manages SoundGrid ASIO/Core Audio drivers: that is, computers connected to and part of the
SoundGrid network. This rack works in a manner very similar to I/O Rack A.
You will normally use your local driver. However, you can release your local driver so that another computer
can claim it (this is how streaming from computer to computer is made possible).
A driver cannot be shared by more than one computer.
The local driver will appear in the rst slot of I/O Rack B. “LOCAL” indicates that this
driver is installed in the host computer.
The driver’s name is dened by the operating system, but can be changed by
61
double-clicking on its name in the slot.
Click on the icon to see a list of other available drivers. Drivers that are already
assigned are greyed out. If no network drivers are available, then you will see only
your local driver.
Select an available driver and choose Own. This assigns the driver
to you. You will see the driver’s name above the slot.
To release a driver and make it available to other network users,
select Free. Any driver identied on the network as Free is
currently unclaimed and can be claimed by any user.
Page 62

SoundGrid Studio
If all racks in I/O Rack B are empty, then there are no device drivers in the SoundGrid Studio network, or
your computer cannot locate them. This is likely due to an error. Try re-inserting the local driver from the
“Add Device” drop-down menu. If the driver does not appear in the menu, you may have to re-launch the
SoundGrid Studio Application. You may also need to verify that the correct network port has been selected.
Driver status is displayed on the driver icon:
FREE No one owns the driver; it can be allocated to any user
LOCAL Driver is physically located on this computer
If the list is displayed in red, then the driver is not compatible with the version of the SoundGrid Studio Application running on
the host computer. All computers on the network should have the same and latest version of the SoundGrid Studio Application
installed. You can download the latest version from the Waves website.
Backup
This menu item designates a second driver to backup all assignments to the
62
local driver. In essence, the backup mode splits an input signal and sends
it to the local driver as well as to the selected backup driver. This enables
simultaneous recording on two computers. Since the sound is streamed
through the network, the backup computer can be up to 70 meters (230 ft) from
the master recorder.
Page 63

SoundGrid Studio
Multiple Client Core Audio/ ASIO Driver
The Waves SoundGrid ASIO (Windows) or Core Audio (Mac) driver lets you congure multiple hosts with the same local driver. This
means you can use multiple DAWs on the same computer simultaneously. This allows you to record the same source to two DAWs
on the same computer consecutively; route audio from multiple DAWs to a single I/O; and, if you have a SoundGrid server, route
multiple DAWs to the eMotion ST mixer.
Please note the following when using this feature:
1. All hosts must run the same sample rate. If sample rates do not match, each host will behave dierently.
2. Driver inputs and outputs can be shared.
Please note: Some hosts, for example Pro Tools and MultiRack Native, automatically claim all driver outputs. Even when using
such hosts, however, you can use the same input driver channels to record to multiple DAWs.
3. It is not possible to connect local driver channels to one another. This means you cannot use SoundGrid Studio’s device-to-device
patch to virtually connect audio between two hosts on the same computer. To do this, you must route through the eMotion ST
mixer (which requires a SoundGrid server).
4. You may use up to ve hosts on a single computer/driver.
63
SoundGrid Studio Driver Channels
You can allocate between 32 and 128 driver channels. Allocate driver channels in Rack B of the Setup Page. The number of channels
is reected in the patch tabs: fewer allocated channels means fewer channels in the Patch page. The default is 32.
Select Auto to match the amount of driver channels to the maximum I/O count available on the assigned interfaces.
Page 64

SoundGrid Studio
Servers
Adding a DSP server moves processing from the DAW to a server. This allows for more plugins and enables low-latency recording
and monitoring. With a server-based network you can also access the eMotion ST mixer and use StudioRack in DSP mode. To learn
more about using eMotion ST and StudioRack, consult their respective user manuals. Adding a server to your system requires an
eMotion ST SoundGrid License
Adding servers to the rack is similar to adding I/Os and drivers.
When there are no servers available on the SoundGrid network, the drop-down menu will look like this.
A server cannot be shared by drivers: only one computer can utilize a server’s processing power, regardless of the number of
computers or servers on the network.
Once assigned to a computer, a server remains unavailable to others until released by the user.
64
A server assigned to a computer appears greyed out in the Servers list.
If you attempt to assign a server that is not compatible with SoundGrid or with your version
of SoundGrid Studio, the Reasher window (pictured on the left) will appear. You will have
the option of updating the server rmware or cancelling the assignment. You can launch
the Updater manually by clicking the FW button. The server slot will remain red until the
rmware is compatible.
Servers Status Indicator Two possibilities: On / Not Available.
Page 65

SoundGrid Studio
Controls
Controls are protocols that enable devices such as HUI and MIDI surfaces to work together with the eMotion ST
mixer. A control protocol must be installed in order to assign parameter controls in eMotion ST or SoundGrid
Studio
Controls Status Indicators
Two possibilities: Protocol Available / Not Available
Double-click on a protocol icon. This will open the protocol’s control panel. Here you can assign MIDI controls
and map the protocol’s control surface.
65
Page 66

SoundGrid Studio
4.2.5 Settings Page
Use this page to set global network parameters.
66
WSG Processing Buffer
The Waves SoundGrid Buer is located in the SoundGrid Studio Setup > System Inventory page, not in the Settings page. But
since its function is closely related to the StudioRack Driver Buer control, they
will be discussed together here. The WSG Buer sets the amount of time it takes for
audio to stream from the I/O to the server and back. This determines the speed of
real-time processing. Lower settings result in lower system latency and greater responsiveness. Higher settings yield more stability but
greater latency. If you encounter pops or similar errors, increase the buer setting. This buer size is set in samples, but is also displayed
in milliseconds for user convenience. This setting is independent of I/O, driver, or host latencies, all of which are controlled in the
Settings page of the Setup section.
Range @ 44.1-48kHz: 40-96 samples. Default: 40 samples (0.8 ms).
Range @ 88.2-96kHz: 80-192 samples. Default: 80 samples (0.8 ms).
Page 67

SoundGrid Studio
StudioRack Driver Buer
To maintain stability, the ASIO/Core Audio driver must also be buered. The default setting for each
is 256 samples. The buer size of Core Audio drivers cannot be changed here, since the driver is
controlled by the DAW. The ASIO driver buer size can be changed (PC only).
Range: 32, 64,128, 256, 512,1024 samples (ASIO driver only).
The network buer helps the OS send synchronized information to and from the ASIO/Core drivers and I/Os through the network
port. When many channels are going in/out of the driver/s to many destinations, the Network buer may need to be increased to
reduce the possibilities of audio drops artifacts as a result of overloading the network port driver.
Range @ 44.1-48kHz: 104, 144, 192, 240, 288, 336, 384, 432, 480, 528, 576, 1024
Range @ 88.2-96kHz: 208, 256, 304, 352, 400, 448, 496, 544, 592, 640, 1088.
eMotion ST Meters
Determines metering behavior in the eMotion ST mixer.
Options: Input, Pre-fader, Post-fader.
For more information, refer to the eMotion ST user guide.
67
Session
Determines which SoundGrid Studio session will load upon booting the eMotion ST mixer.
Two possibilities: Last Session / From Template (this opens a list of available templates).
Diagnostic Settings
Enables verbose logging used for technical support. Under normal circumstance, leave verbose
logging o.
Options: Enable Verbose Logging / Disable Verbose Logging
Page 68

SoundGrid Studio
4.2.6 Session Info Page
The Session Info tab is used to save, load, and manage SoundGrid Studio sessions. Press the desired button and a standard save/load
dialogue box will appear.
Details for each le are displayed, and there is a space for user notes.
Save, Save As, and Load SoundGrid
Studio sessions.
Save a session as a template. The
le will be saved in the templates
folder and will be available in the
Templates menu of the Wizard.
Information about the current
session (date created, le size, etc.)
User notes
68
Software versions for diagnostics
You can save a session as a SoundGrid Studio template. The resulting template session will contain information about SoundGrid
inventory, patches, and eMotion ST. It will not include DAW session or StudioRack information (StudioRack settings are saved with
the host DAW session as well as with the WaveSystem toolbars).
When you open a session, SoundGrid Studio will prompt you if the current conguration does not match that of the saved session.
You will have the choice of opening the session with the saved inventory or with the present conguration. When you open a
template, the current conguration will always be used.
Page 69
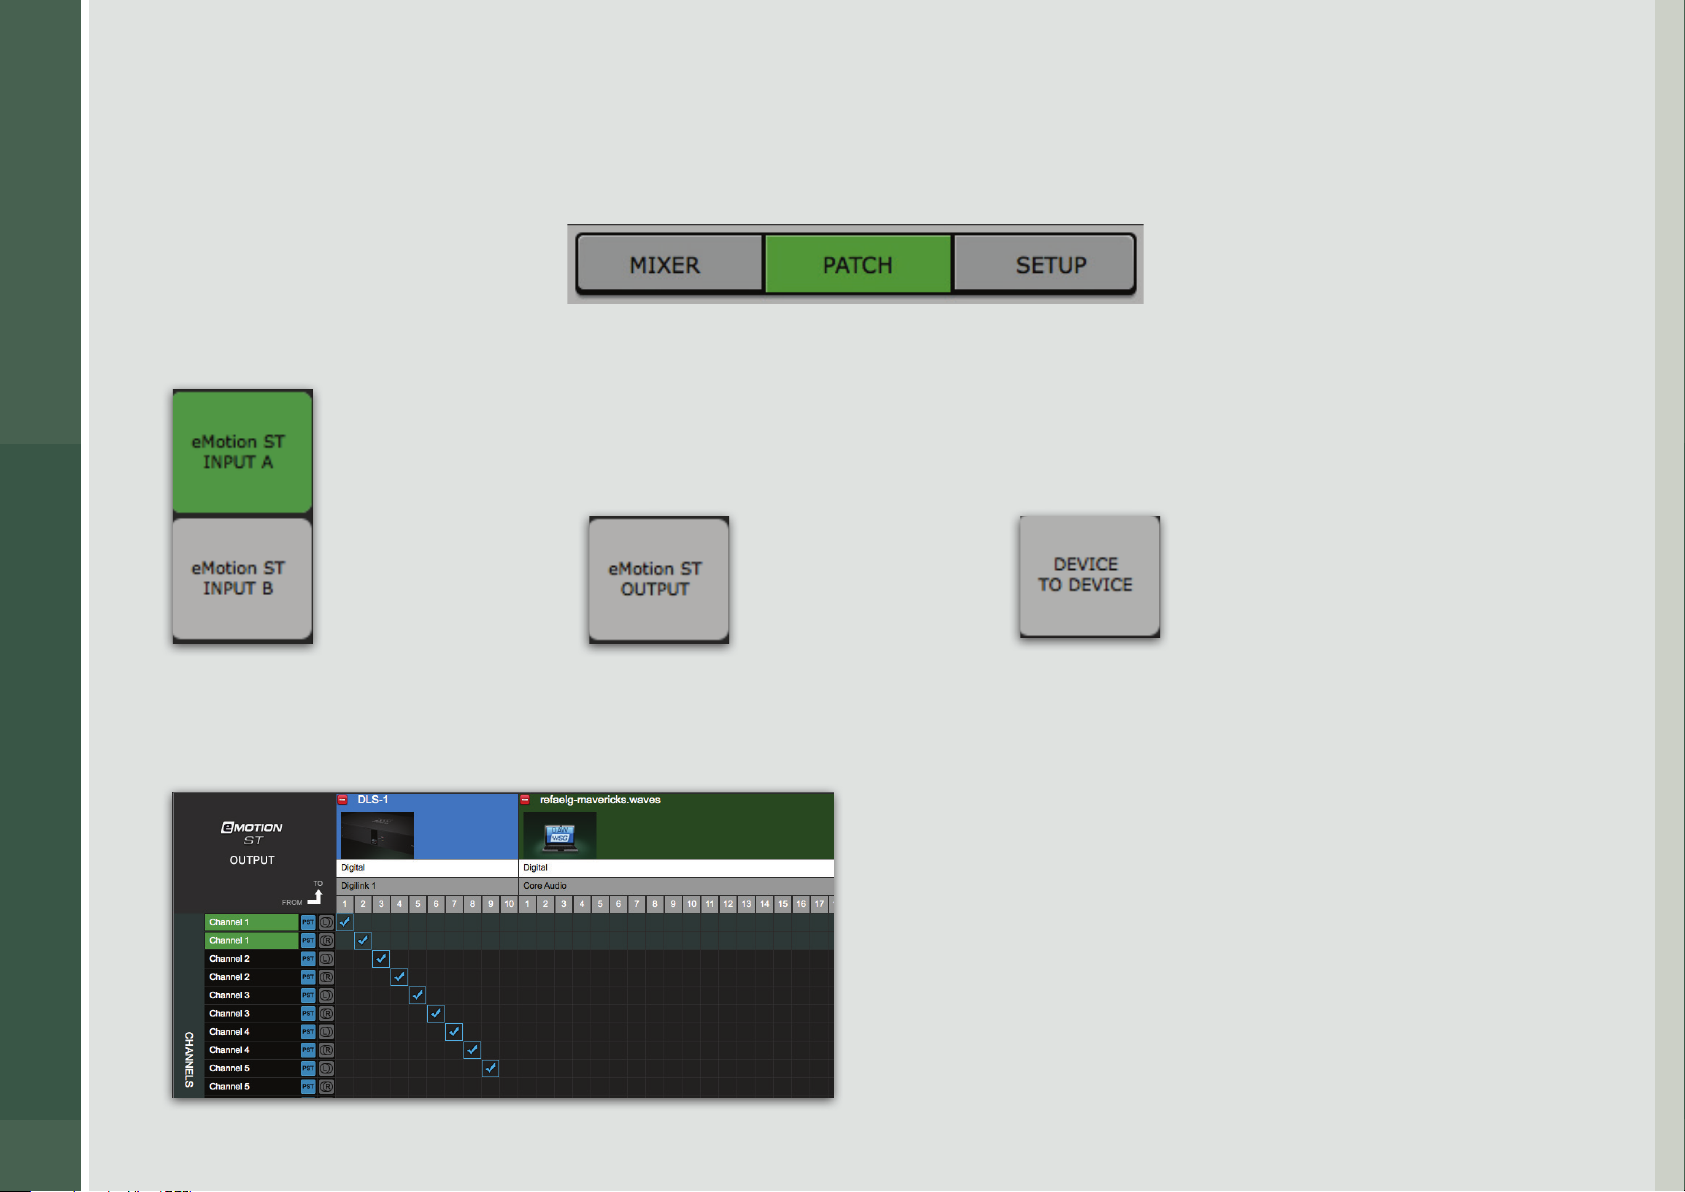
SoundGrid Studio
4.2.7 Patch Page
Use the Patch page to connect SoundGrid Studio inputs, outputs, and software or hardware I/Os. The Patch is populated based on
the assigned devices that are listed in the inventory and are active.
There are three eMotion ST I/O patches on this page:
69
eMotion ST mixer
inputs A and B
Along the top of the Patch matrix are SoundGrid ASIO/Core Audio channel patches. On the left side are tabs for choosing inputs,
outputs, and SoundGrid drivers. When patching eMotion ST inputs, the signal ow is from top to left. eMotion ST outputs and
device-to-device connections patch from left to top. An arrow indicates patch direction.
eMotion ST
mixer output
Device-to-device
connections
Page 70

SoundGrid Studio
The process of patching I/Os and devices in SoundGrid Studio is the same for all types of connections. Hover over the grid and an
intersecting column and row appears.
Drag the point of intersection to locate the patch point. Click to
establish the connection.
70
Click on an existing patch point to delete the patch.
A dialog box will appear to conrm this choice.
Page 71

SoundGrid Studio
You can create a series of patches by click-dragging in a diagonal line. This enables you to
quickly patch, for example, ASIO outs 1–8 to eMotion ST inputs A1–A8.
Delete a series of patches by dragging over patch points.
You can route outputs to more than one location, but inputs can come from only one source.
eMotion channel names assigned in the Patch section will appear as channel strip names in the eMotion mixer. To rename a channel,
double-click on its name cell. You can change the name of a driver in the Patch page or in the System Inventory page.
Device names cannot be changed here.
71
Patch channels can be mono or stereo. Click on the box to the right of the channel name
to toggle between the two.
Page 72

SoundGrid Studio
Device channels can be viewed in an expanded or collapsed manner.
An arrow indicates the
direction of the patch.
Click on the expand/collapse button to expose all channels of a device.
72
All patches on a specic tab can be deleted by pressing the Del button on the top left corner.
A conrmation prompt will appear after engaging this button.
Page 73

SoundGrid Studio
Driver Channel Names in your DAW
SoundGrid Studio patches from the Waves SoundGrid ASIO/Core Audio driver to a hardware I/O device, a secondary driver (another
computer), or the eMotion ST mixer.
SoundGrid Studio transmits these names through the driver to the DAW. These will appear as the default names within your DAW.
Most DAWs allow you to change the naming manually. For example, you may a DiGiGrid IOS with a total of 10 inputs (8 analog, 2
digital) and 14 outputs (8 analog, 2 digital, and 2 stereo headphone outputs). When these inputs and outputs are patched to and
from the local driver (I/O to DAW, DAW to I/O), you will see the following in the Connection or IO setup within your DAW:
73
Local driver channels that are not patched to a hardware device or to the eMotion ST mixer will appear as SoundGrid 1, SoundGrid 2, etc.
Page 74
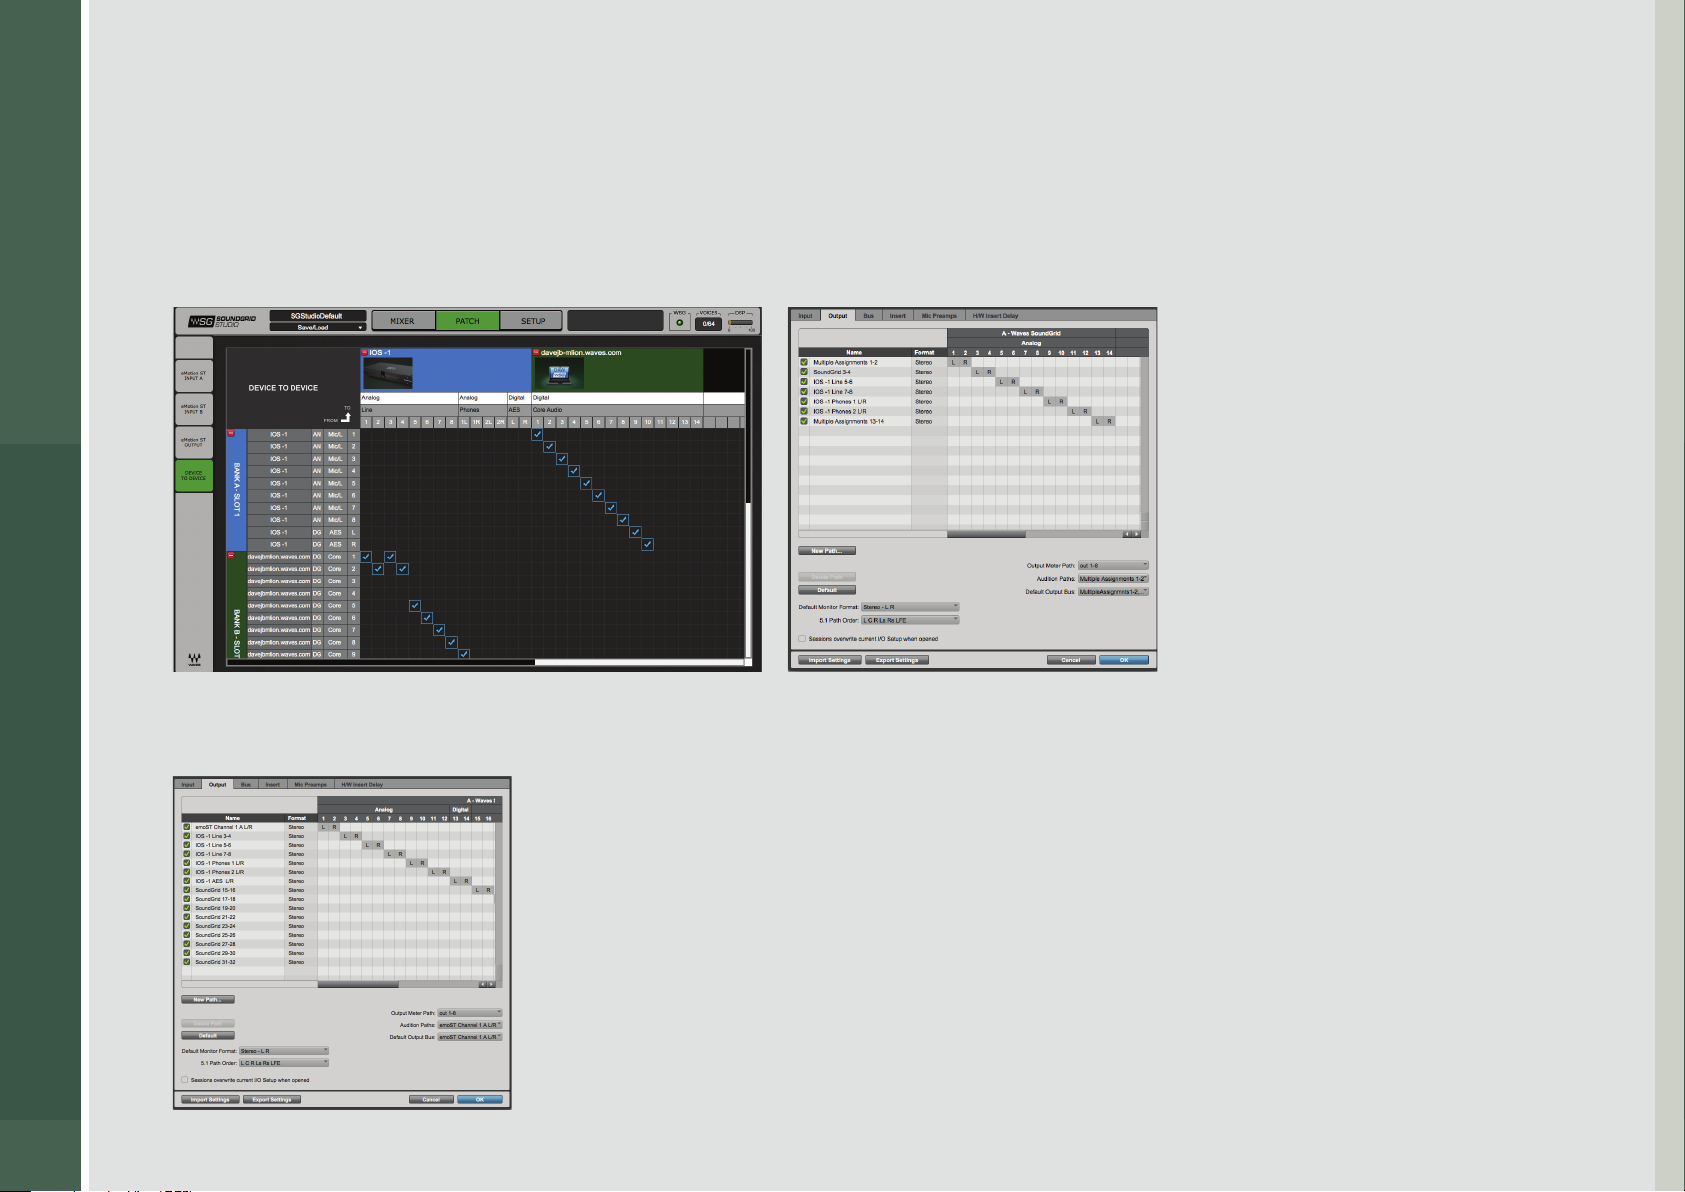
SoundGrid Studio
Note: This transmission occurs while you launch your DAW and the driver handshakes with it. This means that any change of I/O
name or eMotion ST channel name will not be visible in your DAW until you relaunch it. Some DAWs, such as Cubase, will let you
reset the connection to the driver, saving you the need to relaunch the application.
Important: DAW outputs through the driver can be patched to mutilple destinations; for example, the DAW’s Main out can go to
your Hardware Channel 1 & 2 as well as to Hardware Channel 3 & 4. In such a case, the name of the driver channel will be “Multiple
Assignments.” In this case we suggest you manually name these driver channels.
74
As mentioned above, driver channels can be connected to the eMotion ST mixer or to a secondary remote driver.
Here is an example of the DAW outputs patched to the eMotion ST mixer:
Page 75

SoundGrid Studio
Here is an example of your DAW receiving input from another DAW on a secondary computer via networking:
To ensure that the names have been updated in your DAW, you may need to follow certain steps, depending on your DAW. Here are
a few examples.
75
Pro Tools
Go to Setup > I/O
Delete and reset all I/O
congurations to DEFAULT.
Cubase
Go to Devices > Device Setup >
Waves SoundGrid.
Select RESET above the PORT
System Name table.
Logic
Go to Mix > I/O Labels.
Select Reset All Labels.
Page 76

SoundGrid Studio
5. FURTHER LEARNING
Armed with the information in this manual, you should be able to set up, congure, patch and control your SoundGrid Studio
system, including all the hardware and software devices it manages. To get the most from this system, we recommend that you
read the user guides for all of your devices. If you choose to add a DSP server to your system, you will be using the eMotion ST mixer
and the StudioRack plugin, so you will need to become familiar with those tools. Even if this is not the right time for you to add a
DSP server, you can still use StudioRack to better manage your plugins. Or to automate parameters. Or to build StudioRack sessions
oine and then move to a system with a server to take advantage of low-latency monitoring while recording. It’s not too soon to
learn a bit about your options.
SoundGrid Studio is a highly integrated system. It consists of several tools that work together to create a new experience in studio
production. When you learn more about a part of the system, you learn even more about the whole. The more you learn about all of
the elements that make up SoundGrid Studio, the more powerful your studio will be.
We at Waves thank you for joining the ever-growing team of sound professionals who are using SoundGrid Studio. By doing so, you
are helping bring about a more exible, ecient, and creative way of making sound happen.
76
Please feel free to contact Waves Customer Support if you need help or have questions.
 Loading...