

Page 1

Page 2

2
Table of Contents
Introduction ................................................................................................................................................. 3
About SoundGrid for VENUE ........................................................................................................................................... 3
What You Need to Get Started......................................................................................................................................... 4
Quick Start ....................................................................................................................................................................... 5
Installation ................................................................................................................................................... 6
Hardware Installation ....................................................................................................................................................... 6
Software Installation ......................................................................................................................................................... 7
Register SoundGrid Rack for VENUE .......................................................................................................................................... 7
Waves Central ............................................................................................................................................................................. 7
Installing the Software.................................................................................................................................................................. 8
SoundGrid Inventory Application .............................................................................................................. 12
SoundGrid Inventory Controls ........................................................................................................................................ 13
IO Rack .......................................................................................................................................................................... 17
SoundGrid Inventory Information and Alerts .................................................................................................................. 20
SoundGrid Rack ........................................................................................................................................ 22
SoundGrid Rack Controls and Indicators ....................................................................................................................... 23
SoundGrid Rack Components, Voices, and Latency ..................................................................................................... 27
Adding and Managing Plugins........................................................................................................................................ 29
Moving and Copying Plugins .......................................................................................................................................... 31
Plugin Pane .................................................................................................................................................................... 32
Presets ........................................................................................................................................................................... 33
SoundGrid Rack/VENUE Integration ........................................................................................................ 35
CONFIG/SHOW Modes ................................................................................................................................................. 35
Control Surface Mapping ............................................................................................................................................... 36
Snapshots ...................................................................................................................................................................... 37
D-Show/Profile Session compatibility ............................................................................................................................. 38
SoundGrid for VENUE / User Guide
Page 3

3
Introduction
Thanks for choosing Waves! In order to get the most out of this product, please take a few minutes to read this user
guide. We also suggest that you visit Waves Support where you’ll find an extensive answer base, system and host
requirements, troubleshooting guides, and much more.
About SoundGrid for VENUE
Waves SoundGrid Rack for VENUE is a software and hardware integration with Avid® VENUE | S6L systems. It
provides SoundGrid real-time audio processing for front-of-house, monitor, and broadcast users. The SoundGrid
network moves plugin processing from the VENUE engine to a SoundGrid server. The SoundGrid Rack plugin takes
advantage of SoundGrid processing power and lets you assign up to eight plugins to each VENUE plugin insert. This
greatly increases processing potential, with minimum system latency.
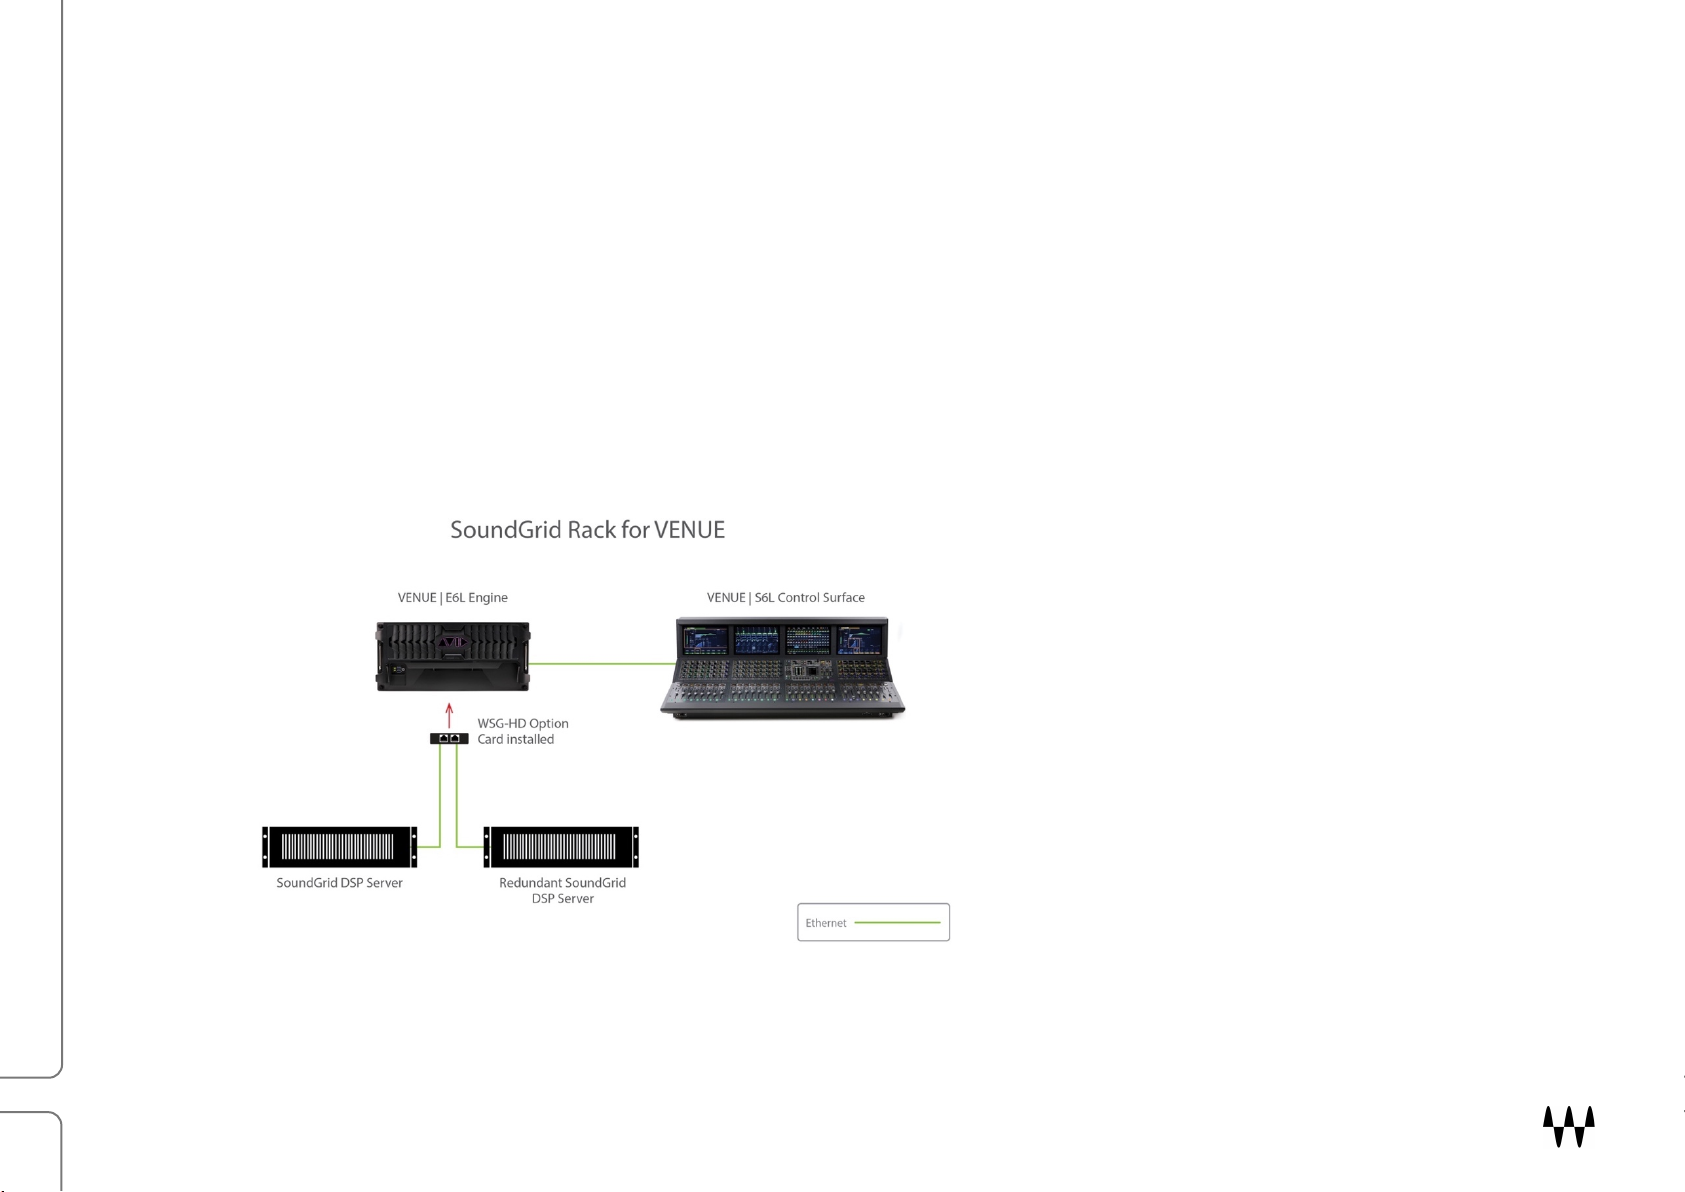
This integration of Waves SoundGrid networking technology with the Avid VENUE system consists of the several
items:
• SoundGrid Inventory application
• SoundGrid Rack plug-in
• Avid WSG-HD Waves SoundGrid Option card
• One or two SoundGrid servers
• And, of course, plugins
This system provides Show file compatibility with legacy D-Show/Profile Show files, mapped encoders, multi-touch
control, and per-plugin and per-insert automatic delay compensation. With two servers there’s automatic switching to
a redundant server for compete security.
SoundGrid Rack plugins are mapped directly to the VENUE control surface in a logical, common-sense manner.
Rack presets can be shared with other Waves rack systems, including StudioRack, MultiRack, and eMotion LV1.
SoundGrid Rack and SoundGrid Inventory are compatible with all S6L and E6L models. For more information please
visit Waves website.
SoundGrid for VENUE / User Guide
Page 4
4
What You Need to Get Started
Before you begin, make sure that you have the following items available.
1. Avid WSG-HD Waves SoundGrid Option card
2. Qualified SoundGrid server
3. Secondary SoundGrid server for redundancy (optional)
Important: To ensure best performance, it is crucial that the redundant server is the same model and revision
as the main server.
4. Cat 5e, Cat 6, or Cat 7 cables
5. Waves license for SoundGrid Rack for VENUE
6. Licenses for plugins
7. USB flash drive
8. Computer that has access to the internet (Mac or Windows) for activating licenses and downloading an offline
installer
Waves servers and licenses can be purchased at www.waves.com or from your Waves dealer.
Contact your Avid dealer for the Avid WSG-HD Waves SoundGrid Option card.
SoundGrid for VENUE / User Guide
Page 5

5
Quick Start
If you’re already comfortable installing Waves software products and you know your way around VENUE, you can
probably download, install, and activate SoundGrid for VENUE by following the steps below. If, however, the quick
start isn’t enough, this user guide will teach you the necessary steps to set up and use SoundGrid Rack for VENUE.
1. Connect your server(s) to the Avid WSG-HD SoundGrid Option card.
2. On another computer, download the Waves Central application from the Waves website. Learn more about
Waves Central at www.waves.com/support.
3. Download the dedicated offline installer for SoundGrid Rack for VENUE. Unzip and place the Waves folder on
your USB flash drive.
4. Move your licenses from your Waves License Cloud to the Console or to a USB flash drive.
5. Run Waves Central on the Console using the offline installer that you downloaded in step 3.
6. Go to “Option / Plug-ins: Install WaveShell SoundGrid Rack.”
7. Go to “Option / Devices / Engine / WSG HD.”
8. Click Show SoundGrid Inventory to bring the application to the foreground.
9. In SoundGrid Inventory, choose the Intel Network Port that is connected to your VENUE Engine. The correct
port name will end in “LM.“
10. Assign Avid WSG-HD Waves SoundGrid Option Card.
11. Assign your connected server(s).
12. Click “Hide Inventory.”
SoundGrid for VENUE / User Guide
Page 6
6
Installation
Hardware Installation
SoundGrid for VENUE requires a WSG-HD card, which is sold by Avid. The card occupies one PCI slot in the Avid
VENUE engine. SoundGrid hardware installation consists of nothing more than connecting the WSG-HD card to the
servers. For instructions about installing the WSG-HD card, please refer to the WSG-HD Card Installation document,
available on the Avid website.
Connecting Servers
Use Cat 5e, Cat 6, or Cat 7 cables to connect Avid WSG HD external Ethernet port 1 (and port 2 if using two
servers) directly to the SoundGrid servers. There is no need for an Ethernet switch or other additional hardware.
A server can be connected to either
port: the physical connection does
not determine if a server is the
active server or redundant server.
Two or more VENUE S6L systems can be networked, each with its own SoundGrid Inventory. All SoundGrid
assignments should be made before connecting the two systems.
SoundGrid for VENUE / User Guide
Page 7
7
Software Installation
This section describes the process of registration, installation, and activation of Waves licenses and software. Feel
free to skip steps that have already been completed.
Register SoundGrid Rack for VENUE
Your new Waves SoundGrid Rack for VENUE software and all new Waves plugins must be registered to your Waves
account. If you purchased the software directly from Waves, this has been done for you. If you purchased the software
elsewhere, you will need to register the product yourself.
If you don’t have a free Waves account, go to http://www.waves.com/create-account and open one. Next, visit
https://www.waves.com/support/register-new-products to register your products. A license will be deposited immediately
in your Waves Central license cloud.
All Waves VENUE software installations are performed on the Console. There is no need to run an installation on the
VENUE Engine.
Waves Central
Waves software installations in VENUE consoles are carried out with Waves Central, an application for downloading and
installing all Waves software products and managing Waves licenses. To download Waves Central, visit
www.waves.com/downloads/central.
Once Waves Central is installed in VENUE, it can be launched here:
Options / Devices / Waves SG / Settings: Launch Waves Central.
Note: Waves software is not installed in the same manner as other plugins. You must use Waves Central.
SoundGrid for VENUE / User Guide
Page 8
8
Installing the Software
Software installation requires a computer that’s connected to the internet. As part of the download process, you’ll
create an offline installer with which you can install Waves Central, all software, and licenses to the VENUE console.
Fresh Install
A fresh install means that no Waves software is installed on VENUE. To install SoundGrid Inventory, SoundGrid
Rack, and Waves plugins to VENUE, you must create an offline installer using a computer that’s connected to the
internet (not the VENUE computer).
Do this in the computer that’s connected to the internet:
1. Download the Waves Central application to the online computer (https://www.waves.com/downloads/central).
2. Launch Waves Central.
3. Go to “Licenses/Manage Licenses.” Select the “SoundGrid Rack for VENUE” license, along with the licenses
for your Waves bundles/plugins and send them to your USB flash drive.
4. Go to “Install / Prepare Offline Installer.”
5. Choose “Windows” as the target platform.
6. Choose your USB flash drive as the target directory. This will create a Waves folder on the target drive. This
folder must be placed at the root level of the USB drive. Do not place it inside another folder.
7. From the Product List, select “Choose SoundGrid Rack for Venue” and all Waves bundles/plugins that you
wish to install.
8. Choose “Prepare Offline Installer.” The Waves Central application is included in this offline installer.
Important: Do not install Waves instruments as they are not supported by SoundGrid and their
samples libraries are quite large.
SoundGrid for VENUE / User Guide
Page 9
9
Do this in the VENUE console:
1. Plug the USB flash drive into the S6L.
2. Go to “Option/System.”
3. Enter the CONFIG mode and press “Update.”
4. Choose “Install Waves Central.” This action copies and installs Waves Central from the offline installer. When
the installation is complete, you can proceed directly to Waves Central. If you cancelled Auto Launch, choose
“Launch Waves Central” from the Settings panel “Option/Devices/Network Cards/Waves WSG-HD/Settings.”
5. In Waves Central, select “Uninstall” in the “Install” drop-down menu. Chose “Uninstall V9 plug-ins” (if
previously installed).
6. When the uninstall is finished, select “Prepare Offline Installer” in the Install menu.
7. Navigate to the Waves folder on your USB flash drive and select “Folder.”
8. From the product list, choose “SoundGrid Rack for VENUE” and all of the bundles/plugins you wish to Install.
Note: If the console is connected to the internet, you can choose to move licenses to the console.
If you perform a Restore, these licenses will be deleted. You will need to reactivate them.
Once installation is complete, restart the console.
9. In VENUE, go to Options/Plugins, select “WaveShell SoundGrid Rack,” and choose “Install.”
Note: VENUE does not display individual Waves plugins. Instead it indicates
“WaveShellSoundGridRack-AAX.”
SoundGrid for VENUE / User Guide
Page 10
10
Installing Updates and New Software
Once you’ve installed the SoundGrid software and Waves Central, you can download and install updates, new
plugins, and licenses directly to an online VENUE. This lets you quickly install a new plugin or demo, or to install a
new license.
When you launch Waves Central on this online VENUE, all of your Waves products are scanned to determine if
you’re running the current versions. Waves Central will prompt you if updates are available. Keeping your software
up to date makes for a more stable processing environment; we recommend a full update each time Waves Central
indicates that newer versions are ready.
You can, however, select only the products you want to download, without updating your entire collection of Waves
plugins. This is very useful when, for example, you want to download a single plugin or demo plugin now, and then
do the full update later. It can save considerable time.
Installing and updating directly to an online VENUE
1. Make sure your VENUE system is connected to the internet (use the ECx port on the S6L control surface).
2. Go to Option/Devices/Network Cards/Waves WSG-HD/Settings.
3. In Waves Central choose “Install.” Select the software and click “Install.” Software will be installed to the
VENUE.
Note: We strongly recommend that if you install software directly from Waves Central to the
VENUE console you also make a new offline installer. This serves as a backup that you can use for
reinstalling software and licenses when you are working at a location without internet access.
Installing additional software and updating existing software using an offline installer
If the VENUE console is not connected to the internet, use another computer to make an offline installer from which
you can install new plugins or update your Waves software. If time permits, create a complete offline installer. This
gives you an up-to-date backup of all of your software.
Creating an offline installer is discussed in the Fresh Install section above.
SoundGrid for VENUE / User Guide
Page 11

11
Waves Central Updates
Periodically, the Waves Central application software needs to be updated. These are largely housekeeping updates
that keep Waves Central efficient and robust. When you launch Waves Central, you may receive a prompt that tells
you to update before continuing. Follow the link, https://www.waves.com/downloads/central. Download, install, and
relaunch Waves Central.
If your console is not connected to the internet, you won’t be prompted to update Waves Central. You must update
the application on your next online visit to Waves Central.
SoundGrid for VENUE / User Guide
Page 12
12
SoundGrid Inventory Application
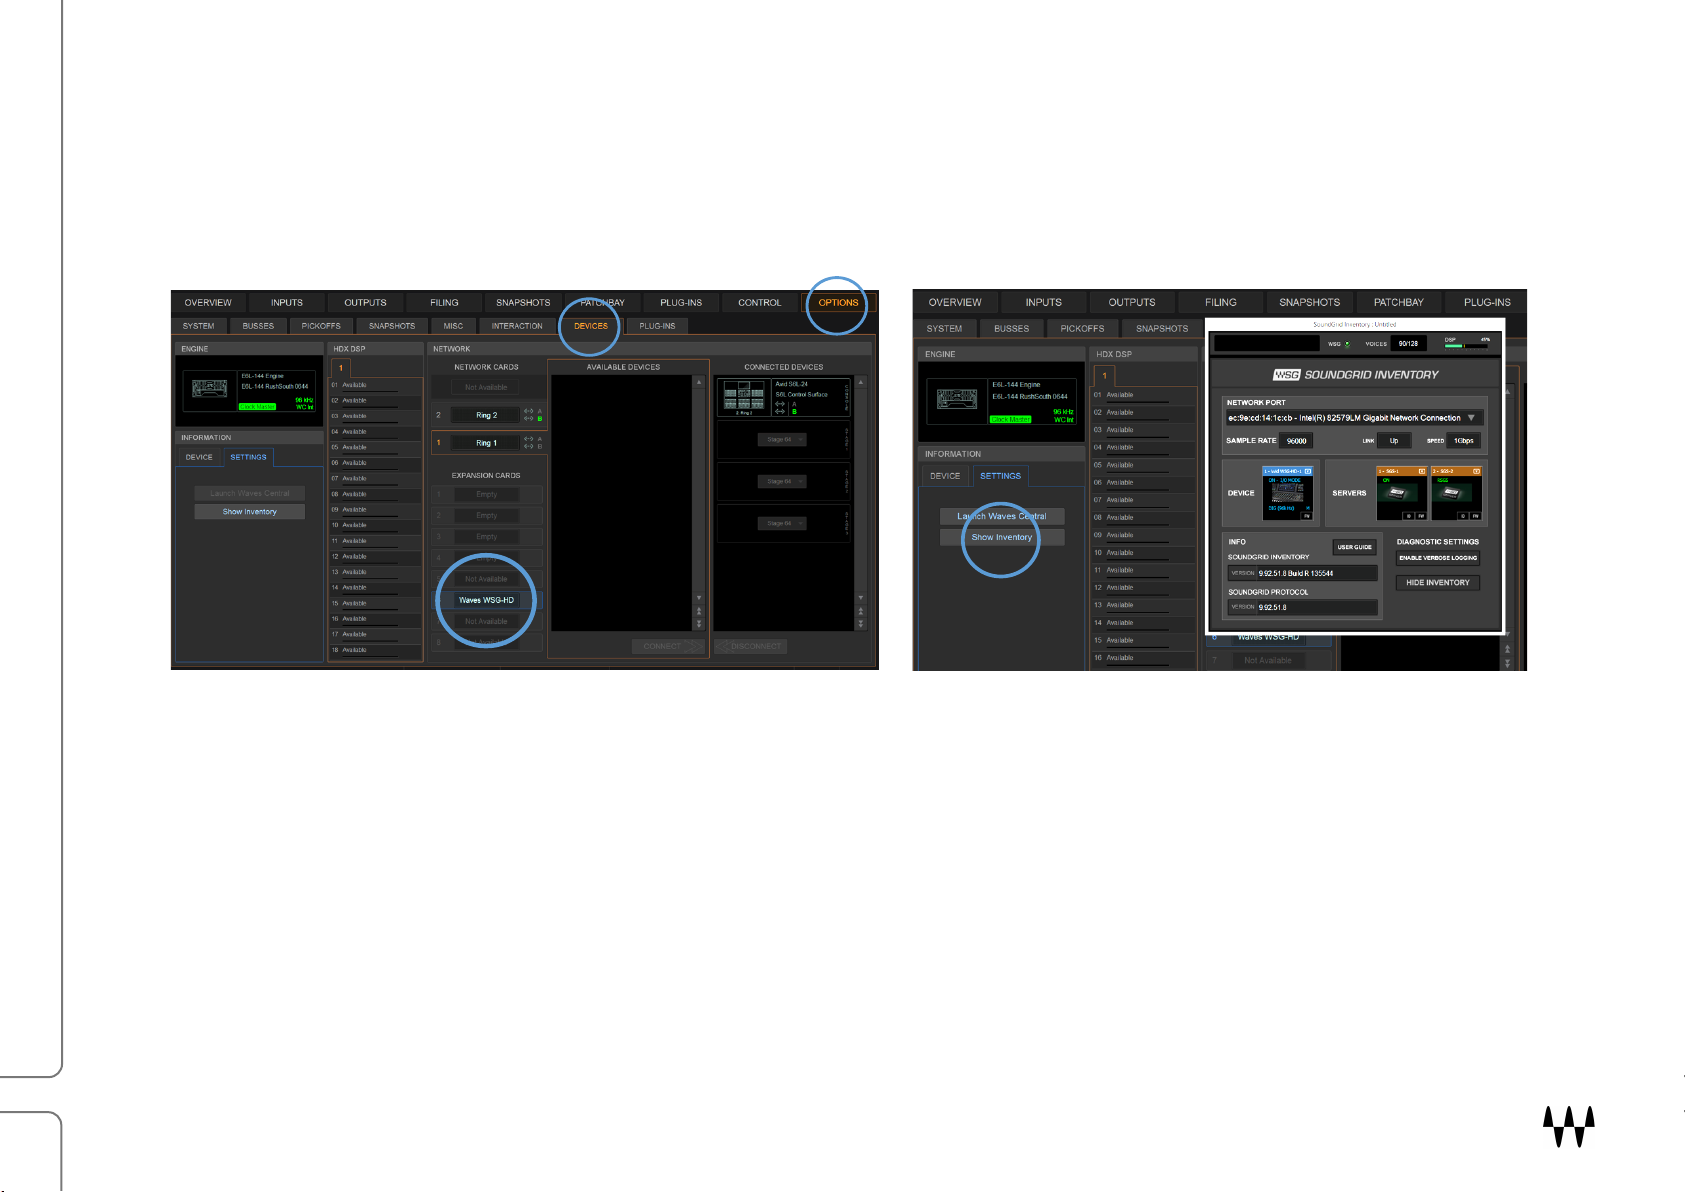
From the VENUE Options/Devices tab, select
“Waves WSG-HD” as the expansion card.
Click the “Show Inventory” button to open the
SoundGrid Inventory page. This is where the Avid
WSG-HD Waves SoundGrid card and one or two
SoundGrid servers are assigned to the system.
The SoundGrid Inventory page is used to assign and manage I/Os and servers. It plays an integral role behind the
scenes, connecting the SoundGrid Rack and the SoundGrid servers. Therefore, the SoundGrid Inventory application
must be running and configured at all times.
The SoundGrid application loads automatically when you boot up the console. Once configured, you likely won’t
need to access this app again except for troubleshooting or updating firmware in the servers or the WSG-HD card. In
the event of a temporary system failure or SoundGrid network disruption, VENUE is notified and will automatically
bypass all instances of SoundGrid Rack.
The SoundGrid Inventory page is also used to monitor the SoundGrid network.
SoundGrid for VENUE / User Guide
Page 13

13
SoundGrid Inventory Controls
SoundGrid Status Section
This panel monitors the SoundGrid network. It is visible in the SoundGrid
Inventory and in the Rack view.
WSG LED
Reports the status of the SoundGrid network. Green indicates a normal condition. Red indicates an
error, such as a lost connection to the network or a server error: Check network connections and the
condition of devices. Confirm that the Avid WSG-HD Waves SoundGrid Option card is properly seated
and operating properly and that all devices are assigned.
Voices
This box displays the maximum number of channels that are routed to the SoundGrid Server and
back in a single instance of SoundGrid Rack.
Think of a voice as one plugin input: a mono plugin is one voice, a stereo plugin is two, and a sidechain is three.
SoundGrid for VENUE provides a total of 128 voices. The number of voices is based on maximum throughput
without compromising stability—it cannot be changed. The Voices meter displays how many of the 128 have been
allocated. This display is mirrored in all instances of SoundGrid Rack.
Voices used per channel
Mono 1 Voice
Stereo 2 Voice
Mono to Stereo 2 Voice (max channel count is on output =2)
Mono Sidechain 2 Voice
Stereo Sidechain 3 Voice (max channel count is on input =2+1)
Mono to Stereo Sidechain 2 Voices (This is a special case where the plug-in acts like stereo with a sidechain.)
SoundGrid for VENUE / User Guide
Page 14

14
Green
DSP peak value: 1% to 84%
System is stable. You can add more plugins.
Yellow
DSP peak value: 1% to 84%
The network is approaching its limits. Monitor the meter status and be
prepared to remove some plugins and/or increase the network buffer size.
Yellow
DSP peak value: 85% to 99%
Network load is excessive. Monitor the meter status: Remove some
plugins and/or increase the network buffer size.
Red
DSP load is beyond the limit. Remove heavy-load plugins immediately.
DSP Meter
The DSP meter shows system usage of the primary SoundGrid Server.
• The solid bar area displays average DSP use. The number of cores can vary between servers, so the DSP
average represents a calculation of all cores.
• The yellow line shows peak use, as indicated in the percentage display above the line. This represents the
highest peak in any core. Certain plugins can exhibit a high average/peak DSP ratio. This may cause overloads,
momentary or constant, that result in audio drops. When adding a large number of these CPU-hungry plugins,
the peak and average indicators will drift apart. In such cases, you may need to disable or remove certain
plugins.
SoundGrid for VENUE / User Guide
Page 15

15
SoundGrid Network Section
Network Port
Shows all detected network ports on the S6L engine. Use the drop-down menu to select the LAN port that ends with
the letters “LM.”
Link
Reports the status of the Ethernet connection to the console that’s running the SoundGrid Inventory software.
Options: UP / DOWN / INVALID
Speed
Reports the speed of the SoundGrid network.
Options: 100 Mb/sec, 1 GB/sec, N/A. It should read “1 GB/sec.”
Sample Rate
Displays the sample rate of the SoundGrid network. The sample rate is set by VENUE and it is always 96 kHz.
SoundGrid for VENUE / User Guide
Page 16

16
Information and Diagnostics Section
User Guide
Opens this user guide.
SoundGrid Inventory and SoundGrid Protocol
These report the software versions that are currently running.
Enable Verbose Logging
Creates a report that’s used by Waves technical support for troubleshooting and customer service. The report file is
sent to the desktop. De-select Verbose Logging for normal operation.
Hide Inventory
Moves the application to the background. The Inventory can be returned to the front by pressing the “SG Inventory”
button/indicator on the SoundGrid Rack. Alternatively, you can bring the app to the foreground by clicking on the
“Show Inventory” button, “VENUE: Options/Devices/WSG HD/Settings.”
SoundGrid for VENUE / User Guide
Page 17

17
IO Rack
The I/O section is used to assign the Avid WSG-HD card and
one or two SoundGrid servers to the VENUE console and
engine. If you are setting up a multi-console system, Avid
recommends that you first assign SoundGrid devices to each
console and then network the consoles to each other.
Adding and Removing Devices
Devices and servers are assigned in the same way. Click the arrow at the top of the slot to open the Device menu.
Select a device
Choose an Avid WSG-HD card from the Device list. Only an Avid WSG-HD card can be
assigned by the SoundGrid Inventory application. Other SoundGrid-compatible devices
will not be available and will not appear on the Devices list. Assign one or more servers
in the same manner.
If a device in the menu is red, its firmware is out of date with the SoundGrid Inventory. Assign the device and
firmware updating will commence automatically. A server that is assigned to another host (i.e., another VENUE
console in a multi-console system) is unavailable and grayed out.
Redundant Server
Assign a second SoundGrid server to provide redundancy in the event that the primary server fails. The redundant
server is identified with RSGS (redundant SoundGrid server). Switchover to the second server is automatic and
takes a few seconds. During this period, sound is muted.
To ensure seamless functionality in case of failure, both servers should be of
the same type and generation. This information is displayed in the Server
Info menu item.
Remove
Releases the device from the local host.
SoundGrid for VENUE / User Guide
Page 18

18
On
Device is active and operational.
N/A
Device is unavailable. Likely causes:
Device is assigned to another system.
Device or firmware is incompatible with current SoundGrid software.
Device was previously assigned to this system, but it is not currently connected.
Device is off.
Clock Source /
Sample Rate
Source of clock that the Avid WSG-HD card is locked to. The system sample rate is indicated on the
icon. Sample rate is set only from the VENUE system
M
The Avid WSG-HD card is the master device of the SoundGrid network. This is the normal state.
RSGS
(server only)
Indicates that the server is present and is standing by as a redundant server. Main/redundant server
assignment is determined by SoundGrid Inventory and is not user adjustable.
ID
(server only)
Click to activate lights on the front panel of the server that’s associated with the icon. This is used to
identify the server. (Not compatible with all servers.)
Menu Items Unique to the Servers Menu
Server Network Buffer
This sets the amount of time it takes for audio to stream from the I/O
to the server and back. It determines the maximum speed of real-
time processing. Lower settings result in lower system latency and
greater responsiveness. Higher settings yield more stability but
greater latency. If you encounter pops or similar errors, increase the
buffer setting. The buffer size is set in samples but is also displayed in milliseconds.
Range: 80 to 192 samples. Default: 80 samples (0.8 ms)
Device Status
The device name is shown at the top of the slot. There are several status indicators and buttons on the icon itself
and just below it. The color of the text in the slot indicates status of the device: (blue=active / red=device not
available).
Indicators on the icon:
SoundGrid for VENUE / User Guide
Page 19

19
FW
Indicates the status of installed firmware. Also used to initiate a manual firmware update.
Gray Firmware is compatible with the installed software
Blue Firmware is compatible with the installed software, but a newer version exists. Firmware should
be updated as soon as possible.
Red Firmware is not compatible or is out of date. Click the FW button to re-flash device hardware
When the process is finished, re-boot the engine.
The servers will restart automatically.
Test Redundancy checks if the redundant server can support the current
session in the event that the main DSP server fails. This is important when the
main and redundant servers are not identical. The test is session-specific.
SoundGrid for VENUE / User Guide
Page 20

20
SoundGrid Inventory Information and Alerts
System status is shown as display boxes in the VENUE Settings section. The following examples represent
situations that are rare, but which require your immediate attention.
SoundGrid Inventory application is not responsive or quits
If the SoundGrid Inventory application freezes or quits unexpectedly,
audio will continue to pass through the rack and processing will be
unchanged. VENUE will ask if you want to relaunch the Inventory.
Take into account that relaunching the application re-syncs the I/O
and the servers, which results in a brief drop in audio. Wait for a
pause in the program that will accommodate an interruption.
Primary server fails
In this case, the main server or I/O has gone offline. SoundGrid
Inventory will switch automatically to the redundant server, if
available. The changeover will take a few seconds, during which time
audio will be muted. You will be notified of this.
SoundGrid for VENUE / User Guide
Page 21

21
All servers fail:
This indicates that all servers have been lost. It can occur in two in
two conditions:
• A SoundGrid system with one server: that server fails
• A system with a main and a redundant server: both servers fail.
The Rack is bypassed until the server problem is solved.
Restart the Racks
Once a rack or server issue has been resolved, you will see this
prompt. When the rack and the Inventory resync, there will be a short
mute. Wait until there is a gap in the performance and then click “Use
Racks.”
Click the down arrow to minimize the status box.
SoundGrid for VENUE / User Guide
Page 22

22
DSP meter
Access SoundGrid Inventory panel
Plugin icon
Plugin name
Plugin IN/OUT (plugin bypass)
Plugin menu access
Disabled plugin
Empty rack slots
Voices display
Rack faders
Peak level and hold indicators
Meters
SG Rack sidechain component is loaded
SoundGrid Rack
The SoundGrid Rack plugin is the heart of the SoundGrid implementation for VENUE. It provides a bridge between the
VENUE console and SoundGrid-compatible plugins. Each SoundGrid Rack plugin instance can chain up to eight plugins.
SoundGrid for VENUE / User Guide
Page 23

23
A SoundGrid Rack can be mono or stereo, depending on the status of the channel. Signal flow in a rack is from top to
bottom, and if a mono-to-stereo plugin is added to a mono rack, the rack will be stereo from that point on in the signal
flow. However, plugins “above” the mono-to-stereo plugin will remain mono.
SoundGrid Rack Controls and Indicators
Rack Input and Output
Peak level and hold indicators (input and output)
Displays channel peak level and clipping. Click on the meter to reset the value box
Input / Output Faders
Sets SoundGrid Rack I/O levels—one fader for either the mono or stereo component.
Range: -144 dB to +10 dB
Input / Output Meter - Stereo or mono peak meter.
Range: -INF to +10 dBFS infinite-hold peak indicator. Click anywhere on the meter to clear.
Plugin Rack Section
The Rack section is a chainer that hosts up to eight plugins per VENUE insert.
Plugin name
Displays the name of the plugin inserted in the rack slot
Plugin icon
A thumbnail image of the plugin’s interface
Plugin menu access
This arrow accesses the plugin menu, which is used to insert and manage plugins.
IN button
Plugin processing is bypassed when the IN button is not lit. The plugin is still active, is included in delay
compensation calculations, and uses server DSP.
SoundGrid for VENUE / User Guide
Page 24

24
Disabled plugin indicator
A disabled plugin remains in the rack but is removed from processing in the server and is not considered in delay
compensation calculations. The plugin will no longer display an icon, but rather the text “Disabled.” There are a
number of reasons why a plugin is disabled:
• The plugin is not installed.
• There is no license.
• The plugin has been disabled by the user.
When a disabled plugin is re-enabled, its settings are restored. When a plugin is removed, its settings are lost unless
they have been saved as a preset.
Empty rack slot
“Add Plugin” appears in the plugin name cell.
SoundGrid Rack Status Indicators
The panel at the top reports the status of the SoundGrid Rack. There are three indicators:
• SoundGrid Inventory status.
• Percentage of available DSP being used.
• Number of voices being used.
• If the loaded SoundGrid Rack component is sidechain enabled.
SoundGrid for VENUE / User Guide
Page 25

25
Green
DSP peak value: 1% to 84%
System is stable. You can add more plugins.
Yellow
DSP peak value: 1% to 84%.
The network is approaching its limits. Monitor the meter status and be
prepared to remove some plugins and/or increase the network buffer size.
Yellow
DSP peak value: 85% to 99%
Network load is excessive. Monitor the meter status: Remove some
plugins and/or increase the network buffer size.
SoundGrid Inventory Status
The SG Inventory panel indicates the status of the SoundGrid network. It has two conditions:
• Green: SoundGrid inventory is operating properly
• Flashing red: SoundGrid Inventory is not configured properly
Click this button to bring the SoundGrid Inventory to the front.
DSP meter
This single meter displays the current DSP load on the SoundGrid network. The solid area displays average DSP
use across all cores. The yellow line shows peak DSP level of the core with the greatest peak processing.
The Average meter can show Green, Yellow, or Red.
SoundGrid for VENUE / User Guide
Page 26

26
Red
DSP load is beyond the limit. Remove heavy-load plugins immediately.
Voices
The voices meter displays how many voices have been allocated. This indicator is mirrored in all SoundGrid Racks,
as well as in the SG Inventory and all instances of SoundGrid Rack. (See next section.)
SC
A orange SC indicates that a mono or stereo SoundGrid Rack sidechain component is loaded. It does not indicate
presence of a sidechain signal. One sidechain signal is sent to all of the plugins in the rack.
SoundGrid for VENUE / User Guide
Page 27

27
SoundGrid Rack Components, Voices, and Latency
Components
SoundGrid Rack is a plugin, so it instantiates in the same manner as all other Waves plugins. There are six different
components to suit the format of the channel and how whether or not you intend to use a sidechain.
• Mono
• Mono Sidechain
• Stereo
• Stereo Sidechain
• Mono to Stereo
• Mono to Stereo Sidechain
Voices
Voices are the number of channels that are routed to the SoundGrid Server and back in a single
instance of SoundGrid Rack. SoundGrid for VENUE provides a total of 128 voices.
You can open as many instances of SoundGrid Rack as you like, with any combination of
components within the voice limitations of your setup.
Voices used per channel
Mono 1 Voice
Stereo 2 Voices
Mono-to-Stereo 2 Voices (max channel count on output is 2)
Mono Sidechain 2 Voices
Stereo Sidechain 3 Voices (max channel count on input is 2+1)
Mono-to-stereo Sidechain 2 Voices (This is a special case where the plugin acts like stereo with sidechain.)
The Voices meter displays how many voices have been allocated. This display is mirrored in all instances of
SoundGrid Rack. The maximum number of voices is set at 128 and cannot be changed.
SoundGrid for VENUE / User Guide
Page 28

28
Latency
Latency is calculated based on two factors: Server Network Buffer setting and plugin latency.
Server Network Buffer
The Server Network Buffer is configured in the SoundGrid Inventory application. It sets the amount of time it
takes for audio to stream from the I/O to the server and back. An additional set value of 80 samples is added by
the audio path between Avid and SoundGrid. This determines the speed of real-time processing. Lower settings
result in less system latency and greater responsiveness. Higher settings yield more stability but greater latency.
If you encounter pops or similar errors, increase the buffer setting. The buffer size is set in samples and is also
displayed in milliseconds.
Plugin Latency
Some plugins introduce latency. Calculations that require a determined amount of time to calculate or have
features such as look-ahead processing declare a fixed latency to the host’s delay compensation engine.
SoundGrid does real-time processing so its latency is very small, but it cannot reduce plugin latency. Plugins
that introduce “x” latency in a Native platform will introduce the same latency on a SoundGrid system. To view a
full list of latencies of all Waves plugins, visit “www.waves.com/support/tech-specs/plugin-latency.”
SoundGrid for VENUE / User Guide
Page 29

29
Adding and Managing Plugins
To add a plugin to a SoundGrid Rack, click the arrow on an empty rack
slot. This opens the Plugins Menu, a multi-level drop-down menu that lists
all available plugins. Plugins are organized by category.
If you are inserting a plugin to an empty slot (i.e., no plugin is present in the
slot), then the only available menu items are “Plugin list” and “Paste [plugin
name].”
Once the plugin slot is populated, the Expanded Plugin Menu is enabled.
Bypass
This bypasses the plugin’s processing but does not remove it from the
chain. The plugin remains active and continues to use CPU and is
included in delay compensation calculations. Bypassing or un-bypassing
a plugin does not cause a click or interruption, so it can be done at any
time. When a plugin is bypassed, the IN button on the rack frame is not
lit.
Disable Plugin
Removes the plugin from the processing chain without deleting it from the
rack. Disabling plugins that are currently unused may reduce rack
latency. A disabled plugin’s name is still shown above the slot and
“DISABLED” replaces the icon. A disabled plugin can be re-enabled with
all of its settings intact.
SoundGrid for VENUE / User Guide
Page 30

30
Remove Plugin
Deletes the plugin from the slot. All parameter settings are lost.
Copy
Copies the plugin and its parameters. This enables pasting the plugin and its current settings to another rack slot.
There are two paste options:
Paste
Pastes the copied plugin and its parameters to an empty slot or replaces the plugin that occupies the slot.
Paste Preset
Pastes presets from a copied plugin to another plugin in the same family (e.g., Q10 to Q6, or L1
Ultramaximizer to L1 Limiter, etc.). This does not replace the plugin, only the presets. If the source plugin and
the target plugin are not of the same family, then Paste Preset is not available. Choose between Paste
[plugin name], which will replace the target plugin with the source, or cancel.
Enable/Disable Sidechain
Toggle on or off to enable the plugin’s sidechain. When the sidechain is active, the IN button will turn orange.
Latency
Indicates the delay introduced by the plugin.
Rack Latency
Indicates the total latency of all plugins and inserts in the rack. If no latency is declared by any of the plugins in the
rack, both Latency and Rack Latency will be grayed out.
SoundGrid for VENUE / User Guide
Page 31

31
Moving and Copying Plugins
Important: Adding, removing, disabling, or moving a plugin changes the structure of the rack, which may
result in a brief mute. Do not make these changes when an audio interruption is unacceptable. Wait until
there is a pause in the performance. This action is blocked in VENUE Show mode. Bypassing a plugin or
changing its parameters can be done at any time.
Signal flow in this rack is from top to bottom. Alter the processing sequence by re-arranging plugin order.
Use these actions to move and copy plugins in the rack:
Ctrl + click
Disables the plugin and removes it from the DSP processor. The plugin can be re-enabled with all settings intact.
Drag an icon off of the left side of the screen
Removes the plugin (this cannot be undone).
Click + drag icon
Moves a plugin and its presets to another rack slot.
Alt + click + drag icon
Copies a plugin from one rack slot to another.
Copy/Paste between Stereo and Mono
Copy a mono plugin module to a stereo channel: the plugin becomes a stereo module. The mono plugin’s
parameters will be applied to both sides of the stereo plugin, unless the stereo plugin has provision for split/linked
processing. In such a case, the mono plugin parameters will be the settings for the left channel.
Mono-to-Stereo Plugins
A stereo plugin cannot be inserted into a mono rack. However, you can add a mono-to-stereo plugin to a mono rack.
From that point in the rack’s signal flow (below the stereo plugin), the rack will be stereo, and only stereo plugins can
be inserted. Mono plugins can still be inserted prior to (above) the mono-to-stereo plugin.
SoundGrid for VENUE / User Guide
Page 32

32
Plugin Pane
The Plugin Pane shows a plugin’s entire user interface. Open the pane by clicking on a plugin icon.
Plugin functionality and controls are the same in VENUE as in other hosts. Certain visual details may have been
modified slightly to fit the window.
SoundGrid for VENUE / User Guide
Page 33

33
SoundGrid Rack Sidechain Components
When a sidechain component is loaded, a small SC is shown at the top
of the rack. This allows any SC-enabled plugin to accept a sidechain
signal. All of the plugins in a rack share the same sidechain.
Assign a sidechain source with VENUE’s sidechain menu.
The Sidechain button at the top of the Waves plugin pane is used to turn the sidechain input on or off for that plugin.
There is also a sidechain listen button. This button appears only on sidechain-compatible plugins. Choose “Enable
SC” from the plugin menu.
Presets
SoundGrid Rack manages plugins presets and rack presets with the WaveSystem Toolbar. The Toolbar also lets
you A/B between plugins and to cycle through all available plugin presets. The selected plugin and the rack each
has its own toolbar. SoundGrid Rack has two WaveSystem Toolbars:
The Rack Toolbar is used for copying individual presets between racks or between sessions. It manages presets for
the entire rack: structure, parameter settings for all plugins in the rack, and input and output levels. You can move
plugin presets between hosts, independent of the loaded session.
SoundGrid Rack has the same number of slots as other SoundGrid applications, including MultiRack, eMotion LV1,
and StudioRack. Therefore, individual presets can be transferred between these Waves applications. Presets can be
saved as external files and then transferred to other systems and loaded—and vice versa.
Note: Loading a Rack Preset can change previously loaded plugins. For this reason, you are
blocked from loading a rack preset when in SHOW mode.
SoundGrid for VENUE / User Guide
Page 34

34
When loading sessions or presets that include plugins that are not licensed or nor installed, those plugins will appear
Undo/redo last 32 plugin actions
Copies current preset to next preset register
Toggles between two presets
Recalls presets from file
Move to previous or next preset
Saves presets to Waves file format
in the rack as disabled until the issue is resolved. Other plugins will load normally.
The Plugin Toolbar manages presets for the plugin that’s currently being addressed. It sits at the top of the Plugin pane.
To learn more about the WavesSystem Toolbar and other Waves plugins conventions, refer to the WaveSystem user
guide at: www.waves.com/1lib/pdf/plugins/waves-system-guide.pdf
Rescan Licenses
As long as you are using SoundGrid Rack for Venue, you can
set up and load a session without a Waves plugins license
(e.g., the USB flash drive is not connected) or with a
partial license. Plugins will load in a disabled state, so they will
not process audio.
To enable the disabled plugins:
1. Connect your USB flash drive
2. Go to SoundGrid Rack LOAD Menu
3. Select Rescan Licenses
SoundGrid for VENUE / User Guide
Page 35

35
SoundGrid Rack/VENUE Integration
SG Inventory
SoundGrid Rack
Select LAN Port
Insert Plugin
Assign I/O
Remove Plugin
Remove I/O
Enable Plugin
Firmware Update I/O (FW)
Disable Plugin
Assign Server
Move Plugin
Remove Server
Paste Plugin
Firmware Update Server (FW)
Load Preset Menu (Rack ONLY)
Enable Verbose Logging
CONFIG/SHOW Modes
SoundGrid Inventory and SoundGrid Rack are synced with VENUE’s CONFIG and SHOW modes.
When in SHOW mode, a lock function prevents unintended “structural” changes in a SoundGrid Rack, such as
adding, removing, or copying plugins, changing hardware assignments, oupdating firmware, or quitting the
application. Locking these controls does not affect parameter settings and internal routing, nor does not it affect
Bypass.
Functions Locked in SHOW Mode
SoundGrid for VENUE / User Guide
Page 36

36
Control Surface Mapping
All Waves SoundGrid plugins—in all of their components—have been mapped to the VENUE encoders. When
SoundGrid Rack is focused, the encoders control the current selected (“displayed”) plugin. If no plugin is selected,
the mapping will represent the rack itself (i.e., the input/output faders).
The mappings attempt to reflect the graphic
layout of the plugins. Each plugin can have a
different number of controls, with very different
layouts—and a big difference in the number of
controls. In cases where all of a plugin’s
controls don’t fit on a single page, they are
divided into multiple pages, according to
graphic layout and logic.
A plugin control that’s mapped to VENUE
encoders is outlined in red.
The VENUE encoder display specifies only the plugin controls mapped to the rotary knob, not directly to discrete
controls. In some cases, discrete controls are mapped to both the rotary controls and the SEL or IN buttons.
SoundGrid for VENUE / User Guide
Page 37

37
Snapshots
SoundGrid Rack is a plugin, so it can be set to be in or out of the VENUE Scope of Snapshots, just like any other
plugin. A snapshot takes into account the entire rack, including its inserted plugins. It does not address individual
plugins. Changing a snapshot WILL NOT change the contents of the SoundGrid Rack.
Important: The content of all racks is locked stationary when VENUE is in SHOW mode. VENUE
considers the SoundGrid Rack as a single instance, and only when the console is in CONFIG
mode can the contents (i.e., the inserted plug-ins) be added, removed, or moved.
Adding or enabling a plugin to a Rack that is in scope of a snapshot will propagate that change to all Snapshots.
Removing or disabling a plugin to a rack that’s within scope of a snapshot is destructive. The plugin will be removed
from all snapshots.
A prompt will appear when you attempt to add, remove,
disable, or enable a plugin if SoundGrid Rack is already
within in the scope of one or more snapshots, since these
actions can affect your snapshots.
We recommend that you add all intended plugins before
creating snapshots.
Please refer to the VENUE S6L System Guide to learn about managing plugins and snapshots, specifically about
snapshot “Edit Mode” and “Update Mode,” which can be used to make changes across all snapshots.
SoundGrid for VENUE / User Guide
Page 38

38
D-Show/Profile Session compatibility
SoundGrid for VENUE is compatible with older D-Show/Profile sessions.
When opening a D-Show/Profile session on a VENUE system, all required Waves plugins will load, along with their
settings and snapshots information. No matter how the channel racks were populated in the legacy session, each
plugin loads into VENUE as an individual rack. The total number of SoundGrid Rack instances is restricted to 128
voices, so if the older session requires more than 128 voices, all plugins beyond voice 128 will load disabled.
Each rack introduces latency as the audio is routed to the SoundGrid server and back. The minimum roundtrip
latency is 0.8 ms. This latency accumulates in a session that has multiple Waves plug-ins in the same signal path:
each plugin is adding at least 0.8 ms delay. To minimize an accumulation of latencies, you should manually
consolidate the racks. In this process there is chance of losing some snapshot information.
To consolidate plugins into racks, use the “Copy/Paste” feature in the Plugins menu.
SoundGrid for VENUE / User Guide
 Loading...