

Page 1

DigiGrid M
Page 2

DigiGrid M
DigiGrid D
Table of Contents
Introduction ............................................................................................................................................................................................4
1. GETTING STARTED .......................................................................................................................................................................5
1.1 System Requirements ..............................................................................................................................................................5
1.2 Registration ..................................................................................................................................................................................5
1.3 Software Installation .................................................................................................................................................................5
1.4 Licenses .........................................................................................................................................................................................6
2. Hardware .............................................................................................................................................................................................7
3. Suggested Use and Congurations ...........................................................................................................................................8
3.1 One Computer with a DiGiGrid M ........................................................................................................................................8
3.2 Adding More I/Os to Your System ........................................................................................................................................9
2
3.3 Adding a Server ........................................................................................................................................................................ 10
3.4 Multiple Computers with a Single DiGiGrid M .............................................................................................................. 11
4. Software Setup and Controls ..................................................................................................................................................... 12
4.1 Device Firmware ....................................................................................................................................................................... 14
4.1.1 Resetting the Unit ......................................................................................................................................................... 15
4.2 Identifying a Device from the SoundGrid Studio Device Rack ................................................................................ 15
5. Control Panel .................................................................................................................................................................................... 16
5.1 Clock Page .................................................................................................................................................................................. 17
Page 3

DigiGrid M
6. Adding a Server ............................................................................................................................................................................... 19
6.1 Applications of an External Server ................................................................................................................................... 20
6.1.1 eMotion ST mixer .......................................................................................................................................................... 20
6.1.2 StudioRack ....................................................................................................................................................................... 21
7. Moving Audio in a Soundgrid Network .................................................................................................................................. 22
7.1 Using an I/O Device with a DAW ........................................................................................................................................ 23
7.2 Patching I/O to Driver and Driver to I/O ......................................................................................................................... 24
7.3 eMotion ST Mixer Patching .................................................................................................................................................. 31
7.4 Device-to-Device Patching ................................................................................................................................................... 32
8. Technical Specications ................................................................................................................................................................ 33
Page 4

DigiGrid M
INTRODUCTION
Thank you for choosing this DiGiGrid Desktop interface for SoundGrid systems. In order to get the most out of your product,
please take some time to read this manual. We also suggest that you become familiar with our support sites, www.digigrid.net and
www.waves.com/support, where you will nd an extensive answer base, the latest tech specs, detailed installation guides, software
updates, and current information about licensing and registration.
DiGiGrid M is a SoundGrid interface designed especially for musicians
This is an easy-to-use, plug-and-play interface that’s ideally suited for music settings. M’s top-quality converters and mic preamps
provide audio capture of the highest order. There are two inputs. One is a dedicated mic/line input; the other is for instrument/line
sources. A dedicated high-power headphone output produces a classic warm analogue control path. The unit has a non-slip base.
M is powered by a twist-lock 12V DC power supply (provided as standard). When a DiGiGrid S network switch is part of the
SoundGrid network, the M interface does not need external power. It’s instead powered through Power over Ethernet (PoE).
The DiGiGrid S also enables networking up to four DiGiGrid devices, separated by as much 75 meters.
M is part of a SoundGrid network, so as your needs grow, you can connect extra I/Os and DSP from the rack-mounted DiGiGrid
4
series. With a simple Ethernet connection to your Mac or PC running any DAW, you have a simple stand-alone, high-quality audio
interface. The M interface can even be connected to multiple computers and DAWs at the same time.
DiGiGrid S provides power over Ethernet for DiGiGrid D, M, Q interfaces.
This switch enables D, M, and Q interfaces to operate without external power sources. It features one upstream (non-PoE)
port, and four downstream PoE ports, which allows connection to four further DiGiGrid devices. The DiGiGrid S is the perfect
complement to your growing networked audio system, both now and in the future.
Page 5

DigiGrid M
1. GETTING STARTED
Aside from setting up your microphone preamps, there’s not much you need to know to begin working with your DiGiGrid M.
1.1 System Requirements
• SoundGrid Studio runs on Mac and PC (consult the Waves website for current OS and DAW compatibility)
• Compatible native DAW (Logic, Cubase, Nuendo, Ableton, Pro Tools Native, and many more). A list of SoundGrid-compatible hosts
is available at the Waves websit.
• DiGiGrid M / SoundGrid Studio software installed on the host computer
• Cat 5e or Cat 6 Ethernet cables
1.2 Registration
To download DiGiGrid M software you will need to register your device at www.digigrid.net or www.waves.com.
You must know the serial number of your DiGiGrid M in order to register it.
The serial number appears on a label on the back of the unit and on a sticker on the box.
Once you register you will receive two emails:
5
1. A notication that you can now download the installer
2. Instructions about authorizing your license
1.3 Software Installation
After you register your new DiGiGrid M, you can download Waves Central from the Downloads/Latest Version section of the Waves
website.
• Launch Waves Central.
• Click “Easy Install & Activate.” Any products that are not currently activated will appear on the list.
• Make sure that your DiGiGrid M driver and SoundGrid Studio are checked, and then click on the “Install & Activate” button.
• Restart your computer.
Page 6

DigiGrid M
Since SoundGrid enables you to access an I/O device from any computer in the network, you will need to install the software on
each connected computer.
The DiGiGrid M installer consists of:
• The DiGiGrid M hardware driver.
• The SoundGrid ASIO/Core Audio driver, which serves as a bridge between the DAW and the SoundGrid network.
• The SoundGrid Studio Application, which manages all SoundGrid network resources and assigns devices to computers.
• StudioRack, a software plugin rack, or chainer, that hosts up to eight plugins and can move their processing from the DAW to an
external SoundGrid server. (External server not included.)
• eMotion ST, a software mixer that provides low-latency plugin processing and monitor mixing. Requires an external server.
1.4 Licenses
DiGiGrid Native I/O devices do not require a license to operate in a SoundGrid network. However, certain advanced features, such as
using StudioRack and eMotion ST for low-latency recording and monitoring, or ooading processing from the host CPU, require a
server and a SoundGrid license. This license is included with the purchase of DiGiGrid M.
When you register your device, the relevant licenses are deposited in your Waves account. Use the Waves Central application to
activate your licenses and install them on your computer or on a USB ash drive.
6
Page 7
DigiGrid M
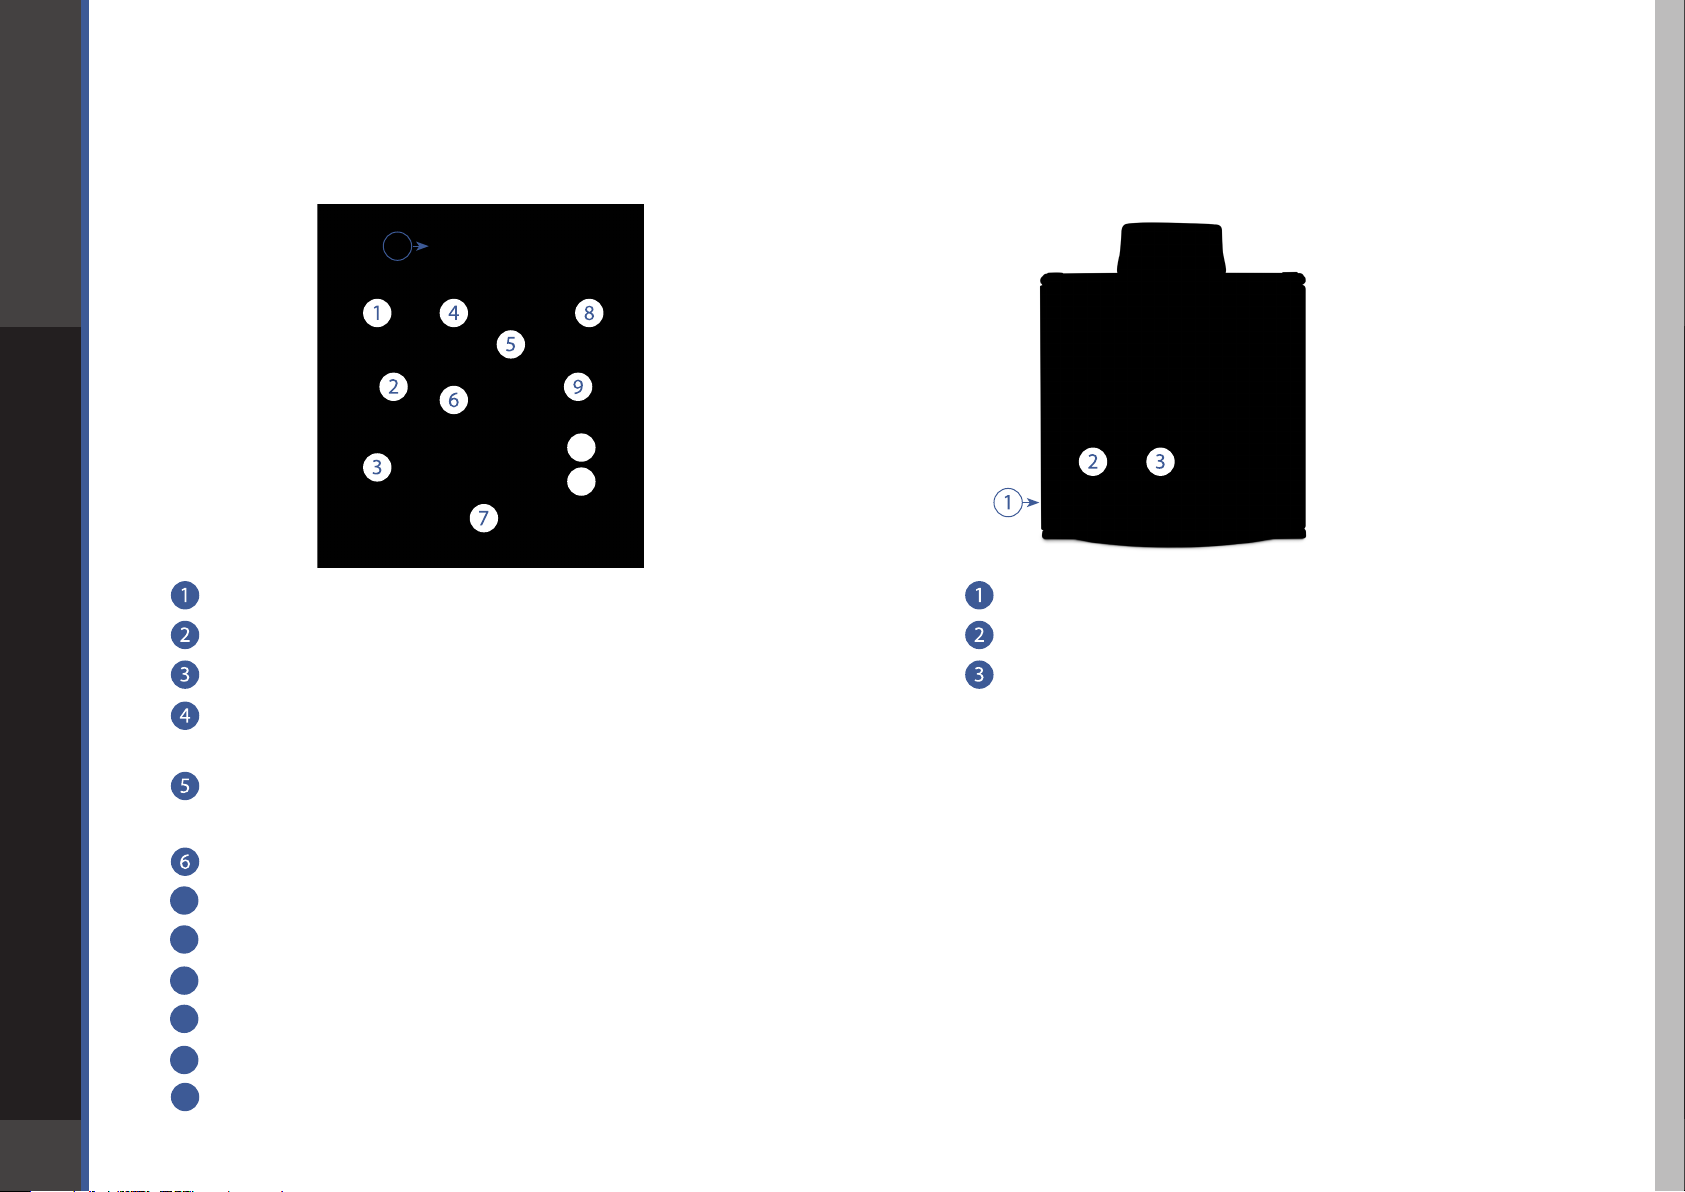
2. HARDWARE
DiGiGrid M Front Panel
12
10
11
Guitar Gain: +6 to +30dB
Guitar Input Meter
Hi Z Guitar Input 1MΩ impedance
MIX (Guitar Input Direct Listen): Routes mono feed of guitar input
DiGiGrid M Rear
Reset
DC In
Soundgrid Network
7
to monitor and headphone outputs, bypassing all other paths.
MIX (Mic Input Direct Listen): Routes mono feed of microphone
input to monitor and headphone outputs, bypassing all other paths.
Headphone Output
7
Mic Input
8
Mic Gain: 0 to +70dB
9
Mic Input Meter
10
Phantom Power On/O
11
Highpass Filter -3dB @ 100Hz, 18dB / octave
12
Output Level
Page 8
DigiGrid M
3. SUGGESTED USES AND CONFIGURATIONS
There are many ways to use your DiGiGrid M. There are certain factors to consider when incorporating a DiGiGrid M into your studio:
your existing (or future) equipment, how you work, and what you need to accomplish. Project studios with one or two DAWs can
share I/O resources. Studios with several rooms and many DAWs can stream audio between rooms and quickly swap out devices. But
no matter how simple or complex your setup is, connecting a DiGiGrid M involves only one cable: an Ethernet Cat 5e or Cat 6.
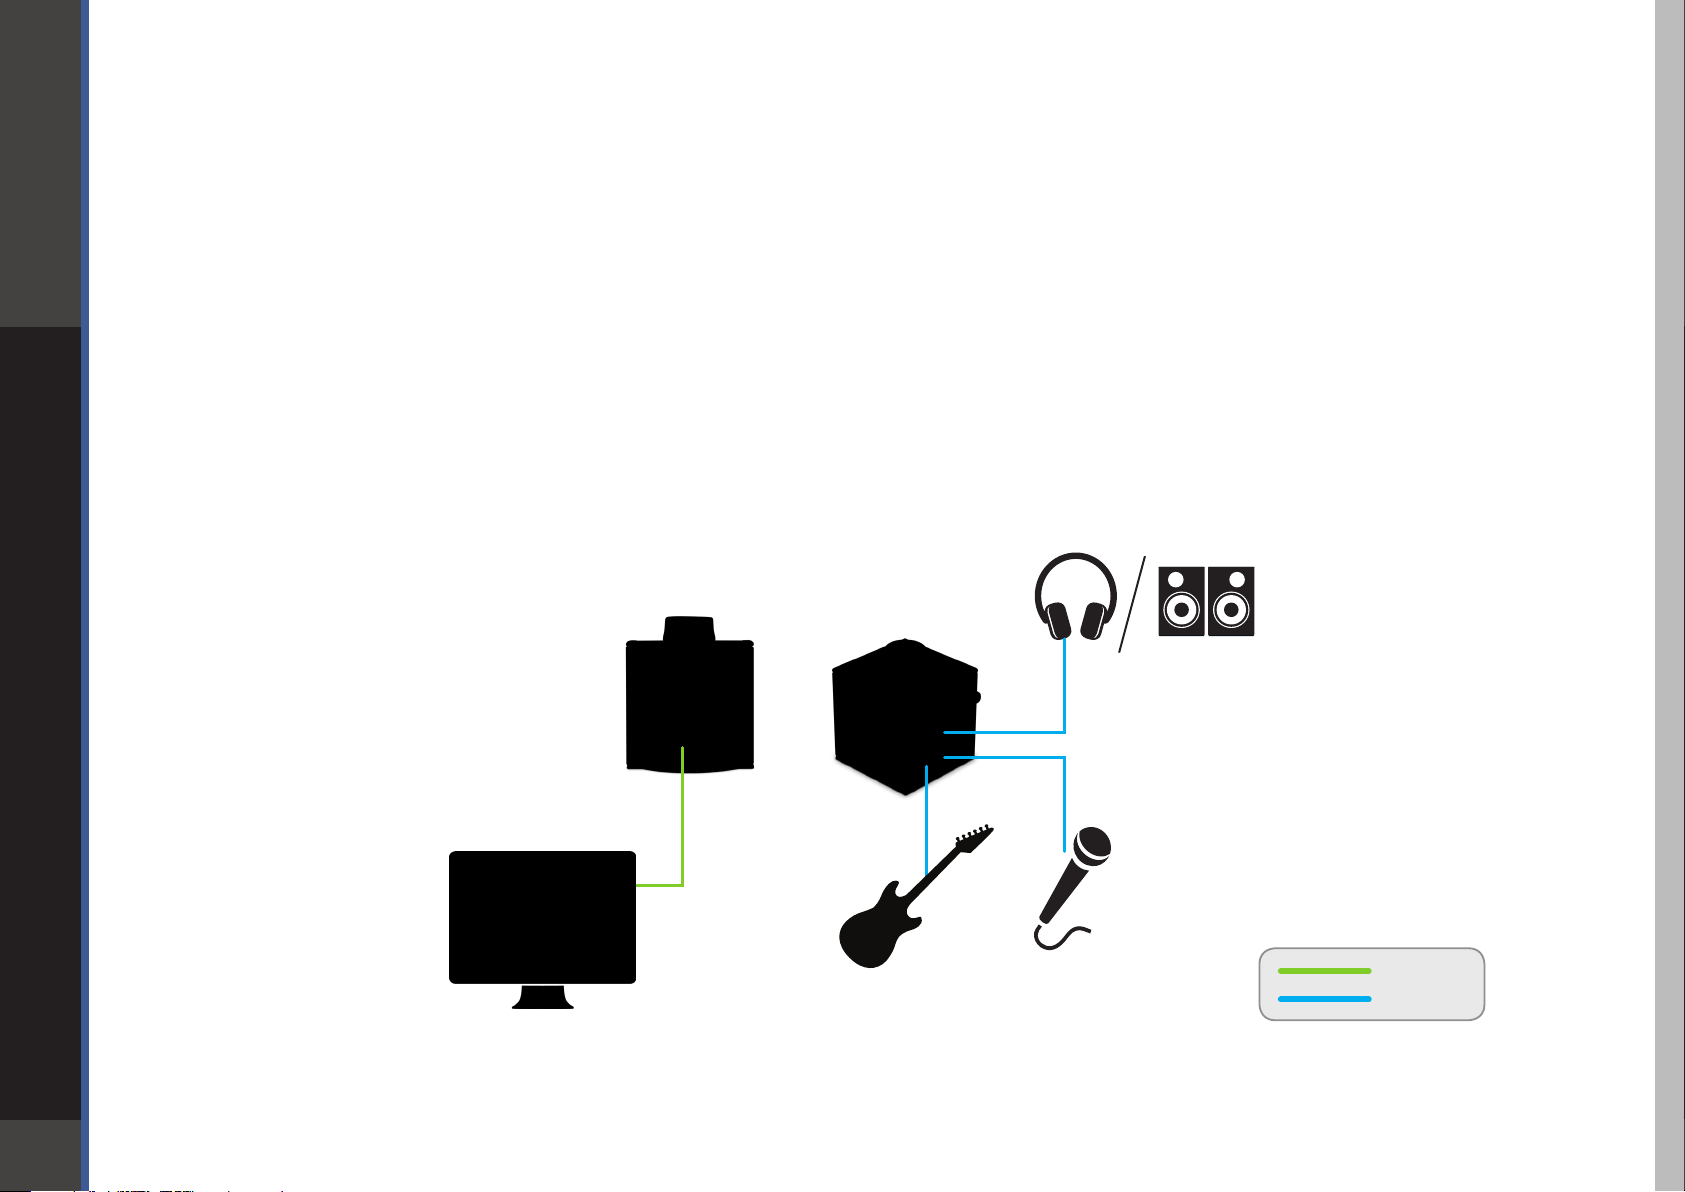
3.1 One Computer with a DiGiGrid M
This is the most basic studio conguration. It includes a host computer with a native DAW and a single a DiGiGrid M that connects
microphones, instruments, headphones, and monitors to the SoundGrid ASIO/Core Audio driver. This driver controls the network
and all its devices.
8
DiGiGrid M
Ethernet
Analog
Page 9
DigiGrid M
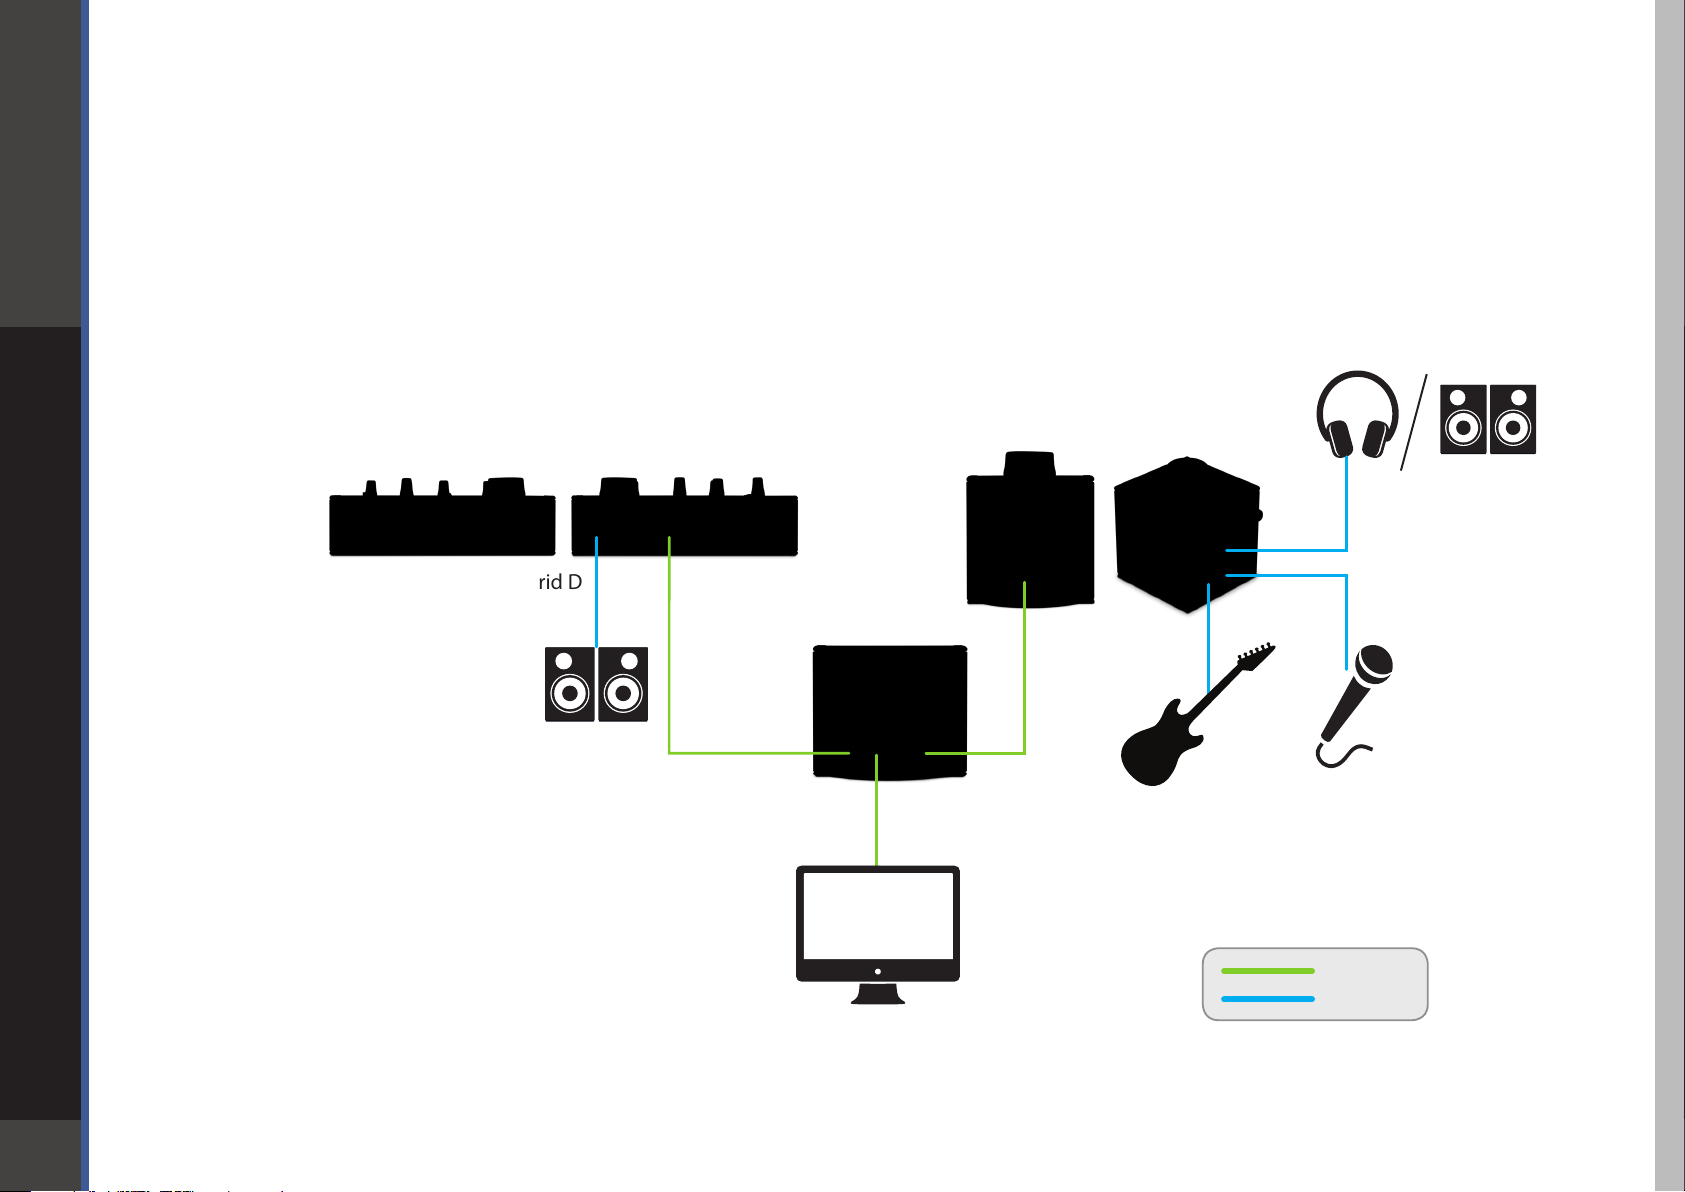
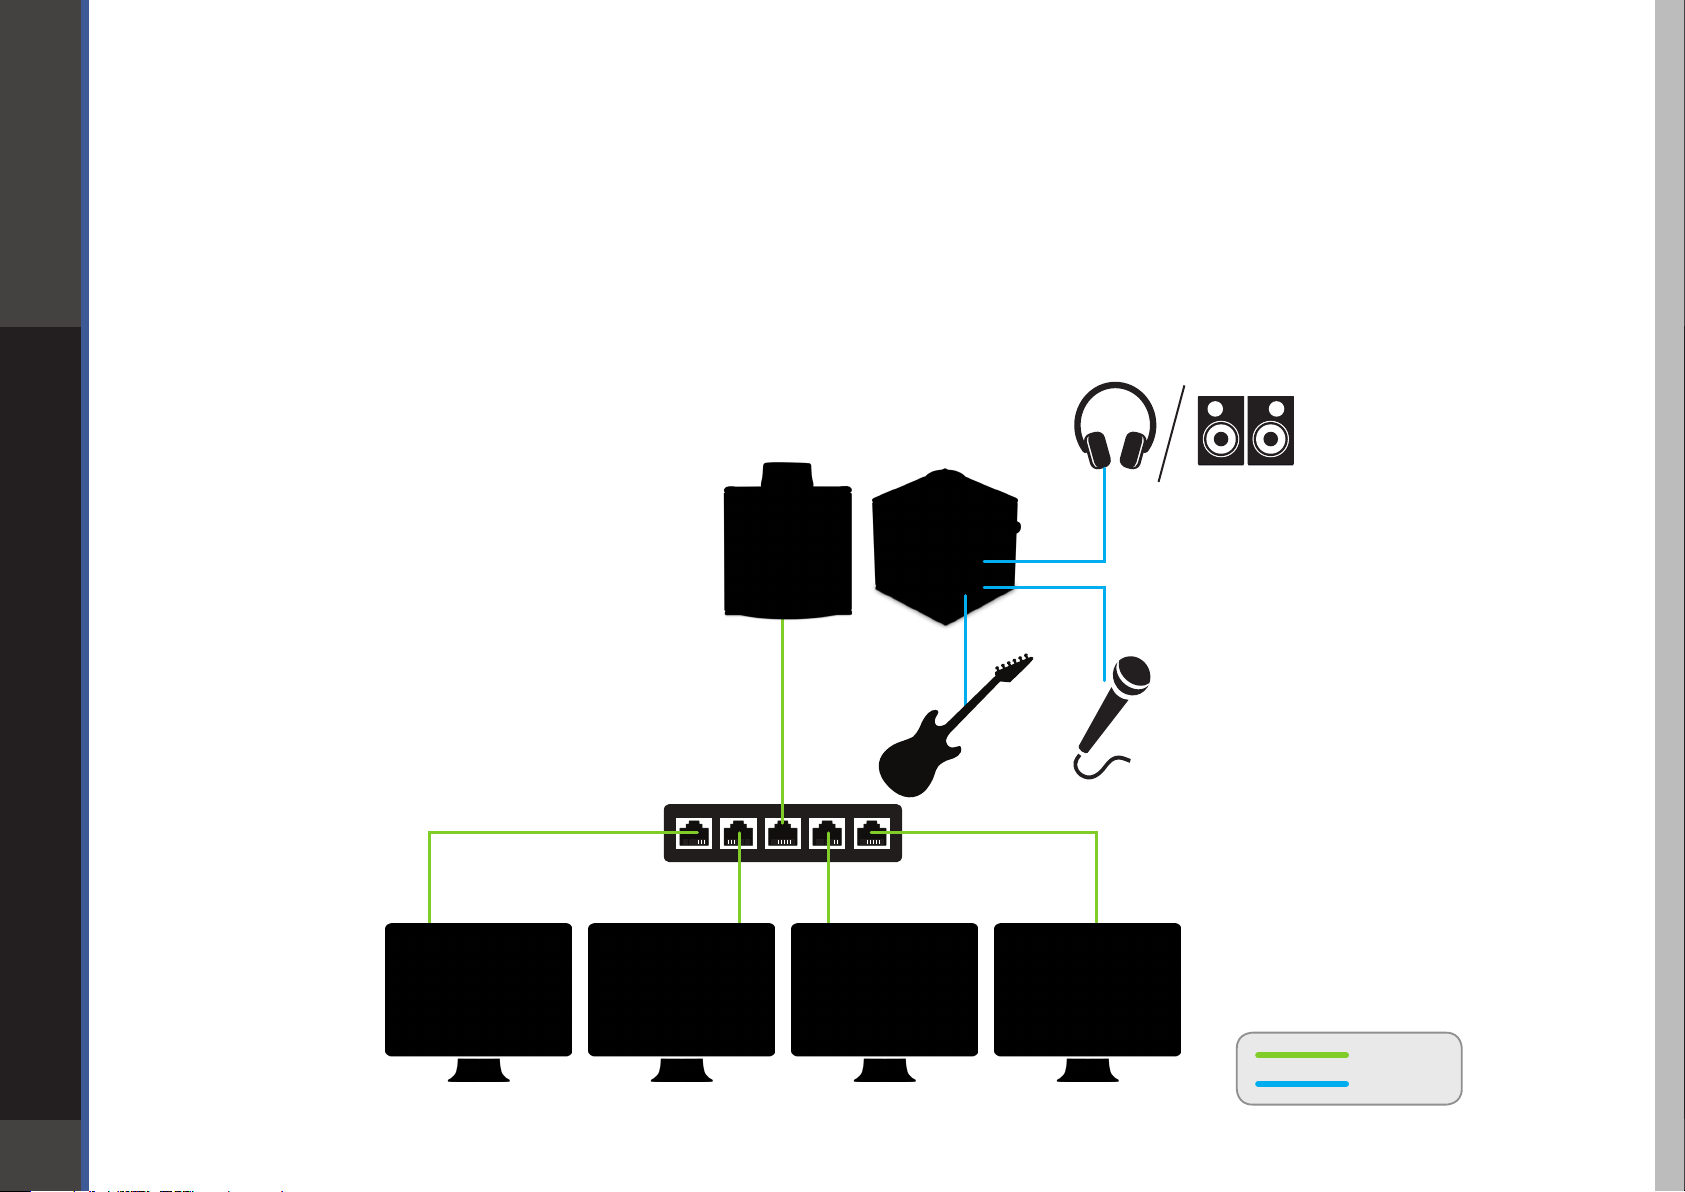
3.2 Adding More I/Os to Your System
Add a DiGiGrid D and you gain one more individual headphone output and four more inputs.
Connect the DiGiGrid D and DiGiGrid M to the DiGiGrid S switch.
You can add up to eight SoundGrid I/O devices to a single host. Each of these can be accessed by any computer on the network.
Audio and clock pass through the same Ethernet cable. This means of distributing clock is called “Sync over Ethernet” (SoE)
and is used between all SoundGrid devices. If the DiGiGrid M is the SoE master, then the entire network will be locked
to this external source.
DiGiGrid D
DiGiGrid M
9
DiGiGrid S
Ethernet
Analog
Host Computer
Page 10
DigiGrid M
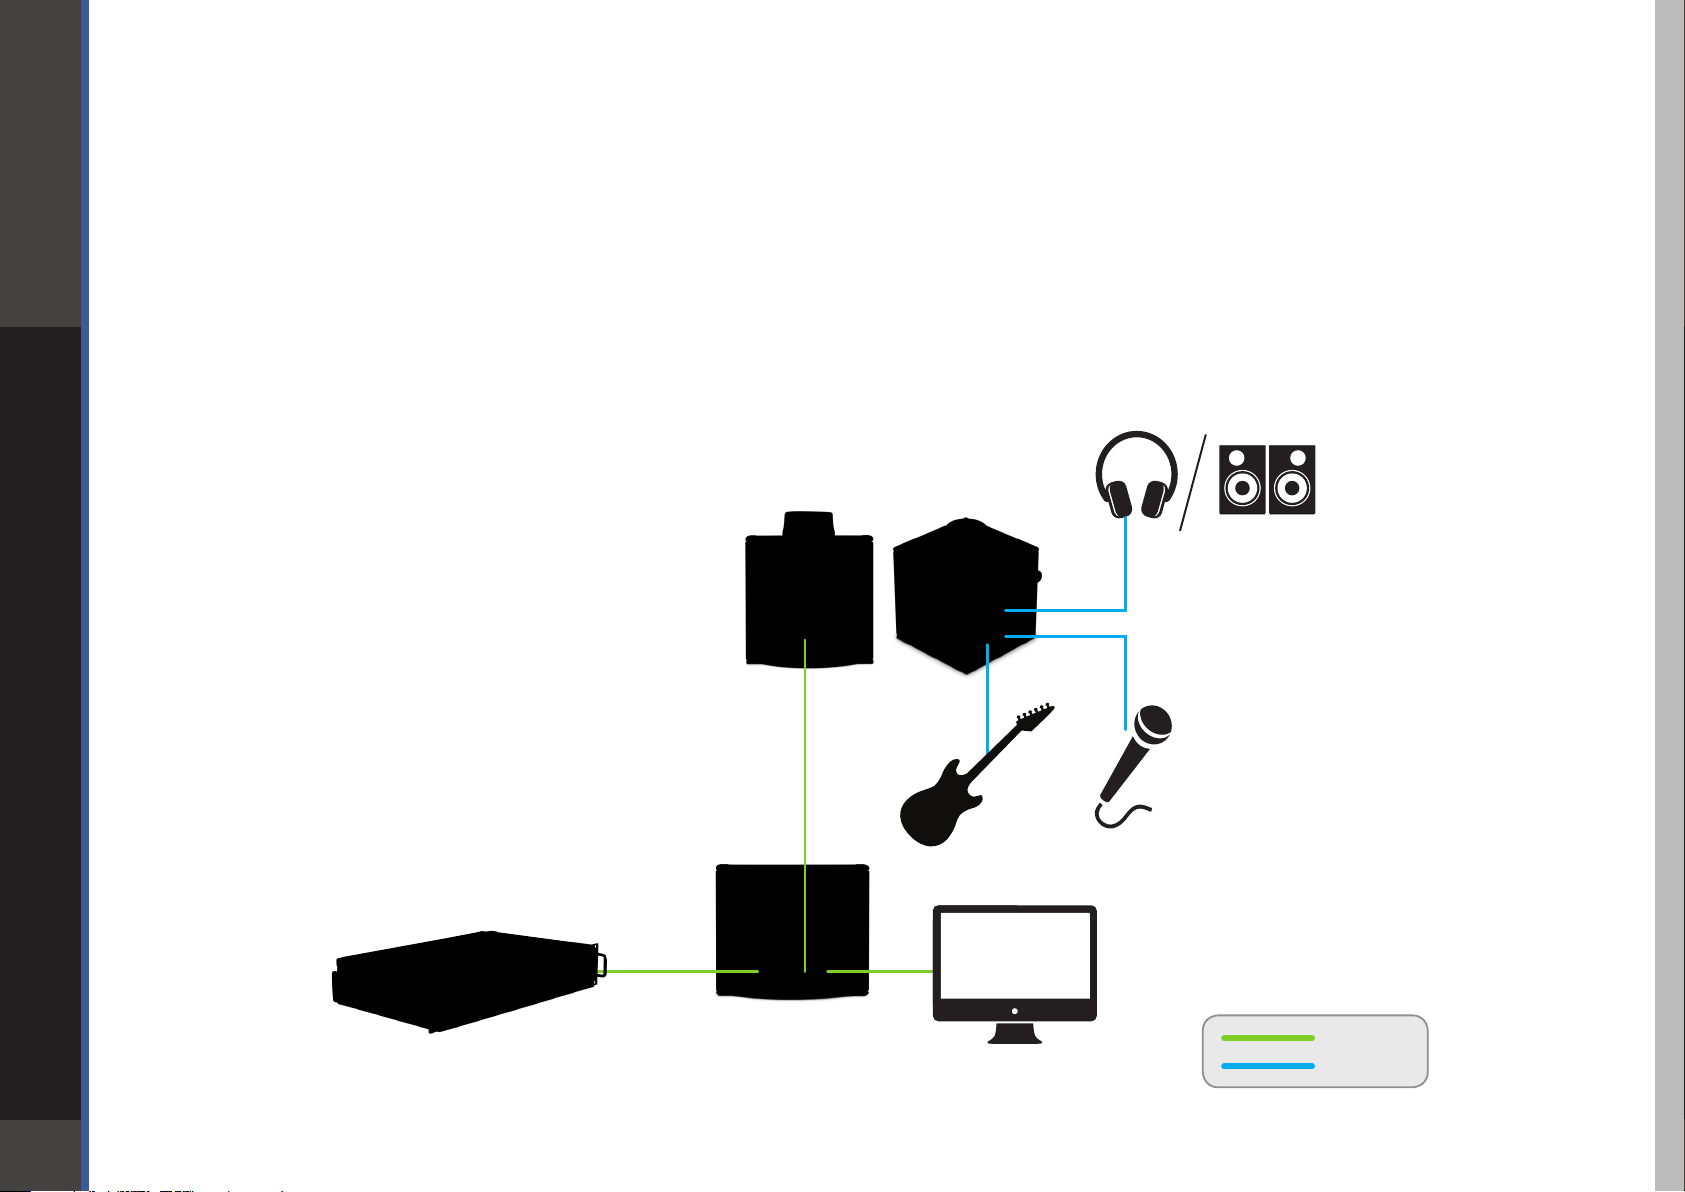
3.3 Adding a Server
Adding a SoundGrid DSP server to a SoundGrid Studio system provides the processing power for the eMotion ST mixer and
the StudioRack plugin. This enables low-latency recording and monitoring, and increases the number of plugins you can use
simultaneously.
Some DiGiGrid and SoundGrid I/O devices are equipped with internal servers. Consider the server and I/O as separate devices in
the Devices Racks of the System Inventory page. The server is assigned in the Servers section, and the I/O is assigned in the Rack A:
Hardware I/O Devices section. All servers initially appear as “SGS.” Once assigned, a server can be renamed.
10
SoundGrid Server
DiGiGrid S
DiGiGrid M
Host Computer
Ethernet
Analog
Page 11
DigiGrid M
3.4 Multiple Computers with a Single DiGiGrid M
If you want to stream audio between several computers in order to combine multiple mixes or elements, connect several DAWs
to one DiGiGrid M interface. Each DAW can send and receive an audio stream, and any one computer can control the I/O.
Any native DAW—or combination of dierent native DAWs—can be a part of this network, so each computer must have the
DiGiGrid M software installed.
If you want to add more computers, you will need to connect them to the DiGiGrid S or to an approved external 1GB
Ethernet switch.
DiGiGrid M
11
Ethernet
Analog
Computer 4Computer 2Host Computer Computer 3
Page 12

DigiGrid M
4. SOFTWARE SETUP AND CONTROLS
A SoundGrid network is managed by the SoundGrid Studio Application. This application assigns and removes devices, oversees the
network, patches between devices, and provides access to device control panels.
To maintain network eectiveness, the SoundGrid Studio Application always runs in the background. Bring SoundGrid Studio to the
front by clicking on the SoundGrid icon in the Mac Top Bar or the Windows System Tray.
MacPC
When SoundGrid Studio opens you will see the System Inventory page, part of the Setup section.
12
Page 13

DigiGrid M
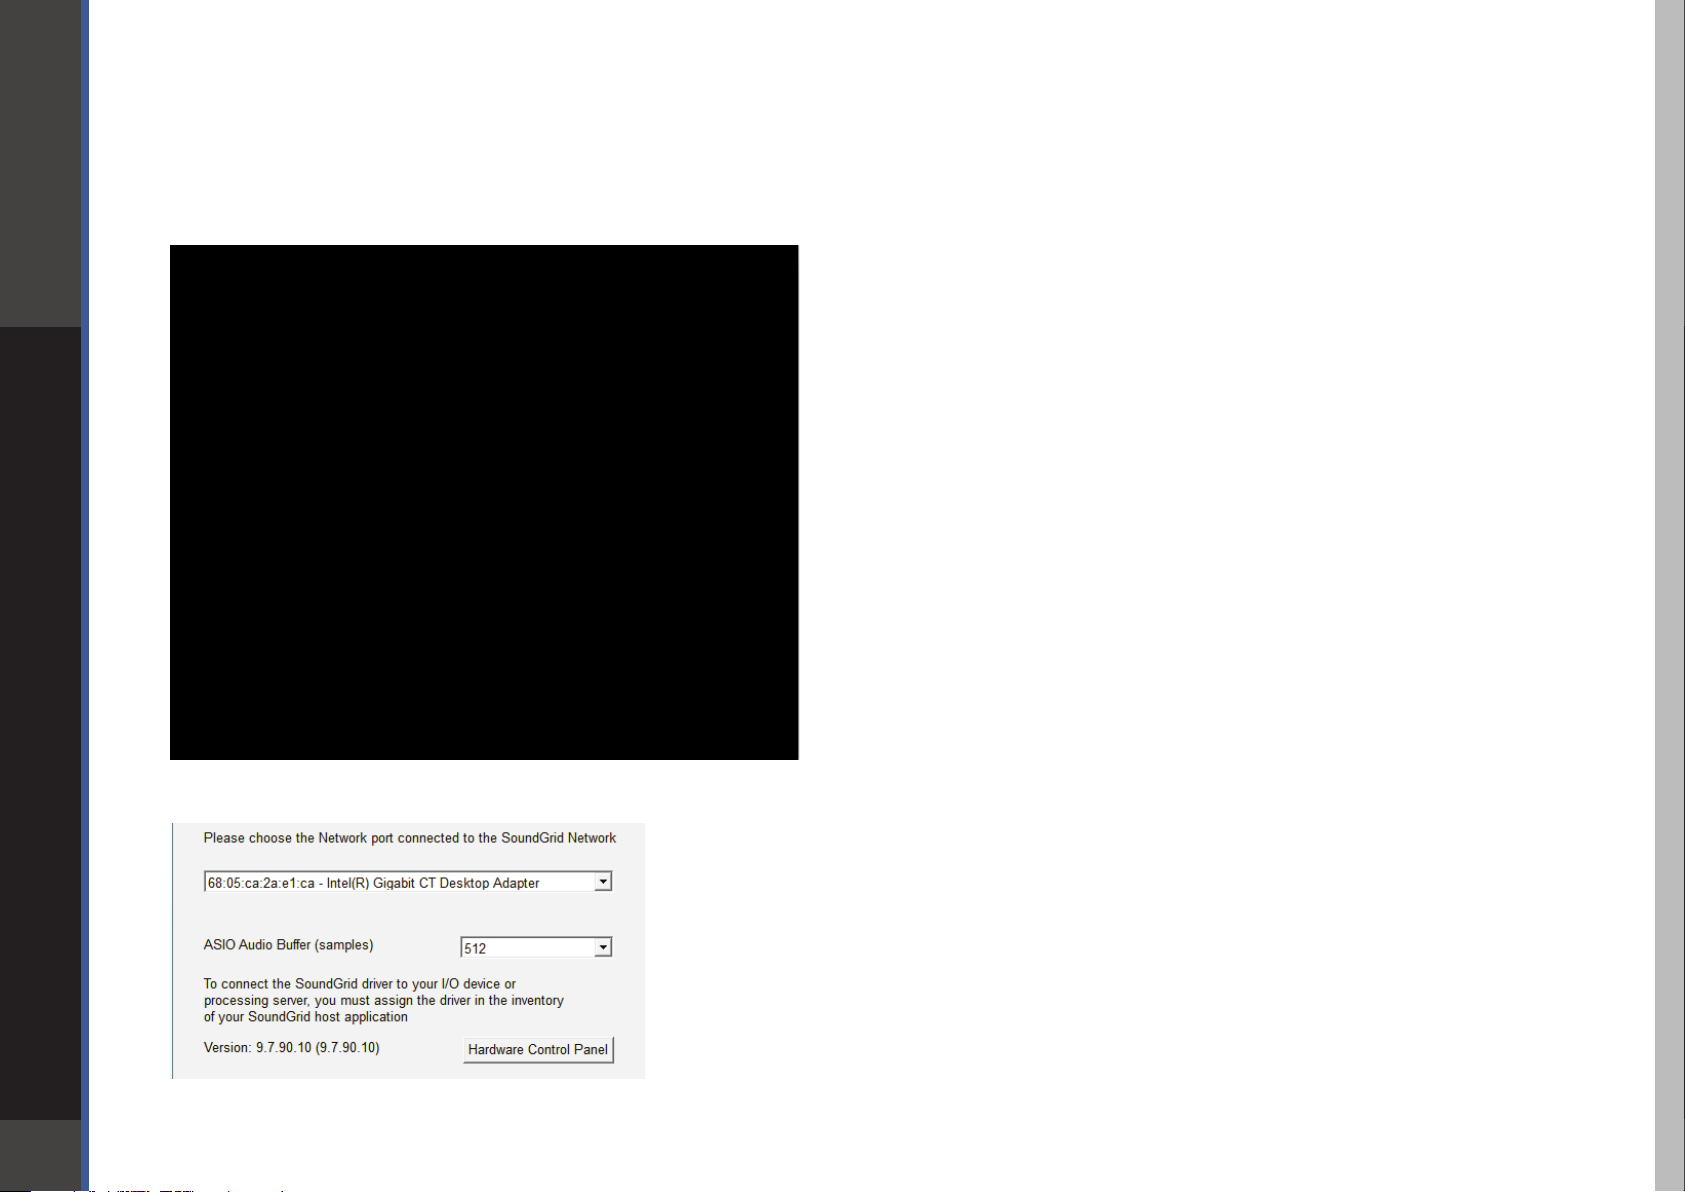
The rst time you launch SoundGrid Studio, the Wizard will open. It scans the network, inventories its assets, and then congures the
devices. If the Wizard does not start automatically, click the Start Auto Cong button, which is next to the Network Port.
Choose “NEXT” to start automatic conguration. This will take a few moments. Choose “CANCEL” to congure manually.
If the Wizard cannot locate the requested SoundGrid network devices, this means the devices
might be turned o or not connected properly. When you resolve the problem, the Wizard
will allow you to rescan the network or work as a Driver node slaved to another system. For
more information please refer the SoundGrid Studio User Guide.
When conguration is complete, close the window. If there’s still a problem, you can use the
System Inventory page to assign devices, control the network, and manage clock. To learn
how to use this page, please refer to the SoundGrid Studio Application user guide.
SoundGrid Studio uses Ethernet to stream audio between devices on a SoundGrid network.
Clock synchronization is also carried over Ethernet. This method of providing clock is called
13
Sync over Ethernet (SoE). SoundGrid I/O devices can clock by other means as well, but SoE is by
far the most common (and convenient) way to provide clock information to network devices.
In the SoundGrid Studio Setup page, you will see racks containing all of the devices assigned to your system: physical and virtual I/O
devices, drivers, and servers. Each I/O rack slot displays the device’s mode, clock status, and sample rate.
In this example the DiGiGrid M is the SoundGrid network’s clock master device, indicated by its
blue color and the icon text: On, Master Clock, INT (48 kHz).
To add another SoundGrid device, click on the arrow in an empty rack slot. From the list of
available devices, choose the one you want to add, in this case, a DiGiGrid IOS interface. In this
image the DiGiGrid M is grayed out, and therefore unavailable, since it is already claimed (in this
case, by you).
Page 14

DigiGrid M
The new device is visible in the rack slot. Unless changed by the user, it remains a clock slave and
is colored green. Use the same menu to change the clock master assignment from one device to
another or to remove the device from the rack slot.
4.1 Device Firmware
Firmware is a small program that runs on a device in order to control it. It enables DiGiGrid M to communicate correctly with
SoundGrid Studio. An I/O that is using outdated or incompatible rmware will not work properly in a SoundGrid network until its
rmware is updated. To see if your DiGiGrid M rmware is compatible with the version of SoundGrid Studio that you are currently
running, go the System Inventory page and locate the device. Next to each device slot is a button labeled FW, whose color indicates
rmware status.
14
Grey Compatible rmware
Blue Compatible rmware, but a newer version exists
Red Firmware not compatible and must be updated in order to use
Click on the FW button to launch the rmware Updater. This will initiate a scan of the hardware and then oer options.
Do not disconnect the device or turn o the computer until you see “Done.” After updating, turn the DiGiGrid M OFF and
back ON to reset the device.
Page 15

DigiGrid M
4.1.1 Resetting the Unit
If after an unsuccessful rmware update theDiGiGrid M is not recognized by MultiRack or SoundGrid Studio (the DiGiGrid M device
does not appear in the Inventory panel), you can use the Reset button to try to recover the unit.
The Reset button is on the DiGiGrid M side panel.
• Turn o the unit.
• Press and hold the Reset button.
• Restart the unit while holding the button.
• Release the Reset button once the device has fully booted.
The unit is now in “force update” mode, and a new rmware update can be performed.
4.2 Identifying a Device from the SoundGrid Studio Device Rack
Just below the FW button is an ID button. Clicking on this button activates LEDs on the back panel of the hardware device.
This serves the same function as the Identify button on the Control Panel Top Bar.
15
Page 16
DigiGrid M
5. CONTROL PANEL
Access the DiGiGrid M Control Panel by clicking on the Gear symbol in the SoundGrid Studio Device Rack. From here you can control
clock source, sample rate, clock type, and clock status.
Pressing the “Hardware Control Panel” button on the Driver Control
Panel app will open the control panels of all I/O devices assigned to
your SoundGrid application. If none are assigned, nothing will happen.
16
The Driver Control Panel app is located here:
PC: C:\Program Files (x86)\Waves\SoundGrid\Driver Control Panel
Mac: System HD/Applications/Waves/SoundGrid
Page 17

DigiGrid M
5.1 Clock Page
Use the Clock page to set the clock source and sample rate for the device and to assess clock status. Clock controls are on the left
side of the page Status indicators are on the right.
17
SOURCE sets the clock source
Sync over Internet The DiGiGrid M sets its clock to the sample rate of the SoundGrid
network. The device is a slave.
Internal The device is the clock master and as such it determine the
sample rate of the SOE network.
Page 18

DigiGrid M
SAMPLE RATE sets the sample rate when Clock Source is set to Internal. Range: 44.1 / 48 / 88.2 / 96 kHz.
CLOCK STATUS INDICATORS
Three windows on the right side of the Clock control panel help you to quickly assess the network status of the DiGiGrid M .
18
STATUS Reports the presence or absence of sync between the M and
the SoundGrid network.
CURRENT CLOCK
SOURCE
SOE Indicates that the device is assigned to the SoundGrid network
Displays the current sync method. This may dier from the
choice made in the Source menu.
and whether it’s the SOE master or a slave.
Page 19

DigiGrid M
6. ADDING A SERVER
When you connect a server to the host computer and run the SoundGrid Studio Wizard, the server is assigned and congured
for the host. Normally that’s all you need to do. The server appears in the SoundGrid Studio Server rack, and the DiGiGrid M is seen
in the Hardware I/O rack.
To assign, free, or rename a server, click on the arrow to reveal the list of available servers, select a server from the list, and
remove or assign the server.
A server cannot be shared by multiple SoundGrid host applications such as SoundGrid Studio or MultiRack.
19
Within a SoundGrid network, only one computer can utilize a server’s processing power for StudioRack and
the eMotion ST mixer. Once assigned to a computer, a server remains unavailable to all other computers until
released by the user.
For further details, refer to the SoundGrid Studio Application manual.
Page 20

DigiGrid M
6.1 Applications of an External Server
The external server gives you access to advanced features for mixing processing, and monitoring.
6.1.1 eMotion ST mixer
The eMotion ST is the mixer element of the SoundGrid Studio System. It lets you run SoundGrid plugins with low latency for
monitoring while recording. The eMotion ST mixer enables you to create personalized monitor mixes, with plugin processing done
pre-, post-, or in parallel with your DAW. eMotion ST combines 8 channel inputs with up to 64 StudioRack plugins. Each input or
StudioRack channel can be sent to aux tracks or a main mix.
20
For further information, refer to the eMotion ST user guide.
Page 21

DigiGrid M
6.1.2 StudioRack
StudioRack is a plugin chainer for any DAW. It hosts up to eight plugins, controls them, assigns them
to external controllers, and manages them. All this in a way that makes it easy to move from one DAW
session to another and from one DAW platform to another. It enables users to create racks of processors
with limitless parameters and exible signal ows, which are easily inserted into any track of the session.
When part of a SoundGrid network with a SoundGrid DSP server, StudioRack can shift plugin processing
away from the local CPU and direct it to the SoundGrid DSP server. StudioRack works in conjunction with
the eMotion ST mixer to create numerous personalized monitor mixes that use the same plugins heard in
the mix—all with virtually no latency.
For more information, please refer to the StudioRack user manual.
21
Page 22

DigiGrid M
7. MOVING AUDIO IN A SOUNDGRID NETWORK
You’ve congured the network and set up the DiGiGrid M. One last thing to do: Integrate your hosts into the SoundGrid network so
that you can send audio to and from devices—and listen to it. In order to do this, the audio must be patched from one point to another.
SoundGrid is a scalable and very exible network, so audio must be patched. You can connect any combination of items: a device
channel, the eMotion ST mixer, another driver (that is, another computer), or a mix of these. Plus you can change your conguration at
any time.
Usually you don’t need to think about patching. When you rst set up a SoundGrid network or change its physical inventory, the Wizard
automatically sets up your devices and establishes the patches. Still, you should know how to patch between devices, drivers, and
applications. Then you can take advantage of the exibility of a SoundGrid network.
There are three types of SoundGrid Patch page connections:
• Patch I/Os to drivers in order to connect with a DAW. The driver “speaks the same language” as the OS or DAW, so it serves as the
intermediary between the I/O and the DAW.
• Patch directly to the eMotion ST. This application “speaks the same language” as the DiGiGrid M , so this connection bypasses the
SoundGrid driver altogether.
22
• Patch two or more devices to each other to split signals to several hosts. This serves the purpose of a multi-connector or tie line.
Page 23

DigiGrid M
7.1 Using an I/O Device with a DAW
When using a DAW on a SoundGrid network, the SoundGrid ASIO/Core Audio driver serves as a bridge between
DiGiGrid M and the DAW.
It enables the I/O to communicate with the DAW, and it provides patch points for connections. Using the driver and routing audio
through it involves two steps: patch between the I/O and the driver; then select the correct driver in your DAW as the playback engine.
Selecting the Number Of Channels
When you congure your host application, you can allocate between Auto, 32,
and 128 driver channels. This is done in Rack B of the Setup page. The number of
channels you select here is reected in the Patch page: fewer allocated channels
means fewer channels visible.
Pick a number that only slightly exceeds the maximum total number of driver
channels you will be using. There’s no harm in selecting all 128 channels, but it
may make the Patch page unwieldy.
Select Auto to match the number of driver channels to the maximum I/O count
23
available on the assigned interfaces.
Page 24

DigiGrid M
7.2 Patching I/O to Driver and Driver to I/O
When streaming audio to and from an DiGiGrid M and a DAW, you must assign DiGiGrid M inputs and outputs to the SoundGrid
ASIO/Core Audio driver. (Alternatively, you may choose to monitor through the eMotion ST mixer. We’ll cover that option later in this
section.)
In the SoundGrid Studio Patch page, select the Device-to-Device tab. All device and driver channels are shown along both the
horizontal and vertical axes. To make a standard “ascending patch” connection, draw the cursor in a diagonal line as shown below.
To create a customized patch, click on individual cells. There are many ways to patch devices, but normally DiGiGrid M inputs are
patched to the ASIO/Core Audio inputs for recording. For playback, the patches are opposite, unless you choose to patch to the
eMotion ST mixer for monitor mixing.
Once again, if you set up your system using the Wizard, you will not need to do any of this.
24
Page 25

DigiGrid M
Selecting the Driver in the DAW
DAW I/O Setup
When a DAW is part of a SoundGrid network, the SoundGrid
ASIO/Core Audio driver must be its playback engine. Choose
Waves SoundGrid from among your playback engine options.
When you look at the I/O setup page of your DAW, what you see
are driver channels whose default names represent what they
are connected to. What they are connected to is determined in
the Patch page of the SoundGrid Studio application.
25
Page 26

DigiGrid M
Note the relationship between the SoundGrid Studio Patch page and the DAW I/O Setup page.
26
In the Patch page (left), DiGiGrid M analog channels 1–4 are patched to driver channels 1–4.
The arrow on the upper left of the Patch indicates that signal ows from the DiGiGrid M to the driver.
Now look at the DAW I/O. The 4 driver channels appear at the top, and are patched to DAW input channels 1-4.
Page 27

DigiGrid M
Driver Channel Names in your DAW
SoundGrid Studio patches from the Waves SoundGrid ASIO/Core Audio driver to a hardware I/O device, a secondary driver (another
computer), or the eMotion ST mixer.
SoundGrid Studio transmits these names through the driver to the DAW. These will appear as the default names within your DAW.
Most DAWs allow you to change the naming manually. For example, you may a DiGiGrid IOS with a total of 10 inputs (8 analog, 2
digital) and 14 outputs (8 analog, 2 digital, and 2 stereo headphone outputs). When these inputs and outputs are patched to and
from the local driver (I/O to DAW, DAW to I/O), you will see the following in the Connection or IO setup within your DAW:
27
Local driver channels that are not patched to a hardware device or to the eMotion ST mixer will appear as SoundGrid 1, SoundGrid 2, etc.
Page 28

DigiGrid M
Note: This transmission occurs while you launch your DAW and the driver handshakes with it. This means that any change of I/O
name or eMotion ST channel name will not be visible in your DAW until you relaunch it. Some DAWs, such as Cubase, will let you
reset the connection to the driver, saving you the need to relaunch the application.
Important: AW outputs through the driver can be patched to multiple destinations; for example, the DAW’s Main out can go to your
hardware channels 1 and 2 as well as to hardware channel 3 and 4. In such a case, the name of the driver channel will be “Multiple
Assignments.” In this case we suggest you manually name these driver channels.
28
As mentioned above, driver channels can be connected to the eMotion ST mixer or to a secondary remote driver.
Here is an example of the DAW outputs patched to the eMotion ST mixer:
Page 29

DigiGrid M
Here is an example of your DAW receiving input from another DAW on a secondary computer via networking:
To ensure that the names have been updated in your DAW, you may need to follow certain steps, depending on your DAW. Here are
a few examples.
29
Pro Tools
Go to Setup > I/O
Delete and reset all I/O
congurations to DEFAULT.
Cubase
Go to Devices > Device Setup >
Waves SoundGrid.
Select RESET above the PORT
System Name table.
Logic
Go to Mix > I/O Labels.
Select Reset All Labels.
Page 30

DigiGrid M
Multiple Client Core Audio/ ASIO Driver
The Waves SoundGrid ASIO (Windows) or Core Audio (Mac) driver lets you congure multiple hosts with the same local driver. This
means you can use multiple DAWs on the same computer simultaneously. This allows you to record the same source to two DAWs
on the same computer consecutively; route audio from multiple DAWs to a single I/O; and, if you have a SoundGrid server, route
multiple DAWs to the eMotion ST mixer.
Please note the following when using this feature:
1. All hosts must run the same sample rate. If sample rates do not match, each host will behave dierently.
2. Driver inputs can be shared by multiple DAWs.
3. Driver outputs are exclusive on PC computers running Windows: if a certain driver channel output is used in DAW A, it cannot
be used in DAW B. Driver outputs are not exclusive on Mac computers: the driver’s operating system layer is able to mix these
channels.
On PC computers running Windows, this limitation requires that you allocate driver channels manually between your DAWs.
Choosing a driver output in a DAW will overwrite previous selections. For example, if you choose Main out in Cubase to be
Driver Channel 1 and 2, you should choose the Main output in Ableton Live to be 3 and 4: if you choose 1 and 2 in Ableton
Live, the Cubase output will be canceled.
30
Please note: Some hosts, for example Pro Tools and MultiRack Native, automatically claim all driver outputs. Even when using
such hosts, however, you can use the same input driver channels to record to multiple DAWs.
4. It is not possible to connect local driver channels to one another. This means you cannot use SoundGrid Studio’s device-to-device
patch to virtually connect audio between two hosts on the same computer. To do this, you must route through the eMotion ST
mixer (which requires a SoundGrid server).
5. You may use up to ve hosts on a single computer/driver.
Page 31

DigiGrid M
7.3 eMotion ST Mixer Patching
The eMotion ST mixer enables you to create studio monitor mixes as well as personalized headphone mixes. Patch to and from the
mixer using the eMotion ST input and output tabs on the left side of the interface. The green buttons indicate whether a channel is
mono, left side of a stereo pair, or right side of a stereo pair. Toggle between these states by double-clicking on the button.
31
To learn more about patching between devices or to and from the eMotion ST mixer, please refer to the SoundGrid Studio
Application user guide.
A few things to remember about the Patch page:
• All available devices and driver channels will appear in the patch. The number of channels depends on devices and connections.
• Patch direction is indicated by an arrow on the left side of the patch.
• Establish a patch by clicking on a cell, or by dragging across several cells. Remove a patch by clicking on it again.
• An output can patch to two inputs. An input can accept only one source.
Use the tabs at left to choose among the patch options.
Page 32

DigiGrid M
7.4 Device-to-Device Patching
Choose this view to patch devices and drivers to each other. All device and driver channels are shown along both the horizontal
and vertical axes. There are many ways to patch devices, but normally DiGiGrid M inputs are patched to the ASIO/Core Audio inputs
for recording. For playback the patches are opposite, unless you choose to patch to the eMotion ST mixer for monitor mixing.
For further details, refer to the SoundGrid Studio Application user guide.
32
Page 33

DigiGrid M
8. TECHNICAL SPECIFICATIONS
Mic Input
Input Impedance 1K5Ω
Gain Range 0 To +70dB
Frequency Response (Analogue To Analogue) -3dB <10Hz To 100kHz
Harmonic Distortion 0.005% (40dB Gain)
Noise EINTypically -127dB (70dB Gain)
High Pass Filter -3dB 100Hz 18dB/Octave
Line Input
Input Impedance 1MΩ
Gain Range +6 To +30dB
Frequency Response (Analogue To Analogue) -3dB <10Hz To 100kHz
Harmonic Distortion 0.005%
Noise / Min Gain -82dBu Max Gain -73dBu
33
Headphone
Gain Range Innity To +10dBMax
Output Level
Load Level RMS
16Ω 2.3V
32Ω 3.7V
100Ω 6.0V
200Ω 7.5V
600Ω 8.8V
Page 34

DigiGrid M
XLR connectors
Phase Termination Point
Positive (+) Pin 2
Negative (-) Pin 3
Signal Ground Pin 1
Chassis Ground Case
¼” TRS connectors
Phase Termination Point
Positive (+) Tip
Negative (-) Ring
Signal Ground Sleeve
34
 Loading...