

Page 1
PullzAll™
GENERAL SAFETY PRECAUTIONS
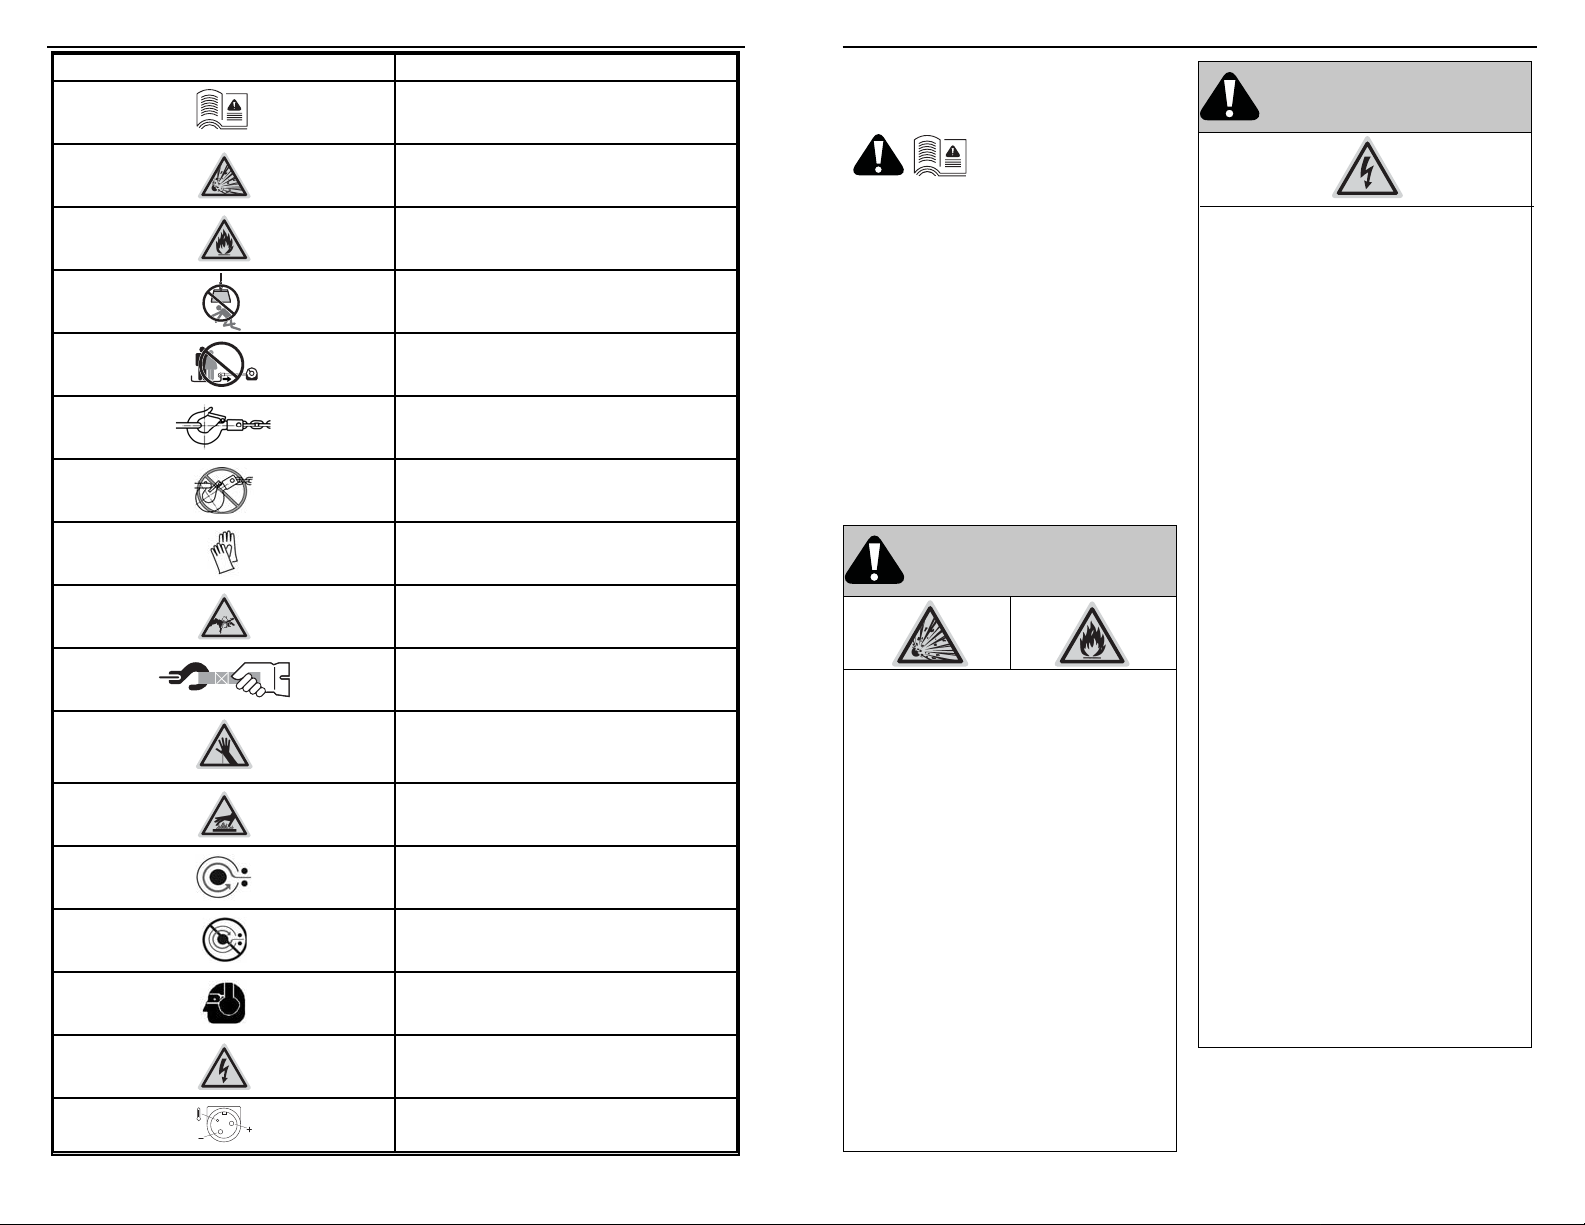
SYMBOL EXPLANATION
Read the instruction manual
Explosion/Bursting Hazard
Installation and Operator’s Guide
Every pulling and lifting situation has the potential for personal injury. In order to
minimize that risk, we ask that you read this basic guide carefully. Please familiarize
yourself with the operation of your PullzAll before using it, and be constantly safety
oriented. In this guide, we will set forth many of the basic rules of safe PullzAll operation.
However, because every pulling/lifting situation is different, your constant good judgment
and consistent focus on safety are of great importance.
TABLE OF CONTENTS:
SAFETY
Symbol Index ............................................................................................................... 2
General Safety Precautions .....................................................................................3-6
SPECIFICATIONS
Corded 120 VAC PullzAll ............................................................................................. 7
Cordless 24V DC PullzAll ............................................................................................ 8
INSTRUCTIONS
Utility Pulling Introduction ............................................................................................ 9
How the PullzAll Works ........................................................................................10-12
Power Source ....................................................................................................... 13-14
Operating the PullzAll ...........................................................................................15-18
Accessories .............................................................................................................. 19
Rigging Techniques ................................................................................................... 20
Maintenance & Final Analysis ...................................................................................21
WARN INDUSTRIES 12900 SE Capps Road
Clackamas, OR 97015
USA
Fire and Burn Hazard
Never lift load over persons
Do not move persons
Properly seat load in throat of hook
Never apply load to hook tip or latch
Always wear gloves
Finger/Fairlead Crushing Hazard
Always use supplied hookstrap
Hand Piercing/ Cutting Hazard
Hot Surface Hazard
Wind wire rope on top of drum
Do not wind wire rope on bottom of drum
PullzAll™ is a trademark of Warn Industries, Inc.
Warn® and the WARN logo are registered trademarks of Warn Industries, Inc.
© 2010 Warn Industries, Inc.
Customer Service: (800) 543-WARN
(9276)
International: (503) 722-3008
Fax: (503) 722-3000
www.warn.com
Always wear hearing and eye protection
Shock Hazard
Charger Plug Pinout
WARN INDUSTRIES * THE BASIC GUIDE TO UTILITY PULLING
2
Page 2
GENERAL SAFETY PRECAUTIONS
GENERAL SAFETY PRECAUTIONS
Warnings and Cautions
As you read these instructions, you will see
WARNINGS, CAUTIONS, NOTICES and NOTES.
Each message has a specifi c purpose. WARNINGS
are safety messages that indicate a potentially
hazardous situation, which, if not avoided could result
in serious injury or death. CAUTIONS are safety
messages that indicate a potentially hazardous
situation which, if not avoided, could result in minor
or moderate injury. A CAUTION may also be used
to alert against unsafe practice. CAUTIONS and
WARNINGS identify the hazard, indicate how to avoid
the hazard, and advise of the probable consequence
of not avoiding the hazard. NOTICES are messages
to avoid property damage. NOTES are additional
information to help you complete a procedure.
PLEASE WORK SAFELY!
WARNING
CHEMICAL AND FIRE HAZARD
Failure to observe these instructions could
lead to serious injury or death.
• Always read all instructions and cautionary
markings on battery charger, battery pack and
cordless pulling tool.
• Never operate pulling tool in an environment
containing explosive or combustible material.
• Never expose battery unit to high heat or fi re.
• Never store Cordless PullzAll battery unit in a
tool box or pocket with nails, screws, keys, etc.
Shorting of battery terminal may cause fi re.
• Always avoid contact with battery leakage, which
may occur under extreme usage or temperature
conditions.
• Always remove the battery when the unit is not in
use.
• Always dispose or recycle battery according to
local ordinances / regulations.
• Always protect terminals with insulating tape,
prior to disposal, to prevent shorting.
• Never attempt to disassemble the battery. No
user serviceable parts inside.
WARNING
ELECTRICAL HAZARD
Failure to observe these instructions could
lead to serious injury or death.
• Always use properly grounded single phase
receptacle protected by a ground fault circuit
interrupter (GFCI).
• Never remove ground pin from plug.
• Never route electrical cables across sharp edges.
• Never route electrical cables through or near
moving parts.
• Never route electrical cables near parts that
become hot.
• Never remove electrical cover from battery charger.
• Never leave the pulling tool power cord plugged
in when installing, rigging, servicing or when the
pulling tool is not being used.
• Never disconnect ground bond.
• Never operate product in a wet environment.
• Always power pulling tool with only the
recommended electrical system voltage. See the
pulling tool specifi cation sheet for details.
• Never operate charger with damaged cord or plug.
Replace them immediately.
• Never operate charger if it has received a sharp
blow, been dropped or otherwise damaged in any
way.
• Never charge battery in damp or wet environment.
• Always charge battery pack in temperatures above
+32 °F (0° C) and below 120 °F (49° C). This is
important and will prevent serious damage to the
battery.
• Always store pulling tool and battery pack where
temperatures will not exceed 120 °F (49 °C).
• Always disconnect charger when battery is fully
charged.
WARNING
FALLING OR CRUSHING HAZARD
Failure to observe these instructions could
lead to serious injury or death.
• Never use pulling tool to secure a load.
• Never shock load rope. Shock load can damage,
overload and break rope.
• Never use the pulling tool’s rope to tow vehicle or
object. Impact loading during towing can exceed
rope strength.
• Always be certain the anchor you select will
withstand the load and the strap or chain will not
slip.
• Always take time to use appropriate rigging
techniques for pulling/lifting.
• Never spool out past the red paint on wire rope.
• Never exceed pulling tool or rope capacity listed
on product data sheet. Double line using a snatch
block to reduce pulling tool load.
• Never exceed 1000 lb. (454 kg) Maximum pulling
capacity.
• Always use suitable anchor point capable of
handling load.
• Always use factory approved mounting hardware,
components, and accessories.
• Always respool under tension load after use.
Tightly wound rope reduces chances of “binding”,
which can damage the rope.
• Always spool the rope onto the drum in the
direction specifi ed by the product warning label on
the product and/or documentation.
• Always avoid “jogging” or “plugging” (quick on/
off cycles) with the pulling tool. This can damage
motor controls and rope.
WARNING
FALLING OR CRUSHING HAZARD
Failure to observe these instructions could
lead to serious injury or death.
• Never attach a recovery strap to the pulling tool
hook to increase the length of a pull.
• Always use a hook with a latch.
• Always ensure hook latch is closed and not
supporting load.
• Never apply load to hook tip or latch. Apply load
only to the center of hook.
• Never use a hook whose throat opening has
increased, or whose tip is bent or twisted.
• Never attempt to tow a vehicle or object with the
recovery strap attached directly to the pulling tool
hook.
• Never use bungee straps that develop tremendous
and potentially dangerous amounts of force when
stretched.
• Always avoid side pulls which can pile up rope at
one end of the drum. This can damage rope or
pulling tool.
• Never hook rope back onto itself. This damages
the rope.
• Always use a choker chain, choker rope, or strap.
• Never use pulling tool to lift or move persons.
• Never use pulling tool to lift over persons
• Always select an anchor point as far away as
possible. This will provide the pulling tool with its
greatest pulling power.
• Always use suitable anchor point capable of
handling load.
WARN INDUSTRIES * THE BASIC GUIDE TO UTILITY PULLING
3
WARN INDUSTRIES * THE BASIC GUIDE TO UTILITY PULLING
4
Page 3
WARNING
GENERAL SAFETY PRECAUTIONS
WARNING
GENERAL SAFETY PRECAUTIONS
CAUTION
CAUTION
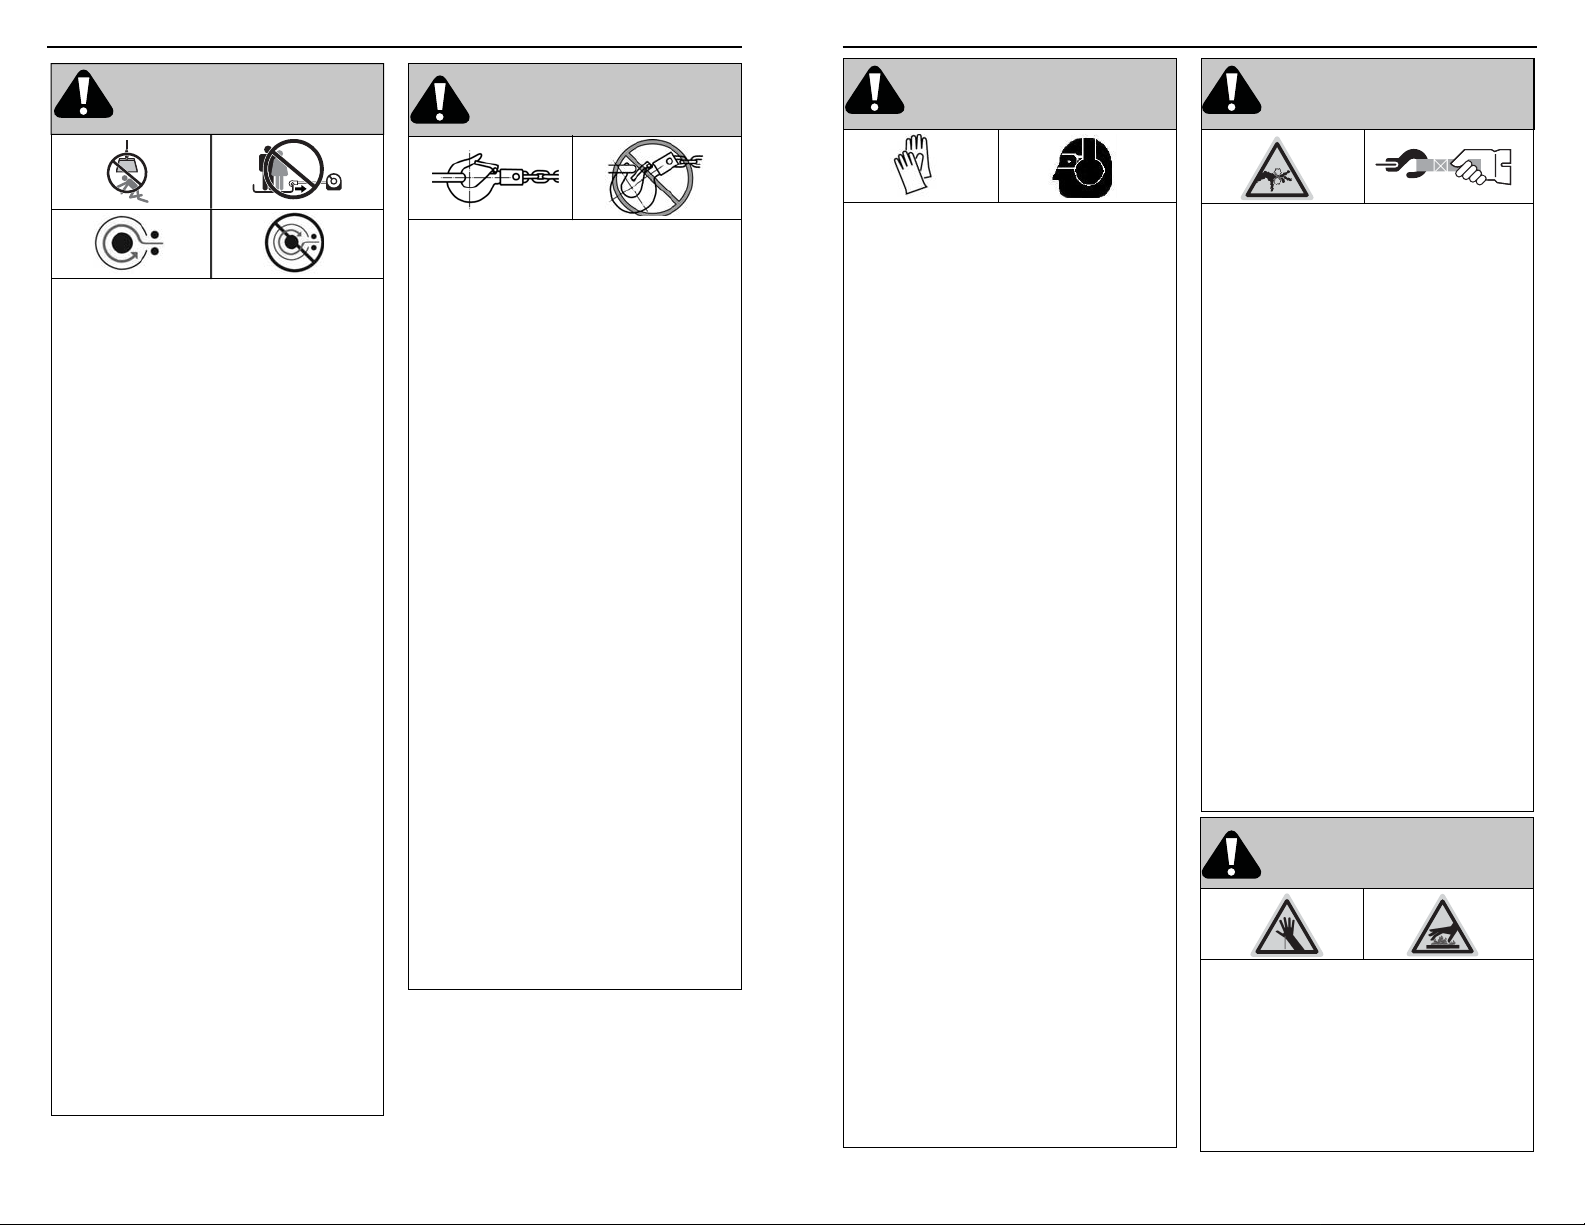
MOVING PARTS ENTANGLEMENT
HAZARD
Failure to observe these instructions could
lead to serious injury or death.
General Safety:
• Always remove jewelry and wear eye and ear
protection.
• Always wear gloves, eye and ear protection.
• Always keep hands clear of wire rope, hook loop,
hook and fairlead opening during installation,
operation and when spooling in or out.
• Always keep hands and clothing clear of the rope,
hook and fairlead opening during operation and
when spooling.
• Never let rope slip through your hands.
• Always Know Your Pulling Tool. Take time to fully
read the Instructions and/or Operations Guide,
in order to understand your pulling tool and its
operations.
• Never operate this pulling tool when under the
infl uence of drugs, alcohol or medication.
• Never run the PullzAll while carrying it at your side.
• Always be aware battery operated units are
continually in an operative condition.
Operational Safety:
• Always wear heavy leather gloves when handling
rope.
• Always stand clear of rope and load and keep
others away while pulling/lifting.
• Always remove any element or obstacle that may
interfere with safe operation of the pulling tool.
• Never leave the pulling tool power cord plugged
in when installing, rigging, servicing or when the
pulling tool is not being used.
• Always use supplied hook strap whenever spooling
rope in or out, during installation and during
operation.
• Always use extreme caution when handling hook
and rope during spooling operations.
• Never operate or install a pulling tool without
reading or understanding the operator’s manual.
• Never operate this pulling unit if you are under 16
years of age.
MOVING PARTS ENTANGLEMENT
HAZARD
Failure to observe these instructions could
lead to serious injury or death.
Pulling Safety:
• Always keep pulling tool and pulling/lifting load in
sight during pulling/lifting operation.
• Always require operators and bystanders to be
aware of rope and load.
• Always be aware of stability of load during pulling/
lifting, keep others away. Alert all bystanders of any
unstable condition.
• Never touch rope or hook while someone else is at
the control switch or during pulling/lifting operation.
• Never touch rope or hook while in tension or under
load.
• Always inspect rope, hook, and slings before
operating pulling tool. Frayed, kinked or damaged
wire rope must be replaced immediately. Damaged
components must be replaced before operation.
Protect parts from damage.
• Always tightly wind wire rope onto drum after each
use. During spooling in or out, rope direction can
unexpectedly switch if rope is in layers on drum.
Tightly wound rope reduces chance of binding.
WARNING
CUT AND BURN HAZARD
Failure to observe these instructions could
lead to serious injury or death.
To avoid injury to hands and fi ngers:
• Always wear gloves, eye and ear protection.
• Never insert battery into charger if battery case
is cracked or damaged. Battery short or fi re may
result.
• Never short battery terminals, because it may
cause sparks or burns.
MOVING PARTS ENTANGLEMENT
HAZARD
Failure to observe these instructions could
lead to minor or moderate injury.
To avoid injury to hands or fi ngers:
• Never let rope slip through your hands.
• Always select an anchor point as far away as
possible. This will provide the pulling tool with its
greatest pulling power.
CAUTION
CUT AND BURN HAZARD
Failure to observe these instructions could
lead to minor or moderate injury.
• Always be aware of possible hot surfaces at pulling
tool motor or battery during or after pulling tool use.
• Always charge PullzAll NiMH type battery pack
only. Other types of batteries may burst causing
damage and injury to person.
• Always read all instructions and cautionary
markings on battery charger, battery pack and
cordless pulling tool.
CRUSHING HAZARD
Failure to observe these instructions could
lead to minor or moderate injury.
• The Corded 120 VAC PullzAll has some delay in the
trigger control. Use the slow spooling speed and
release the trigger early to prevent from spooling the
hook loop into the fairlead.
NOTICE
AVOID PULLZALL AND EQUIPMENT
DAMAGE
• Always avoid over heating the pulling tool motor.
For extended pulling/lifting, stop at reasonable
intervals to allow the pulling tool motor to cool
down. See table for run time/duty cycle guidelines.
• Always store the pulling tool in a protected, clean,
dry area.
WARN INDUSTRIES * THE BASIC GUIDE TO UTILITY PULLING
5
WARN INDUSTRIES * THE BASIC GUIDE TO UTILITY PULLING
6
Page 4
PULLZALL SPECIFICATIONS
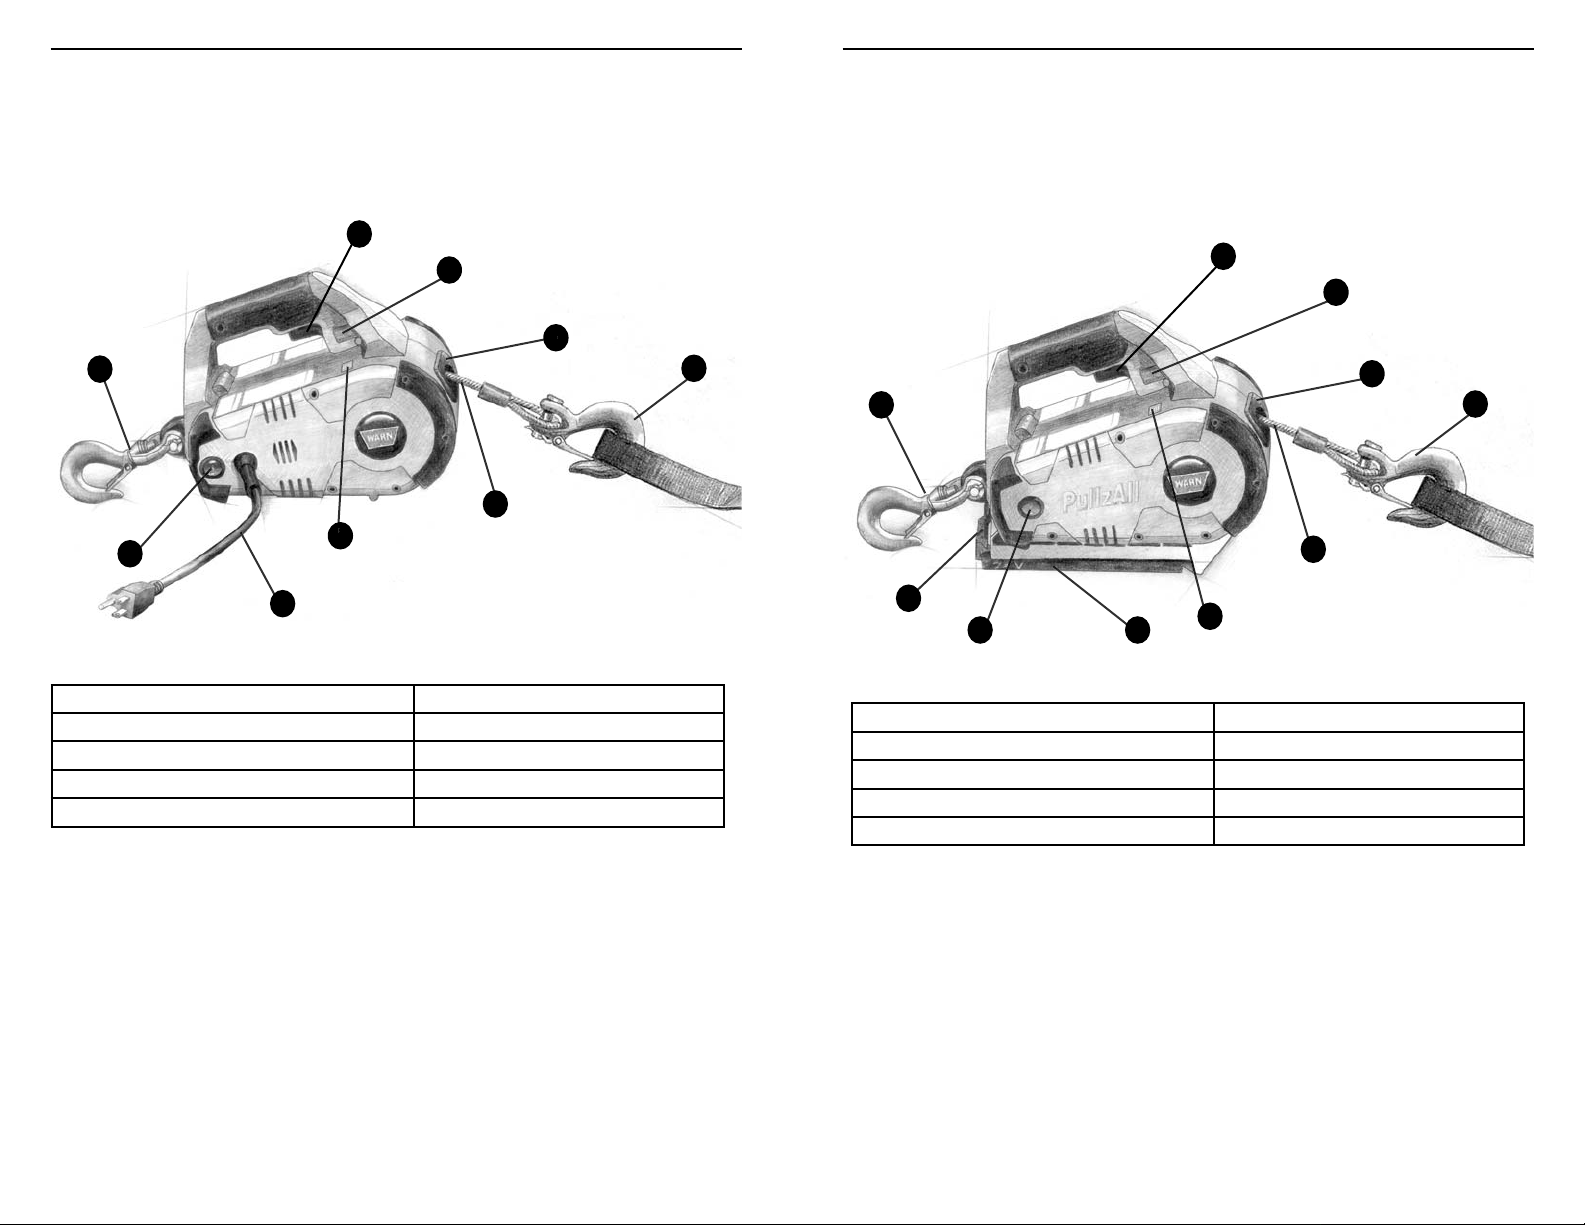
The Corded WARN® PullzAll consists of the following features:
The Corded WARN PullzAll is a powerful pulling tool. Powered by a 120 volt AC power
source this compact tool has a pulling capacity of 1000 pounds (454 kilos).
The unit has a variable speed trigger for power-in and power-out operation, 15 ft (4.6 m) of
7/32 inch (0.56 cm) wire rope and two clasp hooks.
1.
2.
3.
7.
9.
5.
8.
4.
PULLZALL SPECIFICATIONS
The CordlessWARN® PullzAll consists of the following features:
The Cordless WARN PullzAll is a powerful pulling tool. Powered by a 24 volt rechargeable
battery this compact tool has a pulling capacity of 1000 pounds (454 kilos).
The unit has a variable speed trigger for power-in and power-out operation, 15 ft (4.6 m) of
7/32 inch (0.56 cm) wire rope and two clasp hooks.
1.
2.
3.
7.
9.
4.
6.
1. Variable Speed Trigger 6. Power Cord
2. Directional Switch 7. Swiveling Anchor Hook
3. Fairlead 8. On/Off Power Switch
4. Hook with Latch and Hook Strap 9. Wire Rope
5. Ready/Overload Indicator
Specifi cation Data for the Corded WARN PullzAll
Max Pulling Capacity 1000 lbs. (454 kg)
Wire Rope Diameter 7/32 in (0.56 cm)
Power Source 120 VAC
Power Input 1200 W (10A)
WARN INDUSTRIES * THE BASIC GUIDE TO UTILITY PULLING
7
10.
8.
6.
5.
1. Variable Speed Trigger 6. Rechargeable Battery
2. Directional Switch 7. Swiveling Anchor Hook
3. Fairlead 8. On/Off Power Switch
4. Hook with Latch and Hook Strap 9. Wire Rope
5. Ready/Overload Indicator 10. Battery Release Button
Specifi cation Data for the Cordless WARN PullzAll
Max Pulling Capacity 1000 lbs. (454 kg)
Wire Rope Diameter 7/32 in (0.56 cm)
Power Source 24V DC Battery (NiMH)
Power Input 720 W (30 A)
WARN INDUSTRIES * THE BASIC GUIDE TO UTILITY PULLING
8
Page 5
So, you have your WARN
PullzAll and you are ready to put it
to use.
This guide provides you
with a basic understanding of
your PullzAll and teaches you
the basics of proper pulling/
lifting techniques. Before we get
started, we must emphasize that
the information in this guide is
general in nature. Because no two
situations are alike, it would be
nearly impossible to review them
all. We will, however, provide you
with the general principles and
techniques to use this tool safely
and effectively. Then it is up to
you to take the time to analyze
the situation and apply the proper
technique.
Along with a little common
sense, the information laid out in
this guide can help you lift and
pull safely. Just remember to
think through each lifting or pulling
situation before you act.
To Go Prepared
TM
, the
following instructions will help you
understand the operation of the
PullzAll.
UTILITY PULLING INTRODUCTION
WARNING
Never operate a
PullzAll without
reading or
understanding
the operator’s
manual.
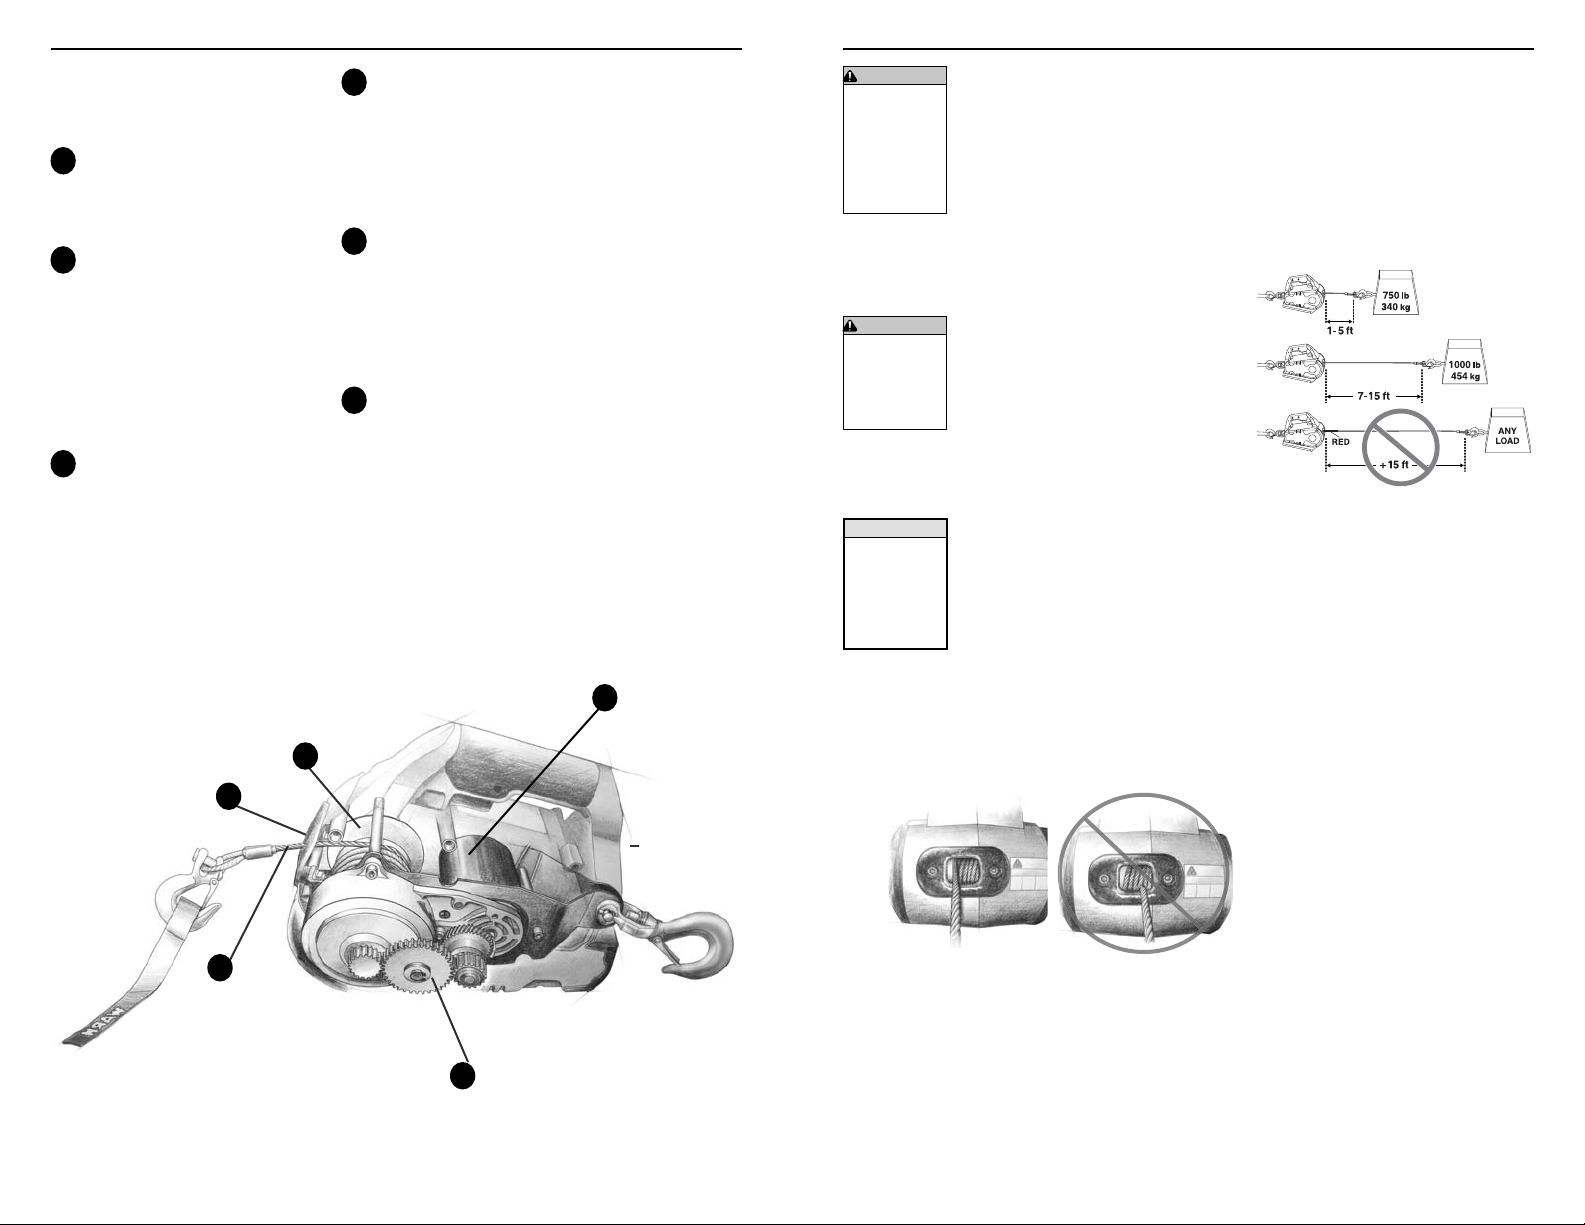
HOW THE PULLZALL WORKS
To begin, you should
familiarize yourself with
your PullzAll and each of its
components:
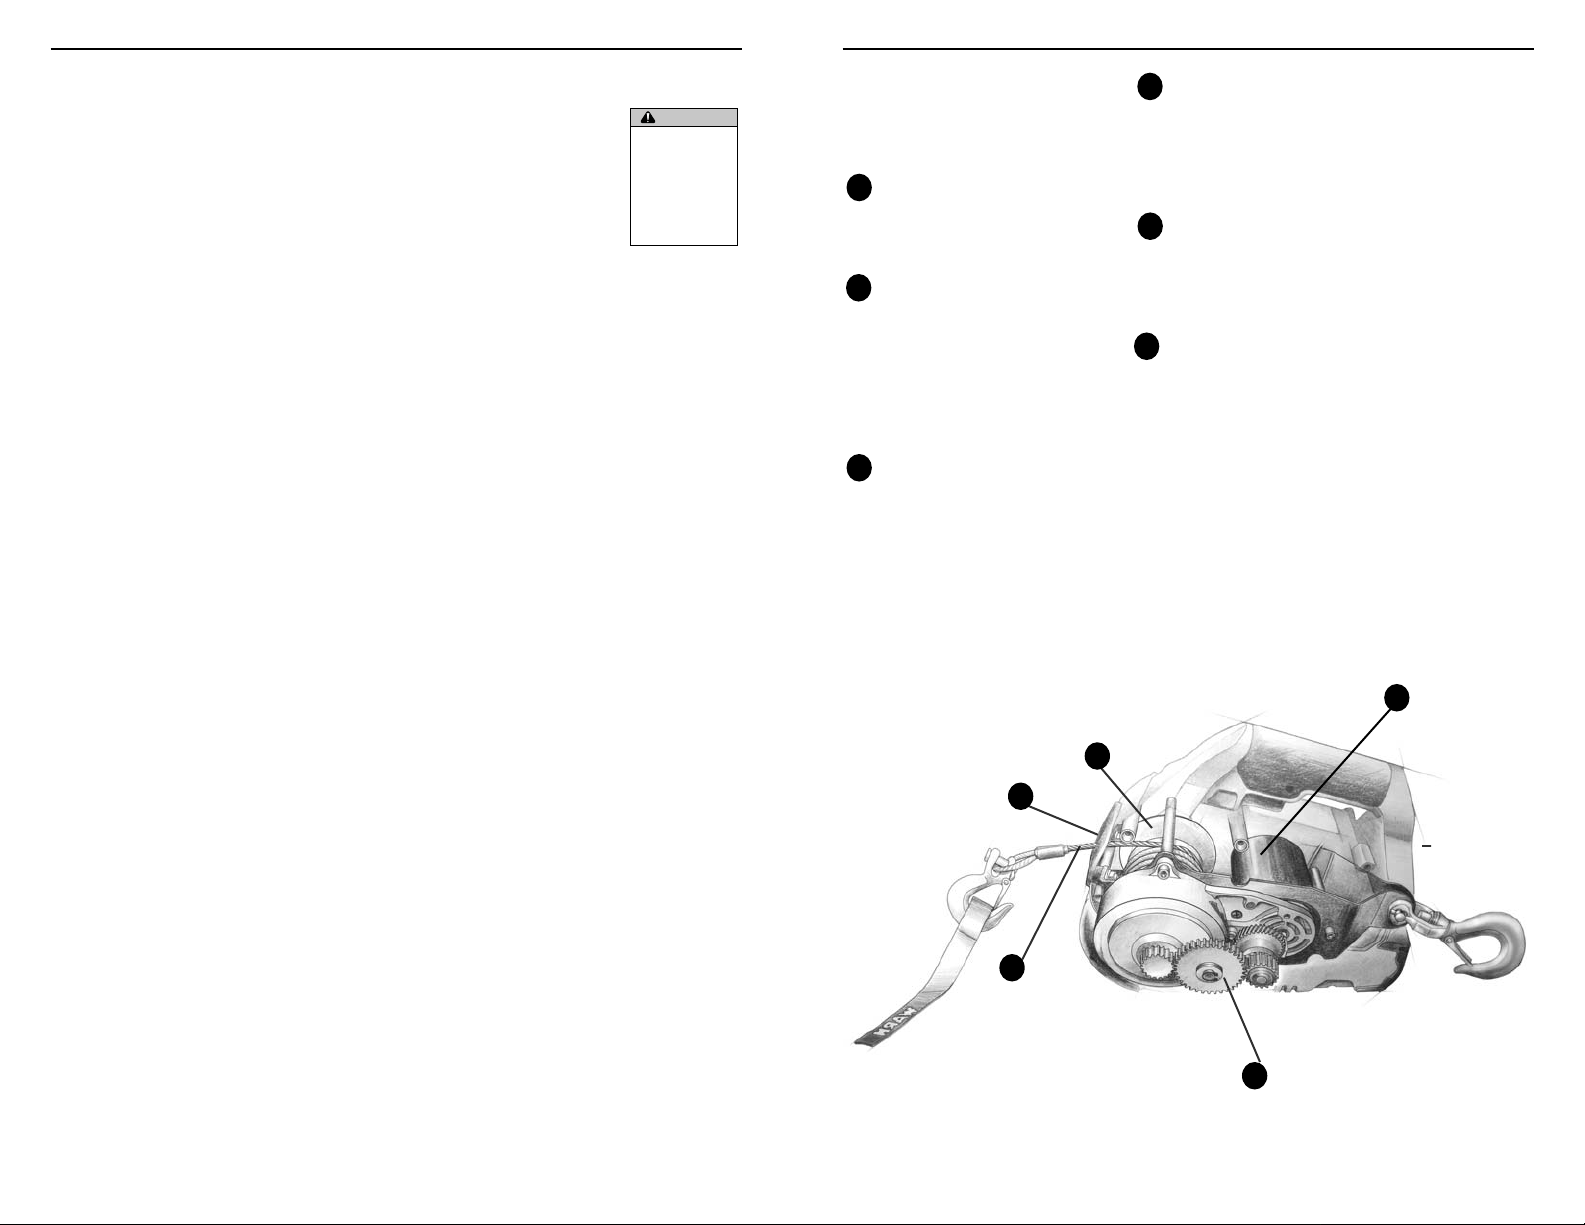
1.
Motor The motor provides
torque to the gear train, which
turns the PullzAll drum and winds
the wire rope.
2.
Spooling Drum The PullzAll
drum is the cylinder from which
the wire rope winds. The drum is
driven by the gear train and motor.
Its direction can be changed using
the directional selector switch. The
wire rope unwinds off the top of
the drum.
3.
Wire Rope The rope’s
diameter and length are
determined by the PullzAll’s load
capacity and design. Wrapped
around the PullzAll drum and fed
through the fairlead, the rope is
looped at the end to accept the
hook’s clevis pin.
PullzAll at an angle, the fairlead acts
to guide the wire rope onto the top
of the spooling drum. It minimizes
damage to the rope while it goes
through the PullzAll mount.
convert the PullzAll motor torque
into a large pulling force. The gear
train design makes it possible for
the PullzAll to be light and compact.
device that automatically interrupts
the power whenever the circuit
becomes overloaded. The ready/
overload indicator LED turns red
under extreme loads and fl ashes
red when maximum load has been
exceeded.
4.
Fairlead When using the
5.
Gear Train The reduction gears
6.
Load Limiter (not shown) Is a
WARN INDUSTRIES * THE BASIC GUIDE TO UTILITY PULLING
9
2.
4.
3.
5.
WARN INDUSTRIES * THE BASIC GUIDE TO UTILITY PULLING
10
1.
Page 6
Before using your WARN
PullzAll to pull or lift a load it is
important to understand how it
works. The major advantage
of the PullzAll is its handheld
convenience for performing
numerous recreational and work
tasks. Thinking through how you
intend to use your PullzAll now
could save you a big headache
later.
Control of Your PullzAll
The PullzAll tool has an On/
Off power switch and is controlled
by a directional switch and a
variable speed trigger control.
The directional switch
provides control of the forward and
reverse rotation of the spooling
drum. Keep tension on the wire
rope when winding in or out to
prevent “bird nesting” that can bind
and entangle the wire rope causing
damage to it and the PullzAll.
When you see the red paint on the
wire rope, do not spool out any
further. Doing so, can cause the
wire rope to spool on the drum
in the wrong direction. This can
damage the wire rope and fairlead.
The direction selection arrow
should always match the direction
of the wire rope when it is spooling
in or out.
HOW THE PULLZALL WORKS
How the PullzAll Reacts to Load
The PullzAll is rated by pulling
capacity. The maximum pulling
torque occurs when there is only
one layer of wire rope on the drum.
As the layers of wire rope on the
drum increase, the pulling power
decreases. This is the basics of
mechanical advantage.
Load Limiter
Exceeding the PullzAll capacity
will cause the load limiter to trip,
which interrupts the power to the
motor. This prevents overheating
and potential motor damage. At
90% of pulling capacity the overload
indicator turns red. When 100%
of pulling capacity is reached the
load limiter will cause the overload
indicator to fl ash red and the PullzAll
motor to stop. When this occurs,
release the load by spooling out. Do
not attempt to apply the same load
if the load limiter has tripped, as
this can be harmful to the unit. If the
load limiter fails to reset contact an
authorized service center.
WARNING
Always keep
PullzAll and
pulling load in
sight during
pulling operation.
WARNING
Never spool out
past the red paint
on wire rope.
NOTICE
The PullzAll
is controlled
by the variale
speed trgger
and direction
selection switch.
HOW THE PULLZALL WORKS
PullzAll Mechanics
It is important to understand that
the longer the pull, the more heat gets
created within the motor. Spooling
out the rope also generates heat. Let
the motor cool between pulls because
prolonged use without cooling the
PullzAll will damage the motor.
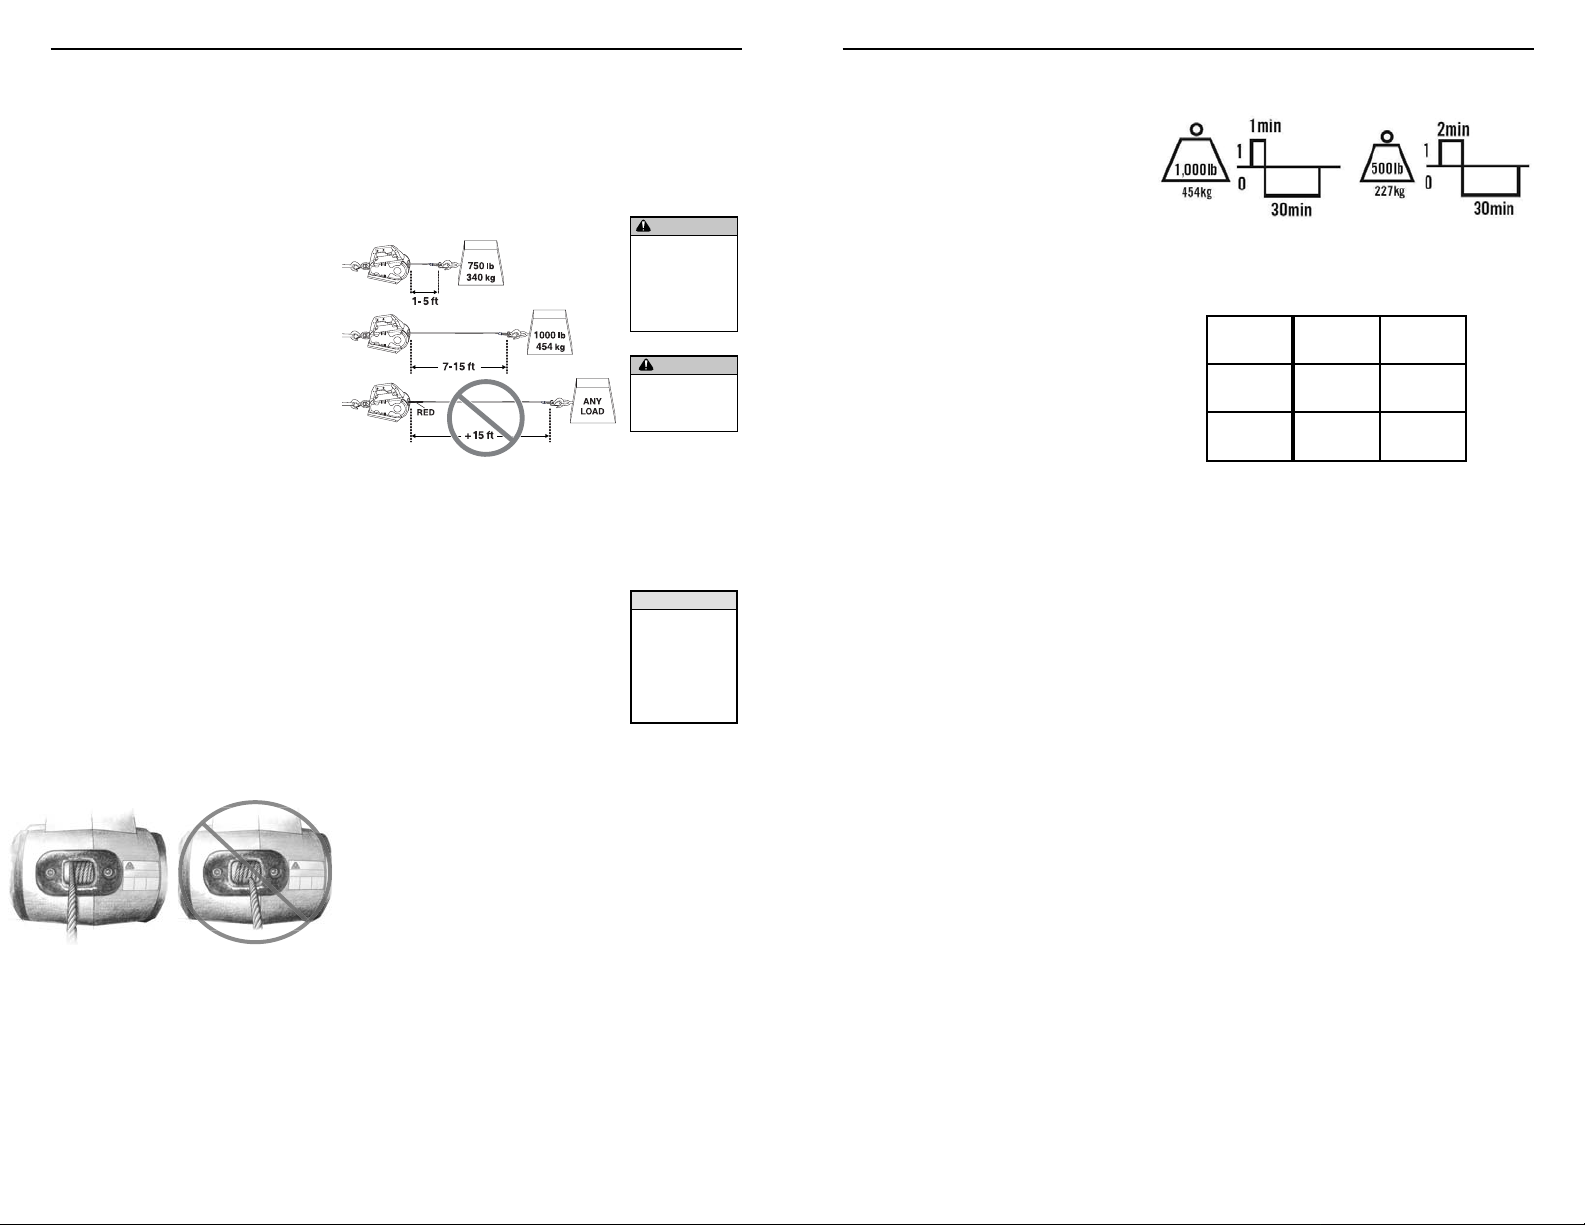
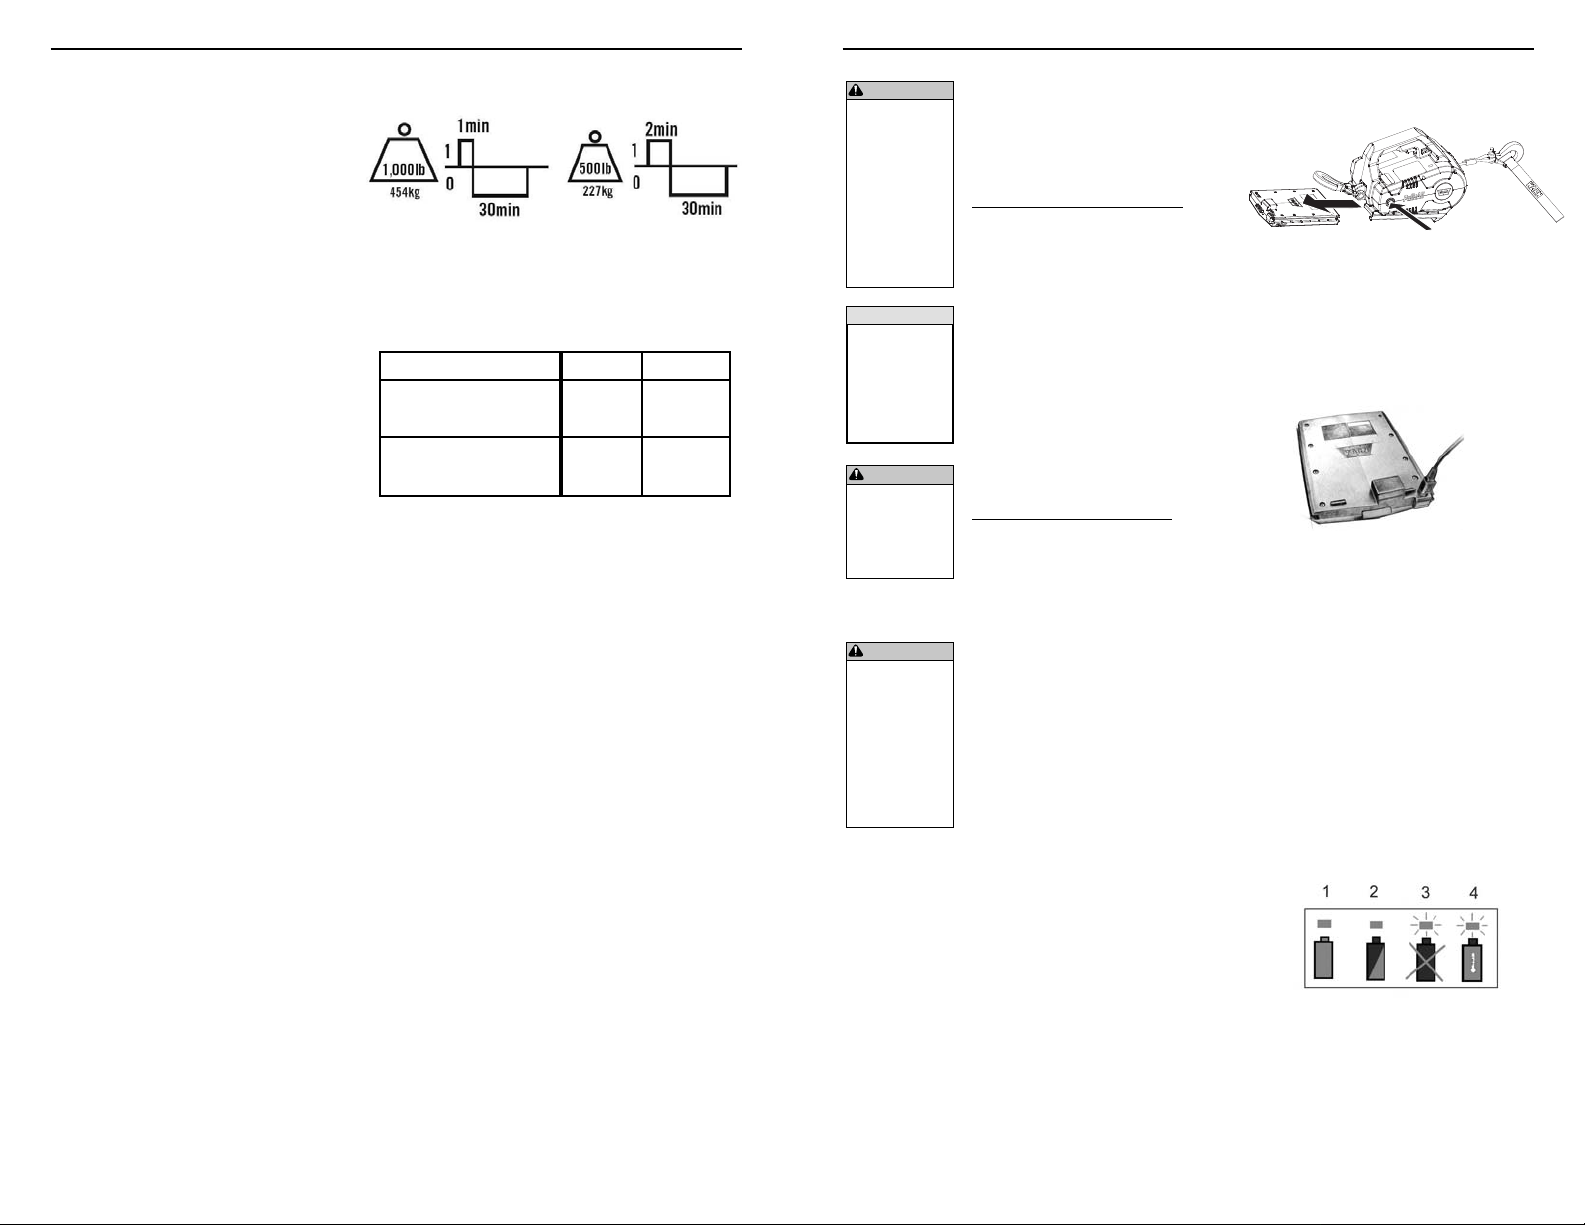
Run Time/Duty Cycle
The PullzAll is rated for
intermittent duty. It should not be
operated for long periods with the
motor at low RPMs. When the motor
approaches stall speed a very rapid
heat build up occurs which may
cause motor damage. Follow the
recommended run times and cooling
times in the table shown. If the unit
does not function after it is allowed to
cool, call a Warn authorized service
center.
RUN TIME/DUTY CYCLE TABLE
LOAD 500 lbs.
(227 kg)
RUN
2 min 1 min
1000 lbs.
(454 kg)
TIME
COOL
30 min 30 min
TIME
The variable speed trigger
switch has two general modes of
operation:
1) Variable speed mode for fi ne
load positioning.
2) Full speed mode for long
distance.
WARN INDUSTRIES * THE BASIC GUIDE TO UTILITY PULLING
If the load limiter continues to
trip, perform the following actions:
1) Reduce the weight of the load.
2) Increase the distance of the
anchor point.
3) Rig a double line pull.
For details: See “Rigging
Techniques” section in this manual.
11
WARN INDUSTRIES * THE BASIC GUIDE TO UTILITY PULLING
12
Page 7
The PullzAll is available in
both corded and cordless models.
Each model has its own benefi ts.
Ensure the power source is
connected properly following these
instructions:
Corded 120 VAC PullzAll
Properly Grounded Plug
Ensure the PullzAll power
cord is connected to a properly
grounded, 3-prong electrical
socket with a Ground Fault Circuit
Interrupter (GFCI).
Minimum Amperage
If using an extension cord
and/or generator, make sure that it
is rated to handle a minimum of 15
Amps, the current required to run
the PullzAll at full capacity.
Cordless 24V DC PullzAll
Battery Care
Always turn On/Off power
switch off when not in use.
Permanent battery damage may
occur if the unit is allowed to selfdischarge in the ‘On’ position. Store
battery and charger in locations
where temperatures will not exceed
120ºF (49 ºC).
When noticeable loss of
performance is observed, replace
battery pack with a fully charged
battery. Avoid running the battery
completely dead. This can cause
permanent damage to the battery
pack.
Installing the Battery Pack
1) Verify the power switch is in the
‘Off’ position.
2) Slide the battery pack into the
body, making sure that the latch is
fully engaged. The battery release
button must be in the top position.
Removing the Battery Pack
1) Verify the power switch is in the
‘Off’ position.
2) Push down the battery release
WARN INDUSTRIES * THE BASIC GUIDE TO UTILITY PULLING
POWER SOURCE
button at the back of the battery
and slide the battery away from the
PullzAll body.
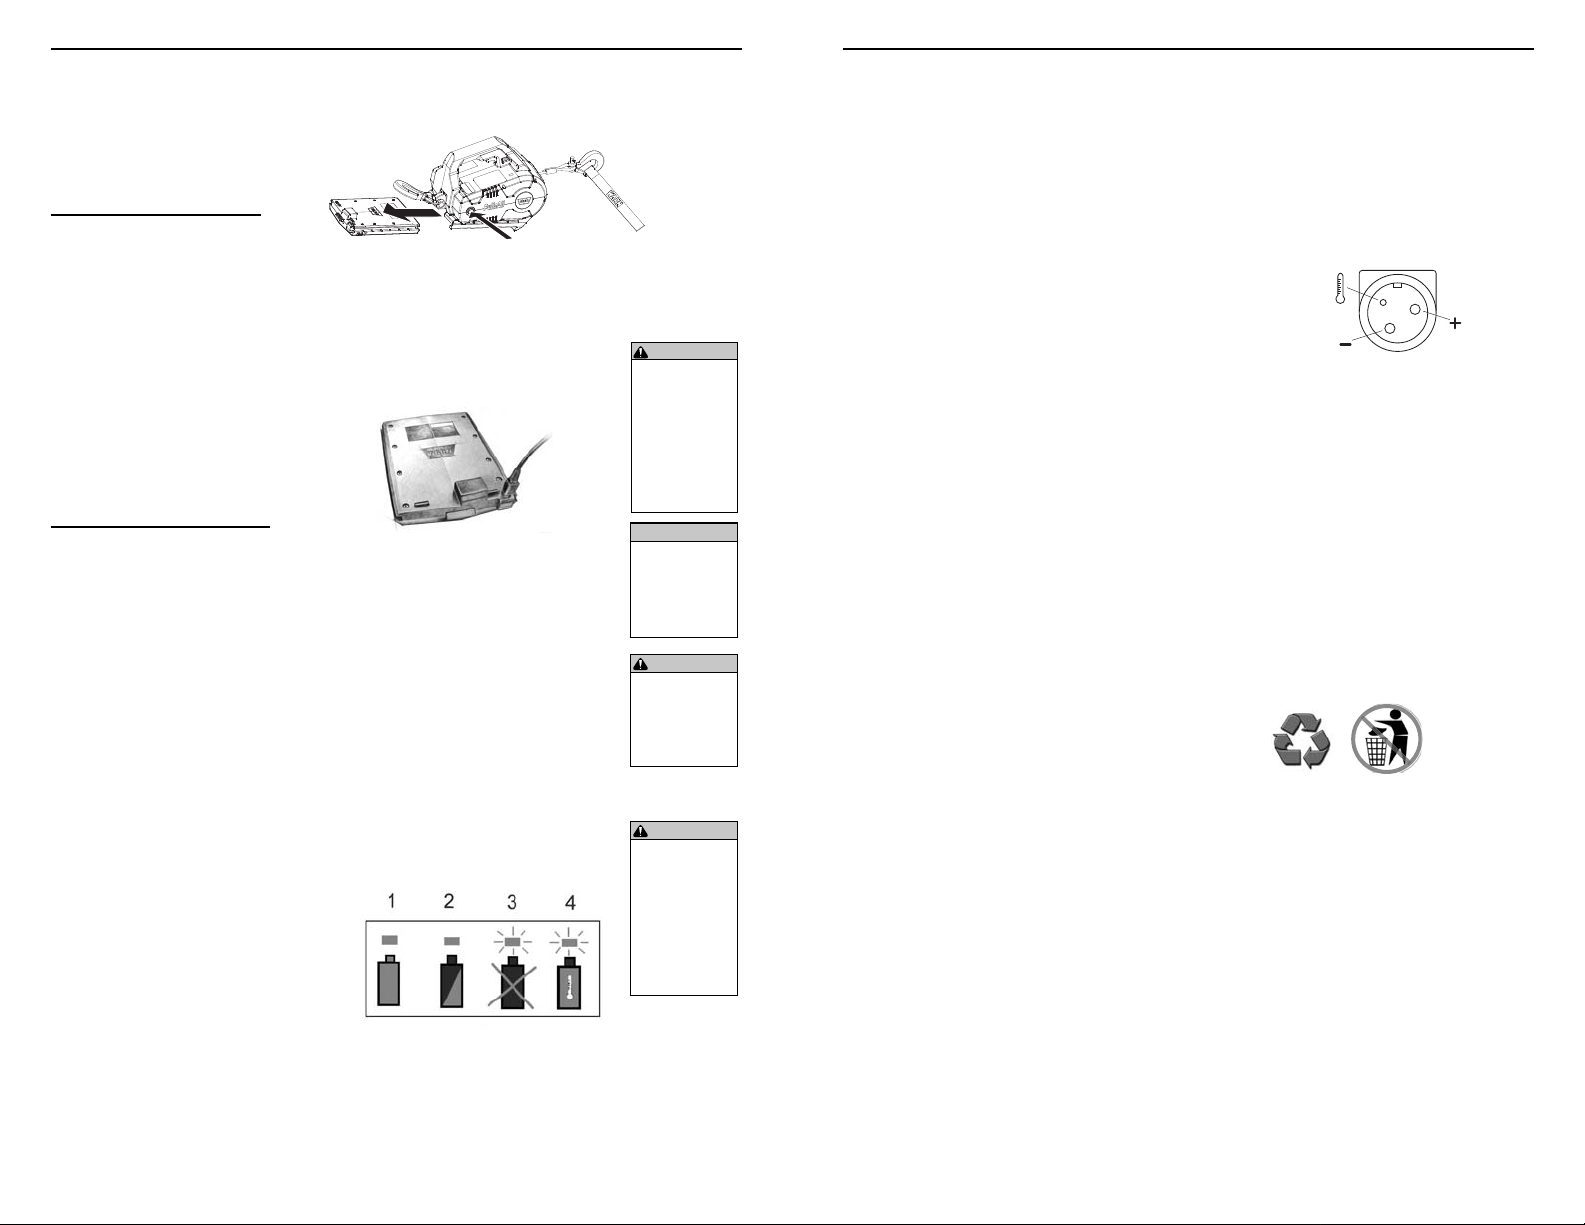
Charging the Battery Pack
Plug charger’s power cord
into a standard power outlet, then
insert the battery charging plug from
the charger into the battery. The
charger’s red LED indicator light will
be solid, indicating charging.
A fully discharged battery
should charge in approximately two
hours. Charging will automatically
stop when charging is complete.
For best performance, unplug the
charger and allow the battery to
cool to room temperature before
use in the PullzAll.
The battery charger indicator light
signifi es:
1) Green LED on: Fully charged
2) Red LED on: Charging
3) Red LED fl ashing: A fault
condition is present.
4) Green LED fl ashing: Over
temperature protection.
If the red LED is fl ashing, stop
charging the battery and follow the
charger safety rules below. If the
problem persists, contact a Warn
authorized service center.
13
WARNING
Never leave
the PullzAll
power cord
plugged in or the
battery in unit
when installing,
servicing or
storing.
NOTICE
Always let
battery cool
before using in
tool and before
charging.
WARNING
Never attempt
to disassemble
the battery or
remove any
component.
WARNING
Always avoid
contact with
battery leakage,
which may
occur under
extreme usage
or temperature
conditions.
POWER SOURCE
Charger Safety Rules
Follow these important
safety instructions and review
the cautionary markings on the
battery charger, battery pack, and
the Cordless PullzAll tool before
using the Cordless PullzAll battery
charger. Remove charger from
power source when battery is fully
charged.
Use only the charger that
accompanies the Cordless PullzAll
or an Offi cial WARN charger
accessory. Only charge WARN
Cordless PullzAll rechargeable
batteries, other types of batteries
may burst causing personal injury
and damage.
Do not charge the battery in
damp or wet environment.
Do not disassemble the
charger. Take it to a Warn
authorized service center when
service is required.
Important Charging Notes
1) The battery pack accepts
only about 80% of its maximum
capacity with its fi rst few charge
cycles. However, after the fi rst
few charge cycles and normal
usage, the battery will charge to full
capacity.
2) The charger was designed
to fast charge the battery, only
when the battery temperature is
between 32ºF (0º C) and 120ºF
(49º C). If the battery pack is too
hot or too cold, the battery pack
should not be charged. (This
may happen if the battery pack
is hot from heavy use.) Wait
until the battery returns to room
temperature before charging.
3) A substantial drop in
operating time per charge may
mean that the battery pack is
nearing the end of its life and
should be replaced.
If the battery does not charge
properly:
a. Check for voltage at the outlet
by plugging in some other electrical device.
b. Verify charger voltage is ap-
proximatly 30vdc. Refer to
charger plug pinout here or on
charger label.
c. Check battery pack terminals
for dirt. Clean with a cotton
swab and alcohol if necessary.
d. If you still do not get proper
charging, contact Warn customer service.
Battery Disposal
The PullzAll battery uses
NiMH technology. Check your local
ordinances/regulations for disposal
or recycling regulations. Prior to
disposal, protect exposed terminal
with heavy insulating tape to prevent
shortage.
Chemical First Aid: If leakage from
battery comes in contact with skin,
wash with soap and water. If liquid
gets into eyes, fl ush with water for
15 minutes.
WARN INDUSTRIES * THE BASIC GUIDE TO UTILITY PULLING
14
Page 8
Practice using your PullzAll
before you pull or lift a load. A real
situation is no time to be learning
how to use your PullzAll.
Knowing the proper pulling
and lifting techniques can help
keep you and others around
you safe. And perhaps the most
important part of the pulling
process, regardless of the situation,
is what you do before you pull.
In this guide, you are shown
the basic fundamentals for effective
pulling/lifting. However, it is up to
you to analyze the situation and
make the decisions necessary for
the proper use of your PullzAll.
Apply your knowledge of your
PullzAll and the basic fundamentals
you have practiced to adjust
your techniques to each unique
situation.
Some keys to remember when
using your WARN PullzAll:
1. Always take your time to
assess your situation and plan
your pull or lift carefully.
2. Always take your time when
using a PullzAll.
3. Use the right equipment for
your situation.
4. Always wear leather gloves
and do not allow the wire rope
to slide through your hands.
5. Only one person should
operate the PullzAll while
pulling a load.
6. Think safety at all times.
7. Practice. Practice and
practice the steps.
OPERATING THE PULLZALL
Pulling or Lifting Procedure
The following steps describe
how to pull or lift using a single
line rigging technique. Double or
multiple line rigging techniques
follow the same basic steps but
use a snatch block to assist the
process. For details, see the
“Rigging Techniques” section in this
manual.
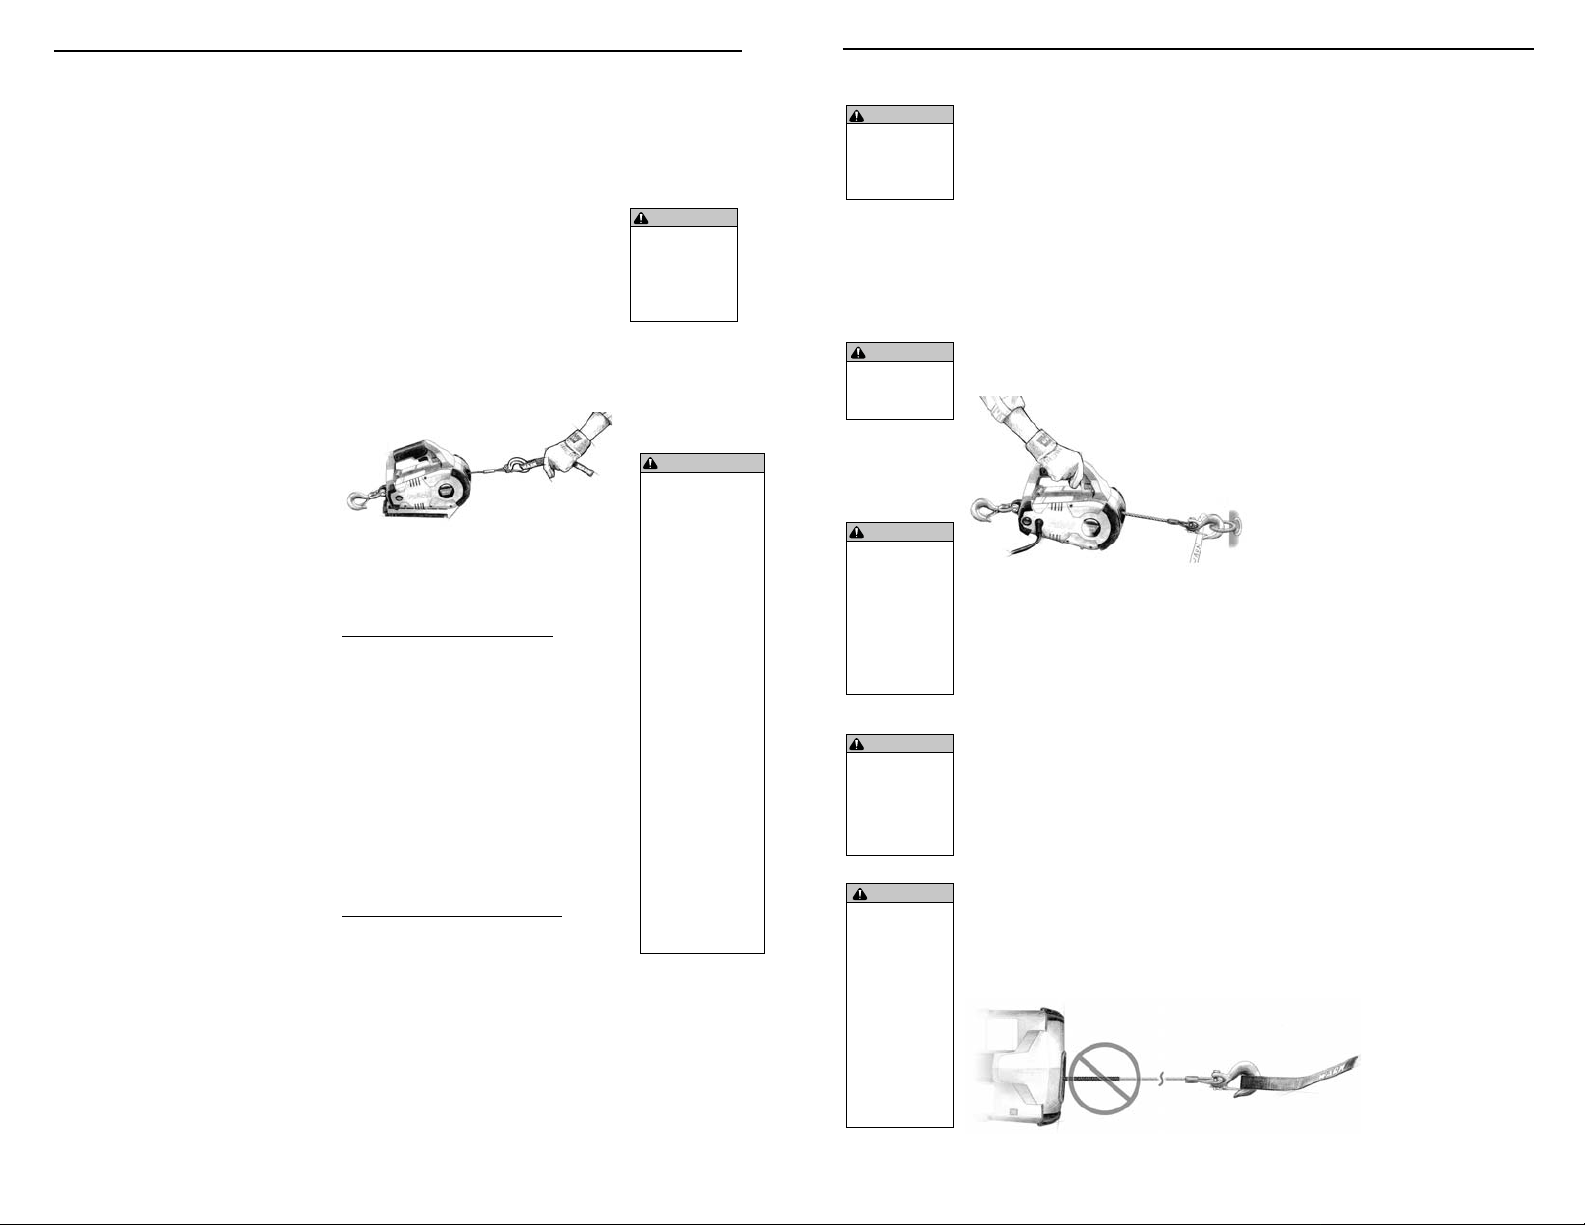
Step 1: PUT ON GLOVES AND
ATTACH HOOK STRAP. Ensure
the hook strap is attached to the
hook with latch on the wire rope,
not the swiveling anchor hook.
Step 2: CONNECT TO POWER
SOURCE.
Corded 120 VAC PullzAll
1) Connect the PullzAll power
cord to a properly grounded,
3-prong electrical socket.
2) Verify that power cords and
extension cords are positioned
so that the wire rope or mov-
ing load will not damage the
cords.
3) Verify that extension cords are
rated for 15 Amps.
Cordless 24V DC PullzAll
1) Ensure the battery pack is fully
charged.
2) Verify the power switch is in
the ‘Off’ position.
3) Slide battery pack into the
body, making sure that the
latch is fully engaged. The
battery release button must be
in the top position.
WARNING
Always use
supplied hook
strap to hold hook
when spooling
rope in or out.
WARNING
Always use
properly grounded
120V AC 50/60
Hz single phase
receptacle
protected by a
ground fault circuit
interrupter (GFCI).
Never remove
ground pin from
plug.
Never operate this
AC product in a wet
environment.
Never route
electrical cables
across sharp edges.
Never route
electrical cables
through or near
moving parts.
Never route
electrical cables
near parts that
become hot.
OPERATING THE PULLZALL
Step 3: POWER ON THE
WARNING
Always use
suitable anchor
point capable of
handling load.
WARNING
Never spool out
past red paint on
wire rope.
WARNING
Always keep
hands and
clothing clear of
the rope, hook
and fairlead
opening during
operation and
when spooling.
WARNING
Never hook
wire rope back
onto itself. This
damages the
rope.
CAUTION
The Corded 120
VAC PullzAll has
some delay in the
trigger control
use the slow
spooling speed
and release the
trigger early to
prevent from
spooling the
hook loop into
the fairlead.
PULLZALL. Flip the power switch
to the ‘On’ position. Always leave
the power switch in the ‘Off’
position when the PullzAll is not in
use.
Step 4: SPOOL OUT WIRE ROPE
TO LOAD. Press the directional
switch to ‘spool out’. Always keep
tension on the wire rope while
spooling in and out. The wire rope
may unwind inside the PullzAll unit
causing bird nesting and binding,
leading to wire rope damage.
Spooling Alone: Attach the hook
with latch to an anchor point and
walk the PullzAll away from the
load.
Spooling with an Assistant: Have
the person handling the rope hold
the hook strap and walk the wire
rope away from the PullzAll while
spooling out the wire rope.
NEVER spool the wire rope out
past the red paint on the wire rope.
The red paint is visible when 13 ft.
(3.9 m) of wire rope is unwound.
Doing so can cause the wire rope
to spool on the drum in the wrong
direction. This can damage the
wire rope and fairlead.
Step 5: ATTACH TO ANCHOR
POINT. Attach the PullzAll to an
anchor point using the swiveling
anchor hook. That is capable of
handling the load.
Step 6: PLAN TO PULL. Line
up your pull as straight ahead
as possible. This prevents side
pulls that can allow the wire rope
to rub on the fairlead. Also, side
pulls cause the wire rope to stack
up at one end of the drum. This
can damage the wire rope or the
PullzAll.
Step 7: SECURE TO THE LOAD.
Establish a load point. Often a load
does not have a secure load point.
It may be necessary to secure the
load with a choker chain or a load
strap.
Step 8: ATTACH THE CLEVIS/DSHACKLE. Attach the shackle to
the two ends of the strap or chain
being careful not to over tighten
the shackle (tighten and back-off
1/2 turn). Secure the shackle into
the throat of the PullzAll hook.
Step 9: PUT WIRE ROPE UNDER
TENSION. Press the directional
switch to ‘spool in’ wire rope.
Use the trigger control to slowly
wind the wire rope until no slack
remains. Tension in the wire rope
will keep it from bird nesting and
binding. Once the wire rope is
under tension, stand well clear,
and never step over the wire rope.
Step 10: CHECK YOUR LOAD.
Ensure all connections are
secured and free of debris before
continuing with the procedure.
WARN INDUSTRIES * THE BASIC GUIDE TO UTILITY PULLING
15
WARN INDUSTRIES * THE BASIC GUIDE TO UTILITY PULLING
16
Page 9
Begin Pulling or Lifting
the Load
The following steps describe
how to operate the PullzAll after it
has been properly rigged.
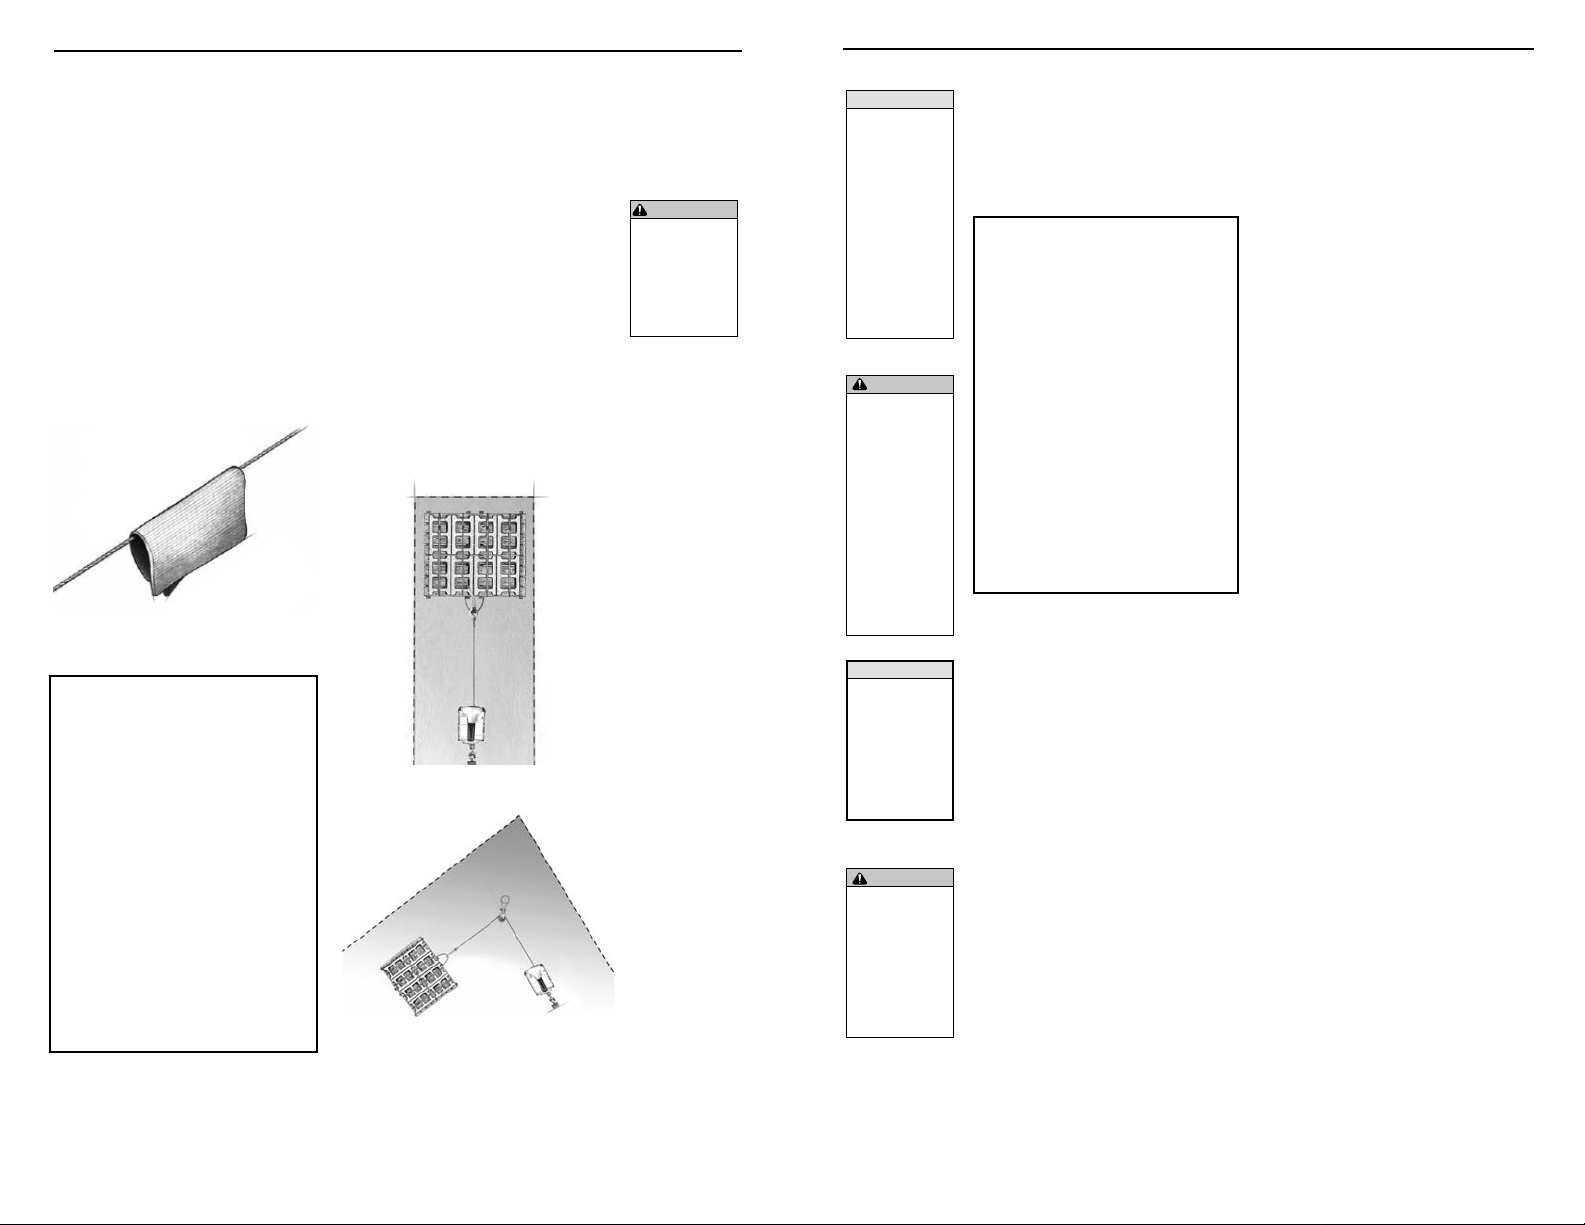
Step 11: LAY SOMETHING OVER
THE WIRE ROPE. In the interest
of safety consider hanging a dense
fabric midway between the PullzAll
and the load point to absorb
energy should the wire rope or
load point snap loose. For example
use a heavy blanket, heavy jacket,
chain or a back pack.
Troubleshooting
If the PullzAll will not spool
in or out, ensure that the On/
Off power switch is in the ‘On’
position. Verify that the overload
indicator is not fl ashing and the
green power indicating light is
on.
On the Corded PullzAll unit,
ensure that the power cord is
plugged in and the circuit has
power.
On the Cordless PullzAll
unit ensure that the battery is
charged. Then try spooling
the rope. If this does not solve
the problem, contact a Warn
authorized service center.
OPERATING THE PULLZALL
Step 12: MAKE YOUR
INTENTIONS CLEAR. Be sure that
everyone in the immediate vicinity
surrounding the pulling operation is
completely aware of your intention
before you pull or lift.
Declare where the spectators
should not stand—never behind,
in front of, or under the load and
never near the wire rope or snatch
block. Your situation may have
other “no people” zones.
Establish “no people” zones
WARNING
Never use pulling
tool to lift or move
persons.
Never use pulling
tool to lift over
persons.
OPERATING THE PULLZALL
Step 13: BEGIN PULLING/
NOTICE
Avoid over
heating the
PullzAll motor.
For extended
pulling, stop
at reasonable
intervals to allow
the PullzAll
motor to cool
down.
See table for run
time guidelines.
CAUTION
The Corded 120
VAC PullzAll
has some delay
in the trigger
control. Use the
slow spooling
speed and
release the
trigger early to
prevent from
spooling the
hook loop into
the fairlead.
NOTICE
Always avoid
side pulls which
can pile up rope
at one end of
the drum. This
can damage wire
rope or PullzAll.
WARNING
Always keep
hands and
clothing clear of
the rope, hook
and fairlead
opening during
operation and
when spooling.
LIFTING. Press the directional
switch to ‘spool in’ wire rope. With
light tension already on the wire
rope, begin spooling in slowly and
steadily.
What to look for under load
The rope must always be
spooled onto the drum.
As you spool in, make
sure the rope winds evenly
and tightly on the drum. This
prevents the outer wire wraps
from drawing into the inner
wraps, “bird nesting” and
binding can damage the wire
rope and PullzAll.
During side pulls the wire
rope tends to stack up at one
end of the drum. To prevent
stacking the wire rope on one
side of the drum, line up the pull
as straight ahead as possible.
Step 14: SECURE LOAD.
Once movement of the load is
complete, be sure to secure the
load completely. Only then should
you release tension in the wire
rope.
Step 15: DISCONNECT WIRE
ROPE. Reverse directional switch
and spool out a short length of
wire rope. Disconnect hook with
latch from the load whenever
possible.
Step 16: DISCONNECT FROM
ANCHOR. Disconnect the
swiveling anchor hook from the
anchor point.
Step 17: REWIND WIRE ROPE.
Reverse directional switch to
‘spool in’ wire rope. Be sure any
wire rope already on the spooling
drum is wound tightly. Arrange
the wire rope so it will not kink or
tangle when spooled. Always keep
the wire rope under tension when
spooling the wire rope back onto
the drum. Do not let the wire rope
slide through your hand.
If alone, attach the hook with latch
to an anchor point, apply light
tension to the wire rope and slowly
walk the PullzAll towards anchor
point as wire rope winds on drum.
If a person is handling the rope,
keeping tension, they should
walk the wire rope in, using the
hook strap. If you do not have the
hook strap, use a length of cord
or something similar. To prevent
serious injury, NEVER put your
fi ngers inside the hook area as you
are spooling in.
DO NOT use the load limiter to
stop the hook against the fairlead;
the hook should not spool into the
unit.
.
Step 18: TURN OFF THE PullzAll
Flip the power switch to the ‘Off’
position. Store the PullzAll in a
clean and dry place.
Pulling operations are now
complete.
WARN INDUSTRIES * THE BASIC GUIDE TO UTILITY PULLING
17
WARN INDUSTRIES * THE BASIC GUIDE TO UTILITY PULLING
18
Page 10

The PullzAll is a convenient
handheld pulling tool. Some of the
following accessories are vital to
the safe operation of the PullzAll,
while others offer added versatility
and convenience.
Gloves: Wire rope, through use,
will develop “barbs” which can
slice skin. It is extremely important
to wear protective gloves while
operating the PullzAll or handling
the wire rope. Avoid loose fi tting
clothes or anything that could
become entangled in the wire rope
and other moving parts.
Hook Strap: Used to hold the
hook and keep fi ngers away from
the fairlead as the rope is being
spooled in and out. Pulling tools
develop tremendous forces and
can easily remove fi ngers and
limbs that are placed in pinch
points. Put the hook into the loop
and hold the strap between the
thumb and forefi ngers.
ACCESSORIES
Snatch Block: Used properly, the
multi-purpose snatch block allows
you to: (1) increase your PullzAll’s
pulling power, and (2) change your
pulling direction without damaging
the wire rope. Proper use of the
snatch block is covered in the
“Rigging Techniques”.
Clevis/D-Shackles: The
D-Shackle is a safe means for
connecting the looped ends of
straps and snatch blocks. The
shackle’s pin is threaded to allow
easy removal.
Strap: Typically made of tough,
high-quality nylon, it provides the
operator an attachment method for
connecting the PullzAll wire rope to
a load or anchoring point.
CAUTION
Never attach a
recovery strap to
the PullzAll hook
to increase the
length of a pull.
Never use
bungee straps
that develop
tremendous
and potentially
dangerous
amounts of force
when stretched.
RIGGING TECHNIQUES
Various pulling situations will
require application of other pulling
techniques. These could range
from too little distance to achieve
maximum pull/lift using straight line
WARNING
Never spool out
past red paint on
wire rope.
rigging, increasing pulling power, or
maintaining a straight line pulling
situation. You will have to assess
what technique is correct for you
situation. Think “safety” at all times.
Think through each situation before
you act.
Increasing Pulling Power &
Duration
In some cases, you may fi nd
yourself needing more pulling
power. The use of snatch blocks
increases mechanical advantage
and increases your pulling power:
Pallet Pulling Example:
Single line
Start by spooling out the wire
rope. Attach the hook to an anchor
and run the rope through a snatch
block.
Using the snatch block, spool
out enough wire rope to reach your
load point. DO NOT spool out past
the red wire rope. Doing so can
cause the wire rope to spool on the
drum in the wrong direction. This
can damage wire rope and fairlead.
Secure to the load point with
a strap or choker chain. Attach the
clevis/shackle. Attach the shackle
to the two ends of the strap/chain,
being careful not to over tighten
(tighten and back-off 1/2 turn).
Lifting
Anchor the PullzAll so that it
is offset and not inline with object
to be lifted. Do not attempt to lift an
off-center load, this can cause the
load to swing dangerously. Never
allow the load to swing or twist.
Choker Chain: Can be used to
hook-up a load.
WARN INDUSTRIES * THE BASIC GUIDE TO UTILITY PULLING
Accessory kits are available
for the PullzAll. Contact Warn
customer service to learn more.
19
WARNING
Never use pulling
tool to lift or move
persons.
Never use pulling
tool to lift over
persons.
Double line
Double Line
Because pulling power
decreases with the number of
layers of rope on the PullzAll drum,
you can use a snatch block to
double line out more rope. This
decreases the number of layers of
rope on the drum, and increases
pulling power.
WARN INDUSTRIES * THE BASIC GUIDE TO UTILITY PULLING
20
Page 11

MAINTENANCE AND FINAL ANAL YSIS
Maintenance
Inspect the wire rope and
hooks for signs of wear or damage
before and after each operation.
Worn and damaged parts must
be replaced. Do not attempt to
lengthen the wire rope or repair a
damaged rope.
Keep the wire rope and hooks
free from contaminants. Use a
clean towel to remove dirt & debris.
Using light oil on the wire rope
and hooks can prevent corrosion
from forming. When cleaning the
Cordless PullzAll tool be sure to
keep clear of electrical terminals
on battery pack and verify that the
battery is not cracked or otherwise
damaged.
Any hook that has twisted
components or excessive opening
may indicate over-loading of the
product. Contact a Warn authorized
service center for repairs,
replacement parts or accessories.
Examples of Wire Rope Damage:
Kinks, cuts, knots, mashed or
frayed portions, and broken
strands.
Examples of Hook Damage:
Cracks, twisted components,
excessive opening, seat wear,
loose or unclosed latch, and
corrosion.
Final Comment
This guide to proper pulling
techniques cannot cover all the
possible situations in which you
may need to use a PullzAll. In
the fi nal analysis, the decisions
you make will determine the fi nal
outcome. So think through each
situation and each step of use.
Always be mindful of your own
safety and the safety of others.
Pay attention and you’ll have fun.
WARNING
Never leave
the PullzAll
power cord
plugged in or the
battery in unit
when installing,
servicing or
storing.
WARNING
Always use
Warn Industries
Replacement
Parts when the
product needs
to be serviced.
Contact the
Warn Customer
Service
department to
fi nd the proper
replacement part
numbers (contact
information listed
in Warranty
information).
PullzAll™
Guide d’installation et manuel de
l’utilisateur
Chaque situation de traction et levage peut potentiellement occasionner des blessures.
Pour minimiser ce risque, il est important que vous lisiez ce guide de base avec
attention, que vous vous familiarisiez avec le maniement du PullzAll avant de l’utiliser et
que vous vous préoccupiez avant tout de la sécurité. Nous exposons dans ce guide de
nombreuses règles de sécurité fondamentales pour le maniement du PullzAll. Toutefois,
comme chaque situation de traction/levage est différente, votre bon sens et votre
attachement constant aux principes de sécurité sont d’une importance primordiale.
TABLE DES MATIÈRES:
SÉCURITÉ
Index des symboles ................................................................................................... 23
Mesures générales de sécurité ............................................................................24-27
SPÉCIFICATIONS
PullzAll 120 V c.a. avec fi l ......................................................................................... 28
PullzAll 24 V c.c. sans fi l ........................................................................................... 29
INSTRUCTIONS
Introduction à la traction utilitaire ............................................................................... 30
Principes de fonctionnement du PullzAll ..............................................................31-33
Source d’alimentation ........................................................................................... 34-35
Utilisation du PullzAll ............................................................................................ 36-39
Accessoires ............................................................................................................... 40
Techniques de câblage .............................................................................................. 41
Entretien et derniers commentaires .......................................................................... 42
WARN INDUSTRIES * THE BASIC GUIDE TO UTILITY PULLING
21
WARN INDUSTRIES 12900 SE Capps Road
PullzAll™ est une marque de commerce de Warn Industries Inc.
Warn® et le logo WARN sont des marques déposées de Warn Industries Inc.
© 2010 Warn Industries, Inc.
Clackamas, OR 97015
États-Unis
Service à la clientèle : (800) 543-WARN
(9276)
International : (503) 722-3008
Télécopie : (503) 722-3000
www.warn.com
Page 12
MESURES GÉNÉRALES DE SÉCURITÉ
SYMBOLE EXPLICATION
Lire le manuel d’utilisation
MESURES GÉNÉRALES DE SÉCURITÉ
Avertissements et mises en
garde
AVERTISSEMENT
Risque d’explosion/rupture
Risque d’incendie et de brûlure
Ne jamais soulever de charge au-dessus de
personnes
Ne pas déplacer des personnes
Positionner correctement la charge dans la
gorge du crochet
Ne jamais appliquer la charge sur l’extrémité
ou le loquet du crochet
Toujours porter des gants
Danger d’écrasement des doigts dans le
guide-câble
Toujours utiliser la sangle de crochet fournie
Risque de percement/coupure des mains
Risque de surface chaude
Enrouler le câble sur le dessus du tambour
Ne pas enrouler le câble sur le dessous du
tambour
Toujours porter un dispositif de protection
auditive et oculaire
Risque de choc électrique
Brochage de prise de chargeur
WARN INDUSTRIES * LE MANUEL DE BASE DES TECHNIQUES DE TREUILLAGE UTILITAIRE
23
Les directives suivantes comprennent des
indications intitulées AVERTISSEMENT, MISE EN
GARDE, AVIS et REMARQUE. Chacune a un objectif
bien précis : AVERTISSEMENT présente des consignes
de sécurité soulignant un danger potentiel qui, s’il n’est
pas évité, peut entraîner des blessures graves ou la mort.
MISE EN GARDE comprend des consignes de sécurité
signalant un danger potentiel qui, s’il n’est pas évité, peut
entraîner des blessures légères ou modérées. MISE EN
GARDE sert aussi à signaler une utilisation dangereuse.
MISE EN GARDE et AVERTISSEMENT identifi ent un
danger, indiquent comment l’éviter et montrent ses
conséquences possibles si on l’ignore. AVIS présente
des consignes visant à éviter les dommages matériels.
REMARQUE donne des renseignements additionnels
qui aident à accomplir une procédure. TRAVAILLEZ
PRUDEMMENT!
AVERTISSEMENT
RISQUES ASSOCIÉS AUX PRODUITS
CHIMIQUES ET RISQUE D’INCENDIE
Le non-respect des consignes peut entraîner
des blessures graves ou la mort.
• Toujours lire toutes les instructions et les
avertissements sur le chargeur de batterie, la batterie et
l’outil de traction sans fi l.
• Ne jamais faire fonctionner l’outil de traction dans un
environnement contenant des matériaux explosifs ou
combustibles.
Ne jamais exposer la batterie à une forte chaleur ou un feu.
•
• Ne jamais ranger la batterie du PullzAll sans fi l dans
une boîte ou poche à outils avec des clous, vis, clés,
etc. Le court-circuitage des bornes de la batterie peut
provoquer un incendie.
• Toujours éviter tout contact avec une fuite de la
batterie, ce qui peut se produire en cas d’utilisation ou
de température extrême.
• Toujours retirer la batterie lorsque l’appareil n’est pas
utilisé.
• Toujours éliminer ou recycler la batterie conformément
aux règlements en vigueur.
• Toujours protéger les bornes avec du ruban isolant
avant leur élimination pour empêcher tout court-circuit.
• Ne jamais tenter de démonter la batterie. Elle ne
contient aucune pièce réparable par l’utilisateur.
WARN INDUSTRIES * LE MANUEL DE BASE DES TECHNIQUES DE TREUILLAGE UTILITAIRE
24
RISQUE ÉLECTRIQUE
Le non-respect des consignes peut entraîner
des blessures graves ou la mort.
• Toujours utiliser une prise correctement mise à
la terre conçue pour fonctionner avec un courant
monophasé et protégée par un disjoncteur
différentiel.
• Ne jamais enlever la broche de terre de la fi che.
• Ne jamais faire passer les câbles électriques pardessus des bords tranchants.
• Ne jamais faire passer les câbles électriques à
travers des pièces mobiles ou à proximité.
• Ne jamais faire passer les câbles électriques à
proximité de pièces pouvant devenir chaudes.
• Ne jamais retirer le couvercle électrique du
chargeur de batterie.
• Ne jamais laisser le cordon d’alimentation de l’outil
de traction branché durant l’installation, le câblage,
l’entretien ou quand l’outil de traction n’est pas
utilisé.
• Ne jamais débrancher la liaison de mise à la terre.
• Ne jamais faire fonctionner l’appareil dans un
environnement humide.
• Toujours alimenter l’outil de traction uniquement
avec un circuit électrique possédant la tension
recommandée. Voir la fi che technique de l’outil de
traction pour plus de détails.
• Ne jamais utiliser le chargeur avec un cordon
ou une prise endommagé. Les remplacer
immédiatement.
• Ne jamais faire fonctionner le chargeur s’il a subit
un coup dur ou une chute, ou a été endommagé.
• Ne jamais charger la batterie dans un
environnement humide ou mouillé.
• Toujours charger la batterie à des températures
supérieures à 0 °C et inférieures à 49 °C. Ceci
est important et permettra d’éviter de graves
dommages à la batterie.
• Toujours ranger l’outil de traction et la batterie dans
un lieu où la température ne dépasse pas 49 °C.
• Toujours débrancher le chargeur lorsque la batterie
est complètement chargée.
Page 13
MESURES GÉNÉRALES DE SÉCURITÉ
MESURES GÉNÉRALES DE SÉCURITÉ
AVERTISSEMENT
DANGER DE CHUTE OU D’ÉCRASEMENT
Le non-respect des consignes peut entraîner
des blessures graves ou la mort.
• Ne jamais se servir de l’outil de traction pour
maintenir une charge.
• Ne jamais secouer le câble sous charge. Cela peut
endommager, surcharger et casser le câble.
• Ne jamais utiliser le câble de l’outil de traction pour
remorquer un véhicule ou objet. La charge d’impact
durant le remorquage peut excéder la résistance du
câble.
• Toujours s’assurer que le point d’ancrage choisi
peut supporter la charge et que la sangle ou la
chaîne ne glisse pas.
• Toujours prendre le temps d’utiliser des techniques
de câblage adaptées pour tirer/soulever.
• Ne jamais débobiner au-delà de la peinture rouge
sur le câble.
• Ne jamais dépasser la capacité de l’outil de traction
ou du câble indiquée sur la fi che technique du
produit. Un câblage double avec poulie ouvrante
permet de réduire la charge subie par l’outil de
traction.
• Ne jamais dépasser la capacité de traction
maximale de 454 kg.
• Toujours utiliser un point d’ancrage approprié
capable de supporter la charge.
• Toujours utiliser un matériel de montage, des
composants et des accessoires homologués par le
fabricant.
• Toujours rembobiner sous tension de charge
après chaque utilisation. Un câble enroulé de
manière serrée réduit le risque qu’il coince et soit
endommagé.
• Toujours enrouler le câble sur le tambour dans
le sens spécifi é par l’étiquette d’avertissement
apposée sur l’appareil ou fi gurant dans sa
documentation.
• Toujours éviter de faire marcher et d’arrêter l’outil
de traction rapidement de façon répétée (avec la
commande ou la prise). Cela peut endommager les
commandes du moteur ou le câble.
WARN INDUSTRIES * LE MANUEL DE BASE DES TECHNIQUES DE TREUILLAGE UTILITAIRE
AVERTISSEMENT
DANGER DE CHUTE OU D’ÉCRASEMENT
Le non-respect des consignes peut entraîner
des blessures graves ou la mort.
• Ne jamais attacher une sangle de dépannage au
crochet de l’outil de traction pour augmenter la
longueur d’un treuillage.
• Toujours utiliser un crochet muni d’un loquet.
• Toujours s’assurer que le loquet du crochet est
fermé et qu’il ne soutient aucune charge.
• Ne jamais appliquer la charge sur l’extrémité ou le
loquet du crochet. Appliquer la charge uniquement
au centre du crochet.
• Ne jamais utiliser un crochet dont l’ouverture de la
gorge a augmenté ou dont l’extrémité est courbée
ou tordue.
• Ne jamais essayer de remorquer un véhicule ou
un objet avec la sangle de dépannage directement
attachée au crochet de l’outil de traction.
• Ne jamais utiliser des sangles élastiques car elles
développent une force énorme en tension et sont
potentiellement dangereuses.
• Toujours éviter de tirer sur le côté, ce qui a pour
effet d’empiler le câble sur l’une des extrémités du
tambour. Cela peut endommager le câble ou l’outil
de traction.
• Ne jamais accrocher le câble à lui-même. Cela
l’endommagerait.
• Toujours utiliser une élingue, un câble à nœud
coulant ou une sangle.
• Ne jamais utiliser l’outil de traction pour soulever
ou transporter des personnes.
• Ne jamais se servir de l’outil de traction pour
soulever une charge au-dessous de personnes.
• Toujours choisir un point d’ancrage aussi distant
que possible. Cela assure à l’outil de traction une
puissance de traction maximum.
• Toujours utiliser un point d’ancrage approprié
capable de supporter la charge.
25
DANGER DE HAPPEMENT PAR DES
PIÈCES MOBILES
Le non-respect des consignes peut entraîner
des blessures graves ou la mort.
Consignes de sécurité générales :
• Toujours retirer les bijoux et porter des lunettes de
sécurité et des protège-oreilles.
• Toujours porter des gants, des lunettes de sécurité et
des protège-oreilles.
• Toujours garder les mains éloignées du câble, de
la boucle du crochet, du crochet et de l’ouverture
du guide-câble durant l’installation et l’utilisation de
l’appareil et l’enroulement ou le déroulement du câble.
• Toujours garder les mains et les vêtements éloignés
du câble, du crochet et de l’ouverture du guidecâble pendant le fonctionnement de l’appareil et
l’enroulement ou le déroulement du câble.
• Ne jamais laisser le câble glisser dans les mains.
• Toujours se familiariser avec l’outil de traction.
Prendre le temps de bien lire le manuel d’utilisation
afi n de comprendre l’outil de traction et son
fonctionnement.
• Ne jamais faire fonctionner l’outil de traction sous
l’effet de drogues, de l’alcool ou de médicaments.
• Ne jamais faire fonctionner le PullzAll en le portant sur
le côté.
• Toujours garder à l’esprit que les appareils à batterie
sont continuellement opérationnels.
Consignes de sécurité relatives au fonctionnement :
• Toujours porter des gants de cuir épais durant la
manipulation du câble d’acier.
• Toujours se tenir à l’écart du câble et de la charge
et ne jamais laisser personne s’approcher durant les
opérations de traction ou de levage.
• Toujours s’assurer que tout objet ou obstacle pouvant
gêner la bonne utilisation de l’outil de traction est
écarté.
• Ne jamais laisser le cordon d’alimentation de l’outil
de traction branché durant l’installation, le câblage,
l’entretien ou quand l’outil de traction n’est pas utilisé.
• Toujours utiliser la sangle de crochet fournie pour
enrouler ou dérouler le câble, durant l’installation ou
l’utilisation.
• Toujours faire très attention en manipulant le crochet
et le câble pendant les manœuvres de déroulement.
• Ne jamais installer et faire fonctionner un outil
de traction sans avoir lu et compris le manuel de
l’utilisateur.
• Ne jamais faire fonctionner cet appareil de traction si
l’on a moins de 16 ans.
WARN INDUSTRIES * LE MANUEL DE BASE DES TECHNIQUES DE TREUILLAGE UTILITAIRE
AVERTISSEMENT AVERTISSEMENT
DANGER DE HAPPEMENT PAR DES
PIÈCES MOBILES
Le non-respect des consignes peut entraîner
des blessures graves ou la mort.
Consignes de sécurité relatives à la traction :
• Toujours garder l’outil de traction et la charge à
tracter/soulever en vue lors des opérations de
traction/levage.
• Toujours exiger de l’opérateur et des personnes
présentes d’être conscients du câble et de la charge.
• Toujours être conscient de la stabilité de la charge
durant la traction/le levage. Veiller à ce que personne
ne s’approche. Alerter toutes les personnes alentour
en cas d’instabilité.
• Ne jamais toucher le câble ou le crochet lorsqu’une
autre personne manipule l’interrupteur de commande
ou durant les opérations de traction/levage.
• Ne jamais toucher le câble ou le crochet lorsque le
câble est tendu ou sous charge.
• Toujours inspecter le câble, le crochet et les élingues
avant de faire fonctionner l’outil de traction. Tout câble
effi loché, tordu ou endommagé doit être remplacé
immédiatement. Tous les composants endommagés
doivent être remplacés avant d’utiliser le produit.
Protéger toutes les pièces contre le risque de
dommages.
• Toujours enrouler le câble sur le tambour de façon
serrée après chaque utilisation. Durant l’enroulement
ou le déroulement, le câble peut changer de sens
inopinément s’il s’enchevêtre et se coince sur le
tambour. Un câble enroulé de manière serrée réduit le
risque qu’il coince.
AVERTISSEMENT
RISQUE DE COUPURE ET DE BRÛLURE
Le non-respect des consignes peut entraîner
des blessures graves ou la mort.
To avoid injury to hands and fi ngers:
• Always wear gloves, eye and ear protection.
• Never insert battery into charger if battery case is
cracked or damaged. Battery short or fi re may result.
• Never short battery terminals, because it may cause
sparks or burns.
26
Page 14

MESURES GÉNÉRALES DE SÉCURITÉ
ATTENTION
DANGER DE HAPPEMENT PAR DES
PIÈCES MOBILES
Le non-respect des instructions peut entraîner
des blessures mineures ou modérées.
Pour éviter de se blesser les mains ou les
doigts :
• Ne jamais laisser le câble glisser dans les mains.
• Toujours choisir un point d’ancrage aussi distant
que possible. Cela assure à l’outil de traction une
puissance de traction maximum.
ATTENTION
RISQUE DE COUPURE ET DE
BRÛLURE
Le non-respect des instructions peut
entraîner des blessures mineures ou
modérées.
• Toujours être attentif aux surfaces chaudes
éventuelles au niveau du moteur ou de la batterie
de l’outil de traction pendant ou après l’utilisation de
celui-ci.
• Toujours charger uniquement des blocs-batteries
NiMH pour PullzAll. Les autres types de batteries
peuvent exploser, causant dommages et blessures.
• Toujours lire toutes les instructions et les
avertissements sur le chargeur de batterie, la
batterie et l’outil de traction sans fi l.
ATTENTION
DANGER D’ÉCRASEMENT
Le non-respect des instructions peut
entraîner des blessures mineures ou
modérées.
• La commande à gâchette du PullzAll 120 V c.a.
avec fi l a un certain délai. Utiliser la vitesse de
rembobinage lente et relâcher la gâchette tôt pour
éviter de rembobiner la boucle du crochet dans le
guide-câble.
AVIS
ÉVITER D’ENDOMMAGER LE
PULLZALL ET L’ÉQUIPEMENT
• Toujours éviter de surchauffer le moteur de l’outil
de traction. Pour une traction/un levage de longue
durée, arrêter le moteur de l’outil de traction à
intervalles raisonnables pour lui permettre de
refroidir. Voir le tableau du guide de durée de
fonctionnement/cycle d’utilisation.
• Toujours ranger l’outil de traction dans un endroit
sûr, propre et sec.
CARACTÉRISTIQUES DU PULLZALL
Le PullzAll WARN® avec fi l comprend les fonctionnalités suivantes :
Le PullzAll WARN avec fi l est un puissant outil de traction. Alimenté par une source de 120
volts c.a., cet outil compact possède une capacité de traction de 454 kg.
L’appareil est doté d’une gâchette à vitesse variable permettant d’enrouler et dérouler le
câble, d’un câble de 4,6 m et 0,56 cm de diamètre et deux crochets avec fermoir.
1.
2.
3.
7.
9.
5.
8.
6.
1. Gâchette à vitesse variable 6. Cordon d’alimentation
2. Sélecteur directionnel 7. Boucle d’ancrage pivotante
3. Guide-câble 8. Interrupteur marche/arrêt
4. Crochet avec loquet et sangle 9. Câble
5. Indicateur de disponibilité/surcharge
Spécifi cations techniques du PullzAll WARN avec fi l
Capacité de traction max 454 kg
Diamètre du câble 0.56 cm
Source d’alimentation 120 V c.a.
Puissance d’entrée 1200 W (10A)
4.
WARN INDUSTRIES * LE MANUEL DE BASE DES TECHNIQUES DE TREUILLAGE UTILITAIRE
27
WARN INDUSTRIES * LE MANUEL DE BASE DES TECHNIQUES DE TREUILLAGE UTILITAIRE
28
Page 15

CARACTÉRISTIQUES DU PULLZALL
Le PullzAll WARN® sans fi l comprend les fonctionnalités suivantes :
Le PullzAll WARN sans fi l est un puissant outil de traction. Alimenté par une batterie
rechargeable de 24 volts, cet outil compact possède une capacité de traction de 454 kg.
L’appareil est doté d’une gâchette à vitesse variable permettant d’enrouler et dérouler le
câble, d’un câble de 4,6 m et 0,56 cm de diamètre et deux crochets avec fermoir.
1.
2.
3.
7.
9.
10.
8.
6.
5.
1. Gâchette à vitesse variable 6. Cordon d’alimentation
2. Sélecteur directionnel 7. Boucle d’ancrage pivotante
3. Guide-câble 8. Interrupteur marche/arrêt
4. Crochet avec loquet et sangle 9. Câble
5. Indicateur de disponibilité/surcharge 10. Bouton d’éjection de batterie
4.
INTRODUCTION À LA TRACTION UTILITAIRE
Bien, vous avez votre PullzAll
AVERTISSEMENT
Ne jamais faire
fonctionner
un PullzAll
sans avoir lu
et compris le
manuel de
l’utilisateur.
WARN et vous êtes prêt à l’utiliser.
Ce guide vous fournit une
compréhension globale du PullzAll
et vous enseigne les techniques
de base de traction/levage. Mais
avant de commencer, nous devons
souligner que les informations
contenues dans ce guide sont de
nature générale. Parce qu’il n’y a
pas deux situations identiques, il
serait pratiquement impossible de
les examiner toutes en détail. Nous
pouvons toutefois vous fournir
les principes généraux et les
techniques. Ce sera ensuite à vous
de prendre le temps d’analyser
la situation et d’appliquer la
technique adéquate.
Avec un peu de bon sens,
les informations exposées dans
ce guide peuvent vous aider à
soulever et tirer en toute sécurité.
Pensez juste à étudier chaque
situation de traction ou levage
avant d’agir.
Les instructions suivantes
vous aideront à comprendre le
fonctionnement du PullzAll afi n que
vous soyez bien préparé.
Spécifi cations techniques du PullzAll WARN sans fi l
Capacité de traction max 454 kg
Diamètre du câble 0.56 cm
Source d’alimentation Batterie 24 V c.c. (NiMH)
Puissance d’entrée 720 W (30 A)
WARN INDUSTRIES * LE MANUEL DE BASE DES TECHNIQUES DE TREUILLAGE UTILITAIRE
29
WARN INDUSTRIES * THE BASIC GUIDE TO UTILITY PULLING
30
Page 16
PRINCIPES DE FONCTIONNEMENT DU PULLZALL
Pour commencer, vous devez
vous familiariser avec votre PullzAll
et chacun de ses composants :
1.
Moteur Le moteur fournit le
couple au système d'engrenages
qui fait tourner le tambour du
PullzAll et enroule le câble.
2.
Tambour Le tambour du
PullzAll est le cylindre sur lequel
le câble s'enroule. Le tambour est
entraîné par le train d'engrenages
et le moteur. Son sens peut être
changé au moyen du sélecteur
directionnel. Le câble se déroule
par la partie supérieure du
tambour.
3.
Câble Le diamètre du câble
et sa longueur sont déterminés
par la structure et la puissance de
traction du PullzAll. Enroulé autour
du tambour du PullzAll, le câble
passe par le guide-câble et se
termine par une boucle pour l'axe
de chape du crochet.
2.
4.
4.
Guide-câble Quand vous
utilisez le PullzAll à un angle, le
guide-câble permet de guider le
câble sur le dessus du tambour.
Il minimise les dommages sur le
câble lorsqu'il traverse le support du
PullzAll.
5.
Train d'engrenages Les
engrenages réducteurs convertissent
le couple du moteur du PullzAll en
une force de traction considérable.
La conception du train d'engrenages
permet au PullzAll d'être léger et
compact.
6.
Limiteur de charge (non
représenté) Il s'agit d'un dispositif
qui coupe automatiquement
l'alimentation lorsque le circuit est
surchargé. L'indicateur DEL de
disponibilité/surcharge tourne au
rouge en cas de charges extrêmes et
clignote en rouge lorsque la charge
maximale a été dépassée.
1.
PRINCIPES DE FONCTIONNEMENT DU PULLZALL
AVERTISSEMENT
Toujours
garder l’œil sur
le PullzAll et la
charge tractée
durant les
opérations de
traction.
AVERTISSEMENT
Ne jamais
débobiner
au-delà de la
peinture rouge
sur le câble.
AVIS
Le PullzAll est
commandé par
la gâchette à
vitesse variable
et le sélecteur
directionnel.
Avant d'utiliser votre PullzAll
WARN pour tirer ou soulever
une charge, il est important de
comprendre comment il fonctionne.
Le principal avantage du PullzAll est
qu'il est portatif et qu'il peut servir
à de nombreux usages, aussi bien
pour les loisirs que pour le travail.
Réfl échissez sérieusement aux
façons dont vous comptez utiliser
le PullzAll afi n de vous éviter des
tracas plus tard.
Commande du PullzAll
L'outil PullzAll possède
un interrupteur marche/arrêt et
est commandé par un sélecteur
directionnel et une gâchette à
vitesse variable.
Le sélecteur directionnel
permet de commander la rotation
en avant et en arrière du tambour.
Maintenir la tension du câble lorsque
le câble est enroulé ou déroulé
pour éviter tout risque d'imbrication
pouvant coincer le câble et
l'endommager ainsi que le PullzAll.
Lorsque vous voyez la peinture
rouge sur le câble, ne déroulez plus
le câble. Vous risqueriez alors de
rembobiner le câble sur le tambour
dans le mauvais sens. Cela pourrait
endommager le câble et le guidecâble. La fl èche de sélection de sens
doit toujours correspondre au sens
du câble lorsqu'on l'enroule ou le
déroule.
Comment le PullzAll réagit aux
charges
Les performances du PullzAll sont
indiquées pour la capacité de traction
maximale. Celle-ci est obtenue lorsque
la première couche de câble est sur le
tambour. Au fur et à mesure que les
couches augmentent sur le tambour,
la puissance de traction décroît. C'est
le principe de base de l'avantage
mécanique.
Limiteur de charge
Le dépassement de la capacité
du PullzAll entraîne le déclenchement
du limiteur de charge, ce qui a pour
effet de couper l'alimentation du
moteur. Cela empêche la surchauffe et
des dommages potentiels au moteur.
À 90 % de capacité de traction,
l'indicateur de surcharge s'allume
en rouge. À 100 % de capacité de
traction, le limiteur de charge fait
clignoter l'indicateur de surcharge en
rouge et arrête le moteur du PullzAll.
Lorsque cela se produit, libérez la
charge en débobinant. Ne tentez
pas d'appliquer la même charge si le
limiteur de charge s'est déclenché,
car cela peut nuire à l'appareil. Si le
limiteur de charge ne se réarme pas,
communiquez avec un centre de
service autorisé.
3.
5.
WARN INDUSTRIES * LE MANUEL DE BASE DES TECHNIQUES DE TREUILLAGE UTILITAIRE
31
Si le limiteur de charge continue
à se déclencher, effectuez les actions
La gâchette à vitesse
variable possède deux modes de
fonctionnement :
1) Le mode à vitesse variable
pour effectuer un positionnement
précis de la charge;
2) Le mode pleine vitesse pour
les longues distances.
WARN INDUSTRIES * LE MANUEL DE BASE DES TECHNIQUES DE TREUILLAGE UTILITAIRE
32
suivantes :
1) Réduisez le poids de la charge.
2) Augmentez la distance du point
d'ancrage;
3) Dédoublez le câblage de traction.
Pour plus de détails : voir la section
des « Techniques de câblage » dans
ce manuel.
Page 17
PRINCIPES DE FONCTIONNEMENT DU PULLZALL
Mécanisme PullzAll
Il est important de comprendre
que plus la traction est longue,
plus cela crée de la chaleur dans le
moteur. Le déroulement du câble
génère également de la chaleur.
Laissez refroidir le moteur entre les
tractions, car une utilisation prolongée
du PullzAll sans refroidissement
endommagera le moteur.
Durée de fonctionnement/cycle
d'utilisation
Le PullzAll est conçu pour un
service de traction intermittent. Ne le
faites pas fonctionner pendant des
périodes prolongées avec le moteur
tournant à bas régime. Lorsque le
moteur de l'outil de traction atteint une
vitesse si faible qu’il peut caler, il se
met à surchauffer très rapidement, ce
qui peut l’endommager. Respectez
les durées de fonctionnement et de
refroidissement recommandées dans
le tableau indiqué. Si l'appareil ne
fonctionne pas après avoir refroidi,
appelez un centre de service agréé
WARN.
TABLEAU DES DURÉES DE
FONCTIONNEMENT/CYCLES D’UTILISATION
CHARGE (227 kg) (454 kg)
DURÉE DE
2 min 1 min
FONCTIONNEMENT
DURÉE DE
30 min 30 min
REFROIDISSEMENT
SOURCE D’ALIMENTATION
Le PullzAll est disponible en deux
AVERTISSEMENT
Ne jamais
laisser le cordon
d’alimentation
du PullzAll
branché ou la
batterie dans
l’appareil lors
de l’installation,
l’entretien ou le
stockage.
AVIS
Toujours laisser
la batterie
refroidir avant
de l’utiliser dans
l’outil et avant de
la charger.
AVERTISSEMENT
Ne jamais tenter
de démonter la
batterie ou de
retirer n’importe
quel composant.
AVERTISSEMENT
Toujours éviter
tout contact
avec une fuite
de la batterie,
ce qui peut se
produire en cas
d’utilisation ou
de température
extrême.
modèles : avec ou sans fi l. Chaque
modèle a ses avantages. Veillez à
ce que la source d'alimentation soit
branchée correctement en suivant
ces instructions :
PullzAll 120 V c.a. avec fi l
Prise correctement mise à la terre
Branchez le cordon d'alimentation
du PullzAll à une prise électrique à
trois voies correctement mise à la
terre et protégée par un disjoncteur
différentiel.
Intensité minimum
Si vous utilisez une rallonge ou
une génératrice, assurez-vous
qu'elle est prévue pour 15 ampères
minimum, l'intensité nécessaire pour
faire fonctionner le PullzAll à pleine
capacité.
PullzAll 24 V c.c. sans fi l
Entretien de la batterie
Mettez toujours l'interrupteur
marche/arrêt hors tension lorsque
l'appareil n'est pas utilisé. Des
dommages irréversibles à la batterie
peuvent se produire si vous laissez
l'appareil s'auto-décharger en position
« On ». Rangez la batterie et le
chargeur dans des endroits où la
température ne dépasse pas 49 ºC.
Lorsqu'une perte notable
de rendement est observée,
remplacez la batterie par une batterie
complètement chargée. Évitez
de faire fonctionner la batterie si
elle est complètement à plat. Cela
risquerait de l'endommager de façon
permanente.
de celle-ci et faites-la glisser hors du
corps du PullzAll.
Recharge de la batterie
Branchez le cordon du chargeur
dans une prise de courant standard,
puis insérez la fi che de charge de
batterie du chargeur dans la batterie.
Le voyant DEL rouge du chargeur
s'allume sans clignoter, indiquant que
la charge est en cours.
Une batterie complètement
déchargée doit se charger en deux
heures environ. Le processus s'arrête
automatiquement lorsque la charge
est terminée. Pour un rendement
optimal, débranchez le chargeur
et laissez la batterie refroidir à
température ambiante avant de s'en
servir dans le PullzAll.
Signifi cation du voyant du chargeur
de batterie :
1) DEL verte allumée : complètement
chargée
2) DEL rouge allumée : charge en
cours
3) DEL rouge clignotante : présence
d'une anomalie.
4) DEL verte clignotante : protection
pour cause de surchauffe.
WARN INDUSTRIES * LE MANUEL DE BASE DES TECHNIQUES DE TREUILLAGE UTILITAIRE
33
Installation de la batterie
1) Vérifi ez que l'interrupteur est en
position « Off ».
2) Glissez la batterie dans le corps
de l'appareil, en vous assurant que le
loquet est bien enclenché. Le bouton
de déverrouillage de la batterie doit
être en position haute.
Retrait de la batterie
1) Vérifi ez que l'interrupteur est en
position « Off ».
2) Appuyez sur le bouton de
déverrouillage de la batterie à l'arrière
WARN INDUSTRIES * LE MANUEL DE BASE DES TECHNIQUES DE TREUILLAGE UTILITAIRE
34
Si la DEL rouge clignote, arrêtez
la charge de la batterie et appliquez
les consignes de sécurité du chargeur
ci-dessous. Si le problème persiste,
contactez un centre de service agréé
WARN.
Page 18
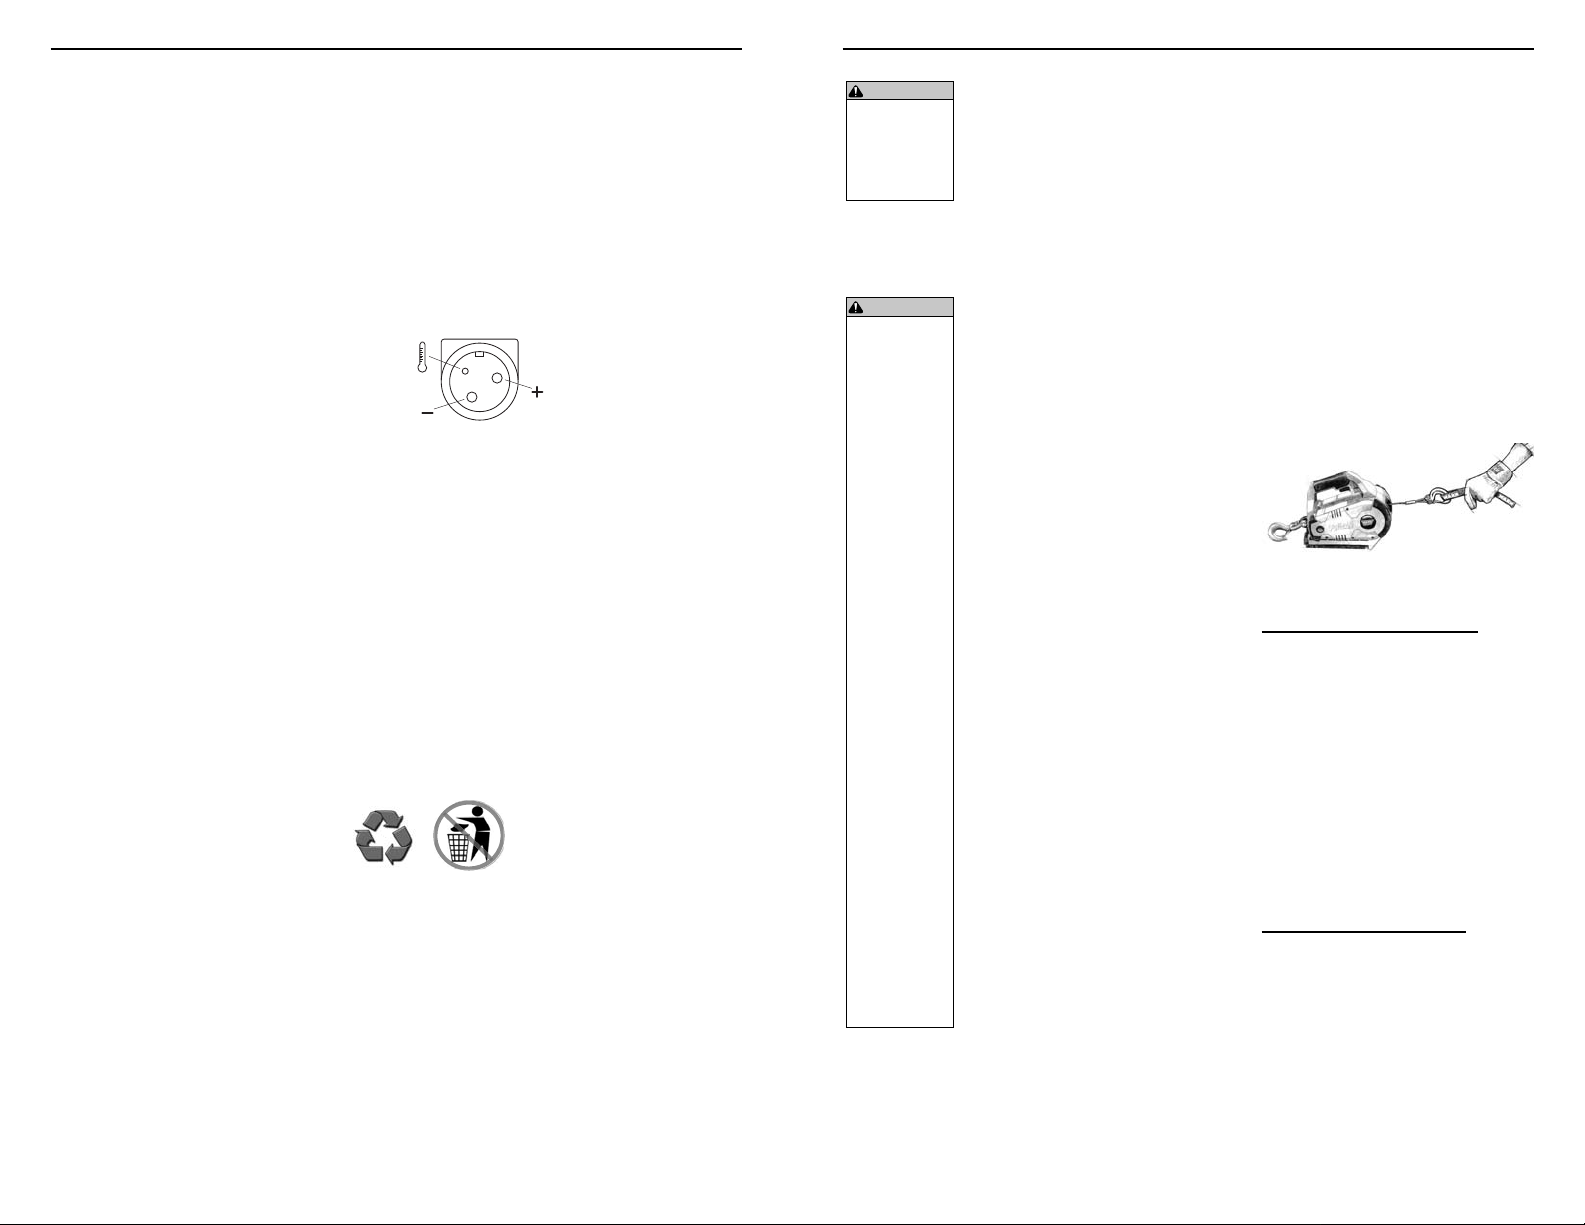
Consignes de sécurité du
chargeur
Suivez ces importantes
consignes de sécurité et lisez les
avertissements apposés sur le
chargeur de batterie, la batterie
et l'outil sans fi l PullzAll avant
d'utiliser le chargeur de batterie du
PullzAll sans fi l. Retirez le chargeur
de sa source d'alimentation lorsque
la batterie est complètement
chargée.
Utilisez uniquement le
chargeur fourni avec le PullzAll
sans fi l ou un accessoire de
chargeur WARN offi ciel. Chargez
uniquement des batteries
rechargeables pour PullzAll
WARN sans fi l; les autres types de
batteries peuvent exploser, causant
dommages et blessures.
Ne chargez pas la batterie
dans un environnement humide ou
mouillé.
Ne démontez pas le chargeur.
Portez-le à un centre de service
autorisé Warn pour entretien.
Notes importantes concernant la
charge
1) La batterie accepte
seulement environ 80 % de
sa capacité maximale lors des
premiers cycles de charge.
Toutefois, après les premières
charges et un usage normal,
la batterie se charge à pleine
capacité.
2) Le chargeur a été conçu
pour effectuer une charge rapide
de la batterie seulement lorsque
la température de celle-ci se situe
entre 0 et 49 ºC. Si la batterie est
trop chaude ou trop froide, elle ne
doit pas être chargée. (Cela peut
arriver si la batterie est chaude
suite à une utilisation intensive.)
Attendez qu'elle atteigne la
température ambiante avant de la
charger.
3) Une baisse sensible de
la durée de fonctionnement par
charge peut signifi er que la batterie
SOURCE D’ALIMENTATION
est presque à la fi n de sa durée de
vie et doit être remplacée.
Si la batterie ne se recharge pas
correctement :
a. Vérifi ez la tension à la prise
en branchant un autre appareil
électrique.
b. Vérifi ez si la tension du
chargeur est d'environ 30 V c.c.
Reportez-vous au brochage
de prise de chargeur ici ou sur
l'étiquette sur le chargeur.
c. Vérifi ez la propreté des
bornes de la batterie. Nettoyez-les
avec un coton-tige et de l'alcool si
nécessaire.
d. Si vous n'obtenez toujours
pas de charge correcte, contactez
le service clientèle Warn.
Mise au rebut de la batterie
La batterie du PullzAll utilise
la technologie NiMH. Vérifi ez la
réglementation en vigueur en
ce qui concerne l'élimination ou
le recyclage. Avant d'éliminer
la batterie, protégez les bornes
exposées avec un ruban isolant
épais pour éviter les courtscircuits.
Premiers soins : en cas de
contact d'une fuite de batterie avec
la peau, lavez avec du savon et de
l'eau. Si le liquide pénètre dans les
yeux, rincez à grande eau pendant
15 minutes.
UTILISATION DU PULLZALL
Entraînez-vous à utiliser
AVERTISSEMENT
Toujours utiliser
la sangle de
crochet fournie
pour enrouler ou
dérouler le câble.
AVERTISSEMENT
Toujours
utiliser une prise
correctement
mise à la terre,
conçue pour
fonctionner
avec un courant
monophasé de
120 V c.a. 50/60
Hz, et protégée
par un disjoncteur
différentiel.
Ne jamais
enlever la broche
de mise à la terre
de la fi che.
Ne jamais utiliser
l’appareil dans
des conditions
humides ou
mouillées.
Ne jamais faire
passer les câbles
électriques pardessus des bords
tranchants.
Ne jamais faire
passer les câbles
électriques à
travers des
pièces mobiles
ou à proximité.
Ne jamais faire
passer les câbles
électriques à
proximité de
pièces pouvant
devenir chaudes.
le PullzAll avant de tracter ou
soulever une charge. Une situation
réelle n'est pas un moment
approprié pour apprendre à utiliser
le PullzAll.
La connaissance des
techniques de traction et levage
permettra de maintenir un bon
niveau de sécurité pour vousmême et les autres. La partie la
plus importante de la procédure de
traction est peut-être ce qui est fait
avant de tracter.
Nous allons couvrir dans
cette section les fondements d'un
levage/traction effi cace. Toutefois,
c'est à vous d'analyser la situation
et de prendre les décisions
nécessaires pour l'utilisation
correcte du PullzAll. Appliquez ce
que vous savez de votre PullzAll,
les bases sur lesquelles vous
vous êtes entraîné et adaptez vos
techniques à la situation dans
laquelle vous vous trouvez.
Quelques points clés à se rappeler
quand vous utilisez le PullzAll
WARN :
1. Prenez toujours le temps
d'évaluer la situation dans
laquelle vous vous trouvez et
préparez l'opération de traction ou levage avec soin.
2. Prenez toujours votre temps
quand vous utilisez un PullzAll.
3. Utilisez le bon équipement
pour la situation.
4. Portez toujours des gants en
cuir et ne laissez pas le câble
glisser dans les mains.
5. Une seule personne doit faire
fonctionner le PullzAll pour
tirer une charge.
6. Pensez toujours en termes de
sécurité.
7. Entraînez-vous. Faites et
refaites les étapes.
Pour tirer ou Soulever
Les étapes suivantes décrivent
comment tirer ou soulever avec un
câblage simple. Les techniques de
câblage double ou multiple suivent
les mêmes étapes de base mais
utilisent une poulie ouvrante pour
assister la procédure. Pour plus de
détails, consultez la section des «
Techniques de câblage » dans ce
manuel.
Étape 1 : METTEZ DES GANTS
ET ATTACHEZ LA SANGLE DU
CROCHET. Assurez-vous que la
sangle de crochet est attachée au
crochet avec loquet du câble, pas le
crochet d'ancrage pivotant.
Étape 2 : BRANCHEZ À LA
SOURCE D'ALIMENTATION.
PullzAll 120 V c.a. avec fi l
1) Connectez le cordon
d'alimentation du PullzAll à une
prise électrique à trois voies
correctement mise à la terre.
2) Assurez-vous que les cordons
d'alimentation et les rallonges sont
placés de sorte qu'ils ne seront
pas endommagés par le câble ou
par la charge en déplacement.
3) Vérifi ez que les rallonges
électriques sont prévues pour 15
ampères.
PullzAll 24 V c.c. sans fi l
1) Assurez-vous que la batterie est
complètement chargée.
2) Vérifi ez que l'interrupteur est en
position « Off ».
3) Glissez la batterie dans le corps
de l'appareil, en vous assurant
que le loquet est bien enclenché.
Le bouton de déverrouillage de la
batterie doit être en position haute.
WARN INDUSTRIES * LE MANUEL DE BASE DES TECHNIQUES DE TREUILLAGE UTILITAIRE
35
WARN INDUSTRIES * LE MANUEL DE BASE DES TECHNIQUES DE TREUILLAGE UTILITAIRE
36
Page 19
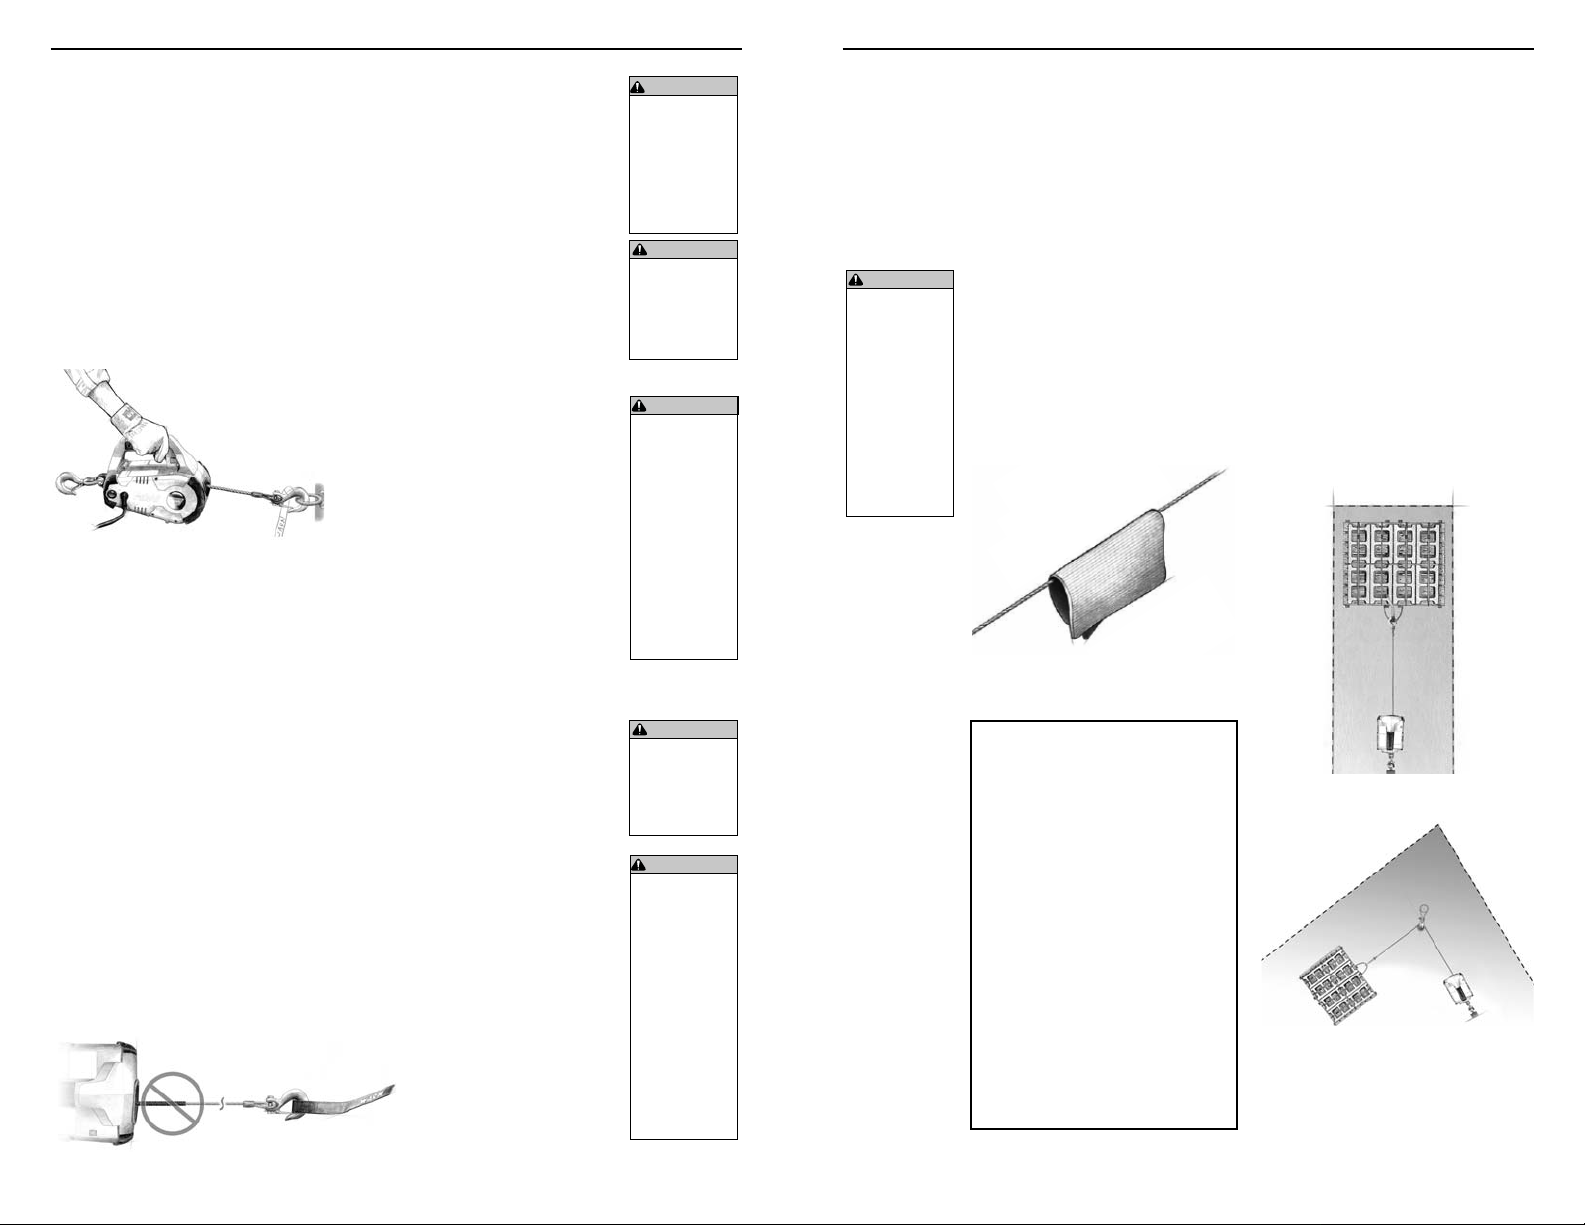
Étape 3 : ALLUMEZ LE
PULLZALL. Mettez l'interrupteur
en position « On ». Laissez toujours
l'interrupteur en position « Off »
lorsque le PullzAll n'est pas utilisé.
Étape 4 : DÉROULEZ LE CÂBLE
VERS LA CHARGE. Appuyez sur le
sélecteur directionnel pour dérouler.
Maintenez toujours la tension du
câble lorsque vous enroulez ou
déroulez le câble. Celui-ci peut se
dérouler à l'intérieur du PullzAll
causant une imbrication pouvant le
coincer et l'endommager.
Déroulement tout seul : fi xez
le crochet avec loquet à un point
d'ancrage et éloignez-vous de la
charge avec le PullzAll.
Déroulement avec un assistant:
demandez à la personne qui
s'occupe du câble de tenir la sangle
du crochet et de s'éloigner du
PullzAll tout débobinant le câble.
NE déroulez JAMAIS le câble
au-delà de la marque de peinture
rouge sur le câble. Cette marque
est visible après avoir déroulé 3,9 m
de câble. Vous risqueriez alors de
rembobiner le câble sur le tambour
dans le mauvais sens. Cela pourrait
endommager le câble et le guidecâble.
UTILISATION DU PULLZALL
Étape 5 : FIXEZ LE CÂBLE AU
POINT D'ANCRAGE. À l'aide du
crochet d'ancrage pivotant, fi xez le
PullzAll à un point d'ancrage capable
de supporter la charge.
Étape 6 : PLANIFIEZ LA
TRACTION. Alignez le câble de
façon à pouvoir tirer en ligne droite
autant que possible. Cela empêche
de tirer de côté, ce qui forcerait le
câble à frotter contre le guide-câble.
D'autre part, si vous tirez de côté,
le câble s'empile principalement sur
l'une des extrémités du tambour.
Cela peut endommager le câble et
le PullzAll.
Étape 7 : FIXEZ LE CÂBLE À
LA CHARGE. Établissez un point
de charge. La charge ne possède
souvent pas de point de charge
solide. Il peut s'avérer nécessaire de
fi xer la charge avec une élingue ou
une sangle de charge.
Étape 8 : ATTACHEZ LA MANILLE
D'ANCRAGE. Fixez la manille aux
deux bouts de la sangle ou élingue
en faisant attention de ne pas trop
serrer (serrez puis relâchez d'un
demi-tour). Fixez la manille dans la
gorge du crochet du PullzAll.
Étape 9 : METTEZ LE CÂBLE EN
TENSION. Appuyez sur le sélecteur
directionnel pour rembobiner le
câble. En utilisant la gâchette,
rembobinez lentement le câble
jusqu'à ce qu'il n'y ait plus de mou.
La tension du câble l'empêchera de
s'imbriquer et de se coincer. Lorsque
le câble est en tension, restez bien
à l'écart et ne passez jamais pardessus.
Étape 10 : VÉRIFIEZ LA CHARGE.
Avant de poursuivre la procédure,
assurez-vous que toutes les
connexions sont bien faites et
exemptes de débris.
AVERTISSEMENT
Toujours
utiliser un point
d’ancrage
approprié
capable de
supporter la
charge.
AVERTISSEMENT
Ne jamais
débobiner
au-delà de la
peinture rouge
sur le câble.
AVERTISSEMENT
Toujours garder
les mains et
les vêtements
éloignés du
câble, du crochet
et de l’ouverture
du guide-câble
pendant le
fonctionnement
de l’appareil et
l’enroulement ou
le déroulement
du câble.
AVERTISSEMENT
Ne jamais
accrocher
le câble à
lui-même. Cela
l’endommagerait.
ATTENTION
La commande
à gâchette du
PullzAll 120 V
c.a. avec fi l a
un certain délai.
Utiliser la vitesse
de rembobinage
lente et relâcher
la gâchette tôt
pour éviter de
rembobiner
la boucle du
crochet dans le
guide-câble.
UTILISATION DU PULLZALL
Commencez à tirer ou soulever
la charge
Les étapes suivantes
décrivent comment faire
fonctionner le PullzAll après qu’il
ait été câblé correctement.
Étape 11 : PLACEZ UN OBJET
SUR LE CÂBLE. Si vous le jugez
AVERTISSEMENT
Ne jamais utiliser
l’outil de traction
pour soulever ou
transporter des
personnes.
Ne jamais se
servir de l’outil
de traction
pour soulever
une charge
au-dessous de
personnes.
nécessaire et dans l’intérêt de la
sécurité, placez un tissu épais à
mi-chemin entre le PullzAll et le
point de charge pour absorber
l’énergie si le câble ou le point de
charge venait à se rompre. Vous
pourriez, par exemple, utiliser une
couverture ou une veste lourde,
une chaîne ou un sac à dos.
Dépannage
Si le PullzAll n'enroule ou
ne déroule pas, assurez-vous
que l'interrupteur marche/arrêt
est en position « On ». Vérifi ez
que l'indicateur de surcharge
ne clignote pas et que le voyant
vert indicateur d'alimentation est
allumé.
Sur le PullzAll avec fi l,
veillez à ce que le cordon
d'alimentation soit branché et le
circuit sous tension.
Sur le PullzAll sans fi l,
veillez à ce que la batterie
soit chargée. Essayez ensuite
d'enrouler le câble. Si le
problème persiste, contactez le
service à la clientèle Warn.
Étape 12 : FAÎTES CONNAÎTRE
VOS INTENTIONS. Avant de
commencer à tirer ou soulever,
assurez-vous que toutes les
personnes présentes à proximité
de l’appareil sont complètement
conscientes de vos intentions.
Indiquez exactement les
emplacements où les spectateurs
ne doivent pas se placer - jamais
derrière, devant ou sous la charge,
ni à proximité du câble ou de
la poulie ouvrante. La situation
peut présenter d’autres « zones
interdites ».
Établissez des « zones interdites »
WARN INDUSTRIES * LE MANUEL DE BASE DES TECHNIQUES DE TREUILLAGE UTILITAIRE
37
WARN INDUSTRIES * LE MANUEL DE BASE DES TECHNIQUES DE TREUILLAGE UTILITAIRE
38
Page 20

Étape 13 : COMMENCEZ À
TIRER OU SOULEVER. Appuyez
sur le sélecteur directionnel
pour rembobiner le câble. Avec
une légère tension sur le câble,
commencez à l’enrouler lentement
et régulièrement.
Ce qu’il faut surveiller sous
charge
le câble doit toujours être
enroulé sur le tambour.
Lorsque vous rembobinez,
assurez-vous que le câble
s’enroule sur le tambour de
manière uniforme et serrée.
Cela empêche les spires
extérieures de s’enfoncer
dans les spires intérieures, de
s’imbriquer et de coincer, ce qui
peut endommager le câble et le
PullzAll.
Lorsque vous enroulez
le câble en tirant de côté,
celui-ci s’empile principalement
sur l’une des extrémités du
tambour. Pour éviter que le
câble s’empile sur un côté du
tambour, alignez les tractions
aussi droit que possible.
Étape 14 : FIXEZ LA CHARGE.
Une fois la charge récupérée,
veillez à ce qu’elle soit bien
immobilisée avant de relâcher la
tension du câble.
Étape 15 : DÉCONNECTEZ LE
CÂBLE. Inversez le sélecteur
directionnel et déroulez une courte
longueur de câble. Déconnectez le
crochet avec loquet de la charge
dans la mesure du possible.
Étape 16 : DÉCROCHEZ DU
POINT D’ANCRAGE. Décrochez
le crochet d’ancrage pivotant du
point d’ancrage.
Étape 17 : REMBOBINEZ LE
CÂBLE. Inversez le sélecteur
directionnel pour rembobiner
le câble. Assurez-vous que le
câble qui est déjà sur le tambour
WARN INDUSTRIES * LE MANUEL DE BASE DES TECHNIQUES DE TREUILLAGE UTILITAIRE
UTILISATION DU PULLZALL
est enroulé de manière serrée.
Arrangez le câble à enrouler de
manière à ce qu’il ne s’entortille
ni ne s’emmêle pendant le
rembobinage. Gardez toujours
une tension dans le câble et
rembobinez-le sur le tambour. Ne
laissez jamais le câble glisser dans
les mains.
Si vous êtes seul, fi xez le crochet
avec loquet à un point d’ancrage,
appliquer une légère tension
au câble et déplacez-vous pour
ramener lentement le PullzAll vers
le point d’ancrage à mesure que le
câble s’enroule sur le tambour.
Si une autre personne s’occupe du
câble, en maintenant la tension,
elle doit se déplacer pour ramener
le câble en le tirant par la sangle
de crochet. Si vous ne disposez
pas de sangle de crochet, utilisez
un morceau de corde ou quelque
chose de similaire. Pour éviter
tout accident grave, éloignez
TOUJOURS les doigts de la
zone du crochet lorsque vous
rembobinez.
N’UTILISEZ PAS le limiteur de
charge pour arrêter le crochet
contre le guide-câble; le crochet
ne doit pas être rembobiné dans
l’appareil.
Étape 18 : ÉTEIGNEZ LE PullzAll
Mettez l’interrupteur à la position «
Off ». Rangez le PullzAll dans un
endroit frais et sec.
Les opérations de traction sont à
présent terminées.
39
AVIS
Éviter de
surchauffer
le moteur du
PullzAll. Pour
une traction de
longue durée,
arrêter le moteur
à intervalles
raisonnables pour
lui permettre de
refroidir.
Voir le tableau
du guide de
durée de
fonctionnement.
ATTENTION
La commande
à gâchette du
PullzAll 120 V
c.a. avec fi l a
un certain délai.
Utiliser la vitesse
de rembobinage
lente et relâcher
la gâchette tôt
pour éviter de
rembobiner
la boucle du
crochet dans le
guide-câble.
AVIS
Toujours éviter
de tirer sur le
côté, ce qui
a pour effet
d’empiler le
câble sur l’une
des extrémités
du tambour.
Cela peut
endommager
le câble ou le
PullzAll.
AVERTISSEMENT
Toujours garder
les mains et les
vêtements éloignés
du câble, du crochet
et de l’ouverture du
guide-câble pendant
le fonctionnement
de l’appareil et
l’enroulement ou
le déroulement du
câble.
ACCESSORIES
traction portatif pratique. Certains
des accessoires suivants sont
indispensables pour de bonnes
conditions de fonctionnement du
PullzAll, alors que d’autres le rendent
plus polyvalent et simple d’utilisation.
Gloves: Gants : Le câble, par
usure, va présenter des « barbillons
» qui peuvent déchirer la peau. Il
est extrêmement important de
porter des gants de protection
pendant l’utilisation du PullzAll ou
la manipulation du câble. Évitez de
porter des vêtements amples ou quoi
que ce soit qui puisse se prendre
dans le câble ou dans d’autres
ATTENTION
Ne jamais
attacher une
sangle de
dépannage
au crochet du
PullzAll pour
augmenter la
longueur d’une
traction.
Ne jamais utiliser
des sangles
élastiques car
elles développent
une force
énorme en
tension et sont
potentiellement
dangereuses.
parties mobiles de l’appareil.
Sangle à crochet : utilisez la sangle
pour tenir le crochet tout en gardant
les doigts éloignés du guide-câble
pendant l’actionnement du câble. Les
outils de traction développent une
force énorme et peuvent facilement
arracher des doigts ou un membre
malencontreusement pris dans le
câble. Mettez le crochet dans la
boucle et tenez la sangle entre le
pouce et l’index.
Élingue : peut être utilisée pour
attacher une charge.
Le PullzAll est un outil de
WARN INDUSTRIES * THE BASIC GUIDE TO UTILITY PULLING
40
Poulie ouvrante : utilisée
correctement, la poulie multifonction
vous permet de : (1) augmenter la
puissance de traction du PullzAll et (2)
changer la direction de traction sans
endommager le câble. L’utilisation
correcte de la poulie est couverte dans
la section « Techniques de câblage ».
Clevis/D-Shackles: The D-Shackle
is a safe means for connecting the
looped ends of straps and snatch
blocks. The shackle’s pin is threaded
to allow easy removal.
Sangle : généralement faite à
base de nylon ultra-résistant de haute
qualité, elle offre à l’opérateur un
moyen d’attacher le câble du PullzAll à
une charge ou un point d’ancrage.
Les kits d’accessoires sont
disponibles pour le PullzAll.
Communiquez avec le service à la
clientèle WARN pour en savoir plus.
Page 21
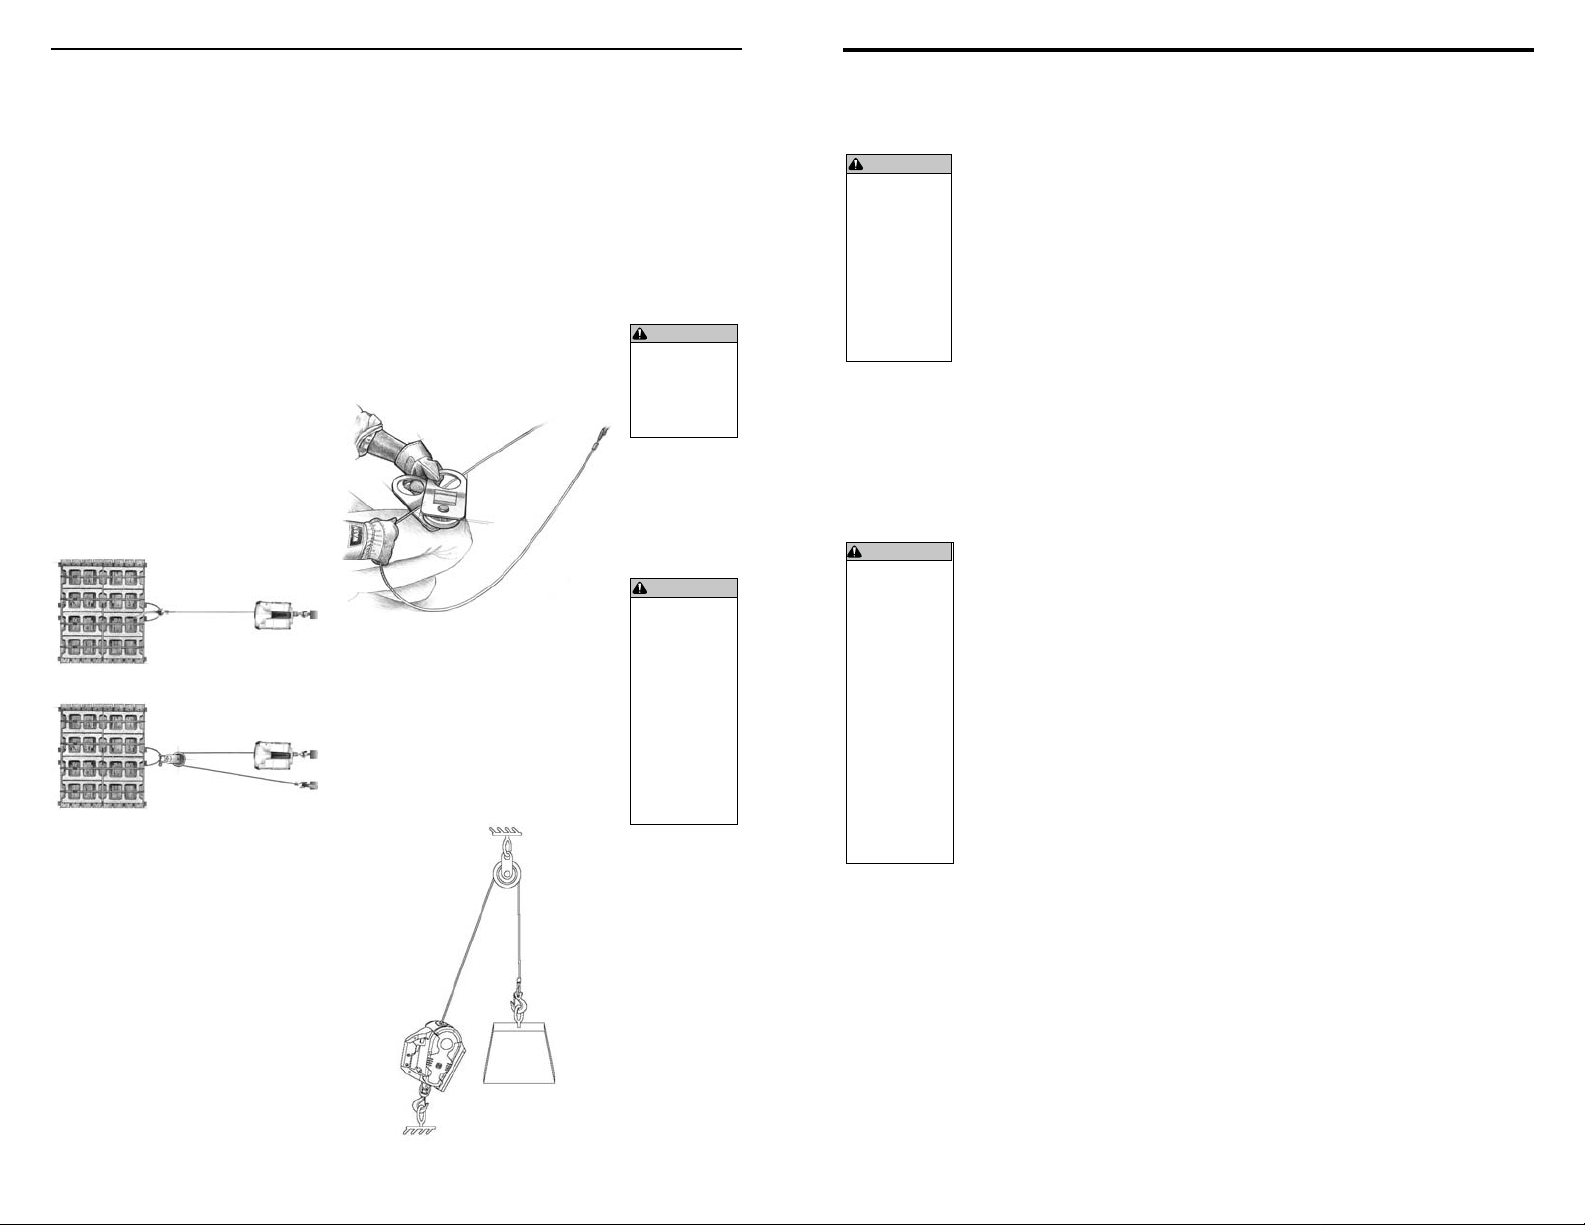
Différentes situations de traction
nécessitent d’autres techniques de
traction. Celles-ci peuvent aller d’un
manque de place pour obtenir une
traction ou un levage suffi sant en
utilisant un câblage direct à la simple
augmentation de la puissance de
traction ou au maintien d’une traction
en ligne droite. Vous devrez évaluer
la technique la plus adaptée à votre
situation. Pensez toujours « sécurité
». Pensez à étudier chaque situation
avant d’agir.
Augmentation de la puissance et
de la durée de traction
Dans certains cas, vous aurez
besoin de plus de puissance de
traction. L’utilisation de poulies
ouvrantes augmente l’avantage
mécanique et, par là même, la
puissance de traction :
Exemple de traction de palette :
Câblage simple
Câblage double
Câblage double
Comme la puissance de traction
décroît en fonction des couches de
câble sur le tambour du PullzAll, vous
pouvez utiliser une poulie ouvrante
pour dédoubler le câblage et réduire
la quantité de câble sur le tambour.
Cela réduit le nombre de couches de
câble sur le tambour et augmente la
puissance de traction.
Commencez par dérouler le
câble. Attachez le crochet à un point
d’ancrage et faites passer le câble
par une poulie ouvrante.
TECHNIQUES DE CÂBLAGE
Tout en utilisant la poulie
ouvrante, déroulez suffi samment de
câble pour atteindre le point de charge.
NE DÉBOBINEZ PAS au-delà de la
marque de peinture rouge sur le câble.
Vous risqueriez alors de rembobiner le
câble sur le tambour dans le mauvais
sens. Cela pourrait endommager le
câble et le guide-câble.
Fixez le câble sur le point
d’ancrage avec une sangle ou une
élingue. Attachez la manille d’ancrage.
Fixez la manille aux deux bouts de la
sangle ou élingue en faisant attention
de ne pas trop serrer (serrez puis
relâchez d’un demi-tour).
Levage
Ancrez le PullzAll de sorte qu’il
soit décalé et non aligné avec l’objet
à soulever. Ne tentez pas de soulever
une charge si elle est décalée, cela
peut provoquer le balancement
dangereux de la charge. Ne laissez
jamais la charge se balancer ou
tourner sur elle-même.
AVERTISSEMENT
Ne jamais
débobiner
au-delà de la
peinture rouge
sur le câble.
AVERTISSEMENT
Ne jamais utiliser
l’outil de traction
pour soulever ou
transporter des
personnes.
Ne jamais se
servir de l’outil
de traction
pour soulever
une charge
au-dessous de
personnes.
ENTRETIEN ET DERNIERS COMMENTAIRES
Derniers commentaires
techniques de traction ne peut
pas couvrir toutes les situations
possibles où vous pourriez avoir
à utiliser un PullzAll. En dernière
analyse, les décisions que vous
prendrez détermineront le résultat
fi nal. Assurez-vous donc de bien
réfl échir à chaque situation et à
chaque étape à effectuer. Gardez
toujours à l’esprit votre propre
sécurité et celles des personnes
alentour. Faites attention et vous
passerez un bon moment.
AVERTISSEMENT
Ne jamais
laisser le cordon
d’alimentation
du PullzAll
branché ou la
batterie dans
l’appareil lors
de l’installation,
l’entretien ou le
stockage.
AVERTISSEMENT
Toujours utiliser
des pièces de
rechange Warn
Industries lors
de l’entretien du
produit. Contacter
le service à la
clientèle Warn
pour obtenir
les références
correctes des
pièces de
rechange (voir
les coordonnées
dans la section
sur la garantie).
Maintenance
Inspectez le câble et les
crochets pour détecter tout signe
d’usure ou de dommage avant
et après chaque utilisation. Les
pièces usées et endommagées
doivent être remplacées. Ne tentez
pas de rallonger le câble ou de le
réparer s’il est endommagé.
Gardez le câble et les
crochets exempts de contaminants.
Utilisez une serviette propre pour
enlever saletés et débris. Appliquez
une huile légère sur le câble et
les crochets pour empêcher la
corrosion. Lors du nettoyage de
l’outil sans fi l PullzAll, prenez soin
de vous tenir à l’écart des bornes
électriques sur la batterie et vérifi ez
que la batterie n’est pas fi ssurée
ou endommagée.
Tout crochet tordu ou dont la
gorge est excessivement ouverte
peut indiquer une surcharge de
l’appareil. Contactez un centre
de service agréé WARN pour
les réparations, les pièces de
rechange ou des accessoires.
Exemples de dommages
aux câbles : torsions, coupures,
nœuds, portions écrasées ou
effi lochées et torons cassés.
Exemples de dommages
aux crochets : fi ssures,
composants tordus, gorge
excessivement ouverte, usure de
siège, loquet desserré ou restant
ouvert, et corrosion.
Le manuel de base pour les
WARN INDUSTRIES * LE MANUEL DE BASE DES TECHNIQUES DE TREUILLAGE UTILITAIRE
41
WARN INDUSTRIES * LE MANUEL DE BASE DES TECHNIQUES DE TREUILLAGE UTILITAIRE
42
Page 22
PullzAll™
PRECAUCIONES GENERALES DE SEGURIDAD
SÍMBOLO EXPLICACIÓN
Lea el manual de instrucciones
Peligro de explosión o rotura
Guía de instalación y del usuario
En cada situación de arrastre o elevación existe la posibilidad de ocasionar daños
personales. Para reducir al mínimo ese riesgo, le pedimos que lea esta guía básica
atentamente. Por favor, familiarícese con la operación del PullzAll antes de usarlo y
tenga siempre presente la seguridad. En esta guía se establecen muchas de las reglas
básicas de seguridad durante el uso del PullzAll. No obstante, debido a que cada
situación de arrastre o elevación es diferente, es muy importante el buen juicio y un
enfoque constante en la seguridad.
ÍNDICE:
SEGURIDAD
Índice de símbolo .....................................................................................................44
Precauciones generales de seguridad ................................................................. 45-48
ESPECIFICACIONES
PullzAll con cable de alimentación de 120 V de CA .................................................. 49
PullzAll inalámbrico de 24 V de CC ........................................................................... 50
INSTRUCCIONES
Introducción al arrastre de uso general .................................................................... 51
Cómo funciona el PullzAll .................................................................................... 52-54
Fuente de alimentación ....................................................................................... 55-56
Uso del PullzAll ...................................................................................................57-60
Accesorios ............................................................................................................... 61
Técnicas de maniobrado ........................................................................................... 62
Mantenimiento y análisis fi nal .................................................................................. 63
PRODUCTOS DE WARN INDUSTRIES 12900 SE Capps Road
Servicio de atención al cliente:
Desde fuera de EE.UU.: (503) 722-3008
PullzAll™ es una marca comercial de Warn Industries, Inc.
Warn® y el logotipo de WARN son marcas comerciales registradas de Warn Industries, Inc
© 2010 Warn Industries, Inc.
Clackamas, OR 97015
EE.UU.
(800) 543-WARN
(9276)
Fax: (503) 722-3000
www.warn.com
Peligro de incendio y quemaduras
No eleve nunca una carga por encima de una
persona
No lo use para desplazar personas
Fije de forma apropiada la carga en la
garganta del gancho
No aplique nunca una carga a la punta del
gancho o al seguro.
Lleve puestos guantes en todo momento
Peligro de aplastamiento de los dedos o la
guía del cable
Use siempre la correa del gancho
suministrada
Peligro de perforación o corte en las manos
Peligro de superfi cie caliente
Enrolle el cable en la parte superior del
tambor
No enrolle el cable en la parte inferior del
tambor
Lleve puesta siempre protección ocular y
auditiva
Peligro de electrocución
Disposición de las clavijas del enchufe del
cargador
WARN INDUSTRIES * LA GUÍA BÁSICA DEL ARRASTRE DE USO GENERAL
44
Page 23

PRECAUCIONES GENERALES DE SEGURIDAD
PRECAUCIONES GENERALES DE SEGURIDAD
Advertencias y precauciones
Al leer estas instrucciones, verá ADVERTENCIAS,
PRECAUCIONES, AVISOS y NOTAS. Cada mensaje
tiene un propósito específi co. Las ADVERTENCIAS
son mensajes de seguridad que indican que está
ante una situación potencialmente peligrosa que,
si no se evita, puede resultar en lesiones graves
o la muerte. Las PRECAUCIONES son mensajes
de seguridad que indican una situación de posible
peligro que, si no se evita, puede resultar en lesiones
menores o de poca gravedad. Las PRECAUCIONES
pueden alertar también contra prácticas no seguras.
Las PRECAUCIONES y ADVERTENCIAS identifi can
el peligro, indican cómo evitarlo y advierten de las
posibles consecuencias si no se evita tal peligro.
Los AVISOS son mensajes para evitar daños a la
propiedad. Las NOTAS son información adicional
que le ayudarán a llevar a cabo un procedimiento.
¡TRABAJE SIEMPRE DE FORMA SEGURA!
ADVERTENCIA
PELIGRO DE INCENDIO O POR PRESENCIA
DE PRODUCTOS QUÍMICOS
De no seguirse estas instrucciones, podrían
producirse lesiones graves o incluso la muerte.
• Lea siempre todas las instrucciones y señales de
precaución del cargador de batería, el paquete de
batería y la herramienta de arrastre inalámbrica.
• No opere nunca la herramienta de arrastre donde
haya material explosivo o combustible.
• No exponga nunca la unidad de la batería a alto
calor o al fuego.
• No guarde nunca la unidad de la batería del PullzAll
inalámbrico en una caja de herramientas o un bolsillo
junto con clavos, tornillos, llaves, etc. Un cortocircuito
en el borne de la batería podría provocar un incendio.
• Evite siempre el contacto con una fuga de la batería,
que puede darse si las condiciones de uso o las
temperaturas son extremas.
• Quite siempre la batería cuando no vaya a usar la
unidad.
• Deseche o recicle la batería siempre de acuerdo a
las ordenanzas o regulaciones locales.
• Antes de proceder a desecharla, proteja siempre los
bornes con cinta aislante para evitar cortocircuitos.
• No trate nunca de desmontar la batería. No hay
ninguna pieza en el interior que deba ser manipulada
por el usuario.
WARN INDUSTRIES * LA GUÍA BÁSICA DEL ARRASTRE DE USO GENERAL
PELIGRO ELÉCTRICO
De no seguirse estas instrucciones, podrían
producirse lesiones graves o incluso la muerte.
• Utilice siempre un receptáculo monofásico con
• No quite nunca la clavija de conexión a tierra del
• No pase nunca los cables eléctricos por bordes
• No pase nunca los cables eléctricos por partes
• No pase nunca los cables eléctricos cerca de
• No retire nunca la cubierta eléctrica del cargador
• No deje nunca enchufado el cable de alimentación
• No desconecte nunca la conexión a tierra.
• No haga funcionar nunca este producto en un
• Opere la herramienta de arrastre únicamente con el
• No opere nunca el cargador si el cable o el enchufe
• No opere nunca el cargador si ha recibido un golpe
• No cargue nunca la batería en un ambiente
•
• Guarde siempre la herramienta de tracción y el
• Desconecte siempre el cargador cuando la batería
45
ADVERTENCIA
conexión adecuada a tierra protegido por un
interruptor de averías por conexión a tierra.
enchufe.
agudos.
móviles o cerca de ellas.
piezas que se calienten.
de batería.
de la herramienta de arrastre al realizar la
instalación, cuando se esté haciendo maniobras,
mantenimiento o reparaciones, o cuando no la esté
usando.
ambiente húmedo.
voltaje del sistema eléctrico recomendado. Consulte
la hoja de especifi caciones de la herramienta si
desea información detallada.
están dañados. Reemplácelos inmediatamente.
seco, si se ha caído o se ha dañado de alguna
forma.
húmedo.
Cargue siempre el paquete de la batería a
temperaturas superiores a 0 °C e inferiores a 49 °C.
Este aspecto es importante y evitará daños graves a
la batería.
paquete de batería donde las temperaturas no
excedan los 49ºC.
esté totalmente cargada.
ADVERTENCIA ADVERTENCIA
PELIGRO DE CAÍDA O APLASTAMIENTO
PELIGRO DE CAÍDA O APLASTAMIENTO
De no seguirse estas instrucciones, podrían
producirse lesiones graves o incluso la
muerte.
• Nunca utilice la herramienta de arrastre para
asegurar una carga.
• No golpee nunca el cable de la carga. Un golpe
a la carga puede dañar, sobrecargar o romper el
cable.
• No utilice nunca el cable de la herramienta de
arrastre para remolcar otro vehículo o un objeto.
Un tirón en la tracción puede exceder la resistencia
del cable.
• Verifi que siempre que el anclaje seleccionado
soportará la carga y que la correa o la cadena no
se deslizará.
• Tómese siempre su tiempo para asegurar la
carga con técnicas apropiadas antes de arrastrar o
elevar.
• No desenrolle nunca más allá del punto donde
empieza la pintura roja en el cable.
• No exceda nunca la capacidad de la herramienta
de arrastre o del cable que se indica en la hoja
técnica del producto. Emplee un cable doble
utilizando una polea pasteca para reducir la carga
de la herramienta de arrastre.
• Nunca exceda la capacidad máxima de 454 kg en
la tracción.
• Use siempre un anclaje apropiado que sea capaz
de soportar la carga.
• Use siempre piezas de montaje, componentes y
accesorios aprobados por el fabricante.
• Enrolle siempre bajo tensión de carga después
del uso. Un cable bien enrollado reduce las
posibilidades de tener “dobleces” que puedan
dañar el cable.
• Enrolle y desenrolle el cable al tambor siempre
en la dirección especifi cada en la etiqueta de
advertencia del producto o en la documentación.
• Evite siempre los tirones u obstrucciones (ciclos
rápidos de encendido y apagado) durante el uso de
la herramienta de arrastre. Esto podría dañar los
controles del motor y el cable.
WARN INDUSTRIES * LA GUÍA BÁSICA DEL ARRASTRE DE USO GENERAL
De no seguirse estas instrucciones, podrían
producirse lesiones graves o incluso la
muerte.
• Nunca sujete la correa de recuperación al gancho
de la herramienta de arrastre para incrementar la
longitud de arrastre.
• Utilice siempre un gancho con seguro.
• Verifi que siempre que el seguro del gancho está
cerrado y que no soporta carga.
• No aplique nunca una carga a la punta del gancho
o al seguro. Aplique la carga únicamente al centro
del gancho.
• No use nunca un gancho cuya abertura haya
aumentado o cuya punta esté doblada o retorcida.
• Nunca intente remolcar un vehículo u objeto con
la correa de recuperación sujeta directamente al
gancho de la herramienta de arrastre.
• Nunca utilice correas de goma que producen una
gran fuerza al estirarse, lo cual supone un posible
peligro.
• Evite siempre los enrollados laterales, ya que
pueden apilar el cable en un extremo del tambor.
Esto puede dañar el cable o la herramienta de
arrastre.
• No enganche nunca el cable sobre sí mismo. Esto
lo deterioraría.
• Utilice siempre una cadena estranguladora, un
cable estrangulador o una correa.
• No utilice nunca la herramienta de arrastre para
levantar o desplazar personas.
• No utilice nunca la herramienta de arrastre para
elevar objetos por encima de personas.
• Seleccione siempre un punto de anclaje lo más
lejano posible. De esta forma se proporciona a la
herramienta de tracción su máxima capacidad de
rendimiento.
• Use siempre un anclaje apropiado que sea capaz
de soportar la carga.
46
Page 24
PRECAUCIONES GENERALES DE SEGURIDAD
PRECAUCIÓN
PRECAUCIÓN
PRECAUCIONES GENERALES DE SEGURIDAD
PELIGRO DE ENREDARSE EN LAS
PIEZAS EN MOVIMIENTO
De no seguirse estas instrucciones, podrían
producirse lesiones graves o incluso la muerte.
Seguridad general:
• No lleve nunca puestas joyas, y lleve siempre
protección ocular y auditiva.
• Lleve siempre puestos guantes y protección ocular y
auditiva.
• Mantenga siempre las manos alejadas del cable,
del bucle del gancho, del gancho y de la abertura de
la guía durante la instalación, la operación, y en el
enrollado y desenrollado.
• Mantenga siempre las manos y la ropa alejadas del
cable, del gancho y de la abertura de la guía durante el
accionamiento y el enrollado.
• Nunca deje que el cable se deslice por sus manos.
• Sepa siempre como usar la herramienta de arrastre.
Tómese su tiempo para leer bien las instrucciones
y la Guía de operación para poder comprender el
funcionamiento y uso de la herramienta de arrastre.
• No ponga nunca en funcionamiento esta herramienta
de arrastre si se encuentra bajo los efectos de drogas,
alcohol o medicamentos.
• No ponga nunca el PullzAll en funcionamiento si lo
está transportando a su lado.
• Tenga siempre presente que las unidades que
funcionan con batería están continuamente en
condición operativa.
Seguridad operacional:
• Lleve puestos siempre guantes gruesos de cuero para
manipular el cable.
• Manténgase siempre alejado del cable y de la carga,
y no deje que otros se acerquen cuando se realice la
operación de arrastre y elevación.
• Retire siempre cualquier elemento u obstáculo que
pueda interferir con la seguridad durante el uso de la
herramienta de arrastre.
• No deje nunca enchufado el cable de alimentación
de la herramienta de arrastre al realizar la instalación,
cuando se esté haciendo maniobras, mantenimiento o
reparaciones, o cuando no la esté usando.
• Use siempre la correa suministrada con el gancho
cuando vaya a enrollar o desenrollar el cable, durante
la instalación y durante la operación.
• Tome siempre medidas extremas de precaución al
manejar el gancho y el cable durante las maniobras de
enrollado y desenrollado.
• No accione ni instale nunca la herramienta de arrastre
sin antes leer y comprender completamente el manual
del usuario.
• Nunca use esta unidad de arrastre si es menor de 16
años de edad.
WARN INDUSTRIES * LA GUÍA BÁSICA DEL ARRASTRE DE USO GENERAL
ADVERTENCIAADVERTENCIA
PELIGRO DE ENREDARSE EN LAS
PIEZAS EN MOVIMIENTO
De no seguirse estas instrucciones, podrían
producirse lesiones graves o incluso la muerte.
Seguridad en el arrastre:
• Mantenga siempre la herramienta de arrastre, y la carga
de arrastre y elevación a la vista durante la operación.
• Requiera siempre al usuario y a las personas presentes
que vigilen el cable y la carga.
• Tenga siempre presente la estabilidad de la carga
durante la operación de arrastre y elevación; haga que
las personas presentes se mantengan alejadas. Alerte
a todas las personas presentes de cualquier posible
inestabilidad.
• No toque nunca el cable ni el gancho si hay alguien
cerca del interruptor de control o durante la operación de
arrastre y elevación.
• No toque nunca el cable ni el gancho mientras éstos se
encuentren en tensión o con carga.
• Inspeccione siempre el cable, el gancho y las eslingas
antes de poner en funcionamiento la herramienta
de arrastre. Si el cable esta deshilachado, retorcido
o dañado, deberá reemplazarse de inmediato. Los
componentes dañados deberán reemplazarse antes de
la operación. Evite que las piezas resulten dañadas.
• Siempre enrolle bien el cable en el tambor después
de cada uso. Durante el enrollado y desenrollado, la
dirección del cable puede variar inesperadamente si
el cable está dispuesto en capas en el tambor. Un
enrollado bien apretado reduce las posibilidades de
enredo.
ADVERTENCIA
PELIGRO DE CORTES Y QUEMADURAS
De no seguirse estas instrucciones, podrían
producirse lesiones graves o incluso la muerte.
Para evitar daños en las manos:
• Lleve siempre puestos guantes y protección ocular y
auditiva.
• No inserte nunca la batería en el cargador si la estructura
de la batería tiene alguna grieta o aparenta estar dañada.
Podría provocarse un cortocircuito o incendiarse la batería.
• No acorte nunca los bornes de la batería, ya que esto
podría provocar chispas o quemaduras.
47
PRECAUCIÓN
PELIGRO DE ENREDARSE EN LAS
PIEZAS EN MOVIMIENTO
De no seguirse estas instrucciones, podrían
producirse lesiones menores o moderadas.
Para evitar daños en las manos:
• Nunca deje que el cable se deslice por sus manos.
• Seleccione siempre un punto de anclaje lo más
lejano posible. De esta forma se proporciona a la
herramienta de tracción su máxima capacidad de
tracción.
PELIGRO DE CORTES Y
QUEMADURAS
De no seguirse estas instrucciones, podrían
producirse lesiones menores o moderadas.
• Tenga siempre en cuenta que las superfi cies del
motor de la herramienta de arrastre o la batería
pueden estar calientes durante o después del uso
de la misma.
• Cargue siempre el paquete de batería NiMH del
PullzAll solamente. Otros tipos de batería pueden
explotar provocando daños y lesiones personales.
• Lea siempre todas las instrucciones y señales de
precaución del cargador de batería, el paquete de
batería y la herramienta de arrastre inalámbrica.
WARN INDUSTRIES * LA GUÍA BÁSICA DEL ARRASTRE DE USO GENERAL
PELIGRO DE APLASTAMIENTO
De no seguirse estas instrucciones, podrían
producirse lesiones menores o moderadas.
• El PullzAll con alimentación por cable de 120 V de
CA tiene algo de demora en el control de gatillo.
Use la velocidad de enrollado lenta y suelte el gatillo
antes de lo normal para evitar que se enrolle el
bucle del gancho en la guía del cable.
AVISO
EVITE DAÑOS AL EQUIPO Y AL
CABRESTANTE
• Evite siempre el sobrecalentamiento del motor
de la herramienta de arrastre. Si la operación
de arrastre y elevación se va a realizar durante
un periodo de tiempo largo, deje que se enfríe
el motor primero. Consulte la tabla para ver las
pautas del tiempo de funcionamiento o ciclo de
trabajo.
• Guarde siempre la herramienta de arrastre en un
área protegida, limpia y seca.
48
Page 25
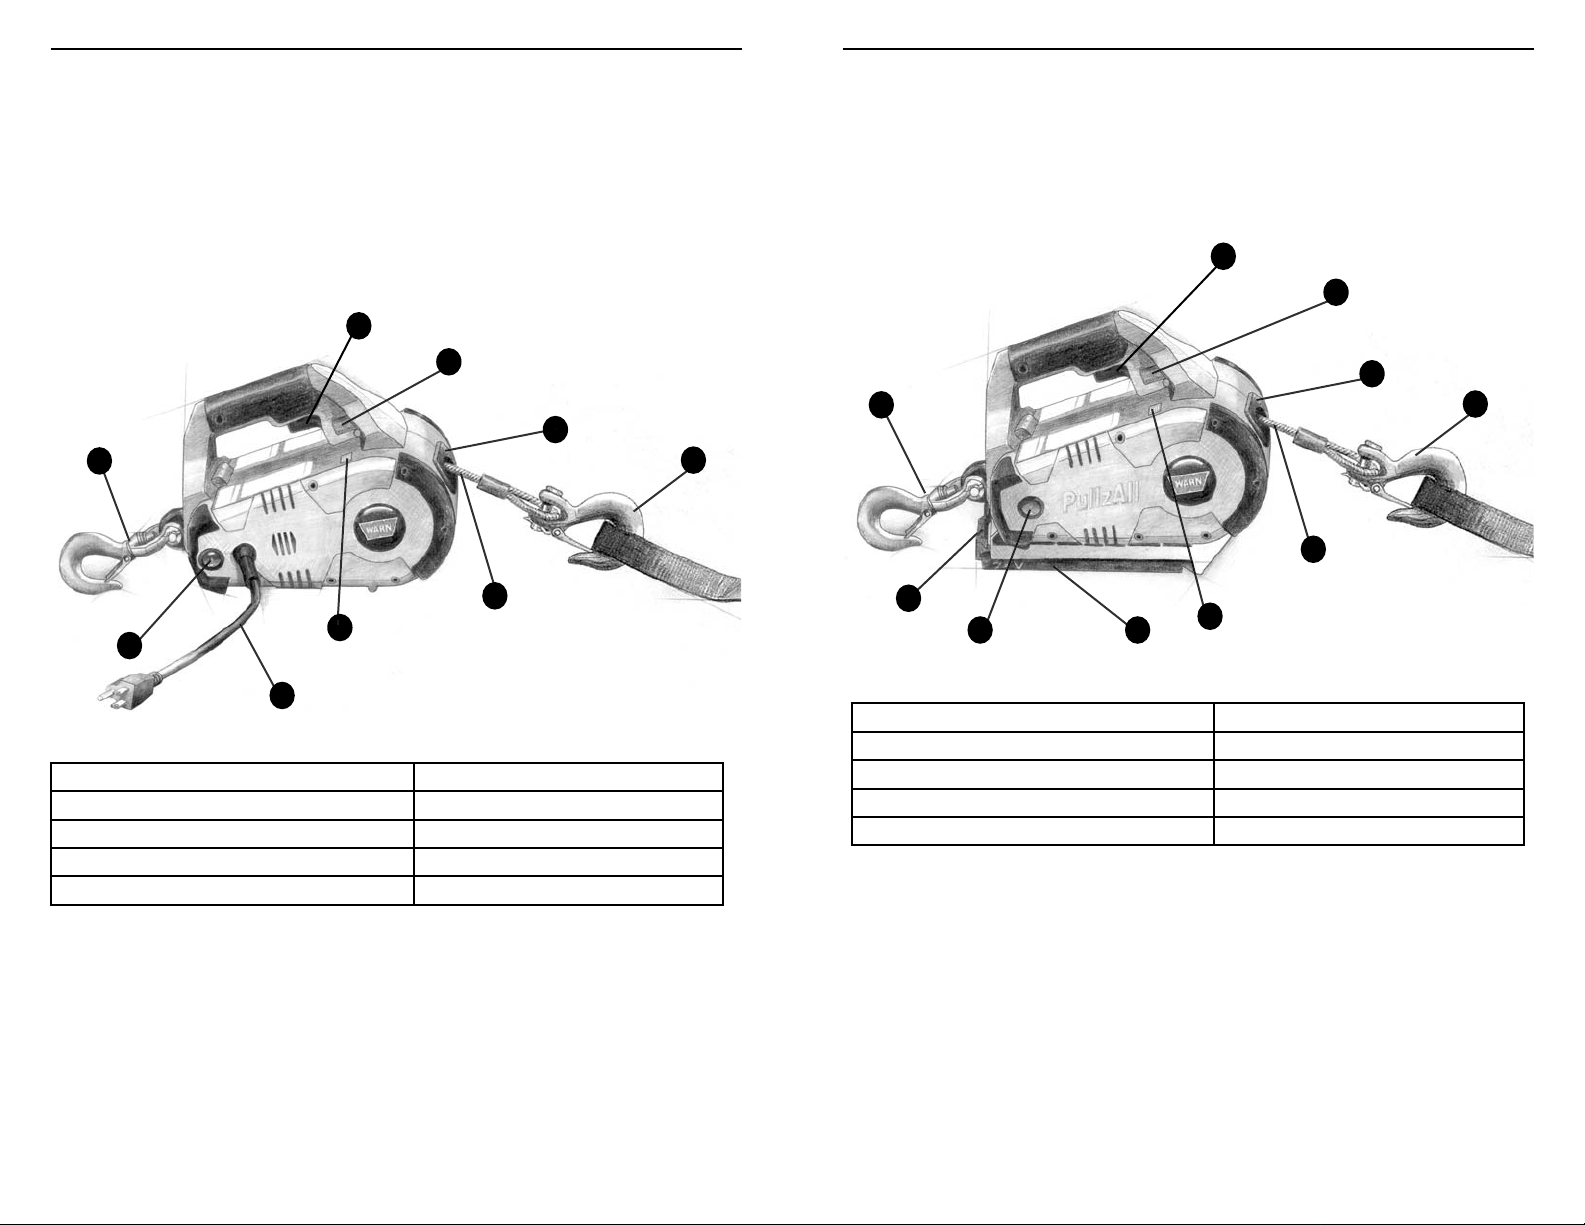
ESPECIFICACIONES DEL PULLZALL
El modelo PullzAll de WARN® con cable de alimentación cuenta con las siguientes
características:
El PullzAll con cable de alimentación de WARN es una herramienta de tracción de gran
potencia. Accionado por una fuente de energía de 240 voltios de CA, esta herramienta
compacta tiene una capacidad de tiro de 454 kilos (1000 libras).
La unidad tiene un gatillo de velocidad variable para operaciones de enrollado y
desenrollado, cable de 4,6 m de largo y 0,56 cm de diámetro y dos ganchos de presilla.
1.
ESPECIFICACIONES DEL PULLZALL
El modelo PullzAll de WARN® inalámbrico cuenta con las siguientes características:
El PullzAll con cable de alimentación de WARN es una herramienta de tracción de gran
potencia. Accionada por una batería recargable de 24 voltios, esta herramienta compacta
tiene una capacidad de tiro de 454 kilos (1000 libras).
La unidad tiene un gatillo de velocidad variable para operaciones de enrollado y
desenrollado, cable de 4,6 m de largo y 0,56 cm de diámetro y dos ganchos de presilla.
1.
2.
2.
3.
7.
9.
5.
8.
6.
1. Gatillo de velocidad variable 6. Cable de alimentación
2. Interruptor direccional 7. Gancho de anclaje giratorio
3. Guía del cable 8. Interruptor de Encendido/Apagado
4. Gancho con cierre y correa de gancho 9. Cable
5. Indicador de Listo/Sobrecarga
3.
7.
4.
9.
10.
8.
6.
5.
4.
1. Gatillo de velocidad variable 6. Cable de alimentación
2. Interruptor direccional 7. Gancho de anclaje giratorio
3. Guía del cable 8. Interruptor de Encendido/Apagado
4. Gancho con cierre y correa de gancho 9. Cable
5. Indicador de Listo/Sobrecarga 10. Botón de liberación de la batería
Especifi caciones para el PullzAll con cable de alimentación de WARN
Capacidad de arrastre máxima 1000 libras (454 kg)
Diámetro del cable 7/32 de pulg (0,56 cm)
Fuente de alimentación 120 V de CA
Entrada de alimentación 1200 W (10 A)
WARN INDUSTRIES * LA GUÍA BÁSICA DEL ARRASTRE DE USO GENERAL
49
Especifi caciones para el PullzAll inalámbrico de WARN
Capacidad de arrastre máxima 1000 libras (454 kg)
Diámetro del cable 7/32 de pulg (0,56 cm)
Fuente de alimentación Batería de CC de 24 V (NiMH)
Entrada de alimentación 720 W (30 A)
WARN INDUSTRIES * GUÍA BÁSICA PARA EL USO GENERAL DEL CABRESTANTE
50
Page 26

INTRODUCCIÓN AL ARRASTRE DE USO GENERAL
Ya tiene el PullzAll de WARN
y está preparado para utilizarlo
Esta guía proporciona un
conocimiento básico del PullzAll
y enseña lo fundamental de las
técnicas apropiadas de arrastre
y elevación. Pero antes de
comenzar, debemos aclarar que
la información en esta guía es
solamente de carácter general.
Como no hay dos situaciones
iguales, sería casi imposible
ilustrar todos los casos que
pueden presentarse. No obstante,
podemos brindarle los principios
y las técnicas generales. Será
su responsabilidad tomarse el
tiempo necesario para analizar
la situación y aplicar la técnica
apropiada.
Junto con un poco de sentido
común, la información que se
incluye en esta guía le puede
ayudar a realizar una operación
de arrastre y elevación de forma
segura. No olvide que debe
analizar cada situación de arrastre
y elevación antes de proceder a
la acción.
Para estar preparado,
las instrucciones siguientes
le ayudarán a comprender la
operación del PullzAll.
ADVERTENCIA
No use nunca el
PullzAll sin antes
leer y comprender
completamente
el manual del
usuario.
CÓMO FUNCIONA EL PULLZALL
Para comenzar, debe
familiarizarse con el PullzAll y con
cada uno de sus componentes:
1.
Motor: el motor proporciona
el par de giro al mecanismo de
engranajes que a su vez gira el
tambor del PullzAll y enrolla el
cable.
2.
Tambor de enrollado/
desenrollado: El tambor del
PullzAll es el cilindro en el cual
se enrolla el cable. El tambor se
acciona por medio del motor y el
tren de engranajes. Su sentido de
giro se puede cambiar utilizando
el interruptor selector. El cable se
desenrolla desde la parte superior
del tambor.
3.
Cable: el diámetro del cable
y su longitud se determinan de
acuerdo a la capacidad de carga
del PullzAll y al diseño del mismo.
Enrollado alrededor del tambor del
PullzAll a través de la guía, el cable
se enlaza al fi nal para aceptar el
pasador del gancho.
4.
en ángulo, la guía del cable actúa
para dirigir el cable hacia la parte
superior del tambor de enrollado.
Esto reduce al mínimo daños al
cable cuando pasa por la montura
del PullzAll.
5.
engranajes de reducción convierten
el par de giro del motor del PullzAll
en una fuerza de gran tracción. El
diseño del tren de engranajes hace
posible que el PullzAll sea más
ligero y compacto.
6.
muestra): es un instrumento que
interrumpe automáticamente la
alimentación cuando el circuito se
sobrecarga. El indicador luminoso
de listo/sobrecarga se pone en
rojo cuando hay cargas extremas y
destella en rojo cuando se excede la
carga máxima.
Guía: cuando se usa el PullzAll
Tren de engranajes: los
Limitador de carga (no se
1.
WARN INDUSTRIES * LA GUÍA BÁSICA DEL ARRASTRE DE USO GENERAL
51
2.
4.
3.
5.
WARN INDUSTRIES * LA GUÍA BÁSICA DEL ARRASTRE DE USO GENERAL
52
Page 27

Antes de usar el PullzAll de
WARN para arrastrar o elevar una
carga, es importante comprender
cómo funciona. La ventaja principal
del PullzAll reside en la comodidad
de poder sostenerlo en las manos y
sus numerosos usos prácticos, tanto
de tipo recreativo como profesional.
Analizar ahora cómo desea usar
el PullzAll le puede evitar graves
problemas más tarde.
Control del PullzAll
La herramienta PullzAll cuenta
con un interruptor de Encendido/
Apagado que se controla por un
interruptor direccional y un control
de gatillo de velocidad variable.
El interruptor direccional
posibilita el control de la rotación
hacia delante y hacia atrás del
tambor de enrollado. Mantenga
la tensión del cable cuando lo
enrolle o desenrolle para evitar
acumulaciones que puedan enredar
el cable y provocar daños al mismo
o al PullzAll. Cuando vea la pintura
roja en el cable, no desenrolle más.
De lo contrario, se puede provocar
que el cable se enrolle en el tambor
en el sentido equivocado. Esto
puede dañar el cable y la guía del
mismo. La fl echa de selección del
sentido deberá siempre coincidir con
el sentido del cable cuando se está
enrollando o desenrollando.
CÓMO FUNCIONA EL PULLZALL
Cómo reacciona el PullzAll a la
carga
El PullzAll está clasifi cado según
la capacidad de arrastre. El par de
giro de arrastre máximo ocurre cuando
solo hay una capa de cable en el
tambor. Al ir aumentando las capas de
cable en el tambor, va disminuyendo
la potencia de arrastre. Este es
el principio básico de la ventaja
mecánica.
Limitador de carga
Exceder la capacidad del
PullzAll provocará que se dispare el
limitador de carga, lo que interrumpe
la alimentación al motor. Esto evita el
sobrecalentamiento y un posible daño
al motor. Al 90% de la capacidad de
arrastre, el indicador de sobrecarga
se pone en rojo. Cuando se alcanza
el 100% de la capacidad de arrastre,
el limitador de carga hará que destelle
el indicador de sobrecarga y detendrá
el motor del PullzAll. Cuando esto
ocurra, libere la carga desenrollando.
No intente aplicar la misma carga si
se ha disparado el limitador de carga,
ya que esto podría dañar la unidad. Si
el limitador de carga no se restablece,
comuníquelo a un centro de servicio
autorizado.
ADVERTENCIA
Mantenga
siempre el
PullzAll y la carga
a la vista durante
las operaciones
de arrastre.
ADVERTENCIA
No desenrolle
nunca más allá
del punto donde
empieza la
pintura roja en el
cable.
AVISO
El PullzAll
se controla
con un gatillo
de velocidad
variable y un
interruptor de
selección de
dirección.
CÓMO FUNCIONA EL PULLZALL
Mecánica del PullzAll
Es importante comprender
que cuanto más prolongado sea el
arrastre, más calor se genera en
el motor. La acción de desenrollar
el cable también genera calor.
Deje que se enfríe el motor entre
operaciones de arrastre, ya que un
uso prolongado sin enfriamiento
del PullzAll terminará dañando el
motor.
Tiempo de funcionamiento y
ciclo de trabajo
El PullzAll está indicado para
un trabajo intermitente. No deberá
utilizarse durante períodos de
tiempo prolongados con el motor
a bajas RPM. Cuando el motor se
aproxima a la velocidad crítica, se
genera calor muy rápidamente,
lo que puede ocasionar daños al
motor. Adhiérase a los tiempos de
funcionamiento y de enfriamiento
recomendados que se muestran
en la tabla. Si la unidad no
funciona después del enfriamiento
recomendado, llame a un centro de
servicio autorizado de Warn.
TABLA DE TIEMPO DE FUNCIONAMIENTO/
CICLO DE TRABAJO
CARGA 500 libras
TIEMPO DE
FUNCIONAMIENTO
TIEMPO DE
ENFRIAMIENTO
(227 kg)
2 min 1 min
30 min 30 min
1000 libras
(454 kg)
El gatillo de velocidad variable
tiene dos modos generales de
operación:
1) Modo de velocidad variable para
un posicionamiento preciso de la
carga.
2) Modo de velocidad plena para
una distancia larga.
WARN INDUSTRIES * LA GUÍA BÁSICA DEL ARRASTRE DE USO GENERAL
Si el limitador de carga continúa
disparándose, proceda de la siguiente
forma:
1) Reduzca el peso de la carga.
2) Aumente la distancia del punto de
anclaje.
3) Disponga un arrastre con doble
cable.
Si desea más información: consulte la
sección de Técnicas de maniobrado
de este manual.
53
WARN INDUSTRIES * LA GUÍA BÁSICA DEL ARRASTRE DE USO GENERAL
54
Page 28
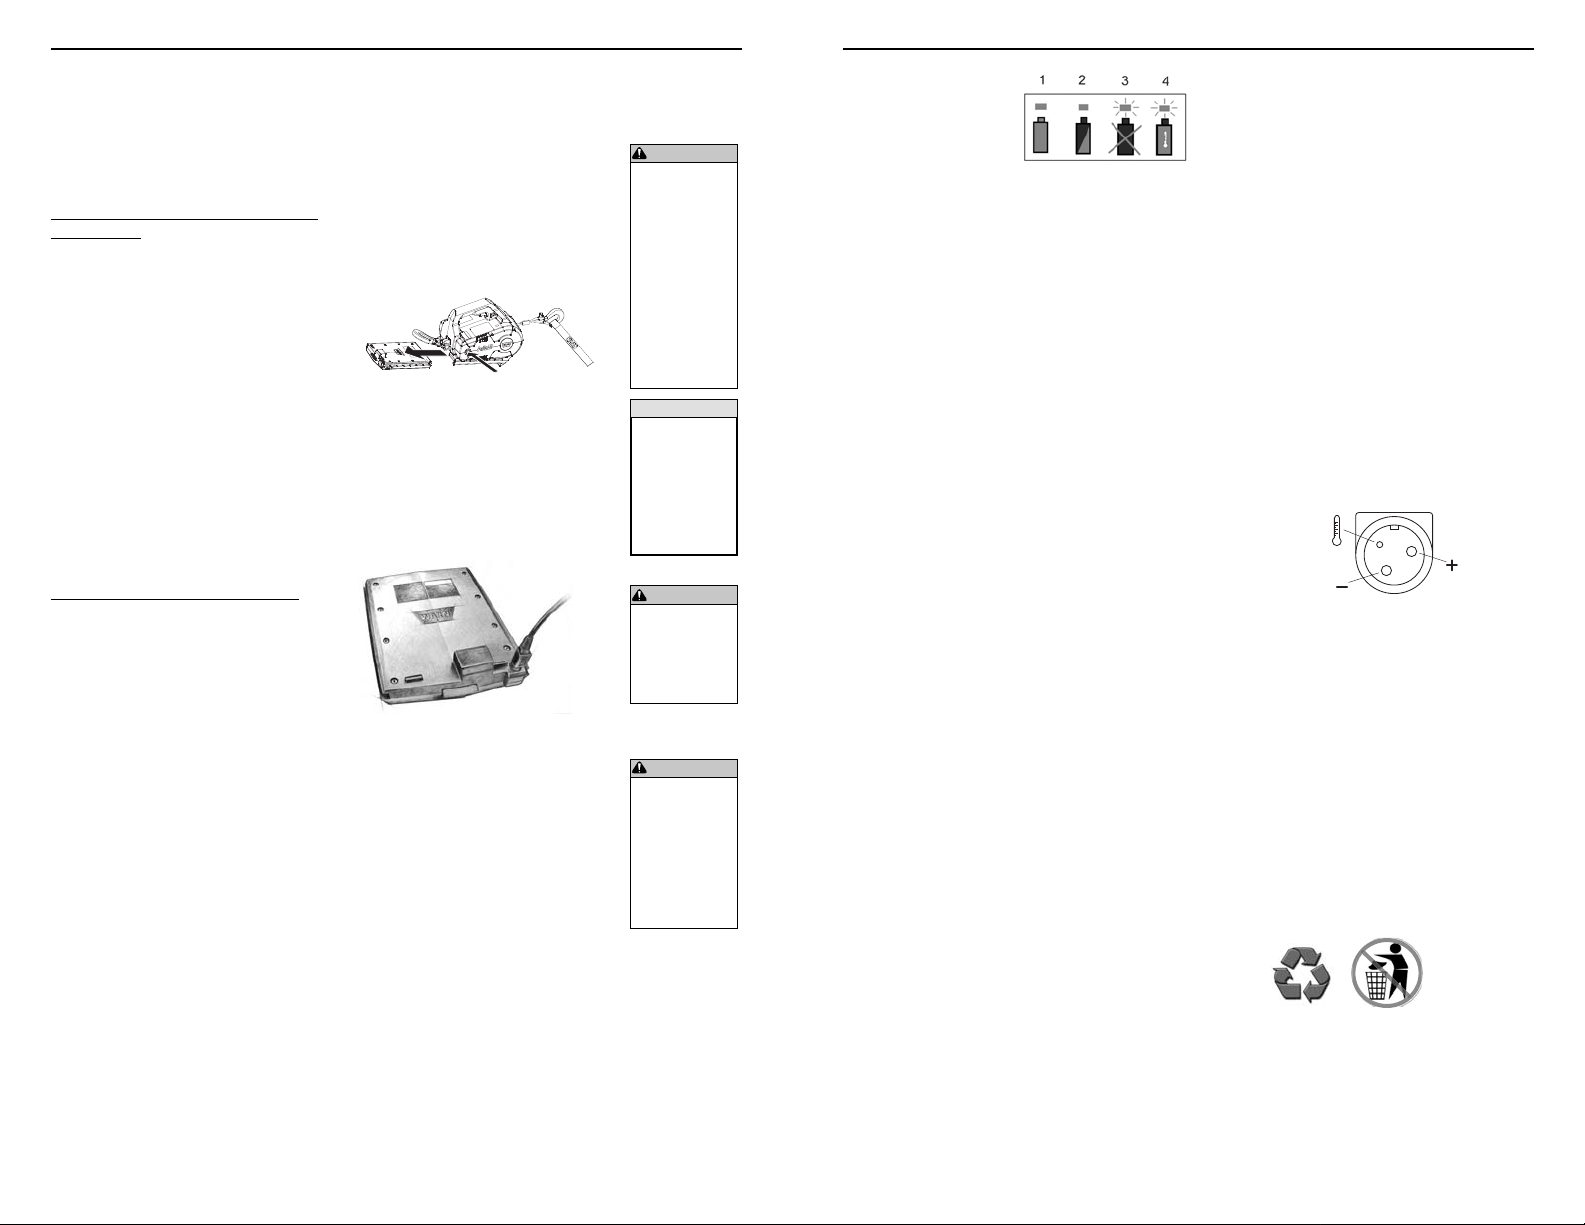
El PullzAll está disponible en
modelos con cable de alimentación
e inalámbrico. Cada modelo tiene
sus propios benefi cios. Verifi que que
la fuente de energía esté conectada
correctamente siguiendo las
instrucciones siguientes:
PullzAll con cable de alimentación de
120 V de CA
Enchufe con conexión a tierra
adecuada
Compruebe que el cable
de alimentación del PullzAll está
conectado a una toma de corriente
para tres clavijas con una conexión a
tierra apropiada y con un interruptor
de averías por conexión a tierra.
Amperaje mínimo
Si va a usarse un cable
prolongador o un generador, verifi que
que puede usarse con la corriente
nominal mínima de 15 amperios para
hacer funcionar el PullzAll a plena
capacidad.
PullzAll inalámbrico de 24 V de CC
Cuidado de la batería
Ponga siempre el interruptor de
encendido y apapado en la posición
de apagado cuando esté en uso.
La batería podría quedar dañada
permanentemente si se permite que
la unidad se descargue por sí sola en
la posición de ‘Encendido’. Guarde
la batería y el cargador en lugares
donde la temperatura no exceda los
49ºC (120ºF).
Cuando se observe una notable
disminución en su rendimiento,
cambie el paquete de batería por
una batería completamente cargada.
Evite que la batería se descargue
completamente. Esto podría provocar
un daño permanente al paquete de
batería.
Instalación del paquete de batería
1) Compruebe que el interruptor
de encendido se encuentre en la
posición de ‘Apagado’.
2) Deslice el paquete de batería en
el armazón, comprobando que el
WARN INDUSTRIES * LA GUÍA BÁSICA DEL ARRASTRE DE USO GENERAL
FUENTE DE ALIMENTACIÓN
seguro esté bien puesto. El botón de
liberación de la batería debe estar en
la posición superior.
Extracción del paquete de batería
1) Compruebe que el interruptor
de encendido se encuentre en la
posición de ‘Apagado’.
2) Oprima el botón de liberación de
la batería en la parte posterior de
la misma y extraiga la batería del
armazón del PullzAll deslizándola.
Cambio del paquete de batería
Enchufe el cable del cargador a
una toma de corriente convencional
y, seguidamente, inserte el enchufe
cargador de la batería desde el
cargador a la batería. Se encenderá
la luz indicadora roja del cargador
indicando que se está cargando.
Una batería completamente
descargada deberá cargarse en
aproximadamente dos horas. La
operación de carga se detendrá
automáticamente cuando se haya
terminado de cargar. Para conseguir
el mejor funcionamiento, desenchufe
el cargador y deje que se enfríe la
batería a temperatura ambiente antes
de usarla en el PullzAll.
La luz indicadora del cargador
de batería tiene los signifi cados
siguientes:
1) Luz verde encendida:
Completamente cargada
2) Luz roja encendida: Cargando
3) Luz roja parpadeando: Se ha
presentado una situación de fallo.
4) Luz verde parpadeando: Protección
de temperatura excesiva.
55
ADVERTENCIA
No deje nunca
el cable de
alimentación
del PullzAll
enchufado ni
la batería en la
unidad cuando se
estén realizando
operaciones
de instalación,
mantenimiento o
almacenamiento.
AVISO
Deje siempre
enfriar la
batería antes
de usarla en
la herramienta
y antes de
cargarla.
ADVERTENCIA
No intente nunca
desmontar
la batería o
quitar ningún
componente.
ADVERTENCIA
Evite siempre el
contacto con una
fuga de la batería
que pueda darse
si las condiciones
de uso o las
temperaturas son
extremas.
FUENTE DE ALIMENTACIÓN
Si la luz roja está parpadeando,
pare la carga de la batería y siga las
normas de seguridad del cargador que
aparecen más abajo. Si el problema
persiste, comuníquese con un centro
de servicio autorizado de Warn.
Reglas de seguridades del cargador
Siga estas importantes
instrucciones de seguridad y
compruebe las marcas de precaución
que vienen en el cargador de batería,
el paquete de batería y la herramienta
de arrastre PullzAll inalámbrico antes
de usar el cargador de batería del
PullzAll inalámbrico. Retire el cargador
de la fuente de energía cuando la
batería esté completamente cargada.
Use solamente el cargador que
viene con el PullzAll inalámbrico o
un accesorio cargador homologado
de WARN. Cargue solamente
baterías recargables para el PullzAll
inalámbrico de WARN; si lo hace con
otro tipo de baterías, éstas podrían
explotar produciendo lesiones
personales y daños.
No cargue la batería en un
ambiente húmedo.
No desmonte el cargador. Llévelo
a un centro de servicio autorizado
de Warn cuando sea necesaria una
reparación o mantenimiento.
Aspectos importantes de la
operación de carga
1) El paquete de batería acepta
solamente aproximadamente el
80% de su capacidad máxima en
los primeros ciclos de carga. Sin
embargo, después de unos pocos
ciclos de carga y del uso normal, la
batería se cargará a plena capacidad.
2) El cargador ha sido diseñado para
cargar rápidamente la batería,
siempre que la temperatura de
la misma se encuentre entre 0ºC
(32ºF) y 49ºC (120ºF). Si el paquete de batería está demasiado
caliente o demasiado frío, éste no
WARN INDUSTRIES * LA GUÍA BÁSICA DEL ARRASTRE DE USO GENERAL
se cargará. (Esto puede suceder
si el paquete de batería está caliente después de un uso intenso).
Espere a que la batería vuelva a
la temperatura ambiente antes de
proceder a cargar.
3) Una disminución sustancial en el
tiempo de carga puede signifi car
que el paquete de batería está
próximo al fi n de su vida útil y que
deba ser reemplazado.
Si la batería no se carga
correctamente:
a. Compruebe que hay voltaje en
la toma de corriente enchufando
algún otro dispositivo eléctrico.
b. Compruebe que el voltaje del car-
gador es de aproximadamente 30
V de CC. Consulte la disposición
de las clavijas del enchufe del
cargador aquí o en la etiqueta del
cargador.
c. Compruebe que los bornes de la
batería no estén sucios. Si fuera
necesario, límpielos con un bastoncito de algodón y alcohol.
d. Si aún así la carga sigue si ser
satisfactoria, notifíquelo al servicio
de atención al cliente de Warn.
Cómo desechar las baterías
La batería PullzAll emplea
tecnología NiMH. Verifi que las
ordenanzas/regulaciones locales para
el desecho o el reciclaje. Antes de
proceder a desecharla, proteja los
bornes expuestos con abundante cinta
aislante para evitar cortocircuitos.
Primeros auxilios para accidentes con
productos químicos: Si el líquido de la
batería cae sobre la piel, lávela con agua
y jabón. Si el líquido cae en los ojos,
enjuáguelos con agua durante 15 minutos.
56
Page 29

Practique el uso del PullzAll
antes de proceder al arrastre o
la elevación de una carga. Una
situación real no es el momento para
aprender a utilizarlo.
Conocer las técnicas correctas
de arrastre y elevación puede ayudar
con su seguridad y la de los demás.
Quizás la parte más importante en
el proceso de arrastre, en cualquier
situación, es lo que usted hace antes
de la tracción.
En esta guía, se muestran
los conceptos básicos para una
operación efi caz de arrastre y
elevación. No obstante, usted es el
responsable de analizar la situación
y tomar las decisiones necesarias
para usar correctamente el PullzAll.
Aplique sus conocimientos sobre
el PullzAll y los principios básicos
que haya practicado y adapte sus
técnicas a la situación en particular.
Cuando vaya a utilizar el PullzAll de
WARN, recuerde lo siguiente:
1. Tómese su tiempo siempre
para evaluar la situación y
planifi que la operación de
tracción o elevación cui-
dadosamente.
2. Tómese su tiempo siempre
cuando utilice un PullzAll.
3. Utilice el equipo apropiado
para su situación en particu-
lar.
4. Utilice siempre guantes de cu-
ero, y no permita que el cable
se deslice entre sus manos.
5. Solamente una persona debe
controlar el PullzAll para reali-
zar el arrastre de una carga.
6. Piense en su seguridad en
todo momento.
7. Práctica Practique lo más
posible cada fase.
Procedimiento de arrastre o
elevación
Los siguientes pasos describen
como realizar una operación de
arrastre o elevación usando una
técnica de maniobrado con un único
cable. Las técnicas de maniobrado
de cable doble o múltiple siguen el
mismo proceso pero utilizan una
USO DEL PULLZALL
polea para realizar la tracción. Si
desea más información, consulte la
sección de Técnicas de maniobrado
de este manual.
Paso 1: PÓNGASE UNOS
GUANTES Y ACOPLE LA CORREA
DEL GANCHO. Compruebe que la
correa del gancho está acoplada al
mismo con seguro en el cable y no el
gancho de anclaje giratorio.
Paso 2: CONECTE LA FUENTE DE
ALIMENTACIÓN.
PullzAll con cable de
alimentación de 120 V de CA
1) Conecte el cable de alimentación del PullzAll a una toma
de corriente de 3 clavijas y que
esté bien conectada a tierra.
2) Compruebe que los cables
de alimentación y los cables
prolongadores estén situados de
forma que el cable de arrastre
o la carga en movimiento no
dañen a dichos cables.
3) Compruebe que los cables prolongadores tienen un amperaje
nominal de 15 Amperios.
PullzAll inalámbrico de 24 V de CC
1) Compruebe que el paquete de
batería está completamente
cargado.
2) Compruebe que el interruptor
de encendido y apagado se
encuentre en la posición de
‘Apagado’.
3) Deslice el paquete de batería en
el armazón, comprobando que
el seguro esté bien puesto. El
botón de liberación de la batería
debe estar en la posición superior.
ADVERTENCIA
Utilice siempre
la correa
suministrada
para sostener el
gancho cuando
vaya a enrollar
o desenrollar el
cable.
ADVERTENCIA
Utilíce siempre
un receptáculo
monofásico
con conexión
adecuada a tierra
de 120 voltios de
CA y 50/60 Hz,
protegido por
un interruptor
de averías por
conexión a tierra.
Nunca quite
la clavija de
conexión a tierra
del enchufe.
No haga
funcionar
este producto
activado por CA
en un ambiente
húmedo.
No pase nunca
los cables
eléctricos por
bordes agudos.
No pase nunca
los cables
eléctricos por
partes móviles o
cerca de ellas.
No pase nunca
los cables
eléctricos cerca
de piezas que se
calienten.
USO DEL PULLZALL
ADVERTENCIA
Use siempre un
anclaje apropiado
que sea capaz
de soportar la
carga.
ADVERTENCIA
No desenrolle
nunca más allá
del punto donde
empieza la
pintura roja en el
cable.
ADVERTENCIA
Mantenga
siempre las
manos y la
ropa alejadas
del cable, del
gancho y de la
abertura de la
guía durante el
accionamiento y
el enrollado.
ADVERTENCIA
No enganche
nunca el
cable sobre sí
mismo. Esto lo
deterioraría.
PRECAUCIÓN
El PullzAll con
alimentación por
cable de 120 V
de CA tiene algo
de demora en el
control de gatillo.
Use la velocidad
de enrollado
lenta y suelte el
gatillo antes de
lo normal para
evitar que se
enrolle el bucle
del gancho en la
guía del cable.
Paso 3: ENCENDIDO DEL
PULLZALL. Cambie el interruptor
a la posición de ‘Encendido’. Deje
siempre el interruptoren la posición
de ‘Apagado’ cuando el PullzAll no
esté en uso.
Paso 4: DESENRROLLADO DEL
CABLE PARA COLOCAR LA
CARGA. Presione el interruptor
direccional para ‘desenrollar’
el cable. Mantenga siempre la
tensión en el cable para enrollar
y desenrollar. El cable puede
desenrollarse en el interior de la
unidad del PullzAll provocando
acumulación y dobleces que
terminará dañando el cable.
Enrollado o desenrollado solo:
Acople el gancho con seguro a
un anclaje y aleje el PullzAll de la
carga.
Enrollado o desenrollado con un
ayudante: Haga que la persona que
maneje el cable sostenga la correa
del gancho y camine alejándose
con el cable desde el PullzAll,
desenrollando así el cable.
NUNCA desenrolle el cable más
allá de la pintura roja del mismo.
La pintura roja es visible cuando el
cable de 3,9 m está desenrollado.
De hacerlo así puede causar que
el cable se enrolle en el tambor en
la dirección contraria. Esto puede
dañar el cable y la guía.
Paso 5: ACOPLAR AL PUNTO DE
ANCLAJE. Acople el PullzAll a un
punto de anclaje usando el gancho
de anclaje giratorio. Esto hace
posible el manejo de la carga.
Paso 6: PLAN PARA EL
ARRASTRE. Alinee su esfuerzo
de arrastre lo más derecho posible.
Esto evitará los tirones laterales
que pueden hacer que el cable roce
en la guía del mismo. Asimismo,
las operaciones de arrastre lateral
pueden hacer que el cable se
acumule en un extremo del tambor.
Esto puede dañar el cable o el
PullzAll.
Paso 7: ASEGURE LA CARGA.
Establezca un punto de carga. A
menudo, una carga no tiene un
punto de carga seguro. Puede ser
necesario asegurar la carga con
una cadena de estrangulación o una
correa de carga.
Paso 8: ACOPLE EL ENGANCHE
EN FORMA DE D. Acople el
enganche a los dos extremos de la
correa o cadena, teniendo cuidado
de no sobretensarlo (tense y
retroceda media vuelta). Asegure el
enganche en la garganta del gancho
del PullzAll.
Paso 9: PONER EL CABLE BAJO
TENSIÓN. Presione el interruptor
direccional para ‘enrollar’ cable.
Utilice el control del gatillo para
enrollar lentamente el cable hasta
que esté completamente tenso.
La tensión del cable evitará
acumulaciones y dobleces. Una vez
que el cable esté tenso, aléjese y no
pise nunca el cable.
Paso 10: VERIFICACIÓN DE LA
CARGA. Asegúrese de que todas
las conexiones estén aseguradas y
despeje el área de cualquier residuo
antes de continuar con el
procedimiento.
WARN INDUSTRIES * LA GUÍA BÁSICA DEL ARRASTRE DE USO GENERAL
57
WARN INDUSTRIES * LA GUÍA BÁSICA DEL ARRASTRE DE USO GENERAL
58
Page 30

Comience el arrastre o la
elevación de la carga
Los pasos siguientes
describen cómo usar el PullzAll
después de haber sido dispuesto
de forma apropiada.
Paso 11: PONGA ALGUNA COSA
SOBRE EL CABLE. Por razones
de seguridad, considere colgar
una tela gruesa a mitad de camino
entre el PullzAll y el punto de
carga para absorber la energía en
el caso que el cable o el punto de
carga se suelten. Por ejemplo, use
una manta, una chaqueta gruesa,
una cadena o una mochila.
Diagnóstico y resolución de
problemas
Si el PullzAll no puede
enrollar o desenrollar,
compruebe que el interruptor
de Encendido/Apagado se
encuentre en la posición de
‘Encendido’. Compruebe que
el indicador de sobrecarga no
está parpadeando y que está
encendida la luz verde que
indica la entrada de energía.
En la unidad del PullzAll
con cable de alimentación,
compruebe que éste esté
enchufado y que el circuito
tenga potencia.
En la unidad del PullzAll
inalámbrico, compruebe que la
batería esté cargada. Entonces
trate de enrollar el cable. Si
esto no resuelve el problema,
comuníquese con un centro de
servicio autorizado de Warn.
WARN INDUSTRIES * LA GUÍA BÁSICA DEL ARRASTRE DE USO GENERAL
USO DEL PULLZALL
Paso 12: COMUNIQUE SUS
INTENCIONES. Asegúrese de que
todas las personas que están en
las inmediaciones de la operación
de arrastre sepan bien cuáles son
sus intenciones antes de comenzar
la tracción o la elevación.
Ponga límites en cuanto
al lugar donde deben estar los
espectadores; nunca detrás,
enfrente o bajo la carga, y nunca
cerca del cable o de la polea. Su
situación puede exigir tener otras
zonas donde la gente no puede
estar.
Establezca las zonas prohibidas para
las personas
59
ADVERTENCIA
No utilice nunca
la herramienta
de arrastre
para levantar
o desplazar
personas.
No utilice nunca
la herramienta
de arrastre para
elevar objetos
por encima de
personas.
USO DEL PULLZALL
AVISO
Evite
sobrecalentar
el motor del
PullzAll. Si el uso
del PullzAll se va
a realizar durante
un periodo de
tiempo largo,
deje que se
enfríe el motor
primero.
Consulte la
tabla para ver
las pautas
de tiempo de
funcionamiento.
PRECAUCIÓN
El PullzAll con
alimentación por
cable de 120 V
de CA tiene algo
de demora en el
control de gatillo.
Use la velocidad
de enrollado
lenta y suelte el
gatillo antes de
lo normal para
evitar que se
enrolle el bucle
del gancho en la
guía del cable.
AVISO
Evite siempre
los arrastres
laterales, ya
que pueden
apilar el cable
en un extremo
del tambor. Esto
puede dañar
el cable o el
PullzAll.
ADVERTENCIA
Mantenga
siempre las
manos y la
ropa alejadas
del cable, del
gancho y de la
abertura de la
guía durante el
accionamiento y
el enrollado.
Paso 13: COMIENCE EL
ARRASTRE O ELEVACIÓN.
Presione el interruptor direccional
para ‘enrollar’ cable. Con una
ligera tensión ya en el cable,
comience la operación de
enrollado del cable lenta y
uniformemente.
Qué hay que considerar
cuando haya carga
El cable debe estar
enrollado siempre en el tambor.
Al enrollar el cable, éste
debe quedar tenso y bien
distribuido en el tambor. Esto
evita que las vueltas más
externas del cable se traben
con las vueltas internas;
asimismo, evita acumulaciones
y atascamientos que pueden
dañar al cable y el PullzAll.
Durante operaciones de
tiro lateral, el cable tiende a
acumularse en un extremo
del tambor. Para evitar el
apilamiento del cable a un lado
del tambor, alinee las vueltas
de enrollado lo más derechas
posible.
Paso 14: ASEGURE LA CARGA.
Una vez se haya completado el
movimiento de la carga, verifi que
que ésta quede bien asegurada.
Solo entonces podrá liberar
tensión en el cable.
Paso 15: DESCONECTE EL
CABLE. Invierta el interruptor
direccional y desenrolle una
pequeña porción del cable.
Desconecte el gancho con seguro
de la carga cuando sea posible.
Paso 16: DESCONECTE DEL
ANCLAJE. Desconecte el gancho
de anclaje giratorio del punto de
anclaje.
WARN INDUSTRIES * LA GUÍA BÁSICA DEL ARRASTRE DE USO GENERAL
Paso 17: Enrolle de nuevo EL
CABLE. Invierta el interruptor
direccional para ‘enrollar’ cable.
Asegúrese de que el cable ya
enrollado en el tambor esté bien
tenso. Disponga el cable de forma
que no se doble ni se trabe al
enrollarlo. Mantenga siempre tenso
el cable cuando vaya a enrollarlo
nuevamente en el tambor. No deje
que el cable se deslice por sus
manos.
Si está solo, acople el gancho
con seguro a un punto de anclaje,
aplique una tensión leve al cable y
lleve el PullzAll lentamente hacia el
punto de anclaje a medida que el
cable va enrollándose en el tambor.
Si una persona está manipulando
el cable, manteniendo la tensión,
deberá llevar el cable al enrollarse,
usando la correa del gancho. Si no
tiene la correa del gancho, utilice
la longitud de un cordón o algo
parecido. Para prevenir lesiones
graves, NUNCA ponga los dedos
dentro del área del gancho al
enrollar.
NO utilice el limitador de carga para
detener el gancho contra la guía
del cable; el gancho no debe ser
enrollado en el interior de la unidad.
Paso 18: APAGUE EL PullzAll.
Cambie el interruptor a la posición
de ‘Apagado’. Guarde el PullzAll en
un lugar limpio y seco.
Las operaciones de arrastre ya se
han fi nalizado.
60
Page 31

El PullzAll es una herramienta
de arrastre muy útil que se sostiene
con la mano. Algunos de los
siguientes accesorios son vitales
para utilizar el PullzAll sin correr
peligro, mientras otros ofrecen
versatilidad adicional y comodidad.
Guantes: Con el uso, el cable llegará
a tener “púas” que pueden cortar la
piel. Es extremadamente importante
llevar guantes protectores mientras
el PullzAll está en funcionamiento o
se está tocando el cable. Evite usar
ropa suelta o cualquier otra cosa que
se pueda enredar en el cable o en
otras partes móviles.
Correa de gancho: Se utiliza para
sostener el gancho y mantener los
dedos alejados de la guía del cable
cuando se enrolla o desenrolla el
cable. Las herramientas de arrastre
desarrollan una gran fuerza que
puede amputar fácilmente dedos y
miembros que se encuentren en los
puntos de estrangulación. Coloque
el gancho dentro del bucle y sujete
la correa entre los dedos pulgar e
índice.
ACCESORIOS
Polea: Si se usa la polea de usos
múltiples correctamente, ésta le
permite: (1) aumentar la potencia
de tiro del PullzAll y (2) cambiar la
dirección de tiro sin dañar el cable. El
uso apropiado de la polea se trata en
la sección Tecnicas de maniobrado.
Enganches en forma de D: El
enganche en forma de D es un medio
seguro de conectar los extremos
enlazados de correas y poleas. El
perno del enganche es roscado para
poderlo quitar fácilmente.
Correa: Generalmente hecha de
nilón resistente y de alta calidad,
proporciona al usuario un método de
acoplamiento del cable del PullzAll a
la carga y al punto de anclaje.
PRECAUCIÓN
Nunca sujete
la correa de
recuperación
al gancho del
PullzAll para
incrementar
la longitud de
arrastre.
Nunca utilice
correas de goma
que producen
una gran fuerza
al estirarse, lo
cual supone un
posible peligro.
TÉCNICAS DE MANIOBRADO
En varias situaciones donde
se utiliza el arrastre se requieren
ADVERTENCIA
No desenrolle
nunca más allá
del punto donde
empieza la
pintura roja en el
cable.
ADVERTENCIA
No utilice nunca
la herramienta
de arrastre
para levantar
o desplazar
personas.
No utilice nunca
la herramienta
de arrastre para
elevar objetos
por encima de
personas.
aplicaciones de otras técnicas
de arrastre. Éstas pueden ser
tales como poner una distancia
corta para obtener una tracción/
elevación máxima utilizando el
maniobrado de línea recta, o
simplemente aumentar la potencia
de tiro o mantener una situación
de arrastre en línea recta. Usted
tendrá que decidir qué técnica es la
más adecuada para la situación en
que se encuentra. Tenga en mente
la “seguridad” en todo momento.
Considere bien cada situación
antes de actuar.
Aumento de la potencia de
arrastre y duración
En algunos casos, notará
que se necesita más potencia
de tracción. El uso de poleas
aumenta la ventaja mecánica y esto
incrementa la potencia de tracción:
Ejemplo de arrastre de una paleta:
Cable sencillo
anclaje y pase el cable a través de
una polea.
Usando la polea, desenrolle
el cable lo sufi ciente para alcanzar
su punto de carga. NO desenrolle
más allá del cable rojo. Hacerlo así
puede provocar que el cable se
enrolle en el tambor en el sentido
equivocado. Esto puede dañar el
cable y la guía del mismo.
Asegure el punto de carga
con una correa o una cadena
de estrangulación. Acople el
enganche. Acople el enganche a
los dos extremos de la correa o
cadena, teniendo cuidado de no
sobretensarla (tense y retroceda
media vuelta).
Elevación
Haga un anclaje al PullzAll
de forma que esté acodado y no
en línea con el objeto que va a
elevarse. No trate de elevar una
carga con el centro de gravedad
desplazado ya que esto puede
provocar que la carga oscile
peligrosamente. No permita nunca
que la carga oscile ni se gire.
Cadena de estrangulación: Puede
usarse para enganchar una carga.
WARN INDUSTRIES * LA GUÍA BÁSICA DEL ARRASTRE DE USO GENERAL
Hay conjuntos de accesorios
disponibles para el PullzAll. Si desea
más información, comuníquese con
el servicio de atención al cliente de
Warn.
61
Cable doble
Cable doble
Debido a que la potencia de
tracción disminuye con el número
de capas del cable en el tambor
del PullzAll, se puede utilizar una
polea para utilizar el cable doble.
Esto disminuye el número de capas
del cable en el tambor y aumenta la
potencia de tracción.
Comience desenrollando el
cable. Enganche el gancho a un
WARN INDUSTRIES * LA GUÍA BÁSICA DEL ARRASTRE DE USO GENERAL
62
Page 32

Mantenimiento
Antes y después de cada
operación, inspeccione el cable y
los ganchos para detectar posibles
síntomas de desgaste o daños.
Deberá reemplazarse cualquier
pieza que esté desgastada o
dañada. No intente alargar el
cable ni reparar uno dañado.
Mantenga limpios de
contaminantes el cable y los
ganchos. Use un trapo limpio para
limpiar la suciedad y los residuos.
La aplicación de un aceite ligero
en el cable y los ganchos evitará
la formación de corrosión. Cuando
vaya a limpiar la herramienta
PullzAll inalámbrica, asegúrese
de no entrar en contacto con los
terminales eléctricos del paquete
de batería y compruebe que ésta
no tiene grietas u otros daños.
Cualquier gancho que
tenga componentes retorcidos
o una abertura excesiva puede
estar indicando que ha habido
una sobrecarga del producto. Si
fueran necesarias reparaciones,
piezas de repuesto o accesorios,
comuníquese con un cenrtro de
servicio autorizado de Warn.
Ejemplos de daños en el
cable: retorcimientos, cortes,
nudos, porciones aplastadas o
deshilachadas, o hilos rotos.
Ejemplos de daños en el
gancho: grietas, componentes
retorcidos, aberturas excesivas,
desgaste del asiento, seguro
suelto o que no cierra bien, y
corrosión.
MANTENIMIENTO Y ANÁLISIS FINAL
Comentario fi nal
Esta guía de técnicas
apropiadas de tracción no puede
tratar todas las posibles situaciones
en que se tenga que utilizar
un PullzAll. En el análisis fi nal,
las decisiones que usted tome
determinarán el resultado fi nal. Por
lo tanto, analice bien cada situación
y cada fase de uso. Piense siempre
en su propia protección y en la de
los demás. Ponga atención y lo
disfrutará.
ADVERTENCIA
No deje nunca
el cable de
alimentación
del PullzAll
enchufado ni
la batería en la
unidad cuando se
estén realizando
operaciones
de instalación,
mantenimiento o
almacenamiento.
ADVERTENCIA
Use siempre
piezas de
repuesto de Warn
Industries cuando
sea necesario
durante
reparaciones o
mantenimiento.
Comuníquese
con el servicio
de atención al
cliente de Warn
para obtener
los números
de referencia
de las piezas
de repuesto
(la información
de contacto
se encuentra
en la hoja de
Garantía).
WARN INDUSTRIES * LA GUÍA BÁSICA DEL ARRASTRE DE USO GENERAL
63
 Loading...