

Page 1

Warn Industries, Inc.
12900 S.E. Capps Road
Clackamas, OR USA 97015-8903
1-503-722-1200 FAX: 1-503-722-3000
www.warn.com
Customer Service / Service Clients: 1-800-543-9276
International Sales Support / Les Ventes internationales
Soutiennent: 1-503-722-3008
© 2013 Warn Industries, Inc.
WARN®, the WARN logo are registered trademarks of Warn Industries, Inc.
WARN® et le logo WARN sont des marques
déposées de Warn Industries, Inc.
73203B0
POWERPLANT
(Domestic)
INSTALLATION AND OPERATOR’S GUIDE
GUIDE D’INSTALLATION ET OPERATEUR
™
Page 2

English...........................................................................1
Français.......................................................................17
Español........................................................................33
Deutsch .......................................................................50
Português ...................................................................67
Page 3
ORIGINAL INSTRUCTIONS
SYMBOL INDEX
PowerPlant Winch Installation
Guide
Every winching situation has the potential for personal injury. In order to minimize that risk, it is important to read this guide and The Basic Guide to
Winching Techniques carefully. Please familiarize yourself with the operation of your winch before using it and be constantly safety oriented. In this
guide we provide important safety information and instructions on how to install your winch. Please read the Basic Guide to Winching Techniques
for information on how to properly use your winch and proper rigging techniques.
Please keep this manual and other product literature found in this kit for future reference. In this kit you will find the following pieces of literature:
Winch Installation Guide, Basic Guide to Winching Techniques, Specification and Performance Data, Product Warranty, Replacement Parts List and
other product literature specific to some products. Should any of these be missing, please visit www.warn.com or contact us at the number below.
TABLE OF CONTENTS:
SAFETY
Symbol Index .............................................................................................................................................................................2
General Safety Precautions ...............................................................................................................................................3-6
INSTRUCTIONS
Safe Working Conditions .......................................................................................................................................................7
Know Your Winch .....................................................................................................................................................................8
Mounting .....................................................................................................................................................................................9
Air Intake Hose and Filter Installation ............................................................................................................................ 10
Electrical Connections .........................................................................................................................................................11
System Check .......................................................................................................................................................................... 11
First Time Operation Instructions ..............................................................................................................................12-15
Winch Operation ........................................................................................................................................................ 12
Air Compressor Operation ................................................................................................................................12-13
Rope Operation .................................................................................................................................................... 14-15
Final Analysis and Maintenance .....................................................................................................................................16
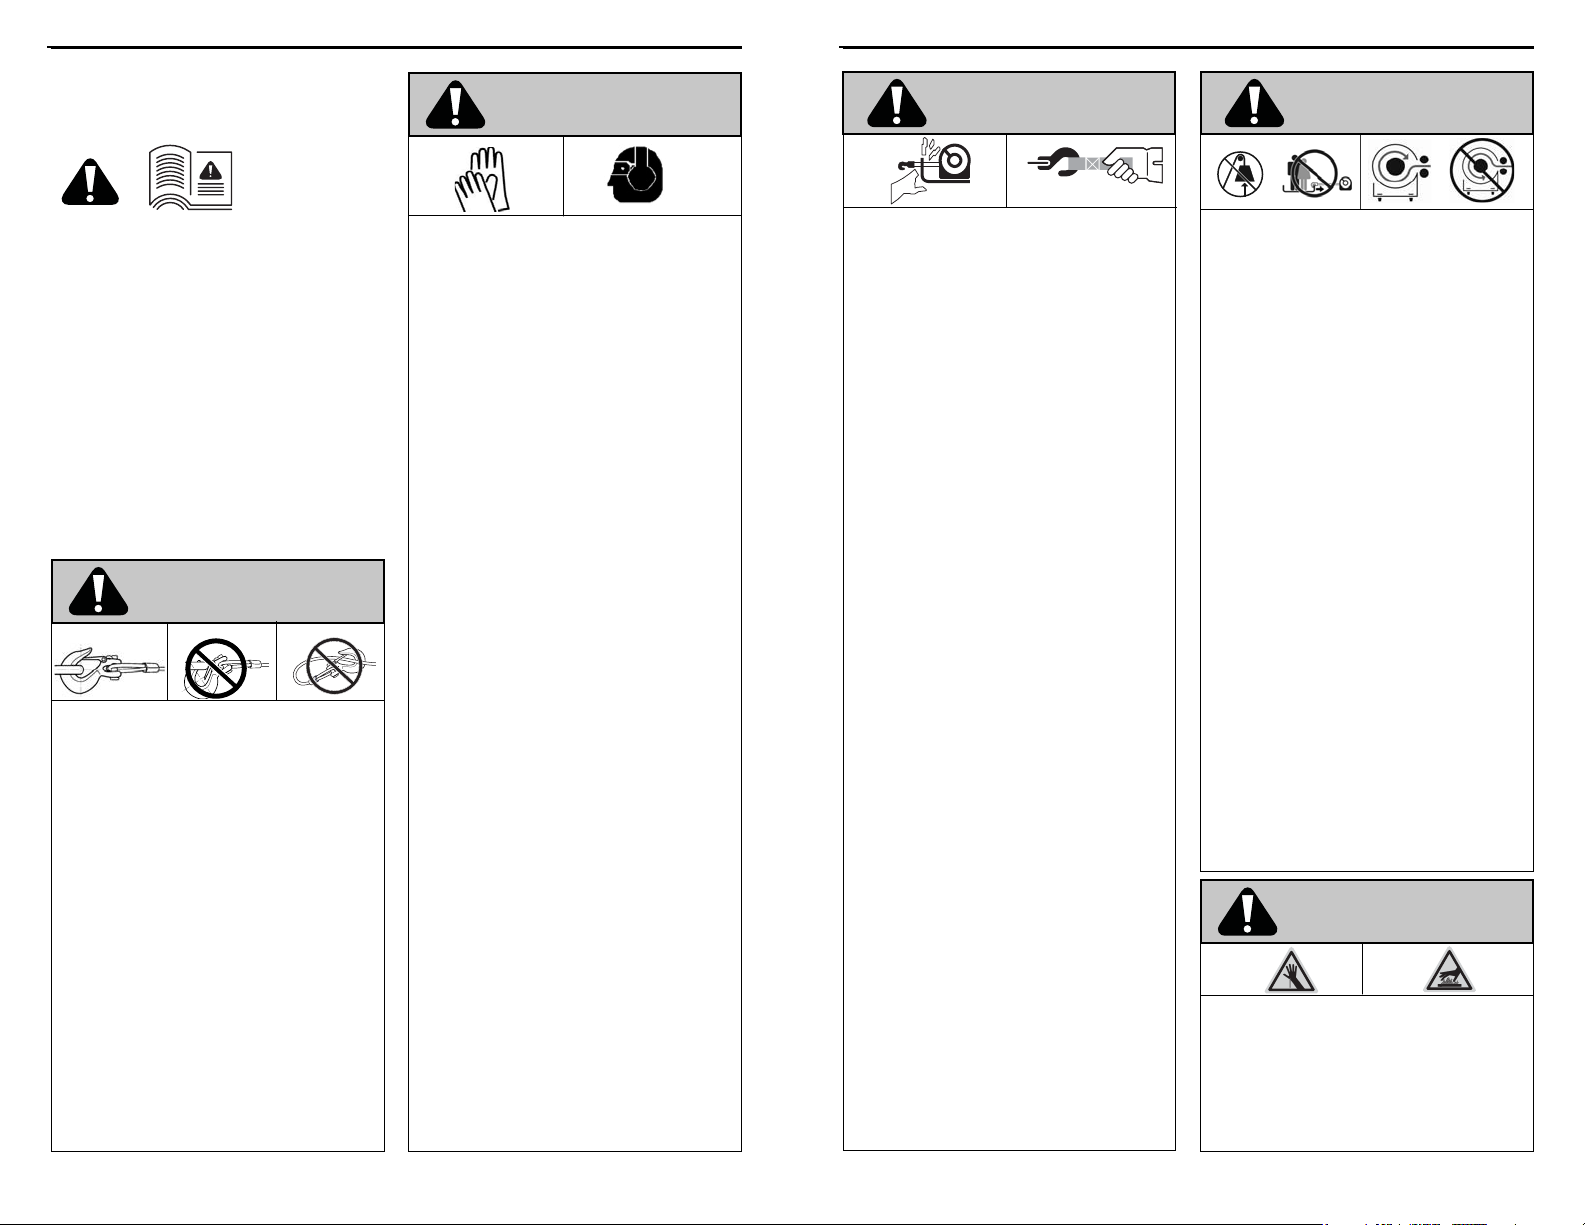
SYMBOL EXPLANATION
Read All Product
Literature
Always Wear Hearing and
Eye Protection
Never Use Winch as a
Hoist
Properly Seat Load in
Throat of Hook
Wind Rope on Bottom of
Drum
Finger/Fairlead Crushing
Hazard
Hand Piercing/Cutting
Hazard
Explosion/Bursting
Hazard
Never Route Electrical
Cables through Sharp
Edges Hazard
SYMBOL EXPLANATION
Always Wear Leather
Gloves
Do Not Move People
Always Use Supplied
Hook Strap
Never Apply Load to
Hook Tip or Latch
Never Wind Rope Over
Top of Drum
Fairlead Pinch Point
Hot Surface Hazard
Fire and Burn Hazard
Never Route Electrical
Cables through or near
Moving Parts Hazard
WARN® and th e WARN logo are reg istered t rademark s of Warn Indus tries, Inc .
© 2013 Warn Industries, Inc.
WARN INDUSTRIES
1
Warn Industries Inc.
12900 SE Capps Road
Clackamas, OR 97015
USA
Customer Service: (800) 543-9276
International Fax: (503) 722-3005
Fax: (503) 722-3000
www.warn.com
Avoid Installing Electrical
Cables around Pinch and
Wear/Abrasion Points
WARN INDUSTRIES
73203B0 2
Exposed Wiring Hazard,
Insulate Exposed Wiring
and Terminals
Never Hook Back on
Rope
Page 4
GENERAL SAFETY PRECAUTIONS
GENERAL SAFETY PRECAUTIONS
Warnings and Cautions
WARNING
As you read these instructions, you will see WARNINGS,
CAUTIONS, NOTICES and NOTES. Each message has a speci c
purpose. WARNINGS are safety messages that indicate
a potentially hazardous situation, which, if not avoided
could result in serious injury or death. CAUTIONS are safety
messages that indicate a potentially hazardous situation
which, if not avoided, could result in minor or moderate
injury. A CAUTION may also be used to alert against unsafe
practice. CAUTIONS and WARNINGS identify the hazard,
indicate how to avoid the hazard, and advise of the probable
consequence of not avoiding the hazard. NOTICES are
messages to avoid property damage. NOTES are additional
information to help you complete a procedure. PLEASE
WORK SAFELY!
WARNING
MOVING PARTS ENTANGLEMENT HAZARD
Failure to observe these instructions could lead to
serious injury or death.
• Always ensure hook latch is closed and not
supporting load.
• Never apply load to hook tip or latch. Apply load only
to the center of hook.
• Never use a hook whose throat opening has
increased, or whose tip is bent or twisted.
• Always use a hook with a latch.
• Always ensure the operator and bystanders are aware
of the stability of the vehicle and/or load.
• Always keep wired remote control lead and power
cord clear of the drum, rope, and rigging. Inspect for
cracks, pinches, frayed wires or loose connections.
Damaged components must be replaced before
operation.
• Always pass remote lead thru window when used in
vehicle.
• Never hook back on rope.
WARN INDUSTRIES
3 73203B0
MOVING PARTS ENTANGLEMENT HAZARD
Failure to observe these instructions could lead to
serious injury or death.
General Safety:
• Always Know Your Winch. Take time to fully read the
Instructions and/or Operations Guide, and/or Basic
Guide to Winching Techniques, in order to understand
your winch and its operations.
• Never exceed winch or winch rope rated capacity.
Double line using a snatch block to reduce winch load.
• Always wear heavy leather gloves when handling
winch rope.
• Never use winch or winch rope for towing. Shock
loads can damage, overload and break rope.
• Never use a winch to secure a load.
• Never operate this winch when under the in uence of
drugs, alcohol or medication.
• Never operate this winch if you are under 16 years of
age.
Installation Safety:
• Always choose a mounting location that is su ciently
strong to withstand the maximum pulling capacity of
your winch.
• Always use class 8.8 metric (grade 5) or better
hardware.
• Never weld mounting bolts.
• Always use factory approved mounting hardware,
components, and accessories.
• Never use bolts that are too long.
• Always con rm required bolt length to ensure proper
thread engagement.
• Always complete the winch installation and hook
attachment before installing the wiring.
• Always keep hands clear of winch rope, hook loop,
hook and fairlead opening during installation,
operation, and when spooling in or out.
• Always position fairlead with warning readily visible
on top.
• Always prestretch rope and respool under load before
use. Tightly wound rope reduces chances of “binding”,
which can damage the rope.
WARNING WARNING
MOVING PARTS ENTANGLEMENT HAZARD
Failure to observe these instructions could lead to
serious injury or death.
Winching Safety:
• Always inspect winch rope, hook, and slings before
operating winch. Frayed, kinked or damaged winch
rope must be replaced immediately. Damaged
components must be replaced before operation.
Protect parts from damage.
• Always remove any element or obstacle that may
interfere with safe operation of the winch.
• Always be certain the anchor you select will
withstand the load and the strap or chain will not
slip.
• Always use supplied hook strap whenever spooling
winch rope in or out, during installation and during
operation.
• Always require operators and bystanders to be
aware of vehicle and or load.
• Always be aware of stability of vehicle and load
during winching, keep others away. Alert all
bystanders of an unstable condition.
• Always unspool as much winch rope as possible
when rigging. Double line or pick distant anchor
point.
• Always take time to use appropriate rigging
techniques for a winch pull.
• Never touch winch rope or hook while someone else
is at the control switch or during winching operation.
• Never engage or disengage clutch if winch is under
load, winch rope is in tension or drum is moving.
• Never touch winch rope or hook while under tension
or under load.
• Always stand clear of winch rope and load and keep
others away while winching.
• Never use vehicle to pull load on winch rope.
Combined load or shock load can damage, overload
and break rope.
• Never wrap winch rope back onto itself. Use a
choker chain or tree trunk protector on the anchor.
WARN INDUSTRIES
73203B0 4
FALLING OR CRUSHING HAZARD
Failure to observe these instructions could lead to
serious injury or death.
•
• Never operate winch with less than 5 wraps of rope
• Never use winch as a hoist or to suspend a load.
• Always be certain anchor will withstand load, use
• Never use winch to lift or move persons.
• Never use excessive e or t to freespool winch rope.
•
• Always wind the winch rope on bottom (mountside)
• Never wind rope over top of drum.
• Always spool the winch rope onto the drum in the
CUT AND BURN HAZARD
Failure to observe these instructions could lead to
serious injury or death.
To avoid injury to hands and ngers:
• Always wear heavy leather gloves when handling
• Always be aware of possible hot surfaces at winch
Always stand clear, keep hands clear, keep others away.
around the drum. Rope could come loose from the
drum, as the rope attachment to the drum is not
designed to hold a load.
appropriate rigging and take time to rig correctly.
Always use proper posture/lifting technique or get
lifting assistance while handling and installing product.
of drum.
direction speci ed by the drum rotation labels on the
winch and/or in the documentation. This is required
for the automatic brake (if so equipped) to function
properly.
WARNING
winch rope.
motor, drum or rope during or after winch use.
Page 5
WARNING
GENERAL SAFETY PRECAUTIONS
WARNING
GENERAL SAFETY PRECAUTIONS
WARNING CAUTION
RISK OF EXPLOSIONS OR FIRE
Failure to observe these instructions could lead to
serious injury or death.
• Always operate the compressor in a well ventilated
area free of combustible materials, gasoline, or
vapors.
• Always store ammable material in a secure location
away from compressor.
• Never restrict or block any of the compressor
ventilation openings.
• Never operate unit indoors or in any con ned area.
• Never allow the compressor to operate unattended.
• Never place objects against or on top of compressor.
WARNING
RISK OF BURNS
Failure to observe these instructions could lead to
serious injury or death.
• Never touch any exposed metal parts on compressor
during or immediately after operation.
• Never reach around protective shrouds or attempt
maintenance until unit has been allowed to cool.
RISK OF BURSTING
Failure to observe these instructions could lead to
serious injury or death.
• Always drain intercooler daily or after each use. If
intercooler develops a leak, replace it immediately
with a new intercooler or replace the entire
compressor.
• Never drill into, weld, or make any modi cations to
the intercooler or its attachments.
• Never make adjustments or parts substitutions to
alter the factory set operating pressures.
• Never exceed the pressure rating of air tools, air
operated accessories, tires, and other in atables.
• Always install a pressure regulator and pressure
gauge to the air outlet (if not equipped) of your
compressor if air control is necessary.
• Always follow the equipment manufacturers’
recommendations.
• Never exceed the maximum allowable pressure
rating of attachments.
• Never use compressor to in ate small low-pressure
objects such as children’s toys, footballs, basketballs,
etc.
WARNING
CHEMICAL AND FIRE HAZARD
Failure to observe these instructions could lead to
serious injury or death.
• Always remove jewelry and wear eye protection.
• Never route electrical cables across sharp edges.
• Never route electrical cables near parts that get hot.
• Never route electrical cables through or near moving
parts.
• Always place the supplied terminal boots on
wires and terminals as directed by the installation
instructions.
• Never lean over battery while making connections.
• Never route electrical cables over battery terminals.
• Never short battery terminals with metal objects.
• Always verify area is clear of fuel lines, fuel tank,
brake lines, electrical wires, etc., when drilling.
• Always consult operator’s manual for proper wiring
details.
• Always insulate and protect all exposed wiring and
electrical terminals.
MOVING PARTS ENTANGLEMENT HAZARD
Failure to observe these instructions could lead to
minor or moderate injury.
To avoid injury to hands or ngers:
• Never leave remote control where it can be activated
during free spooling, rigging, or when the winch is not
being used.
• Never leave the winch remote control plugged in
when installing, freespooling, rigging, ser vicing or
when the winch is not being used.
NOTICE
AVOID WINCH AND EQUIPMENT DAMAGE
• Always avoid side pulls which can pile up winch rope
at one end of the drum. This can damage winch rope
or winch.
• Always ensure the clutch is fully engaged or
disengaged.
• Always use care to not damage the vehicle frame
when anchoring to a vehicle during a winching
operation.
• Never submerge winch in water.
• Always store the remote control in a protected, clean,
dry area.
RISK FROM FLYING OBJECTS
Failure to observe these instructions could lead to
WARNING
RISK TO BREATHING
Failure to observe these instructions could lead to
serious injury or death.
• Never use air from compressor to supply air for
human consumption.
WARN INDUSTRIES
5 73203B0
serious injury or death.
• Always wear ANSI Z87.1 approved safety glasses
with side shields when using the air compressor.
• Never point any nozzle or sprayer toward any part of
the body or at other people or animals.
• Always turn the compressor o and bleed pressure
from the air hose and intercooler before attempting
maintenance, attaching tools, or accessories.
CAUTION
CUT AND BURN HAZARD
Failure to observe these instructions could lead to
minor or moderate injury.
• Never let winch rope slip through your hands.
WARN INDUSTRIES
73203B0 6
Page 6
SAFE WORKING CONDITIONS
KNOW YOUR WINCH
This manual provides instructions on how to
install your WARN winch system and initial
operating instructions. Please read the Basic
Guide To Winching Techniques for complete
operational instructions for your WARN winch
system.
Safety
When installing your WARN winch system, read
and follow all mounting and safety instructions.
The operator should always operate the
winch from a safe position when pulling a load.
The safe areas are: (1) Perpendicular to the wire
rope, (2) Inside the vehicle with the hood up (if
winch is mounted on front of vehicle). These safe
positions will help prevent the wire rope from
striking the operator if the wire rope fails when
under load.
Operate winch from the fully extended remote
control cord length whenever possible. The
operator must always be at least 8 ft. (2.44 m)
from the winch while operating. This will prevent
entanglement with the fairlead and keep the
operator out of harms way during winch load
pulling.
Never work around the wire rope while under
load.
Always use caution when working with electricity
and remember to verify that no exposed electrical
connections exist before energizing your winch
circuit.
For specifications and performance data, refer to
the specification sheet supplied with your winch.
Sound Emissions
The winch is designed so that the sound
emissions do not exceed 70 dBa from the
operator’s station. The operator must be at least
8 ft. (2.44 m) from the winch while operating.
If the winch is exceeding 70 dBa from the
operator’s station, have the winch inspected at an
authorized service center.
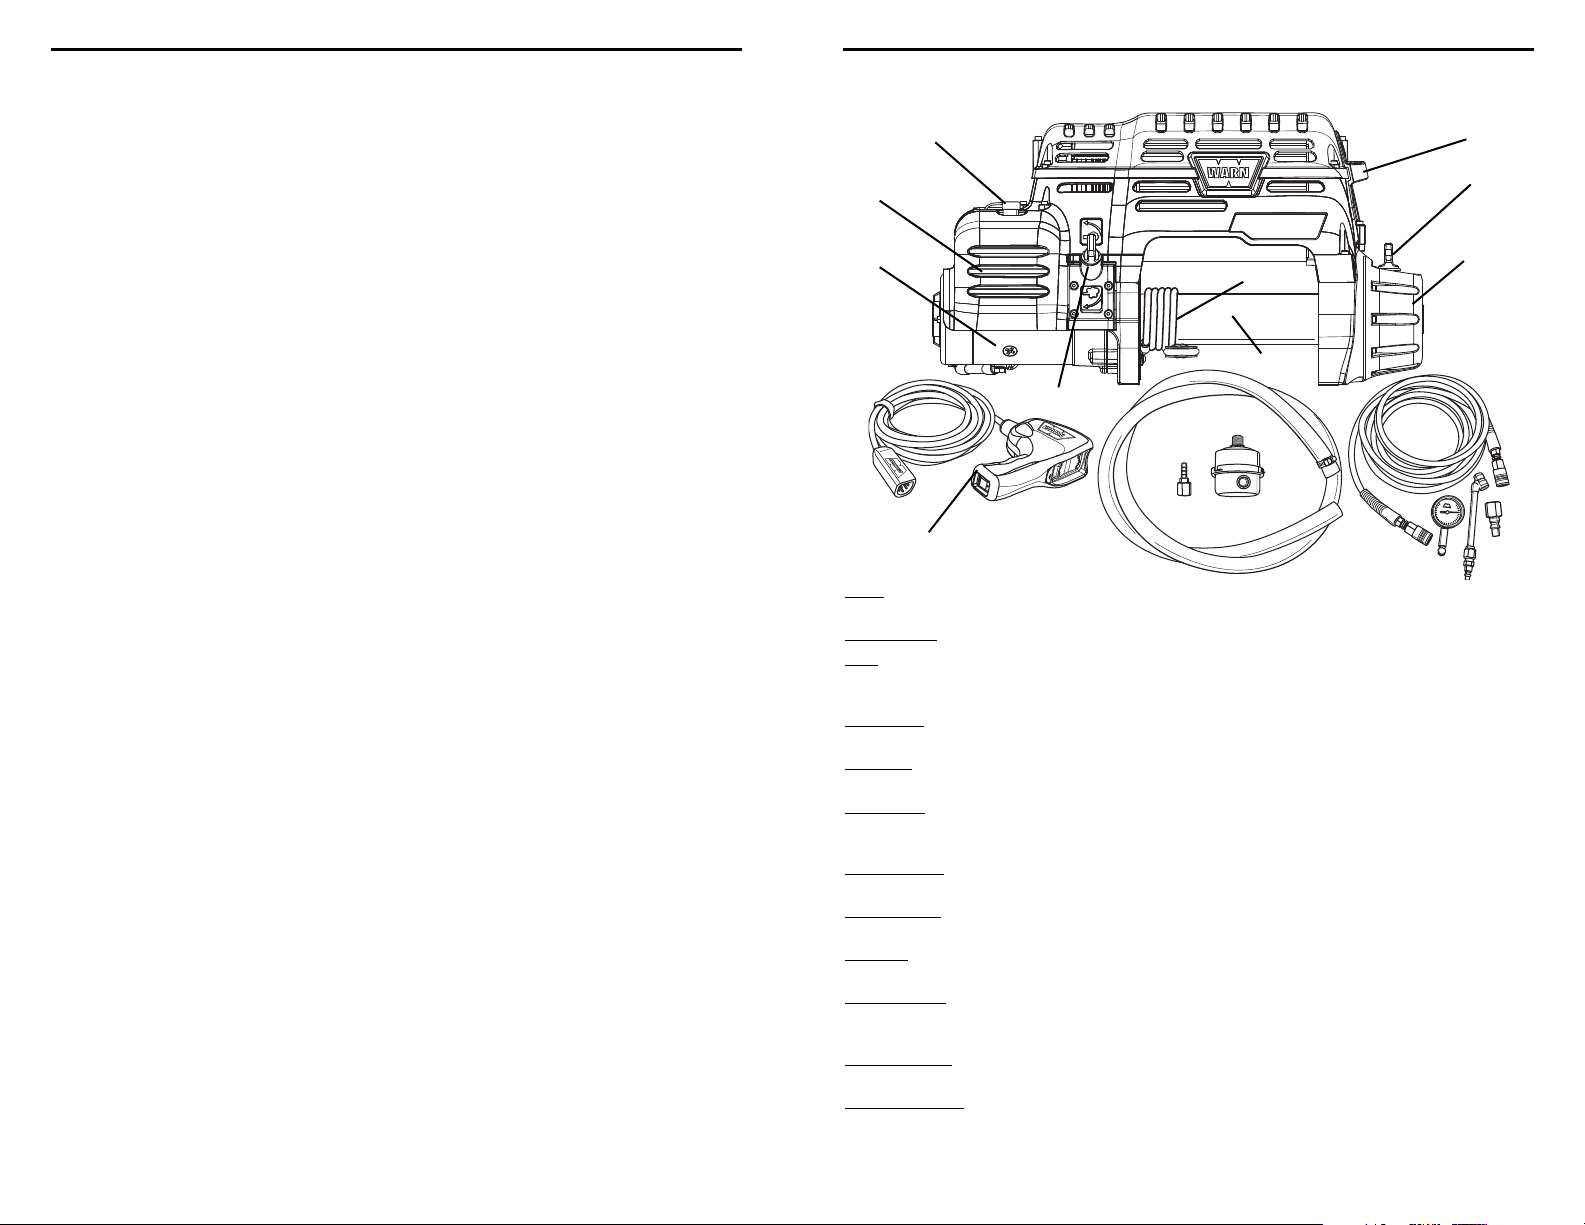
Know Your Winch
Before you begin, you should familiarize yourself with your WARN winch and each of its components:
Remote Socket
Contactor
Air Access Door
Clutch Lever
Transmission
Motor
(Gear Train)
Rope
Winch Drum
Air Accessory Kit
Mode Selector
Air Intake Hose Kit
Remote Control
Motor: The winch motor is powered by the vehicle’s battery. The motor provides power to the gear
mechanism, which turns the winch drum and winds the winch rope.
Mode Selector: The mode selector allows the user to switch between winching and compressor operation.
Rope: The winch rope’s diameter and length are determined by the winch’s load capacity and
design. Wrapped around the winch drum and fed through the fairlead, the winch rope is
looped at the end to accept the hook’s clevis pin.
Winch Drum: The winch drum is the cylinder onto which the winch rope feeds. The drum is driven by the
motor and gear train. Its direction can be changed using the remote control.
Gear Train: The reduction gear converts the winch motor power into a large pulling force. The gear train
design makes it possible for the winch to be lighter and more compact.
Clutch Lever: The clutch allows the operator to manually disengage the spooling drum from the gear train,
enabling the drum to rotate freely (known as “freespooling”). Engaging the clutch “locks” the
winch drum back onto the gear train.
Air Access Door: The rubber door marked “AIR” on the geartrain side of the PowerPlant can be pulled out to
gain access to the quick-connect air fitting.
Remote Socket: The remote socket is where the operator plugs in the wired remote control or optional
wireless remote receiver, in order to control the winch.
Contactor: Using electrical power from the vehicle’s battery, the contactor switches power to the motor,
enabling the operator to change the direction of the winch drum rotation.
Remote Control: The remote control plugs into the winch, via the remote socket, allowing the operator to
control the winch direction, as well as stand well clear of the wire rope while operating the
winch. The remote also has a switch to turn the compressor on and off.
Air Accessory Kit: Comes with hose, tire chuck, tire gauge and a quick disconnect coupling for all your air
supply and inflation needs.
Air Intake Hose Kit: Once installed on winch, it provides clean air to the compressor from within the engine
compartment.
WARN INDUSTRIES
7 73203B0
WARN INDUSTRIES
73203B0 8
Page 7
MOUNTING
AIR INTAKE CONNECTION
Step 1 - Mount the Winch
Winch mounting kits are available from your
WARN Dealer to satisfy nearly all applications. For
information on available kits, contact your WARN
product dealer.
For optimal performance and the results you expect,
NOTICE
WARN mounting plates are strongly recommended.
CAUTION
and serious injury, complete the winch installation and attach
the hook before installing the wiring.
su ciently strong enough to withstand the maximum pulling
capacity of your winch.
in the direction speci ed by the drum rotation labels on the
winch and/or in the documentation. This is required for the
automatic brake (if so equipped) to function properly.
(mount side) of the drum.
possible for safe winching operation (Refer to
the following diagrams for proper mounting
orientation). All others are improper and
inappropriate. The mounting details indicate the
proper torque levels.
combinations torqued to recommended levels will
prevent vibration during operation. Specifications
listed below. Mounting system will dictate bolt
length.
Mounting Details:
(1) Smooth and at, thickness = 1/4” (6.4 mm)
(2) 3/8” (9.525 mm) lockwasher X 4
(3) 3/8-16 X 1 1/4” long, grade 5 bolt X 4
Torque 30-35 ft. lbs. (41-47Nm)
To prevent accidental activation of the winch
WARNING
Always choose a mounting location that is
Never use bolts that are too long.
WARNING
Always spool the winch rope onto the drum
WARNING
Always wind the winch rope on the bottom
WARNING
Only the mounting orientations shown are
The use of recommended bolt and lock washer
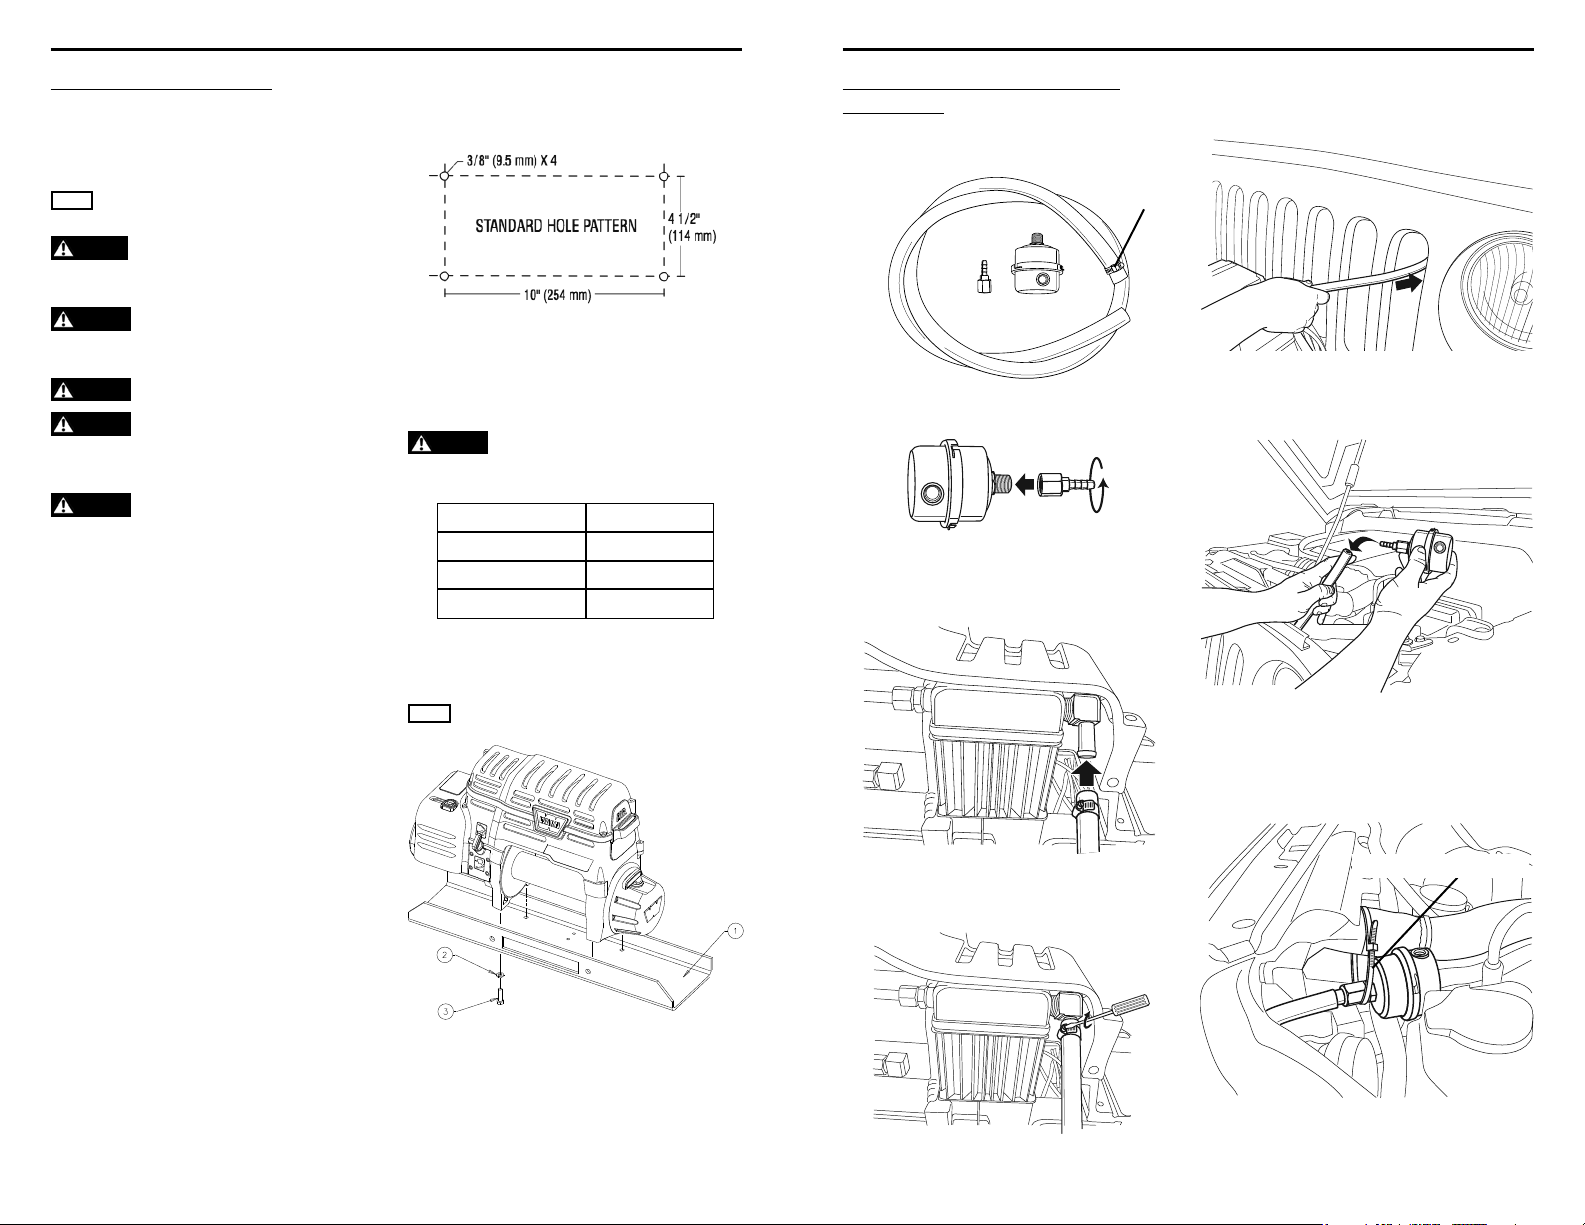
Mounting Bolt Pattern:
Standard: 10” x 4.5”, 254 mm x 114.3 mm
Choose a mounting location that is sufficiently
strong enough to withstand the maximum pulling
capacity of your winch.
Always con rm required bolt length to
WARNING
ensure proper thread engagement.
Plate Thickness Bolt Length
1/4” (7 mm) 1.25” (32 mm)
3/8” (10 mm) 1.5” (40 mm)
1/2” (13 mm) 1.5” (40 mm)
Mounting Orientation:
This winch is designed for feet down mounting only.
NOTICE
Step 2 - Air Intake Hose & Filter
Installation
1. Locate air intake kit contents. Place the small
hose clamp onto end of the intake hose.
hose clamp
2. Connect the barb fitting to the airtake filter.
3. From the back side of the winch, locate the
hose fitting on the compressor head and push
the hose on.
4. Tighten clamp securely.
5. Route the air intake hose thru the vehicle
grille or bumper openings into the engine
compartment.
6. Install the filter onto the end of the hose.
7. Mount filter up as high as possible. Use the
supplied tie wraps or other means to secure the
hose and filter.
Tighten tie wrap securely
WARN INDUSTRIES
9 73203B0
WARN INDUSTRIES
73203B0 10
Page 8
ELECTRICAL CONNECTIONS
FIRST TIME OPERATING INSTRUCTIONS
Step 3 - Install the Wiring
To prevent serious injury or death. Always
WARNING
place the supplied terminal boots on wires and terminals as
directed by the installation instructions.
To prevent serious injury or death from
WARNING
electrical re:
Never route electrical cables across sharp edges.
Never route electrical cables near parts that get
hot.
Never route electrical cables through or near
moving parts.
Avoid pinch and wear/abrasion points when
installing all electrical cables.
Always insulate and protect all exposed wiring
WARNING
and electrical terminals.
Use the included insulating boots on exposed
connections to prevent electrical shorting. Route
battery connection cables in areas which will not
cause them to chafe or cut through the insulation
causing a potential short circuit.
Upon completion of installation, check winch for
proper operation.
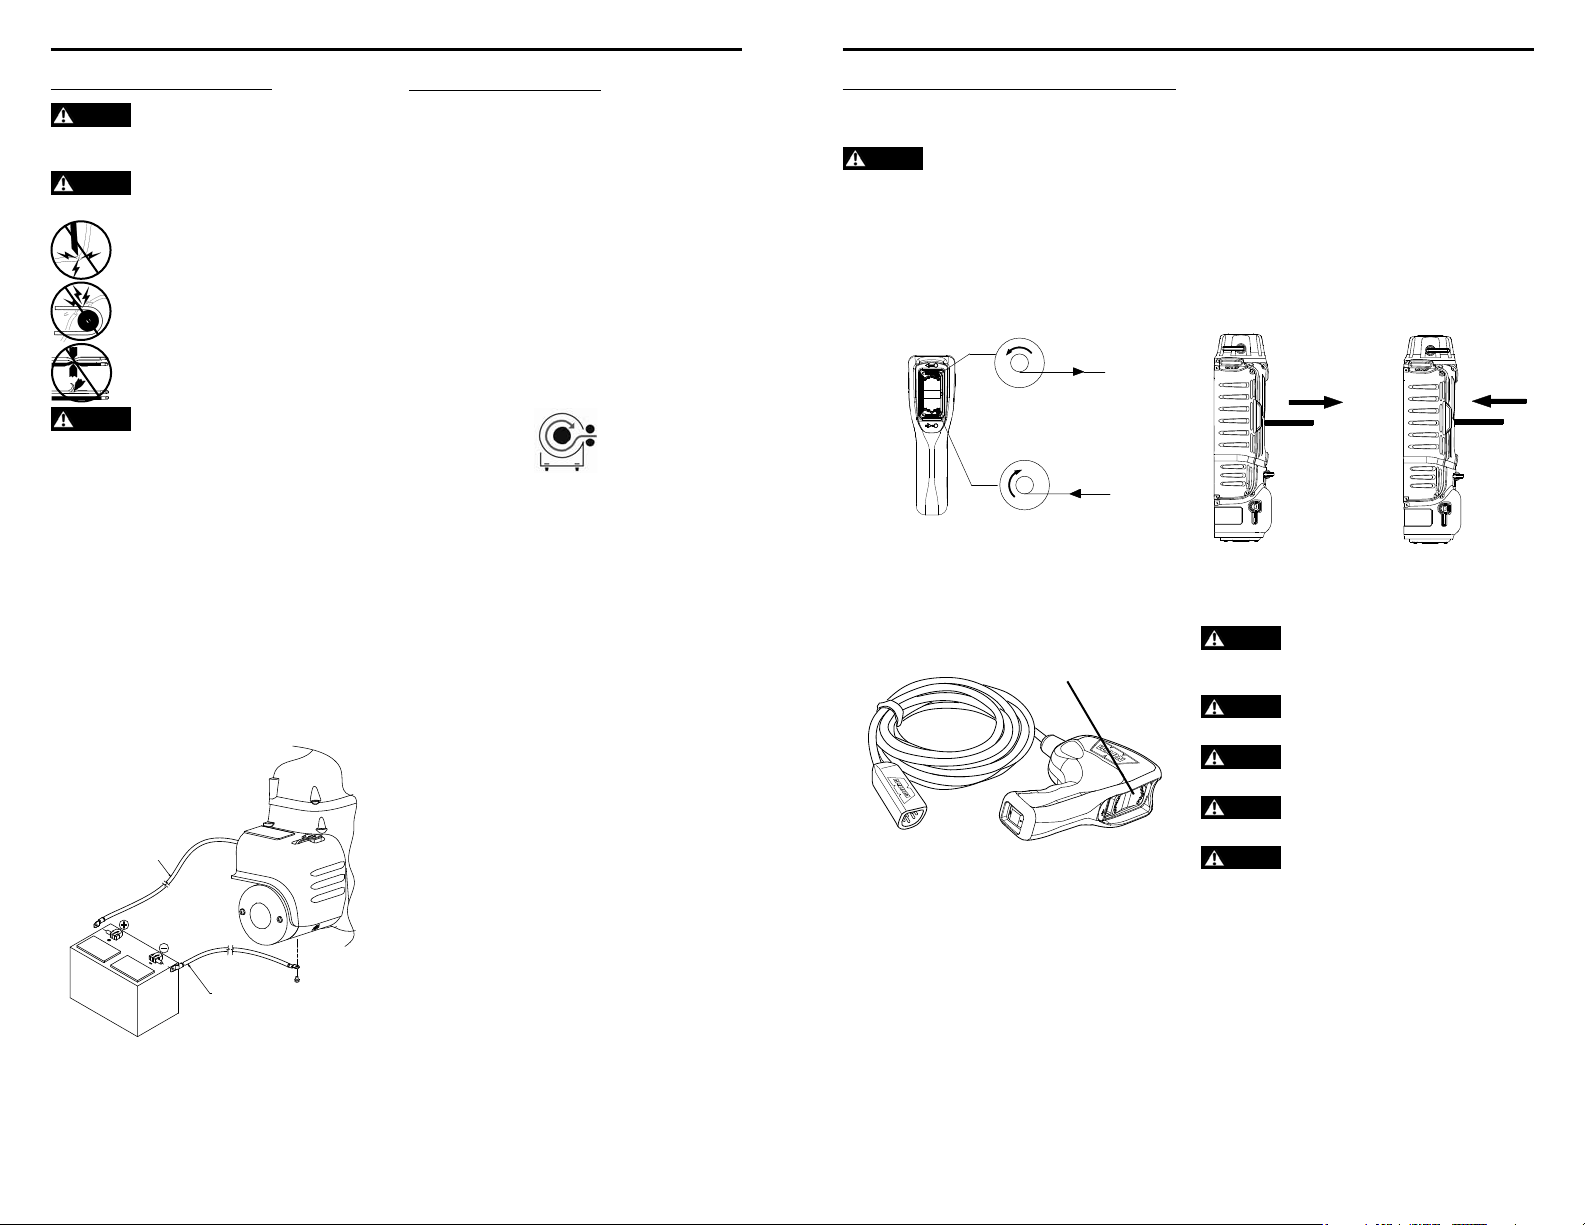
Battery Recommendations
A fully charged battery and good connections are
essential to the proper operation of your winch. The
minimum requirement for a 12 volt DC battery is
650 Cold Cranking Amps.
Red Cable 72” (183cm)
Black Cable 72” (183cm)
Electrical Diagram
Step 4 - System Check
Perform system check:
• Check fasteners and make sure they are tight and
to proper torque.
•
Verify wiring to all components is correct and
be certain that all connections are tight
•
Verify there is no exposed/bare wiring,
terminals or cable insulation damage.
• Check motor rotation: Winch should power in
and rotate the direction indicated by the drum
rotation label. If winch rotates in opposite
direction, recheck electrical connections.
• Check rope direction: Always wind winch rope
on bottom (mountside) of drum.
Once you have performed a system check, you
are ready to con rm winch function. Proceed
to First Time Winch Operation Instructions, Air
Compressor Operation Instructions and Final
Analysis and Maintenance sections in this booklet.
.
Step 5 - First Time Operating Instructions
Winch Operation:
Always understand your winch and the
WARNING
winching operation by reviewing The Basic Guide to Winching
Techniques included with your winch.
Remote Control Switch
Do not leave the remote plugged into the winch
when not in use. Leaving the remote plugged in
may result in a dangerous condition and/or battery
drain.
OUT
IN
Winch Control Switch
The large rocker switch on the remote control
handle controls the spooling in and spooling out
functions of the winch. This switch is operable only
when the Mode Selector is in the “Winch” symbol
position.
Motor Temperature Indicator and Cuto
With heavy usage, over a short period of time,
the motor will heat up considerably. To prevent
any damage to the motor due to high heat, there
is a thermal protection device on the motor.
When the factory programed high
temperature point is reached, this device will shut
off the motor and cause the indicator light in the
remote control to blink.
The winch spooling in function and the
compressor will not operate, but the winch
spooling out function will still operate in case it
is necessary to release a load. After the motor is
allowed to cool, normal operation will resume.
Winch Control Switch
Clutch Operation
When the clutch is engaged, the gear train is
coupled to the wire rope drum and power can
be transferred from the winch motor. When the
clutch is disengaged it is in the freespool position
and the gear train and wire rope drum are
uncoupled allowing the drum to rotate freely.
The clutch lever, located on the winch
housing opposite the motor, controls the clutch
engagement. To prevent damage, always fully
engage or fully disengage the clutch lever.
Disengaged
Engaged
Air Compressor Operation:
Always turn the compressor o and bleed pressure
WARNING
from the air hose and intercooler before attempting maintenance,
attaching tools, or accessories.
Never point any nozzle or sprayer toward any part of
WARNING
the body or at other people or animals.
Always wear ANSI Z87.1 approved safety glasses
WARNING
with side shields when using the air compressor.
Never reach around protective shrouds or attempt
WARNING
maintenance until unit has been allowed to cool.
Never touch any exposed metal parts on compressor
WARNING
during or immediately after operation.
Select the Compressor Mode
Turn the mode selector knob to the “Air
Compressor” symbol. Remove the Air Access
Door and connect an air hose to the quickconnect fitting.
Air Access Door
The rubber door marked “AIR” on the geartrain
side of the PowerPlant can be pulled out to gain
access to the quick-connect air fitting. Before
operating the compressor, an air hose should be
connected to the fitting. During any winching
WARN INDUSTRIES
11 73203B0
WARN INDUSTRIES
73203B0 12
Page 9
FIRST TIME OPERATING INSTRUCTIONS
FIRST TIME OPERATING INSTRUCTIONS
operation the fitting must be left open without
a hose connected. If a hose is connected during
winching, air pressure will build up in the unit
and the pressure switch will stop the motor. It
is recommended that the door be in place on
the housing at all times except during actual
compressor operation.
Air Access
Door
Mode Selector
rear of the air fitting. Pull on the metal ring
momentarily.
Draining the Intercooler
It is normal for condensation to collect in the
intercooler. This can be drained off at the relief
valve by pulling on the metal ring. This should be
done after every ten hours of usage or before any
prolonged storage period.
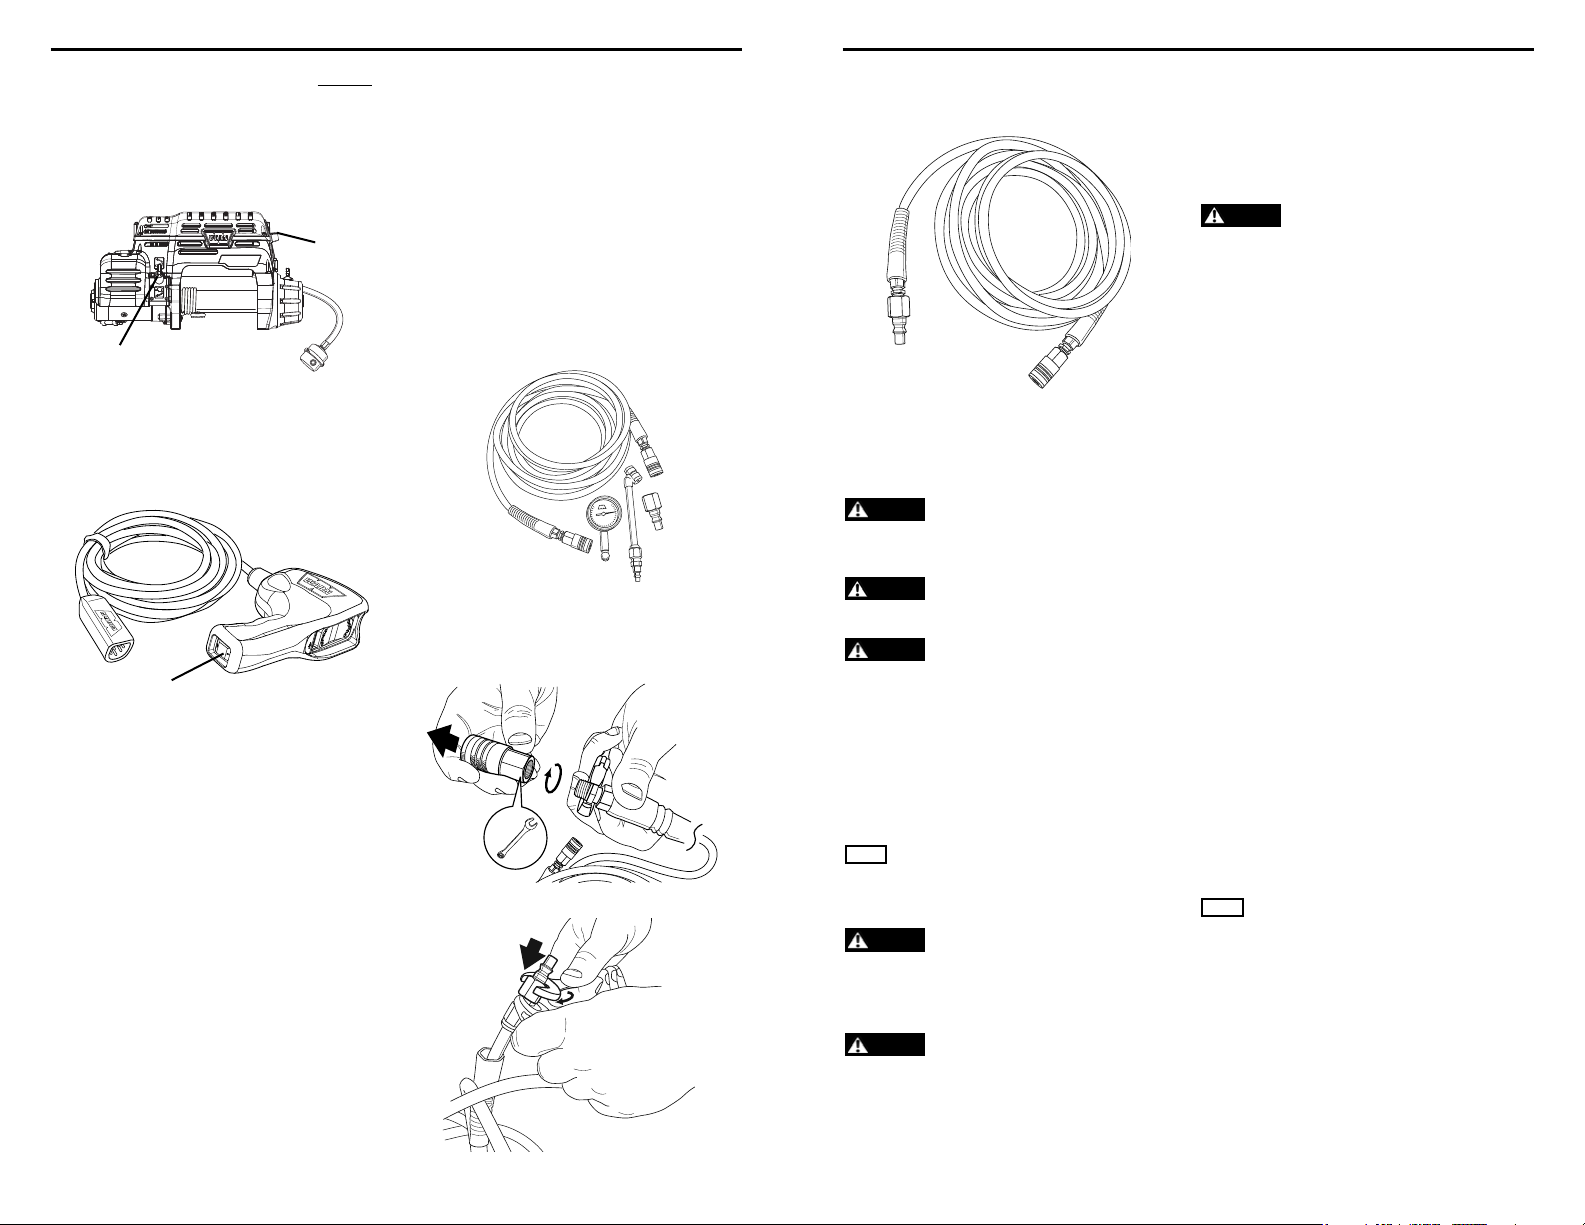
Air Hose Fitting
1. Your WARN air compressor accessory kit
supplies you with everything you need to
customize your air compressor for multiple
uses.
Compressor Switch
Plug in the Remote Control. The smaller rocker
switch turns the compressor on and off. This can
only be used when the mode selector is in the
“air compressor” symbol position.
2. You can easily change out the air hose couplers
to modify your air compressor hose to allow for
multiple fittings. Using a wrench, remove one
Compressor Switch
of the existing female couplers.
Intercooler
The intercooler provides a small air chamber
that reduces the air temperature at the quickconnect fitting. There is a pressure switch and a
relief valve mounted to the intercooler.
Pressure Switch
The pressure switch will automatically stop
the compressor when it reaches the factory set
“cutout” pressure of approximately 100 psi. When
the pressure drops to the “cut-in” pressure of
approximately 70 psi, the compressor will start
up again.
3. Using wrench attach male coupler.
Relief Valve
If the pressure switch does not shut off the
compressor at its “cut-out” pressure setting, the
relief valve will protect against high pressure by
“popping out” at approximately 125 psi.
The relief valve should be operated manually
once a month to make sure it moves freely
and is functional. It is located below and to the
WARN INDUSTRIES
13 73203B0
4. The completed hose assembly can be used as
a hose extension or with most standard stand
alone air compressors.
Avoid shock loads when spooling, by pulsing the
control switch to take up winch rope slack. Shock
loads can momentarily far exceed the winch and
rope ratings.
Spooling In Under No Load
someone else is at the control switch or during winching
operation.
Spooling with an Assistant: Have the assistant
hold the hook strap putting as much constant
tension on the winch rope as possible. While
keeping tension, the assistant should walk toward
the winch while you operate the control switch
spooling in the winch rope. Release the
when the hook is a minimum of 6 ft. (2m) from the
fairlead opening.
Rope Operation:
Spooling Out
Never operate winch with less than 5 wraps of
WARNING
rope around the drum. Rope could come loose from the drum,
as the rope attachment to the drum is not designed to hold
a load.
Always keep hands clear of winch rope, hook
WARNING
loop, hook and fairlead opening during installation, operation,
and when spooling in or out.
Always wear heavy leather gloves when
WARNING
handling winch rope.
Freespooling is generally the quickest and easiest
way to spool out winch rope. Before freespooling
winch rope out from the winch, power out enough
rope to remove any tension the winch rope might
be under. Disengage the clutch. Then freespool
by manually spooling out enough winch rope for
the winching operation. See The Basic Guide to
Winching Techniques for more information.
NOTICE
Do NOT power out more than 30 ft without allowing
the winch to cool for 20 minutes before powering rope back in.
Instead, place the clutch in freespool and pull the rope out by
hand.
Always use supplied hook strap whenever
WARNING
spooling winch rope in or out, during installation or operation
to avoid injury to hands and ngers.
Spooling In Under Load
Never exceed winch’s rated line pull.
WARNING
Power-in the winch rope evenly and tightly on
the drum. This prevents the outer winch wraps
from sinking into the inner wraps, binding, and
damaging the winch rope.
WARN INDUSTRIES
73203B0 14
Spool in the remainder for storage as directed
below.
Spooling Alone: Arrange the winch rope to
be spooled so it will not kink or tangle when
spooled. Be sure any winch rope on the drum is
tightly and evenly layered. Spool enough winch
rope to complete the next full layer on the drum.
Tighten and straighten the layer. Repeat process
until the hook is a minimum of 6 ft. (2 m) from the
fairlead opening.
Spool in the remainder for storage as directed
below.
Spooling Remainder for Storage
When the hook is within 6 ft. (2 m) of the fairlead,
disconnect the hook from the anchor or load.
Hold onto the supplied hook strap and hold
tension on the winch rope. Slowly power-in the
winch by “pulsing” the power-in switch on the
remote control until the hook is within 3 ft. (1 m)
of the fairlead.
Stop winching in and attach the hook to a
suitable anchor point on the vehicle.
NOTICE
cause damage to the fairlead.
Once the hook is suitably attached to the
vehicle, power-in the remaining slack in the winch
rope by “pulsing” the power-in switch on the
remote control until there is minimal slack in the
winch rope.
Overloading/Overheating
This winch is rated for intermittent duty. When
the motor approaches stall speed, very rapid heat
buildup occurs which may cause motor damage.
Never touch winch rope or hook while
WARNING
Do not power the hook into the fairlead. This could
switch
Page 10
FIRST TIME OPERATING INSTRUCTIONS
FINAL ANALYSIS AND MAINTENANCE
Double-line rigging (see The Basic Guide to
Winching Techniques) will reduce the amperage
draw, and reduce heat buildup in the motor. This
allows longer continual use.
Stretching Winch Rope Operation
Always prestretch rope and respool under load
WARNING
before use. Tightly wound rope reduces chances of “binding”,
which can damage the rope.
Never operate winch with less than 5 wraps of
WARNING
rope around the drum. Rope could come loose from the drum,
as the rope attachment to the drum is not designed to hold
a load.
The life of a winch rope is directly related to
the use and care it receives. During its first use, a
new winch rope must be spooled onto its drum
under a load of at least 1000 lbs. (454 kgs). Use
the following instructions to properly stretch the
winch rope onto the winch drum.
1) Choose a FLAT AND LEVEL location that is large
enough to run out the entire length of winch
rope.
2) Turn the clutch lever on the winch to the “Free
Spool” position. Spool out the winch rope to the
last 5 wraps on the drum. Once the winch rope is
spooled out, turn the clutch lever on the winch to
the “Engaged” position.
3) Attach the hook end of the rope to a suitable
anchor point and back the vehicle away from the
anchor point until there is very little slack in the
winch rope. Before getting out of the vehicle, set
the parking brake, place the vehicle in gear or
park and turn the vehicle o .
4) Connect the remote control to the winch.
Standing approximately 8 ft. (2.44 m) away from
the winch, power-in the winch until all of the
slack is wound onto the winch drum. Disconnect
the remote control from the winch. Hold tension
on the winch rope with one hand; carefully push
the winch rope to the side of the drum the winch
rope is attached to so there are no gaps between
each coil on the drum. Be sure to check that the
winch rope is winding o of the bottom if the
drum, not the top, or the automatic load holding
brake will not function properly. (If the winch
rope is winding o the top you have powered the
winch “out” instead of “in” on the remote control).
5) The following steps should be done using two
people for proper safety. If you attempt to tension
your winch rope alone be sure to always engage
the parking brake, place the transmission in gear
or park and turn the vehicle o every time you
exit the vehicle to inspect the winch rope. Never
WARN INDUSTRIES
15 73203B0
exit the vehicle with a load on the winch rope.
Tensioning the winch rope is critical to ensure a
long product life. Tensioning the winch rope will
prevent outer layers of winch rope from pinching
and deforming the inner layers.
6) Use care to evenly wrap each layer to prevent
damage to the rope.
7) Pass the remote control through the driver’s
window for the driver of the vehicle to operate.
Instruct your assistant to stand to the side of
the vehicle and away from the winch rope. Your
assistant should signal you if the winch rope is
winding correctly by watching it move across
the fairlead as the winch rope is powered in.
Start the vehicle and place the transmission in
neutral. Release the parking brake while applying
moderate brake pedal pressure.
Press power-in on the remote control switch.
After winching in for approximately 6 ft. (2m),
stop winching. Slowly let up o of the brake
pedal and then apply the parking brake. This will
ensure that there is no load on the winch rope.
Then place the transmission in park or in gear and
turn the vehicle o . Exit the vehicle and inspect
the winch to make sure that the winch rope is
being evenly wound onto the winch drum and
not sinking into the lower layer. If the winch rope
is sinking, power the winch rope out and repeat
this step from the beginning with more brake
pedal pressure.
8) When you are convinced the winch rope is
winding onto the winch drum properly, repeat
step 6 until the vehicle is within 6 ft. (2 m) of
the winch anchor. Once within 6 ft. (2 m), slowly
let up o of the brake pedal and then apply
the parking brake. This will ensure that there
is no load on the winch rope. Then place the
transmission in park or in gear and turn the
vehicle o . Exit the vehicle. Disconnect the hook
from the anchor. While holding onto the supplied
hook strap, hold tension on the winch rope and
slowly power-in the winch by “pulsing” the powerin switch on the remote control until the hook is
within 3 ft. (1 m) of the fairlead. Stop winching in
and attach the hook to a suitable anchor point on
the vehicle.
Do not power the hook into the fairlead. This could
NOTICE
cause damage to the fairlead.
Once the hook is suitably attached to the
vehicle, power-in the remaining slack in the winch
rope by “pulsing” the power-in switch on the
remote control until there is minimal slack in the
winch rope.
Check
Before rst
operation
Take time to fully read the Instructions and/
or Operations Guide, and/or Basic Guide to
Winching Techniques, in order to understand
your winch and its operations
Check fasteners and make sure they are tight
and to proper torque.
Replace damaged fasteners.
Verify wiring to all components is correct and
be certain that all connections are tight.
Verify there is no exposed/bare wiring,
terminals or cable insulation damage
(cha ng/cutting).
Cover any exposures with terminal boots.
Repair or replace damaged electrical cable.
Inspect rope for damage.
Replace rope immediately if damaged.
Keep winch, rope and switch control free
from contaminants.
Use a clean rag or towel to remove any
dirt and debris.
WARNING
To prevent serious injury or death:
Always spool the winch rope onto the drum as
indicated by the drum rotation label.
Always Wind Rope on Bottom of Drum.
the winching operation by reviewing the Basic
Guide to Winching Techniques included with your
winch.
contact:
Never Wind Rope Over Top of Drum.
WARN INDUSTRIES
73203B0 16
After each
use
Every 90 days
X
XX
XX
XX
XXX
X
Take time to fully understand your winch and
For further information or any questions
WARN INDUSTRIES, INC.
12900 S.E. Capps Road, Clackamas
OR USA 97015-8903, 1-503-722-1200,
Customer Service: 1-800-543-9276
Dealer Locator Service: 1-800-910-1122
or visit www.warn.com.
Page 11

INSTRUCTIONS
INDEX DES SYMBOLES
Guide d’utilisation et installation du
treuil PowerPlant
Chaque utilisation du treuil est potentiellement susceptible de blessures corporelles. Afin de minimiser ce risque, il est important de lire
consciencieusement ce guide et le guide de base des techniques d'utilisation du treuil. Veuillez vous familiariser avec le fonctionnement de votre
treuil avant de l'utiliser et soyez à tout moment axé sur la sécurité. Dans ce guide, nous fournissons des informations de sécurité importantes et des
instructions sur la façon d'installer votre treuil. Veuillez lire le guide de base des techniques de treuillage pour des informations sur la façon d'utiliser
correctement votre treuil et les techniques de câblage appropriées
Veuillez garder ce manuel et tout autre documentation sur le produit trouvée dans ce kit aux fins de consultation future. Dans ce kit, vous trouverez
les informations suivantes : Guide d'installation du treuil, guide de base des techniques de treuillage, spécification et données de performance,
garantie du produit, remplacement de liste de pièces et autres documents spécifiques à certains produits. Si un de ces articles est manquant, veuillez
visiter www.warn.com ou contactez-nous au numéro ci-dessous.
TABLE DES MATIÈRES :
SÉCURITÉ
Indice de symbole ................................................................................................................................................................. 18
Consignes générales de sécurité ..............................................................................................................................19-22
INSTRUCTIONS
CONDITIONS DE TRAVAIL SÛRES ..................................................................................................................................... 23
Sécurité des conditions de travail ................................................................................................................................... 24
Montage ....................................................................................................................................................................................25
ADMISSION D’AIR CONNEXION ........................................................................................................................................ 26
Raccordements électriques ............................................................................................................................................... 27
Vérification du système ....................................................................................................................................................... 27
INSTRUCTIONS RELATIVES À UNE PREMIÈRE UTILISATION ..............................................................................28-31
Utilisation du treuil .................................................................................................................................................... 28
Utilisation du compresseur d'air ....................................................................................................................28-29
Utilisation du câblage ........................................................................................................................................30-31
Analyse Finale et Entretien ................................................................................................................................................32
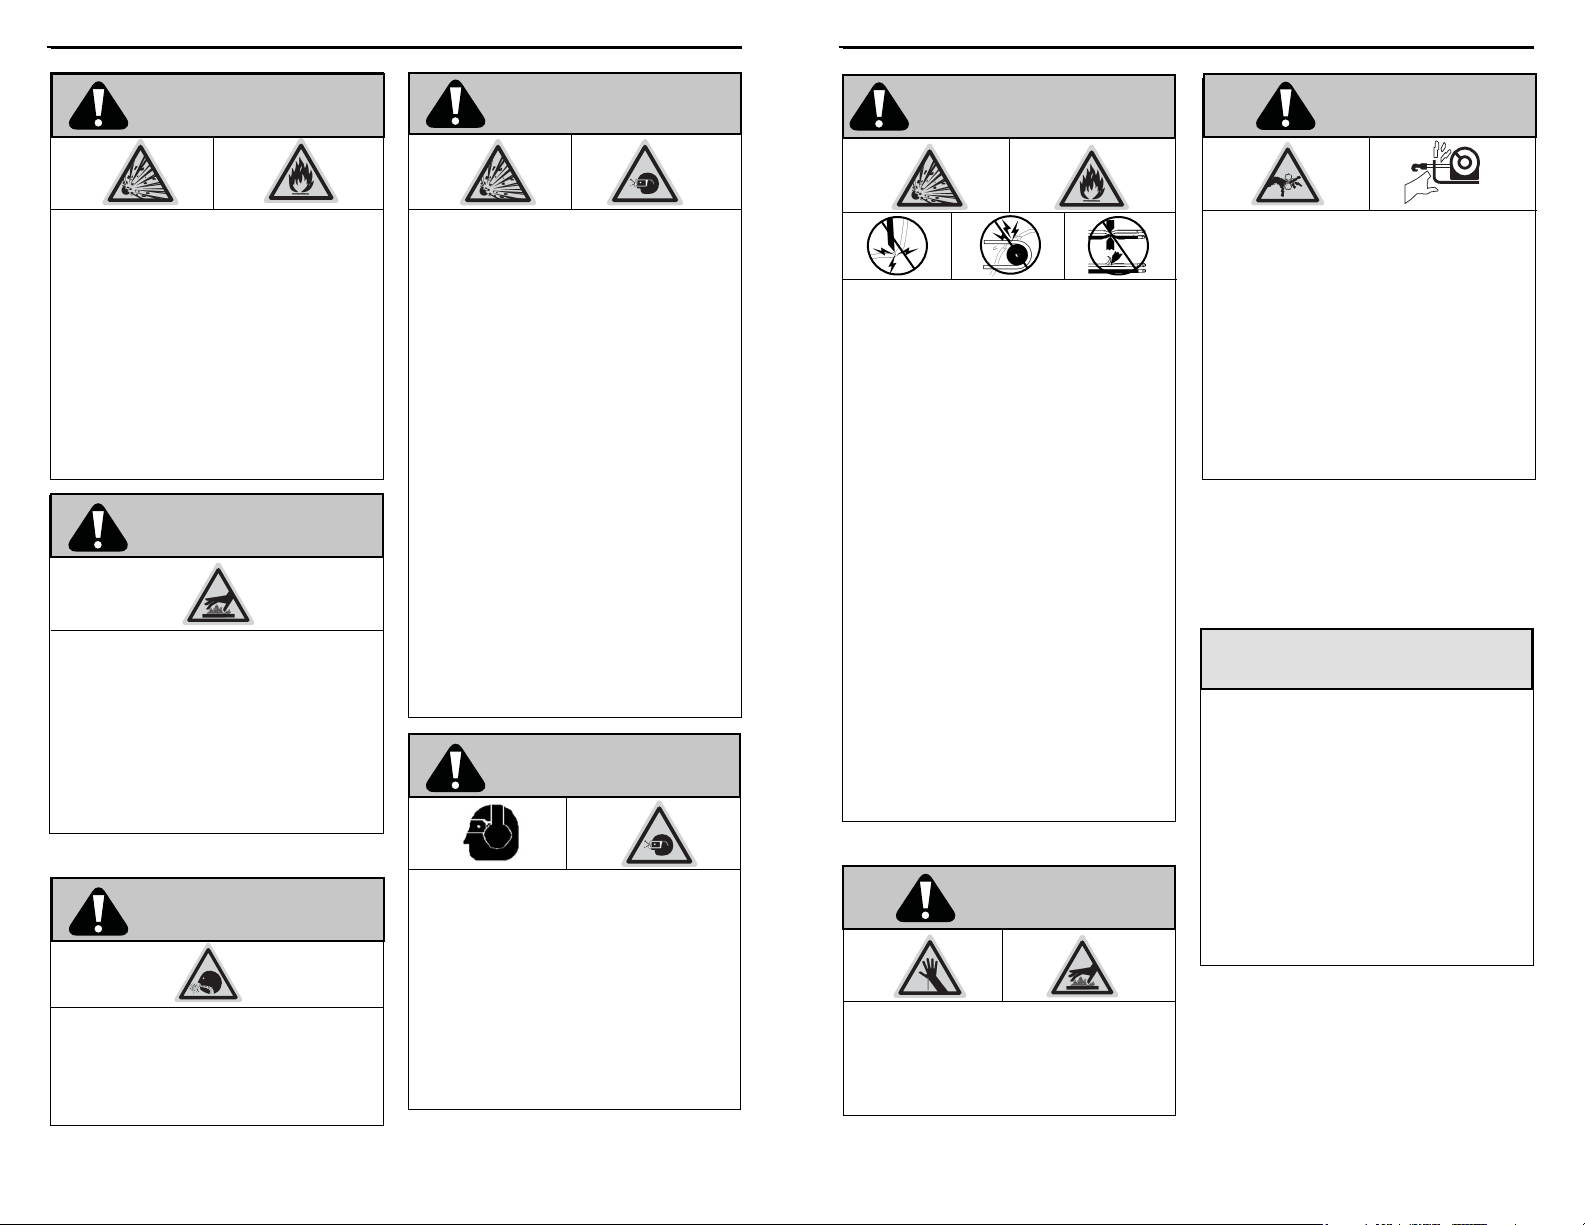
SYMBOLE EXPLICATION
Lire tous les documents
relatifs au produit
Toujours porter un
dispositif de protection
auditive et oculaire
Ne jamais utiliser le treuil
comme palan
Positionner correctement
la charge dans la gorge du
crochet
Enrouler le câble sur
le dessous du tambour
Danger d’écrasement des
doigts dans
le guide-câble
Risque de percement/
coupure des mains
Risque d’explosion/
rupture
Danger en raison
d’une arête tranchante
SYMBOLE EXPLICATION
Toujours porter
des gants de cuir
Ne pas déplacer
des personnes
Toujours utiliser lasangle
de crochet fournie
Ne jamais appliquer la
charge sur l’extrémité ou
le loquet du crochet
Ne jamais enrouler
le câble sur le dessus
du tambour
Point de pincement
du guide-câble
Risque de surface
chaude
Risque d’incendie
et de brûlure
Danger lié à des
pièces mobiles
Warn® et le l ogo WARN sont des m arques dép osées de Warn I ndustrie s Inc.
©2013 Warn Industries Inc.
WARN INDUSTRIES
17
Warn Industries Inc.
12900 SE Capps Road
Clackamas, OR 97015
États-Unis
Service à la clientèle: (800) 543-9276
No. de Fax international: (503) 722-3005
Télécopie: (503) 722-3000
www.warn.com
Éviter les points de
pincement et d’usure/
abrasion lors de
l’installation des câbles
électriques
WARN INDUSTRIES
73203B0 18
Isoler tous les câbles
exposés
Ne jamais accrocher le
câble à lui-même
Page 12
MESURES GÉNÉRALES DE SÉCURITÉ
MESURES GÉNÉRALES DE SÉCURITÉ
Avertissements et mises en
garde
Les directives suivantes comprennent des indications
intitulées AVERTISSEMENT, ATTENTION, AVIS et REMARQUE.
Chacune d’entre elles comporte un objectif bien précis:
AVERTISSEMENT présente des consignes de sécurité
soulignant un danger potentiel qui, s’il n’est pas évité,
peut entraîner des blessures graves ou la mort. ATTENTION
comprend des consignes de sécurité signalant un danger
potentiel qui, s’il n’est pas évité, peut entraîner des blessures
légères ou modérées. ATTENTION sert aussi à signaler une
utilisation dangereuse. ATTENTION et AVERTISSEMENT
identi ent un danger, indiquent comment l’éviter et
montrent ses conséquences possibles si on l’ignore. AVIS
présente des consignes visant à éviter les dommages
matériels. REMARQUE donne des renseignements
additionnels qui aident à accomplir une procédure.
TRAVAILLEZ PRUDEMMENT!
AVERTISSEMENT
DANGER DE HAPPEMENT PAR DES PIÈCES
MOBILES
Le non-respect des consignes peut entraîner des
blessures graves ou la mort.
• Toujours s’assurer que le loquet du crochet est fermé et
qu’il ne soutient aucune charge.
• Ne jamais appliquer la charge sur l’extrémité ou le loquet
du crochet. Appliquer la charge uniquement au centre du
crochet.
• Ne jamais utiliser un crochet dont l’ouverture de la gorge a
augmenté ou dont l’extrémité est courbée ou tordue.
• Toujours utiliser un crochet avec loquet.
• Toujours s’assurer que l’opérateur et les personnes
présentes sont conscients de la stabilité du véhicule et/ou
de la charge.
• Toujours garder le l de la télécommande et le cordon
d’alimentation à l’écart du tambour, du câble et du
câblage. S’assurer qu’il n’y a pas de ssures, de points de
pincement, de ls e lochés ou de connexions desserrées.
Tous les composants endommagés doivent être remplacés
avant d’utiliser le produit.
• Toujours faire passer la télécommande par la fenêtre, si
on l’utilise de l’intérieur d’un véhicule.
• Ne jamais accrocher le câble à lui-même
WARN INDUSTRIES
19 73203B0
DANGER DE HAPPEMENT PAR DES PIÈCES
MOBILES
Le non-respect des consignes peut entraîner des
blessures graves ou la mort.
Consignes de sécurité générales:
• Toujours se familiariser avec le treuil. Prendre le
• Ne jamais excéder la capacité nominale du treuil
• Toujours porter des gants de cuir épais durant
• Ne jamais utiliser le treuil ou le câble du treuil
• Ne jamais se servir du treuil pour maintenir une
• Ne jamais faire fonctionner l’appareil sous l’e et
• Ne jamais laisser des personnes âgées de moins de16
Consignes de sécurité se rapportant àl’installation:
• Toujours choisir une surface de montage
• Toujours utiliser un matériel de montage de catégorie
• Ne jamais souder les boulons de montage.
• Toujours utiliser un matériel de montage, des
• Ne jamais utiliser des boulons trop longs.
• Toujours achever le montage du treuil et la xation
• Toujours garder les mains éloignées du câble du
• Toujours positionner le guide-câble avec
• Toujours étirer au préalable le câble et l’enrouler sous
AVERTISSEMENT
temps de bien lire le manuel d’utilisation, et/ou le
manuel de base des techniques de treuillage, a n de
comprendre le treuil et son fonctionnement.
ou du câble d’acier. Un câblage double avec poulie
ouvrante permet de réduire la charge subie par le
treuil.
lamanipulation du câble du treuil.
pour faire du remorquage. Cela peut endommager,
surcharger et casser le câble.
charge.
dedrogues, de l’alcool ou de médicaments.
ans utiliser ce treuil.
su samment résistante pour supporter la capacité de
traction maximale du treuil.
8,8 ou supérieure.
composants et des accessoires homologués par
lefabricant.
ducrochet avant d’e ectuer le câblage.
treuil, de la boucle du crochet, du crochet et de
l’ouverture du guide- câble durant l’installation
et l’utilisation de l’appareil et l’enroulement ou le
déroulement du câble.
l’avertissement visible sur le dessus.
charge avant de l’utiliser. Un câble enroulé de manière
serrée réduit le risque qu’il coince et soit endommagé.
AVERTISSEMENT
DANGER DE HAPPEMENT PAR DES PIÈCES
MOBILES
Le non-respect des consignes peut entraîner des
blessures graves ou la mort.
Consignes de sécurité concernant letreuillage:
• Toujours inspecter le câble du treuil, le crochet et les
élingues avant de faire fonctionner le treuil. Tout câble de
treuil e loché, tordu ou endommagé doit être remplacé
immédiatement. Tous les composants endommagés doivent
être remplacés avant d’utiliser le produit. Protéger toutes les
pièces contre le risque de dommages.
• Toujours s’assurer que tout objet ou obstacle pouvant gêner
la bonne utilisation du treuil est écarté.
• Toujours s’assurer que le point d’ancrage choisi peut
supporter la charge et que la sangle ou la chaîne ne glisse pas.
• Toujours utiliser la sangle de crochet fournie pour enrouler ou
dérouler le câble du treuil, durant l’installation ou l’utilisation.
• Toujours exiger de l’opérateur et des personnes présentes
d’être attentifs au véhicule et à la charge.
• Toujours être conscient de la stabilité du véhicule et de
la charge durant le treuillage. Veiller à ce que personne ne
s’approche. Alerter toutes les personnes alentour en cas
d’instabilité.
• Toujours dérouler autant de câble du treuil que possible
avant de procéder au câblage. Utiliser une ligne double ou
choisir un point d’ancrage distant.
• Toujours prendre le temps d’utiliser des techniques de câblage
adaptées avant d’utiliser le treuil pour tirer.
• Ne jamais toucher le câble du treuil ou le crochet lorsqu’une
autre personne est à l’interrupteur de commande ou durant le
fonctionnement du treuil.
• Ne jamais essayer d’embrayer ou de débrayer si le treuil
est sous charge, si le câble du treuil est entension ou si le
tambour est en train de tourner.
• Ne jamais toucher le câble ou le crochet lorsque lecâble est
tendu ou sous charge.
• Toujours se tenir à l’écart du câble du treuil et dela charge
durant l’utilisation et ne jamais laisser personne s’approcher.
• Ne jamais se servir d’un véhicule pour tirer une charge
sur le câble du treuil. La charge combinée ou un choc peut
endommager, surcharger et casser le câble.
• Ne jamais replier le câble du treuil sur lui-même.
• Utiliser toujours une chaîne ou une protection de tronc
d’arbre sur le point d’ancrage.
WARN INDUSTRIES
73203B0 20
DANGER DE CHUTE OU D’ÉCRASEMENT
Le non-respect des consignes peut entraîner des
blessures graves ou la mort.
• Toujours rester à l’écart, en gardant les mains et les autres
• Ne jamais utiliser le treuil avec moins de 5 spires de câble
• Ne jamais utiliser le treuil comme palan ou pour suspendre
• Toujours s’assurer que le point d’ancrage peut supporter la
• Ne jamais utiliser le treuil pour soulever ou transporter des
• Ne jamais forcer trop fort pour dérouler le câble du treuil.
• Toujours utiliser une posture/technique de levage adéquate
• Toujours enrouler le câble sur le tambour dans le sens
• Toujours enrouler le câble du treuil sur le tambour comme
• Toujours enrouler le câble du treuil sur le dessous (côté
• Ne jamais enrouler le câble sur le dessus du tambour.
• Toujours enrouler le câble du treuil sur le tambour dans
RISQUE DE COUPURE ET DE BRÛLURE
Le non-respect des consignes peut entraîner des
blessures graves ou la mort.
Pour éviter de se blesser les mains et les doigts:
• Toujours porter des gants de cuir épais durant lamanipulation du
• Toujours penser aux surfaces chaudes au niveau dumoteur du
AVERTISSEMENT
personnes à l’écar t également.
enroulées autour du tambour, car le câble pourrait se dérouler
du tambour, étant donné que l’ancrage ducâble n’est pas conçu
pour retenir une charge.
une charge.
charge, et prendre le temps d’employer des techniques de
câblage appropriées.
personnes.
ou demander de l’aide lors de la manipulation ou de
l’installation du produit.
spéci é par l’étiquette d’avertissement apposée sur le treuil
ou la documentation du treuil. Cela est nécessaire pour que le
frein automatique (le cas échéant) fonctionne correctement.
indiqué par l’autocollant de rotation du tambour.
support) du treuil.
le sens spéci é par les étiquettes de rotation du tambour
apposées sur le treuil et/ou par la documentation du treuil.
Cela est nécessaire pour que le frein automatique (le cas
échéant) fonctionne correctement.
AVERTISSEMENT
câble du treuil.
treuil, du tambour ou du câble durant ouaprès l’utilisation du treuil.
Page 13
AVERTISSEMENT
MESURES GÉNÉRALES DE SÉCURITÉ
AVERTISSEMENT
MESURES GÉNÉRALES DE SÉCURITÉ
AVERTISSEMENT
ATTENTION
RISQUE D’EXPLOSIONS OU D’INCENDIE
Le non-respect des consignes peut entraîner des
blessures graves ou la mort.
• Toujours faire marcher le compresseur dans un lieu extérieur
bien aéré et exempt de matériaux combustibles, d’essence et
autres vapeurs.
• Toujours stocker les produits in ammables en lieu sûr à
l’écart du compresseur.
• Ne restreindre ni bloquer aucune ouverture de ventilation du
compresseur.
• Ne jamais faire fonctionner l’appareil dans un endroit exigu.
• Ne jamais laisser le compresseur en marche sans sur veillance.
• Ne jamais placer d’objets contre le compresseur ou par-
dessus.
AVERTISSEMENT
RISQUE DE BRÛLURES
Le non-respect des consignes peut entraîner des
blessures graves ou la mort.
• Ne jamais toucher des parties métalliques exposées du
compresseur durant ou immédiatement après son utilisation.
Le compresseur demeure chaud pendant plusieurs minutes
après son utilisation.
• Ne pas essayer de contourner les coi es de protection en
s’étirant ou tenter d’e ectuer des travaux d’entretien sur
l’appareil avant qu’il n’ait refroidi.
AVERTISSEMENT
RISQUE POUR LA RESPIRATION
Le non-respect des consignes peut entraîner des
blessures graves ou la mort.
• Ne jamais utiliser l’air du compresseur comme source d’air
pour les humains.
RISQUE D’EXPLOSION
Le non-respect des consignes peut entraîner des
blessures graves ou la mort.
• Toujours drainer le refroidisseur intermédiaire
quotidiennement ou après chaque utilisation. Si le
refroidisseur intermédiaire a des fuites, le remplacer
immédiatement par un refroidisseur neuf ou remplacer le
compresseur tout entier.
• Ne jamais percer, souder ou modi er d’une quelconque
façon le refroidisseur intermédiaire ou ses accessoires.
• Ne jamais e ectuer d’ajustements ou de substitutions de
pièces a n d’altérer les pressions de fonctionnement réglées
en usine.
• Ne jamais excéder la pression nominale des outils
pneumatiques, des accessoires à commande pneumatique,
des pneus et autres objets gon ables.
• Toujours installer un régulateur de pression et un
manomètre à la sortie d’air (si ce n’est pas le cas) de votre
compresseur s’il faut contrôler le niveau d’air.
• Toujours suivre les recommandations du fabricant.
• Ne jamais dépasser la pression nominale maximum permise
des accessoires.
• Ne jamais utiliser le compresseur pour gon er des objets
à faible pression tels que les jouets d’enfants, les ballons de
football, de basket-ball, etc.
AVERTISSEMENT
RISQUE PROVENANT D’OBJETS PROJETÉS
Le non-respect des consignes peut entraîner des
blessures graves ou la mort.
• Toujours porter des lunettes de sécurité à coques latérales
homologuées ANSI Z87.1 lors de l’utilisation du compresseur
d’air.
• Ne jamais pointer un embout ou un pulvérisateur en
direction du corps, d’une personne ou d’animaux.
• Toujours éteindre le compresseur et éliminer la pression du
tuyau d’air et du refroidisseur intermédiaire avant d’e ectuer
des travaux d’entretien, de xer des outils ou des accessoires.
RISQUES ASSOCIÉS AUX PRODUITS CHIMIQUES
ET RISQUE D’INCENDIE
Le non-respect des consignes peut entraîner des
blessures graves ou la mort.
• Toujours retirer les bijoux et porter des lunettes desécurité.
• Ne jamais faire passer les câbles électriques
par-dessus des bords tranchants.
• Ne jamais faire passer les câbles électriques àproximité de
pièces qui s’échau ent.
• Ne jamais faire passer les câbles électriques àtravers des
pièces mobiles ou à proximité.
• Toujours placer les capuchons fournis sur les ls et les
bornes, conformément aux instructions d’installation.
• Ne jamais se pencher au-dessus de la batterie enprocédant
aux connexions.
• Ne jamais faire passer les câbles électriques
par-dessus les bornes de la batterie.
• Ne jamais court-circuiter les bornes de la batterie avec des
objets métalliques.
• Toujours s’assurer que la zone ne contient pas de conduites
de carburant, de réservoir de carburant, deconduites de
frein, de câblage électrique, etc., avant de percer.
• Toujours consulter le manuel de l’utilisateur pour
lesinformations correctes de câblage.
• Toujours isoler et protéger tous les ls et bornes électriques
exposés.
ATTENTION
RISQUE DE COUPURE ET DE BRÛLURE
Le non-respect des instructions peut entraîner des
blessures mineures ou modérées.
• Ne jamais laisser le câble du treuil glisser dans
lesmains.
DANGER DE HAPPEMENT
PAR DES PIÈCES MOBILES
Le non-respect des instructions peut entraîner des
blessures mineures ou modérées.
Pour éviter de se blesser les mains oulesdoigts:
• Ne jamais laisser la télécommande dans un
emplacement où elle peut être activée durant la mise en
roue libre, le câblage ou quand le treuil n’est pas utilisé.
• Ne jamais laisser la télécommande du treuil
branchée durant l’installation, le déroulement en
roue libre, lecâblage, l’entretien ou quand le treuil
n’est pas utilisé.
AVIS
ÉVITER D’ENDOMMAGER LE TREUIL ET
L’ÉQUIPEMENT
• Toujours éviter de tirer sur le côté, ce qui a pour e et
d’empiler le câble du treuil sur l’une des extrémités du
tambour. Cela peut endommager le câble ou le treuil.
• Toujours s’assurer d’avoir complètement embrayé
oucomplètement débrayé.
• Toujours faire attention à ne pas endommager le
châssis du véhicule si l’on décide de s’arrimer à un
véhicule pour pouvoir travailler avec le treuil.
• Ne jamais submerger le treuil dans l’eau.
• Toujours ranger la télécommande dans un endroit
sûr, propre et sec.
WARN INDUSTRIES
21 73203B0
WARN INDUSTRIES
73203B0 22
Page 14

CONDITIONS DE TRAVAIL SÛRES
SE FAMILIARISER AVEC LE TREUIL
Ce manuel fournit des instructions sur la façon
d'installer votre système de treuil WARN et les
instructions initiales d'utilisation Veuillez lire le
guide de base des techniques de treuillage pour
les complètes instructions d'utilisation de votre
système de treuil WARN.
Sécurité
Lors de l'installation du système de treuil WARN,
lire et suivre les instructions de montage et de
sécurité.
L'opérateur doit toujours utiliser le treuil d'un
endroit sûr au moment de lever une charge.
Les zones de sécurité sont les suivantes (1)
perpendiculaire au câblage, (2) l'intérieur du
véhicule avec le capot vers le haut (si le treuil est
monté sur l'avant du véhicule). Ces positions de
sécurité aideront à prévenir le câblage de frapper
l'opérateur si le câble échoue lors de la charge.
Utilisez le treuil avec la longueur de câble
de la télécommande complètement étendue
autant que possible L'opérateur doit toujours
être à au moins 2,5 m du treuil pendant son
fonctionnement. Cela évitera l'enchevêtrement
avec le guide-câble et maintiendra l'utilisateur
éloigné de dangers lors de l'extraction de la
charge du treuil.
Ne jamais travailler autour d'un câble sous
charge.
Soyez toujours prudent lorsque vous travaillez
avec l'électricité et n'oubliez pas de vérifier
qu'aucune connexion électrique n'est exposée avant
de mettre sous tension le circuit du treuil.
Pour les spécifications et les données de
performance, vous référer à la fiche technique
fournie avec le treuil.
Émissions de sons
Le treuil est conçu de telle sorte que les
émissions sonores ne dépassent pas 70 dBa
depuis le poste de l'opérateur. L'opérateur doit
toujours être à au moins 2,5 m du treuil pendant
son fonctionnement. Si le treuil est supérieur à 70
dBa à partir du poste de conduite, faites inspecter
le treuil dans un centre de service agréé.
CONNAÎTRE VOTRE TREUIL
Avant de commencer, vous devez vous familiariser avec le treuil WARN et chacun de ses composants :
Prise à distance
Contacteur
Porte d'entrée d'air
Levier d'embrayage
Transmission
Moteur
Train d'engrenages
Câble
Tambour du treuil
Jeu d’accessoires
Sélecteur de
Mode
Kit de tuyau
Télécommande
Moteur: Le moteur du treuil est alimenté par la batterie du véhicule. Le moteur fournit de l'énergie pour le
mécanisme d'engrenage, ce qui fait tourner le tambour de treuil et enroule le câble du treuil.
Sélecteur de mode: Le sélecteur de mode permet à l'utilisateur de basculer entre le treuil et le fonctionnement du
compresseur.
Câble: Le diamètre du câble du treuilet la longueur sont déterminés par la capacité de charge et la conception du
treuil. Enroulé autour du tambour du treuil et nourri par le passe-câble,le câble du treuil est bouclé à la fin
pour accepter le boulon à fourche du crochet
Tambour du treuil: Le tambour du treuil est le cylindre sur lequel le câble du treuil se nourrit. Le tambour est entraîné par le
moteur et le train d'engrenages. Son orientation peut être modifiée à l'aide de la télécommande.
Train d'engrenages: Le réducteur convertit la puissance du moteur du treuil en une grande force de traction. La conception du
train d'engrenages fait qu'il soit possible que le treuil soit plus léger et plus compact.
Levier d'embrayage: L'embrayage permet à l'opérateur de dégager manuellement le tambour de bobinage à partir du train
d'engrenages, ce qui permet au tambour de tourner librement (« en roue libre »). L'embrayage
« verrouille » le tambour du treuil arrière sur le train d'engrenages.
Porte d'entrée d'air: La porte en caoutchouc marqué « AIR » sur le côté du train d'engrenage du PowerPlant peut être retiré
pour accéder au raccord rapide d'air.
Prise à distance: La prise à distance se trouve où l'opérateur branche la télécommande à fil ou un optionnel récepteur sans
fil à distance, afin de commander le treuil.
Contacteur: Utilisation de l'alimentation électrique à partir de la batterie du véhicule, le contacteur commute
l'alimentation du moteur, ce qui permet à l'opérateur de changer le sens de rotation du tambour du treuil.
Télécommande: La télécommande se branche sur le treuil, par l'intermédiaire de la douille à distance, permettant à
l'opérateur de contrôler la direction du treuil, ainsi que de se maintenir à l'écart du câble pendant le
fonctionnement du treuil. La télécommande a également un interrupteur pour mettre en marche ou
arrêter le compresseur
Jeu d'accessoires : Est livré avec un tuyau, un mandrin de pneu, un manomètre et un raccord rapide pour toute
l'alimentation en air et tout le nécessaire pour le gonflage.
Kit de tuyau
d'admission d'air: Une fois installé sur le treuil, il fournit de l'air propre pour le compresseur à partir de l'intérieur du
compartiment moteur.
d'admission d' air
WARN INDUSTRIES
23 73203B0
WARN INDUSTRIES
73203B0 24
Page 15

MONTAGE
ADMISSION D’AIR CONNEXION
Étape 1 - Monter le treuil
Kits de montage de treuil sont disponibles auprès
de votre revendeur WARN pour satisfaire presque
toutes les applications. Pour plus d'informations sur
les kits disponibles, contactez votre revendeur de
produits WARN.
Pour des performances optimales et les résultats que
NOTE
vous attendez, les plaques de montage de WARN sont fortement
recommandées.
ATTENTION
treuil et de graves blessures, terminer l'installation du treuil et
xer le crochet avant d'installer le câblage.
AVERTISSEMENT
de montage su samment solide pour résister à la force de
traction maximale du treuil.
AVERTISSEMENT
AVERTISSEMENT
le tambour dans la direction indiquée par les étiquettes de
rotation du tambour du treuil et / ou dans la documentation.
Cela est nécessaire pour que le freinage automatique (le cas
échéant) puisse fonctionner correctement.
AVERTISSEMENT
le fond (montage latéral) du tambour.
Seuls les orientations de montage illustrés sont
possibles pour utiliser le treuil en toute sécurité
(Reportez-vous aux diagrammes suivants pour une
orientation correcte de montage). Tous les autres
sont incorrectes et inappropriées Les détails de
montage indiquent les niveaux de couple correct.
L'utilisation de boulons recommandés et de
combinaisons de rondelle ressort couplées au
niveau recommandé éviteront les vibrations lors
du fonctionnement.. Spécifications ci-dessous. Le
système de montage déterminera la longueur des
boulons.
Détails de montage :
(1) Lisse et plat, épaisseur = 6,4 mm (1/4”)
(2) 9,525 mm (3/8”) rondelle X 4
(3) 3/8-16 X 1 1/4” long, grade 5 boulon X 4
Couple 41-47Nm
Pour éviter toute activation accidentelle du
Toujours choisir un emplacement
Ne jamais utiliser de trop longues vis.
Toujours enrouler le câble du treuil sur
Toujours enrouler le câble du treuil sur
Schéma de modèle de montage
Standard : 254 mm x 114,3 mm
Toujours choisir un emplacement de montage
suffisamment solide pour résister à la force de
traction maximale du treuil.
AVERTISSEMENT
boulons requis pour assurer l'engagement du câble
appropriée.
Épaisseur de la
plaque
Toujours véri er la longueur des
Longueur du
boulon
7 mm (1/4”) 32 mm (1,25”)
10 mm (3/8”) 40 mm (1,5”)
13 mm (1/2”) 40 mm (1,5”)
Orientation de montage :
Ce treuil est conçu pour un montage le support vers le bas
NOTE
uniquement.
Étape 2 - Tuyau d'admission d'air&
Installation du ltre
1. Localisez admission d'air contenu du kit. Placez
le petit collier de serrage sur l'extrémité du
tuyau d'entrée.
Collier de
serrage
2. Connectez le raccord cannelé au filtre d'entrée
d'air.
3. Du coté arrière du treuil, localisez le raccord du
tuyau sur la tête du compresseur et pousser le
tuyau à l'intérieur.
4. Serrez fermement l'ancrage.
5. Faites passer le tuyau d'entrée d'air à travers la
grille du véhicule ou toute ouverture du parechocs dans le compartiment moteur.
6. Installez le filtre à l'extrémité du tuyau.
7. Montez le filtre aussi haut que possible. Utilisez
les attaches autobloquantes fournies ou
d'autres moyens pour fixer le tuyau et le filtre.
Serrez l'attache autobloquante
WARN INDUSTRIES
25 73203B0
WARN INDUSTRIES
73203B0 26
Page 16

RACCORDEMENTS ÉLECTRIQUES
INSTRUCTIONS RELATIVES À UNE PREMIÈRE UTILISATION
Étape 3 - Installer le treuil
AVERTISSEMENT
mort. Toujours placer les capuchons fournis sur les câbles et les
bornes comme indiqué dans les instructions d'installation.
AVERTISSEMENT
mort dues à des incendies électriques
AVERTISSEMENT
câbles et bornes électriques exposés.
Utilisez les bottes isolantes incluses sur les
connexions exposées pour éviter tout court-circuit.
Faite passer les câbles de raccordement de la
batterie dans des zones qui ne causeront pas de
frottement ou de coupure pouvant provoquer un
potentiel court-circuit.
À la fin de l'installation, vérifiez que le treuil
fonctionne correctement.
Recommandations de batterie
Une batterie chargée et de bonnes connexions
sont essentielles au bon fonctionnement de votre
treuil. L'exigence minimale pour une batterie de 12
volts est de 650 ampères de démarrage à froid.
Câble rouge
183cm
Pour éviter des blessures graves ou la
Pour éviter des blessures graves ou la
Ne jamais faire passer des câbles électriques sur
des bords tranchants.
Ne jamais faire passer des câbles électriques près
de zones devenant chaudes
Ne jamais faire passer des câbles électriques à
travers ou près d'objets mobiles.
Évitez le pincement et les points d'usure ou
d'abrasion lors de l'installation de câbles
électriques.
Toujours isoler et protéger tous les
Câble noir 183cm
Schéma électrique
Étape 4 - Véri cation du système
E ectuez un test du système :
• Contrôlez les fixations et assurez-vous qu'elles
sont bien serrées et du correct couple.
•
Véri ez que le câblage de tous les composants
est correct et assurez-vous que toutes les
connexions soient bien serrées
•
Véri ez qu'il n'existe aucun câblage à
découvert , des dommages de bornes ou
d'isolation des câbles.
• Vérifiez la rotation du moteur : Le treuil doit
fonctionner et tourner dans la direction indiquée
sur l'étiquette du tambour de rotation. Si le
treuil tourne en sens inverse, vérifiez à nouveau
les connexions électriques .
• Vérifiez le sens du câble : Toujours tourner le
câble du treuil sur le fond (coté du montage) du
tambour.
Une fois que vous avez e ectué une véri cation
du système, vous êtes prêt à con rmer la
fonction du treuil. Passez aumode d'emploi
pour la première utilisation, instructions de
fonctionnement du compresseur d'air etanalyse
nale et sections de maintenance dans ce livret.
.
Étape 5 - Mode d'emploi pour la
première utilisation
Utilisation du treuil :
AVERTISSEMENT
l'opération de treuillage en examinant le Manuel de base pour
les techniques de treuillage inclues avec votre treuil.
Commutateur de contrôle de treuil
Ne pas laisser le contrôle à distance branché sur
le treuil lorsqu'il n'est pas utilisé. Laisser le contrôle
à distance branché peut avoir comme conséquence
une situation dangereuse et / ou déchargement de
la batterie.
Commutateur de contrôle de treuil
Le grand interrupteur situé sur la poignée
de commande à distance contrôle les fonctions
de marche et d'arrêt du bobinage du treuil. Ce
commutateur est utilisable uniquement lorsque
le sélecteur de mode est en position de symbole
"Treuil".
Moteur indicateur de température et de coupure
Avec une utilisation intensive, sur une
courte période de temps, le moteur va
considérablement se surchauffer Afin d'éviter
tout dommage au moteur due à une forte
chaleur, le moteur a un dispositif de protection
thermique.
Lorsque le point de haute température
programmé d'usine est atteinte, cet appareil
éteindra le moteur et fera que le voyant de la
télécommande clignote.
L'enroulement du treuil en fonction et le
Toujours comprendre votre treuil et
SORTIE
ENTRÉE
Commutateur de contrôle de treuil
compresseur ne fonctionneront pas, mais la
fonction de verrouillage du treuil continuera
de fonctionner au cas où il serait nécessaire de
libérer une charge. Après le refroidissement du
moteur, le fonctionnement normal reprend.
Fonctionnement de l'embrayage
Lorsque l'embrayage est engagé, le
train d'engrenages est couplé au tambour
d'enroulement de fil et la tension peut être
transférée à partir du moteur du treuil. Lorsque
l'embrayage est débrayé, il est dans la position
de bobinage libre et le train d'engrenages et le
tambour d'enroulement de fil sont découplés en
permettant au tambour de tourner librement.
Le levier d'embrayage, situé sur le boîtier
du treuil en face du moteur, commande
l'enclenchement de l'embrayage. Pour éviter tout
dommage, embrayer totalement ou désembrayer
Désembrayé
complètement le levier d'embrayage.
Embrayé
Fonctionnement du compresseur d'air :
AVERTISSEMENT
pression du tuyau d'air et du refroidisseur avant d'e ectuer une de
maintenance, xer des outils, ou des accessoires.
AVERTISSEMENT
pulvérisateur vers une partie du corps ou d'autres personnes ou
animaux.
AVERTISSEMENT
avec écrans latéraux ANSI Z87.1 lors de l'utilisation du compresseur
d'air.
AVERTISSEMENT
ou n'e ectuer des procédures de maintenance que lorsque se sera
refroidie.
AVERTISSEMENT
exposées sur le compresseur pendant ou immédiatement après
l'opération.
Toujours arrêter le compresseur et la
Ne jamais pointer une buse ou un
Toujours porter des lunettes de sécurité
Toujours utiliser des écrans protec teurs
Toujours toucher les parties métalliques
Sélectionnez le mode compresseur
Tournez le sélecteur de mode sur le symbole «
Compresseur d'air ». Retirez la porte d'entrée d'air
et connectez le tuyau d'air au raccord rapide.
WARN INDUSTRIES
27 73203B0
WARN INDUSTRIES
73203B0 28
Page 17

INSTRUCTIONS RELATIVES À UNE PREMIÈRE UTILISATION
INSTRUCTIONS RELATIVES À UNE PREMIÈRE UTILISATION
Porte d'entrée d'air
La porte en caoutchouc marqué « AIR » sur le côté
du train d'engrenage du PowerPlant peut être retirée
pour accéder au raccord rapide d'air. Avant de faire
fonctionner le compresseur, un tuyau d'air doit être
connecté au raccord. Au cours d'une opération de
treuillage le montage doit être laissée ouvert sans un
tuyau connecté. Si un tuyau est connecté pendant le
treuillage, la pression d'air s'accumulera dans l'unité
et l'interrupteur de pression arrêtera le moteur. Il est
recommandé que la porte soit en place sur le boîtier
en permanence sauf pendant le fonctionnement réel
du compresseur.
Soupape
Si l'interrupteur de pression n'arrête pas le
compresseur à son réglage de pression
« ouverte », la soupape de sûreté protègera contre
toute pression en « laissant échapper » à environ 860
kPa.
La soupape doit être actionné manuellement
une fois par mois pour s'assurer qu'elle bouge sans
contrainte et qu'elle est fonctionnelle. Elle est situé
au-dessous et à l'arrière du raccord d'air. Tirez
momentanément sur l'anneau métallique
Vidange du refroidisseur
Il est normal que de la condensation s'accumule
Porte
d'entrée d'air
dans le refroidisseur Ceci peut être vidanger à la
soupape en tirant sur l'anneau métallique. Cela devrait
être fait toutes les dix heures d'utilisation ou avant
toute période de stockage prolongée.
Raccord du tuyau d'air
Sélecteur de Mode
1. Votre kit d'accessoires de compresseur d'air WARN
vous fournit tout ce dont vous avez besoin pour
personnaliser votre compresseur d'air pour de
Commutateur du compresseur
multiples usages.
Branchez la télécommande. Le plus petit
interrupteur à bascule commute le compresseur sur
marche ou arrêt. Il ne peut être utilisé que lorsque
le sélecteur de mode est en position de symbole «
Compresseur d'air ».
2. Vous pouvez facilement changer les têtes
Commutateur du compresseur
Refroidisseur
Le refroidisseur fournit une petite chambre à air qui
d'accouplement d'air pour modifier votre tuyau
du compresseur d'air pour permettre de multiples
accessoires. Avec une clé, retirer l'un des
coupleurs femelles existantes.
réduit la température de l'air au raccord à connexion
rapide. Il s'agit d'un commutateur de pression et d'une
soupape montée sur le refroidisseur.
Commutateur de pression
Le commutateur de pression arrête
automatiquement le compresseur lorsqu'il atteint le
réglage par défaut de la pression
« d'ouverture » d'environ 690 kPa. Lorsque la pression
tombe à la pression de conjonction d'environ 480 kPa,
le compresseur se mettra en marche à nouveau.
WARN INDUSTRIES
29 73203B0
3. Utiliser une clé pour attacher un coupleur mâle.
du treuil.
tambour de manière uniforme et serrée. Cela empêche
les spires extérieures de s’enfoncer dans les spires
intérieures, ce qui peut coincer et endommager le
câble.
l’enroulement du câble, actionner l’interrupteur de
commande de manière intermittente afin d’éliminer
le mou du câble. Les charges de choc peuvent
4. Le tuyau flexible intégral peut être utilisé comme
une extension de tuyau ou avec les plus courants
compresseurs d'air autonomes.
momentanément dépasser de loin la capacité du treuil
et du câble.
Enroulement à vide
ou le crochet lorsqu’une autre personne est à l’interrupteur
decommande ou durant le fonctionnement du treuil.
Déroulement avec un assistant: demander à un assistant
de tenir la sangle de crochet en appliquant une tension
aussi constante que possible sur le câble du treuil.
Tout en maintenant la tension, il devra se déplacer
en direction du treuil pendant l’actionnement de
l’interrupteur de commande pour enrouler le câble.
Câble Opération:
Déroulement du câble
AVERTISSEMENT
Ne jamais utiliser le treuil avec moins de 5
spires de câble enroulées autour du tambour, car le câble pourrait
se dérouler du tambour, étant donné que l’ancrage ducâble n’est
pas conçu pour retenir une charge.
AVERTISSEMENT
Toujours garder les mains éloignées
du câble du treuil, de la boucle du crochet, du crochet et de
l’ouverture du guide -câble durant l’installation et l’utilisation
del’appareil et l’enroulement ou le déroulement du câble.
AVERTISSEMENT
Toujours porter des gants de cuir épais
durant la manipulation du câble du treuil.
Le déroulement en roue libre constitue
généralement la façon la plus rapide et la plus facile
de dérouler le câble du treuil. Avant de mettre le
treuil en roue libre pour dérouler le câble, dérouler au
moteur une quantité suffisante de câble pour soulager
le câble de toute tension. Débrayer. Dérouler ensuite
manuellement une quantité suffisante de câble pour
pouvoir travailler avec le treuil. Voir le manuel de base
des techniques de treuillage pour de plus amples
informations.
AVIS
Ne PAS dérouler le câble de plus de 9m sans laisser refroidir
le treuil pendant 20minutes avant de recommencer l’enroulement.
Utiliser plutôt l’embrayage en déroulement libre en tirant le câble
à la main.
AVERTISSEMENT
Toujours utiliser le cordon du crochet
fourni pour enrouler ou dérouler le câble, durant l’installation
ou l’utilisation pour éviter de se blesser les mains ou les doigts.
Enroulement sous charge
WARN INDUSTRIES
73203B0 30
Relâcher l’interrupteur lorsque lecrochet parvient
à une distance minimale de 2 m del’ouverture du
guide-câble.
de la manière indiquée ci-dessous.
Déroulement sans assistance: Arranger le câble à
enrouler de manière à ce qu’il ne s’entortille ni ne
s’emmêle pendant le rembobinage. Veiller à ce que le
câble soit enroulé sur le tambour de manière uniforme
et serrée. Enrouler une quantité su sante de câble pour
compléter une couche entière sur le tambour. Serrer
et étaler de manière égale la couche de câble. Faire de
même jusqu’à ce que le crochet se trouve àau moins
2m de l’ouverture du guide-câble.
de la manière indiquée ci-dessous.
Enroulement du reste du câble pour le ranger
Lorsque le crochet se trouve à moins de 2m du
guide-câble, détacher le crochet du point d’ancrage
ou de la charge. En tenant la sangle de crochet
fournie, maintenir la tension sur câble du treuil.
Enrouler lentement le treuil en appliquant de petites
pressions sur la touche «Power in» (enrouler) de la
télécommande jusqu’à ce que le crochet soit à moins
de 1m du guide-câble.
d’ancrage approprié sur le véhicule.
AVIS
endommager le guide-câble.
AVERTISSEMENT
Ne jamais dépasser l’e ort en 1ère couche
Enrouler mécaniquement le câble du treuil sur le
Pour éviter les charges de choc durant
AVERTISSEMENT
Ne jamais toucher le câble du treuil
Enrouler le reste du câble pour le ranger,
Enrouler le reste du câble pour le ranger,
Arrêter le treuillage et fixer le crochet sur un point
Ne pas laisser le crochet atteindre le guide-câble. Cela pourrait
Une fois le crochet fixé correctement au véhicule,
Page 18

INSTRUCTIONS RELATIVES À UNE PREMIÈRE UTILISATION
DERNIÈRE ANALYSE ET ENTRETIEN
enrouler le câble de façon à éliminer le mou restant en
appliquant de petites pressions sur la touche «Power
in» (enrouler) de la télécommande jusqu’à ce que le
mou soit minime sur le câble du treuil.
Surcharge/surchau e
Ce treuil est conçu pour un service intermittent.
Lorsque le moteur est sur le point de caler, une
accumulation rapide de chaleur se produit et peut
endommager le moteur.
Le câblage double (voir le manuel de base des
techniques de treuillage) permet de réduire le débit en
ampères et de réduire ainsi l’accumulation de chaleur
dans le moteur. Cela permet une utilisation continue
prolongée.
ÉTIREMENT DU CÂBLE DU TREUIL
AVERTISSEMENT
Toujours étirer au préalable le câble et
l’enrouler sous charge avant de l’utiliser. Un câble enroulé de
manière serrée réduit le risque qu’il coince et soit endommagé.
AVERTISSEMENT
Ne jamais utiliser le treuil avec moins de 5
spires de câble enroulées autour du tambour, car le câble pourrait
se dérouler du tambour, étant donné que l’ancrage du câble n’est
pas conçu pour retenir une charge.
La durée de vie du câble est directement liée àson
utilisation et à l’entretien qu’il recevra. Lorsdesa
première utilisation, un câble neuf doit être enroulé
sur son tambour sous une charge d’aumoins 454 kg .
Suivre simplement les directives suivantes pour étirer
correctement le câble sur le tambour.
1) Choisir un emplacement PLAT ET DE NIVEAU
su samment grand pour pouvoir dérouler le câble sur
toute sa longueur.
2) Mettre le levier d’embrayage du treuil en position
«Free Spool» (déroulement en roue libre). Dérouler le
câble de façon à ne laisser que 5 spires sur le tambour.
Une fois le câble déroulé, mettre le levier d’embrayage
du treuil en position «Engaged» (enprise).
3) Attacher le crochet du câble à un point d’ancrage
adéquat et éloigner le véhicule du point d’ancrage en
marche arrière jusqu’à ce que le câble du treuil soit
presque tendu. Avant de descendre du véhicule, serrer
le frein à main et mettre le véhicule en prise ou en
position de stationnement, puis couper le moteur.
4) Connecter la télécommande au treuil. Se tenir
àenviron 2,44m du treuil et enrouler le câble sur le
tambour du treuil jusqu’à éliminer complètement le
mou du câble. Déconnecter la télécommande du treuil.
Maintenir le câble tendu d’une main; pousser avec
précaution le câble vers le côté du tambour auquel
le câble est xé de façon à ce qu’il n’y ait pas d’espace
entre les spires sur le tambour. S’assurer que le câble
s’enroule sur le bas du tambour et non sur le haut,
sinon le frein de retenue automatique dela charge ne
fonctionnera pas correctement. (Silecâble s’enroule
sur le haut, cela signi e que l’on a actionné le treuil en
mode de déroulement et non d’enroulement au moyen
de la télécommande).
WARN INDUSTRIES
31 73203B0
5) Par mesure de sécurité, les étapes suivantes
devraient être e ectuées par deux personnes. Si vous
tentez de tendre le câble tout seul, assurez-vous de
toujours mettre le frein à main, la transmission en
prise ou en position de stationnement et d’éteindre le
moteur du véhicule chaque fois que vous descendez
du véhicule pour inspecter le câble du treuil. Ne jamais
quitter le véhicule alors que le câble du treuil porte une
charge. Il est essentiel de tendre le câble pour assurer
une longue durée de vie au produit. Tendre le câble
empêchera les couches extérieures du câble de pincer
et déformer les couches intérieures.
6) Prendre soin d’enrouler chaque couche de manière
uniforme a n d’éviter d’endommager le câble.
7) Faire passer la télécommande par la fenêtre du
conducteur a n de l’utiliser. Demander à l’assistant
de s’éloigner du véhicule et du câble. L’assistant doit
indiquer si le câble s’enroule correctement à mesure
qu’il dé le sur le guide-câble et s’enroule. Démarrer
le véhicule et mettre le levier de vitesses au point
mort. Desserrer le frein à main tout en appuyant
modérément sur la pédale de frein.
Appuyer sur la touche «Power in» (enrouler) de la
télécommande. E ectuer le treuillage sur environ 2m,
puis arrêter. Relâcher lentement la pédale de frein,
puis serrer le frein à main. Cela permet d’assurer qu’il
n’y a aucune charge sur le câble. Mettre le levier de
vitesse en position de stationnement ou en prise, puis
couper le moteur. Descendre du véhicule et inspecter
le treuil pour vous assurer que le câble est enroulé
uniformément sur le tambour du treuil etqu’il ne
creuse pas la couche inférieure. Si c’est le cas, dérouler
le câble et répéter cette étape à partir du début en
appliquant davantage de pression sur la pédale de
frein.
8) Après vous être assuré que le câble s’enroule
correctement sur le tambour, répéter l’étape 6 jusqu’à
ce que le véhicule soit à moins de 2 m du point
d’ancrage. Une fois la distance atteinte, relâcher
lentement la pédale de frein puis serrer le frein à
main. Cela permet d’assurer qu’il n’y a aucune charge
sur le câble. Mettre le levier de vitesse en position de
stationnement ou en prise, puis couper le moteur.
Descendre du véhicule. Décrocher le crochet du point
d’ancrage. Tout en retenant le cordon ducrochet
fourni, maintenir la tension sur câble et enrouler
lentement le treuil par de petites pressions sur
l’interrupteur de commande jusqu’à ce que le crochet
soit à moins de 1m du guide-câble. Arrêter le treuillage
et xer le crochet sur un point d’ancrage approprié sur
le véhicule.
Ne pas laisser le crochet atteindre le guide-câble.
AVIS
Cela pourrait endommager le guide-câble.
Une fois le crochet fixé correctement au véhicule,
enrouler le câble de façon à éliminer le mou restant
enappliquant de petites pressions sur la touche
«Power in» (enrouler) de la télécommande jusqu’à
ceque le mou soit minime sur le câble du treuil.
Contrôle
première
utilisation
Prendre le temps de bien lire le manuel
d’utilisation, et/ou le manuel de base des
techniques de treuillage, a n de comprendre
le treuil et son fonctionnement
Véri er les xations et s'assurer qu'elles sont
bien serrées aux couples de serrage indiqués.
Remplacer toute xation endommagée.
Véri er que chaque composant est correct et
que tous les points de connexion sont bien
serrés;
Véri er qu'il n'y a pas de ls exposés/nus,
de bornes ou de câbles dont l'isolant est
endommagé (frottement/coupure).
Couvrir les parties exposées au moyen
de capuchons. Au besoin, réparer
ou remplacer les câbles électriques
endommagés.
Véri er que les câbles ne sont pas
endommagés.
Remplacer le câble immédiatement s'il est
endommagé.
Garder le treuil, le câble et la
télécommande exempts de contaminants.
Utiliser un chi on ou une serviette
propre pour enlever les saletés et débris
éventuels.
Avant la
AVERTISSEMENT
mort :
Pour éviter des blessures graves ou la
Toujours enrouler le câble du treuil sur le
letreuil et son fonctionnement en examinant
le Manuel de base des techniques de treuillage
inclus avec le treuil.
tambour comme indiqué par l’autocollant de
rotation
du tambour.
question, contactez :
Toujours enrouler le câble sur le dessous dutambour.
Ne jamais enrouler le câble sur le dessus du tambour.
12900 S.E. Capps Road, Clackamas, OR USA 97015-
Registre des concessionnaires: 1-800-910-1122
WARN INDUSTRIES
73203B0 32
Après
chaque
utilisation
Tous les 90
jours
X
XX
XX
XX
XXX
X
Prendre le temps de bien vous familiariser avec
Pour plus d'informations ou pour toute
WARN INDUSTRIES, INC.
8903, 1-503-722-1200,
Service à la clientèle: 1-800-543-9276
ou visitez le site www.warn.com
Page 19

INSTRUCCIONES ORIGINALES
ÍNDICE DE SÍMBOLOS
Instalación de cabrestante
PowerPlant y Guía de uso
En cada situación donde se utiliza un cabrestante existe la posibilidad de ocasionar daños personales. Para reducir al mínimo ese riesgo, es
importante que lea detenidamente esta guía y la Guía básica de técnicas para el uso del cabrestante. Por favor, familiarícese con la operación
del cabrestante antes de usarlo y tenga siempre presente la seguridad. En esta guía se incluye información de seguridad relevante, así como las
instrucciones para instalar el cabrestante. Lea la Guía básica de técnicas para el uso del cabrestante para obtener información sobre el uso apropiado
de su cabrestante y sobre las técnicas de maniobrado adecuadas.
Guarde este manual y otros documentos del producto con el kit para consultas futuras. Se incluyen los siguientes documentos: Guía de instalación
del cabrestante, Guía básica para técnicas de arrastre con cabrestante, Datos de características y funcionamiento, Garantía del producto, Lista de
piezas de recambio y otros documentos sobre los productos. En caso de falta de alguno de estos documentos, visite www.warn.com o póngase en
contacto con nosotros al número de teléfono indicado más abajo.
ÍNDICE:
SEGURIDAD
Índice de símbolos ................................................................................................................................................................ 34
Precauciones generales de seguridad .....................................................................................................................35-38
INSTRUCCIONES
Condiciones de trabajo seguras....................................................................................................................................... 39
Familiaricese con el cabrestante ...................................................................................................................................... 40
Montaje ..................................................................................................................................................................................... 41
Manguera de toma de aire e instalación del filtro .................................................................................................... 42
Conexiones eléctricas .......................................................................................................................................................... 43
Comprobación del sistema ................................................................................................................................................ 43
Instrucciones de primer uso ........................................................................................................................................44-48
Uso del cabrestante .................................................................................................................................................. 44
Uso del compresor de aire................................................................................................................................44-45
Uso del cable ......................................................................................................................................................... 46-48
Análisis final y mantenimiento ........................................................................................................................................ 49
SÍMBOLO EXPLICACIÓN
Lea toda la
documentación sobre el
producto
Lleve siempre puesta
protección ocular
y auditiva
Nunca utilice el
cabrestante como
si fuese una grúa
Fije de forma apropiada
la carga en la garganta
del gancho
Enrolle el cable en la
parte inferior del tambor
Peligro de aplastamiento
de los dedos o de la guía
del cable
Peligro de perforación
o corte en las manos
Peligro de explosión
o rotura
Peligro de borde a lado
SÍMBOLO EXPLICACIÓN
Lleve siempre puestos
guantes de cuero
No lo use para desplazar
personas
Use siempre la correa del
gancho suministrada
No aplique nunca una
carga a la punta del
gancho o al seguro
Nunca enrolle el cable en
la parte superior
del tambor
Punto de pellizco
de la guía del cable
Peligro de super cie
caliente
Peligro de incendio
y quemaduras
Peligros asociados
a la presencia
de piezas móviles
WARN® y el log otipo de WARN so n marcas co merciale s registr adas de Warn In dustrie s, Inc.
© 2013 Warn Industries, Inc.
WARN INDUSTRIES
33
Warn Industries Inc.
12900 SE Capps Road
Clackamas, Oregón 97015
EE.UU.
Servicio de atención al cliente: (800) 543-9276
Fax internacional: (503) 722-3005
Fax: (503) 722-3000
www.warn.com
Evite la instalación de
cables eléctricos en
torno a aristas losas
y puntos abrasivos o
desgastadores
WARN INDUSTRIES
73203B0 34
Aísle los cableados
expuestos
No enganche nunca el
cable sobre sí mismo
Page 20

PRECAUCIONES GENERALES DE SEGURIDAD
PRECAUCIONES GENERALES DE SEGURIDAD
Advertencias y precauciones
ADVERTENCIA
Al leer estas instrucciones, verá ADVERTENCIAS,
PRECAUCIONES, AVISOS y NOTAS. Cada mensaje tiene un propósito
especí co. Las ADVERTENCIAS son mensajes de seguridad que
indican que está ante una situación potencialmente peligrosa que,
si no se evita, puede resultar en lesiones graves o en la muerte.
Las PRECAUCIONES son mensajes de seguridad que indican una
situación de posible peligro que, si no se evita, puede resultar en
lesiones menores o de baja gravedad. Las PRECAUCIONES pueden
alertar también contra prácticas no seguras. Las PRECAUCIONES
yADVERTENCIAS identi can el peligro, indican cómo evitarlo y
advierten de las posibles consecuencias si no se evita tal peligro.
Los AVISOS son mensajes para evitar daños a la propiedad. Las
NOTAS contienen información adicional que le ayudarán a llevar
a cabo un procedimiento. TRABAJESIEMPRE DE FORMA
SEGURA.
ADVERTENCIA
PELIGRO DE ENREDO
EN LAS PARTES MÓVILES
De no seguirse estas instrucciones, podrían producirse
lesiones graves o incluso la muerte.
• Veri que siempre que el seguro del gancho está cerrado y que
no soporta carga.
• Nunc a aplique una carga a la punta del gancho o al seguro. Aplique la
carga únicamente al centro del gancho.
• No utilice nunca un gancho cuya abertura haya aumentado o
cuya punta esté doblada o retorcida.
• Utilice siempre un gancho con seguro.
• Asegúrese siempre de que el operador y otras personas sean
conscientes de la estabilidad del vehículo y/o de lacarga.
• Mantenga siempre el cable del control remoto y el cable de
alimentación alejados del tambor, del cable y del cordaje.
Inspeccione el aparato para comprobar la posible existencia de
grietas, pellizcos, cables deshilachados oconexiones sueltas.
Los componentes dañados deberán reemplazarse antes de la
operación.
• Pase siempre el control remoto a través de una ventana cuando
lo utilice en un vehículo.
•
No enganche
WARN INDUSTRIES
35 73203B0
nunca
el cable sobre sí mismo
PELIGRO DE ENREDO
EN LAS PARTES MÓVILES
De no seguirse estas instrucciones, podrían producirse
lesiones graves o incluso lamuerte.
Seguridad general:
• Conozca siempre el funcionamiento de su cabrestante.
Leadetenidamente las Instrucciones, la Guía de operación y/o
la Guía básica de técnicas del cabrestante para comprender el
funcionamiento y la manipulación del cabrestante.
• No exceda nunca la capacidad nominal del cabrestante nidel
cable del cabrestante. Emplee un cable doble con una polea para
reducir la carga del cabrestante.
• Lleve puestos siempre guantes gruesos de cuero para manipular
el cable del cabrestante.
• No use nunca el cabrestante o el cable del cabrestante para
remolcar. Un golpe a las cargas puede dañar, sobrecargar o romper
el cable.
• No utilice nunca el cabrestante para amarrar una carga.
• No ponga nunca en funcionamiento este cabrestante si se
encuentra bajo los efectos de drogas, alcohol omedicamentos.
• Nunca utilice este cabrestante si es menor de 16 años deedad.
Seguridad en la instalación:
• Elija siempre una ubicación de montaje que sea lo
su cientemente sólida para soportar la capacidad de carga
máxima del cabrestante.
• Utilice siempre piezas de grado 5 (grado 8.8 métrico) osuperior.
• No suelde nunca los pernos de montaje.
• Use siempre piezas de montaje, componentes yaccesorios
aprobados por el fabricante.
• No utilice nunca pernos que sean demasiado largos.
• Complete siempre la instalación del cabrestante y el
acoplamiento del gancho antes de instalar el cableado.
• Mantenga siempre las manos alejadas del cable del cabrestante,
del bucle del gancho, del gancho y de la abertura de la guía
durante la instalación, la operación
y en el enrollado y desenrollado.
• Ponga siempre la guía del cable con la etiqueta deadvertencia
visible en la parte superior.
• Realice siempre un estiramiento previo del cable y vuelva a
enrollarlo con carga antes de usarlo. Un cable bien enrollado
reduce las posibilidades de tener “dobleces” quepuedan dañar el
cable.
ADVERTENCIA ADVERTENCIA
PELIGRO DE ENREDO EN LAS PARTES MÓVILES
De no seguirse estas instrucciones, podrían producirse
lesiones graves o incluso lamuerte.
Seguridad durante la operación delcabrestante:
• Inspeccione siempre el cable del cabrestante, elgancho y las
eslingas antes de poner el cabrestante en funcionamiento. Si el
cable del cabrestante está deshilachado, retorcido o dañado, deberá
reemplazarse de inmediato. Los componentes dañados deberán
reemplazarse antes de la operación. Evite que las piezas resulten
dañadas.
• Retire siempre cualquier elemento u obstáculo que pueda interferir
en la seguridad de la operación del cabrestante.
• Veri que siempre que el anclaje seleccionado soportará la carga y
que la correa o la cadena no se deslizará.
• Utilice siempre la correa del gancho suministrada cuando vaya a
enrollar o desenrollar el cable del cabrestante, durante la instalación y
durante la operación.
• Haga siempre que los operadores y otras personas presentes vigilen
el vehículo y/o la carga.
• Tenga siempre presente la estabilidad del vehículo y dela carga
durante el uso del cabrestante; haga que las personas presentes se
mantengan alejadas. Alerte a todas las personas presentes de una
posible inestabilidad.
• Desenrolle siempre tanto cable del cabrestante como sea posible
para elmaniobrado. Emplee un cable doble o elija un punto
deanclaje distante.
• Tómese siempre su tiempo para utilizar técnicas apropiadas de
maniobrado cuando utilice el cabrestante.
• No toque nunca el cable del cabrestante ni el gancho si hay
alguien cerca del interruptor de control, o si el cabrestante está en
funcionamiento.
• Nunca embrague ni desembrague si el cabrestante está soportando
una carga, si el cable está en tensión o si el tambor está en
movimiento.
• No toque nunca el cable del cabrestante ni el gancho mientras
están tensos o con carga.
• Manténgase siempre alejado del cable del cabrestante y de la
carga, y no deje que otros se acerquen cuando elcabrestante esté en
funcionamiento.
• No utilice nunca un vehículo para tirar de la carga en el cable del
cabrestante. La carga combinada o un golpe en la carga pueden
dañar, sobrecargar o romper el cable.
• No enrolle nunca el cable del cabrestante sobre sí mismo. Utilice
una cadena de estrangulación o un protector de tronco de árbol en el
anclaje.
WARN INDUSTRIES
73203B0 36
PELIGRO DE CAÍDA O APLASTAMIENTO
De no seguirse estas instrucciones, podrían producirse
lesiones graves o incluso lamuerte.
• Manténgase siempre alejado y haga que otras personas también lo
• Nunca accione el cabrestante si no hay, al menos, 5vueltas de cable
• No use nunca el cabrestante como grúa o para suspender una carga.
• Compruebe siempre que el anclaje soportará la carga. Utilice técnicas
• No utilice nunca el cabrestante para levantar o desplazar personas.
• No realice nunca esfuerzos excesivos para enrollar elcable del
• Utilice siempre posturas y técnicas de levantamiento adecuadas o
• Enrolle y desenrolle el cable del tambor siempre en la dirección
• Siempre enrolle el cable del cabrestante alrededor deltambor en el
• Siempre enrolle el cable del cabrestante en la parte inferior (lado de
• Nunca enrolle el cable en la parte superior del tambor.
• Siempre enrolle y desenrolle el cable al tambor en la dirección
PELIGRO DE CORTES Y QUEMADURAS
De no seguirse estas instrucciones, podrían producirse
lesiones graves o incluso la muerte.
Para evitar daños en las manos:
• Lleve puestos siempre guantes gruesos de cuero para manipular el
• Tenga siempre en cuenta que las super cies del motor, del tambor o
estén.
alrededor del tambor. El cable podría soltarse del tambor, ya que el
acoplamiento del cable al tambor no está diseñado para aguantar
cargas.
de maniobrado adecuadas y tómese tiempo para operar de forma
correcta.
cabrestante.
solicite ayuda a la hora de manipular einstalar el producto.
especi cada en la etiqueta de advertencia del cabrestante o en la
documentación. Esto es necesario para el funcionamiento correcto del
freno automático (siviene equipado con ello).
sentido indicado por la marca de rotación del cabrestante.
montaje) del tambor.
especi cada en las etiquetas de rotación del tambor en el cabrestante
o en la documentación. Esto es necesario para el funcionamiento
correcto del freno automático (si viene equipado con ello).
ADVERTENCIA
cable del cabrestante.
del cable del cabrestante pueden estar calientes durante o después del
uso del mismo.
Page 21

PRECAUCIONES GENERALES DE SEGURIDAD
PRECAUCIONES GENERALES DE SEGURIDAD
ADVERTENCIA
RIESGO DE EXPLOSIÓN O INCENDIO
De no seguirse estas instrucciones, podrían
producirse lesiones graves e incluso la muerte.
• Opere siempre el compresor en un área bien ventilada
en donde no haya materiales combustibles, gasolinas o
emanaciones.
• Almacene siempre los materiales in amables en un lugar
seguro alejado del compresor.
• Nunca restrinja ni bloquee ninguna de las aberturas de
ventilación de compresor.
• No opere nunca esta unidad en recintos cerrados ni en áreas
con nadas.
• No permita nunca que el compresor opere sin nadie que lo
atienda.
• No apoye nunca objetos contra el compresor ni los ponga en
su parte superior.
ADVERTENCIA
ADVERTENCIA RIESGO DE QUEMADURAS
De no seguirse estas instrucciones, podrían producirse
lesiones graves e incluso la muerte.
• No toque nunca ninguna super cie de metal expuesta del
compresor durante su operación o inmediatamente después.
El compresor permanecerá caliente durante varios minutos
después de su operación.
• No toque en las inmediaciones de las cubiertas protectoras ni
trate de reparar o dar mantenimiento a la unidad hasta que
se haya enfriado.
RIESGO DE EXPLOSIÓN
De no seguirse estas instrucciones, podrían
producirse lesiones graves e incluso la muerte.
• Drene siempre el refrigerador intermedio diariamente o
• No haga nunca per foraciones, soldaduras ni modi cación
• No haga nunca ajustes ni sustituciones de piezas que alteren
• No exceda nunca la presión nominal de herramientas
• Si es necesario el control de aire, instale siempre un
• Siga siempre las recomendaciones del fabricante del equipo.
• No exceda nunca la presión nominal máxima permisible para
• No use nunca el compresor para in ar objetos de in ado a
ADVERTENCIA
después de cada uso. Si el refrigerador intermedio sufre
una fuga, reemplácelo de inmediato con uno nuevo o
reemplazado el compresor completo.
alguna al refrigerador intermedio ni a ninguno de sus
accesorios.
las presiones de operación establecidas de fábrica.
neumáticas, accesorios operados con aire, neumáticos u otros
dispositivos in ables.
regulador de presión y un manómetro en la salida de aire del
compresor (si no viene equipado con ellos).
los accesorios.
presión baja como juguetes infantiles, pelotas de fútbol, de
baloncesto, etc.
ADVERTENCIA
RIESGO DE QUE SALGAN DESPEDIDOS OBJETOS
De no seguirse estas instrucciones, podrían
ADVERTENCIA
RIESGO DE INHALACIÓN
De no seguirse estas instrucciones, podrían producirse
lesiones graves e incluso la muerte.
• No use nunca aire proveniente del compresor para
sumunistrar aire para el consumo humano.
WARN INDUSTRIES
37 73203B0
producirse lesiones graves e incluso la muerte.
• Lleve puestas siempre gafas de seguridad homologadas
según la norma ANSI Z87.1 con protección lateral cuando
vaya a usar el compresor.
• No apunte nunca una boquilla o rociador hacia parte alguna
del cuerpo, ni hacia otras personas o animales.
• Apague siempre el compresor y haga un sangrado de presión
a la manguera de aire y al refrigerador intermedio antes de
realizar cualquier reparación, o de acoplar herramientas o
accesorios.
ADVERTENCIA
PELIGRO DE ENREDO EN LAS PARTES MÓVILES
Si no observa estas instrucciones, podrían
producirse lesiones menores o moderadas.
PELIGRO DE INCENDIO O POR PRESENCIA DE
PRODUCTOS QUÍMICOS
Para evitar daños en las manos:
• No deje nunca el control remoto donde pueda activarse
De no seguirse estas instrucciones, podrían producirse
lesiones graves o incluso la muerte.
• Acuérdese siempre de quitarse las joyas y utilizar protección
ocular.
• No pase nunca los cables eléc tricos por bordes a lados.
• No pase nunca los cables eléc tricos cerca de piezas que se
calienten.
• No pase nunca los cables eléc tricos por partes móviles
ocerca de ellas.
• Coloque siempre las fundas de terminales suministradas
en los cables y los terminales, tal como se indica en las
instrucciones de instalación.
• No se apoye nunca en la batería si está haciendo conexiones.
• No pase nunca los cables eléc tricos sobre los terminales de la
batería.
• No cortocircuite nunca los terminales de la batería con
objetos metálicos.
• Si va a perforar, veri que siempre que en el área no haya
tuberías o tanques de combustible, líneas de frenos, cables
eléctricos, etc.
• Consulte siempre el manual del usuario para obtener
detalles de cableado adecuados.
• Aísle y proteja siempre los cables y los terminales eléctricos
que queden expuestos.
• No deje nunca el control remoto del cabrestante conectado
EVITE DAÑOS AL EQUIPO
Y AL CABRESTANTE
• Evite siempre los tirones laterales, ya que pueden apilar el
• Compruebe siempre que se ha embragado o desembragado
PRECAUCIÓN
• Evite siempre dañar la estructura cuando vaya a anclar su
• No sumerja nunca el cabrestante en agua.
• Guarde siempre el control remoto en un área protegida,
PELIGRO DE CORTES Y QUEMADURAS
Si no observa estas instrucciones, podrían
producirse lesiones menores o moderadas.
• Nunca deje que el cable del cabrestante se deslice por sus
manos.
WARN INDUSTRIES
73203B0 38
PRECAUCIÓN
durante el enrollado libre, el maniobrado o cuando el
cabrestante no esté en uso.
cuando se esté instalando o haciendo enrollado libre,
maniobras o mantenimiento ni cuando no se esté utilizando
el cabrestante.
AVISO
cable del cabrestante en un extremo del tambor. Esto puede
dañar elcable del cabrestante o el propio cabrestante.
completamente.
vehículo en una operación con el cabrestante.
limpia y seca.
Page 22

CONDICIONES DE TRABAJO SEGURAS
FAMILIARÍCESE CON EL CABRESTANTE
Este manual proporciona instrucciones sobre la
instalación de su sistema de cabrestante WARN
y las instrucciones de funcionamiento inicial.
Lea la Guía básica de técnicas de operación
del cabrestante para obtener instrucciones
completas de funcionamiento para su sistema de
cabrestante WARN.
Seguridad
Cuando instale su sistema de cabrestante WARN,
lea y siga todas las instrucciones de montaje y de
seguridad.
Cuando desplace una carga, el operador debe
hacerlo siempre desde una posición segura. Las
áreas seguras son: (1) perpendiculares al cable
de tracción o (2) el interior del vehículo con la
capota subida (si el cabrestante está montado
delante del vehículo). Estas posiciones seguras
ayudan a evitar que el cable alcance al operador
si dicho cable no aguanta la carga y se rompe.
Siempre que sea posible, accione el
cabrestante desde la longitud total del cable del
control remoto. El usuario debe situarse siempre
a 2,5 m, por lo menos, del cabrestante. Esto
evitará que se enganche con la guía y lo situará
fuera del alcance de cualquier latigazo del cable
durante el desplazamiento de la carga.
No trabaje nunca cerca del cable de tracción
cuando el cabrestante lleve carga.
Sea precavido siempre que trabaje con
electricidad y no olvide comprobar que no haya
ninguna conexión eléctrica expuesta antes de
alimentar el circuito del cabrestante.
Para obtener las especificaciones y los datos de
funcionamiento, consulte la hoja de información
que viene con el cabrestante.
Emisiones acústicas
El cabrestante está diseñado de tal forma
que las emisiones acústicas audibles desde el
emplazamiento del operador no superen los
70 dBa. El usuario debe situarse a 2,5 m, por lo
menos, del cabrestante. Si el cabrestante excede
70 dBa desde el lugar donde se encuentra el
usuario, llévelo a un centro de servicio autorizado
para ser inspeccionado.
Conozca el funcionamiento de su cabesrtante
Antes de comenzar, debe familiarizarse con el cabrestante WARN y con cada uno de sus componentes:
Casquillo del control remoto
Contactor
Puerta de acceso de aire
Palanca de embrague
Transmisión
Motor
(Tren de engranajes)
Cable
Tambor del
cabrestante
Kit de accesorios
de aire
Selector de modo
Kit de manguera
Control remoto
Motor: El motor del cabrestante funciona con la batería del vehículo. El motor proporciona energía al
mecanismo de engranajes, que gira el tambor del cabrestante y enrolla el cable del cabrestante.
Selector de modo: El selector de modo permite al usuario poder cambiar entre uso en modo arrastre con cabrestante o
uso compresor.
Cable: El diámetro del cable del cabrestante y su longitud se determinan de acuerdo a la capacidad de carga del
cabrestante y al diseño del mismo. Enrollado alrededor del tambor del cabrestante a través de la guía, el
cable del cabrestante se enlaza al final para aceptar el perno del enganche.
Tambor del cabrestante: El tambor del cabrestante es el cilindro en el cual se enrolla el cable del cabrestante. El tambor se
acciona por medio del motor y del tren de engranajes. Se puede cambiar el sentido de giro utilizando el
control remoto.
Tren de engranajes: El engranaje de reducción convierte la energía del motor del cabrestante en una fuerza de gran
tracción. El diseño del tren de engranajes hace posible que el cabrestante sea más ligero y compacto.
Palanca de embrague: El embrague permite al usuario desactivar el tambor de enrollado desde el sistema de engranajes,
lo que permite al tambor girar libremente (llamado “enrollado manual”). Al embragar se vuelve a
“bloquear” el tambor del cabrestante en el tren de engranaje.
Puerta de Acceso AIRE: Puede tirarse de la puerta de caucho marcada con “AIR” (AIRE) en el lado del tren de engranajes de la
unidad para acceder al empalme de conexión rápida de aire.
Casquillo del El casquillo del control remoto es donde el operador enchufa el control remoto con cable o el receptor
control remoto: del control remoto sin cables opcional para controlar el cabrestante.
Contactor: Los contactores transmiten corriente al motor utilizando la energía eléctrica de la batería del vehículo.
Esto permite que el usuario cambie la dirección de la rotación del tambor del cabrestante.
Control remoto: El control remoto se conecta al cabrestante a través del casquillo del control remoto, que permite al
usuario controlar la dirección del cabrestante y mantenerse alejado del cable mientras funciona. El
control remoto también dispone de un interruptor para encender y apagar el compresor.
Kit de accesorios de aire: Incluye manguera, mandril y calibrador de neumáticos, y acople de desconexión rápida para suministrar
aire e inflar en caso necesario.
Kit de manguera de Una vez instalado en el cabrestante, proporciona aire puro al compresor desde el compartimento del
toma de aire: motor.
de toma de aire
WARN INDUSTRIES
39 73203B0
WARN INDUSTRIES
73203B0 40
Page 23

MONTAJE
CONEXIÓN DE TOMA DE AIRE
Paso 1 - Montaje del cabrestante
Puede encontrar los kits de montaje para
cabrestantes en su distribuidor de WARN para
la mayoría de las aplicaciones. Si desea más
información sobre los kits disponibles, comuníquese
con su distribuidor de productos WARN.
Para obtener las máximas prestaciones y los resultados
AVISO
esperados se recomienda el uso de las placas de montaje WARN.
PRECAUCIÓN
cabrestante y lesiones de gravedad, realice la instalación del
cabrestante y acople el gancho antes de instalar el cable.
ADVERTENCIA
que sea lo su cientemente sólida para soportar la capacidad de
carga máxima del cabrestante.
ADVERTENCIA
demasiado largos.
ADVERTENCIA
al tambor en la dirección especi cada en las etiquetas
de rotación del tambor en el cabrestante o en la
documentación. Esto es necesario para el funcionamiento
correcto del freno automático (si viene equipado con ello).
ADVERTENCIA
en la parte inferior (lado de montaje) del tambor.
Solo son posibles las direcciones de montaje
mostradas para un uso seguro del cabrestante
(consultar los gráficos siguientes para una correcta
orientación del montaje). Cualquier otra orientación
de montaje es incorrecta e inadecuada. Los
detalles del montaje indican los niveles adecuados
del par de torsión.
El uso de las combinaciones recomendadas de
arandelas de presión y pernos, aplicando los niveles
de apriete recomendados, evita las vibraciones
durante el accionamiento. A continuación se
enumeran las especificaciones. El sistema de
montaje dictará la longitud de los pernos.
Detalles del montaje:
(1) Suave y llana, grosor = 6,4 mm (1/4 pulg.)
(2) Arandela de presión de 9,525 mm (3/8 pulg.) X 4
(3) 3/8-16 X 1 1/4 pulg. de largo, perno de calibre
5 X 4
Par de torsión 41-47 Nm
Para evitar la activación accidental del
Elija siempre una ubicación de montaje
No utilice nunca pernos que sean
Siempre enrolle y desenrolle el cable
Siempre enrolle el cable del cabrestante
Patrón de los pernos de montaje:
Estándar: 254 mm x 114,3 mm
Seleccione una ubicación de montaje que sea lo
suficientemente sólida para soportar la capacidad
de carga máxima del cabrestante.
ADVERTENCIA
para garantizar la adecuada seguridad.
No olvide revisar la longitud del tornillo
Grosor de la placa Longitud del perno
7 mm (1/4 pulg.) 32 mm (1.25 pulg.)
10 mm (3/8 pulg.) 40 mm (1,5 pulg.)
13 mm (1/2 pulg.) 40 mm (1,5 pulg.)
Orientación de montaje:
Este cabrestante está diseñado para montaje en parado.
AVISO
Paso 2 – Manguera de toma de aire &
Instalación del ltro
1. Ubicar el contenido del kit de toma de aire.
Ponga la pequeña abrazadera de manguera al
final de la manguera de entrada.
abrazadera
cremallera
2. Conecte la conexión de asas al filtro de entrada
de aire.
3. Desde el lado posterior del cabrestante, localice
el empalme de la manguera en el cabezal del
compresor y ponga la manguera empujándola.
4. Apriete bien la abrazadera.
5. Dirija la manguera de toma de aire a través
de la rejilla del vehículo o de las aberturas del
parachoques para entrar en el compartimento
del motor.
6. Instale el filtro en el extremo de la manguera.
7. Monte el filtro lo más alto posible. Use las
bandas de sujeción suministradas u otro medio
para fijar la manguera y el filtro.
Ajuste bien las bandas de sujeción.
WARN INDUSTRIES
41 73203B0
WARN INDUSTRIES
73203B0 42
Page 24

CONEXIONES ELÉCTRICAS
INSTRUCCIONES DE PRIMER FUNCIONAMIENTO
Paso 3 - Instalación del cableado
ADVERTENCIA
o la muerte. Coloque siempre las fundas de terminales
suministradas en los cables y en los terminales, tal como se
indica en las instrucciones de instalación.
ADVERTENCIA
mortales debidos a incendios de origen eléctrico:
ADVERTENCIA
terminales eléctricos que queden expuestos.
Utilice los manguitos aislantes provistos en las
conexiones expuestas a fin de evitar cortocircuitos.
No instale los cables de la batería donde puedan
desgastarse debido al roce o sufrir cortes en el
material aislante produciéndose así un cortocircuito.
Cuando haya finalizado la instalación, compruebe
si el cabrestante funciona correctamente.
Recomendaciones para la batería
Una batería completamente cargada y unas
conexiones correctas resultan esenciales para el
buen funcionamiento del cabrestante. El requisito
mínimo para una batería de 12 voltios de CC es de
650 amperios para el arranque en frío.
Cable rojo 183cm
(72 pulg.)
WARN INDUSTRIES
43 73203B0
Para prevenir lesiones de gravedad
Para prevenir lesiones graves o accidentes
No pase nunca los cables eléctricos por bordes
a lados.
No pase nunca los cables eléctricos cerca de piezas
que se calienten.
Nunca pase los cables eléctricos por partes móviles
o cerca de ellas.
Evite los puntos de pellizco y desgaste o abrasión
cuando instale todos los cables eléctricos.
Aísle y proteja siempre los cables y
Cable negro
183cm (72 pulg.)
Diagrama eléctrico
Paso 4 - Revisión del sistema
Comprobación del funcionamiento del sistema:
• Controle los elementos de fijación y asegúrese
de que estén apretados con el par de apriete
correcto.
•
Veri que que el cableado de todos los
componentes es correcto y que todas las
conexiones están bien apretadas
•
Veri que que no hay cableado ni terminales
expuestos/al aire o daños en el aislante.
• Compruebe la rotación del motor: El cabrestante
debe enrollarse y rotar en la dirección indicada
en la etiqueta de rotación del tambor. Si el
cabrestante gira en la dirección contraria, revise
nuevamente las conexiones eléctricas.
• Compruebe la dirección del cable: Siempre
enrolle el cable del cabrestante en la parte
inferior (lado de montaje) del tambor.
Una vez haya realizado una revisión del sistema,
estará listo para con rmar el funcionamiento del
cabrestante. Siga en las secciones Instrucciones
de primer funcionamiento y Análisis nal y
mantenimiento de este documento. Operation
Instructions, Air Compressor Operation
Instructions and Final Analysis and Maintenance
sections in this booklet.
.
Paso 5 - Instrucciones de primer
funcionamiento
Funcionamiento del cabrestante:
ADVERTENCIA
completamente el cabrestante y su funcionamiento, revisando
la Guía básica de técnicas de uso del cabrestante que viene con
el mismo.
Interruptor del control remoto
No deje el control remoto conectado al
cabrestante cuando no se esté utilizando. Dejar el
control enchufado puede producir una situación
peligrosa y/o desgastar la batería.
Interruptor de control del cabrestante
El interruptor oscilante grande que viene en el
mando del control remoto controla las funciones
de enrollado y desenrollado del cabrestante. Este
interruptor se puede usar accionar solamente
cuando el selector de modo se encuentra en la
posición del símbolo del cabrestante.
Indicador de temperatura del motor y desconexión
Con un uso intenso durante un período
corto de tiempo, el motor se calentará
considerablemente. Para evitar daños al motor
debido a una calentamiento extremo, existe un
dispositivo de protección térmica en el motor.
Cuando se alcanza la mayor temperatura de
fábrica el dispositivo detiene el motor y activa el
indicador luminoso parpadeante en el mando a
distancia.
WARN INDUSTRIES
73203B0 44
Dedique el tiempo su ciente a conocer
DESENROLLADO
ENROLLADO
Interruptor de control del cabrestante
compresor, pero todavía operará la función de
desenrollado en caso de ser necesaria la descarga
de una carga. Una vez que se enfríe el motor, se
podrá reanudar la operación normal.
Accionamiento del embrague
de engranajes se acopla al tambor del cable y, en
estas condiciones, puede transferirse movimiento
desde el motor del cabrestante. Cuando el
embrague está desembragado se encuentra
en posición de enrollado libre y el sistema
de engranajes y el tambor del cable están
desengranados, lo que permite que el tambor
gire libremente.
cubierta del cabrestante, enfrente del motor,
controla el rendimiento del embrague. Para
evitar daños, engrane y desengrane siempre
completamente la palanca del embrague.
Funcionamiento del compresor de aire:
la manguera de aire y el refrigerador intermedio antes de realizar
cualquier reparación, o de acoplar herramientas o accesorios.
hacia parte alguna del cuerpo, ni hacia otras personas ni animales.
homologadas según la norma ANSI Z87.1 con protección lateral cuando
vaya a usar el compresor de aire.
cubiertas protectoras ni trate de reparar o dar mantenimiento a la
unidad hasta que se haya enfriado.
expuesta del compresor durante su operación o inmediatamente
después.
Selección del modo de compresor
“Compresor de aire”. Retire la puerta de acceso
de aire y conecte una manguera de aire al
empalme de conexión rápida.
No operará la función de enrollado ni el
Cuando el embrague está activado, el sistema
La palanca del embrague, ubicada en la
Desembragado
ADVERTENCIA
ADVERTENCIA
ADVERTENCIA
ADVERTENCIA
ADVERTENCIA
Gire el selector de modo al símbolo
Apague siempre el compresor y purgue
No apunte nunca una boquilla o un rociador
Lleve siempre puestas gafas de seguridad
No toque nunca en las inmediaciones de las
No toque nunca ninguna super cie metálica
Activado
Page 25

INSTRUCCIONES DE PRIMER FUNCIONAMIENTO
INSTRUCCIONES DE PRIMER FUNCIONAMIENTO
Puerta de acceso de aire
Puede tirarse de la puerta de caucho marcada
con “AIRE” en la parte del tren de engranaje de
la unidad para acceder al empalme de conexión
rápida de aire. Antes de operar el compresor,
deberá conectarse una manguera de aire al
empalme. Durante cualquier operación del
cabrestante, el empalme deberá dejarse abierto
sin estar conectado a la manguera. Si hay una
manguera conectada durante la operación del
cabrestante, se acumulará presión de aire en
la unidad y el interruptor de presión parará el
motor. Se recomienda que la puerta esté en su
lugar en el armazón en todo momento, excepto
durante la propia operación del compresor.
Puerta de
acceso de aire
Selector de modo
Interruptor del compresor
Enchufe el control remoto. El interruptor
oscilante más pequeño enciende y apaga el
compresor. Este interruptor solo se puede usar
cuando el modo selector está en la posición del
símbolo “compresor de aire”.
Interruptor del compresor
Refrigerador intermedio
El refrigerador intermedio proporciona
una pequeña cavidad de aire que reduce la
temperatura del aire en el empalme de conexión
rápida. Hay un interruptor de presión y una
válvula de seguridad montados en el refrigerador
intermedio.
Interruptor de presión
El interruptor de presión detendrá
automáticamente el compresor cuando
alcance la presión de "corte" de fábrica de
aproximadamente 690 kPa (100 psi). Cuando la
presión desciende a la presión “aceptable” de
aproximadamente 480 kPa (70 psi), el compresor
arrancará de nuevo.
Válvula de escape
Si el interruptor de presión no apaga el
compresor a su presión de “corte” prestablecida,
la válvula de alivio actuará para proteger contra
la presión elevada “saltando” a una presión
aproximada de 860 kPa (125 psi).
La válvula de seguridad deberá operarse
manualmente una vez al mes para verificar
que se mueve libremente y que funciona
correctamente. Está situada por debajo y hacia la
parte posterior del empalme de aire. Tire de la
anilla metálica durante unos segundos.
Drenaje del refrigerador intermedio
Es normal que se acumule condensación en
el refrigerador intermedio. Esta condensación
puede drenarse en la válvula de seguridad
tirando de la anilla metálica. Esto deberá hacerse
cada 10 horas de uso o antes de guardar la
unidad por un período prolongado de tiempo.
Accesorios de la manguera de aire
1. El kit de accesorios del compresor de aire
WARN incluye todo lo necesario para adaptar el
compresor de aire a distintos usos.
2. Puede cambiar fácilmente los acopladores de
aire para modificar la manguera del compresor
de aire y disponer de varios usos. Con la
ayuda de una llave inglesa, retire el acoplador
instalado.
3. Con la llave inglesa instale el nuevo acoplador.
4. Todo el ensamblaje de manguera puede
utilizarse como una extensión de la manguera o
con la mayoría de compresores de aire estándar
existentes en el mercado.
Cuerda:
Desenrollado
ADVERTENCIA
Nunca accione el cabrestante si no hay, al
menos, 5 vueltas de cable alrededor del tambor. El cable podría
soltarse del tambor, ya que el acoplamiento del cable altambor no
está diseñado para aguantar cargas.
ADVERTENCIA
Siempre mantenga las manos alejadas del
cable del cabrestante, del bucle del gancho, del gancho y de la
abertura de la guía durante la instalación, la operación y en el
enrollado y desenrollado.
ADVERTENCIA
Siempre lleve puestos siempre guantes
gruesos de cuero para manipular el cable del cabrestante.
Generalmente, el desenrollado manual es la forma
más rápida y sencilla de sacar el cable del cabrestante.
Antes de proceder al desenrollado manual, saque
suficiente cable del cabrestante a fin de eliminar
cualquier tensión a la que pueda estar sometido el
mismo. Quite el embrague. A continuación, proceda al
desenrollado manual, sacando manualmente suficiente
cable del cabrestante para la operación. Consulte la
Guía básica de técnicas para el uso del cabrestante
para obtener más información.
AVISO
NO desenrolle el cable más de 9 metros sin dejar que el
cabrestante se enfríe durante 20 minutos antes de volver aenrollar el
cable. En su lugar, coloque el embrague enposición de enrollado libre
y tire del cable a mano.
ADVERTENCIA
Siempre utilice la correa del gancho
suministrada cuando vaya a enrollar o desenrollar el cable
delcabrestante o durante la instalación o el funcionamiento para
evitar daños en las manos.
Enrollado bajo carga
ADVERTENCIA
No exceda nunca los límites de tracción del
cable del cabrestante.
Enrolle el cable del cabrestante uniformemente
y bien tensado alrededor del tambor. Esto evita que
las vueltas más externas del cable del cabrestante
se hundan en las vueltas internas; asimismo, evita
atascamientos y daños al cable del cabrestante.
Evite las sacudidas de la carga cuando esté
enrollando; para ello, pulse el interruptor de control a
fin de tensar y hacer entrar las porciones del cable del
cabrestante que puedan quedar flojas. Lassacudidas de
la carga pueden hacer sobrepasar momentáneamente
la capacidad nominal del cabrestante y del cable.
Enrollado sin carga
ADVERTENCIA
Nunca toque el cable del cabrestante ni
el gancho si hay alguien cerca del interruptor de control, o si el
cabrestante está en funcionamiento.
Enrollado o desenrollado con un ayudante: Pida al
ayudante que sujete la correa del gancho tensando
el cable del cabrestante de forma constante y tanto
como sea posible. Manteniendo tenso el cable, el
ayudante debe caminar hacia el cabrestante mientras
usted acciona el interruptor de control para enrollar el
cable del cabrestante. Suelte el interruptor cuando el
gancho esté a una distancia mínima de 2 m (6 pies) de
la abertura de la guía.
Luego, enrolle la parte final del cable para
almacenarlo tal como se indica a continuación.
Enrollado o desenrollado solo: Disponga el cable del
cabrestante de forma que no se doble ni se trabe al
enrollarlo. Asegúrese de que el cable del cabrestante
ya enrollado alrededor del tambor esté bien tenso
y dispuesto en capas uniformes. Enrolle su ciente
cable del cabrestante como para formar la siguiente
capa completa en el tambor. Tense y enderece lacapa.
Repita este proceso hasta que el gancho quede a una
distancia mínima de 2 m (6 pies) delaabertura de la
guía.
Luego, enrolle la parte final del cable para
almacenarlo tal como se indica a continuación.
WARN INDUSTRIES
45 73203B0
WARN INDUSTRIES
73203B0 46
Page 26

INSTRUCCIONES DE PRIMER FUNCIONAMIENTO
INSTRUCCIONES DE PRIMER FUNCIONAMIENTO
Enrollado del resto del cable para el almacenamiento
Cuando el gancho se encuentre a 2 m (6 pies) de
la guía, desconéctelo del punto de anclaje o carga.
Sostenga la correa del gancho (incluida con el
producto) y mantenga la tensión en el cable del
cabrestante. Enrolle el cabrestante lentamente
pulsando el botón de enrollado en el control remoto
hasta que el gancho se encuentre a 1 metro (3 pies) de
la guía.
Pare de enrollarlo y enganche el gancho al punto
de anclaje apropiado en el vehículo.
AVISO
No permita que el gancho toque la guía.
Esto podría causar daños a la guía.
Una vez que el gancho esté bien acoplado al
vehículo, enrolle el resto del cable suelto pulsando el
interruptor de enrollado en el control remoto hasta
que haya una holgura mínima en el cable.
Sobrecarga/sobrecalentamiento
El cabrestante está indicado para un servicio
intermitente. Cuando el motor se aproxima a la
velocidad crítica, se genera calor muy rápidamente,
loque puede ocasionar daños al motor.
El maniobrado con línea de doble cable (consulte
la Guía básica del técnicas para el uso del cabrestante)
reduce el amperaje de consumo yel recalentamiento
del motor. Esto permite un uso continuo más
prolongado.
ESTIRAMIENTO DEL CABLE
DEL CABRESTANTE
ADVERTENCIA
Realice siempre un estiramiento previo del
cable y vuelva a enrollarlo con carga antes de usarlo. Un cable bien
enrollado reduce las posibilidades de tener “dobleces” que puedan
dañar el cable.
ADVERTENCIA
Nunca accione el cabrestante si no hay, al
menos, 5 vueltas de cable alrededor del tambor. El cable podría
soltarse del tambor, ya que el acoplamiento del cable altambor no
está diseñado para aguantar cargas.
La vida útil del cable del cabrestante está
directamente relacionada con la forma en que se
utiliza y se cuida. Durante su primer uso, un cable
del cabrestante nuevo debe enrollarse en el tambor
bajo una carga de, por lo menos, 454 kg. (1000lbs).
Siga las instrucciones siguientes para tensar el cable
del cabrestante correctamente en el tambor del
cabrestante.
1) Escoja una super cie PLANA Y PAREJA que sea lo
su cientemente amplia como para poder extender
todo el cable del cabrestante.
2) Gire la palanca del embrague del cabrestante hacia
la posición “Free Spool” (enrollado libre). Desenrolle el
cable del cabrestante del tambor hasta las últimas 5
vueltas. Una vez desenrollado el cable del cabrestante,
ponga la palanca del embrague del cabrestante en la
posición “Engaged” (embragado).
3) Acople el extremo del cable con gancho a un punto
de anclaje apropiado y aleje el vehículo de tal punto
hasta que quede muy poco cable del cabrestante
suelto. Antes de salir del vehículo, ponga el freno
de mano, deje una velocidad puesta o en aparcado
(vehículos automáticos) y apague elvehículo.
4) Conecte el control remoto al cabrestante. Desde
una distancia de aproximadamente 2,44 metros
(8pies) del cabrestante, enrolle el cable hasta que
se halla enrollado todo el cable suelto en el tambor
del cabrestante. Desconecte el control remoto del
cabrestante. Mantenga la tensión en el cable del
cabrestante con una mano; empuje cuidadosamente
el cable del cabrestante hacia el lado del tambor al
que esté enganchado, de forma que no haya espacios
libres en el tambor entre cada vuelta. Veri que que
el cable del cabrestante se enrolle enla parte inferior
del tambor y no en la superior, yaque, en caso
contrario, el freno de carga automático no funcionará
correctamente. (Si el cable del cabrestante se enrolla en
la parte superior, habrá desenrollado el cabrestante en
lugar de enrollarlo con el control remoto).
5) Para una mayor seguridad, dos personas deberán
realizar los pasos siguientes. Si trata de tensar el cable
del cabrestante usted solo, veri que siempre que el
freno de mano esté puesto, deje una marcha puesta
o estacione y apague el vehículo cada vez que lo
abandone para inspeccionar el cable del cabrestante.
No salga nunca del vehículo con una carga aplicada al
cable. Tensar el cable del cabrestante es fundamental
para garantizar una larga vida útil del mismo. Al
tensarse el cable del cabrestante, se evitará que sus
capas exteriores pellizquen o deformen las capas
interiores.
6) Procure enrollar cada vuelta de forma pareja para
evitar daños al cable.
7) Pase el control remoto a través de la ventanilla del
conductor para que pueda usarlo el conductor del
vehículo. Pida a su ayudante que se ubique en la parte
lateral del vehículo, alejado del cable del cabrestante.
Él deberá indicarle si el cable del cabrestante se está
enrollando correctamente al verlo pasar por la guía.
Arranque el vehículo y ponga la transmisión en punto
muerto. Suelte el freno de mano mientras presiona
moderadamente el pedal del freno.
Pulse el botón de enrollar en el control remoto.
Después de enrollar aproximadamente 2m (6 pies)
de cable, pare el enrollado. Lentamente, deje de
presionar el pedal del freno para aplicar el freno de
mano. Esto asegurará que no haya carga en el cable
del cabrestante. A continuación, ponga la transmisión
en aparcado (vehículos automáticos) oponga una
velocidad con la palanca de cambios yapague el
vehículo. Salga del vehículo y asegúrese de que el
cable del cabrestante esté enrollándose de forma
pareja en el tambor del cabrestante y no hundiéndose
en la capa inferior. Si el cable del cabrestante se está
hundiendo, desenróllelo y repita este paso desde el
principio con más presión en el pedal del freno.
8) Cuando esté convencido de que el cable del
cabrestante está enrollándose correctamente en
el tambor, repita el paso 6 hasta que el vehículo
se encuentre a 2 metros (6 pies) del anclaje del
cabrestante. Una vez que esté a 2 m (6 pies), dejede
presionar el pedal del freno lentamente para utilizar
el freno de mano. Esto asegurará que no haya carga
en el cable del cabrestante. Acontinuación, ponga
la transmisión en aparcado (vehículos automáticos)
o ponga una velocidad con la palanca de cambios y
apague el vehículo. Salga del vehículo. Desenganche el
gancho del punto de anclaje. Mientras que sostiene la
correa del gancho (incluida en el producto), mantenga
la tensión en el cable del cabrestante y enróllelo
lentamente pulsando el interruptor de enrollado en el
control remoto hasta que el gancho se encuentre a 1
metro (3 pies) de la guía. Pare de enrollarlo y enganche
el gancho al punto de anclaje apropiado en el vehículo.
No permita que el gancho toque la guía. Esto podría causar
AVISO
daños a la guía.
Una vez que el gancho esté bien acoplado al
vehículo, enrolle el resto del cable suelto pulsando
elinterruptor de enrollado en el control remoto hasta
que haya una holgura mínima en el cable.
WARN INDUSTRIES
47 73203B0
WARN INDUSTRIES
73203B0 48
Page 27

ANÁLISIS FINAL Y MANTENIMIENTO
ORIGINALANLEITUNG
Control
Lea detenidamente las Instrucciones, la
Guía de operación y/o la Guía básica de
técnicas del cabrestante para comprender
el funcionamiento y la manipulación del
cabrestante.
Controle los elementos de jación y
asegúrese de que estén apretados con el par
de apriete correcto.
Sustituya todos los elementos de jación
que estén dañados.
Veri que que el cableado de todos los
componentes es correcto y que todas
lasconexiones están bien apretadas.
Veri que que no hay cableado ni terminales
expuestos/al aire o daños en el aislante
(desgaste/corte).
Cubra las exposiciones con fundas para
terminales. Repare o sustituya los cables
eléctricos dañados.
Compruebe que el cable no presente daños.
Sustituya el cable de inmediato
si está dañado.
Mantenga libres de contaminantes
elcabrestante, el cable y el control
deconmutación.
Utilice un paño limpio o una toalla para
quitar la suciedad.
ADVERTENCIA
Para prevenir lesiones de gravedad o
la muerte:
Siempre enrolle el c able del cabrestante
alrededor del tambor en el sentido indicado por
la marca derotación del cabrestante.
Enrolle el cable en la parte inferior del tambor.
Nunca enrolle el cable en la parte superior
deltambor.
Antes del
primer uso
Después
de cada uso
Cada 90 días
X
XX
XX
XX
XXX
X
Tómese su tiempo para comprender
completamente el cabrestante y su
funcionamiento revisando la Guía básica de
técnicas de uso del cabrestante que viene con el
mismo.
Para más información o preguntas contacte con:
WARN INDUSTRIES, INC.
12900 S.E. Capps Road, Clackamas, OR USA 97015-
8903, 1-503-722-1200,
Servicio de atención al cliente: 1-800-543-9276
Servicio localizador de distribuidor: 1-800-910-1122
o visite www.warn.com.
Aufbauanleitung für die
PowerPlant-Winde
Jeder Umgang mit der Winde schließt die Möglichkeit ein, dass Personen verletzt werden. Um dieses Risiko zu mindern, ist es wichtig, diese
Anleitung und den „Leitfaden der Zugtechniken für Winden“ (The Basic Guide to Winching Techniques) sorgfältig zu lesen. Machen Sie
sich vor der Nutzung mit dem Betrieb der Winde vertraut und denken Sie stets an Sicherheit. In dieser Anleitung geben wir Ihnen wichtige
Sicherheitsinformationen und Anweisungen, wie Ihre Winde installiert wird. Bitte lesen Sie den „Leitfaden der Zugtechniken für Winden“, um zu
erfahren, wie Sie Ihre Winde einsetzen, und um die richtigen Techniken für den Zugbetrieb kennenzulernen.
Bewahren Sie diesen Leitfaden und andere beiliegende Texte zu dem Produkt auf, um sie künftig heranziehen zu können. Bei dieser Lieferung
finden Sie die folgenden Texte: Einbauanleitung Winde, Leitfaden der Zugtechniken für Winden, Daten zu Spezifikationen und Leistung,
Gewährleistung für das Produkt, Ersatzteilliste sowie weitere Texte, die für bestimmte Produkte geliefert werden. Wenn ein Text fehlen sollte,
besuchen Sie bitte www.warn.com oder rufen Sie uns unter der unten stehenden Nummer an.
INHALT:
SICHERHEIT
Verzeichnis der Symbole .................................................................................................................................................... 51
Allgemeine Sicherheitsmaßnahmen ........................................................................................................................52-55
ANLEITUNG
Sichere Arbeitsbedingungen ............................................................................................................................................ 56
Bestandteile der Winde ....................................................................................................................................................... 57
Montage ....................................................................................................................................................................................58
Anschluss des lufteinlasses ................................................................................................................................................ 59
Elektrisch anschlüsse ............................................................................................................................................................ 60
Systemprüfung ....................................................................................................................................................................... 60
Anleitung für den erstmaligen Betrieb....................................................................................................................61-65
Betrieb der Winde ...................................................................................................................................................... 62
Betrieb des Luftkompressors ...........................................................................................................................62-63
Verwendung des Seils ........................................................................................................................................64-65
Abschließende Analyse und Wartung ........................................................................................................................... 66
Warn Industries Inc.
12900 SE Capps Road
Clackamas, OR 97015
USA
WARN INDUSTRIES
49 73203B0
WARN® und da s WARN-Logo sin d eingetrag ene Warenze ichen von Warn I ndustrie s Inc.
© 2013 Warn Industries, Inc.
WARN INDUSTRIES
50
Kundendienst: (800) 543-9276
Fax (International): (503) 722-3005
Fax: (503) 722-3000
www.warn.com
Page 28

SYMBOLINDEX
ALLGEMEINE SICHERHEITSMASSNAHMEN
SYMBOL ERKLÄRUNG
Lesen Sie die gesamte
Produktdokumentation
Immer Gehör- und
Augenschutz tragen
Winde niemals zum
Heben verwenden
Last ordnungsgemäß
im Hakenhals platzieren
Seil von unten auf die
Trommel aufspulen
Quetschgefahr für die
Finger in der Führung
Schnitt-/Stichgefahr
für die Hände
Explosionsgefahr
Gefahr durch
scharfe Kanten
Vermeiden Sie
Quetschpunkte und
scharfe Kanten bei
der Installation von
elektrischen Kabeln
SYMBOL ERKLÄRUNG
Immer Lederhandschuhe
tragen
Keine Personen
befördern
Immer mitgelieferten
Hakengurt verwenden
Hakenspitze oder Riegel
niemals belasten
Seil nie von oben auf die
Trommel aufspulen
Quetschgefahr
durch Führung
Gefahr durch
heiße Flächen
Brand- und
Verbrennungsgefahr
Gefahr durch bewegliche
Teile
Isolieren Sie freiliegende
Drähte
Niemals das Seil an sich
selbst einhaken
Warnhinweise und
Vorsichtsmaßnahmen
In diesem Handbuch be nden sich WARNHINWEISE,
VORSICHTSMASSNAHMEN, WICHTIGE ANMERKUNGEN und HINWEISE.
Jeder dieser Punkte hat einen besonderen Zweck. WARNHINWEISE sind
Sicherheitshinweise, die auf eine möglicherweise gefährliche Situation
hinweisen, die zu schweren oder tödlichen Verletzungen führen
kann, wenn sie nicht vermieden wird. VORSICHTSMASSNAHMEN sind
Sicherheitshinweise, die auf eine möglicherweise gefährliche Situation
hinweisen, die zu leichten oder mäßigen Verletzungen führen kann,
wenn sie nicht vermieden wird. Eine VORSICHTSMASSNAHME kann
auch auf unsichere Praktiken hinweisen. VORSICHTSMASSNAHMEN und
WARNHINWEISE kennzeichnen die Gefahr, weisen auf Möglichkeiten zur
Vermeidung der Gefahr hin und geben Aufschluss über die möglichen
Folgen, wenn diese Gefahr nicht vermieden wird. Das Signalwor t
WICHTIG weist auf Anmerkungen mit Vorgehensweisen zur Vermeidung
von Sachschäden hin. HINWEISE liefern zusätzliche Informationen,
die Ihnen helfen, ein bestimmtes Ver fahren durchzuführen. BITTE
UNBEDINGT ALLE SICHERHEITSMASSNAHMEN BEACHTEN!
ACHTUNG
GEFAHR DURCH BEWEGLICHE TEILE
Die Missachtung dieser Anweisungen kann zu
schweren oder tödlichen Verletzungen führen.
• Immer sicherstellen, dass der Riegel geschlossen ist und keine Last
trägt.
• Niemals Hakenspitze oder Riegel belasten. Nur die Hakenmitte
belasten.
• Niemals verworfene Haken bzw. Haken mit einer verbreiterten
Durchlassö nung verwenden.
• Immer einen Haken mit Riegel verwenden.
• Immer gewährleisten, dass Bedienpersonal und in der Nähe
be ndliche Personen auf die Stabilität von Fahrzeug und Last während
des Windenbetriebs achten.
• Fernsteuerungs- und Stromversorgungskabel immer von der Trommel,
dem Seil und beim Abspannen fernhalten. Auf rissige, geknickte oder
ausgefranste Drähte oder lockere Anschlüsse achten. Beschädigte
Komponenten sind vor der Inbetriebnahme auszuwechseln.
• Fernsteuerungskabel bei Verwendung im Fahrzeug immer durch
Fenster verlegen.
• Niemals das Seil an sich selbst einhaken.
ACHTUNG
GEFAHR DURCH BEWEGLICHE TEILE
Die Missachtung dieser Anweisungen kann zu
schweren oder tödlichen Verletzungen führen.
Allgemeine Sicherheitsmaßnahmen:
• Immer mit der Winde vertraut machen. Nehmen Sie sich Zeit,
um die Anleitung und/oder Bedienungsanleitung und/oder
Grundlegenden Richtlinien zur Windentechnik zu lesen, um
sich mit der Winde und deren Betrieb vertraut zumachen.
• Niemals die Nennkapazität der Winde bzw. des Windenseils
überschreiten. Zur Reduzierung der Last sind eine Umlenkrolle
und ein zweifach geschertes Seil erforderlich.
• Immer schwere Lederhandschuhe bei der Handhabung des
Windenseils tragen.
• Winde oder Windenseil niemals zum Abschleppen verwenden.
Schockbelastungen können das Seil beschädigen, überlasten
und zum Reißen bringen.
• Winde niemals zum Sichern einer Last ver wenden.
• Winde niemals unter Alkohol-, Drogen- oder
Medikamentenein uss in Betrieb nehmen.
• Nur Personen, die mindestens 16 Jahre alt sind, dürfen diese
Winde in Betrieb nehmen.
Sicherheitsmaßnahmen bei der Installation:
• Immer eine Befestigungsstelle wählen, die fest genug ist,
um der maximalen Nennleistung der Winde standhalten
zukönnen.
• Die Befestigungsteile müssen immer mindestens Grad 5 (d. h.
8,8) entsprechen.
• Befestigungsschrauben niemals schweißen.
• Immer nur vom Hersteller zugelassene Befestigungsteile,
Komponenten und Zubehörteile verwenden.
• Niemals zu lange Schrauben verwenden.
• Immer die Windeninstallation und Hakenbefestigung
abschließen, bevor die Verkabelung installier t wird.
• Immer Kontakt mit dem Windenseil, der Öse, dem Haken und
der Seilführung während der Installation, des Betriebs und
beim Ab- und Aufspulen vermeiden.
• Seilführung immer so positionieren, dass der Warnhinweis
deutlich sichtbar nach oben zeigt.
• Immer vor Inbetriebnahme das Seil dehnen und unter Last
neu aufspulen. Ein fest aufgespultes Windenseil reduziert das
Risiko, dass sich die Seillagen lockern und hängen bleiben oder
Schäden verursachen.
WARN INDUSTRIES
51 73203B0
WARN INDUSTRIES
73203B0 52
Page 29

ALLGEMEINE SICHERHEITSMASSNAHMEN
ACHTUNG ACHTUNG
ALLGEMEINE SICHERHEITSMASSNAHMEN
ACHTUNG
ACHTUNG
GEFAHR DURCH BEWEGLICHE TEILE
Die Missachtung dieser Anweisungen kann zu
schweren oder tödlichen Verletzungen führen.
Sicherheitsmaßnahmen beim Windenbetrieb:
• Windenseil, Haken und Schlingen vor Inbetriebnahme der Winde
immer prüfen. Ausgefranste, geknickte oder beschädigte Windenseile
müssen umgehend ausgetauscht werden. Beschädigte Komponenten
sind vor der Inbetriebnahme auszuwechseln. Alle Einzelteile sind vor
Schäden zu schützen.
• Gegenstände oder Hindernisse, die einen sicheren Betrieb der Winde
beeinträchtigen könnten, sind immer zu entfernen.
• Immer sicherstellen, dass der gewählte Anker der Last standhalten
kann und dass weder der Riemen noch die Kette verrutschen können.
• Beim Auf- und Abspulen des Windenseils, während der Installation
und während des Betriebs immer den mitgelieferten Hakengurt
verwenden.
• Bedienpersonal und in der Nähe be ndliche Personen müssen sich des
Fahrzeugs und der Last immer bewusstsein.
• Beim Windenbetrieb immer auf die Stabilität des Fahrzeugs und
der Last achten und andere Personen davon fernhalten. In der Nähe
be ndliche Personen müssen über instabile Zustände informiert
werden.
• Beim Abspannen immer möglichst viel abspulen. Windenseil
zweifach scheren oder weit entfernten Ankerpunkt wählen.
• Immer Vorsicht beim Abspannen in Vorbereitung des
Windenvorgangs!
• Niemals während des Windenbetriebs, oder wenn jemand anders
die Steuerung der Winde übernommen hat, Windenseil oder Haken
berühren.
• Niemals die Kupplung bei belasteter Winde, gespanntem Windenseil
oder sich bewegender Seiltrommel ein- oder ausrasten lassen.
• Niemals Windenseil oder Haken berühren, wenn diese unter
Spannung stehen.
• Immer Abstand zum Windenseil und zur Last einhalten und andere
Person während des Windenbetriebs fernhalten.
• Niemals Fahrzeug verwenden, um Last mit Windenseil zu ziehen.
Kombinierte Lasten oder Schockbelastungen können das Seil
beschädigen, überlasten und zum Reißen bringen.
• Windenseil niemals übereinander aufspulen. Verwenden Sie eine Kette
oder eine Baumschutzvorrichtung am Anker.
STURZ- ODER QUETSCHGEFAHR
Die Missachtung dieser Anweisungen kann zu
schweren oder tödlichen Verletzungen führen.
• Immer Abstand halten, Hände fernhalten, andere Personen fernhalten.
• Niemals die Winde mit weniger als fünf Seilwicklungen um die
Trommel betreiben. Das Seil könnte sich von der Trommel lösen, da die
Seilbefestigung an der Trommel nicht für eine Belastung konzipiert
wurde.
• Winde niemals als Hebevorrichtung oder zum Anheben von Lasten
verwenden.
• Immer sicherstellen, dass der Anker der Last standhalten kann;
unbedingt auf ordnungsgemäßes Abspannen achten.
• Winde niemals als Lift oder zur Beförderung von Personen verwenden.
• Niemals übermäßige Kraft für den Freilauf des Windenseils anwenden.
• Beim Handling und Installieren des Produkts immer auf richtige
Haltung/Hebetechnik achten oder Hebehilfe bescha en.
• Seil immer in der auf dem Warnetikett der Winde und/oder in den
Unterlagen angegebenen Richtung auf die Trommel spulen. Diese
Maßnahme ist für die ordnungsgemäße Funktion der Automatikbremse
(wenn vorhanden) unerlässlich.
• Windenseil immer entsprechend den Rotationsangaben auf dem
Trommelaufkleber aufspulen.
• Windenseil immer von unten (Montageseite) auf die Trommel
aufspulen.
• Seil nie von oben auf die Trommel aufspulen.
• Windenseil immer in der den Rotationsangaben auf dem
Trommelaufkleber und/oder in den Unterlagen entsprechenden
Richtung auf die Trommel spulen. Dies ist für die ordnungsgemäße
Funktion der Automatikbremse (wenn vorhanden) unerlässlich.
ACHTUNG
SCHNITTVERLETZUNGS- UND
VERBRENNUNGSGEFAHR
Die Missachtung dieser Anweisungen kann zu
schweren oder tödlichen Verletzungen führen.
So lassen sich Verletzungen an den Händen und
Fingern vermeiden:
• Immer schwere Lederhandschuhe bei der Handhabung des
Windenseils tragen.
• Während des Betriebs und nach Ver wendung der Winde immer auf
möglicherweise heiße Flächen in der Nähe des Motors, der Trommel
oder des Seils achten.
WARN INDUSTRIES
53 73203B0
EXPLOSIONS- ODER BRANDGEFAHR
Die Nichtbeachtung dieser Anweisungen kann zu
schweren oder tödlichen Verletzungen führen.
• Kompressor stets in gut belüfteten Bereichen ohne leicht
entzündliches Material, Kraftsto oder Dämpfe in Betrieb
nehmen.
• Leicht entzündliches Material nur in sicherer Entfernung
vom Kompressor lagern.
• Belüftungsö nungen des Kompressors nicht blockieren.
• Gerät weder in Innenräumen noch in engen Räumlichkeiten
in Betrieb nehmen.
• Kompressor nicht unbeaufsichtigt in Betrieb nehmen.
• Gegenstände nicht gegen den Kompressor lehnen oder auf
dem Kompressor abstellen.
ACHTUNG
BERSTGEFAHR
Die Nichtbeachtung dieser Anweisungen kann zu
schweren oder tödlichen Verletzungen führen.
• Kondensat täglich nach jedem Einsatz aus dem
• Zwischenkühler oder Zubehör nicht anbohren, schweißen
• Werkseitig eingestellte Betriebsdrücke dürfen nicht verändert
• Drucknennwerte der Druckluftwerkzeuge, des
• Am Luftaustritt des Kompressors sind zur Druckluftkontrolle
• Empfehlungen des Herstellers beachten.
• Zulässigen Höchstdruck des Zubehörs nicht überschreiten.
• Kompressoren sollten nicht zum Aufblasen von kleinen
ACHTUNG
VERBRENNUNGSGEFAHR
Die Nichtbeachtung dieser Anweisungen kann zu
schweren oder tödlichen Verletzungen führen.
• Exponierte Metall ächen am Kompressor weder während des
Betriebs noch unmittelbar nach dem Betrieb berühren. Der
Kompressor bleibt auch wenige Minuten nach Betriebsende
heiß.
• Nicht um die Schutzabdeckung herum greifen oder
Wartungsmaßnahmen vor Abkühlen des Geräts beginnen.
GEFAHR DURCH
FORTGESCHLEUDERTE TEILE
Die Nichtbeachtung dieser Anweisungen kann zu
ACHTUNG
schweren oder tödlichen Verletzungen führen.
• Bei Verwendung des Luftkompressors ist eine Schutzbrille
• Düsen oder Sprühelemente nicht auf Körperteile oder andere
• Vor Beginn der Wartungsmaßnahmen und dem Anschluss
ERSTICKUNGSGEFAHR
Die Nichtbeachtung dieser Anweisungen kann zu
schweren oder tödlichen Verletzungen führen.
• Abluft von Kompressoren darf nie als Atemluft dienen.
WARN INDUSTRIES
73203B0 54
Zwischenkühler ablassen. Bei Lecks muss der Zwischenkühler
unmittelbar durch einen neuen Kühler ersetzt oder der
gesamte Kompressor ausgewechselt werden.
oder anderweitig modi zieren.
und Einzelteile nicht ausgewechselt werden.
luftbetriebenen Zubehörs, der Reifen und der anderen
aufblasbaren Teile nicht überschreiten.
(wenn nicht schon vorhanden) ein Druckregler und ein
Druckmesser zu installieren.
Gegenständen mit niedrigen Drücken verwendet werden
(z.B. Spielzeug, Fußbälle, Basketbälle usw.).
ACHTUNG
gemäß ANSI Z87.1 mit seitlichen Blenden erforderlich.
Personen bzw. Tiere richten.
von Werkzeugen oder Zubehörteilen muss der Kompressor
ausgeschaltet und der Druck aus dem Luftschlauch und dem
Zwischenkühler abgelassen werden.
Page 30

ALLGEMEINE SICHERHEITSMASSNAHMEN
SICHERE ARBEITSBEDINGUNGEN
ACHTUNG
CHEMISCHE UND BRANDGEFAHR
Die Missachtung dieser Anweisungen kann zu
schweren oder tödlichen Verletzungen führen.
• Immer Schmuck entfernen und Augenschutz tragen.
• Niemals Elektrokabel über scharfe Kanten verlegen.
• Niemals Elektrokabel in der Nähe von Teilen verlegen, die heiß
werden.
• Niemals Elektrokabel durch bewegliche Teile oder in der Nähe
von beweglichen Teilen verlegen.
• Immer die mitgelieferten Schutzmanschetten an Kabeln und
Anschlüssen gemäß den Installationsanweisungen anbringen.
• Beim Herstellen von Anschlüssen niemals über die Batterie
beugen.
• Niemals Elektrokabel über Batterieanschlüsse verlegen.
• Niemals Batterieanschlüsse mit Metallgegenständen
kurzschließen.
• Immer sicherstellen, dass ein Bereich, in dem gebohrt
werden soll, frei von Kraftsto eitungen, Kraftsto tanks,
Bremsleitungen, elektrischen Kabeln usw. ist.
• Einzelheiten über richtige Verkabelung immer der
Bedienungsanleitung entnehmen.
• Immer freiliegende Kabel und elektrische Anschlüsse isolieren
und schützen.
VORSICHT
VORSICHT
GEFAHR DURCH BEWEGLICHE TEILE
Die Missachtung dieser Anweisungen kann zu
leichten oder mäßigen Verletzungen führen.
So lassen sich Verletzungen an Händen und Fingern
vermeiden:
• Fernsteuerung beim Freilauf, Abspannen oder bei
Nichtgebrauch der Winde immer entfernen, damit sie nicht
aktiviert werden kann.
• Fernsteuerung beim Installieren, Freilauf, Abspannen,
Wartungs-/Reparaturarbeiten oder bei Nichtgebrauch
derWinde niemals angeschlossen lassen.
HINWEIS
SO LASSEN SICH SCHÄDEN AN DER WINDE UND
AN GERÄTEN VERMEIDEN:
• Das Einziehen des seil von der Seite ist immer zu vermeiden,
da sich das Windenseil sonst an einem Ende der Trommel
ansammeln kann. Bei Nichtbeachtung dieser Anweisung können
Schäden am Windenseil oder der Winde entstehen.
• Immer darauf achten, dass die Kupplung vollkommen ein- oder
ausgerastet ist.
• Immer sicherstellen, dass das Chassis bei der Verankerung des
Fahrzeugs während des Windenbetriebs nicht beschädigt wird.
• Niemals die Winde in Wasser eintauchen.
• Fernsteuerung immer an einem geschützten, sauberen,
trockenen Ort aufbewahren.
Dieser Leitfaden enthält die Anleitung,
wie Ihr WARN-Winden-System installiert
wird sowie Anweisungen zur erstmaligen
Verwendung. Bitte lesen Sie den Leitfaden der
Zugtechniken für Winden, um eine vollständige
Bedienungsanleitung für Ihr WARN-WindenSystem zu erhalten.
Sicherheit
Lesen und befolgen Sie die
Sicherheitsanweisungen bei der Installation Ihres
WARN-Winden-Systems.
Die Winde muss bei Zug einer Last immer
von einer sicheren Stelle aus betrieben werden.
Sichere Bereiche sind: (1) Senkrecht zu dem
Seil, (2) im Fahrzeuginneren mit geschlossener
Motorhaube (sofern die Winde an der Vorderseite
des Fahrzeugs angebracht ist). Diese sicheren
Bereiche tragen dazu bei, dass das Seil - selbst
im Falle eines Reißens unter Last - nicht den
Bediener trifft.
Betreiben Sie die Winde, wo immer dies
möglich ist, mit vollständig abgerolltem Kabel
der Fernbedienung. Der Bediener muss bei
Betrieb stets mindestens 2,5 m von der Winde
entfernt bleiben. Dadurch wird ein Eindringen
in die Seilführung verhindert und der Bediener
während des Zugs der Last aus der Gefahrenzone
gebracht.
Niemals unter Last in der Nähe des Drahtseils
arbeiten.
Bei Arbeiten mit Elektrizität immer vorsichtig
sein. Denken Sie daran, zu prüfen, dass keine
offenen elektrischen Verbindungen bestehen, bevor
Sie die Winde anschalten.
Für Angaben zu Spezifikationen und Leistung
lesen Sie das Spezifikationsblatt, welches mit Ihrer
Winde geliefert wurde.
SCHNITTVERLETZUNGS- UND
VERBRENNUNGSGEFAHR
Die Missachtung dieser Anweisungen kann zu
leichten oder mäßigen Verletzungen führen.
• Windenseil niemals durch die Hände gleiten lassen.
WARN INDUSTRIES
55 73203B0
Geräuschemissionen
Die Winde ist so konstruiert, dass die
Geräuschemissionen am Ort des Bedieners
nicht über 70 dBa liegen. Der Bediener muss bei
Betrieb mindestens 2,5 m von der Winde entfernt
bleiben. Sofern die Winde am Ort des Bedieners
Geräusche von mehr als 70 dBa macht, muss sie
von einem zugelassenen Service Center einer
Inspektion unterzogen werden.
WARN INDUSTRIES
73203B0 56
Page 31

MIT DER WINDE VERTRAUT MACHEN
MONTAGE
Bestandteile der Winde
Bevor Sie beginnen, müssen Sie sich mit der WARN-Winde und ihren Komponenten vertraut machen:
Anschluss Fernbedienung
Schalter
Luft-Eintrittsö nung
Kupplungshebel
Kraftübertragung
Motor
(Getriebezug)
Seil
Windentrommel
Modus-Auswahl
Zubehörsatz für
Luft
Lufteinlass-Schlauch
Fernbedienung
Motor: Der Motor der Winde wird über die Batterie des Fahrzeugs betrieben. Der Motor überträgt die Kraft an das
Getriebe, welches die Windentrommel dreht und das Windenseil betätigt.
Modus-Wahl: Die Auswahl des Modus ermöglicht es dem Nutzer, von dem Betriebsmodus „Winden“ auf „Kompressor“
umzuschalten.
Seil: Durchmesser des Windenseilsund Länge werden von Bauart und Last, aufwelche die Winde ausgelegt ist,
bestimmt. Das Windenseil ist um die Windentrommelgeschlungen und durch die Seiltrompete geführt.
Der Bolzen für die Befestigung des Hakens befindet sich in einer Schlaufe am Ende.
Windentrommel: Die Windentrommel ist der Zylinder, auf den sich das Windenseil aufrollt. Die Trommel wird über das
Getriebe von dem Motor angetrieben. Die Laufrichtung kann über die Fernbedienung geändert werden.
Getriebezug: Das Untersetzungsgetriebe wandelt die Motorleistung der Winde in eine hohe Zugleistung um. Die
Konzeption des Getriebezuges ermöglicht eine leichtere und kompaktere Winde.
Kupplungshebel: Die Kupplung ermöglicht es dem Bediener, die Windentrommel manuell von dem Getriebe zu
entkoppeln. Die Trommel kann sich dann frei drehen (auch als „Leerlauf“ bezeichnet). Durch Einkuppeln
wird die Winde wieder fest mit dem Getriebe verbunden.
Lufteinlass: Der mit „AIR“ („Luft“) beschriftete Gummiverschluss auf der Getriebeseite der PowerPlant-Winde kann
entfernt werden, um Zugang zu der Schnellkupplung für Luft zu erhalten.
Anschluss Mit dem Anschluss der Fernbedienung werden die Stecker der Kabelfernbedienung (oder der optionalen
Fernbedienung: kabellosen Fernbedienung) verbunden, um die Winde zu steuern.
Schalter: Der Schalter leitet Strom in den Motor durch die Nutzung des Stroms der Fahrzeugbatterie und
ermöglicht so dem Bediener, die Laufrichtung der Trommel zu ändern.
Fernbedienung: Die Fernbedienung wird an der Steckdose für die Fernbedienung mit der Winde verbunden. Sie
ermöglicht es dem Bediener, die Laufrichtung der Winde zu ändern, und dabei eine angemessene
Entfernung von dem Seil einzuhalten. Die Fernbedienung verfügt auch über einen Schalter, mit dem der
Kompressor an- und abgeschaltet werden kann.
Zubehörsatz für Luft: Besteht aus Schlauch, Reifenventilanschluss, Druckmesser und einer Schnellentriegelung für die
Versorgung und Befüllung mit Luft.
Lufteinlass-Schlauch
mit Zubehör: Nach dem Einbau liefert er saubere Luft aus dem Motorraum an den Kompressor.
mit Zubehör
Schritt 1 - Montage der Winde
Ihr WARN-Händler liefert Ihnen Montagesätze für
die Winde, die für beinahe alle Anwendungen
geeignet sind. Wenden Sie sich für Informationen
über die verfügbaren Einbausätze an Ihren WARNHändler.
Für die optimale Leistung und die Ergebnisse, die Sie
HINWEIS
erwarten, werden Einbauplatten von WARN dringend empfohlen.
ACHTUNG
der Winde und ernsthaften Verletzungen vorzubeugen, den
Windeneinbau abschließen und den Haken montieren, bevor
die elektrischen Kabel verbunden werden.
WARNUNG
genug ist, um der maximalen Zugleistung Ihrer Winde zu
widerstehen.
WARNUNG
WARNUNG
der Richtung aufrollen, die auf der Beschriftung der Winde
und/oder der Dokumentation angegeben ist. Dies ist
notwendig, damit die automatische Bremse (sofern damit
ausgestattet) korrekt funktioniert.
WARNUNG
(Montageseite) der Trommel führen.
Nur die gezeigten Montagerichtungen
ermöglichen einen sicheren Windenbetrieb (siehe
die folgenden Abbildungen für die korrekte
Montagerichtung). Alle anderen Richtungen sind
falsch und ungeeignet. Die Montagedetails geben
die korrekten Drehmomente an.
Die Verwendung der empfohlenen
Kombinationen von Bolzen und Federscheiben
zusammen mit den empfohlenen
Anzugsdrehmomenten verhindern, dass während
des Betriebs Vibrationen entstehen. Spezifikationen
sind unten aufgelistet. Die Bolzenlänge hängt von
dem Befestigungssystem ab.
Details zur Montage:
(1) Eben und ach, Stärke = 1/4” (6,4 mm)
(2) 3/8” (9.525 mm) Federscheibe X 4
(3) 3/8-16 X 1 1/4” Länge, Grad 5 Bolzen X 4
Drehmoment 41-47 Nm (30-35 ft. lbs.)
Um einer unbeabsichtigten Aktivierung
Immer einen Einbauort wählen, der stabil
Niemals zu lange Bolzen verwenden.
Das Windenseil auf der Trommel immer in
Das Windenseil immer über die Unterseite
Arten der Montage-Bolzen:
Standard: 254 mm x 114,3 mm (10” x 4,5”)
Einen Einbauort wählen, der stabil genug ist, um
der maximalen Zugleistung Ihrer Winde zu
widerstehen.
WARNUNG
Stets auf verlangte Bolzenlänge achten,
damit das Gewinde richtig fassen kann.
Stärke der Platte Bolzenlänge
7 mm (1/4”) 32 mm (1.25”)
10 mm (3/8”) 40 mm (1.5”)
13 mm (1/2”) 40 mm (1.5”)
Montagerichtung:
Diese Winde ist nur für einen Einbau mit abwärts
HINWEIS
gerichteten Stellfüßen geeignet.
WARN INDUSTRIES
57 73203B0
WARN INDUSTRIES
73203B0 58
Page 32

ANSCHLUSS DES LUFTEINLASSES
ELEKTRISCHE ANSCHLÜSSE
Schritt 2 - Einbau von LufteinlassSchlauch und Filter
1. Teile des Zubehörsatzes für Lufteinlass
zusammenlegen. Die kleine Schlauchklemme
auf das Ende des Lufteinlass-Schlauchs setzen.
Schlauchklemme
2. Den gerändelten Schlauchansatz mit dem
Lufteinlassfilter verbinden.
3. Die Lage des Schlauchansatzes auf der
Rückseite der Winde am Kompressorkopf
ermitteln und den Schlauch aufdrücken.
5. Den Lufteinlass-Schlauch durch Öffnungen des
Kühlergrills oder der Stoßstange des Fahrzeugs
in den Motorraum führen.
6. Den Filter am Ende des Schlauchs anbringen.
7. Den Filter so hoch wie möglich anbringen.
Die mitgelieferten Kabelbinder oder andere
Materialien verwenden, um Schlauch und Filter
zu befestigen.
Schritt 3 - Installation der
Elektrokabel
WARNUNG
Verletzungen zu vermeiden: Die mitgelieferten
Anschlusskappen so auf die Kabel und Anschlüsse setzen, wie
dies in den Installationsanweisungen angegeben ist.
WARNUNG
Verletzungen durch elektrische Entladungen zu vermeiden:
WARNUNG
und Anschlussstellen isolieren und schützen.
Die mitgelieferten Isolationskappen für
offenliegende Verbindungen verwenden, um
elektrische Kurzschlüsse zu vermeiden. Die
Batterieanschlusskabel in Bereiche verlegen, wo ihre
Isolation nicht durchscheuert oder durchschnitten
und so möglicherweise ein Kurzschluss verursacht
wird.
Nach Abschluss der Installation die Winde auf
ordnungsgemäßen Betrieb prüfen.
Empfehlungen für die Batterie
Eine vollständig aufgeladene Batterie und
einwandfreie Verbindungen sind entscheidend
für den korrekten Betrieb Ihrer Winde. Die
Minimalanforderung für eine 12 V DC-Batterie ist
eine Kaltstartfähigkeit von 650 Ampere
Um ernsthafte oder lebensbedrohliche
Um ernsthafte oder lebensbedrohliche
Elektrokabel nicht über scharfe Kanten führen.
Elektrokabel nicht in die Nähe von Teilen verlegen,
welche heiß werden.
Elektrokabel nicht durch oder in die Nähe
beweglicher Teile verlegen.
Quetsch- und Abriebstellen bei der Installation von
Elektrokabeln vermeiden.
Stets alle o enliegenden elektrischen Kabel-
Schritt 4 - Systemprüfung
Durchführung der Systemprüfung:
• Befestigungen prüfen, ob sie fest sitzen und mit
dem richtigen Drehmoment angezogen wurden.
•
Nachprüfen, ob die Verkabelung aller
Komponenten korrekt ist, um sicher zu sein,
dass die Verbindungen fest sitzen
•
Nachprüfen, dass es keine o enen/nichtisolierten Kabel, Anschluss-Stecker oder
Schäden an der Kabelisolation gibt.
• Motor-Rotation prüfen: Die Winde muss so mit
Spannung versorgt werden und sich so drehen,
wie auf der Anzeige zur Trommeldrehung
angegeben. Wenn die Winde sich in die
Gegenrichtung dreht, alle elektrischen
Verbindungen nochmals prüfen.
• Führung des Seils prüfen: Das Seil immer über
die Unterseite (Montageseite) der Trommel
führen.
Sobald Sie eine Systemprüfung durchgeführt
haben, können Sie das ordnungsgemäße
Funktionieren der Winde bestätigen. Gehen Sie
in dieser Broschüre zu den Kapiteln Anleitung für
den erstmaligen Betrieb, Betriebsanleitung für
den Luftkompressor, Abschließende Prüfung und
Wartung.
.
Kabelbinder fest anziehen
4. Die Schlauchklemme fest anziehen.
WARN INDUSTRIES
59 73203B0
Rotes Kabel
183 cm
(72”)
Schwarzes Kabel 183 cm (72”)
Anschlussplan
WARN INDUSTRIES
73203B0 60
Page 33

ANLEITUNG FÜR DEN ERSTBETRIEB
ANLEITUNG FÜR DEN ERSTBETRIEB
Schritt 5 - Anleitung für den erstmaligen
Betrieb
Betrieb der Winde:
WARNUNG
und wie der Winden-Betrieb abläuft, indem Sie den „Leitfaden
der Zugtechniken für Winden“ zu Rate ziehen.
Schalter Fernbedienung
Ziehen Sie die Fernbedienung ab, wenn
die Winde nicht verwendet wird. Bleibt die
Fernbedienung eingesteckt, so stellt dies eine
Gefahr dar und führt zu Batterieverbrauch.
Verstehen Sie immer, was Ihre Winde macht,
AUS
Bedienung der Kupplung
Wenn eingekuppelt ist, ist der Getriebezug
mit der Seiltrommel verbunden und Kraft
kann von dem Windenmotor übertragen
werden. Wenn ausgekuppelt ist, ist der Leerlauf
eingeschaltet und das Getriebe ist nicht mit der
Seiltrommel verbunden. Deshalb kann sich die
Trommel frei drehen.
Der Kupplungshebel, der sich auf dem
Windengehäuse gegenüber dem Motor befindet,
steuert die Kupplung. Um Schäden zu vermeiden,
muss mit dem Hebel stets vollständig ein- oder
ausgekuppelt werden.
Ausgeschaltet
Eingeschaltet
EIN
Steuerung der Winde
Mit dem großen Kippschalter auf der
Fernbedienung werden die Auf- und AbwickelFunktionen der Winde betätigt. Dieser Schalter
funktioniert nur dann, wenn die Modus-Auswahl auf
Position „Winch“ (Winde) steht.
Steuerungsschalter der Winde
Anzeige der Motortemperatur und Abschalter
Bei starker Nutzung über einen kurzen
Zeitraum wird sich der Motor erheblich aufheizen.
Um Schäden an dem Motor aufgrund der Hitze zu
vermeiden, gibt es für den Motor eine thermische
Schutzeinrichtung.
Wenn die im Werk vorgegebene
Höchsttemperatur erreicht ist, schaltet diese
Einrichtung den Motor ab und bringt die
Anzeigelampe auf der Fernbedienung zum
Blinken.
Die Aufwickel-Funktion und der Kompressor
arbeiten dann nicht. Die Abwickel-Funktion
arbeitet, falls es notwendig ist, eine Last
freizugeben. Nachdem der Motor abkühlen
konnte, startet der Normalbetrieb erneut.
WARN INDUSTRIES
61 73203B0
Betrieb des Luftkompressors
WARNUNG
aus dem Schlauch und Ladeluftkühler ablassen, bevor eine Wartung
begonnen bzw. Werkzeuge oder Zubehör angebracht werden.
WARNUNG
Körperteil, andere Personen oder Tiere richten.
WARNUNG
mit Seitenschutz tragen, wenn der Luft-Kompressor verwendet wird.
WARNUNG
eine Wartung beginnen , bevor das Gerät abkühlen konnte.
WARNUNG
Kompressors herausstehende Metallteile berühren.
Den Kompressor immer ausschalten und Druck
Niemals Düsen oder Zerstäuber auf einen
Immer nach ANSI Z87.1 zugelassene Schutzbrillen
Niemals hinter Schutzvorrichtungen greifen oder
Niemals während oder kurz nach dem Betrieb des
Kompressormodus einschalten.
Den Modus-Schalter auf das Symbol
„Air Compressor“ (Kompressor) stellen. Die
Lufteinlassöffnung entfernen und einen
Luftschlauch mit der Schnellkupplung verbinden.
Luft-Eintrittsö nung
Der mit „AIR“ („Luft“) beschriftete
Gummiverschluss auf der Getriebeseite der
PowerPlant-Winde kann entfernt werden, um
Zugang zu der Schnellkupplung für Luft zu
erhalten. Vor dem Einschalten des Kompressors
muss ein Luftschlauch mit der Kupplung
verbunden werden. Während des Winde-
Betriebs muss die Kupplung frei bleiben, ohne
dass ein Schlauch aufgesetzt wird. Wenn
während des Winde-Betriebs ein Schlauch
aufgesetzt wird, bildet sich in dem Gerät Druck,
und dieser Druck führt zur Abschaltung des
Motors. Es wird empfohlen, den Verschluss stets
in dem Gehäuse zu belassen, außer während
des tatsächlichen Kompressorbetriebs.
Luft-Eintritt-
sö nung
Modus-Auswahl
Kompressorschalter
Die Fernbedienung einstecken. Mit dem
kleineren Wippschalter wird der Kompressor
an- und ausgeschaltet. Dies kann nur dann
erfolgen, wenn die Modus-Wahl auf das Symbol
„Luftkompressor“ gestellt ist.
Kompressorschalter
Entlastungsventil
dem Abschaltwert nicht abschaltet, schützt das
Entlastungsventil vor Überdruck, indem bei ca. 9
bar (125 psi) Druck abgelassen wird.
von Hand betätigt werden, damit es sich nicht
verklemmt und funktional bleibt. Es befindet sich
unten hinter dem Luftanschluss. Den Metallring
kurz ziehen.
Wasser aus Ladeluftkühler ablassen
Ladeluftkühler ansammelt. Es kann über das
Sicherheitsventil abgelassen werden, indem an
dem Metallring gezogen wird. Dies muss nach
jeweils zehn Stunden Betriebszeit geschehen
oder vor einer längeren Lagerzeit.
Anschlussteile für Luftschlauch
1. Ihr WARN-Kompressor Zubehörsatz versorgt
2. Sie können die Schlauchkupplungen leicht
Ladeluftkühler
Der Ladeluftkühler verfügt über eine kleine
Kammer, welche die Lufttemperatur in der
Schnellkupplung reduziert. Der Ladeluftkühler
verfügt über Druckschalter und Sicherheitsventil.
Druckschalter
Der Druckschalter schaltet den Kompressor
automatisch ab, wenn er den vom Werk
festgelegten Abschaltwert von ca. 7 bar (100
psi) erreicht hat. Wenn der Druck auf den
Einschaltwert von ca. 5 bar (70 psi) sinkt, startet
der Kompressor erneut.
WARN INDUSTRIES
73203B0 62
Wenn der Druckschalter den Kompressor bei
Das Entlastungsventil muss einmal pro Monat
Es ist normal, dass sich Kondenswasser im
Sie mit allem, was Sie benötigen, um den LuftKompressor für verschiedene Einsatzwecke
auszurüsten.
austauschen, um den Luftschlauch für
unterschiedliche Anschlussteile verwendbar
zu machen. Mit einem Schraubenschlüssel
ein vorhandenes „weibliches“ Anschlussteil
entfernen.
Page 34

ANLEITUNG FÜR DEN ERSTBETRIEB
ANLEITUNG FÜR DEN ERSTBETRIEB
3. Mit einem Schraubenschlüssel ein „männliches“
Anschlussteil anbringen.
HINWEIS
Spulen Sie NICHT mehr als 10m Seil ab, ohne die
Winde 20 Minuten abkühlen zu lassen, bevor Sie das Seil wieder
aufspulen. Schalten Sie stattdessen die Kupplung in den Freilauf
und ziehen Sie das Seil manuell ab.
Immer den mitgelieferten Hakengurt beim
ACHTUNG
Auf- und Abspulen, während der Installation oder während
des Betriebs verwenden, um Verletzungen an den Händen und
Fingern zu vermeiden.
Aufspulen unter Last
Die maximale Zugkraft der Winde darf nie
ACHTUNG
überschritten werden.
Das Windenseil gleichmäßig einziehen und fest
4. Der ergänzte Schlauch kann als Verlängerung
verwendet werden und eignet sich auch für
den Einsatz mit den meisten eigenständigen
Standard-Kompressoren.
um die Trommel legen. Dadurch wird verhindert, dass
die äußeren Wickelschichten die darunter liegenden
Schichten und Wicklungen und somit das Windenseil
beschädigen.
Vermeiden Sie Stoßbelastungen beim Spulen, indem
Sie regelmäßig den Steuerschalter verwenden, um
lockere Seilabschnitte einzuziehen. Stoßbelastungen
können die Nennwerte der Winde und des Seils
kurzzeitig weit überschreiten.
Aufspulen ohne Last
Niemals während des Windenbetriebs, oder
ACHTUNG
wenn jemand anders die Steuerung der Winde übernommen
hat, Windenseil oder Haken berühren.
Spulen mit Hilfspersonal: Lassen Sie das Hilfspersonal
den Hakengurt halten, wobei diese Person das
Windenseil ohne Unterbrechung und möglichst
stark spannt. Unter Aufrechterhaltung der
Spannung sollte diese Person nun auf die Winde
zugehen, während Sie das Seil unter Verwendung
Seil Betrieb:
Abspulen
Niemals die Winde mit weniger als fünf
ACHTUNG
Seilwicklungen um die Trommel betreiben. Das Seil könnte sich
von der Trommel lösen, da die Seilbefestigung an der Trommel
nicht für eine Belastung konzipiert wurde.
Immer Kontakt mit dem Windenseil, der Öse,
ACHTUNG
dem Haken und der Seilführung während der Installation, des
Betriebs und beim Ab- und Aufspulen vermeiden.
Bei der Handhabung des Windenseils immer
ACHTUNG
schwere Lederhandschuhe tragen.
Beim Freilauf handelt es sich generell um die
schnellste und einfachste Methode, das Windenseil
abzuspulen. Bevor das Windenseil im Freilauf von der
Winde gespult wird, sollte so viel Seil abgerollt werden,
dass jegliche Spannung entfernt wird. Kupplung lösen.
Dann per Hand genug Seil für den Windenbetrieb
abspulen. Weitere Informationen entnehmen Sie bitte
den Grundlegenden Richtlinien zur Windentechnik.
WARN INDUSTRIES
63 73203B0
des Steuerschalters aufspulen.
wenn der Haken mindestens 2m von der
Führungsö nung entfernt ist.
Das restliche Seil nun zu Lagerzwecken wie folgt
aufspulen.
Alleine spulen: Legen Sie das Windenseil so, dass es
beim Aufspulen weder geknickt wird oder hängen
bleiben kann. Vergewissern Sie sich, dass die
Seillagen um die Trommel fest und gleichmäßig
angeordnet sind. So viel Seil aufspulen, bis die
nächste Lage um die Trommel voll ist. Seillage
festziehen und gerade ausrichten. Wiederholen Sie
diesen Vorgang, bis der Haken mindestens 2m vom
Seilfenster entfernt ist.
Das restliche Seil nun zu Lagerzwecken wie folgt
aufspulen.
Aufspulen des Restseils zu Lagerzwecken
Den Haken vom Anker oder der Last lösen, wenn
er sich 2 m von der Führung entfernt be ndet.
Den mitgelieferten Hakengurt festhalten und
Schalter loslassen,
sicherstellen, dass das Windenseil weiterhin
unter Spannung steht. Wickeln Sie das Seil
langsam durch mehrfaches kurzes Einschalten der
Wickelfunktion an der Fernsteuerung so weit auf,
dass der Haken weniger als 1m von der Seilführung
entfernt ist.
Windenvorgang beenden und den Haken
an einem geeigneten Ankerpunkt am Fahrzeug
befestigen.
Nicht den Haken in die Seilführung ziehen. Dadurch
HINWEIS
könnte die Seilführung beschädigt werden.
Sobald der Haken an einer geeigneten Stelle am
Fahrzeug befestigt ist, wickeln Sie das Windenseil
durch mehrfaches kurzes Einschalten der Winde
an der Fernsteuerung weiter auf, bis das Seil fast
gespannt ist.
Überlastung/Überhitzung
Die Winde ist für den Aussetzbetrieb vorgesehen.
Sinkt die Drehzahl, sodass die Gefahr besteht, dass
der Motor bald stehen bleibt, kann sich die Winde
sehr schnell erhitzen und den Motor beschädigen.
Bei Verwendung einer Umlenkrolle (siehe
Richtlinien zur Windentechnik) werden die
Stromaufnahme und die Hitzebildung im Motor
reduziert. Dadurch verlängert sich die mögliche
Einsatzzeit der Winde.
DEHNEN des WINDENSEILS
Immer vor Inbetriebnahme das Seil dehnen
ACHTUNG
und unter Last neu aufspulen. Ein fest aufgespultes Seil
reduziert das Risiko, dass sich die Seillagen lockern und
hängen bleiben oder Schäden verursachen.
Niemals die Winde mit weniger als fünf
ACHTUNG
Seilwicklungen um die Trommel betreiben. Das Seil könnte
sich von der Trommel lösen, da die Seilbefestigung an der
Trommel nicht für eine Belastung konzipiert wurde.
Die Lebensdauer des Windenseils hängt von
seiner Pflege und Einsatzhäufigkeit ab. Beim ersten
Gebrauch muss ein neues Windenseil mit einer Last
von mindestens 454kg auf die Trommel gespult
werden. Folgende Anweisungen beachten, damit
das Windenseil korrekt auf die Windentrommel
aufgespult wird.
1) Wählen Sie einen FLACHEN UND EBENEN
Standort mit ausreichend Platz, um das Windenseil
in ganzer Länge auszulegen.
2) Drehen Sie den Kupplungshebel an der
Winde in die Freilaufstellung. Das Windenseil
bis auf fünf Trommelumwindungen abwickeln.
Kupplungshebel an der Winde nach dem Abspulen
des Windenseils in die eingekuppelte Position
stellen.
WARN INDUSTRIES
73203B0 64
3) Das Hakenende des Seils an einem geeigneten
Ankerpunkt befestigen und das Fahrzeug so weit
zurückfahren, bis das Windenseil fast gespannt
ist. Vor dem
einen Gang einlegen bzw. bei Automatikgetriebe
die Parkstellung wählen und den Motor abstellen..
4) Die Fernsteuerung an die Winde anschließen.
Halten Sie ungefähr 2,5m Abstand von der Winde
und spulen Sie das Seil auf die Winde auf, bis
es gespannt ist. Nehmen Sie die Fernsteuerung
von der Winde ab. Windenseil mit einer Hand
unter Spannung halten. Windenseil vorsichtig
in Richtung der Trommelseite drücken, an der
es befestigt ist, damit zwischen den einzelnen
Wicklungen keine Abstände bleiben. Vergewissern
Sie sich, dass das Windenseil auf der Unterseite
der Trommel und nicht auf der Oberseite abläuft.
Anderenfalls kann die automatische Lastbremse
nicht ordnungsgemäß funktionieren. (Wenn das
Windenseil auf der Oberseite abläuft, wurde der
Spulvorgang der Winde bei Verwendung der
Fernsteuerung in die falsche Richtung aktiviert.)
5) Aus Sicherheitsgründen sollten die folgenden
Schritte immer von zwei Personen ausgeführt
werden. Falls Sie beabsichtigen, das Windenseil
ohne die Unterstützung einer weiteren Person
unter Spannung zu setzen, müssen Sie unbedingt
darauf achten, dass die Feststellbremse angezogen
ist, ein Gang eingelegt oder das Getriebe in die
Parkposition gestellt ist und der Fahrzeugmotor
abgeschaltet ist, wenn Sie zum Überprüfen des
Windenseils aus dem Fahrzeug steigen. Steigen Sie
niemals aus dem Fahrzeug aus, während das Seil
unter Belastung steht. Das korrekte Anspannen
des Windenseils trägt entscheidend dazu bei, dass
es lange nutzbar bleibt. Durch das Anspannen
des Windenseils wird verhindert, dass die inneren
Lagen des Windenseils durch die äußeren
Wicklungen eingeklemmt und verformt werden.
6) Darauf achten, dass jede Lage sauber
aufgewickelt wird, um eine Beschädigung des Seils
zu verhindern.
7) Übergeben Sie dem Fahrzeugführer die
Fernsteuerung durch das Fenster auf der
Fahrerseite. Weisen Sie Ihren Helfer an, sich neben
das Fahrzeug zu stellen und Abstand zum Seil zu
halten. Ihr Helfer sollte das Windenseil beobachten
und Ihnen durch Signale mitteilen, dass es korrekt
über die Seilführung aufgewickelt wird. Starten
Sie den Fahrzeugmotor, und nehmen Sie den
Gang heraus. Feststellbremse lösen und dabei mit
mäßigem Druck auf die Bremse treten.
Aktivieren Sie die Aufwickelfunktion über die
Fernsteuerung. Wickelvorgang nach ungefähr
2m stoppen. Langsam den Fuß von der Bremse
Aussteigen Feststellbremse anziehen,
Page 35

ANLEITUNG FÜR DEN ERSTBETRIEB
SCHLUSSANALYSE UND WARTUNG
nehmen und dann die Feststellbremse anziehen.
Dadurch wird sichergestellt, dass das Windenseil
nicht unter Belastung steht. Das Getriebe
dann wieder in die Parkposition schalten oder
einen Gang einlegen und den Fahrzeugmotor
abschalten. Aus dem Fahrzeug aussteigen und
überprüfen, ob das Windenseil gleichmäßig auf die
Windentrommel aufgewickelt und nicht in einer
darunter liegenden Lage eingeklemmt wird. Wenn
das Windenseil sich zu verklemmen droht, wieder
abspulen und den Vorgang wiederholen. Diesmal
jedoch etwas fester auf die Bremse treten.
8) Wenn Sie sich davon überzeugt haben, dass
das Windenseil korrekt auf die Windentrommel
aufgewickelt wird, Schritt 6 so lange wiederholen,
bis sich das Fahrzeug nur noch weniger als 2m
vom Windenankerpunkt entfernt be ndet. Wenn
der Abstand weniger als 2 m beträgt, langsam
den Fuß von der Bremse nehmen und dann
die Feststellbremse anziehen. Dadurch wird
sichergestellt, dass das Windenseil nicht unter
Belastung steht. Das Getriebe dann wieder in die
Parkposition schalten oder einen Gang einlegen
und den Fahrzeugmotor abschalten. Aus dem
Fahrzeug aussteigen. Den Haken vom Ankerpunkt
lösen. Halten Sie den mitgelieferten Hakengurt
fest und stellen Sie sicher, dass das Windenseil
weiterhin unter Spannung steht. Wickeln Sie das
Seil langsam durch mehrfaches kurzes Einschalten
der Wickelfunktion an der Fernsteuerung so
weit auf, dass der Haken weniger als 1m von der
Seilführung entfernt ist. Windenvorgang beenden
und den Haken an einem geeigneten Ankerpunkt
am Fahrzeug befestigen.
HINWEIS
Nicht den Haken in die Seilführung ziehen. Dadurch
könnte die Seilführung beschädigt werden.
Sobald der Haken an einer geeigneten Stelle am
Fahrzeug befestigt ist, wickeln Sie das Windenseil
durch mehrfaches kurzes Einschalten der Winde
an der Fernsteuerung weiter auf, bis das Seil fast
gespannt ist.
Prüfung
Nehmen Sie sich Zeit, um die Anleitung und/oder
Bedienungsanleitung und/oder Grundlegenden
Richtlinien zur Windentechnik zu lesen, um sich mit
der Winde und deren Betrieb vertraut zu machen.
Befestigungselemente prüfen und vergewissern,
dass sie fest und mit dem richtigen Drehmoment
angezogen sind.
Beschädigte Befestigungselemente ersetzen.
Vergewissern Sie sich, dass die Verkabelung aller
Komponenten korrekt ist, und stellen Sie sicher, dass
alle Anschlusspunkte fest sitzen.
Vergewissern Sie sich, dass keine freiliegenden/
blanken Drähte oder Anschlüsse oder schadhaften
Kabelisolierungen (Abrieb/Schnitte) vorhanden sind.
Alle freiliegenden Stellen mit Schutzmanschetten
abdecken. Schadhafte Stromkabel reparieren
oder erneuern.
Überprüfen Sie das Seil auf Schäden.
Das Seil bei Schäden sofort ersetzen.
Halten Sie Winde, Seil und Schalter schmutzfrei.
Entfernen Sie Schmutz und Rückstände mit
einem sauberen Tuch.
So lassen sich schwere oder tödliche
ACHTUNG
Verletzungen verhindern:
Windenseil immer entsprechend den Rotationsangaben
auf dem Trommelaufkleber aufspulen.
Seil immer von unten auf die Trommel aufspulen.
Seil nie von oben auf die Trommel aufspulen.
Vor dem ersten
Betrieb
Nach jedem
Einsatz
Alle 90 Tage
X
XX
XX
XX
XXX
X
Nehmen Sie sich die Zeit, um sich anhand der
Richtlinien zur Windentechnik im Lieferumfang
Ihrer Winde mit der Funktionsweise und dem
Windenbetrieb vollständig vertraut zu machen.
Für weitere Informationen oder bei Fragen
wenden Sie sich bitte an:
WARN INDUSTRIES, INC.
12900 S.E. Capps Road, Clackamas, OR USA 97015-
8903, 1-503-722-1200,
Kundendienst: 1-800-543-9276
Händlersuchdienst: 1-800-910-1122
oder besuchen Sie www.warn.com.
WARN INDUSTRIES
65 73203B0
WARN INDUSTRIES
73203B0 66
Page 36

INSTRUÇÕES ORIGINAIS
ÍNDICE DE SÍMBOLOS
Instalação do guincho PowerPlant e
Guia de Operações
Toda situação em que um guincho é usado apresenta o potencial de causar ferimentos. Para reduzir esse risco é importante ler, com atenção, este
guia e o Guia Básico de Técnicas de Operação de Guincho. Familiarize-se com a operação do guincho antes de usá-lo e tenha a segurança sempre
em mente. Este guia fornece importantes informações e instruções de segurança sobre como instalar o guincho. Leia o Guia Básico de Técnicas de
Operação de Guincho para obter informações sobre o guincho e as técnicas de armação adequadas.
Guarde este manual e outros materiais de consulta contidos neste kit, para consulta futura. Neste kit você encontra o seguinte material de leitura:
Guia de Instalação do Guincho, Guia Básico de Técnicas de Operação de Guincho, Especificação e Dados de Desempenho, Garantia do produto, Lista
das peças de reposição e outro material de leitura específico referente a alguns produtos. Se algum estiver faltando, visite www.warn.com ou entre
em contato conosco pelo número abaixo.
SUMÁRIO:
SEGURANÇA
Índice de símbolos ................................................................................................................................................................ 68
Precauções gerais de segurança ................................................................................................................................69-72
INSTRUÇÕES
Condições seguras de trabalho ........................................................................................................................................ 73
Conheça o guincho que está usando ............................................................................................................................ 74
Montagem ................................................................................................................................................................................75
Instalação da mangueira de ar e do filtro..................................................................................................................... 76
Conexões elétricas ................................................................................................................................................................ 77
Verificação do sistema ......................................................................................................................................................... 77
Instruções para a primeira operação ........................................................................................................................78-82
Operação do guincho .......................................................................................................................................................... 78
Operação do compressor de ar ...................................................................................................................... 78-79
Operação do cabo .............................................................................................................................................. 80-82
Análise final e manutenção .............................................................................................................................................. 83
SÍMBOLO EXPLICAÇÃO
Leia toda a literatura do
material
Sempre use proteção
para os ouvidos
e os olhos
Nunca use um guincho
como uma grua
Prenda a carga na
abertura do gancho
apropriadamente
Enrole o cabo no
fundo do tambor
Risco de esmagamento
de dedos/cabo guia
Risco de perfuração/corte
das mãos
Risco de explosão/
ruptura
Risco de superfície a ada
SÍMBOLO EXPLICAÇÃO
Sempre use
luvas de couro
Não transporte pessoas
Sempre use a correia de
gancho fornecida
Nunca aplique carga na
ponta ou na trava de
segurança do gancho
Nunca enrole o cabo por
cima do tambor
Ponto de aperto
do cabo guia
Risco de superfície
quente
Risco de incêndio
e explosão
Risco de peças móveis
WARN® e o logo tipo da WARN são ma rcas regi stradas da Wa rn Industr ies, Inc.
© 2013 Warn Industries, Inc.
WARN INDUSTRIES
67
Warn Industries Inc.
12900 S.E. Capps Road
Clackamas, OR 97015
EUA
Atendimento ao cliente: (800) 543-9276
Fax internacional: (503) 722-3005
Fax: (503) 722-3000
www.warn.com
Evite instalar cabos
elétricos perto de pontos
de aperto e desgaste/
abrasão
WARN INDUSTRIES
73203B0 68
Isole a ação exposta que
representa risco
Nunca prenda o gancho
no próprio cabo
Page 37

PRECAUÇÕES GERAIS DE SEGURANÇA
PRECAUÇÕES GERAIS DE SEGURANÇA
Advertências e cuidados
Durante a leitura destas instruções, você verá ADVERTÊNCIAS,
CUIDADOS, AVISOS e OBSERVAÇÕES. Cada mensagem tem uma
nalidade especí ca. ADVERTÊNCIAS são mensagens de segurança
que indicam uma situação possivelmente perigosa que, se não for
evitada, pode causar ferimentos graves ou morte. CUIDADOS são
mensagens de segurança que indicam uma situação possivelmente
perigosa que, se não for evitada, pode causar ferimentos leves ou
moderados. CUIDADO também pode ser usado para alertar contra
práticas inseguras. CUIDADOS e ADVERTÊNCIAS identi cam o tipo
de risco, como evitar esse risco e informam sobre as possíveis
consequências se o risco não for evitado. AVISOS são mensagens
para evitar danos patrimoniais. OBSERVAÇÕES sãoinformações
adicionais para ajudar a concluir um procedimento. TRABALHE DE
MANEIRA SEGURA!
ADVERTÊNCIA
RISCO DE ENROSCO NAS PEÇAS MÓVEIS
O não cumprimento destas instruções podecausar
ferimentos graves ou morte.
• Sempre veri que se o engate do gancho está fechado e se
não está sustentando carga.
• Nunca aplique carga na ponta ou no engate desegurança do
gancho Aplique carga somente nocentro do gancho.
• Nunca use um gancho cuja aber tura da curva tenha
aumentado ou cuja ponta esteja dobrada ou torta.
• Sempre use um gancho com engate de segurança.
• Sempre garanta que o operador e as pessoas ao redor
estejam cientes da estabilidade do veículo
e/ouda carga.
• Sempre mantenha o cabo do controle remoto conectado
e o cabo de alimentação afastado do tambor, do cabo e da
amarração. Veri que se há rachaduras, perfurações, os
corroídos ou conexões soltas. Os componentes dani cados
devem ser substituídos antes da operação.
• Sempre passe o o remoto pela janela quando usá-lo em um
veículo.
• Nunca prenda o gancho no próprio cabo
ADVERTÊNCIA
RISCO DE ENROSCO NAS PEÇAS MÓVEIS
O não cumprimento destas instruções podecausar
ferimentos graves ou morte.
Segurança geral:
• Sempre conheça seu guincho: leia com cuidado oGuia de
Instruções e/ou o Guia do Operador, e/ou o Guia Básico de
Técnicas de Operação de Guincho, para entender o guincho e
suas operações.
• Nunca exceda a capacidade nominal do guincho ou do cabo
de aço. Duplique a linha usando uma patesca para reduzir a
carga do guincho.
• Sempre use luvas grossas de couro ao manusear ocabo do
guincho.
• Nunca use o guincho ou o cabo do guincho para reboque.
Cargas de impacto podem dani car, sobrecarregar e romper o
cabo.
• Nunca use o guincho para segurar uma carga.
• Nunca opere este guincho quando estiver sob ain uência de
drogas, álcool ou medicamentos.
• Nunca opere o guincho se tiver menos de 16 anos.
Instalação segura:
• Sempre escolha um local de montagem su cientemente
resistente para suportar a capacidade máxima de tração do
guincho.
• Sempre use equipamento grau 5 (grau 8,8 métrico)
ousuperior.
• Nunca solde parafusos de montagem.
• Sempre use ferramentas, componentes e acessórios de
montagem aprovados.
• Nunca use parafusos longos demais.
• Sempre conclua a instalação do guincho e o engate
dogancho antes da instalação da ação.
• Sempre mantenha as mãos longe do cabo do guincho, da
alça do gancho, do gancho e da abertura do cabo guia durante
a instalação, a operação e o enrolamento/desenrolamento do
cabo.
• Sempre posicione o cabo guia com a etiqueta ADVERTÊNCIA
na parte de cima.
• Sempre estique o cabo de aço previamente e enrole
novamente sob carga antes do uso. O cabo rmemente
enrolado tem menos chance de "emaranhar-se", o que
poderia dani cá-lo.
ADVERTÊNCIA ADVERTÊNCIA
RISCO DE ENROSCO NAS PEÇAS MÓVEIS
O não cumprimento destas instruções pode causar
ferimentos graves ou morte.
Segurança na operação do guincho:
• Sempre inspecione o cabo do guincho, o gancho e as lingas antes de
operar o guincho. Cabos corroídos, dobrados ou dani cados devem
ser substituídos imediatamente. Os componentes dani cados devem
ser substituídos antes da operação. Proteja as peças contra danos.
• Sempre remova todos os elementos ou obstáculos que possam
interferir na operação segura do guincho.
• Sempre tenha certeza de que a xação que você selecionou irá
suportar a carga e que a correia ou acorrente não deslizará.
• Sempre use a correia de gancho fornecida ao enrolar ou desenrolar o
cabo do guincho durante a instalação e a operação.
• Sempre exija que o operador e as pessoas ao redor estejam cientes da
estabilidade do veículo e/ou da carga.
• Sempre esteja ciente da estabilidade do veículo e da carga durante
a operação do guincho. Mantenha as outras pessoas afastadas. Alerte
todas as pessoas ao redor no caso de uma condição instável.
• Sempre desenrole a maior quantidade possível de cabo do guincho
durante a ajustagem. Duplique a linha ou selecione um ponto de
xação mais afastado.
• Sempre demore o tempo necessário para usar astécnicas de
ajustagem adequadas para a tração do guincho.
• Nunca toque no cabo do guincho ou no gancho quando outra pessoa
estiver utilizando o painel decomandos ou durante a operação do
guincho.
• Nunca engate ou desengate a embreagem se o guincho estiver sob carga,
o cabo de aço estiver tensionado ouotambor do cabo de aço estiver em
movimento.
• Nunca toque no cabo do guincho ou no gancho enquanto estiverem
sob tensão ou carga.
• Sempre se mantenha afastado do cabo do gancho eda carga e
mantenha as pessoas afastadas durante a operação do guincho.
• Nunca use o veículo para puxar carga com o cabo doguincho. Cargas
combinadas ou de impacto podem dani car, sobrecarregar e romper
o cabo.
• Nunca prenda o cabo do guincho nele mesmo.
• Useuma corrente tipo choker ou um protetor detronco de ár vore na
xação.
RISCO DE QUEDA OU ESMAGAMENTO
O não cumprimento destas instruções pode causar
ferimentos graves ou morte.
• Sempre permaneça afastado, mantenha as mãos afastadas e
mantenha as outras pessoas afastadas.
• Nunca opere o guincho com menos de 5 voltas docabo ao redor do
tambor. O cabo pode se soltar do tambor, pois a xação do cabo no
tambor não foi projetada para sustentar uma carga.
• Nunca use o guincho como uma grua ou para suspender uma carga.
• Sempre con ra se a xação suportará a carga, useaajustagem
correta e pare para fazer a ajustagem adequada.
• Nunca use o guincho para elevar ou transportar pessoas.
• Nunca use esforço excessivo para a movimentação livre do cabo do
gancho.
• Sempre use a técnica de posicionamento/elevação correta ou peça
ajuda ao manusear e instalar o produto.
• Sempre enrole o cabo no tambor na direção especi cada pela
etiqueta de advertência do guincho que se encontra no guincho e/
ou na documentação. Isso é necessário para que o freio automático
(seequipado) funcione corretamente.
• Sempre enrole o cabo do guincho no tambor, conforme indicado
pela etiqueta de rotação do tambor.
• Enrole sempre o cabo na par te inferior (lado de montagem) do
tambor.
• Nunca enrole o cabo por cima do tambor.
• Sempre enrole o cabo no tambor na direção especi cada pelas
etiquetas de rotação do guincho localizadas no guincho e/ou na
documentação. Isso é necessário para que o freio automático (se
equipado) funcione corretamente.
ADVERTÊNCIA
RISCO DE CORTES E QUEIMADURAS
O não cumprimento destas instruções pode causar
ferimentos graves ou morte.
Para evitar ferimentos nas mãos ou nos dedos:
• Sempre use luvas grossas de couro ao manusear ocabo do guincho.
• Sempre esteja atento a possíveis superfícies quentes no motor,
tambor ou cabo do guincho durante ou após o uso do guincho.
WARN INDUSTRIES
69 73203B0
WARN INDUSTRIES
73203B0 70
Page 38

ATENÇÃO
PRECAUÇÕES GERAIS DE SEGURANÇA
ATENÇÃO
PRECAUÇÕES GERAIS DE SEGURANÇA
ADVERTÊNCIA
CUIDADO
PERIGO DE EXPLOSÕES OU RISCO DE INCÊNDIO
O não cumprimento destas instruções pode
resultar em ferimentos graves ou em morte.
• Utilizar o compressor numa área sempre bem ventilada,
sem materiais combustíveis, gasolina ou vapores.
• Armazenar sempre os materiais in amáveis num local
seguro, afastados do compressor.
• Nunca restringir nem bloquear nenhuma das aberturas da
ventilação do compressor.
• Nunca fazer funcionar a unidade no interior nem num
recinto fechado.
• Nunca permitir que o compressor funcione sem vigilância.
• Nunca colocar objectos contra ou em cima do compressorr.
ATENÇÃO
RISK OF BURNSRISCO DE QUEIMADURAS
O não cumprimento destas instruções pode
resultar em ferimentos graves ou em morte.
• Nunc a tocar em peças metálicas expostas no compressor
durante ou imediatamente após o seu funcionamento. O
compressor permanecerá quente durante vários minutos após
terminado o funcionamento.
• Não tentar agarrar ou tocar em nenhuma superfície em redor da
capa protectora nem tentar efectuar serviço de manutenção até
que a unidade tenha tido oportunidade de arrefecer.
RISCO DE REBENTAMENTO
O não cumprimento destas instruções pode
resultar em ferimentos graves ou em morte.
• Drenar sempre o refrigerador intermediário diariamente
ou após cada utilização. Se ocorrer uma fuga no refrigerador
intermediário, substituir imediatamente por um novo ou
substituir o compressor completamente.
• Nunc a perfurar, soldar ou efectuar quaisquer modi cações no
refrigerador intermediário ou nos seus acessórios.
• Nunc a efectuar ajustamentos nem substituir peças para alterar
as pressões de funcionamento de nidas de fábrica.
• Nunc a exceder a classi cação nominal de pressão para as
ferramentas de ar, acessórios operados por ar, pneus e outros
elementos insu áveis.
• Instalar sempreum regulador de pressão e um manómetro
na saída de ar (caso não equipado) do seu compressor se for
necessário o controlo de ar.
• Observar sempre as recomendações do fabricante do
equipamento.
• Nunc a exceder a classi cação máxima de pressão permitida dos
acessórios.
• Nunc a usar o compressor para encher de ar pequenos objectos
de baixa pressão, como por exemplo, brinquedos de crianças,
bolas de futebol, basquetebol, etc.
ATENÇÃO
RISCO DE OBJECTOS PROJECTADOS
O não cumprimento destas instruções pode
resultar em ferimentos graves ou em morte.
• Always wear ANSI Z87.1 approved safety glasses accessories.
• Usar sempre óculos de protecção com guardas
laterais aprovados pelas normas ANSI Z87.1, durante o
manuseamento do compressor de ar.
• Nunca apontar um bocal ou pulverizador para qualquer
parte do corpo ou para outras pessoas ou animais.
• Desligar sempre o compressor e drenar a pressão da
mangueira de ar e do refrigerador intermediário antes de
tentar proceder ao serviço de manutenção, ou de fazer a
conexão de ferramentas ou acessórios.
PRODUTOS QUÍMICOS E RISCO DE INCÊNDIO
O não cumprimento destas instruções pode causar
ferimentos graves ou morte.
• Sempre retire joias e bijuterias e use proteção para os olhos.
• Nunca encaminhe os cabos elétricos por super fícies a adas.
• Nunca encaminhe cabos elétricos per to de peças que
esquentam.
• Nunca encaminhe cabos elétricos através de ou perto de
peças móveis.
• Sempre coloque as capas de terminal fornecidas nos os e
terminais conforme mostrado nas instruções de instalação.
• Nunca se debruce sobre a bateria ao efetuar asligações.
• Nunca encaminhe os cabos elétricos sobre os terminais da
bateria.
• Nunca provoque curto nos terminais da bateria com objetos
de metal.
• Sempre veri que se a área está livre de linhas de
combustível, tanques de combustível, linhas de freio, ação
elétrica, etc. ao perfurar.
• Sempre consulte o manual do operador para obter detalhes
sobre a ação correta.
• Sempre isole e proteja todos os terminais elétricos e ações
expostos.
CUIDADO
RISCO DE CORTES E QUEIMADURAS
O não cumprimento dessas instruções pode causar
ferimentos leves ou moderados.
• Nunca deixe o cabo do guincho deslizar por suas mãos.
RISCO DE ENROSCO NAS PEÇAS MÓVEIS
O não cumprimento dessas instruções pode causar
ferimentos leves ou moderados.
Para evitar ferimentos nas mãos ou nos dedos:
• Nunca deixe o controle remoto onde possa ser ativado
durante a movimentação livre, a ajustagem ou quando o
guincho não estiver em uso.
• Nunca deixe o controle remoto do guincho conectado
durante a instalação, movimentação livre, ajustagem,
manutenção ou quando o guincho não estiver em uso.
AVISO
EVITE DANOS AO EQUIPAMENTO
E AO GUINCHO
• Sempre evite trações laterais que possam resultar
emacúmulo do cabo do guincho em uma das extremidades
do tambor. Isso pode dani car o cabo do guincho ou o
guincho.
• Sempre garanta que a embreagem esteja totalmente
engatada ou desengatada.
• Sempre tenha cuidado para não dani car o chassi durante a
xação a um veículo ao operar o guincho.
• Nunca mergulhe o guincho em água.
• Sempre armazene o controle remoto em uma área
protegida, limpa e seca.
WARN INDUSTRIES
71 73203B0
WARN INDUSTRIES
73203B0 72
Page 39

CONDIÇÕES SEGURAS DE TRABALHO
CONHEÇA O GUINCHO QUE ESTÁ USANDO
Este manual fornece instruções para a instalação
do sistema de guincho WARN e as instruções
iniciais de operação. Leia o Guia Básico de
Técnicas de Operação de Guincho para obter as
instruções operacionais completas do sistema de
guincho WARN.
Segurança
Ao instalar o sistema de guincho WARN, leia e
siga as instruções de montagem e segurança.
O operador deve sempre operar o guincho de
uma posição segura ao puxar uma carga. As áreas
seguras são: (1) Perpendicular ao cabo de aço, (2)
Dentro do veículo com o capô levantado (se o
guinho estiver montado na dianteira do veículo).
Essas posições seguras ajudam a evitar que o
cabo de aço atinja o operador, se o cabo falhar
quando estiver submetido a uma carga.
Opere o guincho com a extensão do cabo
do controle remoto totalmente estendida,
sempre que possível. O operador deve sempre
estar a pelo menos 2,5 m do guincho durante o
funcionamento. Isso evita o emaranhamento com
o cabo guia e mantém o operador fora de perigo
durante a tração da carga pelo guincho.
Nunca trabalhe ao redor do cabo de aço
enquanto ele estiver sob carga.
Tenha sempre cuidado ao trabalhar com
eletricidade, e lembre-se de verificar para que não
haja conexões elétricas expostas antes de ligar o
circuito do guincho.
Para obter as especificações e dados de
desempenho, consulte a folha de especificações
que acompanha o guincho.
Sinais sonoros
O guincho foi projetado de forma que os sinais
sonoros não excedam 70 dBa emitidos da estação
do operador. O operador deve estar a pelo menos
2,5 do guincho durante a operação. Se o guincho
exceder 70 dBa da estação do operador, solicite
que o guincho seja inspecionado na central de
serviços autorizada.
Conheça o guincho que está usando.
Para começar, familiarize-se com o guincho WARN e com cada um dos seus componentes:
Soquete remoto
Contator
Porta de acesso do ar
Alavanca da embreagem
Transmissão
Motor
(Trem de engrenagem)
Cabo
Kit de acessórios
de ar
Seletor do modo
Tambor do
guincho
Kit de mangueiras
Controle remoto
Motor: O motor do guincho é acionado pela bateria do veículo. O motor fornece energia para o
mecanismo da engrenagem que gira o tambor do guincho e enrola o cabo do guincho.
Seletor do modo: O seletor do modo permite alternar entre a operação do guincho e do compressor.
Cabo: O diâmetro e o comprimento do cabo de aço são determinados pelo design e pela capacidade de
carga do guincho. Enrolado em volta do tambor do guincho e alimentado através do cabo-guia,
o cabo é enrolado na extremidade para aceitar o pino da forquilha do gancho.
Tambor do guincho: O tambor do guincho é o cilindro no qual os cabos de aço são colocados. O tambor é acionado
pelo motor e pelo sistema de trem de engrenagens. Sua direção pode ser alterada usando o
controle remoto.
Trem de engrenagens: A engrenagem de redução converte a energia do motor do guincho em uma grande força de
tração. O design do trem de engrenagens torna possível que o guincho seja mais leve e mais
compacto.
Alavanca da A embreagem permite ao operador desengatar manualmente o tambor de enrolamento do
embreagem: trem de engrenagens, fazendo com que o tambor gire livremente (conhecido como “livre
movimentação”). Engatar a embreagem “trava” o tambor do guincho novamente no trem de
engrenagens.
Porta de acesso do ar: A porta de borracha com a indicação “AIR” no lado do trem de engrenagem do PowerPlant pode
ser puxada para fora para acesso à ligação de ar de conexão rápida.
Soquete remoto: O soquete remoto é onde o operador liga o controle remoto com fio ou o receptor do controle
remoto sem fio (opcional), para controlar o guincho.
Contator: Usando a energia elétrica da bateria do veículo, as chaves do contator do sistema de controle
acionam o motor, permitindo ao operador mudar a direção da rotação do tambor do guincho.
Controle remoto: O controle remoto se conecta ao sistema de controle do guincho por meio do soquete remoto,
permitindo ao operador controlar a direção do guincho, bem como se manter bem afastado
do cabo de aço durante o funcionamento do guincho. O controle remoto também possui um
interruptor para ligar e desligar o compressor.
Kit de acessórios de ar: Contém mangueira, mandril para pneu, medidor de pressão de pneus e uma peça de
desconexão rápida para todas as necessidade do suprimento do ar de enchimento.
Kit da mangueira de Quando instalada no guincho fornece ar limpo para o compressor a partir do compartimento do
entrada do ar: motor.
de entrada de ar
WARN INDUSTRIES
73 73203B0
WARN INDUSTRIES
73203B0 74
Page 40

MONTAGEM
CONEXÃO DA ENTRADA DE AR
Etapa 1 - Montagem do guincho
Os kits de montagem do guincho estão
disponíveis no seu Revendedor WARN, e atendem
a praticamente todas as aplicações. Para obter
informação sobre os kits disponíveis, entre em
contato com o representante do produto WARN.
Para obter o desempenho e resultados ideais,
AVISO
recomendamos o uso das chapas de montagem da WARN.
CUIDADO
acidentalmente causando lesões graves, conclua a instalação
do guincho e engate o gancho antes de instalar a ação.
ADVERTÊNCIA
su cientemente resistente para suportar a capacidade máxima
de tração do guincho.
ADVERTÊNCIA
ADVERTÊNCIA
direção especi cada pelas etiquetas de rotação do guincho
localizadas no guincho e/ou na documentação. Isso é
necessário para que o freio automático (se equipado)
funcione corretamente.
ADVERTÊNCIA
(lado de montagem) do tambor.
Somente as orientações de montagem
mostradas são possíveis para a operação segura
do guincho (Consulte os diagramas mostrados
para uma orientação de montagem adequada).
Todas as outras são incorretas e inadequadas. Os
detalhes de montagem indicam os valores corretos
de torque.
Para evitar que o guincho seja ativado
Sempre escolha um local de montagem
Nunca use parafusos longos demais.
Sempre enrole o cabo no tambor na
Enrole sempre o cabo na parte inferior
Padrão do parafuso de montagem:
Padrão: 10” x 4,5”, 254 mm x 114,3 mm
Escolha um local de montagem suficientemente
resistente para suportar a capacidade máxima de
tração do guincho.
ADVERTÊNCIA
parafuso exigido, para garantir o engate adequado
da rosca.
Espessura da
placa
Sempre con ra o comprimento do
Comprimento
do parafuso
7 mm (1/4”) 32 mm (1,25”)
10 mm (3/8”) 40 mm (1,5”)
13 mm (1/2”) 40 mm (1,5”)
Orientação de montagem:
Este guincho foi projetado somente para montagem na
AVISO
con guração pés para baixo.
Etapa 2 - Instalação da mangueira de
entrada de ar e do ltro
1. Localize o contéudo do kit da mangueira de ar.
Coloque o pequeno grampo da mangueira na
extremidade da mangueira de entrada.
grampo da
mangueira
2. Conecte a conexão enrolada no filtro da entrada
de ar.
3. Pelo lado de trás do guincho, localize a conexão
da mangueira no cabeçote do compressor e
empurre a mangueira para garantir a fixação.
5. Passe a mangueira de entrada de ar pelas
aberturas da grade do veículo ou do parachoque para dentro do compartimento do
motor.
6. Instale o filtro na extremidade da mangueira.
O uso das combinações recomendadas do
parafuso e arruela de encosto com torque de acordo
com os níveis recomendados evita a vibração
durante a operação. Especificações relacionadas
abaixo. O sistema de montagem determina o
cumprimento do parafuso.
Detalhes da montagem:
(1) Liso e plano, espessura = 1/4” (6,4 mm)
(2) Arruela de encosto de 3/8” (9,525 mm) X 4
(3) parafuso longo de 3/8-16 X 1 1/4”, grau 5 X 4
Torque de 41-47 Nm
WARN INDUSTRIES
75 73203B0
7. Monte o filtro o mais alto possível. Use os
4. Aperte a abraçadeira com firmeza.
WARN INDUSTRIES
73203B0 76
fixadores fornecidos ou outra forma de fixar a
mangueira e o filtro.
Aperte o xador com rmeza
Page 41

CONEXÕES ELÉTRICAS
INSTRUÇÕES PARA A PRIMEIRA OPERAÇÃO
Etapa 3 - Instalação do guincho
ADVERTÊNCIA
Sempre coloque as capas de terminal fornecidas nos os e
terminais conforme especi cado nas instruções de instalação.
ADVERTÊNCIA
por incêndio nos sistemas elétricos:
ADVERTÊNCIA
elétricos e ações expostos.
Use as capas de isolamento inclusas nas
conexões expostas para evitar curtos elétricos.
Direcione os cabos de conexão da bateria para áreas
onde não se desgastem pelo atrito ou penetrem no
isolamento podendo provocar um curto-circuito.
Ao concluir a instalação, verifique se o guincho
está funcionando corretamente.
Recomendações sobre a bateria
Uma bateria totalmente carregada e boas
conexões são extremamente importantes para a
operação correta do guincho. O requisito mínimo
para uma bateria de 12 volts CC é de 650 A em
partida a frio.
vermelho
183cm
Para evitar ferimentos severos ou morte.
Para evitar ferimentos graves ou morte
Nunca passe cabos elétricos por superfícies a adas.
Nunca passe cabos elétricos perto de peças que
esquentam.
Nunca passe cabos elétricos através de ou perto de
peças móveis.
Evite pontos de aperto e desgaste/abrasão quando
instalar todos os cabos elétricos.
Sempre isole e proteja todos os terminais
Cabo
Cabo preto 183cm
Diagrama elétrico
Etapa 4 - Veri cação do sistema
Faça a veri cação do sistema:
• Verifique os fixadores para que estejam firmes e
com o aperto correto.
•
Veri que se a ação de todos os componentes
está correta e se as conexões estão rmes.
•
Veri que se há os expostos/descascados,
terminais ou isolamento de cabos dani cados.
• Verifique a rotação do motor: o guicho deve
funcionar e rodar segundo a direção indicada
na etiqueta de rotação do tambor. Se o guincho
girar na direção oposta, verifique novamente as
conexões elétricas.
• Verifique a direção do cabo: enrole sempre o
cabo na parte inferior (lado de montagem) do
tambor.
Depois de fazer uma veri cação do sistema você
estará pronto para con rmar o funcionamento
do guincho. Prossiga para as seções deste livreto,
Instruções para a primeira operação do guincho,
Instruções de operação do compressor de ar e
Análise nal e manutenção.
Etapa 5 - Instruções para a primeira
operação
Operação do guincho:
ADVERTÊNCIA
guincho e suas operações, revisando o Guia básico de Técnicas
de Operação do Guincho que acompanha o guincho.
Botão de controle remoto
Não deixe o controle remoto conectado ao
guincho quando não estiver em uso. Se o controle
remoto permanecer conectado pode causar uma
condição perigosa e/ou o descarregamento da
bateria
Interruptor do controle do guincho
O minibalancim maior situado no cabo do
controle remoto controla as operações de
enrolamento e desenrolamento do guincho. Este
guincho só opera quando o Seletor do modo está
na posição com o símbolo “Guincho”.
Indicador da temperatura do motor e desligamento
Após o uso intenso e prolongado, o motor
aquece consideravelmente. Para evitar danos
ao motor devido ao acesso de calor, há um
dispositivo de proteção términa no motor.
Quando o ponto de temperatura alta definido
na fábrica é atingido, esse dispositivo desliga o
motor e faz piscar a luz indicadora situada no
controle remoto.
A função de enrolamento e o compressor
do guincho não operam, mas a função de
desenrolamento do guincho opera caso seja
Sempre se familiarize totalmente com o
SAÍDA
ENTRADA
Interruptor do controle do guincho
necessário liberar a carga. Após o motor resfriar o
guincho volta a operar normalmente.
Operação da embreagem
Quando a embreagem estiver engatada, o
trem de engrenagens é acoplado ao tambor do
cabo de aço e a energia pode ser transferida
do motor do guincho. Quando a embreagem
é desengatada, ela está na posição de
movimentação livre. O trem de engrenagens
e o tambor do cabo de aço são desacoplados
permitindo que o tambor gire livremente.
A alavanca da embreagem, localizada no
alojamento do guincho no lado oposto do motor,
controla o engate da embreagem. Para evitar
danos, sempre engate ou desengate totalmente
a alavanca da embreagem.
Desengatado
Engatado
Operação do compressor de ar:
ADVERTÊNCIA
a pressão da mangueira de ar e do intercooler antes de tentar fazer a
manutenção, xar ferramentas ou acessórios.
ADVERTÊNCIA
direção ao corpo ou a outras pessoas ou animais.
ADVERTÊNCIA
ANSI Z87.1 com protetores laterais ao utilizar o compressor de ar.
ADVERTÊNCIA
superfície em redor das capas protetoras nem tente efetuar a
manutenção até que a unidade tenha tido oportunidade de resfriar.
ADVERTÊNCIA
compressor expostas durante ou logo após a operação.
Sempre desligue o compresso de ar e retire
Nunca aponte bocais ou vaporizadores em
Sempre use óculos de segurança aprovados
Nunca tente agarrar ou tocar em uma
Nunca toque em partes metálicas do
Seleção do modo do compressor
Gire o botão do seletor de modo para o
símbolo “Compressor de Ar”. Retire a porta de
acesso do ar e conecte a mangueira de ar na
ligação de conexão rápida.
WARN INDUSTRIES
77 73203B0
WARN INDUSTRIES
73203B0 78
Page 42

INSTRUÇÕES PARA A PRIMEIRA OPERAÇÃO
INSTRUÇÕES PARA A PRIMEIRA OPERAÇÃO
Porta de acesso do ar
A porta de borracha com a indicação “AIR”
no lado do trem de engrenagem do PowerPlant
pode ser puxada para fora possibilitando o
acesso à ligação de ar de conexão rápida. Antes
da operação do compressor, uma mangueira de
ar deve estar ligada na conexão. Durante toda
operação do guincho é preciso deixar a conexão
aberta sem uma mangueira conectada. Se
houver uma mangueira conectada durante a
operação do guincho, a pressão de ar aumenta
na unidade e o interruptor de pressão desliga
o motor. Recomenda-se que a porta esteja no
lugar o tempo todo, exceto durante a operação
do compressor.
Porta de
acesso do ar
Válvula de alívio
Se o interruptor de pressão não desligar
o compressor quando atingir o ajuste de
“desligamento” da pressão, a válvula de alívio
protegerá contra a pressão alta, abrindo perto
dos 8,5 bar.
A válvula de alívio deve ser operada
manualmente uma vez por mês, para conferir
se ela está se movimentando livremente e
funcionando. Ela está localizada abaixo e atrás da
conexão de ar. Puxe momentâneamente o anel
de metal .
Drenagem do intercooler
É normal que haja condensação acumulada
no intercooler. Ela pode ser drenada na altura da
válvula de alívio, puxando o anel de metal. Isso
deve ser feito depois de cada 10 horas de uso
ou depois de um período prolongado em que
esteve no depósito.
Conexão da mangueira de ar
Seletor do modo
1. O kit de acessórios do compressor WARN
fornece tudo que é necessário para personalizar
seu compressor para vários usos.
Interruptor do compressor
Conecte o controle remoto. O minibalacim
menor liga e desliga o compressor. Ele só pode
ser usado quando o seletor do modo está na
posição com o símbolo “compressor de ar”.
2. Os adaptadores da mangueira de ar podem ser
facilmente trocados para modificar a mangueira
Interruptor do compressor
Intercooler
O intercooler fornece uma pequena câmara
de ar que reduz a temperatura do ar na conexão
rápida. Um interruptor de pressão e uma válvula
de alívio estão montados no intercooler.
de ar do compressor, permitindo que haja
várias conexões. Usando uma chave, retire um
dos acopladores fêmea existentes.
Interruptor de pressão
O interruptor de pressão desliga
automaticamente o compressor quando atinge
a pressão de “desligamento” definida na fábrica,
com cerca de 7 bar. Quando a pressão cai para
o nível de “ligamento” com cerca de 5 bar, o
compressor volta a funcionar.
WARN INDUSTRIES
79 73203B0
3. Usando uma chave, conecte o acoplador
macho.
manualmente suficiente cabo do guincho para
a operação do guincho. Consulte O Guia Básico
de Técnicas de Operação de Guincho para mais
informações.
AVISO
cabo sem deixar o guincho esfriar por 20 minutos antes de enrolar
o cabo novamente. Em vez disso, coloque aembreagem em livre
movimentação e puxe o cabo para fora manualmente.
fornecida quando enrolar ou desenrolar o cabo do guincho,
durante ainstalação ou operação para evitar ferimentos nas
mãos ou nos dedos.
Enrolamento sob carga
4. O conjunto completo de mangueira pode ser
usado como uma extensão de mangueira,
ou com a maioria dos compressores de ar
independentes.
linha do guincho.
firme no tambor. Isso impede que as voltas externas
do cabo do guincho se prendam nas voltas internas,
emperrando e danificando o cabo de aço.
obotão de controle para remover a folga do cabo
de aço. Ascargas repentinas podem exceder
momentaneamente as capacidades do guincho
e do cabo de aço.
Enrolamento em condição sem carga
ounogancho quando outra pessoa estiver utilizando o painel
de comandos ou durante a operação do guincho.
Enrolamento com um assistente: peça ao assistente
que segure a correia do gancho aplicando o
CORDA FUNCIONAMENTO
Desenrolamento
ADVERTÊNCIA
de5voltas do cabo ao redor do tambor. O cabo pode se soltar
do tambor, pois a xação do cabo no tambor não foi projetada
para sustentar uma carga.
ADVERTÊNCIA
do cabo do guincho, da alça do gancho, do gancho e da
abertura do cabo guia durante a instalação, a operação e o
enrolamento/desenrolamento do cabo.
ADVERTÊNCIA
aomanusear o cabo do guincho.
Movimentação livre é geralmente a maneira
mais rápida e fácil de se desenrolar cabos de aço.
Antes de desenrolar os cabos do guincho com
a movimentação livre, recolha a quantidade de
cabo suficiente para remover toda tensão exercida
no cabo. Desengate aembreagem. Em seguida,
execute a movimentação livre desenrolando
WARN INDUSTRIES
73203B0 80
Nunca opere o guincho com menos
Sempre mantenha as mãos longe
Sempre use luvas grossas de couro
máximo possível de tensão constante no cabo do
guincho. Mantendo a tensão, o assistente deve
caminhar em direção ao guincho enquanto você
opera o enrolamento do botão de controle no
cabo. Libere obotão
no mínimo 2 m (6pés) da abertura do cabo guia.
orientado abaixo.
Enrolamento independente: posicione o cabo de
forma que ele não que dobrado ou emaranhado
quando for enrolado. Veri que se todo o cabo
do guincho no tambor está distribuído em
camadas de maneira uniforme e rme. Enrole
uma quantidade de cabo do guincho su ciente
para preencher a próxima camada completa
no tambor. Aperte e alinhe a camada. Repita o
processo até que o gancho esteja a no mínimo 2
m (6 pés) da abertura do cabo guia.
orientado abaixo.
NÃO desenrole com o motor com mais de 9 m (30pés) de
ADVERTÊNCIA
ADVERTÊNCIA
Enrole o cabo do guincho de maneira uniforme e
Evite cargas repentinas ao enrolar, pulsando
ADVERTÊNCIA
Enrole o restante para armazenamento conforme
Enrole o restante para armazenamento conforme
Sempre use a correia do gancho
Nunca exceda a tração nominal da
Nunca toque no cabo do guincho
quando o gancho estiver a
Page 43

INSTRUÇÕES PARA A PRIMEIRA OPERAÇÃO
INSTRUÇÕES PARA A PRIMEIRA OPERAÇÃO
Enrolamento do restante para armazenamento
Quando o gancho estiver a 2 m (6 pés) do cabo
guia, desconecte o gancho da xação ou da
carga. Segure a correia do gancho fornecido
e mantenha a tensão no cabo do guincho.
Lentamente, acione o guincho “pulsando” o botão
de acionamento no controle remoto até que o
gancho esteja a 1 m (3pés) docabo guia.
Pare a operação do guincho e acople o gancho
aum ponto de fixação adequado no veículo.
AVISO
Não deixe o gancho entrar no cabo guia. Isso pode causar
danos ao cabo guia.
Depois que o gancho estiver acoplado
corretamente ao veículo, acione a folga
remanescente no cabo do guincho “pulsando” o
botão de acionamento no controle remoto até que
haja uma folga mínima no cabo do guincho.
Sobrecarga/superaquecimento
Este guincho foi classificado para trabalho
intermitente. Quando o motor se aproxima da
rotação de parada o calor aumenta bruscamente,
o que pode causar danos ao motor.
A armação com linha dupla (consulte O Guia
Básico de Técnicas de Operação de Guincho)
reduz o nível de amperagem e o acúmulo de calor
no motor. Isso permite um uso contínuo mais
prolongado.
PARA ESTICAR O CABO DO GUINCHO
ADVERTÊNCIA
Sempre estique o cabo de aço
previamente e enrole novamente sob carga antes do
uso. Ocabo rmemente enrolado tem menos chance
de“emaranhar-se”, o que poderia dani cá-lo.
ADVERTÊNCIA
Nunca opere o guincho com menos
de5voltas do cabo ao redor do tambor. O cabo pode se soltar
do tambor, pois a xação do cabo no tambor não foi projetada
para sustentar uma carga.
A vida útil de um cabo do guincho está
diretamente relacionada ao uso e aos cuidados que
ele recebe. Durante o primeiro uso, um novo cabo
do guincho deve ser enrolado no seu tambor sob
uma carga de pelo menos 454 kg. (1000 lb). Siga as
instruções abaixo para esticar corretamente o cabo
no tambor do guincho.
1) Escolha um local PLANO e NIVELADO que seja
grande o su ciente para passar toda a extensão
do cabo do guincho.
2) Coloque a alavanca da embreagem do guincho
na posição “Free Spool” (movimentação livre).
Desenrole o cabo do guincho deixando pelo
menos 5 voltas no tambor. Depois que cabo do
guincho for desenrolado, coloque a alavanca da
embreagem do guincho na posição “Engaged”
(engatada).
3) Acople a extremidade do gancho do cabo
em umponto de xação adequado e afaste o
veículo doponto de xação até que haja uma
pequena folga no cabo do guincho. Antes de sair
do veículo, acione o freio de estacionamento,
coloque o veículo em ponto morto ou
estacionamento e desligue o veículo.
4) Conecte o controle remoto ao guincho. Parado
a aproximadamente 2, 44 m (8 pés) do guincho,
acione o guincho até que toda a folga seja
enrolada no tambor do guincho. Desconecte o
controle remoto do guincho. Mantenha a tensão
no cabo do guincho com uma mão; pressione
cuidadosamente o cabo do guincho na lateral
do tambor. O cabo do guincho é acoplado para
que não haja folgas entre cada volta no tambor.
Veri que se o cabo do guincho está desenrolado
na parte de baixo do tambor, não na parte de
cima, ou o freio automático de retenção de carga
não funcionará corretamente. (Se o cabo do
guincho estiver desenrolando na parte superior,
vocêcolocou o guincho na posição “desativada”
em vez de “ativada” no controle remoto).
5) Para uma segurança adequada, as etapas
a seguir devem ser executadas por duas
pessoas. Se você tentar aplicar tensão no cabo
do guincho sozinho, sempre acione o freio de
estacionamento, coloque a transmissão em
ponto morto e desligue oveículo toda vez que
sair para inspecionar o cabo do guincho. Nunca
saia do veículo com carga no cabo do guincho. O
tensionamento do cabo do guincho é importante
para garantir uma vida longa do produto. O
tensionamento do cabo do guincho impedirá que
as camadas externas do cabo do guincho sejam
comprimidas e deformem as camadas internas.
6) Tome cuidado para enrolar uniformemente
cada camada para evitar danos ao cabo.
7) Passe o controle remoto através da janela do
motorista para que o motorista do veículo possa
operá-lo. Oriente seu assistente para car ao lado
do veículo e afastado do cabo do guincho. Seu
assistente deve sinalizar para você se o cabo do
guincho está enrolando corretamente, o que faz
ao observar o movimento do cabo guia enquanto
ocabo do guincho está sendo acionado Dê a
partida no veículo e coloque a transmissão no
ponto morto. Libere o freio de estacionamento
enquanto aplica pressão moderada no pedal do
freio.
Pressione “power-in” no botão do controle
remoto. Depois de operar o guincho por
aproximadamente 2 m (6 pés), interrompa a
operação. Lentamente, solte o pedal do freio e,
em seguida, aplique o freio de estacionamento.
Isso garante que não haja nenhuma carga no
cabo do guincho. Depois, coloque a transmissão
em estacionamento ou engatada e desligue o
veículo. Saia do veículo e inspecione o guincho
para ter certeza de que o cabo do guincho está
sendo enrolado uniformemente no tambor do
guincho e não está se encaixando na camada
mais baixa. Se o cabo do guincho estiver
encaixando, desenrole-o e repita esta etapa
desde o início com mais pressão no pedal do
freio.
8) Quando você estiver convencido de que
o cabo de aço está enrolando corretamente
no tambor do guincho, repita a etapa 6 até o
veículo estar a 2m (6 pés) da xação do guincho.
Quando estiver a 2 m (6 pés), lentamente solte
o pedal do freio e, em seguida, aplique o freio
de estacionamento. Isso garante que não haja
nenhuma carga no cabo do guincho. Depois,
coloque a transmissão em estacionamento ou
engatada e desligue o veículo. Saia do veículo.
Desconecte o gancho da xação. Enquanto
segura a correia do gancho fornecida, mantenha
a tensão no cabo do guincho elentamente
acione o guincho, “pulsando” o botão de
acionamento no controle remoto até que o
gancho esteja a 1 m (3 pés) do cabo guia. Pare
a operação do guincho e acople o gancho a um
ponto de xação adequado no veículo.
AVISO
Não deixe o gancho entrar no cabo guia. Isso pode causar
danos ao cabo guia.
Depois que o gancho estiver acoplado
corretamente ao veículo, acione a folga
remanescente no cabo do guincho “pulsando” o
botão de acionamento no controle remoto até que
haja uma folga mínima no cabo do guincho.
WARN INDUSTRIES
81 73203B0
WARN INDUSTRIES
73203B0 82
Page 44

MANUTENÇÃO E ANÁLISE FINAL
Veri car
Leia com cuidado o Guia de Instruções
e/ou Guia do Operador, e/ou o Guia Básico
de Técnicas de Operação de Guincho, para
entender o guincho e suas operações.
Veri que os xadores para que estejam rmes
e com o aperto correto.
Substitua os xadores dani cados.
Veri que se a ação de todos os componentes
está correta e se as conexões estão rmes.
Veri que se há os expostos/descascados,
terminais ou isolamento de cabos dani cados
(por atrito/cortes).
Cubra as áreas expostas com capas de
terminais. Conserte ou substitua cabos
elétricos dani cados.
Veri que se há danos no cabo.
Substitua o cabo imediatamente se ele
estiver dani cado.
Mantenha o guincho, o cabo e o controle
do interruptor livre de contaminantes.
Use um pano limpo ou toalha para remover
toda sujeira e detritos.
Antes da
primeira
operação
X
XX
XX
XX
XX X
Após cada
uso
X
A cada 90 dias
ADVERTÊNCIA
Para evitar ferimentos severos ou
morte:
S empre enrole o cabo do guincho no tambor,
conforme indicado pela etiqueta de rotação
Dedique um tempo para se familiarizar totalmente
com o guincho e suas operações, revisando o Guia
Básico de Técnicas de Operação de Guincho que
acompanha o guincho.
dotambor.
Sempre enrole o cabo no fundo do tambor.
Para obter mais informações ou se tiver alguma
pergunta, entre em contato com:
Nunca enrole o cabo por cima do tambor.
WARN INDUSTRIES, INC.
12900 S.E. Capps Road, Clackamas, OR USA 97015-
8903, 1-503-722-1200,
Atendimento ao cliente: 1-800-543-9276
Serviço de localização de distribuidores
autorizados: 1-800-910-1122
ou visite www.warn.com.
WARN INDUSTRIES
83 73203B0
 Loading...