

Page 1

Navigation
Contents
Index
USER’S MANUAL
FOR WINDOWS
®
USER’S MANUAL
FOR WINDOWS
®
Page 2

Page 2
®
, August 15, 2000
Reader
Page 3

Page 3
Page 4

Page 4
Page 5

TABLE OF CONTENTS
Page 5
Setting Up Your Work Area 23
Working with the Tablet 24
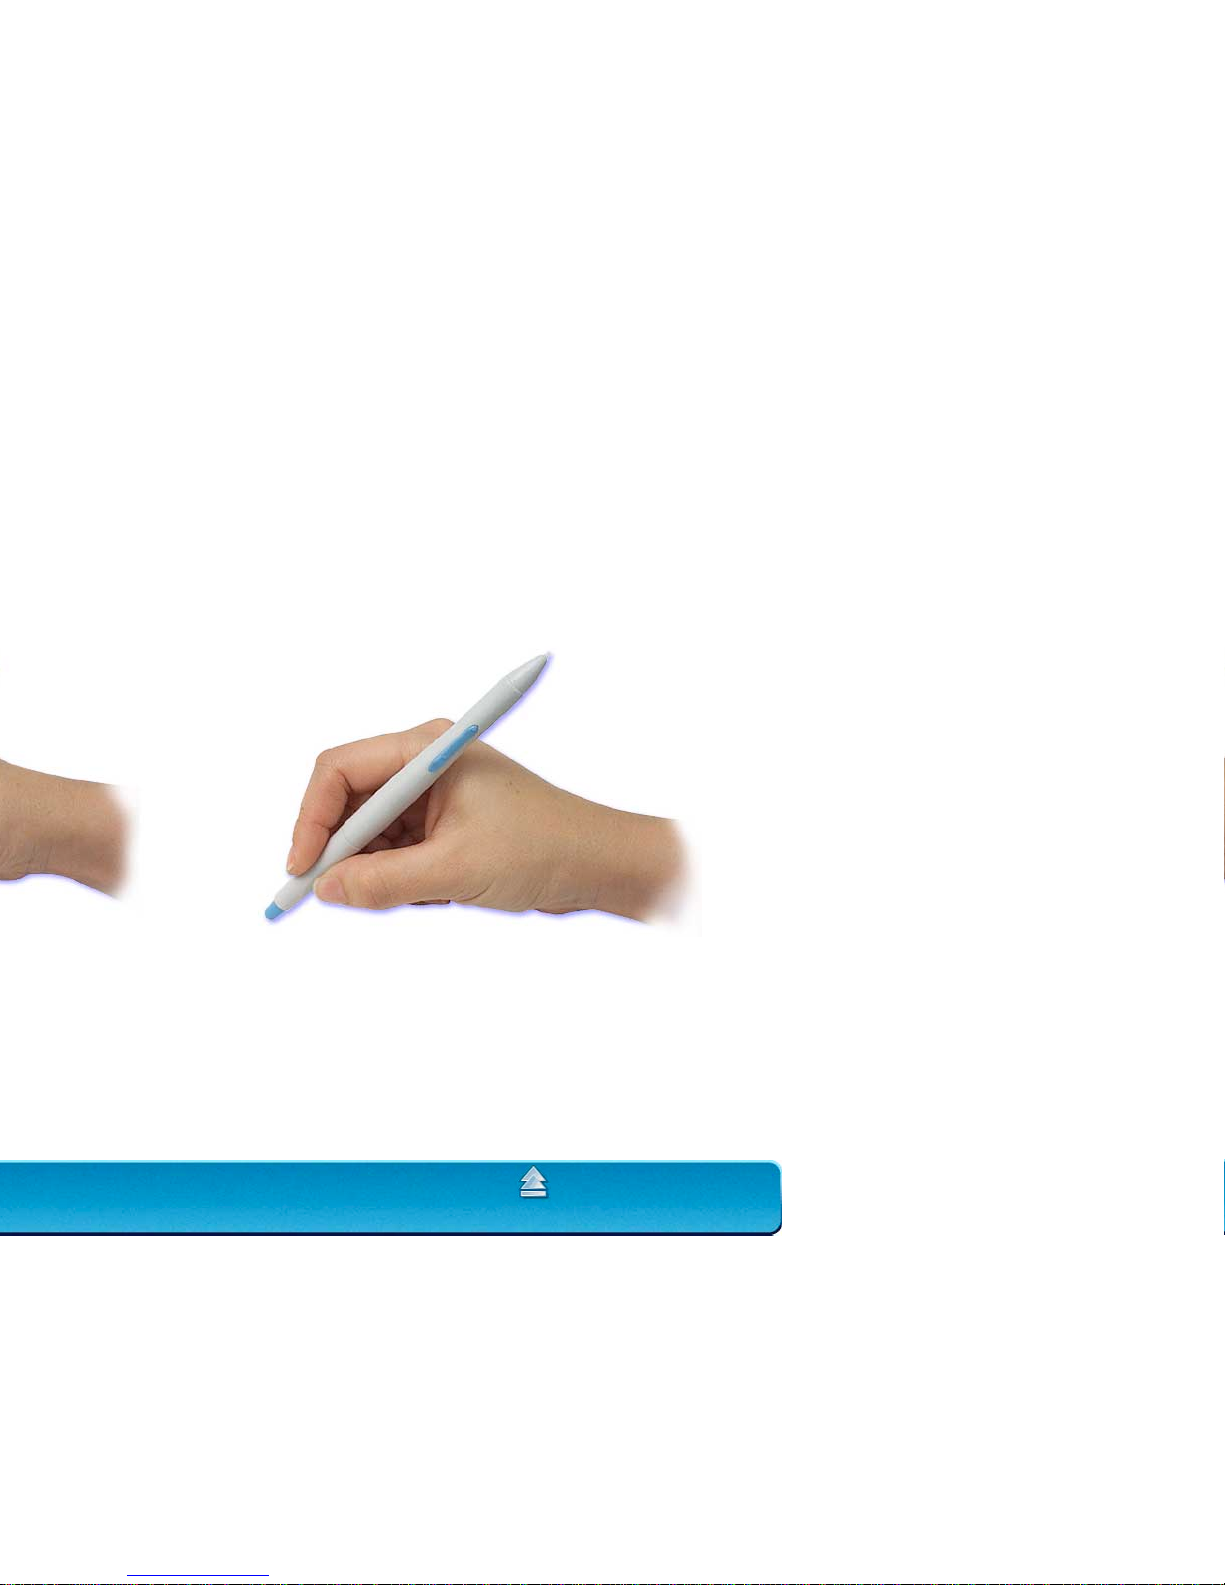
Using the Graphire Pen 25
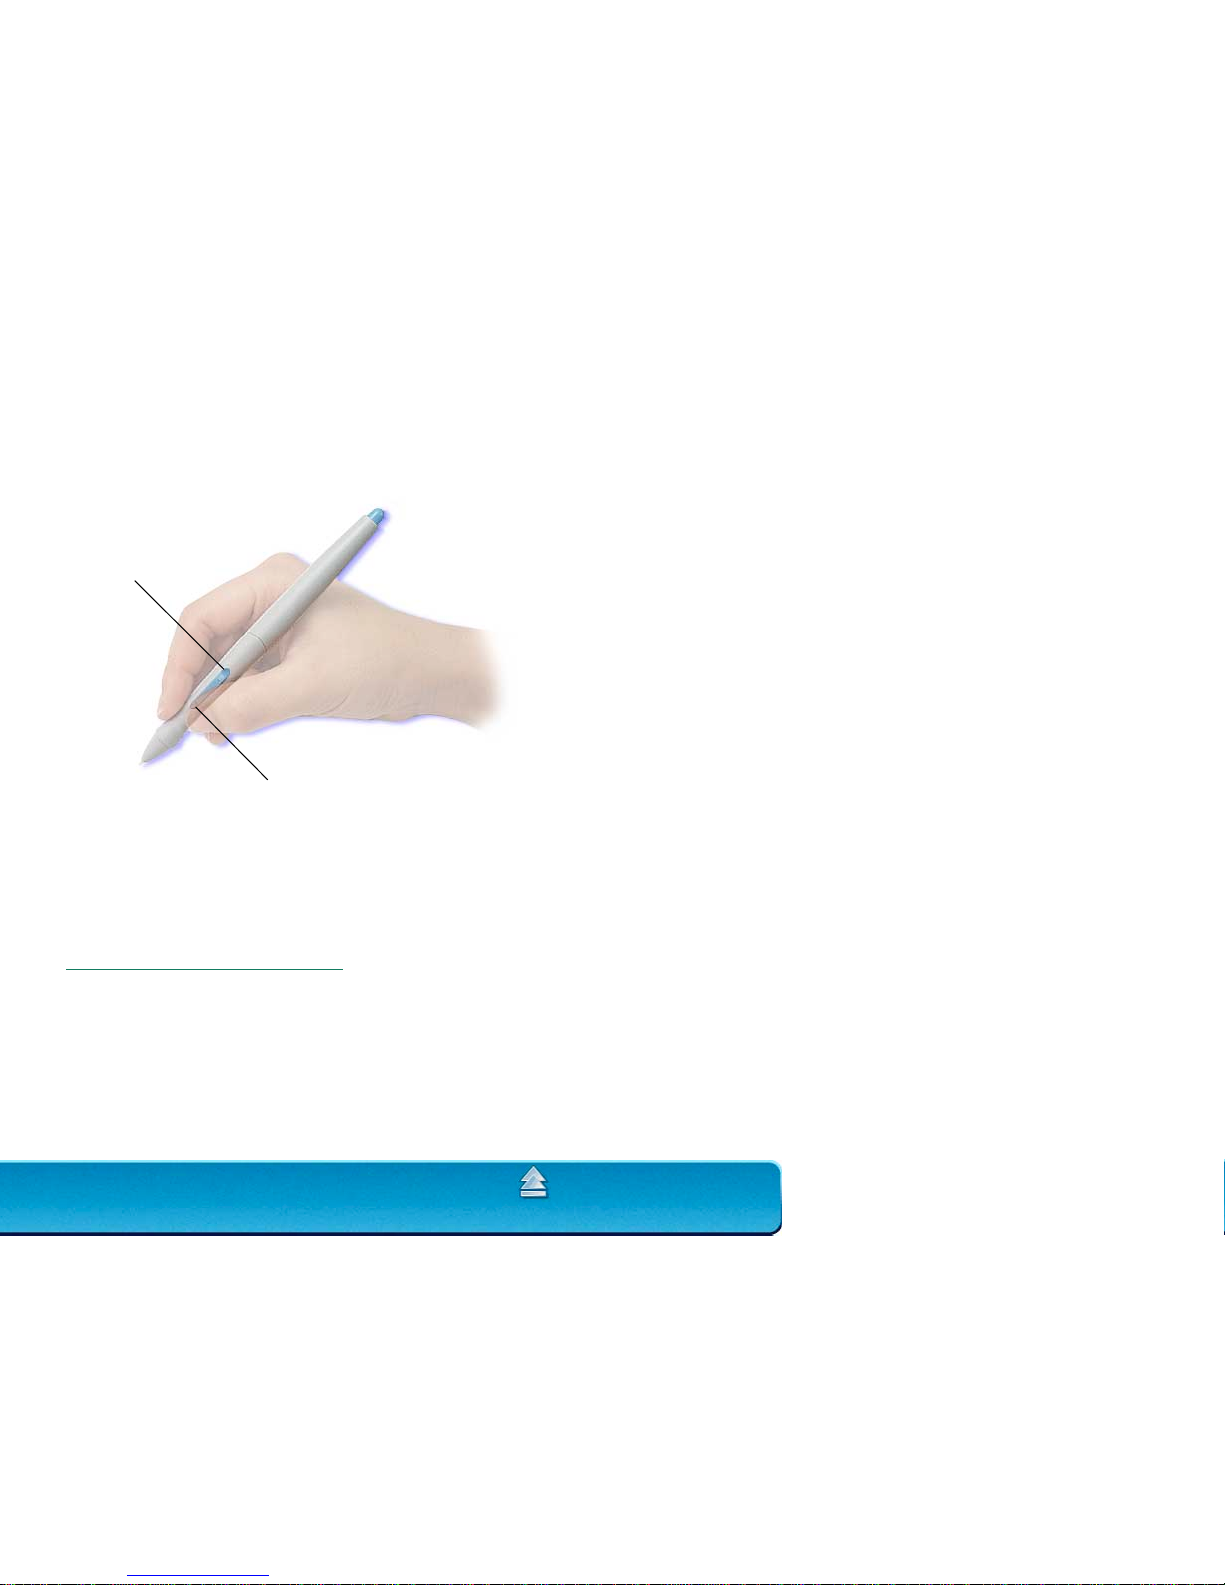
Holding the Pen 25
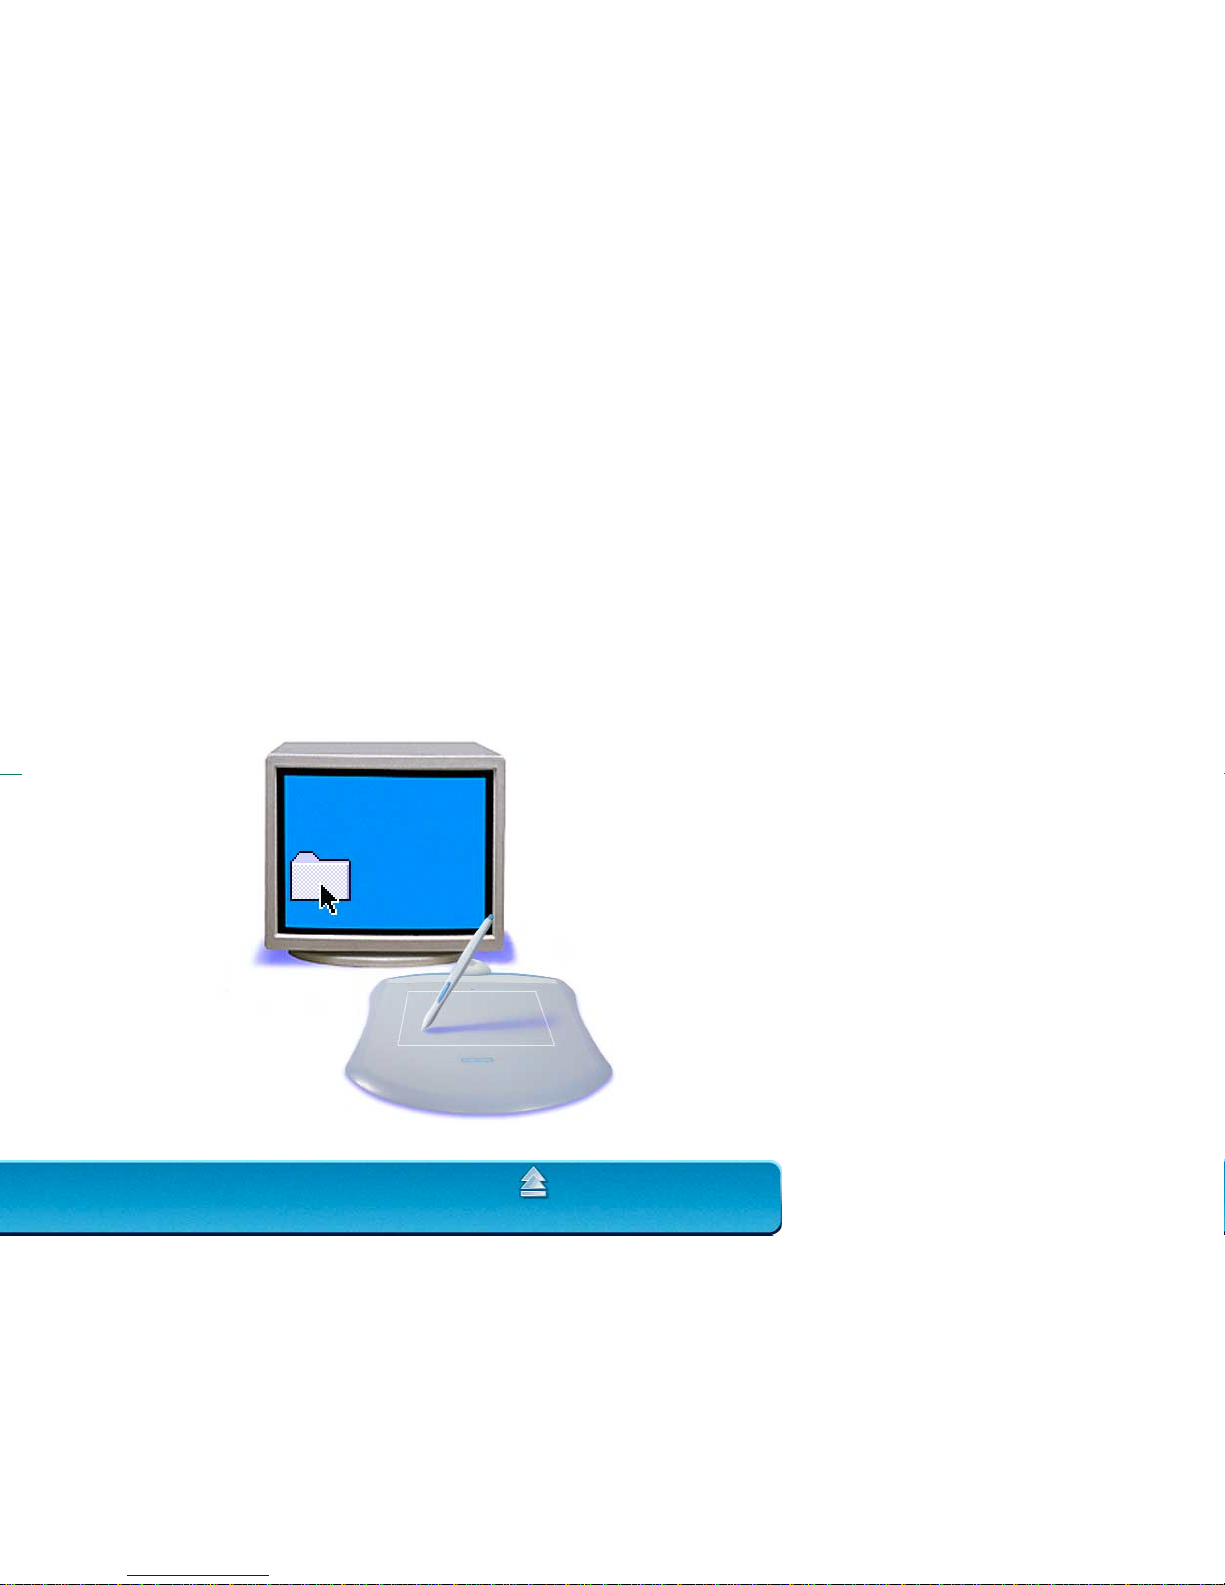
Pointing 26
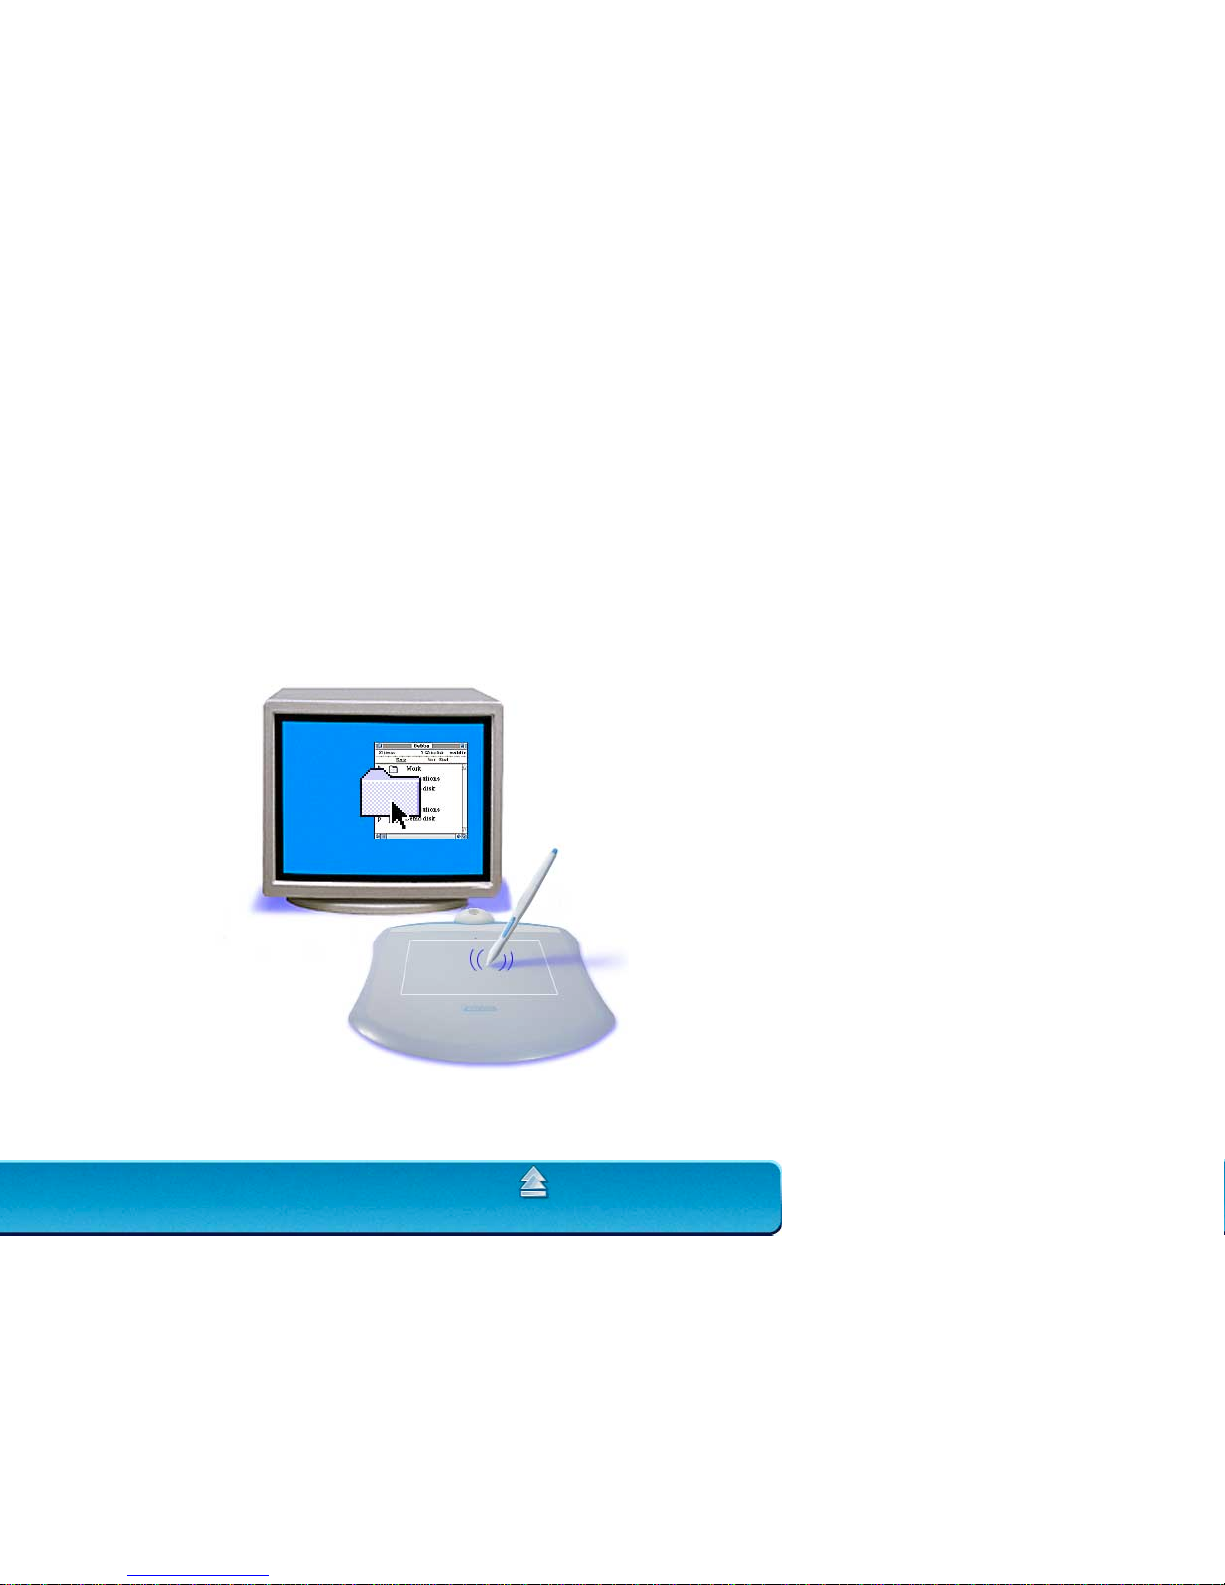
Clicking 27
Using the Side Switch 28
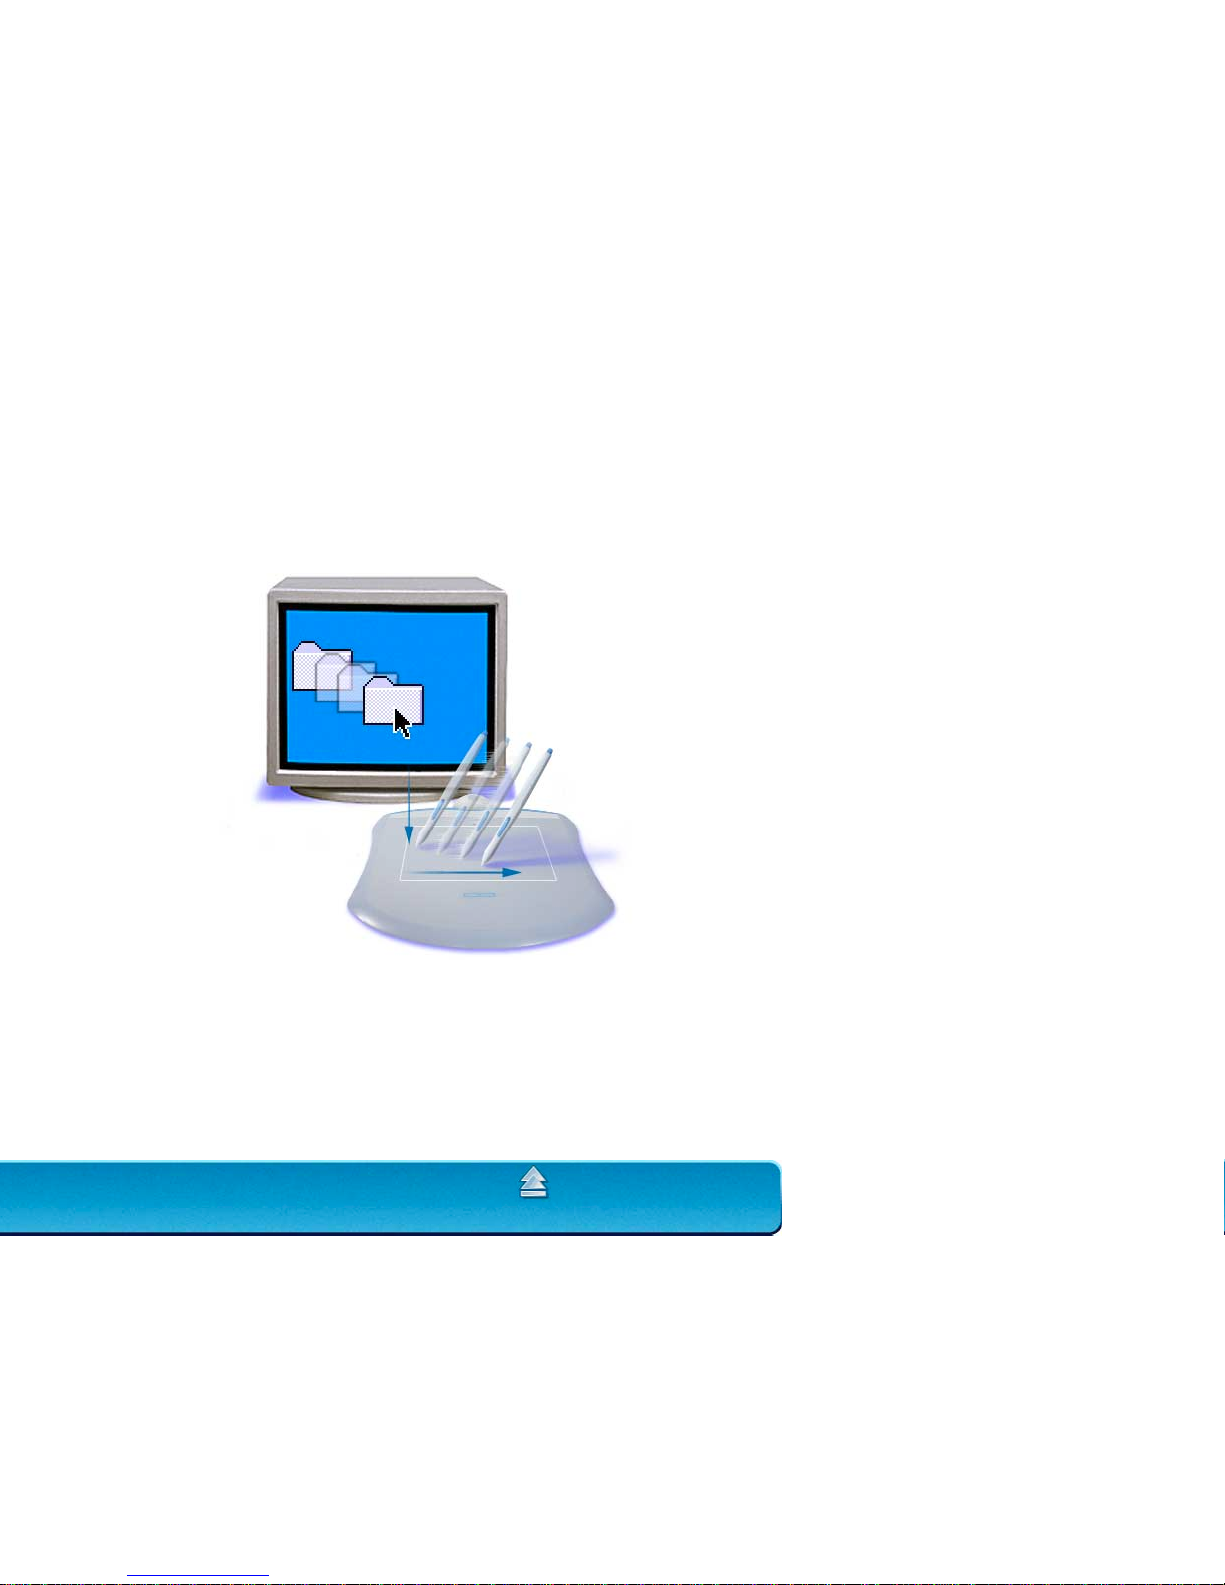
Dragging 29
Proximity 30
Drawing with Pressure 31
Erasing 32
Eye-Hand Coordination Exercise 33
Using the Graphire Cordless Mouse 34
Using the Cordless Mouse Fingerwheel 35
Caring for Your Tools and Tablet 36
Replacing the Pen Tip 37
CUSTOMIZING 38
Opening the Control Panel 39
Control Panel Features 40
Tabs 41
Control Panel Lists 43
Control Panel Buttons 45
Page 6
TABLE OF CONTENTS
Page 6
Pull-Down Menus 77
File 77
Edit 77
Add 78
Remove 78
Language 79
Help 79
ADVANCED FEATURES 80
Advanced Tip Pressure Settings 81
Click Force Adjustment 82
Pressure Curve Adjustment 83
Advanced Eraser Pressure Settings 85
Copying Settings 86
HA
VING TROUBLE? 87
Troubleshooting 88
Testing USB Tablets 88
Verifying Your Computer is USB Ready 89
Testing Serial Tablets 90
Testing Your Graphire Tools 91
Testing the Graphire Pen 91
Testing the Graphire Cordless Mouse 92
Troubleshooting Tables 93
USB Tablet Problems 93
Serial Tablet Problems 94
General Problems 94
Windows-Specific Problems 97
Page 7

TABLE OF CONTENTS
Page 7
Page 8

Page 8
vigating the Manual.
Page 9

Page 9
and
Advanced Features
chapters, you will notice that the screen
buttons. These are intentionally left out in order to
ormation). Refer also to your application
Page 10

Page 10
Page 11

INSTALLATION
Page 11
INSTALLATION
W BEFORE INSTALLATION
Page 12

INSTALLATION
Page 12
before
installing the software.
Page 13

INSTALLATION
Page 13
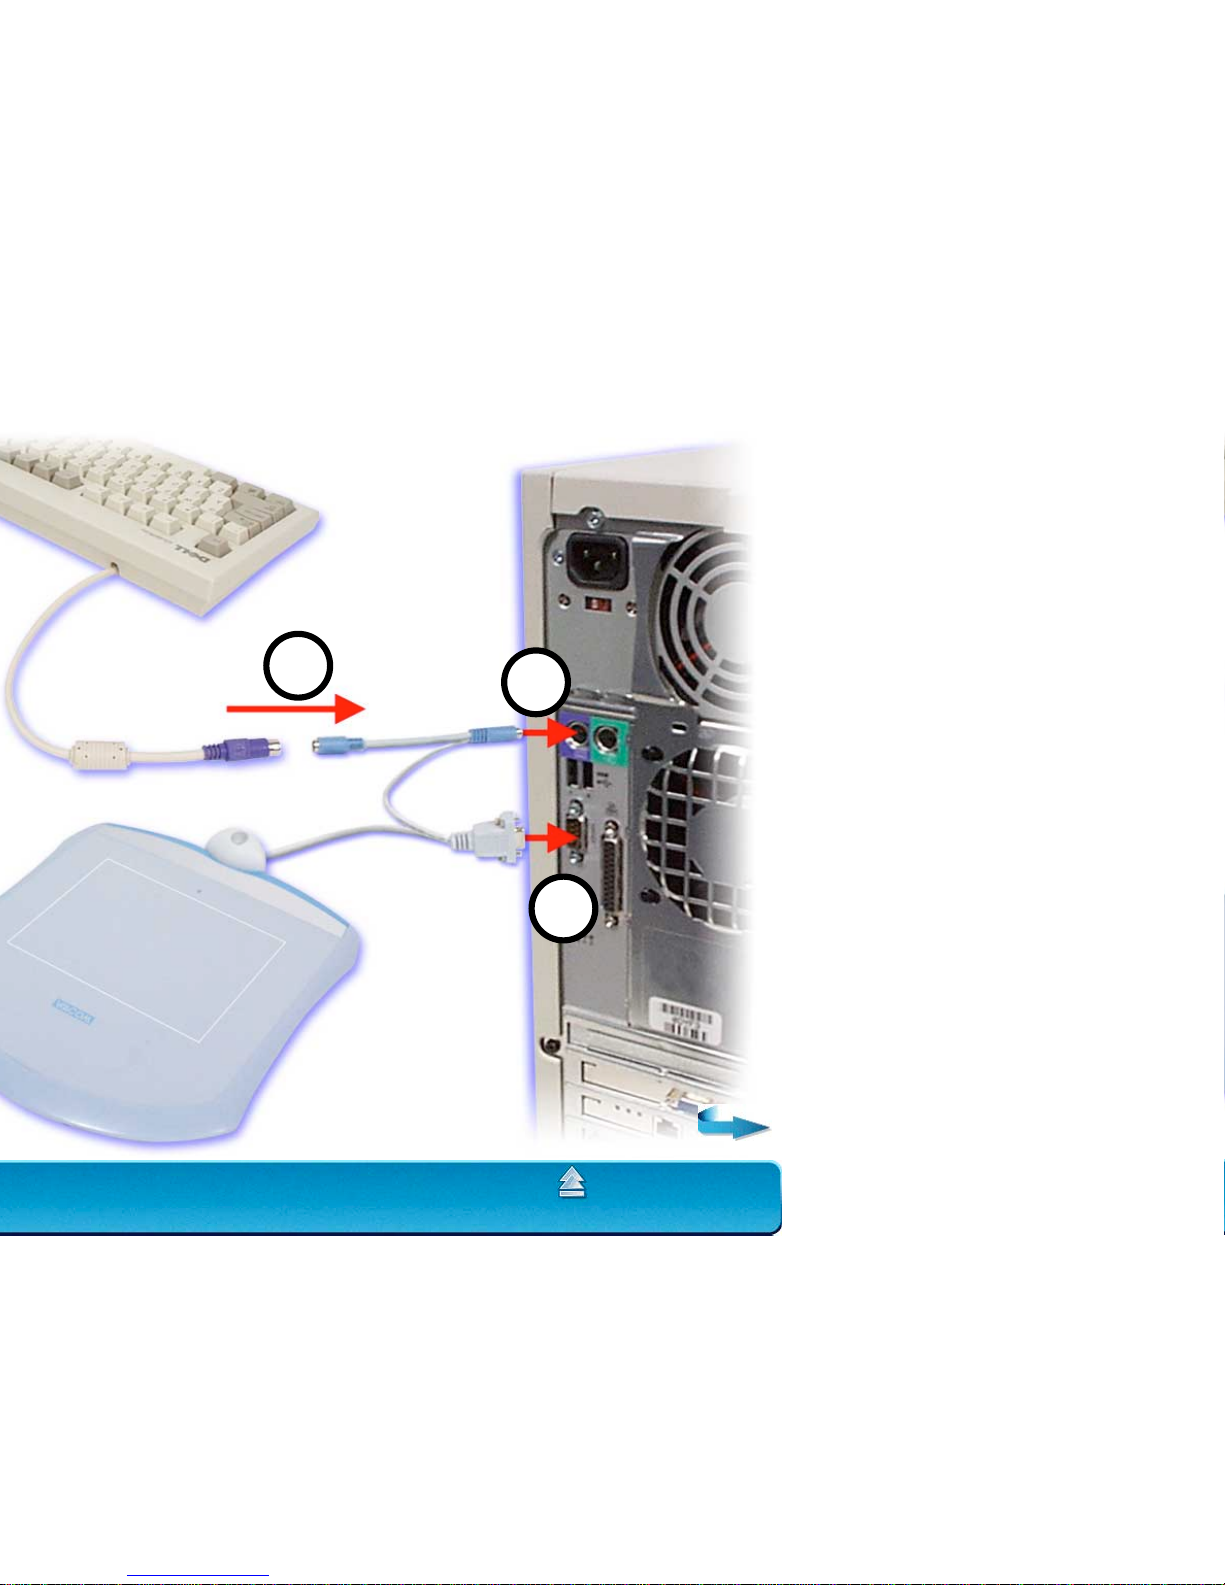
To tablet
Page 14

INSTALLATION
Page 14
ETUP
L
ANGUAGE
dialog box and follow the prompts to complete the installation of the
Graphire User’s Manual
and Help. If Acrobat Reader
INISH
to close the W
ACOM
S
ETUP
dialog box.
APPING
tab – the P
EN
M
ODE
option should be selected. (A W
ACOM
ROGRAMS
. It contains shortcuts to the Wacom control panel, User's
Page 15
INSTALLATION
Page 15
B
A
C
Page 16

INSTALLATION
Page 16
DD
N
EW
H
ARDWARE
W
IZARD
. If the A
DD
N
EW
DRIVER
FOR
YOUR
DEVICE
(
RECOMMENDED
) and follow the prompts. If you are
RIVE
option.
HOOSE
S
ETUP
L
ANGUAGE
dialog box will display.
ETUP
L
ANGUAGE
dialog box and follow the prompts.
Graphire User’s Man ual
and Help. If Acrobat Reader
ETUP
program from the Graphire Tablet CD.
TART
menu under P
ROGRAMS
. It contains shortcuts to the Wacom control panel,
Page 17

INSTALLATION
Page 17
ANCEL
.
Graphire User’s Man ual
and Help. If Acrobat Reader
Page 18

INSTALLATION
Page 18
Page 19

USING GRAPHIRE
Page 19
Page 20
USING GRAPHIRE
Page 20
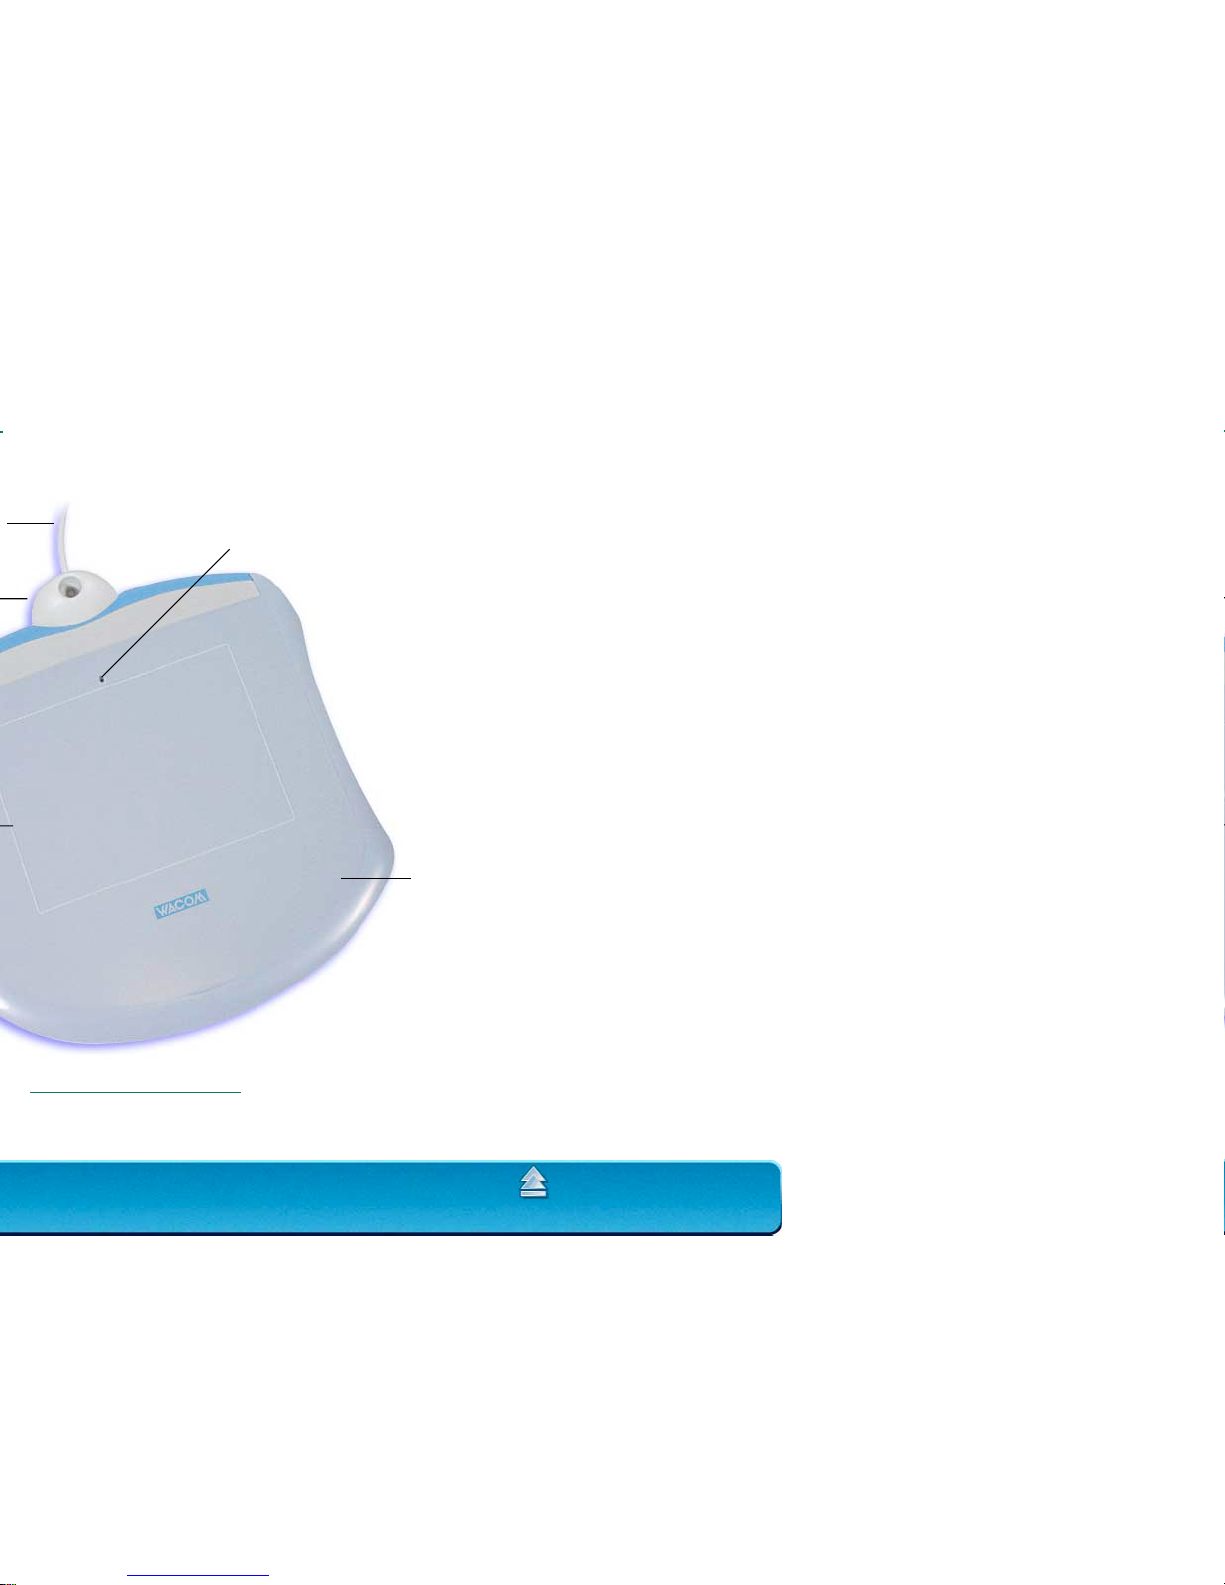
Status LED
Tablet Overlay
Page 21

USING GRAPHIRE
Page 21
Eraser
Graphire Pen
Page 22
USING GRAPHIRE
Page 22
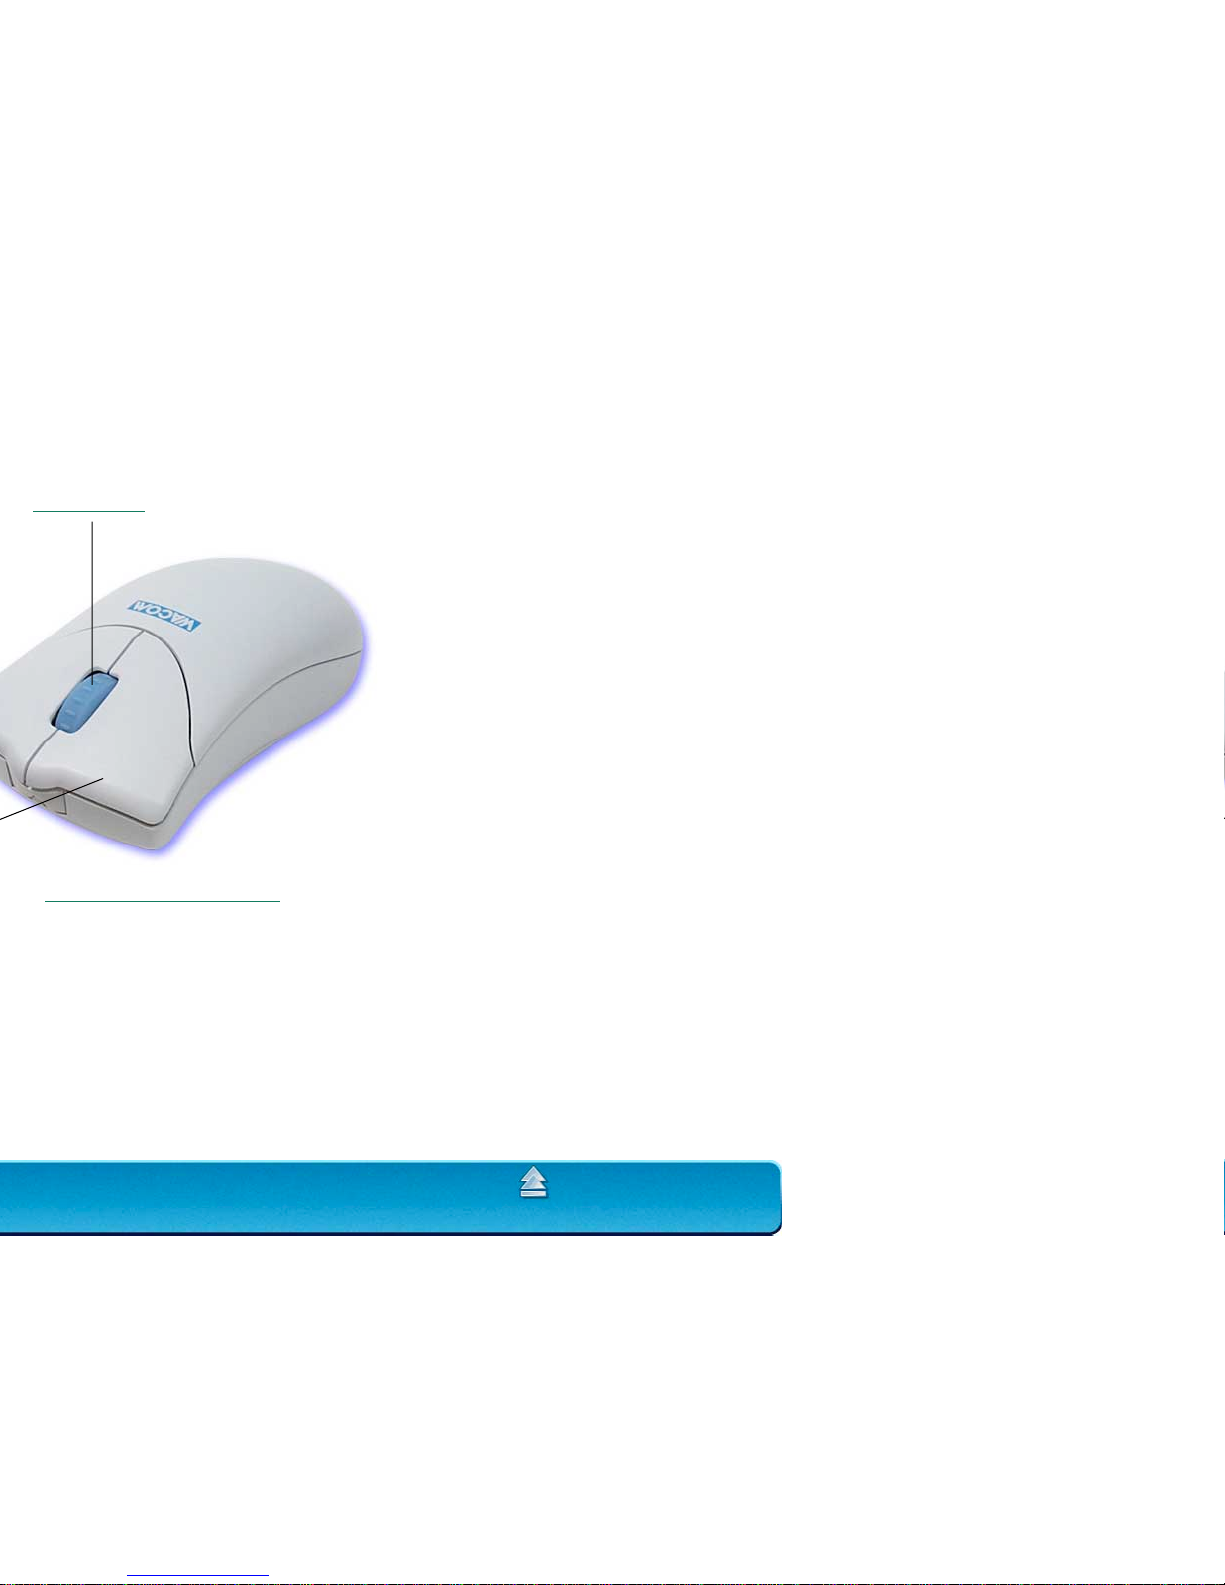
Graphire Cordless Mouse
Fingerwheel
Page 23

USING GRAPHIRE
Page 23
orking with the Tablet for additional
To minimize fatigue:
• Take short breaks between tasks to stretch
and relax your muscles.
• Use a gentle grip when working with your
Graphire tools.
• Alternate tasks throughout the day.
• Minimize awkward postures and repetitive
movements that cause discomfort.
Page 24
USING GRAPHIRE
Page 24
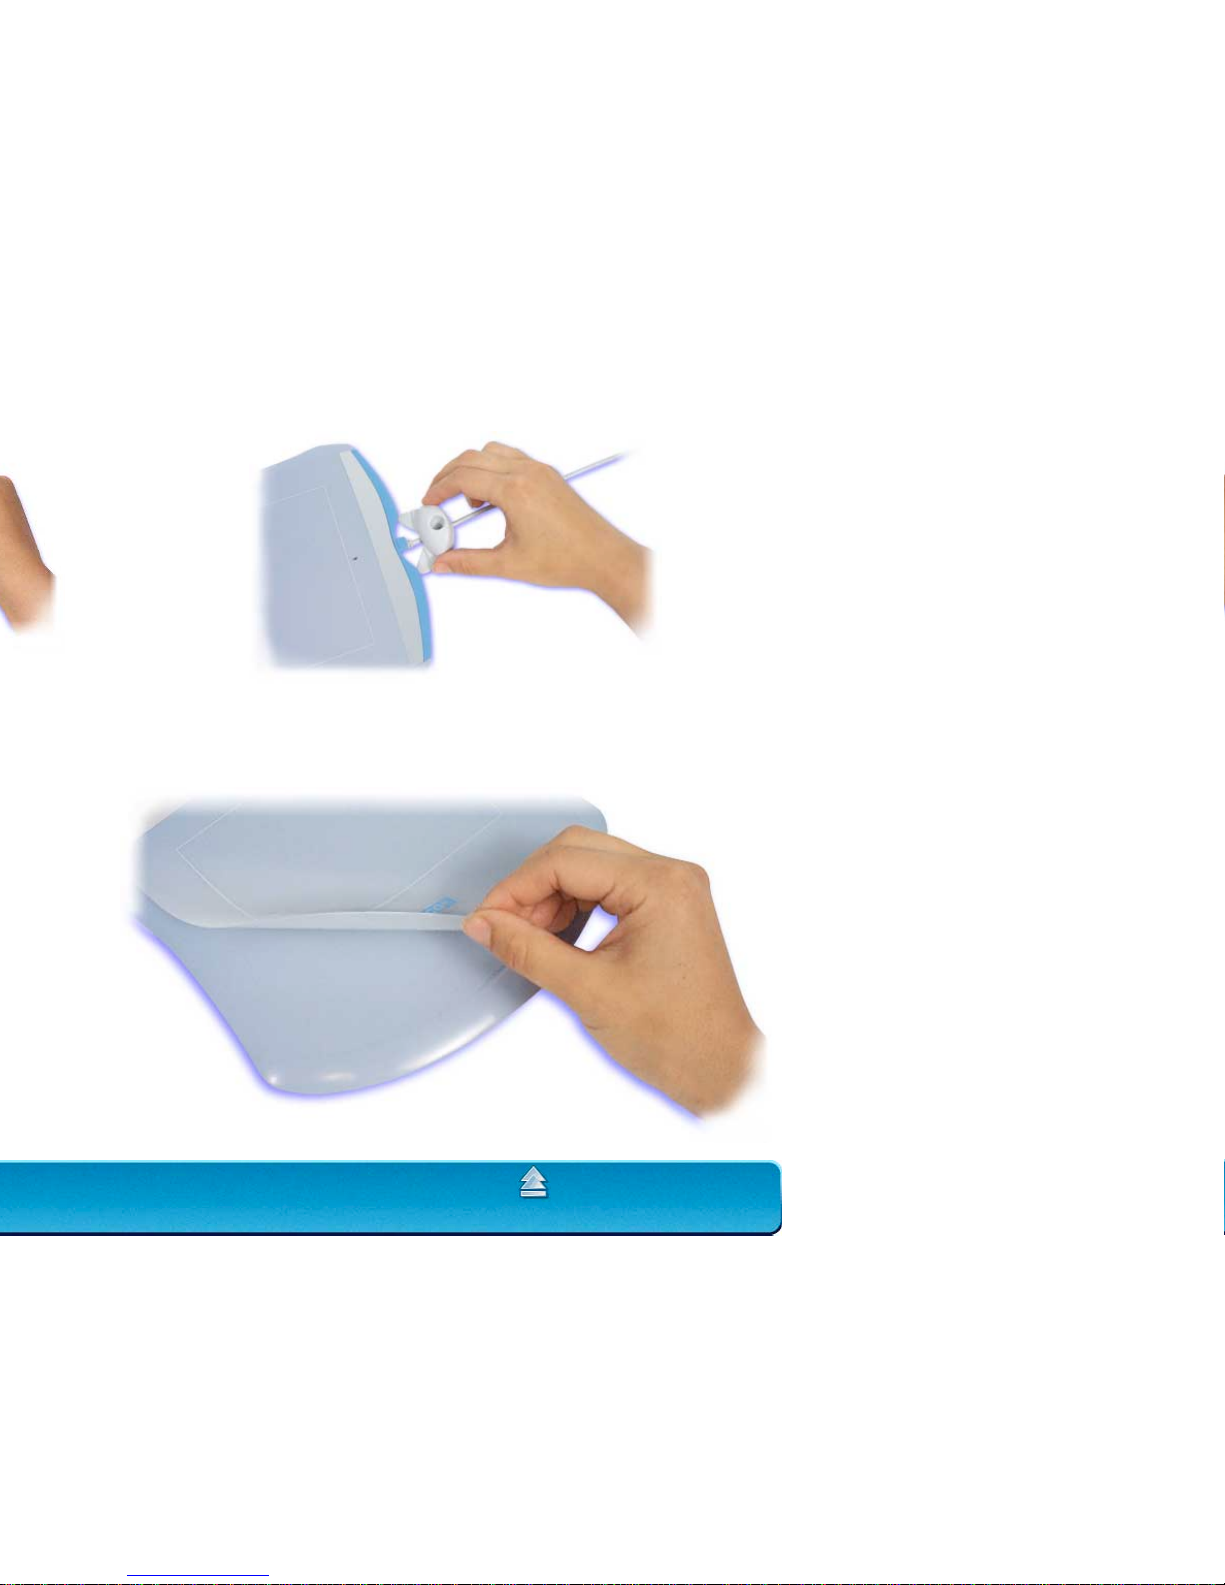
To attach the pen stand, place the stand above the tablet cable.
Push the stand toward the tablet’s pen stand cutout until the stand fits
snugly. To detach the pen stand, slide it back away from the tablet.
Page 25
USING GRAPHIRE
Page 25
Position for erasing
Page 26
USING GRAPHIRE
Page 26
Page 27
USING GRAPHIRE
Page 27
Page 28
USING GRAPHIRE
Page 28
Tool Buttons.
The lower switch position is set for
a right-click by default.
Page 29
USING GRAPHIRE
Page 29
Page 30

USING GRAPHIRE
Page 30
Page 31

USING GRAPHIRE
Page 31
Tip Feel.
ormation.
Page 32

USING GRAPHIRE
Page 32
Page 33

USING GRAPHIRE
Page 33
Page 34

USING GRAPHIRE
Page 34
The left buttons is set to LEFT CLICK by default.
To learn how to program buttons, see Customizing the Graphire Cordless Mouse.
Important:
When using
other pointing devices,
place the Graphire
Cordless Mouse on your
desk. Leaving a Graphire
tool on the tablet may
interfere with screen
cursor positioning when
using other pointing
devices.
Page 35

USING GRAPHIRE
Page 35
CROLL 3 lines for each notch of wheel movement in
Page 36

USING GRAPHIRE
Page 36
not
use
Page 37

USING GRAPHIRE
Page 37
arts and Accessories.
Page 38

CUSTOMIZING
Page 38
CUSTOMIZING
c settings.
Page 39

CUSTOMIZING
Page 39
To open the Wacom control panel,
double-click here with the tool you
wish to customize.
Page 40

CUSTOMIZING
Page 40
Control Panel
Buttons apply to
the entire control
panel.
The HELP...
button displays
online Help. The
information is the
same as in the
Customizing
and
Advanced
Features
chapters in this
manual.
Tab buttons
apply only to the
selected tab.
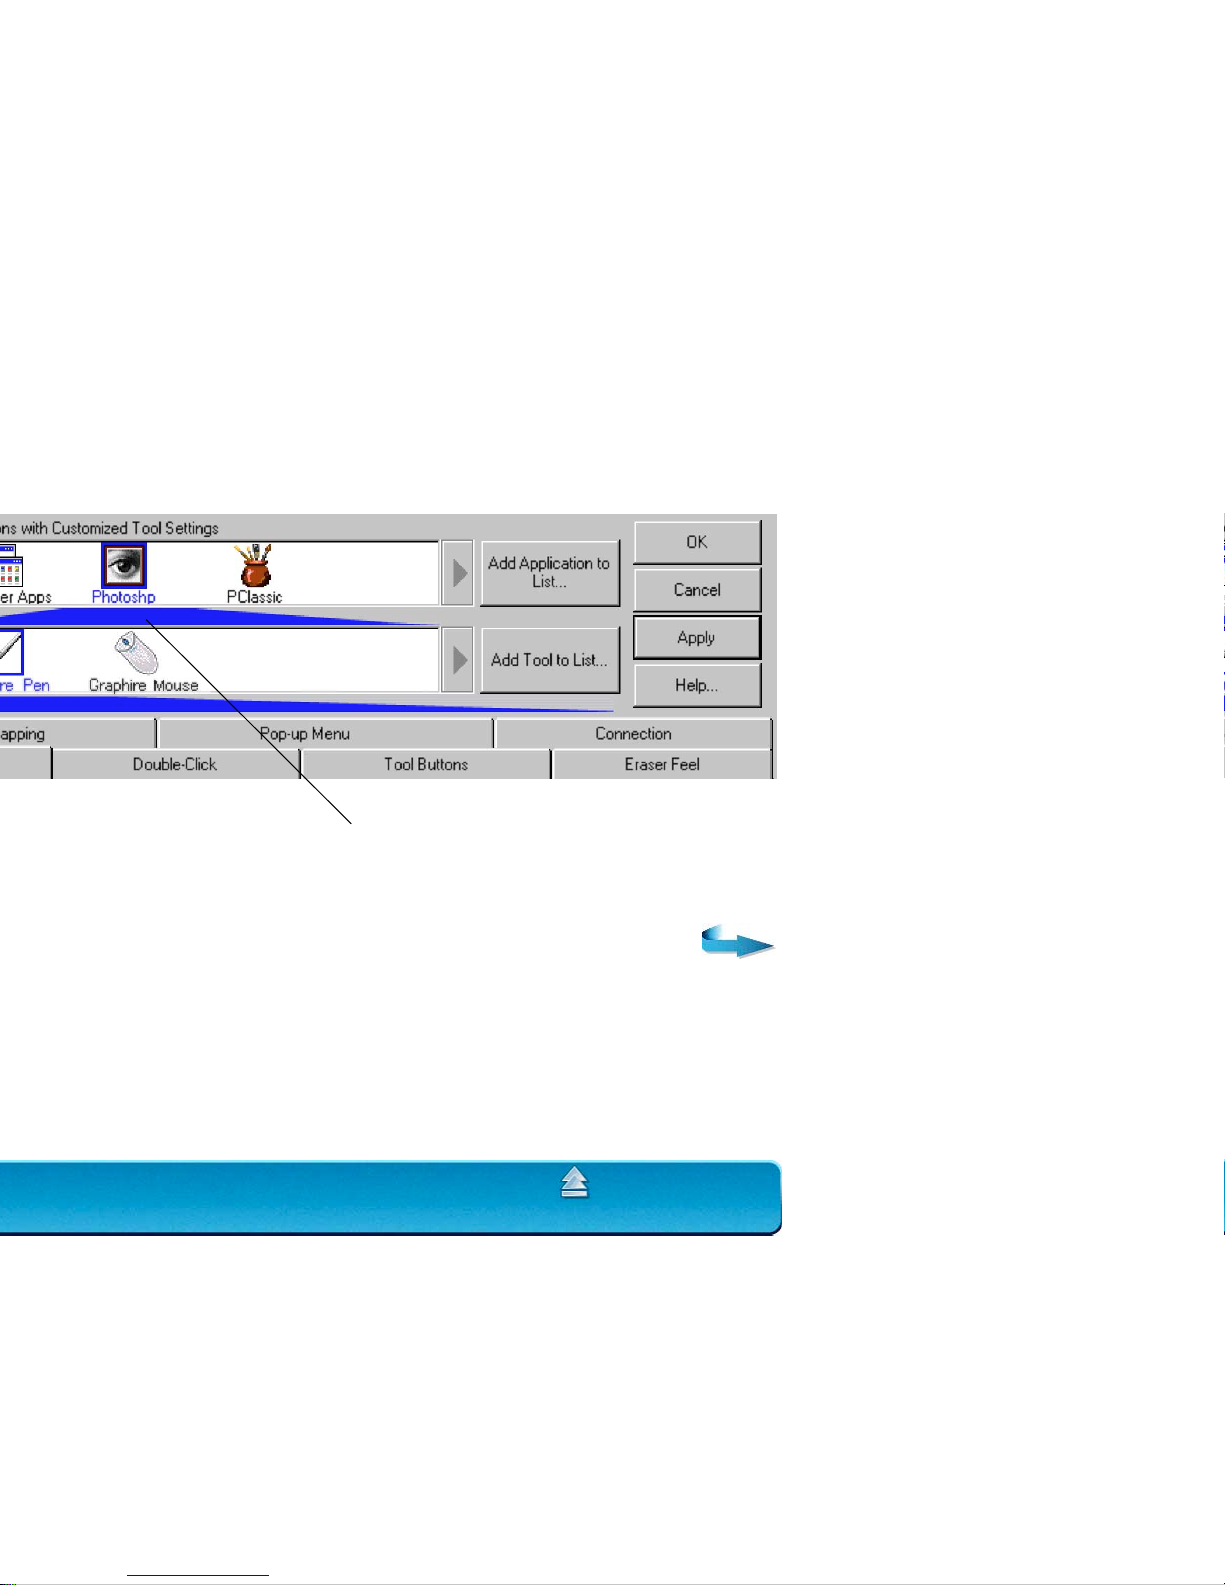
These buttons add an application
or tool to the lists at the left.
Page 41

CUSTOMIZING
Page 41
OOL LIST and the appropriate
Page 42

CUSTOMIZING
Page 42
PPLY buttons), click
Your Pen and Cordless
Page 43

CUSTOMIZING
Page 43
Click to add an installed application to the
APPLICATION LIST. You can customize tool
settings for the selected application.
Click to add a Graphire tool to
the T
OOL LIST. You can
customize the tool for the
above selected application.
Your current selections are
highlighted. Wedges emphasize the
relationship between tab settings and
the selected tool and application.
Page 44

CUSTOMIZING
Page 44
Page 45

CUSTOMIZING
Page 45
ELP... from the
ELP... button in the specific dialog box.
Page 46

CUSTOMIZING
Page 46
OOL LIST by clicking on its icon.
Displayed if you are working with a serial tablet.
Page 47

CUSTOMIZING
Page 47
Page 48

CUSTOMIZING
Page 48
Toggles to the advanced options display.
A checkmark appears when advanced settings are in effect.
Page 49

CUSTOMIZING
Page 49
Double-click on the target
to test your settings before
applying them.
Page 50

CUSTOMIZING
Page 50
Click here to change the function assigned to the pen
tip. The tip must be set to left click in order to draw in
most graphics applications.
Page 51

CUSTOMIZING
Page 51
Page 52

CUSTOMIZING
Page 52
Page 53

CUSTOMIZING
Page 53
EFINE
Page 54

CUSTOMIZING
Page 54
Page 55

CUSTOMIZING
Page 55
Toggles to the advanced options display.
A checkmark appears when advanced settings are in effect.
Page 56

CUSTOMIZING
Page 56
Display Area.
Select a monitor
area for tablet to
screen mapping.
Aspect. Select a
tablet to screen
mapping
relationship.
Select the Orientation of your tablet.
Note: Except for tablet orientation, the mapping
settings for the Graphire Pen and Cordless
Mouse are independent of one another.
Page 57

CUSTOMIZING
Page 57
Select the Orientation of your tablet.
Page 58

CUSTOMIZING
Page 58
EN MODE for drawing, and y our Graphire Cordless Mouse is set to
Page 59

CUSTOMIZING
Page 59
Page 60

CUSTOMIZING
Page 60
Page 61

CUSTOMIZING
Page 61
Page 62

CUSTOMIZING
Page 62
Page 63

CUSTOMIZING
Page 63
LL MONITORS or
Page 64

CUSTOMIZING
Page 64
for a description of the available options.
HIFT key and
HIFT+CLICK is simulated.
Select the function
to perform when
pressing the right
button.
Select the function to perform when clicking the
fingerwheel button. Refer to Customizing the
Cordless Mouse Fingerwheel to select the function
to perform when rolling the fingerwheel.
Page 65

CUSTOMIZING
Page 65
INGERWHEEL tab.
Sets the fingerwheel to
scroll one page for each
notch of fingerwheel
movement.
Sets the fingerwheel to
scroll the selected number
of lines for each notch of
fingerwheel movement.
Enter a value (1 to 15) to
set the amount of
movement. Roll the
fingerwheel forward to
scroll up, and back to
scroll down.
Page 66

CUSTOMIZING
Page 66
OP-UP MENU function. Whenever you
Adds a keystroke macro to the menu list.
Adds PEN MODE and MOUSE MODE options to
the menu list. The mapping option y ou select
from the Pop-up Menu is applied only to the
tool used to select it.
Removes the selected item(s) from the list.
Page 67

CUSTOMIZING
Page 67
orking with Application-Specific Settings for more information.
HIFT key and clicking on them.
Page 68

CUSTOMIZING
Page 68
Your current selections are highlighted. Wedges
emphasize the relationship between tab settings
and the selected tool and application.
Page 69

CUSTOMIZING
Page 69
PPLY or OK button.
Page 70
CUSTOMIZING
Page 70
Your current selections are highlighted. Wedges
emphasize the relationship between tab settings
and the selected tool and application.
Page 71

CUSTOMIZING
Page 71
Page 72

CUSTOMIZING
Page 72
Displays the name of the
selected application.
BROWSE to select the
executable file of any
application installed on
your computer.
Note: If two programs
have the same file name,
they will share the same
customized settings.
Click OK to continue.
Page 73

CUSTOMIZING
Page 73
OOL LIST for this application. By default,
PPLICATION LIST. When you select the
OOL LIST for the application, it will use the settings for ALL
Lists the tools that can be customized.
Note: If a tool is not selected it will continue
to work with the settings specified for ALL
OTHER APPS.
Page 74

CUSTOMIZING
Page 74
OOL LIST for the chosen application.
Page 75

CUSTOMIZING
Page 75
OOL LIST, choose the tool you want to
Page 76

CUSTOMIZING
Page 76
Displays messages about your selected serial port.
•CONNECTED. The tablet is connected and responding correctly.
•NOT RESPONDING. There is no communication between the tablet
and the computer.
•OVERRIDDEN. Another application has taken over control of the
serial port.
•DRIVER OFF. The Graphire driver is turned off.
Page 77

CUSTOMIZING
Page 77
ELP... button for detailed information on settings and options.
Page 78

CUSTOMIZING
Page 78
USTOMIZED TOOL... option will be dimmed.
Page 79

CUSTOMIZING
Page 79
.
Page 80

ADVANCED FEATURES
Page 80
Page 81

ADVANCED FEATURES
Page 81
IP PRESSURE FEEL slider.)
IP PRESSURE FEEL slider, your advanced settings will
Toggles to the basic options display.
Use this area to
automatically set the
maximum amount of
force to use when
drawing.
After you set advanced
settings, a checkmark
appears.
Page 82

ADVANCED FEATURES
Page 82
Page 83

ADVANCED FEATURES
Page 83
Enter a value from 20 to 100%, or
drag the MAXIMUM TIP FORCE control
to set the maximum force your pen
tip will respond to.
Enter a value from 0 to 80%, or drag the
MINIMUM TIP FORCE control to set the
minimum force that will register pressure.
Page 84

ADVANCED FEATURES
Page 84
AXIMUM TIP FORCE control moves, and the value in the edit box
TART
While applying normal pressure to the pen tip, draw
several strokes here to automatically set the maximum
force value.
Click here to reset maximum force value to the
start value for this test.
Page 85

ADVANCED FEATURES
Page 85
RASER PRESSURE FEEL slider , y our adv anced settings
Page 86

ADVANCED FEATURES
Page 86
Page 87

HAVING TROUBLE?
Page 87
for your region.
Page 88

HAVING TROUBLE?
Page 88
erifying Your Computer is USB Ready.
Page 89

HAVING TROUBLE?
Page 89
Technical Support.
EW HARDWARE FOUND dialog should appear and you can
Page 90

HAVING TROUBLE?
Page 90
Open the Wacom control panel to the CONNECTION tab. It should
Page 91

HAVING TROUBLE?
Page 91
ATA values should change to reflect the tool
WITCHES state and PRESSURE value should
WITCHES state should
WITCHES state and PRESSURE value will change.
LOSE button to exit the dialog box.
Page 92

HAVING TROUBLE?
Page 92
WITCHES state should change for each button you click.
HEEL status should change to -1.
LOSE button to exit the dialog box.
Graphire Cordless Mouse
1
23
Page 93

HAVING TROUBLE?
Page 93
Check if there is an available USB port on a USB hub device. If none
are available you will need to add a USB hub.
USB Ready). Verify that your tablet’s USB cable is properly
connected to an active USB port. If you are connecting to a USB hub
device, make sure the hub is connected to an active USB port and
that the hub is active. Refer to T
esting USB Tablets for instructions.
Page 94

HAVING TROUBLE?
Page 94
Remove an existing peripheral serial device and any associated
device drivers for that hardware, or add an additional serial port.
Then install Graphire.
computer is off before disconnecting or connecting your tablet.
Refer to Ser
ial Tablet Installation for instructions. If the tablet’s power
light still does not turn on, you may have a defective tablet (see
Contacting
Technical Support).
Open the Wacom control panel and go to the C
ONNECTION tab. Verify
that T
ABLET DRIVER ON is checked. If not, use y our mouse to select it.
If you do not have a mouse attached to your computer, use the T
AB
key to select the checkbox and then press the spacebar to toggle the
driver on.
Open the Wacom control panel and go to the tool’s T
IP FEEL tab.
Move the T
IP PRESSURE FEEL slider toward FIRM, or select the MORE
O
PTIONS button and increase the CLICK FORCE setting.
Open the Wacom control panel and go to the E
RASER FEEL tab. Move
the E
RASER PRESSURE FEEL slider toward FIRM, or select the MORE
O
PTIONS button and increase the CLICK FORCE setting.
Page 95

HAVING TROUBLE?
Page 95
In the Wacom control panel, try decreasing the DOUBLE-CLICK
D
ISTANCE or increasing the double-click speed (see Adjusting Double-
Click). If that does not work, try unchecking the DOUBLE-CLICK ASSIST
checkbox.
Open the Wacom control panel and go to the tool’s T
IP FEEL tab.
Move the T
IP PRESSURE FEEL slider toward SOFT, or select the MORE
O
PTIONS button and decrease the CLICK FORCE setting.
Make sure the status LED changes from orange to green when the tip
is pressed. If it does not, you may have defective hardware (see
T
roubleshooting).
Check the control panel’s T
OOL BUTTONS tab and verify that the tip is
assigned to a L
EFT-CLICK function.
this without pressing down on the pen tip.
From the Wacom control panel, verify that the side switch is set to the
proper function for the application and tool that you are using.
Make sure the tablet status LED changes from orange to green when
you press the side switch. If it does not, you may have defective
hardware (see T
roubleshooting).
Page 96

HAVING TROUBLE?
Page 96
Make sure that you change the settings f or the tool and the application
that you are using. See W
orking with Graphire Tools and Working
with Application-Specific Settings.
using another pointing device. Leaving your tool on the tablet may
interfere with screen cursor positioning when using other input
devices.
Open the Wacom control panel and go to the M
APPING tab. Verify that
P
EN MODE is selected and that the DISPLAY AREA is set to ENTIRE
D
ISPLAY for the selected tool and application. If this does not help,
click on the R
ESET TAB TO DEFAULTS button to reestablish tablet to
screen mapping.
If this does not work, open the Windows folder and delete the
WACOM.DAT file. Then restart your computer . When the tab let driver
loads, it will create a new preferences file with the factory default
settings.
Page 97

HAVING TROUBLE?
Page 97
the tablet’s active area.
Wacom recommends using the side switch to double-click (review the
techniques in Clic
king).
Try increasing the D
OUBLE-CLICK DISTANCE or reducing the double-
click speed (see Adjusting Doub
le-Click).
Try using a lighter T
IP PRESSURE FEEL (see Adjusting Tip Feel).
This will rev erse the right and left button settings on your W acom tools.
Restart Windows for your Wacom tool settings to be correctly
recognized.
You must use a mouse when working in a full screen DOS window.
Page 98

HAVING TROUBLE?
Page 98
When the C
LOSE PROGRAM dialog box (Windows 95, 98, or Me) or the
T
ASK MANAGER (Windows 2000) is active, the Wacom tablet will not
work.
Use your mouse or keyboard to continue. When this dialog box is
closed, you can again use your Graphire tool to control the screen
cursor.
On a multiple monitor system, the tablet is mapped to the virtual
desktop (a rectangular area covering all monitors). In the Wacom
control panel’s P
ORTION OF DISPLAY dialog box, the screen rectangle
represents the entire virtual desktop.
If your video display areas do not form a rectangle because they are
different sizes or they are not evenly aligned, the screen cursor
positioning will be incorrect after moving into the unmapped area of the
virtual desktop. To reestablish the correct screen cursor position, lift
your Graphire tool out of tablet proximity and bring it back into
proximity over an area of the tablet that is mapped to a display area.
You must update the operating system with Service Pack 3 (SP3) or
later in order for application-specific settings to work correctly.
Running your Graphire tablet software on a Windows NT 4.0 system
that is not updated to SP3 may cause you to experience a blue screen
crash.
Page 99

HAVING TROUBLE?
Page 99
Page 100

HAVING TROUBLE?
Page 100
 Loading...