

Page 1
Page 2
Dear Parent:
At
VTech
®
we know that a child has the ability to do great
things. That’s why all of our electronic learning products are
uniquely designed to develop a child’s mind and allow them to
learn to the best of their ability. Whether it’s learning about
letters, numbers, geography or algebra, all
VTech
®
learning
products incorporate advanced technologies and extensive
curriculum to encourage children of all ages to reach their
potential.
When it comes to providing interactive products that enlighten,
entertain and develop minds, at
VTech
®
we see the potential
in every child.
27
Page 3

Table of Contents
Introduction ................................................................................................1
Getting Started ...........................................................................................2
Installing Batteries............................................................................2
Replacing the Backup Battery .........................................................2
Powering Vapor ON and OFF ...........................................................3
Resetting Vapor................................................................................. 3
Setting the Date and Time ................................................................3
Detaching the Handheld from the Main Unit ..................................4
Attaching the Handheld to the Main Unit........................................ 4
Y our V apor...................................................................................................5
The Handheld Buttons......................................................................5
The Category Buttons ......................................................................6
The Keyboard ....................................................................................7
The T ouch Panel ................................................................................8
The Mouse .......................................................................................12
Automatic Shut-off Feature ..................................................................... 13
Description of Activities ..........................................................................13
Status Bar ........................................................................................ 13
Language......................................................................................... 13
Mathematics ....................................................................................15
Games ..............................................................................................16
Applications ....................................................................................18
Organizer .........................................................................................19
Optional Accessories ..............................................................................22
Connecting the VT-41 Printer.........................................................22
Trouble Shooting for Printer Errors............................................... 23
Connecting Vapor with the AC Adaptor........................................23
Smart Cards ....................................................................................23
Activity Scoring and Levels ....................................................................24
Care and Maintenance .............................................................................26
Page 4
Introduction
Thank you for purchasing the VTech® Vapor™ learning product! We at VTech are
committed to providing the best possible products to entertain and educate your child.
Should you have any questions or concerns, please call our Consumer Services
Department at 1-800-521-2010 in the U.S. or 1-800-267-7377 in Canada.
Vapor is an electronic learning aid that challenges young minds with 44 activities
ranging from spelling, math and memory games, to learning tools like unit converters
and language translators. Pop-out the handheld and touch its screen with a stylus
pen to play the games or keep a busy life in order with the organizer.
Items Included in this Package:
Vapor™ Main Unit
Vapor™ Handheld
Two Stylus Pens
Mouse and Mouse Pad
User's Manual
1
Page 5
Getting Started
Installing Batteries
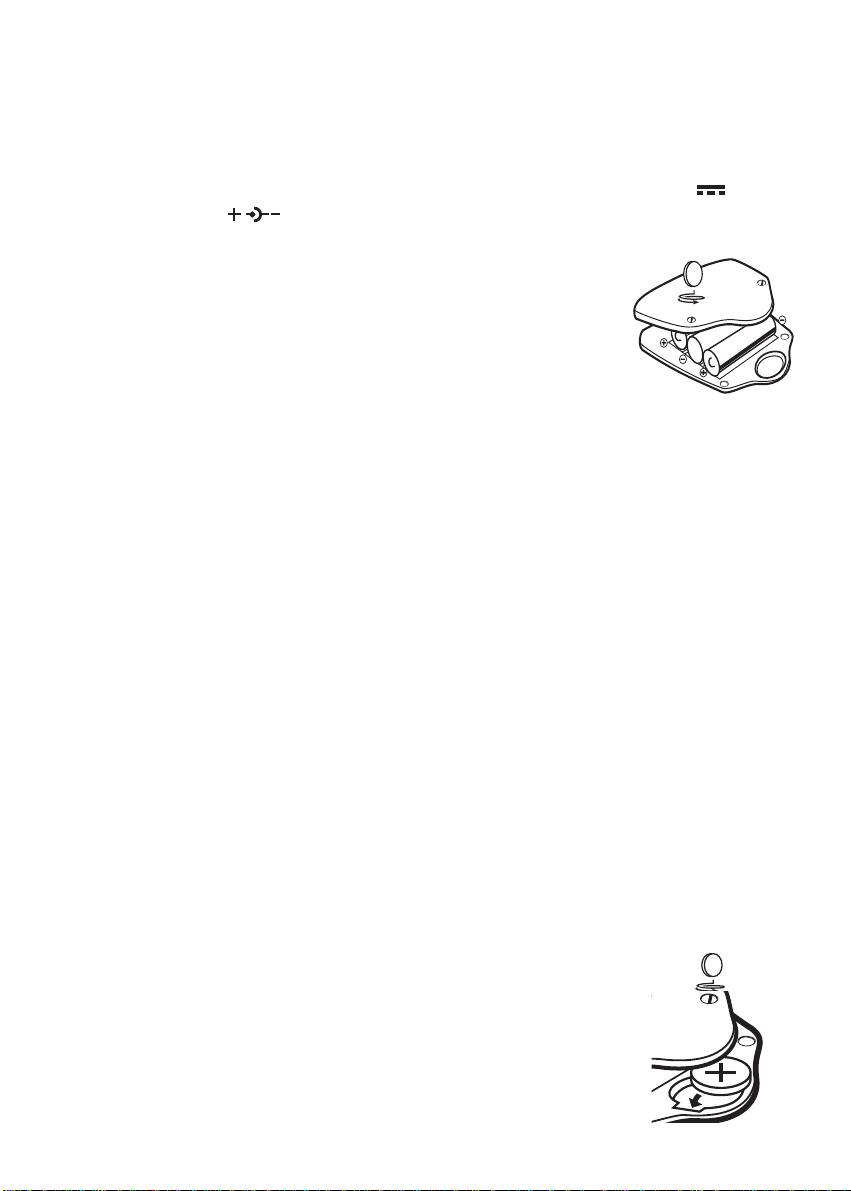
Vapor operates on 3 “AAA” batteries (UM-4 or LR03) or a standard 9V 300mA
AC center-positive
To install the batteries:
1. Make sure Vapor is OFF.
2. Using a coin, loosen the screws of the battery cover.
3. Insert 3 new “AAA” batteries into the battery compartment as
shown. Do not use rechargeable batteries in Vapor.
4. Close the battery cover and tighten the screws to secure the
battery cover.
Important:While replacing the batteries, the CR2032 backup battery must be kept in Vapor,
if not, you will lose all saved information.
Battery Notice
• Install batteries correctly observing the polarity (+, -) signs to avoid leakage.
• Do not mix old with new batteries.
• Do not use different types of batteries.
• Remove batteries from Vapor when you are not going to use Vapor for a long time.
• Do not dispose of batteries in fire.
• Do not attempt to recharge ordinary batteries.
• Do not short-circuit supply terminals.
adaptor (not included).
Note: If the sound becomes weak or Vapor suddenly stops working, turn Vapor OFF
for 15 seconds, and then turn it back ON. If the problem persists it may be caused
by weak batteries. Please install a new set of 3 “AAA” batteries and try Vapor
again.
Replacing the Backup Battery
Vapor comes with a backup battery already installed. Before using Vapor, remove
the protective strip from the backup battery by pulling on the plastic tab. To avoid
damage to Vapor from leaky batteries, replace the backup battery at least once a
year.
To replace the backup battery:
1. Make sure Vapor is OFF.
2. Using a coin, loosen the screws of the battery cover.
3. Insert 1 CR2032 size battery as illustrated.
4. Close the battery cover and tighten the screws to secure the
battery cover.
2
Page 6

Important: While replacing the backup battery, the 3 “AAA” batteries must be kept in Vapor
or Vapor must be connected to the AC adaptor while the adaptor is plugged
in. If not, you will lose all saved information.
Powering Vapor ON and OFF
To turn the handheld ON, press and hold the Power button for 1 second or longer.
To turn the handheld OFF, press the Power button again.
Resetting Vapor
If Vapor stops working or doesn’t turn on:
1. Check your batteries to make sure they are fresh and installed properly.
2. Press the Reset button and then press the Power button again.
3. When prompted, “Delete all data? ( / ),” select to restart Vapor without
data loss.
If you are still having problems, we encourage you to contact our Consumer Services
Department at 1-800-521-2010 in the U.S. or 1-800-267-7377 in Canada with any
problems and/or suggestions that you have. A service representative will be happy
to assist you.
Setting the Date and Time
To set the date and time:
1. Press the Organizer button or tap Organizer in the main menu, and then tap Time.
2. Tap icon
3. Tap icon
4. Tap icon to change from AM to PM when you are in the 12-hour format.
5. Tap icon or to set the date.
6. When you are finished setting the date and time, tap Enter.
in the center.
or to set the hours and minutes.
3
Page 7

Detaching the Handheld from the Main Unit
Detach the handheld from the main unit as shown below:
Attaching the Handheld to the Main Unit
Attach the handheld to the main unit as shown below:
4
Page 8

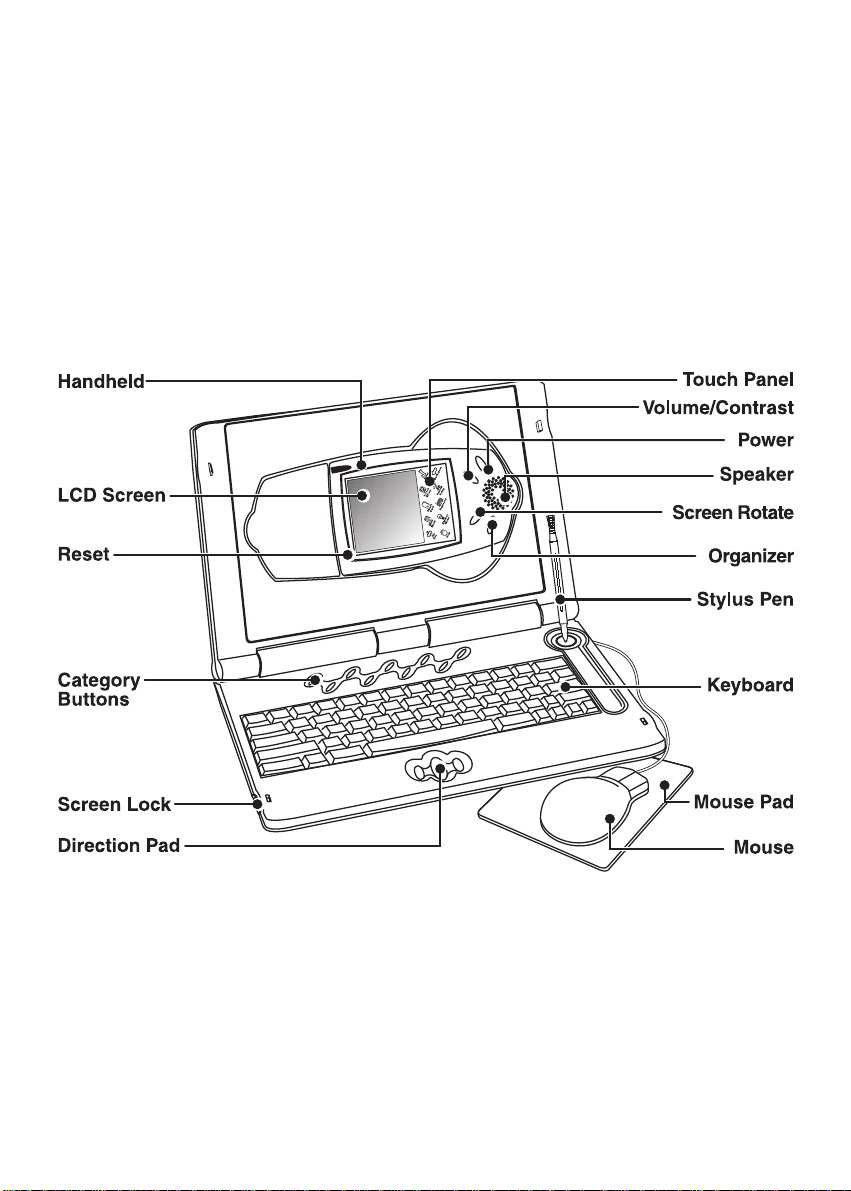
Your Vapor
The Handheld Buttons
Power Button
Press and hold this button for 1 second or longer to turn the handheld ON. Press
this button again to turn the handheld OFF.
Volume/Contrast Control Button
Press this button to change the sound level of the speaker and the darkness of the
screen. After pressing Volume/Contrast, a control panel will appear on the screen.
Use the stylus pen or mouse to select the level.
5
Page 9

Screen Rotate Button
Press this button to change the screen direction as shown below. This button only
works when the handheld is out of the main unit.
Organizer Button
Press this button to go to the Organizer activities.
The Category Buttons
Demo Button
Press this button to see how the handheld detaches from the main unit.
System Setup Button
Press this button to change the time and date formats, enter your personal information,
set your password for Diary, select a screen saver, or turn the bubble text (text that
appears to describe some icons) on or off (see System Setup icon in the Touch Panel
section for instructions).
Print Screen Button
Press this button to print what is displayed on that screen. Vapor is compatible with
VTech’s VT-41 printer only.
6
Page 10

Language Button
Press this button to go to the Language activities.
Mathematics Button
Press this button to go to the Mathematics activities.
Games Button
Press this button to go to the Games activities.
Applications Button
Press this button to go to the Applications activities.
Organizer Button
Press this button to go to the Organizer activities.
Smart Card Button
Press this button to play the Trivia Smart Card or to list all saved data in a Memory
Smart Card (see Smart Cards for details). If there is no card in the Smart Card slot
when this button is pressed, Vapor will show an error message.
Note: Smart Cards are sold separately.
The Keyboard
Letter Keys
Press these keys to type letters or words in activities.
7
Page 11

Number Keys
Press these keys to type numbers in activities.
Function Keys
Press this key to confirm a selection or an answer.
Press this key to exit the current screen and go back to the
previous screen.
Press this key to type capital letters or to use the symbols shown
on the top half of some keys.
Press this key to change fields or move the cursor forward.
Press this key to type all capital letters. Press Caps Lock once to
activate this key. Press Caps Lock again to deactivate this key.
Press this key to delete the last character typed.
Press Shift + this key to use symbols that are not located on any of
the keys.
Press this key to see instructions or questions again.
Press this key to change the level of difficulty in an activity.
Press this key to see the correct answer for questions in certain
activities or to use the Toolbar in other activities. (see Answer/Menu
icon in the Touch Panel section for instructions).
Press this key to get helpful hints about the activities.
The Touch Panel
There are ten icons on the touch panel. To use these icons, tap on them with the
stylus pen.
8
Page 12

Esc Icon
Tap this icon to exit the current screen and go back to the previous screen.
Main Menu Icon
Tap this icon to display the main menu.
Enter Icon
Tap this icon to confirm a selection or an answer.
Backspace Icon
Tap this icon to delete the last character selected or typed.
Keyboard Icon
Tap this icon to use the on-screen keyboard. This is used in place of the
real keyboard.
To use the on-screen keyboard:
1. Tap this icon to display the on-screen keyboard.
2. To enter data, tap the letter, number, and symbol icons with the stylus pen.
3. To enter capital letters, tap icon
4. To enter numbers and symbols, tap icon
go back to the letters, tap icon or icon .
5. Use the Backspace icon to delete a mistyped character.
. To go back to lower case letters, tap icon .
. To use more symbols, tap or . To
Answer/Menu Icon
Tap this icon to see the correct answer for questions in certain activities or
to use the Toolbar in other activities.
To see an answer to a question or activity:
If you are having difficulty with a question or activity, tap this icon to see its answer.
Note: These activities will show the answer:
All Language and Mathematics activities, Number Path, Strange Trivia, Planet Trivia,
Q&A Tester, and the German/French/Spanish Testers.
To use the Toolbar:
Tap this icon to do one of the following functions: New, Open, Save, Delete, Search,
or Print. Not every activity uses all those functions. Only available icons for each
activity will appear in the Toolbar.
9
Page 13

Note: These activities use the Toolbar:
Slide Puzzle Maker, Q&A, Calendar, Phone Book, Face It, Diary, To Do List, Money
Manager, Note Pad, Currency Converter, and Smart Cards.
System Setup Icon
Tap this icon to change the time and date formats, enter your personal
information, set your password for Diary, select a screen saver, and turn the
bubble text setting on or off.
To change the time format:
1. Tap the System Setup icon to display the menu.
2. Tap icon
3. Tap the format you want the time displayed in (12-hour or 24-hour time) and tap Enter.
To change the date format:
1. Tap the System Setup icon to display the menu.
2. Tap icon
3. Check the box of the format you want to use by tapping the box on the screen. Choose
between MM/DD/YYYY and DD/MM/YYYY.
4. Tap Esc to exit.
To enter your personal information:
1. Tap the System Setup icon to display the menu.
2. Tap icon
3. Enter your name, birth date, and any other information.
4. Tap Esc to exit.
To set a password for the Diary:
1. Tap the System Setup icon to display the menu.
2. Tap icon
3. Tap icon .
4. The first time you enter a password, tap Enter for your original password.
5. When you see New Password scrolling across the screen, you can now enter your
password and then tap Enter.
6. Enter your password again to confirm and then tap Enter.
in the System Setup menu and tap Enter.
in the System Setup menu and tap Enter.
in the System Setup menu and tap Enter.
in the System Setup menu and tap Enter.
10
Page 14

To change your password:
1. Tap the System Setup icon to display the menu.
2. Tap icon in the System Setup menu and tap Enter.
3. Tap icon .
4. Enter your current password and tap Enter.
5. Enter a new password and tap Enter.
6. Enter the new password again to confirm and then tap Enter.
To select a screen saver:
1. Tap the System Setup icon to display the menu.
2. Tap icon
3. Select one of the four screen savers by tapping on it.
4. To choose the length of time you want the screen saver to appear after not using
Vapor, tap icon
this feature off by tapping off on that screen).
5. Tap Esc to exit.
in the System Setup menu.
and choose between 30-90 seconds (you may also choose to turn
To turn the bubble text on and off:
1. Tap the System Setup icon to display the menu.
2. Tap icon
3. Tap the box to have the bubble text on or off.
4. Tap Esc to exit.
in the System Setup menu and tap Enter.
Help Icon
Tap this icon to get helpful hints about the activities.
Screen Effect Icon
Vapor has four different screen effects that are used for fun.
11
 Loading...