

Vodafone Smart X9 User Manual

Smart X9
User Manual

About this manual
Thank you for choosing this mobile phone. In order to keep
your phone in its best condition, please read this manual and
keep it for future reference.
Copyright
Copyright © 2018 Vodafone Group
All rights reserved.
No part of this publication may be quoted, reproduced,
translated or used in any form or by any means, electronic or
mechanical, including photocopying and microfilm, without
the prior written permission of Vodafone Group.
Notice
Vodafone Group reserves the right to make modifications on
print errors or update specifications in this guide without prior
notice. This manual has been designed with the utmost care
to ensure the accuracy of its content. However, all
statements, information and recommendations contained
therein do not constitute a warranty of any kind, either
expressed or implied. We offer self-service for our smart
terminal device users.
Disclaimer
Vodafone Group expressly disclaims any liability for faults and
damages caused by unauthorised modifications of the
software.
Images and screenshots used in this manual may differ from
the actual product. Content in this manual may differ from
the actual product or software.
1

Trademarks
Android is a trademark of Google LLC; Oreo is a trademark of
Mondelez International, Inc. group.
The Bluetooth
trademarks owned by the Bluetooth SIG, Inc. and any use of
such marks by Vodafone Group is under license.
®
word mark and logos are registered
microSDXC Logo is a trademark of SD-3C, LLC.
Qualcomm
®
Snapdragon™ processors are products of
Qualcomm Technologies, Inc.
Qualcomm and Snapdragon are trademarks of Qualcomm
Incorporated, registered in the United States and other
countries. Used with permission.
Other trademarks and trade names are those of their
respective owners.
Version No.: R1.0
Edition Time: July 19, 2018
2

Contents
Getting started ...................................................... 8
Getting to know your phone ..............................................8
Knowing the keys...................................................................9
Installing the nano-SIM card and the microSD™ card
................................................................................................... 10
Charging the battery .......................................................... 11
Extending the battery life ................................................. 13
Powering on/off ................................................................... 13
Setting up for the first time ............................................. 14
Locking/unlocking the screen and keys .................... 14
Using the touch screen .................................................... 15
Getting to know the home screen ................................ 17
Personalising ...................................................... 21
Changing the system language ..................................... 21
Setting the date and time ................................................ 21
Changing ringtone, notification and alarm sound.. 22
Turning on/off other sounds and vibration ............... 22
Adjusting volume ................................................................ 23
Using do not disturb mode .............................................. 23
Adding a mute switch on the lock screen .................. 25
Applying new wallpapers .................................................. 26
Changing screen brightness ........................................... 26
Using night light .................................................................. 27
Showing or hiding the navigation keys ....................... 27
Protecting your phone with screen locks .................. 27
Using your fingerprint ....................................................... 28
Protecting your phone with screen pinning.............. 30
3

Knowing the basics ........................................... 32
Monitoring the phone status .......................................... 32
Managing notifications ..................................................... 33
Managing shortcuts and widgets .................................. 35
Organising with folders ..................................................... 36
Rearranging the favourites tray ...................................... 37
Using app shortcuts ........................................................... 37
Notification dots .................................................................. 38
Entering text .......................................................................... 39
Editing text ............................................................................. 42
Opening and switching apps ........................................... 43
Use two apps in split-screen mode ............................... 44
Uninstalling an app ............................................................. 44
Connecting to networks and devices .......... 45
Connecting to mobile networks .................................... 45
Connecting to Wi-Fi (WLAN) ............................................ 46
Using Wi-Fi Direct® .............................................................. 49
Connecting to Bluetooth devices ................................. 50
Exchanging data via NFC................................................... 52
Using tap & pay .................................................................... 52
Connecting to your computer via USB ........................ 53
Using USB On-The-Go (OTG) ........................................... 54
Removing or Erasing the microSD card ...................... 55
Sharing your mobile data connection ......................... 55
Connecting to virtual private networks ...................... 58
Using emergency mode ................................................... 60
Phone calls .......................................................... 62
Placing and ending calls .................................................. 62
Answering or rejecting calls ............................................ 63
4

Working with the call history .......................................... 64
Calling your contacts ......................................................... 65
Checking voicemail ............................................................ 65
Using options during a call .............................................. 66
Managing multi-party calls .............................................. 66
Adjusting your call settings ............................................. 68
Contacts ................................................................ 72
Checking contact details .................................................. 72
Adding a new contact ........................................................ 72
Setting up your own profile ............................................. 72
Importing, exporting, and sharing contacts .............. 73
Working with favourite contacts ..................................... 74
Searching for a contact ..................................................... 75
Editing contacts ................................................................... 75
Web accounts ...................................................... 76
Adding or removing accounts ........................................ 76
Configuring account sync ................................................ 77
Messages .............................................................. 78
Opening the Messages screen........................................ 78
Sending a message ............................................................. 78
Adding an attachment ....................................................... 79
Replying to a message ...................................................... 79
Forwarding a message ....................................................... 80
More message options ...................................................... 80
Web browser ........................................................ 82
Opening the browser ......................................................... 82
Using multiple browser tabs ............................................ 82
Downloading files ............................................................... 83
5

Changing Chrome settings .............................................. 83
Camera ................................................................. 84
Capturing a photo ............................................................... 84
Recording a video ............................................................... 86
Using manual camera mode .......................................... 87
Using other camera modes ............................................. 88
Customising camera/camcorder settings ................. 88
Gallery ................................................................... 92
Opening gallery ................................................................... 92
Working with albums ......................................................... 92
Working with pictures ........................................................ 93
Retouching your pictures ................................................ 94
Making a GIF picture or a collage .................................. 95
Playing videos ...................................................................... 96
Music ..................................................................... 97
Viewing your music library .............................................. 97
Setting a song as the default ringtone or notification
sound ....................................................................................... 97
Playing music ....................................................................... 98
Managing playlists .............................................................. 99
Video ................................................................... 100
Opening the video library ............................................. 100
Playing and controlling videos ................................... 100
Managing video files ....................................................... 101
Voice recorder .................................................. 102
Recording a voice memo .............................................. 102
Playing a voice memo .................................................... 102
6

Editing a voice memo ..................................................... 102
More apps ........................................................... 104
Calculator ........................................................................... 104
Clock ..................................................................................... 104
Downloads .......................................................................... 105
File manager ...................................................................... 105
Private Space ...................................................................... 106
Google apps ....................................................................... 109
Settings ............................................................... 111
Network & Internet .......................................................... 111
Connected devices .......................................................... 113
Apps & notifications ........................................................ 114
Features ............................................................................... 117
Battery .................................................................................. 118
Display .................................................................................. 118
Sound ................................................................................... 119
Storage ................................................................................. 120
Security & location .......................................................... 120
Accounts .............................................................................. 123
Accessibility ........................................................................ 124
Google .................................................................................. 124
System ................................................................................. 125
Software updates ............................................................. 126
Troubleshooting ............................................... 127
7
/
y
Getting started
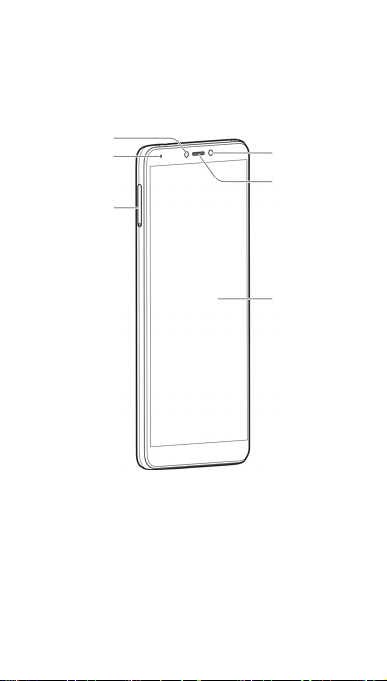
Getting to know your phone
8
Indicator light
Front camera
nano-SIM
microSD card
tra
Proximity & light
senso r
Earpiece
Tou ch scr ee n
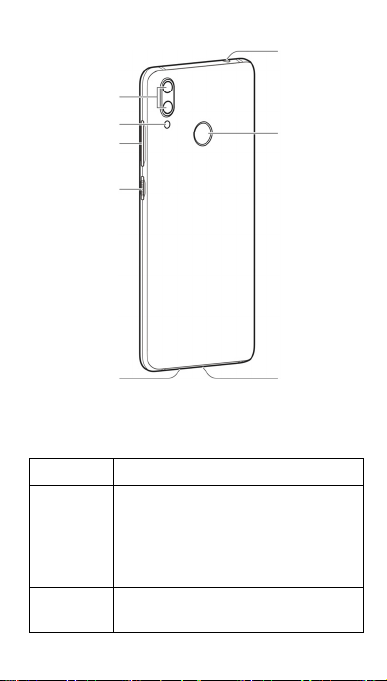
r
Dual-lens
camera
Dual-flash
Volume key
Power key
Headset jack*
Fingerprint
senso r
Speake
Charging/USB
Type -C j ack
* Supports CTIA headsets only.
Knowing the keys
Key Function
Power key Press and hold to power off, restart, turn
Volume key Press or hold either end of the key to turn
on or off flight mode, or capture the
screen.
Press to turn off or on the screen
display.
the volume up or down.
9
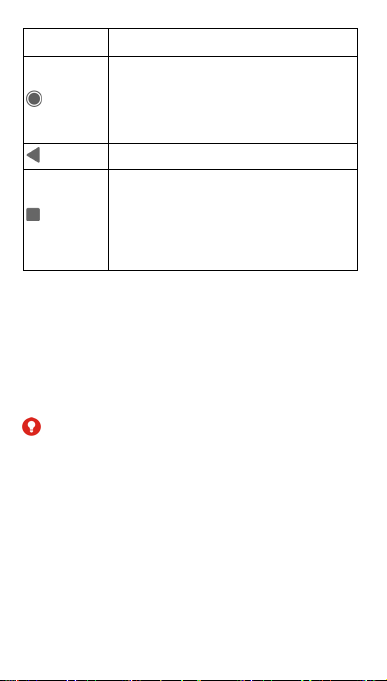
Key Function
Touch to return to the home screen
(Home)
(Back)
(Recent apps)
from any application or screen.
Touch and hold to use the Google
Assistant.
Touch to go to the previous screen.
Touch to see recently used apps.
Double-tap to switch to the most recent
application.
Touch and hold while using an app to
activate split-screen mode.
Installing the nano-SIM card and the
microSD™ card
A microSD card (optional, not included) can be installed or
removed while the phone is turned on. You need to unmount
the microSD card before removing it. See Remove the
microSD card from your phone.
WARNING!
To avoid damage to the phone, do not use any other kind of
SIM cards, or any non-standard nano-SIM card cut from a SIM
card. You can get a standard nano-SIM card from your
Vodafone service.
1. Insert the tip of the tray eject tool into the hole on the
card tray.
10
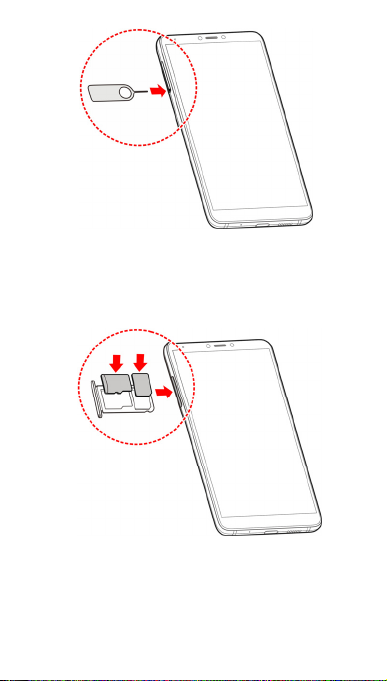
2. Pull out the card tray. You can place a nano-SIM card on
the right card slot, and place a microSD card on the left
card slot, as shown. Carefully slide the tray back into
place.
Charging the battery
Your phone’s battery should have enough power for the
phone to turn on, find a network signal, and make a few calls.
You should fully charge the battery as soon as possible.
11
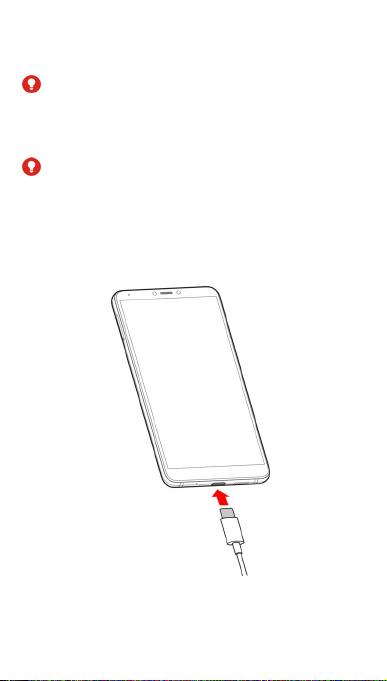
If the battery is low, there will be a pop-up message on the
screen.
WARNING!
Use only approved chargers and USB Type-C cables. The use
of unapproved accessories could damage your phone or, in
the worst case, cause the battery to explode.
WARNING!
Do not remove the back cover. The battery is not
removable. Removal may cause fire or explosion.
1. Connect the charger adapter to the phone charging jack.
Do not force the charger connector into the phone
charging jack.
12

2. Connect the charger to a standard AC power outlet. If the
phone is on, you’ll see a charging icon, such as
, appear on the status bar.
3. Disconnect the charger when the battery is fully charged.
NOTE:
If the battery is extremely low, you may be unable to power
on the phone even when it is being charged. In this case, try
again after charging the phone for at least 20 minutes.
Contact the customer service if you still cannot power on the
phone after prolonged charging.
or
Extending the battery life
Active applications, screen brightness levels, Bluetooth and
Wi-Fi usage and GPS functionality can drain your battery. You
can follow the helpful tips below to help conserve your
battery power:
Use the Power-saver feature in Settings. See Battery.
Reduce the screen backlight time.
Lower the screen brightness.
Turn Wi-Fi, Bluetooth and auto-sync off when not in use.
Disable the GPS function when not in use. Most
applications using this function will periodically query
the GPS satellites for your current location, and each
query drains your battery.
Powering on/off
Press and hold the Power key to turn on your phone.
To power off, press and hold the Power key to open the
options menu and touch Shut down.
13

NOTE:
If the phone freezes or takes too long to respond, you can
press and hold the Power key for about 16 seconds to restart
the phone.
Setting up for the first time
When you first power on your phone after you purchase it or
reset it to factory settings (see Reset options), you will need
to set up the device before use.
Select the language field and follow the on-screen prompts
to set up your phone.
Locking/unlocking the screen and keys
Your phone allows you to quickly lock the screen and keys
(put the phone to sleep mode) when not in use and to turn
the screen back on and unlock it, as needed.
To lock the screen and keys:
To quickly turn the screen off and lock the keys, press the
Power key.
NOTE:
To save battery power, the phone automatically turns off the
screen after some time of inactivity. You will still be able to
receive messages and calls while the phone screen is off.
To unlock the screen and keys:
1. Press the Power key to turn the screen on.
2. Swipe up on the screen.
- or Swipe from a shortcut icon at the bottom to open the
related app or feature.
14

- or Touch a notification twice consecutively to open the
related app.
NOTE:
If you have set a fingerprint, an unlock pattern, a PIN or a
password for your phone (see Protecting your phone with
screen locks and Using your fingerprint), you’ll need to press
your finger against the fingerprint sensor, draw the pattern or
enter the PIN/password to unlock your screen.
NOTE:
You can edit the shortcut icons on the lock screen. Swipe up
on the home screen and touch Settings > Display > Edit
lock screen shortcuts, and then touch Lock screen layout
to set the number of shortcuts, touch a shortcut to change it,
or touch Add new shortcut to add one.
Using the touch screen
Your phone’s touch screen enables you to control actions
through a variety of touch gestures.
Touch
When you want to type using the onscreen keyboard,
select items on the screen such as the application and
settings icons, or press the onscreen buttons, simply
touch them with your finger.
15
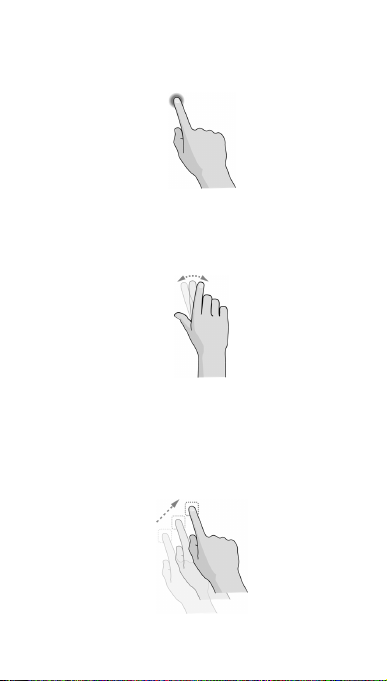
Touch and Hold
To open the available options for an item (for example, a
message or link in a web page), touch and hold the item.
Swipe or Slide
To swipe or slide means to quickly drag your finger
vertically or horizontally across the screen.
Drag
To drag, press and hold your finger with some pressure
before you start to move your finger. While dragging, do
not release your finger from the screen until you have
reached the target position.
16

Pinch
In some apps (such as Maps, web browser, and Gallery),
you can zoom in and out by placing two fingers on the
screen at once and pinching them together (to zoom out)
or spreading them apart (to zoom in).
Rotate the screen
For most screens, you can automatically change the
screen orientation from portrait to landscape by turning
the phone sideways.
NOTE:
The auto-rotate feature needs to be enabled for the
screen orientation to automatically change. Swipe up on
the home screen and touch Settings > Display, and
then switch on Auto-rotate screen if it is turned off.
You can also access the screen rotation control by sliding
down the status bar twice, slide left and touch
Auto-ro tate/Portrai t.
Getting to know the home screen
The home screen is the starting point for your phone’s
applications, functions, and menus. You can customise your
home screen by adding shortcuts, folders, widgets, and more.
17
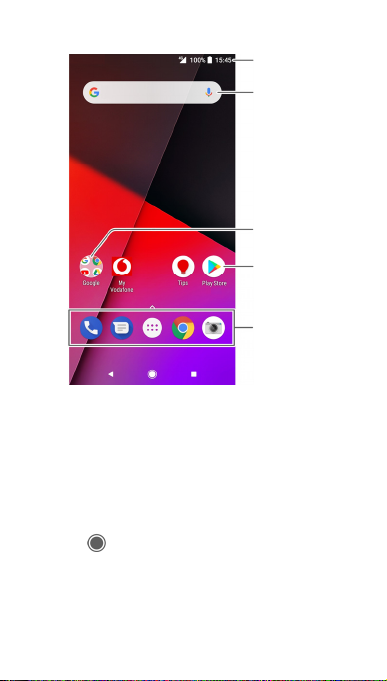
Status bar
Google search
Folde r
Shortcut
Favo urites tray
Extended home screen panels
Your home screen is extendable, providing more space for
shortcuts, widgets, or folders. Simply swipe right to left on the
home screen to see the extended panels, if already
configured. You can also add or remove home screen panels,
or adjust their order.
To add a new home screen panel:
1. Touch
2. Touch and hold an item such as a shortcut, a folder or a
widget on the screen and drag it to the right edge of the
screen to create a new home screen panel and put the
item on it.
to access the home screen.
18

To move a home screen panel:
1. Touch and hold an empty area of the home screen and
slide left or right to view the home screen thumbnails.
2. Touch and hold a thumbnail and drag it left or right to
the place you need.
To delete a home screen panel:
No empty home screen panel is allowed to exist. If the
shortcut, widget or folder is the only item on the current
home screen panel, the panel will be deleted as you remove
the item.
To open your favourite home screen app:
You can slide left to right on the home screen to open your
favourite app quickly, which will require you to set it up first
time round.
Slide left to right on the home screen to access your favourite
home screen app.
NOTE:
Swipe up on the home screen and touch Settings > Display,
and then touch Favourite app panel to turn on or off this
feature, or touch Favourite home screen app to select your
favourite app.
To lock or unlock your home screen layout:
After the home screen layout is locked, you cannot
add/remove /adjust the home screen panel, or
add/remove/move items on the home screen.
1. To do this simply, touch and hold an empty area of the
home screen to access the home screen thumbnails.
2. Touch the
lock/unlock the home screen layout.
/ symbol at the top of the screen to
19

NOTE:
Swipe up on the home screen and touch Settings >
Display > Lock home screen layout to lock or unlock the
home screen layout.
20

Personalising
Changing the system language
1. Swipe up on the home screen and touch Settings >
System > Languages & input > Languages. The first
language in the list is the default system language.
2. Touch Add a language and then the language you need.
Select the regional variant of the language if prompted.
3. Touch and hold a language and move it to the top to
switch to that language.
NOTE:
To remove languages from the list, touch
select the languages you want to delete.
Setting the date and time
1. Swipe up on the home screen and touch Settings >
System > Date & time.
2. Set the date, time, time zone, and time format.
To adjust the date and time automatically, turn on
Automatic date & time.
To adjust the date and time manually, turn off
Automatic date & time and touch Set date / Set
time to change the date and time.
To adjust the time zone automatically, turn on
Automatic time zone.
To adjust the time zone manually, turn off
Automatic time zone and touch Select time zone
to set the correct time zone.
To adjust the time format, touch Use 24-hour
format.
21
> Remove and

Changing ringtone, notification and alarm
sound
You can customise the default incoming call ringtone,
notification sound, and alarm sound.
1. Swipe up on the home screen and touch Settings >
Sound > Ringtones.
2. Touch Phone ringtone, Default notification sound, or
Default alarm sound.
3. Select the ringtone you want to use.
NOTE:
If you have additional audio files saved in the internal
storage or the microSD card, touch Add ringtone at the
bottom of the ringtone list to choose one as the
ringtone.
4. Touch OK.
NOTE:
See Set a ringtone for a contact for how to assign a special
ringtone to an individual contact.
NOTE:
To make the phone ringtone fade in when a call comes, touch
Settings > Sound and switch on Gradually increase
ringtone.
Turning on/off other sounds and vibration
1. Swipe up on the home screen and touch Settings >
Sound.
2. Tou c h Dial pad tones, Screen-locking sounds,
Charging sounds, Touch sounds, Vibrate on tap, or
Gradually increase ringtone.
22

Adjusting volume
1. Swipe up on the home screen and touch Settings >
Sound.
2. Drag the sliders below Ringtone volume, Notification
volume, Media volume, and Alarm volume to adjust
the volume for each type of audio.
NOTE:
You can adjust the media volume when a media application is
in use by pressing the Volume key. If no media application is
active, press the Volum e key to adjust ringtone volume (or
the earpiece volume during a call).
Using do not disturb mode
You can limit interruptions with Do not disturb mode. This
mode silences your phone so that it doesn’t make sounds or
vibrate when you don’t want it to.
To turn on Do not disturb mode:
1. Swipe down from the top of the screen with two fingers
to access the Quick Settings.
2. Touch the word “Do not disturb” and turn on the switch
at the top right corner.
3. Touch Total silence, Alarms only, or Priority only
depending on whether you want to allow exceptions. You
can customise the exceptions when Priority only is
selected.
4. Touch Until you turn off Do not disturb if you want to
turn off Do not disturb mode manually; touch
to set the time before Do not disturb mode turns off
automatically.
5. Touch DONE.
23
or

NOTES:
Press the Volume key when no media application is
active to show the volume bar. Drag the slider to the left
or keep pressing the Volume down key to turn on
vibration. Press the key again to turn on Alarms only.
To turn off Do not disturb mode quickly, press either end
of the Volume key when the screen is on and then touch
TURN OFF NOW.
To set exceptions for Do not disturb mode (Priority only):
You can set reminders, events, and callers that you specify as
exceptions when Do not disturb mode is set to Priority only.
1. Swipe up on the home screen and touch Settings >
Sound > Do not disturb preferences > Priority only
allows.
2. Turn on the switch next to the items you want to allow.
Touch Messages or Calls and set who can alert you of
their messages or calls.
NOTE:
When Repeat callers is switched on, you’ll receive a
notification if someone calls you a second time within a 15
minute period, regardless of whether notifications from that
person receive priority status.
To set a Do not disturb rule:
If you want to allow all notification alerts through most of the
time, but want to limit alerts during certain times (like at
night or on the weekends), you can set a rule for Do not
disturb mode.
1. Swipe up on the home screen and touch Settings >
Sound > Do not disturb preferences > Add more.
24

2. Enter the rule name, select Time rule or Event rule.
3. Enter a name for the rule and touch OK.
4. For a time rule, set the days, the start and end times, and
set Do not disturb preferences.
whether to allow the rule to stop at either the rule end
time or by the next alarm you've set in the Clock app.
For an event rule, select a Calendar account you want to
make the rule for, select the type of reply you want to
use, and set Do not disturb preferences.
NOTE:
To turn on or off a rule, touch it to open its details screen and
then touch the on/off switch.
To block visual disturbances:
You can set Do not disturb mode to block visual disturbances
such as notifications.
1. Swipe up on the home screen and touch Settings >
Sound > Do not disturb preferences > Block visual
disturbances.
2. Touch the on/off switches to choose whether to block
visual notifications when the screen is on and off.
You can also choose
Adding a mute switch on the lock screen
This feature allows you to quickly enable or disable silent
mode on your phone via a virtual mute switch on the lock
screen.
To add the mute switch:
1. Swipe up on the home screen and touch Settings >
Sound.
2. Switch on Silent mode mute switch.
25

3. Touch Turn on mute switch to to select Allow alarms
only or Total silence for the mute switch.
To use the mute switch:
1. Slide left on the mute switch bar on the right side of the
lock screen.
2. Touch the switch to enable or disable silent mode.
Applying new wallpapers
You can set the wallpaper for the home screen and lock
screen.
1. Touch and hold an empty place on the home screen and
then touch WALLPAPERS.
2. Pick an image from Gallery, Photos or Wallpapers, or
an animation from Live wallpapers. Pinch on the image
from Gallery and Photos to crop it if needed.
3. If prompted, select to set the wallpaper for the home
screen, the lock screen or both.
NOTE:
In addition, you can swipe up on the home screen and touch
Settings > Display > Wallpaper to pick an image from
Gallery, Photos or Wallpapers, or an animation from Live
wallpapers.
Changing screen brightness
1. Swipe up on the home screen and touch Settings >
Display > Brightness level.
2. Drag the slider to manually adjust the screen brightness.
NOTE:
Your phone can automatically adjust the screen brightness
for available light. Touch
beside the slider to turn the
26

feature on or off.
Using night light
You can enable Night Light to tint the screen amber for eye
care, or set a schedule when Night Light will be turned on.
1. Swipe up on the home screen and touch Settings >
Display > Night Light.
2. Turn on the switch beside Status to enable Night Light.
- or If you want to set a schedule when Night Light will be
turned on automatically, touch Schedule and select an
option.
3. Drag the slider below Intensity to adjust the eye care
effect when Night Light is on.
Showing or hiding the navigation keys
1. Swipe up on the home screen and touch Settings >
Features > Navigation keys.
2. To hide the navigation keys, switch off Always show the
navigation keys and touch
To display the navigation keys again, swipe up from the
bottom of the screen.
on the navigation bar.
Protecting your phone with screen locks
You can protect your phone by creating a screen lock. When
it is enabled, you need to swipe up on the screen, draw a
pattern or enter a numeric PIN or password to unlock the
phone’s screen and keys.
1. Swipe up on the home screen and touch Settings >
Security & location > Screen lock.
2. Touch None, Swipe, Pattern, PIN or Password.
27

Touch None to disable the screen lock.
Touch Swipe to enable screen lock and allow
unlocking with a ‘swipe' gesture. You can unlock the
screen by touching the display and sliding up.
Touch Pattern to create a pattern that you must
draw to unlock the screen.
Touch PIN or Password to set a numeric PIN or a
password that you must enter to unlock the screen.
3. For Pattern, PIN, or Password lock, select whether to
protect your phone by requiring your pattern, PIN or
password before it starts up. Then follow the onscreen
prompts to continue.
NOTE:
When this feature is enabled, your phone cannot receive
calls, messages, or notifications until it starts up.
4. For Pattern, PIN, or Password lock, select how you want
notifications and their contents to show when the phone
is locked. Then touch DONE.
CAUTION:
Remember the pattern, PIN or password you set. Otherwise,
you will have to reflash the phone software to use the phone
and all data in your phone will be erased.
Using your fingerprint
With the fingerprint sensor on the back of your phone, you
can register up to 5 fingerprints and use them to unlock the
phone, or access Private Space. You can also simply press the
fingerprint sensor to take photos or answer calls, or swipe
down on the fingerprint sensor to open the notification panel.
28

NOTE:
The fingerprint feature is usable only when the screen lock
(Pattern , PIN or Password) is enabled. When the screen lock
is reset to None or Swipe, all registered fingerprints are
erased.
To register a fingerprint:
1. Swipe up on the home screen and touch Settings >
Security & location > Fingerprint > Fingerprint
management.
2. Enter the screen lock pattern, PIN or password you set. If
you haven’t set a screen lock, follow the prompts to set
it.
3. Touch REGISTER or Add fingerprint.
4. Follow the prompts to record a finger.
5. Touch OK.
NOTE:
Touch an existing fingerprint record to change its name or
delete it.
To set touch-control functions:
1. Swipe up on the home screen and touch Settings >
Security & location > Fingerprint.
2. You can set the following options.
Take photo: Press the fingerprint sensor to take a
photo when the Camera app is opened. No
fingerprint verification is needed.
Answer call: Press the fingerprint sensor to answer
incoming calls. No fingerprint verification is needed.
View notification panel: Swipe down on the
fingerprint sensor to open the notification panel.
29
 Loading...