

Page 1
User manual
User manual
Smart Tab 4
Smart Tab 4
Vodafone
Power to you
1
Page 2

Table of Contents
1 Your device ...........................................................................5
1.1 Keys and connectors ....................................................................5
1.2 Getting started ................................................................................7
1.3 Home screen ....................................................................................9
2 Text input ............................................................................18
2.1 Using Onscreen Keyboard .......................................................18
2.2 Android keyboard ........................................................................18
2.3 Text editing ....................................................................................18
3 People .........................................................................................21
3.1 Consult your contacts ...............................................................21
3.2 Managing contact groups ........................................................22
3.3 Adding a contact .........................................................................22
3.4 Editing your contacts.................................................................23
3.5 Contacts importing, exporting and sharing......................24
3.6 Accounts .........................................................................................24
4 Messaging, Email .............................................................26
4.1 Messaging ...................................................................................26
4.2 Gmail/Email ..................................................................................32
4.3 Hangouts .....................................................................................38
5 Calendar & Time ...............................................................41
5.1 Calendar .......................................................................................41
5.2 Time ...............................................................................................43
6 Getting connected ...........................................................45
6.1 Connecting to the Internet .....................................................45
6.2 Browser .........................................................................................48
6.3 Connecting to Bluetooth devices .......................................56
2 3
6.4 Connecting to a computer ......................................................57
6.5 Sharing your tablet's mobile data connection................58
6.6 Connecting to virtual private networks .............................59
6.7 Configuring Internet (SIP) calling .........................................60
7 Google Play Store ........................................................62
7.1 Locate the item you want to download and install ......62
7.2 Download and install .................................................................63
7.3 Manage your downloads ..........................................................65
8 Multimedia applications ...............................................67
8.1 Camera .........................................................................................67
8.2 Gallery ...........................................................................................69
8.3 YouTube .......................................................................................71
8.4 Music .............................................................................................72
8.5 Video Player ...............................................................................74
9 Google Maps ...................................................................75
9.1 Get My Location ...........................................................................75
9.2 Search for a location ..................................................................76
9.3 Star a location ...............................................................................77
9.4 Get driving, public transportation or walking directions .
78
9.5 Arrangement of Layers .............................................................79
10 Others ..................................................................................80
10.1 Calculator ....................................................................................80
10.2 File Manager ...............................................................................80
10.3 Sound Recorder ........................................................................81
10.4 Other applications .....................................................................81
11 Settings ............................................................................82
11.1 Wireless & networks ...................................................................82
11.2 Device ...............................................................................................84
Page 3
11.3 Personal...........................................................................................86
11.4 Accounts .........................................................................................91
11.5 System .............................................................................................91
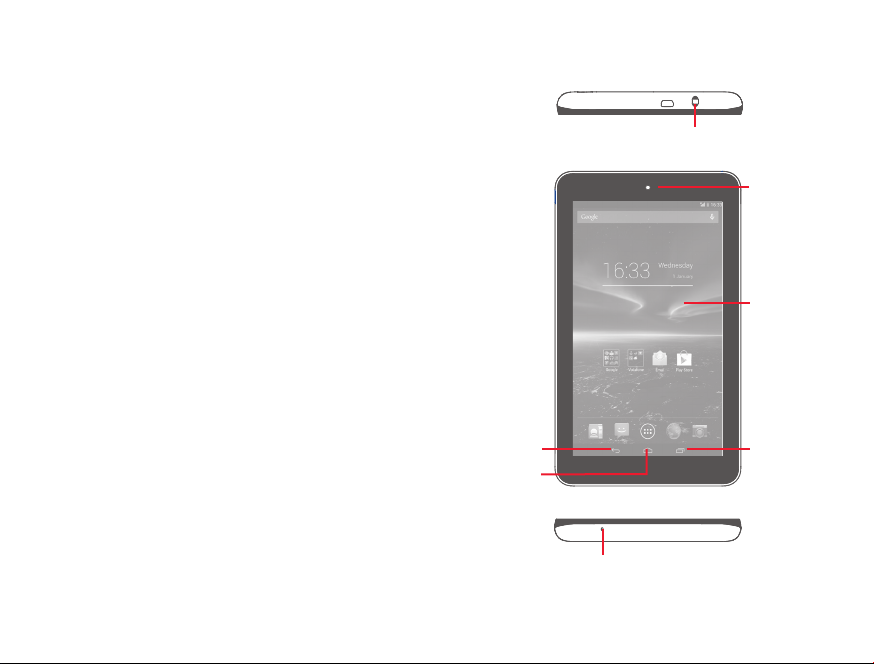
1 Your device
1.1 Keys and connectors
Headset connector
Front camera
Touch screen
Back key
Home key
Microphone
4 5
Multitask key
Page 4
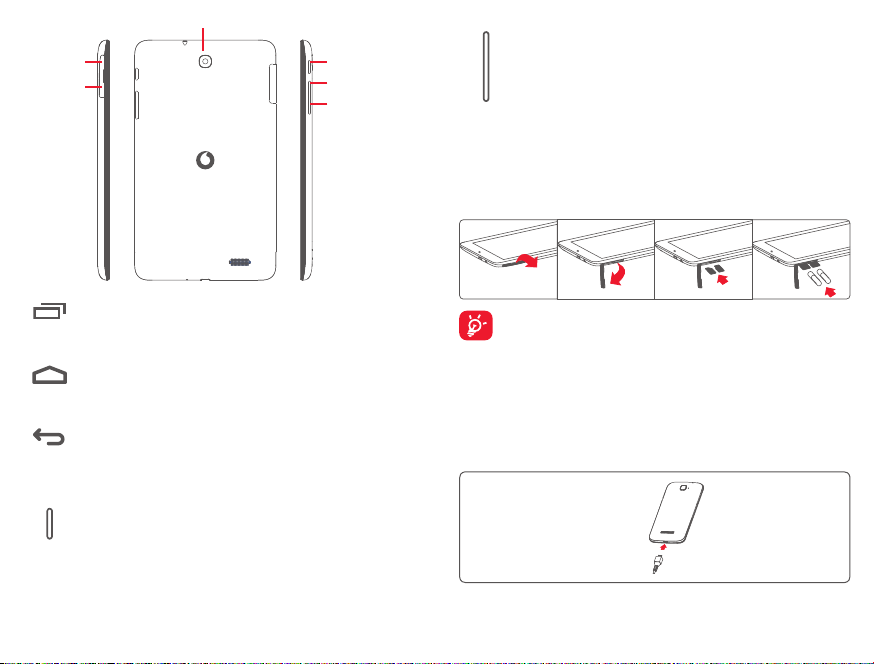
Micro Sim
microSD
Rear Camera
Power key
Volume up
Volume down
Volume Keys
• In Music/Video/Streaming mode, adjust the media
volume.
1.2 Getting started
1.2.1 Set-up
Inserting the micro SIM card & the microSD card
Multitask key
• Touch to open a list of thumbnail images of applications
you've worked with recently.
Home key
• While on any application or screen, touch to return to
the Home screen.
Back key
• Touch to go back to the previous screen, or to close
a dialog box, options menu, the notification panel, etc.
These keys are visible when the screen lights up.
Power key
• Press: Lock the screen/Light up the screen
• Press and hold: Power on or pop up the menu to get
more options, such as Power off, Restart, Airplane
mode, etc.
• Press and hold Power key and Volume down key to
capture a screenshot.
6 7
Before inserting/removing the SIM card and the microSD card,
you should ensure the tablet is off, to protect it from corruption
or damage. In addition, regularly removing or inserting the SD
card may cause the tablet to restart.
Your tablet only supports micro-SIM cards. Do not attempt to insert
other SIM types like mini and nano cards, otherwise you may damage
your tablet.
Charging the battery
To charge your tablet, connect the charger to your tablet and mains
socket.
Page 5
• When using your tablet for the first time, charge the battery fully
(approximately 5 hours).
You are advised to fully charge the battery (
indicated by the percentage on screen while the tablet is powered off.
The percentage increases as the tablet is charged.
To reduce power consumption and energy waste, when
battery is fully charged, disconnect your charger from the plug;
switch off Wi-Fi, GPS, Bluetooth or background-running
applications when not in use; reduce the backlight time,
etc. This device cannot be charged through usb computer
connection. Please plug in your charger before first usage.
). Charging status is
1.2.2 Power on your tablet
Hold down the Power key until the tablet powers on, unlock your
tablet(Slide, PIN, Password, Pattern, Face unlock or Voice unlock) if
necessary and confirm. The Home screen is displayed.
If you do not know your PIN code or if you have forgotten it, contact
your network operator. Do not leave your PIN code with your
tablet. Store this information in a safe place when not in use.
Set up your tablet for the first time
The first time you power on the tablet, you should set the following
options:
• Touch Get started..., then select the tablet's language.
• The device will search for service by itself. The process of activation
will take a few minutes
• Select your input keyboard, then touch Next.
• Select Mobile data connection you want to use, then touch Next.
• Set your date and timezone, you can also choose Automatic time
zone, then touch Next.
• Setup your Google account: Touch Set up now. If you have
a Google Account, touch Yes, then enter your user name and
password. If you forget your password, you can go to http://www.
google.com/ to retrieve it. Touch Next to skip to the next step.
8 9
• Touch Next ,then the Setup complete screen will display, touch
Finish to confirm.
When the tablet is powered on, you can connect to a Wi-Fi network,
without a SIM card inserted (refer to section "6.1.2 Wi-Fi"), to sign
into your Google account and to use some features.
1.2.3 Power off your tablet
Hold down the Power key until the pop-up menu appears, select
Power off to confirm.
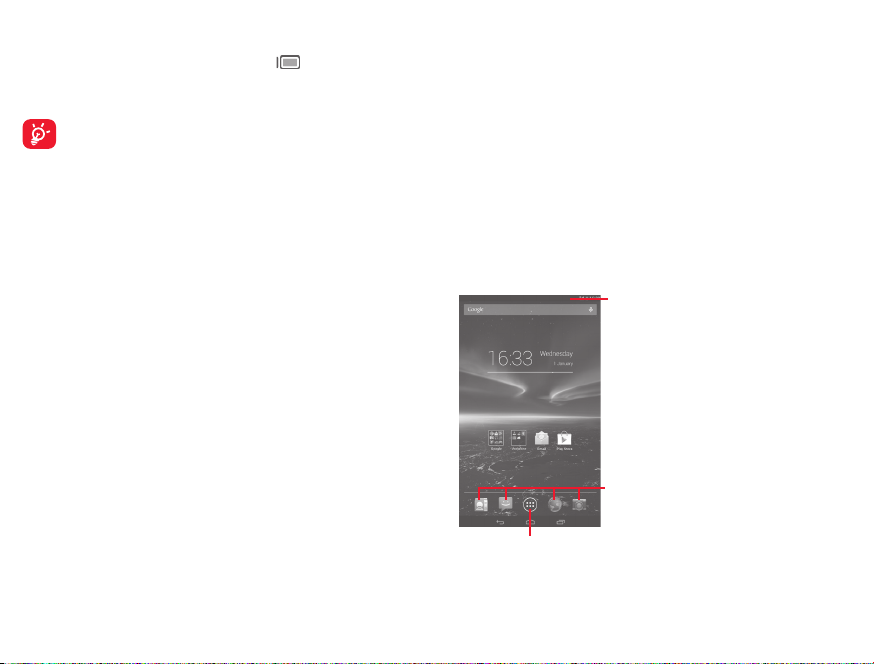
1.3 Home screen
You can bring all your favourite icons (applications, shortcuts, folders
and widgets) to your homescreen for quick access. Touch the Home
key to switch to Home screen.
Status bar
• Status/Notification indicators.
Favorite tray applications
• Touch to enter the application.
• Touch and hold to move or
Application tab
• Touch to see all applications.
The Home screen extends on either side of the screen to allow more
space for adding applications, shortcuts etc. Slide the Home screen
horizontally left and right to get a complete view of the Home screen.
change applications.
Page 6
The white short line at the lower part of the screen indicates which
screen you are viewing.
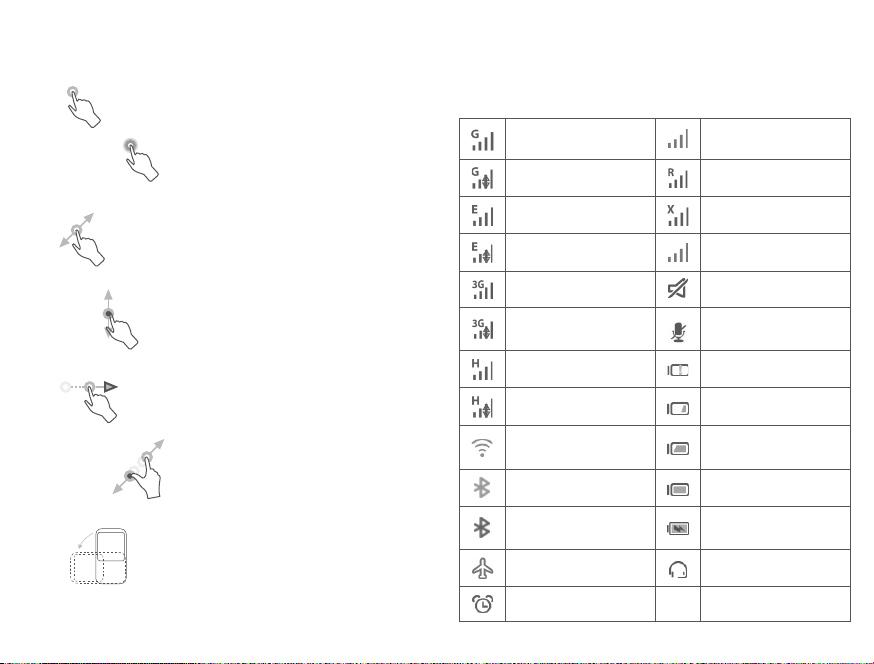
1.3.1 Using the touchscreen
Touch
To access an application, touch it with your finger.
Touch and Hold
Touch and hold the home screen to access Widgets and Downloaded
screen.
Drag
Place your finger on any item to drag it to another location.
Slide/Swipe
Slide the screen to scroll up and down the applications, images, web
pages… at your convenience.
Flick
Similar to swiping, but flicking makes it move quicker.
Pinch/Spread
Place your fingers of one hand on the screen surface and draw them
apart or together to scale an element on the screen.
Rotate
Automatically change the screen orientation from portrait to
landscape by turning the tablet sideways to have a better view.
10 11
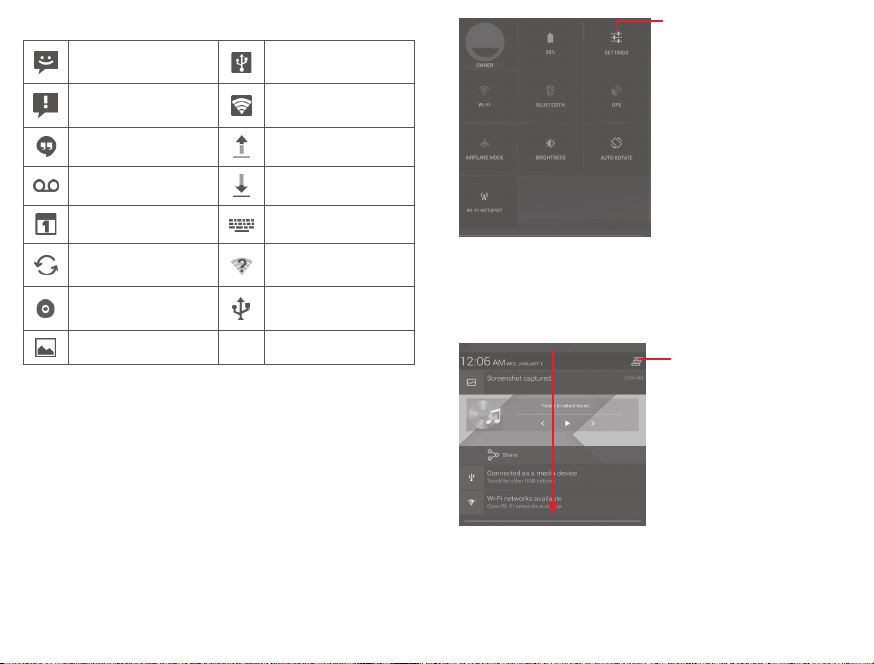
1.3.2 Status bar
From status bar, you can view both tablet status (to the right side)
and notification information (to the left side).
Status icons
GPRS connected No signal (gray)
GPRS in use Roaming
EDGE connected
EDGE in use Signal strength (blue)
3G connected Ringer is silenced
3G in use
HSPA 4G connected Battery is very low
HSPA 4G in use Battery is low
Connected to a Wi-Fi
network
Bluetooth is on Battery is full
Connected to a
Bluetooth device
Airplane mode Headset connected
Alarm is set
No SIM card inserted
Tablet microphone is
mute
Battery is partially
drained
Battery is charging
Page 7
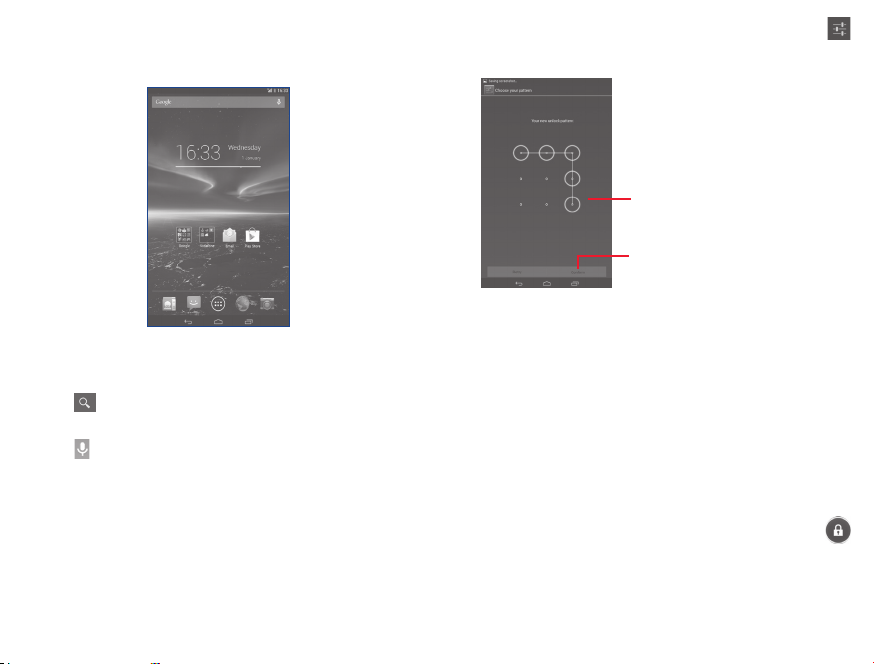
Notification icons
New text or multimedia
message
Problem with SMS or
MMS delivery
New Hangouts message Uploading data
New voicemail Downloading data
Upcoming event Select input method
Data is synchronizing
Song is playing
Screenshot captured
Touch and draw down the Status bar on the right to open the Quick
settings panel, drag it down on the left to open the Notification panel.
Touch and drag up to close panels.
Quick setting panel
Touch and drag down the Status bar on the right to open the Quick
settings panel, where you may enable or disable functions or change
modes by touching the icons.
USB tethering is on
Portable Wi-Fi hotspot
is on
An open Wi-Fi network
is available
Tablet is connected via
USB cable
Touch to access Settings,
where you can set more items
Notification panel
When there are notifications, touch and drag down the Status
bar on the left to open the Notification panel to read the detailed
information.
Touch to clear all event–based
notifications (other ongoing
notifications will remain)
12 13
Page 8
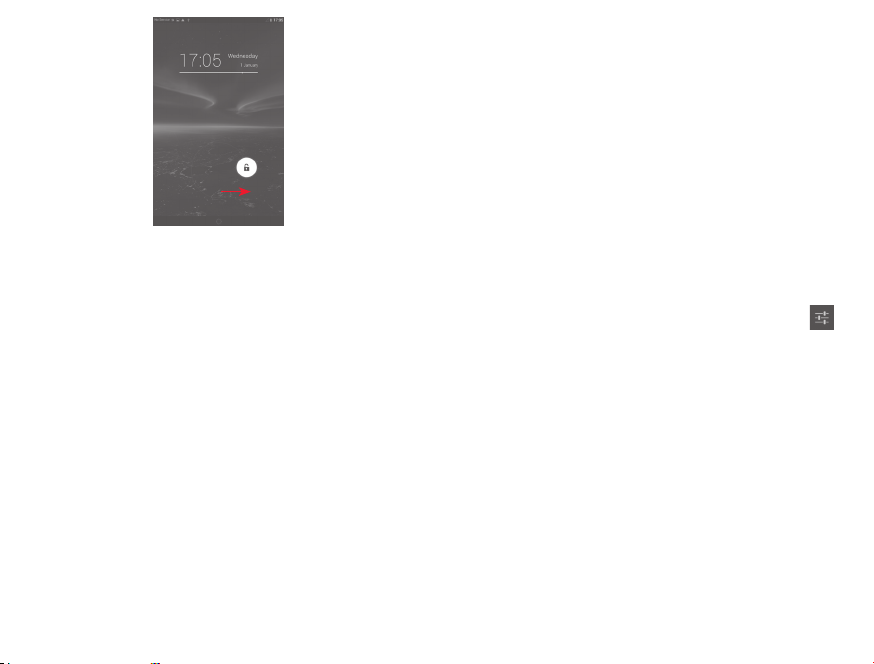
1.3.3 Search bar
The tablet provides a Search function which can be used to locate
information within applications, the tablet or the web.
Search by text
• Touch Search bar from the Home screen.
• Enter the text/phrase you want to search for.
• Touch
Search by voice
• Touch
• Speak the word/phrase you want to search for. A list of search
results will display for you to select from.
on the keyboard if you want to search on the web.
from Search bar to display a dialog screen.
1.3.4 Lock/Unlock your screen
To protect your tablet and privacy, you can lock the tablet screen by
choosing slide or creating a variety of patterns, PIN or password, etc.
To create a screen unlock pattern (refer to section "Screen lock"
for detailed settings)
14 15
• Drag down the Quick settings panel and touch the settings icon
to enter Settings, then touch Security\Screen lock\Pattern.
• Draw your own pattern.
Draw your unlock pattern
Touch to confirm by drawing
pattern again
To create a screen unlock PIN/Password
• Touch Settings\Security\Screen lock\PIN or Password.
• Set your PIN or password.
To lock tablet screen
Press the Power key once to lock the screen.
To unlock tablet screen
Press the power key once to light up the screen, draw the unlock
pattern you have created or enter PIN or password, etc. to unlock
the screen.
If you have chosen Slide as the screen lock, touch and drag the icon
to the right to unlock the screen.
Page 9
1.3.5 Personalize your Home screen
Add
You may touch and hold a folder, an application or a widget to
activate the Move mode, and drag the item to any Home screen as
you prefer.
Reposition
Touch and hold the item to be repositioned to activate the Move
mode, drag the item to the desired position and then release. You
can move items both on the Home screen and the Favorite tray.
Hold the icon on the left or right edge of the screen to drag the item
to another Home screen.
Remove
Touch and hold the item to be removed to activate the Move mode,
drag the item up to the top of Remove, and release after the item
turns red.
Create folders
To improve the organization of items (shortcuts or applications) on
the Home screen, you can add them to a folder by stacking one item
on top of another.
Wallpaper customization
Touch and long press the blank area in Home screen, then touch
Wallpaper to customize wallpaper.
1.3.6 Volume adjustment
Using volume key
Press Volume key to adjust the volume. To activate the Silent mode,
press the Volume down key until the tablet silent.
Using Settings menu
Drag down the notification panel and touch the settings icon
enter Settings, then touch Sound, you can set the volume of calls
renting, notification, system and etc. to your preference.
to
16 17
Page 10
2 Text input
2.1 Using Onscreen Keyboard
Onscreen Keyboard settings
Touch the Application tab from the Home screen, select Settings\
Language&input, touch the Settings icon
Android keyboard (AOSP), a series of settings are available for your
selection.
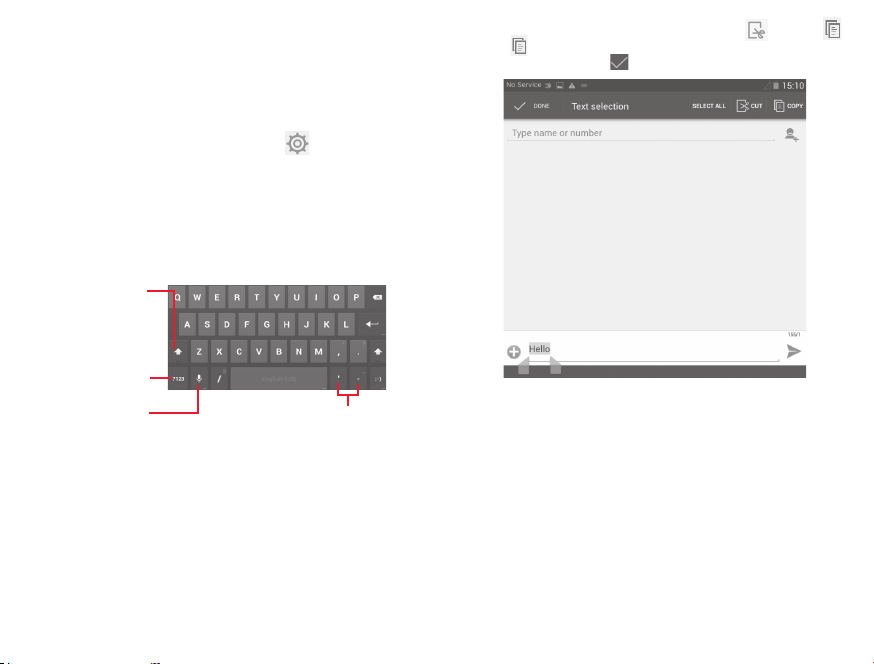
2.2 Android keyboard
Touch to switch
between "abc/Abc"
mode; Touch & hold
to switch between
"abc/ABC" mode.
Touch to switch
between symbol
and numeric
keyboard.
Touch & hold to
show input options;
When Wi-Fi or
data connection is
on, touch to enter
voice input.
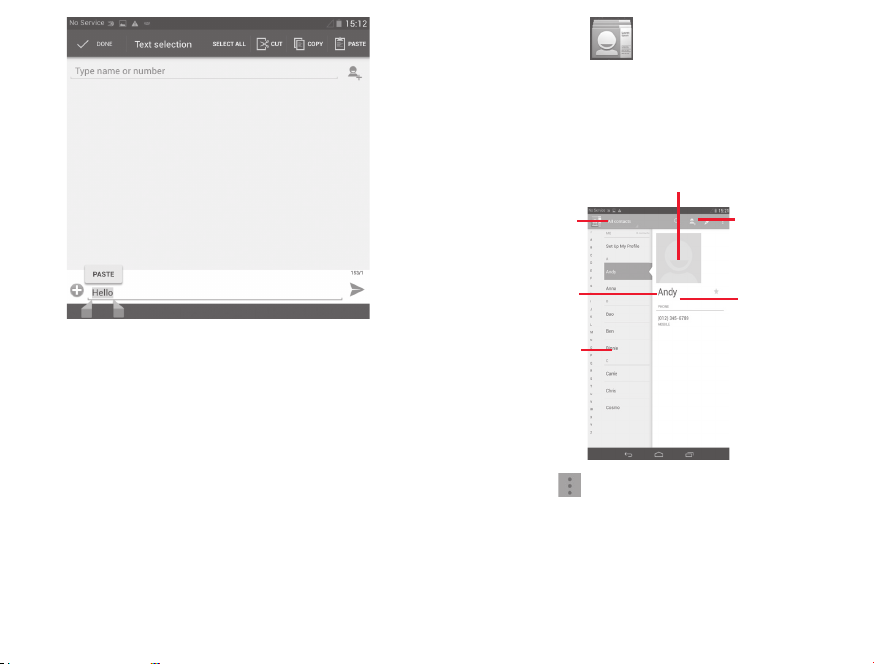
2.3 Text editing
You can edit the text you have entered.
• Touch and hold or double-tap within the text you would like to
edit.
• Drag the tabs to change the high-lighted selection.
18 19
on the right of
Touch & hold, then
select to enter
symbols/emoticons.
• Following options will show: Select all, Cut
Paste
• Touch the icon DONE to confirm.
You can also insert new text
• Touch where you want to type, or touch and hold a blank space,
the cursor will blink and the tab will show. Drag the tab to move
the cursor.
• If you have selected any text, touch the tab to show PASTE icon
which allows you to paste any text you have previously copied.
, Copy ,
Page 11
3 People
People enables quick and easy access to the people you want to
reach.
You can view and create contacts on your tablet and synchronize
these with your Gmail contacts or other applications.
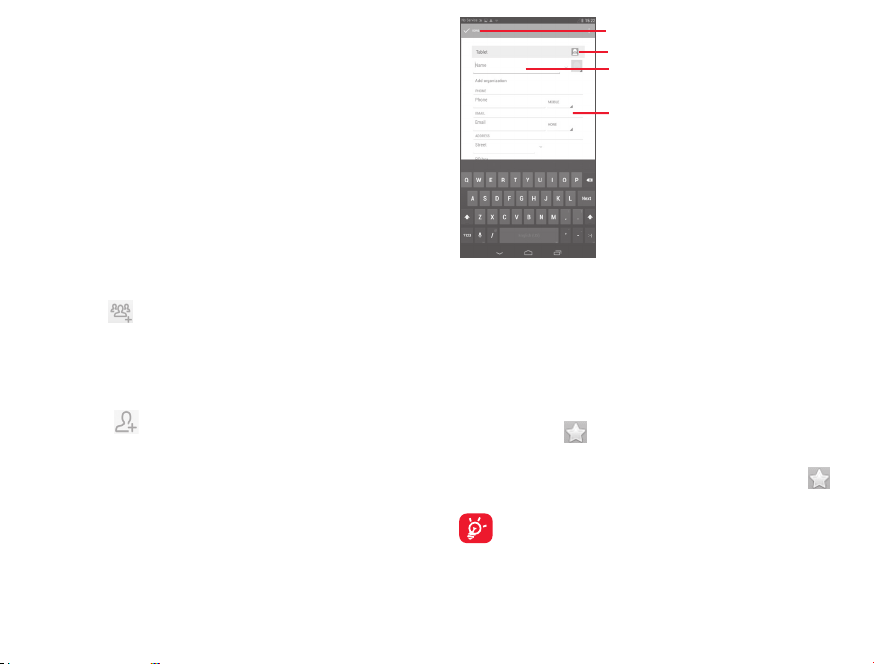
3.1 Consult your contacts
Touch to view your
contact groups and
favourite contacts.
Touch to view the
contact’s detailed
information.
Touch icon to
open Quick
Contact panel.
Touch the Menu key to display contacts list option menu.
Following actions are enabled:
• Delete contact Select and delete unwanted contacts.
• Contacts to
display
Choose contacts to display.
Touch to add a
new contact.
Touch to search
in People.
20 21
Page 12
• Import/Export Import or export contacts between phone,
• Accounts Manage the synchronization settings for
• Settings Set contacts' display mode.
• Share visible
contacts
SIM card, microSD card and phone storage.
different accounts.
Share contacts with others by sending the
contact's vCard to them via Bluetooth, Email,
SMS,etc.
3.2 Managing contact groups
The contact group helps you to improve the organization of your
contacts. You can add, remove and view groups in the Groups screen.
Touch the Groups to view local groups. To create a new group,
touch the icon
If you have added accounts to your tablet, touch the Groups to view
groups in accounts.
, enter the new name and touch Done to confirm.
3.3 Adding a contact
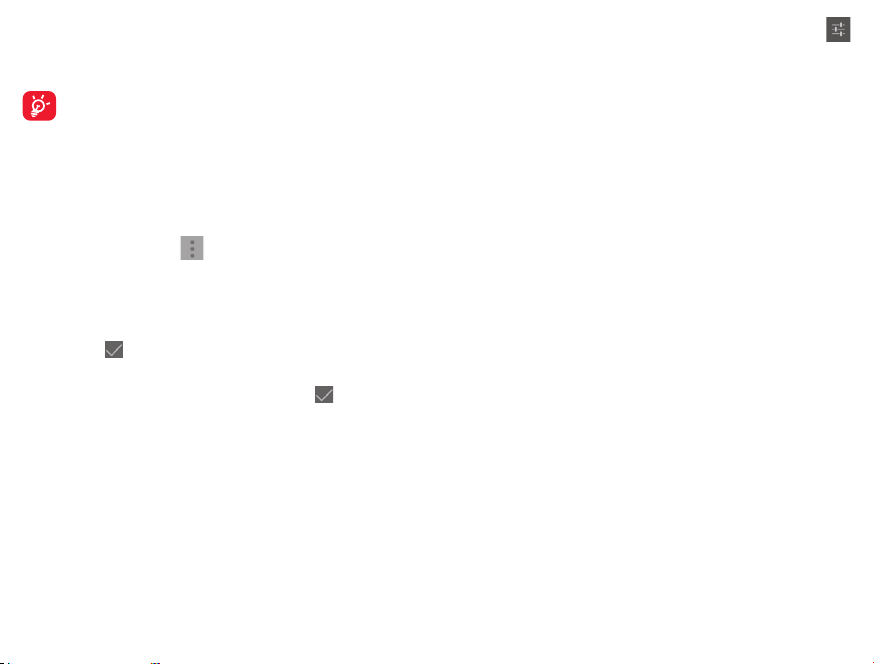
Touch the icon in the contact list to create a new contact.
You are required to enter the contact's name and other contact
information. By scrolling up and down the screen, you can move from
one field to another easily.
22 23
Touch to save.
Touch to select a picture for the contact.
Touch to add a new label.
Touch to unfold the other predefined
labels of this category.
If you want to add more information, touch Add another field to
add a new category.
When finished, touch Done to save.
To exit without saving, you can touch Cancel.
Add to/remove from Favourites
To add a contact to Favourites, you can touch a contact to view
details then touch
turn gold in colour).
To remove a contact from favourites, touch the gold star
contact details screen.
Only phone contacts can be added to Favourites.
to add the contact to Favourites (the star will
on
3.4 Editing your contacts
To edit contact information, touch the Menu key on the contact
details screen, then touch Edit. When finished, touch Done.
Page 13
Delete a contact
To delete a contact, touch the Menu key and select Delete from
contact details screen.
The contact you have deleted will also be removed from
other applications on the tablet or web the next time you
synchronize your tablet.
3.5 Contacts importing, exporting and sharing
This phone enables you to import or export contacts between
phone, SIM card, microSD card and phone storage.
From Contacts screen, touch
Export, then select to import/export contacts from/to SIM card, Phone,
Phone storage, Accounts, etc.
To import/export a single contact from/to SIM card, choose an account
and target SIM card(s), select the contact you want to import/export, and
touch the icon
To import/export all contacts from/to SIM card, choose an account and
target SIM card(s) mark Select all and touch the icon
You can share a single contact or contacts with others by sending the
contact's vCard to them via Bluetooth, Gmail, etc.
Touch a contact you want to share, touch the Menu key, and select
Share from contact details screen, then select the application to
perform this action.
to confirm.
to open options menu, touch Import/
to confirm.
3.6 Accounts
Contacts, data or other information can be synchronized from
multiple accounts, depending on the applications installed on your
phone.
24 25
To add an account, drag down the notification panel and touch
to enter Settings, then touch Add account.
You are required to select the kind of account you are adding, like
Google, Email, etc.
As with other account set-ups, you need to enter detailed
information, like username, password, etc.
You can remove an account to delete it and all associated
information from the phone. Open the Settings screen, touch the
account you want to delete, touch the Menu key and select Remove
account, then confirm.
Turn on/off the sync & Auto-sync
Touch an account to enter the account screen, mark/unmark
the checkbox(s) to turn on/off the account’s auto-sync. When
activated, all changes to information on the phone or online will be
automatically synchronized to each other.
Sync manually
You can also synchronize an account manually on Accounts screen,
touch an account in the list, then touch the Menu key and select
Sync now.
Page 14
4 Messaging, Email
4.1 Messaging
You can create, edit and receive SMS and MMS with this tablet.
To access this feature, touch
All messages you receive or send out can be saved in tablet
memory or SIM card. To consult the SMS messages stored in
SIM card, touch
Settings\Text message(SMS)\Manage SIM messages.
4.1.1 Write message
On message list screen, touch the new message icon to write
text/multimedia messages.
from the Apps.
from Messaging screen, then touch
Touch to search in all messages.
• Touch to view the whole
message thread.
• Touch & hold to delete
message or add shortcut.
Touch to create a new message.
For saved contacts, touch the photo to open the Quick
Contact panel to communicate with the contact. For unsaved
contacts, touch the photo to add the number to your People.
Sending a text message
Enter the mobile phone number of the recipient on Type person's
name or number bar or touch
text message bar to enter the text of the message. When finished,
touch
if two cards are inserted.
An SMS message of more than 160 characters will be charged as
several SMS. When the total number of characters you have entered
is approaching the 160-character limit, a counter will appear upon the
Send option of the text box to remind you how many characters are
allowed to be entered in one message.
Sending a multimedia message
MMS enables you to send video clips, images, photos, animations,
slides and sounds to other compatible mobiles and e-mail addresses.
An SMS will be converted to MMS automatically when media files
(image, video, audio, slides, etc.) are attached or subject or email
addresses are added.
To send a multimedia message, enter the recipient's phone number
in the Type person's name or number bar, touch Type text message
bar to enter the text of the message, touch the Menu key to open
the option menu, select Add subject to insert a subject, and touch
When finished, touch
to send the text message. You have to choose a SIM card
Specific letters (accent) will increase the size of the SMS,
which may cause multiple SMS to be sent to your recipient.
to attach picture, video, audio and so on.
to send the multimedia message.
to add recipients, touch Type
26 27
Page 15

Attach options:
• Pictures Access Gallery application or File manager to
select a picture as attachment.
• Capture picture Access Camera to capture a new picture for
attaching.
• Videos Access Gallery application or File manager to
select a video as attachment.
• Capture video Access Camcorder to record a new video for
attaching.
• Audio Access to select an audio file as attachment.
• Record audio Enter Sound Recorder to record a voice
message for attaching.
• Slideshow Enter Edit slide show screen, touch Add slide
to create a new slide, and touch currently
existing slide to edit it (see following picture).
Touch the Menu key to get more actions, like
setting the slide duration, adding music, etc.
• Contact Access People application to select one or
more contact(s) to attach.
• Calendar Access Calendar application to select one or
more event(s) to attach.
4.1.2 Manage messages
When receiving a message, an icon will appear on status bar as
notification. Drag down the status bar to open the Notification panel,
touch the new message to open and read it. You can also access the
Messaging application and touch the message to open.
Messages are displayed in conversational order.
28 29
To reply to a message, touch the current message to enter messagecomposing screen, enter the text, then touch
Touch and hold an SMS in message details screen. The following
message options are available for selection.
• Copy This option displays when the message is
• Forward Touch to forward the message to another
• Lock/Unlock
message
• Save message
to SIM card
• View message
details
• Delete message Delete the current message.
• Select text Touch to select the message text to copy,
an SMS. Copy the current message content.
You can paste it to the enter bar of the new
message you are going to compose.
recipient.
Touch to lock/unlock the message so it can't/
can be deleted if you reach maximum number
of stored messages.
This option displays when the message is an
SMS. Touch to save the message to SIM card.
Touch to view details of the message.
cut, add to dictionary, etc.
.
4.1.3 Adjust message settings
You can adjust a set of message settings. From Messaging application
screen, touch the Menu key and select Settings.
Text message (SMS)
• Delivery reports Select to request a delivery report for each
• Edit quick text Touch to add or edit message templates.
• SMS storage
location
text message you send.
Touch to select phone or SIM card to store
messages.
Page 16

• Manage SIM
messages
• Validity period Touch to set the validity period of messages.
Multimedia message (MMS)
• Group
messaging
• Delivery reports Select to request a delivery report for each
• Read reports Select to request a report on whether each
• Send read
report
• Auto-retrieve Select to download the full MMS message
• Roaming auto-
retrieve
• Creation mode Touch to select MMS creation mode.
• Maximum
message size
• Priority Touch to set the priority of MMS.
Touch to manage messages stored on your
SIM card.
Mark the checkbox to send a single message
to multiple recipients.
multimedia message you send.
recipient has read a multimedia message sent
by you.
Select to request a report on whether the
multimedia message is sent out.
(including message body and attachment)
automatically to your phone. Otherwise,
download only the MMS message header.
Select to download the full MMS message
(including message body and attachment)
automatically when roaming. Otherwise,
download only the MMS message header to
avoid extra charges.
Select to edit the message size, but it should
not be more than 300KB.
Notifications
• Notifications Select to display message notifications in
• Mute Touch to mute or select the time interval of
• Select ringtone Touch to select a ringtone as a new message
• Vibrate Touch to activate vibration when notified.
General
• Chat wallpaper Touch to select wallpaper for message
• Message font
size
• Delete old
messages
• Text message
limit
• Multimedia
message limit
• Cell broadcast Touch to choose a SIM card and configure
• Enable WAP
PUSH
• Show email
address
status bar.
notification sound.
notification tone.
background.
Touch to select message font size.
Select to delete old messages when the
maximum number of stored messages is
reached.
Touch to set the number of text messages
to be saved per conversation.
Touch to set the number of multimedia
messages to be saved per conversation.
cell.
Mark the checkbox to enable to receive
WAP PUSH.
Mark the checkbox to include email address
in contact results.
30 31
Page 17
• Enable CB
ringtone
• Select CB
ringtone
Mark the checkbox to enable CB ringtone.
Touch to select a ringtone for cell broadcast
messages.
4.2 Gmail/Email
The first time you set up your phone, you can select to use an
existing Gmail or to create a new Email account.
4.2.1 Gmail .............................................................................
As Google's web-based email service, Gmail is configured when you
first set up your phone. Gmail on your phone can be automatically
synchronized with your Gmail account on the web. Unlike other
kinds of email accounts, each message and its replies in Gmail
are grouped in your inbox as a single conversation; all emails are
organized by labels instead of folders.
To access Gmail
Gmail displays messages and conversations from one single Gmail
account at a time, if you own more than one account, you can add a
new one by touching the Menu key and selecting Settings from Inbox
screen, then touch ADD ACCOUNT. When finished, you can switch
accounts by touching the account name from Inbox screen, and touch
the account you want to view.
To create and send emails
• Touch the icon
• Enter recipient(s)’s email address in To field, and if necessary,
touch the Menu key and select Add Cc/Bcc to add a copy or a
blind copy to the message.
• Enter the subject and the content of the message.
from Inbox screen.
32 33
• Touch the Menu key and select Attach picture/video to add
an attachment.
• Finally, touch the icon
• If you do not want to send the mail out right away, you can touch
the Menu key and select Save draft or touch Back key to save
a copy. To view the draft, touch the icon
If you do not want to send or save the mail, you can touch the Menu
key and then select Discard.
To add a signature to emails, touch the Menu key and select Settings
from inbox screen, choose an account, then touch Signature.
To receive and read your emails
When a new email arrives, you will be notified by a ringtone or
vibration, and an icon
Touch and drag down the Status bar to display the Notification panel,
touch the new email to view it. Or you can also access the Gmail
Inbox label and touch the new mail to read it.
You can search for an email by sender, receiver, subject, etc.
• Touch the icon
• Enter the keyword you want to search for in the searching box and
touch
in the soft keyboard.
To reply or forward emails
• Reply
• Reply all
• Forward
to send.
, then select Drafts.
will appear on Status bar.
from Inbox screen.
When viewing an email, touch
sender of this mail.
and select "Reply all" to send
Touch
message to all people in a mail loop.
Touch
and select "Forward" to forward
the received mail to other people.
to reply the
Page 18

Managing Gmails by Labels
To conveniently manage conversations and messages, you can
organize them using a Label.
To label a conversation when reading a conversation’s messages,
touch the icon
To view conversations by labels when viewing your inbox or another
conversation list, touch the icon
of conversations with that label.
To manage labels, touch MANAGE LABELS from Labels screen.
Mark the checkbox to select email to activate batch mode, and
generate the following options:
•
•
•
/
•
•
• Mark as (not)
important
• Mute To mute the entire conversation. When
and select the label to assign to the conversation.
, then touch a label to view a list
Touch to archive the email message. To display
the archived messages, you can touch
in Inbox screen then touch All mail.
Touch to delete the email message.
Touch to add or change the label of the email
message or conversation.
Touch to mark an email message as read or
unread.
To assign a star or remove the star from the
conversation.
To mark the email as important or not
important.
muted, new mails related to this conversation
will not be displayed in Inbox, but archived.
34 35
• Report spam To report the email message/conversation as
• Report phishing To report the email message/conversation as
Gmail settings
To manage Gmail settings, touch the Menu key and select Settings in
Inbox screen.
General settings
• Confirm before
deleting
• Confirm before
archiving
• Confirm before
sending
• Reply all Mark the checkbox to make the default
• Auto-fit
messages
• Auto-advance Touch to select which screen to show after
• Message actions Touch to show/hide message actions.
• Sender image Mark the checkbox to show beside name in
spam.
phishing.
Mark the checkbox to confirm before
deleting emails.
Mark the checkbox to confirm before
archiving emails.
Mark the checkbox to confirm before
sending emails.
responding to messages.
Mark the checkbox to zoom in/out the
messages to fit the screen.
you delete or archive a conversation.
conversation list.
Page 19
Touch an account, the following settings will show:
• Inbox type To set this inbox as the default one or
• Notifications Select to activate notification when a new
• Inbox sound &
vibrate
• Signature To add a signature text to the end of each
• Sync Gmail Touch to turn on/off Gmail sync.
• Days of mail to
sync
• Manage labels Touch to open the Label screen, where you
• Download
attachments
priority one.
email arrives.
Touch to set Sound, Vibrate and Notify
once.
mail you send.
Touch to set the duration of days for mail
sync.
can manage synchronization and notifications.
Mark the checkbox to auto download
attachments to recent messages via Wi-Fi.
4.2.2 Email
Besides your Gmail account, you can also set up external POP3 or
IMAP email accounts in your phone.
To access this function, touch Email from Home screen.
An email wizard will guide you through the steps to set up an email
account.
• Enter the email address and password of the account you want
to set up.
• Touch Next. If the account you entered is not provided by your
service provider in the phone, you will be prompted to go to
the email account settings screen to enter settings manually. Or
you can touch Manual setup to directly enter the incoming and
outgoing settings for the email account you are setting up.
• Enter the account name and display name in outgoing emails.
• To add another email account, you can touch Menu key
Settings. Touch Add account on the right of the title to create.
To create and send emails
• Touch the icon
• Enter recipient(s) email address(es) in To field.
• If necessary, touch Menu key
a copy or a blind copy to the message.
• Enter the subject and the content of the message.
• Touch Menu key
• Finally, touch
• If you do not want to send the mail right away, you can touch
Menu key
from Inbox screen.
and touch Add Cc/Bcc to add
, touch Attach file to add an attachment.
to send.
and Save draft or touch Back key to save a copy.
and
36 37
Page 20
4.3 Hangouts
Google's instant messaging service, Hangouts, lets you communicate
with your friends whenever they are connected to this service.
To access this feature and sign in, touch Application tab from the
Home screen, then touch Hangouts. All friends added by using
Hangouts from the web or phone will be displayed in your friends list.
Touch your account to set your online status.
Touch the text box below your online status to enter your status
message.
To sign out, touch the Menu key from Friends list to display options,
then select Sign out. Or you can also select Sign out from online
status.
4.3.1 Chatting with your friends
To start a chat, touch the name of a friend in your Friends list, then
enter your message and finally touch
You can invite other friends to join in a group chat by touching the
Menu key and selecting Add to chat and then selecting the friend you
want to add.
4.3.2 To add a new friend
From Friends list, touch the icon to add a new friend. Enter the
Hangouts ID or Gmail address of the friend you want to add, and
then touch Done.
A notification with this invitation will be received by the friend.
By touching the invitation, the friend can select Block, Decline or
Accept in response.
.
4.3.3 To close a chat
When you want to end a chat, touch the Menu key from Chatting
screen directly, and then select End chat.
If you want to end all chats, touch the Menu key and select End all
chats from Friends list screen.
4.3.4 To manage your friends
Besides adding new friends to your friends list, the following actions
are available for your choice:
• To view all
friends/most
popular friends
• To block/
Remove a friend
By default, only friends that you frequently
communicate with are displayed in Friends
list. To view all friends, touch the Menu key
and select Display options, then touch Name.
To return to displaying most popular friends
screen, touch Availability or Recency from
Display options.
To block a friend from exchanging messages
or remove them from your friends list, touch
the Menu key and select Friend info from
Chatting screen, then touch Block or Remove.
All blocked friends can be viewed by touching
the Menu key and selecting Settings, touch
an account then choose Blocked friends. To
unblock a friend, touch the name of this friend
and touch OK when prompted.
38 39
Page 21
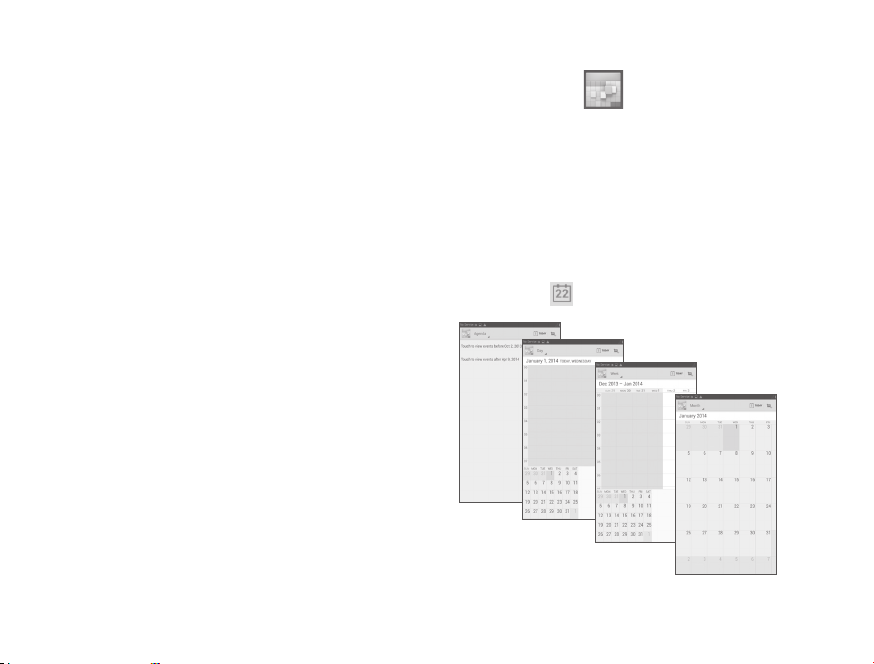
4.3.5 Settings
A series of settings are available for your selection by touching the
Menu key selecting Settings from Friends list screen, and choose
an account.
• Mobile indicator Select to display an indicator icon along with
• Away when
screen off
• Invitation
notifications
• IM/Video chat
notifications
• Notification/
Video chat
ringtone
• Vibrate Touch to set the vibrate way for text or
• Blocked friends Touch to show/unblock blocked friends.
• Clear search
history
• Manage account Touch to add, remove or sync your
• Terms &
privacy
your name in other people’s Friends list.
Select to set status as Away when the screen
is turned off.
Select to activate the notification function on
status bar when a new message arrives.
Touch to set the notification way for text or
Video chat.
Touch to choose a ringtone for notification
or Video chat.
Video chat.
Touch to clear previous chat search history
from showing up in the Search box.
accounts.
Touch to show more information about Talk.
5 Calendar & Time
5.1 Calendar
Use Calendar to keep track of important meetings, appointments,
etc.
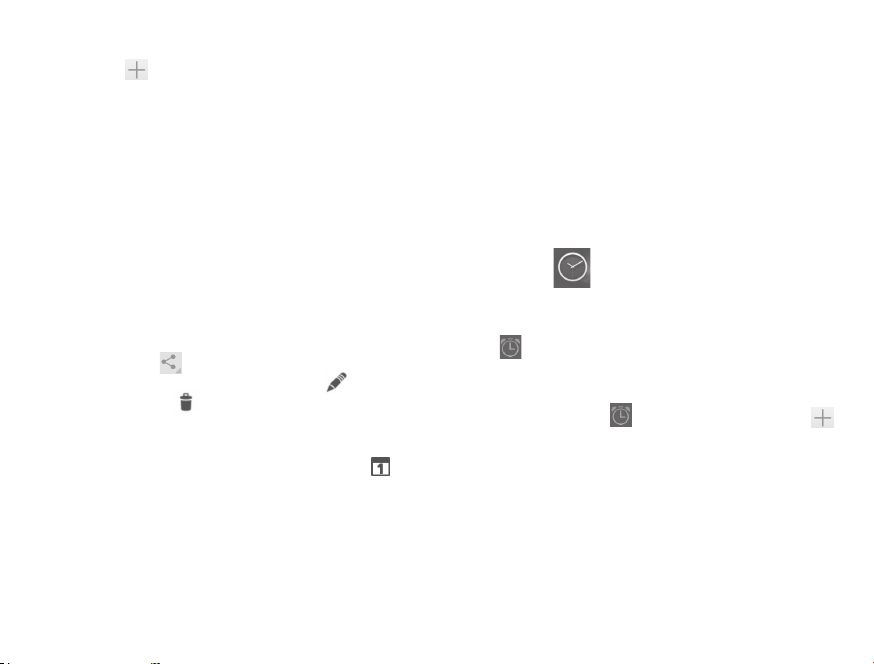
5.1.1 Multimode view
You can display the Calendar in daily, weekly, monthly, or agenda
view.
Touch the month label on the top of the screen to change your
Calendar view, and a drop-down menu will display for you to choose.
Touch the icon
In Agenda, Day or
Week view touch an
event to view its details.
to return to Today's view.
Agenda view
Day view
Touch a day in Month view to
open that day's events.
Week view
Month view
40 41
Page 22
5.1.2 To create new events
You can add new events from any Calendar view.
• Touch the icon to access new event edit screen.
• Fill in all required information for this new event. If it is a whole-day
event, you can select All day.
• Invite guests to the event. Enter the email addresses of the guests
you want to invite with commas to separate. The guests will
receive an invitation from Calendar and Email.
• When finished, touch DONE from the top of the screen.
To quickly create an event from Day, Week view screen, touch
and hold an empty spot or an event to open Option menu, then
touch New event to enter the event details screen of the time you
have previously selected. Or you can also touch the empty spot to
select the target area which will turn blue, and tap again to create
the new event.
5.1.3 To delete or edit an event
To share, delete or edit an event, touch the event to enter details
screen, touch the icon
Bluetooth, Email and messaging, etc., touch the icon
event, and touch the icon
to share the event to other people by
to edit the
to delete.
5.1.4 Event reminder
If a reminder is set for an event, the upcoming event icon will
appear on Status bar as a notification when the reminder time arrives.
Touch and drag down the status bar to open the notification panel,
touch event name to view Calendar notification list.
Touch Snooze to turn off all event reminders for 5 minutes.
Touch Back key to keep the reminders pending on the status bar and
the notification panel.
Important options by touching the Menu key from Calendar main
screen:
• Refresh To refresh the calendar
• Search To search in the calendar
• Calendars to
display
• Settings To make a series of Calendar settings
• Clear events To clear the selected events
• Go to To jump to the date you set
To show or hide, remove or add calendars
5.2 Time
Time application includes four applications – World clock, Alarm,
Timer and Countdown.
Touch
5.2.1 To set an alarm
From Time screen, touch to enter Alarm screen, touch to
add a new alarm. Following options will show:
When finished, touch OK to confirm.
Alarm to add or set an alarm.
• Time Touch to set time
• Repeat Touch to select days you want alarm to work
• Ringtone Touch to select a ringtone for the alarm
• Label Touch to set a name for the alarm
42 43
Page 23

Touch and hold on a currently existing alarm and touch Delete alarm
to delete the selected alarm.
5.2.2 To adjust alarm settings
Touch Menu icon from Alarm screen. The following options
can now be adjusted:
• Alarm in silent
mode
• Snooze
duration
• Auto-silence Touch to set the duration of alarms
• Volume buttons Touch to set side Volume up/down key
• Turn over to
activate
Select to play alarm with sound or vibration
even when the phone is in Silent mode
Touch to set temporary turn off time of an
alarm
behaviors when alarm sounds: None, Snooze
or Dismiss
Touch to choose the status Snooze or
Dismiss. Touch the switch to turn on/off
snoozing or dismissing the alarm by turning
over the phone
6 Getting connected
To connect to the internet with this phone, you can use GPRS/
EDGE/3G networks or Wi-Fi, whichever is most convenient.
6.1 Connecting to the Internet
6.1.1 GPRS/EDGE/3G
The first time you turn on your phone with SIM card inserted, it will
automatically configure network service: GPRS, EDGE or 3G. If the
network is not connected, you can touch on quick setting panel.
To check the network connection you are using, then touch
Settings\More...\Mobile networks\Access Point Names or Network
operators.
To create a new access point
A new GPRS/EDGE/4G network connection can be added to your
phone with the following steps:
• Drag down notification panel and touch
• Touch More...\Mobile networks\Access Point Names
• Touch Menu key and select New APN.
• Enter the required APN information.
• When finished, touch the Menu key and select Save.
to access Settings.
44 45
Page 24
To activate/deactivate Data roaming
When roaming, you can decide to connect/disconnect to a data
service.
• Drag down notification panel and touch
• Touch SIM management\Roaming\Data roaming.
• Touch to select from popup options: Disable, National Roaming
only and All Networks.
• When Data roaming is deactivated, you can still perform data
exchange with a Wi-Fi connection (refer to "5.1.2 Wi-Fi").
to access Settings.
6.1.2 Wi-Fi
Using Wi-Fi, you can connect to the Internet when your tablet is
within range of a wireless network. Wi-Fi can be used on your tablet
even without a SIM card inserted.
To turn Wi-Fi on and connect to a wireless network
• Touch
• Touch the switch
• Touch Wi-Fi, the detailed information of detected Wi-Fi networks
is displayed in the Wi-Fi networks section.
• Touch a Wi-Fi network to connect. If the network you selected is
secured, you are required to enter a password or other credentials
(you may contact your network operator for details). When finished,
touch Connect.
on quick setting panel to get to Settings.
beside Wi-Fi to turn on/off Wi-Fi.
To activate notification when a new network is detected
When Wi-Fi is on and the network notification is activated, the Wi-Fi
icon will appear on the status bar whenever the tablet detects an
available wireless network within range. The following steps activate
the notification function when Wi-Fi is on:
• Drag down notification panel and touch
• Touch Wi-Fi. Then touch the Menu key and select Advanced
from Wi-Fi screen.
• Mark/Unmark the Network notification checkbox to activate/
deactivate this function.
To add a Wi-Fi network
When Wi-Fi is on, you may add new Wi-Fi networks according to
your preference.
• Drag down notification panel and touch
• Touch Wi-Fi, and then touch .
• Enter the name of the network and any required network
information.
• Touch Save.
When successfully connected, your tablet will be connected
automatically the next time you are within range of this network.
To forget a Wi-Fi network
The following steps prevent automatic connections to networks
which you no longer wish to use.
• Turn on Wi-Fi, if it’s not already on.
• In the Wi-Fi screen, touch & hold the name of the saved network.
• Touch Forget network in the dialog that opens.
to access Settings.
to access Settings.
46 47
Page 25
6.2 Browser
Using Browser, you can enjoy surfing the Web.
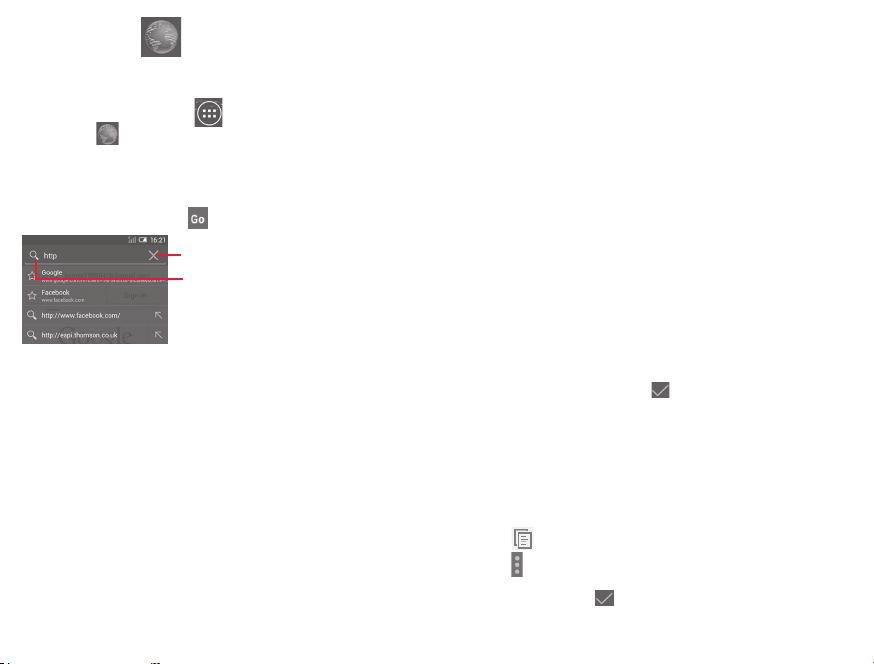
To access this function, touch
Browser icon
To go to a web page
On Browser screen, touch the URL box at the top, enter the address
of the web page, then touch
The URL bar will hide after a few seconds. To show the URL bar,
you can touch and slide down the screen.
To set homepage
• Touch the Menu key from Browser screen to display option menu,
touch Settings\General\Set home page.
• Choose a page or most visited website as your homepage.
• If you choose Other, enter the URL of the website you want to
set as your homepage, touch OK to confirm.
.
from Home screen and then touch
to confirm.
Touch to delete all contents
Touch to search and go to this address
6.2.1 Viewing web pages
When opening a website, you can navigate on web pages by sliding
your finger on the screen in any direction to locate the information
you want to view.
To zoom in/out of a web page
Pinch/Spread your finger on the screen to zoom out/in of the web
page.
To quickly zoom into a section of a web page, double-tap on the
section you want to view. To return to normal zoom level, doubletap again.
To find text on a web page
• Touch the Menu key from web page screen, then select Find on
page.
• Enter the text or phrase you want to find.
• The first word with matching characters will be highlighted on the
screen, and subsequent matches will be boxed.
• Touch the up or down arrow to switch to the previous or next
matching items.
• When finished, you can touch
search bar.
Further operations for the text on a web page
You can copy, share or search the text from a web page:
• Touch and hold the text to highlight the text.
• Move the two tabs to select the text.
• Touch SELECT ALL to select all words in this web screen.
• Touch
• Touch
on the page or the web.
• When finished, touch or the Back key to deactivate the mode.
to copy the selected text.
to show further actions, including find, share and search
or the Back key to close the
48 49
Page 26
To open new window/switch between windows
Multiple windows can be opened at the same time for your
convenience.
• Touch
• Touch the
without any trace.
• To close a window, touch
or slide it sideways.
Other options:
• Refresh To refresh the current page.
• Share page To share the current page with your friends
• Request
• Save for offline
• Close To close all tabs and exit.
• Home To get back to the home page you set.
• Find on page To input contents you want to find on the
• Stop To stop opening the current page.
• Version To see the version of browser.
to open a new window.
and select New incognito tab to open a window
on the window you want to close
via various ways, like Messaging, Email,
Bluetooth, etc.
To enable/disable computer version websites.
desktop site
To save the web page for offline reading.
reading
current page.
Touch the icon on the left of the URL, you can view more
information about the current page.
6.2.2 Manage links, history and downloads
To manage a link, address displayed on a web page
• Link Touch the link to open the web page.
Touch and hold the link to open options for
further operation, like open in new window,
save link, copy link URL, etc.
• Address Touch to open Google Maps and locate the
To view Browser history
• Touch the icon
• Touch History tab to view browser history.
• Touch Saved pages to view the pages you've saved.
To download a web application/view your downloads
Before downloading a web application, you need to enable your
tablet to install web applications (touch the Menu key from the
Home screen, touch Settings\Security, mark the checkbox of
Unknown sources, finally touch OK to confirm).
To download an item, touch the item or the link you want to
download.
To cancel a download, touch the downloaded item from the
Notification panel, select the item to be cancelled, and touch
to confirm.
To view items you have downloaded, touch the application
Downloads.
address.
from Browser screen.
50 51
Page 27
Manage bookmarks
To bookmark a web page
• Open the web page you want to bookmark.
• Touch the star on the right of link, or from the History screen,
touch the star beside the URL.
• Enter the name and the location if needed and touch OK to
confirm.
To open a bookmark
• Touch the icon
• Touch the bookmark you want to open.
• You can also touch and hold to display the options screen, then
touch Open or Open in new window.
To edit a bookmark
• Touch the icon
• Touch and hold the bookmark you want to edit.
• Touch Edit bookmark, and input your changes.
• When finished, touch OK to confirm.
Touch and hold a bookmark in the bookmark list to view these
additional options:
• Add shortcut to
Home
• Share link To share the bookmark.
• Copy link URL To copy the bookmark link.
• Delete
bookmark
• Set as
homepage
to enter the Bookmarks screen.
to enter the Bookmarks screen.
To add a bookmark shortcut to the Home
screen.
To delete a bookmark.
To set this page as the homepage.
6.2.3 Settings
A series of settings are available for your adjustment. To access
Browser settings, touch
General
• Set home page Touch to set homepage.
• Form auto-fill Mark the checkbox to fill out web forms
• Auto-fill text Touch to set up text to auto-fill in web
Privacy & security
• Clear cache Touch to clear locally cached content and
• Clear history Touch to clear the browser history.
• Show security
warnings
• Accept cookies Mark to allow sites to save and read cookie
• Clear all cookie
data
• Remember
form data
• Clear form data Touch to clear all the saved form data.
• Enable location Mark the checkbox to allow sites to request
from Browser screen, and select Settings.
with a single touch.
forms.
databases.
Mark the checkbox to show warning if there
is a problem with a site’s security.
data.
Touch to clear all browser cookies.
Mark the checkbox to remember data in
forms for later use.
access to your location.
52 53
Page 28

• Clear location
access
• Remember
passwords
• Clear passwords Touch to clear all saved passwords.
• Enable
notifications
• Clear
notification
Accessibility
• Force enable
zoom
• Text scaling Slide to change the size of the text display.
• Zoom on
double-tap
• Minimum font
size
• Inverted
rendering
• Contrast Slide to change pages contrast.
Advanced
• Set search
engine
• Open in
background
Touch to clear location access for all websites.
Mark the checkbox to save usernames and
passwords for websites.
Touch to select notification type.
Touch to clear notification access to all
websites.
Mark the checkbox to control a website's
zoom as you prefer.
Slide to change the magnification level when
double-tapping the page.
Slide to change the minimum font size.
Mark the checkbox to display pages in invert
color.
Touch to select a search engine.
Mark the checkbox to open new windows
behind the current one.
• Enable
JavaScript
• Allow multiple
tabs per app
• Enable plug-ins Mark the checkbox to enable plug-ins.
• Website
settings
• Default zoom Touch to select the magnification level by
• Open pages
in overview
• Auto-fit pages Mark the checkbox to format web pages to
• Block pop-up
windows
• Text encoding Touch to select the character-encoding
• Reset to default Touch to clear all browser data and to reset
Bandwidth management
• Search result
preloading
• Web page
preloading
• Load images Mark the checkbox to display images on
Mark the checkbox to enable JavaScript.
Mark the checkbox to allow one application
to use multiple tabs.
Touch to view advanced settings for individual
websites.
default.
Mark the checkbox to open web pages
zoomed out, in an overview.
fit the screen.
Mark the checkbox to prevent pop-up
windows.
standard.
all settings to default.
Touch to enable/disable browser to preload
search results in the background.
Touch to enable/disable browser to preload
the linked web pages in the background.
web pages.
54 55
Page 29
Labs
• Quick controls Mark the checkbox to enable quick controls
and hide app and URL bars.
6.3 Connecting to Bluetooth devices
Bluetooth is a short-range wireless communication technology that
you can use to exchange data, or connect to other Bluetooth devices
for various uses.
To access this function, drag down notification panel and touch
to access Settings. Then touch Bluetooth, your device and other
available ones will display on the screen.
To turn on Bluetooth
• Drag down notification panel and touch
• Touch
To make your tablet more recognizable, you can change your tablet
name which is visible to others.
• Touch
• Enter a name, and touch Rename to confirm.
To make device visible
• Drag down notification panel and touch
• Touch Bluetooth.
• Touch your device to make it visible or invisible.
• Touch
To pair/connect your tablet with a Bluetooth device
To exchange data with another device, you need to turn Bluetooth
on and pair your tablet with the Bluetooth device with which you
want to exchange data.
to activate/deactivate Bluetooth function.
and select Rename tablet.
and select Visibility timeout to select the visible time.
56 57
to access Settings.
to access Settings.
• Drag down notification panel and touch
• Touch Bluetooth.
• Touch SEARCH FOR DEVICES.
• Touch a Bluetooth device you want to be paired with in the list.
• A dialog will popup, touch Pair to confirm.
• If the pairing is successful, your tablet connects to the device.
To disconnect/unpair from a Bluetooth device
• Touch the Settings icon
• Touch Unpair to confirm.
6.4 Connecting to a computer
With the USB cable, you can transfer media files and other files
between microSD card/internal storage and computer.
Before using MTP or PTP you should firstly mark USB debugging.
• To access this function, touch Settings\About tablet, then
touch Build number 7 times. Now you may touch Settings\
Development\USB debugging.
To connect/disconnect your tablet to/from the computer:
• Use the USB cable that came with your tablet to connect the tablet
to a USB port on your computer. You will receive a notification
that the USB is connected.
• If you use mass storage, open the Notification panel and touch
USB connected, then touch Mount in the dialog that opens to
confirm that you want to transfer files.
• If you use MTP or PTP, your tablet will be automatically connected.
To disconnect (from mass storage):
• Unmount the microSD card on your computer.
• Open the Notification panel and touch Turn off.
For the operating system Windows XP or lower, you should
download and install Windows Media Player 11 on your
computer from the following link: http://windows.microsoft.
com/zh-CN/windows/download-windows-media-player.
beside the device you want to unpair.
to access Settings.
Page 30
To locate the data you have transferred or downloaded in the
internal storage, touch File Manager, all data you have downloaded
is stored in File Manager, where you can view media files (videos,
photos, music and others), rename files, install applications into your
tablet, etc.
To format a microSD card
• Drag down notification panel and touch
• Touch Storage.
• Touch Format SD card. On the screen a popup warns you
that formatting the microSD card will erase its contents, touch
.
to access Settings.
6.5 Sharing your tablet's mobile data connection
You can share your tablet's mobile data connection with a single
computer via a USB cable (USB tethering) or with up to eight devices
at once by turning your tablet into a portable Wi-Fi hotspot.
The functions below may incur additional network charges
from your network operator. Extra fees may also be charged
in roaming areas.
To share your tablet's data connection via USB
Use the USB cable that along with your tablet to connect the tablet
to a USB port on your computer.
• Drag down notification panel and touch
• Touch More...\Tethering & portable hotspot.
• Mark\Unmark the checkbox of USB tethering to activate/
deactivate this function.
To share your tablet's data connection as a portable Wi-Fi hotspot
• Drag down notification panel and touch
• Touch More...\Tethering & portable hotspot.
• Touch the switch beside Wi-Fi hotspot to activate/
deactivate this function.
58 59
to access Settings.
to access Settings.
To rename or secure your portable hotspot
When Portable Wi-Fi hotspot is activated, you could change the
name of your tablet's Wi-Fi network (SSID) and secure its Wi-Fi
network.
• Drag down notification panel and touch
• Touch More...\Tethering & portable hotspot\Wi-Fi hotspot.
• Touch Set up Wi-Fi hotspot to change the network SSID or set
your network security.
• Touch Save.
to access Settings.
6.6 Connecting to virtual private networks
Virtual private networks (VPNs) allow you to connect to the
resources inside a secured local network from outside that network.
VPNs are commonly deployed by corporations, schools, and other
institutions so that their users can access local network resources
when not inside that network, or when connected to a wireless
network.
To add a VPN
• Drag down notification panel and touch
• Touch More...\VPN settings and then touch
• In the screen that opens, follow the instructions from your
network administrator to configure each component of the VPN
settings.
• Touch Save.
The VPN is added to the list on the VPN settings screen.
Before adding a VPN, you should set a lock screen pattern,
PIN code or password for your tablet.
To connect/disconnect to a VPN
To connect to a VPN:
• Drag down notification panel and touch
• Touch More...\VPN settings.
to access Settings.
.
to access Settings.
Page 31

• VPNs you have added are listed; touch the VPN you want to
connect with.
• In the dialog that opens, enter any requested credentials and touch
Connect.
To disconnect:
• Open the Notification panel and touch the resulting notification for
the VPN disconnection.
To edit/delete a VPN
To edit a VPN:
• Drag down notification panel and touch
• Touch More...\VPN settings.
• VPNs you have added are listed; touch & hold the VPN you want
to edit.
• Touch Edit profile.
• After finished, touch Save.
To delete:
• Touch and hold the VPN you want to delete, in the dialog that
opens, touch Delete profile.
to access Settings.
6.7 Configuring Internet (SIP) calling
You can place/receive voice calls via the Internet when connected
to a Wi-Fi network, rather than via your mobile network. You
should configure a valid internet account before using this feature.
Refer to section 3.1.1 Placing a call to learn more about placing an
internet call.
To add an internet calling account
• Select Tablet from the Home screen.
• Touch the Menu key and then select Settings\Internet call\
Use Internet call.
• Mark the checkbox to enable Internet calling.
• Touch Accounts, then touch ADD ACCOUNT tab.
60 61
• In the screen that opens, follow the instructions from your internet
calling service provider to configure the settings for your account.
• When finished, touch SAVE to confirm or touch DISCARD to
cancel.
To edit/remove an internet calling account
To edit:
• Select Tablet from the Home screen.
• Touch the Menu key and then select Settings\Internet call\
Accounts.
• Accounts you have added are listed; touch the account you want
to edit.
• Edit your chosen settings. When finished, touch SAVE.
To remove:
• Touch the account you want to remove.
• Touch the Menu key and select Remove account.
To configure your tablet to receive Internet calls
Receiving Internet incoming calls is off by default to reduce power
consumption.
• Select Tablet from the Home screen.
• Touch Settings\Internet call\Accounts\Receive incoming
calls.
• Mark/Unmark the checkbox to activate/deactivate this function.
Page 32
7 Google Play Store
Google Play Store is an online software store, where you can
download and install applications and games to your Android
Powered Tablet.
To open Google Play Store:
• Touch Google Play Store from extended screen.
• For the first time you access Google Play Store, a screen with
terms of service pops up for your attention, touch Accept to
continue.
Touch the Menu key, then select Help to enter Google Play Store
help page for more information on this function.
(1)
7.1 Locate the item you want to download
and install
Google Play Store home page provides several ways to find
applications. It show applications and games in categorized listings.
Touch the Menu key and select My apps to see all your downloads.
Touch to search in
Google Play Store.
Slide up and down to
see all categories.
Touch a category on Google Play Store screen to browse its
contents. You can also select a subcategory if there is any. Within
each category you can select to view items sorted by Top free, Top
new free, Trending, etc
Touch the Google Play Store icon
or touch Back key to return to the previous screen.
on the top left of the screen
7.2 Download and install
To download & install:
• Navigate to the item you want to download, and select to enter
the details screen from which you can read its description, overall
rating or comments, view developer’s information, etc.
• Touch Install to preview the functions and data the application can
access on your tablet if you install it.
• Touch Accept & download.
• The progress of the download will show on the details screen,
• After download and installation have finished, you will see a
To open the application you have downloaded:
• On Google Play Store screen, touch the Menu key and select
• Touch the installed application in the list, then touch Open.
to stop downloading the item. You can also access this
touch
screen through Notificaiton panel.
notification icon
Be especially cautious with applications that have access to
many functions or to a significant amount of your data. Once
you accept, you are responsible for results of using this item
on your tablet.
My apps.
on the status bar.
(1)
Depending on your country and operator.
62 63
Page 33

To buy an application
(1)
On Google Play Store, some applications are labeled as free, while
some of them are to be paid for before downloading and installing.
• Touch the application you want to buy.
• Touch the price on the up-right of the screen to preview the
functions and data the application can access on your tablet if you
install it.
• Touch Continue to confirm.
• When making your first purchase, you are required to input your
credit card information and to log in to Google payment and billing
service.
• If your account has multiple credit card accounts, select one to
proceed.
• Select the Terms of service link and read the document. When
finished, touch Back key.
• Mark the checkbox if you agree with the terms of service.
• Touch Buy now at the bottom of the screen.
When finished, Android downloads the application.
To request a refund
If you are not satisfied with the application, you can ask for a refund
within 15 minutes of the purchase. Your credit card will not be
charged and the application will be removed. If you change your
mind, you can install the application again, but you will not be able
to request a refund.
• Touch the Menu key and select My apps from Google Play Store
screen.
• Touch the application that you want to uninstall and refund.
• Touch Refund to uninstall the application and refund. If the button
becomes Uninstall, your trial period has expired.
• In the survey form, select the answer that best matches your
reason, and touch OK.
7.3 Manage your downloads
After you downloaded and installed an application, the following
further operations are available for your selection.
View
On Google Play Store screen, touch the Menu key and select My
apps.
Uninstall
On Google Play Store screen, touch the Menu key and select My
apps. Touch the application you want to uninstall to enter the details
screen, touch Uninstall, and finally touch OK to confirm.
Refund
On Google Play Store screen, touch the Menu key and select My
apps. Touch the application you want to uninstall for a refund, touch
Refund, and finally touch OK to confirm.
Update notification
On Google Play Store screen, touch the Menu key and select My
apps. Touch the Menu key and select Settings\Notifications to
enable update notification.
(1)
Google Paid applications may not be available to users in some countries.
64 65
Page 34
Auto update
To auto update all installed applications, touch the Menu key and
select My apps from Google Play Store screen. Touch the Menu key
and select Settings\Auto-update apps to enable this function.
To auto update one specific application, mark the checkbox of Allow
automatic updating from the details screen,
Rate and review
Open the details screen for an application, touch the stars
under RATE & REVIEW to award and input
comments, touch OK to confirm.
Flag
You can report an inappropriate application to Google Play Store
by flagging it. Open the details screen for the application, scroll to
the bottom and touch Flag as inappropriate, enter the reason and
finally touch Submit.
8 Multimedia applications
8.1 Camera
Your tablet is fitted with a Camera for taking photos and shooting
videos.
Before using the Camera, please be sure to open the protective lens
cover before use to avoid it affecting your picture quality.
Touch to show settings
Touch to switch
between front/rear
camera
Double-tap or
pinch two or
more fingers
together or
spread them
apart to zoom
in/out.
Touch to take a picture or video.
To take a picture
The screen acts as the viewfinder. First position the object or
landscape in the viewfinder, touch
will be automatically saved.
Slide to view
pictures or videos
you have taken.
Slide to switch
between camera
and camcorder.
icon to take the picture which
66 67
Page 35
To shoot a video
First position the object or landscape in the viewfinder, and touch
icon to start recording. Touch to pause recording, touch
again or press the to save the video.
Further operations when viewing a picture/video you have taken
• Touch the icons below the screen to share and edit the photo or
video you have taken.
• Touch the photo icon to access Gallery.
8.1.1 Settings in framing mode
Before taking a photo/shooting a video, touch the icon to adjust
a number of settings in framing mode.
Back camera shooting mode
Touch the icon
display for your choice:
• Wide screen Touch to turn on/off full screen preview
• Shutter sound Touch to turn on/off shutter sound.
• Panorama Touch to turn on panorama function. Press
• Night Touch to turn on night function.
to access camera settings and below options will
mode.
the Shutter button or the Volume key to
start taking panoramic photo and move the
tablet towards your capture direction and
overlap the two lines. Once the nine slots
below the screen are filled, the tablet will
automatically save the photo.
68 69
Front camera shooting mode
Switch to front camera, touch the icon
and below options will display for your choice:
• Make up Touch to turn on/off face beauty function.
• Expression
(4-shot)
Touch to turn on expression (4-shot) function
and once four photos taken, the tablet will
automatically synthesize and save in one
picture.
to access camera settings
8.2 Gallery
Gallery acts as a media player for you to view photos and playback
videos. In addition, a set of further operations to pictures and videos
are available for your choice.
Touch to select
categories:
Albums,
Locations,
Times.
To view a picture/play a video
Pictures and videos are displayed by albums in Gallery.
• Touch an album and all pictures or videos will spread the screen.
Touch to open camera.
Touch to stitch and
edit pictures.
Touch the album to
spread it apart.
Slide left or right to
view more albums.
Page 36
• Touch the picture/video directly to view or play it.
• Slide left/right to view previous or next pictures/videos.
Working with pictures
You can work with pictures by editing them, sharing them with
friends, setting them as contact photo or wallpaper, etc.
Touch
icon slecet Edit, more options will display for you to
choose.
Touch to go back to picture display screen.
Touch to undo the previous modification.
Touch to redo the previous modification.
Touch to save the modified picture.
Batch operation
Gallery provides a multi-select function, so that you can work with
pictures/videos in batches.
Open the main Gallery window or an album, touch
Select album or Select item to activate batch operation mode (you
70 71
icon and select
can also touch and hold one album/picture), then touch albums/
pictures you want to work on. Touch
ones. Touch to share selected ones.
icon to delete selected
8.3 YouTube
YouTube is an online video-sharing service where the user can
download, share and view videos. It supports a streaming function
that allows you to start watching videos almost as soon as they begin
downloading from the Internet.
As an online video service, your tablet must have a network
connection to access YouTube.
All videos in YouTube are grouped into several categories,
like Most Popular, Most Discussed, Featured Videos, etc.
Touch to search for a video.
Touch to play the video and
to show more information.
By touching the Setting from YouTube screen, you can set General
settings and Search settings for YouTube.For details about these
features, please visit the YouTube website: www.YouTube.com.
Page 37
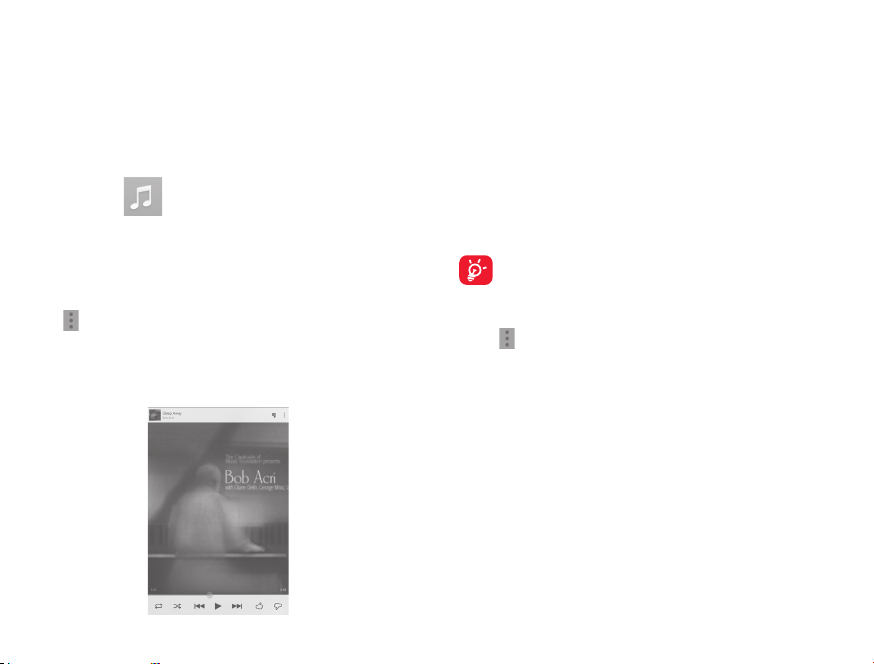
8.3.1 Watch videos
Touch a video to play it. In the Playing screen, you can view
information and video comments, and also browse links to related
videos.You can also rate, share, label as favorite, create a new playlist,
etc from this screen.
To exit video playing screen, touch Back key to return to the video
list.
8.4 Music
Using this menu, you can play music files stored on the microSD card
or the tablet storage. Music files can be downloaded from computer
to tablet using a USB cable.
You will find four categories in which all songs are classified:
Artists, Albums, Songs and Playlists. Slide left and right to view all.
Touch
icon and select Shuffle all to shuffle all songs.
8.4.1 Playing music
Touch a song to play it.
Touch to select repeat mode: Repeating all songs,
Repeating current song, or Repeat is off.
Touch to play the current playlist in shuffle mode (tracks
are played in random order).
Touch to skip to the previous track in the album, playlist,
or shuffle.
Touch to pause/resume playback.
Touch to skip to the next track in the album, playlist, or
shuffle.
Touch to show the displaying song.
Touch to hide options.
While playing songs with Play Music, the operation of pause,
play or skip is still available even if the screen is locked.
Adjust sound effects
Touch
icon and select Sound effects from Now playing screen to
enable and adjust sound effects.
8.4.2 Working with playlists
Playlists allow you to conveniently organize all songs stored in the SD
card or tablet storage.
You can create a new playlist, add a song to the list, and delete or
rename a playlist.
72 73
Page 38
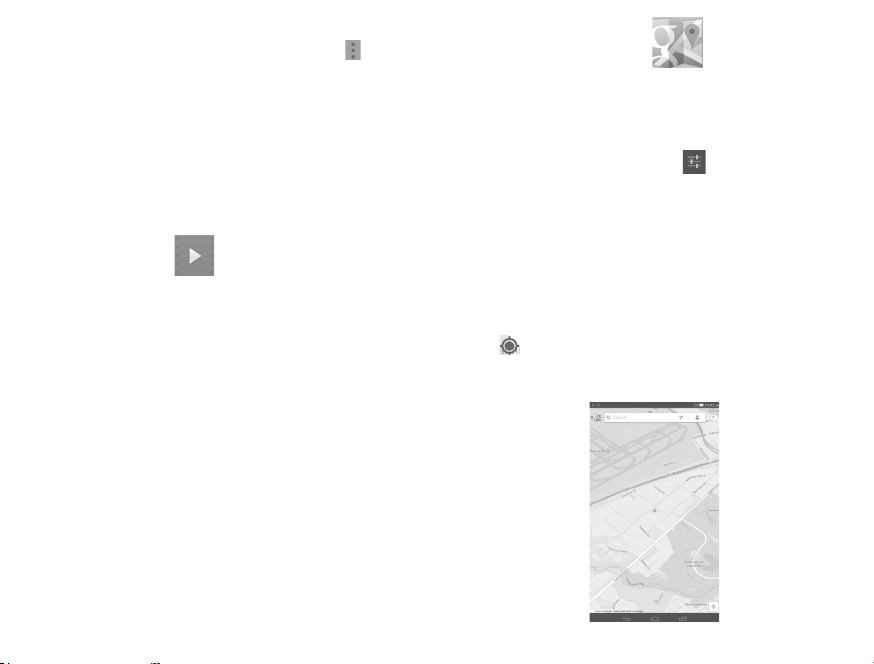
To create a playlist
Touch Recently added from Playlists screen, touch the
then select Save as playlist, enter the name and finally touch Save.
To delete a playlist
Touch and hold a playlist to show the menu, then touch Delete.
To rename a playlist
Touch and hold a playlist to show the menu, then touch Rename.
When finished, touch Save to confirm.
icon and
8.5 Video Player
Video player is a small built-in video player that lists all your videos.
Touch an item from the list to play. While playing, use Pause,
Forward and Back functional icons as required, touch a point on the
timeline to jump to and play from.
9 Google Maps
9.1 Get My Location
9.1.1 Choose a data source to decide My Location
Drag down notification panel and touch to access Settings, touch
Location access.
Mark the checkbox of Access to my location and Google's location
service.
Turn on GPS satellites to set GPS as My Location data source.
9.1.2 Open Google Maps and view My Location
Touch Maps from the Home screen.
Touch
The map will then center on a blue dot with a blue circle around.
Your actual position is within the blue circle.
icon on the map to view My Location.
74 75
Page 39
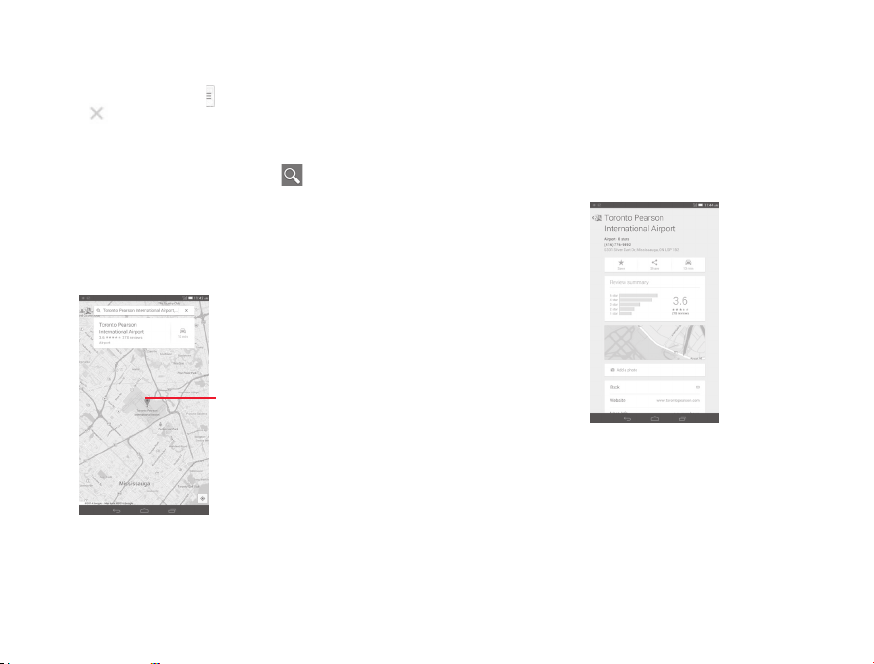
To move the map, drag the map with your finger.
To zoom in and out of a map, pinch or spread your fingers, or you
can also zoom in by double-tapping a location on screen.
To clear the map history, touch
then touch
.
and Settings, select Maps history,
9.2 Search for a location
While viewing a map, touch the search icon to activate search
function.
In the search box, enter an address, a city or a local business.
Touch the search icon to search, and in a while your search results
will appear on the map as red dots. You can touch one to show a
label.
Touch to show more
information
9.3 Star a location
Just like bookmarking a web address on the Internet, you can star any
position on the map for later use.
9.3.1 How to star (or unstar) a location
Touch a location on a map
Touch the address rectangle that opens
Touch the gray star at the top of the screen to star the location. (Or
touch a gold star to unstar that location.)
9.3.2 View a list of starred items
Touch at the upper-left corner, and touch Saved Places.
The list of your starred items and their addresses opens.
Touch a location in the list to view it.
76 77
Page 40
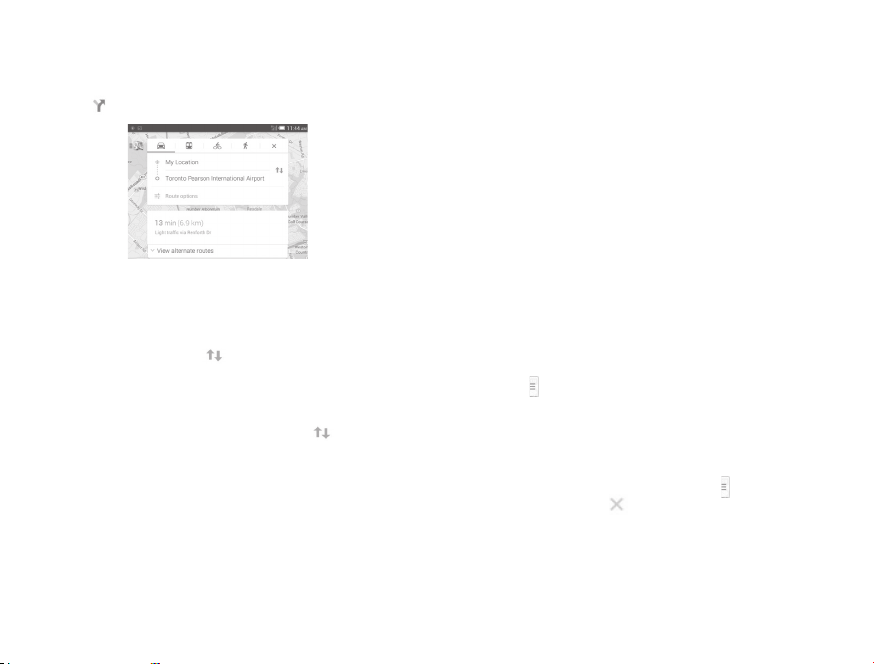
9.4 Get driving, public transportation or walking
directions
9.4.1 Get suggested routes for your trip
Touch icon from Maps screen.
• Touch enter bar or the triangle to edit your start point by one
of the following methods: entering an address, using My Location,
selecting a start point on a map, selecting a starred item, selecting
an address from your contacts or using search history.
• Do likewise for your end point.
• To reverse directions, touch
• A couple of suggested routes will appear in a list. Touch any routes
to view their respective detailed directions.
To get reverse directions for a route you’ve already made, simply
open that route’s directions window and touch
enter your start point and end point again.
9.4.2 Preview suggested routes and decide on a route
more preferable or feasible to you
You can preview each turn in your route in Navigation, Satellite,
and other views.
• Touch a left or right arrow to preview the next or previous leg
of your route.
.
. No need to
• You can view turn-by-turn directions, estimated distance and
possible arrival time in a list by touching DIRECTIONS LIST,
touch Back key or MAP VIEW to return to previous view.
When selecting a more preferable or feasible route, distance and
time will be the two most important factors for your evaluation.
Distance and estimated time will be displayed at the top of the
directions screen.
9.4.3 Search for locations along your route
Please refer to "9.2 Search for a location" for detailed information.
9.5 Arrangement of Layers
Layers allow you to view locations and additional information
overlaid on the map. You can add multiple layers or remove only
certain layers so you control exactly what information you want
visible on the map at one time.
9.5.1 To view multiple layers
Touch icon from Maps screen. All available layers are listed (like
Traffic, Satellite, etc), select one to view.
9.5.2 To clear the map
After you get directions or search on a map, you can clear the
markers/layers that have been drawn: touch
Maps history, then touch
.
and Settings, select
78 79
Page 41
10 Others
10.1 Calculator
With Calculator, you can solve many mathematical problems.
To access this function, touch
touch
.
Enter a number and the arithmetic operation to be performed, enter
the second number, then touch "=" to display the result. Touch
to delete digits one by one, touch and hold to delete all at one
time.
When some numbers or operations have been entered, touch
and hold the entering bar to open a menu offering these further
operations:
(1)
• Cut To cut selected text
• Copy To copy selected text
(1)
• Paste
To paste what you have previously copied to
the entering bar
10.2 File Manager
To access this function, touch from Home screen and then
touch
File Manager works with both external SD card and internal storage.
.
from Home screen and then
File Manager displays all data stored on both microSD card and
internal storage, including applications, media files; videos, pictures
or audios you have captured; other data transferred via Bluetooth,
USB cable, etc.
When you download an application from PC to microSD card, you
can locate the application on File Manager, then touch it to install it
in your tablet.
File Manager allows you to perform and be really efficient with the
following common operations: create (sub) folder, open folder/file,
view, rename, move, copy, delete, play, share, etc.
10.3 Sound Recorder
To access this function, touch from Home screen and then
touch
Sound Recorder allows you to record voice/sound for seconds/
hours.
10.4 Other applications
The previous applications in this section are preinstalled on your
tablet. To read a brief introduction of the preinstalled 3rd party
applications, please refer to the leaflet provided with the tablet. You
can also download thousands of 3rd party applications by going to
Google Play Store on your tablet.
.
(1)
(1)
Option will not appear unless copy or cut operation has been made.
80 81
(1)
Application availability depends on country and operator.
Page 42
11 Settings
Drag down notification panel and touch to access Settings.
11.1 Wireless & networks
11.1.1 Wi-Fi
Using Wi-Fi you can now surf the Internet without using your SIM
card whenever you are in range of a wireless network. The only thing
you have to do is to enter the Wi-Fi screen and configure an access
point to connect your tablet to the wireless network.
For detailed instructions on using Wi-Fi, please refer to "6.1.2 Wi-Fi".
11.1.2 Bluetooth
Bluetooth allows your tablet to exchange data (videos, images, music,
etc.) in a small range with another Bluetooth supported device
(tablet, computer, printer, headset, car kit, etc.).
For more information on Bluetooth, please refer to "6.3 Connecting
to Bluetooth devices".
11.1.3 Data usage
Mark the checkbox of Set mobile data limit, then you can drag the
limit line and the warning line according to your limitation. Your
mobile data connection will be disabled when the specified limit is
reached. You can also choose a data usage cycle to view the statistics
and related applications of used data by your tablet.
Data usage is measured by your tablet, and your carrier may
count differently. Please consider using a conservative limit.
11.1.4 Airplane mode
Mark the checkbox of Airplane mode in "more..." menu to
simultaneously disable all wireless connections including Wi-Fi,
Bluetooth and more.
11.1.5 VPN
A mobile virtual private network (mobile VPN or mVPN) provides
mobile devices with access to network resources and software
applications on their home network, when they connect via other
wireless or wired networks. Mobile VPNs are used in environments
where workers need to keep application sessions open at all times,
throughout the working day, as the user connects via various wireless
networks, encounters gaps in coverage, or suspend-and-resumes
their devices to preserve battery life. A conventional VPN cannot
survive such events because the network tunnel is disrupted, causing
applications to disconnect, time out, fail, or even the computing
device itself to crash.
For more information on VPN, please refer to "6.6 Connecting to
virtual private networks".
11.1.6 Tethering & portable hotspot
This function allows you to share your tablet's mobile data
connection via USB or as a portable Wi-Fi access point (Please refer
to "6.5 Sharing your tablet's mobile data connection").
11.1.7 Mobile networks
• Data connection
Touch to turn on/off data connection.
• Preferences
Touch to view/edit/delete preferences.
82 83
Page 43

• Access Point Names
You can select your preferred network with this menu.
• Network operators
You can select a network operator.
11.2 Device
11.2.1 Sound
Use the Sound settings to configure volume and ringtones for
different events and environments.
Volume
Volume settings can make user adjust the volume of ringtone,
notifications, music, video and alarms, etc.
System
• Touch sounds Mark the checkbox to enable sounds to play
• Screen lock
sound
• Power on
ringtone
• Shut down
ringtone
11.2.2 Display
• Lock screen
notifications
• Wallpaper Touch to set the wallpaper.
when touching the action button.
Mark the checkbox to enable sounds to play
when locking and unlocking the screen.
Set your default power on ringtone.
Set your default shut down ringtone.
Mark the checkbox to show notifications on
lock screen.
• Brightness Touch to adjust the brightness of the screen.
• Auto-rotate
screen
• Sleep Touch to set screen timeout.
• Font size Touch to set the fond size.
Touch to select whether rotate screen
automatically or not.
11.2.3 Storage
Use these settings to monitor the total and available space on your
tablet and on your microSD card; to manage your microSD card.
If a warning message comes up saying that tablet memory is
limited, you are required to free up space by deleting some
unwanted applications, downloaded files, etc.
11.2.4 Battery
In battery management screen you can view the battery usage data
since you last connected the tablet to a power source. The screen
also shows your battery status and how long it has been used since
last charging. Touch one category, then you can learn its specific
power consumption.
11.2.5 Applications
You use the Applications settings to view details about the
applications installed on your tablet, to manage their data and force
them to stop, and to set whether you want to permit installation of
applications that you obtain from web sites and emails.
84 85
Page 44

11.3 Personal
11.3.1 Location access
GPS satellites
Check to use your tablet’s global positioning system (GPS) satellite
receiver to pinpoint your location within an accuracy as close as
several meters ("street level"). The process of accessing the GPS
satellite and setting your tablet's precise location for the first time
will require up to 5 minutes. You will need to stand in a place with a
clear view of the sky and avoid moving. After this, GPS will only need
20-40 seconds to identify your precise location.
11.3.2 Security
Set up screen lock
• None Touch to disable screen unlock security.
• Slide Touch to enable slide unlock mode.
• Pattern Touch to draw pattern to unlock screen.
• PIN Touch to enter a numeric PIN to unlock screen.
• Password Touch to enter a password to unlock screen.
Owner info
Touch to input owner information which will display on the lock
screen.
Find Me Back
Turn on the switch to activate the function. It will protect your
privacy in case of a theft or loss.
Encrypt tablet
You can encrypt your accounts, settings,download apps and their
data, media and other files by touching Encrypt tablet.
Make passwords visible
Mark the checkbox to show passwords as you type.
Device administrators
Touch to view or deactivate device administrators.
Unknown sources
Mark the checkbox to permit installation of applications that you
obtain from web sites, emails, or other locations other than Google
Play Store.
To protect your tablet and personal data, download applications only
from trusted sources, such as Google Play Store.
Verify apps
Mark the checkbox to disallow or warn before installing apps which
my cause harm.
Trusted credentials
Touch to display trusted CA certificates.
Install from SD card
Touch to install encrypted certificates from the microSD card or
tablet storage.
Clear credentials
Touch to remove all credentials.
86 87
Page 45

11.3.3 Language & input
Use the Language & input settings to select the language for the text
on your tablet and for configuring the onscreen keyboard. You can
also configure voice input settings and the pointer speed.
Language
Touch to select the language and the region you want.
Spell checker
Mark the checkbox to enable the system to show suggested words.
Personal dictionary
Touch to open a list of the words you’ve added to the dictionary.
Touch a word to edit or delete it. Touch the add button (+) to add
a word.
Default
Touch to select a default input method. Touch Configure input
methods to show all input methods. Touch the settings icon
configure a certain input method.
Android keyboard
The Android keyboard settings apply to the onscreen keyboard
that is included with your tablet. The correction and capitalization
features affect only the English version of the keyboard. Available
options are as follows:
• Input languages
Touch to set input language.
• Auto-capitalization
Mark the checkbox to have the onscreen keyboard automatically
capitalize the first letter of the first word after a period, the first
word in a text field, and each word in name fields.
to
• Sound on keypress
Mark the checkbox to play a brief sound each time you touch a key
on the onscreen keyboard.
• Auto correction
Touch to turn on/off auto correction, or you can also adjust the
sensitivity of correction.
• Show correction suggestions
Touch to show or not the correction suggestions while typing.
• Next word suggestions
Mark the checkbox to popup word suggestions.
• Advanced settings
Touch to view more advanced settings for android keyboard, such as
Key popup dismiss delay, Suggest Contact name, and etc.
Voice search
Touch to view settings about voice search, such as Language, Speech
output, etc.
Text-to-speech settings
• Preferred engine
Touch to choose a preferred text-to-speech engine, touch the
settings icon
• Speech rate
Touch to open a dialog where you can select how quickly you want
the synthesizer to speak.
• Listen to an example
Touch to play a brief sample of the speech synthesizer, using your
current settings.
to show more choices for each engine.
88 89
Page 46

Pointer speed
Touch to open a dialog where you can change the pointer speed,
touch OK to confirm.
11.3.4 Backup and reset
Back up my data
Mark the checkbox to back up your tablet’s settings and other
application data to Google Servers, with your Google Account.
If you replace your tablet, the settings and data you’ve backed up
are restored onto the new tablet for the first time you sign in with
your Google Account. If you mark this option, a wide variety of
settings and data are backed up, including your Wi-Fi passwords,
bookmarks, a list of the applications you’ve installed, the words
you’ve added to the dictionary used by the onscreen keyboard, and
most of the settings that you configure with the Settings application.
If you unmark this option, you stop backing up your settings, and any
existing backups are deleted from Google Servers.
Back up account
Touch to back up your account.
Automatic restore
Mark the checkbox to restore your backed up settings or other data
when you reinstall an application.
DRM reset
Touch to select delete all DRM licenses.
Factory data reset
Tablet reset will erase all of your personal data from internal tablet
storage, including information about your Google Account, any other
accounts, your system and application settings, and any downloaded
applications. Resetting the tablet does not erase any system software
updates you’ve downloaded or any files on your microSD card, such
90 91
as music or photos. If you mark the checkbox - Reserve the content
of Tablet storageII before touching Reset tablet, any files stored on
your tablet’s storage will not be erased. If you reset the tablet in this
way, you’re prompted to re-enter the same kind of information as
when you first started Android.
When you are unable to power on your tablet, there is another
way to perform a factory data reset by using hardware keys. Press
the Volume up key and the power key at same time until the screen
lights up.
11.4 Accounts
Use the settings to add, remove, and manage your Email and other
supported accounts. You can also use these settings to control how
and whether all applications send, receive, and synchronize data on
their own schedules, and whether all applications can synchronize
user data automatically.
11.5 System
11.5.1 Date & time
Use Date & Time settings to customize your preferences for how
date and time are displayed.
Automatic date & time
Touch to select Use network/GPS provided time or Off.
Mark the checkbox to use network provided time or use GPS
provided time.
Automatic time zone
Mark the checkbox to use network-provided time zone. Or unmark
to set all values manually.
Page 47

Set date
Touch to open a dialog where you can manually set the tablet’s date.
Set time
Touch to open a dialog where you can manually set the tablet’s time.
Select time zone
Touch to open a dialog where you can set the tablet’s time zone.
Use 24-hour format
Mark the checkbox to display the time using 24-hour clock format.
Select date format
Touch to open a dialog where you can select the format for
displaying dates.
11.5.2 Accessibility
You use the Accessibility settings to configure any accessibility plugins you have installed on your tablet.
Magnification gestures
Touch to turn on/off to activate/deactivate zoom in/out function by
triple-tapping the screen.
Speak passwords
Mark the checkbox to speak passwords while typing.
Accessibility shortcut
Touch to turn on/off to enable/disable accessibility features.
Touch & hold delay
Touch to adjust the duration of touch and hold delay. This function
enables your tablet to differ touch and touch & hold, which may
avoid incorrect operations.
Enhance web accessibility
Touch to open a dialog which asks you to install scripts from Google
which make their web content more accessible. Touch Allow to
confirm.
11.5.3 Development
To access this function, touch Settings\About tablet, then touch
Build number 7 times. Now Development is available.
The Developer options screen contains settings that are useful
for developing Android applications. For full information, including
documentation of the Android applications and development tools,
see the Android developer web site (http://developer.android.com).
Take bug report
Touch to select to collect information about your current device
state and send as an email message.
Desktop backup password
Touch to set/change/remove desktop full backup password.
Stay awake
Mark the checkbox to prevent the screen from dimming and locking
when the tablet is connected to a charger or to a USB device that
provides power. Don’t use this setting with a static image on the
tablet for long periods of time, or the screen may be marked with
that image.
92 93
Page 48

Protect SD card
Mark the checkbox to select that Apps must request permission to
read SD card.
USB debugging
Mark the checkbox to permit debugging tools on a computer to
communicate with your tablet via a USB connection.
Power menu bug report
Mark the checkbox to select to include option in power menu for
submitting a bug report.
Allow mock locations
Mark the checkbox to permit a development tool on a computer to
control where the tablet believes it is located, rather than using the
tablet’s own internal tools for this purpose.
Select debug app
Touch to select debug app.
Verify apps over USB
Mark the checkbox to check apps over USB.
Show touches
Mark the checkbox to show visual feedback for touches.
Pointer location
Mark the checkbox to show current touch data.
Show layout bounds
Mark the checkbox to show clip bounds, margins, etc.
94 95
Show GPU view updates
Mark the checkbox to show GPU view updates.
Show hardware layers updates
Mark the checkbox to show hardware layers updates.
Show GPU overdraw
Mark the checkbox to show GPU overdraw.
Show surface updates
Mark the checkbox to show screen updates.
Window animation scale
Touch to adjust the animation scale for your window.
Transition animation scale
Touch to adjust the animation scale while performing transition.
Animator duration scale
Touch to adjust the animation duration scale.
Disable HW overlays
Mark the checkbox to select to always use GPU for screen
compositing.
Force GPU rendering
Mark the checkbox to forcely use 2D hardware acceleration in
applications.
Page 49

Force 4x MSAA
Mark the checkbox to enable 4x MSAA.
Strict mode enabled
Mark the checkbox to enable strict mode. After enabled, the screen
will flash when applications do long operations on the main thread.
Show CPU usage
Mark the checkbox to show current CPU usage.
Profile GPU rendering
Mark the checkbox to use 2D hardware acceleration in applications.
Enable OpenGL traces
Touch to adjust OpenGL traces.
Enable traces
Touch to adjust traces.
Don't keep activities
Mark the checkbox to destroy all activities as soon as you leave.
Background process limit
Touch to change the limit for background processes.
Show all ANRs
Mark the checkbox to show "Application Not Responding" dialog for
background applications.
11.5.4 About tablet
This contains information about things ranging from Legal information,
Model number, Firmware version, Baseband version, Kernel version,
Build number to those listed below:
System updates
Touch to check for system updates.
Status
This contains the status of the Battery status, Battery level, My tablet
number, Network, Signal strength, etc.
Legal information
Touch to view legal information.
96 97
Page 50

Some services and apps may not be available in all countries.
Please ask in-store for details.
Android is a trademark of Google Inc. The Android robot is
reproduced or modified from work created and shared by
Google and used according to terms described in the Creative
Commons 3.0 Attribution Licence.
© Vodafone Group 2014. Vodafone and the Vodafone logos are
trade marks of Vodafone Group. Any product or company names
mentioned herein may be the trade marks of their respective owners.
 Loading...