


User manual
Vodafone Smart 4G
1.Your mobile ····················································· 1
1.1Removing the back cover ········································· 1
1.2Charging the battery················································ 2
1.3SIM card and microSD card ······································· 3
1.4Powering on/off and Airplane mode ·························· 3
1.5Locking/unlocking the screen ·································· 4
1.6Home screen·························································· 4
1.7Using the touchscreen············································· 5
1.8Notification and status icons····································· 5
1.9Notification panel ··················································· 6
1.10Managing applications ··········································· 8
1.11Managing Home screen ········································· 8
1.12Managing folders ·················································· 8
2.Phone calls ······················································ 9
2.1Making a call ·························································· 9
2.2Answering or rejecting a call ····································· 10
2.3During a call ··························································· 10
2.4Conference calls ····················································· 11
2.5Answering another incoming call ······························ 12
2.6Supplementary services··········································· 12
2.7Voicemail ······························································ 13
3.People······························································ 13
3.1Adding a contact····················································· 14
3.2Quick Contact ························································ 14
3.3Managing contacts·················································· 14
3.4Managing groups ···················································· 16
3.5Importing contacts from SIM card or storage··············· 17
4.Text input methods ·········································· 17
4.1Using the text input panel ········································ 17
4.2Switching input methods ········································· 18
4.3Editing text····························································· 18
4.4Horizontal keyboard ················································ 19
4.5Input method settings ············································· 19
5.Messaging························································ 19
5.1Creating a message ················································· 20
5.2Replying to a message············································· 20
5.3Searching messages················································ 20
5.4Deleting a message ················································· 20
5.5Customising message settings·································· 21
6.Email ······························································· 21
6.1Adding an email account·········································· 21
6.2Switching accounts ················································· 22
6.3Combined account view··········································· 22
6.4Viewing emails ······················································· 22
6.5Creating and sending emails····································· 22
6.6Replying to and forwarding emails····························· 23
6.7Saving email attachments ········································ 23
6.8Deleting an email account ······································· 23
6.9Customising email account settings ·························· 24
7.Data service ····················································· 24
7.1Turning on the data service ······································ 24
7.2Wi-Fi······································································ 25
7.3Sharing your phone's data connection ······················· 26
7.4Bluetooth ······························································ 28
8.Browser···························································· 30
8.1Browsing web pages ················································ 30
8.2Managing bookmarks ·············································· 30
8.3Setting a home page ··············································· 31
8.4Customising browser settings ··································· 31
9.Camera and video camera ································ 31
9.1Taking a photo························································ 32
9.2Recording a video ··················································· 32
9.3Panoramic mode ···················································· 33
10.Gallery ··························································· 34
10.1Viewing pictures and videos···································· 34
10.2Editing a picture ···················································· 34
11.Google PlayTM Music········································ 35
11.1Adding music to a playlist······································· 35
11.2Playing a playlist ··················································· 36
11.3Playing a music file················································ 36
12.Accounts and syncing ···································· 37
12.1Adding an account ················································ 37
12.2Enabling syncing··················································· 38
13.More applications··········································· 38
13.1Calendar ······························································ 38
13.2Alarm clock ·························································· 40
13.3Calculator ···························································· 40
14.Settings ························································· 40
14.1Setting the date and time ······································· 41
14.2Setting the display ················································ 41
14.3Adjusting the volume ············································ 42
14.4Changing the phone ringtone ································· 42
14.5Managing applications ··········································· 43
14.6Security settings ··················································· 44
15.NFC································································ 45
16.Location access·············································· 46
17.Restoring factory settings ······························ 47
18.FOTA (Firmware Over The Air) updating·········· 47
Frequently Asked Questions································ 49 Product Safety Information·································· 52 Technical data ····················································· 67 Accessories ························································· 68

1. Your mobile
Headset |
|
|
connector |
Micro USB port |
|
Front |
Power LED |
Flash |
|
||
Camera |
|
|
|
|
|
|
Receiver |
Camera |
|
Power |
|
Volume |
key |
|
key |
|
|
Loudspeaker
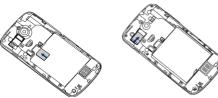
1.1 Removing the back cover
Lift up the battery cover from the notch.
Pull the ribbon strip upward to release the battery.
This is the This is the battery ribbon strip
back cover notch
Removing the back cover: Hold the sides of the phone securely with your left hand; lift up the back cover with your right hand thumbnail, using the notch.
1
Removing the battery: Hold the sides of the phone securely with your left hand; pull the ribbon strip upward with your right hand to release the battery.
Note: Make sure that you turn off the phone before replacing or removing the battery.
1.2 Charging the battery
1.Connect the small end of the supplied USB charging/data cable to your phone, using the Micro USB port at the top.
2.Connect the other end to the supplied plug and insert that into a mains socket to start charging your phone.
3.The power LED will glow green when battery level is
more than 90%.
Hints:
•You can also charge your phone, though more slowly, using the powered USB ports on your computer.
•You can view the power information using the battery icon in the statue bar.
•The phone will power off automatically when the battery is too low. Charge the battery if this happens. When the battery is critically low, the charging status may not be displayed immediately (you must wait before it is displayed). Using the phone to play games or perform other activities during the charging process may cause the phone to power off due to low battery.
•The battery will gradually discharge if is left for a long period of time. Before using the battery again, you must recharge it in order to power on and use your phone as
2
normal.
1.3 SIM card and microSD card
Insert the SIM card and the microSD card as shown in the images below.
Insert microSD card
Insert SIM card
Notes:
•Take care to keep the SIM card safe. Do not bend it, damage it, or allow it come into contact with static electricity or water.
•The SIM card must be inserted correctly according to the markings on the case.
•Make sure that your SIM card is a micro SIM (3FF) type.
•This phone does not support hot swapping. Unplug the data cable and power off the phone before inserting or removing the SIM card and microSD card.
1.4 Powering on/off and Airplane mode
Power on: When the phone is off, press and hold the Power key to turn on the phone.
Power off: When the phone is on, press and hold the Power key until the options pop up. Select Power off and then OK to turn off the phone.
3
Reboot: When the phone is on, press and hold the Power key until the options pop up. Select Reboot to reboot the phone.
Airplane mode: When the phone is on, press and hold the Power key until the options pop up. Select Airplane mode and the phone will automatically disable all signal transmission.
1.5 Locking/unlocking the screen
Locking the phone turns the screen off and stops any unwanted button presses. To lock the screen while using the phone, simply press the Power key.
To unlock it, press the Power key, touch and drag  to the right, you can also drag it in other directions.
Note: Touch  >
>  > Security > Screen lock to set
the type of lock screen. You can also find  on the left-most Home screen.
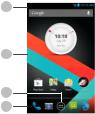
1.6 Home screen
1
2
3
4
4

1.Status bar: Displays notification and status icons. Gently slide down to open the Notification panel.
2.Display area: The phone's main display area.
3.Touch  to open the applications list.
4.Shortcut bar: Touch to enter the corresponding application.
1.7 Using the touchscreen
Touch: Launch applications and other functions.
Touch and hold: Touch and hold the screen for 2 or more seconds to open the control options for the current screen.
Slide/swipe: Slide the screen up, down, left and right to view information, applications, web pages, etc.
Drag: Touch and hold the selected application and drag it to another location.
Pinch/spread: Place two fingers on the screen and draw them apart to zoom in or together to zoom out.
Rotate: Automatically change the screen orientation from portrait to landscape by turning the phone sideways.
1.8 Notification and status icons
|
No signal |
|
No network |
|
|
|
|
|
Signal strength |
|
Airplane mode |
|
|
|
|
|
4G in use |
|
HSPAP in use |
|
|
|
|
|
HSDPA in use |
|
EDGE in use |
|
|
|
|
5

|
GPRS in use |
|
Roaming |
|
|
|
|
|
GPS is on |
|
GPS locating success |
|
|
|
|
|
Bluetooth is on |
|
Battery is charging |
|
|
|
|
|
Battery is very low |
|
Battery is full |
|
|
|
|
|
New message |
|
Missed call |
|
|
|
|
|
An open Wi-Fi network |
|
Connected to a Wi-Fi |
|
is available |
|
network |
|
Uploading data |
|
Downloading data |
|
|
|
|
|
microSD card is full |
|
Problem with sign-in or |
|
|
synchronisation |
|
|
|
|
|
|
USB tethering is on |
|
Portable Wi-Fi hotspot |
|
|
is on |
|
|
|
|
|
|
Google Play Music is |
|
Alarm is set |
|
running |
|
|
|
|
|
1.9 Notification panel
Touch and drag down the Status bar to open the Notification panel. You can view phone network information, new events, etc.
6
From the Notification panel, you can do any of the following:
•Quickly open or close relevant applications.
•Touch  to clear all notifications.
•Drag up from the bottom of the panel to close the Notification panel.
Using the Quick Settings button
Open the Notification panel and touch  to switch to the Quick Settings button panel.
In the Quick Settings button panel, you can configure the following settings:
•Touch  to set the brightness.
•Touch  to open the Settings.
•Touch  to turn Wi-Fi on or off.
•Touch  to change mobile data usage.
•Touch  to check the battery status.
•Touch  to turn Aeroplane Mode on or off.
7
•Touch  to turn Bluetooth on or off.
•Touch  to turn Battery Saver on or off.
1.10 Managing applications
On the Home screen, touch  to enter the applications list. In the applications list, you can do any of the following:
•Touch an application icon to open it.
•Swipe left or right to view another list screen.
•Touch the widgets tab to switch to the widgets list.
•Touch and hold  , then swipe to GoogleTM icon to open Google NowTM.
1.11 Managing Home screen
•On the applications/widgets list, touch and hold an application’s shortcut or widget, and drag it onto the
Home screen.
•On the Home screen, touch and hold a shortcut or widget and drag it to the  to delete it.
Tip: To help you set up your phone the way you like it,
drag  from the left-most Home screen to the main Home screen, so you can access it more easily.
1.12 Managing folders
•Add folders: On the Home screen, touch and hold an application icon and stack it on top of another application icon to create a folder.
8
•Rename folders: On the Home screen, touch a folder and then touch the folder name in the popup to rename the folder.
•Delete folders: On the Home screen, touch and hold a folder and drag it to the  to delete it.
•Move folders to the shortcut bar: When there is space on the shortcut bar at the bottom of the screen, touch and hold a folder and drag it to the shortcut bar.
2. Phone calls
You can make a phone call from the keypad, People or the Call log. While you are in a call, you can also answer another incoming call, send it to your voicemail or conduct a conference call.
Touch  at the bottom of the Home screen or touch
  >
>  to open the dial application.
2.1 Making a call
•On the dial application screen, touch  to switch to the keypad tab.
•Touch the number keys to enter the telephone number.
•Touch  at the bottom of the screen to dial the
number.
Hint: To avoid affecting the quality of the call, do not touch the receiver or loudspeaker when making or answering a call.
9
Making a call from Contacts
•On the dial application screen, touch  to switch to the Contacts tab.
•Touch a contact to make the call.
Making a call from Call log
•On the dial application screen, touch  to switch to the Call log tab.
•Touch  on the right side of the Call log to make the call.
2.2 Answering or rejecting a call
When you receive an incoming call, you can do any of the following:
•Answer the call: Drag  to the right to answer the call.
•Reject the call: Drag  to the left to reject the call.
•Rejection SMS: Drag  upward to reject the call and send an SMS message to the caller.
Hint: On the dial application screen, touch  > Settings > Quick reply to edit the rejection SMS.
2.3 During a call
On the call screen, you can do any of the following:
•Hang up the call: Touch  to hang up the call.
•Enter another number: Touch  to open the keypad
10
and enter another number.
•Turn on Speakerphone: Touch  to hear the caller on the loudspeaker (so you don’t need to hold it to your ear).
•Mute: Touch  to mute the call so that the other person cannot hear your voice.
•Hold the call: Touch  to put the current call on hold.
•Add a third person to the call: Touch  to enter the
dial screen and add a third person to the call.
Hint: You can touch and use other functions during a call. To return to the call screen, open the Notification panel and touch the current call.
2.4 Conference calls
You can hold a conference call with multiple participants.
•Place a call to the first participant.
•Touch  during the call with the first participant.
•Use the keypad to enter the phone number of the second participant you want to add, or touch  or
or
 to select the number.
•After connecting with the second participant, touch
 to start the conference call.
•Touch  to end the conference call.
Hint: You can have up to 6 participants in conference call
11
mode. See the Vodafone website or contact Vodafone customer services for details.
2.5 Answering another incoming call
If you receive another incoming call while you are in a call, you can accept the incoming call and automatically place the current call on hold without hanging up.
Hint: You need to enable call waiting before you can use this service. See the Vodafone website or contact Vodafone customer services for details.
2.6 Supplementary services
Your phone supports a variety of supplementary services. These include call forwarding and call waiting.
Hint: These services require network support. See the Vodafone website or contact Vodafone customer services for details.
Setting up call forwarding
If you are unable to answer calls, you can set up this function to forward incoming calls to another number.
•On the dial application screen, touch  > Settings > Call forwarding.
•Select a forwarding type, enter the number you want to forward calls to.
•Select Enable to enable this function.
Setting up call waiting
After setting up this function, the phone will notify you if
12
you receive an incoming call while already in a call. It will also inform the incoming caller to wait for you to end your current call before they are connected. You can also answer the incoming call and switch between the two calls.
•On the dial application screen, touch  > Settings > Additional settings > Call waiting.
•Mark the Call waiting checkbox to enable this function.
2.7 Voicemail
If you activate and set up voicemail, your phone will automatically send unanswered calls to voicemail (including calls that are unanswered when you are in another call and when your phone is off).
•On the dial application screen, touch  > Settings > Voicemail > Setup.
•Touch Voicemail number, enter your voicemail number and then touch OK to set up voicemail.
•To listen to your voicemail, press and hold the 1 key on the dial keypad screen and follow the server instructions.
Hint: Before using this function, contact Vodafone customer services to activate voicemail. See the Vodafone website or contact Vodafone customer services for details.
3. People
You can use the People application to save and manage phone numbers, addresses and other information.
13
On the Home screen, swipe the screen to the right then
touch  , or touch
  >
>  to open the people application.
3.1 Adding a contact
•On the Contacts screen, touch  .
.
•Select where to save the contact.
•Enter the contact information.
•Touch  to save the contact information. Hint: In the Call log, touch a phone number you want to save to save it directly as a contact.
3.2 Quick Contact
On the Contacts screen, touch the avatar (image) of a contact and select the icon for the way you want to communicate with the contact. You can quickly call the contact or send them an SMS or email. The icons available depend on the information you have for the contact and the applications and accounts on your phone.
3.3 Managing contacts
Adding a contact to Favourites
On the Contacts screen, select the contact you want to add to Favourites and then touch the  at the right of
the contact name. The star will turn white (  ) to indicate that the contact has been added to Favourites.
14
Searching for a contact
•On the Contacts screen, touch  .
.
•Enter the name of the contact you want to search for. Search results will be displayed below the search bar.
Hint: You can also slide the scroll bar at the right of Contacts to quickly search for a contact.
Editing a contact
•On the Contacts screen, select the contact you want to edit then touch  > Edit.
•Edit relevant information and then touch  to save the contact. Alternatively, touch
  > Discard to cancel your changes.
Deleting a contact
•On the Contacts screen, select the contact you want to delete then touch  > Delete.
•Touch OK to confirm that you want to delete the contact.
Sending a contact vCard
You can send a “.vcf ” format vCard via email, Bluetooth or MMS. Before using email to send a vCard, you need to set up an email account on the phone. (Read the “6.1 Adding an email account” section of this user manual, on page 21.)
•Touch a contact on the Contacts screen.
•Touch  > Share.
15
• Select how to send the vCard.
3.4 Managing groups
Creating a group
•On the Contacts screen, touch  to switch to the Groups screen.
•Touch  and select an account.
•Enter the group name.
•Touch  , select one or multiple contacts and then touch OK.
•Touch  to save the group information.
Editing a group
You can always make changes to the information you have stored for a group.
•Select a group and touch  > Edit.
•Edit the group name and add or delete members.
•Touch  .
.
Adding a contact to your groups
To add a contact to your groups, you can do any of the following:
•When editing contact information, touch the group names below Groups to select groups.
•When editing a group, enter a contact's name. The phone will automatically display the names of stored contacts as you enter the name. Touch the contact you
16
want to add to the group.
3.5 Importing contacts from SIM card or storage
•On the People screen, touch  > Import/Export, and select the corresponding option.
•Select one or multiple contacts.
•Touch  to finish copying the contact(s).
Hint: Read the “Frequently Asked Questions” section of this user manual to get more information about how to import contacts from another phone by using the microSD card, on page 49.)
4. Text input methods
4.1 Using the text input panel
The phone's input panel can be used to enter text. When you need to enter text, touch the text input area to open the input panel. Touch  to hide the input panel.
17
4.2 Switching input methods
When you installed other different input methods, you can switch the input methods.
•When the keyboard is displayed on the screen, gently slide down the Status bar to open the Notification Panel.
•Touch Select Input Method and select the input method you want to use.
Hint: Touch  >
>  > Language & input > Default, then select which input method to set as the default.
4.3 Editing text
Touch and hold the text you have entered and select the content you want to edit. You can use the icons that appear in the top right of the screen to quickly edit the text.
• : Select all text.
• : Cut selected text. Touch and hold the text you have entered, move the cursor to select the text you want to edit and touch this icon to cut the text. After cutting, you can touch and hold a blank area in the text
field until  appears. Move
  to the location where you want to paste the text and then
touch  to paste the text you previously cut.
•  : Copy selected text. Touch and hold the text you have entered. Move the cursor to select the text you
18
 Loading...