


 Loading...
Some services and apps may not be available in all countries. Please ask in-store for details.
Android is a trademark of Google Inc. The Android robotisreproducedormodifiedfromworkcreated and shared by Google and used according to terms described in the Creative Commons 3.0 Attribution Licence.
© Vodafone Group 2016. Vodafone and the Vodafone logos are trade marks of Vodafone Group. Any product or company names mentioned herein maybethetrademarksoftheirrespectiveowners.
CJA28HDVDAAA
Smart mini 7dual
User Manual
Vodafone
Power to you
VFD 301
Table of Contents
1 Your phone................................................................. |
4 |
|
1.1 |
Keys and connectors...................................................... |
4 |
1.2 |
Getting started.................................................................. |
7 |
1.3 |
Home screen................................................................... |
10 |
2 |
Text input................................................................. |
20 |
|
|
2.1 |
Using the onscreen keyboard................................... |
20 |
|
2.2 |
Text editing....................................................................... |
21 |
3 |
Phone call, Call log & People............................ |
22 |
|
|
3.1 |
Phone call......................................................................... |
22 |
|
3.2 |
Call log............................................................................... |
30 |
|
3.3 |
Contacts............................................................................. |
30 |
4 |
Messaging & Email............................................... |
37 |
|
|
4.1 |
Message............................................................................. |
37 |
|
4.2 |
Gmail/Email..................................................................... |
43 |
5 |
Calendar, Alarm clock & Calculator................ |
46 |
|
|
5.1 |
Calendar............................................................................. |
46 |
|
5.2 |
Clock................................................................................... |
48 |
|
5.3 |
Calculator.......................................................................... |
50 |
6 |
Getting connected................................................ |
51 |
|
|
6.1 |
Connecting to the Internet........................................ |
51 |
|
6.2 |
Chrome.............................................................................. |
54 |
|
6.3 |
Connecting to Bluetooth devices........................... |
54 |
6.4 Connecting to a computer via USB........................ |
55 |
6.5To safely remove the microSD card from your
phone.................................................................................. |
56 |
6.6Sharing your phone’s mobile data connection.57
|
6.7 |
Connecting to virtual private networks |
................58 |
7 |
Google Play Store.................................................. |
59 |
|
8 |
Multimedia applications..................................... |
60 |
|
|
8.1 |
Camera............................................................................... |
60 |
|
8.2 |
Photos................................................................................ |
62 |
|
8.3 |
Play music......................................................................... |
65 |
|
8.4 |
Video Player..................................................................... |
66 |
9 |
Google Maps.............................................................. |
67 |
|
|
9.1 |
Get My Location............................................................. |
67 |
|
9.2 |
Search for a location..................................................... |
68 |
|
9.3 |
Save a location................................................................ |
68 |
|
9.4 |
Open Street View for a location............................... |
69 |
9.5Get driving, public transportation or walking
|
|
directions........................................................................... |
69 |
10 |
Others........................................................................ |
70 |
|
|
10.1 |
File Manager..................................................................... |
70 |
|
10.2 |
Sound Recorder.............................................................. |
70 |
|
10.3 |
Radio................................................................................... |
71 |
11 |
Settings..................................................................... |
72 |
|
|
11.1 |
Wireless & networks...................................................... |
72 |
1 |
2 |
|
11.2 |
Device................................................................................. |
74 |
|
11.3 |
Personal............................................................................. |
77 |
|
11.4 |
System................................................................................ |
83 |
12 |
Update your phone’s software.......................... |
90 |
|
13 |
Product safety information................................ |
91 |
|
14 |
Telephone warranty........................................... |
103 |
|
15 |
Accessories.......................................................... |
105 |
|
16 |
Specifications...................................................... |
106 |
|
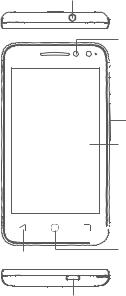
1 Your phone
1.1Keys and connectors
Headset connector
Flash

 Front Camera

 Power key
Volume key
Touch screen
 Overview key
Home key
Back key
Micro-USB
Connector
3 |
4 |
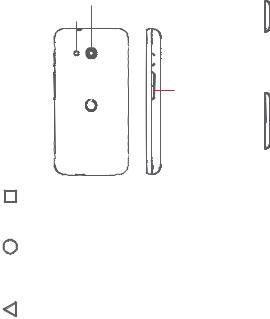
Camera
Camera Flash/Flashlight


 Power key

 Volume up
Volume down
Recents key
•Touch: this shows your recently-used apps. Touch an app to open it, or swipe it left or right to remove it from the list.
Home key
•While on any app or screen, touch the Home key to return to the main Home screen.
•Long press this key to access Google Now & Voice
Search.
Back key
•Touch to go back to the previous screen, or to close a dialogue box, options menu, the Notification panel, etc.
Power key
•Press:activatethelockscreen/wakeupthescreen.
•Long press: show the pop-up menu to select from
Shut down, Restart, Flight mode.
Press and hold: power on.
•Long press the Power key and the Volume down key to capture a screenshot.
Volume keys
•During a call, they adjust the earpiece or headset volume.
•In Music/Video/Streaming mode, they adjust the media volume.
•In general mode, they adjust the ringtone volume.
•Mute the ringtone of an incoming call.
5 |
6 |

1.2Getting started
1.2.1Setup
Removing or installing the back cover
Inserting or removing the SIM card
You must insert your SIM card to make phone calls.
Power off your phone and remove battery before inserting or removing the SIM card.
1 |
1 |
2 |
2 |
Place the SIM card with the chip facing downwards and slide it into its housing. Make sure that it is correctly inserted. To remove the SIM card, press and slide it out.
A Dual SIM capable device, shall support only DS-DS (Dual
SIM, Dual Standby), and must not support DS-DA (Dual SIM, Dual Active).If the one SIM is active (in call), the other SIM may not make calls/text/transmit data.
SIMSlot1:LockedtoVodafoneNetwork SIMSlot2:OpentoAllNetwork
Mobile Data is only available for SIM slot 1. Your phone only supports micro-SIM card. Do not attempt to insert other SIM types like mini or nano cards, as you may damage your phone.
Installing or removing the battery
Power off your phone before removing the battery.
•Insert the battery and click it into place, then close the cover.
•Unclip the cover, then remove the battery.
Inserting or removing the microSD card
Power off your phone and remove battery before inserting or removing the microSD card.
Slide the microSD holder to the left to unlock it, then lift it up.
Place the microSD card in the space provided, with the gold contacts facing down. Then fold the microSD holder down and slide it to the right until it locks.
Charging the battery
7 |
8 |
To charge the battery, connect the charger to your phone and mains socket. You can also charge your phone via a USB cable.
To reduce your phone’s power consumption, switch off
Wi-Fi, GPS, Bluetooth or apps running in the background when not needed. In Settings you can also lower the brightness of the screen, and shorten the length of time before the screen goes to sleep.
1.2.2Power on your phone
Hold down the Power key until the phone powers on. It will take a few seconds before the screen lights up. Unlock your phone (Swipe, PIN, password or pattern) if necessary and confirm. The Home screen will display.
If you do not know your PIN code or if you have forgotten it, contact your network operator. Do not leave your PIN code with yourphone.Storethisinformationinasafeplacewhennotinuse.
Set up your phone for the first time
Thefirsttimeyoupoweronthephoneyouwillbeaskedtosetthe following options: language, Google account, date & time, etc.
1.Select the phone’s language, then touch  .
.
2.Select Wi-Fi network, then touch NEXT.
3.Input your Name, then touch NEXT.
4.Protect your phone, set screen lock now or touch SKIP to move to next setup.
5.Select Google services, once finished, touch NEXT.
6.Select a Home screen, then touch NEXT.
7.Select Help tips, then touch NEXT.
Togetherwiththeotheroptions(Date & time, App permissions, and etc) all configured, the setup of your device is completed.
If you power on your phone with no SIM card inserted, you will stillbeabletoconnecttoaWi-FinetworktosignintoyourGoogle account and to use some features.
9
1.2.3Power off your phone
HolddownthePower key from the Home screen until the Phone options appear, then select Shut down.
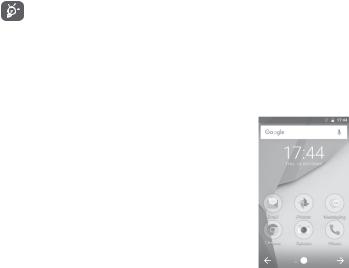
1.3Home screen
Your phone has two kinds of Home screen that you can use: the standard Home and the Simple Home screen.
Youcansetthiswhenyoufirstturnthephoneon,orbytouching
Settings > Home.
In the simplified Home screen, all the features you need, are presented in an intuitive and attractive design.
Touching the Home key always takes you to your main Home screen, and you can personalise all your Home screens by adding your favourite apps, shortcuts and widgets to them.
10
In the standard Home screen the bottom set of icons is always visible, whichever of your Home pages you are on. This also includes the Application tab, which will show all your available apps.
|
|
|
Status bar |
|
|
|
• Status/Notification indicators |
|
|
|
|
a |
b |
|
• Touch and drag down to open the |
|
Notification panel |
||
|
|
|
Google Search bar
•Touch a to enter text search screen
•Touch b to enter voice search screen

 Slide left or right to view other panels
on the Home screen
Favourite tray apps
• Touch to enter the app
•Long press to move or change apps
Application tab
•Touch to open All apps
The Home screen extends on either side of the screen to allow more space for adding apps, shortcuts, etc. Slide the Home screen horizontally left and right to get a complete view of the Home screen. The white spot in the lower part of the screen indicates which screen you are viewing.
In the standard Home screen, you can slide right to access your favourite app (which is set to Smart tips). You can change this to open a different app by touching Settings > Display > Favourite
Home screen app.
1.3.1 Using the touchscreen
Touch 
To access an app, touch it with your finger.
Long press 
Long press the Home screen to access the available options for setting the wallpaper.
Drag 
Long press an item to be able to drag it to another location.
Slide/Swipe 
Slide the screen to scroll up and down lists, screens of apps, images, web pages, etc.
Flick 


Similar to swiping, but flicking makes it move quicker.
Pinch/Spread
Place your fingers of one hand on the screen surface and draw them apart or together to scale an element on the screen.
Rotate 
Automatically change the screen orientation from portrait to landscape by turning the phone sideways.
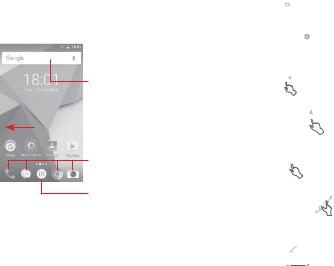
1.3.2Status bar
From status bar, you can view both phone status (on the right side) and notification information (on the left side).
11 |
12 |
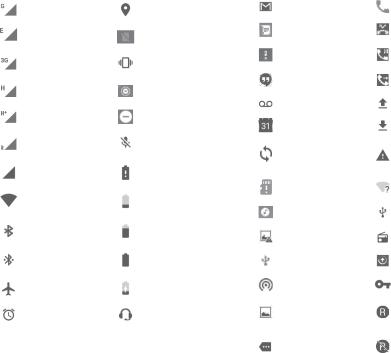
Status icons
|
GPRS connected |
|
GPS is on |
|
|
|
|
|
EDGE connected |
|
No SIM card inserted |
|
|
|
|
|
3G connected |
|
Vibrate mode |
|
|
|
|
|
HSDPA (3G) connected |
|
Ringer is silenced |
|
|
|
|
|
HSPA (3G) connected |
|
Do not disturb mode |
|
|
|
|
|
Data roaming |
|
Phone microphone |
|
|
muted |
|
|
|
|
|
|
|
|
|
|
Signal strength |
|
Battery is very low |
|
|
|
|
|
Connected to a Wi-Fi |
|
Battery is low |
|
network |
|
|
|
|
|
|
|
|
|
|
|
Bluetooth is on |
|
Battery is partially |
|
|
drained |
|
|
|
|
|
|
|
|
|
|
Connected to a |
|
Battery is full |
|
Bluetooth device |
|
|
|
|
|
|
|
|
|
|
|
Flight mode |
|
Battery is charging |
|
|
|
|
|
Alarm is set |
|
Headset connected |
|
|
|
|
Notification icons
|
New Gmail TM message |
|
Call in progress |
|
|
|
|
|
New text or multimedia |
|
Missed call |
|
message |
|
|
|
|
|
|
|
|
|
|
|
Problem with SMS or |
|
Call on hold |
|
MMS delivery |
|
|
|
|
|
|
|
|
|
|
|
New Hangouts |
|
Call forwarding is on |
|
message |
|
|
|
|
|
|
|
|
|
|
|
New voicemail |
|
Uploading data |
|
|
|
|
|
Upcoming event |
|
Download finished |
|
|
|
|
|
|
|
Carrier data use |
|
Data is synchronising |
|
threshold approaching |
|
|
|
or exceeded |
|
|
|
|
|
No microSD card |
|
An open Wi-Fi network |
|
installed |
|
is available |
|
|
|
|
|
Song is playing |
|
Phone is connected via |
|
|
USB cable |
|
|
|
|
|
|
|
|
|
|
Screenshot error |
|
Radio is on |
|
|
|
|
|
USB tethering is on |
|
System update |
|
|
available |
|
|
|
|
|
|
|
|
|
|
Portable Wi-Fi hotspot |
|
Connected to VPN |
|
is on |
|
|
|
|
|
|
|
|
|
|
|
Screenshot captured |
|
International Roaming |
|
|
is enabled |
|
|
|
|
|
|
|
|
|
|
More notifications are |
|
International Roaming |
|
hidden |
|
is disabled |
|
|
|
|
13 |
14 |
Notification panel
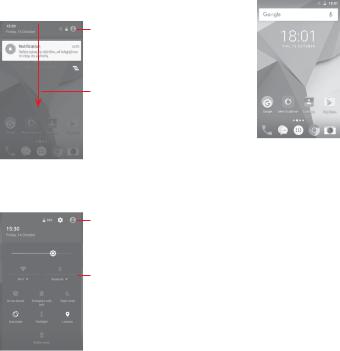
Touch and drag down the Status bar to open the Quick settings panelanddragdownagaintoopentheQuicksettingspanel.Touch and drag up to close it. From the Notification panel, you can open items and other reminders indicated by notification icons or view wirelessserviceinformation.
Touch to access the Quick settings bar
Touch and drag downwards twice to access the Quick settings bar
Touch a notification and slide it sideways to delete it.
Touch the icon  to clear all event–based notifications (other ongoing notifications will remain).
Touch  and then the Settings icon
  to access Settings.
The customised picture will show if you set up your profile in the Contacts application .(1)
(1) Please refer to "3.3.1 View your contacts"
Quick settings bar
•Touch icons to enable/disable functions or to change modes
•Touch the down arrow to view settings
1.3.3Search bar
The phone provides a Search function which can be used to find the information you want on your phone, in your applications or on the web.
a b
a Search by text
•Touch the Search bar from the Home screen.
•Enter the text/phrase you want to search for.
•Touch  onthekeyboardifyouwanttosearchontheweb. b Search by voice
•Touch  from the Search bar to display a dialog screen.
•Speak the word/phrase you want to search for. A list of search results will display for you to select from.
15 |
16 |
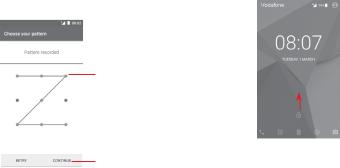
1.3.4Lock/Unlock your screen
To protect your phone and privacy, you can lock your phone screen with a variety of patterns, PIN or password, etc. through
Settings > Security > Screen lock.
To create a screen unlock pattern (Follow onscreen instructions)
•Touch Settings > Security > Screen lock > Pattern.
•Draw your own pattern.
Draw your unlock pattern
Touch to confirm by drawing pattern again
To create a screen unlock PIN/Password
•Touch Settings > Security > Screen lock > PIN or Password.
•Set your PIN or password.
To lock phone screen
Press the Power key once to lock the screen.
To unlock phone screen
Press the Power keyoncetolightupthescreen,drawtheunlock pattern you have created or enter PIN or password to unlock the screen.
If you have chosen Swipe as the screen lock, slide upward to unlock the screen, slide left to access Camera and slide right to access Phone.
1.3.5 Personalise your Home screen
Add an app or widget
Touch the Application tab  , then long press the app to activate the Move mode, and drag the item to any Home screen.
Reposition an app or widget
Long press the item to be repositioned to activate the Move mode, drag the item to the desired position and then release. You can move items both on the Home screen and the Favourites tray. Hold the icon on the left or right edge of the screen to drag the item to another Home screen.
17 |
18 |
Remove
Long press the item to be removed to activate the Move mode, drag the item up to the top of Remove icon, and release after the item turns red.
Create folders
To make it easier to organise apps and shortcuts on the Home screen and the Favourite tray, you can add them to a folder by stacking one item on top of another. To rename a folder, open it and touch the folder’s title bar to input the new name.
Wallpaper customisation
Long press an empty area on the Home screen or go to Settings > Display > Wallpaper to customise your wallpaper.
1.3.6 Volume adjustment
Using volume key
Press Volume key to adjust the volume. To activate the vibrate mode, press the Volume down key until the phone vibrates. Press the Volume down key once more to activate the silent mode.
Using Settings menu
Drag down twice from the notification panel and touch the settings icon  to open Settings, then touch Sound & notification. You can set the volume of calls, notification, system and etc. to your preference.
2 Text input
2.1Using the onscreen keyboard
Onscreen keyboard settings
Touch the Application tab from the Home screen, select
Settings > Language & input.
Adjust the onscreen keyboard orientation
Turn the phone sideways or upright to adjust the Onscreen
Keyboard orientation. You can also adjust it by changing the settings (go to Settings > Display > When device is rotated > Rotate the contents of the screen).
2.1.1Android keyboard
|
|
|
|
|
|
|
Touch to enter text |
Touch to switch |
|
|
|
|
|
|
or numbers |
|
|
|
|
|
|
|
|
|
|
|
|
|
|
|
|
between "abc/ |
|
|
|
|
|
|
|
Abc" mode; Long |
|
|
|
|
|
|
Long press, |
press to switch |
|
|
|
|
|
|
|
|
|
|
|
|
|
then select to |
|
between "abc/ |
|
|
|
|
|
|
|
|
|
|
|
|
|
enter symbols/ |
|
ABC" mode |
|
|
|
|
|
|
|
|
|
|
|
|
|
emoticons |
|
|
|
|
|
|
|
|
|
|
|
|
|
|
|
|
|
|
Touch to switch between the |
||||||
|
symbol and numeric keyboard |
||||||
19 |
20 |
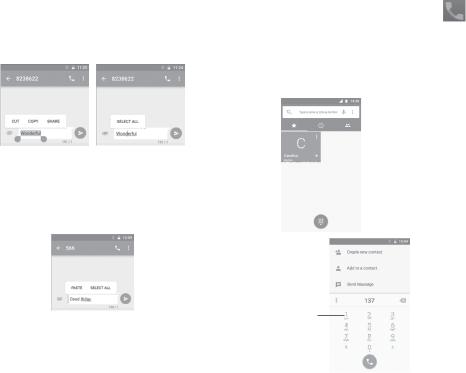
2.2Text editing
You can edit the text you have entered.
•Long press or double touch the text you want to edit.
•Drag the tabs to change the highlighted selection.
•The following options will show: CUT, COPY, SHARE and
SELECT ALL.
You can also insert new text
•Touchwhereyouwanttotype,orlongpressablankspace,the cursor will blink and the tab will show. Drag the tab to move the cursor.
•If you have selected any text, touch the tab to show PASTE which allows you to paste any text you have previously copied.
3 Phone call, Call log & People
3.1 Phone call
3.1.1Placing a call
To make a call when the phone is active, go to the Home screen and touch the Phone  icon in the Favourites tray.
If the phone is locked, press the Power buttonandthenswipethe phone icon to the right.
|
|
|
|
|
|
|
|
Call log |
|
|
|
|
|
|
|
|
|
|
|
|
|
|
|
|
|
Contacts |
|
|
|
|
|
|
|
|
|
|
|
|
|
|
|
|
|
|
Touch to |
|
|
|
|
|
Touch to view the |
||
|
|
|
||||||
|
|
|
|
|
|
contact’s detailed |
||
call the |
|
|
|
|
|
|||
previewed |
|
|
|
|
|
information. You can |
||
number |
|
|
|
|
|
also edit, delete, share |
||
|
|
|
|
|
|
|
|
the contact, or send a |
|
|
|
|
|
|
|
|
message to the contact. |
|
|
|
|
|
|
|
|
Show the dial pad |
|
|
|
|
|
|
|
||
Long press to access voicemail
21 |
22 |
Enter the number you want from the dial pad directly or select a contact from Call log or CONTACTS by touching tabs, then touch  to place the call.
The number you entered can be saved to Contacts by touching the Create new contact icon  or the Add to a contact icon
  .
.
If you make a mistake, you can delete the incorrect digits by touching  .
.
To hang up a call, touch  .
.
International call
To dial an international call, long press to enter "+", then enter the international country prefix followed by the full phone number and finally touch  .
.
Emergency call
Ifyourphonehasnetworkcoverage,dialtheemergencynumber and touch  to make an emergency call. This works even without a SIM card and without typing the PIN code.
3.1.2Answering or rejecting a call
When you receive a call, a call window will be presented on top of the screen. Touch  to dismiss a call or
  to answer a call.
Touch the call window to open the Phone call screen.
On the Phone call screen, touch 
•Slide the icon right to answer the call;
•Slide the icon left to reject the call;
•Slide the icon up to reject the call by sending a preset message. To mute incoming calls, press the Volume up/down key.
23 |
24 |
3.1.3Calling your voicemail
Your voicemail is provided by your network to avoid missing calls. It works like an answering machine that you can access at any time.
To listen to your voicemail, long press  on the dial pad..
To set your voicemail number, touch  key and touch Settings >
Calls > Voicemail.
If you receive a voicemail, a voicemail icon  appears on the Status bar. Open the Notification panel, touch New voicemail.
3.1.4During a call
To adjust the volume during a call, press the Volume up/down key.
Touch to hold the current call. Touch this icon again to retrieve the call.
Touch to display dial pad.
Touch to end the current call.
Touch to mute the current call. Touch this icon again to unmute the call.
Touch to activate the speaker during the current call. Touch this icon again to deactivate the speaker.
Touch to place call to another contact.
To avoid accidentally pressing the touchscreen during a call, screen will be locked automatically when you put your phone close to your ear; and it will be unlocked when the phone is taken away from your ear.
3.1.5Managing multiple calls
With this phone you can handle multiple calls at the same time.
Conference calls (1)
You can set up a conference call.
•Place a call to the first participant of the conference call.
•Touch  and select Add call.
•Enter the phone number of the person you want to add to
conference and touch  . You can also add participants from
Call log or Contacts.
•Press menu icon to start a conference call.
•During a conference call, touch  to drop a participant or to talk privately to one of the participants. Touch
  to drop the
participant from the conference, touch to talk privately to the participant and hold on other participants.
• Touch  to end the conference call and disconnect all callers.
(1) Depending on your network operator.
25 |
26 |
3.1.6Call settings
From phone screen, touch  key and select Settings the following options are available:
Display options
• Sort by
To set the contacts display by First name or Last name.
• Name format
To set the name format by First name first or Last name first.
Sounds and vibration
• Phone ringtone
Select a ringtone for incoming calls.
• Also vibrate for calls
Markthecheckboxtoactivatevibrationwhenthere'sanincoming call.
• Dial pad tones
Mark the checkbox to enable dial pad tones.
Quick responses
Toeditquickresponses whichwill be usedwhenyourejectacall with messages.
Calls
• Vibrate reminder
Mark the checkbox to turn off vibrate reminder.
• Hearing aids
Mark the checkbox to turn on the hearing aid.
• Voicemail |
|
Service |
Opens a dialog box where you can select |
|
your carrier’s voicemail service or another |
|
service. |
Setup |
If you are using your carrier’s voicemail |
|
service, this opens a dialog box where you |
|
can enter the phone number to use for |
|
listening to and managing your voicemail. |
Sound |
Touch to select the notification sound. |
Vibrate |
Mark the check box to enable vibration |
|
when the call is connected. |
• Fixed Dialling Numbers
Fixed Dialling Number (FDN) is a service mode of SIM, where outgoing calls are restricted to a set of phone numbers. These numbers are added to the FDN list. The most common practical application of FDN is for parents to restrict the phone numbers which their children can dial.
For security reasons, you’ll be prompted to enable FDN by entering SIM PIN2 which is usually acquired from your service provider or SIM maker.
• Call forwarding
Touch to configure how your calls are always forwarded or when you are busy, unanswered or unreachable.
27 |
28 |

• Call barring
You can activate or deactivate the call barring for outgoing and incoming calls. The various options are:
All outgoing calls All outgoing calls are barred.
International Outgoing international calls are barred. outgoing calls
International Outgoing international calls except those except home to your country of subscription are barred.
All incoming calls All incoming calls are barred.
Incoming calls |
Incoming calls are barred when you are |
while roaming |
abroad. |
Cancel all |
Deactivate all call barring. |
Change barring |
Change the original barring password for |
password |
activating call barring. |
• Additional settings |
|
Caller ID |
Opens a dialog box where you can set |
|
whether your phone number is displayed |
|
when making calls. |
Call waiting |
Mark the check box to notify you of a new |
|
incoming call. |
3.2 |
Call log |
|
You can view your call history by touching |
from the Phone |
|
screen to view call history. |
|
|
Touch a contact or number to view information or further operations.
You can view detailed information of a call, launch a new call or send messages to a contact or number, or add numbers to Contacts (only available for unsaved phone numbers), etc.
Touch the photo  to open the Quick Contact panel.
To clear the entire call memory, touch  key from the phone screen and touch Call history, touch
  again and select Delete or Clear call history to erase any unwanted call logs.
3.3 Contacts
Youcanviewandcreatecontactsonyourphoneandsynchronise these with your Gmail contacts or other apps on the web or on your phone.
29 |
30 |
3.3.1View your contacts
To access the Contacts app, touch the Application tab on the Home screen, then select Contacts.
Touch to view your favourite contacts
Touch to set up your profile and your picture will show
Touch icon to open the Quick Contact panel and view the contact’s detailed information
Contact list
Touch to add a new contact
After setting up your profile, your picture will show and the icon in quick settings screen will vary together.
Touch the  key to display the contacts list option menu.
Following options are available:
• Contacts to Choose which contacts to display. display
• Import/Export Import or export contacts between phone,
SIM card, and microSD card, or share contacts.
• Groups |
Touch to create a new contacts group or |
|
configure existed groups settings. |
• Accounts |
Manage the synchronisation settings for |
|
different accounts. |
• Settings |
Open the contact display settings. |
3.3.2Adding a contact
Touch the Application tab on the Home screen, select Contacts, then touch the icon  inthecontactlisttocreateanewcontact.
Touch to save
Touch to add a new label
Touch to take a photo or select a picture for the contact
31 |
32 |
Loading...