

Vodafone Smart Tab 4G Operating Guide
User manual
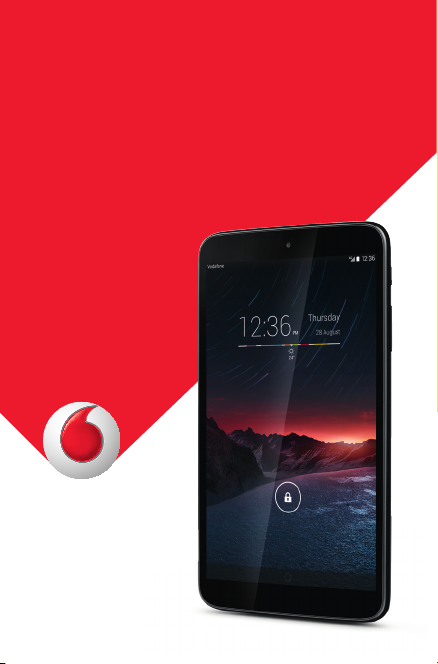
Smart Tab 4G
Vodafone
Power to you

Table of Contents
1 Your device ........................................................................... 1
1.1 Keys and connectors ....................................................................1
1.2 Getting started ................................................................................3
1.3 Home screen ....................................................................................5
2 Text input ............................................................................14
2.1 Using Onscreen Keyboard .......................................................14
2.2 Swift key ..........................................................................................14
2.3 Text editing ....................................................................................14
3 Contacts .............................................................................16
3.1 Consult your contacts ...............................................................16
3.2 Managing contact groups ........................................................17
3.3 Adding a contact .........................................................................17
3.4 Editing your contacts.................................................................19
3.5 Contacts importing, exporting and sharing......................19
3.6 Accounts .........................................................................................20
4 Messaging, Email .............................................................21
4.1 Messaging .....................................................................................21
4.2 Gmail/Email ..................................................................................24
4.3 Hangouts .......................................................................................29
5 Calendar & Time ...............................................................32
5.1 Calendar .........................................................................................32
5.2 Clock ................................................................................................34
6 Getting connected ...........................................................36
6.1 Connecting to the Internet .....................................................36
6.2 Browser ...........................................................................................38
6.3 Connecting to Bluetooth devices .......................................44
6.4 Connecting to a computer ......................................................45
6.5 Sharing your tablet's mobile data connection................46

6.6 Connecting to virtual private networks .............................47
7 Google Play Store ..........................................................49
7.1 Locate the item you want to download and install ......49
7.2 Download and install .................................................................50
7.3 Manage your downloads ..........................................................51
8 Multimedia applications ...............................................53
8.1 Camera ...........................................................................................53
8.2 Gallery .............................................................................................55
8.3 YouTube ..........................................................................................57
9 Maps ....................................................................................59
9.1 Get My Location ...........................................................................59
9.2 Search for a location ..................................................................60
9.3 Star a location ...............................................................................61
9.4 Get driving, public transportation or walking directions62
9.5 Arrangement of Layers .............................................................63
10 Others ..................................................................................64
10.1 Calculator ......................................................................................64
10.2 File Manager .................................................................................64
10.3 Sound Recorder ..........................................................................65
10.4 Kingsoft Office ..............................................................................65
10.5 Peel Smart Remote ....................................................................65
10.6 Device Manager ...........................................................................66
10.7 Other applications .....................................................................66
11 Settings ..............................................................................67
11.1 Wireless & networks ...................................................................67
11.2 Device ...............................................................................................69
11.3 Personal...........................................................................................70
11.4 Accounts .........................................................................................75
11.5 System .............................................................................................75
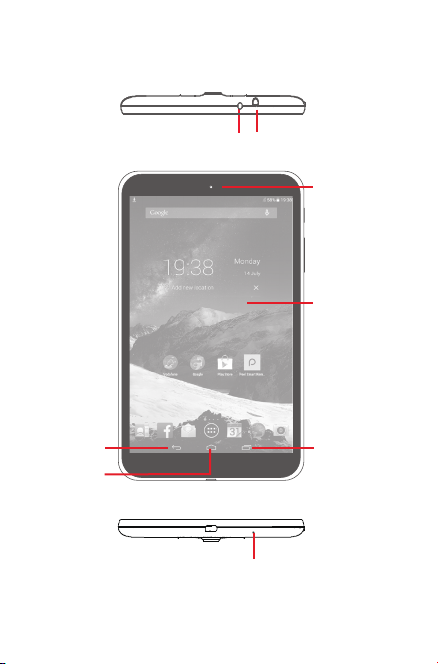
1 Your device
1.1 Keys and connectors
Headset connector
IR LED
Front camera
Touch screen
Back key
Home key
Multitask key
Microphone
1
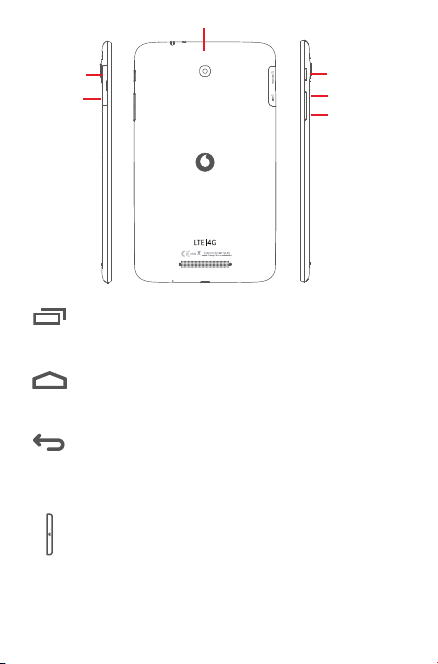
Rear Camera
Micro SD
Sim
Multitask key
• Touch to open a list of thumbnail images of applications
you've worked with recently.
Home key
• While on any application or screen, touch to return to the
Home screen.
Back key
• Touch to go back to the previous screen, or to close a
dialog box, options menu, the notification panel, etc.
These keys are visible when the screen lights up.
Power key
• Press: Lock the screen/Light up the screen
• Press and hold: Power on or pop up the menu to get more
options, such as Power off, Airplane mode, etc.
• Press and hold Power key and Volume down key to
capture a screenshot.
2
Power key
Volume up
Volume down
Volume Keys
• In Music/Video/Streaming mode, adjust the media
volume.
1.2 Getting started
1.2.1 Set-up
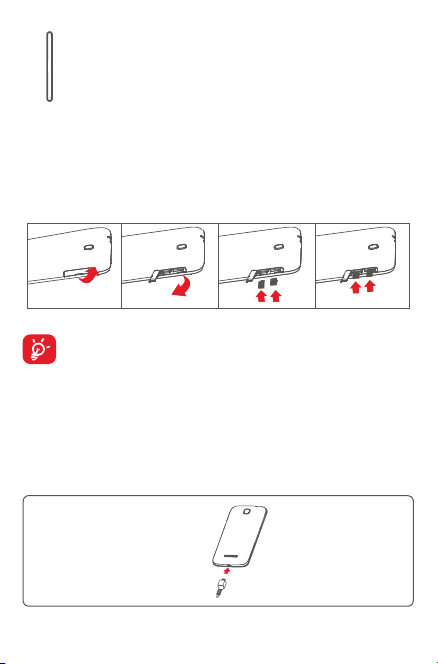
Inserting the micro SIM card & the microSD card
Before inserting/removing the SIM card and the microSD card,
you should ensure the tablet is off, to protect it from corruption
or damage. In addition, regularly removing or inserting the SD
card may cause the tablet to restart.
Your tablet only supports micro-SIM cards. Do not attempt to insert
other SIM types like mini and Nano cards, otherwise you may damage
your tablet.
Charging the battery
To charge your tablet, connect the charger to your tablet and mains
3
socket.

• When using your tablet for the first time, charge the battery fully
(approximately 5 hours).
You are advised to fully charge the battery (
indicated by the percentage on screen while the tablet is powered off. The
percentage increases as the tablet is charged.
To reduce power consumption and energy waste, when battery is
fully charged, disconnect your charger from the plug; switch off
Wi-Fi, GPS, Bluetooth or background-running applications when
not in use; reduce the backlight time, etc.
Adapter shall be installed near the equipment and shall be easily
accessible
). Charging status is
1.2.2 Power on your tablet
Hold down the Power key until the tablet powers on, unlock your tablet
(Slide, PIN, Password, Pattern, Face unlock) if necessary and confirm. The
Home screen is displayed.
If you do not know your PIN code or if you have forgotten it, contact your
network operator. Do not leave your PIN code with your tablet. Store this
information in a safe place when not in use.
Set up your tablet for the first time
The first time you power on the tablet, you should set the following
options:
• Select the tablet's language, then touch Start.
• Select Mobile data connection you want to use, then touch Next.
• Setup your Google account: If you have a Google Account, touch Set
up now, then enter your user name and password. You can also touch
Skip to get the next step.
• Set Date and Time. You can also choose Automatic time zone, then
touch Finish.
• Touch Skip, then the Setup complete screen will display,
• When the tablet is powered on, you can connect to a Wi-Fi network,
without a SIM card inserted (refer to section "6.1.2 Wi-Fi"), to sign into
your Google account and to use some features.
4
1.2.3 Power off your tablet
Hold down the Power key until a pop-up menu appears, then select
Power off to confirm.
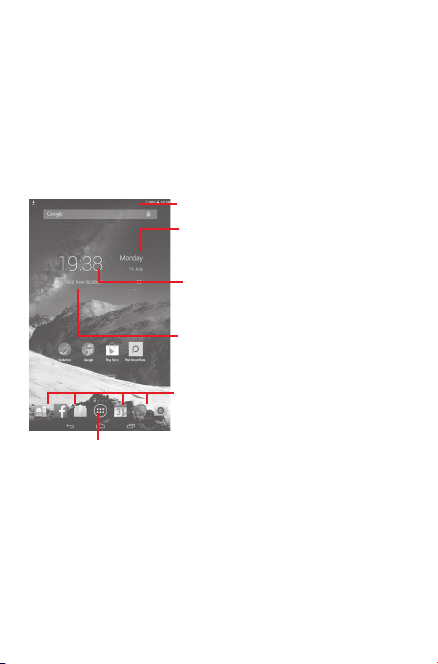
1.3 Home screen
You can bring all your favourite icons (applications, shortcuts, folders and
widgets) to your home screen for quick access. Touch the Home key to
switch to Home screen.
Status bar
• Status/Notification indicators.
Smart Day View
• Touch to enter Calendar screen
to set date.
Smart Day View
• Touch to enter Clock screen to
set time.
Smart Day View
• Touch to set a location to show
its daily temperature.
Favorite tray applications
• Touch to launch the application.
• Touch and hold to move or
Application tab
• Touch to see all applications.
The Home screen extends on either side of the screen to allow more
space for adding applications, shortcuts etc. Slide the Home screen
horizontally left and right to get a complete view of the Home screen.
The page indicators above the apps tray indicate which screen you are
viewing.
change applications.
5
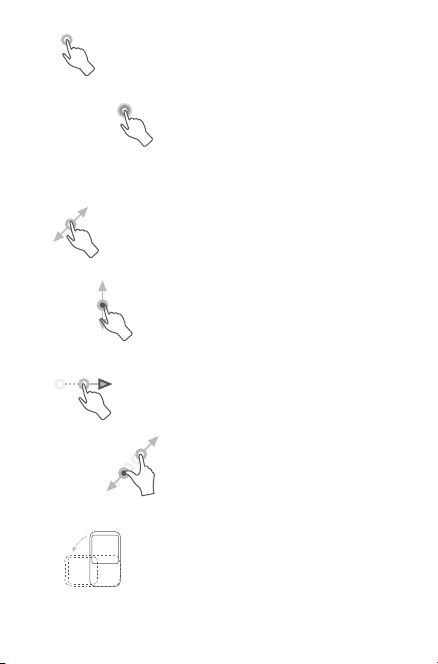
1.3.1 Using the touchscreen
Touch
To access an application, touch it with your finger. When the tablet is in
standby mode, double touch the screen to wake up the tablet.
Touch and Hold
Touch and hold the home screen to access Widgets, Wallpapers,
and Settings screen. Touch and hold an App on the home screen to
remove the app. Touch and hold an app on the app launcher to get app
information, or uninstall the app.
Drag
Place your finger on any item to drag it to another location.
Slide/Swipe
Slide the screen to scroll up and down the applications, images, web
pages… at your convenience.
Flick
Similar to swiping, but flicking makes it move quicker.
Pinch/Spread
Place your fingers of one hand on the screen surface and draw them
apart or together to scale an element on the screen.
Rotate
Automatically change the screen orientation from portrait to landscape
by turning the tablet sideways to have a better view.
6
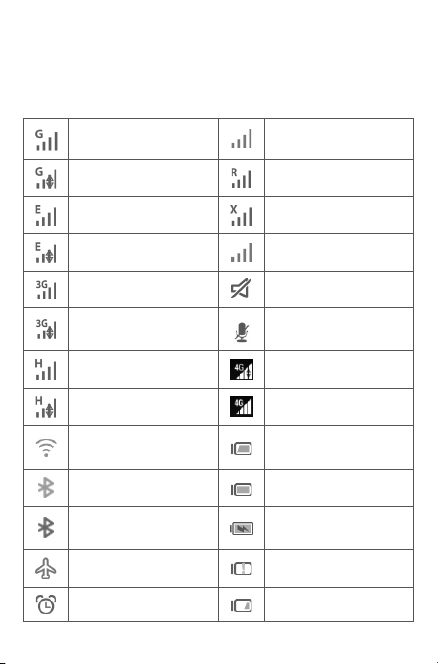
1.3.2 Status bar
From status bar, you can view both tablet status on the right side and
notification information on the left side.
Status icons
GPRS connected No signal (gray)
GPRS in use Roaming
EDGE connected
EDGE in use Signal strength (blue)
3G connected Ringer is silenced
3G in use
HSPA connected 4G in use
HSPA in use 4G connected
Connected to a Wi-Fi
network
Bluetooth is on Battery is full
Connected to a
Bluetooth device
Airplane mode Battery is very low
Alarm is set Battery is low
7
No SIM card inserted
Tablet microphone is
mute
Battery is partially
drained
Battery is charging
Headset connected
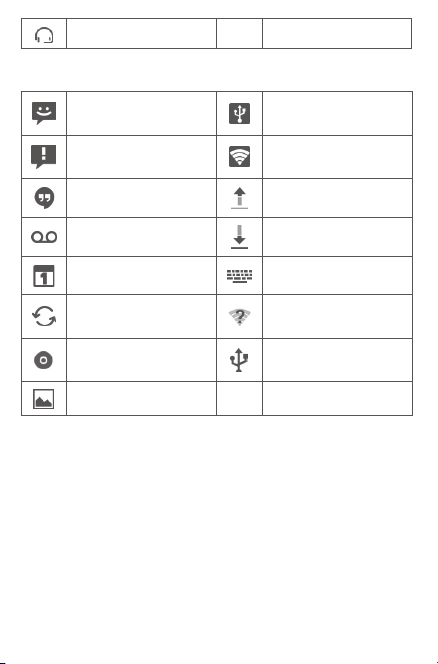
Notification icons
New text or multimedia
message
Problem with SMS or
MMS delivery
New Hangouts message Uploading data
New voicemail Downloading data
Upcoming event Select input method
Data is synchronizing
Song is playing
Screenshot captured
Quick setting panel
Touch and drag down the Status bar on the right to open the Quick
settings panel, where you can enable or disable functions or change
modes by touching the icons. Touch and drag up to close the panel.
USB tethering is on
Portable Wi-Fi hotspot
is on
An open Wi-Fi network
is available
Tablet is connected via
USB cable
8

Touch to access Settings, where
you can set more items
Notification panel
When there are notifications, touch and drag down the Status bar on
the left to open the Notification panel to read the detailed information.
Touch and drag up to close the panel.
Touch to clear all event–based
notifications (other ongoing
notifications will remain)
1.3.3 Search bar
The tablet provides a Search function which can be used to locate
information within applications, the tablet or the web.
9

Search by text
• Touch Search bar from the Home screen.
• Enter the text/phrase you want to search for.
• Touch on the keyboard if you want to search on the web.
Search by voice
• Touch
• Speak the word/phrase you want to search for. A list of search results
from Search bar to display a dialog screen.
will display for you to select from.
1.3.4 Lock/Unlock your screen
To protect your tablet and privacy, you can lock the tablet screen by
choosing slide or creating a variety of patterns, PIN or password, etc.
To create a screen unlock pattern (refer to section "Screen lock" for
detailed settings)
• Drag down the Quick settings panel and touch the settings icon
to enter Settings, then touch Security\Screen lock\Pattern.
• Draw your own pattern.
10
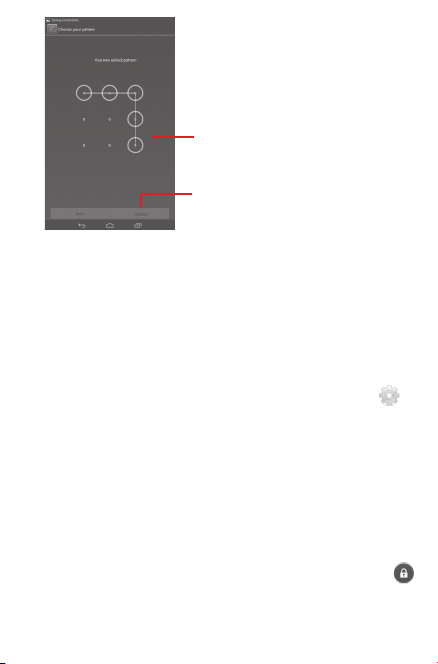
Draw your unlock pattern
Touch to confirm by drawing
pattern again
To create a screen unlock PIN/Password
• Touch Settings\Security\Screen lock\PIN or Password.
• Set your PIN or password.
To lock tablet screen
Press the Power key once to lock the screen.
Palm and Lock
• Drag down the Quick setting panel and touch the settings icon
enter Settings, then touch Security.
• Mark/Unmark the checkbox of Palm and Lock to enable/disable the
feature. When the feature is enabled, putting your palm on any screen
will lock the screen.
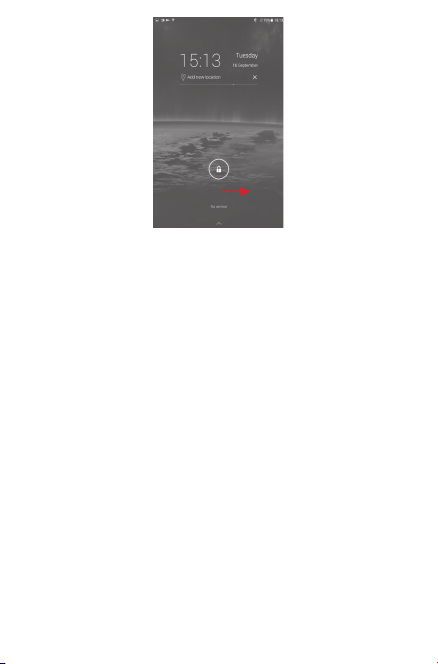
To unlock tablet screen
Press the power key once to light up the screen, draw the unlock pattern
you have created or enter PIN or password, etc. to unlock the screen.
If you have chosen Slide as the screen lock, touch and drag the icon
to the right to unlock the screen.
11
to
1.3.5 Personalize your Home screen
Add
You may touch and hold a folder, an application or a widget to activate
the Move mode, and drag the item to any Home screen as you prefer.
Reposition
Touch and hold the item to be repositioned to activate the Move mode,
drag the item to the desired position and then release. You can move
items both on the Home screen and the Favorite tray. Hold the icon on
the left or right edge of the screen to drag the item to another Home
screen.
Remove
Touch and hold the item to be removed to activate the Move mode, drag
the item up to the top of Remove, and release after the item turns red.
Create folders
To improve the organization of items (shortcuts or applications) on the
Home screen, you can add them to a folder by stacking one item on top
of another.
12

Wallpaper customization
Touch and long press the blank area in Home screen, then touch
Wallpaper to customize wallpaper.
1.3.6 Volume adjustment
Using volume key
Press Volume key to adjust the volume. To activate the Silent mode,
press the Volume down key until the tablet silent.
Using Settings menu
Drag down the notification panel and touch the settings icon
enter Settings, then touch Sound, you can set the volume of calls
renting, notification, system and etc. to your preference.
to
13
2 Text input
2.1 Using Onscreen Keyboard
Onscreen Keyboard settings
Touch the Application tab
Language & input, touch the Settings icon
a series of settings are available for your selection.
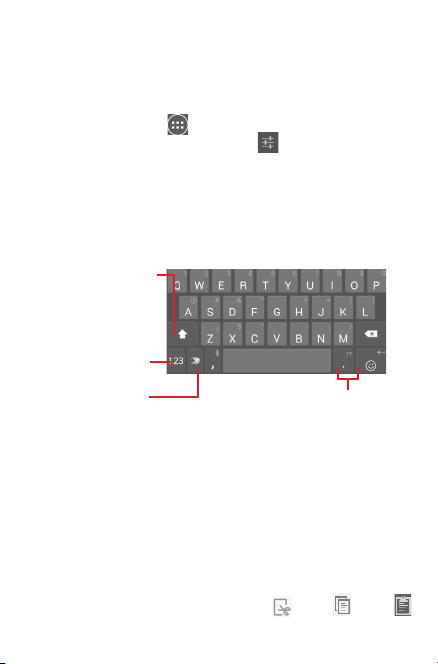
2.2 Swift key
Touch to switch
between "abc/Abc"
mode; Touch & hold to
switch between "abc/
ABC" mode.
Touch to switch
between symbol
and numeric
keyboard.
Touch & hold to
show input options;
When Wi-Fi or data
connection is on,
touch to enter voice
input.
2.3 Text editing
You can edit the text you have entered.
• Touch and hold or double-tap within the text you would like to edit.
• Drag the tabs to change the high-lighted selection.
• Following options will show: Select all, Cut
from the Home screen, select Settings\
on the right of Swift key,
Touch & hold, then
select to enter
symbols/emoticons.
, Copy , Paste .
14
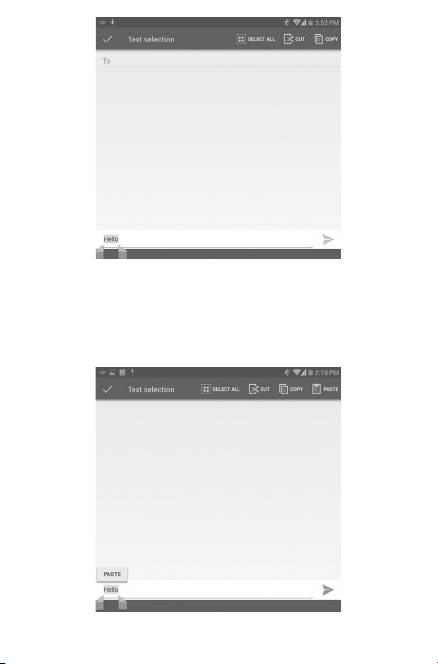
You can also insert new text
• Touch where you want to type, or touch and hold a blank space, the
cursor will blink and the tab will show. Drag the tab to move the cursor.
• If you have selected any text, touch the tab to show PASTE icon which
allows you to paste any text you have previously copied.
15
3 Contacts
Contacts enables quick and easy access to the people you want to
reach.
You can view and create contacts on your tablet and synchronize these
with your Gmail contacts or other applications.
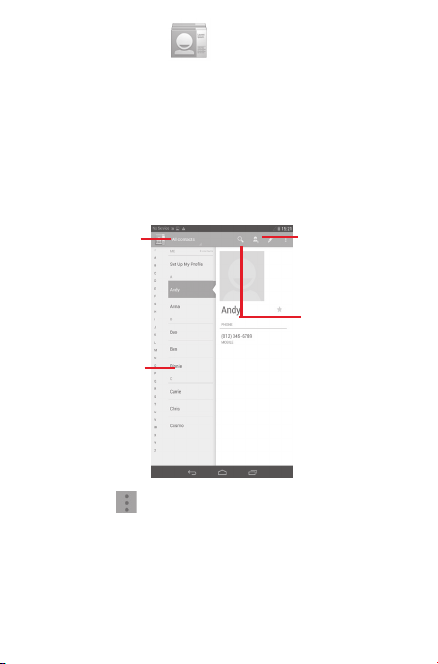
3.1 Consult your contacts
Touch to view your
contact groups and
favorite contacts.
Touch icon to
open Quick
Contact panel.
Touch the Menu key to display contacts list option menu.
Following actions are enabled:
• Share Share contacts with others by sending the
contact’s vCard to them via Bluetooth, Email, etc.
• Delete Select and delete unwanted contacts.
Touch to add a
new contact.
Touch to search
in Contacts.
16

• Place on Home
screen
• Contacts to
display
• Import/Export Import or export contacts between tablet, SIM
• Accounts Manage the synchronization settings for different
• Settings Set contacts' display mode.
Touch to put the contact widget on the Home
screen.
Choose contacts to display.
card, microSD card and internal storage.
accounts.
3.2 Managing contact groups
The contact group helps you to improve the organization of your
contacts. You can add, remove and view groups in the Groups screen.
Touch the Groups to view local groups. To create a new group, touch
the icon
have added accounts to your tablet, touch the Groups to view groups
in accounts.
, enter the new name and touch Done to confirm. If you
3.3 Adding a contact
Touch the icon in the contact list to create a new contact.
You are required to enter the contact's name and other contact
information. By scrolling up and down the screen, you can move from one
field to another easily.
17
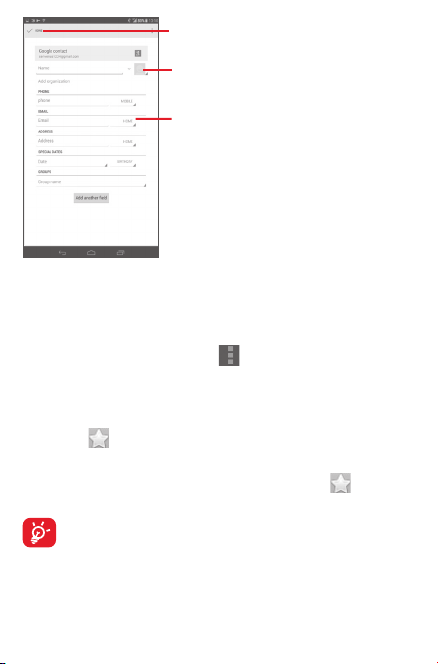
Touch to save.
Touch to select a picture for the contact.
Touch to unfold the other predefined
labels of this category.
If you want to add more information, touch Add another field to add a
new category.
When finished, touch Done to save.
To exit without saving, you can touch
Add to/remove from Favorites
To add a contact to Favorites, you can touch a contact to view details
then touch
in color).
To remove a contact from favorites, touch the gold star
details screen.
to add the contact to Favorites (the star will turn gold
Only device contacts can be added to Favorites.
to choose Discard.
on contact
18
3.4 Editing your contacts
To edit contact information, touch to choose the contact, then touch
on top of the screen, When finished, touch Done.
Delete a contact
To delete a contact, touch the Menu key
contact details screen.
The contact you have deleted will also be removed from other
applications on the tablet or web the next time you synchronize
your tablet.
and select Delete from
3.5 Contacts importing, exporting and sharing
This tablet enables you to import or export contacts between tablet, SIM
card, microSD card and tablet storage.
From Contacts screen, touch
Export, then select to import/export contacts from/to SIM card, Tablet,
Tablet storage, Accounts, etc.
To import/export a single contact from/to SIM card, choose an account
and target SIM card(s), select the contact you want to import/export, and
touch the icon
To import/export all contacts from/to SIM card, choose an account and
target SIM card(s) mark Select all and touch the icon
You can share a single contact or contacts with others by sending the
contact's vCard to them via Bluetooth, Gmail, etc.
Touch a contact you want to share, touch the Menu key
select Share from contact details screen, then select the application to
perform this action.
to confirm.
to open options menu, touch Import/
to confirm.
, and
19
3.6 Accounts
Contacts, data or other information can be synchronized from multiple
accounts, depending on the applications installed on your tablet.
To add an account, drag down the notification panel and touch
enter Settings, then touch Add account.
You are required to select the kind of account you are adding, like
Google, Email, etc.
As with other account set-ups, you need to enter detailed information,
like username, password, etc.
You can remove an account to delete it and all associated information
from the tablet. Open the Settings screen, touch the account you want
to delete, touch the Menu key
confirm.
Turn on/off the sync & Auto-sync
Touch an account to enter the account screen, mark/unmark the
checkbox(s) to turn on/off the account’s auto-sync. When activated,
all changes to information on the tablet or online will be automatically
synchronized to each other.
Sync manually
You can also synchronize an account manually on Accounts screen,
touch an account in the list, then touch the Menu key and select Sync
now.
and select Remove account, then
to
20
4 Messaging, Email
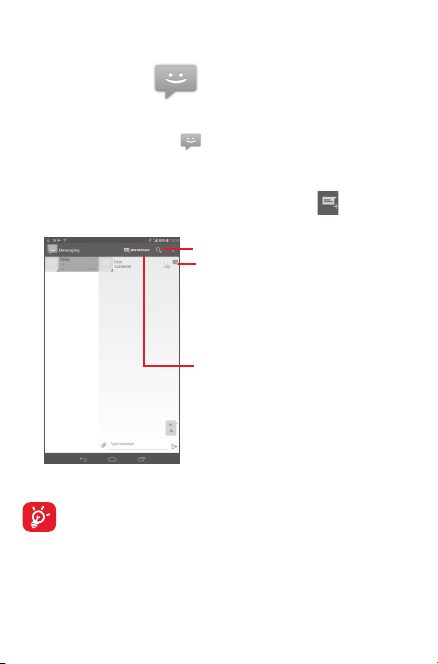
4.1 Messaging
You can create, edit and receive SMS and MMS with this tablet.
To access this feature, touch
4.1.1 Write message
On message list screen, touch the new message icon to write text/
multimedia messages.
For saved contacts, touch the photo to open the Quick Contact
panel to communicate with the contact. For unsaved contacts,
touch the photo to add the number to your People.
from the Apps.
Touch to search in all messages.
Touch to view the whole message
thread.
Touch to enter contact screen.
Touch to create a new message.
21
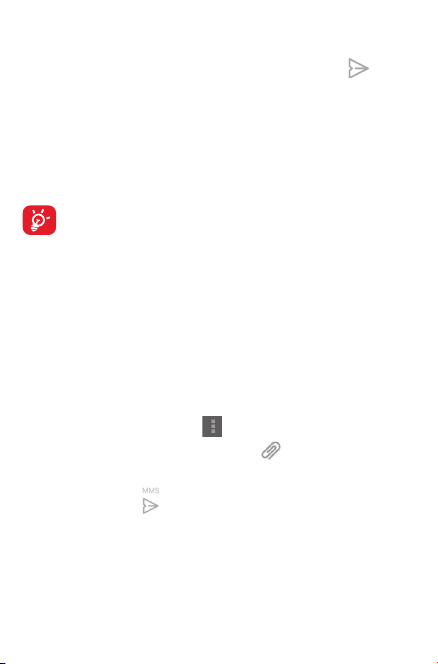
Sending a text message
Enter the phone number of the recipient on To bar, touch Type message
bar to enter the text of the message. When finished, touch
the text message.
An SMS message of more than 160 characters will be charged as
several SMS. When the total number of characters you have entered
is approaching the 160-character limit, a counter will appear upon the
Send option of the text box to remind you how many characters are
allowed to be entered in one message.
Specific letters (accent) will increase the size of the SMS, which
may cause multiple SMS to be sent to your recipient.
Sending a multimedia message
MMS enables you to send video clips, images, photos, animations, slides
and sounds to other compatible mobiles and e-mail addresses.
An SMS will be converted to MMS automatically when media files (image,
video, audio, slides, etc.) are attached or subject or email addresses are
added.
To send a multimedia message, enter the recipient's phone number
in the To bar, touch Type text message bar to enter the text of the
message, touch the Menu key
Add subject to insert a subject, and touch
audio and so on.
When finished, touch
Attach options:
• Pictures Access Gallery application or File manager to
• Capture picture Access Camera to capture a new picture for
to send the multimedia message.
select a picture as attachment.
attaching.
to open the option menu, select
to attach picture, video,
22
to send
• Videos Access Gallery application or File manager to
• Capture video Access Camcorder to record a new video for
• Audio Access to select an audio file as attachment.
• Record audio Enter Sound Recorder to record a voice message
• Slideshow Enter Edit slide show screen, touch Add slide to
select a video as attachment.
attaching.
for attaching.
create a new slide, and touch currently existing
slide to edit it (see following picture). Touch the
Menu key to get more actions, like setting the
slide duration, adding music, etc.
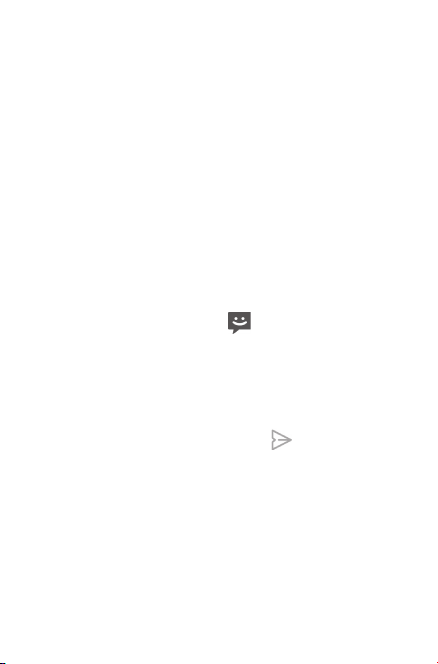
4.1.2 Manage messages
When receiving a message, an icon will appear on status bar as
notification. Drag down the status bar to open the Notification panel,
touch the new message to open and read it. You can also access the
Messaging application and touch the message to open.
Messages are displayed in conversational order.
To reply to a message, touch the current message to enter messagecomposing screen, enter the text, then touch
Touch and hold an SMS in message details screen. The following
message options are available for selection.
• Copy text This option displays when the message is an
SMS. Copy the current message content. You
can paste it to the enter bar of the new message
you are going to compose.
• Forward Touch to forward the message to another recipient.
• View details Touch to view details of the message.
• Delete Delete the current message.
23
.
 Loading...