


User Guide
Vodafone Mobile Wi-Fi
R206-Z
Designed
by Vodafone

Welcome
to the world of mobile communications
1 Welcome
2 Device overview
3 Getting started: Step 1
4 Getting started: Step 2
5 Mobile Wi-Fi web UI
application screen
6 Current network panel
7 Mobile Wi-Fi view
8 SMS view
9 Account view
10 Device status screen
icons
11 MicroSD Card
12 Hints and tips
17 Glossary

1
The Vodafone Mobile Wi-Fi R206-Z creates a personal portable
Wi-Fi zone which allows several Wi-Fi enabled devices (for
example PCs, Apple® iPhone, iPad or iPod touch, or mobile
gaming devices such as Nintendo® DSi, Android devices
including smartphones and tablets) to share a secure mobile
internet connection.
The device is battery, mains or USB powered, and this exibility
allows the device to be positioned for best mobile coverage and
then share this coverage between several devices via Wi-Fi.
Advanced conguration using a cable or Wi-Fi
To perform advanced conguration of the device, browse to the
web UI http://VodafoneMobile.wi or http://192.168.0.1 from
a computer running Microsoft® Windows® 8, Windows® 8 RT
(Wi-Fi access only), Windows® 7 (SP1 recommended), Windows
Vista™ (SP2 recommended), or Windows® XP (SP3 required), a
computer running Linux (Wi-Fi conguration only, not cable), or
an Apple Mac running Mac OS® X 10.6 (Intel®), 10.7 or 10.8 (all
with latest updates).
Advanced conguration for iPhone / iPad / iPod Touch /
smartphone / tablet users
Apple device users should use the Safari browser to browse to
the web UI http://VodafoneMobile.wi or ht tp: //192.168.0.1 , or
download the Vodafone Mobile Wi-Fi Monitor app. Smartphone
and tablet users can check the device status by downloading
the Vodafone Mobile Wi-Fi Monitor app from the App Store in
iTunes or the Android Market / Google Play. See Page 15 for
sample app screenshots.
Welcome
System
requirements
To use the Vodafone
Mobile Wi-Fi R206-Z
you need a device
with Wi-Fi capability.
Tip:
For advanced
configuration, the
web UI password is
‘admin’.

2
LEDs
End User Licence Agreement (EULA)
Please ensure that you have read and accepted the software
EULA for your country before using the Vodafone Mobile Wi-Fi
application or device. The EULA is available here:
www.support.vodafone.com/VodafoneMobileWiFi/R206-Z
Device overview
1. LED Indicators
2. Power Button
3. WPS Button
4. Micro USB Port
5. SIM Card Slot
6. MicroSD Card Slot
Network
Messages
Battery
3
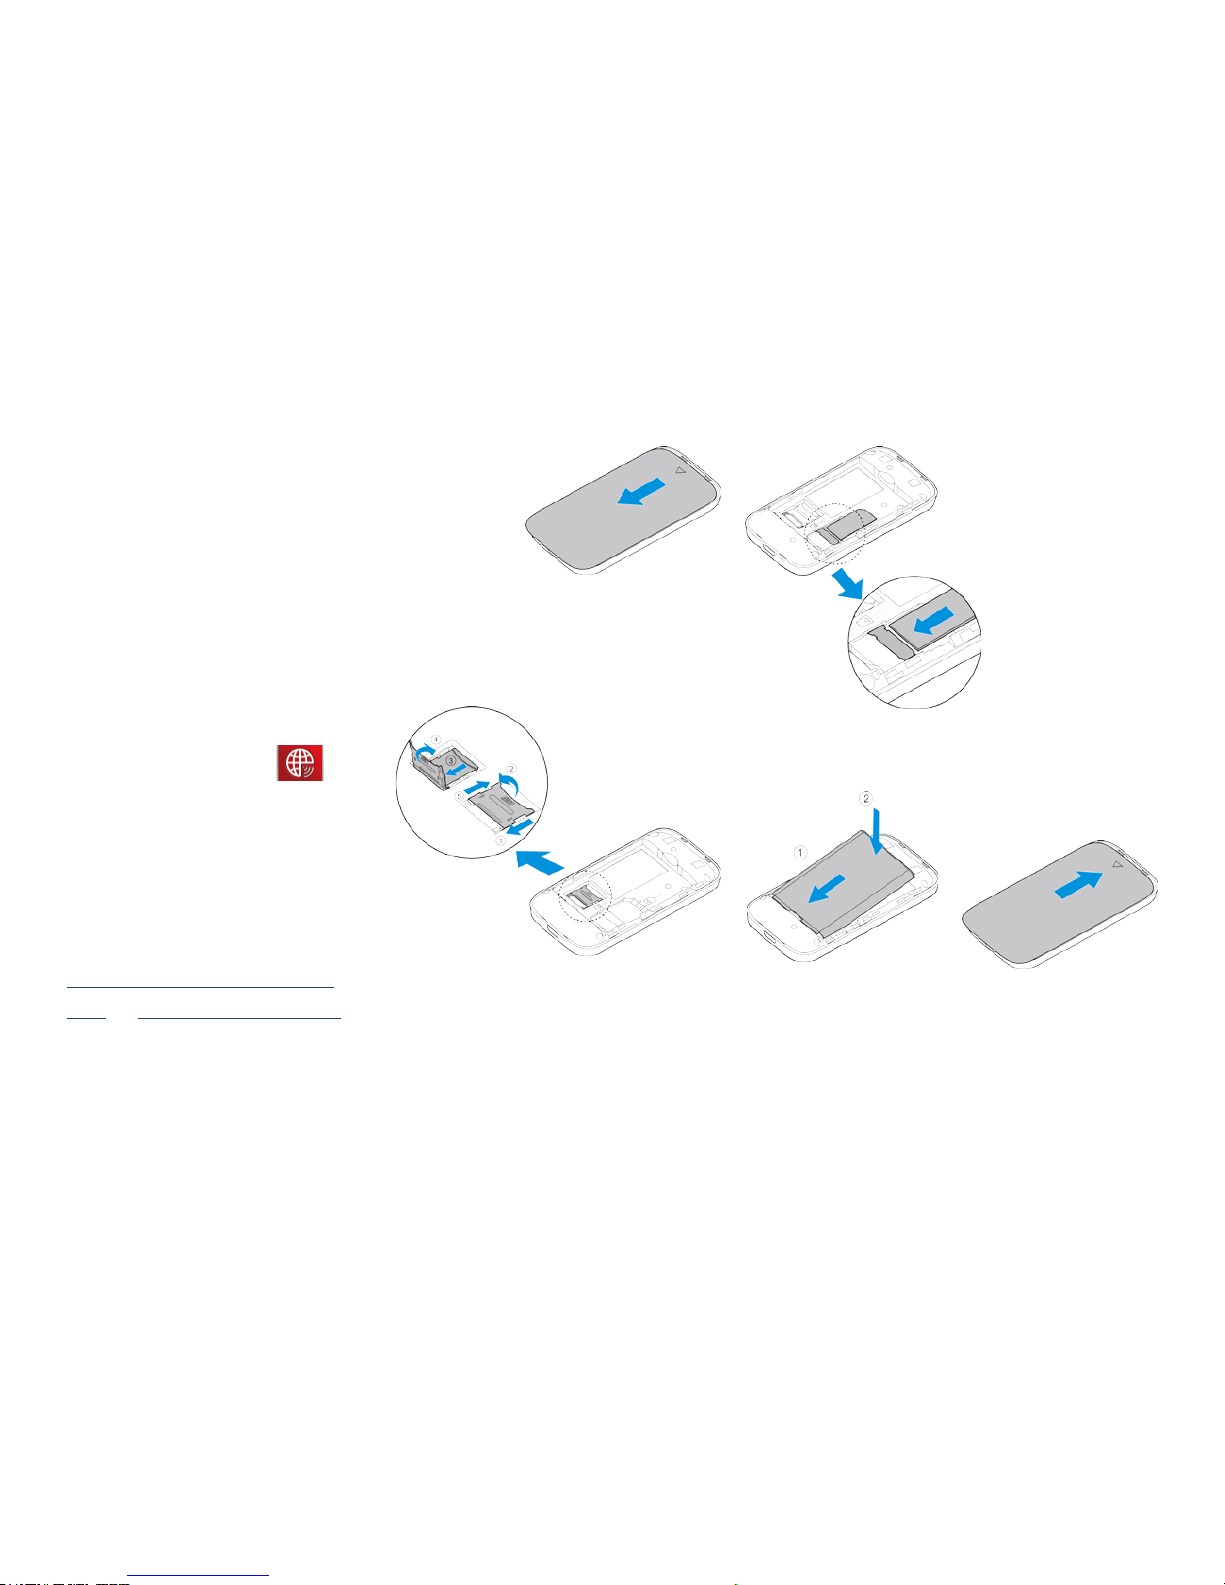
1. To prepare the Vodafone Mobile Wi-Fi R206-Z, you need to
insert your SIM, MicroSD card (optional) and battery before
use. Note the Wi-Fi network name (SSID) and secure Wi-Fi
network key that can be found on a label inside the back
cover of the device and on the reminder card.
2. Plug the device into the mains or your PC. The battery will
be charged in the background. Make sure the device is fully
charged (approximately 3.5 hours on mains) before using it
in battery mode. Please only use the supplied charger with
this device.
3. Switch on the device by pressing and holding the power
button for 3 seconds. The device will go through its start-up
sequence, and will automatically connect to the network
unless a PIN code for SIM is required. Check the display for
connection status.
Getting
started:
Step 1 of 2
Note: Once setup
is complete, when
connected to the R206-Z
via USB (and you have
installed the software
onto your PC) you can
access the R206-Z
configuration screen by
clicking on the Mobile
Wi-Fi desktop icon .
Alternatively, if you
are connected over
Wi-Fi, you can enter the
following addresses into
your browser:
http://VodafoneMobile.
wifi or ht tp: //192.168.0.1
You may want to save
these addresses as
favourites in your
browser so you can
access the Mobile Wi-Fi
web UI application
screen easily.
Remove
back cover
SIM card
MicroSD
card
Insert
battery
Replace
back cover

4
4. Use the normal Wi-Fi application on your computer or device
to connect. Select the Mobile Wi-Fi network from the list of
available Wi-Fi networks, click Connect and enter the WPA2
password (secure Wi-Fi network key). If your connecting
device has WPS functionality, you can press and hold the
WPS button on the R206-Z for 5 seconds (all 3 LEDs will ash
simultaneously), then any WPS-enabled device can connect
without requiring the network key.
Congratulations – you now have internet access via Vodafone
Mobile Wi-Fi.
5. When you are connected to the Vodafone Mobile Wi-Fi R206-Z
via Wi-Fi or a USB cable, you can access the Vodafone Mobile
Wi-Fi conguration screen by clicking on the Mobile Wi-Fi
desktop icon (if you have installed via USB), or by typing
either http://VodafoneMobile.wi or http://192.168.0.1 into
your web browser. You can change settings and check the
device and network status from this browser page.
Getting
started:
Step 2 of 2
Tip:
The Vodafone
Mobile Wi-Fi R206-Z
will automatically
connect to the Mobile
network when it is
powered on.
If required, this
default automatic
network connection
can be changed to a
manual connection
via the web UI of the
device.