

Vodafone R205 Advanced Configuration Manual

Advanced Configuration Guide &
Common Problems and Solutions
Vodafone Mobile Wi-Fi
Vodafone R205

Advanced Configuration Guide
Vodafone Mobile Wi-Fi – R205
Vodafone R205 March 2012
Version 1.0
2
Table of Contents
Welcome ............................................................................................................................................................................ 3
1. Getting Started – Initial Connection and Security Settings ......................................................................... 4
1.1 Vodafone Mobile Wi-Fi Overview ..................................................................................................................................... 5
1.1.1 System Requirements ................................................................................................................................................ 5
1.1.2 Device overview ............................................................................................................................................................ 5
1.1.3 Vodafone Mobile Wi-Fi status display ................................................................................................................... 6
1.1.4 Power saving and battery charging states .......................................................................................................... 8
1.1.5 Vodafone Mobile Wi-Fi software updating and reporting capabilities, End User Licence
Agreement ................................................................................................................................................................................. 8
1.2 Device Set-up & Initial Connection ................................................................................................................................ 9
1.2.1 Device Set-up ................................................................................................................................................................. 9
1.2.2 Initial Connection ...................................................................................................................................................... 10
1.3 The Vodafone Mobile Wi-Fi browser login screen ................................................................................................. 12
1.4 Initial Security Configuration ......................................................................................................................................... 13
1.4.1 Login and change the admin password............................................................................................................ 13
1.4.2 Establish a Secure Profile that meets your personal requirements ...................................................... 14
1.5 Advanced Configuration for iPhone, iPad, iPod Touch, smartphone or tablet .......................................... 15
2. Vodafone Mobile Wi-Fi Configuration Interface – Advanced Settings .................................................. 16
2.1 Overview ................................................................................................................................................................................ 17
2.1.1 Access the Vodafone Mobile Wi-Fi Configuration pages from your web browser ........................... 17
2.1.2 Login to the Vodafone Mobile Wi-Fi to make changes ............................................................................... 18
2.2 Vodafone Mobile Wi-Fi..................................................................................................................................................... 19
2.2.1 Mobile Broadband settings .................................................................................................................................... 19
2.2.2 Wi-Fi settings ............................................................................................................................................................... 25
2.2.3 Router ............................................................................................................................................................................ 28
2.3 Storage ................................................................................................................................................................................... 33
2.3.1 File storage .................................................................................................................................................................. 33
2.3.2 Sharing .......................................................................................................................................................................... 34
2.4 SMS .......................................................................................................................................................................................... 36
2.4.1 SMS settings ................................................................................................................................................................ 36
2.5 Account .................................................................................................................................................................................. 37
2.5.1 Account details .......................................................................................................................................................... 37
2.5.2 Account type ............................................................................................................................................................... 38
2.5.3 Balance .......................................................................................................................................................................... 39
2.5.4 TopUp ............................................................................................................................................................................ 40
3. Help and Troubleshooting ................................................................................................................................... 41
3.1 Overview ................................................................................................................................................................................ 42
3.2 The Help and Diagnostics screens .............................................................................................................................. 43
3.2.1 Help ................................................................................................................................................................................ 43
3.2.2 Diagnostics .................................................................................................................................................................. 44
3.2.3 Device controls .......................................................................................................................................................... 49
3.2.4 About .............................................................................................................................................................................. 50
3.2.5 Support .......................................................................................................................................................................... 51
3.3 Common Problems and Solutions .............................................................................................................................. 52
3.4 Using the Factory Reset Button ................................................................................................................................... 58
4. Glossary ...................................................................................................................................................................... 59

Advanced Configuration Guide
Vodafone Mobile Wi-Fi – R205
Vodafone R205 March 2012
Version 1.0
3
Welcome
This Advanced Configuration Guide outlines the steps necessary to install and configure your Vodafone
Mobile Wi-Fi and how to use the browser interface.
This guide is separated into 4 chapters:
Getting Started – Initial Setup and Security Settings
The Vodafone Mobile Wi-Fi Browser Interface – Advanced Settings
Troubleshooting
Glossary
Please save this Advanced Configuration Guide to your computer’s hard drive for
future reference.
Also refer to the User Guide which was shipped in the box with your Vodafone
Mobile Wi-Fi device.
© Vodafone Group 2012, VODAFONE, the Vodafone logos and Vodafone Mobile Connect are trade marks of the
Vodafone Group. Microsoft and Windows are either registered trade marks or trade marks of Microsoft Corporation
in the United States and/or other countries. Other product and company names mentioned herein may be the
trade marks of their respective owners.

Advanced Configuration Guide
Vodafone Mobile Wi-Fi – R205
Vodafone R205 March 2012
Version 1.0
4
1. Getting Started – Initial Connection and
Security Settings
- Vodafone Mobile Wi-Fi Overview
- Initial Connection
- The Browser Login Screen
- Initial Security Configuration
- Using the Vodafone Mobile Wi-Fi monitor app on iPhone, iPad, iPod Touch,
smartphone or tablet
Getting Started
1
Advanced Configuration Guide
Vodafone Mobile Wi-Fi – R205
Vodafone R205 March 2012
Version 1.0
5
1.1 Vodafone Mobile Wi-Fi Overview
The Vodafone Mobile Wi-Fi R205 creates a personal portable Wi-Fi hotspot which allows up to 5 Wi-Fi
enabled devices (for example PCs, Apple® , iPad or iPod touch, or mobile gaming devices such as
Nintendo® DSi, Android devices such as the Samsung® Galaxy Tab) to share a secure mobile internet
connection.
The device is battery, mains or USB powered, and this flexibility allows the device to be positioned for best
mobile coverage and then share this coverage between several devices via Wi-Fi.
The Mobile Wi-Fi device should not be used in a confined space where air flow is limited, for instance
inside a jacket pocket or inside a hand bag etc. You will get better Wi-Fi performance when the device is
being charged compared to when it is running from the battery.
1.1.1 System Requirements
To use the Vodafone Mobile Wi-Fi you need a device with Wi-Fi capability (supporting Wi-Fi 802.11 b/g/n)
and an internet browser.
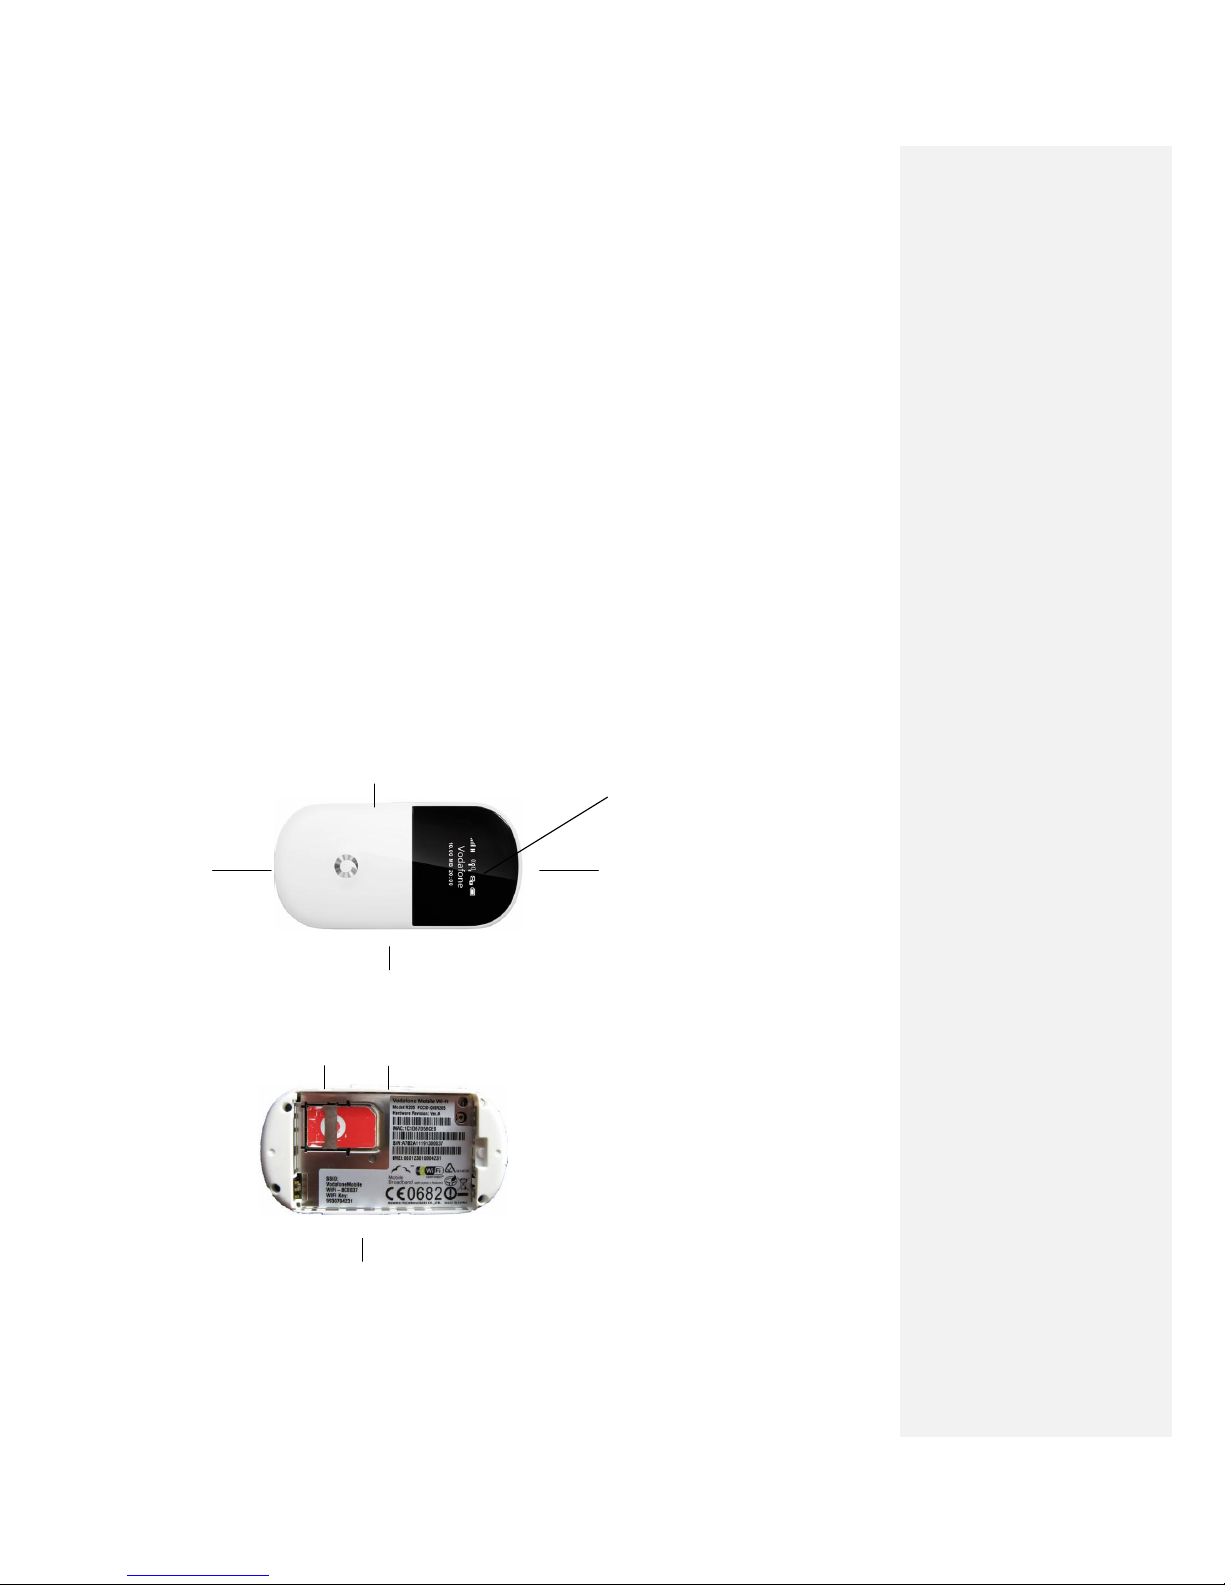
1.1.2 Device overview
Status
display
Power
on/off
Back
cover
release
button
Micro SD
card slot
Micro USB
slot
Wi-Fi Network
name and key
Power
on/off
Reset
button

Advanced Configuration Guide
Vodafone Mobile Wi-Fi – R205
Vodafone R205 March 2012
Version 1.0
6
1.1.3 Vodafone Mobile Wi-Fi status display
The status display screen on the front of the device displays information about the state of the Mobile
Broadband connection, the network you are connected to, if an action is required from the user, the
status of the devices Wi-Fi connectivity, and the battery charge.
Display power saving : the built-in power saving function means the information is displayed for 10
seconds and then is dimmed for 5 seconds, then the display powers off. In order to illuminate the display,
briefly press the Power button, and the status information will display for another 10 seconds.
Display information
Network signal: 1-5 bars. 5 bars indicates strong network signal.
Bearer: Type of network bearer (H or 3G+): HSPA or HSPA+, 3G: 3G, E: EDGE, G: GPRS.
Wi-Fi status and number of users: Example above show Wi-Fi broadcasting and 2 users connected.
Unread messages: Number of unread SMS messages received. Example above shows 1 unread SMS.
Battery: Varies from black (discharged) to white (fully charged). Example shows a fully charged battery.
Network Operator or additional information: The mobile broadband network that the device is connected to is
displayed. Additional information messages may also be displayed here. Examples of messages are “No SIM”, “SIM
invalid”, “Input PIN”, and “Input PUK”.
Roaming indicator: The example above shows the device is roaming off your normal network.
Connect duration: Time of current connection to network.
Upload and download volume: Approximate cumulative data usage (multiple connections).
Wi-Fi performance: You will always get better Wi-Fi performance when the device is being charged
compared to when it is running from the battery.
Battery
Upload & download
data volume
Connect
duration
Roaming
indicator
Network
operator or
additional
information
Wi-Fi status
and number
of users
Network
signal
Unread
messages
Bearer
Advanced Configuration Guide
Vodafone Mobile Wi-Fi – R205
Vodafone R205 March 2012
Version 1.0
7
Mobile Broadband signal strength:
Connected with excellent signal strength (5 bars) through to Low signal strength (1 bar) .
The Mobile Broadband network connection has failed, or the service is not available.
Not connected, but a network connection is available (excellent signal, icon will greyed out). The device may be
set to manual connection (not automatic connection) and is awaiting connection from the PC User Interface.
Battery charge:
While the device is being charged the battery icon will cycle through the charging icons below. When not being charged the
icon will show the charge left in the battery.
Discharged (0%)
Charging (10%)
Charging (30%)
Charging (60%)
Charged (100%)

Advanced Configuration Guide
Vodafone Mobile Wi-Fi – R205
Vodafone R205 March 2012
Version 1.0
8
1.1.4 Power saving and battery charging states
Power saving: There are 2 types of power saving built into the device – display and connectivity.
Display: The built-in display power-saving function means the information is displayed on the
Vodafone Mobile Wi-Fi for 10 seconds, then for 5 seconds with the display dimmed before the
display powers off to conserve the battery charge. In order to illuminate the display, press the
Power button, and the status information will displayed for another 10 seconds.
Connectivity: After 10 minutes without any users connected to the Vodafone Mobile Wi-Fi (via
Wi-Fi or USB cable), the device will go into sleep mode.
If the device is being powered by battery and is in sleep mode, then it must be woken up by
pushing the Power button before the device can be connected to. The display will briefly
illuminate and connectivity will be allowed via Wi-Fi access.
If the device is being powered by the mains charger or PC USB cable, then as soon as a Wi-Fi
connection request is received the Vodafone Mobile Wi-Fi will wake up from sleep mode (without
any physical intervention), connect to the Wireless Broadband network and accept the Wi-Fi
connection request.
Battery charging: Charging rates depend on whether the device is connected to the Mobile Broadband
network, whether the Wi-Fi is transmitting, and whether the device is connected to the mains charger or
to a PC. The scenarios are described below, but in summary it is best to use the mains charger when
possible to ensure the battery remains charged, and charging is always faster when connected to the
mains compared to PC USB charging:
Mains charging
When not connected to the Mobile Broadband network – will take a maximum of 3 hours.
When connected – will depend on the number of users and the amount of traffic flowing, but
charging will take slightly longer than 3 hours.
PC USB trickle charging
While not connected to the Mobile Broadband network (powered off) – will take a maximum
of 4 hours.
When connected – will depend on the number of users and the amount of traffic flowing.
With regular browsing charging will take place at a reduced rate, but if high volume traffic
flows through the device then it will not charge and may start discharging.
1.1.5 Vodafone Mobile Wi-Fi software updating and reporting capabilities, End User
Licence Agreement
Vodafone Mobile Broadband software is included on this device, and contains built-in software updating
and reporting capabilities as listed in the End User Licence Agreement.
End User Licence Agreement: Please ensure that you read and accept the End User Licence Agreement
(EULA) for your country before you use the device and software. The EULAs are available for viewing here:
www.support.vodafone.com/VodafoneMobileWiFi/r205
Advanced Configuration Guide
Vodafone Mobile Wi-Fi – R205
Vodafone R205 March 2012
Version 1.0
9
1.2 Device Set-up & Initial Connection
1.2.1 Device Set-up
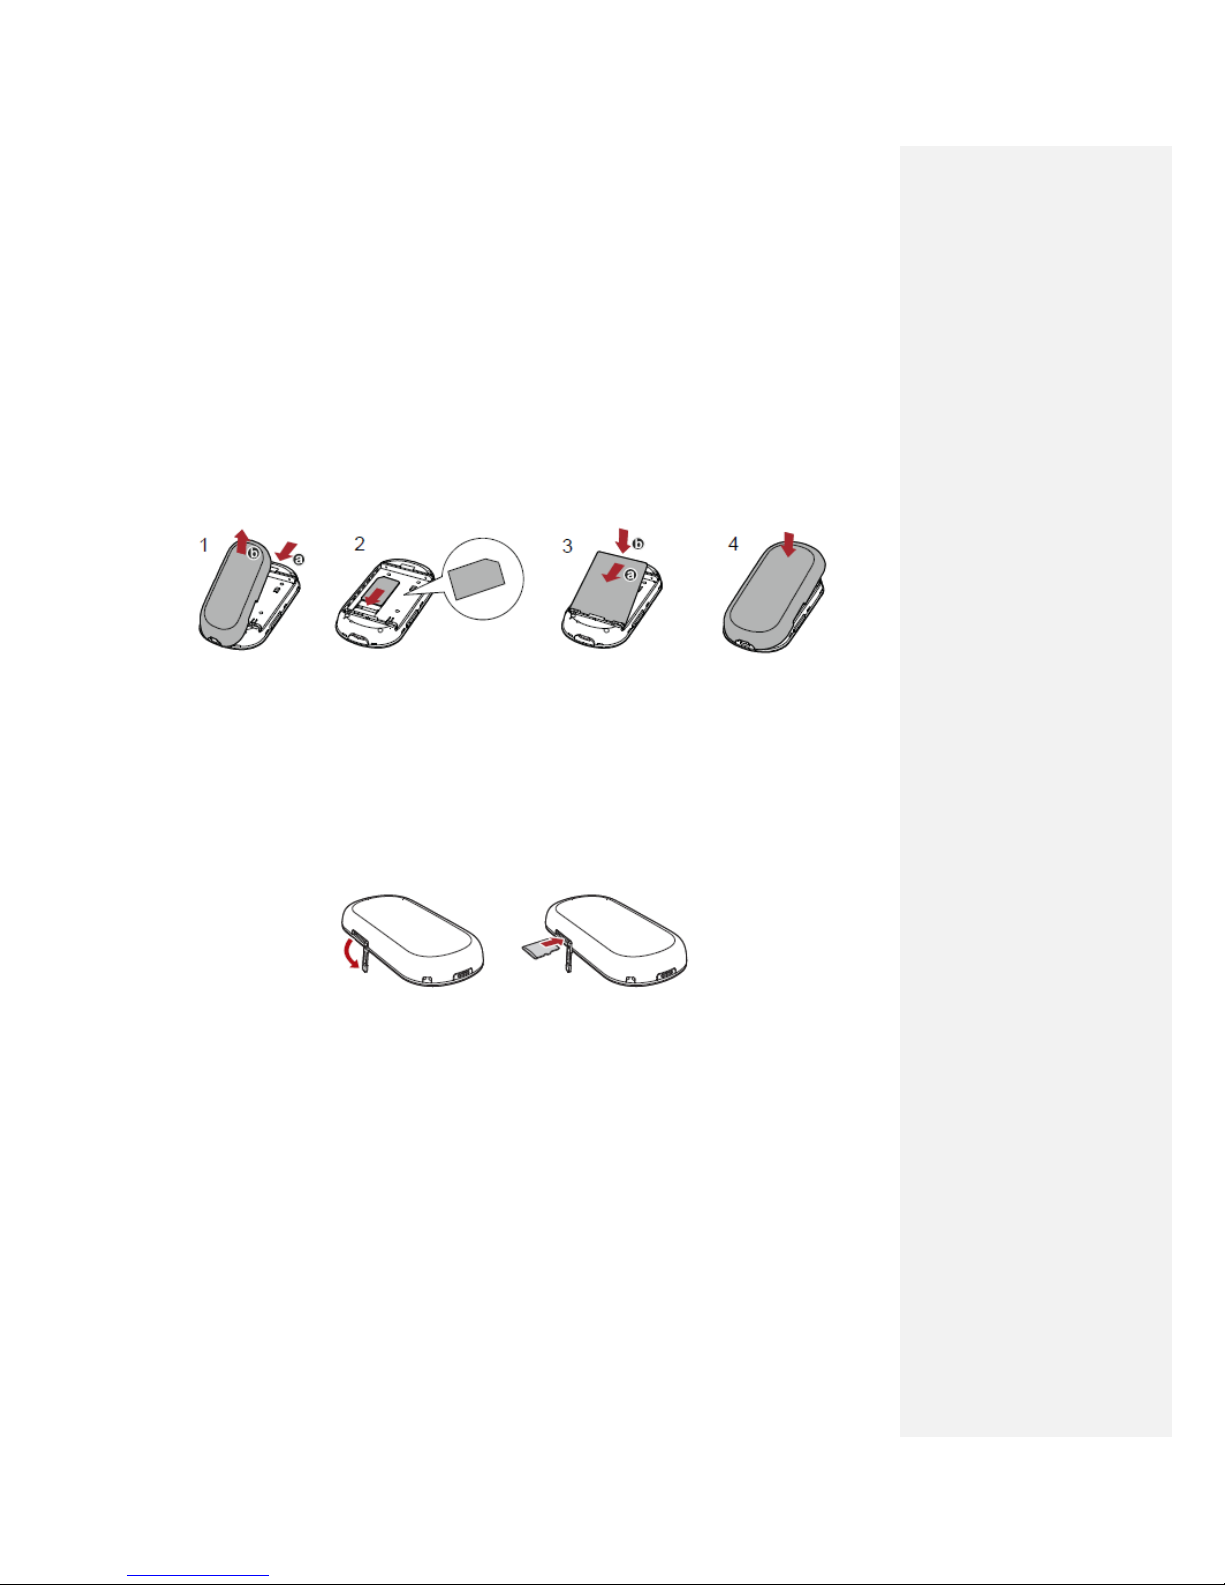
1. To prepare the Vodafone Mobile Wi-Fi device, you need to insert your SIM (and MicroSDHC card if you
are using one for file sharing and streaming), and insert and charge the battery before use.
2. Push the back cover release button to unclip the back of the device (1), and insert the SIM (2), then
insert the battery (3) and replace the back cover (4)
Note: Before replacing the back cover please make a note of your Wi-Fi security details which include a
secure network WPA2 Key and a Wi-Fi Network Name (SSID). The WPA2 Key (case-sensitive) and the SSID
are unique to your device and can be found on a label on the inside of the back cover. These details will be
needed to connect your Wi-Fi enabled devices to the Mobile Wi-Fi device. The details are also on the
Reminder Card that came in the packaging box with the device. Also they can be retrieved once the device
is powered on by double-tapping the Power button. The SSID and the network key are then briefly shown
on the device display.
If you are using a Micro SD card to store and share data, open the Micro SD card holder cover and insert
card.
3. On first use, plug the Vodafone Mobile Wi-Fi into the mains supply, turn the mains power and allow
the battery to fully charge (approximately 3 hours) before using it in battery mode. A battery
charging icon will be displayed in the Status Screen on the front of the device.
4. Switch on the device by pressing the Power button for 3 seconds. The display on the front of the
Mobile Wi-Fi device will be illuminated, the device displays the Vodafone logo and will then go through its
start-up sequence, connecting to the mobile network and starting Wi-Fi.
5. Use the normal Wi-Fi application on your computer or device to connect. Select the Mobile Wi-Fi
network from the list of available Wi-Fi networks, click Connect and enter the WPA2 password (secure WiFi network key) noted earlier in step 2. You should now have internet access via Vodafone Mobile Wi-Fi.

Advanced Configuration Guide
Vodafone Mobile Wi-Fi – R205
Vodafone R205 March 2012
Version 1.0
10
1.2.2 Initial Connection
Advanced configuration using a cable or Wi-Fi
To perform advanced configuration of the device you will need a computer running Microsoft®
Windows® 7 (SP1 recommended), Windows Vista™ (SP2 recommended), or Windows® XP (SP3
recommended), a computer running Linux (Wi-Fi configuration only, not cable), or an Apple Mac running
Mac OS® X 10.5 (Intel®), 10.6 or 10.7 (all with latest updates).
Advanced configuration app for iPhone / iPad / iPod Touch / smartphone / tablet users
Apple device users should use the Safari browser to browse to the web UI http://VodafoneMobile.wifi or
http://192.168.0.1 , or download the Vodafone Mobile Wi-Fi monitor app. Smartphone and tablet users
can check the device status by downloading the Vodafone Mobile Wi-Fi monitor app from the App Store in
iTunes or the Android Market / Google Play. See Section 1.5 for sample monitor app screenshots.
The Vodafone Mobile Wi-Fi comes pre-configured with the Access Point Number (APN) and other
Vodafone network settings to allow you to use this device on the Vodafone network without complex
configuration or set-up.
Before you start: Make a note of your Wi-Fi security details - the WPA2 Key and Wi-Fi Network Name
(SSID). The WPA2 Key and the SSID are unique to your device and can be found on a label inside the
battery cover of the Vodafone Mobile Wi-Fi device. The details are also on the Reminder Card that came in
the packaging box with the device. Also they can be retrieved once the device is powered on by doubletapping the Power button. The SSID and the network key are briefly shown on the device display.
You have two connection options when doing the initial setup of the Vodafone Mobile Wi-Fi.
Option 1 - Set up a connection to the Vodafone Mobile Wi-Fi - Wi-Fi Mode
In Wi-Fi mode you use the Vodafone Mobile Wi-Fi as a shared access point or Vodafone Mobile Wi-Fi. You
use your PC’s Wi-Fi capability to access the device.
➊ Use your normal Wi-Fi manager on your computer to locate the Vodafone Mobile Wi-Fi wireless
network.
Note: The steps to connect to a Wi-Fi network vary depending on your operating system and whether you use the
native application or third-party software. Generally you click an icon (often in the System Tray for Windows or
choose System Preferences > Network on a Mac) where you can select “View Available Wireless Networks.”
If you are unfamiliar with wireless networking on your computer, consult the computer help system.
For differences between Windows 7 and Vista set-up please see the FAQ “What is the difference between
Vista and Windows & network set-up?” on page 54.
If multiple wireless networks are found, highlight the one named VodafoneMobileWiFi-xxxxyy. The
xxxxyy represent a randomly generated set of numbers and letters which will differ per device.
➋ Click Connect.
Option 2 - Set up a connection to the Vodafone Mobile Wi-Fi – Micro USB Cable connection
In USB Cable mode, you connect the Vodafone Mobile Wi-Fi directly to a computer using the Micro USB
cable provided with the Vodafone Mobile Wi-Fi. You are using your PC’s LAN capability over the USB Cable
to access the device, and it will automatically establish a network connection.

Advanced Configuration Guide
Vodafone Mobile Wi-Fi – R205
Vodafone R205 March 2012
Version 1.0
11
When you first use the USB Cable to connect the R205 to your PC or Mac, the drivers for the device and a
desktop shortcut to the Mobile Wi-Fi Configuration User Interface will be downloaded from the Vodafone
Mobile Wi-Fi to your computer, and installed. These are pre-requisite to accessing your device when
plugged into the computer using the USB cable.
Note: Wi-Fi will be on when the device is plugged into the computer using the USB cable. If you select
disconnect from the Mobile Broadband network in the web UI, then all the Vodafone Mobile Wi-Fi users
will be disconnected from the Mobile Broadband network as well.
WARNING ! It is highly recommended that you set up security for your Vodafone Mobile Wi-Fi at this
time. The device has WPA2 security enabled, but you may want to change the WPA2 network key and
your device administrator logon password with personalised settings.
Note: If you are connected to the device over Wi-Fi and find the Vodafone Mobile Wi-Fi redirects to the
web UI (i.e. configuration page) instead of the page you expected when using the browser, this will be due
to the fact that the device cannot connect the user to a Mobile Broadband network. And needs some sort
of intervention from you.
If you have trouble connecting to the device ensure your WPA2 security key has been entered correctly.
Note: The WPA2 key is case sensitive - please ensure you input it with the correct upper and lower case
characters. An additional common cause of PC connection problems could be that your computer’s Wi-Fi
adapter has become confused by working with multiple Wi-Fi devices. The normal way to fix this on a PC
is to right click on the Wireless Network Connection icon in the Windows toolbar, then select Repair.
Please check the device status display to see if it is waiting an input (for instance pressing the Power
button), and also check the connected state in the web User Interface (UI) to confirm the device is
showing “Connected”, and if not refer to the Troubleshooting section later in this guide.
Advanced Configuration Guide
Vodafone Mobile Wi-Fi – R205
Vodafone R205 March 2012
Version 1.0
12
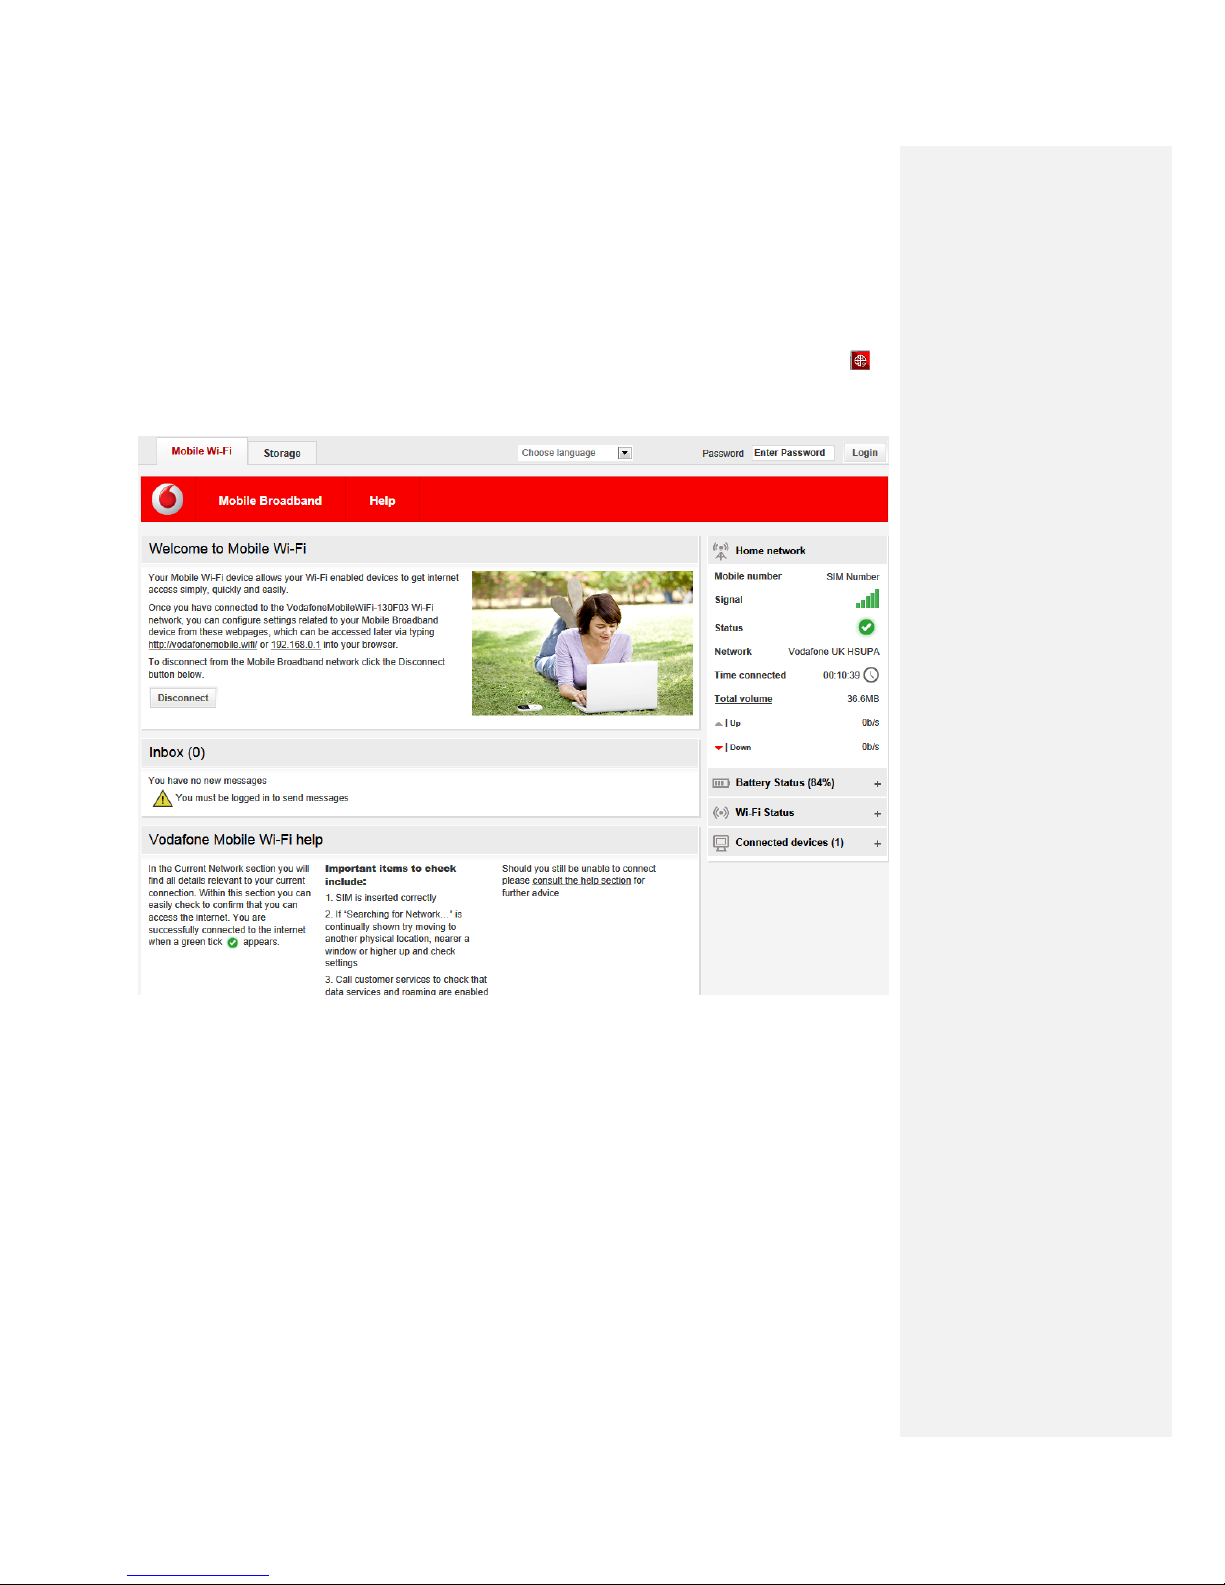
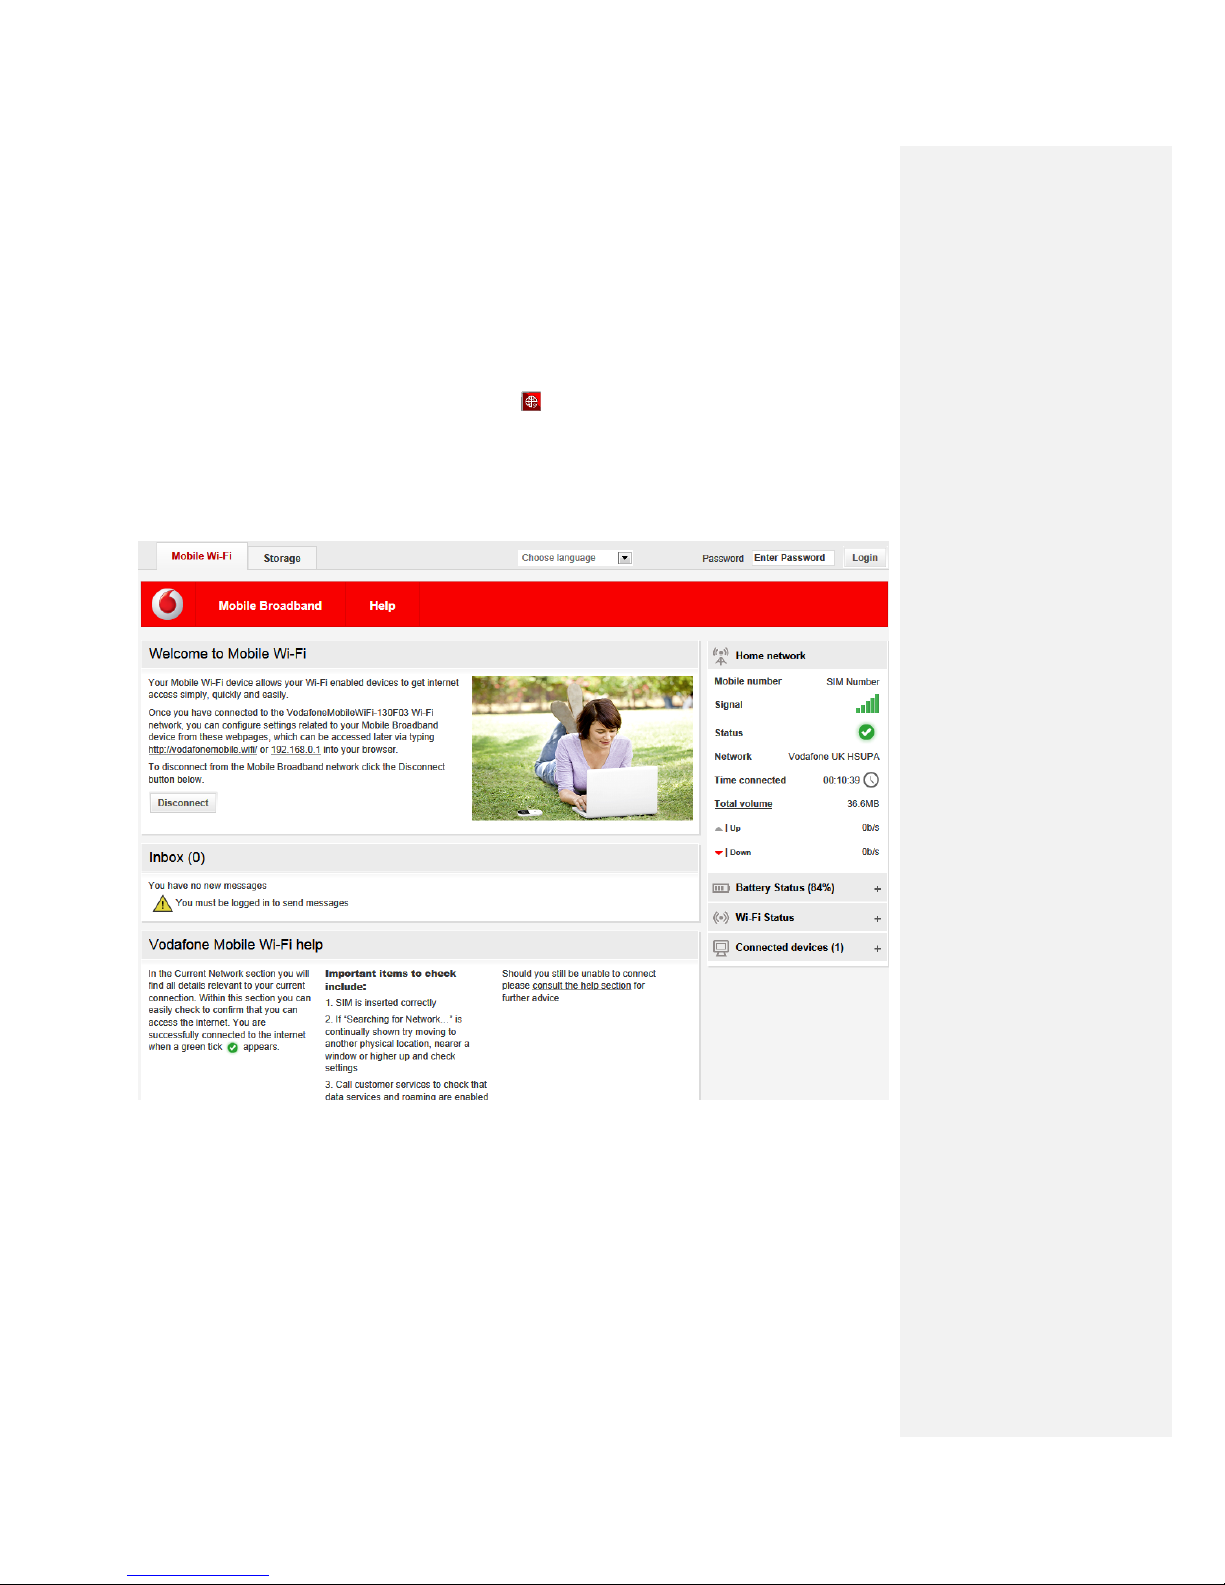
1.3 The Vodafone Mobile Wi-Fi browser login screen
When connected to the device via Wi-Fi, enter http://VodafoneMobile.WiFi or http://192.168.0.1 into
the address window of your web browser, and press the Enter or Return key. If you have previously
connected to the device using the Micro USB cable from your PC you can click on the short cut icon
on your desktop.
The Vodafone Mobile Wi-Fi configuration User Interface (UI) will be displayed.
The web browser will always display certain information (network, Wi-Fi and battery status and list of
connected devices) regardless of whether you are logged in or not.
Advanced Configuration Guide
Vodafone Mobile Wi-Fi – R205
Vodafone R205 March 2012
Version 1.0
13
1.4 Initial Security Configuration
The Vodafone Mobile Wi-Fi comes pre-configured with the information required to connect to the
Vodafone mobile network. It will not normally require any additional configuration to the basic settings
unless you are using the device behind a corporate firewall, and this may require the appropriate proxy
server settings to be modified (see later section of this guide for how to do this).
The security of your wireless network is very important. We recommend that you configure the default
security settings immediately by following these procedures:
Login and change the Administration Password
Establish a Secure Profile that meets your specific requirements
1.4.1 Login and change the admin password
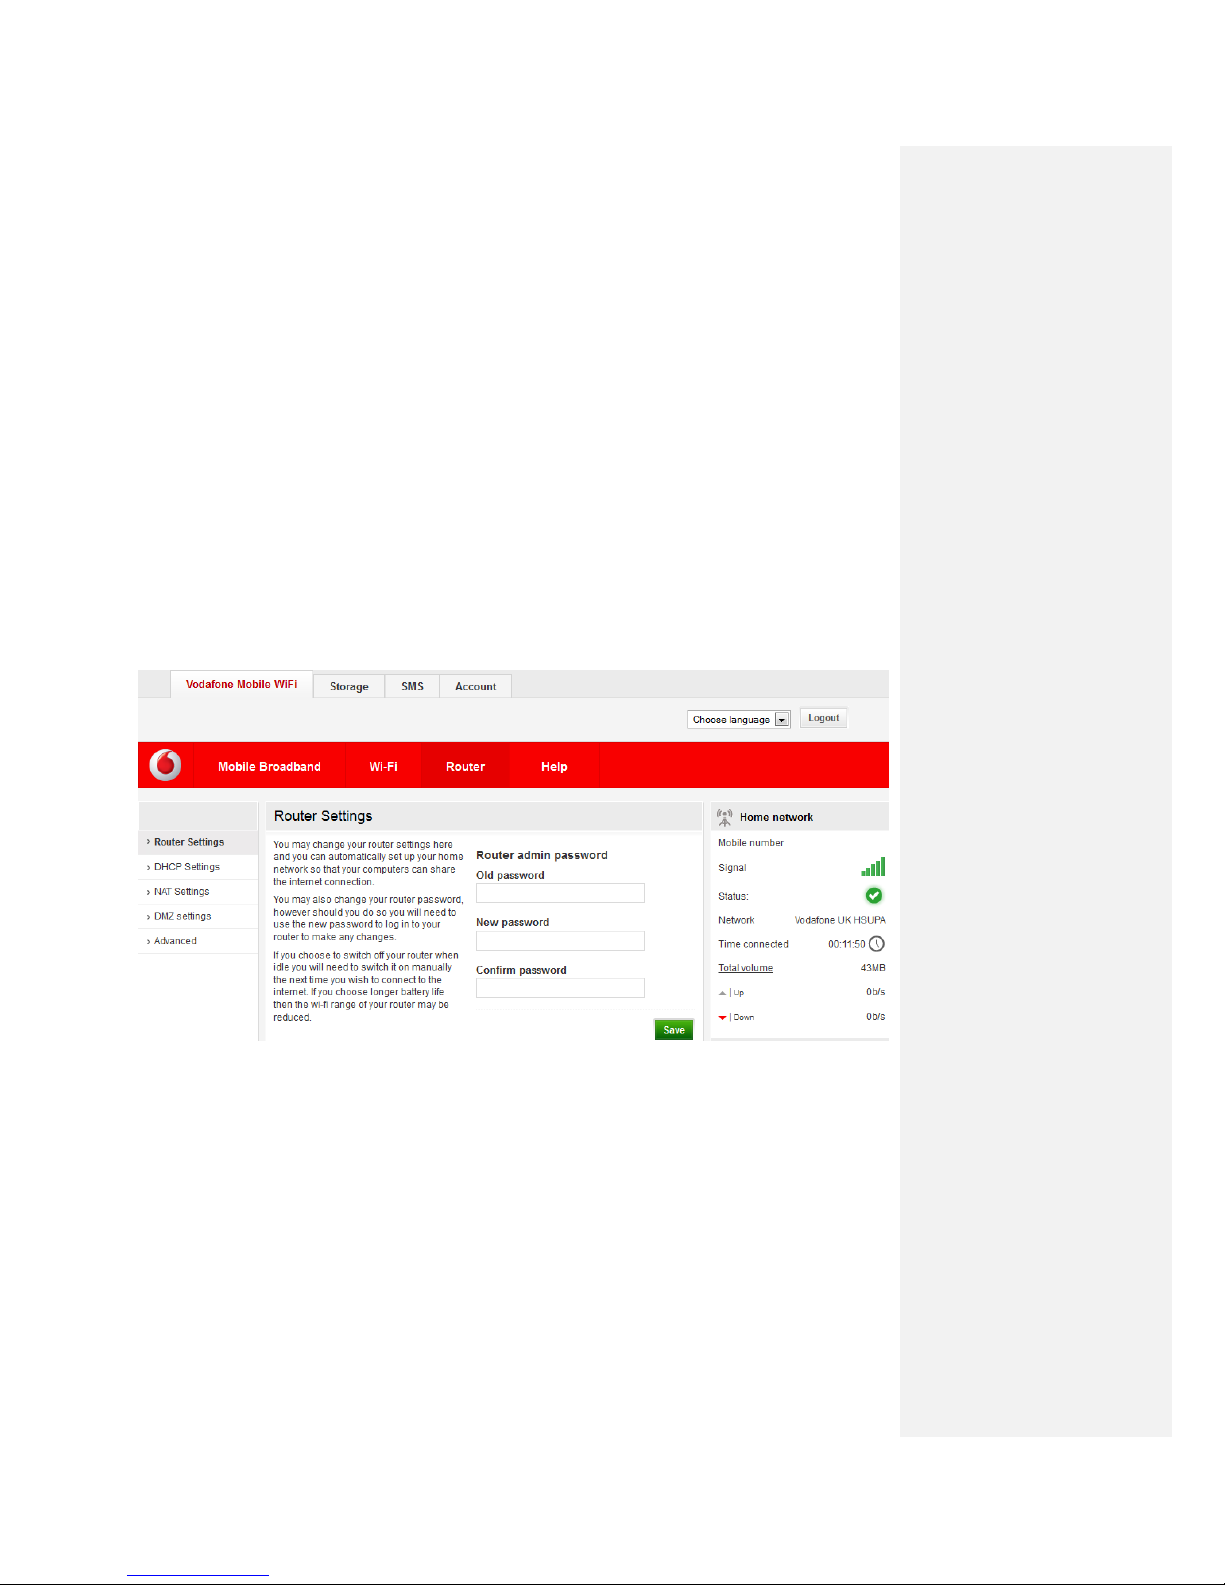
➊ Enter the default password “admin” into the Login window in the upper right corner of the screen and
click Login. Select Vodafone Mobile Wi-Fi > Router > Router Settings.
➋ Type “admin” into the Old password field.
➌ Select a new password and enter it into both password fields (New password and Confirm password).
➍ Click Save.
This will be the new administration password that you use when you login to the browser interface.
Note: Please record the new password. You will have to reset the device using the Master Reset button if
you forget your new administration password. This will also reset all other changes you have made to the
Mobile Wi-Fi device configuration.
NOTE:

Advanced Configuration Guide
Vodafone Mobile Wi-Fi – R205
Vodafone R205 March 2012
Version 1.0
14
1.4.2 Establish a Secure Profile that meets your personal requirements
You can use advanced router security options: WEP, WPA-PSK, WPA/WPA2 mixed, WPA2-PSK, MAC
address filtering / NAT security. WPA2-PSK is the default, but you may need to lower the security level if
any of the devices that want to use the Vodafone Mobile Wi-Fi are do not support this level of security.
Select Vodafone Mobile Wi-Fi > Wi-Fi > Security
IMPORTANT: Your Vodafone Mobile Wi-Fi comes with a pre-set WPA2 key that is unique to the
device and is listed on the label that can be found inside the back cover of the Vodafone Mobile
Wi-Fi. If you want to change this key to something more memorable, you can change it by
following the steps below. Vodafone recommend changing the WPA2 key to a secure key which
can be easily remembered. Note: The WPA2 key is case sensitive - please ensure you input it with
the correct upper and lower case characters.
➊ From the left hand menu, select Wi-Fi.
➋ Enter a memorable Network Key you want to use for Wi-Fi access to the device .
➌ Choose the Authentication level you want from the drop-down box (WPA2 is the default).
➍ Select the type of key encryption algorithm you want to use from the drop-down box.
➎ Click Save.
IMPORTANT: Your wireless connection will be disabled at this point. You must reconnect with the new
network key you just established if you are currently using wireless access to do the initial security
configuration.

Advanced Configuration Guide
Vodafone Mobile Wi-Fi – R205
Vodafone R205 March 2012
Version 1.0
15
1.5 Advanced Configuration for iPad, iPod Touch, or tablet
You can monitor the status of your Vodafone Mobile Wi-Fi device from any of the devices listed above,
subject to device operating system versions of iOS v3.1.3 or above, or Android V2.1.0 or above.
Apple device users should use the Safari browser to browse to the web UI http://VodafoneMobile.wifi or
http://192.168.0.1 , or download the Vodafone Mobile Wi-Fi monitor app.
tablet users can check the device status by downloading the Vodafone Mobile Wi-Fi monitor app from the
App Store in iTunes or the Android Market / Google Play.
Download the Vodafone Mobile Wi-Fi monitor app .
Click on the app icon
Sample monitor screens show below
Tablet / iPad

Advanced Configuration Guide
Vodafone Mobile Wi-Fi – R205
Vodafone R205 March 2012
Version 1.0
16
2. Vodafone Mobile Wi-Fi Configuration Interface
– Advanced Settings
- Overview
- Mobile Broadband settings
- Wi-Fi settings
- Router Settings
- File Storage
- SMS
U
File
2
Advanced Configuration Guide
Vodafone Mobile Wi-Fi – R205
Vodafone R205 March 2012
Version 1.0
17
2.1 Overview
2.1.1 Access the Vodafone Mobile Wi-Fi Configuration pages from your web browser
Enter http://VodafoneMobile.WiFi or http://192.168.0.1 into the address window of your web
browser, and press the Enter key. If you have previously connected to the device using the Micro USB
cable from you PC you can click on the short cut icon on your desktop.
When you first connect to the Vodafone Mobile Wi-Fi with your web browser, you see the “Vodafone
Mobile Wi-Fi Configuration Page” below which gives basic status information. You will not be logged into
the Vodafone Mobile Wi-Fi at this stage, and will be unable to save and changes you make to the device
configuration until you login.

Advanced Configuration Guide
Vodafone Mobile Wi-Fi – R205
Vodafone R205 March 2012
Version 1.0
18
2.1.2 Login to the Vodafone Mobile Wi-Fi to make changes
To login to the Vodafone Mobile Wi-Fi, enter your password (the default password “admin”) into the Login
window in the upper right corner of the screen, and click Login. The Home Page will be displayed, and
you will be able to update values on all screens.
Advanced Configuration Guide
Vodafone Mobile Wi-Fi – R205
Vodafone R205 March 2012
Version 1.0
19
2.2 Vodafone Mobile Wi-Fi
The Vodafone Mobile Wi-Fi view has four options on the Navigation bar covering device configuration:
Mobile Broadband, Wi-Fi, Router and Help.
2.2.1 Mobile Broadband settings
The Mobile Broadband area of the Mobile Wi-Fi view has 4 selections on the left hand Menu bar: Status,
SIM PIN, Connection and Network.
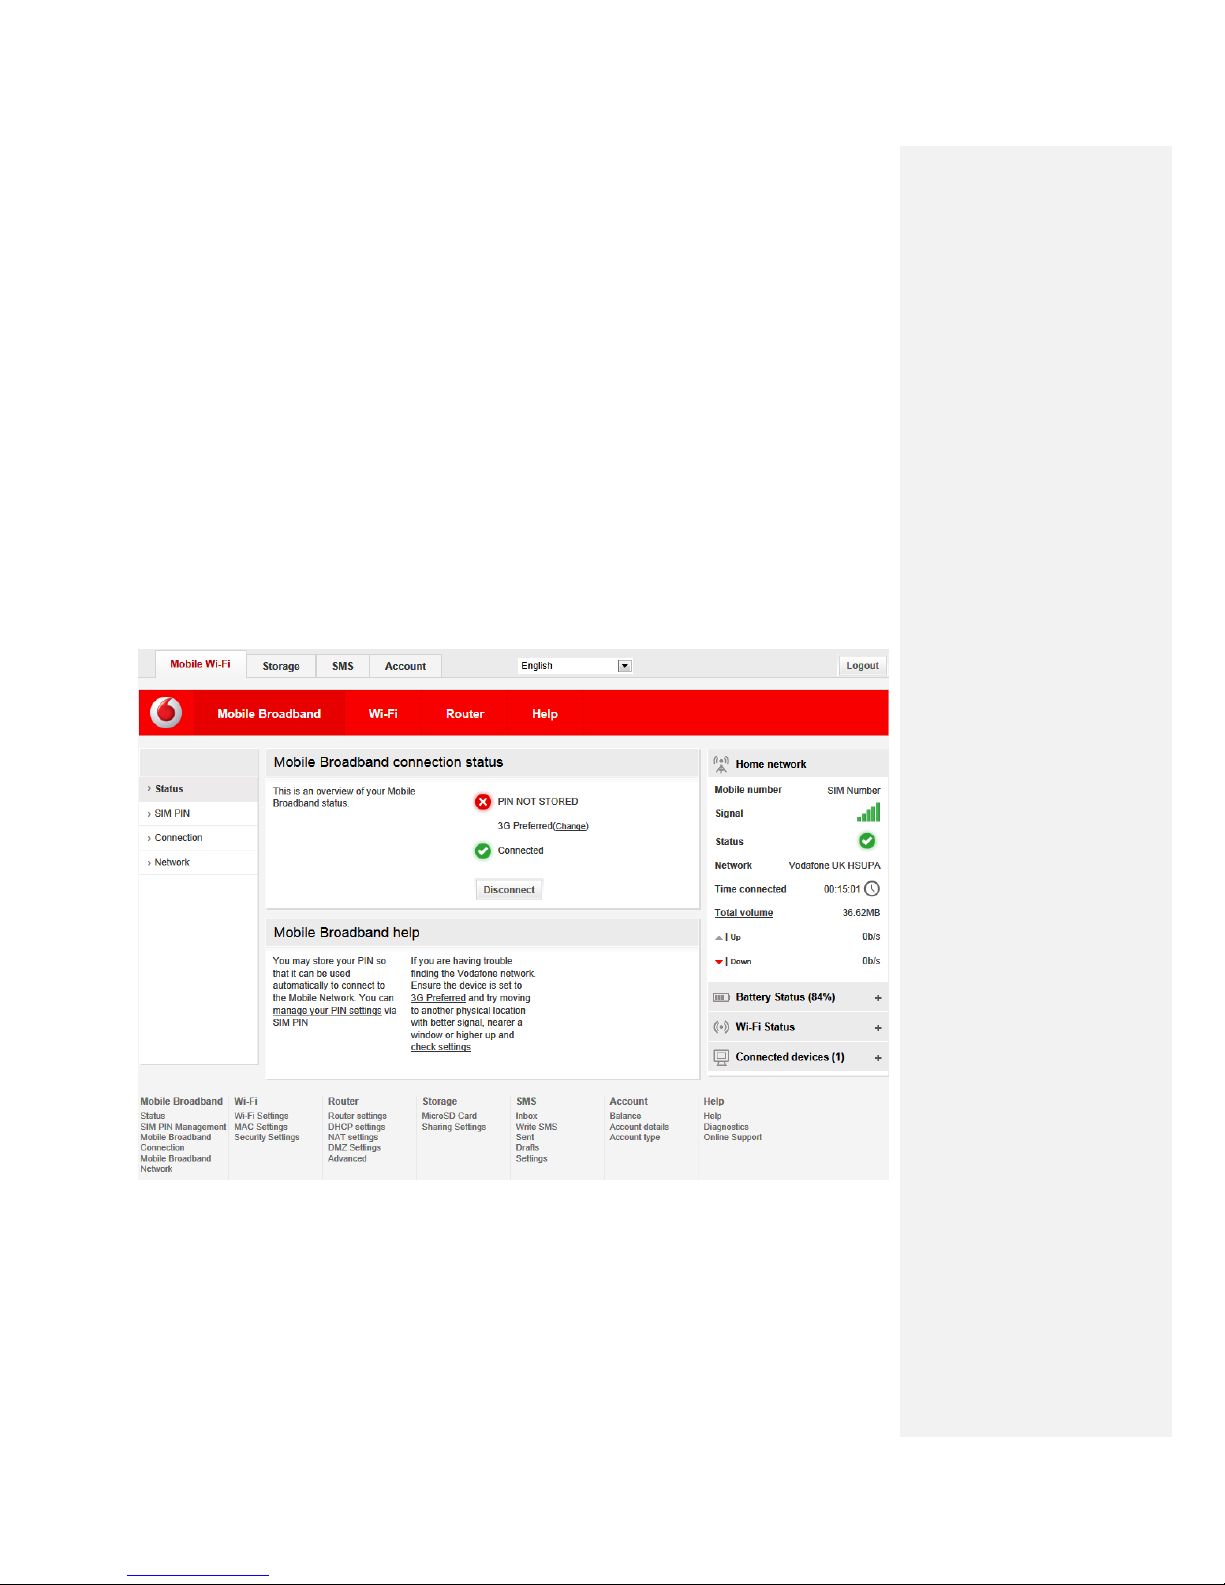
2.2.1.1 Status
Choose Status from the left hand menu bar to get an overview of the state of the Mobile Broadband
connection. This screens show you the SIM PIN setting, the type of Mobile Network connection preferred,
and whether the device is currently connected to the network.
 Loading...