


User Manual
(For LK6530i, LK7530i, and LK8630i models)

NovoTouch User Manual
Table of Contents |
|
Safety............................................................................................ |
4 |
Regulatory Compliance ............................................................................................. |
6 |
Package Contents ....................................................................... |
8 |
Optional Accessories................................................................................................. |
9 |
Overview .................................................................................... |
10 |
Display Front View ................................................................................................... |
10 |
Display Rear View..................................................................................................... |
11 |
Display Right View ................................................................................................... |
12 |
Display Bottom View ................................................................................................ |
13 |
Remote Control......................................................................................................... |
14 |
Installing Batteries............................................................................................................................... |
15 |
Remote Control Usage ....................................................................................................................... |
15 |
Installing the Wall Mount .......................................................... |
16 |
Installing the VKA05 OPS Module ........................................... |
19 |
Connections............................................................................... |
20 |
HDMI-In (1.4/2.0)........................................................................................................ |
20 |
DisplayPort-In ........................................................................................................... |
20 |
VGA-In ....................................................................................................................... |
21 |
Audio-In..................................................................................................................... |
21 |
LAN (RJ-45)............................................................................................................... |
22 |
Touch......................................................................................................................... |
22 |
AV-In .......................................................................................................................... |
23 |
RS-232 ....................................................................................................................... |
23 |
USB (2.0/3.0) ............................................................................................................. |
23 |
microSD..................................................................................................................... |
24 |
HDMI-Out................................................................................................................... |
24 |
Audio-Out.................................................................................................................. |
24 |
Coax-Out ................................................................................................................... |
25 |
Getting Started .......................................................................... |
26 |
Powering the Display ............................................................................................... |
26 |
Switching Input Source............................................................................................ |
27 |
Setting up an Internet Connection .......................................................................... |
28 |
Copyright © 2017 Vivitek. Vivitek is a trademark of Delta Electronics, Inc. |
Page 2 |

|
NovoTouch User Manual |
Setting up a Wi-Fi Connection ............................................................................................................ |
28 |
Display Settings........................................................................................................ |
30 |
Audio ................................................................................................................................................... |
31 |
Screen................................................................................................................................................. |
31 |
Display ................................................................................................................................................ |
32 |
Adjust .................................................................................................................................................. |
32 |
Using the Display ...................................................................... |
33 |
Home Screen ............................................................................................................ |
33 |
NovoTouch Remote Viewer ..................................................................................... |
34 |
Browser ..................................................................................................................... |
35 |
Note ........................................................................................................................... |
36 |
System Settings........................................................................................................ |
37 |
Finder ........................................................................................................................ |
38 |
Tools.......................................................................................................................... |
39 |
Cleaning the Display ................................................................. |
40 |
Specifications ............................................................................ |
41 |
Troubleshooting ........................................................................ |
42 |
Appendix (RS-232 Specifications) ........................................... |
43 |
Copyright Statement ................................................................. |
46 |
Copyright © 2017 Vivitek. Vivitek is a trademark of Delta Electronics, Inc. |
Page 3 |

NovoTouch User Manual
Safety
Placement
Do not place the unit on an unstable cart, stand, tripod, bracket, table, or shelf.
Do not expose the unit to direct sunlight and other sources of heat.
Do not put the unit near appliances that generate magnetic fields.
Do not put any liquid near or on the unit, make sure you do not spill any liquid inside the unit.
Do not put heavy objects on top of the unit.
Power Supply
Check that the unit’s operating voltage is identical to your local power supply.
Please unplug the display from the power supply during possible thunder-storms or lightning.
Please unplug the display from the power supply when the unit will be idle for a long time.
Please prevent the power cable from receiving physical or mechanical damage.
Please use the original power cable from the product packaging, and don't modify or lengthen it.
Please check and ensure that the AC source is connected with the ground.
The power cable that comes with the display is for use exclusively by this device.
LED Screen
Never use any hard or sharp object in place of the styluses.
Do not use permanent or dry-erase markers on the screen. If dry-erase markers are used on the screen, remove the ink as soon as possible with a lint-free, non-abrasive cloth.
Unplug the power cable before cleaning.
For a longer panel lifetime and better display performance, do not set the display to high brightness for a long period of time.
Temperature
Do not place the unit near or over a radiator or a heater.
If your display is suddenly moved from a cold to a warm place, please unplug the power cable and do not turn it on at least 2 hours, making sure the moisture inside the unit is all evaporated.
Normal operating temperature is 0 - 40°C.
Humidity
Do not expose the unit to rain, or place in a high humidity area.
Please make sure indoor environment is dry and cool.
Copyright © 2017 Vivitek. Vivitek is a trademark of Delta Electronics, Inc. |
Page 4 |
NovoTouch User Manual
Normal operating humidity is 10% - 90%.
Ventilation
Please put the unit in a well ventilated place, so the heating can be released easily.
Ensure that the unit has enough space for ventilation. Space requirement: left, right and back >10cm, top> 20cm.
Earphone
Using the earphones to listen to loud audio for an extended period of time might affect one’s hearing.
Before using earphones, please turn down the volume in advance.
Battery
Please make sure the battery is properly disposed or recycled after use.
Please keep the battery away from children.
DO NOT throw the battery into a fire.
For the remote control batteries, ensure that the correct batteries are used and installed in the proper orientation.
Maintenance
This machine should only be maintained/serviced by certified technician.
Inspect the display mount frequently to ensure that it has remained securely installed.
Check the mounting location for loose screws, gaps, distortions, signs of damage or weakness that can occur over time.
Disposal of Old Electric and Electronic Equipment
The symbol on your product or the package represents that the product should not be treated as the normal household waste when discarded but should be carried to the recycling location of the waste electric and electronic equipment. The consequence on the environment and human health due to the incorrect disposal of the product can be prevented if it can be ensured
that the product is properly discarded. Material recycling is helpful to the protection of natural resources. The symbol is only valid in European Union. If you want to discard electrical and electronic equipment, contact the governmental authorities or your dealer for the correct method of disposal.
Important Recycling Instructions
The product may contain other electronic wastes and may pose risk if not discarded properly. Abide by the local, state/provincial or federal laws of recycling or discarding. For more information, please visit the website and contact Electronic Industries Alliance (EIA) on WWW.EIAE.ORG.
Copyright © 2017 Vivitek. Vivitek is a trademark of Delta Electronics, Inc. |
Page 5 |

NovoTouch User Manual
Regulatory Compliance
FCC Warning
This equipment has been tested and found to comply with the limits for a Class A digital device pursuant to Part 15 of the FCC Rules. These limits are designed to provide reasonable protection against harmful interference when the equipment is operated in a commercial environment.
This equipment generates, uses, and can radiate radio frequency energy and, if not installed and used in accordance with the instruction manual, may cause harmful interference to radio communications. Operation of this equipment in a residential area is likely to cause harmful interference in which case the user will be required to correct the interference at his/her own expense.
Changes or modifications not expressly approved by the parties responsible for compliance could void the user’s authority to operate the equipment.
Federal Communications Commission (FCC) Notice (U.S. Only)
This device complies with Part 15 of the FCC Rules. Operation is subject to the following two conditions: (1) this device may not cause harmful interference, and (2) this device must accept any interference received, including interference that may cause undesired operation.
Canada
This class A digital apparatus complies with Canadian ICES-003.
CE Declaration of Conformity
This device complies with the requirements set out in the Council Directive on the Approximation of the Laws of the Member States relating to Electromagnetic Compatibility (2014/30/EU), Low-voltage Directive (2014/35/EU) and RoHS directive (2011/65/EU).
This product has been tested and found to comply with the harmonized standards for Information Technology Equipment, these harmonized standards published under Directives of Official Journal of the European Union.
WARNING: This equipment is compliant with Class A of EN55032/CISPR 32. In a residential environment this equipment may cause radio interference.
NOTE: This equipment has been tested and found to comply with the limits for a Class A digital device, pursuant to part 15 of the FCC Rules. These limits are designed to provide reasonable protection against harmful interference when the equipment is operated in a commercial environment. This equipment generates, uses, and can radiate radio frequency energy and, if not installed and used in accordance with the instruction manual,
Copyright © 2017 Vivitek. Vivitek is a trademark of Delta Electronics, Inc. |
Page 6 |

NovoTouch User Manual
may cause harmful interference to radio communications. Operation of this equipment in a residential area is likely to cause harmful interference in which case the user will be required to correct the interference at his own expense.
Safety Certifications
FCC-A, cTUVus, CE, CB, EAC, RoHS
Disposal and Recycling
This product may contain other electronic waste that can be hazardous if not disposed of properly. Recycle or dispose in accordance with local, state, or federal Laws. For more information, contact the Electronic Industries Alliance at www.eiae.org.
Copyright © 2017 Vivitek. Vivitek is a trademark of Delta Electronics, Inc. |
Page 7 |

NovoTouch User Manual
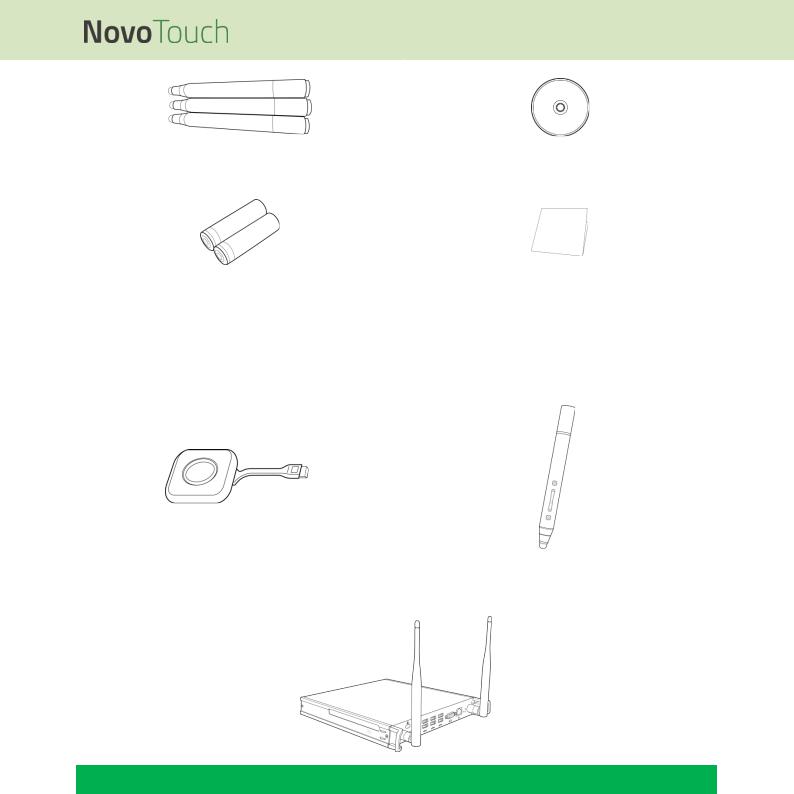
Package Contents
Ensure that all of the proper items are included with the display in the packaging. The items that should be included in the packaging are:
NovoTouch |
VKA05 OPS Module (with Antenna) |
|
|
Remote Control |
Power Cable |
|
|
Wall Mount Kit |
Audio Cable |
|
|
USB Cable |
VGA Cable |
|
|
Copyright © 2017 Vivitek. Vivitek is a trademark of Delta Electronics, Inc. |
Page 8 |
NovoTouch User Manual
Stylus x 3 |
Documentation CD |
|
|
Batteries x 2 |
Quick Guide |
|
|
Optional Accessories
LauncherPlus (QL300) |
Smart Pen (VKP05) |
|
|
VKW21 Windows OPS Module
Copyright © 2017 Vivitek. Vivitek is a trademark of Delta Electronics, Inc. |
Page 9 |
NovoTouch User Manual
Overview
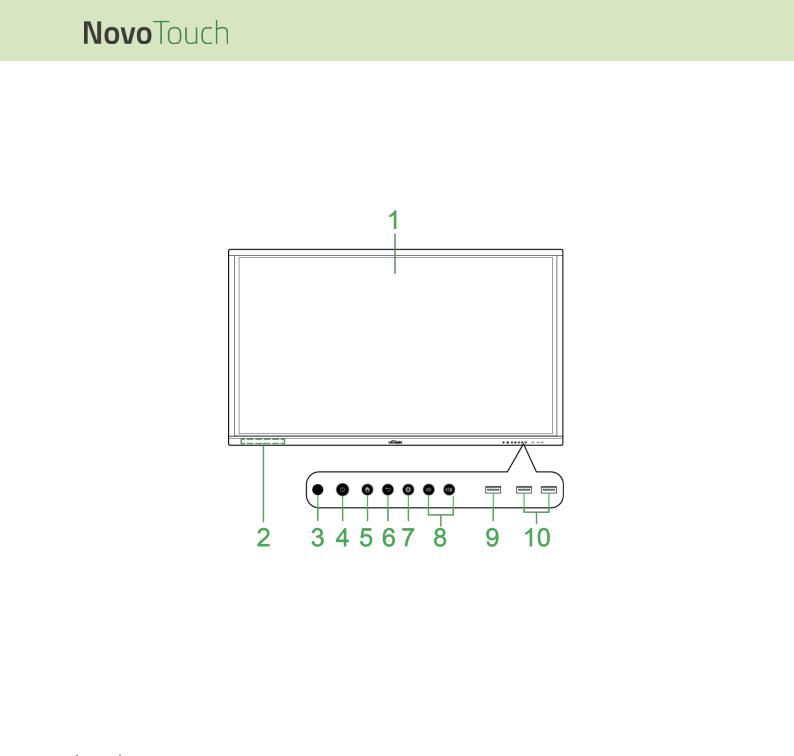
Display Front View
The following illustration shows the front side of the display and its various components:
|
No. |
|
|
Item |
|
|
|
Description |
|
|
|
|
|
|
|
|
Use touch gestures to navigate the display’s user interface. |
|
|
|
1 |
|
|
Touchscreen |
|
|
Tap to wake the display when it is in standby mode (the screen is off but the |
|
|
|
|
|
|
|
|
|
|
display is on). |
|
|
2 |
|
|
Magnetic Stylus Holder |
|
|
Holds the styluses included in with the display. |
|
|
|
|
|
|
|
|
|
|
|
|
|
3 |
|
|
Remote Control IR Sensor |
|
|
Receives the signal from the display’s remote control with a range of up to 8 |
|
|
|
|
|
|
|
meters. |
|
|||
|
|
|
|
|
|
|
|
||
|
|
|
|
|
|
|
Power Button: |
|
|
|
|
|
|
|
|
|
[When display is off]: |
|
|
|
|
|
|
|
|
|
|
Press to power on the display. |
|
|
|
|
|
|
|
|
[When display is on]: |
|
|
|
|
|
|
|
|
|
|
Press to place the display on standby. |
|
|
4 |
|
|
Power Button / Status |
|
|
|
Press and hold for 2 seconds to power off the display. |
|
|
|
|
Indicator LED |
|
|
Status Indicator LED: |
|
||
|
|
|
|
|
|
|
|||
|
|
|
|
|
|
|
Blue: The display is powered on or in standby mode. |
|
|
|
|
|
|
|
|
|
Red: The display is connected to a power source but not powered on. |
|
|
|
|
|
|
|
|
|
Off: The display is not connected to a power source. |
|
|
|
|
|
|
|
|
|
Flashing Red/Blue: (1) The display is in standby mode, (2) the display is |
|
|
|
|
|
|
|
|
|
|
powering off, or (3) the firmware is upgrading |
|
|
5 |
|
|
Home Button |
|
|
Opens the display’s home screen. |
|
|
|
|
|
|
|
|
|
|
|
|
|
6 |
|
|
Back Button |
|
|
Returns the display to the previous screen. |
|
|
|
|
|
|
|
|
|
|
|
|
|
7 |
|
|
Settings Button |
|
|
Opens the display’s input source menu. |
|
|
|
|
|
|
|
|
|
|
|
|
|
8 |
|
|
Volume Down/Up Button |
|
|
Decreases/Increases the display’s volume |
|
|
|
|
|
|
|
|
|
|
|
|
|
9 |
|
|
USB 3.0 Port |
|
|
Connects to a USB flash drive to view media files or to a mouse/keyboard. |
|
|
|
|
|
|
|
|
|
|
|
|
|
10 |
|
|
USB 2.0 Ports |
|
|
Connects to a USB flash drive to view media files or to a mouse/keyboard. |
|
|
|
|
|
|
|
|
|
|
|
|
Copyright © 2017 Vivitek. Vivitek is a trademark of Delta Electronics, Inc. |
Page 10 |
NovoTouch User Manual
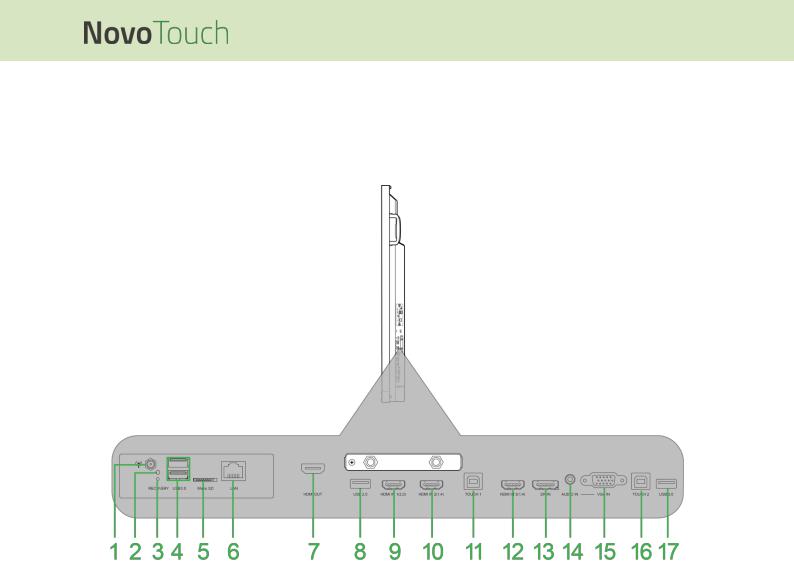
Display Rear View
The following illustration shows the rear of the display and its various components:
|
No. |
|
|
Item |
|
|
Description |
|
|
1 |
|
|
Handles |
|
|
Allows you to safely carry/move the display. |
|
|
|
|
|
|
|
|
|
|
|
2 |
|
|
Wall Mount Screw Holes |
|
|
Used to install the wall mount included with the display. See the “Installing the |
|
|
|
|
|
|
Wall Mount” section for more information. |
|
||
|
|
|
|
|
|
|
|
Copyright © 2017 Vivitek. Vivitek is a trademark of Delta Electronics, Inc. |
Page 11 |
NovoTouch User Manual
Display Right View
The following illustration shows the right side of the display and its various components:
NOTE: The illustration shows the right side after installation of the VKA05 OPS module. See the Installing the VKA05 OPS Module section for more information on how to install the OPS module.
|
No. |
|
|
Item |
|
|
Description |
|
|
1 |
|
|
Antenna Connector |
|
|
Connects to the antenna included with the VKA05 OPS for Wi-Fi signal. |
|
|
|
|
|
|
|
|
|
|
|
2 |
|
|
Power LED Indicator |
|
|
Lights up to indicate that the VKA05 OPS is powered. |
|
|
|
|
|
|
|
|
|
|
|
3 |
|
|
Recovery Button |
|
|
Resets the VKA05 OPS module. |
|
|
|
|
|
|
|
|
|
|
|
4 |
|
|
USB 3.0 Ports |
|
|
Connects to a USB flash drive to view media files or to a mouse/keyboard. |
|
|
|
|
|
|
|
|
|
|
|
5 |
|
|
microSD Card Slot |
|
|
Reads media files stored on a microSD card. |
|
|
|
|
|
|
|
|
|
|
|
6 |
|
|
LAN Port |
|
|
Connects to a router for internet access. |
|
|
|
|
|
|
|
|
|
|
|
7 |
|
|
HDMI Out Port |
|
|
Connects to either a second display or projector to duplicate or extend the |
|
|
|
|
|
|
video shown on the display. |
|
||
|
|
|
|
|
|
|
|
|
|
8 |
|
|
USB 2.0 Port |
|
|
Connects to a USB flash drive to view media files or to a mouse/keyboard. |
|
|
|
|
|
|
|
|
|
|
|
9 |
|
|
HDMI In Port 1 (2.0) |
|
|
Connects to Blu-Ray/DVD players, set-top boxes, digital media players, |
|
|
|
|
|
|
computers, or other video sources to broadcast video and audio. |
|
||
|
|
|
|
|
|
|
|
|
|
10 |
|
|
HDMI In Port 2 (1.4) |
|
|
Connects to Blu-Ray/DVD players, set-top boxes, digital media players, |
|
|
|
|
|
|
computers, or other video sources to broadcast video and audio. |
|
||
|
|
|
|
|
|
|
|
|
|
11 |
|
|
Touch Port 1 |
|
|
Connects to a computer to allow the touchscreen to control the computer’s |
|
|
|
|
|
|
interface. |
|
||
|
|
|
|
|
|
|
|
|
|
12 |
|
|
HDMI In Port 3 (1.4) |
|
|
Connects to Blu-Ray/DVD players, set-top boxes, digital media players, |
|
|
|
|
|
|
computers, or other video sources to broadcast video and audio. |
|
||
|
|
|
|
|
|
|
|
|
|
13 |
|
|
DisplayPort In Port |
|
|
Connects to a computer to broadcast video and audio. |
|
|
|
|
|
|
|
|
|
|
|
14 |
|
|
Audio In Jack |
|
|
Connects to the video source to broadcast its audio. |
|
|
|
|
|
|
|
|
|
|
|
15 |
|
|
VGA In |
|
|
Connects to a computer to broadcast video. |
|
|
|
|
|
|
|
|
|
|
|
16 |
|
|
Touch Port 2 |
|
|
Connects to a computer to allow the touchscreen to control the computer’s |
|
|
|
|
|
|
interface. |
|
||
|
|
|
|
|
|
|
|
|
|
17 |
|
|
USB 2.0 Port |
|
|
Connects to a USB flash drive to view media files or to a mouse/keyboard. |
|
|
|
|
|
|
|
|
|
|
Copyright © 2017 Vivitek. Vivitek is a trademark of Delta Electronics, Inc. |
Page 12 |
NovoTouch User Manual
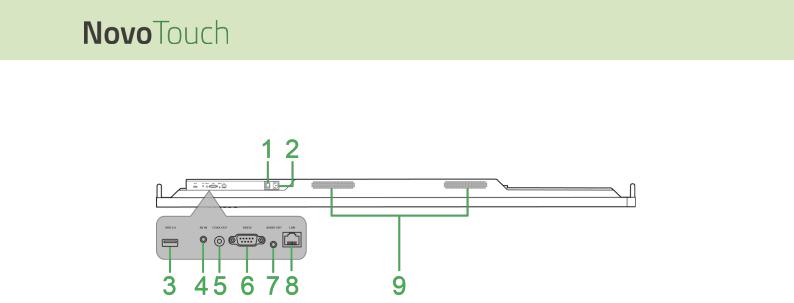
Display Bottom View
The following illustration shows the bottom of the display and its various components:
|
No. |
|
|
Item |
|
|
Description |
|
|
1 |
|
|
Power Switch |
|
|
Activates the display once it is connected to a power source. |
|
|
|
|
|
|
|
|
|
|
|
2 |
|
|
Power Connector |
|
|
Connects to a power outlet. |
|
|
|
|
|
|
|
|
|
|
|
3 |
|
|
USB 2.0 Port |
|
|
Connects to a USB flash drive to view media files or to a mouse/keyboard. |
|
|
|
|
|
|
|
|
|
|
|
4 |
|
|
AV In Jack |
|
|
Connects to DVD players, set-top boxes, and other sources to broadcast |
|
|
|
|
|
|
analog video and audio |
|
||
|
|
|
|
|
|
|
|
|
|
5 |
|
|
Coax Out Port |
|
|
Connects to external speakers to broadcast audio. |
|
|
|
|
|
|
|
|
|
|
|
6 |
|
|
RS-232 Port |
|
|
Connects to a computers or servers for control commands. |
|
|
|
|
|
|
|
|
|
|
|
7 |
|
|
Audio Out Jack |
|
|
Connects to external speakers to broadcast audio. |
|
|
|
|
|
|
|
|
|
|
|
8 |
|
|
LAN Port |
|
|
DISABLED: Do not connect this port. |
|
|
|
|
|
|
|
|
|
|
|
9 |
|
|
Speakers |
|
|
Broadcasts the display’s audio. |
|
|
|
|
|
|
|
|
|
|
Copyright © 2017 Vivitek. Vivitek is a trademark of Delta Electronics, Inc. |
Page 13 |
NovoTouch User Manual
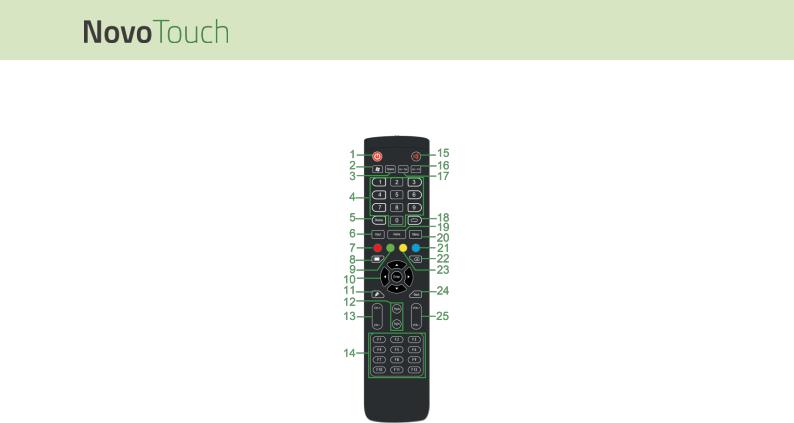
Remote Control
The following illustration shows the display’s remote control and its buttons:
|
No. |
|
|
Button |
|
|
Description |
|
|
1 |
|
|
Power |
|
|
Turns the display on or off. |
|
|
|
|
|
|
|
|
|
|
|
2 |
|
|
Windows Menu* |
|
|
Performs the same action as the Windows key on a PC keyboard. |
|
|
|
|
|
|
|
|
|
|
|
3 |
|
|
Spacebar* |
|
|
Performs the same action as the spacebar on a PC keyboard. |
|
|
|
|
|
|
|
|
|
|
|
4 |
|
|
Numeric Keypad |
|
|
Numeric input buttons. |
|
|
|
|
|
|
|
|
|
|
|
5 |
|
|
Display Information |
|
|
Displays the current channel/input information. |
|
|
|
|
|
|
|
|
|
|
|
6 |
|
|
Input Source |
|
|
Opens the input source menu. |
|
|
|
|
|
|
|
|
|
|
|
7 |
|
|
Lock/Unlock Display Buttons |
|
|
Disables/Enables both the buttons located on the front of the display and the |
|
|
|
|
and Touchscreen |
|
|
display’s touchscreen. |
|
|
|
|
|
|
|
|
|
||
|
8 |
|
|
Blank Screen |
|
|
Makes the screen display a monochromatic screen. |
|
|
|
|
|
|
|
|
|
|
|
9 |
|
|
Lock/Unlock Display Buttons |
|
|
Disables/Enables the buttons located on the front of the display. |
|
|
|
|
|
|
|
|
|
|
|
10 |
|
|
Navigation Buttons |
|
|
Navigates between various applications and menus shown on screen. |
|
|
|
|
|
|
|
|
|
|
|
11 |
|
|
Quick Draw |
|
|
Launches the displays drawing tools. See the |
|
|
|
|
|
|
Tools section for more information. |
|
||
|
|
|
|
|
|
|
|
|
|
12 |
|
|
Page Up/Down* |
|
|
Performs the same action as the Page Up/Down buttons on a PC keyboard. |
|
|
|
|
|
|
|
|
|
|
|
13 |
|
|
Function Buttons |
|
|
Functional buttons. |
|
|
|
|
|
|
|
|
|
|
|
14 |
|
|
F1 - F12* |
|
|
Performs the same action as the F1 - F12 keys on a PC keyboard. |
|
|
|
|
|
|
|
|
|
|
|
15 |
|
|
Mute |
|
|
Disables the display’s audio. |
|
|
|
|
|
|
|
|
|
|
|
16 |
|
|
Alt+F4 (Close Window)* |
|
|
Performs the same action as the Alt+F4 key combination on a PC keyboard. |
|
|
|
|
|
|
|
|
|
|
|
17 |
|
|
Alt+Tab (Switch Window)* |
|
|
Performs the same action as the Alt+Tab key combination on a PC keyboard. |
|
|
|
|
|
|
|
|
|
|
|
18 |
|
|
Function Button |
|
|
Functional button. |
|
|
|
|
|
|
|
|
|
|
|
19 |
|
|
Home Screen |
|
|
Returns the display to the home screen. |
|
|
|
|
|
|
|
|
|
|
|
20 |
|
|
Settings Menu |
|
|
Opens the OSD settings menu. |
|
|
|
|
|
|
|
|
|
|
|
21 |
|
|
Freeze Screen |
|
|
Freezes the screen. |
|
|
|
|
|
|
|
|
|
|
|
22 |
|
|
Backspace |
|
|
Deletes the entered text. |
|
|
|
|
|
|
|
|
|
|
|
23 |
|
|
Lock/Unlock Touchscreen |
|
|
Disables/Enables the display’s touchscreen and prevents touch gestures from |
|
|
|
|
|
|
working. |
|
||
|
|
|
|
|
|
|
|
|
|
24 |
|
|
Back |
|
|
Returns to the previous screen. |
|
|
|
|
|
|
|
|
|
|
|
25 |
|
|
Volume +/- |
|
|
Adjusts the display’s audio level. |
|
|
|
|
|
|
|
|
|
|
*Only functional when an OPS unit running Windows is installed into the display.
Copyright © 2017 Vivitek. Vivitek is a trademark of Delta Electronics, Inc. |
Page 14 |
NovoTouch User Manual
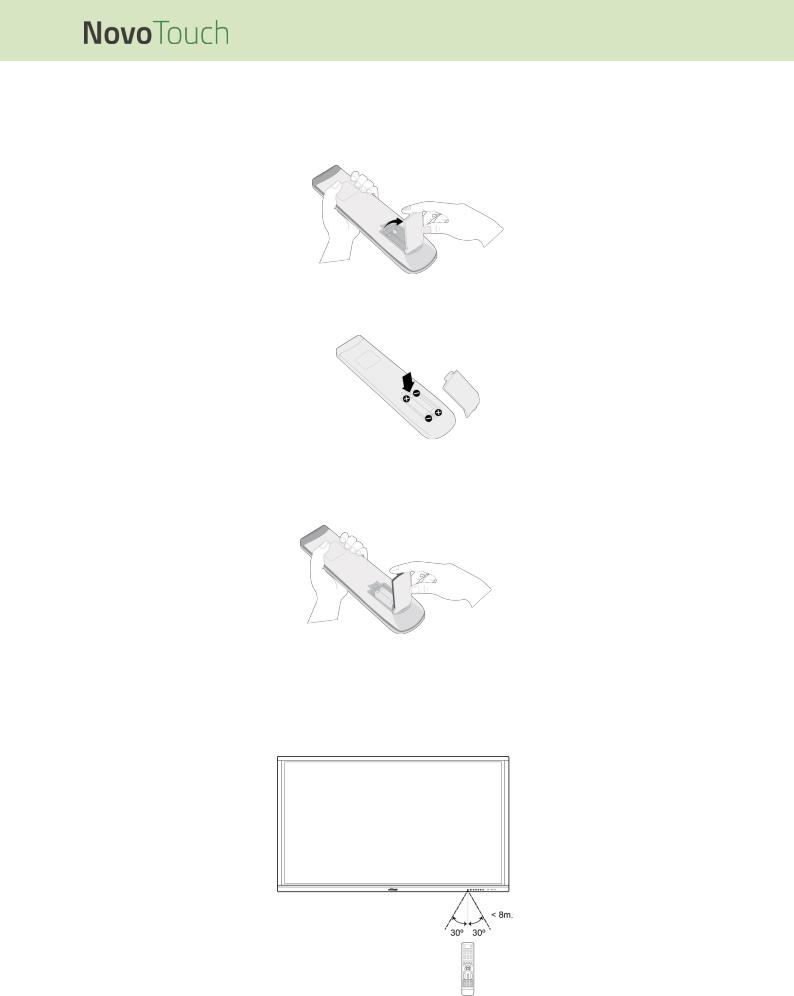
Installing Batteries
Before using the display’s remote control you must first install the two AAA batteries included with the display.
1.Open the battery compartment cover on the remote control.
2.Insert the batteries ensuring that the + and - terminals on the battery match their corresponding terminals in the battery compartment.
 WARNING: Failure to install the correct batteries in the correct orientation may result in damage or possibly injury.
3. Replace the battery compartment cover on the remote control.
Remote Control Usage
When using the remote control ensure that the remote control is pointed at the IR sensor at the front of the display within a range of 8 meters distance and 30-degrees to the left and right of the IR sensor.
Copyright © 2017 Vivitek. Vivitek is a trademark of Delta Electronics, Inc. |
Page 15 |
 Loading...