


Preface
Copyright
©2016 Vivitek  is a trademark of Delta Electronics, Inc. All other trademarks are the property of their respective owners. All values, weights and sizes in this Manual are approximate values. Specifications are subject to change without notice.
Disclaimer
The information in this document is subject to change without notice. The manufacturer makes no representations or warranties with respect to the contents hereof and specifically disclaims any implied warranties of merchantability or fitness for any particular purpose. The manufacturer reserves the right to revise this publication and to make changes from time to time in the content hereof without obligation of the manufacturer to notify any person of such revision or changes.
Trademark Recognition
HDMI, the HDMI Logo, and High-Definition Multimedia Interface are trademarks or registered trademarks of HDMI Licensing LLC in the United States and other countries.
ii
Important Safety Information
Important:
It is strongly recommended that you read this section carefully before using Qumi. These safety and usage instructions that will make sure you enjoy many years of safe use of Qumi. Keep this manual for future reference.
Symbols Used
Warning symbols are used on the unit and in this manual to alert you of hazardous situations.
The following symbols are used to call attention to important information.
Note:
Provides additional information on the topic at hand
Important:
Provides additional information that should not be overlooked.
Caution:
Alerts you to situations that may damage the unit..
Warning:
Alerts you to situations that may damage the unit, create a hazardous environment, or cause personal injury..
Throughout this manual, component parts and items in the OSD (On-Screen Display) menus are denoted in bold font as in this example:
“Press the Menu button on the remote controller to open the Setting menu”.
General Safety Information
Do not open the casing. There are no user-maintainable parts inside the projector. For any maintenance, please contact a qualified service technician.
Follow all warnings and precautions on the machine or in this Manual.
According to its design, the projection light source is extremely bright. To avoid harm to eyes, do not look straight at the lens when the LED is ON.
Do not place the machine on unstable surface or stand.
Avoid using the system near water, in direct sunlight, or near a heating device.
Do not place any heavy objects (e.g., books or bags) on the unit..
iii
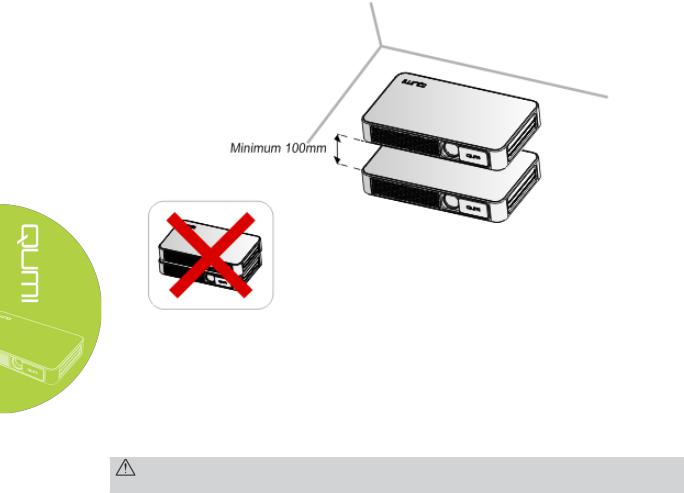
Qumi Installation Notice
Allow at least a 20" (500mm) clearance around the exhaust vent.
4"
Make sure that the intake vents do not recycle hot air from the exhaust vent.
When operating Qumi in an enclosed space, make sure that the surrounding air temperature within the enclosure does not exceed operating temperature while Qumi is running, and the air intake and exhaust vents are unobstructed.
All enclosures should pass a certified thermal evaluation to make sure that Qumi does not recycle exhaust air, as this may cause the device to shutdown even if the enclosure temperature is with the acceptable operating temperature range.
Caution:
Avoid usage of Qumi in dusty environment.
iv
Power Supply Safety
Only use the supplied adapter.
Do not place anything on the cord. Place the cord where it will not be in the way of foot traffic.
Remove the battery from the remote control when storing or not in use for a prolonged period.
Cleaning Qumi
Before cleaning, disconnect the power supply cables. See “Cleaning Qumi” in Page 37.
Note:
Qumi will be warm after usage. Allow Qumi to cool down before storing in a compartment.
Control Warning
Before installing and using Qumi, read the regulatory notices in the Regulatory Compliance on page 48.
Symbol Explanations
DISPOSAL: Do not use household or municipal waste collection services for disposal of electrical and electronic equipment. EU countries require the use of separate recycling collection services.
Main Features
HD720p resolution with a 16:9 aspect ratio.
Up to 500 lumens of brightness and 5,000:1 contrast for brilliant and sharp images.
Project a large 100” (diameter) high definition image from only 12" (3.7) meters from the projection surface.
Long life energy efficient LED light source with an estimated 30,000 hours of operation.
Wirelessly stream and project documents, photos, movies and other content with the integrated wireless (Wi-Fi) system.
Built-in audio speakers with audio-out port and Bluetooth for attachment of external speakers.
About this Manual
This manual is intended for end users and describes how to install and operate Qumi. Wherever possible, relevant information—such as an illustration and its description—has been kept on one page. This printer-friendly format is both for your convenience and to help save paper, thereby protecting the environment. It is suggested that you only print sections that are relevant to your needs.
v

Table of Contents |
|
Preface ..................................................................................................................................................... |
ii |
Chapter 1 At a Glance ............................................................................................................................ |
1 |
Overview .................................................................................................................................................. |
1 |
Standard Accessories: .............................................................................................................................. |
3 |
Remote Control ........................................................................................................................................ |
4 |
Setting Up the Remote Control................................................................................................................ |
5 |
Chapter 2 Getting Started ...................................................................................................................... |
6 |
What you need......................................................................................................................................... |
6 |
Setting Up Qumi ....................................................................................................................................... |
7 |
HappyCast - Android Setup ................................................................................................................... |
12 |
HappyCast - iOS Setup .......................................................................................................................... |
13 |
Chapter 3 Qumi User Interface............................................................................................................. |
15 |
Views ...................................................................................................................................................... |
15 |
Photo ...................................................................................................................................................... |
16 |
Video ...................................................................................................................................................... |
17 |
Music...................................................................................................................................................... |
18 |
Document ............................................................................................................................................... |
19 |
APP Store ............................................................................................................................................... |
20 |
Browser .................................................................................................................................................. |
21 |
Apps ....................................................................................................................................................... |
22 |
WiFi ....................................................................................................................................................... |
23 |
Settings................................................................................................................................................... |
24 |
Chapter 4 On-Screen Display (OSD) Settings ........................................................................................ |
25 |
OSD Menu Controls................................................................................................................................ |
25 |
OSD Menu Overview .............................................................................................................................. |
26 |
OSD Language Settings........................................................................................................................... |
27 |
Chapter 5 Taking Care of Your Qumi..................................................................................................... |
37 |
Cleaning Qumi ........................................................................................................................................ |
37 |
Cleaning the Lens ................................................................................................................................... |
37 |
Troubleshooting ..................................................................................................................................... |
38 |
Vivitek Support Site................................................................................................................................ |
41 |
Specifications ......................................................................................................................................... |
42 |
Projection Distance vs Projection Size ................................................................................................... |
43 |
Projection Distance and Size Table ........................................................................................................ |
43 |
Timing Mode Table................................................................................................................................. |
44 |
Qumi Dimensions ................................................................................................................................... |
45 |
Regulatory Compliance .......................................................................................................................... |
46 |
Safety Certifications ............................................................................................................................... |
46 |
Disposal and Recycling ........................................................................................................................... |
46 |
vi
Chapter 1 At a Glance
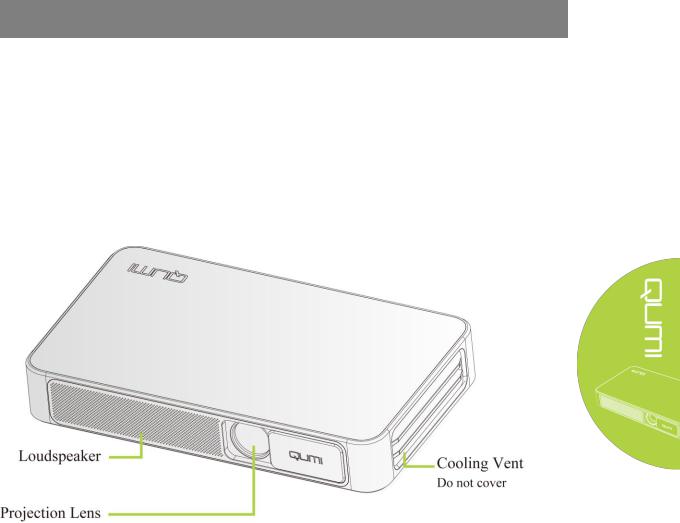
Overview
Front/Top/Right View
and Sliding Lens protector
1

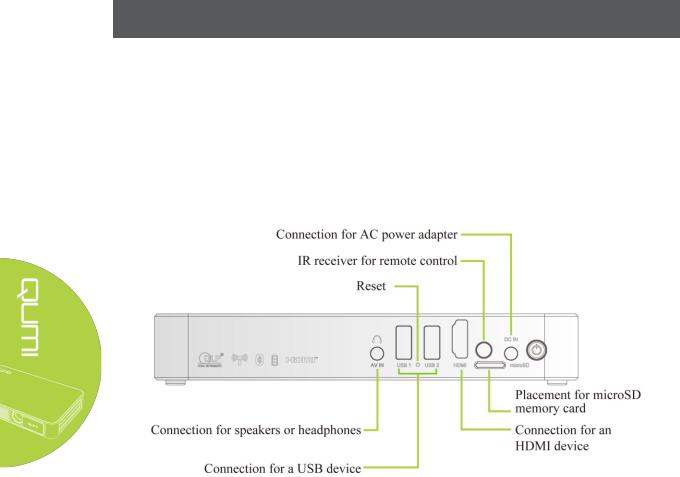
Rear/Top/Left View
Bottom View
2
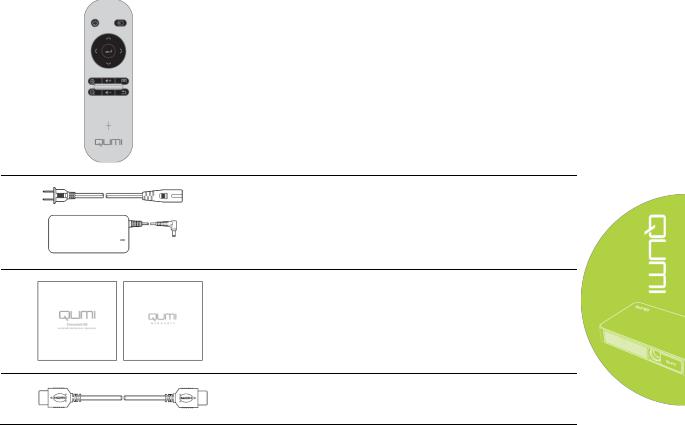
Standard Accessories:
Along with Qumi, the following are accessories include:
Remote control (with one CR2025 battery)
Regional Power Cord and Power Adapter
Documentation Kit
(Quick Start Guide, Warranty Card)
Standard HDMI cable
Contact your dealer immediately if any items are missing, appear damaged, or if the unit does not work. It is recommended that you keep the original packing material in case you ever need to return the equipment for warranty service.
3
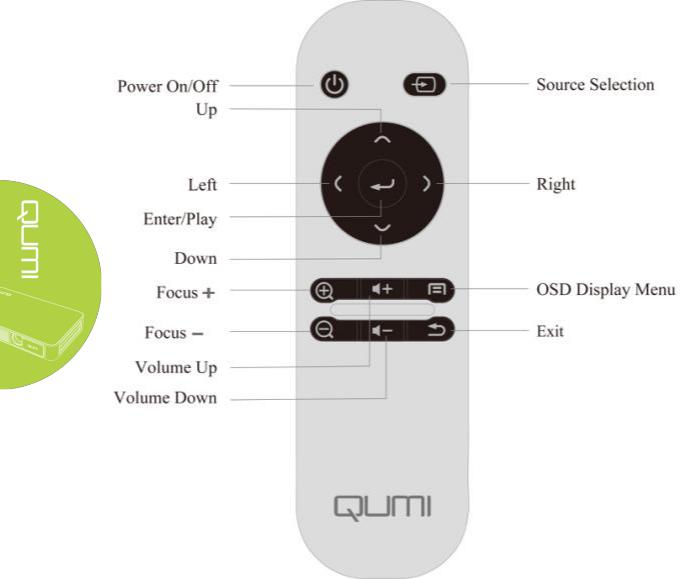
Remote Control
4
Setting Up the Remote Control
The remote control comes with one (1) 3V lithium battery (CR2025). The battery is pre-installed in the remote control.
To begin using the remote control, remove the plastic tab (A) from the battery compartment. Use a screwdriver to remove the battery cover by turning counter-clockwise 1/8 turn.
Replacing the Remote Control’s Batteries
1. Remove the battery compartment cover by turning the cover towards the arrow
(A). Then lift the cover out towards the arrow (B)..
2. Remove the old battery and insert the new battery with the positive side facing up.
3. Install the cover and turn as shown in the illustration.
Caution:
1.Only use 3V lithium battery (CR2025).
2.Dispose of used batteries according to local ordinance regulations.
3.Remove the battery when not using Qumi for prolonged periods.
Operating Range
The remote control uses infrared (IR) transmission to control Qumi. It is necessary to point the remote towards Qumi..
The remote control functions properly within a radius of approximately 7 meters (23 feet) and 15 degrees above or below the Qumi level (If the remote is not held perpendicular to the sides or rear of Qumi).
If Qumi is unresponsive to the remote control, move closer towards Qumi or it may be necessary to replace the battery.
5
Chapter 2 Getting Started
What you need
Qumi can be connected to many types of external devices and peripherals. To play
music, connect Qumi to an external or portable music player. To play films, connect Qumi to a DVD, VCD or VHS player using HDMI interface. To play video and display photos, connect Qumi to a video camera and digital camera using HDMI interface. To display files and other
types of media, connect Qumi to peripherals like a computer or USB drive.
These devices can be connected to Qumi using an appropriate cable. Make sure that the connecting device has an appropriate output connector. See below for more connectivity information:
6
Setting Up Qumi
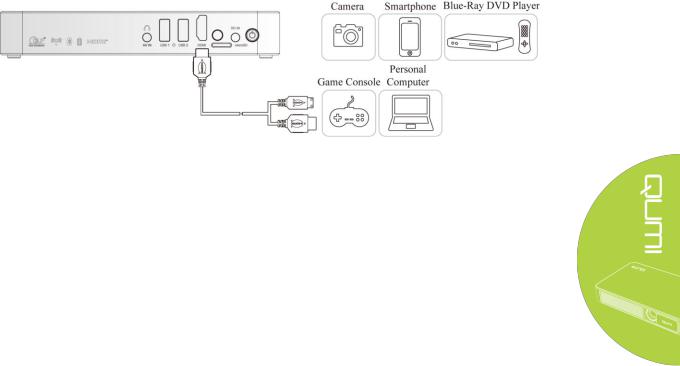
Connecting Peripherals by HDMI
Connect HDMI-compatible peripherals to Qumi using an HDMI cable (included)
7
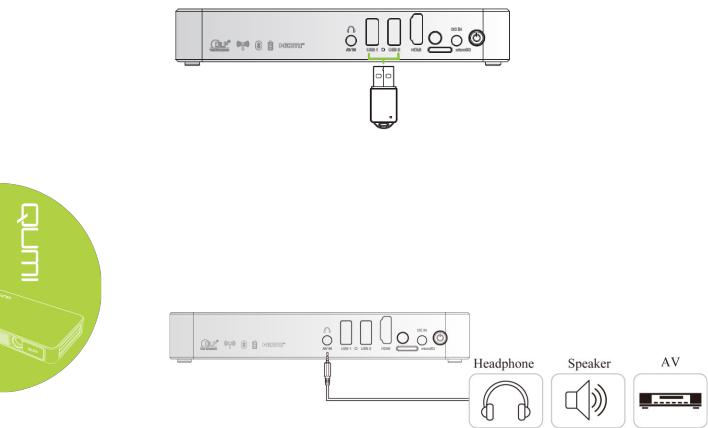
Inserting a USB device
Connect a USB device to Qumi by inserting the device(s) into the appropriate port.
Connecting Audio
Connect earphones or speaker to Qumi by inserting into the AV-in port.
Bluetooth Audio out is also available under Settings, Bluetooth. Turn Bluetooth "ON" and pair audio device.
8
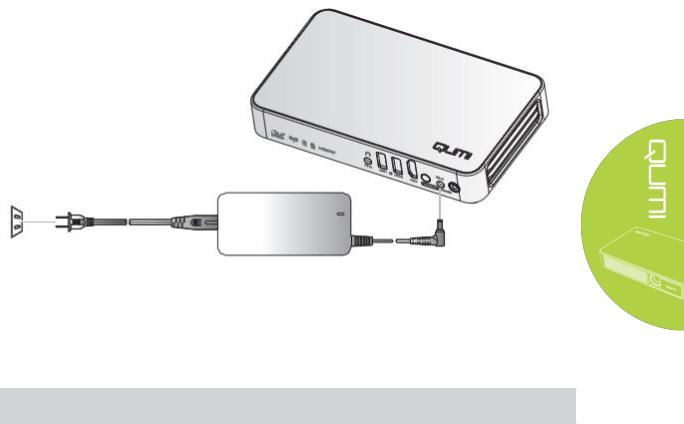
Charging the Battery
Follow the below steps to charge Qumi:
Connect the AC power adapter to Qumi.
Connect the other end of AC power adapter to a wall outlet.
During charging, the blue light on the AC power adapter will be on. After being fully charged, the blue light will automatically shut off.
Note:
The battery will be fully charged in about 3 to 4 hours.
9
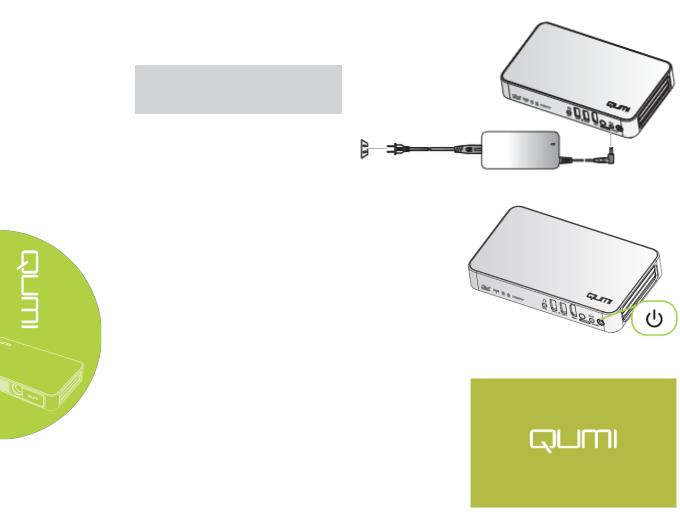
Starting and Shutting Down Qumi
1. Connect the AC power adapter to Qumi. Connect the other end of AC power adapter to a wall outlet.
Note:
The adapter models may differ between countries.
2. Press  power button to turn on Qumi.
When AC power adapter is connected, press the power button for 1 second.
When AC power adapter is not connected, press the power button for 3 seconds.
Qumi splash screen displays
and connected devices are detected at this time but not displayed.
10
 Loading...