Videx Security 317X User Manual

3000 Series
Art. 3171B - 3172 - 3176 Digital intercoms
3 |
12 |
4 |
1 |
2 |
5 |
9 |
10 |
7 |
6 |
6 |
8 |
11 |
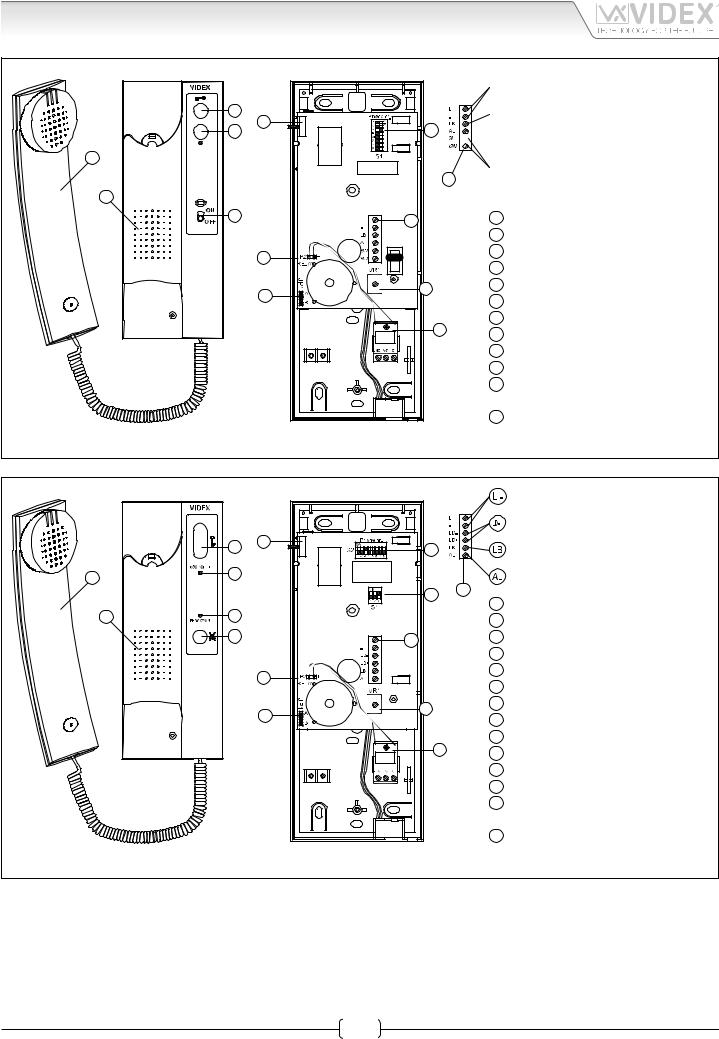
 Bus line
 Local bell input


 Alarm input
 Service push button
1Handset
2Bell loudspeaker
3Door opening push button
4Service push button
5Privacy ON-OFF (only Art. 3172)
6Connection
78 way Dip-Switch (Phone ID)
8Microphone volume control
9Connection for optional relay board (JP2 Red = +)
10Default = A Pos., B Pos. with opt. board “6”
11Option relay board (Art. 402) to activate an external bell
12Electronic call tone volume control (3 levels)
Fig. 1 - Art. 3171B - Art. 3172
1 |
2 |
|
|
|
|
|
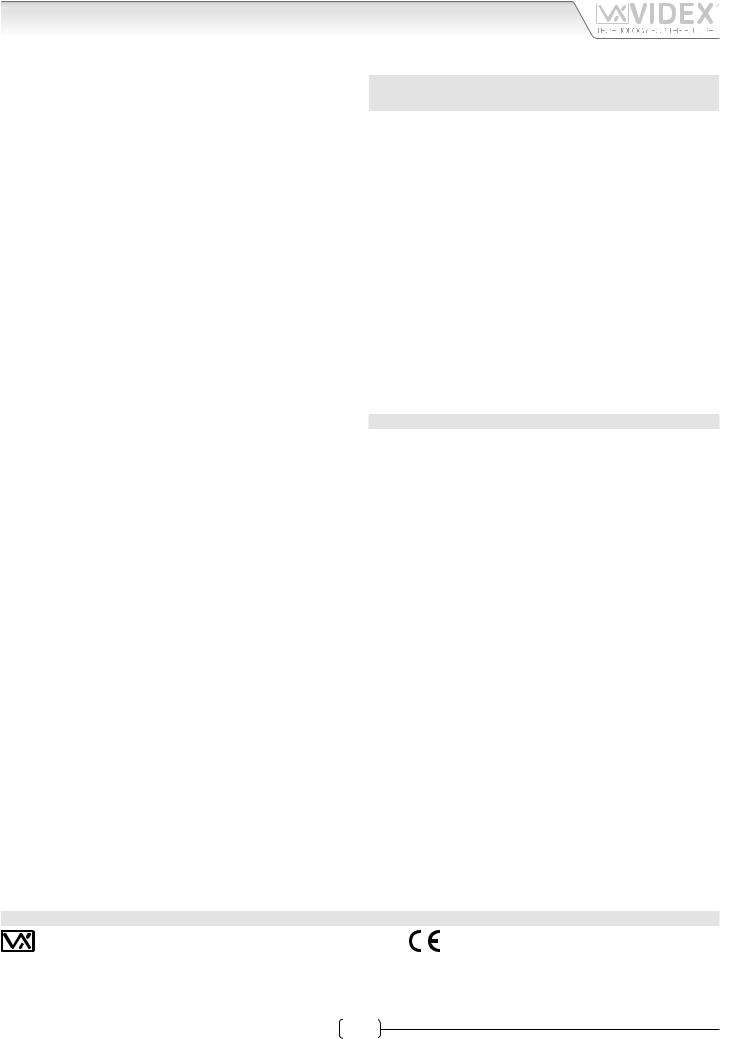
Bus line |
|
|
|
|
|
DOOR OPEN LED power supply |
3 |
14 |
8 |
|
|
Local bell input |
|
|
|
|||
|
|
|
|
||
4 |
|
|
|
|
Alarm input |
|
|
|
|
7 |
|
|
|
9 |
|
|
|
|
|
|
1 |
Handset |
|
5 |
|
|
|
||
|
|
|
2 |
Bell loudspeaker |
|
6 |
|
|
|
||
|
7 |
|
3 |
Door opening push button |
|
|
|
|
|
4 |
DOOR OPEN signalling LED |
|
11 |
|
|
5 |
PRIVACY ON signalling LED |
|
|
|
6 |
Privacy ON-OFF push button |
|
|
|
|
|
||
|
12 |
10 |
|
7 |
Connection |
|
|
|
8 |
8 way Dip-Switch (Phone ID) |
|
|
|
|
|
||
|
|
|
13 |
9 |
3 way Dip-Switch (lenght of privacy time) |
|
|
|
10 |
Microphone volume control |
|
|
|
|
|
||
|
|
|
|
11 |
Connection for optional relay board |
|
|
|
|
12 |
Default = A Pos., B Pos. with opt. board “7” |
|
|
|
|
13 |
Optional relay board (Art. 402) to activate an |
|
|
|
|
14 |
external bell |
|
|
|
|
Electronic call tone volume control (3 levels) |
Fig. 2 - Art. 3176
1
Art. 3171B - 3172 - 3176 - Installation instructions |
66251340-EN - V 2.0 - 24/07/15 |

3000 Series
Art. 3171B - 3172 - 3176 Digital intercoms
DESCRIPTION
The Art. 3171 is a digital intercom based on the “2 Wire BUS”, it includes a door-open button and a service button plus an electronic call tone with a 3 level volume control which can be adjusted by the user. Internally, the intercom, has an 8 way dip-switch to set the PHONE ID, a terminal board with 6 terminals for connection to the bus and other connections and a trimmer (VR1) to adjust the microphone volume. With the 3000 Series it is possible to connect up to 180 intercoms on the same system. If required it is possible to give the same address for a max. of 3 intercoms (for applications that require more units in the same apartment). The door-open push button on the Art. 3171 is also “call to concierge” (if there is one on the system) push button, while the “ ” push button works on the terminals “SW SW” (Max 30Vac/dc 0,2A) of the terminal board.
The Art. 3172 is the same as the Art. 3171 plus the privacy switch which activates the “privacy mode” (the user can’t receive incoming calls).
The Art. 3176 is similar to the Art. 3172 but in this case the “privacy mode” is activated by pressing the  push button. It is signalled by the red led “privacy on” and its duration (except when the same push button is pressed again) depends on the 3 way dipswitch (housed inside the intercom) settings. The Art. 3176 doesn’t have the service push button but it has a green led “door open” to give the user a visual indication of whether the door is open or closed: to use this service, an additional wire is required from a door contact to the intercom.
All 3 models of intercoms allow the connection of an optional relay board Art. 402, for the activation of an external sounder instead of the internal one: the board is housed inside the intercom, connected to the JP2 (red wire on side “+”) and the JP1 jumper (normally on A position) must be moved to the “B” position.
OPERATION
IN STAND-BY MODE:
The unit is ready to accept all the incoming calls;
TO ANSWER A CALL AND OPEN THE DOOR:
Pick the handset up and speak with the visitor (or concierge); press the “Key” button (if it is an external call) to open the door (an acoustic signal will be emitted and the door will be opened for the time programmed) or replace the handset to end the conversation; if the call is local (local bell), the call tone will have a different tonality from the main one.
TO CALL THE CONCIERGE UNIT (IF PRESENT AND ONLY VX2210-1 VERSION):
With the handset replaced, press the “Key” button and wait: the call is booked on the concierge and will be answered at the discretion of the operator;
TO ACTIVATE THE SERVICE RELEVANT TO THE  PUSH BUTTON (EXCEPT THE ART. 3176):
Press the push button and the connected service will operate. Making some easy connections. It is possible to use this push button as an “alarm” push button: make a short between one of the “SW” terminal and the “–” terminal and then connect the free “SW” terminal to the “AL”, terminal. The signal generated will be received by the concierge and/or by the Art. 512DR to activate an additional service.
TO SELECT THE DESIRED MELODY (ONLY VERSIONS ART. 3171P, ART. 3172P):
1.Keep pressed the “Key” button until (after about 10 seconds) the intercom play the active melody; at the end of melody play, the intercom emit a beep (end of play);
2.Listen the available melodies operating (press and release) the “Key” button after the beep at the end of play;
3.After the end of play beep if you don’t press the “Key” button within 3 seconds, the last melody heard is selected.
The selected melody will play how many times how is the number of rings value (3 or 6) programmed.
TO SWITCH ON THE PRIVACY MODE:
•For the Art. 3172 put ON the switch, the small door over the switch will be RED;
•For the Art.3176 press the push button marked as  ; the red LED “privacy on” will illuminate.
2
Art. 3171B - 3172 - 3176 - Installation instructions |
66251340-EN - V 2.0 - 24/07/15 |

3000 Series
Art. 3171B - 3172 - 3176 Digital intercoms
|
|
|
|
|
|
|
PROGRAMMING |
|
|
|
|
|
|
Programming is made by setting the internal 8 way dip-switch |
|
|
|
|
||
|
DIP SWITCH S1 |
|
TIME |
|||
to the positions shown on decimal/binary conversion table |
|
|
|
|
|
|
1 |
|
2 |
|
3 |
||
(pag. 7) of this manual and the configuration of the number |
|
|
|
|||
OFF |
|
OFF |
|
OFF |
Unlimited |
|
of rings (3 or 6). |
|
|
||||
ON |
|
OFF |
|
OFF |
15 min |
|
For the Art. 3176 it is necessary to set the internal 3 way dip- |
|
|
||||
OFF |
|
ON |
|
OFF |
30 min |
|
switch, to set the duration of the privacy mode, shown on the |
|
|
||||
ON |
|
ON |
|
OFF |
1 hour |
|
table below. |
|
|
||||
OFF |
|
OFF |
|
ON |
2 hours |
|
|
|
|
||||
|
ON |
|
OFF |
|
ON |
4 hours |
SET THE NUMBER OF RINGS |
OFF |
|
ON |
|
ON |
8 hours |
ON |
|
ON |
|
ON |
16 hours |
|
The standard setting is 6 rings. |
|
|
||||
|
|
|
|
|
|
|
To change the rings setting make as follow: |
|
|
|
|
|
|
•Switch off the intercom disconnecting the “L” wire;
•Short-circuit terminals “–” and “LB”;
•Switch on the intercom connecting again “L”;
•Remove the short-circuit as soon as the intercom emit the confirmation beeps:
»»if are emitted two beep, rings are set to 6;
»»if is emitted one beep, rings are set to 3;
•Repeat again the operation if the number of rings set is not the required one.
SEÑALES DE LA BORNES |
||
L |
“BUS” bus connection. |
|
– |
||
|
||
LB |
Local bell input (ground signal). |
|
AL |
Alarm input (ground signal). |
|
|
The alarm generated by this input will |
|
|
be sent to the concierge (if present) and |
|
|
will be intercepted by the Art. 512DR if |
|
|
present and correctly configured. |
|
SW (only VX3171, VX3172) |
Service push button terminals |
|
SW (only VX3171, VX3172) |
||
LD– (only VX3176) |
Terminals for “Door Open” LED supply |
|
LD+ (only VX3176) |
||
|
||
TECHNICAL SPECIFICATIONS
Addressing range: |
from 1 to 180 (BIN code) |
Working voltage: |
BUS line Voltage |
Stand-by absorption: |
about 0.6 mA |
Phone max. absorption: |
about 80mA |
Working temperature: |
-10 +50 C° |
CUSTOMER SUPPORT |
|
|
All Countries: |
UK Customers: |
|
VIDEX ELECTRONICS S.P.A. |
VIDEX SECURITY LTD |
|
www.videx.it - technical@videx.it |
www.videx-security.com |
|
Tel: +39 0734-631669 |
Tech Line: 0191 224 3174 |
|
Fax: +39 0734-632475 |
Fax: 0191 224 1559 |
|
|
|
3 |
|
|
|
The product is CE marked demonstrating its conformity and is for distribution within all member states of the EU with no restrictions. This product follows the provisions of the European Directives 2004/108/ECC (EMC); 2006/95/ECC (LVD) and 93/68/ECC (CE marking).
Art. 3171B - 3172 - 3176 - Installation instructions |
66251340-EN - V 2.0 - 24/07/15 |
 Loading...