

Page 1
© 2006 Verizon
Verizon One
User Guide
TM
Page 2

Table of Contents
2
Verizon One User Guide
1. Product Description 9
1.1 Installation Requirements 9
1.2 Networking Requirements 9
2. Conventions Used in This
Document
11
3. Safety Instructions 12
3.1 Safety Instructions 12
3.2 Battery Safety Instructions 12
4. Regulatory Information 13
4.1 FCC Compliance Note 13
5. Getting to Know Verizon One 14
5.1 Base Unit Features 14
5.2 Cordless Handset Features 14
5.3 Touch-Screen Features 15
6 Verizon One Set-Up 17
6.1 Checking Kit Contents 17
© 2006 Verizon
7. Installing the Verizon One Base Unit 18
7.1 Choosing a Location to Install Verizon One 18
7.2 Installing the Base Unit on a Desktop or
Flat Surface 18
7.3 Wall Mounting on a Hollow
Drywall Surface (Optional) 19
8. Handset Battery 21
8.1 Installing the Handset Battery 21
8.2 Parking or Charging the
Handset (Battery) 22
8.3 Battery Charge Indication 23
8.4 Turning On the Handset 25
8.5 Using the Handset Belt Clip 25
9. Registering the Handset to the
Base Unit 26
9.1 Registration Procedure 26
Page 3

Verizon One User Guide
3
10. Verizon One Handset Controls 28
10.1 Handset Control Buttons 28
10.2 Handset Activity LED 31
10.3 Backlighting 32
11. Verizon One Handset Screens 33
11.1 Standby 33
11
.2 No New Calls 33
11
.3 New Calls 34
11
.4 Ringer Off 34
11
.5 New Calls, No Messages Waiting,
Line in Use 34
11
.6 New Calls, Messages Waiting,
Line in Use 35
12. Dialing Functions 36
12.1 Off-Hook Dialing and Dialing Screen 36
12.2 Preview or On-Hook Dialing 37
12.3 Off-Hook & On-Hook Dialing Alternatives 38
12.4 Placing a Handset Call On Hold 38
12.5 Redial 39
12.6 Incoming Call Screen 39
12.7 Call Waiting Screen 40
13. Using the Verizon One Handset
Menu 41
13.1 Incoming Calls Log 43
13.1.1 Place a Call 43
13.1.2 Save a Record to your Phonebook 44
13.1.3 Erase Call from the Incoming Calls Log 44
13.2 Ringer Setup Menu 45
13.2.1 Ringer Volume 46
13.2.2 Ringer Tone (Melody) 46
13.2.3 Keypad Tones 47
13.3 Handset Name Menu 47
13.4 Date and Time Menu 48
14. Using the Handset Phonebook
Menu
14.1 View Your Phonebook 49
14.2 Add a New Name 50
14.3 Edit a Phonebook Entry 53
14.4 Erase a Phonebook Entry 55
14.5 Place a Call 5
49
5
© 2006 Verizon
Page 4

Verizon One User Guide
4
15. Using Intercom and Call Transfer
Functions 56
15.1 Intercom Functions 56
15.1.1 Paging the Base 56
15.1.2 No Answer From a Page 57
15.1.3 Using the Intercom During an Active Call 57
15.2 Call Transfer Functions 58
15.2.1 Completing a Call Transfer 58
15.2.2 Call Back 59
15.3 3-Way Conferencing 59
15.3.1 3-Way Conference 60
15.4 Handset Locator 60
15.5 Out-of-Range Detection 61
16. Headset Support 62
17. Verizon One Base Unit Controls 63
17.1 Base Speakerphone Control Buttons 63
17.2 Base Activity LED 65
18. Verizon One Base Unit Operations 67
18.1 Base, Stylus and Touch-Screen 67
18.2 Making and Ending Calls 67
18.3 Answering Incoming Calls 68
18.4 Transferring Calls from the Base
to the Handset 68
18.5 Transferring Calls from the
Handset to the Base 68
18.6 Paging from the Base 69
18.7 Adjusting the Volume 69
18.8 Using the Mute Button 69
18.9 Using the Hold Button 70
18.10 Using the Menu and Address
Book Buttons
70
19. Touch-Screen Features 71
19.1 Touch-Screen Navigation 71
19.1.1 Menu 72
19.1.2 Touch-Screen Ke
Keypad 74
19.1.3 Incoming Calls, Outgoing Calls and Voice
Mail Logs
19.1.4 Call Log Features 75
19.1.4.1 View Caller 75
yboard and Numeric
74
© 2006 Verizon
Page 5

Verizon One User Guide
5
19.1.4.2 Update a Contact 76
19.1.4.3 Map a Caller 76
19.1.5 Receiving an Incoming Call 77
19.1.6 Placing an Outgoing Call 78
19.2 Voice Mail 79
19.3 Speed Dial 79
19.3.1 Add a Contact to Your Speed Dial List 79
19.3.2 Edit a Contact on Your Speed Dial List 80
19.3.3 Dial a Contact on Your Speed Dial List 80
19.4 Emergency Numbers 80
19.4.1 Add an Emergency Number 80
19.4.2 Edit an Existing Emergency Number
19.5 Address Book 81
19.5.1 Calling a Contact from your Address Book 81
19.5.2 Get Address, Map and Directions 82
19.5.3 Adding Contacts to Your Address Book 82
19.5.3.1 Add a Person 82
19.5.3.2 Delete a Person 83
19.5.3.3 Add a Business Contact
19.5.3.4 Add a Group
19.6 Calendar 84
19.6.1 Access Your Calendar 84
19.6.2 View Your Calendar
83
84
80
84
19.6.3 Appointments 8
19.6.3.1 Add an Appointment
19.6.3.2 Edit an Appointment 86
19.6.3.3 Delete an Event 8
19.6.4 Tasks
19.6.4.1 Add a Task
19.6.4.2 Edit a Task
19.6.4.3 View Tasks
19.7 Memos 88
19.7.1 Memo Screen 88
19.7.2 View a Memo 88
19.7.3 Add a Memo
19.9 SuperPages 90
19.9.1 Look Up a Business 90
19.9.2 Look Up a Person 91
19.9.3 Reverse Lookup 91
19.9.4 Search Results 92
19.9.4.1 SuperPages - Map 92
19.9.4.2 Add a SuperPages Search
Number to Your Address Book
19.10 E-mail 93
19.10.1 Setup E-mail 93
19.10.2 Check E-mail 94
Results
93
85
87
87
87
88
88
5
6
© 2006 Verizon
Page 6

Verizon One User Guide
6
19.10.3 Reply to an E-mail 94
19.11 Alarm/Timer 94
19.11.1 Start Timer 94
19.11.2 Set Alarm 94
19.11.3 Start Stopwatch 95
19.12 Calculator 95
19.13 News & More 95
19.13.1 Choose Content 95
19.13.1.1 My Choices 95
19.13.1.2 Top Headlines 95
19.13.1.3 Movies 96
19.13.1.4 Weather 96
19.13.1.4.1 Local Weather 96
19.13.1.4.2 Radar 97
19.13.1.4.3 International Weather 97
19.13.1.5 Sports News 97
19.13.1.6 Scores 97
19.13.1.7 Entertainment 97
19.13.1.8 Lottery 98
19.13.1.8.1 View Game 98
19.13.1.8.2 Change Location 98
19.13.1.9 Stocks 98
19.13.1.10 SuperPages 98
19.13.1.11 Restaurants 99
19.13.1.11.1 Lookup Restaurants 99
19.13.1.11.2 Change Cuisine 99
19.13.1.11.3 Change Location 99
19.13.1.11.4 Restaurants Near Me
19.13.1.12 Horoscopes 100
19.14 Add
19.14.1 Manage Calls 100
19.14.1.1 Using Manage Calls 101
19.14.1.2 Manage Call Forwarding Destination
(Phone Numbers) 102
19.14.2 Voice Mail 102
19.14.2.1 Play Messages 102
19.14.2.2 Forward Messages 102
19.14.2.3 Schedule Call Forwarding 103
19.14.2.4 Edit Call Forwarding 104
19.15 Phone Tips 105
19.16 Settings 105
19.16.1 Date/Time 105
19.16.2 Screen Saver 105
19.16.3 Display 106
19.16.4 Voice Mail* 106
19.16.5 Cell Phones
iobiSM Home* 100
99
106
© 2006 Verizon
Page 7

Verizon One User Guide
7
19.16.5.1 Manage Cell Phones 106
19.16.5.2 Add Cell Phones 107
19.16.5.2.1 Authorizing a Cell Phone 107
19.16.5.3 View Cell Phone 107
19.16.6 Home Networking 107
19.16.7 Ring Tones 108
19.16.7.1 Set Ring Tone 108
19.16.7.2 View Ring Tones 108
19.16.8 Volume 108
19.16.9 Handsets 109
19.16.9.1 Name Handsets 109
19.16.9.2 Register Handsets 109
19.16.9.3 Edit Handsets 109
19.16.10 Shortcuts 110
19.16.10.1 View Shortcuts 110
19.16.10.2 Choose Shortcuts 110
19.16.12 System Info 110
20. Home Networking 111
20.1 What is Home Networking 111
20.2 Important Information About Your
Verizon One Home Network 111
20.3 Installing Your Verizon One Home Network 112
20.3.1 Home Networking System Requirements 113
20.3.2 LED Indicators 114
20.3.3 Interface Descriptions 117
20.3.4 Installing a Wired Network 1
20.3.5 Installing a Wireless Network 120
20.3.6 Installing Both a Wired and Wireless
Network Simultaneously 122
20.4 Accessing Configuration Settings 122
20.5 Authenticate User 132
20.6 Password Protection 132
20.7 Configure Wireless Settings 133
20.7.1 Setup Wireless Network 133
20.7.2 Setup Wireless Security 133
20.8 Manage Security 134
20.8.1 Change Firewall 134
20.8.2 Add Services 134
20.8.3 Manage Services
18
134
© 2006 Verizon
Page 8

20.8.4 View Services 135
20.8.5 View Clients 135
20.9 Setup My Connection 135
20.9.1 Setup FiOS Connection 135
20.9.2 Setup DSL Connection 135
21. Technical Support 136
21.1 Getting Help 136
21.1.1 Touch-Screen Help 1
21.1.2 Help with Your DSL Service 136
21.1.3 Helpful Web Sites 137
21.1.4 Important Troubleshooting Tips 137
21.1.5 Contact Us 137
21.1.6 Automatic Software Updates 137
21.1.7 Verizon One Customer Notifications 138
36
8
Verizon One User Guide
© 2006 Verizon
Page 9
1. Product Description
9
Verizon One User Guide
1.1 Installation Requirements
To install Verizon One, you will need the
following:
A Network Interface Card (NIC) installed in
your PC, or an IEEE 802.11b/g adapter.
NOTE: Please wait until you have
received notification from Verizon One
that your DSL line has been activated
before installing the Communications
Subsystem of your Verizon One
may, however, install your Verizon One
prior to the availability of DSL service to
your line.
1.2 Networking Requirements
The following system specifications
are required for optimum performance
of Verizon One via 10/100 Base-T
Ethernet or Wireless installations:
© 2006 Verizon
. You
Connection Type Minimum System Requirements
Ethernet • Pentium® or equivalent and above class machines,
Macintosh®
• Microsoft® Windows® (95, 98, 2000, ME, NT 4.0, or XP),
Macintosh® OS X, or Linux installed
• Computer Operating System CD-ROM on hand
Wireless IEEE
802.11g
• Internet Explorer® 4.x or Netscape® Navigator® 4.x or
higher
• 64 MB RAM (128 MB recommended)
• 10 MB of free hard drive space
• TCP/IP Protocol stack installed
• 10/100 Base-T Network Interface Card (NIC)
• Pentium® or equivalent and above class machines
• Microsoft® Windows® (98, ME, 2000, or XP) or
Macintosh® OS X installed
• Computer Operating System CD-ROM on hand
• Internet Explorer® 4.x or Netscape® Navigator® 4.x or
higher
• 64 MB RAM (128 MB recommended)
• 10 MB of free hard drive space
• An available IEEE 802.11b/g/g+ PC adapter
Page 10

1. Product Description
10
Verizon One User Guide
1.2 Networking Requirements (cont’d)
NOTE: Before you connect via 10/100
Base-T, you must have an available
Ethernet card installed in your computer.
If your Ethernet card does not auto-
negotiate, you must set it to half duplex.
Refer to the Ethernet card manufacturer’s
instructions for installing and configuring
your Ethernet card.
NOTE: PCs can use any Wireless Fidelity
(Wi-Fi) 802.11b/g/g+ certified card to
communicate with Verizon One. The
Wireless card and Verizon One must use
the same Wired Equivalent Privacy (WEP)
security code type. The factory default for
WEP is DISABLED. If you enable WEP,
you must ensure the network setting
for your wireless adapter is set to “Must
Use Shared Key for WEP” or “Open
Wi-Fi.” You must ensure that your PC’s
Wi-Fi adapter is configured properly for
© 2006 Verizon
whichever network setting you use. You
can access the settings in the advanced
properties of the wireless network adapter
Verizon One can function in two modes:
The first mode, called the Standalone
Mode, occurs when Verizon One IS
NOT CONNECTED to active DSL
service. In this mode, Verizon One
provides traditional, standard cordless
telephone functionality that can be used
in your home/office, as explained in this
document
The second mode, called the Active
Mode, occurs when Verizon One IS
CONNECTED to active DSL service.
In this mode, Verizon One provides
additional voice and data services through
your high-speed Internet connection that
are accessible from the touch-screen
display (such as Address Book and
.
Calendar functionality). For details on
how to use these additional features and
navigate the touch-screen display, please
.
see Verizon One applications and tools.
Page 11

Verizon One User Guide
2. Conventions Used in This Document
11
• LCD Screens: The screens displayed
in this document are meant to provide
a visual representation of Verizon One’s
Handset and Base functionality. The
actual data displayed in your LCD
screens may differ slightly from the data
displayed in the screens of this
document.
• Note
that provides additional details about a
feature or function.
• On-Hook: Refers to the condition
when either the Base Unit or Handset
is not active in requesting a dial tone
or placing a call.
• Off-Hook: Refers to the condition
when either the Base Unit or Handset
is active in requesting a dial tone or is
engaged in a call.
© 2006 Verizon
: Refers to outlined information
• Pointer: Refers to the pointer symbol
► used to select items in the LCD
screens.
• Screen: Refers to either the Handset’s
or the Base Unit’s Liquid Crystal
Display (LCD).
• Words Enclosed in Symbols:
< > represent physical buttons that you
can press with your finger. These are
located on the face of the Handset and
the Base Unit.
• Words Enclosed in Brackets:
[ ] represent soft key functions
accessible/selectable through Handset
and Base LCD screens.
Page 12
3. Safety Instructions
12
Verizon One User Guide
3.1 Safety Instructions
• Never install any telephone wiring
during a lightning storm.
• Never install telephone jacks in wet
locations unless the jack is specifically
designed for a wet location.
• Never touch non-insulated telephone
wires or terminals unless the telephone
line has been disconnected at the
network interface.
• Use caution when installing or
modifying telephone lines.
• Avoid using during a lightning storm.
• Do not use while wet or while standing
in water. Do not place Verizon One near
water, such as near a sink or bath tub.
• Unplug Verizon One from the wall
outlet and telephone jack before
cleaning. Only use a soft, damp cloth
to clean Verizon One
chemicals or cleaning agents.
© 2006 Verizon
. Do not use
• Use only the Power Adaptor that came
with Verizon One.
IMPORTANT:
of electricity to your home/office, your
Verizon One
For this reason, it is recommended
that you have at least one standard
telephone in your home/office for use in
case of an emergency.
WARNING
Risk of electric shock. Voltages up to
140 Vdc (with reference to ground)
may be present on telecommunications
circuits.
In the event of a loss
system will not operate.
3.2 Battery Safety Instructions
• Use only the battery that was provided
with your Verizon One kit, or an
authorized replacement recommended
by the manufacturer.
• Do not puncture the battery. The
battery contains toxic materials that
could be released if mishandled,
resulting in injury.
• Keep batteries and other potentially
hazardous devices out of the reach of
children.
• Never dispose of batteries in fire, which
could result in an explosion.
Page 13

4. Regulatory Information
13
Verizon One User Guide
4.1 FCC Compliance Note
This equipment has been tested and
found to comply with the limits for a
Class B digital device, pursuant FCC
Statement: This Product has been
tested and found to comply with the
limits for a Class B digital device,
pursuant to part 15 of the FCC Rules.
These limits are designed to provide
reasonable protection against harmful
interference in a residential installation.
This Product generates, uses, and can
radiate radio frequency energy and, if
not installed and used in accordance
with the instructions, may cause harmful
interference to radio communication.
However, there is no guarantee that
interference will not occur in a particular
installation. If this Product does cause
harmful interference to radio or television
reception, which can be determined
by turning the Product off and on, the
© 2006 Verizon
Customer is encouraged to try to correct
the interference by one or more of the
following measures:
• Reorient or relocate the receiving
antenna.
• Increase the separation between the
Product and receiver.
• Connect the Product into an outlet on a
circuit different from that to which the
receiver is connected.
• Consult Verizon Online or an
experienced radio/TV technician for help.
Page 14

5. Getting To Know Verizon One
14
Verizon One User Guide
5.1 Base Unit Features
The following features are provided in
the Verizon One Base Unit. An in-depth
description of functions will be discussed
later in this document:
• Symmetrical 5.8 GHz DSS cordless
telephone technology with built-in 5.8
GHz Antennae
• 75 Hopping Channels for enhanced
operation under interference
• 12-key Keypad allows alphanumeric
data entry to the Base
• Control buttons which allow set-up,
navigation, menu selection, and call
control (such as Hold, Mute, Intercom,
Volume Control) from the Base
• Full Duplex, Hands-free Speaker/
Microphone for placing and receiving
calls from the Base
© 2006 Verizon
• Internally filtered convenience/fax
jack – enables the connection of other
telephony equipment, such as fax
machines, directly to Verizon One
• Integrated Handset Cradle with Battery
Charger
• Illuminated, Color LCD touch-screen
– Primary user interface that enables
access to Verizon One’s advanced
services
• LED Indicators display the operational
status of Verizon One’s telephony and
data networking functions
• Message Waiting/Ringing LED
indicator – provides indication of
incoming calls and/or message waiting
• Selective intercom page to either Base
or the Handset
• Stylus functions as a detachable, pen like, plastic tool for selecting items on
the Base touch-screen
5.2 Cordless Handset Features
The following features are provided in
the Verizon One Cordless Handset. An
in-depth description of functions will be
discussed later in this document:
• Symmetrical 5.8 GHz DSS cordless
telephone technology with built-in
5.8GHz Antenna
• 75 Hopping Channels for enhanced
operation under interference
• Illuminated 12-key Keypad allows
alphanumeric data entry
• Control buttons which allow set-up,
navigation, menu selection, and call
control (such as Hold, Mute, Intercom,
Manual Volume Control) from the
Handset
• Illuminated Liquid Crystal Display (LCD)
screen with graphics-based operation
Page 15

5. Getting To Know Verizon One
15
Verizon One User Guide
5.2 Cordless Handset Features
(cont’d)
• Message Waiting/Ringing LED
indicator—provides indication of
incoming calls and/or message waiting
• Caller ID***, Call Waiting**** and Call
Waiting with Caller Line ID
• Incoming Calls with the last 40 Caller
ID records
• Support for Off-Hook dialing, pre-dialing
and redial
• One-touch conference and Selective
intercom page between Base and
Handset
• Phonebook dialing; up to 50 entries
• Redial from list of last 5 numbers dialed
• Saving Selective Caller ID records into
Phonebook directory
• Digital Volume Control
© 2006 Verizon
• Rechargeable Battery
• Ear Plug Adapter for headset (optional
headset not included)
• Belt Clip for hands-free operation when
using a headset (optional headset not
included)
*Display of these features requires your DSL service
to be active. Once your Service Ready Date has
arrived, and Verizon One detects an active DSL
connection - these features will automatically
appear.
**Available to Verizon Home Voice Mail subscribers
only.
***Caller ID subscription is required.
****Call Waiting subscription is required.
5.3 Touch-Screen Features
The following features are accessible
via the Verizon One touch-screen. See
Section 19: Touch-Screen Features for
more information on each of the following:
•
Calls
•
Voice Mail**
•
Speed Dial
•
Emergency Numbers
•
Address Book*
•
Calendar*
•
Memos
•
SuperPages*
•
Calculator
•
News & More*
Page 16

5. Getting To Know Verizon One
16
Verizon One User Guide
5.3 Touch-Screen Features (cont’d)
• Upgrade to iobism Home*
See section 19.12 for more information
on
iobi Home and each of these
features:
• Call Forwarding**
• On-screen Voice Mail***
Manage Calls
•
• iobi Home on Your Desktop
•
iobi Home on the Web
• Verizon Customer Notifications
• Automatic Software Updates
© 2006 Verizon
*iobi Home provided by Verizon Long Distance
(“Verizon”) and subject to terms and conditions. *
Home is not currently compatible with Macintosh®
computers. Verizon is not responsible for messages
that are lost or delayed due to transmission via the
Internet. Information sent via the Internet, including
E-mail and Text Messages, is not secure and may be
intercepted by third parties during transmission. Verizon
is not responsible for the content of messages sent
via the E-mail feature. iobi Home may not be used
for any unlawful purpose, such as sending unsolicited
commercial E-mail messages (e.g., spamming).
Recipient is responsible for the cost of receiving Text
Messages, if any. Taxes and other charges apply.
**Charges for forwarded calls will be billed by the
carrier that carries the forwarded calls. Calls may not
be forwarded to an international number.
***You must subscribe to
Verizon Home Voice Mail (sold separately) to access
Voice Mail features of
a compatible version of
iobi Home.
iobi
Page 17
Verizon One User Guide
17
6. Verizon One Set-Up
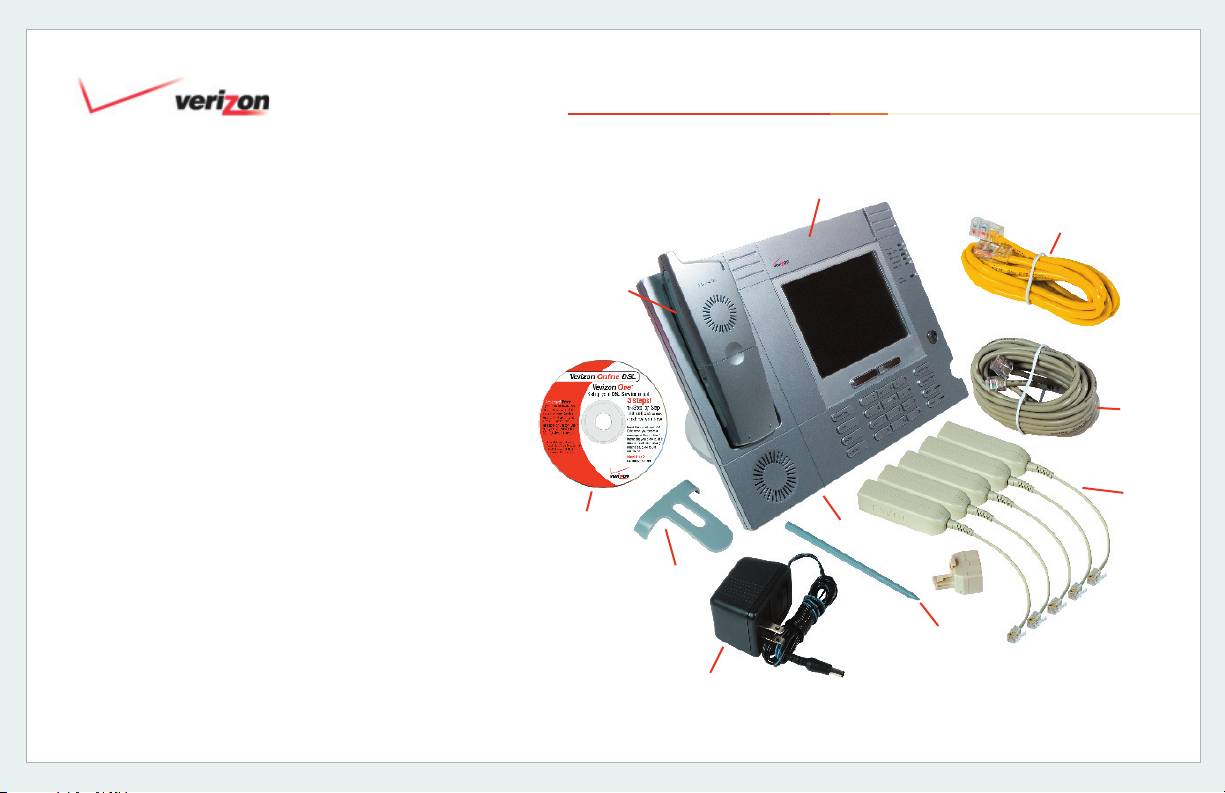
6.1 Checking Kit Contents
Your kit contains everything you need to
set-up Ve
Verizon Online DSL service if you are a
new subscriber.
1. Verizon One Base Unit with Display
2. Verizon One Base Unit Swivel Support Stand
3. Cordless Telephone Handset with Battery
4. Handset Belt Clip
5. Stylus
6. Power Adaptor and Cord
7. RJ-11 Gray Phone Cord
8. RJ-45 Yellow Ethernet Cable
9. DSL Installation CD
Verizon One will instruct you when to insert into your computer.
10. DSL Filter Kit
The DSL Installation CD will instruct you on where and how to install filters.
Filter Kit only included for new DSL subscribers.
11. Verizon One Important Product Information (not pictured)
12. Verizon Online DSL Resource Guide (not pictured)
rizon One and install your
1
8
3
7
10
9
2
4
5
6
© 2006 Verizon
Page 18
Verizon One User Guide
7. Installing the Verizon One Base Unit
18
7.1 Choosing a Location to Install
Verizon One
For optimal performance of Verizon
One, choose a location that is:
• Away from active electrical areas
• Away from interference such as a
television, radio or microwave oven
• Away from water or moisture,
excessive dust, or extreme cold
• Away from heat sources and sunlight
• In a central location that has no
obstructions—this will optimize
cordless performance
• Separate from another Verizon One
Base Unit
© 2006 Verizon
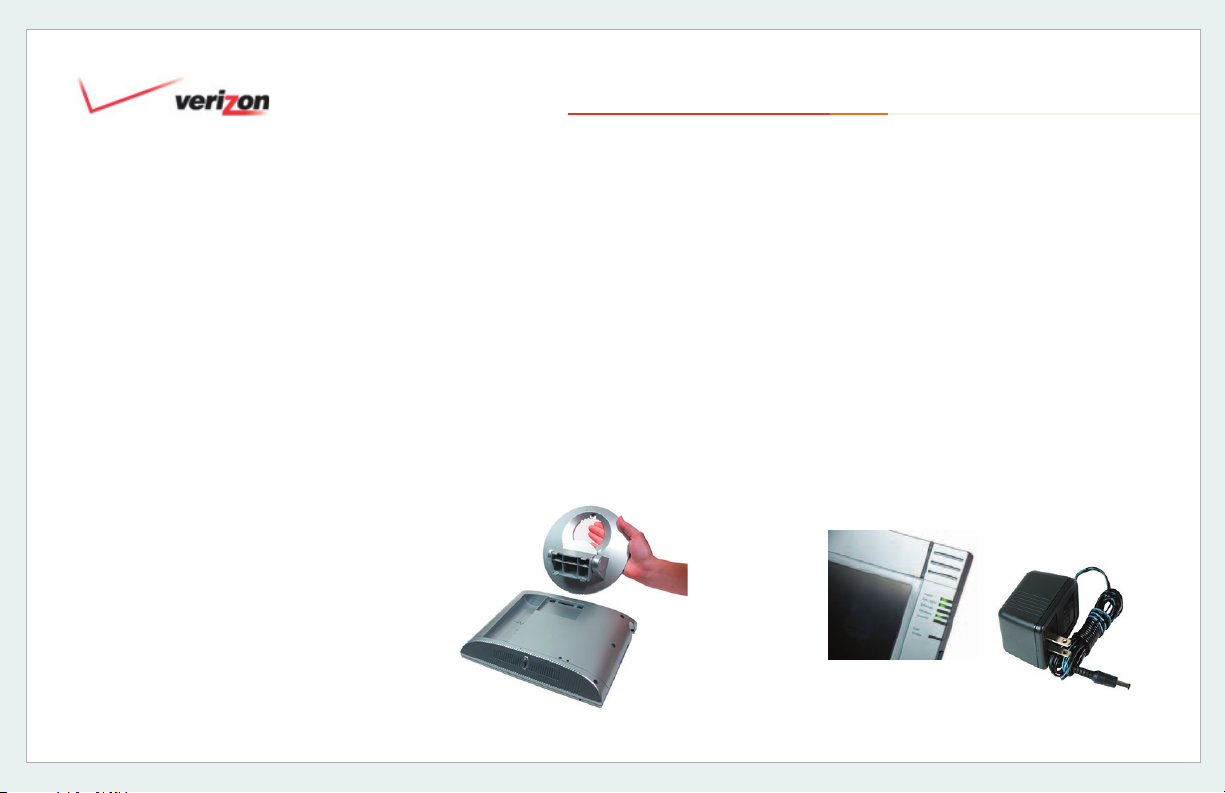
7.2 Installing the Base Unit on a
Desktop or Flat Surface
Step 1
Attach the Verizon One Base Unit to the
Swivel Support Stand (Figure 1).
Snap the Verizon One Base Unit Swivel
Support Stand onto the back of the Base
Unit. Locate a sturdy, flat surface, table
or desktop near an active wall AC power
outlet, an active telephone jack and your
primary computer.
Figure 1
Step 2
Plug in the Power Cord (Figure 2).
Connect the DC 12V power supply cord
to the power connector marked 12V DC
on the rear panel of the Verizon One
Base Unit. Plug the other end of the
power supply into an AC wall socket,
and then turn on the power switch (if it is
not on already). Check the Base to see
if the Power LED is solid green. If the
Power LED is solid green, Verizon One
power is on.
Power is On
Figure 2
Page 19

Verizon One User Guide
7. Installing the Verizon One Base Unit
19
7.2 Installing the Base Unit on a
Desktop or Flat Surface
Step 3
Follow the Instructions on the Verizon
One Display (Figure 3).
The Verizon One display will walk you
through the necessary steps to complete
the set-up of Verizon One and the
installation of your Verizon Online DSL
Service (if required).
Figure 3
© 2006 Verizon
(cont’d)
7.3 Wall Mounting on a Hollow
Drywall Surface (Optional)
Follow the steps below to mount Verizon
One on a wall:
NOTE: The hardware needed to wall
mount Verizon One is not included with
the product.
1. Obtain two #8 pan-head screws and
two #8 wall anchors.
2. Place the Verizon One
stand against the wall where it is
to be mounted. Using a pencil,
mark one of the two corresponding
screw locations. Mark the other at the
appropriate distance vertically.
3. Drill a 3/16” hole for the wall anchors
and insert. Screw in the #8 screws
until the face of the screws are
approximately 1/8” from the wall.
Base Unit
4. Test-fit the Verizon One
swivel stand on the screws and adjust
the screw depth for a sliding fit. Once
the stand fits tightly against the wall,
remove it from the wall.
5. Connect the phone cable (included)
from the jack marked DSL on the rear
panel of the Base Unit to the
telephone wall jack provisioned for
DSL and phone service. This
connection will provide dial tone for
voice services in addition to providing
DSL to your Verizon One.
Note: Verizon One has a Fax Jack
(
that can be used to connect additional
telephone equipment such as a fax
machine).
Base Unit
Page 20

Verizon One User Guide
7. Installing the Verizon One Base Unit
20
7.3 Wall Mounting on a Hollow Drywall
Surface (Optional)
6. Connect the DC 12V power supply
cord to the power connector marked
12V DC on the rear panel of the
Verizon One Base Unit. Plug the
other end of the power supply into an
AC wall socket, and then turn on the
power switch (if it is not already on).
7. Check the Base to see if the Power
LED is solid green. If the Power LED
is solid green, the Verizon One
Base is powered up.
8. Verify telephone operation by
pressing the <Speakerphone>
button found on the front of the Base
Unit. Once pressed, the In-Use LED
should be solid blue and a dial tone
should be heard from the speaker.
9. Once telephone operation has
been verified, snap the Base Unit
© 2006 Verizon
(cont’d)
Swivel stand onto the base. Adjust
the stand by pressing the paddle
and tilting the base until the top of
the Base Unit touches the edge of
the circular stand. The Base Unit
must be installed in this position.
Prior to placing the Base Unit and
Swivel Stand onto the wall, use the
cable management grooves within
the bottom of the stand to guide the
Power and telephone cables, so that
the stand can sit flush with the wall.
Mount the unit to the wall.
10. Once the unit has been mounted to
the wall, re-verify telephone
operation by pressing the
<Speakerphone> button on the front
of the Base unit. Once pressed, the
In-Use LED should be solid blue and
a dial tone should be heard from the
speaker.
Page 21
8. Handset Battery
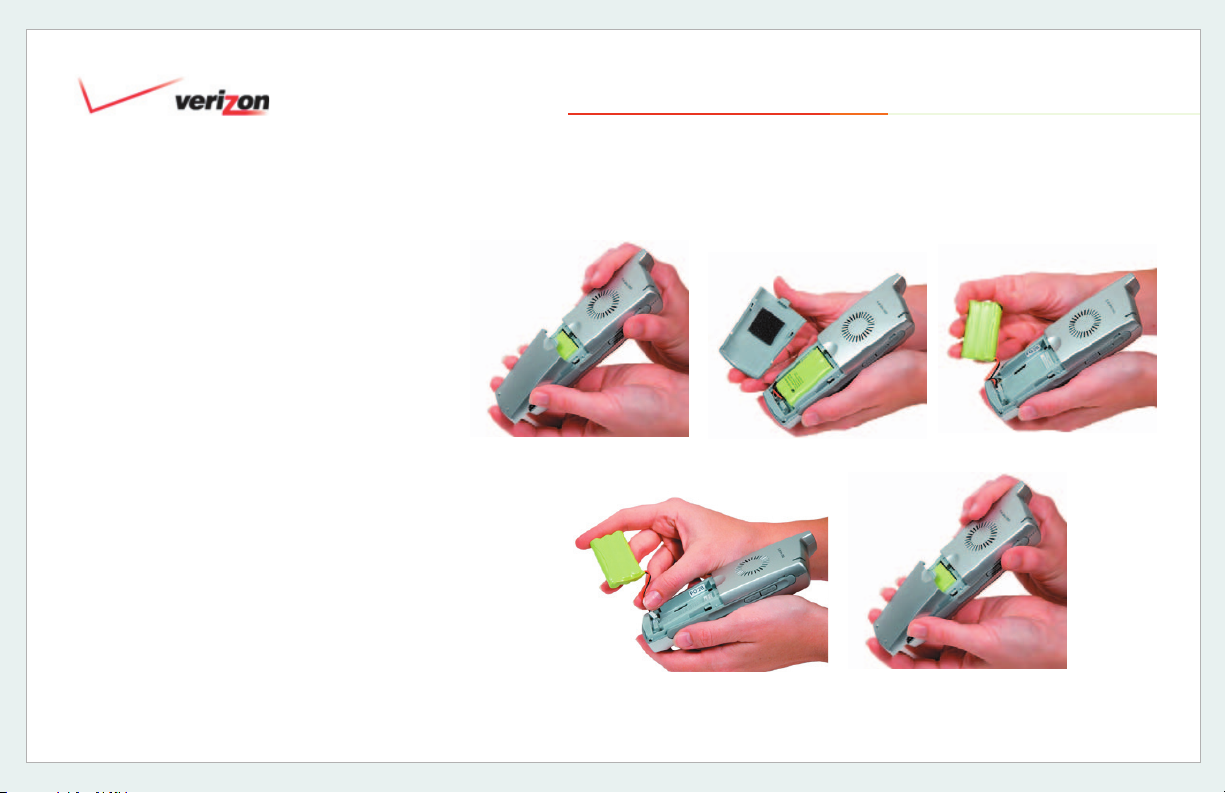
8.1 Installing the Handset Battery
IMPORTANT: Before you install or
handle the battery, please read Section
3.2 for Battery Safety Instructions.
Remove the battery cover by pressing
and sliding the cover off the battery
compartment. Attach the battery cable
connector to the connector socket inside
the battery compartment, and then
slide the battery into the compartment.
(Note: Prior to replacing the battery
cover, be sure that the battery cables will
not obstruct the compartment when the
cover is replaced.) Replace the battery
cover by sliding the cover upward until it
snaps into place on the Handset.
Note: Prior to using your Verizon One
Handset for the first time, the Handset
battery must be fully charged. See
Section 8.2 Parking or Charging the
Handset (Battery) for instructions.
21
Verizon One User Guide
© 2006 Verizon
Page 22
8. Handset Battery
8.2 Parking or Charging the Handset
(Battery)
Prior to using your Verizon One Handset
for the first time, the Handset Battery
must be fully charged. To charge the
Handset, place the Handset into the
cradle with the keypad face down so
that the contacts on the Handset touch
the contacts on the Base Unit. Allow the
battery to charge for approximately 12
hours prior to initial use. During normal
operation when the Handset is not in use,
park the Handset (face down) into the
Base Unit with contacts touching. This will
maintain your Handset’s charge.
Note: To charge the Handset initially,
allow the Handset and battery to charge
for 12 hours. Whenever the Handset
battery needs recharging, the battery
icon on the Handset’s LCD will flash.
Verizon One User Guide
Handset
Contacts
Slide the Handset face down into the cradle
of Base so that the contacts touch.
22
Base Unit
Contacts
© 2006 Verizon
Page 23

8. Handset Battery
23
Verizon One User Guide
8.3 Battery Charge Indication
The Handset provides 4 indicator levels
of the battery charge state. (Full, High,
Medium, Low). It takes approximately 2
seconds for the Handset to detect the
battery charge level after it has been
removed from the cradle. The Handset
LCD design includes a Battery Level
meter icon.
Battery Level (Low Charge) – When
the Handset reaches a Low battery level
during a Talk state, the “Battery Low”
tone is played once per minute through
the speaker and the Battery Low icon
begins to flash indicating approximately
8 minutes of Talk time are remaining. If
the Handset is not currently on a call,
the battery icon will be flashing. When
you press any key, the Handset will emit
an error tone and all keypad functions
will be disabled (in the event that the
battery is too low to initiate a telephone
© 2006 Verizon
call). The battery low icon will continue
to flash until the battery is recharged or
completely discharged.
Icon
flashes
Low battery level indication
(battery icon flashes)
Battery Level (Medium Charge)—When
the Handset reaches a Medium battery
level, the battery icon is displayed and is
“steady,” i.e. not flashing. It will remain
on until either a Low charge is reached,
in which case the icon will be flashing,
or until a High charge is reached by recharging the battery.
Icon on
“steady”
Medium battery level indication
(battery icon is steady)
Battery Level (High Charge) – When
the Handset is at a High battery level,
the battery icon is not displayed.
High battery level indication
(battery icon is not displayed)
Page 24
8. Handset Battery
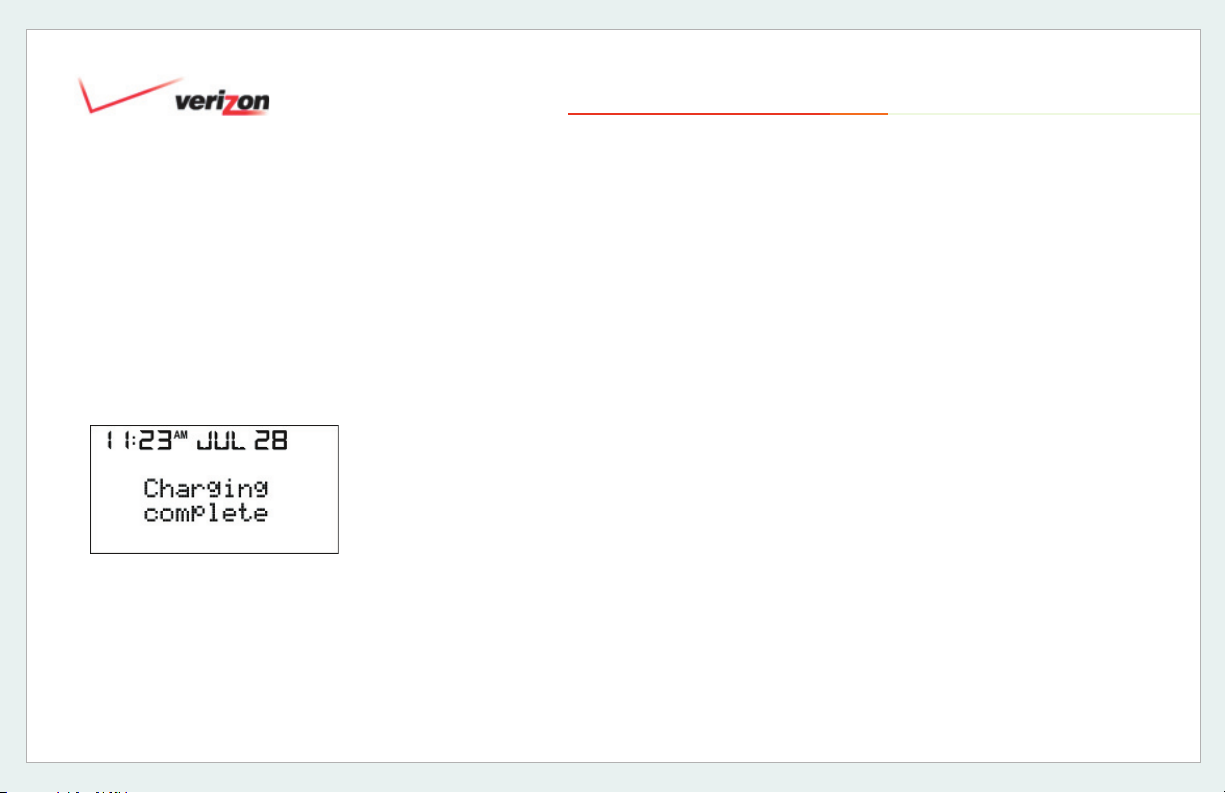
8.3 Battery Charge Indication (cont’d)
Battery Level (Full Charge) – If the
Handset is fully charged when removed
from the Base and in an idle state,
the screen will display the “Charging
complete” message for 3 seconds or
until you press any key. It will then revert
to the normal Standby screen.
24
Verizon One User Guide
© 2006 Verizon
Page 25
8. Handset Battery
25
Verizon One User Guide
8.4 Turning On the Handset
Once the battery has been installed
and the Handset has been charged,
the Handset will be functional. Pressing
any key will illuminate the display. The
Handset must be registered to the Base
Unit before it is operational.
© 2006 Verizon
8.5 Using the Handset Belt Clip
If you want to use the belt clip provided
with the Handset, snap the belt clip onto
the back of the Handset, and then fasten
the belt clip and Handset onto your
belt. This is an easy and secure way to
transport the phone, and is convenient
when using the headset jack for handsfree operation.
Page 26
Verizon One User Guide
9. Registering the Handset to the Base Unit
26
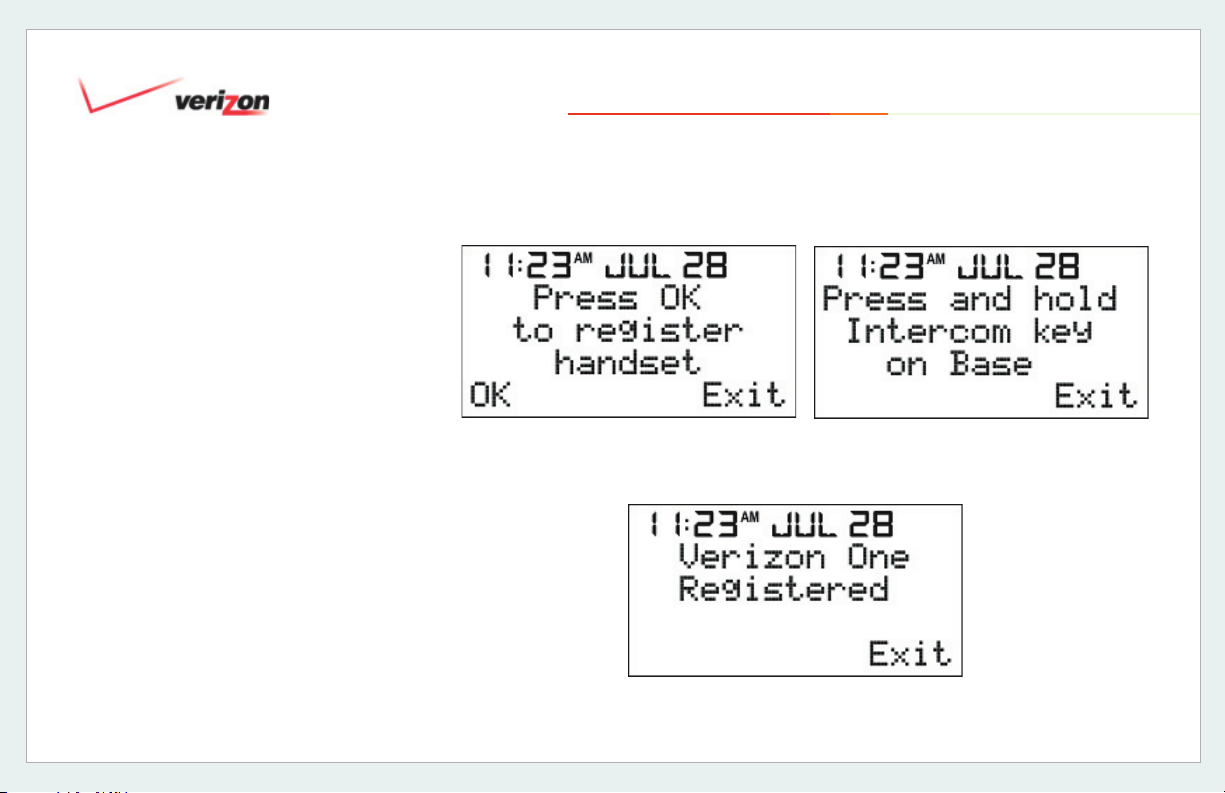
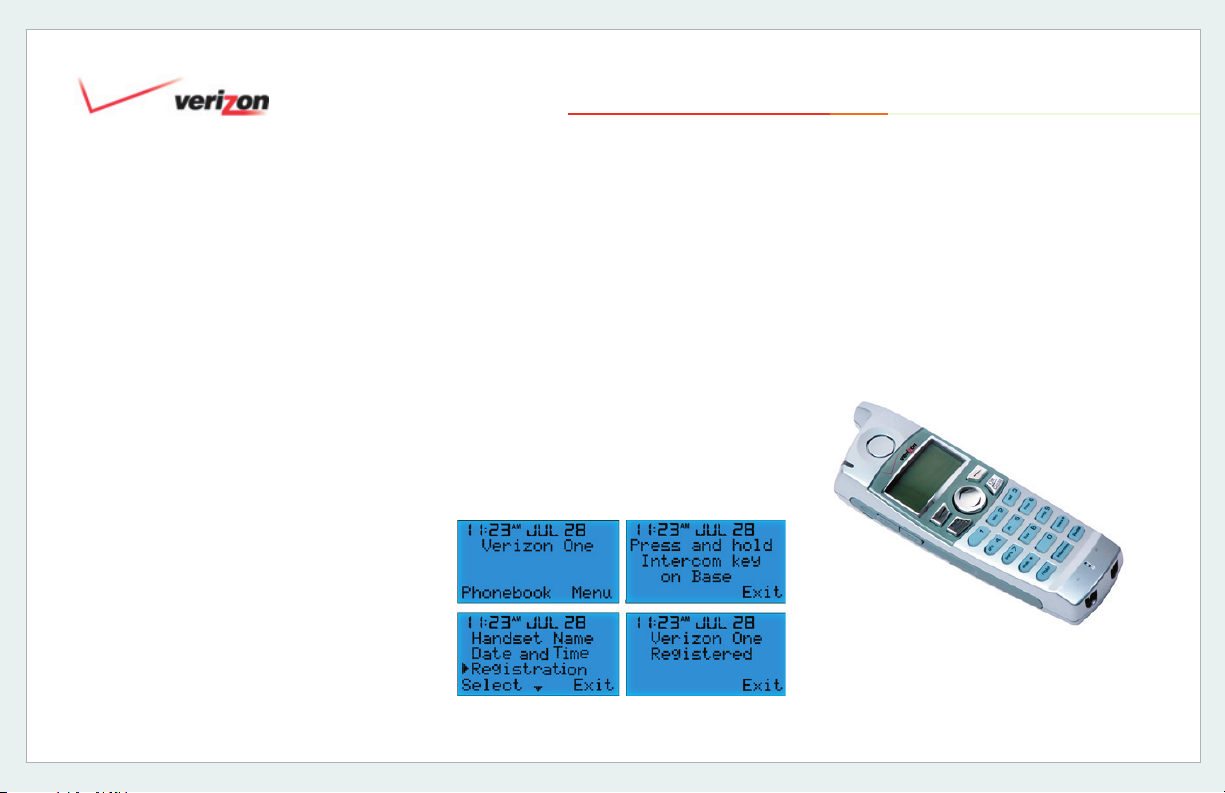
9.1 Registration Procedure
After successfully charging your Verizon
One Handset, you must perform a
registration procedure to allow the
Handset to communicate with the Base
Unit. To register the Handset to the Base
Unit, perform these steps:
1. Select the <Menu> function on the
Handset.
2. Using the round navigation button,
scroll down to fi nd the [Registration]
menu. Next, press the top left
corner key to select Registration.
3. Once you have selected
Registration, the Handset will
instruct you to press and hold the
<Intercom> key on the Base Unit.
Press and hold this key for 3 seconds.
4. After 3 seconds, the Handset will
automatically register to the Base Unit.
© 2006 Verizon
To verify successful registration, press the
<Talk/Flash> button on the Handset. A dial
tone will be heard from the Handset and a
call may be placed successfully. If no dial
tone is heard, but the Handset indicated
that it had successfully registered with
the Base, verify that the Base Unit is
connected to an active telephone line
and that this line is plugged into the DSL/
Phone port on the back of the Base Unit.
Each Verizon One phone comes with one
(1) cordless handset. Up to four additional
handsets may be purchased separately
and registered to the Verizon One base
station to create a phone system with fi ve
(5) distinct handset and intercom locations.
Page 27

Verizon One User Guide
9. Registering the Handset to the Base Unit
9.1 Registration Procedure (cont’d)
You may choose to re-name your
Handset. See Section 13.4 for
Handset Name Menu instructions.
Note: To select soft key functions
displayed on the left side of the LCD
screen, press the
left corner key of the Handset. To
select soft key functions displayed
on the right side of the screen, press
the
These buttons are used to select soft
key functions only. For example, if you
want to select Phonebook, press
To select Menu, press
up or down, use the round navigation
button
key in the top right corner.
.
key in the top
.
. To scroll
27
© 2006 Verizon
Page 28
10. Verizon One Handset Controls
28
Verizon One User Guide
10.1 Handset Control Buttons
The following control buttons are
provided on the Verizon One Handset:
Note: “Off-Hook” refers to the condition
when either the Base Unit or Handset
is active in requesting a dial tone or is
engaged in a call. “On-Hook” refers to
the condition when either the Base Unit
or Handset is not active in requesting a
dial tone or placing a call.
© 2006 Verizon
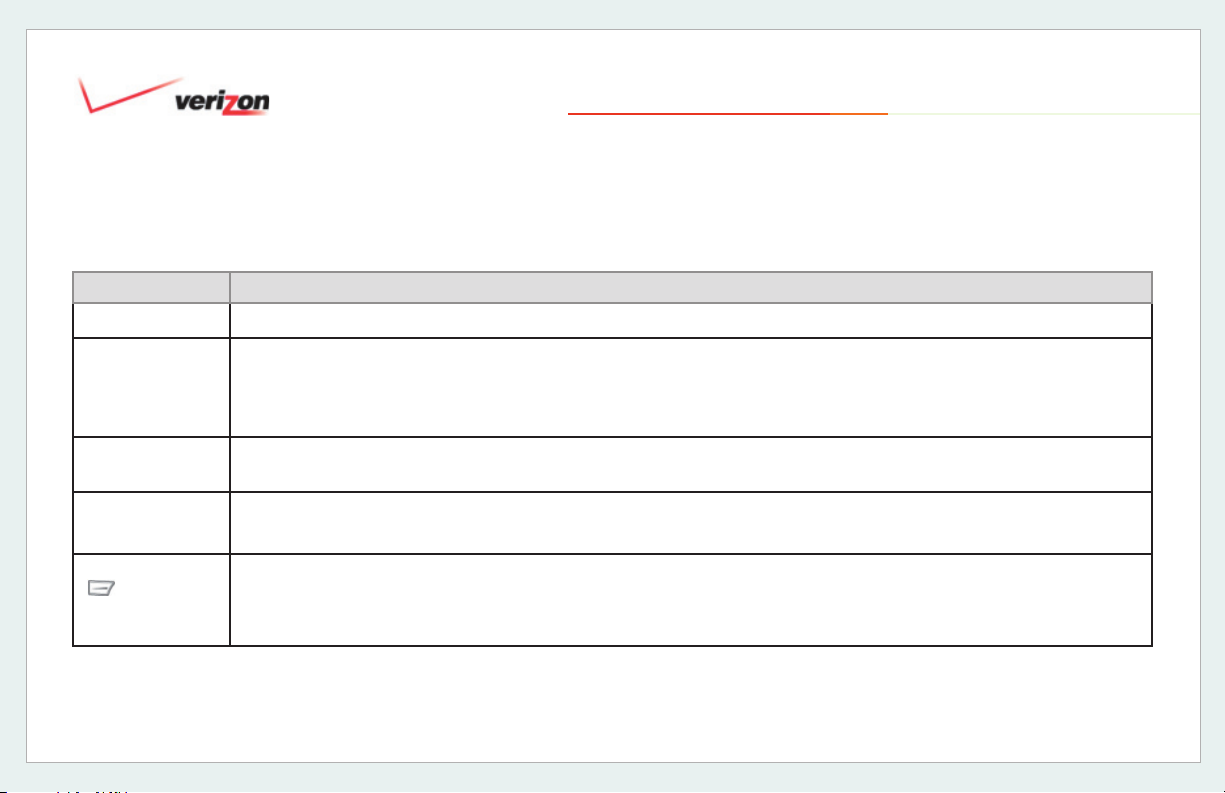
Button Function
Volume Up/
Volume Down
(On side of
Handset)
Talk/Flash When pressed initially, this button places the phone in an Off-
Off/Clear Pressing <Off/Clear> enables you to end any call by placing the
*Call Waiting subscription is required.
**3-Way Calling subscription is required.
Pressing these buttons will raise/lower the volume of the Handset
Ringer when the Handset is On-Hook. The ringer volume can be
set to low, medium, high, or off. The ringer level will be displayed
while you are changing the volume. Pressing these buttons when
in an Off-Hook mode will adjust the speaker volume.
Hook status, and you may dial the desired phone number. When
pressed during an active call, it will simulate a momentary press
and release of the phone’s hook switch and will put the active call
on hold and accept an incoming call as with Call Waiting* or 3Way Calling** features.
phone On-Hook. <Off/Clear> is also used to clear entries and
selections made on the soft-menu available on the Handset LCD.
Page 29
Verizon One User Guide
10. Verizon One Handset Controls
10.1 Handset Control Buttons (cont’d)
Button Function
Hold When pressed once, this button will place the call on Hold. Press <Hold> again to release the call from hold status.
Intercom When <Intercom> is pressed on the Handset, it becomes a paging device to locate the Base Unit and/or to
establish an intercom call between the Handset and Base Unit. When <Intercom> is pressed, the Base Unit
will receive the signal from the Handset, and will ring until the Base Unit is set to an Off-Hook status or until
<Intercom> is pressed on the Handset again, thus turning the intercom function off.
Redial Redial enables you to select one of the last 5 phone numbers entered in the phone. (Note: It will not redial numbers
such as passcodes or account numbers that may have been entered after the outgoing call was established.)
29
12-key Keypad
(0-9, *, #)
Check icons Pressing this button will allow you to:
© 2006 Verizon
The Keypad enables you to enter the desired numbers and characters.
-Select a menu option from the Main Menu screen
-Edit/Erase/Save the option setting
Page 30
10. Verizon One Handset Controls
10.1 Handset Control Buttons (cont’d)
Button Function
Pressing this button will allow you to:
-Access the Handset’s Main Menu screen
-Delete/Backspace characters
-View the settings of an option once it is selected
Pressing this button enables you to:
-Scroll up/down to the desired menu option
-Toggle between sub-level menu options and settings
-Select calls displayed on the Handset’s LCD screen
-Access speed dial numbers
30
Verizon One User Guide
© 2006 Verizon
Page 31

10. Verizon One Handset Controls
31
Verizon One User Guide
10.2 Handset Activity LED
The Handset includes an Activity LED,
also referred to as the “Voice Message
Waiting LED,” which performs the
following functions:
• Incoming Ring: The Activity LED is
flashing at a cadence in accordance
to an incoming ring pattern. When the
ring cadence is ON, the LED blinks.
• Talk Mode: If the Handset is in the
Talk mode, Intercom, or Voice Mail
mode, the Activity LED will be solid blue.
• Paging: When the Handset is being
paged, the Activity LED will flash
according to Paging tone cadence.
• Call on HOLD or on MUTE: The
Activity LED will blink at 1 Hz rate
when you have placed a call on MUTE
or on Hold from the Handset.
© 2006 Verizon
• Message Waiting: When there is a
Voice Mail Message waiting and none
of the above conditions are present,
the Activity LED flashes.
Activity LED
Belt Clip hook
(on sides and back)
Volume
(Up/Down buttons)
Talk/Flash
Hold
Microphone
Charging Contacts
(on bottom)
Speaker
(on front and
back)
Belt Clip hook
LCD Screen
OFF/Clear
Headset Jack
(on side)
12-key Keypad
Redial
Intercom
Page 32

10. Verizon One Handset Controls
10.3 Backlighting
Backlighting refers to the condition when
the LCD screen or the buttons on the
Handset or the Base light indicate any of
the following conditions:
• Incoming Calls
• Pressing Keys
• Paging and/or Intercom functions
32
Verizon One User Guide
© 2006 Verizon
Page 33

11. Verizon One Handset Screens
33
Verizon One User Guide
11.1 Standby
After you have charged and registered
the Handset to the Base, the Standby
screen will be displayed on the
Handset’s LCD screen. The Standby
screen provides information such as:
• Current Time and Date
• Battery Level Meter
Note: At a high or full charge, the
battery level meter will not be
displayed
• Handset Name (“Verizon One” is the
Handset’s default name)
• Number of New Calls and Messages
• Message Waiting Indicator
Note: The activity LED on the
Handset will also blink
• Line Status
• Ringer Muted Indication
© 2006 Verizon
While the Standby screen is displayed,
you can press <Up/Down> to scroll
through the list of Incoming calls.
The following examples illustrate the
Handset’s response to various call
conditions:
11.2 No New Calls
When there are no new calls, no
messages waiting, and the line is not
in use, the Handset will display the
following Standby screen:
Page 34

11. Verizon One Handset Screens
34
Verizon One User Guide
11.3 New Calls
When there are new calls in the
Incoming Call Log, no messages
waiting, and the line is not in use, the
Handset will display the following screen:
© 2006 Verizon
11.4 Ringer Off
When the ringer is off, the Handset will
display the Ringer OFF icon on the LCD
screen:
11.5 New Calls, No Messages Waiting,
Line in Use
When there are new calls in the Call
Log, no messages waiting, and the line
is in use, the Handset will display the
following screen:
Page 35

11. Verizon One Handset Screens
11.6 New Calls, Messages Waiting,
Line in Use
When there are new calls in the
Incoming Call Log, there are messages
waiting, and the line is in use, the
Handset will display the following
screens, alternately:
35
Verizon One User Guide
© 2006 Verizon
Page 36

12. Dialing Functions
36
Verizon One User Guide
12.1 Off-Hook Dialing and Dialing
Screen
Press <TALK> while the Standby screen
appears to go to the Off-Hook state. You
will hear a dial tone. Pressed numbers
will be dialed out immediately. The
following “Talk” screen will be displayed
for 5 seconds:
© 2006 Verizon
After 5 seconds, the following Talk
screen will display the caller’s name, the
phone number, the Talk time in minutes
and seconds, and the Volume level.
A talk time reading such as “000:09”,
as indicated above, represents the
talk time in minutes and seconds. The
timer should then start counting from
“000:06” onwards. After counting to
“999:59” the timer will change back to
“000:00” and continue counting. “VOL-2”
indicates the “level 2” talk volume level.
Selecting [Mute] will Mute the Handset
microphone. This will alternate the Talk
screen with the Call muted screen at
1-second intervals. You may select one
of the following options:
• To unmute the Handset, press <TALK>
or select [Unmute].
• Press <Hold> to put the call on Hold.
Page 37

12. Dialing Functions
37
Verizon One User Guide
12.2 Preview or On-Hook Dialing
Press number keys (0-9) during the time
that the Standby screen appears to go
to the Preview Dialing screen, shown
below. The number input will first appear
on the right side of the 2nd row and will
move to the right as a new number is
entered. The maximum number of digits
accepted for Preview dialing is 32.
The quotation marks “█” indicate that
the blinking cursor is ready for input. You
may select one of the following options
once you have input the number:
• Press <TALK> after you have
correctly entered the number. You will
hear a dial tone, the number will be
dialed and the following Talk screen
will be displayed:
© 2006 Verizon
• Select [Save] to initiate a Phonebook
entry. Follow the Phonebook “Add a
New Name” process.
• Select [Clear] to delete the last input
number(s).
Page 38

12. Dialing Functions
38
Verizon One User Guide
12.3 Off-Hook & On-Hook Dialing
Alternatives
Both Off-Hook and On-Hook Dialing
functions can be accessed using your
Incoming Call Log (See Section 12.2),
your Phonebook (See Section 14.5), and
from the Base Unit (See Section 18.2).
© 2006 Verizon
12.4 Placing a Handset Call On Hold
While on a call, press <Hold> to place
the call On Hold. Your Handset screen
will display the following:
While On Hold, the Handset will
automatically switch to Standby mode
and display “Line In Use” on the LCD
screen. The following will then be
displayed:
Page 39

12. Dialing Functions
39
Verizon One User Guide
12.5 Redial
Press <Redial> while on the Standby
screen to go to the Redial list. The
screen will display the last 5 numbers
dialed from the Handset or Base Unit.
The pointer will start with the most
recent number. Press <Up/Down>
to scroll through the list. Each redial
number shall consist of a maximum
of 32 digits. If the outgoing number
matches the number of an entry in
your Phonebook, the name from your
Phonebook will be displayed instead of
the number. You may select one of the
following options once the arrow is at the
desired number:
© 2006 Verizon
1. Select the number you wish to dial
using <Up/Down> to scroll.
2. Press <Redial> again, [Dial] or
<TALK> to automatically go Off-Hook
and dial the desired number.
3. Select [Save] to save the Number
to your Phonebook. Follow the
Phonebook entry “Add A New
Number” process. After the number
is successfully stored, the display will
return to the Redial screen.
4. Press <OFF> to return to the
Standby screen.
12.6 Incoming Call Screen
When an incoming call occurs, your
Handset and Base Unit will ring and the
Activity LED will flash during the first
ring of the call. If there is an incoming
call while the Handset is in a Menu, the
Menu will quit and show the Incoming
Call screen:
The screen will display the available
Caller ID information, including name
and number.
Page 40

12. Dialing Functions
40
Verizon One User Guide
12.6 Incoming Call Screen (cont’d)
If no name is present through Caller ID,
the Handset will then attempt to match
the number with your Phonebook. If
there is a matching record found, the
name field on the screen will display
the name as previously input in your
Phonebook.
An unanswered call’s Caller ID
information will remain on the screen
for 60 seconds. If another function is
performed before 60 seconds, such as
pressing <OFF/clear>, <TALK/flash>
or the <Up/Down> arrow, the Caller ID
information will disappear. If a new call
comes in during this time, the Caller ID
information will be updated.
© 2006 Verizon
12.7 Call Waiting Screen
If you have subscribed to a Call
Waiting service, a Call Waiting tone
will be generated every 6 seconds.
A Call Waiting service will allow you to
receive a second call while currently
engaged on a call. The Talk screen
will alternate in 1-second intervals with
the Call Waiting Caller ID information,
if available. You can press <Talk> to
flash the line and toggle between
callers.
Call Waiting
Caller ID Name
and Number
Page 41

Verizon One User Guide
13. Using the Verizon One Handset Menu
41
Note: To select soft key functions
displayed on the left side of the LCD
screen, press the key in the top left
corner key of the Handset. To select
soft key functions displayed on the right
side of the screen, press the key
in the top right corner. These buttons
are used to select soft key functions
only. For example, if you want to select
Phonebook, press . To select Menu,
press . To scroll up or down, use the
round navigational button .
© 2006 Verizon
To access the Handset’s Menu:
1. Select [Menu] in the Standby screen.
2. The following Menu screen will be
displayed: The pointer [►] will be
pointing to the [Incoming Calls] menu.
3. Press <Up/Down> to scroll through
the Menu options. Stop the pointer at
the desired Menu option.
4. Select [Select] to confirm your choice.
If you select [Exit], you will return to
the Standby screen.
After you have selected a Menu option,
the Sub-Menu will be displayed. Select
the desired Sub-Menu option, and select
[Select] to confirm your choice.
Page 42

Verizon One User Guide
13. Using the Verizon One Handset Menu
The following chart displays Main Manu
and Sub-Menu options available to the
Handset:
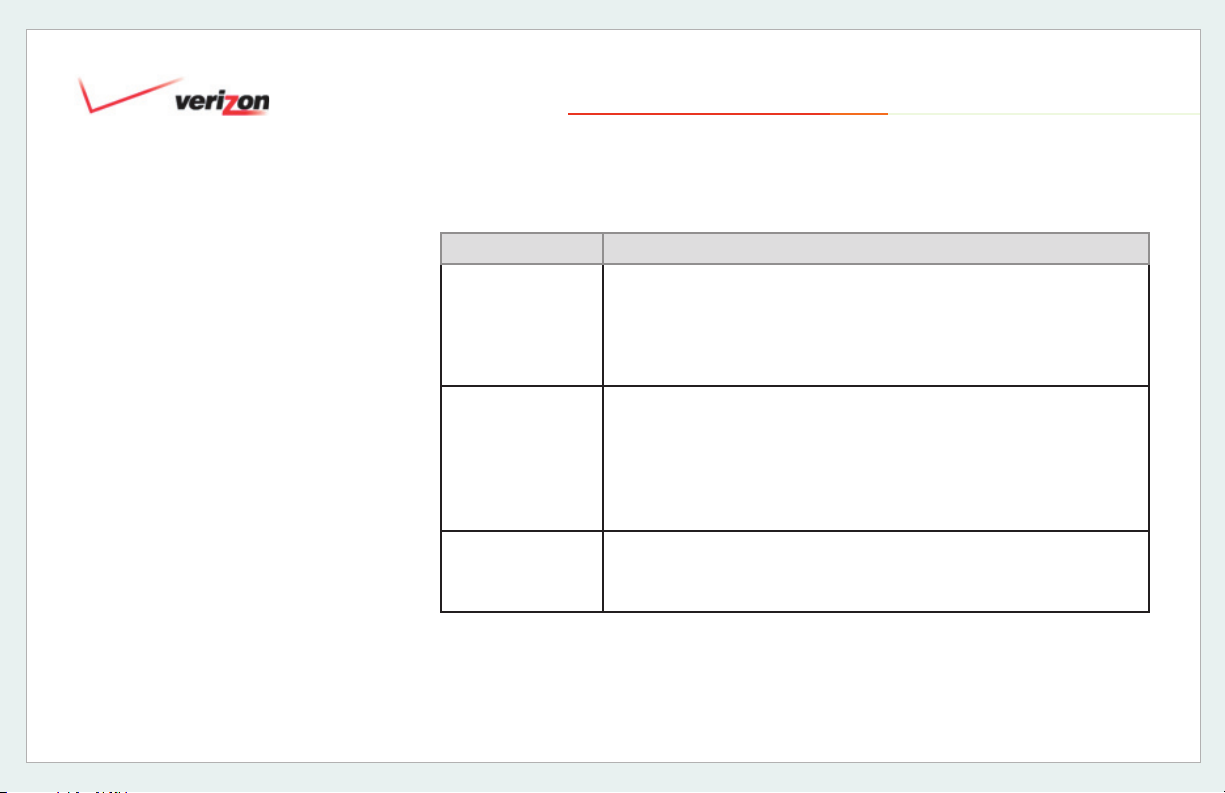
Menu Option Sub-Menu Option(s)
Incoming Calls Log View list of incoming calls, displaying Caller ID information, if available. Up to 40 records are in the log. From
this log, you will be able to do the following:
Save – Save incoming call.
Erase – Erase saved call.
Erase All – Erase all saved calls.
Ringer Set-up Ringer Volume – Set the volume to the desired level on your Handset (Off, Low, Medium, High).
Ringer Tone – Select the melody that you want to use for the Ringer.
Keypad Tones – Turn On/Off keypad confirmation tones.
Handset Name Enter a name of your choice to customize your Handset. “Verizon One” is the default Handset name.
Date and Time Enter the desired Date and Time settings.
Registration View the Handset’s registration information. Registration of the Handset to the Base Unit must occur before
using the Handset. Instructions are detailed in Section 9.
42
© 2006 Verizon
Page 43

Verizon One User Guide
13. Using the Verizon One Handset Menu
43
13.1 Incoming Calls Log
When the [Incoming Calls] menu is
selected from the Menu screen, the most
recent incoming calls will be displayed
with the Caller ID information available
and the time and date received. You can
scroll through the list using <Up/Down>
to see your incoming calls in the order
received starting with the most recent.
The time and date of the call is displayed
at the top of the screen (instead of the
current time and date).
The Incoming Call Log will hold up to 40
records. Once full, the oldest records are
dropped for the newest records.
© 2006 Verizon
If [Incoming Calls] is selected and there
are no Incoming Call Logs available,
the Handset will emit an error tone, and
the following “No calls” screen will be
displayed along with the current time
and date:
In addition to viewing your Incoming Call
Log, you may use this list to do
the following:
13.1.1 Place a Call
To dial a phone number from the
Incoming Calls Log, scroll to the desired
record and press <Talk>. The phone will
automatically go Off-Hook and dial the
selected number.
Page 44

Verizon One User Guide
13. Using the Verizon One Handset Menu
44
13.1.2 Save a Record to your
Phonebook
To save a call record from the Incoming
Calls Log to the Phonebook, scroll to
the record that you want to save. Select
[Options] to display the following “Save/
Erase/Erase All” screen. Select [Save]:
If your Phonebook is not full, additional
entries can be added, and the “Name”
screen will be displayed. Follow the
instructions in the Phonebook Section
13. Your Phonebook will store up to
50 entries.
© 2006 Verizon
Once your Phonebook is full, you will
receive an error tone and a “Phonebook
full” message. After 2 seconds, the
screen will return to the next Incoming
Call record.
13.1.3 Erase Call from the Incoming
Calls Log
To erase a call from the Incoming Calls
Log, scroll to the desired record and
select [Options] to display the following
“Save/Erase/Erase All” screen:
Select [Erase]. The Handset will display
the “Entry erased” screen. After 2
seconds, the screen will return to the
next Incoming Call record. If there is only
one record, and you choose to erase this
record, the screen will return to Standby.
Page 45

Verizon One User Guide
13. Using the Verizon One Handset Menu
45
13.1.3 Erase Call from the Incoming
Calls Log
Selecting [Erase All] enables you to
erase all records from the Incoming
Calls Log. The screen will display the
[Erase all?] screen above, prompting
you to confirm your selection. Select
[OK] to erase all entries in the Incoming
Calls Log. Select [Exit] to cancel the
“Erase all” action.
© 2006 Verizon
(cont’d)
13.2 Ringer Setup Menu
Select [Ringer Setup] from the Menu
screen, for the following options:
• Ringer Volume
• Ringer Tone (Melody)
• Keypad Tones
If you select [OK] in the “Erase all?”
screen, the following “List erased”
screen will be displayed. After 2seconds, the screen will return to Standby:
Page 46

Verizon One User Guide
13. Using the Verizon One Handset Menu
46
13.2.1 Ringer Volume
When you select [Ringer Volume] the
screen below will be displayed with the
current volume. “Medium” is the default
ringer volume. Select [Change] and
scroll <Up/Down> to change Ringer
Volume to either “Medium,” “High,”
“Low,” or “Off”. (
between the levels is 6 dB.) Select
[Save] to confirm your settings. You will
then be returned to the Menu screen:
© 2006 Verizon
Note: The difference
13.2.2 Ringer Tone (Melody)
When you select [Ringer Tone] the
screen on the right will be displayed
with the current tone. “Standard” is the
default ringer tone. Select [Change] and
scroll <Up/Down> to switch to a different
Melody. As you scroll through you will
hear each melody option. Ten melodies
are available for selection.
Once the desired melody is identified,
select [Save] to confirm. You will be
returned to the Menu screen Press
<OFF> to return to the Standby screen
without saving changes and to stop
playing the test Melody.
Page 47

Verizon One User Guide
13. Using the Verizon One Handset Menu
47
13.2.3 Keypad Tones
When you select [Keypad Tones] the
following screen will be displayed with
the arrow at the current status. “On”
is the default Keypad Tones setting.
Select [Change] if you want to change
the Keypad Tones to “Off.” Select [Save]
to save your settings. You will then be
returned to the Menu screen:
© 2006 Verizon
13.3 Handset Name Menu
This feature allows you to assign a name
to your registered Handset. When the
[Handset Name] menu is selected, the
screen will display the current
Handset name:
Note: “Verizon One” is the default
Handset name.
1. Enter a name at the blinking
underscore using the keys (0-9, *, #)
on the Handset keypad. After you
enter a character, the underscore
will advance to next space on the
right (
characters that can be used for a
name is 12).
2. Select [Clear] to clear the digit/letter
on the left of the blinking underscore.
Note: The maximum number of
3. Press <OFF> to return to Standby
without saving the new name.
4. Select [Save] to save the Handset
name and to return to the Menu
screen (regardless of whether the
Handset name has or has not been
modified):
Page 48

Verizon One User Guide
13. Using the Verizon One Handset Menu
48
13.4 Date and Time Menu
When the [Date and Time] menu is
selected, the pointer will be positioned
at the Time setting, and the first digit of
Time will blink, waiting for your input:
1. Enter the first digit. Once entered, the
second digit will blink. Continue to
enter the correct Time. The blinking
occurs in the following sequence: 1st
-> 2nd (skip the colon :) -> 3rd -> 4th
-> in endless loop until <Up/Down> is
pressed. An error tone will be given if
an invalid digit is entered.
2. Select [AM/PM] to change the current
“AM” setting to “PM” and vice versa.
3. Press <Up/Down> to display the Date
screen, or
4. Press <OFF> to return to Standby or
select [Save] to save the settings and
to return to the Menu screen
© 2006 Verizon
1. Enter the correct Date following the
cursor as done with the Time setting.
2. Select [Month] to change the current
Month setting.
3. Select [Save] to save the settings and
to return to the Menu screen.
Error checking of valid dates takes
When the [Date and Time] menu is
selected, the pointer will be positioned
at the Time setting, and the first digit of
Time will blink, waiting for your input:
:
place on [Save]. If the Date is not
valid, an error tone is played and
you will be returned to the Date
editing screen which will display
the last valid Calendar Date for the
specified month. The first digit will
then blink while waiting for input.
(For example, 31-JUN is
substituted with 30-JUN).
4. Press <OFF> to return to the Standby
screen without saving changes.
5. If <Up/Down> is pressed at this time,
the display will return to the Time screen.
Page 49

Verizon One User Guide
14. Using the Handset Phonebook Menu
49
14.1 View Your Phonebook
The Phonebook within your Handset is
available to store Names and Numbers
for easy access and dialing:
Phonebook and Phone
Number Features
The maximum number
of entries that the
Phonebook can contain
The maximum number of
characters for name entry
The maximum number of
digits for phone number
entry
© 2006 Verizon
Quality
50
11
24
To access your Phonebook, select
[Phonebook] from the Menu. The
following screen will be displayed, and
the pointer will be positioned at “(Add
New Name):”
Press <Up/Down> to scroll through
the list of Phonebook entries, or press
a number (1 - 50) to go directly to an
entry, and then select [Select]. Note:
The second digit is ignored if the number
entered is greater than the number of
entries in the Phonebook.
When the pointer is at a Name in the
Phonebook list, the following screen will
be displayed:
Page 50

Verizon One User Guide
14. Using the Handset Phonebook Menu
50
14.1 View Your Phonebook (cont’d)
Select [View] when the pointer is at the
desired entry, to view the telephone
Number for that entry.
After selecting a phone entry, press
<TALK> to go Off-Hook and dial the
selected phone number:
When a Name exists, a Phonebook
entry is displayed by Name. When a
Phonebook entry has no associated
Name, the entry will be displayed by the
phone Number.
© 2006 Verizon
If the Number has more than 11 digits
and less than 23, the display is swapped
with two pages. Each page will then be
displayed at an interval of 3 seconds.
If the number has more than 22 digits,
the display is then swapped with three
pages which each display at an interval
of 3 seconds.
If there are no entries in your
Phonebook, the “Empty List” message
will be displayed on the screen:
14.2 Add a New Name
To add a new name, select [Select]
when the pointer is at (Add New
Name). The Name screen below will be
displayed. This screen will prompt you
for Name information:
Note: If the Phonebook is full, you will
not be able to enter a new name until
excess entries are erased from the
Phonebook. The Phonebook holds up to
50 names.
Page 51

Verizon One User Guide
14. Using the Handset Phonebook Menu
51
14.2 Add a New Name (cont’d)
1. Enter a name with up to 11 characters
at the blinking underscore using the
keypad characters (0-9, *, #).
Note:
characters, an error tone will be
heard and additional input will not be
accepted.
If you are saving a Name from your
Incoming Calls Log, the caller’s
Name will be already be displayed in
the “Name” field as it appeared on
your Caller ID, as displayed below:
© 2006 Verizon
If you try to input more than 11
2. Select [Clear] to delete (backspace)
characters.
3. Press <OFF> to return to the Standby
screen. This will cancel your input. Or,
4. Press <Up/Down> while you are at
the Name screen to display the
Number screen
5. Enter a number at the blinking
underscore using the keypad
characters (0-9, *, #). Ignore dashes
as they will be inserted for you.
:
If you are saving a Number from
your Incoming Calls Log, the caller’s
Number will be displayed in the “Name”
field as it appeared on your Caller ID, as
displayed below:
6. Select [Clear] to delete (backspace)
numbers, if you make an error.
Note:
enter “#.” Press the # symbol twice to
insert “P,” which provides a 3 second
pause during dialing. If you try to input
more than 24 digits, an error tone wil
be heard and additional digit input will
not be accepted.
Press the # symbol once to
l
Page 52

Verizon One User Guide
14. Using the Handset Phonebook Menu
52
14.2 Add a New Name (cont’d)
The phone number will be formatted
according to the following rules:
String of
Digits
1 7 digit
number
2 8 digits,
leading digit 1
3 10 digits (###)###-####
4 11 digits,
leading digit 1
5 Other cases No formatting
© 2006 Verizon
Screen Format
###-####
1 ###-####
1(###)###-####
7. Press <OFF> to return to the Standby
screen. This will cancel your input. Or,
8. Press <Up/Down> to go back to the
“Name” input screen. Or,
9. Select [Save] to store the entry to
your Phonebook. The entry will
automatically be listed in alphabetical
order, and the list will be re-numbered.
After you [Save], the following “Name
saved” screen will be displayed for 2
seconds, and then will return to the
Phonebook List:
If you selected [Save] but did not enter a
Name, the empty Name record is treated
as “space” and is sorted to the beginning
of the list regardless of the Number field,
using first found/first display. The screen
then returns to “Add New Name” in the
Phonebook.
If you selected [Save] but did not enter a
phone Number, a “No Number Entered”
message will be displayed on the screen
for 2 seconds. An error tone will then be
heard, and the screen will return to the
“Number edit” screen so that you can
add the Number.
Page 53

Verizon One User Guide
14. Using the Handset Phonebook Menu
53
14.2 Add a New Name (cont’d)
The following screen will be displayed:
If the Phonebook is full when you
select (Add New Name), a “Phonebook
full” message will be displayed for 2seconds. When the Phonebook is full,
you can store a new Name entry only
after an existing entry has been erased:
© 2006 Verizon
14.3 Edit a Phonebook Entry
To edit a Phonebook entry, select
[Options] when the pointer is at the
desired entry. The following screen will
be displayed with the pointer at [Edit]:
1. Select [Edit]. The following “Name”
screen will be displayed:
2. The Name will appear with the
blinking underscore.
3. Select [Clear] to delete (backspace)
characters that you wish to edit.
4. Using the keypad characters (0-9,
*, #), enter the edited Name. (
you input more than 11 characters, an
error tone will be heard and additional
characters will not be accepted).
Note: If
Page 54

Verizon One User Guide
14. Using the Handset Phonebook Menu
54
14.3 Edit a Phonebook Entry (cont’d)
5. Select [Save] to save your settings
and to return to Standby.
6. Press <OFF> to return to the Standby
screen.
7. Continue by editing the Number,
press <Up/Down>. The display will
show the corresponding Number of
the Name you have selected, as
follows:
8. Select [Clear] to delete (backspace)
numbers that you wish to edit.
© 2006 Verizon
9. Enter a number at the blinking
underscore using the keypad
characters (0-9, *, #).
Press the # key once to insert a
“#.” Press the # key twice to insert
“P,” which will insert a 3 second
pause during dialing.
try to input more than 24 digits, an
error tone will be emitted, and the
digit input will not be accepted.
10. Select [Save] to store the entry to
the Phonebook which will list entries
in alphabetical order and re-
number the list. The “Name saved”
screen will be displayed for 2-
seconds, as shown above. The
display then will return to the [Edit]
option in the Phonebook List:
Note: If you
11. Press <OFF> to return to the
Standby screen. Or,
12. Press <Up/Down> to go back to the
“Name” input screen.
Page 55

Verizon One User Guide
14. Using the Handset Phonebook Menu
55
14.4 Erase a Phonebook Entry
To erase a Name and Number from the
Phonebook, choose the desired Name
or Number and select [Erase]. The
Name and Number will be erased, and
the Phonebook will be re-numbered.
The Handset will display the “Entry
erased” message for 2 seconds,
and then the screen will return to the
Phonebook List, as follows:
© 2006 Verizon
14.5 Place a Call
While On-Hook, scroll to the desired
Name and Number, or press a number
(1 - 50) to go directly to the entry, in
your Phonebook, and press <Talk>. The
phone will automatically go Off-Hook
and dial the selected number.
While in the Off-Hook/Talk mode, scroll
to the desired Name and Number in your
Phonebook. The Handset will display the
following screen:
Select [Dial] to dial the number in the
pointed entry, or select [Exit] to return to
the Talk screen.
Page 56

Verizon One User Guide
15. Using Intercom and Call Transfer Functions
56
15.1 Intercom Functions
The Handset for the Verizon One Base
Unit has the default name “Verizon
One” and the Base is called “Base.”
These names assist in understanding
the Intercom and Call Transfer Functions
discussed in this section.
© 2006 Verizon
15.1.1 Paging the Base
To page the Base from the Handset,
press <Intercom> on the Handset.
The Base is automatically paged. The
Handset will display the following screen:
When the Base goes Off-Hook, the Base
and the Handset are able to talk to each
other.
Select [Exit] on the screen, or press
<OFF> or <Intercom> to stop paging or to
release the call. You will be returned to a
Standby mode.
The Base will see “Verizon One paging”
on its screen. When the Base goes OffHook, the Base and the Handset are able
to talk to each other.
Page 57

Verizon One User Guide
15. Using Intercom and Call Transfer Functions
57
15.1.2 No Answer From a Page
If a Page is not answered, a “No answer”
message will be displayed on the device
that originated the Page when:
• There is no answer from the Paged
party after two minutes
• The Paged party chose not to answer
by pressing [Exit] or <OFF> “Verizon
.” The Handset can respond to a
One
“No answer” message in one of the
following ways:
• Select [Exit] and the Handset returns to
a Standby screen
• Press <OFF>
• Wait for the Page to timeout and return
to the Standby screen
© 2006 Verizon
15.1.3 Using the Intercom During an
Active Call
When you are on an active call, press
<Intercom> on the Handset which will
put the call On Hold and start the paging
menu. The Base will automatically
be paged. You will see “Call on Hold”
BLINKING on the Handset screen.
Select [Exit] or press <Intercom> if you
want to stop paging, take a call off hold, or
return to the TALK mode
If <Speakerphone> or <Intercom>
is pressed on the Base, an intercom
connection is established with “Verizon
:
One,” and “Base”. The external call is still
on Hold. The Talk screen will alternate with
the “Intercom Base Vol-2” and the “Call on
Hold” screen in 1-second intervals.
If the Base disconnects the Intercom page
the “Verizon One” Handset will return to a
TALK mode and display the “Call on Hold”
message. You can then press [Unhold] to
return to the external call
This same process is used to Transfer
a Call or to Conference the external
caller with the Handset and the Base, as
described in the next sections:
:
Page 58

Verizon One User Guide
15. Using Intercom and Call Transfer Functions
58
15.2 Call Transfer Functions
© 2006 Verizon
15.2.1 Completing a Call Transfer
An external call received on the “Verizon
One” Handset may be transferred to the
Base by pressing <Hold> on “Verizon
One” and then pressing <Intercom> to
automatically page the Base. “Verizon
One” will display “Call on Hold” and
“Paging Base,” switching messages
alternatively.
If “Verizon One” presses <OFF> on the
Handset at this moment, the Handset
will display a “Line In-Use” message.
The Base will ring and display a
“Transfer from Verizon One
as shown in the screen above. Press the
<Speakerphone> button on the Base to
accept the call transfer. The Base is now
connected with the external caller:
” message,
Page 59

Verizon One User Guide
15. Using Intercom and Call Transfer Functions
59
15.2.2 Call Back
If the “Verizon One” user presses <OFF>
to transfer a call and the Base does not
answer, after 30 seconds of ringing, the
Base will stop ringing and the ringing will
“return” to “Verizon One.” The Base will
acknowledge the “Line In Use” screen
and the call will be “called back” to
“Verizon One.” “Verizon One” will ring
and display a “Call back” message to let
the Handset user know that this is the
external call coming back.
© 2006 Verizon
To accept the call back, the “Verizon One”
user presses the <TALK> button to be
reconnected.
If the “Verizon One” user selects [Exit]
or presses <OFF> during the Call
back, “Verizon One” will stop ringing,
drop the external call, and return to the
Standby screen. The external call is now
disconnected. If the “Verizon One” user
does not answer the Call back and does
not select [Exit] or press <OFF>, the call
will ring until the caller hangs up.
15.3 3-Way Conferencing
With an external call on Hold with
“Verizon One”, and while “Verizon One”
is on an intercom call with the Base,
a 3-way conference may be started
between “Verizon One,” the Base and
the external caller. To set up 3-way
conferencing, “Verizon One” presses
<Hold> or [Unhold]. After either of these
keys is pressed, both “Verizon One” and
the Base will display the screen below:
Page 60

Verizon One User Guide
15. Using Intercom and Call Transfer Functions
60
15.3 3-Way Conferencing (cont’d)
The Handset may select one of the
following options:
• Press <OFF> on “Verizon One” to quit
the conference. The Base can continue
the external call alone. Or, similarly,
the Base can disconnect to quit the
conference and leave “Verizon One” to
continue the external call alone.
• Press <OFF> on both “Verizon One”
and the Base to disconnect the
external and intercom calls.
• Press <Hold> on either the Handset or
the Base to put the external call on
Hold and the Base and “Verizon One
can continue the intercom call internally.
© 2006 Verizon
15.3.1 3-Way Conference
If a person is on the Handset talking to
an outside caller while a second person
at the Base station would like to join the
conversation in a “3-way conference,”
the person on the Base can press
<Speakerphone> to join the call. A “New
Party Joined” tone is emitted to alert the
other parties that another person has
joined in the call. A “Conference” message
will also be displayed on both screens.
”
15.4 Handset Locator
To locate your Handset, press <Intercom>
on the Base which will automatically page
the Handset. You will be able to locate the
Handset by tracking the Page tone that is
emitted (even if the Handset ringer is OFF).
During this process, the “Base paging”
message will be displayed on the Handset:
The registered Handset will emit a Paging
tone for 2 minutes and then return to the
Standby screen. To stop the Paging tone
on the Handset, select [Exit] or <OFF> on
the Handset or press the <Intercom> button
on the Base.
Page 61

Verizon One User Guide
15. Using Intercom and Call Transfer Functions
61
15.5 Out-of-Range Detection
If the Handset detects an out-of-range
condition, it will start searching for the
Base and display the following screen:
© 2006 Verizon
After the Handset finds the Base, the
Handset will display the Standby screen.
If the Handset cannot find the Base, the
Handset will emit an error tone and display
an “Out of range” message. The user
should then move closer to the Base until
the Handset is within range again:
Page 62

16. Headset Support
Your Verizon One Handset is equipped
with a 2.5 mm Headset jack for use with
an optional accessory Headset for handsfree operation. If you choose to use the
Headset option, you must do the following:
1. Obtain an optional accessory Headset.
2. Locate the Headset jack on the side
of the Handset.
3. Connect the plug on the Headset cord
to the jack on the Handset. Note: The
plug should fit securely. Do not force
the connection.
4. Once the Headset is connected to
the Headset jack, the audio paths to
the Handset microphone and
earpiece speaker are disconnected.
The Volume <Up/Down> buttons
control the Headset earpiece speaker
volume. Ringer alerting remains
active on the Handset speaker.
62
Verizon One User Guide
© 2006 Verizon
Page 63

17. Verizon One Base Unit Controls
63
Verizon One User Guide
17.1 Base Speakerphone Control
Buttons
The following control buttons are
provided on the Verizon One Base Unit
for control of the Base Speakerphone:
Note: “Off-Hook” refers to the condition
when either the Base or Handset is
active in requesting a dial tone or is
engaged in a call. “On-Hook” refers to
the condition when either the Base or a
Handset is not active in requesting a dial
tone or placing a call.
© 2006 Verizon
Button Function
Menu Pressing this button takes you to the touch-screen Menu.
Address Book Pressing this button takes you to the Address Book.
Speakerphone
ON/OFF Button
Speed Dial Pressing this button launches the Speed Dial application on the
Flash Pressing this button simulates a momentary press and release
Redial Pressing this button enables you to redial the last number that
*Call Waiting subscription is required.
**3-Way Calling subscription is required.
Pressing the Speakerphone button will take the telephone OffHook, enabling the speaker with an audible dial tone. The button
will illuminate and remain lit until it is pressed again to turn off the
speakerphone.
device, and enables you to see all speed dial numbers.
of the phone’s hook switch. When pressed initially, this button
places the phone in an Off-Hook status. When pressed during an
active call, this button puts the active call on hold and accepts the
incoming call as with Call Waiting* or 3-Way Calling**.
was entered in the phone. (Note: It will not redial numbers such as
passcodes or account numbers that may have been entered after
the outgoing call was established).
Page 64

Verizon One User Guide
17. Verizon One Base Unit Controls
17.1 Base Speakerphone Control
Buttons
Button Function
Intercom Pressing this button will automatically begin paging the Verizon One handset.
Volume Up
Volume Down
Mute When pressed initially, the Mute button will Mute Verizon One’s microphone so that the party on the other end of
Hold When pressed once, this button will place the entire call on Hold. Press the Hold button again to release the call
12-key Keypad
(0-9, *, #)
(cont’d)
Pressing and holding either of these buttons will continually raise/lower the volume of the audio that emanates
through the speaker until the button is released or a maximum/minimum level is reached. When the phone is OnHook and ringing, the volume control buttons revert to controlling the phone’s ringer volume. The ringer volume
may be turned down to the point that it is turned off.
the telephone call may not hear audio. This button will illuminate and remain lit while Mute is activated. When the
Mute button is pressed again (Mute is deactivated) the microphone will become active and the call will become
audible to the party on the other end of the telephone call.
from a Hold status. The Hold button will illuminate and flash while the call is in a Hold status.
Pressing these keys enables you to enter the desired characters.
64
© 2006 Verizon
Page 65

17. Verizon One Base Unit Controls
65
Verizon One User Guide
17.2 Base Activity LED
The Base Unit includes an Activity LED,
also referred to as the “Voice Message
Waiting LED,” which performs the
following functions:
• Incoming Call: The Activity LED is
flashing at a cadence in accordance
to an incoming ring pattern. When the
ring cadence is ON, the LED blinks.
• Talk Mode: If the Base is in a Talk
mode, Intercom, or Voice Mail mode,
the Activity LED lights solid blue.
• Paging: When the Base is being
paged, the Activity LED will flash
according to the Paging tone cadence.
• Call on HOLD or on MUTE: The
Activity LED should blink at 1 Hz rate
when the Base has placed a call on
MUTE or on HOLD.
© 2006 Verizon
• Message Waiting: When there is a
Voice Mail message waiting and none
of the previous conditions are present,
the Activity LED flashes. (This feature
requires an optional subscription to
Verizon Voice Mail service).
Page 66

17. Verizon One Base Unit Controls
66
Verizon One User Guide
17.2 Base Activity
LED
(sitting in cradle of
Speed Dial
Flash
Redial
Intercom
© 2006 Verizon
(cont’d)
Handset
Base)
Menu
Functions Keys
Speaker
Keypad
LCD Screen
Activity LED
Power LED
Networking LEDs
DSL/RDY
Ethernet
Wireless
Internet
Line In-Use
Address Book
Speaker Button
Control Buttons
Volume Up
Volume Down
Mute
Hold
Stylus
Page 67

Verizon One User Guide
18. Verizon One Base Unit Operations
67
18.1 Base, Stylus and Touch-Screen
If you are using Verizon One in Active
Mode, you will perform most of your
interactions through the Base Unit’s
touch-screen. For details on how to use
these additional features and navigate
the touch-screen display, see Section 19
Touch-Screen Features.
A stylus is provided with the Base and,
by using the stylus, you can gently tap
the components in the touch-screen and
navigate to various features. The stylus,
which is included with your Verizon
One kit, is stored in the stylus holder
located on the right side of the Verizon
One base. To use the stylus, firmly
press the stylus to disengage it from the
stylus holder on the Base. Then, use the
pointed end of the stylus to gently tap
the touch-screen.
© 2006 Verizon
Important: Always use the point of
the stylus for tapping on the touchscreen and making selections. Please
do not use a pen, pencil or other
pointed object on the touch-screen
as these items may cause damage
to the screen. If the touch-screen
becomes soiled, use a damp, clean
cloth moistened with a window-cleaning
solution to gently wipe the screen.
Please do not use an abrasive as this
may scratch the screen.
18.2 Making and Ending Calls
To make a call from the Base Unit, press
the speaker button. The phone will go
Off-Hook and give a dial tone. You may
then dial the desired number. To end a
call, press the <Speaker> button. The
phone will go On-Hook and disconnect
the call.
Page 68

Verizon One User Guide
18. Verizon One Base Unit Operations
68
18.3 Answering Incoming Calls
To answer an incoming call, from the
Base Unit, press <Speaker> during an
incoming call ringtone. After you press
<Speaker>, the Base will go Off-Hook
and you may begin speaking.
© 2006 Verizon
18.4 Transferring Calls from the Base
to the Handset
By lifting the Handset from the Base and
pressing <Talk> during an active call, the
user will be connected to the call.
18.5 Transferring Calls from the
Handset to the Base
If you place the Handset into the Base
cradle and do NOT press <OFF> on the
Handset while the Base is connected
to an active call, the Handset will be
disconnected from the call, and the call
will remain active for the Base and/or
any other Handsets.
Note: If the Handset is placed into the
cradle after placing a call on HOLD, and
the Base is connected to the call, the call
will not be disconnected.
If you have an active call from the
Handset, but not on the Base, and you
want to transfer the call to the Base,
press <Speaker> on the Base. The call
will transfer from the Handset to the Base.
Page 69

Verizon One User Guide
18. Verizon One Base Unit Operations
69
18.6 Paging from the Base
To page the Handset from the Base
Unit, press <Intercom> on the Base.
The Base will page the Handset for
approximately two minutes and then
stop paging. If the Handset responds
(by pressing <Intercom> within the two
minutes of paging), it will end the page
and start an intercom call.
© 2006 Verizon
18.7 Adjusting the Volume
To adjust the volume on the Base Unit,
press <Volume Up> or <Volume Down>
on the front of the Base.
18.8 Using the Mute Button
To place an active call into a Mute state,
press <Mute> on the Base. The <Mute>
button will illuminate when the call is
set to Mute. To return the call to normal
conversation, press <Mute> again.
Page 70

Verizon One User Guide
18. Verizon One Base Unit Operations
70
18.9 Using the Hold Button
To place the call in a Hold state, press
<Hold> on the Base. The <Hold> button
will illuminate (flashing) when the call is on
Hold. Press <Hold> again to return to the
call.
© 2006 Verizon
18.10 Using the Menu and Address
Book Buttons
Pressing the <Menu> button takes you
to the touch-screen Menu. Pressing the
<Address Book> button takes you to
your Address Book.
Page 71

19. Touch-Screen Features
71
Verizon One User Guide
19.1 Touch-Screen Navigation
Verizon One’s visual touch-screen
display provides access to everything
you use most often. This section shows
how to navigate using the touch-screen
menu.
One-Touch Screen Features
Home Screen
The Home screen allows access by
providing shortcuts to the Menu
and popular menu options such as
Calls & Memos and News & More.
Your Home screen picture and weather
settings can be customized by selecting
Settings from t
Touch the
screen to return Home.
© 2006 Verizon
he Menu.
Home icon on any
Select one of the following from the
Home screen to get:
Calls & Memos
Access to communications tools such
as Calls, Memos and Voice Mail*.
News & More
Access to information such as News,
Sports, Movies and more.
Menu
Your direct link to your Calls, Address
Book, Calendar, Verizon SuperPages,
Settings, and every Verizon One
feature accessible via touch-screen.
Shortcuts
Choose to have quick access to a
handful of features.
Volume
Control the volume of your device, or
silence it, from the Home screen.
Home
Calls & Memos
News & More
*Available to Verizon Home Voice Mail subscribers only
Menu
Shortcuts
Volume
Page 72

19. Touch-Screen Features
19.1.1 Menu
72
Verizon One User Guide
© 2006 Verizon
Calls: Access your incoming and
outgoing call logs***, add callers
directly to your Address Book or
call back with one touch.
Voice Mail**: One t
access your Voice Mailbox and
listen to your messages.
Memos: Use a keypad or
freestyle memo pad (using the
stylus) to jot down numbers or
leave notes for other household
members.
ouch to
SuperPages*: Search and view
residential and business listing
information, access maps and
directions, and direct dial with
one touch.
Address Book*: Access and
manage your online address
book with the ability to directly
place calls from it.
Calendar*: Access and manage
your online calendar, schedule
appointments, make task lists
and more.
News & More*: Check local
weather and the 5-day forecast
(for your home or any ZIP code),
read news and sports headlines,
review movie listings, fi nd theaters
and show times, get sports
scores, watch favorite stocks and
read your daily horoscope.
Verizon Messages:
messages about your Verizon
account and service status.
Emergency Numbers: Create
and dial from a list of your saved
emergency phone numbers
including Police, Fire, Hospital,
Doctor and Poison Control.
Receive
Page 73

19. Touch-Screen Features
19.1.1 Menu (cont’d)
73
Verizon One User Guide
© 2006 Verizon
E-Mail**: Check and send
E-Mail directly from the Verizon
One device.
Alarm/Timer
the Timer or start the Stopwatch
to keep time.
Calculator: Perform basic
calculation functions like
addition, subtraction,
multiplication and division.
Speed Dial: One touch to dial a
phone number from your saved
speed dial numbers.
: Set an Alarm, use
Settings: Select your Display,
Backgrounds, Screensavers
and Ringtones.
Phone Tips:
shortcuts that you can use for
some of the most common
phone applications—such as
dialing the last person who
called you (*69).
*Display of these features requires your DSL service to be active. Once your Service Ready
Date has arrived, and Verizon One detects an active DSL connection—these features will
automatically appear.
**Available to Verizon Home Voice Mail subscribers only.
***Caller ID subscription is required.
Reference dialing
Wireless*: Share your single
DSL connection with multiple
computers and hardware
devices in your household create a local wireless network
with Verizon One’s combination
DSL modem and wireless
router.
Help: Get instructions, fi nd
FAQs and locate helpful We
sites.
b
Page 74

19. Touch-Screen Features
74
Verizon One User Guide
19.1.2 Touch-Screen Keyboard and
Num
Select or touch an entry field to
access the keyboard - or - in the case of
number fields, a numeric keypad. Note
that you can select
letters and the
When entering a phon
keypad, use ONLY ten digits (area
code + phone number). Do NOT enter a
1 before the area code.
eric Keypad
Shift for capital
@ sign, etc.
e number on the
19.1.3 Incoming Calls, Outgoing Calls
and Voice Mail Logs
From Calls & Memos:
Select Calls & Memos from the Hom
screen for a summary of Missed Calls,
Memos, and Voice Mail waiting for you.
You may select Dial to dial the person
who last called you (if Caller ID
information is available for the Caller).
© 2006 Verizon
From Menu:
From
Home, select Menu, and then select
Calls for your Incoming Calls, Outgoing
Calls and Voice Mail Logs. The Incoming
Calls screen appears. Select the In, Out or
Voice Mail tab:
In tab: When the In tab is selected, you
have a view of all Incoming Calls and
related data. View your most recent 50
Incoming Calls. Each entry in the Log
represents a Call and the date and time it
was received. It also contains the Caller’s
name and phone number (if you subscribe
to Verizon Caller ID and the information is
available).
Out tab: When the Out tab is selected,
e
you have a view of all Outgoing Calls
and related data. View your most recent
50 Outgoing Calls. Each entry in the Log
represents a Call and the date and time it
was made.
Voice Mail tab
Verizon Voice Mail Service. You must be a
current Verizon Home Voice Mail subscriber
to use this feature. If you are a current
subscriber, select Set-up. This will allow
you to enter in your Verizon Voice Mail
Access Number. Once you have entered
your
Voice Mail access number and
selected Done to save, use the Dial Voice
Mail selection to check your messages.
Note: You can insert a comma following the
access number entry to designate a pause
in the number sequence.
For Verizon Home Voice Mail subscribers
who also subscribe to the Verizon iobi
Home service, the Voice Mail tab will
display an on-screen visual list of your
Voice Mail messages, and you can listen to
them in any order.
: This feature works with
Page 75

19. Touch-Screen Features
75
Verizon One User Guide
19.1.4 Call Log* Features
19.1.4.1 View Caller
The View Caller screen allows you to
view, call or map a caller and/or Contact.
You can also add this caller to your
Address Book or update an existing
Address Book Contact with call
information. Access the View Caller screen by selecting a Call in a Call Log.
* Caller ID subscription is required.
© 2006 Verizon
Commands & Symbols Action
Calls the Contact number displayed.
Calls the contact/number displayed with 1+.
Add this caller to your Address Book
(appears if the contact is not in the
Update this contact in your Address
Book (appears if the contact is already
in the Address Book).
Look up origin of a call to locate caller
and/or for driving directions.
Select Yes
you wish to delete
Address Book).
Delete this Call from your Call Log.
when asked to confirm that
.
Page 76

19. Touch-Screen Features
19.1.4.2 Update a Contact
On the Update a Contact screen, select
the Group for the Contact for which you
wish to add this phone number. Enter or
update a Contact Name and select a
phone number Type. Select Done to save
your changes.
19.1.4.3 Map a Caller
The
Map a Caller screen shows a map
of your Contact’s geographical location.
You can select
directions.
Directions to get driving
76
Verizon One User Guide
© 2006 Verizon
Page 77

19. Touch-Screen Features
77
Verizon One User Guide
19.1.5 Receiving an Incoming Call
When you receive a call, Verizon
One
will display the In Call screen
which displays Caller ID* information
(if available). The
provides screen commands that you can
touch with your stylus to answer, route
or disconnect an Incoming Call, or
perform other phone functions:
*Caller ID subscription is required.
**Available to Verizon Home Voice Mail
subscribers only.
© 2006 Verizon
In Call screen also
Commands & Symbols Action
Transfer the call.
Answer Call Wait
Answer a call on speakerphone.
Forward a call to Voice Mail.
Indicates that your caller is on Hold. To take a caller
off Hold, either select the
called cannot hear you). To take a caller
either select the
on the Base.
**
Disconnect the call.
ing or go back to the original call.
Get a map and/or driving directions for this caller.
Hold icon or press the
Hold button on the Base.
Indicates that your caller is on Mute. (Person you
off Mute,
Mute icon or press the Mute button
Page 78

19. Touch-Screen Features
78
Verizon One User Guide
19.1.6 Placing an Outgoing Call
In addition to the outgoing call methods
described in the Handset and Base
sections, you may also make a phone
call using the touch-screen or a
combination of touch-screen commands
with Base buttons.
To place a call:
1. Dial a Phone Number on the Base
keypad. The Dialer screen appears on
your touch-screen.
2. Select Dial. The call is placed. The In
Call screen appears.
3. Select End Call to disconnect at any
time.
© 2006 Verizon
Options on the Dialer Screen when you are
Off-Hook but have not yet entered a number:
Commands & Symbols Action
Speed Dial Access your saved Speed Dial List.
Emergency Access your Emergency Numbers.
Information Dial 411 for Directory Assistance.
End Call Disconnect the call.
Options on the Dialer Screen when you are
Off-Hook and have entered a number:
Commands & Symbols Action
Add Number Add this number to your Address Book.
Add Memo Access the Add Memo Screen.
Map Get a map and/or driving directions for the
End Call
Disconnect the call.
location of this number.
Page 79

19. Touch-Screen Features
79
Verizon One User Guide
19.2 Voice Mail
The Voice Mail tab works with Verizon
Voice Mail Service. You must be a
current Verizon Home Voice Mail
subscriber to use this feature. If you
are a current subscriber, select
up. This will allow you to enter in your
Verizon Voice Mail Access Number.
Once you have entered your Voice Mail
access number and selected
save, use the Dial Voice Mail
to check your messages.
can insert a comma following the access
number entry to designate a pause in
the number sequence.
For Verizon Home Voice Mail
subs
cribers who also subscribe to the
Verizon
Mail tab will display an on-screen visual
list of your Voice Mail messages, and
you can listen to them in any order.
© 2006 Verizon
iobi Home service, the Voice
Note: You
Set-
Done to
selection
19.3 Speed Dial
One-touch dial a phone number from a
list of your saved Speed Dial positions.
19.3.1 Add a Contact to Your Speed
Dial List
1. Select Speed Dial from the
Menu.
2. On the Speed Dial screen, sel
to go to the Emergency
Numbers screen or pick an “empty”
Dial position from 1-9 to add a
Speed Dial (e.g.
3. On the entry screen for this Speed
Dial position, select
entry fi eld to access the keyboard to
enter the
of the person or business you would
like to add to your Speed Dial list.
Name and Phone Number
ect
).
or touch the
The position number at the top of the
screen will be the Speed Dial number
for this person or business from now on
(unless you choose to change this entry in
the future).
Tip:
When entering a phone number on
the keypad, use ONLY ten digits (area
code + phone number). Do NOT enter a
“1” before the area code.
Page 80

19. Touch-Screen Features
80
Verizon One User Guide
19.3.2 Edit a Contact on Your Speed
Dial List
1. Select Speed Dial from the
Menu.
2. Touch the Name of the entry you wish
to update.
3. On the entry screen for this Speed Dial
position, select or touch the entry fi eld
to access the keyboard to update the
Name and Phone Number fi elds.
4. Select Done
return to the Speed Dial page.
to save your changes and
19.3.3 Dial a Contact on Your Speed
Dial List
1. Select Speed Dial from the
Menu.
2. Select the Dial icon next to the Speed
Dial number you want to dial to initiate
the call.
© 2006 Verizon
19.4 Emergency Numbers
View your list of saved emergency phone
numbers on the Emergency Number
screen. Police, Fire, Hospital, Doctor and
Poison are default placeholders that you
may populate with the appropriate phone
numbers.
•
Select to dial an
Emergency number.
• Select Add to add a new Emergency
number. Select an Emergency
number on the list to update or change
information.
19.4.1 Add an Emergency Number
1. Enter a Name and Phone Number
- for the number you are adding
to your Emergency list - on the
Emergency - Add Entry
2. Select
Done to save your changes.
screen.
19.4.2 Edit an Existing Emergency
Number
1. Edit your Emergency contact’s
Name and Phone Number on the
Emergency - Edit Entry screen.
2. Select
To delete this Emergency number,
select
Done to save your changes.
Delete.
Page 81

19. Touch-Screen Features
81
Verizon One User Guide
19.5 Address Book
Access and manage your online Address
Book and directly place calls from it.
Your Address Book may contain Personal
Contacts, Business Contacts and
Groups. You may assign Contacts to
Groups for quick access.
View Contacts
Select Address Book Menu.
The Address Book screen appears.
This screen displays a list of people in
your Address Book. Use the scroll bar at
the right to navigate through the entire list.
The default view is an alphabetical list of
all of your Contacts.
Filter Contact List
To fi lter and view only the Contacts from
© 2006 Verizon
from the
a specifi c Group, select a Group from the
drop down menu. For example, select
Work to view only the Contacts you have
placed in the Group named Work
To view your Contacts alphabetically,
select from the A-F, G-L, M-S, or T-Z
buttons to advance the list accordingly.
When you fi nd the Contact that you’re
looking for, select it by touching the
Contact listing (anywhere except on the
Dial button). Select Add to Add a Contact
to your Address Book.
.
19.5.1 Calling a Contact from your
Address Book
You may call a Contact from the View
Contact - Numbers screen. Select a
phone number from the menu, then
select
or (when the call
requires dialing a “1”).
• Select Address Book to view address
and location information for this Contact.
• Select Speed Dial to add this Contact to
your Speed Dial list.
Note: The Speed Dial button appears only
if the phone number selected is NOT stored
in your Verizon One Speed Dial already.
Speed Dial maximum is 9.
• Select Edit Contact to update information
for this Contact.
• Select Delete to permanently delete
this Contact from your Address Book. You
will be asked to confi rm: select Yes or No
to either complete or cancel your delete
Contact request.
• Select Back to return to the Address
Book screen (list of Contacts).
Page 82

19. Touch-Screen Features
82
Verizon One User Guide
19.5.2 Get Address, Map and
Directions
The View Contact – Addresses screen
displays the Addresses stored for the
selected Contact. Under the Contact
Name is the E-mail and Home Address.
•
Select Map for a map of the Home
Address.
Select Numbers to go to the View
•
Contact – Numbers screen for dialing
and other options and information for
the Contact.
Select Edit Contact to update
•
information for the Contact.
Select Delete to permanently delete
•
the Contact from your Address Book
(you will be asked to confi rm: select
Yes or No to either complete or cancel
your delete Contact request).
Select Back to return to the Address
•
Book screen (list of Contacts).
© 2006 Verizon
19.5.3 Adding Contacts to Your
Address Book
On the Address Book - Add Entry
screen, indicate the type of Address
Book entry you wish to add by selecting
Add a Person, Add a Business or Add
a Group.
19.5.3.1 Add a Person
1. Select Address Book from the
Menu.
2. Select Add from the Address Book
screen.
3. Select Add a Person.
4. On the Add Contact - Required
Information screen, enter First
Name, Last Name, Nickname and
Primary Phone and select a Primary
Phone Number type from the Type
menu.
5. Select More to complete the rest of the
Add Contact wizard.
Tip: You can complete the Address Book
Add a Contact wizard by selecting More
upon completing each screen. Or, you can
select Done on any screen to save your
information and exit the Add a Contact
wizard and return to the Address Book
screen.
6. On the Add Contact - Home Numbers
screen, enter
and/or
to advance to the Add Contact - Work
Numbers
Phone, Cell, Fax
Pager numbers. Select More
screen.
Page 83

19. Touch-Screen Features
Add a Person
83
Verizon One User Guide
19.5.3.1 Add a Person (cont’d)
7. On the Add Contact - Work Numbers
Add Work Numbers screen, enter
work Phone, Cell, Fax and/or Pager
numbers. Select More to advance to
the New Contact - Home Address
screen.
8. On the Add Contact - Home Address
screen, enter street Address, City,
State, ZIP and Country. Select More
to advance to the New Contact -
Work Address screen.
9. On the Add Contact - Work Address
screen, Add Street, City, State, ZIP
and Country. Select More to advance
to the Add Contact - Internet screen.
10. On the Add Contact – Internet
screen, Add Home E-mail and Work
E-mail addresses. Select More to
advance to the Add Contact – Group
screen.
© 2006 Verizon
Select More to advance to select a Group.
11. On the Add Contact – Group
screen, select a Group from the
menu to add this contact to. Select
a photo from the the Picture menu
for a Contact. Select Done to save
your information and exit the Add a
Contact wizard.
Tip: You can navigate back to previous
screens by selecting Back. Select Cancel
to exit without saving the information you
entered.
19.5.3.2 Delete a Person
1. Select Address Book from the
Menu.
2. Select a Contact from the Address
Book screen.
3. Select Delete from the View Contact
– Numbers screen.
4. Confi rm: select Yes or No to
complete or cancel your delete Contact
request.
19.5.3.3 Add a Business Contact
1. Select Address Book from the
Menu.
2. Select Add from the Address Book
screen.
3. Select Add a Business.
4. On the Edit Contact - Required
Information screen, enter First Name,
Last Name, Nickname, and a Primary
Phone Number.
Tip: You can select Done on any screen to
save your information and exit the Add a
Contact wizard. You may also navigate back
to previous screens by selecting Back. You
can skip screens or advance by selecting
More.
Page 84

19. Touch-Screen Features
84
Verizon One User Guide
19.5.3.3 Add a Business Contact
(cont’d)
5. On the Add Business Contact
- Required Information screen,
enter Name, Primary Phone Number
and select Phone or Cell from the
Type menu. Select More to advance
to the Add Business - Numbers
screen.
Tip: You can complete the Address Book
Add a Contact wizard by selecting More
upon completing each screen.
19.5.3.4 Add a Group
1. Select Address Book from the
Menu.
2. Select Add from the Address Book
screen.
3. Select Add a Group.
© 2006 Verizon
Now you can add Personal and Business
Contacts to this Group on the Add/Edit
Contact – Group screens.
19.6 Calendar
Schedule and manage your daily
activities, make task lists and schedule
Call Forwarding ahead of time.
19.6.1 Access Your Calendar
Select Calendar from the Menu. The
Calendar screen appears.
19.6.2 View Your Calendar
1. Select Calendar
The Calendar screen appears.
Shaded dates in Month view indicate a
scheduled Event(s) for that day.
2. To view an existing Event, select the
day on the Month view.
from the Menu.
3. Select the Day tab.
4. Select an Event to view its details.
The Calendar - Event Detail screen
displays your Event and related information.
To update or edit Event details, select Edit.
You can also:
• Select the Month, Day or Week tab to
select a Calendar view.
• Select the back or forward arrow to go to
the previous–or move to the next–Month,
Day or Week.
• Select Add to add an Event to your
Calendar.
• Select View Tasks to view your Task list.
• Select the back or forward arrow at the
top to go to the previous–or move to the
next– Month, Day or Week
.
Page 85

19. Touch-Screen Features
85
Verizon One User Guide
19.6.3. Appointments
19.6.3.1 Add an
1. Select Calendar from the Menu.
2. Select
3. Select
4. On the Calendar - Add
screen, enter Subject and Location.
Tip:
Select or touch an entry fi eld to
access the keyboard.
5. Touch the Start entry fi eld for the
Select Date and Time screen.
6. Choose a
a day
view. You may back up or advance a
month by touching the arrow buttons.
7. Choose a Start Time
© 2006 Verizon
from the Monthly calendar
Appointment if applicable).
Appointment
Add on the Calendar screen.
Appointment .
Appointment
Start Date by touching
(check All-Day
8. Select
9. Touch the
10. Choose an End Date by touching a
11. Choose an End Time
12. Select Enter to accept your Time and
13. Select More to set a Reminder.
14. On the next screen, select a lead-time
time for an
Reminder
of the
will remind you through an audio
Enter to accept your Time and
Date selections and return to the
Calendar – Add Event
End entry fi eld for the
Select Date and Time screen.
day from the Monthly calendar view.
Event if applicable).
Date selections and return to the
Calendar – Add Event
for On the next screen select a lead-
Appointment
if you’d like to have a
reminder before the time and date
Appointment. Verizon One
screen.
(check All-Day
screen.
alert, in addition to delivering a reminder
message on the touch-screen display. If
you do not want a reminder, select
from the Reminder menu. If you do not
want a reminder, select
Reminder menu.
If you intend for the appointment to
recur, select Daily, Weekly, Monthly
or Yearly from the Repeats menu. If
the Appointment you are creating is
NOT a recurring appointment, select
None from the Repeats menu (default).
Unless you selected None (for a onetime Appointment), enter a date for this
Appointment to Stop Repeating.
Select Done to save the Appointment and
return to the Calendar screen. Select Back
to return to the previous screen. Select
Cancel to exit without saving.
None from the
None
Page 86

19. Touch-Screen Features
86
Verizon One User Guide
19.6.3.2 Edit an Appointment
1. Select Calendar from the Menu.
2. Select the day of the Appointment you
wish to edit.
3. Select the
4. Select the Appointment that you wish to
edit.
5. Select
6. Update
End fi elds as needed. Select More.
7. Update Reminder, Repeats
Repeating fi elds as needed. Select
Done to save your updates.
Important!
Appointment on Verizon One, change(s)
are saved to the entire series. Updates
to only one instance of a
Appointment must be performed on the
Web
.
© 2006 Verizon
Day tab.
Edit.
Subject, Location, Start and
When you Edit an
Repeating
and Stop
19.6.3.3 Delete an Event
1. Select Calendar from the Menu.
2. Select the day of the
you
3. Select the
4. Select the
5. Select
Important!
One
deleted. Deletion of only one instance
of a Repeating Appointment must be
performed on the Web.
wish to edit.
Day tab.
Appointment that you wish
to Delete.
Delete. Confi rm: Yes or No.
When you Delete a
Repeating Appointment on Verizon
, the entire series is permanently
Appointment
Page 87

19. Touch-Screen Features
87
Verizon One User Guide
19.6.4 Tasks
19.6.4.1 Add a Task
1. Select Calendar from the Menu.
2. Select
3. Select Task
4. On the Calendar - Add Task
Task).
5. Select Task Priority (High, Low or
Normal) from the menu. This can be
edited as needed.
6. Touch the
7. Choose a
day
8. Select
– Add Task
© 2006 Verizon
Add on the Calendar screen.
.
enter Subject (name for this new
Due Date entry fi eld for the
Select Date screen.
Due Date by touching a
on the Monthly calendar.
Enter to accept your Due Date
selection and return to the Calendar
screen.
screen,
Note:
box to indicate that a Task is complete.
You can also select a checked box to
change the
back to pending.
9. Select Done to save the Task and
return
Select the Completed check
Status from Completed
to the Calendar screen.
19.6.4.2 Edit a Task
1. Select Calendar from the Menu.
2. Select View Tasks
screen.
3. Select the Task
4. Select
5. Edit the
touching the entry fi eld.
Edit on the Calendar – Task
Detail screen.
Subject as needed by
on the Calendar
that you wish to edit.
6. Edit the Priority (High, Low or Normal
from the menu) as needed.
7. Select the Completed check box to
indicate that a Task is complete. You can
also select a checked box to change
the
Status from Completed back to
pending.
8. Edit the Due Date by touching the
entry fi eld for the
Date
screen. Make the necessary
changes. Select Enter to return to the
Calendar – Edit Task
9. Select Done when your changes are
complete.
Calendar – Select
screen.
Page 88

19. Touch-Screen Features
88
Verizon One User Guide
19.6.4.3 View Tasks
1. Select Calendar from the Menu.
2. Select View Tasks screen. The Calendar – Tasks screen appears.
The Calendar – Task
your saved Tasks, each with
Due Date. Also:
• Select a Task for the
Detail screen where you can Edit or
Delete the Task.
•
Select Delete All to delete all tasks
from your Calendar. You will be asked
to confi rm: select Yes
complete or cancel your Delete All
Tasks
•
Tip: To Delete only one specifi c Task
rather than ALL Tasks, touch the specifi c
© 2006 Verizon
request.
Select Back to return to the Calendar
screen.
on the Calendar
screen lists all of
Calendar – Task
or No to either
Status and
Task on the Calendar – Task
and select
Task Detail
Delete on the Calendar –
screen.
screen
19.7 Memos
Use a freestyle memo pad (using the
stylus on the touch-screen) to jot
down numbers or leave notes for other
household members.
Tip:
When you see on the Home
screen, you have a new Memo waiting
for you.
19.7.1 Memo Screen
The Memo screen lists all of your
Memos (holds up to 10). Selecting
(default) or
you sort by date or who the memo is
For. Select one of the Memos on the list
to view it.
You can also select Add to add a new
memo, or Delete All to delete all memos.
Name from the menu lets
Date
When deleting, select Yes when asked to
confi rm that you wish to delete.
19.7.2 View a Memo
The Memo - View Memo screen is where
you can view a memo and the time and
date that it was left for you. Touch Delete
when you no longer need to save this
memo.
19.7.3 Add a Memo
In the For entry fi eld on the Memo -
Add Memo screen, enter the name
of the person who the new memo is for.
You can then use the stylus to write your
message. Or follow the instructions
below to enter text, select pen colors
and widths, background colors, even
add expressions. When you are done
with your memo creation, touch Done to
save the memo or Cancel to exit the
memo without saving.
Page 89

19. Touch-Screen Features
89
Verizon One User Guide
19.7.3 Add a Memo (cont’d)
To use the keyboard to enter printed
text in the drawing area:
1. Choose the text color by selecting
the
with available colors will appear. The
currently selected color is outlined.
Select the color you would like your
text to be, and the menu will close.
2. Select Text
the drawing area where you would
like your text to begin. The keyboard
will then appear. Type your message
and touch
in the memo with your selected color.
To change the color of the
background of your memo:
1. Select
menu with available colors will appear.
© 2006 Verizon
Pen Color . A pop-up menu
. Touch any point in
Enter. The text will appear
Background . A pop-up
2. Select the background color of your
choice from the available color options
and the menu will close. Your
background color will be changed.
To change the color of the pen when
drawing lines:
1. Select Pen Color . A pop-up menu
with available colors will appear. The
currently selected color is highlighted.
2. Select the color you would like your
pen to be and the menu will close. All
new drawings will appear in the newly
selected color.
To change the width of the pen for
drawing:
1. Touch and hold the Pen Width
A pop-up menu will appear, showing
available widths to choose from. The
currently selected width is outlined.
.
2. Select the width and the menu will
close. All new drawings will be the width
you selected.
To place a pre-defined expression onto
the drawing area:
1. Select Expressions
will appear with a series of expressions
to choose from.
2. Select an expression of your choice.
Touch the location in the drawing area
where you would like to place it. Your
selected expression will be drawn.
Tip:
When placing an expression on a
memo, if you touch, hold and drag, you
can adjust its location. This can only be
done when you first place it on the memo.
. A pop-up menu
Page 90

19. Touch-Screen Features
90
Verizon One User Guide
19.7.3 Add a Memo (cont’d)
To erase portions of the drawing area:
1. Select
turn into a rectangle. Touch any point
of the drawing area and drag.
Anything underneath the rectangle
will be erased (with the exception of
the background color).
2. Select Pen Width
the pen function.
Tip:
hold
pop-up menu.
To change the size of the area the
eraser will cover:
1. Touch and hold the
A pop-up menu will appear with
available sizes to choose from.
© 2006 Verizon
Eraser . Your cursor will
again to return to
To erase the whole area, touch and
Eraser and select All from the
Eraser .
The currently selected size is outlined.
2. Select the size, and the menu will close.
Touch any point in the drawing area
and drag. Your eraser will be the size
you selected.
To erase everything on the memo, but
keep the background color:
1. Touch and hold the Eraser
menu will appear.
2. Select the All option. All information will
be erased, but the background color will
remain.
. A pop-up
19.9 SuperPages
Verizon One gives you select-screen
access to Verizon SuperPages so you
can look up a residential or business
listing and direct dial it with one touch.
Also access maps and directions.
19.9.1 Look Up a Business
1. Select SuperPages from the
Menu.
2. Select Yellow Pages
business.
3. Enter
4. Enter
5. Enter
6. Select
search will appear on the
SuperPages
Keyword or Business Name.
City.
State.
Find It. The results of your
- Search Results screen.
to look up a
Page 91

19. Touch-Screen Features
91
Verizon One User Guide
19.9.1 Look Up a Business (cont’d)
Tip: Select Categories to look up a
business by category. Once you have
reached the most specifi c level for your
category selection (e.g. Art Galleries or
Boat Rentals), enter your
and select
© 2006 Verizon
Find It.
City and State
19.9.2 Look Up a Person
1. Select SuperPages from the
Menu
2. Select
person
3. Enter
4. Enter
5. Enter
6. Enter
7. Select
search will appear on the
SuperPages - Search Results
screen.
.
White Pages to look up a
.
First Name.
Last Name (required).
City.
State.
Find It. The results of your
19.9.3 Reverse Lookup
1. Select SuperPages from the
Menu.
2. Select
a person or business with their phone
number.
3. Enter
Number
of your search will appear on the
screen.
Reverse Lookup to look up
Area Code and Phone
. Select Find It. The results
SuperPages - Search Results
Page 92

19. Touch-Screen Features
92
Verizon One User Guide
19.9.4 Search Results
Not only does the SuperPages -
Search Results
results of your
also your link to one-touch dialing,
and
Driving Directions.
• Select
search over.
•
•
the
•
•
© 2006 Verizon
New Search to start your
Select to call your Contact.
Select to call your Contact when
call requires dialing a “1”.
Select for a map and driving
directions.
Select to add this person to your
Address Book.
screen display the
SuperPages search, it is
Maps
19.9.4.1 SuperPages - Map
1. Select SuperPages from the
Menu.
2. Conduct a search by selecting one
of the following: Business, Person
or
Reverse Lookup. Enter
parameters requested on the next
screen, and select
3. From the
Results screen, select .
The map that appears matches the
search result that you selected on the
previous screen. Select
to Search Results. Select
driving directions:
1. On the
screen, enter the starting point from
which you want Driving Directions:
Enter
SuperPages - Search
SuperPages - Directions
Address, City, State and ZIP.
Find It.
Back to return
Directions for
2. Select the Save Address check box if
you wish to save this Address for future
Driving Directions requests.
3. Select Show. Directions for driving to
your Search Result location will appear.
Tip: The address at the top of the
Directions screens is that of the Search
Result selected.
Page 93

19. Touch-Screen Features
93
Verizon One User Guide
19.9.4.2 Add a SuperPages Search
Results Number to Your
Address Book
To add a Phone Number from
SuperPages Search Results to your
Address Book:
1. Select SuperPages
Menu.
2. Conduct a search by selecting one
of the following: Business, Person or
Reverse Lookup. Enter parameters
on the next screen. Select Find It
3. From the SuperPages - Search
Results
this
The Add Contact – Required screen
appears with the SuperPages Contact/
Business information pre-populated for
you.
© 2006 Verizon
screen, select to add
party to your Address Book.
from the
4. Edit the information as needed.
5. Add additional information by
selecting More to access more Add a
Contact wizard screens. Select Done to
save your new Address Book entry.
19.10 E-Mail
You can check and send E-Mail directly
from the Verizon One device
Note: To use the Mobile E-Mail feature,
you will need a Verizon Online e-mail
account. Go to www.verizon.com/iobi to
set it up.
.
19.10.1 Setup E-Mail
1. Select Menu .
2. Use the scroll bar to fi nd E-Mail and
.
select
3. Select
Online
4. Select
E-Mail messages
If you’ve forgotten your password, go to
http://dslstart.verizon.net to fi nd it.
If you don’t have a Verizon Online e-mail
account, go to www.verizon.com/iobi to
set it up.
.
to enter your Verizon
E-Mail password.
to check your
.
Page 94

19. Touch-Screen Features
94
Verizon One User Guide
19.10.2 Check E-Mail
1. Select to enter your Verizon
Online E-Mail password.
Forgot password? Go to
dslstart.verizon.ne
2. Use the scroll bar to view your list of
E-Mail messages
3. Select the E-Mail you want to view
t for help.
.
19.10.3 Reply to an E-Mail
1. Use the scroll bar to view your list of
E-Mail messages.
2. Select the E-Mail you want to view
3. Select
to the sender. Select
write a message to all recipients
4. Select
5. Select
© 2006 Verizon
to write a message
to enter a message.
.
to
19.11 Alarm/Timer
You can use Verizon One to set a timer,
set an alarm or time something with the
stopwatch
.
19.11.1 Start Timer
1. Select to use the Timer
.
.
.
feature.
2. Select
Sec to select a time frame
3. Select
countdown
4. An alert will sound and appear on
screen when time runs out. Select
5. Select
and next to Hour, Min or
.
to start the
.
to turn the alert off.
to stop the countdown.
19.11.2 Set Alarm
1. Select to use the Alarm
feature.
2. Select
or Sec to choose what time you want
the Alarm to sound
3. Select
Alarm. An alert will sound and appear
on screen when it’s time for the Alarm
to go off
4. Select
Alarm
5. When it sounds, select
the alert off. Select
alarm to go off in another 10 minutes
and next to Hour, Min
.
to turn on the
.
to turn off the
.
to turn
to set the
.
Page 95

19. Touch-Screen Features
95
Verizon One User Guide
19.11.3 Start Stopwatch
1. Select to use the
stopwatch feature.
2. Select
Stopwatch
3. Select
Stopwatch
4. Select
Stopwatch count
5. Select
Stopwatch and reset all counters to 00
to begin the
.
to pause the
.
to resume the
.
to stop the
19.12 Calculator
The calculator allows for basic
calculation functions of addition,
subtraction, multiplication and division.
© 2006 Verizon
19.13 News & More
Check local weather and the 5-day
forecast, read news and sports headlines,
review movie listings, fi nd theaters and
show times, get sports scores, watch
favorite stocks, read your daily horoscope
and locate local restaurants by cuisine
type.
Verizon One’s News & More contains
multiple Content Channels including:
.
• My Choices • Entertainment
• Top Headlines • Lottery
• Movies
• Weather • SuperPages
• Sports News • Restaurants
• Scores • Horoscopes
• Stocks
19.13.1 Choose Content
1. From the Menu, select News &
More. The News & More screen
appears.
2. Select a Content Channel to view.
Tip: You can also access all Content
Channels from the Home screen by
selecting News and More.
19.13.1.1 My Choices
Set up your favorite content to rotate
every 20 seconds on your Verizon One
touch-screen. Go to https://www36.
verizon.com/verizon-on
your choices.
e to customize
19.13.1.2 Top Headlines
View News Headlines. Just select a
headline to read the news Story.
Page 96

19. Touch-Screen Features
96
Verizon One User Guide
19.13.1.3 Movies
Find out what is playing at nearby
theaters. Review movie listings and
show times.
When you access
& More
Theaters List
a theater from the list based on your
ZIP code or enter a new
a
you want to travel) from the menu. A
list of Theaters base
parameters will automatically appear.
The list of Theaters contains the Theater
Name. Select a movie theater to view a
list of movies playing there.
The
movies for your theater. On this screen:
© 2006 Verizon
in the Menu, the Movies -
Distance (how far from that ZIP code
Movies At Theater screen lists
Movies from News
screen appears. Select
ZIP and select
d on your new
1. Select a movie to view its rating,
release date, show times and brief
synopsis
entire synopsis.
2. Select Theater Info from the Movies
At Theater
address and phone number.
On the Movies-Theater Info screen:
1. Select the or icons to call the
theater.
2. Select for the Map and Driving
Directions screens.
Tip:
becomes the default until you enter a
different one. This means that the theaters
in your area always appear automatically.
Enter a ZIP Code to look up theaters in a
different location.
. Select More Info to read
screen to view theater
Once entered, your ZIP Code
Tip: You can also access
Home screen. Select News & More, and
then select Movies from the Summary
menu.
Movies from the
19.13.1.4 Weather
When you access Weather from News
& More in the Menu, you are brought to
the Weather screen
.
19.13.1.4.1 Local Weather
1. View today’s local weather and a fi ve-
day forecast for your area based upon
your ZIP code.
2. Enter a new ZIP Code
weather for another area.
3. If you are viewing Today’s Weather,
select the
weather forecast for the next 5 days
in your area. If you are viewing the
5-Day Forecast, select
Weather to see today’s more detailed
forecast.
5-Day Forecast to show the
to look up
Today’s
Page 97

19. Touch-Screen Features
97
Verizon One User Guide
19.13.1.4.1 Local Weather (cont’d)
Tip: Once entered, your ZIP Code
becomes the default until you enter a
different one. This means that the
weather for your area appears
automatically when you come to the
Weather screen.
19.13.1.4.2 Radar
1.
Open News & More and select .
Select .
2.
Select to get the
3.
Satellite view.
Select to see the
4.
Radar animate for the last hour of
weather activity
Select to see the
5.
Radar in full-screen.
Select the Map to zoom in.
6.
© 2006 Verizon
.
19.13.1.4.3 International Weather
1.
Select .
Select .
2.
Select .
3.
Select to enter a new City and
4.
Country.
Select to get the
5.
weather for that area
.
19.13.1.5 Sports News
View
select a headline to view the Story.
Sports News headlines. Just
19.13.1.6 Scores
Choose from a list of sports to see recent
scores.
19.13.1.7 Entertainment
1. Open News & More and select
Entertainment .
2. Ten entertainment news headlines
are
through each story.
OR
Select
headlines at your own pace.
3.
listed and will automatically move
and to scroll through the
Select to read the full story.
Page 98

19. Touch-Screen Features
98
Verizon One User Guide
19.13.1.8 Lottery
1. Open News & More and select Lottery .
2.
Lottery results are listed and will
automatically move through each
item.
OR
Select
lotteries.
3.
and to scroll through the
Select to get Lottery details.
19.13.1.8.1 View Game
1. Select and to scroll through
the lotteries.
2.
© 2006 Verizon
Select to get the Lottery details.
19.13.1.8.2 Change Location
1. Select .
2. Select a State from the list to view the
Lotteries.
19.13.1.9 Stocks
Track up to 10 Stocks/Ticker Symbols
and use Company Search to look up
Ticker Symbols.
To add a Stock Symbol to watch:
1. From the Stocks screen, select Add to
add the ticker symbol for the stock you
wish to track.
2. Enter a Ticker Symbol (or enter the
company name in the Don’t know the
symbol?
3. Select Search to look up the Ticker. The
Stocks - Company Search screen
appears.
Find it fi eld.
4. You are returned to the
screen where your new symbol now
appears in the Ticker Symbol fi eld.
5. Select
your list of Stocks to track.
Next time you return to
symbol(s) will appear automatically.
Done to add this Symbol to
Stocks
Stocks, your
19.13.1.10 SuperPages
See Section 19.9 SuperPages for steps
.
Page 99

19. Touch-Screen Features
99
Verizon One User Guide
19.13.1.11 Restaurants
You can lookup restaurants in your area.
Your ZIP Code becomes the default until
you enter a different one. This means
that the restaurants in your area always
appear automatically
.
19.13.1.11.1 Lookup Restaurants
1. Select News & More on the Home
screen.
2. Select
3. 90 Restaurants near you will be listed
and will automatically move through
each listing.
OR
Select
restaurants at your own pace
4. Select
specifi c restaurant.
© 2006 Verizon
.
and to scroll through the
.
to view information about a
19.13.1.11.2 Change Cuisine
1. Select .
2. Select
restaurants that serve a specifi c cuisine.
3. A list of cuisine choices is offered
4. Use the scrollbar
entire list.
5. Select a cuisine.
6. All restaurants under that category,
sorted by distance, will appear
7. Select
Select
Select
Select to look at a mapped location
of this restaurant.
Select to add this restaurant to
your business contacts.
for restaurant details.
to call long distance.
to fi nd
.
to view the
.
to dial the number.
19.13.1.11.3 Change Location
1. Select . A list of cuisine choices is
offered
2. Select
within another area.
3. Select the Location fi eld to enter
another ZIP code.
OR
Select the Distance fi eld to change the
search radius.
.
to fi nd restaurants
19.13.1.11.4 Restaurants Near Me
1. Select . A list of cuisine choices is
offered
2. Select
in your area.
.
to fi nd restaurants
Page 100

19. Touch-Screen Features
100
Verizon One User Guide
19.13.1.11.4 Restaurants Near Me
(cont’d)
3. This is a list of restaurants near you,
based upon the ZIP code and search
radius you have entered. The list is
sorted by distance, starting with the
closest
4
. Select to learn more about
a specifi c restaurant.
5
. To change the ZIP code, select the
ZIP code fi eld and use the touchpad
to enter a new ZIP code
. To change the search radius, select
6
the
search radius
.
.
Distance menu and select a new
.
19.13.1.12 Horoscopes
When you access Horoscopes
from News & More in the Main Menu,
the Horoscopes screen appears. Select
© 2006 Verizon
an astrological sign from the list to view
the Horoscope. The Horoscopes – View
screen appears. Here you can read the
Horoscope for the astrological sign you
selected.
Tip:
You can also access Horoscopes
from the Home screen. Select News &
More, and then select Horoscopes from
the Summary menu.
19.14 Add iobiSM Home*
Add iobism Home to take your Verizon
One to the next level. This section
describes additional features you can use
on Verizon One if you subscribe to iobi
Home.
Visit www.verizon.com/iobihom
learn more about iobi Home or to
upgrade today.
Please note: You must subscribe to iobi
Home
e to
service on the same telephone
which is active on your DSL service.
This is required in order that the iobi
Home
accessible on Verizon One
features described below be
:
19.14.1 Manage Calls
Manage incoming Calls directly from the
Verizon One
prompts you when a new call come
comes in and lets you
Calls
send the call to your Voice Mail
iobi Home also lets you forward
calls from
telephone number such as a cellular or
work number. You can also create and
save a list of different
numbers that can easily be activated or
deactivated. Plus you can set-up a
– for regular times when you’re away
from home.
, Forward** to another number, or
Call Forwarding schedule in advance
screen. iobi Home
Answer or Block
***.
your home phone to another
Destination
 Loading...