

Page 1

User Guide
Page 2

Congratulations
DROID by Motorola
DROID by Motorola gives you a premium browsing
and messaging experience with the very latest from
™
, all in a thin touch QWERTY slider.
Google
•Browsing. Get more from the Web, with a huge
screen and full HTML. Search, browse, everything
you want to do, all made easier.
• Maps, entertainment, and more. The latest
technology and apps. Google Maps
way. YouTube
™
to stay entertained. Easy access to
Google and thousands of Android applications to
expand your world.
Caution: Before assembling, charging or using your
phone for the first time, please read the important
legal and safety information packaged with your
phone. Once your phone is up and running, touch
Menu >
information
Settings >About phone >Safety
to read the full information.
™
to find your
More information
On your computer—Go to
http://www.motorola.com/support/droid
So, whether you want to read, watch, or play, we can
help.
.
1Congratulations
Page 3
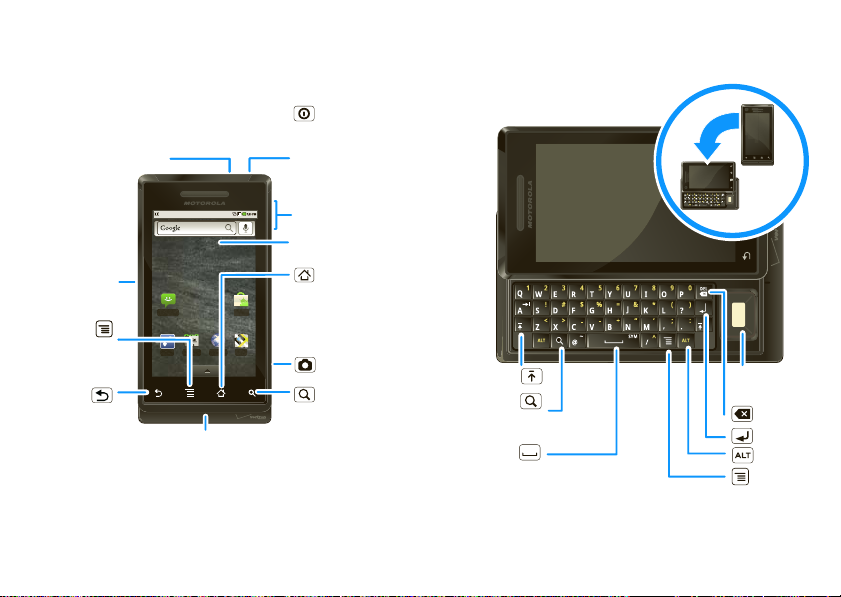
Your phone
the important keys & connectors
3.5mm Headset Jack
Power Key
Press to put
the display to
sleep, or hold
to turn off.
When you open or turn your phone,
the screen adjusts for you.
Micro USB
Connector
Charge or
connect
to PC.
Menu Key
Touch to open
menu options.
Back Key
Touch to go
back.
2 Congratulations
Messaging Market
Phone
Contacts Browser Maps
Microphone
Volume Keys
Touchscreen
Home Key
Touch to return
to the home
screen.
Camera Key
Search Key
Touch for text
search.
Shift
Search
Press for
text search.
Space
Scroll &
Select
Delete
Return
Alternate
Menu
Page 4
Contents
Your phone . . . . . . . . . . . . . . . . . . . . . . . . . . . . . . . . 2
Let’s go . . . . . . . . . . . . . . . . . . . . . . . . . . . . . . . . . . . 3
Touchscreen & keys . . . . . . . . . . . . . . . . . . . . . . . . . 4
Home screen . . . . . . . . . . . . . . . . . . . . . . . . . . . . . . 6
Calls . . . . . . . . . . . . . . . . . . . . . . . . . . . . . . . . . . . . . 9
Web . . . . . . . . . . . . . . . . . . . . . . . . . . . . . . . . . . . . . 11
Google Maps™ . . . . . . . . . . . . . . . . . . . . . . . . . . . . . 12
Latitude. . . . . . . . . . . . . . . . . . . . . . . . . . . . . . . . . . . 14
YouTube™ . . . . . . . . . . . . . . . . . . . . . . . . . . . . . . . . . 15
Apps for all . . . . . . . . . . . . . . . . . . . . . . . . . . . . . . . . 17
Manage your life . . . . . . . . . . . . . . . . . . . . . . . . . . . . 18
Contacts . . . . . . . . . . . . . . . . . . . . . . . . . . . . . . . . . 21
Messaging . . . . . . . . . . . . . . . . . . . . . . . . . . . . . . . 23
Text entry . . . . . . . . . . . . . . . . . . . . . . . . . . . . . . . . 25
Tips & tricks . . . . . . . . . . . . . . . . . . . . . . . . . . . . . . 26
Personalize . . . . . . . . . . . . . . . . . . . . . . . . . . . . . . . 27
Photos & videos . . . . . . . . . . . . . . . . . . . . . . . . . . . 29
Music . . . . . . . . . . . . . . . . . . . . . . . . . . . . . . . . . . . 32
Bluetooth® wireless . . . . . . . . . . . . . . . . . . . . . . . . 36
WiFi . . . . . . . . . . . . . . . . . . . . . . . . . . . . . . . . . . . . 37
USB & memory card. . . . . . . . . . . . . . . . . . . . . . . . 38
Tools . . . . . . . . . . . . . . . . . . . . . . . . . . . . . . . . . . . . 39
Management . . . . . . . . . . . . . . . . . . . . . . . . . . . . . 40
Security. . . . . . . . . . . . . . . . . . . . . . . . . . . . . . . . . . 40
Troubleshooting . . . . . . . . . . . . . . . . . . . . . . . . . . . 41
Safety, Regulatory & Legal . . . . . . . . . . . . . . . . . . . 42
Let’s go
let’s get you up and running
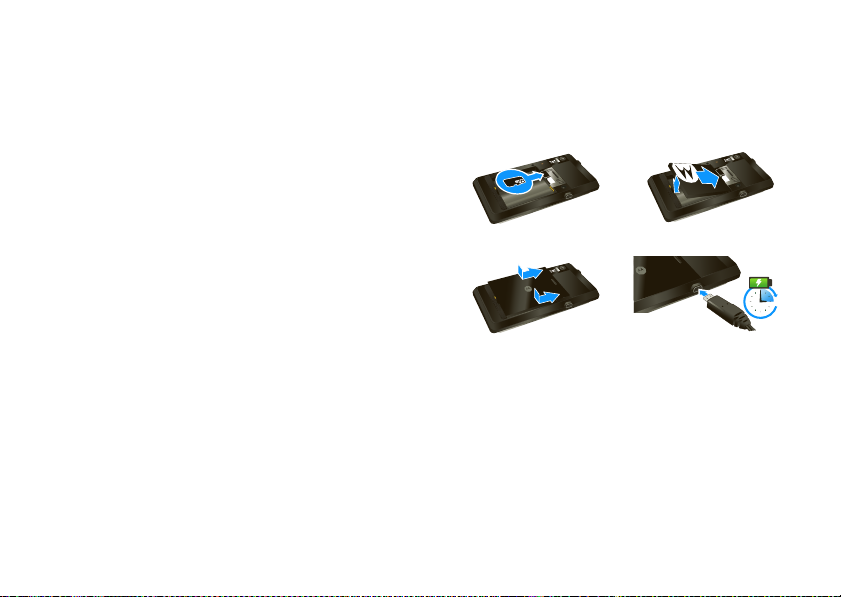
Assemble & charge
1 MicroSD in (may
already be inserted)
3 Cover on 4 Charge up
Note: Your device is always on when being charged.
Caution: Please read “Battery Use & Safety” on
page 42.
Set up & go
The first time you turn on your phone, a setup wizard
guides you through signing in to your existing Google
account. If you don’t have a Google account, you can
create one using the wizard.
2 Battery in
3H
™
3Let’s go
Page 5
Tip: Remember to write down your user name and
password, and keep them in a safe place.
Turn it on & off
To turn on your phone, press and
hold Power (on top of the
phone).
To turn off your phone, press and
hold Power , then touch
off
.
Power
WiFi connect
If you want to use a WiFi computer network for even
faster Internet access, touch Menu >
Wireless & networks >Wi-Fi settings
>
Settings
.
Cool content & more
Browse and download thousands of the coolest apps
on the planet from Android Market
Your phone comes with a microSD memory card
installed—you can load it up with photos, videos, and
music from your computer using “USB drag & drop”
on page 38.
4 Touchscreen & keys
™
.
Touchscreen & keys
a few essentials
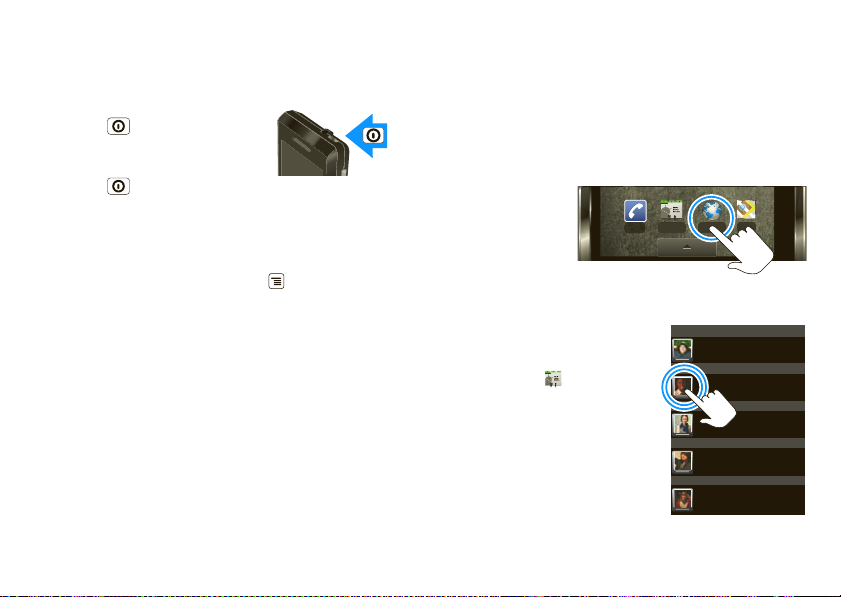
Touch tips
Here are some tips on how to navigate around your
phone.
Touch
To choose an
icon or option,
touch it.
Touch & hold
To open special options,
touch and hold an icon or
other item. Try it: In the home
screen, touch
then touch and hold a contact
to open options.
Contacts
Phone
Contacts Browser Maps
,
J
Rick Wasser
L
Wallace Mans
M
Jennie Jenkins
R
Leo Heaton
W
Mick West
Page 6
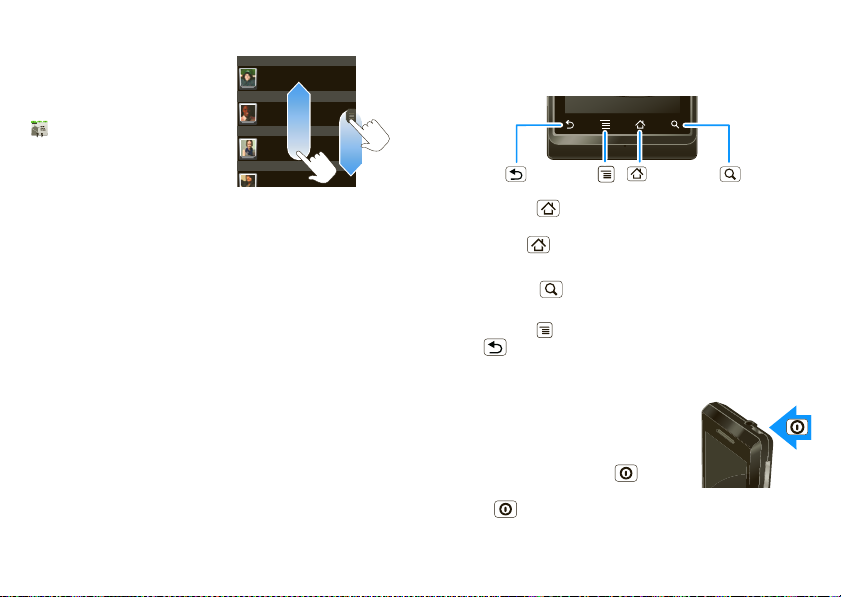
Drag
To scroll through a list or
move slowly, drag across the
touchscreen. Try it: In the
home screen, touch
Contacts
Contacts
, then drag your
list up or down.
Tip: When you drag or flick a
J
Rick Wasser
L
Wallace Mans
M
Jennie Jenkins
R
list, a scroll bar appears on
the right. Drag the scroll bar to move the list to a letter
AZ.
Flick
To scroll through a list or move quickly, flick across the
touchscreen (drag quickly and release).
Tip: When you flick a long list, touch the screen to stop
it from scrolling.
Zoom
Get a closer look at maps or web pages. To zoom in,
double-touch the screen. To zoom out, double touch
the screen again.
Key tips
Menu, home, & back
Back Key
Menu Key
Home Key
Touch Home to close any menu or app and return
to the home screen. In the home screen, touch and
hold Home to show the last few apps you used,
then touch an app to open it.
Touch Search for text search, or touch and hold for
voice search.
Touch Menu to open menu options, or touch
Back t o go back .
Sleep & wake up
To save your battery, prevent
accidental taps, or when you want
to wipe smudges off your
touchscreen, put the touchscreen to
sleep by pressing Power . To
wake up the touchscreen, just press
Power again, or open the phone.
Search Key
5Touchscreen & keys
Page 7
To change how long your phone waits before the
screen goes to sleep automatically, touch Menu
Settings >Sound & display >Screen timeout
>
.
Tip: To make the screen lock when it goes to sleep,
use “Screen lock” on page 40.
Power key menu
Press and hold Power to open the power key
menu, where you can turn off the phone (
or turn
Airplane mode
or
Silent mode
Power off
on or off.
Adjust volu me
Press the volume keys to
change the ring volume (in
the home screen), or the
earpiece volume (during a
Volume Keys
call).
Spin the screen
When you rotate the phone 90 degrees
counterclockwise, the touchscreen can rotate to stay
rightside up:
Find it: Menu >
Orientation
>
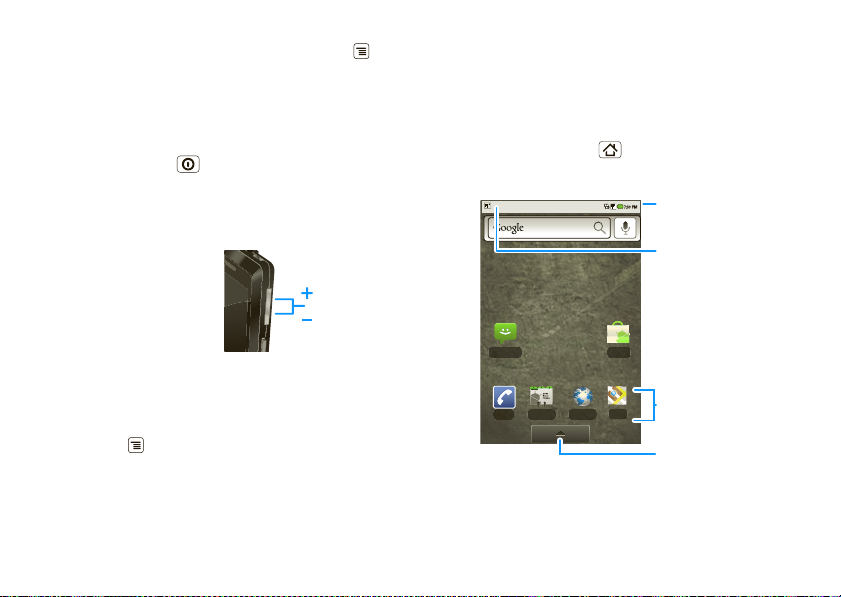
6 Home screen
Settings >Sound & display
Home screen
quick access to the things you need most
Quick start: Home screen
The home screen gives you all your latest information
in one place. It’s what you see when you turn on the
phone or touch Home from a menu. It’s basically
),
like this:
Status Indicators
Status Bar
Touch & drag this bar down
to check notifications.
Messaging Market
Phone
Contacts Browser Maps
Shortcuts
Touch to open.
Applications Tab
Drag up to see
all your apps.
Note: Your home screen might look a little different.
Page 8
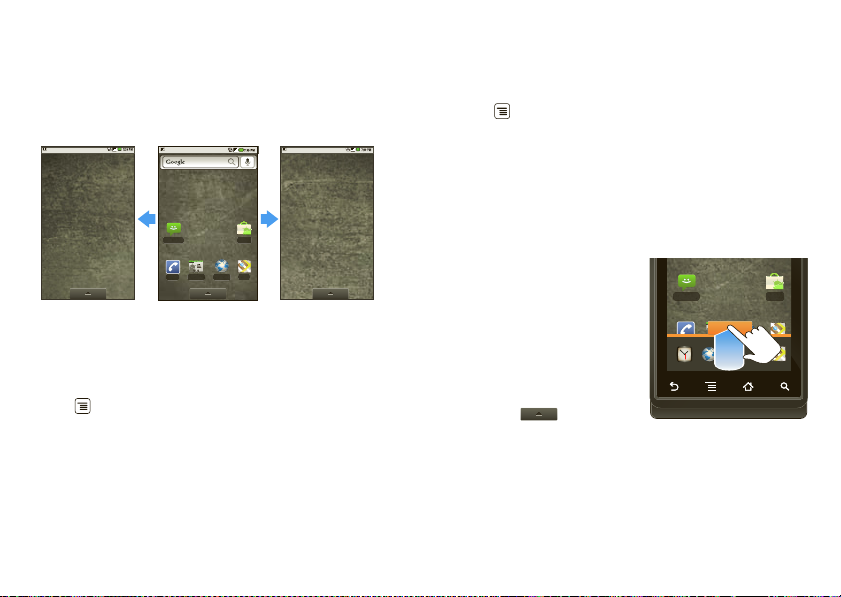
The home screen extends beyond what you see on
the screen to give you more room for adding
shortcuts, widgets, and more. Flick the home screen
left and right to see more panels or to add widgets or
shortcuts.
Messaging Market
Phone
Contacts Browser Maps
Widgets
Add a widget, such as a clock, music player, or a
calendar that shows upcoming appointments.
To open a widget, touch it. To add widgets, touch
Menu >
Note: If you install apps from Android Market that
have widgets, touch and hold the home screen, then
select a widget to add to the home screen.
Add > Widgets
.
Shortcuts
To add shortcuts to the home screen, open the
Applications tab, then touch and hold the shortcut you
want. It will be added to the home screen. Or, touch
Menu >
Add > Shortcuts
.
Apps
Your phone comes with some apps already, and you
can download and install more. To open an app, touch
it.
Applications tab
All the apps on your phone,
including the apps that
came with your phone, and
Messaging Market
the ones you download and
install, are listed in
alphabetical order in your
Applications tab.
To open the Applications
tab, touch and drag
up.
Running multiple apps
No need to close an app before opening another one.
Your phone runs multiple apps, all at once.
7Home screen
Page 9
You can open a new app while already running another.
Touch Home to return to the home screen. Open
the Applications tab and touch the app you want. To
switch from one running app to another, touch and
hold Home to see what apps are already open,
then touch the one you want. You can view up to the
last six apps that you ran.
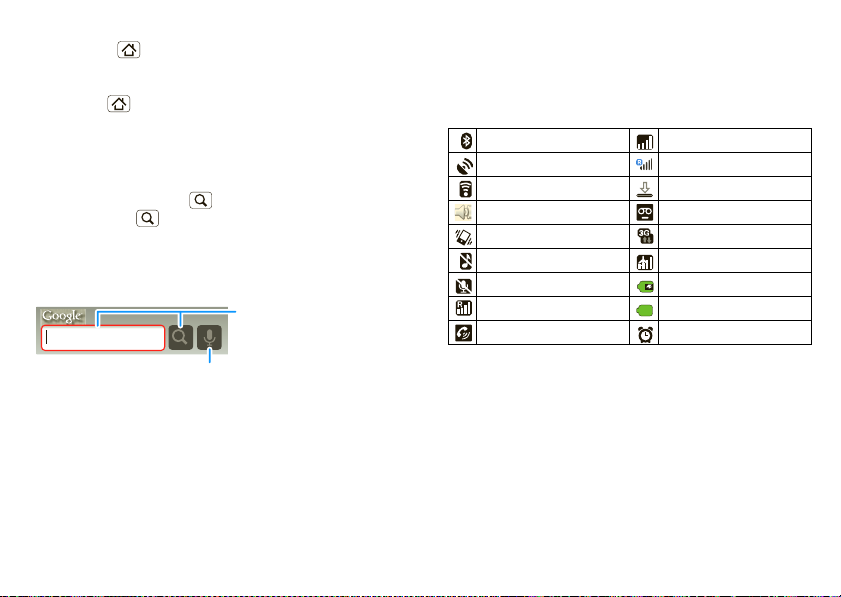
Search
To search, touch Search on the front of the phone,
or touch Search on the QWERTY keypad.
For a text search, touch
the text box & type
using the touch keypad
or the QWERTY keypad.
Then, touch the icon for
Google Search
Search by voice.
8 Home screen
a text search.
Phone status & notifications
The status bar at the top of the screen contains icons
that tell you about messages and phone status. To
view your notifications, touch the status bar and drag it
down. Icons on the right tell you about phone status:
Bluetooth® active network (full signal)
GPS active network (roaming)
WiFi active downloading
volume voicemail message
vibrate 3G (fastest data)
silent flight mode
mute call battery (charging)
signal (roaming) battery (full charge)
speakerphone active alarm set
Tip: To see today’s date, touch and hold the status bar
at the top of the screen.
Page 10
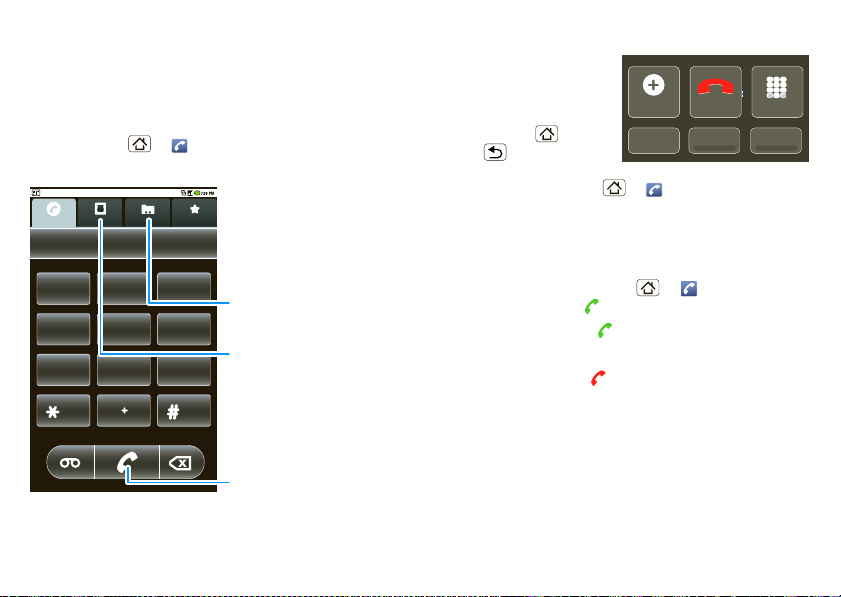
Calls
it’s good to talk
Quick start: Calls
Dialing options
Find it: Home >
Call log FavoritesContactsPhone
Phone
Incall options
During a call, touch
Bluetooth
to use a
Bluetooth® device.
Tip: You can
touch Home or
Back to leave the
active call display. To
reopen it, touch Home >
call in progress
To mute a call, touch
.
Mute
.
Add Call
Bluetooth
End Dialpad
Mute
Phone >Return to
Speaker
Speaker
123
GHI JKL MNO
456
789
ABC DEF
TUVPQRS WXYZ
0
Contacts
Touch to open, then touch an
entry to call.
Recent Calls
Touch to open, then touch an
entry to call.
Call
Enter a phone number and
touch here to call it.
Make & answer calls
To make a call, touch Home >
number, then touch .
To answer a call, drag to the right.
End
To end a call, touch
.
To ignore a call, drag to the left.
Phone
, enter a
Handsfree
Note: Using a mobile device or accessory while
driving may cause distraction and may be illegal.
Always obey the laws and drive safely.
During a call:
Speaker
• To use the speakerphone, touch
.
9Calls
Page 11
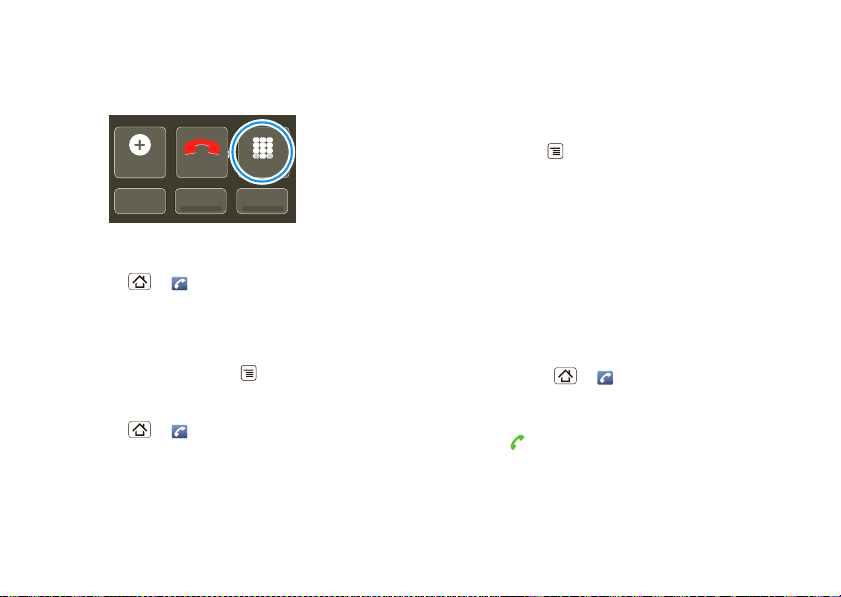
• To use a Bluetooth® device, touch
Add call
Bluetooth
Mute
Dialpad
Speaker
Bluetooth
.
Enter numbers during a call
To enter numbers during a call, touch
Add call
Add call
Bluetooth
Bluetooth Mute
End Dialpad
Mute
Dialpad
Speaker
Speaker
Dialpad
.
Recent calls
Find it: Home >
• To call a number, touch it.
• To send a text message, create a contact, view a
contact, or other options, touch and hold an entry.
• To clear the list, touch Menu >
Phone >Call log
Clear call log
Frequent calls
Find it: Home >
• To call a number, touch it.
• To send a text message, view a contact, or other
options, touch and hold an entry.
Phone >Favorites
Conference calls
To start a conference call, call the first number. After
they answer, touch
When the next number answers, touch
Add call
and call the next number.
Merge call
.
Your phone number
Find it: Menu >
My phone number
>
Settings >About phone >Status
Emergency calls
Note: Your service provider programs one or more
emergency phone numbers (such as 911 or 112) that
you can call under any circumstances, even when your
phone is locked. Emergency numbers vary by country.
Your preprogrammed emergency number(s) may not
work in all locations, and sometimes an emergency
call cannot be placed due to network, environmental,
or interference issues.
1 Touch Home >
locked, touch
Emergency Call
2 Enter the emergency number.
3 Touch to call the emergency number.
Note: Your mobile device can use AGPS satellite
signals to help emergency services find you (“GPS &
AGPS” on page 44).
Phone
(if your phone is
).
10 Calls
Page 12

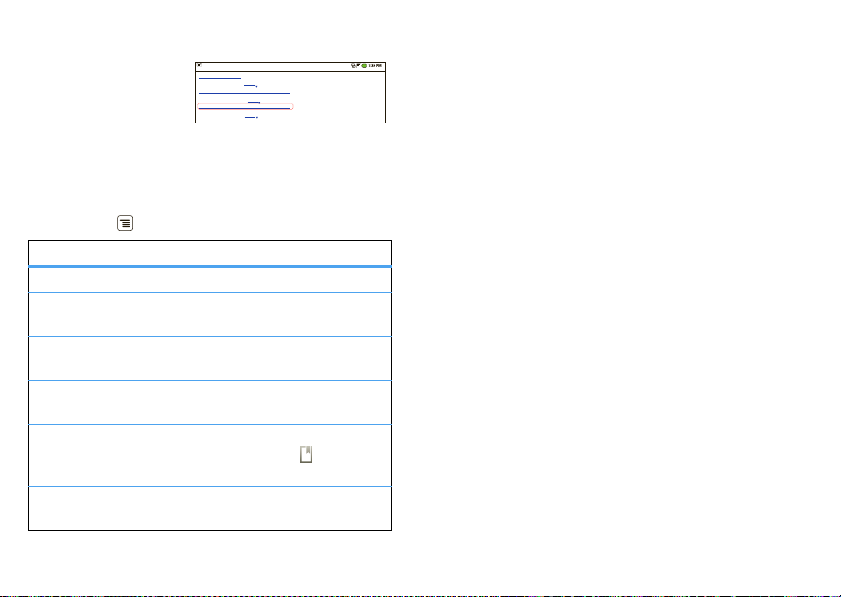
Web
iGoogl
g
g
g
e Preference
s Help
p
p
p
you don’t need a PC, surf the web with your phone
Quick start: Browser
Find it: Home >
Web Images
Local News more
My Locaon: Off - Turn On
iGoogle Preferences Help
Google Search
Sign In
Browser
Connection
Over the air
or Wi-Fi.
Links
Touch to open.
Web Address
To enter a URL,
touch .
Drag or flick to scroll.
Connect
Your phone uses the mobile phone network (over the
air) to automatically connect to the Web.
Note: Your service provider may charge to surf the
Web or download data.
To use a wireless network, touch Menu >
Wireless & networks
>
Wi-Fi settings
touch
. Touch
Wi-Fi
to turn it on and
to search for nearby wireless
Settings
networks. Touch a network to connect.
Web touch tips
Zoom & magnify
In Web pages, when you scroll (drag or flick), zoom
icons appear at the bottom of your screen.
New window
Refresh
Bookmarks
Forward
Windows
More
Touch to display
options.
Note: If you can’t connect, contact your service
provider.
OHIO HISTORY CENRAL
An Online Encyclopedia of Ohio History
About Ohio History Central
Ohio Quick Facts Ohio Across Time Useful Links Subscribe Sponsors Register Members Scrapbooks
Browse DHC Index Category Topic Multimedia
Darwin Wings Baseball Team
Home History Organizaons Darwin Wings Baseball Team
The Darwin Wings was a minor league baseball club in Darwin, Ohio, beginning in
the 1939 season.
The Wings played in the Middle Atlanc League and were affiliates of the Chicago
Panthers. They were renamed the Ducks before the 1941 season. The Ducks
moniker was a reference to Ducky Heinz, the team’s manager and club owner.
Search
Choose your text size A
Time Period
Related Entries
Baseball
Darwin, Ohio
Wings
Zoom In/Out
A
A
A
Region
11Web
Page 13
Select links
y
When you touch a
link, your phone
outlines it and goes to
that page. If you touch
and hold the link, your
phone shows options, like
Bookmark link
.
Baseball Dayton Team - NJ.com
Get the latest Baseball Dayton high school Baseball news, rankings, schedules, stats, scaores, results & athletes. . .
highschoolsports.nj.com/school/... - Opons
Dayton Flyers Baseball rosters, game schedules, photos, arcles ...
Dayton Flyers Baseball are ranked #2306 on Fanbase. Find arcles, photos, videos, rosters, and results for seasons...
www.fanbase.com/Dayton-Flyers-B... - Opons
Dayton Wings Baseball Team - Ohio History Central - A product of ...
Get the latest Baseball Dayton high school Baseball news, rankings, schedules, stats, scaores, results & athletes. . .
www.ohiohistorycentral.org/entr... - Opons
ton baseball
Searches related to: da
Open in new window
Browser options
Touch Menu to see browser options:
options
Refresh
Windows
New window
Back/Forward
Add bookmark
More
12 Google Maps™
Reloads the current page.
View the browser windows that
are currently open.
Add a new browser window to
your list.
Navigate to previously viewed
pages.
Add the current page to your
bookmark list. Touch to see
your bookmarks.
Shows additional browser
options.
or
Google Maps
™
where you are, where you’re going
Note: This feature is not available in all areas. Check
with your service provider.
Quick start: Google Maps
Where am I? Where do I want to go? Don’t worry—let
Google Maps
™
find out for you.
Page 14

Find it: Home >
My Location
Accurate to 1800 meters
Search
Directions Layers
My Location Join Latitude More
Maps
Map View
Drag or flick to scroll.
Touch to show zoom.
Touch to show options.
Google Maps™ opens by default in “Map mode”. To
learn more about the different map modes, go to
“Select map mode” on page 14.
Set your location sources
Set your phone to determine your location using GPS
satellite signals (highly accurate, but uses battery
power) or using the mobile network (less accurate, but
conserves battery power).
Settings
To set your location, touch Menu >
Location & security >Use GPS satellites
>
wireless networks
.
and/or
Use
Find your location
Note: Don’t forget to set your location sources.
From the main Map screen, touch Menu >
Location
. Your location is shown on the map as .
The bigger the circle, the less accurate the location.
Find any location
1 Touch Menu >
Search
.
2 Enter text in the search box, like an address,
business, or city, then touch .
Tip: If it’s an address you have visited before, select
from the list shown.
3 Touch the search box to view all the results, then
touch the one you want. Select
directions
Get directions
1 Touch Menu >
,
Call
or
Add as a contact
Directions
Show on map, Get
.
.
2 Enter a starting point address or touch and select
My current location, Contacts
, or
Points on map
My
.
13Google Maps™
Page 15
3 Enter an end point address or touch and select
Contacts
or
Points on map
.
4 Select your mode of transport (car, public transport
Go
or walk), then touch
. Your directions are shown
as a list. To view your directions on a map, touch
Show on map
5 When you have finished, touch Menu >
Clear map
>
.
More
.
Select map mode
Touch Menu >
Satellite, Latitude
positions or directions.
Touch Menu >
My Maps, Wikipedia
Clear Map
Touch
Map view
Shows a map, complete with names of streets, rivers,
lakes, mountains, and borders. This is the default view.
Satellite view
Shows map on top of aerial photo.
Traffic view
If available in your area, realtime traffic conditions are
shown on the roads as colorcoded lines.
14 Latitude
Layers
to select from
Traffic
or recent searches, viewed
Layers >More layers
, or
Transit Lines
to se le ct from
.
to clear your selections.
,
Latitude
where are your friends & family?
Note: This feature is not available in all areas. Check
with your service provider.
Join Latitude
See where your friends and family are on Google
™
. Plan to meet up, check that your parents got
Maps
home safely, or just stay in touch.
Don’t worry, your location is not shared unless you
agree to it. You need to join Latitude, and then invite
your friends to view your location or accept their
invitations. When using Google Maps, touch Menu
Join Latitude
>
agree with it, touch
Add & remove friends
Find it: Home >
To add friends:
1 Touch Menu >
2 Touch
address
If your friends already use Latitude, they’ll receive an
email request and a notification. If they have not yet
joined Latitude, they’ll receive an email request that
. Read the privacy policy and if you
Agree & share
Maps
Add friends
Select from Contacts
, then touch a contact >
.
>Menu >
.
or
Add via email
Add friends
Latitude
.
Page 16
invites them to sign in to Latitude with their Google
account.
To remove friends:
1 Touch Menu >
Latitude
to show your friend’s
list, then touch a friend in your list.
Remove
2 Touch
.
Share location
When you receive a request to share location details
you can choose to:
Accept and share back
•
—see your friend’s location,
and your friend can see yours.
Accept, but hide my location
•
—see your friend's
location, but they can't see yours.
Don't accept
•
—location information is not shared
between you and your friend.
Hide your location
Touch Menu >
Touch your contact name, then touch Menu
Privacy >Hide your location
>
Latitude
to show your friend’s list.
.
Turn off Latitude
Touch Menu >
Touch Menu >
Latitude
to show your friend’s list.
Privacy >Turn off Latitude
.
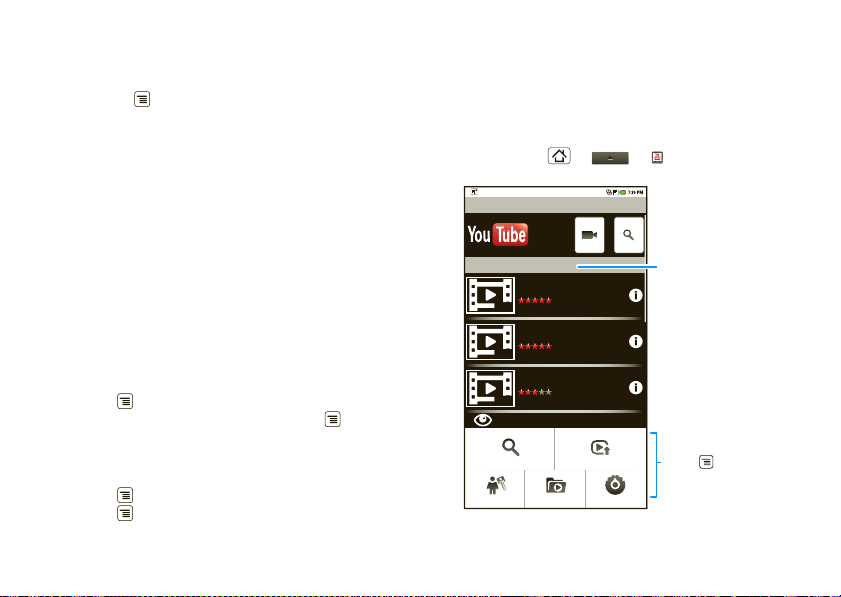
Yo u Tu be
™
go and create your own classic
Quick start: YouTube
Post that great video you’ve taken and see how many
hits you get.
Find it: Home > >
YouTube
TM
Most Viewed
Lady Gaga On Saturda...
Lady Gaga appeared together...
02:58
1 day ago 857,862 views
gol de cabeza de paler...
Golazo de Martin Palermo dura...
00:51
13 hours ago 268,275 views
okailove1004
okailove
05:23
1 day ago 250,567 views
View all Most viewed
Search Upload
SettingsCategoriesMy account
YouTube
Categories
Touch a video to play.
Touch to show
options.
15YouTube™
Page 17
YouTube usergenerated content web site lets you
share videos with YouTube users everywhere. You
don’t need a YouTube account to browse and view
videos.
Note: If you don’t have a YouTube account, visit
http://www.youtube.com
to find out more. To create
an account or sign in, go to “Your account” on
page 16.
Watch videos
See popular video categories, like Most viewed, Most
discussed and Most recent. Touch a category, then
touch the video to start playing it. To see more video
categories, touch Menu >
Categories
.
Search for videos
Find it: Menu >
Enter text, then touch .To clear your search history,
touch Menu >
Search
Settings >Clear search history
.
Share videos
Send someone a link to a video that you are watching.
1 Touch Menu >
2 Address and complete your email, then touch
16 YouTube™
Share
.
Send
Your account
Log in or create account
Find it: Menu > My account
1 To create your YouTube account, touch the “Don’t
have a YouTube account? Click here to create one”
link.
If you already have a YouTube account, enter your
user name and password, and touch Sign in.
2 For a new account, enter a user name, complete the
fields, then touch I accept.
Upload videos
Find it: Menu > Upload
1 Touch the video you want to upload. You can change
the video title, description, set the access, and add
tags.
2 Touch Upload.
.
Page 18
Apps for all
get the app you want
Android Market
Note: You must set up a Gmail account (see “Gmail”
on page 18) in order to buy and download apps from
the Android Market.
Find it: Home >
Get all the fun games and cool apps you want! Market
provides you with access to software developers
everywhere, so you can find the app you want. If you
need help or have questions about Android Market,
touch Menu >
Browse & install apps
Scroll to and touch the app you want to install. Then,
Install
touch
Warning: If an app you are downloading requires
access to your data or control of functions on your
phone, you’ll be asked to give your permission. After
selecting
selecting
additional Google
Purchase now
instructions. To see the download progress, open the
notifications window.
Install
Buy
™
Market
Help
.
(if app is free) or
Buy
.
, the app will download. After
, you may be asked to sign in to an
™
account. Sign in and select
to proceed. Follow the onscreen
After you download an app, the icon for that app
appears on your Applications tab (see “Apps” on
page 7).
Manage & restore apps
To manage your apps, from your phone’s home screen
touch Menu >
applications
Settings >Applications >Manage
.
Touch the app to open the details screen—from here
you can review, uninstall, and more.
To reinstall any downloaded items, touch Home
Market >Download
>
. All previously installed apps
are listed and available for download.
Important customer information
Please be advised that many services and applications
offered through this unique device are provided by
™
and various application developers. If you
Google
use, link to, or download a Google service, or an
application such as a nonVerizon Wireless
locationbased GPS type service, chat room,
marketplace, or social network, from this device, you
should carefully review the terms of such service or
application. If you use any of these nonVerizon
Wireless services or applications, personal information
you submit may be read, collected, or used by the
service or application provider and/or other users of
those forums.
17Apps for all
Page 19
Motorola, Inc., and Verizon Wireless are not
responsible for your use of those applications or
information you choose to submit or share with others.
Specific terms and conditions, terms of use, and
privacy policies apply to those applications and
services. Please review carefully any and all terms and
conditions applicable to those applications and
services including those related to any locationbased
services for any particular privacy policies, risks, or
waivers.
Your Verizon Wireless customer agreement terms and
conditions and certain other specifically identified
terms govern your use of any Verizon Wireless
products and services.
18 Manage y our life
Manage your life
stay on top of things
What can you manage?
Email, contacts, and calendar on your phone give you
access to the same personal information that you add,
view, and edit on your computer with the use of
Microsoft
You can:
• View Google
• Schedule and respond to meeting requests.
• Access your company directory.
For more information, see “Synchronize with
Microsoft™ Office Outlook™” on page 20.
Gmail
Create a new email
Find it: Home > >
>
Enter the recipient email address and message, then
touch
Tip: Touch Menu for options, like
Cc/Bcc
Compose
Send
.
™
Outlook™.
™
and Exchange contacts in one list.
Gmail
.
> Menu
Attach
or
Add
Page 20
Tips
• To search for messages, touch Menu >
Search
• To set new email notifications, such as having a
special sound play when you receive a message,
touch Menu >
Settings >Email notifications
,
then select the ringtone and vibrate options.
• To label an email thread, touch and hold a message,
then touch
Change labels
.
Shortcuts
To refresh list, touch Menu + U.
To compose new, touch Menu + C.
To open conversation, press Enter.
To archive conversation, touch Menu + Y.
To jump to top of list, press Alternate + up.
To jump to end of list, press Alternate +
down.
To page up, press Shift + spacebar.
To page down, press spacebar.
Set up an account
Find it: Home > >
Email
The email setup wizard will guide you through setting
.
up your email account.
Create a new email
Email
Find it: Home > >
Compose
>
>Menu
Enter the recipient email address and message, then
Send
touch
Tip: Touch Menu for options, like
.
Attach
or Add
Cc/Bcc.
Calendar
Find it: Home > >
Calendar
19Manage your life
Page 21
View your calendar in
different ways: Touch
Agenda
Menu >
Day
, or
Week
,
. When
you highlight an event
Sun
30 31 12345
September 2009
Mon Tue Wed Thu Fri Sat
in the day and week
views, more details
appear.
Add calendar events
From any calendar
67 89 10 11 12
13 14 15 16 17 18 19
view, touch Menu
New event
>
event details and touch
Done
Manage calendar
. Enter
20 21 22 23 24 25 26
.
27 28 29 30
123
events
To edit an event, touch
45678910
and hold the event,
then touch
Edit event
you’re done, touch
. Edit event details, then when
Done
.
Google data synchronization
Find it: Menu >
The Google apps on your phone give you access to the
same personal information (emails, events, and
contacts) that you have on a computer using Gmail,
20 Manage y our life
Settings >Accounts & sync
Calendar, and Contacts. It’s easy to synchronize the
Google apps information you want to keep up to date.
Select apps to synchronize
1 Touch
Background data
Tip: To save battery power do not touch
data
.
Add account
2 Touch
synchronize, like
Synchronize with Microsoft™Office
Outlook
™
.
Background
to add the apps you want to
Google
or
Corporate
.
If you use Microsoft™Office Outlook™ on your work
computer, your phone can synchronize emails, and
events with your Microsoft
Find it: Menu >
account
>
1 Enter your user name (username@company.com),
Corporate
™
Exchange server.
Settings >Accounts & sync >Add
password, email address, and server details
including domain name and security type (server
address is the same URL you use to access your
company’s email using the Web on your computer).
Note: Contact your business IT department for
server details.
Next
2 Touch
.
Page 22
3 Set up your sync options: select email, contacts, or
calendar.
4 Touch Save & sync.
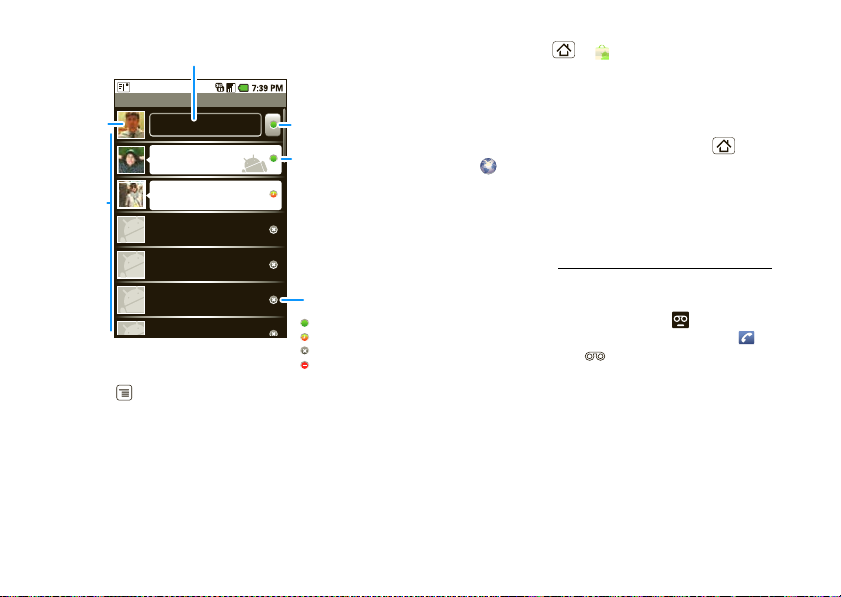
Contacts
contacts like you’ve never had before
Quick start: Contacts
Find it: Home >
Displaying 5 contacts
J
Jennie Jenkins
L
Leo Heaton
M
Mick West
R
Rick Wasser
W
Wallace Mans
Tip: To search the list, just open your phone and type a
name. When you flick or drag this list, a scroll bar
appears on the right. Drag the scroll bar to move the
list faster.
Contacts
ContactsPhone Call log Favorites
Contacts List
Touch to view
contact information.
Touch & hold to edit,
delete, & more.
Menu Options
Touch Menu to
edit sync groups or
to add/import new
contacts.
21Contacts
Page 23
Call, text, or email contacts
Find it: Home >
For
View contact, Call contact, Text contact, Add to
favorites
, or other options, touch and hold the contact.
Contacts
Edit or delete contacts
Find it: Home >
Touch the contact, then touch Menu >
Delete contact
or
Tip: When editing a contact, you can set a ringtone,
address, and other details that will be saved on your
phone.
Contacts
Edit contact
.
Create contacts
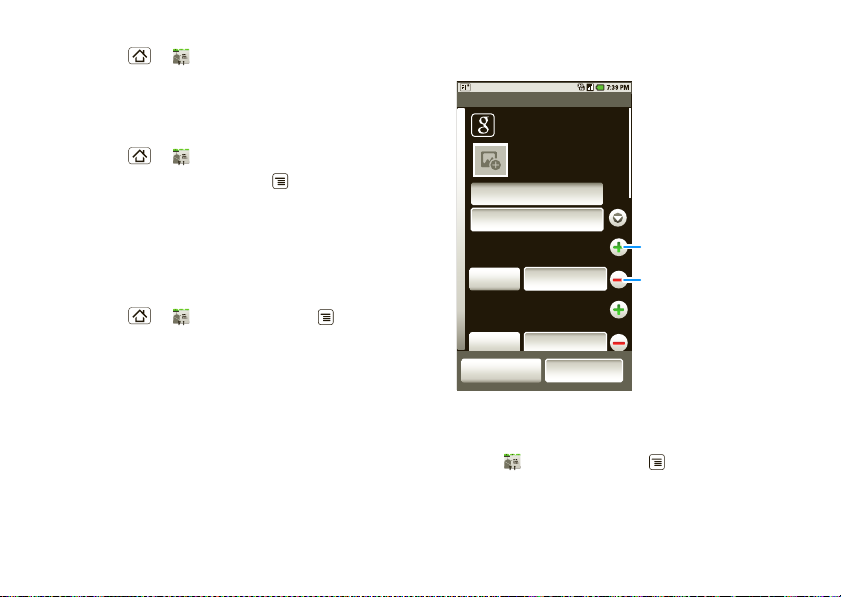
Find it: Home >
contact
22 Contacts
Contacts
>Menu >
New
Select the account to save the contact to, then type
the contact name and details.
Edit contact
Google
mcg30203@gmail.com
Touch Home to choose a
Given name
Family name
Phone
Home
Email
Home
Done
Phone
Email
Revert
When you’re finished, touch
different type for this entry.
Touch + to add another
entry.
Touch - to remove this entry.
To see more details, flick up.
Done
.
Groups
Find it:
You can put your
(like “friends”, “family”, or “work”). Then, you can find
contacts faster by showing one group at a time.
Contacts
Contacts
>Menu >
Display options
into groups that you create
Page 24
Messaging
sometimes it’s best 2 text, or IM, or email . . .
Quick start: Messaging
Find it: Home >
Messaging
Create messages
Find it:
Enter the recipient and message. In text messages
and emails, touch Menu for options, like
smiley
Messaging >New message
or
Attach
.
Insert
weftl-request@lists.weft.o...
WEFTI Digest, Vol 40, Issue 1 4:12 PM
wefta-request@lists.weft....
WEFTa Digest, Vol 34, Issue 2 4:12 PM
Fred Vescio
John Haddon is calling t... 4:11 PM
The Kenton Review
The Kenton Review Newslett... 3:40 PM
Steven Sherer
Steven Sherer also commen...
Jack bradley
FW: Coming Home to Parad...
Jack bradley
For the seventeenth time ...
Laura Lehman
When are you coming to... 10/032009
e@email.comInbox
Message List
Touch to open a message.
9:57 AM
Touch & hold to move,
10/3/2009
10/3/2009
delete, & more.
Tip: To see more messages, flick or drag up.
Read & reply to messages
• To open a message and all of its replies, touch it.
• To respond to a message, just open it and enter
your response in the text box at the bottom.
• To open options, touch and hold a message.
Send & receive attachments
To send a file in a message, open a new message and
touch Menu >
When you receive a message with an attachment,
open the message and touch the file name to
download it. Then, touch the name again to open it.
Some file formats can be converted to HTML for faster
viewing, and your phone will show a button that says
Get HTML version
Tip: To send and receive large attachments faster, use
a WiFi connection, in “WiFi” on page 37.
Google Talk
Google Talk instant messaging lets you chat with other
Google Talk users on phones or on the web.
Find it: Home > >
™
Attach
.
.
Talk
23Messaging
Page 25
Touch to change your online status message.
Touch to
change your
picture.
Friends list
Friends list b@gmail.com
on android phone
Hey what’s up?
Jen
Alfred
offline
Alvin
offline
Anson
offline
Anu
Touch to change
your status.
Opened chats.
Touch a callout
to open the chat
screen and start
chatting with
your friend.
Online
status:
Available
Idle
Busy
Offline
Touch Menu to see a list of your Google Talk
friends, send invitations to add new friends, and much
more.
Instant messages
To send and receive instant messages, you can use an
instant messaging app (such as Google Talk
browser.
24 Messaging
™
) or your
• To download and use an instant messaging app,
touch Home >
Communication
>
Market >Apps
, then choose an app for your
provider. Once you download the app, you’ll see it
on your Applications tab (see “Apps” on page 7).
• If you don’t see an app for your IM provider, you can
use your Web browser. Touch Home
Browser
>
and touch
, then enter your provider’s Web site
Go
. Once you’re there, follow the link to
sign in.
Note: Your IM options will depend on your IM provider.
To browse instant messaging apps from your
computer, go to http://www.android.com/market
.
Voi c e mail
When you have a new voicemail, shows at the top
of your screen. To hear the voicemail, touch
then touch and hold .
Phone
,
Page 26
Text entry
think keyboard, now think smaller
Typing tips
Here are some tips for using your phone’s keypad:
• To choose symbols from a list, press Alternate
>Symbols .
• To e n te r alternate characters in the corners of keys,
press Alternate .
• To enter several alternate characters until you
press Alternate again, press Alternate
twice.
• To enter one capital letter, press Shift .
• Enter only capital letters, until you press Shift
again, press Shift twice.
• To select text, press and hold Shift , then
press left or right.
• To cut or copy selected text, touch and hold text
Cut
or
Copy
>
• To paste cut or copied text, touch and hold >
• To delete a character (hold to delete more), press
Delete .
• To delete the current line, press Alternate +
Delete .
.
Paste
• To jump to the beginning/end of a line, press
Alternate + Scroll .
• To start a new line (email), press Return .
To change text entry settings, change languages, and
see the dictionary of terms you’ve used, from the
home screen, touch Menu >
& keyboard
.
Settings >Language
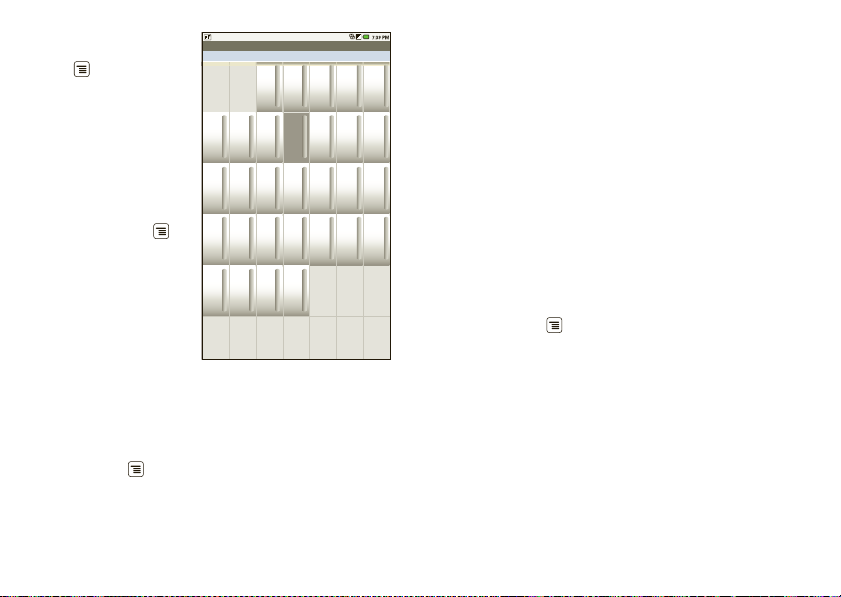
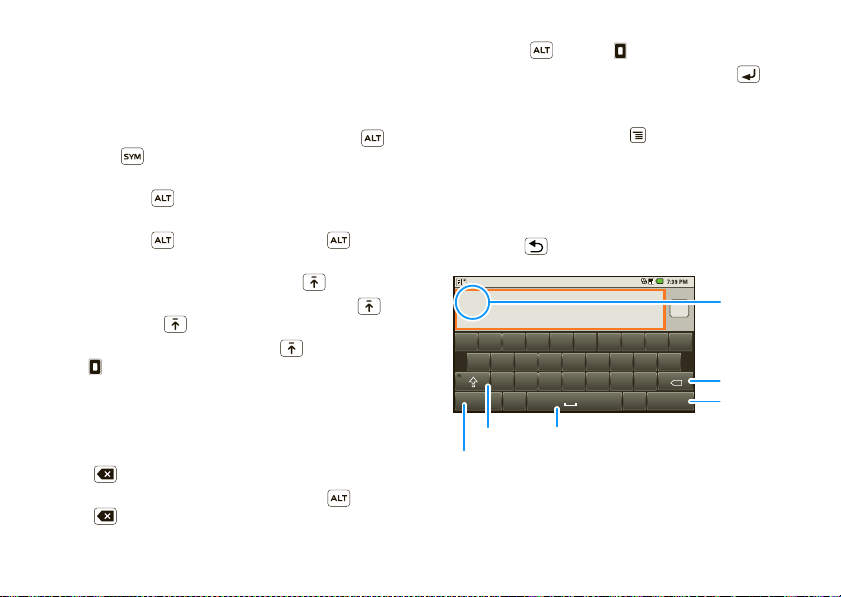
Touchscreen keypad
When your phone is closed, you can open a display
keypad by touching a text field. To close the keypad,
touch Back .
To
q
we r ty ui op
as
df g hj kl
zxcvbnm
,.
?123
Shift
Symbols/Numbers
Touch to open a keypad for symbols and numbers.
Space
Next
Next
DEL
x
Text Entry
Touch to open
the touchscreen
keypad.
Delete
Return
25Te xt entry
Page 27

Note: You must set
feature—touch Menu >
>
Orientation
.
Orientation
to on to use this
Settings >Sound & display
To change your settings for this keypad, from the home
screen, touch Menu >
keyboard
>
Android keyboard
Settings >Language &
.
Text entry settings
When you use the touchscreen keypad, your phone
suggests words from your dictionary and chosen
language. Your phone also automatically enters
apostrophes in some words, like “dont.”
Find it: Menu >
• To change the language and style for your
touchscreen keypad, touch
• To edit your dictionary, touch
• To change the sounds, correction, and other settings
for your touchscreen keypad, touch
keyboard
• To change the automatic correction settings for your
full keypad, touch
26 Tips & tricks
Settings >Language & keyboard
Select locale
User dictionary
.
Device keyboard
.
.
Android
.
Tips & tricks
a few handy hints
General tips
• To return to home screen, touch Home .
• To see recently dialed numbers, touch
Call log
>
.
• To sleep/wake your phone, press Power .
• To set screen timeout, touch Menu >
Sound & display >Screen timeout
>
• To search, touch Search .
• To show last few apps, touch and hold Home .
• To turn sound on/off, press and hold Power
Silent mode
>
.
• To turn airplane mode on/off, press and hold
Power >
Airplane mode
.
• To go to the top of a list, press and hold
Alternate > Scroll up.
• To go to the bottom of al list, press and hold
Alternate > Scroll down.
Phone
Settings
.
Page 28
Battery tips
Want to extend your battery life? Try these:
• To turn off automatic applications sync, touch
Menu >
• To turn off Bluetooth power, touch Menu
Settings >Wireless & networks >Bluetooth
>
• To turn off WiFi, touch Menu >
Wireless & networks >Wi-Fi
>
• To add a
Add >Widgets >Power Control
>
Note: The
enable/disable WiFi, Bluetooth® wireless, GPS,
Sync (turns on/off all active accounts, Google, and
Exchange), and display brightness.
You can expect the following battery charge times:
Usage—up to 385 minutes
Standby—up to 270 hours
Note: All usage times are approximate. Battery
performance depends on network configuration, signal
strength, operating temperature, features selected,
and voice, data and other application usage patterns.
Settings >Accounts & sync
Power Control
Power Control
widget, touch Menu
widget is a simple way to
.
Settings
.
.
.
Personalize
add your personal touch
Widgets
To create a new widget:
1 Find an empty spot on your home screen where you
want to add a widget, then touch and hold.
Tip: You can flick left or right to open other panels
on your home screen.
Widgets
2 Touch
3 Touch the type of widget. If necessary, enter the
widget settings.
You can personalize widgets with content that you
choose.
Ringtones
To personalize your ringtones:
Find it: Menu >
Phone ringtone
>
To set your vibrate options:
Find it: Menu >
Phone vibrate
>
.
Settings>Sound & display
or
Notification ringtone
Settings >Sound & display
27Personalize
Page 29
Wallpaper
To apply a new wallpaper:
1 Find an empty spot on your home screen, then
touch and hold.
Wallpapers
2 Touch
Media gallery
3 Touch
wallpaper, or touch
.
to select a photo as your
Wallpaper gallery
to choose a
wallpaper that comes with your phone.
Sounds
• To set volume for media and videos, touch Menu
Settings >Sound & display >Media volume
>
.
• To play tones when using dial pad, touch Menu
Settings >Sound & display >Audible touch
>
tones
.
• To play sound on a screen selection, touch Menu
Settings >Sound & display >Audible selection
>
.
Display settings
• To set display brightness, touch Menu
Settings >Sound & display >Brightness
>
• To set orientation, touch Menu >
Sound & display >Orientation
>
.
• To set animation, touch Menu >
Sound & display >Animation
>
28 Personalize
.
Settings
Settings
.
Quick launch shortcuts
To set keyboard shortcuts to launch your favorite app,
touch Menu >
launch
>
To use a quick launch shortcut, touch Search and
the assigned key, like Search and B to launch the
browser.
Settings >Applications >Quick
Assign application
.
Language & region
Set your menu language and region:
Find it: Menu >
Select locale
>
Settings >Language & keyboard
Page 30

Photos & videos
see it, capture it, share it!
Photos
Take & share photos
Take that family photo, and post it online for everyone
to see.
Note: To get the clearest photos, wipe the lens clean
with a soft, dry cloth before you take a photo.
Find it: Press Camera
Thumbnail of
Last Photo
Touch to view.
Drag up to
change to
camcorder.
Touch to take the
photo.
Note: Photos are stored on your microSD memory
Picture Resolution
card.
To t ake the photo, touch and hold , or press
Camera .
A thumbnail of the photo you’ve just taken is shown on
the right. Touch the thumbnail to view it.
is 5MP, unless you change it.
• To set the photo as a wallpaper or contact photo,
Set as
touch Menu >
.
• To send the photo in a message or post it online,
Share
touch Menu >
. For more info on sharing
your photos, see “Share your photo gallery” on
page 30.
Delete
• To delete the photo, touch Menu >
• For more options, touch Menu >
More
.
.
Photo options
In the viewfinder, touch Menu >
Settings
to open
the camera menu:
options
Store location
Save the details of where the
photo was taken.
Scene mode
Set the scene, from loads of
options.
Flash mode
White balance
Choose from
Off
.
Choose from
Automatic, On
Daylight, Cloudy
, and
, and
more.
Color effect
Choose from
Sepia, Blue tint
, and
more.
Picture size
Set the size of your photo.
29Photos & videos
Page 31

options
Picture
quality
Focus mode
Choose from
Normal
Choose from
Macro
View your photos
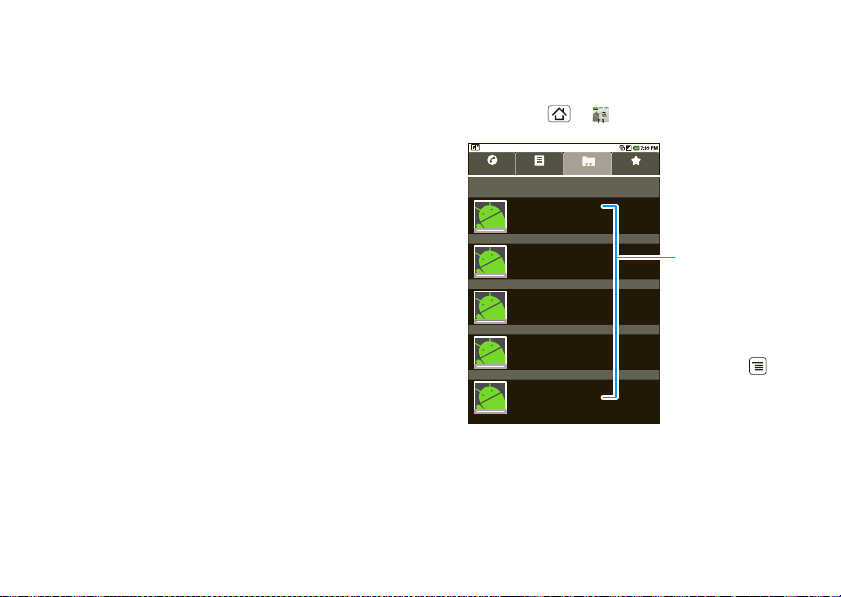
Find it: Home >
Gallery
>
Camera pictures
>
Play a slideshow
Touch Home >
Gallery
>
Camera pictures
>
,
touch a picture, then
touch Menu >
Slideshow
>
More
to start a
slideshow. To stop the
slideshow, touch the
display. To return to the
gallery, touch Back .
Share your photo gallery
Find it: Home >
Gallery
>
Camera pictures
>
30 Photos & videos
.
.
Camera pictures
Fine, Super fine
Auto, Infinity
, and
, and
To send your photo in a message or post it online:
1 Touch and hold a photo, then touch
2 Choose how you want to share—like
Email
, or
Messaging
.
Share
Bluetooth
.
,
Manage your photos
Find it: Home > >
pictures
Gallery >Camera
Touch and hold a photo, then:
Delete
• To delete the photo, touch
.
• To set the photo as a contact picture or wallpaper,
Set as
touch
.
Tip: To copy photos to/from a computer, go to “USB
drag & drop” on page 38.
Edit your photos
Touch Home > >
pictures
, touch & hold picture, then touch and hold
Rotate, Delete
, or
Crop
Gallery >Camera
.
Videos
Record & share videos
Camera
Touch Home >
, then drag the switch up.
Page 32

Note: To get the clearest videos, wipe the lens clean
with a soft, dry cloth before you record a video.
Thumbnail of
Last Video
Touch to view.
Drag down to
change to
camera.
Play your videos
Find it: Home > >
videos
> video
Gallery >Camera
Tip: To send your video in a message, set the video
quality to
Menu >
Low (for MMS messages)
Settings >Video Quality
by touching
.
To record the video, touch . Touch to stop the
video. Or, press Camera . To stop the video
recording, press Camera again.
A thumbnail of the video you’ve just taken is shown on
the right. Touch the thumbnail, then touch Menu :
• To send the video in a message or post it online,
Share
touch
. For more info on sharing your photos,
see “Share your photo gallery” on page 30.
• To play the video, touch .
Delete
• To delete the video, touch
.
00:01 00:34
Video ControlsProgress Bar
Note: To see the controls while the video is playing,
touch the display.
31Photos & videos
Page 33

Music
when music is what you need...
Quick start: Music
Touch, touch, play—instant music. Just open your
music library, then select what you want to play.
Find it: Home > >
Music
Albums
Artists
PlaylistsSongs
Touch a category, then
touch a song or playlist.
Tip: When a song is playing, you can add it to a playlist
by touching Menu >
32 Music
Music
Bigfoot
Live (EP)
The Beautiful Stepdown
0:53 6:19
Music ControlsCategories
Add to playlist
.
Set up music
What music transfer tools do I need?
To put music on your computer and then load it on
your phone, you need:
™
• A Microsoft
Windows™PC or Apple™ Macintosh
• A USB data cable.
You need a memory card
Your music is stored on your memory card. Your phone
supports removable microSD memory cards. To make
sure your memory card is installed, go to “Assemble &
charge” on page 3.
Your music is stored on your memory card. Your phone
supports removable microSD memory cards.
Tip: To see the available memory on your memory
card, touch Menu >
storage
.
Settings >SD card & phone
What music file formats can I play?
Your phone can play many types of files: AMRNB/WB,
MP3, PCM/WAV, AAC, AAC+, eAAC+, MIDI, OGG, and
WMA.
Note: Your phone does not support any DRM
protected files.
™
Page 34

What headphones can I use?
Your phone has a 3.5mm headset jack for wired stereo
listening. You can go wireless with Bluetooth® stereo
headphones or speakers (see “Bluetooth® wireless”
on page 36).
Get music
Transfer music using USB
Transfer music files from a computer to your memory
card.
1 With a memory card inserted, and your phone
showing the home screen, connect a Motorola
micro USB data cable from your phone’s micro USB
port to a USB port on your computer. Your phone
should show in the status bar.
Note: You may need to remove the USB data cable
from the charger power head.
Note: Make sure to connect the phone to a high
power USB port. Typically, these are located directly
on your computer.
™
Note: Your phone supports Microsoft
XP, W indows Vista
™
, and Apple™ Macintosh™. Other
operating systems may not be compatible.
2 Your phone shows a USB connection dialog, at the
top of the screen. Flick down, then touch
Windows™
USB
connection
. You can’t use the files on your memory
card while it is connected.
Mount
3 Touch
(if asked) to connect your memory
card.
4 Find “Removable Device” (your memory card) in the
“My Computer” window.
5 Drag and drop your music to a folder on your
memory card.
Tip: To help manage your music, create a “Music”
folder on your memory card.
6 When you’re done, use the “Safely Remove
Hardware” feature to finish.
Play music
Music library
Open your music library, then select what you want to
play.
33Music
Page 35

Find it: Home > >
Music
Music
Music player
Just touch a song or playlist to get going.
Artists
Albums
PlaylistsSongs
Categories
Touch to list songs
or playlists.
Your music is stored by artists, albums, songs, and
playlists. Touch a category, then touch the song or
playlist you want to play. Touch Menu >
shuffle
to randomly play all your songs.
34 Music
Party
Open Playlist
Shuffle On/Off
Repeat Off/All
/Current
Bigfoot
Live (EP)
The Beautiful Stepdown
1:14 3:45
Artist
Album
Song Title
Music Controls
Total Song Time
Progress Bar
Music player controls
• Play/pause—Touch /.
• Previous/next—Touch /.
• Fast forward/rewind—Touch and hold / .
Page 36

•View playlist—Touch .
•Shuffle—Touch .
• Repeat—Touch .
•Volume—Press the side volume keys.
Library
•View library—Touch Menu >
• Turn shuffle on/off—Touch Menu >
shuffle
.
• Add to playlist—Touch Menu >
• Use as ringtone—Touch Menu >
ringtone
.
• Delete—Touch Menu >
Delete
.
Party
Add to playlist
Use as
.
Hide, wake, turn off
Touch Home to use another app. Your music
continues to play.
When you see in the status bar, a song is playing,
flick down to see details. Touch the song to return to
the music controls.
To turn off your music touch .
Playlists
To add a song from the music library to a playlist, touch
and hold the song then touch
an existing playlist, or touch
Add to playlist
New
to create a new
. Choose
playlist.
To add a song to the playlist you’re playing, touch
Menu >
Add to playlist
in the music player.
To edit, delete and rename playlists, touch and hold the
playlist, in the music library.
.
35Music
Page 37

Bluetooth® wireless
lose the wires and go wireless
Quick start: Bluetooth wireless
Find it: Menu >
>
Bluetooth settings
Bluetooth settings
Bluetooth
Device name
(#########) 38.4 MHz Class 1.5
Discoverable
Make device discoverable
Scan for devices
Bluetooth devices
(found device name)
Pair with this device
For more information about Bluetooth wireless
connections supported by this device, go to
http://www.verizonwireless.com/bluetooth
Turn Bluetooth power on or off
Find it: Touch Menu >
networks
36 Bluetooth® wireless
>
Settings >Wireless & networks
Touch to turn on & scan.
Touch to re-scan.
Touch to connect.
Bluetooth
Settings
.
>
Wireless &
.
Note: To extend battery life, turn Bluetooth power off
when not in use.
Connect new devices
Note: This feature requires an optional accessory.
To connect with a new device, you need to pair with it.
You only need to do this once for each device—to
connect again, see “Reconnect devices” on page 37.
1 Make sure the device you are pairing with is in
discoverable mode.
Note: Refer to the guide that came with the device
for details.
2 Touch Menu >
Bluetooth settings
>
Bluetooth
3 Touch
already on, touch
4 Touch a device to connect.
5 If necessary, touch
0000
(like
) to connect to the device. When the
device is connected, the Bluetooth indicator
appears in the status bar.
Note: Using a mobile device or accessory while
driving may cause distraction and may be illegal.
Always obey the laws and drive safely.
Settings >Wireless & networks
.
to turn on and scan. If Bluetooth is
Scan for devices
OK
, or enter the device passkey
.
Page 38

Reconnect devices
To automatically reconnect your phone with a paired
device, simply turn on the device.
To manually reconnect your phone with a paired
device, touch the device name in the
devices
list.
Bluetooth
Disconnect devices
To automatically disconnect your phone from a paired
device, simply turn off the device.
To manually disconnect your phone from a paired
device, touch the device name in the devices list, then
touch Menu >
Disconnect
.
Edit properties
To edit the device name, touch Menu >
Wireless & networks >Bluetooth settings >Device
>
name
. Enter a name and touch OK.
Settings
Wi-Fi
home, office, or hotspot
Quick start: WiFi
Find it: Menu >
Wi-Fi settings
>
Note: Your phone's WiFi features and power levels
are not allowed for outdoor operation in France. To
avoid unlawful interference with radio signals, do
not use the WiFi features in France unless you are
indoors.
Use a wireless network for fast Internet access and to
download data.
Wi-Fi settings
Wi-Fi
Network notification
Notify me when an open network is
available
Wi-Fi networks
Your network
Add Wi-Fi network
Settings >Wireless & networks
Touch to turn on & scan.
Touch to connect.
37WiFi
Page 39

Turn WiFi on or off
Find it: Menu >
Wi-Fi
.
>
Note: To extend battery life, turn off WiFi power when
not in use.
Settings
>
Wireless & networks
WiFi search & connect
To find networks in your range:
1 Touch Menu >
Wi-Fi settings
>
Wi-Fi
2 Touch
on, touch Menu >
networks it finds within range.
Tip: To see your phone’s MAC address or other
WiFi details, touch Menu >
3 Touch a network to connect.
4 If necessary, enter
Wireless password
phone is connected to the network, the wireless
indicator appears in the status bar.
Tip: When you are in range and WiFi is on, you will
automatically reconnect to available networks you’ve
connected to before.
38 USB & memory card
Settings >Wireless & networks
.
to turn on and scan. If WiFi is already
Scan
. Your phone lists the
Advanced
Network SSID, Security
, and touch
Connect
.
, and
. When your
USB & memory card
connect your phone and computer, then drag & drop
USB drag & drop
You can transfer your pictures, videos, music,
ringtones, and more, from your computer to your
phone’s memory card.
1 With a memory card inserted, and
your phone showing the home
screen, connect a Motorola micro
USB data cable from your phone’s
micro USB port to a USB port on
your computer. Your phone should
show in the status bar.
Note: You may need to remove the USB data cable
from the charger power head.
Note: Make sure to connect the phone to a high
power USB port. Typically, these are located directly
on your computer.
2 Your phone shows a USB connection dialog, at the
top of the screen. Flick down, then touch
connected
. You can’t use the files on your memory
USB
card while it is connected.
Mount
3 Touch
(if asked) to connect your memory
card.
Page 40

4 On your computer, use the “My Computer”
window to find “Removable Disk”.
5 Click on the “Removable Disk” icon to access the
memory card.
6 Drag and drop your pictures, videos, music,
ringtones, and more, to your phone folder. To help
manage your files, you can create more folders in
your phone folder.
7 When you’re done, use the “Safely Remove
Hardware” feature to finish.
Memory card
Note: You need the memory card installed for some
features on your phone, like
Remove or format your memory card
Before you remove or format your memory card you
need to unmount it. Touch Menu >
card & phone storage
To format your memory card, touch
Warning: All data on your memory card will be
deleted.
Camera
>
Unmount SD card
.
Settings >SD
.
Format SD card
Too ls
stay on top of things
Alarm clock
Find it: Home > >
To turn on an alarm, touch the
check b ox.
When an alarm sounds, touch
Dismiss
to turn it off or
Snooze
to delay.
To add an alarm, touch Menu
Add alarm
>
, then enter alarm
details.
To enable or disable an alarm,
touch the check box.
Calculator
Find it: Home > >
.
Your calculator has basic and advanced views. To
change views, touch Menu >
Basic panel
history
. To clear history, touch Menu >
.
Alarm Clock
Alarm Clock
1:00
PM
every day
3:30
PM
Tue
4:00
PM
Mon, Fri
Calculator
Advanced panel
or
Clear
39Tools
Page 41

Management
stay in control
Security
help keep your phone safe
Wireless manager
Find it: Menu >
Manage all your wireless connections: WiFi,
Bluetooth®, airplane mode, & mobile networks.
Airplane mode
Use airplane mode to turn all your wireless
connections off—useful when flying.
Settings >Wireless & networks
Update my phone
To keep your phone current, software updates may be
available. Touch Menu >
System updates
>
it isn’t, touch
to see if your phone is up to date. If
Update
Settings >About phone
.
Network
You should not need to change any network settings.
Contact your service provider for help.
Touch Menu >
Mobile networks
>
Settings >Wireless & networks
to show options for roaming
networks, network selection, operator selection, and
access point names.
40 Management
Quick start: Security
Find it: Menu >
Settings >Location & security
security settings
(uncheck to conserve battery)
Screen unlock pattern
Set unlock pattern
Require pattern
Must draw pattern to unlock screen
Use visible pattern
Screen lock
Note: You can make emergency calls on a locked
phone (see “Emergency calls” on page 10). A locked
phone still rings, but you need to unlock it to
answer.
Lock the screen in the following ways:
• Press Power .
• Let the screen time out (don’t press anything).
• Switch the power off.
Page 42

To unlock the screen, press Power , or open the
phone. Then, drag the lock icon to the right.
Set unlock pattern
To set an unlock pattern, that you need to draw to
unlock your screen, touch Menu >
Location & security >Set unlock pattern
>
follow the instructions to draw your pattern.
To turn the lock off, touch Menu >
Location & security >Require pattern
>
To change the lock pattern, touch Menu >
Location & security >Change unlock pattern
>
Settings
, then
Settings
.
Settings
.
Forgot your pattern or passcode?
If you forget your pattern or passcode, see your
service provider.
Troubleshooting
we’re here to help
Crash recovery
In the unlikely event that your phone stops responding to
taps and key presses, try a quick reset. Remove the back
cover and battery (“Assemble & charge” on page 3),
then replace and switch your phone on as usual.
In the unlikely event that your phone stops responding
to taps and key presses, try a quick reset. Remove the
back cover and battery, then replace and switch your
phone on as usual.
Reset
To reset your phone to factory settings and erase all
the data on your phone, touch Menu >
Privacy >Factory data reset >Reset phone
>
Warning: All data on your phone will be deleted.
Settings
.
Service & repairs
If you have questions or need assistance, go to
http://www.motorola.com/support
select from a number of customer care options. You
can also contact the Motorola Customer Support
Center at 18003316456 (United States),
18883906456 (TTY/TDD United States for hearing
impaired), or 18004614575 (Canada).
, where you can
41Troubleshooting
Page 43

Safety, Regulatory & Legal
Battery Use & Safety
Battery Use & Safety
Important: Handle and store batteries properly to avoid injury or damage.
Most battery issues arise from improper handling of batteries, and particularly from
the continued use of damaged batteries.
DON’Ts
• Don’t disassemble, crush, puncture, shred, or otherwise attempt to
change the form of your battery.
• Don’t let the phone or battery come in contact with water.
into the phone’s circuits, leading to corrosion. If the phone and/or battery get
wet, have them checked by your carrier or contact Motorola, even if they appear
to be working properly.
• Don’t allow the battery to touch metal objects.
jewelry, stay in prolonged contact with the battery contact points, the battery
could become very hot.
• Don’t place your battery near a heat source.
phone or the battery. High temperatures can cause the battery to swell, leak, or
malfunction. Therefore:
•
Do
not
dry a wet or damp battery with an appliance or heat source, such as a
hair dryer or microwave oven.
•
Avoid leaving your phone in your car in high temperatures.
DOs
• Do avoid dropping the battery or phone.
a hard surface, can potentially cause damage.
• Do contact your service provider or Motorola if your phone or battery
has been damaged from dropping or high temperatures.
Important: Use Motorola Original products for quality assurance and
safeguards.
To aid consumers in identifying authentic Motorola batteries from
non-original or counterfeit batteries (that may not have adequate safety protection),
Motorola provides holograms on its batteries. Consumers should confirm that any
battery they purchase has a “Motorola Original” hologram.
42
Excessive heat can damage the
Dropping these items, especially on
Water can get
If metal objects, such as
Motorola recommends you always use Motorola-branded batteries and
chargers.
Motorola mobile devices are designed to work with Motorola batteries.
If you see a message on your display such as
Unable to Charge
•
Remove the battery and inspect it to confirm that it has a “Motorola Original”
hologram;
•
If there is no hologram, the battery is not a Motorola battery;
•
If there is a hologram, replace the battery and retry charging it;
•
If the message remains, contact a Motorola authorized service center.
Important:
Motorola’s warranty does not cover damage to the phone caused by
non-Motorola batteries and/or chargers.
Warning:
Use of a non-Motorola battery or charger may present a risk of fire,
explosion, leakage, or other hazard.
Proper and safe battery disposal and recycling:
only important for safety, it benefits the environment. Consumers may recycle their
used batteries in many retail or service provider locations. Additional information on
proper disposal and recycling may be found on the Web:
•
www.motorola.com/recycling
•
www.rbrc.org/call2recycle/
Disposal:
Promptly dispose of used batteries in accordance with local
regulations. Contact your local recycling center or national recycling
organizations for more information on how to dispose of batteries.
Warning:
Never dispose of batteries in a fire because they may explode.
Battery Charging
Battery Charging
Notes for charging your phone’s battery:
•
When charging your battery, keep it near room temperature. Never expose
batteries to temperatures below 0°C (32°F) or above 45°C (113°F) when
charging.
•
New batteries are not fully charged.
•
New batteries or batteries stored for a long time may take more time to charge.
•
Motorola batteries and charging systems have circuitry that protects the battery
from damage from overcharging.
, take the following steps:
Invalid Battery
(in English only)
or
Proper battery disposal is not
032375o
Page 44

Specific Absorption Rate (IEEE)
SAR (IEEE)
Your model wireless phone meets the governmental
requirements for exposure to radio waves.
Your mobile device is a radio transmitter and receiver. It is designed and
manufactured to not exceed limits for exposure to radio frequency (RF) energy set by
the Federal Communications Commission (FCC) of the U.S. Government and by the
Canadian regulatory authorities. These limits are part of comprehensive guidelines
and establish permitted levels of RF energy for the general population. The
guidelines are based on standards that were developed by independent scientific
organizations through periodic and thorough evaluation of scientific studies. The
standards include a substantial safety margin designed for the safety of all persons,
regardless of age or health, and to account for any variations in measurements.
The exposure standard for mobile devices employs a unit of measurement known as
the Specific Absorption Rate (SAR). The IEEE SAR limit set by the FCC and by the
Canadian regulatory authorities is 1.6 watts per kilogram (W/kg), averaged over one
gram of tissue. Tests for SAR are conducted using procedures accepted by the FCC
and by Industry Canada with the mobile device transmitting at its highest certified
power level in all tested frequencies. Although the SAR is determined at the highest
certified power level, the actual SAR level of the mobile device while operating can
be below the maximum value. This is because the mobile device is designed to
operate at multiple power levels so as to use only the power required to reach the
network. In general, the closer you are to a wireless base station, the lower the
power output.
Before a mobile device is available for sale to the public in the U.S. and Canada, it
must be tested and certified to the FCC and Industry Canada that it does not exceed
the limit established by each government for safe exposure. The tests are performed
in positions and locations (e.g., at the ear and worn on the body) submitted to the
FCC and available for review by Industry Canada. The highest SAR value for this
mobile device when tested for use at the ear is 1.49 W/kg, and when worn on the
body, as described in this guide, is 1.5 W/kg. Body-worn measurements can differ,
depending upon available accessories and regulatory requirements. The SAR
information includes the Motorola testing protocol, assessment procedure, and
measurement uncertainty range for this product.
While there may be differences between the SAR levels of various mobile devices
and at various positions, they meet the governmental requirements for safe
exposure. Please note that improvements to this product model could cause
differences in the SAR value for later products; in all cases, products are designed to
be within the guidelines.
Additional information on SAR can be found on the Cellular Telecommunications
& Internet Association (CTIA) Web site:
http://www.phonefacts.net
or the Canadian Wireless Telecommunications Association (CWTA) Web site:
http://www.cwta.ca
Software Copyright Notice
Software Copyright N otice
Motorola products may include copyrighted Motorola and third-party software
stored in semiconductor memories or other media. Laws in the United States and
other countries preserve for Motorola and third-party software providers certain
exclusive rights for copyrighted software, such as the exclusive rights to distribute
or reproduce the copyrighted software. Accordingly, any copyrighted software
contained in Motorola products may not be modified, reverse-engineered,
distributed, or reproduced in any manner to the extent allowed by law. Furthermore,
the purchase of Motorola products shall not be deemed to grant either directly or by
implication, estoppel, or otherwise, any license under the copyrights, patents, or
patent applications of Motorola or any third-party software provider, except for the
normal, non-exclusive, royalty-free license to use that arises by operation of law in
the sale of a product.
Content Copyright
Content Copyright
The unauthorized copying of copyrighted materials is contrary to the provisions of
the Copyright Laws of the United States and other countries. Thi s device is intended
solely for copying non-copyrighted materials, materials in which you own the
copyright, or materials which you are authorized or legally permitted to copy. If you
are uncertain about your right to copy any material, please contact your legal
advisor.
43
Page 45

Open Source Software Information
OSS Information
For instructions on how to obtain a copy of any source code being made publicly
available by Motorola related to software used in this Motorola mobile device, you
may send your request in writing to the address below. Please make sure that the
request includes the model number and the software version number.
MOTOROLA, INC.
OSS Management
600 North US Hwy 45
Libertyville, IL 60048
USA
The Motorola website
regarding Motorola's use of open source.
Motorola has created the
portal for interaction with the software community-at-large.
To view additional information regarding licenses, acknowledgments and required
copyright notices for open source packages used in this Motorola mobile device,
please press Menu Key >
>
Legal information >Open source licenses
Motorola device may include self-contained applications that present supplemental
notices for open source packages used in those applications.
GPS & AGPS
GPS & AGPS
Your mobile device can use Global Positioning System (GPS) signals for
location-based applications. GPS uses satellites controlled by the U.S. government
that are subject to changes implemented in accordance with the Department of
Defense policy and the Federal Radio Navigation Plan. These changes may affect
the performance of location technology on your mobile device.
Your mobile device can also use Assisted Global Positioning System (AGPS), which
obtains information from the cellular network to improve GPS performance. AGPS
uses your wireless service provider's network and therefore airtime, data charges,
and/or additional charges may apply in accordance with your service plan. Contact
your wireless service provider for details.
44
opensource.motorola.com
opensource.motorola.com
Settings >About Phone
also contains information
website to serve as a
. In addition, this
Your Location
Location-based information includes information that can be used to determine the
approximate location of a mobile device. Mobile phones which are connected to a
wireless network tran smit location-based information. Devices enabled with GPS or
AGPS technology also transmit location-based information. Additionally, if you use
applications that require location-based information (e.g. driving directions), such
applications transmit location-based information. This location-based information
may be shared with third parties, including your wireless service provider,
applications providers, Motorola, and other third parties providing services.
Emergency Calls
When you make an emergency call, the cellular network may activate the AGPS
technology in your mobile device to tell the emergency responders your approximate
location.
AGPS has limitations and
•
Always tell the emergency responder your loc ation to the best of your ability; and
•
Remain on the phone for as long as the emergency responder instructs you.
Performance Tips
•
Go outside and away from underground locations, covered vehicles, structures
with metal or concrete roofs, tall buildings, and foliage. Indoor performance
might improve if you move closer to windows, but some window sun shielding
films can block satellite signals.
•
Move away from radios, entertainment equipment, and other electronic devices.
might not work in your area
. Therefore:
Navigation
Navigation infor mation provid ed by your mobile device does not replace the need for
you to pay attention to road conditions and closures, traffic, weather conditions, and
other factors that may affect your safety while driving. Always make sure the
information on your mobile device agrees with what you see outside your window,
and with other navigation sources such as street signs, visual sightings, and maps.
Always obey posted road signs.
Motorola strives to provide complete and accurate mapping information, directions,
and other navigational data, using a combination of governmental and private
location information sources. These sources may contain some inaccurate or
Page 46

incomplete data. Also, in some countries, complete map information may not be
available.
Safety & General Information
Safety Information
This section contains important information on the safe and efficient
operation of your mobile device. Read this information before using your
mobile device.
Exposure to Radio Frequency (RF) Energy
Your mobile device contains a transmitter and receiver. When it is ON, it receives
and transmits RF energy. When you communicate with your mobile device, the
system handling your call controls the power level at which your mobile device
transmits.
Your mobile device is designed to comply with local regulatory requirements in your
country concerning exposure of human beings to RF energy.
Operational Precautions
For optimal mobile device performance, and to be sure that human exposure to RF
energy does not exceed the guidelines set forth in the relevant standards, always
follow these instructions and precautions.
Product Operation
When placing or receiving a phone call, hold your mobile device just like you would
a landline phone.
If you wear the mobile device on your body, always place the mobile device in a
Motorola-supplied or approved clip, holder, holster, case, or body harness. If you do
not use a body-worn accessory supplied or approved by Motorola, keep the mobile
device and its antenna at least 2.5 centimeters (1 inch) from your body when
transmitting.
Using accessories not supplied or approved by Motorola may cause your mobile
device to exceed RF energy exposure guidelines. For a list of Motorola-supplied or
approved accessories, visit our Web site at:
www.motorola.com
.
RF Energy Interference/Compatibility
Nearly every electronic device is subject to RF energy interference from external
sources if inadequately shielded, designed, or otherwise configured for RF energy
compatibility. In some circumstances, your mobile device may cause interference
with other devices.
Follow Instructions to Avoid Interference Problems
Turn off your mobile device in any location where posted notices instruct you to do
so.
In an aircraft, turn off your mobile device whenever instructed to do so by airline
staff. If your mobile device offers an airplane mode or similar feature, consult airline
staff about using it in flight.
Implantable Medical Devices
If you have an implantable medical device, such as a pacemaker or defibrillator,
consult your physician before using this mobile device.
Persons with implantable medical devices should observe the following precautions:
•
ALWAYS keep the mobile device more than 20 centimeters (8 inches) from the
implantable medical device when the mobile device is turned ON.
•
DO NOT carry the mobile device in the breast pocket.
•
Use the ear opposite the implantable medical device to minimize the potential
for interference.
•
Turn OFF the mobile device immediately if you have any reason to suspect that
interference is taking place.
Read and follow the directions from the manufacturer of your implantable medical
device. If you have any questions about using your mobile device with your
implantable medical device, consult your healthcare provider.
Driving Precautions
Using a mobile device while driving may cause distraction. End a call if you can’t
concentrate on driving. Input information about your destination and route prior to
your drive. Do not input data or engage in text messaging while driving. Keep your
eyes on the road while driving. Listen to the audible turn-by-turn directions, if
available.
Also, using a mobile device or accessory may be prohibited or restricted in certain
areas. Always obey the laws and regulations on the use of these products.
Responsible driving practices can be found at
(in English only).
www.motorola.com/callsmart
45
Page 47

Operational Warnings
Obey all posted signs when using mobile devices in public areas.
Potentially Explosive Atmospheres
Areas with potentially explosive atmospheres are often, but not always, posted and
can include fueling areas, such as below decks on boats, fuel or chemical transfer or
storage facilities, or areas where the air contains chemicals or particles, such as
grain dust, or metal powders.
When you are in such an area, turn off your mobile device, and do not remove,
install, or charge batteries. In such areas, sparks can occur and cause an explosion
or fire.
Symbol Key
Your battery, charger, or mobile device may contain symbols, defined as follows:
Symbol Definition
032374o
Important safety information follows.
Do not dispose of your battery or mobile device in a fire.
032376o
Your battery or mobile device may require recycling in
032375o
accordance with local laws. Contact your local regulatory
authorities for more information.
Do not throw your battery or mobile device in the trash.
Do not let your battery, charger, or mobile device get wet.
46
Symbol Definition
Listening at full volume to music or voice through a headset may
damage your hearing.
Batteries & Chargers
Caution:
Improper treatment or use of batteries may present a danger of fire,
explosion, leakage, or other hazard. For more information, see “Battery Use &
Safety.”
Keep Your Mobile Device & Its Accessories Away
From Small Children
These products are not toys and may be hazardous to small children. For example:
•
A choking hazard may exist for small, detachable parts.
•
Improper use could result in loud sounds, possibly causing hearing injury.
•
Improperly handled batteries could overheat and cause a burn.
Glass Parts
Some parts of your mobile device may be made of glass. This glass could break if
the product is dropped on a hard surface or receives a substantial impact. If glass
breaks, do not touch or attempt to remove. Stop using your mobile device until the
glass is replaced by a qualified service center.
Seizures/Blackouts
Some people may be susceptible to epileptic seizures or blackouts when exposed to
flashing lig hts, such as when playing video game s. These may occur even if a per son
has never had a previous seizure or blackout.
If you have experienced seizures or blackouts, or if you have a family history of such
occurrences, please consult with your physician before playing video games or
enabling a flashing-lights feature (if available) on your mobile device.
Discontinue use and consult a physician if any of the following symptoms occur:
convulsion, eye or muscle twitching, loss of awareness, involuntary movements, or
disorientation. It is always a good idea to hold the screen away from your eyes,
Page 48

leave the lights on in the room, take a 15-minute break every hour, and stop use if
you are tired.
Caution About High Volume Usage
Warn ing:
Exposure to loud noise from any source for extended
periods of time may affect your hearing. The louder the volume sound
level, the less time is required before your hearing could be affected.
To protect your hearing:
•
Limit the amount of time you use headsets or headphones at high volume.
•
Avoid turning up the volume to block out noisy surroundings.
•
Turn the volume down if you can’t hear people speaking near you.
If you experience hearing discomfort, including the sensation of pressure or fullness
in your ears, ringing in your ears, or muffled speech, you should stop listening to the
device through your headset or headphones and have your hearing checked.
For more information about hearing, see our Web site at
direct.motorola.com/hellomoto/nss/AcousticSafety.asp
only).
(in English
Repetitive Motion
When you repetitively perform actions such as pressing keys or entering
finger-written characters, you may experience occasional discomfort in your hands,
arms, shoulders, neck, or other parts of your body. If you continue to have discomfort
during or after such use, stop use and see a physician.
[Apr0109]
Industry Canada Notice to Users
Industry Canada Notice
Operation is subject to the following two conditions: (1) This device may not cause
interference and (2) This device must accept any interference, including interference
that may cause undesired operation of the device. See RSS-GEN 7.1.5.
FCC Notice to Users
FCC Notice
The following statement applies to all products that have received FCC
approval. Applicable products bear the FCC logo, and/or an FCC ID in the
format FCC-ID:xxxxxx on the product label.
Motorola has not approved any changes or modifications to this device by the user.
Any changes or modifications could void the user’s authority to operate the
equipment. See 47 CFR Sec. 15.21.
This device complies with part 15 of the FCC Rules. Operation is subject to the
following two conditions: (1) This device may not cause harmful interference, and (2)
this device must accept any interference received, including interference that may
cause undesired operation. See 47 CFR Sec. 15.19(3).
This equipment has been tested and found to comply with the limits for a Class B
digital device, pursuant to part 15 of the FCC Rules. These limits are designed to
provide reasonable protection against harmful interference in a residential
installation. This equipment generates, uses and can radiate radio frequency energy
and, if not installed and used in accordance with the instructions, may cause
harmful interference to radio communications. However, there is no guarantee that
interference will not occur in a particular installation. If this equipment does cause
harmful interference to radio or television reception, which can be determined by
turning the equipment off and on, the user is encouraged to try to correct the
interference by one or more of the following measures:
•
Reorient or relocate the receiving antenna.
•
Increase the separation between the equipment and the receiver.
•
Connect the equipment to an outlet on a circuit different from that to which the
receiver is connected.
•
Consult the dealer or an experienced radio/TV technician for help.
Use & Care
Use & Care
To care for your Motorola phone, please keep it away from:
liquids of any kind
Don’t expose your phone to water, rain, extreme humidity, sweat, or
other moisture. If it does get wet, don’t tr y to accelerate drying with the
use of an oven or dryer, as this may damage the phone.
extreme heat or cold
Avoid temperatures below 0°C/32°F or above 45°C/113°F.
47
Page 49

microwaves
Don’t try to dry your phone in a microwave oven.
dust and dirt
Don’t expose your phone to dust, dirt, sand, food, or other inappropriate
materials.
cleaning solutions
To clean your phone, use only a dry soft cloth. Don’t use alcoho l or other
cleaning solutions.
the ground
Don’t drop your phone.
Motorola Limited Warranty for the United
States and Canada
Warra nty
What Does this Warranty Cover?
Subject to the exclusions contained below, Motorola, Inc. warrants its mobile
telephones (“Produc ts”), Motorola-branded or cer tified accessories sold for use with
these Products (“Accessories”), and Motorola software contained on CD-ROMs or
other tangible media and sold for use with these Products (“Software”) to be free
from defects in materials and workmanship under normal consumer usage for the
period(s) outlined below. This limited warranty is a consumer's exclusive remedy,
and applies as follows to new Motorola Products, Accessories, and Software
purchased by consumers in the United States or Canada, which are accompanied by
this written warranty:
48
Products and Accessories
Products Covered Length of Coverage
as
Products and Accessories
defined above, unless otherwise
provided for below.
Decorative Accessories and
Cases.
Decorative covers,
bezels, PhoneWrap™ covers and
cases.
Monaural Headsets.
and boom headsets that transmit
mono sound through a wired
connection.
Products and Accessories
that are Repaired or
Replaced.
Exclusions (Products and Accessories)
Normal Wear and Tear.
due to normal wear and tear are excluded from coverage.
Batteries.
Only batteries whose fully charged capacity falls below 80% of their
rated capacity and batteries that leak are covered by this limited warranty.
Abuse & Misuse.
storage, misuse or abuse, accident or neglect, such as physical damage (cracks,
scratches, etc.) to the surface of the product resulting from misuse; (b) contact with
liquid, water, rain, extreme humidity or heavy perspiration, sand, dirt or the like,
extreme heat, or food; (c) use of the Products or Accessories for commercial
purposes or subjecting the Product or Accessory to abnormal usage or conditions; or
(d) other acts which are not the fault of Motorola, are excluded from coverage.
Defects or damage that result from: (a) improper operation,
One (1) year
the first consumer purchaser of the product
unless otherwise provided for below.
Limited lifetime warranty
lifetime of ownership by the first consumer
purchaser of the product.
Ear buds
Limited lifetime warranty
lifetime of ownership by the first consumer
purchaser of the product.
The balance of the original warranty or
for ninety (90) days
returned to the consumer, whichever is
longer.
Periodic maintenance, repair and replacement of parts
from the date of purchase by
for the
for the
from the date
Page 50

Use of Non-Motorola Products and Accessories.
from the use of non-Motorola branded or certified Products, Accessories, Software
or other peripheral equipment are excluded from coverage.
Unauthorized Service or Modification.
service, testing, adjustment, installation, maintenance, alteration, or modification in
any way by someone other than Motorola, or its authorized service centers, are
excluded from coverage.
Altered Products.
that have been removed, altered or obliterated; (b) broken seals or that show
evidence of tampering; (c) mismatched board serial numbers; or (d) nonconforming
or non-Motorola housings, or parts, are excluded from coverage.
Communication Services.
Accessories or Software due to any communication service or signal you may
subscribe to or use with the Products Accessories or Software is excluded from
coverage.
Products or Accessories with (a) serial numbers or date tags
Defects, damages, or the failure of Products,
Defects or damage that res ult
Defects or damages resulting from
Software
Products Covered Length of Coverage
Applies only to physical defects in the
Software.
media that embodies the copy of the software (e.g.
CD-ROM, or floppy disk).
Exclusions (Software)
Software Embodied in Physical Media.
will meet your requirements or will work in combination with any hardware or
software applications provided by third parties, that the operation of the software
products will be uninterrupted or error free, or that all defects in the software
products will be corrected.
Software NOT Embodied in Physical Media.
physical media (e.g. software that is downloaded from the Internet), is provided “as
is” and without warranty.
Ninety (90) days
the date of purchase.
No warranty is made that the software
Software that is not embodied in
from
Who is Covered?
This warranty extends only to the first consumer purchaser, and is not transferable.
What Will Motorola Do?
Motorola, at its option, will at no charge repair, replace or refund the purchase price
of any Products, Accessories or Software that does n ot conform to this warranty. We
may use functionally equivalent reconditioned/refurbished/pre-owned or new
Products, Accessories or parts. No data, software or applications added to your
Product, Accessory or Software, including but not limited to personal contacts,
games and ringer tones, will be reinstalled. To avoid losing such data, software, and
applications, please create a back up prior to requesting service.
How to Obtain Warranty Service or Other
Information
USA All Products, Accessories, and Software:
Canada All Products:
TTY
You will receive instructions on how to ship the Products, Accessories or Software,
at your expense, t o a Motorola Authorized Repair Center. To obtain service, you must
include: (a) a copy of your receipt, bill of sale or other comparable proof of purchase;
(b) a written description of the problem; (c) the name of your service provider, if
applicable; (d) the name and location of the installation facility (if applicable) and,
most importantly; (e) your address and telephone number.
1-888-390-6456
1-800-461-4575
1-800-331-6456
What Other Limitations are There?
ANY IMPLIED WARRANTIES, INCLUDING WITHOUT LIMITATION THE IMPLIED
WARRANTIES OF MERCHANTABILITY AND FITNESS FOR A PARTICULAR PURPOSE,
SHALL BE LIMITED TO THE DURATION OF THIS LIMITED WARRANTY, OTHERWISE
THE REPAIR, REPLACEMENT, OR REFUND AS PROVIDED UNDER THIS EXPRESS
LIMITED WARRANTY IS THE EXCLUSIVE REMEDY OF THE CONSUMER, AND IS
PROVIDED IN LIEU OF ALL OTHER WARRANTIES, EXPRESS OR IMPLIED. IN NO
49
Page 51

EVENT SHALL MOTOROLA BE LIABLE, WHETHER IN CONTRACT OR TORT
(INCLUDING NEGLIGENCE) FOR DAMAGES IN EXCESS OF THE PURCHASE PRICE OF
THE PRODUCT, ACCESSORY OR SOFTWARE, OR FOR ANY INDIRECT, INCIDENTAL,
SPECIAL OR CONSEQUENTIAL DAMAGES OF ANY KIND, OR LOSS OF REVENUE OR
PROFITS, LOSS OF BUSINESS, LOSS OF INFORMATION OR DATA, SOFTWARE OR
APPLICATIONS OR OTHER FINANCIAL LOSS ARISING OUT OF OR IN CONNECTION
WITH THE ABILITY OR INABILITY TO USE THE PRODUCTS, ACCESSORIES OR
SOFTWARE TO THE FULL EXTENT THESE DAMAGES MAY BE DISCLAIMED BY LAW.
Some states and jurisdictions do not allow the limitation or exclusion of
incidental or consequential damages, or limitation on the length of an
implied warranty, so the above limitations or exclusions may not apply to
you. This warranty gives you specific legal rights, and you may also have
other rights that vary from state to state or from one jurisdiction to another.
Hearing Aid Compatibility with Mobile
Phones
Hearing Aids
Some Motorola phones are measured for compatibility with hearing aids. If the box
for your particular model has “Rated for Hearing Aids” printed on it, the following
explanation applies.
When some mobile phones are used near some hearing devices (hearing aids and
cochlear implants), users may detect a buzzing, humming, or whining noise. Some
hearing devices are more immune than others to this interference noise, and phone s
also vary in the amount of interference they generate.
The wireless telephone industry has developed ratings for some of their mobile
phones, to assist hearing device users in finding phones that may be compatible
with their hearing devices. Not all phones have been rated. Phones that are rated
have the rating on their box or a label on the box. To maintain the published Hearing
Aid Compatibility (HAC) rating for this mobile p hone, use only the original equi pment
battery model.
The ratings are not guarantees. Results will vary depending on the user’s hearing
device and hearing loss. If your hearing device happens to be vulnerable to
interference, you may not be able to use a rated phone successfully. Trying out the
50
phone with your hearing device is the best way to evaluate it for your personal
needs.
M-Ratings:
Phones rated M3 or M4 meet FCC requirements and are likely to
generate less interference to hearing devices than phones that are not labeled. M4
is the better/higher of the two ratings.
T-Ratings:
Phones rated T3 or T4 meet FCC requirements and are likely to be more
usable with a hearing device’s telecoil (“T Switch” or “Telephone Switch”) than
unrated phones. T4 is the better/higher of the two ratings. (Note that not all hearing
devices have telecoils in them.)
Hearing devices may also be measured for immunity to this type of interference.
Your hearing device manufacturer or hearing health professional may help you find
results for your hearing device. The more immune your hearing aid is, the less likely
you are to experience interference noise from mobile phones.
Information from the World Health
Organization
WHO Information
Present scientific information does not indicate the need for any special precautions
for the use of mobile phones. If you are concerned, you may want to limit your own
or your children’s RF exposure by limiting the length of calls or by using handsfree
devices to keep mobile phones away from your head and body.
Source: WHO Fact Sheet 193
Further information:
Product Registration
Registration
Online Product Registration:
www.motorola.com/us/productregistration
Product registration is an important step toward enjoying your new Motorola
product. Registering permits us to contact you for product or software updates and
allows you to subscribe to updates on new products or special promotions.
Registration is not required for warranty coverage.
Please retain your original dated sales receipt for your records. For warranty service
of your Motorola Personal Communications Product you will need to provide a copy
of your dated sales receipt to confirm warranty status.
http://www.who.int/peh-emf
Page 52

Thank you for choosing a Motorola product.
Export Law Assurances
Export Law
This product is controlled under the export regulations of the United States of
America and Canada. The Governments of the United States of America and Canada
may restrict the exportation or re-exportation of this product to certain destinations.
For further information contact the U.S. Department of Commerce or the Canadian
Department of Foreign Affairs and International Trade.
Caring for the Environment by Recycling
Recycling Infor mation
This symbol on a Motorola product means the product should not be
disposed of with household waste.
Disposal of your Mobile Device &
Accessories
Please do not dispose of mobile devices or electrical accessories (such
as chargers, headsets, or batteries) with your household waste. Do not
dispose of your battery or mobile device in a fire. These items should be
disposed of in accordance with the national collection and recycling
schemes operated by your local or regional authority. Alternatively, you may return
unwanted mobile devices and electrical accessories to any Motorola Approved
Service Center in your region. Details of Motorola approved national recycling
schemes, and further information on Motorola recycling activities can be found at:
www.motorola.com/recycling
032376o
Disposal of your Mobile Device Packaging &
Product Guide
Product packaging and pr oduct guides should only be disp osed of in accordance with
national collection and recycling requirements. Please contact your regional
authorities for more details.
California Perchlorate Label
Perchlorate Label
Some mobile phones use an internal, permanent backup battery on the printed
circuit board that may contain very small amounts of perchlorate. In such cases,
California law requires the following label:
Perchlorate Material – special handling may apply. See
www.dtsc.ca.gov/hazardouswaste/perchlorate
There is no special handling required by consumers.
Privacy & Data Security
Privacy & Data Securit y
Motorola understands that privacy and data security are important to everyone.
Because some features of your mobile device may affect your privacy or data
security, please follow these recommendations to enhance protection of your
information:
• Monitor access
others may have unmonitored access. Lock your device’s keypad where this
feature is available.
• Keep software up to date
releases a patch or software fix for your mobile device that updates the device’s
security, install it as soon as possible.
• Erase before recycling
mobile device prior to disposing of i t or turning it in for recycling. For instructions
on how to delete all personal information from your device, see your product
guide.
Note:
to
www.motorola.com
consumer Web page for “Motorola Backup” or “Motorola Phone Tools.”
• Location-based information
information that can be used to determine the approximate location of a mobile
device. Mobile phones which are connected to a wireless network transmit
location-based information. Devices enabled with GPS or AGPS technology also
transmit location-based information. Additionally, if you use applications that
require location-based information (e.g. driving directions), such applications
transmit location-based information. This location-based information may be
—Keep your mobile device with you and do not leave it where
—If Motorola or a software/application vendor
—Delete personal information or data from your
For information on backing up your mobile device dat a before erasing it, go
and navigate to the “downloads” section of the
—Location-based information includes
51
Page 53

shared with third parties, including your wireless service provider, applications
providers, Motorola, and other third parties providing services.
• Other information your device may transmit
testing and other diagnostic (including location-based) information, and other
non-personal information to Motorola or other third-party servers. This
information is used to help improve products and services offered by Motorola.
If you have further questions regarding how the use of your mobile device may
impact your privacy or data security, please contact Motorola at
privacy@motorola.com
Smart Practices While Driving
Driving Safety
Check the laws and regulations on the use of mobile devices and their
accessories in the areas where you drive. Always obey them. The use of
these devices may be prohibited or restricted in certain areas—for
example, handsfree use only. Go to
(in English only) for more information.
Your mobile device lets you communicate by voice and data—almost anywhere,
anytime, wherever wireless service is available and safe conditions allow. When
driving a car, driving is your first responsibility. If you choose to use your mobile
device while driving, remember the following tips:
• Get to know your Motorola mobile device and its features such as speed
dial and redial.
taking your attention off the road.
• When available, use a handsfree device.
an additional layer of convenience to your mobile device with
one of the many Motorola Original handsfree accessories
available today.
• Position your mobile device within easy reach.
access your mobile device without removing your eyes from the road. If you
receive an incoming call at an inconvenient time, if possible, let your voicemail
answer it for you.
52
, or contact your service provider.
Drive Safe, Call Smart
If available, these features help you to place your call without
—Your device may also transmit
www.motorola.com/callsmart
If possible, add
Be able to
• Let the person you are speaking with know you are driving; if necessary,
suspend the call in heavy traffic or hazardous weather conditions.
sleet, snow, ice, and even heavy traffic can be hazardous.
• Do not take notes or look up phone numbers while driving.
“to do” list or going through your address book takes attention away from your
primary responsibility—driving safely.
• Dial sensibly and assess the traffic; if possible, place calls when your
car is not moving or before pulling into traffic.
moving, dial only a few numbers, check the road and your mirrors, then continue.
• Do not engage in stressful or emotional conversations that may be
distracting.
Make people you are talking with aware you are driving and
suspend conversations that can divert your attention away from the road.
• Use your mobile device to call for help.
number in the case of fire, traffic accident, or medical emergencies (wherever
wireless phone service is available).
• Use your mobile device to help others in emergencies.
accident, crime in progress, or other serious emergency where lives are in
danger, call 911 or other local emergency number (wherever wireless phone
service is available), as you would want others to do for you.
• Call roadside assistance or a special non-emergency wireless
assistance number when necessary.
posing no serious hazard, a broken traffic signal, a minor traffic accident where
no one appears injured, or a vehicle you know to be stolen, call roadside
assistance or other special non-emergency wireless number (wherever wireless
phone service is available).
If you must make a call while
Dial 911 or other local emergency
If you see a broken-down vehicle
Rain,
Jotting down a
If you see an auto
Page 54

Motorola, Inc.
Consumer Advocacy Office
600 N US Hwy 45
Libertyville, IL 60048
http://www.hellomoto.com
Note:
Do not ship your phone to the above address. If you need to return your phone
for repairs, replacement, or warranty service, please contact the Motorola Customer
Support Center at:
1-800-331-6456 (United States)
1-888-390-6456 (TTY/TDD United States for hearing impaired)
1-800-461-4575 (Canada)
Certain mobile phone features are dependent on the capabilities and settings of
your service provider’s network. Additionally, certain features may not be activated
by your service provider, and/or the provider’s network settings may limit the
feature’s functionality. Always contact your service provider about feature
availability and functionality. All features, functionality, and other product
specifications, as well as the information contained in this guide, are based upon
the latest available information and believed to be accurate at the time of printing.
Motorola reserves the right to change or modify any information or specifications
without notice or obligation.
MOTOROLA and the Stylized M Logo are registered in the US Patent & Trademark
Office. The Bluetooth trademarks are owned by their proprietor and used by
Motorola, Inc. under license. Java and all other Java-based marks are trademarks or
registered trademarks of Sun Microsystems, Inc. in the U.S. and other countries.
Microsoft, Windows, Windows Me, and Windows Vista are registered trademarks
of Microsoft Corporation in the United States and other countries. Google, YouTube,
Picasa, Gmail, and the Google logo are trademarks of Google, Inc. is a
Certification Mark of the Wireless Fidelity Alliance, Inc. DROID is a trademark of
Lucasfilm Ltd. and its related companies. Used under license. All other product or
service names are the property of their respective owners.
© 2009 Motorola, Inc. All rights reserved.
Caution:
Changes or modifica tions made in the radio phone, not expressly approved
by Motorola, will void the user’s authority to operate the equipment.
Bluetooth ID: B015707
Manual Number: 68000202474-A
U.S. patent Re. 34,976
53
Page 55

Guía del Usuario
Page 56

Felicitaciones
DROID de Motorola
DROID de Motorola le brinda una experiencia premium
en exploración y mensajería con lo más reciente de
Google™, todo en un delgado dispositivo deslizador
táctil QWERTY.
• Exploración. Aproveche mejor la Web, con una
gran pantalla y HTML completo. Buscar, explorar,
todo lo que desea, mucho más fácil.
• Mapas, entretenimiento y más. La tecnología y
aplicaciones más recientes. Google Maps™ para
encontrar su camino. YouTube™ para mantenerse
entretenido. Acceso fácil a Google y miles de
aplicaciones para expandir su mundo.
Precaución: antes de armar, cargar o usar el
teléfono por primera vez, lea la guía de información
legal y de seguridad importante que se incluye. Una
vez que el teléfono está listo y funcionando, toque
Menú >
Información de seguridad
>
información.
Programación >Acerca del teléfono
para leer toda la
Más información
En la computadora—Vaya a
http://www.motorola.com/support/droid
Por lo tanto, ya sea que desee leer, ver o reproducir,
podemos ayudarlo.
.
1Felicitaciones
Page 57

Su teléfono
Teléfono
Mensajería Market
Contactos Browser Mapas
Oprima para
inactivar la
pantalla o
mantenga
oprimido para
apagarla.
Conector para
Audífono de 3.5 mm
Te cla Principal
Te cla Atrás
Micrófono
Te cla de
Menú
Pantalla Táctil
Te cla Cámara
Te cla de
Encendido
Te clas de
Volumen
Toque para abrir
opciones de
menú.
Toque para volver
a la pantalla
principal.
Toque para
retroceder.
Te cla Buscar
Toque para
búsqueda de
texto.
Conector Micro
USB
Cargar o conectar
a la PC.
Cuando abre o enciende el teléfono, la
pantalla se ajusta para usted.
Desplazarse y
Volver
Espacio
Alternar
Mayúscula
Oprima para
búsqueda
de texto.
Seleccionar
Borrar
Buscar
Menú
teclas y conectores importantes
2 Felicitaciones
Page 58

Contenido
3H
Su teléfono . . . . . . . . . . . . . . . . . . . . . . . . . . . . . . . . 2
Allá vamos . . . . . . . . . . . . . . . . . . . . . . . . . . . . . . . . 3
Pantalla táctil y teclas . . . . . . . . . . . . . . . . . . . . . . . . 5
Pantalla principal . . . . . . . . . . . . . . . . . . . . . . . . . . . . 7
Llamadas. . . . . . . . . . . . . . . . . . . . . . . . . . . . . . . . . . 9
Web . . . . . . . . . . . . . . . . . . . . . . . . . . . . . . . . . . . . . 12
Google Maps™ . . . . . . . . . . . . . . . . . . . . . . . . . . . . . 13
Latitud. . . . . . . . . . . . . . . . . . . . . . . . . . . . . . . . . . . . 16
YouTube™ . . . . . . . . . . . . . . . . . . . . . . . . . . . . . . . . . 17
Aplicaciones para todos . . . . . . . . . . . . . . . . . . . . . . 18
Controle su vida . . . . . . . . . . . . . . . . . . . . . . . . . . . 20
Contactos . . . . . . . . . . . . . . . . . . . . . . . . . . . . . . . . 23
Mensajería . . . . . . . . . . . . . . . . . . . . . . . . . . . . . . . 25
Ingreso de texto . . . . . . . . . . . . . . . . . . . . . . . . . . . 27
Consejos y trucos . . . . . . . . . . . . . . . . . . . . . . . . . . 29
Personalizar. . . . . . . . . . . . . . . . . . . . . . . . . . . . . . . 30
Fotografías y videos . . . . . . . . . . . . . . . . . . . . . . . . 32
Música . . . . . . . . . . . . . . . . . . . . . . . . . . . . . . . . . . 35
Conexión inalámbrica Bluetooth® . . . . . . . . . . . . . 39
Wi-Fi . . . . . . . . . . . . . . . . . . . . . . . . . . . . . . . . . . . . 41
USB y tarjeta de memoria . . . . . . . . . . . . . . . . . . . 42
Herramientas . . . . . . . . . . . . . . . . . . . . . . . . . . . . . 43
Administración . . . . . . . . . . . . . . . . . . . . . . . . . . . . 44
Seguridad . . . . . . . . . . . . . . . . . . . . . . . . . . . . . . . . 44
Solución de Problemas . . . . . . . . . . . . . . . . . . . . . . 45
Seguridad, Regulación, y Legalidad . . . . . . . . . . . . 46
Allá vamos
preparación para usar el dispositivo
Montaje y carga
1 Insertar la microSD
(es posible que ya
esté insertada)
3 Colocar la cubierta 4 Cargar
Nota: el dispositivo siempre está encendido mientras
se carga.
Precaución: lea atentamente “Uso y seguridad de las
baterías” en la página 46.
2 Insertar la batería
3Allá vamos
Page 59

Configurar y comenzar
La primera vez que encienda el teléfono, un asistente
de configuración lo guiará a través de la conexión a su
cuenta de Google™ existente. Si no tiene una cuenta
de Google, puede crear una con el asistente.
Consejo: recuerde anotar su nombre de usuario y
contraseña, y consérvelos en un lugar seguro.
Encender y apagar
Para encender el teléfono,
mantenga oprimido Encendido
(en la parte superior del teléfono).
Para apagar el teléfono, mantenga
oprimido Encendido , luego
Apagado
toque
.
Conexión Wi-Fi
Si desea usar una red de computadora Wi-Fi para un
acceso a Internet incluso más rápido, toque Menú
Programación >Redes inalámbricas y redes
>
Programación Wi-Fi
>
4 Allá vamos
.
Contenido genial y más
Explore y descargue miles de las aplicaciones más
entretenidas del mundo desde Android Market™.
Este teléfono viene con una tarjeta de memoria
microSD instalada; puede cargarla con fotos, videos y
música de la computadora mediante “Arrastrar y soltar
con USB” en la página 42.
Page 60

Pantalla táctil y teclas
Rick Wasser
Wallace Mans
Jennie Jenkins
Leo Heaton
Mick West
J
L
M
R
W
Rick Wasser
Wallace Mans
Jennie Jenkins
J
L
M
R
algunos aspectos fundamentales
Sugerencias para la pantalla táctil
Aquí se entregan algunos consejos sobre cómo
navegar por el teléfono.
Toque
Para elegir un
icono u opción,
tóquelo.
Mantener oprimido
Para abrir opciones
especiales, mantenga
oprimido un icono u otro
elemento. Inténtelo: en la
pantalla principal, toque
Contactos
mantenga oprimido un
contacto para abrir opciones.
, luego
Teléfono
Contactos Browser Mapas
Arrastrar
Para desplazarse por una
lista o moverse lentamente,
arrastre el dedo por la
pantalla táctil. Inténtelo: en
la pantalla principal, toque
Contactos
su lista de
, luego arrastre
Contactos
hacia
arriba o hacia abajo.
Consejo: cuando arrastre o recorra una lista, aparece
una barra de desplazamiento a la derecha. Arrastre la
barra de desplazamiento para mover la lista a una
letra A - Z.
Recorrer
Para desplazarse a través de una lista o para
moverse rápidamente, recorra la pantalla táctil
(arrastre rápidamente y suelte).
Consejo: cuando recorra una lista larga, toque la
pantalla para detener el desplazamiento.
Zoom
Obtenga una imagen ampliada de mapas o páginas
Web. Para acerca la imagen, toque dos veces la
pantalla. Para alejar la imagen, toque dos veces la
pantalla nuevamente.
5Pantalla táctil y teclas
Page 61

Sugerencias de teclas
Te cla
Principal
Te cla
Atrás
Te cla de
Menú
Te cla
Buscar
Te clas de Volumen
Menú, inicio y atrás
Toque Principal para cerrar cualquier menú o
aplicación y volver a la pantalla principal. En la pantalla
principal, mantenga Principal oprimido para
mostrar las últimas aplicaciones que usó, luego toque
una para abrirla.
Toque Buscar para búsqueda de texto o mantenga
oprimido para búsqueda por voz.
Toque Menú para abrir las opciones de menú o
toque Atrás para retroceder.
Inactivar y reactivar
Para prolongar la batería, evite tocar
la pantalla táctil en forma accidental
o cuando desee limpiar manchas en
ésta, coloque la pantalla táctil en
inactivar, oprimiendo Encendido .
Para reactivar la pantalla táctil,
simplemente oprima nuevamente Encendido o
abra el teléfono.
6 Pantalla táctil y teclas
Para cambiar el tiempo de espera del teléfono antes de
que la pantalla quede inactiva de manera automática,
toque Menú >
Tiempo de espera de la pantalla
>
Programación >Sonido y pantalla
.
Consejo: para bloquear la pantalla cuando quede
inactiva, use “Bloqueo de pantalla” en la página 44.
Menú de tecla de encendido
Mantenga oprimido Encendido para abrir el menú
de la tecla de encendido, donde puede apagar el
teléfono (
Modo silencioso
el
) o active o desactive el
.
Modo avión
o
Apagar
Ajustar el volumen
Oprima las teclas de
volumen para cambiar el
volumen del timbre (en
la pantalla principal) o
el volumen del auricular
(durante una llamada).
Girar la pantalla
Cuando gira el teléfono 90 grados hacia la izquierda, la
pantalla táctil puede girar para mantenerse derecha:
Búsqueda: Menú >
pantalla
>
Orientación
Programación >Sonidos y
Page 62

Pantalla principal
Teléf ono
Mensajería Market
Contactos Browser Mapas
Barra de Estado
Toque y arrastre esta barra
hacia abajo para revisar las
notificaciones.
Indicadores de Estado
Atajos
Toque para abrir.
Arrastre hacia arriba para ver
todas sus aplicaciones.
Ficha Aplicaciones
Teléfono
Mensajería Market
Contactos Browser Mapas
acceso rápido a los elementos más necesarios
Inicio rápido: Pantalla principal
La pantalla principal le entrega toda su información
más reciente en un solo lugar. Es lo que ver al
encender el teléfono o tocar Principal desde un
menú. Es básicamente lo siguiente:
Nota: su pantalla principal puede diferir en cierta
medida.
La pantalla principal se extiende más allá de lo que se
ve en la pantalla, para darle más espacio para agregar
atajos, widgets y más. Recorra la pantalla principal a la
izquierda y a la derecha para ver más paneles o para
agregar widgets o atajos.
Widgets
Agregue un widget como un reloj, reproductor de
música o un calendario que muestra citas próximas.
Para abrir un widget, tóquelo. Para agregar widgets,
toque Menú >
Nota: si instala aplicaciones desde Android Market
que tengan widgets, mantenga oprimida la pantalla
principal y seleccione un widget para agregarlo a la
pantalla principal.
Agregar> Widgets
.
7Pantalla principal
Page 63

Atajos
Mensajería Market
Búsqueda de Google
Busque por voz.
Para una búsqueda de texto,
toque la casilla de texto y
escriba usando el teclado
táctil o el teclado QWERTY.
Luego toque el icono para
una búsqueda de texto.
Para agregar atajos a la pantalla principal, abra la ficha
Aplicaciones y mantenga oprimido el atajo que desea.
Se agregará a la pantalla principal. O bien, toque
Menú >
Agregar > Atajos
.
Aplicaciones
El teléfono ya viene con aplicaciones y usted puede
descargar e instalar más. Para abrir una aplicación,
tóquela.
Ficha Aplicaciones
Todas las aplicaciones del
teléfono, incluidas aquellas
que vienen con éste y las
que usted descarga e
instala, se encuentran
listadas en orden alfabético
en la ficha Aplicaciones.
Para abrir la ficha
Aplicaciones, toque
y arrastre hacia arriba.
8 Pantalla principal
Ejecutar varias aplicaciones
No es necesario cerrar una aplicación para abrir otra. El
teléfono ejecuta varias aplicaciones al mismo tiempo.
Puede abrir una nueva aplicación mientras ejecuta
otra. Toque Principal para volver a la pantalla
principal. Abra la ficha Aplicaciones y toque la
aplicación que desea. Para cambiar de una aplicación
en ejecución a otra, mantenga oprimido Principal
para ver qué aplicaciones ya están abiertas y toque la
que desea. Puede ver hasta las últimas seis
aplicaciones que ejecutó.
Buscar
Para realizar una búsqueda, toque Buscar en
la parte frontal del teléfono, o toque Buscar
en el teclado QWERTY.
Page 64

Estado del teléfono y notificaciones
La barra de estado en la parte superior de la pantalla
contiene iconos que informan acerca de mensajes y
del estado del teléfono. Para ver sus notificaciones,
toque la barra de estado y arrástrela hacia abajo. Los
iconos a la derecha le indican el estado del teléfono:
Bluetooth® activo red (señal completa)
GPS activo red (roaming)
WiFi activo descarga
volumen mensaje de correo
de voz
vibrar 3G (los datos más
rápidos)
silencioso modo de vuelo
llamada silenciada batería (carga)
señal (roaming) batería (carga
completa)
altavoz activo alarma programada
Consejo: para ver la fecha del día de hoy, mantenga
oprimida la barra de estado en la parte superior de
la pantalla.
Llamadas
es bueno conversar
Inicio rápido: Llamadas
Opciones de marcación
Búsqueda: Principal >
Historial de
llamadas
123
GHI JKL MNO
456
789
FavoritosContactosTeléfono
ABC DEF
TUVPQRS WXYZ
0
Teléfono
Contactos
Toque para abrir, luego toque
un ingreso para llamar.
Llamadas Recientes
Toque para abrir, luego toque
un ingreso para llamar.
Llamar
Ingrese un número de
teléfono y toque aquí
para llamarlo.
9Llamadas
Page 65

Opciones de llamada entrante
Agregar
llamada
Bluetooth
Slienciar
Teclado
Telefónico
Altavoz
Durante una llamada,
toque
Bluetooth
para
usar un dispositivo
Bluetooth®.
Consejo: puede tocar
Agregar
Llamada
Bluetooth
Finalizar
Silenciar
Speaker
Telefónico
Altavoz
Principal o
Atrás para salir de
la pantalla de llamada activa. Para volver a abrirla,
toque Principal >
en progreso
.
Para silenciar una llamada, toque
Teléfono >Volver a llamada
Silenciar
.
Realizar y contestar llamadas
Para realizar una llamada, toque Principal
Teléfono
>
, ingrese un número y toque .
Para contestar una llamada, arrastre a la derecha.
Finalizar
Para finalizar una llamada, toque
.
Para ignorar una llamada, arrastre a la izquierda.
Manos libres
Nota: el uso de dispositivos o accesorios móviles
mientras conduce puede ocasionar distracción e
infringir la ley. Siempre obedezca las leyes y conduzca
con seguridad.
10 Llamadas
Tecl ado
Durante una llamada:
Altavoz
• Para usar el altavoz, toque
.
• Para usar un dispositivo Bluetooth®, toque
Bluetooth
.
Ingresar números durante una llamada
Para ingresar números durante una llamada, toque
Teclado Telefónico
.
Agregar
Agregar
Finalizar
llamada
llamada
Bluetooth
Bluetooth Silenciar
Slienciar
Teclado
Teclado
Telefónico
Telefónico
Altavoz
Altavoz
Llamadas recientes
Búsqueda: Principal >
llamadas
• Para llamar a un número, tóquelo.
• Para enviar un mensaje de texto, crear un contacto,
ver un contacto u otras opciones, mantenga
oprimido un ingreso.
• Para borrar la lista, toque Menú >
historial de llamadas
Teléfono >Historial de
Borrar
Page 66

Llamadas frecuentes
Búsqueda: Principal >
• Para llamar a un número, tóquelo.
• Para enviar un mensaje de texto, ver un contacto u
otras opciones, mantenga oprimido un ingreso.
Teléfono >Favoritos
Llamadas de conferencia
Para iniciar una llamada de conferencia, llame al primer
número. Después de obtener respuesta, toque
Agregar llamada
el número siguiente conteste, toque
llamada
y llame al número siguiente. Cuando
Fusionar
.
Su número telefónico
Búsqueda: Menú >
teléfono
>
Estado >Mi número telefónico
Programación >Acerca del
Llamadas de emergencia
Nota: su proveedor de servicios programa uno o más
números de emergencia (como 911 ó 112) a los cuales
usted puede llamar en cualquier situación, incluso
cuando su teléfono está bloqueado. Los números de
emergencia varían según el país. El o los números de
emergencia configurados previamente pueden no
funcionar en todas las ubicaciones y, en ocasiones,
una llamada de emergencia puede no cursarse debido
a problemas de red, ambientales o de interferencia.
1 Toque Principal >
está bloqueado, toque
2 Ingrese el número de emergencia.
3 Toque para llamar al número de emergencia.
Nota: su dispositivo móvil puede usar señales
satelitales AGPS para ayudar a los servicios de
emergencia a encontrarlo (“GPS y AGPS” en la
página 48).
Teléfono
Llamada de Emergencia
(si el teléfono
).
11Llamadas
Page 67

Web
Búsqueda de Google
Web Imágenes
Mi Ubicación: Desacvar - Acvar
Local Nocias más
Iniciar sesión
iGoogle Preferencias Ayuda
Nueva ventana
Actualizar
Favoritos
Reenviar
Windows
Más
oo
gl
gl
g
g
e eferencias
Ay
Ay
y
y
ud
a
Conexión
Por el aire o Wi-Fi.
Enlaces
Toque para abrir.
Dirección Web
Para ingresar una URL,
toque .
Arrastre o recorra para
desplazarse.
Toque para mostrar
las opciones.
Equipo de Béisbol Darwin Wings
Inicio Historia Organizaciones Darwin Wings Béisbol Equipo
Darwin Wings fue un club de las ligas menores de béisbol en Darwin, Ohio, cuyos
comienzos se remontan a la temporada de 1939.
Los Wings jugaron en la Liga del Medio Atlánco y estuvieron asociados a los Chicago
Panthers. Se les cambió el nombre a los Ducks antes de la temporada de 1941. El apodo
de Ducks hacía referencia a Ducky Heinz, el administrador del equipo y dueño del club.
Entradas Relacionadas
Béisbol
Darwin, Ohio
Wings
OHIO HISTORY CENTRAL
Enciclopedia en Línea de la Historia de Ohio
Acera de Ohio History Central
Browse DHC Índice Categoría Tema Multimedia Período en el Tiempo
Escoja su tamaño de texto A
A
A
A
Región
Datos Rápidos de Ohio Ohio en el Tiempo Enlaces ÚtilesSuscribirse Patrocinadores Registrarse Miembros Álbum de Recortes
Buscar
Acercar y alejar
no necesita una PC, navegue por la Web con el
teléfono
Inicio rápido: Browser
Búsqueda: Principal >
Nota: si no se puede conectar, póngase en contacto
con el proveedor de servicio.
12 Web
Browser
Conectar
El teléfono usa la red del teléfono móvil (por aire) para
conectarse automáticamente a la Web.
Nota: su proveedor de servicio puede cobrar por
navegar por la Web o descargar datos.
Para usar una red inalámbrico, toque Menú
Programación >Redes inalámbricas y redes
>
Wi-Fi
para encenderlo y toque
Programación Wi-Fi
. Toque
para buscar redes inalámbricas cercanas. Toque una
red para conectarse.
Sugerencias de la pantalla táctil Web
Zoom y ampliar
En las páginas Web, cuando se desplaza (arrastra o
recorre), los iconos de zoom aparecen en la parte
inferior de la pantalla.
Page 68

Seleccionar enlaces
q
Cuando toque un
enlace, su teléfono los
describe y va a esa
página. Si mantiene
comprimido el enlace,
el teléfono muestra opciones, como
nueva
o
Enlace de favoritos
Equipo Baseball Dayton: NJ.com
Conozca las úlmas nocias de béisbol de la secundaria Baseball Dayton, clasificaciones, programaciones, estadíscas, puntuaciones, resultados y atletas. . .
highschoolsports.nj.com/school/... - Opciones
Dayton Flyers Baseball, programaciones de pardos, fotograas, arculos…
Dayton Flyers Baseball enen una clasificación de 2306 en la base de fanácos. Encuentre arculos, fotograas, videos, turnos y resultados para las temporadas…
www.fanbase.com/Dayton-Flyers-B... - Opciones
Equipo Dayton Wings Baseball - Ohio History Central - Un producto de ...
Conozca las úlmas nocias de béisbol de la secundaria Baseball Dayton, clasificaciones, programaciones, estadíscas, puntuaciones, resultados y atletas. . .
www.ohiohistorycentral.org/entr... - Opciones
Bús
uedas relacionadas con: dayton baseball
Abrir en ventana
.
Opciones de browser
Toque Menú para ver las opciones de browser:
opciones
Actualizar
Windows
Nueva ventana
Atrás/Adelante
Agregar
favorito
Más
Vuelve a cargar la página actual.
Vea las ventanas del browser
actualmente abiertas.
Agregue una nueva ventana del
browser a su lista.
Navegue a las páginas vistas
anteriormente.
Agregue la página actual a la lista
de favoritos. Toque para ver
sus favoritos.
Muestra más opciones del
browser.
Google Maps™
donde está, dónde vaya
Nota: esta característica no está disponible en
todas las áreas. Solicite información a su proveedor
de servicio.
Inicio rápido: Google Maps
¿Dónde estoy? ¿Dónde quiero ir? No se preocupe:
deje que Google Maps™ lo encuentre por usted.
13Google Maps™
Page 69

Búsqueda: Principal >
Buscar
Mi Ubicación Unirse a Latitud Más
Direcciones Capas
Mi Ubicación
Preciso a 1800 metros
Toque para mostrar
las opciones.
Vista del Mapa
Arrastre o recorra para
desplazarse. Toque para
mostrar el zoom.
Google Maps™ se abre de manera predeterminada en
“Modo mapa”. Para obtener más información acerca
de los distintos modos de mapa, vaya a “Seleccionar
modo de mapa” en la página 15.
14 Google Maps™
Mapas
Programar sus orígenes de ubicación
Programe el teléfono para determinar su ubicación a
través de señales satelitales GPS (altamente preciso,
pero usa energía de la batería) o a través de la red
móvil (menos preciso, pero conserva energía de la
batería).
Para programar su ubicación, toque Menú
Programación >Ubicación y seguridad >Usar
>
satélites GPS
y/o
Usar redes inalámbricas
.
Buscar su ubicación
Nota: no olvide programar sus orígenes de ubicación.
En la página del Mapa principal, toque Menú >
Ubicación
. Su ubicación aparece en el mapa como .
Mientras mayor sea el círculo, menor es la precisión
de la ubicación.
Buscar cualquier ubicación
1 Toque Menú >
Buscar
.
2 Ingrese texto en la casilla de búsqueda, como una
dirección, empresa o ciudad y luego toque .
Consejo: si es una dirección que visitó antes,
selecciónela desde la lista desplegable.
Mi
Page 70

3 Toque la casilla de búsqueda para ver todos los
resultados y luego toque lo que desee. Seleccione
Mostrar en mapa, Obtener direcciones, Llamar
Agregar como contacto
Obtener direcciones
1 Toque Menú >
.
Direcciones
.
o
2 Ingrese una dirección de partida o toque y
seleccione
Puntos en el mapa
Mi ubicación actual, Contactos
.
o
3 Ingrese una dirección final o toque y seleccione
Contactos
o
Puntos en el mapa
.
4 Seleccione su modo de transporte (automóvil,
Ir
transporte público o a pie) y luego toque
. Sus
direcciones aparecen como una lista. Para ver sus
direcciones en un mapa, toque
Mostrar en mapa
5 Después de terminar, toque Menú
Más>Borrar mapa
>
.
Seleccionar modo de mapa
Toque Menú >
Satélite, Latitud
direcciones vistas.
Toque Menú >
seleccionar de
Líneas de tránsito
Borrar Mapa
Toque
Vista de mapa
Muestra un mapa, completo con nombres de calles,
ríos, lagos, montañas y fronteras. Ésta es la vista
predeterminada.
Vista satelital
.
Muestra mapa en la parte superior de la foto aérea.
Vista de tránsito
Si está disponible en su área, se muestran las
condiciones de tránsito en tiempo real en los caminos
como líneas codificadas por color.
Capas
para seleccionar de
Tráfico
o búsquedas recientes, posiciones o
Capas >Más capas
Mis Mapas, Wikipedia
para
o
.
para borrar sus selecciones.
,
15Google Maps™
Page 71

Latitud
¿dónde están sus amigos y familiares?
Nota: esta característica no está disponible en todas las
áreas. Solicite información a su proveedor de servicio.
Unirse a Latitud
Vea dónde están sus amigos y familiares en Google
Maps™. Planifique el encuentro, verifique que sus
padres llegaron bien a casa o simplemente
manténgase en contacto.
No se preocupe, su ubicación no se comparte a menos
que usted lo indique. Debe iniciar sesión en Latitud y
luego invitar a sus amigos a ver su ubicación o aceptar
sus invitaciones. Al usar Google Maps, toque Menú
Unirse a Latitud
>
de acuerdo con ella, toque
Agregar y eliminar amigos
Búsqueda: Principal >
Latitud
>
Para agregar amigos:
1 Toque Menú >
2 Toque
través de dirección de email
contacto >
16 Latitud
. Lea la política de privacidad y si está
Aceptar y compartir
Mapas
Agregar amigos
Seleccionar desde Contactos
, luego toque un
Agregar amigos
.
.
> Menú
.
o
Agregar a
Si sus amigos ya usan Latitud, recibirán una solicitud
de email y una notificación. Si aún no se unen a Latitud,
recibirán una solicitud de email donde se les invita a
iniciar sesión en Latitud con la cuenta de Google.
Para eliminar amigos:
1 Toque Menú >
Latitud
para mostrar su lista de
amigos, luego toque un amigo en su lista.
Retirar
2 Toque
.
Compartir ubicación
Cuando recibe una solicitud para compartir detalles de
ubicación puede elegir:
Aceptar y compartir
•
: vea la ubicación de sus
amigos, y sus amigos la suya.
Aceptar, pero ocultar mi ubicación
•
: vea la ubicación
de sus amigos, sin que ellos vean la suya.
No aceptar
•
: la información de ubicación no se
comparte entre usted y sus amigos.
Ocultar ubicación
Toque Menú >
amigos. Toque el nombre de su contacto y luego
Menú >
Latitud
para mostrar su lista de
Privacidad >Ocultar su ubicación
.
Desactivar Latitud
Toque Menú >
amigos. Toque Menú >
Latitud
.
Latitud
para mostrar su lista de
Privacidad >Desactivar
Page 72

Yo u Tu be ™
Más Vistos
Lady Gaga el Sábad...
Hace 1 día 857,862 vistas
Lady Gaga apareció junto con...
02:58
00:51
05:23
gol de cabeza de paler...
Hace 13 horas 268,275 vistas
Golazo de Martin Palermo dura...
okailove1004
Ver todos los Más vistos
Hace 1 día 250,567 vistas
okailove
YouTube
Buscar Cargar
ProgramaciónCategoríasMi cuenta
TM
Categorías
Toque un video para
reproducirlo.
Toque para mostrar
las opciones.
vaya y cree su propio clásico
Inicio rápido: YouTube
Publique ese excelente video que grabó y vea cuántos
aciertos obtiene.
Búsqueda: Principal > >
YouTube
El sitio Web con contenidos generados por usuarios de
YouTube le permite compartir videos con usuarios de
YouTube en todas partes. No necesita una cuenta de
YouTube para explorar y ver videos.
Nota: si no tiene una cuenta YouTube, visite
http://www.youtube.com
para obtener más
información. Para crear una cuenta o iniciar sesión,
vaya a “Su cuenta” en la página 18.
Ver videos
Vea categorías de videos populares, como Más vistos,
Más comentados y Más recientes. Toque una categoría,
luego toque el video para comenzar a reproducirlo.
Para ver más categorías de video, toque Menú
Categorías
>
.
Buscar videos
Búsqueda: Menú >
Ingrese texto, luego toque . Para borrar su historial
de búsqueda, toque Menú >
Borrar historial de búsqueda
>
Buscar
Programación
.
Compartir videos
Envíe un vínculo a un contacto de un video que
esté viendo.
1 Toque Menú >
Compartir
.
17YouTube™
Page 73

2 Complete el email y elija destinatario, luego
Enviar
toque
.
Su cuenta
Iniciar sesión o crear cuenta
Búsqueda: Menú > Mi cuenta
1 Para crear su cuenta de YouTube, toque el enlace
“¿No tiene una cuenta de YouTube? Haga clic aquí
para crear una”.
Si ya tiene una cuenta YouTube, ingrese su nombre
de usuario y contraseña y toque Conectar.
2 Para obtener una cuenta nueva, ingrese un nombre de
usuario, complete los campos, luego toque Acepto.
Cargar videos
Búsqueda: Menú > Cargar
1 Toque el video que desea cargar. Puede cambiar el
título del video, la descripción, configurar el acceso
y agregar etiquetas.
2 Toque Cargar.
18 Aplicaciones para todos
Aplicaciones para todos
obtenga la aplicación que desea
Android Market™
Nota: debe configurar una cuenta de Gmail (consulte
“Gmail” en la página 20) a fin de comprar y descargar
aplicaciones desde Android Market.
Búsqueda: Principal >
¡Obtenga todos los juegos divertidos y aplicaciones
geniales que desea! Market le brinda acceso a
desarrolladores de software de todo el mundo, para que
pueda encontrar la aplicación que desea. Si necesita
ayuda o tiene preguntas acerca de Android Market,
toque Menú >
Ayuda
Explorar e instalar aplicaciones
Desplácese y toque la aplicación que desea instalar.
Luego toque
Comprar
o
Instalar
.
Advertencia: si la aplicación que descarga requiere
acceso a sus datos o al control de funciones del
teléfono, se le pedirá su autorización. Después de
Instalar
seleccionar
, se descargará la aplicación.
Después de seleccionar
conecte a una cuenta de Google™ adicional. Conéctese
y seleccione
Comprar ahora
Market
.
(si la aplicación es gratuita)
Comprar
, se le pedirá que se
para continuar. Siga las
Page 74

instrucciones en pantalla. Para ver el progreso de la
descarga, abra la ventana de notificaciones.
Después de descargar una aplicación, el icono para
esa aplicación aparece en la ficha Aplicaciones
(consulte “Aplicaciones” en la página 8).
Administrar y restaurar aplicaciones
Para administrar sus aplicaciones, desde la pantalla
principal de su teléfono toque Menú >
Aplicaciones >Administrar aplicaciones
>
Programación
.
Toque la aplicación para abrir la pantalla de detalles:
desde aquí puede revisar, desinstalar y más.
Para volver a instalar cualquier elemento descargado,
toque Principal >
Market >Descargar
.
Aparecerán y estarán disponibles para su descarga
todas las aplicaciones instaladas anteriormente.
Información importante para el cliente
Tenga presente que muchos servicios y aplicaciones
que se ofrecen a través de este dispositivo exclusivo
son proporcionadas por Google™ y diversos
desarrolladores de aplicaciones. Si usa, enlaza o
descarga un servicio de Google o una aplicación como
un servicio tipo GPS basado en la ubicación, una sala
de chat, mercado o red social que no son de Verizon
Wireless, debe revisar cuidadosamente los términos
de dicho servicio o aplicación. Si usa cualquiera de
estos servicios o aplicaciones que no son de Verizon
Wireless, la información personal que envía puede ser
leída, recopilada o usada por el proveedor del servicio
o la aplicación y/o por los usuarios de dichos foros.
Motorola, Inc. y Verizon Wireless no son responsables
por el uso que haga de dichas aplicaciones ni por la
información que decida enviar o compartir con otros.
Para dichas aplicaciones y servicios se aplican
términos y condiciones, términos de uso y políticas de
privacidad específicas. Revise cuidadosamente todos
los términos y condiciones que se aplican a dichas
aplicaciones y servicios, incluso aquellos relacionados
con cualquier servicio basado en la ubicación por
cualquier política de privacidad, riesgo o renuncia
específica.
Los términos y condiciones del acuerdo con el cliente
de Verizon Wireless y algunos otros términos
identificados específicamente rigen el uso de cualquier
producto y servicio de Verizon Wireless.
19Aplicaciones para todos
Page 75

Controle su vida
manténgase al día
¿Qué puede administrar?
El email, los contactos y el calendario en su teléfono
le dan acceso a la misma información personal que
agrega, ve y modifica en la computadora con el uso
de Microsoft™ Outlook™.
Puede:
• Vea Google™ e Intercambie contactos en una lista.
• Programar y responder solicitudes de reunión.
• Acceder al directorio de su empresa.
Para obtener más información, consulte “Sincronizar
con Microsoft™ Office Outlook™” en la página 22.
Gmail
Crear un nuevo email
Gmail
Búsqueda: Principal > >
> Menú>
Crear
Ingrese la dirección del destinatario del email y el
Enviar
mensaje, luego toque
.
Consejo: toque Menú para opciones como
Adjuntar
o
Agregar con copia/con copia oculta
20 Controle su vida
.
Consejos
Buscar
• Para buscar mensajes, toque Menú >
.
• Para programar nuevas notificaciones de email,
como reproducir un sonido especial al recibir un
mensaje, toque Menú >
Notificaciones de email
>
Programación
, luego seleccione las
opciones de timbre y vibración.
• Para etiquetar una conversación de email, mantenga
oprimido un mensaje y toque
Cambiar etiquetas
.
Atajos
Para actualizar la lista, toque Menú + U.
Para escribir nuevo, toque Menú + C.
Para abrir conversación, oprima Entrar.
Para archivar conversación, toque Menú + Y.
Para saltar al principio de la lista, oprima Alternar
+ hacia arriba.
Para saltar al final de la lista, oprima Alternar +
hacia abajo.
Para avanzar la página, oprima Mayúscula +
barra espaciadora.
Para retroceder la página, oprima la barra
espaciadora.
Page 76

Configurar una cuenta
Búsqueda: Principal > >
Email
El asistente de configuración lo guiará durante la
configuración de su cuenta de email.
Crear un nuevo email
Email
Búsqueda: Principal > >
> Menú>
Crear
Ingrese la dirección del destinatario del email y el
Enviar
mensaje, luego toque
Consejo: toque Menú para opciones como
Adjuntar
o Agregar con copia/con copia oculta.
.
Calendario
Búsqueda: Principal > >
Calendario
Vea el calendario de
diferentes formas:
Septiembre de 2009
Dom
Lun Mar Mié Jue Vie Sáb
Toque Menú
Agenda, Día
>
Semana
o
. Cuando
30 31 12345
resalte un evento en
las vistas diaria y
semanal, aparecerán
67 89 10 11 12
más detalles.
Agregar eventos en el
13 14 15 16 17 18 19
calendario
Desde cualquier vista
de calendario, toque
Menú >
nuevo
Evento
. Ingrese
detalles del evento y
Listo
toque
.
20 21 22 23 24 25 26
27 28 29 30
45678910
123
Administrar eventos de calendario
Para modificar un evento, mantenga oprimido el
evento y luego toque
Modificar evento
. Modifique los
detalles de evento y después de terminar, toque
Listo
.
21Controle su vida
Page 77

Sincronización de datos de Google
Búsqueda: Menú >
sincronización
Las aplicaciones de Google en su teléfono le dan
acceso a la misma información personal (emails,
eventos y contactos) que tiene en una computadora
usando Gmail, Calendario y Contactos. Es fácil
sincronizar la información de las aplicaciones de
Google que desea mantener actualizada.
Seleccionar aplicaciones para sincronizarlas
1 Toque
Datos de fondo
Consejo: para ahorrar energía de la batería, no
Datos de fondo
toque
2 Toque
Agregar cuenta
que desea sincronizar, como
Programación >Cuentas y
.
.
para agregar las aplicaciones
Google
o
Corporativo
Sincronizar con Microsoft™ Office Outlook™
Si usa Microsoft™ Office Outlook™ en la computadora
de su trabajo, el teléfono puede sincronizar emails y
eventos con el servidor Exchange de Microsoft™.
Búsqueda: Menú >
sincronización
22 Controle su vida
>
Programación >Cuentas y
Agregar cuenta >Corporativo
1 Ingrese su nombre de usuario
(nombredeusuario@empresa.com), contraseña,
dirección de email y detalles de servidor, incluidos
nombre de dominio y tipo de seguridad (la dirección
de servidor es la misma URL que usa para acceder
al email de su empresa a través de la Web en su
computadora).
Nota: comuníquese con el departamento de TI para
obtener detalles del servidor.
2 Toque
Siguiente
.
3 Configure sus opciones de sincronización:
seleccione email, contactos o calendario.
4 Toque Guardar y sincronizar.
.
Page 78

Contactos
ContactosTeléfono Historial de llamadas Favoritos
J
L
R
W
M
Jennie Jenkins
Se muestran 5 contactos
Leo Heaton
Mick West
Rick Wasser
Wallace Mans
Lista de Contactos
Toque para ver la
información de
contacto. Mantenga
oprimido para
modificar, borrar
y más.
Opciones de Menú
Toque Menú para
modificar los grupos
de sincronización o
para agregar/importar
nuevos contactos.
contactos como nunca los ha tenido antes
Inicio rápido: Contactos
Búsqueda: Principal >
Consejo: para buscar en la lista, sólo abra el teléfono y
escriba un nombre. Cuando recorra o arrastre esta
lista, aparece una barra de desplazamiento a la
derecha. Arrastre la barra de desplazamiento para
mover la lista más rápido.
Contactos
Llamar, enviar mensaje de texto o email a los contactos
Búsqueda: Principal >
Para
Ver contacto, Llamar a contacto, Enviar mensaje
de texto a contacto
,
Agregar a favoritos
opciones, toque y mantenga oprimido el contacto.
Contactos
u otras
Modificar o borrar contactos
Búsqueda: Principal >
Toque el contacto, luego toque Menú >
contacto
o
Borrar contacto
Consejo: al modificar un contacto, puede programar
un timbre, una dirección y otros detalles que se
guardarán en el teléfono.
Contactos
Modificar
.
Crear contactos
Búsqueda: Principal >
Nuevo contacto
>
Contactos
>Menú
23Contactos
Page 79

Seleccione la cuenta para guardar el contacto, luego
Teléfono
Nombre dado
Nombre de la familia
Teléfono
Inicio
Inicio
Email
Email
Google
Modificar contacto
mcg30203@gmail.com
Listo
Revertir
Toque Inicio para escoger
otro tipo para este ingreso.
Toque + para agregar otro
ingreso.
Toque - para eliminar este
ingreso.
Para ver más detalles,
desplácese hacia arriba.
escriba el nombre y los detalles del contacto.
Cuando termine, toque
24 Contactos
Listo
.
Grupos
Búsqueda:
opciones
Puede poner sus
“amigos”, “familia” o “trabajo”). Luego, puede buscar
contactos más rápido viendo un grupo a la vez.
Contactos
Contactos
>Menú >
Mostrar
en grupos que crea (como
Page 80

Mensajería
e@email.comBuzón
weftl-request@lists.weft.o...
WEFTI Digest, Vol 40, Número 1 4:12 PM
wefta-request@lists.weft....
WEFTa Digest, Vol 34, Número 22 4:12 PM
Fred Vescio
John Haddon está llamando... 4:11 PM
The Kenton Review
El boletín de The Kenton Review… 3:40 PM
9:57 AM
Steven Sherer
Steven Sherer también comen…
Jack Bradley
ENVIAR A: De vuelta a casa para…
10/3/2009
Jack Bradley
Por enésima vez…
10/3/2009
Laura Lehman
¿Cuándo vienes…? 10/032009
Lista de Mensajes
Toque para abrir un mensaje.
Mantenga oprimido para
mover, modificar, borrar
y más.
a veces es mejor enviar un msj, IM o email. . .
Inicio rápido: Mensajería
Búsqueda: Principal >
Consejo: para ver más mensajes, desplácese o
arrastre hacia arriba.
Leer y responder mensajes
• Para abrir un mensaje y todas sus respuestas,
tóquelo.
Mensajería
• Para responder un mensaje, sólo ábralo e ingrese la
respuesta en la casilla de texto en la parte inferior.
• Para abrir opciones, mantenga oprimido un
mensaje.
Crear mensajes
Búsqueda:
Ingrese el destinatario y el mensaje. En mensajes de
texto y emails, toque Menú para opciones, como
Insertar sonrisa
Mensajería >Mensaje nuevo
o
Adjuntar
.
Enviar y recibir anexos
Para enviar un archivo en un mensaje, abra un nuevo
mensaje y toque Menú >
Cuando reciba un mensaje con un anexo, abra el mensaje
y toque el nombre del archivo para descargarlo. Luego,
toque el nombre nuevamente para abrirlo. Algunos
formatos de archivo se pueden convertir a HTML para
una visualización más rápida y el teléfono mostrará un
botón que dice
Obtener versión HTML
Consejo: para enviar y recibir anexos grandes más
rápido, use una conexión Wi-Fi, en “Wi-Fi” en la
página 41.
Adjuntar
.
.
25Mensajería
Page 81

Google Talk™
en teléfono
Oye, ¿qué cuentas?
desconectado
Jen
Alfred
desconectado
Alvin
desconectado
Anson
Anu
Lista de amigos b@gmail.com
Estado
conectado:
Disponible
Ausente
Ocupado
Desconectado
Toque para
cambiar su
estado.
Conversaciones
abiertas. Toque
una llamada
para abrir la
pantalla de
conversación e
iniciar una
conversación
con su amigo.
Lista de
amigos
Toque para
cambiar su
imagen.
Toque para cambiar su mensaje de
estado conectado.
Los mensajes instantáneos de Google Talk le permiten
conversar con otros usuarios de Google Talk por
teléfono o en la Web.
Búsqueda: Principal > >
26 Mensajería
Hablar
Toque Menú para ver una lista de sus amigos de
Google Talk, enviar invitaciones para agregar nuevos
amigos y mucho más.
Mensajes instantáneos
Para enviar y recibir mensajes instantáneos, puede
usar una aplicación de mensajería instantánea (como
Google Talk™) o su browser.
• Para descargar y usar una aplicación de mensajería
instantánea, toque Principal >
Aplicaciones >Comunicación
>
aplicación para su proveedor. Después de descargar
la aplicación, la verá en su ficha de Aplicaciones
(consulte “Aplicaciones” en la página 8).
• Si no ve una aplicación para el proveedor de IM,
puede usar el browser Web. Toque Principal
Browser
>
proveedor y toque
, luego ingrese el sitio Web de su
Ir
. Una vez que esté ahí, siga el
enlace para iniciar sesión.
Nota: las opciones de IM dependerán del proveedor
de IM. Para explorar aplicaciones de mensajería
instantánea desde la computadora, vaya a
http://www.android.com/market
Market
y luego elija una
.
Page 82

Correo de voz
Cuando tiene un nuevo correo de voz, aparece en la
parte superior de la pantalla. Para escuchar el correo
de voz, toque
oprimido .
Teléfono
y luego mantenga
Ingreso de texto
piense en el teclado, y ahora imagíneselo más pequeño
Consejos para escribir
Éstos son algunos consejos para usar el teclado de
su teléfono:
• Para escoger símbolos desde una lista, oprima
Alternar > Símbolos .
• Para ingresar caracteres alternativos en las
esquinas de las teclas, oprima Alternar .
• Para ingresar varios caracteres alternativos hasta
que oprime Alternar nuevamente, oprima
Alternar dos veces.
• Para ingresar una mayúscula, oprima Mayúscula .
• Ingresar sólo mayúsculas hasta que oprime
Mayúscula nuevamente, oprima Mayúscula
dos veces.
• Para seleccionar texto, mantenga oprimida
Mayúscula , luego oprima a izquierda o derecha.
• Para cortar o copiar texto seleccionado, mantenga
oprimida la opción >
• Para pegar texto cortado o copiado, mantenga
oprimida la opción >
• Para borrar un carácter (mantenga oprimido para
borrar más), oprima Borrar .
Cortar
Pegar
o
.
Copiar
.
27Ingreso de texto
Page 83

• Para borrar la línea actual, oprima Alternar +
Borrar .
• Para saltar al principio/final de una línea, oprima
Alternar + Desplazarse .
• Para comenzar una línea nueva (email), oprima
Vol ver .
Para cambiar programación de ingreso de texto,
cambiar idioma y ver el diccionario de términos que
usó, en la pantalla principal, toque Menú
Programación >Idioma y teclado
>
28 Ingreso de texto
.
Teclado táctil
Cuando el teléfono está cerrado, puede abrir un
teclado de pantalla al tocar un campo de texto.
Para cerrar el teclado, toque Atrás .
Para
q
we r ty ui op
as
df g hj kl
zxcvbnm
,.
?123
Mayúscula
Símbolos y Números
Toque para abrir un teclado para símbolos y números.
Espacio
Nota: debe programar la
Siguiente
Orientación
usar esta función: toque Menú >
Sonido y pantalla >Orientación
>
Para cambiar su programación para este teclado, en la
pantalla principal, toque Menú >
Idioma y teclado >Teclado Android
>
Ingreso de
texto
Siguiente
Toque para abrir
el teclado de la
pantalla táctil.
BORR
x
Borrar
Volver
en activada para
Programación
.
Programación
.
Page 84

Programación de ingreso de texto
Cuando usa el teclado táctil, el teléfono sugiere
palabras del diccionario y del idioma elegido. El
teléfono también ingresa automáticamente apóstrofes
en algunas palabras en inglés como “dont”.
Búsqueda: Menú >
teclado
• Para cambiar el idioma y estilo para su teclado táctil,
Seleccionar local
toque
• Para modificar el diccionario, toque
de usuario
.
• Para cambiar los sonidos, la corrección y otras
programaciones del teclado de la pantalla táctil,
Teclado Android
toque
• Para cambiar la programación de corrección
automática del teclado completo, toque
de dispositivo
Programación >Idioma y
.
Diccionario
.
Teclado
.
Consejos y trucos
unos consejos útiles
Consejos generales
• Para volver a la pantalla principal, toque
Principal .
• Para ver los números marcados recientemente,
toque
• Para inactivar/reactivar el teléfono, oprima
Encendido .
• Para programar el tiempo de espera de la pantalla,
toque Menú >
pantalla
• Para realizar una búsqueda, toque Buscar .
• Para mostrar las últimas aplicaciones, mantenga
oprimido Principal .
• Para activar/desactivar el sonido, mantenga
oprimido Encendido >
• Para activar/desactivar el modo avión, mantenga
oprimido Encendido >
• Para ir al principio de una lista, mantenga oprimido
Alternar > Desplazarse hacia arriba.
• Para ir al final de una lista, mantenga oprimido
Alternar > Desplazarse hacia abajo.
Teléfono >Historial de llamadas
>
Programación >Sonido y
Tiempo de espera de la pantalla
modo Silencioso
Modo avión
.
.
.
.
29Consejos y trucos
Page 85

Consejos acerca de la batería
¿Desea para prolongar la duración de la batería?
Pruebe con estas opciones:
• Para desactivar la sincronización automática de
aplicaciones, toque Menú >
Cuentas y sincronización
>
• Para desactivar la opción de Bluetooth, toque
Menú >
redes
Programación >Redes inalámbricas y
>
Bluetooth
.
• Para desactivar la opción de WiFi, toque Menú
Programación >Redes inalámbricas y redes >Wi-Fi
>
• Para agregar un widget de
Menú >
Nota: el widget de
Agregar >Widgets >Control de energía
Control de energía
sencilla de activar/desactivar las redes inalámbricas
WiFi, Bluetooth®, GPS, Sincronización (activa/
desactiva todas las cuentas activas, Google y
Exchange), y brillo de la pantalla.
Puede esperar los siguientes tiempos de carga de la
batería:
Uso: hasta 385 minutos
Espera: hasta 270 horas
Nota: todos los tiempos de uso son aproximados. El
rendimiento de la batería depende de la configuración
de la red, de la intensidad de la señal, de la temperatura
de funcionamiento, de las funciones seleccionadas y de
los esquemas de uso de voz, datos y otras aplicaciones.
30 Personalizar
Programación
.
Control de energía
es una manera
, toque
Personalizar
agregar un toque personal
Widgets
Crear un nuevo widget:
1 Encuentre un espacio vacío en la pantalla principal
en que desee agregar un widget y mantenga
oprimido.
Consejo: puede desplazarse a la izquierda o a la
.
.
derecha para abrir otros paneles en la pantalla
principal.
Widgets
2 Toque
.
3 Toque el tipo de widget. Si fuera necesario, ingrese
la programación del widget.
Puede personalizar los widgets con los contenidos
que desee.
Tonos de Timbre
Para personalizar los tonos de timbre:
Búsqueda: Menú >
pantalla
>
notificación
Tono de timbre del teléfono
Para programar las opciones de vibración:
Búsqueda: Menú >
pantalla
>
Vibración del teléfono
Programación>Sonidos y
Programación >Sonidos y
o
Timbre de
Page 86

Fondo de pantalla
Para aplicar un nuevo fondo de pantalla:
1 Encuentre un espacio vacío en la pantalla principal y
mantenga oprimido.
2 Toque
3 Toque
Fondos de pantalla
Galería de medios
como fondo de pantalla, o toque
de pantalla
para seleccionar un fondo de pantalla
.
para seleccionar una foto
Galería de fondos
que venga con el teléfono.
Sonidos
• Para programar el volumen para medios y videos,
toque Menú >
pantalla
>
• Para reproducir sonidos con el teclado telefónico,
toque Menú >
pantalla
>
• Para reproducir sonido en una selección de pantalla,
toque Menú >
pantalla
>
Programación >Sonido y
Volumen de medios
Programación >Sonido y
Tonos táctiles audibles
Programación >Sonido y
Selección audible
.
.
.
Programación de pantalla
• Para programar el brillo de la pantalla, toque
Menú >
Brillo
>
Programación >Sonido y pantalla
.
• Para programar la orientación, toque Menú
Programación >Sonido y pantalla >Orientación
>
• Para programar la animación, toque Menú
Programación >Sonido y pantalla >Animación
>
Atajos de inicio rápido
Para programar atajos para iniciar su aplicación favorita,
toque Menú >
Inicio rápido >Asignar aplicación
>
Para usar un atajo de inicio rápido, toque Buscar
y la tecla deseada, como Buscar y B para iniciar
el browser.
Programación >Aplicaciones
.
Idioma y región
Programar el idioma del menú y la región:
Búsqueda: Menú >
teclado
>
Programar local
Programación >Idioma y
.
.
31Personalizar
Page 87

Fotografías y videos
Arrastre hacia
arriba para
cambiar a
videograbadora.
Miniatura de
Última Foto
Toque para ver.
Toque para tomar
la fotografía.
¡véalo, captúrelo, compártalo!
Fotos
Tomar y compartir fotografías
Tome esa fotografía familiar y publíquela en línea para
que todos la vean.
Nota: para obtener las fotografías más nítidas, limpie
la lente con una tela suave y seca antes de capturar
una foto.
Búsqueda: oprima Cámara
Nota: las fotografías se almacenan en la tarjeta de
memoria microSD. La
Resolución de imagen
5MP, a menos que la cambie.
Para tomar la foto, mantenga oprimada la Tecla , u
oprima Cámara .
32 Fotografías y videos
es de
A la derecha se muestra una miniatura de la fotografía
que acaba de tomar. Toque la miniatura para verla.
• Para programar la fotografía como fondo de
pantalla o fotografía de contacto, toque Menú
Programar como
>
.
• Para enviar la fotografía en un mensaje o publicarla
en línea, toque Menú >
Compartir
. Para obtener
más información acerca de cómo compartir sus
fotografías, consulte “Compartir la galería de
fotografías” en la página 33.
Más
Borrar
.
• Para borrar la fotografía, toque Menú >
• Para más opciones, toque Menú >
Opciones de fotografía
En el visor, toque Menú >
Programación
para abrir
el menú de la cámara:
opciones
Ubicación de
almacenamiento
Modo de escena
Guarde los detalles del lugar
donde se tomó la foto.
Programe la escena, desde
muchas de opciones.
Modo flash
Seleccione de entre
Activado
y
Desactivado
Automático
.
.
,
Page 88

opciones
Imágenes de la cámara
Balance de
blancos
Efecto de color
Tamaño de
imagen
Calidad de
imagen
Modo de
enfoque
Escoja entre
Luz de día, Nublado
y más.
Escoja entre
Sepia, Azulado
y más.
Programe el tamaño de su
fotografía.
Escoja entre
Normal
y
Escoja entre
Infinito
Fino, Súper fino
.
Automático
, y
Macro
.
Ver sus fotografías
Búsqueda: Principal
Galería
> >
Imágenes de cámara
>
Reproducir una
presentación
Toque Principal >
Galería
Más
para
,
>
Imágenes de cámara
,
,
>
toque una imagen, luego
toque Menú >
Presentación
>
iniciar una presentación
de diapositivas. Para
detener la presentación
de diapositivas, toque la
pantalla. Para volver a la
galería, toque Atrás .
Compartir la galería de
fotografías
Galería
Búsqueda: Principal > >
Imágenes de cámara
>
Para enviar la foto en un mensaje o publicarla en línea:
1 Mantenga oprimida una fotografía y toque
Compartir
.
33Fotografías y videos
Page 89

2 Escoja cómo desea compartirla: como
Arrastre hacia
abajo para
cambiar a
cámara.
Miniatura de
Último Video
Toque para ver.
Email
o
Mensajería
.
Bluetooth
,
Administrar sus fotografías
Búsqueda: Principal > >
Imágenes de cámara
>
Galería
Mantenga oprimida una fotografía y luego:
Borrar
• Para borrar la fotografía, toque
.
• Para programar la fotografía como una imagen de
contacto o fondo de pantalla, toque
como
.
Programar
Consejo: para copiar fotos en/desde una
computadora, vaya a “Arrastrar y soltar con USB” en la
página 42.
Modificar sus fotografías
Toque Principal > >
de cámara
mantenga oprimido
, mantenga oprimida la imagen, luego
Girar, Borrar
Galería >Imágenes
o
Recortar
.
Videos
Grabar y compartir videos
Tocar Principal >
Cámara
hacia arriba.
34 Fotografías y videos
y arrastre el interruptor
Nota: para obtener los videos más nítidos, limpie
la lente con una tela suave y seca antes de grabar
un video.
Consejo: para enviar su video en un mensaje, programe
la calidad de video en
tocar Menú >
Programación >Calidad de video
Baja (para mensajes MMS)
al
.
Para grabar el video, toque . Toque para detener
el video. O bien, oprima Cámara . Para detener la
grabación del video, oprima Cámara nuevamente.
A la derecha se muestra una miniatura del video que
acaba de grabar. Toque la miniatura y luego toque
Menú :
• Para enviar el video en un mensaje o publicarlo
en línea, toque
Compartir
. Para obtener más
información acerca de cómo compartir sus
fotografías, consulte “Compartir la galería de
fotografías” en la página 33.
Page 90

• Para reproducir el video, toque .
00:01 00:34
Controles de VideoBarra de Progreso
Borrar
• Para borrar el video, toque
.
Reproducir videos
Búsqueda: Principal > >
Videos de cámara
>
> video
Galería
Nota: para ver los controles mientras se reproduce el
video, toque la pantalla.
Música
cuando lo que necesita es música...
Inicio rápido: Música
Toque y reproduzca: música instantánea. Simplemente
abra la biblioteca de música, luego seleccione lo que
desea reproducir.
Bigfoot
En Vivo (EP)
The Beautiful Stepdown
Música
.
Búsqueda: Principal > >
Música
Álbumes
Artistas
Listas de
Canciones
Reproducción
0:53 6:19
Toque una categoría,
luego toque una
canción o lista de
reproducción.
Controles de MúsicaCategorías
Consejo: cuando se esté reproduciendo una canción,
puede agregarla a una lista de reproducción tocando
Menú >
Añadir a lista de reproducción
35Música
Page 91

Configurar música
¿Qué herramientas necesito para transferir música?
Para pasar música a la computadora y luego cargarla
en el teléfono, necesita:
• Una PC con Microsoft™ Windows™ o una Apple™
Macintosh™.
• Un cable de datos USB.
Necesita una tarjeta de memoria
La música se almacena en la tarjeta de memoria.
El teléfono admite tarjetas de memoria microSD
extraíbles. Para asegurarse de que la tarjeta de
memoria está instalada, vaya a “Montaje y carga” en
la página 3.
Consejo: para usar la memoria extraíble en su tarjeta
de memoria, toque Menú >
Almacenamiento en tarjeta SD y teléfono
>
¿Qué formatos de archivo de música puedo reproducir?
El teléfono puede reproducir muchos tipos de archivos:
AMR-NB/WB, MP3, PCM/WAV, AAC, AAC+, eAAC+,
MIDI, OGG y WMA.
Nota: el teléfono no admite archivos protegidos
con DRM.
36 Música
Programación
.
¿Qué audífonos puedo usar?
El teléfono tiene un conector para audífonos de 3.5 mm
para escuchar música a través de cable. Puede estar
desconectado con los audífonos o altavoces estéreo
Bluetooth® (consulte “Conexión inalámbrica
Bluetooth®” en la página 39).
Obtener música
Transferir música con USB
Transferir archivos de música desde una computadora
a la tarjeta de memoria.
1 Con una tarjeta de memoria insertada y el teléfono
en la pantalla principal, conecte un cable de datos
micro USB Motorola desde el puerto micro USB del
teléfono a un puerto USB en la computadora. El
teléfono debe mostrar en la barra de estado.
Nota: es posible que deba retirar el cable de datos
USB del cabezal de alimentación del cargador.
Nota: asegúrese de conectar el teléfono a un
puerto USB de alto poder. Por lo general, se
encuentran directamente en la computadora.
Nota: el teléfono es compatible con
Microsoft™ Windows™ XP, Windows Vista™ y
Apple™ Macintosh™. Es posible que otros
sistemas operativos no sean compatibles.
Page 92

2 Su teléfono muestra un cuadro de diálogo de
Listas de
Reproducción
Canciones
Álbumes
Música
Categorías
Toque para
enumerar canciones
o listas de
reproducción.
Artistas
conexión USB en la parte superior de la pantalla.
Recorra hacia abajo y toque
Conexión USB
. No
puede usar los archivos de la tarjeta de memoria
mientras está conectado.
Instalar
3 Toque
(si se le solicita) para conectar su
tarjeta de memoria.
4 Busque “Dispositivo extraíble” (la tarjeta de
memoria) en la ventana “Mi PC”.
5 Arrastre y coloque su música en una carpeta de la
tarjeta de memoria.
Consejo: para ayudar a administrar la música, cree
una carpeta "Música" en la tarjeta de memoria.
6 Cuando termine, use la función “Quitar hardware en
forma segura” para terminar.
Reproducir música
Biblioteca de música
Abra la biblioteca de música, luego seleccione lo que
desea reproducir.
Búsqueda: Principal > >
Música
Su música se almacena por artistas, álbumes,
canciones y listas de reproducción. Toque una
categoría, luego toque la canción o la lista de
reproducción que desea reproducir. Toque Menú
Aleatorio
>
para reproducir todas sus canciones de
manera aleatoria.
37Música
Page 93

Reproductor de música
Bigfoot
En Vivo (EP)
The Beautiful Stepdown
1:14 3:45
Abrir Lista de
Reproducción
Aleatorio Activado/
Desactivado
Repetir Desactivado/
Todo/Actual
Artista
Álbum
Título de la Canción
Controles de Música
Tiempo Total de la
Canción
Barra de Progreso
Tan sólo toque una canción o lista de reproducción
para comenzar.
Controles del reproductor de música
• Reproducir/pausar: tocar / .
• Anterior/siguiente: tocar / .
38 Música
• Adelantar/retroceder: mantener oprimido / .
• Ver lista de reproducción: tocar .
• Aleatorio: tocar .
•Repetir: tocar .
•Volumen: oprima las teclas de volumen laterales.
• Ver biblioteca: tocar Menú >
Biblioteca
.
• Activar/desactivar Aleatorio: tocar Menú
Aleatorio
>
.
• Agregar a lista de reproducción: tocar Menú
Agregar a lista de reproducción
>
• Usar como tono de timbre: tocar Menú >
como tono de timbre
.
•Borrar: tocar Menú >
Borrar
.
Usar
.
Ocultar, activar, apagar
Toque Principal para usar otra aplicación. La
música sigue reproduciéndose.
Cuando vea en la barra de estado, se está
reproduciendo una canción, recorra hacia abajo para
ver detalles. Toque canción para volver a los controles
de música.
Para desactivar su toque musical .
Page 94

Listas de Reproducción
Dispositivos Bluetooth
Programación Bluetooth
(#########) 38.4 MHz Clase 1.5
Nombre del dispositivo
Asociar a este dispositivo
(encontró nombre
del dispositivo)
Hacer detectable el dispositivo
Detectable
Buscar dispositivos
Bluetooth
Toque para encender
y explorar.
Toque para volver
a explorar.
Toque para conectarse.
Para agregar una canción desde la biblioteca de música
a una lista de reproducción, mantenga la canción
oprimida y luego toque
Agregar a lista de reproducción
Escoja una lista de reproducción existente o toque
Nueva
para crear una nueva.
Para agregar una canción a la lista de reproducción que
está reproduciendo, toque Menú >
de reproducción
en el reproductor de música.
Agregar a lista
Para modificar, borrar o cambiar nombra a las listas de
reproducción, mantenga oprimida la lista de
reproducción en la biblioteca de música.
Conexión inalámbrica Bluetooth®
olvídese de los cables y sea inalámbrico
.
Inicio rápido: Bluetooth inalámbrico
Búsqueda: Menú >
inalámbricas y redes
Para obtener más información acerca de las
conexiones inalámbricas Bluetooth admitidas por este
dispositivo, vaya a la sección de preguntas frecuentes
http://www.verizonwireless.com/bluetooth
Programación >Redes
>
Programación de Bluetooth
.
Activar o desactivar la conexión Bluetooth
Búsqueda: toque Menú >
inalámbricas y redes
>
Programación
>
Redes
Programación de Bluetooth
.
39Conexión inalámbrica Bluetooth®
Page 95

Nota: para prolongar la vida útil de la batería, apague
Bluetooth cuando no esté en uso.
Conectar dispositivos nuevos
Nota: esta función requiere un accesorio opcional.
Para conectarse a un nuevo dispositivo, necesita
asociarlo. Sólo necesita hacer esto una vez para cada
dispositivo; para volver a conectarse, consulte“Volver a
conectar dispositivos” en la página 40.
1 Asegúrese de que el dispositivo que está asociando
esté en modo de detección.
Nota: consulte la guía incluida con el dispositivo
para obtener más detalles.
2 Toque Menú >
inalámbricas y redes
3 Toque
Bluetooth
Bluetooth ya está activada, toque
dispositivos
4 Toque un dispositivo para conectarse.
5 Si es necesario, toque
dispositivo (como
que el dispositivo esté conectado, el indicador de
Bluetooth aparece en la barra de estado.
40 Conexión inalámbrica Bluetooth®
Programación >Redes
>
Programación de Bluetooth
para activar y explorar. Si la opción
.
Buscar
OK
o ingrese el código del
0000
) para conectarse. Una vez
Nota: el uso de dispositivos o accesorios móviles
mientras conduce puede ocasionar distracción e
infringir la ley. Siempre obedezca las leyes y conduzca
con seguridad.
Volver a conectar dispositivos
Para volver a conectar automáticamente el teléfono
con un dispositivo asociado, simplemente encienda
el teléfono.
Para volver a conectar manualmente el teléfono con un
dispositivo asociado, toque el nombre del dispositivo
en la lista
Dispositivos Bluetooth
.
Desconectar dispositivos
Para desconectar automáticamente el teléfono de
un dispositivo asociado, simplemente apague
el dispositivo.
Para desconectar manualmente el teléfono de un
dispositivo asociado, toque el nombre del dispositivo
en la lista de dispositivos, luego toque Principal
Desconectar
>
.
Modificar propiedades
Para modificar el nombre, toque Menú
Programación >Redes inalámbricas y redes
>
Programación Bluetooth >Nombre del dispositivo
>
Ingrese un nombre y toque
OK
.
.
Page 96

Wi-Fi
Redes Wi-Fi
Programación de Wi-Fi
Notificarme cuando esté disponible
una red abierta
Notificación de red
Su red
Agregar red Wi-Fi
Wi-Fi
Toque para encender y
explorar.
Toque para conectarse.
casa, oficina o enlace activo
Inicio rápido: Wi-Fi
Búsqueda: Menú >
inalámbricas y redes
Nota: en Francia no está permitido el uso al aire
libre de las funciones ni los niveles de potencia de
Wi-Fi del teléfono. Para evitar interferencia ilegal
con las señales de radio, no use las funciones Wi-Fi
en Francia, a menos que se encuentre bajo techo.
Use una red inalámbrica para acceso rápido a Internet
y para descargar datos.
Programación >Redes
>
Programación Wi-Fi
Activar o desactivar Wi-Fi
Búsqueda: Menú >
inalámbricas y redes
Nota: para prolongar la vida útil de la batería,
desconecte la función Wi-Fi cuando no esté en uso.
Programación
>
Wi-Fi
>
Redes
Buscar y conectar a Wi-Fi
Para buscar redes en el área de alcance:
1 Toque Menú >
inalámbricas y redes
Wi-Fi
2 Toque
ya está activada, toque Menú >
muestra las redes que encuentra en el área de
alcance.
Consejo: para ver la dirección MAC del teléfono u
otros detalles Wi-Fi, toque Menú >
3 Toque una red para conectarse.
4 Si es necesario, ingrese
Contraseña inalámbrica
el teléfono está conectado a la red, el indicador
inalámbrico aparece en la barra de estado.
Consejo: cuando está dentro del área de cobertura y
Wi-Fi está activado, se reconectará automáticamente a
las redes disponibles que conectó antes.
Programación >Redes
>
Programación Wi-Fi
.
para activar y explorar. Si la opción Wi-Fi
Buscar
. El teléfono
Avanzado
Network SSID, Seguridad
y toque
Conectar
.
y
. Cuando
41Wi-Fi
Page 97

USB y tarjeta de memoria
conecte el teléfono y la PC, luego arrastre y suelte
Arrastrar y soltar con USB
Puede transferir imágenes, videos, música, tonos de
timbre y más, desde la computadora a la tarjeta de
memoria del teléfono.
1 Con una tarjeta de memoria
insertada y el teléfono en la
pantalla principal, conecte un
cable de datos micro USB
Motorola desde el puerto micro
USB del teléfono a un puerto USB
en la computadora. El teléfono debe mostrar en
la barra de estado.
Nota: es posible que deba retirar el cable de datos
USB del cabezal de alimentación del cargador.
Nota: asegúrese de conectar el teléfono a un
puerto USB de alto poder. Por lo general, se
encuentran directamente en la computadora.
2 Su teléfono muestra un cuadro de diálogo de
conexión USB en la parte superior de la pantalla.
Recorra hacia abajo y toque
puede usar los archivos de la tarjeta de memoria
mientras está conectado.
42 USB y tarjeta de memoria
USB conectado
. No
3 Toque
Instalar
(si se le solicita) para conectar su
tarjeta de memoria.
4 En la computadora, use la ventana “Mi PC” para
buscar “Disco extraíble”.
5 Haga clic en el icono de “Disco extraíble” para tener
acceso a la tarjeta de memoria.
6 Arrastre y coloque imágenes, videos, música, tonos
de timbre y más en la carpeta del teléfono. Para
ayudarle a administrar archivos, puede crear más
carpetas en la carpeta del teléfono.
7 Cuando termine, use la función “Quitar hardware en
forma segura” para terminar.
Page 98

Tarjeta de memoria
1:00
PM
todos los días
3:30
PM
Mar
4:00
PM
Lun, Vier
Despertador
Nota: necesita que la tarjeta de memoria esté
instalada para algunas funciones del teléfono,
Cámara
como
Borrar o formatear la tarjeta de memoria
Antes de borrar o formatear la tarjeta de memoria
necesita desmontarla. Toque Menú
Programación >Almacenamiento en tarjeta SD y
>
teléfono
Para formatear la tarjeta de memoria, toque
tarjeta SD
Advertencia: se borrarán todos los datos de la tarjeta
de memoria.
.
>
Desmontar tarjeta SD
.
.
Formatear
Herramientas
manténgase al día
Despertador
Búsqueda: Principal > >
Para activar una alarma, toque la
casilla de verificación.
Cuando una alarma suene,
toque
Posponer
o
Descartar
para apagarla
para retrasarla.
Para agregar una alarma, toque
Menú >
Agregar alarma
y
luego ingrese los detalles
de alarma.
Para activar o desactivar una
alarma, toque la casilla de verificación.
Calculadora
Búsqueda: Principal > >
La calculadora tiene vistas básicas y avanzadas. Para
cambiar las vistas, toque Menú >
Panel básico
o
Borrar historial
>
. Para borrar el historial, toque Menú
.
Despertador
Calculadora
Panel avanzado
43Herramientas
Page 99

Administración
(desmarcar para conservar la carga de la batería)
Debe dibujar el patrón para
desbloquear la pantalla
Programar patrón de desbloqueo
Patrón de desbloqueo de pantalla
Exigir patrón
Usar patrón visible
programación de seguridad
mantenga el control
Administrador inalámbrico
Búsqueda: Menú >
inalámbricas y redes
Administre todas las conexiones inalámbricas: Wi-Fi,
Bluetooth®, modo avión y redes móviles.
Modo avión
Use el modo de avión para apagar todas las
conexiones inalámbricas, útil durante el vuelo.
Actualizar teléfono
Para mantener el teléfono actualizado, es posible que
estén disponibles actualizaciones de software. Toque
Menú >
Actualizaciones de sistema
>
Programación >Acerca del teléfono
está actualizado. Si no lo está, toque
Red
No debería necesitar cambiar ninguna programación
de red. Comuníquese con el proveedor de servicio
para obtener ayuda.
Toque Menú >
y redes
>
redes de roaming, selección de redes, selección de
operador y nombres de puntos de acceso.
44 Administración
Redes móviles
Programación >Redes
para ver si su teléfono
Actualizar
Programación >Redes inalámbricas
para mostrar opciones para
Seguridad
ayude a mantener su teléfono seguro
Inicio rápido: Seguridad
Búsqueda: Menú >
seguridad
.
Bloqueo de pantalla
Nota: puede realizar llamadas de emergencia con el
teléfono bloqueado (consulte “Llamadas de
emergencia” en la página 11). Un teléfono bloqueado
aún tendrá activado el timbre, pero deberá
desbloquearlo para contestar.
Programación >Ubicación y
Page 100

Bloquee la pantalla de las siguientes maneras:
• Oprima Encendido .
• Deje que la pantalla quede en espera (no oprima nada).
• Apague el teléfono.
Para desbloquear la pantalla, oprima Encendido o
abra el teléfono. Luego, arrastre el icono de bloqueo a
la derecha.
Programar patrón de desbloqueo
Para programar un patrón de desbloqueo, que tiene
que dibujar para desbloquear su pantalla, toque
Menú >
Programar patrón de desbloqueo
>
instrucciones para dibujar el patrón.
Para desactivar el bloqueo, toque Menú
Programación >Ubicación y seguridad
>
Exigir patrón
>
Para cambiar el patrón de bloqueo, toque Menú
Programación >Ubicación y seguridad >Cambiar
>
patrón de desbloqueo
Programación >Ubicación y seguridad
, luego siga las
.
.
¿Olvidó el patrón o la contraseña?
Si no recuerda el patrón o la contraseña, consulte con
su proveedor de servicio.
Solución de Problemas
estamos aquí para ayudar
Recuperación de golpes
En el poco probable evento de que el teléfono deje de
responder cuando se pulsan y oprimen las teclas,
intente un reinicio rápido. Quite la cubierta posterior y
la batería (“Montaje y carga” en la página 3), luego
vuelva a colocarlas y encienda el teléfono como de
costumbre.
Reiniciar
Para restaurar la programación de fábrica del teléfono y
borrar todos los datos guardados, toque Menú
Programación >Privacidad >Restauración de
>
datos de fábrica
Advertencia: se borrarán todos los datos del teléfono.
Servicio y reparaciones
Si tiene preguntas o necesita ayuda, visite el sitio
http://www.motorola.com/support
seleccionar diferentes opciones de atención al cliente.
También puede comunicarse con el Centro de
atención a clientes de Motorola, llamando al
1-800-331-6456 (Estados Unidos), 1-888-390-6456
(TTY/TDD en Estados Unidos, para personas con
problemas de audición) o al 1-800-461-4575 (Canadá).
>
Reiniciar teléfono
.
, donde podrá
45Solución de Problemas
 Loading...