

Page 1

LTE Network Extender
User Guide
LTE Network Extender User Guide
September 22, 2020
Version 1.7
Verizon LTE Network Extender User Guide v1.7 1
© 2020 Verizon, All Rights Reserved.
Page 2

LTE Network Extender User Guide
Table of Contents
1 Getting Started ............................................................................................................................................. 3
1.1 Inside the Box ................................................................................................................................................ 3
1.2 Your Network Extender ................................................................................................................................. 4
1.3 Reset Button ................................................................................................................................................. 4
1.4 Requirements ................................................................................................................................................ 4
1.5 Safety ........................................................................................................................................................... 5
1.6 Intellectual Property Rights .......................................................................................................................... 5
1.7 Open Source Software .................................................................................................................................. 5
1.8 Limited Warranty; Disclaimer of Other Warranties ...................................................................................... 5
2 Setup ............................................................................................................................................................ 8
2.1 Network Extender ......................................................................................................................................... 8
2.1.1 LCD Display ...................................................................................................................................... 10
2.2 GPS ......................................................................................................................................................... 11
2.3 Wall Mount (Optional Accessory) ............................................................................................................... 14
2.4 Making a Call ............................................................................................................................................... 16
3 Web Admin UI ............................................................................................................................................ 17
3.1 Admin Website Overview ........................................................................................................................... 17
3.2 Sign-In ......................................................................................................................................................... 19
3.3 Home ......................................................................................................................................................... 21
3.4 Connected Devices ...................................................................................................................................... 22
3.5 Settings ....................................................................................................................................................... 24
3.5.1 Network ........................................................................................................................................... 24
3.5.2 Advanced ......................................................................................................................................... 26
3.5.3 Change Admin Password ................................................................................................................. 28
3.5.4 Time Zone ........................................................................................................................................ 30
3.5.5 Reset ................................................................................................................................................ 31
3.6 About ......................................................................................................................................................... 32
3.6.1 Status & Alarms ............................................................................................................................... 32
3.6.2 GPS ................................................................................................................................................... 34
3.6.3 Support ............................................................................................................................................ 35
4 Configuring Your Firewall ............................................................................................................................ 36
5 Troubleshooting ......................................................................................................................................... 37
5.1 Capacity & Network Coverage .................................................................................................................... 38
5.2 LCD Display Messages & Error Codes .......................................................................................................... 38
Verizon LTE Network Extender User Guide v1.7 2
© 2020 Verizon, All Rights Reserved.
Page 3
LTE Network Extender User Guide
1 Getting Started
Thank you for purchasing a Verizon LTE Network Extender. Your LTE Network Extender provides enhanced
4G LTE network coverage for Verizon wireless mobile devices, with a capacity of up to 14 simultaneous
active users (plus another channel reserved for 911 calls, and another for redirect purposes) and coverage
radius up to 7500 square feet.
The LTE Network Extender is easy to install and works with existing Verizon mobile devices—simply
connect the Network Extender to an existing broadband network. The Network Extender also features a
built-in web server enabling IP settings to be customized. Please review this chapter to familiarize yourself
with your device, and then follow the setup instructions in the next chapter.
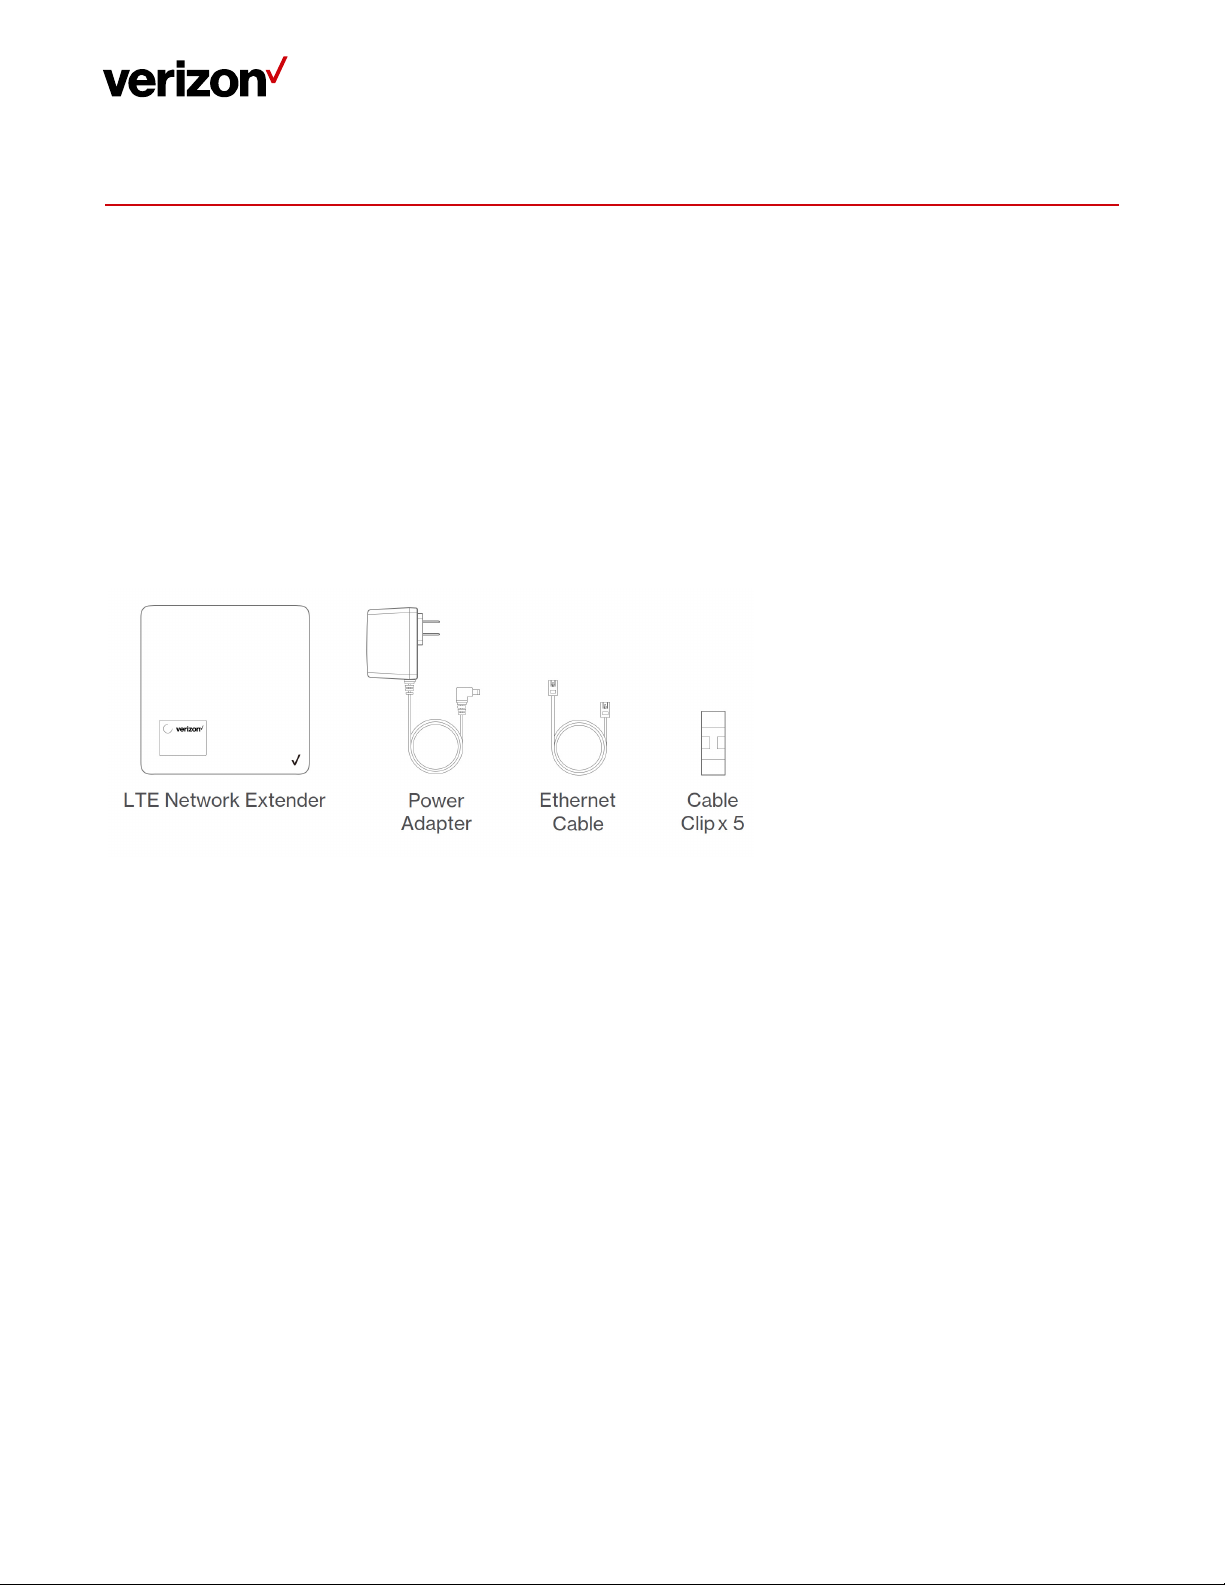
1.1 Inside the Box
• LTE Network Extender
• Power Adapter
• Ethernet Cable
• Cable Clip x 5
Verizon LTE Network Extender User Guide v1.7 3
© 2020 Verizon, All Rights Reserved.
Page 4
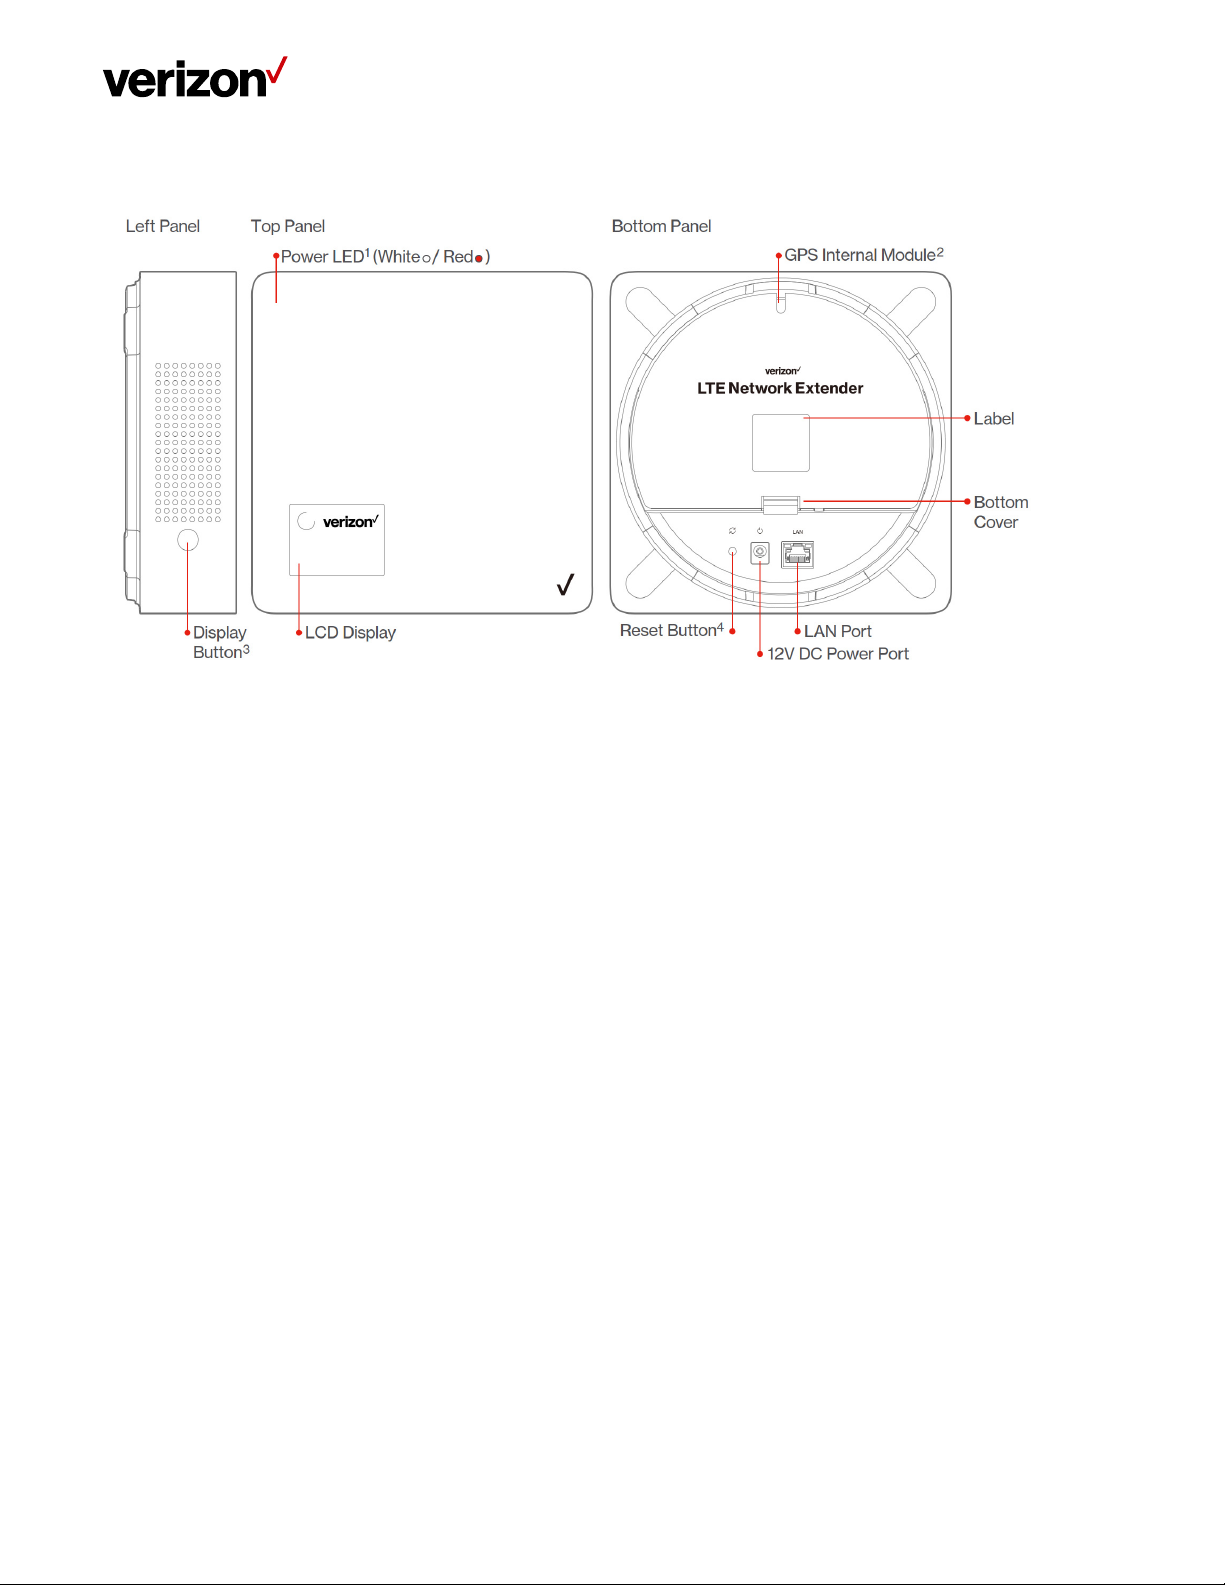
1.2 Your Network Extender
LTE Network Extender User Guide
• The Power LED displays either white or red depending on device mode.
• The Network Extender features an internal GPS module that can be accessed by removing the bottom cover. Refer to
Section 2.2 (GPS) for more information.
• The LCD Display shows status information regarding GPS satellites tracked and number of LTE devices connected.
• The Display Button toggles additional device information on the LCD display.
1.3 Reset Button
The Network Extender’s reset button is on the back of the device, and enables you to reset the device back to its original
factory state. This can be useful for troubleshooting, resetting passwords, or if you experience any difficulty with your
device. Performing a reset will reset all settings and configurations (factory reset). To perform a reset, press and hold the
reset button for at least 10 seconds, until the Power LED displays solid white, indicating a reset. Wait a few minutes for
device to restart.
1.4 Requirements
• This device only supports Verizon Wireless 4G LTE mobile handsets with Advanced Calling turned on. Refer to Section 2.4
(Making a Call) for more information.
• The 4G LTE Network Extender must be connected to an available LAN port on a router or modem with always-on Internet
access with a minimum download speed of 10 Mbps and an upload speed of 5 Mbps. Speeds of 20 Mbps download and
10 Mbps upload or higher are recommended.
• The 4G LTE Network Extender requires a continuous GPS signal from the provided GPS antenna. To find GPS at initial
power up, four strong GPS satellite signals must be available. For better GPS signal strength, please pull out and unwrap
23’ GPS extension cable which is stored at the back of the Network Extender to position the GPS antenna as close to a
window as possible. Refer to Section 2.2 (GPS).
• Home satellite broadband access is not supported.
Verizon LTE Network Extender User Guide v1.7 4
© 2020 Verizon, All Rights Reserved.
Page 5

LTE Network Extender User Guide
1.5 Safety
• This product contains chemicals known to the State of California to cause cancer and birth defects or reproductive
harm. See www.P65Warnings.ca.gov.
• WARNING OF 911 LIMITATIONS: 911 or enhanced 911 services may be limited in areas outside of wireless network
coverage. This device extends the reach of wireless network coverage in your area. Therefore, in the event of an
electrical power outage, broadband connection failure, termination of broadband service or other service disruption, you
may not be able to make 911 calls using this device. Always be prepared to report your location to public safety.
• FCC Radiation Exposure Statement: To ensure the safety of users, the FCC has established criteria for the amount of radio
frequency energy various products may produce depending on their intended usage. This product has been tested and
found to comply with the FCC’s exposure criteria.
• The installation of the Network Extender should allow at least 8 inches between the device and persons to be in
compliance with FCC RF exposure guidelines.
• Place your LTE Network Extender at least 10 feet away from products that generate electromagnetic radiation (e.g.,
microwave oven).
• Use only the included power adapter, using any other power source may damage the Network Extender.
1.6 Intellectual Property Rights
Verizon (or its licensors) owns exclusively and reserves all – and you may not exercise any – intellectual property rights in
and to this product. You acknowledge and agree that the software and all ideas, methods, algorithms, formulae, processes,
and concepts used in developing or incorporated into the product, all future updates and upgrades, and all other
improvements, revisions, corrections, bug-fixes, hot- fixes, patches, modifications, enhancements, releases, and policy and
database updates and other updates in, of, or to the software, all derivative works based upon any of the foregoing, and all
copies of the foregoing are trade secrets and proprietary property of Verizon, having great commercial value to Verizon.
1.7 Open Source Software
Third party software may be included in or distributed with this product. Some software is expressly licensed only under the
license terms indicated. Such software is licensed separately. Additionally, software whose license terms require separate
licensing of the software under open source terms, including without limitation the LGPL, and the BSD, will be understood
to be separately licensed under the relevant open source license. Refer to https://www.askey.com.tw/upload/ASK-
SFE116_Open_Source.pdf for details.
1.8 Limited Warranty; Disclaimer of Other Warranties
Your Verizon Wireless LTE Network Extender has been designed to provide reliable, worry-free service. If for any reason,
you have a problem with your equipment, please refer to the warranty in this section. For information regarding the terms
and conditions of service for your LTE Network Extender, please visit www.verizonwireless.com or call Verizon Wireless
Customer Service at (800) 922-0204 or *611 from your Verizon Wireless mobile phone.
Standard Limited Warranty
What is Covered and For How Long?
What is Covered and For How Long Does This Converge Last?
Verizon LTE Network Extender User Guide v1.7 5
© 2020 Verizon, All Rights Reserved.
Page 6

LTE Network Extender User Guide
Verizon Wireless ("Verizon") warrants to the original purchaser (“Purchaser”) that the Verizon LTE Network Extender and
accessories (“Products”) and all components included in this package shall be free from defects in workmanship and
materials under normal intended use and service for a period of one year following the date of purchase.
What is Not Covered?
This Limited Warranty is conditioned upon proper use of the Products by Purchaser. This Limited Warranty does not apply if
anyone other than an authorized Verizon representative opens the casing for the Product, or if damage or failure is caused
by misuse, abuse, neglect, accident, unusual physical, electrical or electromechanical stress, modifying the Product's
components, or operating the Product in an unsuitable environment or in a manner for which it is not intended. This
Limited Warranty also does not cover: (a) a Product that has the serial number removed or made illegible, physical damage
to the surface of the Product, including, without limitation, breakage, cracks or scratches, dents or adhesive marks on the
outside casing; or (b) malfunctions resulting from the use of the Product in conjunction with accessories, products, or
ancillary/peripheral equipment not furnished or approved by Verizon; or (c) defects or damage from improper operation,
maintenance, installation, or adjustment. Purchaser will be charged for all Product repairs for damage or failure not
covered by this Limited Warranty. Please also note that if the Product used or purchased outside the United States or
Canada, this Limited Warranty will not be applicable.
What Verizon will do?
Verizon’s warranty applies only to the original Purchaser. If a Product is returned by Purchaser in an adequate container for
shipping, accompanied by Purchaser’s sales receipt or comparable substitute proof of sale showing the date of purchase,
the serial number of Product and the sellers’ name and address and within the applicable warranty period as described in
this warranty information section, Verizon will, at its sole discretion, repair or replace the Product or its defective part. If
you need assistance on where to deliver the Product, please contact Verizon Customer Care at (800) 922-0204 or *611.
Upon receipt, Verizon will repair or replace the defective Product within a reasonable period of time, unless covered by any
exclusions indicated above.
Verizon will, at its sole option, provide one of the following remedies to whatever extent it shall deem necessary to satisfy a
proper claim under this limited warranty: 1. Elect to repair or facilitate the repair of any defective components within a
reasonable period of time, free of any charge, for the necessary parts and labor to complete the repair and restore the
Product to its proper operating condition; 2. Replace Products with direct replacements. All repaired/replacement Products
will be warranted for a period equal to the remainder of the original Limited Warranty on the original Product or for 90
days, whichever is longer. The replaced Products, parts, or components become the property of Verizon. Verizon retains
the right to take the final decision of whether a warranty claim is justified. All above warranties are null and void if any
Product is not covered by this Limited Warranty, the repair or replacement of Product shall be at the sole expense of the
Purchaser.
WHAT ARE THE LIMITS ON VERIZON'S WARRANTY/LIABILITY?
TO THE MAXIMUM EXTENT PERMITTED BY LAW, THIS LIMITED WARRANTY AND THE REMEDIES SET FORTH ABOVE ARE
EXCLUSIVE AND IN LIEU OF ALL OTHER WARRANTIES, REMEDIES AND CONDITIONS, WHETHER ORAL OR WRITTEN, EXPRESS
OR IMPLIED. THE PRODUCTS ARE PROVIDED “AS IS” AND “AS AVAILABLE”. VERIZON DISCLAIMS ALL EXPRESS AND IMPLIED
WARRANTIES, CONDITIONS, REPRESENTATIONS, OR OTHER TERMS (INCLUDING AS TO SATISFACTORY QUALITY, FITNESS
FOR A PARTICULAR PURPOSE, SUITABILITY OR MERCHANTABILITY).NEITHER VERIZON NOR ITS AFFILIATES, EMPLOYEES,
AGENTS, SHALL BE LIABLE TO YOU, FOR ANY LOSS OR DAMAGE, INCLUDING WITHOUT LIMITATION LOSS OF PROFITS,
INDIRECT, SPECIAL, PUNITIVE OR CONSEQUENTIAL LOSS OR DAMAGES ARISING OUT OF, OR IN CONNECTION WITH, THE
PROVISION OR USE OF (OR ANY INABILITY TO USE) THE PRODUCT, WHETHER IN CONTRACT, TORT (INCLUDING
Verizon LTE Network Extender User Guide v1.7 6
© 2020 Verizon, All Rights Reserved.
Page 7

LTE Network Extender User Guide
NEGLIGENCE), STATUTE OR OTHERWISE, EVEN IF ADVISED OF THE POSSIBILITY THEREOF. SOME COUNTRIES, DISTRICTS OR
STATES DO NOT ALLOW THE EXCLUSION OR LIMITATION OF RELIEF, SPECIAL, INCIDENTAL, CONSEQUENTIAL OR INDIRECT
DAMAGES, OR THE LIMITATION OF LIABILITY TO SPECIFIED AMOUNTS, SO THE ABOVE LIMITATIONS OR EXCLUSIONS MAY
NOT APPLY TO YOU.
THIS WARRANTY GIVES YOU SPECIFIC LEGAL RIGHTS, AND YOU MAY ALSO HAVE OTHER RIGHTS, WHICH VARY FROM STATE
TO STATE/PROVINCE TO PROVINCE. THIS LIMITED PRODUCT WARRANTY APPLIES ONLY TO THE ORIGINAL PURCHASER OF
THE PRODUCT THAT WAS PURCHASED FROM AN AUTHORISED RESELLER OR SALES CHANNEL.IF ANY TERM CONTAINED
HEREIN IS HELD TO BE ILLEGAL OR UNENFORCEABLE, THE LEGALITY OR ENFORCEABILITY OF THE REMAINING TERMS OF
THIS LIMITED WARRANTY WHICH PURCHASER ACKNOWLEDGES IS AND WILL ALWAYS BE CONSTRUED TO BE LIMITED BY ITS
TERMS OR AS LIMITED AS THE LAW PERMITS SHALL NOT BE AFFECTED OR IMPAIRED.
VERIZON DOES NOT WARRANT ANY THIRD PARTY EQUIPMENT OR SOFTWARE, EVEN IF INCLUDED WITH THE PRODUCT
DISTRIBUTED BY VERIZON OR OTHERWISE. VERIZON PROVIDES ALL SUCH THIRD PARTY PRODUCTS AND SUPPORT AS-IS
WITHOUT WARRANTY OF ANY KIND. RESPONSIBILITY FOR THE QUALITY, CAPABILITIES, OPERATIONS, PERFORMANCE AND
SUITABILITY OF ANY SUCH THIRD PARTY EQUIPMENT OR SOFTWARE RESTS SOLELY WITH THE PURCHASER AND THE DIRECT
VENDOR, OWNER OR SUPPLIER OF SUCH THIRD-PARTY EQUIPMENT OR SOFTWARE.
This Limited Warranty allocates the risks of product failure between Verizon and the original Purchaser, and is recognized
by both parties and reflected in the price paid for the Products. This Limited Warranty is the entire and sole warranty
applicable to the Products and cannot be modified or changed in scope or substance by any oral or written statements,
information, or advice given by Verizon or any of Verizon’s agents, employees, or others and may not rely on any such
statements, information, or advice.
Verizon LTE Network Extender User Guide v1.7 7
© 2020 Verizon, All Rights Reserved.
Page 8
LTE Network Extender User Guide
2 Setup
Your LTE Network Extender can be set up by following the procedures explained in this section. Before installing the LTE
Network Extender, remember to confirm that all components are included in the package.
2.1 Network Extender
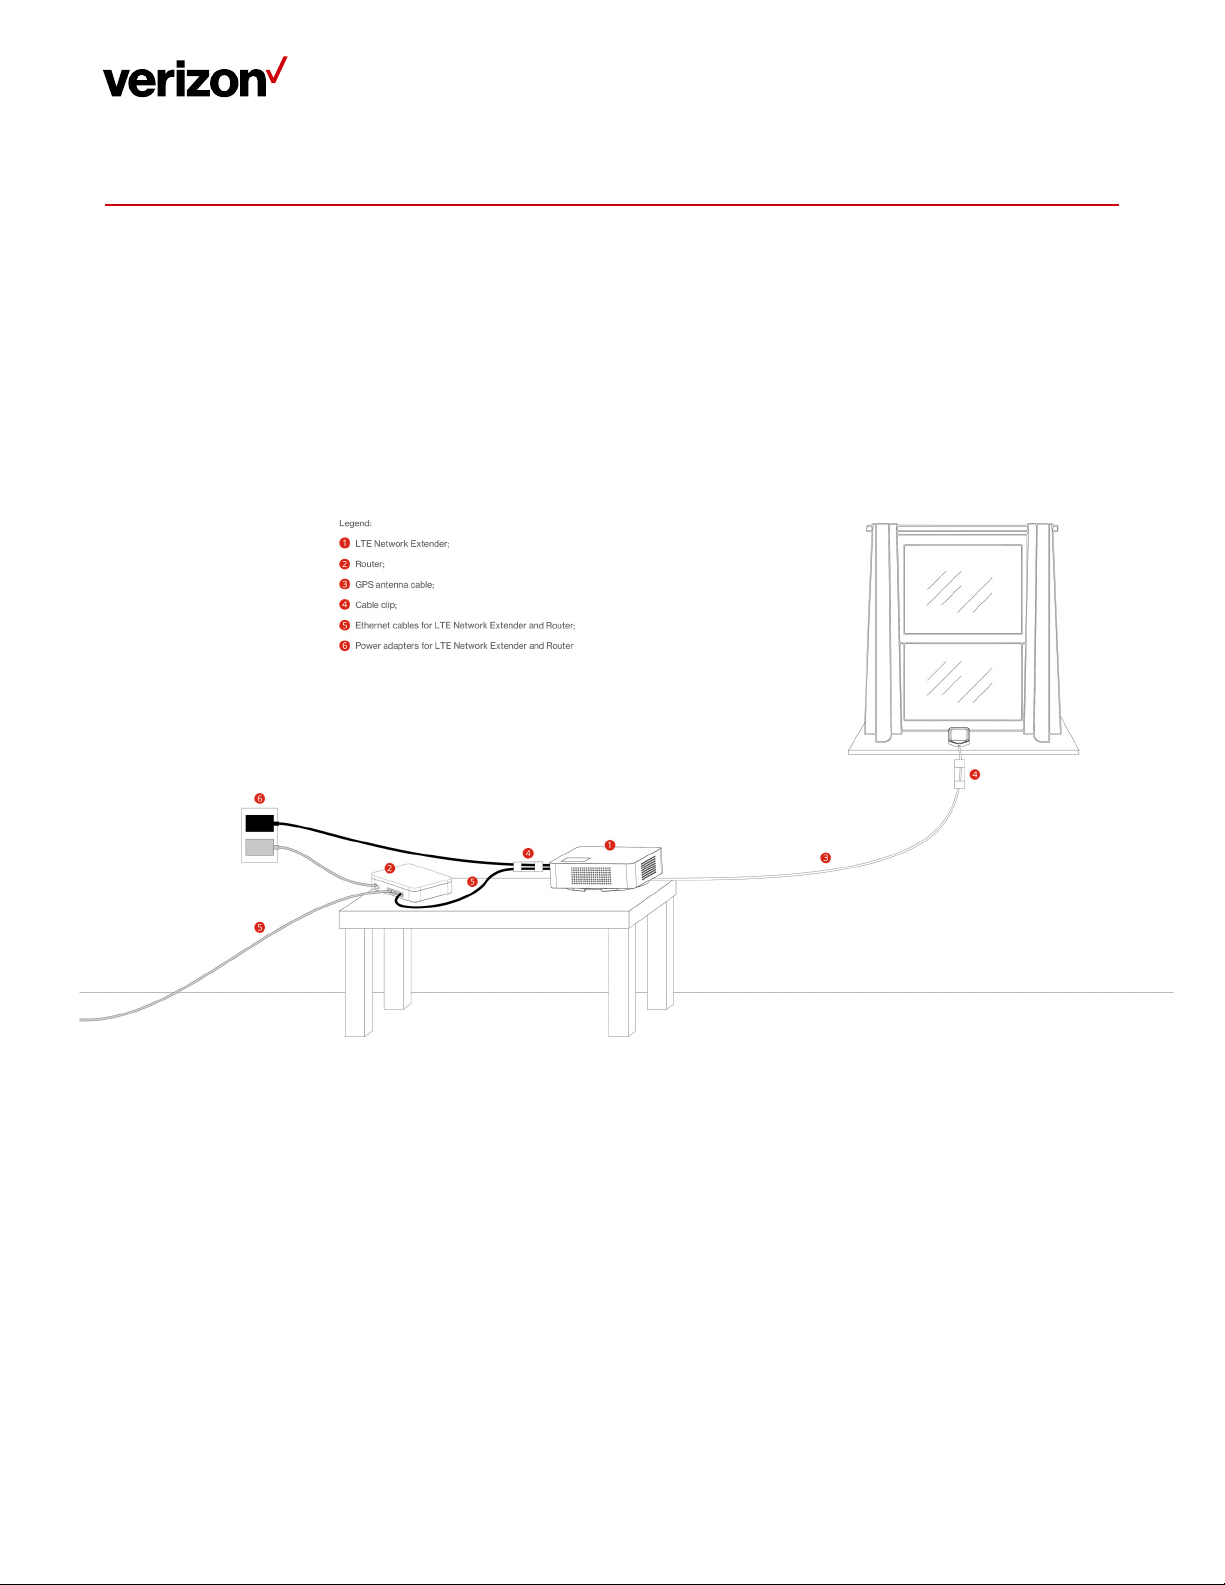
1. It is recommended to place the LTE Network Extender near a window or otherwise elevated location, such as on a
bookshelf or cabinet, for best results. In addition, the attached cable clip can help you fix the GPS cable on the wall
and then you can have GPS receiver close to the window easily.
2. Using the provided Ethernet cable, connect an available LAN port on your router to the LAN port on your LTE
Network Extender.
Verizon LTE Network Extender User Guide v1.7 8
© 2020 Verizon, All Rights Reserved.
Page 9
LTE Network Extender User Guide
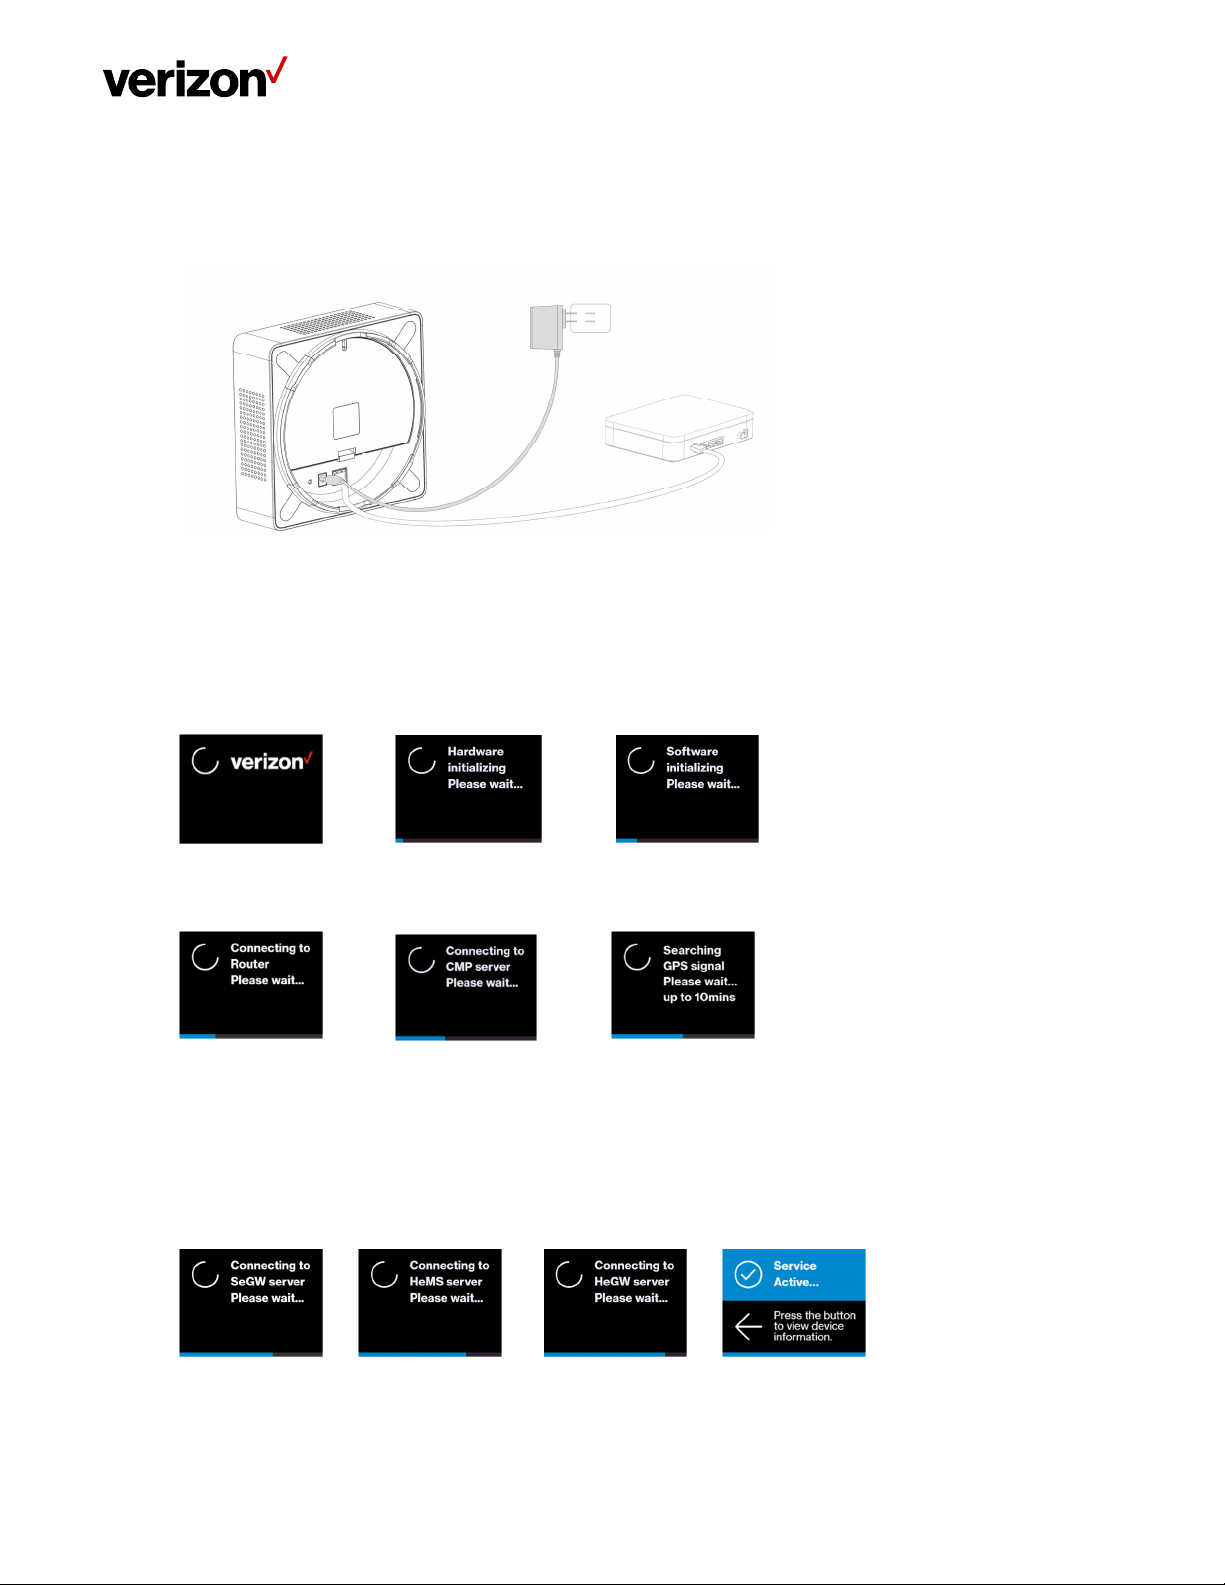
3. Connect the included power adapter to the LTE Network Extender’s DC 12V power port and plug the power
adapter into an available power outlet. We recommend using the LTE Network Extender upright; however, it can
also function well when the LTE Network Extender is in flat.
4. The Power LED should blink white when the LTE Network Extender is plugged in, to indicate the initialization and
startup process. If the Power LED displays solid red, this indicates a hardware issue/problem.
5. The Network Extender will automatically begin the initialization and startup process after the power adaptor and
the Ethernet cable are plugged in. This process may take 5 to 60 minutes depending on GPS signal conditions.
6. During this process, the LTE Network Extender will attempt to acquire a local IP address, followed by connecting to
the Verizon network, and then searching for a GPS signal.
For proper operation and E911 service, a GPS signal is required. If a GPS signal is not acquired after 30 to 60
minutes, please refer to Section 2.2 (GPS). The GPS signal acquisition status can be checked using the Web Admin
UI as shown in Section 3 (Web Admin UI).
7. To finish the startup process, the LTE Network Extender will download any necessary software updates and
configuration data. When the startup process is complete, the Power LED will return to solid white and the LED
Display will show “Service Active”.
Verizon LTE Network Extender User Guide v1.7 9
© 2020 Verizon, All Rights Reserved.
Page 10
LTE Network Extender User Guide
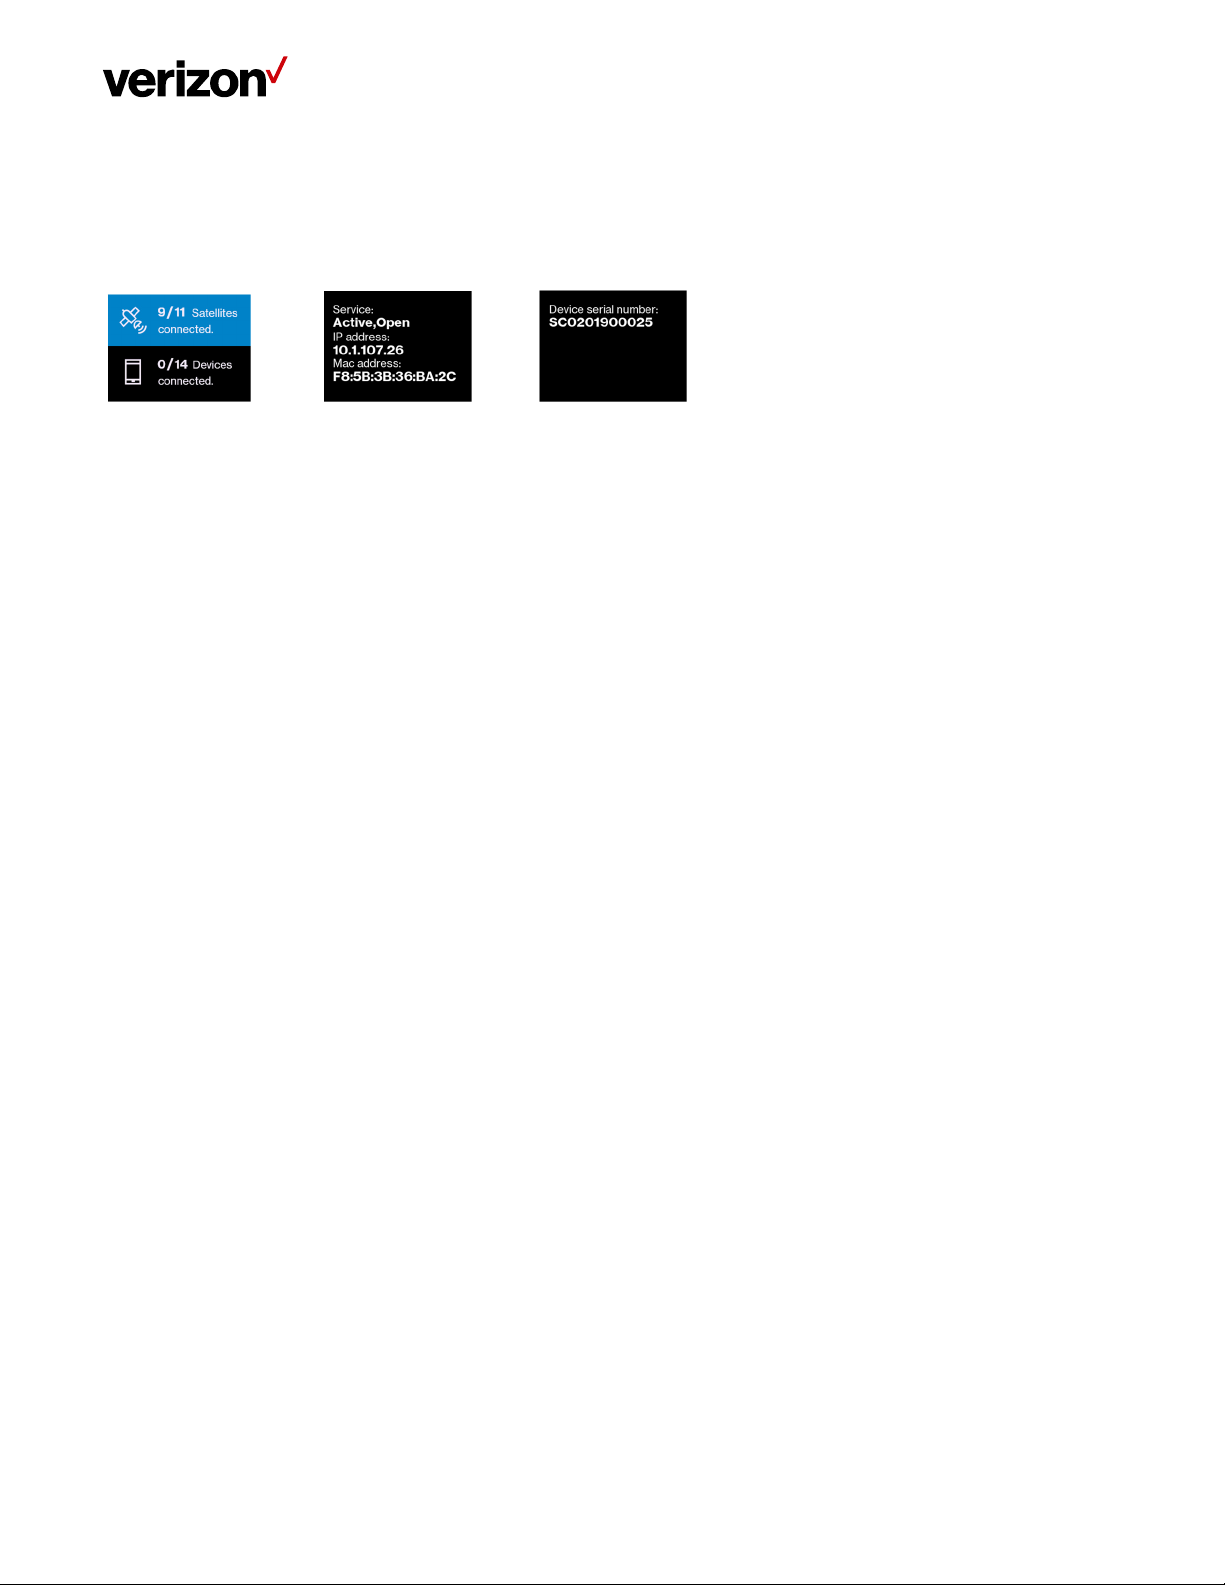
2.1.1 LCD Display
The LCD Display can display additional information: the LTE Network Extender IP address, MAC address, serial number, GPS
Satellites connected, and mobile devices connected. Press the Display Button on the left panel of the Network Extender to
toggle through information screens.
Refer to 5.2 (LCD Display Messages & Error Codes) for more information on other messages or errors that the LCD may
display.
Verizon LTE Network Extender User Guide v1.7 10
© 2020 Verizon, All Rights Reserved.
Page 11
LTE Network Extender User Guide
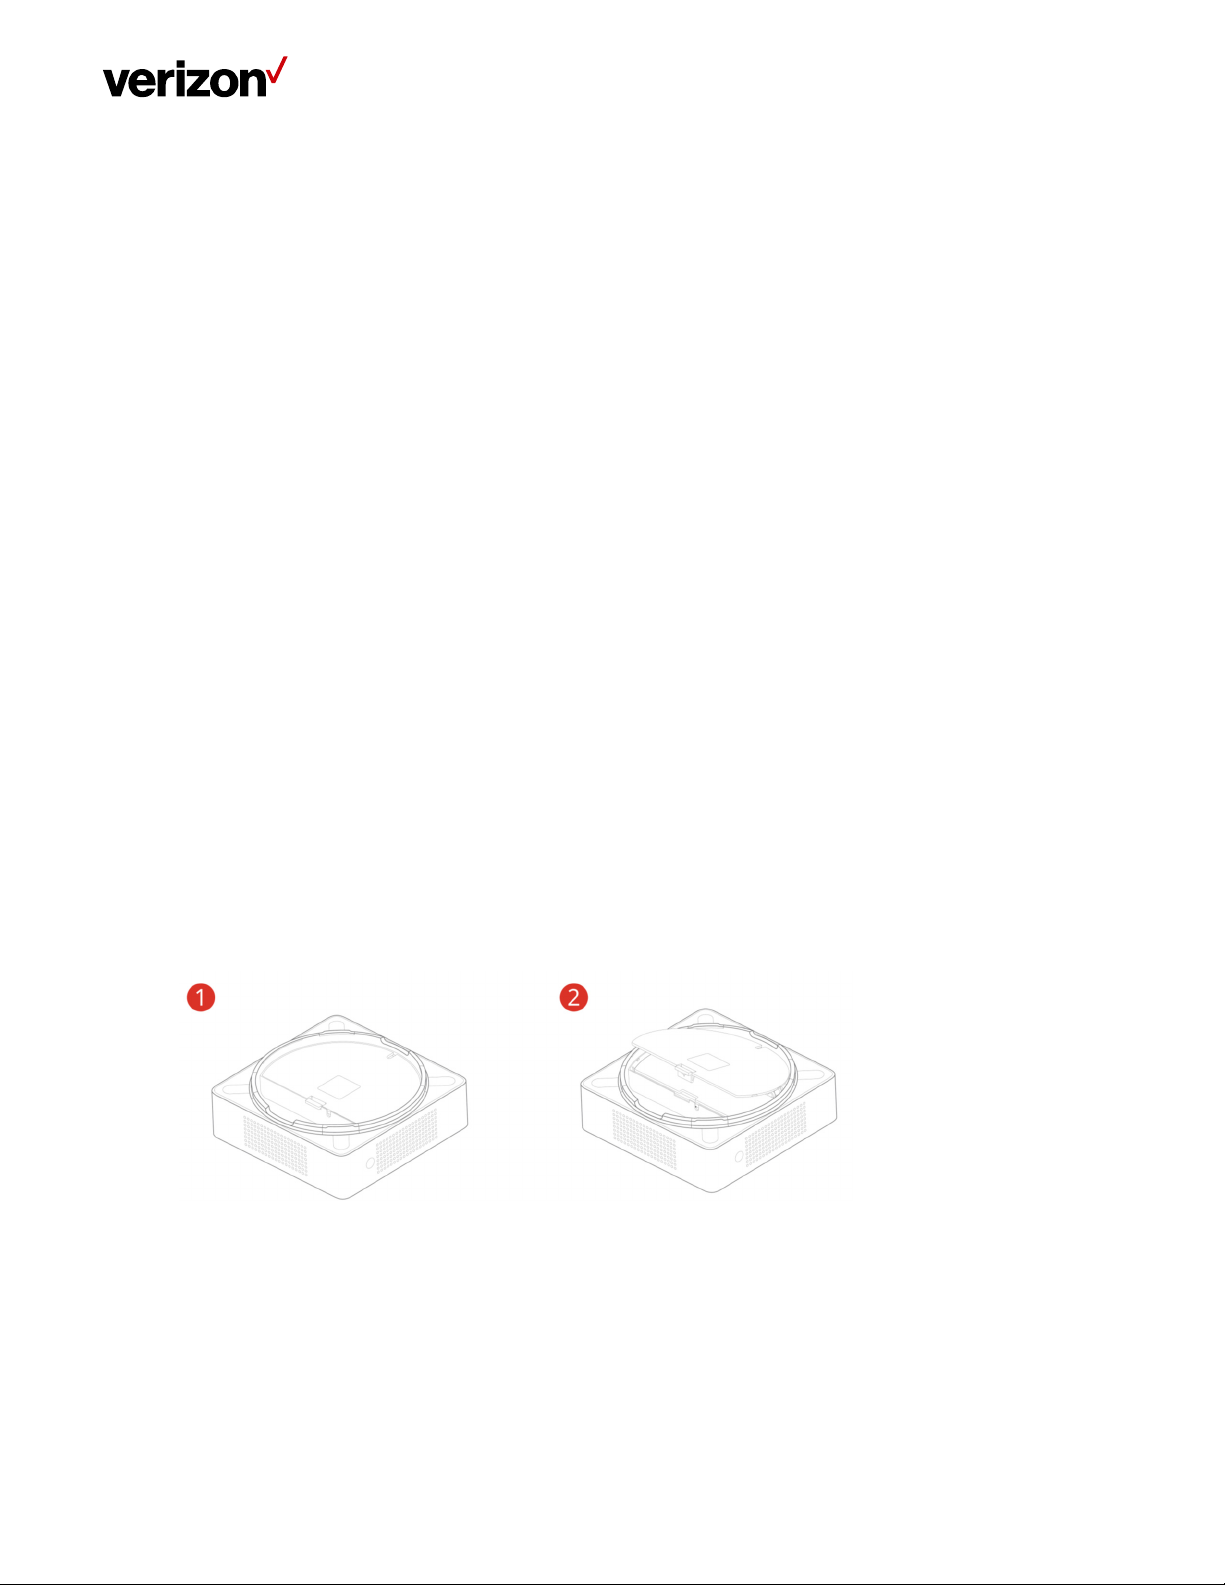
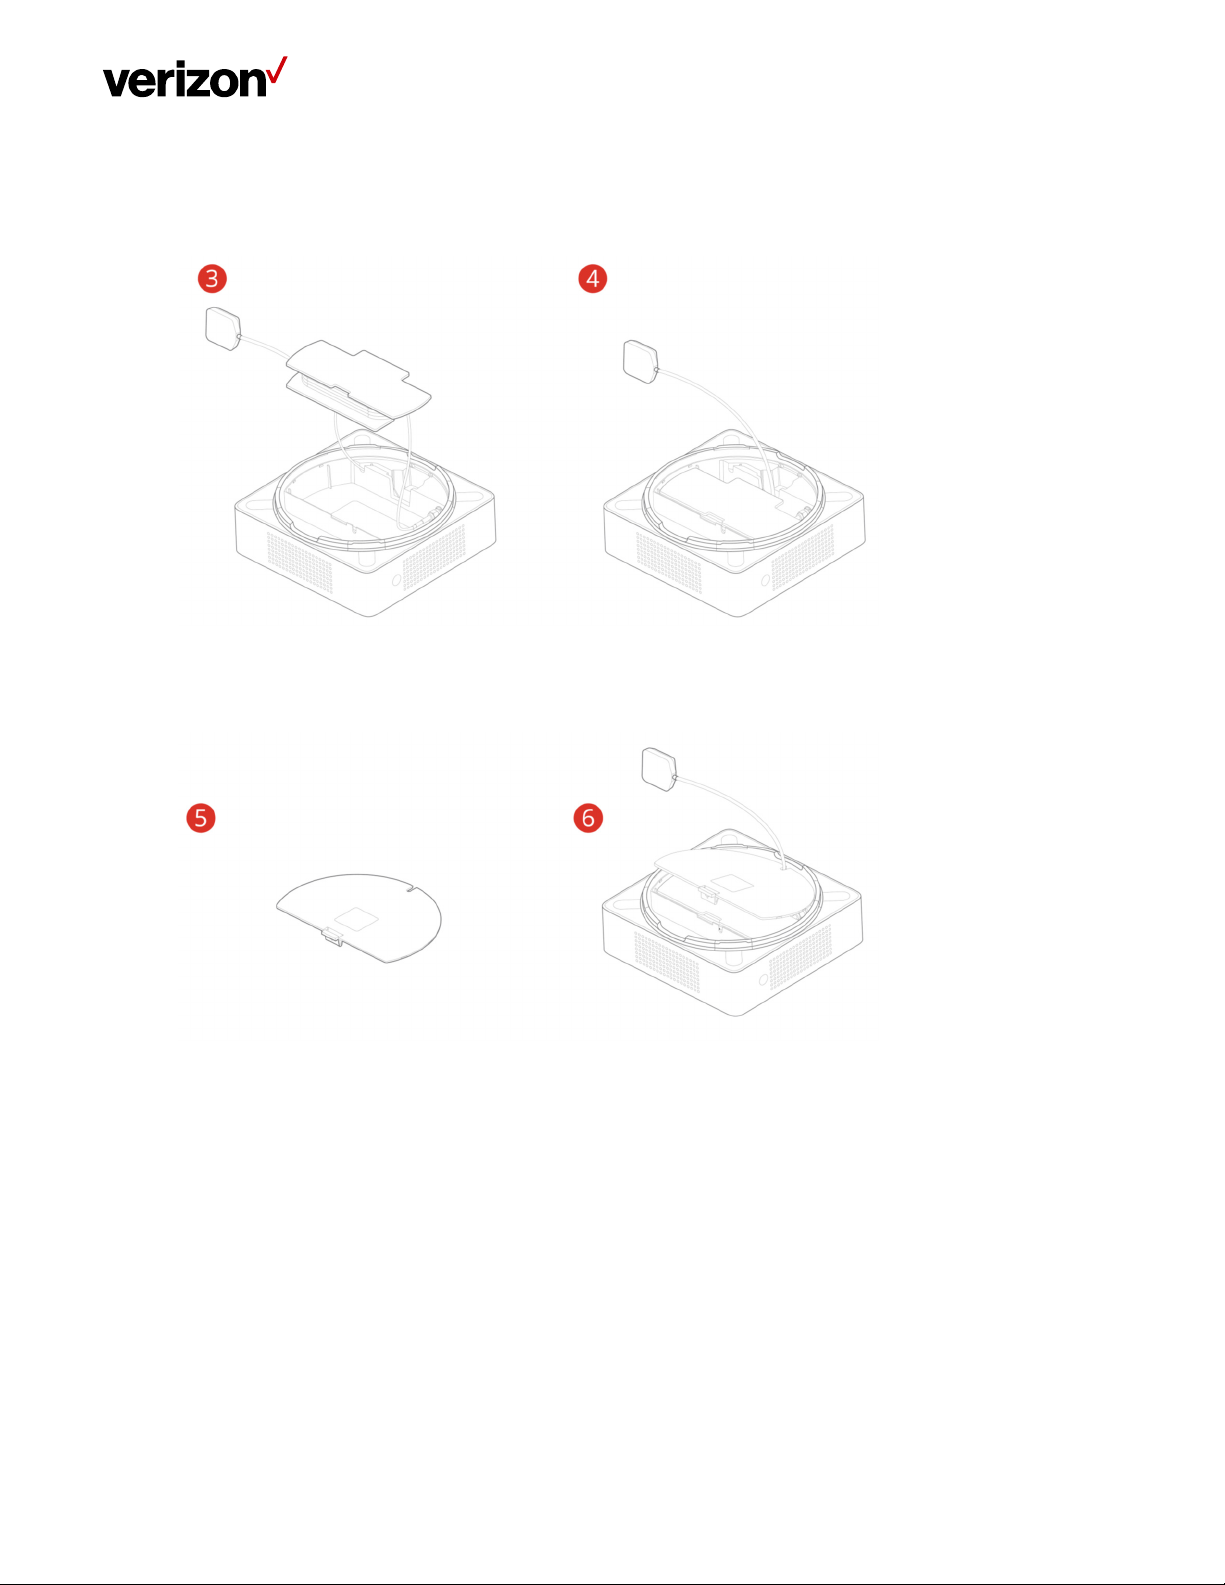
2.2 GPS
If a GPS signal is not acquired after 30-60 minutes, you can use the internal GPS antenna to improve reception. It’s
recommended to position the GPS antenna beside a window. To take out and reposition the GPS antenna, follow the
instructions below.
1. Turn off the LTE Network Extender.
2. Remove the rear cover on the 4G LTE Network Extender.
3. Take out the GPS antenna and unwrap the cable.
4. Return the plastic cable holder into place inside the Network Extender.
5. Reattach the rear cover.
6. Ensure that the GPS cable is running through the notch in order to properly fasten the rear cover back into place.
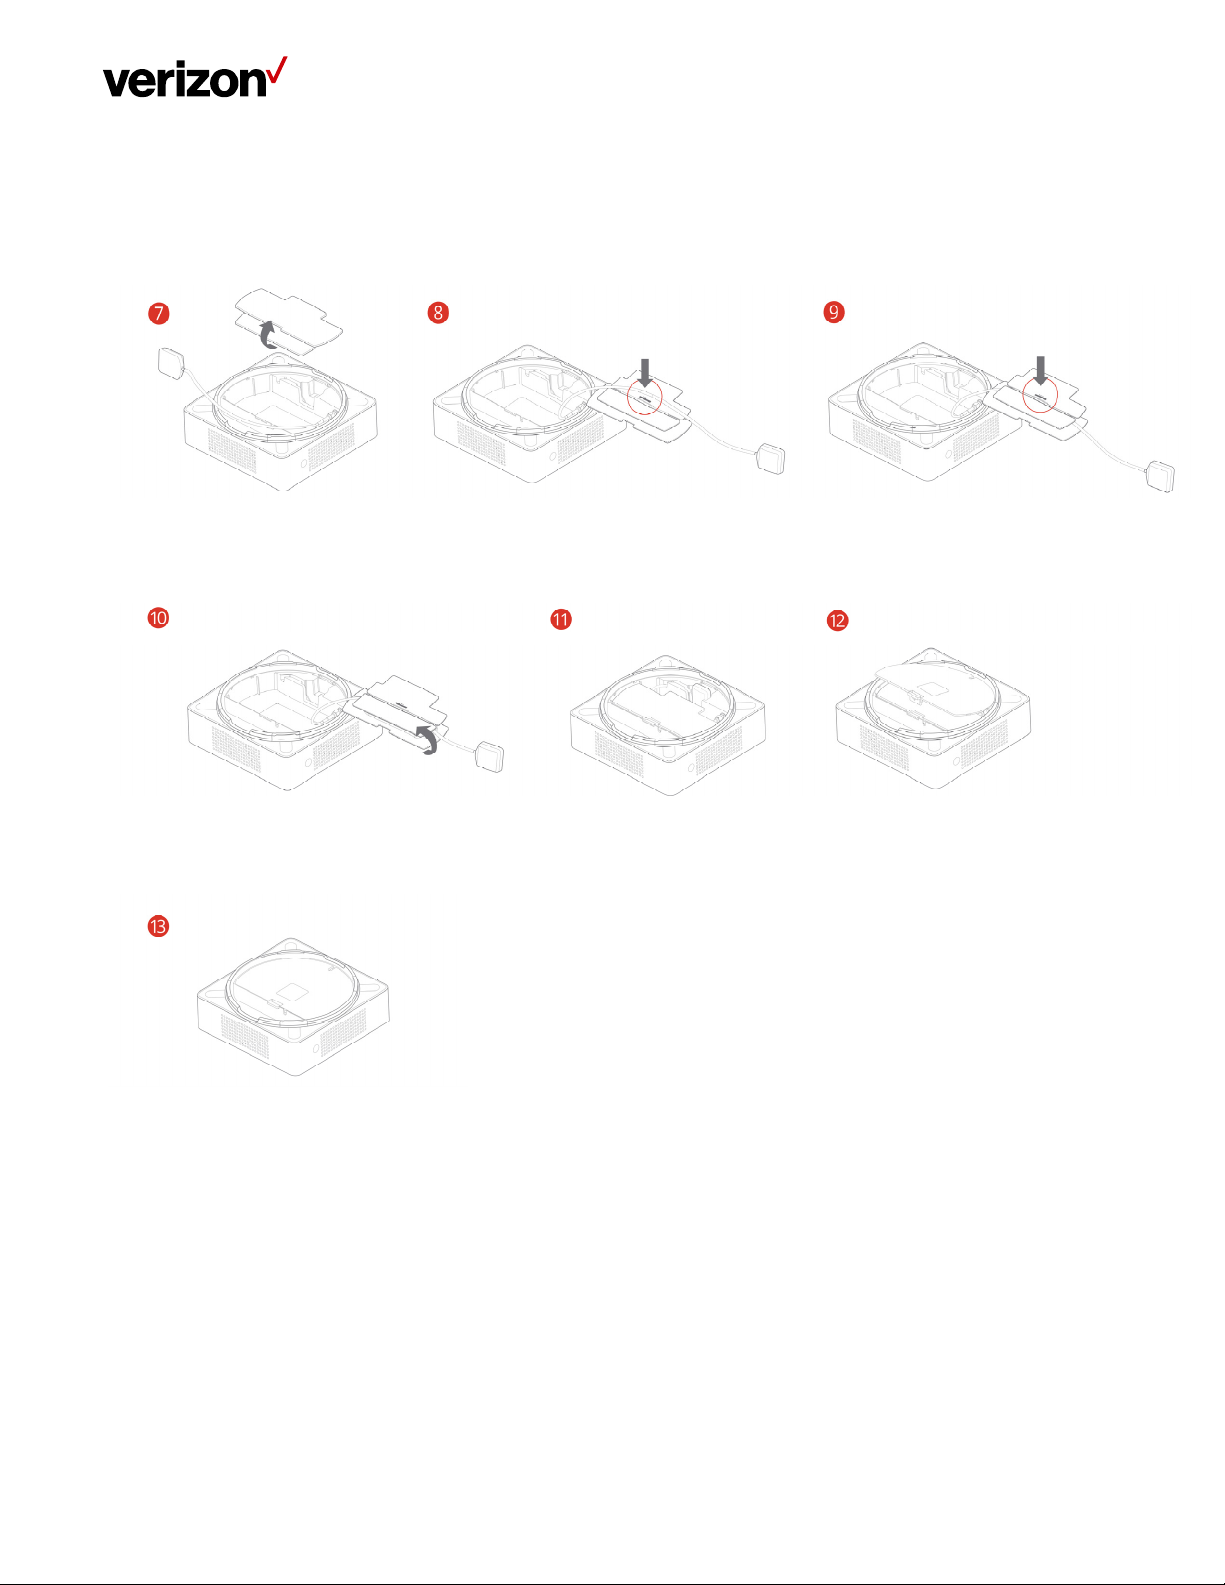
7. Place the antenna close to a window. If needed, you can use double-sided tape to secure the bottom of the GPS
antenna in place, but take care not to cover the antenna with tape.
8. Turn your LTE Network Extender back on and wait for it to begin searching for a GPS signal. Four strong GPS
satellite signals are required for a GPS location fix – the process may take up to 60 minutes.
9. If still encountering problems, check the GPS signal on the GPS page of the Web Admin UI. If you cannot verify that
the Network Extender can consistently track 4 or more strong GPS satellite signals, then try another location for
the GPS antenna where the signal may be better.
In below pictures, steps 1 to 6 show you how to unwrap the GPS antenna cable out of the LTE Network Extender; steps
7 to 13 show you how to wrap up the GPS antenna cable into the LTE Network Extender.
Verizon LTE Network Extender User Guide v1.7 11
© 2020 Verizon, All Rights Reserved.
Page 12
LTE Network Extender User Guide
Verizon LTE Network Extender User Guide v1.7 12
© 2020 Verizon, All Rights Reserved.
Page 13
LTE Network Extender User Guide
Verizon LTE Network Extender User Guide v1.7 13
© 2020 Verizon, All Rights Reserved.
Page 14
LTE Network Extender User Guide
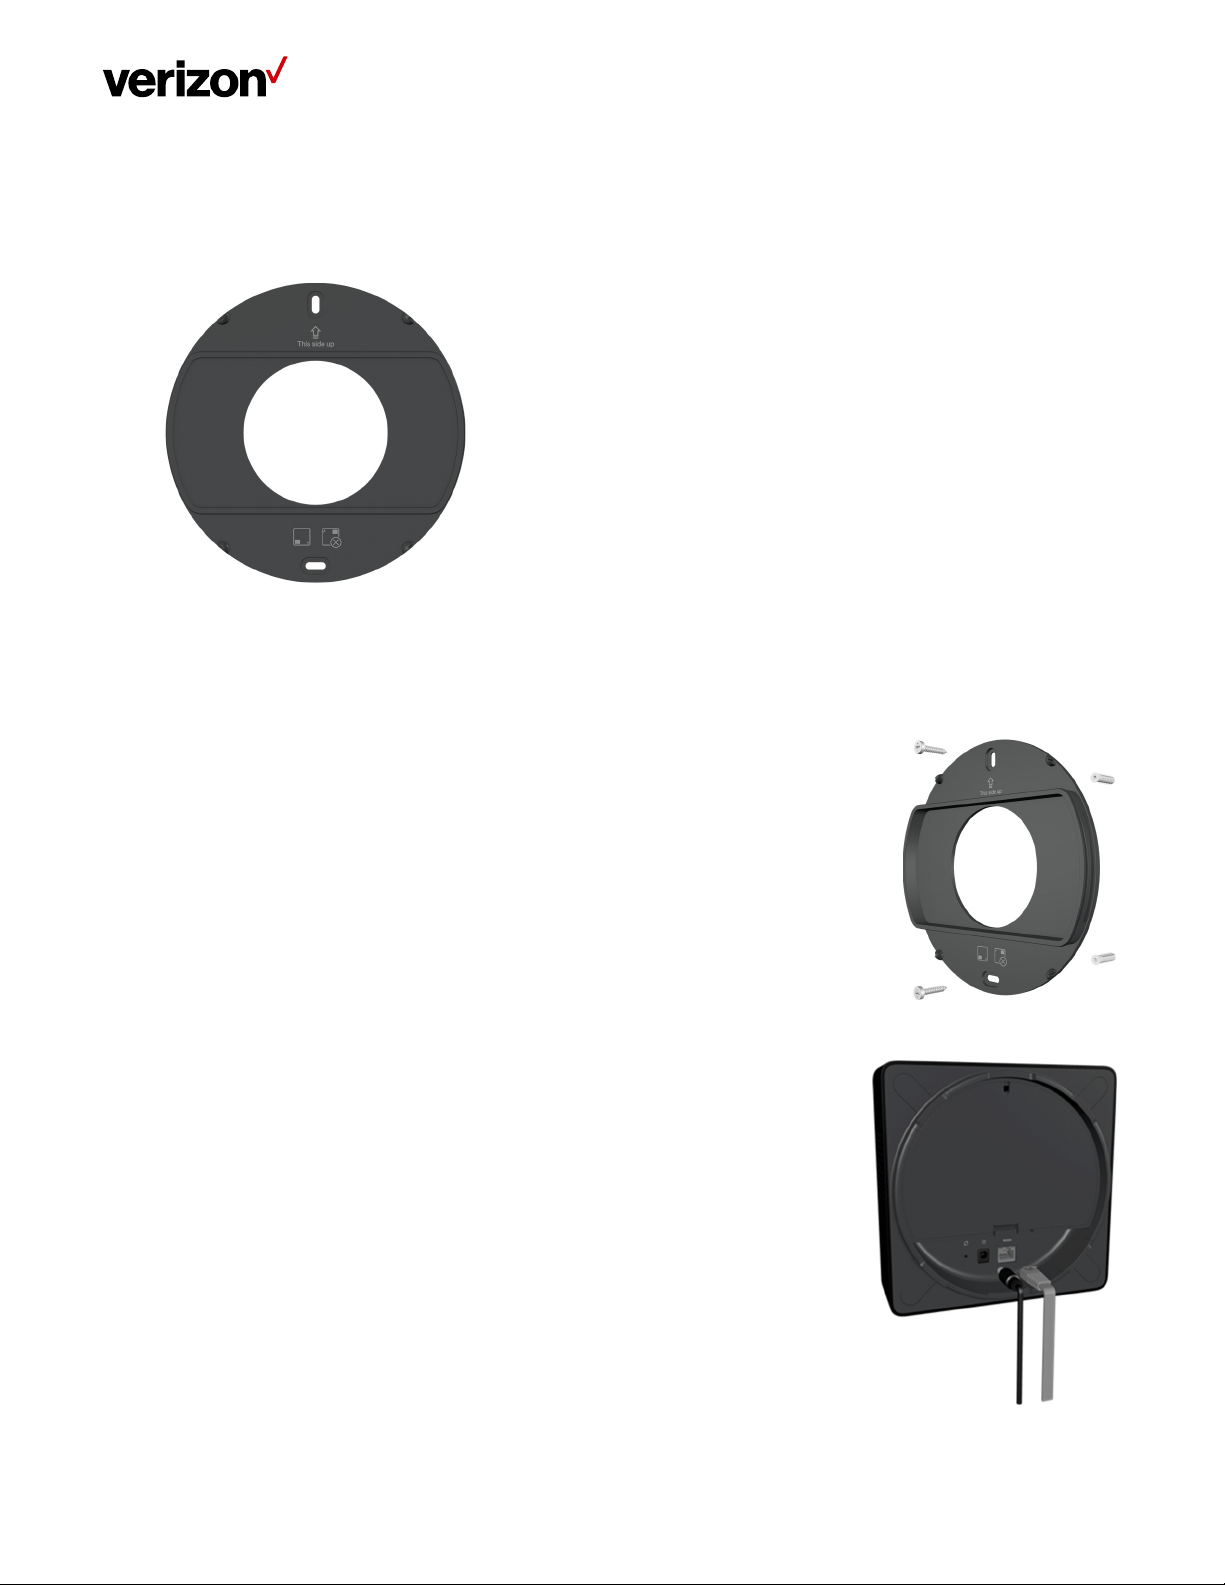
2.3 Wall Mount (Optional Accessory)
A separate wall-mount bracket package is available (sold separately) for your LTE Network Extender. This enables you to fix
your Network Extender directly to a wall for better positioning.
1. Screw the included wall mount bracket into desired position on a wall securely, ensuring it’s the correct way up
(screws are included with the wall-mount). Recommended hole size for the conical plastic anchor is 0.25” in
diameter and 1.20” in depth.
2. Make sure all cables are already connected to your 4G LTE Network Extender.
Verizon LTE Network Extender User Guide v1.7 14
© 2020 Verizon, All Rights Reserved.
Page 15

LTE Network Extender User Guide
3. Align your Network Extender to the bracket (your Network Extender should be oriented with the LCD screen in the
bottom left corner), and press firmly into place until it fits onto the bracket securely.
• The Network Extender can be slightly rotated on the wall mount bracket if needed.
Verizon LTE Network Extender User Guide v1.7 15
© 2020 Verizon, All Rights Reserved.
Page 16

LTE Network Extender User Guide
2.4 Making a Call
When your Network Extender is operational, you can use it make calls with your Verizon mobile phone. To do so, your
phone must be within 50 feet of the LTE Network Extender and have Advanced Calling switched on.
Advanced Calling settings vary according to operating systems:
• Android™: Go to Settings > Advanced Calling and turn on.
• Apple® iOS: Go to Settings > Cellular > Cellular Data Options > Enable LTE > Voice & Data. Additionally, on the “My
Verizon” Mobile App, enable Advance Calling feature for your phones.
• Windows®: Go to Settings > Cellular + SIM > SIM settings and turn on Advanced Calling.
• On some devices, it may be found in Wireless Calling, HD Voice, VoLTE call or similar.
With Advanced Calling switched on, you can verify your Verizon phones are connected to the LTE Network Extender:
1. Dial #48 from your mobile phone
2. You should hear the following confirmation: “You are under LTE Network Extender coverage”
3. Some phones may show a home icon when connected to the LTE Network Extender.
The LTE Network Extender’s coverage can vary according to environmental factors, interference and strength of external
cell towers.
Verizon LTE Network Extender User Guide v1.7 16
© 2020 Verizon, All Rights Reserved.
Page 17

LTE Network Extender User Guide
3 Web Admin UI
The LTE Network Extender Web Admin UI enables you to configure features, see the device’s status and make changes to
settings.
Using a computer connected to the same network (same router) as the LTE Network Extender, follow the steps below to
access the Web Admin UI:
1. Toggle information on the Network Extender’s LCD Display by pressing the Display Button (left panel), until you see
your Network Extender’s IP address displayed.
2. Enter the IP address into the address bar of a web browser e.g. http://<LTE Network Extender IP Address>.
3. You will arrive to the Web Admin UI Home screen as shown in the next section.
3.1 Admin Website Overview
The Web Admin UI provides detailed status information and access to a range of functions and settings. Use the main menu
on the left side to navigate. When you navigate to another page, or click the Sign In icon, you will be prompted to Sign In as
shown in the next section.
Verizon LTE Network Extender User Guide v1.7 17
© 2020 Verizon, All Rights Reserved.
Page 18

LTE Network Extender User Guide
Icons in the top right corner of the Home screen provide a quick display of 4G Service Status, GPS Status, Connected Devices
and Sign In Status.
Verizon LTE Network Extender User Guide v1.7 18
© 2020 Verizon, All Rights Reserved.
Page 19

LTE Network Extender User Guide
3.2 Sign-In
When you arrive to the Web Admin UI, you will need to sign in with the admin password to continue. You’ll be prompted to
sign in when you attempt to navigate to another page, or when you click the Sign-In icon in the top right.
1. Enter the admin password and click Sign In. The default admin password is LTEFemto + last 4 digits of the Network
Extender’s unique MAC ID (e.g., LTEFemtoBED0). You can find your Network Extender’s MAC ID displayed on the
label on the back of the device as shown below:
Verizon LTE Network Extender User Guide v1.7 19
© 2020 Verizon, All Rights Reserved.
Page 20

LTE Network Extender User Guide
2. If you already changed the password and have forgotten it, use the Forgot Admin Password link. You will be
prompted with the Security Challenge Question, which when answered correctly, will reset the password
back to default.
Please note that passwords are case-sensitive – the last four digits of the MAC ID should be entered in UPPER case.
You can change the default password in Settings > Change Admin Password (3.5.3 - Change Admin Password). You
may set up a Security Challenge question and answer.
You can reset the password back to the default admin password anytime if needed, by resetting your Network
Extender back to its factory default settings. This resets all settings back to factory default state. Refer to Section
1.3 (Reset Button) for more information.
Verizon LTE Network Extender User Guide v1.7 20
© 2020 Verizon, All Rights Reserved.
Page 21

LTE Network Extender User Guide
3.3 Home
The Home page displays an overview of your Network Extender’s basic information, such as Operational Status, IP
Address and MAC Address and others.
Verizon LTE Network Extender User Guide v1.7
© 2020 Verizon. All Rights Reserved.
21
Page 22

LTE Network Extender User Guide
System Information
Operational Status Current operational status of the LTE Network Extender.
Operational Mode Current operational mode (Open, Hybrid, or Closed) of the LTE Network Extender.
IP Address The Internet Protocol (IP) address of the LTE Network Extender.
MAC Address Displays the MAC address of the Network Extender. The MAC address is a unique
hardware identifier used to identify a device in a network. This MAC address can also
be found on the back label of the LTE Network Extender.
Software Version Displays the software version of the Network Extender.
Location Displays the GPS coordinates acquired by the Network Extender’s GPS antenna. This is
the physical location of the LTE Network Extender and is provided for E911 calls.
Map Links to the GPS location (above) on Bing Maps. Requires GPS Status to be “Location
Acquired” (Refer to Section 3.6.2 - GPS).
3.4 Connected Devices
The Connected Devices page displays information about connected devices (phone, tablets, or other 4G LTE
devices).
Verizon LTE Network Extender User Guide v1.7
© 2020 Verizon. All Rights Reserved.
22
Page 23

LTE Network Extender User Guide
Current Connections
Total Connections Number of total wireless devices currently connected to the LTE Network Extender
with an active call or data session.
Emergency Calls Number of wireless devices currently connected to the LTE Network Extender with an
active E911 call to emergency services.
Verizon LTE Network Extender User Guide v1.7
© 2020 Verizon. All Rights Reserved.
23
Page 24

LTE Network Extender User Guide
3.5 Settings
3.5.1 Network
The Network page displays information about IPv4 and IPv6 settings. You can enable or disable DHCP Server for
your Network Extender to be dynamically allocated IP address settings, or manually set IP address and DNS values
(when DHCP is disabled). Backhaul limit (affects uplink speeds served by the LTE Network Extender only) and MTU
size can also be set here.
Verizon LTE Network Extender User Guide v1.7
© 2020 Verizon. All Rights Reserved.
24
Page 25

LTE Network Extender User Guide
Mode
Mode IPv4 or IPv6 mode.
DHCP DHCP is enabled by default. When enabled, IP configuration is provided by the local
DHCP server. When disabled, specify a static IP configuration for the Network
Extender manually.
IPv4 / IPv6
Default Gateway Displays default gateway IP address. When DHCP is disabled, enter the default
gateway IP address here.
IP Address Displays local IPv4/IPv6 IP address of the Network Extender. When DHCP is disabled,
enter the IPv4/IPv6 address here.
Subnet Mask Displays subnet mask of the Network Extender. When DHCP is disabled, specify a
subnet mask here.
Primary DNS Displays the primary DNS server IP address. When DHCP is disabled, enter the primary
DNS server IP address here.
Secondary DNS Displays the secondary DNS server IP address. When DHCP is disabled, enter the
secondary DNS server IP address here.
IPv6 Each item of IPv6 setting is just for the Link-local address
MTU Size Maximum Transport Unit (MTU) defines the maximum packet size for data
transmission over the network. The default setting is recommended. When set too
high, users may experience poor voice quality and increased latency. If set too low,
overall bandwidth consumption will be increased and users may experience lower
data speeds.
Verizon LTE Network Extender User Guide v1.7
© 2020 Verizon. All Rights Reserved.
25
Page 26

LTE Network Extender User Guide
3.5.2 Advanced
Advanced Settings enables you to configure the LTE Network Extender’s output power and view neighboring cell
towers detected during initialization and startup. Provides information on Network Extender positioning relative to
other Verizon cell sites and LTE Network Extenders in the network, in the case of multiple Network Extender
clusters.
Verizon LTE Network Extender User Guide v1.7
© 2020 Verizon. All Rights Reserved.
26
Page 27

Last Data Refresh
Local time when the page was last refreshed.
LTE Network Extender User Guide
4G LTE Network
Extender Information
Tra nsm it Po wer
Neighboring Cells
Detected
Displays the Network Extender’s cell network identifier information: Network ID, CELL
ID, Physical CELL ID (PCI) and LTE EARFCN. Network ID (PLMN) and Cell ID (ECGI) are
linked by a hyphen.
The transmit power of the Network Extender can be adjusted using the slider
according to requirements, from maximum (100% = 100mW = 20dBm) to minimum
(10% = 10mW = 10dBm). Digital attenuation in 1mW steps from 10mW to 100mW is
used to achieve this.
Displays OTAR results. Can assist a multi-4G LTE Network Extender cluster with
positioning and power selection.
• Network ID: PLMN of the detected cell.
• EARFCN: This is the EARFCN of the detected cell.
• Cell ID: ECGI of the detected cell.
• PCI: PCI of the detected cell.
• Cell Type: Displays the result based on OTAR scan if the Cell Tower ID is within range
reserved for the 4G LTE Network Extender(s). Otherwise, displays “Macro”.
• RSRP: Displays the measured RSRP in dBm of the detected cell. An icon is provided
alongside the RSRP value indicating if the detected cell is too-close (high RSRP) and
may be causing interference; or if it is too far (low RSRP) and handover may be an
issue. Note – the distance between two 4G LTE Network Extenders using the same
band should be at least 170% of the distance of its coverage radius to avoid LTE
interference. In other words, if an LTE Network Extender has a 100 ft. coverage
radius in a given environment, the next closest LTE Network Extender using the
same band should be at least 170ft away. If two LTE Network Extenders are using
different bands from each other, they can be placed side-by-side. Besides, if the
neighboring cell reported from UE will be denoted by ‘ANR Cell’ and provisioned
from HeMS will be denoted by “HeMS Cell”. These two kinds neighboring cell will
not display the RSRP value.
Verizon LTE Network Extender User Guide v1.7
© 2020 Verizon. All Rights Reserved.
27
Page 28

LTE Network Extender User Guide
3.5.3 Change Admin Password
You can change the admin password used to sign-in to the Web Admin UI on the Change Admin Password page.
When you change password you can set up a security challenge and answer.
In the event of a forgotten password, you can use the Forgot Password prompt at the sign-in page to trigger your
security challenge (refer to Section 3.2 - Sign In). You can also reset the password back to the default password by
resetting the Network Extender back to its factory default state (refer to Section 1.3 - Reset Button).
Current Admin
Password
New Admin Password
Confirm New
Password
Security Challenge You can select a question from the drop-down menu as a security challenge in the
Verizon LTE Network Extender User Guide v1.7
© 2020 Verizon. All Rights Reserved.
Enter the current password. This is required for any password change.
Enter a new password. Choose hard-to-guess passwords, which include combinations
of numbers, letters and symbols. New passwords must meet validation criteria that
are detailed below.
Enter the new password again for confirmation.
event of a lost or forgotten password. Be sure to choose something memorable.
28
Page 29

LTE Network Extender User Guide
Challenge Answer Enter the correct response to your chosen security challenge question. Be sure to
enter something memorable.
Password Validation Criteria
• Password must be between 8 and 20 characters long.
• Password must not include more than three identical characters in a row, e.g., “111”, “aaa”, “CCC”.
• Password must include at least one lowercase letter, one uppercase letter and one number.
• New password cannot be the same as current password.
Security Challenge Questions
• What is your birthplace?
• What was your first car?
• What is your mother’s maiden name?
• What is your pet’s name?
Security Challenge Answer Criteria
• A security answer must be between 1 and 63 characters.
Verizon LTE Network Extender User Guide v1.7
© 2020 Verizon. All Rights Reserved.
29
Page 30

LTE Network Extender User Guide
3.5.4 Time Zone
The Network Extender features built-in time zone and daylight savings settings to configure for your device. Time
zone settings only affect timestamps and logs where featured throughout the Web Admin UI.
Admin Web
Time Zone Select your time zone (or closest) from the options in the drop-down menu.
Observe Daylight
Saving?
Select whether to observe daylight savings or not for the selected time zone, using the
check box. Daylight saving is not supported for Atlantic (AT), Samoa (ST) & Chamorro
(ChT) time.
Verizon LTE Network Extender User Guide v1.7
© 2020 Verizon. All Rights Reserved.
30
Page 31

LTE Network Extender User Guide
3.5.5 Reset
If the LTE Network Extender malfunctions or is not responding, it is recommended to restart the device or perform
a factory reset. Using the Reset page interface you can perform a Complete Restart, Quick Restart or Factory Reset.
Be aware that a factory reset will reset all settings and configurations back to factory default settings.
Complete Restart, Quick Restart and Factory Reset are rejected during active E911 calls on the Network Extender.
You can also perform a factory reset using the physical reset button on the back of the Network Extender. Refer to
Section 1.3 (Reset Button) for more information.
Complete Restart
Use this button to remotely perform a complete restart of the LTE Network Extender
when it is not physically reachable. A complete restart will cause the LTE Network
Extender to perform a re-scan of the neighboring cell. If the LTE Network Extender has
active E911 calls, the reset will be rejected.
Verizon LTE Network Extender User Guide v1.7
© 2020 Verizon. All Rights Reserved.
31
Page 32

LTE Network Extender User Guide
Quick Restart
Use this button to remotely power reset the LTE Network Extender when it is not
physically reachable. If the LTE Network Extender has active E911 calls, the reset will
be rejected.
Factory Reset
Use this button to remotely factory reset the LTE Network Extender when it is not
physically reachable. If the LTE Network Extender has active E911 calls, the reset will
be rejected. NOTE: Factory reset will revert all custom settings (e.g. Admin GUI
password, Static IP configuration) to factory defaults.
3.6 About
3.6.1 Status & Alarms
The Status & Alarms tab on the About page shows the connectivity status, operational status and alerts that can be
used for diagnostics and troubleshooting. If the connectivity status shows a server as “Not Reachable”, confirm
that the Network Extender is properly connected to the router and has acquired an IP Address. For LAN/Routers
with a firewall enabled, please see Chapter 4 (Configuring Your Firewall).
Verizon LTE Network Extender User Guide v1.7
© 2020 Verizon. All Rights Reserved.
32
Page 33

LTE Network Extender User Guide
Last Data Refresh Local time when the page was last refreshed.
Active Alarms
Displays any active alarms on the LTE Network Extender. Alarms may prevent your
Network Extender from coming into service. Please refer to the Description column in
the table for more information and reference 5.1 (LCD Display Messages and Error
Codes) for more help.
Alarm History
Displays a log of the LTE Network Extender’s last 100 alarms, including active or
cleared alarms.
Verizon LTE Network Extender User Guide v1.7
© 2020 Verizon. All Rights Reserved.
33
Page 34

LTE Network Extender User Guide
3.6.2 GPS
The GPS page displays GPS status information and includes GPS Satellite IDs, signal quality and signal strength
descriptions. This screen can assist with effective placement of your LTE Network Extender to acquire the better
GPS signals.
Last Data Refresh Local time when the page was last refreshed.
GPS
GPS Status Displays GPS signal status, i.e., whether the LTE Network Extender has acquired GPS
signals or not. If “Location Acquired” is not displayed, the LTE Network Extender will
not come into service.
Verizon LTE Network Extender User Guide v1.7
© 2020 Verizon. All Rights Reserved.
34
Page 35

LTE Network Extender User Guide
GPS Satellite ID Lists GPS satellites which are currently being detected, including each satellite's
unique identifier ID.
GPS Signal Quality
(dB)
Displays the signal-to-noise ratio in dB for each GPS signal, where a higher value
means better quality.
Description Describes each signal as Strong, Fair or Weak according the Signal Quality level. Strong
signal is required for your Network Extender. Consider repositioning your LTE Network
Extender if these descriptions are Fair or Weak, or using the internal GPS antenna
(refer to Section 2.2 - GPS).
3.6.3 Support
The Support page displays contact details and links to relevant information for a range of customer support
enquiries.
Device Support Page
Hyperlink to the operator’s support pages.
and User Guide
Community Forums Hyperlink to the operator’s community forums.
Customer Support
Phone number for the operator’s customer support.
Phone
Verizon LTE Network Extender User Guide v1.7
© 2020 Verizon. All Rights Reserved.
35
Page 36

LTE Network Extender User Guide
4 Configuring Your Firewall
In most cases, the LTE Network Extender can connect and automatically configure network settings, with minimal
user involvement. In cases where local firewall settings may need to be configured, refer to the information below:
Firewall Settings
Source Destination Protocol Destination Port Notes
LTE Networ k
GPS Assistance Server TCP 80
Extender
LTE Networ k
DNS Server UDP/TCP 53
Extender
LTE Networ k
NTP Server UDP/TCP 123
Extender
LTE Networ k
Extender
VzW SeGW UDP 500/4500 More than one port may be used
for multiple device installation
LTE Networ k
Extender
VzW SeGW ESP/50 NA When NAT/PAT is not present
LTE Networ k
Extender
LTE Network Extender ESP/50 NA When NAT/PAT is not present
Verizon LTE Network Extender User Guide v1.7
© 2020 Verizon. All Rights Reserved.
36
Page 37

LTE Network Extender User Guide
5 Troubleshooting
The Power LED is off.
• Check that the power adapter is properly inserted into the 12V DC Power Port on the back of the LTE Network
Extender, and that it is securely connected to a working power outlet.
The LTE Network Extender has not acquired a GPS signal after one hour or more.
• Try to position your LTE Network Extender in a new location. An ideal location is as close to a window as
possible, in an open area with few surrounding obstructions. Elevating the Network Extender on a cabinet or
shelf may also help.
• Ensure that other devices are not interfering with your Network Extender: your LTE Network Extender should be
at least 10 feet away from any communications device or appliance that generates electromagnetic radiation
such as microwave ovens or Wi-Fi routers.
• Take out the internal GPS antenna as described in Section 2.2 (GPS) and place it close to a window.
• If using another/other LTE Network Extender(s), ensure that their GPS antennas are at least 150 mm apart.
• Ensure that the GPS antenna is connected properly. The GPS antenna must always be connected to the LTE
Network Extender for operation.
• If you cannot reposition the Network Extender or the internal GPS antenna and acquire a signal, you may need
to separately purchase and install an external outdoor antenna.
Unable to make a call using the LTE Network Extender.
• Make sure the Network Extender is powered on and operational.
• Ensure that your router is working properly and has an active Internet connection. Usually the Internet activity
LED on your router should display some activity to indicate this. Refer to the support documentation of your
router for more information.
• Make sure you are within coverage range of your LTE Network Extender (see Section 5.1 - Capacity &
Coverage).
• Check that Advanced Calling is turned on for your Verizon phone as shown in Section 2.4 (Making a Call).
• Verify that your Verizon phone is connected to the LTE Network Extender by dialing #48.
LTE Network Extender Activation
Confirm that your LTE Network Extender was activated at the time of purchase. If not, call Verizon Wireless
Customer Service at (800) 922-0204 or call *611 from your Verizon Wireless mobile phone and select the option
for technical support. Before contacting Verizon Wireless Customer Service, please confirm:
• Your router is working properly and has an active Internet connection. Usually the Internet activity LED on your
router should display some activity to indicate this. Refer to the support documentation of your router for more
information.
• Your LTE Network Extender is receiving a GPS signal. You can check this by using the Display Button to view GPS
information on the LCD screen (see 2.1.1 - LCD Display), and on the GPS page of the Web Admin UI (see 3.6.2. -
GPS).
Verizon LTE Network Extender User Guide v1.7
© 2020 Verizon. All Rights Reserved.
37
Page 38

LTE Network Extender User Guide
5.1 Capacity & Network Coverage
Your LTE Network Extender has the following capacity and coverage:
• Capacity: Up to fourteen simultaneous active users + one channel reserved for E911 calls + one channel
reserved for redirect.
• Coverage: Approximately 7500 square feet (50-foot radius).
Coverage may vary based on environmental factors, floor plan and RF absorption of building materials.
5.2 LCD Display Messages & Error Codes
The following messages or error codes may appear on the display of the LTE Network Extender during operation or
startup process:
Error
Code
Category LCD Display
Startup
Startup
Startup
Startup
Content Description
Booting up.
Factory reset
restarting
Please wait…
Hardware initializing
Please wait...
Factory reset: shutting down.
Factory reset: starting up.
Hardware initializing.
Startup
2A
Verizon LTE Network Extender User Guide v1.7
© 2020 Verizon. All Rights Reserved.
Hardware Error 2A
Please check user
guide
The LTE Network Extender has a Hardware Error disrupting
its normal booting-up process; please try restarting the
device. If the error persists, please call Customer Service
(800-922-0204).
38
Page 39

LTE Network Extender User Guide
2B
3A
4A
Startup
Startup
Startup
Startup
Startup
Hardware Error 2B
Please check user
guide
Software initializing
Please wait...
Software Error 3A
Please check user
guide
Connecting to Router
Please wait...
The LTE Network Extender has a malfunctioning RF
antenna, and the device can no longer provide proper
service. Please call Customer Service (800-922-0204).
Software initializing.
The LTE Network Extender has a Software Error disrupting
its normal booting-up process; please try restarting the LTE
Network Extender. If the error persists, please call
Customer Service (800-922-0204).
Acquiring local IP address.
The Ethernet port on the LTE Network Extender is not
Connection Error 4A
Check Ethernet cable
operational; please check the Ethernet cable is properly
connected at both ends, and the switch, router or Internet
gateway is turned on.
5A
6A
Startup
Startup
Startup
Startup
Connecting to CMP
server
Getting certificate from CMP server.
Please wait...
Server Error 5A
Please check user
guide
The LTE Network Extender has failed to get certificate from
the CMP server; please contact your network administrator.
If the issue persists, please call Customer Service (800-922-
0204).
Searching GPS signal
Please wait...
GPS acquisition.
up to 10mins
GPS Insufficient Error
6A
Please check user
guide
The LTE Network Extender has failed to acquire minimally
required GPS signal; please try to move your GPS antenna
closer to the window, refer to Sections 2.1 Setup: Network
Extender, 2.2 Setup: GPS & 5 Troubleshooting. If the issue
persists, please call Customer Service (800-922-0204).
Verizon LTE Network Extender User Guide v1.7
© 2020 Verizon. All Rights Reserved.
39
Page 40

6B
Startup
LTE Network Extender User Guide
GPS antenna Error 6B
Please check GPS
antenna connection
No GPS antenna is detected in the LTE Network Extender,
please make sure a GPS antenna module is set up and
connected to the device. If the issue persists, please call
Customer Service (800-922-0204).
6C
7A
8A
8B
Startup
Startup
Startup
Startup
Startup
Startup
The LTE Network Extender failed to receive a clock signal
GPS clock Error 6C
Please check user
guide
from its GPS module; please try to move your GPS antenna
closer to the window, refer to Sections 2.1 Setup: Network
Extender, 2.2 Setup: GPS & 5 Troubleshooting. If the issue
persists, please call Customer Service (800-922-0204).
Connecting to SeGW
server
SeGW discovery and IPsec setup (init/serv).
Please wait...
The LTE Network Extender failed to establish IPSec tunnel
Server Error 7A
Please check user
guide
to connect to SeGW; please check the LAN/firewall settings
(refer to 4 - Configuring Your Firewall) or contact your
network administrator. If the issue persists, please call
Customer Service (800-922-0204).
Connecting to HeMS
server
HeMS discovery and download of configuration file.
Please wait…
The LTE Network Extender received incorrect provisioning
Server Error 8A
Please check user
guide
parameters from HeMS, for example, incorrect bandwidth,
wrong command sequence in setting EARFCN for ANR or
unsupported band. If the issues persists, please call
Customer Service (800-922-0204).
Out of service area
Error 8B
Please check user
guide
The LTE Network Extender is out of Verizon's service area; it
could be that Verizon service is not available in your area.
Please try to restart your device, if the issue persists, please
call Customer Service (800-922-0204).
The LTE Network Extender received a "403 Forbidden" error
message from the management server. Please try to restart
your device. If the issue persists, please call Customer
Service (800-922-0204).
The LTE Network Extender received a "500 Internal Server
Error" from the management server. Please try to restart
your device. If the issue persists, please call Customer
Service (800-922-0204).
40
8C
8D
Verizon LTE Network Extender User Guide v1.7
© 2020 Verizon. All Rights Reserved.
Startup
Startup
Server Error 8C
Please check user
guide
Server Error 8D
Please check user
guide
Page 41

8E
9A
9B
9C
Startup
Startup
Startup
Startup
Startup
Info
Info
LTE Network Extender User Guide
Server Error 8E
Please check user
guide
The LTE Network Extender is put into maintenance mode
(Admin=0) by the management server, and no UE can
register on the device. If the issue persists, please call
Customer Service (800-922-0204).
Connecting to HeGW
server
Serving HeGW discovery.
Please wait…
Server Error 9A
Please check user
guide
Server Error 9B
Please check user
guide
Server Error 9C
Please check user
guide
The LTE Network Extender failed to connect to the HeNB
Gateway; please check the LAN/firewall settings or contact
your network administrator. If the issue persists, please call
Customer Service (800-922-0204).
The LTE Network Extender failed to communicate with
Verizon's backend network; please check the LAN/firewall
settings or contact your network administrator. If the issue
persists, please call Customer Service (800-922-0204).
The LTE Network Extender detected a PCI collision problem
with the PCI setting assigned by the management server.
Please try restarting your device. If the issue persists, please
call Customer Service (800-922-0204).
Service Active…
Press the button to
view device
information.
9/11 Satellites
connected
0/14 Devices
Displays GPS satellite connections & connected devices.
connected
Service:
Active, Open
Info
IP address:
10.1.107.26
Displays LTE Network Extender information.
Mac address:
F8:5B:3B:36:BA:2C
Info
Verizon LTE Network Extender User Guide v1.7
© 2020 Verizon. All Rights Reserved.
Device serial number:
SC0201900025
Displays LTE Network Extender information.
41
Page 42

LTE Network Extender User Guide
20
21
22
23
24
System
System
System
Ethernet
GPS
No service Error 20
The device is
overheating
Please check user
The LTE Network Extender is overheating; please place this
device in a cool area where the temperature is between 32-
122 degrees Fahrenheit.
guide
No service Error 21
Please check user
guide
No service Error 22
Please check user
guide
The LTE Network Extender is experiencing a catastrophic
hardware failure with the antenna. Please call Customer
Service (800-922-0204).
There is an abnormally low transmission signal from your
LTE Network Extender affecting the functionality of the
device. The device will try to reboot itself in a moment;
please don't unplug your Network Extender. If the issue
continues after auto-reboot, please call Customer Service
(800-922-0204).
No service Error 23
Please check user
guide
GPS antenna Error 24
Please check user
guide
The Ethernet port on the LTE Network Extender is not
operational; please check the Ethernet cable is properly
connected at both ends, and that the switch, router or
internet gateway is turned on.
No GPS antenna is detected in the LTE Network Extender;
please make sure a GPS antenna module is set up and
connected to the device. If the issue persists, please call
Customer Service (800-922-0204).
25
26
27
28
GPS
GPS
Service
Service
The LTE Network Extender has not been able to acquire a
GPS antenna Error 25
Please check user
guide
GPS signal for the past 24 hours. As a result, the device can
no longer provide service. Please try to move your GPS
antenna closer to the window. If the issue continues, you
may need to acquire an outdoor GPS antenna.
GPS signal Error 26
Please check user
guide
The LTE Network Extender has failed to acquire the
minimally required GPS signal; please try to move your GPS
antenna closer to the window, refer to Sections 2.1 Setup:
Network Extender, 2.2 Setup: GPS & 5 Troubleshooting. If
the issue persists, please call Customer Service (800-922-
0204).
No service Error 27
Please check user
guide
The LTE Network Extender failed to establish IPSec tunnel
to connect to SeGW, and the device can no longer provide
service to your mobile devices. Please check the
LAN/firewall settings or contact your network
administrator. If the issue persists, please call Customer
Service (800-922-0204).
Out of service area
Error 28
Please check user
guide
The LTE Network Extender is out of Verizon's service area; it
could be that Verizon service is not available in your area.
Please try restarting your device again. If the issue persists,
please call Customer Service (800-922-0204).
Verizon LTE Network Extender User Guide v1.7
© 2020 Verizon. All Rights Reserved.
42
Page 43

29
30
31
32
33
Service
Service
Service
Service
Service
LTE Network Extender User Guide
No service Error 29
Please check user
guide
No service Error 30
Please check user
guide
No service Error 31
Please check user
guide
No service Error 32
Please check user
guide
No service Error 33
Please check user
guide
The LTE Network Extender received a "403 Forbidden" error
message from the management server. Please try restarting
your device. If the issue persists, please call Customer
Service (800-922-0204).
The LTE Network Extender received a "500 Internal Server
Error" from the management server. Please try restarting
your device. If the issue persists, please call Customer
Service (800-922-0204).
The LTE Network Extender is put into maintenance mode
(Admin=0) by the management server, and no UE can
register on the device. If the issue persists, please call
Customer Service (800-922-0204).
The LTE Network Extender failed to connect to the HeNB
Gateway, please check the LAN/ firewall settings or contact
your network administrator. If the issue persists, please call
Customer Service (800-922-0204).
The LTE Network Extender detected a PCI collision problem
with the PCI setting assigned by the management server.
Please try restarting your device. If the issue persists, please
call Customer Service (800-922-0204).
34
35
Service
System
System
System
The LTE Network Extender has a communication failure
No service Error 34
Please check user
guide
with Verizon’s network, preventing your device from
providing service to mobile devices. Please try restarting
your Network Extender. If the issue persists, please call
Customer Service (800-922-0204).
The LTE Network Extender experienced failure while
System msg Error 35
Please wait
We will retry shortly
upgrading its software. The device will try to reboot itself in
a moment; please don't unplug your device. If the issue
continues after auto-reboot, please call Customer Service
(800-922-0204).
Updating software
please wait…
Upgrading software.
Configuration
updated.
Restarting
System restarting after a configuration update, e.g.,
changed band.
Please wait...
Verizon LTE Network Extender User Guide v1.7
© 2020 Verizon. All Rights Reserved.
43
Page 44

LTE Network Extender User Guide
System
Restarting
Please wait...
System restarting.
Verizon LTE Network Extender User Guide v1.7
© 2020 Verizon. All Rights Reserved.
44
 Loading...