

Page 1

USER
GUIDE
Verizon Jetpack™
4G LTE Mob ile Hotspo t
Model#: 890L
Global Ready™
Page 2

LEGAL INFORMATION
Copyright © 2012 ZTE CORPORATION.
All rights reserved.
No part of this publication may be excer pted,
reproduced, translated or utilized in any form or
by any means, electronic or mechanical, including
pho tocopyin g and micro film, without the prior
written permission of ZTE Corporation.
The manual is published by ZTE Corporation. We
reserve the right to make modifications on print
errors or updat e specif icat ions without prior
notice.
Version No. : 1.0
Edition Time : 03-2012
1
Page 3

CONTENTS
Welcome ....................................................................4
Thank You for Choosing Verizon Wireless .........4
Getting Started.......................................................5
Screen Indicators ....................................................... 6
Hardware Installation ...........................................8
Installing the 4G SIM Card ...................................... 8
Inserting and Charging the Battery ...................... 9
Removing the 4G SIM Card ...................................11
Connecting to the Internet ..............................12
Connec ting Wi -Fi Enable d Devices To Your
Jetpack .........................................................................12
Follow these Steps ...................................................13
Accessing the Internet............................................13
Advanced Configuration ................................... 14
PIN Code Verification ..............................................15
Basic Setup .................................................................16
WAN Settings .............................................................17
Router ...........................................................................20
Wi-Fi Settings ............................................................21
Firewall .........................................................................26
SMS ...............................................................................31
2
Page 4

Navigating the Device ....................................... 32
WAN Info ......................................................................33
WLAN Info ...................................................................33
Settings ........................................................................34
Message .......................................................................36
Usage of WPS ....................................................... 36
Glossary .................................................................. 37
How to Get Help ................................................... 41
Health and Safety Information ......................41
General Guidelines ...................................................41
Aircraft Safety ..........................................................46
Hospital Safety .........................................................47
Road Safety ................................................................47
Vehicles Equipped with an Airbag ......................48
Third Party Equipment ............................................48
Efficient Use...............................................................49
CTIA Requirements ..................................................49
Radio Frequency (RF) Exposure .........................50
FCC Compliance ........................................................52
Consumer Limited Warranty ........................... 55
3
Page 5

Welcome
Thank You for Choosing Verizon Wireless
You’r e now co nnect ed to the bl azin gly fa st,
powerfully brilliant Verizon 4G LTE Network. This
guide will help you understand your new mobile
hotspot and all the things you can do with it at
home or abroad. So let’s get started.
Th is gu ide w ill s how you h ow to u nle ash t he
potential of your new Verizon Jetpack™. Assistance
is at your fin gert ips at verizonwi rele ss.com/
sup port. Customer Service is at your disposal
at 1-80 0-922-0204 or in any Verizon Wireless
Communications Store.
Device Introduction
The Verizon Jetpack™ - 890L is a newly developed
4G LTE Mob ile Ho tsp ot. I t is Glo bal Re ady ™
pr ovi din g flexibl e acce ss for u sers t o enjoy
hi gh-spe ed inte rne t applic ation s aro und the
globe. When connected to the Veri zon 4G LTE
Network, the Jetpack can support simultaneous
connections to up to 10 Wi-Fi enabled devices.
When connected in 2G or 3G mode the Jetpack
can support simultaneous connections to 5 Wi-Fi
enabled devices.
4
Page 6
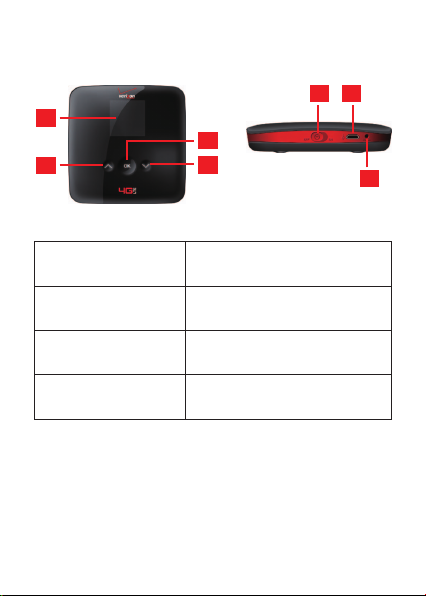
Getting Started
1
2
5 6
4
3
7
BUTTONS AND
INTERFACE
1. SCREEN
2. UP BUTTON
3. DOWN BUTTON
DESCRIPTION
Displays the menus and the
status of your Jetpack.
Scroll up to select the
options.
Scroll down to select the
options.
5
Page 7

Confirm highlighted
selection.
4. OK BUTTON
When the Jetpack button
is locked, press once to
light up the screen, and
press again to unlock.
5. POWER SWITCH Power on/off your Jetpack.
6. MICRO USB PORT Charge your Jetpack.
Press and hold to restore
7. RESET BUTTON
your Jetpack to the factory
default settings.
Screen Indicators
Icon Description
Battery Status
4G Network
3G Network
2G Network
Data Connected
6
Page 8

Icon Description
Signal Strength
and No Network Service
Roaming Signal Strength
Roaming
SMS
New SMS
SMS Full
Number of current Wi-Fi
connections
Settings
7
Page 9
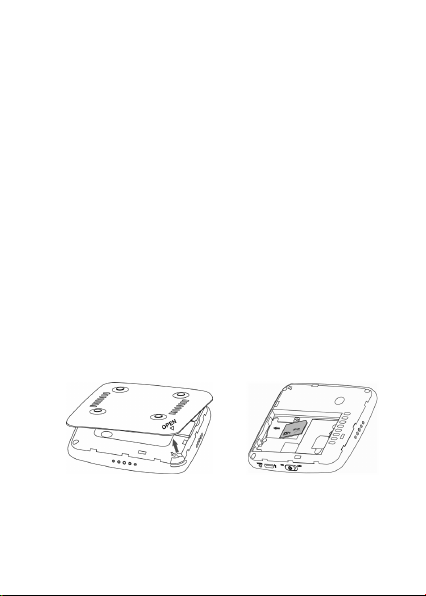
Hardware Installation
Installing the 4G SIM Card
If you have not already done so, please follow
these instructions for the installation of your new
4G SIM Card:
1. Remove 4G SIM Card from the outer card,
being careful not to touch the gold contacts.
CAUTION: Do not bend or scratch your 4G SIM
Card. Avoid exposing your 4G SIM Card to static
electricity, water or dirt.
2. Turn the power off. Remove the battery cover
an d take t he ba tter y out. Lo cat e the 4G
SIM card slot. Hold the card so the Verizon
Wireless logo on the card is facing you and the
gold contact points are properly aligned with
the 4G SIM Card slot.
3. Insert 4G SIM Card with the Verizon Wireless
logo facing you into the slot until it is fully
inserted.
8
Page 10
NOTE: Your 4G SIM (Subscriber Identity Module)
Card is a small rectangular plastic card that stores
your phone number and imp ortant information
about your wireless service.
The 4G SIM Car d M UST remain in the Jetpack
when in use.
Inserting and Charging the Battery
1. Use the thumb catch at the bottom of the
device to open the battery cover and align
the batt ery contac ts with the terminals in
the battery compartment as shown. Push the
battery down until it clicks into place.
2. Pl ace the b att ery cover ove r the bat ter y
co mpartm ent ens uri ng that the arrow o n
the device and the arrow on battery cover
are aligne d. Then pre ss the battery cove r
downward until it clicks into place.
9
Page 11
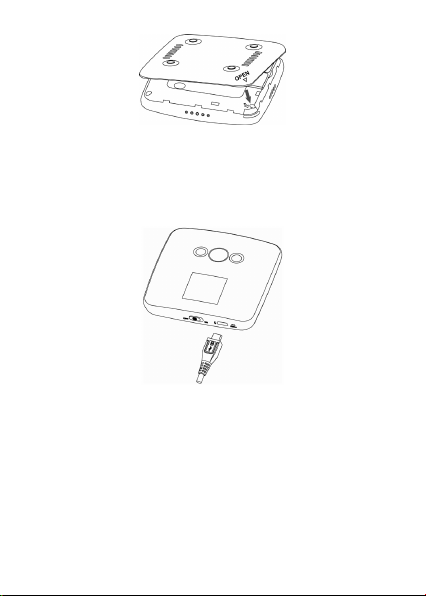
Your device comes with wall charger. To charge:
1. P lug one end of th e wall charg er in to an
electrical outlet and the the other end into the
device’s MICRO USB PORT.
2. It is recommended the battery be fully charged
before you use your Jetpack for the first time.
NOTE: The charge time varies depending upon the
battery level. The device will stop charging if the
temperature of the battery exceeds 113 °F/45 °C.
10
Page 12

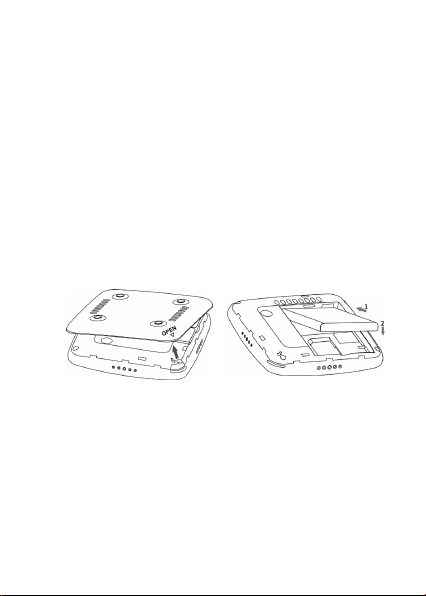
Removing the 4G SIM Card
1. Turn the Verizon Jetpack power off. Remove
the battery cover and take out the battery.
2. Gently remove the SIM Card from the SIM Card
slot.
NOT E: Sh ou ld yo ur 4G SIM Ca rd be lost or
damaged please call 1-800-922-0204 to speak
with a Customer Service Representative. From
outside the U.S. call + 1-908-559-4899 for 24/7
Global Support.
You can move the 4G SIM Card from one device
to anothe r and your wireless servic e will work
seam lessl y as l ong as you have a com patib le
device and service plan. To see which devices are
compatible wi th the Verizon Wirel ess 4G SIM
Card, visit verizonwireless.com/certifieddevice.
For additional information about 4G SIM Cards,
visit verizonwireless.com/4GSIM.
11
Page 13

Connecting to the Internet
With your new Verizon Jetpack, a wireless Internet
connection can always be at your fingertips.
Connecting Wi-Fi Enabled Devices To Your
Jetpack
NOTE: It is recomm ended the battery be ful ly
charged in order to use your Jetpack via Wi-Fi for
the first time, or connect your Jetpack to the wall
adapter for power.
The following should occur once you power on your
Jetpack:
Your Jetpack is powered as soon as you slide
the Power Switch to On and the display lights
up.
Once your Jetp ack is powered on and has
been activated, it automatically connects to
the Internet provided that Mobile Broadband
service is avai lable and one or more Wi-F i
devices are connected to the Jetpack.
The Service(4G LTE, 3G, 2G), Signal Strength
, an d Dat a Con nec ted ico ns on you r
Jetpack indicate it is in service and ready to
connect.
12
Page 14

Follow these Steps
1. Ensure the Wi-Fi enabled device you wish to
connect to yourJetpack has Wi-Fi turned on,
then use the Wi-Fi application toestablish a
connection to your Jetpack.
2. Look for the network (SSID) named “Verizon-
890L”. There are XXXX digits unique to your
dev ice following the net work (SSID) name
displayed.
3. Click Connect and enter the default password
printed on the back of your Jetpack .
NOTE: Your password will also be displayed on the
Jetpack screen each time the Jetpack is powered
on.
Accessing the Internet
After successfully establishing the connection
betwee n your Jet pack and com puter, you can
access the Internet in the Auto Connect, Manual
Connect mode. The default mode is Auto Connect.
13
Page 15
Advanced Configuration
1. Make sure your computer is connected to the
Jetpack .
2. Launch th e internet br owser an d enter
http://192.168.1.1 or http://vz.hotspot in
the address bar.
NOTE: It is recommended that you use IE (7.0 or
later), Firefox (3.0 or later), Opera (10.0 or later),
Safari (4.0 or later) or Chrome (5.0 or later).
3. The login page appears as follows:
Input the case-sensitive default password printed
on the back of your Jetpack, and then click Login
to access the Web User Interface.
NOTE: Do not pu t a nyth ing on the top of your
Jetpack. Do not lay devices to overlap each other
when using.The Jet pack takes 1~2 minu tes to
initialize, and attach to the network.
14
Page 16
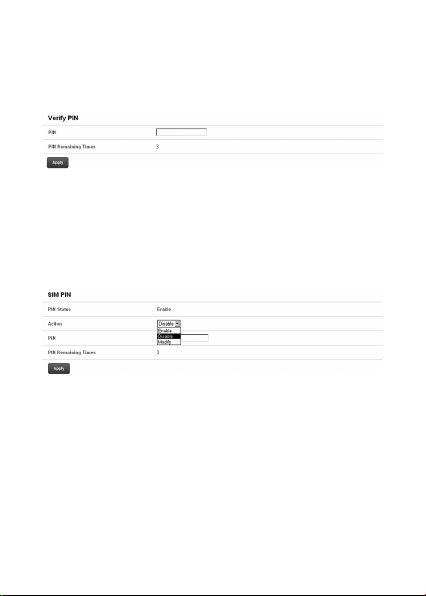
PIN Code Verification
If the PIN code of your SIM card is enabled, you
will need to input the PIN code after you logging in.
NOTE: The SIM card will be locked if you enter
wrong PIN code consecutively for three times.
If you want to change the PIN status or modify the
PIN code, please select WAN Settings > SIM PIN to
do the actions.
15
Page 17
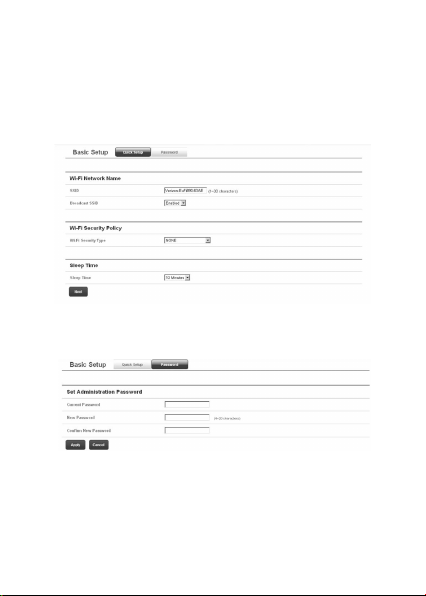
Basic Setup
After logging in, select Basic Setup > Quick Setup
to configure the Wi-Fi settings, including Wi-Fi
Network Name, Wi-Fi Securiy Policy and Sleep
Time.
Select Basic Setup > Password to change the login
password for the Web User Interface.
16
Page 18
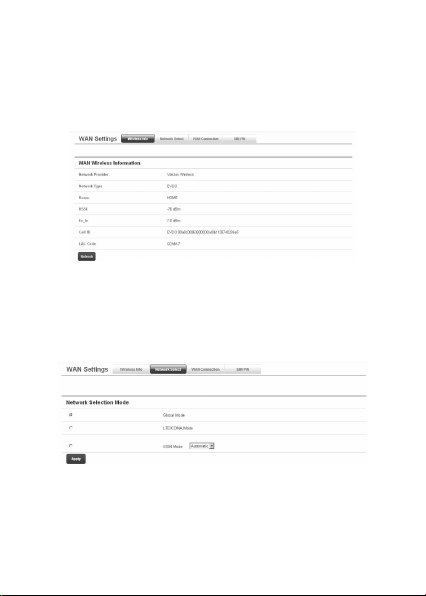
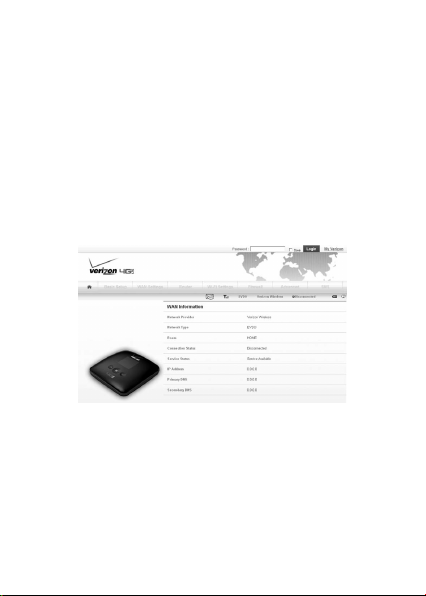
WAN Settings
After logging in, select WAN Settings > Wireless
Info to display the infomation of WAN wireless.
Click Refresh to update the information.
Select WAN Settings > Network Select to select
the proper network mode, including Global Mode,
LTE/CDMA Mode, and GSM Mode(Automatic/
Manual). Click Apply to comfirm your choice.
17
Page 19
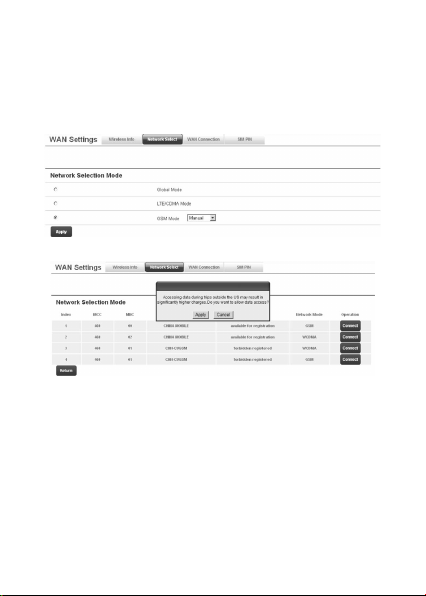
NOTE: In GSM Mode, you can either set your device
to automatic network selection or manual network
selection. If you choose the manual, you will be
prompted to select what GSM network you would
like to connect to.
18
Page 20

Select WAN Settings > WAN Connection to choose
the WAN Connection mode according to your
requirement.
Auto Connect : T he devi ce will connec t to the
Internet automatically when it is powered on.
Ma nua l Con nec t: Conn ect /di sco nnect t o the
Internet connection manually.
Select WAN Settings > SIM PIN to enable/disable/
modify the PIN code of your SIM card.
19
Page 21

Router
After logging in, select Router > LAN to access the
interface below:
IP Address: IP address for LAN interface.
Subnet Mask: Subnet mask for the IP address.
MAC Address: MAC address for the LAN interface.
DHCP Serve r: E na ble/disable DH CP se rver
function.
DHCP IP Pool: Allocate start and end IP address
for IP pool.
Sele ct Router > DMZ to acce ss the interf ace
below:
20
Page 22

DMZ means demilitarized zone, click Add to add
the Wi-Fi client in DMZ, and click Apply to confirm.
Click Delete to erase the Wi-Fi client from DMZ.
An external computer or device can access to the
Wi-Fi client which is in DMZ, rather than any other
part of the network.
Wi-Fi Settings
After logging in, select Wi-Fi Settings > Connected
Devices to disp lay the inform atio n abou t the
devices connected to your Jetpack.
You can click Refresh to update the information,
or click Disco nnect to ter minate the wireless
connection between these Wi-Fi enabled devices
and your Jetpack.
S el ec t W i- Fi Se tt in gs > B as ic t o s et th e
configuration of the wireless network.
21
Page 23

Sl eep Time : Set the tim e be fore th e Je tpack
enters sleep mode, The Jetpack will enter sleep
mode if no Wi-Fi clients (devices) are connected to
the Jetpack for a given period of time.
Ne twor k Mode: I f all of the wirel ess devic es
connect with the Jetpack in the same transmission
mode, performance will be improved by choosing
the appropriate wireless mode.
SSID: Service Set Identifier(SSID). Enter a string
less than 30 characters as the name for your
wireless local area network(WLAN).
Br oadc ast SS ID: Di sabl e or Enab le(D efa ult)
this function. If Enable is selected, the Jetpack
broadcasts the SSID, and other devices can search
and connect to it. When you select Disable, other
devices can not search out the SSID. If you want
someone to connect, you need tell them the SSID,
and let them to setup manually.
22
Page 24
AP Isolation: When Enable is selected, each of your
wireless clients will not be able to communicate
with each other.
Country Code: Choose the right country code.
Freque ncy( Chan nel) : Choose the appr opri ate
channel to optimize the performance and coverage
of your wireless network.
MAX Connections: Choose the maximum number
of the Wi-Fi enabl ed devices which are able to
connect to the Jetpack simultaneously.
Click Apply to save your settings.
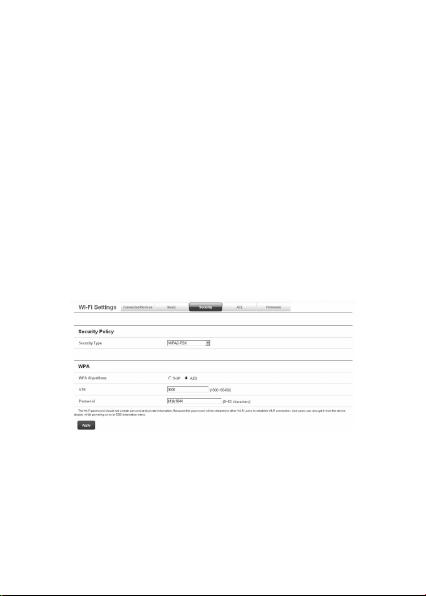
Select Wi-Fi Settings > Security to set the Wi-Fi
security settings.
23
Page 25

The security modes are described below:
NONE: In this mode, no password is required.
WEP: The WLAN clients who have the same key
with wireless gateway can pass the authentication
and access the wireless network.
WPA-PSK: WPA Pre-Shared Key, Enter the PreShared key as a plain text (ASCII) pass-phrase of
at least 8 characters.
WPA2-PSK: A se curer version o f WPA w it h
implementation of the 802.11i standard.
WPA-PSK/WPA2-PSK: Apply both the WPA-PSK
and WPA2-PSK scheme.
If th e Secur ity ty pe is WE P, the f ol lo win g
configuration page will appear:
Authentication Type: Two types of authentication
ca n be use d: OP EN and S HAR E. In th e OPEN
authe ntication type , t he WLAN client (devi ce)
doesn't need to provide the correct credentials
24
Page 26

to the Jetpack in order to connect to it. However,
if the credential s a re incorrect, data won't be
tran sfe rred su ccess ful ly betwee n the WLAN
clients and Jetpack. In effect, no authentication
occurs. And in the SHARE authentication type, the
WLAN client cannot connect to the Jetpack with
the incorrect crendentials.
Encrypt Type: Select the encrypt type(WEP-40
and WEP-104).
Password: You can set at most four keys. Choose
one of them as the default key, which is the only
key in use at any given time. You must enter the
default keys on the Wi-Fi client in order to connect
to the Jetpack.
Select Wi-Fi Settings > ACL to access:
25
Page 27

If the ACL(Access Control List) policy is Deny, the
user in MAC list can't connect to this device. If
the ACL policy is Accept, the user in MAC list can
connect to this device. You can allow or refuse a
Wi-Fi user according to different ACL policy.
Select Wi-Fi Settings > Firmware to display the
Wlan Chip Firmware Version.
Firewall
After logging in, select Firewall > IP/Port Filtering
to access:
If you select Enable, the filter settings will appear:
26
Page 28

Default Policy: Set how to handle the packet if any
of the rules matches.
Source IP Address: Set the source IP address that
will be filtered.
Source Submask: Set the source submask that will
be filtered.
Protocol: Set which protocol will be used for
filtering.
Source Port Range: Set the source port numbers
that will be filtered.
Dest Port Range: Set the destination port numbers
that will be filtered.
27
Page 29

How to add a new rule:
1. Select Enable and click Apply in the Basic
Settings area.
2. Input the detail information in the Ip/Port
Filtering area.
3. Click Add in the Ip/Port Filtering area.
In the Current IP/Port filtering rules area, click
Delete to delete the rules that you selected.
Select Firewall > Port Forwarding to access:
If you select Enable, the Virtual Server Settings
will appear:
28
Page 30

IP Address: Set IP address for the virtual server.
Port: Set port number for the virtual server.
Protocol: Set the protocol for the virtual server.
How to add a virtual server:
1. Select Enable and input the detailed information
in the Virtual Server Settings area.
2. Click Apply to save your settings.
In the Current Virtual Servers area, click Delete to
delete the virtual servers that you selected.
Select Firewall > VPN to enable/disable the VPN
Connection.
Advanced
After logging in, sel ect Advanced > St atus to
display the system information.
29
Page 31
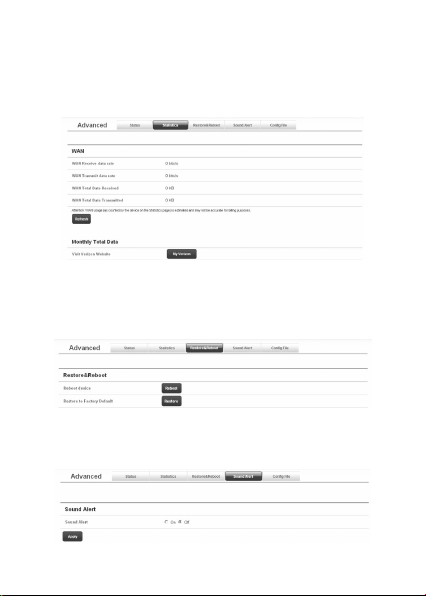
Select Advanced > Statistics to check your WAN
usage. Click Refresh to update the usage, and click
My Verizon to visit Verizon website to check your
monthly total data.
Select Advanced > Restore&Reboot to restart
your device, or restore your device to the factory
default settings.
Select Advanced > Sound Alert to turn on/off the
sound alert.
30
Page 32

Select Advanced > Config File to import/export
the configuration file of the device.
NOTE: It will mod ify the configu ration of this
device to import configuration file. Please make
sure the parameters in the configuration file are
correct.
SMS
This function allows you to view, save, send and
receive text messages. After logging in, select
Message to perform the related operations.
31
Page 33

Navigating the Device
Slide the Power Swi tch to the ON position to
turn on the device. The screen lights up. After the
initialization of the device, the SSID and default
password will display on the screen. Press the OK
button, the following icons will appear:
NOTE: Devices and software are constantly evolv-
ing — the screen images and icons displayed are for
reference only and may differ from your device.
When your Jetpack is roaming, it will remind you
that higher charges may be generated if you want
data access while roaming. Selec t Yes, and then
press the OK button to access the data connection.
Select No, and then press the OK button to refuse.
32
Page 34

WAN Info
Select and press the OK button to check the
WAN information. Use the UP and DOWN buttons
to scroll to the desired menu. Press the OK button
to view info rmat ion about the following WAN
settings:
Network Provi der: Dis play s the nam e of your
service provider.
Network Type: Displays your network type.
Roam: Displays whether or not your device is
roaming.
WAN Connection: Check your connection status.
WLAN Info
Select us ing th e UP an d DO WN buttons
an d pr ess the OK butt on to check the WLA N
information. Use the UP and DOWN buttons to
scroll to the desired menu. Press the OK button
to view information about the following WLAN
settings:
SS ID I nf or ma ti on : D is pl ays th e SS ID a nd
password.
Connected Device: Displays the information about
connected Wi-Fi devices.
Start WPS: Launch the Wi-Fi Protection Setup.
33
Page 35

Read the prompt on the display and refer to the
Usage of WPS chapter.
Settings
Select using the UP and DOWN buttons and
press the OK button to check the settings. Use
the UP and DOWN buttons to scroll to the desired
menu. Press the OK button to view information
about the following settings:
Device Info: Displays the basic information about
your device: Phone Number, SIM ID, MEID, SW
Version and RSSI.
Mobile Network: Use the UP and DOWN buttons
to scroll to the desired menu. Press the OK button
to view the following operations related to your
network:
Data Connection: Connect or disconnect
the WAN connection.
Netw ork Selec t: Ch oose the des ir ed
ne twork fro m th e fo llo wing opti ons:
Global Mode, LTE/CDMA Mode, and GSM
Mode .
Wi-Fi: Press the OK button to select Proceed to
adjusting your Wi-Fi settings or Back to return to
the previous menu.
The following Wi-F i s ettings appear when you
34
Page 36

select Proceed:
Wi-Fi Network Mode: Chang e the W i-Fi
standard.(It is recommended that you do
not change the defualt setting, 11 b/g.)
S SI D B ro ad cas t: E na bl e o r d is abl e
discovery mode, allowing your device to be
found by other Wi-Fi compatible devices.
A P Is ol at ion : En ab le o r D isable t he
co nne cti on be twe en co nne cte d Wi -Fi
devices communicating with each other.
Channel: Choose the appropriate channel
frequency to optimize the performance
and coverage of your wireless network.
MAX Connections: Choose the maximum
nu mber of Wi -Fi dev ice s th at can be
connected to your device simultaneously.
Web User Interface: Indicates you how to access
the web-based Configuration Page for your device.
Software Update: Select Check New to check for
new software.
Button Lock: Set the lock duration for your device
by selecting on of the following options: 30Secs/
15Secs/Never.
Sound Alert: Mute or unmute the system alert.
35
Page 37

Message
Select using the UP and DOWN buttons and
press the OK button to check messages. Select
one of the following options:
New Messages: Displays your unread messages.
Inbox: Displays the messages in your inbox.
Usage of WPS
If your client device supports WPS, you need not
input the password manually after WPS has been
available. Please do the following:
1. Start up your Jetpack.
2. Launch the client device.
3. Select the icon , and then choose Start WPS
to enable the WPS function of your Jetpack.
4. Enable the WPS function of the client.
NOTE: For the detailed operations about the client,
please refer to the client’s instruction.
36
Page 38

Glossary
3G : Thi rd Gene rat ion . 3G re fers to th e third
generation of mobile telephony technology.
4G: Fourth Gen eration. 4G refers to the third
generation of mobile telephony technology.
802.11(b, g, n): A set of WLAN communication
sta ndard s in the 2.4, 3.6 and 5 GHz frequency
bands.
B ro a db a n d: H i gh - ca p a ci t y hi g h- s p ee d ,
transmission channel with a wider bandwidth than
conventional modem lines. Broadband channels
can carry video, voice, and data simultaneously.
DHCP : Dy namic Host Conf iguration Pro tocol.
Software found in servers and routers that
automatically assigns temporary IP addresses to
clients logging into an IP network.
DHCP Server: A server or service with a server
that assigns IP addresses.
Firewall: A hardware or software boundary that
pr ote cts a net work or singl e com put er from
unwanted outside traffic.
Firmwar e: A com puter program embed ded in
an electronic device. Firmware usually contains
operating code for the device.
37
Page 39

Hotspot: A WiFi (802.11) access point or the area
covered by an access point. Used for connecting
to the Internet.
H TT P : H yp er te x t Tr an s fe r P ro to c ol . A n
application-level protocol for accessing the World
Wide Web over the Internet.
IE EE: I nst itu te of E lec tri cal a nd El ect ron ics
Engineers. An international technical/professional
society that promotes standardization in technical
disciplines.
LAN: Local Area Network. A type of network that
lets a group of computers, all in close proximity
(such as inside an office building), communicate
with one another. It does not use common carrier
circuits though it can have gateways or bridges to
other public or private networks.
MAC Address: Media Access Control. A number
that uniquely identifies each network hardware
device. MAC addresses are 12-digit hexadecimal
numbers. This is also known as the physical or
hardware address.
Port: A virtual data connection used by programs
to exchange data. It is the endpoint in a logical
conn ection. Th e po rt is spec ified by the port
number.
38
Page 40

Port Forwarding: A process that allows remote
devices to connect to a specific computer within a
private LAN.
Port Number: A 16-bit number used by the TCP
and UDP protocols to direct traffic on a TCP/IP
ho st. Cer tai n po rt nu mbers a re stan dar d for
common applications.
Pro tocol : A standard that enables connection,
communication, and data transfer between
computing endpoints.
Rou ter: A device that directs traffic from one
network to another.
SIM: Subscriber Identification Module. Found in
GSM network technology, the SIM is a card
cont ainin g id entific ation inf ormatio n fo r th e
subscriber and their account. The SIM card can be
moved to different devices.
SMS: S hort Me ssaging Se rv ice. Sh ort te xt
messages of generally no more than 140-160
characters sent and received by wireless devices.
SSID: Service Set IDentifier. The name assigned to
a WiFi network.
TCP/IP: Transmission Control Protocol/Internet
Protocol. The set of communications protocols
used for the Internet and other similar networks.
39
Page 41

USB: Universal Serial Bus. A connection type for
computing device peripherals such as a printer,
mobile device, etc.
V PN : V ir t ua l P ri v at e N et wo rk . A w ay to
communicate through a dedicated server securely
to a corporate network over the Internet.
WAN: Wide Area Network. A public network that
extends beyond architectural, geographical, or
political boundaries (unlike a LAN, which is usually
a private network located within a room, building,
or other limited area).
W EP : W ir ed Eq u iv al e nt Pr iv ac y. A n I EE E
standard security protocol for 802.11 networks.
Superseded by WPA and WPA2.
Wi-Fi: Wireless Fidelity. Any system that uses the
802.11 standard developed and released in 1997
by the IEEE.
Wi-Fi Client: A wireless device that connects to
the Internet via Wi-Fi.
WPA/WPA2: Wi-Fi Protected Access. A security
protocol for wireless 802.11 networks from the
Wi-Fi Alliance.
40
Page 42

How to Get Help
Assistance is at your fingertips at verizonwirless.
com. Cus tome r Se rvice is at you r di sposal at
1- 800 -92 2-0 204 or i n any Veriz on Wi rel ess
Communications Store.
If you have questions about how to use ZTE mobile
dev ices or your dev ice needs repair service s,
please access to our support website, contact our
services hotline or email for more information.
We bsit e Ad dress: http :/ /www .zte us a.co m/
support/
Service Hotline: 877-817-1759 (9:00 am – 9:00
pm CST)
Service Email: devicesupport@zteusa.com
Health and Safety Information
General Guidelines
Some electronic devices may be susceptible
to electromagnetic interference. Locate the
device awa y fr om TV set, rad io and other
electronic equipment to avoid electromagnetic
interference.
41
Page 43

The device may interfere with medical devices
like hearing aids and pacemakers. Consult a
physician or the manufacturer of the medical
device before using the device.
Please keep yourself at least 20 centimeters
away from the device.
D o n o t u se yo ur de vi c e i n d an g er ou s
environments such as oil terminals or chemical
factories where there are explosive gases or
explosive products being processed.
Please use original accessories or accessories
that are au thor ized by ZTE. Una utho rize d
a c ce s so r ie s ma y a ff e ct t h e d e vi c e
performanc e, dama ge the devic e o r cause
danger to you.
Do not attempt to dismantle the device. There
are no user serviceable parts.
Do not allow the device or accessories to come
int o contact with liquid or moist ure at any
time. Do not immerse the device in any liquid.
Do not place objects on top of the device. This
may lead to overheating of the device.
T he devic e mu st be u se d in ve nt il at ed
environment.
Do not expose the device to direct sunlight
or store it in hot areas. High temperature can
42
Page 44

shorten the life of electronic devices.
Do not allow children to play with the device or
charger.
Use an antistatic cloth to clean the device. Do
not use chemical or abrasive cleanser as these
could damage the plastic case. Turn off your
device before you clean it.
Use the device within the temperature range
of -10°C ~ +35°C, and the storage temperature
range is -20°C ~ +60°C. The humidity range is
5%~90%.
Do not use your device during a thunderstorm.
Remove the charger from the mains socket.
D o n o t t a k e o u t y o u r ( U ) S I M c a r d
unnecessarily. The (U)SIM card may be easily
lost or it can be damaged by static electricity.
Do not place the device alongside computer
di sks, credit c ards, t rave l car ds or oth er
magnetic media. The information contained
on the disks or cards may be affected by the
device.
Do not paint the device.
Do not remove the device battery while the
device is switched on.
Take care not to allow metal objects, such as
43
Page 45

coins or key rings, to contact or short circuit
the battery terminals.
Do not dispose of batteries in fire. The device’
s Li-I ON batteries may be safely disp osed
of at a Li-ION recycling point. Follow local
requirements for recycling.
Do not put the device’s battery in your mouth,
as battery electrolytes are toxic.
Do not modi fy or remanufactu re, attempt
to insert fore ign objec ts into the battery,
immerse or expose to water or other liquids,
expose to fire, explosion or other hazard.
Only use the battery for the system for which
it is specified.
Only use the battery with a charging system
that has been qualified with the system per
this standard. Use of an unqualified battery or
charger may present a risk of fire, explosion,
leakage, or other hazard.
Do not short circuit a battery or allow metallic
con duc ti ve ob je ct s t o cont ac t ba tt er y
terminals.
Replace the battery only with another battery
that has been qualified with the system per
this standard, IEEE-Std-1725-200x. Use of an
44
Page 46

unqualified battery may present a risk of fire,
explosion, leakage or other hazard.
P ro mpt ly disp os e of us ed ba tt er ie s in
accordance with local regulations.
B at te r y u s ag e b y c h il d re n sh ou ld be
supervised.
Avoid dropping the device or battery. If the
device or battery is dropped, especially on a
hard surface, and the user suspects damage,
take it to a service center for inspection.
Im proper battery use may res ult in a fire,
explosion, or other hazard.
Do not put a battery into a microwave oven,
dryer or high-pressure container.
Do not connect the battery directly into an
electric outlet or cigarette lighter charger.
Use only authorized chargers.
Do not pun cture the bat tery with a sharp
object such as a needle.
When the battery is disposed, be sure it is
non-conducting by applying vinyl tape to the (+)
and (-) terminals.
Do not drop, throw, or subject the device to
rough treatment.
45
Page 47

Sto p usi ng the ba tte ry if a bno rmal hea t,
odor, discoloration, deformation, or abnormal
condition is detected during use, charge or
storage.
Do not use your device with a damaged or
deformed battery.
Do not solder the battery directly.
Rem ove th e bat tery whose life cycl e has
expired from equipment immediately.
Remember to recycle: The cardboard packing
supplied with this device is ideal for recycling.
Warnings: In the unlikely event of a battery leak,
take care to keep the leakage away from your eyes
and skin. If the leakage does come into contact
with the eyes or skin, flush thoroughly with clean
water and consult with a doctor.
Aircraft Safety
Switch off your device before the airplane takes
off. In order to protect airplane’s communication
system from interfe renc e, it is never allowed
to use the device when in flight. Get aircrew’s
permission if you want to use the device prior to
take-off.
46
Page 48

Hospital Safety
Switch off your device and remove its battery
in areas where device use is prohibited.
Follow the instructions given by any respective
medical facility regarding the use of Wireless
devices on their premises.
Road Safety
You must exer cise proper con trol of your
vehicle at all times. Give your full attention to
driving.
Observe all of the recommendations contained
in your local traffic safety documentation.
Please check if local laws and/or regulations
restri ct the use of wirel ess dev ices while
driving.
Switch off your device at a refueling point,
such a s a gas stat ion, eve n if you are not
refueling your own car.
Do not store or carry flammable or explosive
mat erials in the same compartment as the
device.
Electronic systems in a vehicle, such as anti-
lock brakes, speed control and fuel injection
systems are not normally affected by radio
transm issi ons. The man ufactu rer of suc h
47
Page 49

eq uipme nt may advi se if it is ade quate ly
shie lded from ra dio transmi ssion s. If you
su spec t vehi cle pr oblem s caus ed by the
radio transmitter in the device, consult your
dealer and do not switch on the device until
your device has been checked by a qualified
technician.
Vehicles Equipped with an Airbag
An airbag inflates with great force. Do not place
objects, including eit her install ed or portab le
wireless equipment, in the area over the airbag
or in the airbag deployment area. If in-vehicle
wireless equipment is improperly installed and the
airbag inflates, serious injury could result.
Third Party Equipment
Th e use of t hir d part y equ ipm ent, c abl es or
accesso ries, n ot mad e or a uthor ized by ZTE,
may invalidate the warranty of the device and
also adversely affect the device’s operation. For
example, use only the ZTE charger supplied with
the device.
48
Page 50

Efficient Use
For optimum performance with minimum power
con su mption , do not cove r th e dev ice wi th
anythin g. Cover ing the devic e ma y cause the
dev ice to operate at hi gher power levels than
needed, and may shorten the using time of the
battery.
CTIA Requirements
a. Do not disa ssemble or open crush, bend or
deform, puncture or shred.
b. Do not modify or remanufacture, attempt
to insert fore ign objec ts into the battery,
immerse or expose to water or other liquids,
expose to fire, explosion or other hazard.
c. Only use the battery for the system for which
it is specified.
d. Only use the battery with a charging system
that has been qualified with the system per
this standard. Use of an unqualified battery or
charger may present a risk of fire, explosion,
leakage, or other hazard.
e. Do not short circuit a battery or allow metallic
con duc ti ve ob je ct s t o cont ac t ba tt er y
terminals.
49
Page 51

f. Replace the battery only with another battery
that has been qualified with the system per
this standard, IEEE-Std-1725-2006. Use of an
unqualified battery may present a risk of fire,
explosion, leakage or other hazard.
g. P ro mp tl y dis po se of us ed ba tt er ie s in
accordance with local regulations
h. B at te r y u s ag e by ch il d re n sh o ul d be
supervised.
i. Avoid dropping the phone or battery. If the
device or battery is dropped, especially on a
hard surface, and the user suspects damage,
take it to a service center for inspection.
j. Im proper battery use may res ult in a fire,
explosion or other hazard.
For those host devices that utilize a USB port as
a charging source, the host device's user manual
shall include a statement that the device shall only
be connected to CTIA certified adapters, products
that bear the USB-IF logo or products that have
completed the USB-IF compliance program.
Radio Frequency (RF) Exposure
This device meets the government’s requirements
for exposure to radio waves.
50
Page 52

This device is designed and manufactured not
to exceed the emission limits for exposu re to
radio frequency (RF) energy set by the Federal
Co mm uni ca tio ns Co mm is si on of th e U .S .
Government:
Th e exposu re st and ard for wirele ss mobile
devices employs a unit of measurement known as
the Specific Absorption Rate, or SAR. The SAR
limit set by the FCC is 1.6W/kg. *Tests for SAR
are conducted using standard operating positions
accepted by the FCC with the device transmitting
at its highest certified power level in all tested
frequency bands. Although the SAR is determined
at the highest certified power level, the actual
SAR level of the device while operating can be
well below the maximum value. This is because the
device is designed to operate at multiple power
levels so as to use only the poser required to reach
the network. In general, the closer you are to a
wireless base station antenna, the lower the power
output.
T he hi ghe st SA R va lu e f or t he de vi ce as
reported to the FCC is 1.39 W/kg (Body-worn
me asu reme nts di ffe r amon g dev ice mo del s,
depending upon available enhancements and FCC
requirements.)
51
Page 53

While there may be differences between the SAR
levels of various devices and at various positions,
they all meet the government requirement.
The FCC has granted an Equipment Authorization
fo r this d evi ce wit h all rep ort ed SAR l evels
evalu ate d as in c omp liance w ith t he FC C RF
exp osur e guidelin es. SAR information on this
device is on file with the FCC and can be found
under the Display Grant section of http://www.fcc.
gov/oet/ea/fccid/ after searching on:
FCC ID: Q78-EUFI890
For body worn operation, this device has been
tested and meets the FCC RF exposure guidelines
for use with an accessory that contains no metal
and the positions the handset a minimum of 1.5
cm from the body. Use of other enhancements
may not ensure compliance with FCC RF exposure
guidelines. If yo u do no t us e a b ody-worn
accessory and are not holding the device at the
ear, position the handset a minimum of 1.5 cm
from your body when the device is switched on.
FCC Compliance
This device complies wit h part 15 of the FCC
Rules. Operation is subject to the following two
conditions: (1) This device may not cause harmful
52
Page 54

interference, and (2) this device must accept any
interference received, including interference that
may cause undesired operation.
Caution: Changes or modifications not expressly
approved by the manufacturer could void the user’
s authority to operate the equipment.
NOTE: This equipment has been tested and found
to comply with the limits for a Class B d igital
dev ice, pursuant to pa rt 15 of the FCC Rul es.
These limits are designed to provide reasonable
pr otect ion aga ins t ha rmf ul inte rfere nce in a
residential installation. This equipment generates,
uses and can radiate radio frequency energy and,
if not installed and used in accordance with the
instru ctio ns, may cau se harmf ul interfere nce
to radio communications. However, there is no
guarantee that interference will not occur in a
particula r i nstallation. If this equipment does
cause harmful interference to radio or television
reception, which can be determined by turning the
equipment off and on, the user is encouraged to
try to correct the interference by one or more of
the following measures:
— Reorient or relocate the receiving antenna.
— In cr ea se th e s ep ara ti on b et we en th e
equipment and receiver.
53
Page 55

— Co nne ct the equ ipmen t int o an outle t on
a cir cuit differ ent from tha t to which the
receiver is connected.
— Consult the dealer or an experienced radio/TV
technician for help.
54
Page 56

Consumer Limited Warranty
ZT E (“Se lle r”) of fer s you a l imit ed wa rra nty
th at the enclo sed produ ct or p rodu cts (the
“Product”) will be free from defects in material
and workmanship for a period that expires one
year fro m the date of sal e of the P roduc t to
you, provided that you are the original end-user
purchaser of the Product and provided that your
purchase was made from a supplier authorized
by the Seller. Transfer or resale of a Product will
automatically terminate warranty coverage with
respect to that Product. This limited warranty is
not transferable to any third party, including but
not limited to any subsequent purchaser or owner
of the Product. This limited warranty is applicable
only to end users in the United States.
Sel ler will, at its sole and absolute discretion,
either repair or replace a Product (for which Seller
may use refurbished parts of similar quality and
functionality) if found by Seller to be defective in
material or workmanship, or if Seller determines
that it is unable to repair or replace such Product,
Seller will refu nd the pur chase pri ce for suc h
Product, provided that the subject Product (i) is
ret urned to a Sell er autho rized service cente r
55
Page 57

within the one year warranty perio d, and (ii) is
accompanied by a proof of purchase in the form of
a bill of sale or receipted invoice which evidences
that the subject Product is within the one year
warranty period. Afte r the one year warranty
period, you must pay all shipping, parts and labor
charges. In the event that the Product is deemed
un-repairable or has been removed from the list of
products supported by the Seller, you will only be
liable for shipping and labor charges.
This limited warranty does not cover and is void
with respect to the following: (i) any Product
whi ch has been improperly installed, repaired,
mai ntained or modified; (ii) any Product which
ha s been su bje cted to misu se (i ncludi ng any
Pr od uct used in conju nc tio n wi th ha rdw ar e
electrically or mechanically incompatible or used
with accessories not approved by Seller), abuse,
accident, physical damage, abnormal operation,
improper handling, neglect, exposure to fire or
liquid; (iii) any Product operated outside published
maximum ratings; (iv) cosmetic damage; (v) any
Product on which warranty stickers or Product
se ria l numb ers h ave b een r emoved , alte red ,
or rend ered illegible; (vi ) cost of installat ion,
removal or reinstallation; (vii) signal reception
56
Page 58

problems (unless caused by defects in material
and workmanship); (viii) damage as a result of
fire, flood, acts of God or other acts which are not
the fault of Seller and which the Product is not
specified to tolerate, including damage caused
by mishandling, shi pping and blown fu ses; (ix)
consumables (such as fuses); or (x) any Product
which has been opened, rep aired, modified or
altered by anyone other than Seller or a Seller
authorized service center.
USE ONLY SELLER APPROVED ACCESSORIES
W I T H S E L L E R D E VI C E S. U S E O F A N Y
U NA UT HO R IZ E D A CC ES S OR I ES M AY B E
DANGEROUS AND WILL INVALIDATE THE DEVICE
WARRANTY IF SAID ACCESSO RI ES CAUSE
DAMAGE OR A DEFECT TO THE DEVICE.
SEL LER SPECIFI CALLY DISCLAIMS LIABILI TY
FOR ANY AND ALL DIRECT, INDIRECT, SPECIAL,
GENERAL, PUNITIVE, EXEMPLARY, AGGRAVATED,
INC IDENTAL OR CONSEQUENTI AL DAMAGE S,
EV EN IF ADV ISED OF THE POS SIBIL ITY OF
SUCH DAMAGES, WHETHER FORESEEABLE OR
UNFORESEEABLE OF ANY KIND WHATSOEVER,
IN CLUDI NG BU T NOT LIMIT ED TO LO SS OF
PR OF IT S, UN AN TI CI PAT ED BE NE FI TS OR
REVENUE, ANTICIPATED PROFITS ARISING OUT
57
Page 59

OF USE OF OR INABILITY TO USE ANY PRODUCT
(FOR EXAMPLE , WASTE D AIRTI ME CHARGES
DUE TO THE MALFUNCTION OF A PRODUCT) OR
CONTRIBUTION OR INDEMNITY IN RESPECT OF
ANY CLAIM RELATED TO A PRODUCT.
REPAI R OR REP LACE MENT OF A DEF ECTIVE
PRODUCT OR RE FU ND OF T HE PUR CH ASE
PRICE RELATING TO A DEFECTIVE PRODUCT,
AS PR OVID ED UNDER TH IS WARRA NTY, ARE
YOUR SOLE AND EXCLUSIVE REMEDIES FOR
BR EAC H OF THE L IMIT ED WARRA NTY, AND
SUBJECT TO THIS WARRANTY, THE PRODUCTS
ARE APPROVED AND ACCEPTED BY YOU “AS
IS”. SELLER MAKES NO OTHER WARRANTIES,
R EP RE SE NTAT IO NS OR CO ND IT IO N S O F
AN Y KIN D, OR AL OR VE RBA L, EXP RES S OR
IMPL IED, STATUTORY OR OTHERW ISE, WITH
RESPECT TO THE PRODUCTS, INCLUDING BUT
NOT LIMITED TO ANY IMPLIED WARRANTY OR
CONDITION OF MERCHANTABILITY OR FITNESS
FO R A PART ICU LAR PU RPO SE OR AG AIN ST
INFRINGEMENT OR ANY IMPLIED WARRANTY
OR CONDITION ARISING OUT OF TRADE USAGE
OR OUT OF A COURSE OF DEALING OR COURSE
OF PERFORMANCE. NO DEALER, DISTRIBUTOR,
AGENT OR EMPLOYEE IS AUTHORIZED TO MAKE
58
Page 60

AN Y MODI FICAT ION OR AD DITIO N TO THIS
WARRANTY.
Some jurisdic tions do not al low the exclu sion
or li mita tion of i ncid enta l or conse quen tial
dama ges, or allow lim itation s on how long an
implied warranty lasts, so the above limitations
or exclusions may not apply to you. This limited
wa rrant y gi ves you spe cific l egal ri ghts, a nd
you may also have other rights which vary from
jurisdiction to jurisdiction.
For warranty service information, please call the
following telephone number: 1-877-817-1759,
1-212-444-0502 or return to the point of sale for
the products.
59
Page 61

 Loading...