

OWNER’S MANUAL
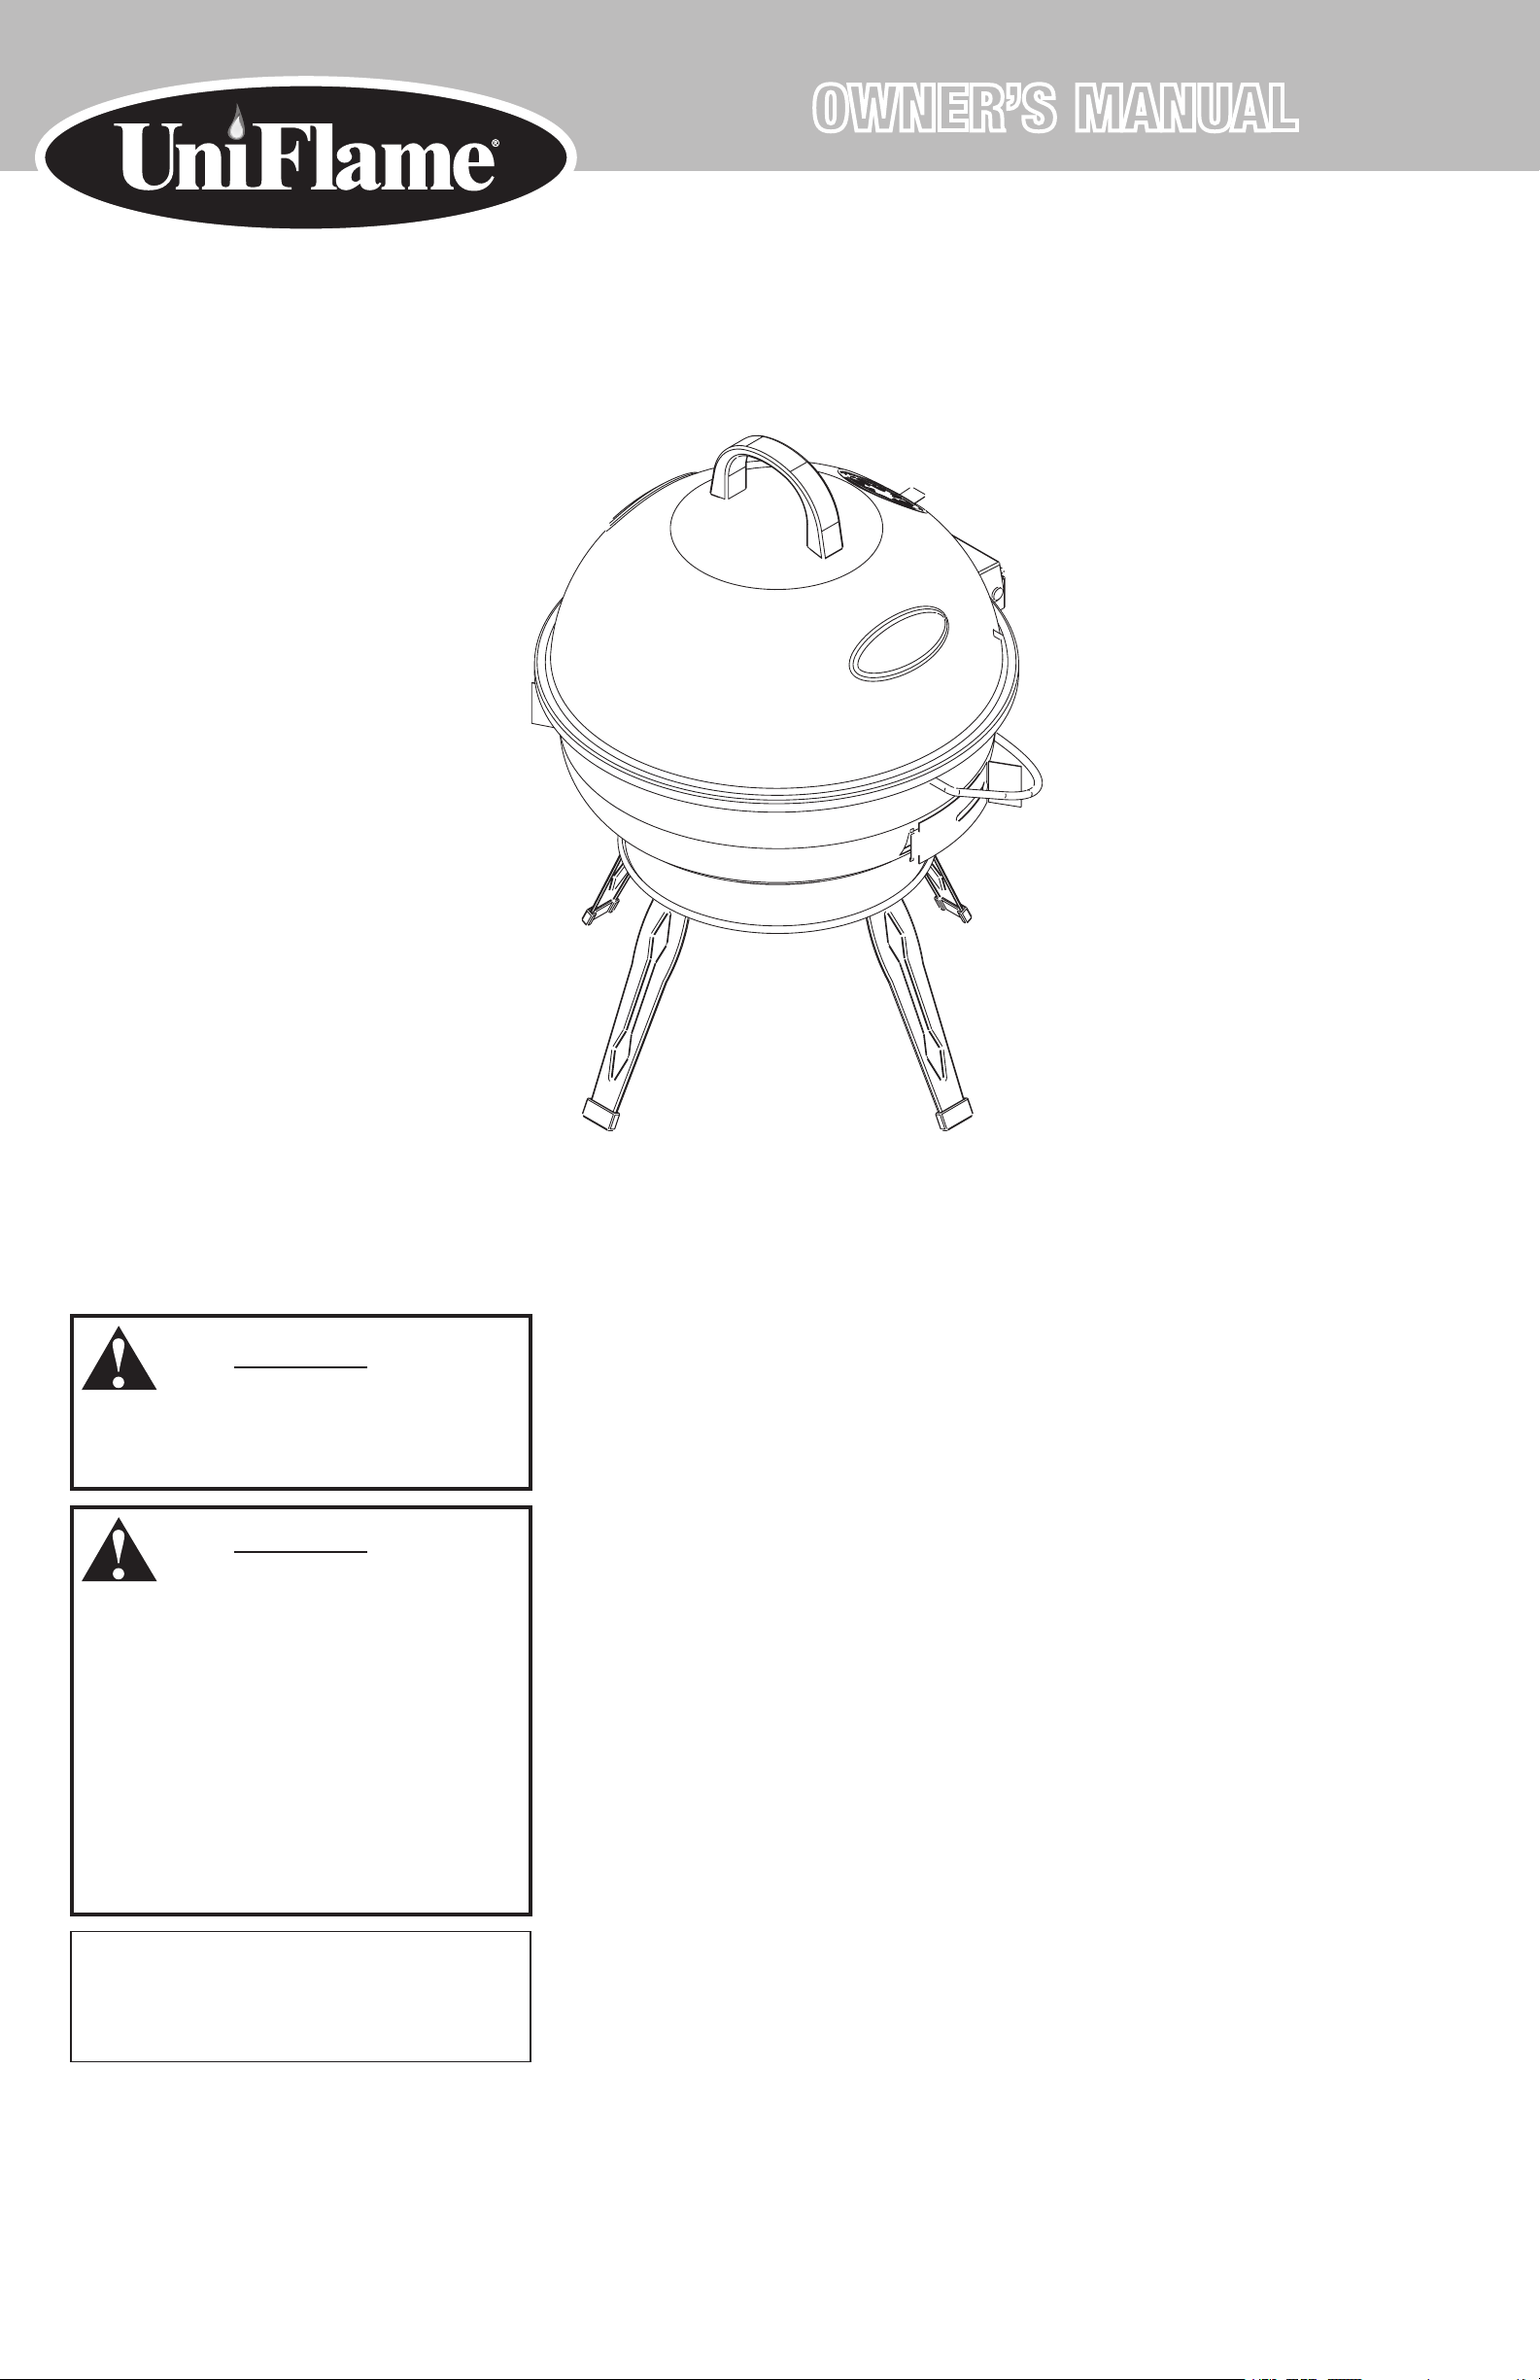
Outdoor Charcoal Barbecue Grill
Model No. NBC1402
WARNING
FOR YOUR SAFETY:
For Outdoor Use Only
(outside any enclosure)
WARNING
WARNING
FOR YOUR SAFETY:
FOR YOUR SAFETY:
1. Improper installation, adjustment, alteration,
1. Improper installation, adjustment, alteration,
service or maintenance can cause injury or
service or maintenance can cause injury or
property damage.
property damage.
2. Read the installation, operation, and
2. Read the installation, operation, and
maintenance instructions thoroughly before
maintenance instructions thoroughly before
installing or servicing this equipment.
installing or servicing this equipment.
3. Failure to follow these instructions could
3. Failure to follow these instructions could
result in fire or explosion, which could
result in fire or explosion, which could
cause property damage, personal injury, or
cause property damage, personal injury, or
death.
death.
Table of Contents
Important Safeguards . . . . . . . . . . . . . . . . . . . . . . . . . . . . . . . . . . . . . . . . . . . . . . . . . . . .2
Exploded View & Hardware . . . . . . . . . . . . . . . . . . . . . . . . . . . . . . . . . . . . . . . . . . . . . . . . 3
Assembly Instructions . . . . . . . . . . . . . . . . . . . . . . . . . . . . . . . . . . . . . . . . . . . . . . . . . . . .4
Operating Instructions . . . . . . . . . . . . . . . . . . . . . . . . . . . . . . . . . . . . . . . . . . . . . . . . . . .5
Clean and Care . . . . . . . . . . . . . . . . . . . . . . . . . . . . . . . . . . . . . . . . . . . . . . . . . . . . . . . . .5
Product Registration . . . . . . . . . . . . . . . . . . . . . . . . . . . . . . . . . . . . . . . . . . . . . . . . . . . . .5
Limited Warranty . . . . . . . . . . . . . . . . . . . . . . . . . . . . . . . . . . . . . . . . . . . . . . . . . . . . . . .5
Save these instructions for future reference.
If you are assembling this unit for someone else,
give this manual to him or her to read and save
for future reference.
Manufactured in China for:
Blue Rhino Global Sourcing, LLC
104 Cambridge Plaza Drive, Winston-Salem, NC 27104 USA
1.800.762.1142, www.bluerhino.com
© 2005 Blue Rhino Global Sourcing, LLC. All Rights Reserved
UniFlame® is a Registered Trademark of Blue Rhino Global Sourcing, LLC. All Rights Reserved
NBC1402-OM-106 ES

Outdoor Charcoal Barbecue Grill Model No. NBC1402
WARNING
FOR YOUR SAFETY
1. This grill is for outdoor use only, and shall not be used in a building,
garage, or any other enclosed area.
2. This grill is NOT for commercial use.
3. This is not a tabletop grill. Therefore, do not place this grill on any
type of tabletop surface
4. Do not use grill for indoor cooking or heating. Toxic carbon monoxide
fumes can accumulate and cause asphyxiation.
5. Do not use gasoline, kerosene, or alcohol for lighting.
6. Do not use in an explosive atmosphere. Keep grill area clear and free
from combustible materials, gasoline and other flammable vapors and
liquids.
7. Do not store or use gasoline or other flammable liquids or vapors
within 25 feet (7.62 m) of this appliance.
8. Instant light charcoal can burn at very high temperatures during
initial startup. Make sure lid is open until charcoal turns to hot coals.
9. Keep all combustible items and surfaces at least 21 inches (53 cm)
away from the grill at all times. DO NOT use this grill or any gas
product under any overhead or near any unprotected combustible
constructions.
10. Do not alter grill in any manner.
11. Do not use the grill unless it is completely assembled and all parts
are securely fastened and tightened.
12. This grill should be thoroughly cleaned and inspected on a regular
basis.
13. Use only Blue Rhino Global Sourcing, LLC. factory authorized parts.
The use of any part that is not factory authorized can be dangerous.
This will also void your warranty. Contact 1.800.762.1142.
14. Do not use this appliance without reading “Operating Instructions” in
this manual.
15. Do not touch metal parts of grill until it has completely cooled (about
45 min.) to avoid burns, unless you are wearing protective gear (pot
holders, gloves, BBQ mittens, etc.).
17. Do not use on wooden decks, wooden furniture or other combustible
surfaces.
18. Do not use in or on boats or recreational vehicles.
19. Position grill so wind can not carry ashes to combustible surfaces.
20. Do not use in high winds.
21. Never lean over the grill when lighting.
22. Do not leave a lit grill unattended, especially keep children and pets
away from grill at all times.
23. Do not attempt to move grill when in use. Allow the grill to cool
before moving or storing.
24. Always open grill lid carefully and slowly as heat and steam trapped
within grill can severely burn you.
25. Always place your grill on a hard, non combustible level surface. An
asphalt or blacktop surface may not be acceptable for this purpose.
26. Do not remove the ashes until they are completely and fully
extinguished.
27. Live hot briquettes and coals can create a fire hazard.
28. Always empty the ashes after each use, once extinguished and cool.
29. Do not place fuel (charcoal briquets, wood or lump charcoal) directly
into bottom of grill. Place fuel only on the charcoal pan/grid.
30. Check to make sure the air vents are free of debris and ash before
and while you are using the grill.
31. Always wear protective gloves when adding fuel to retain desired
heat level.
32. Keep all electrical cords away from a hot grill.
33 Always use a meat thermometer to ensure food is cooked to a safe
temperature.
34. Deaths, serious injury or damage to property may occur if the above
is not followed exactly.
16. Never touch grates (charcoal or cooking), ashes or coals to see if
they are hot.
Contact 1.800.762.1142 for assistance. Do not return to place of purchase.
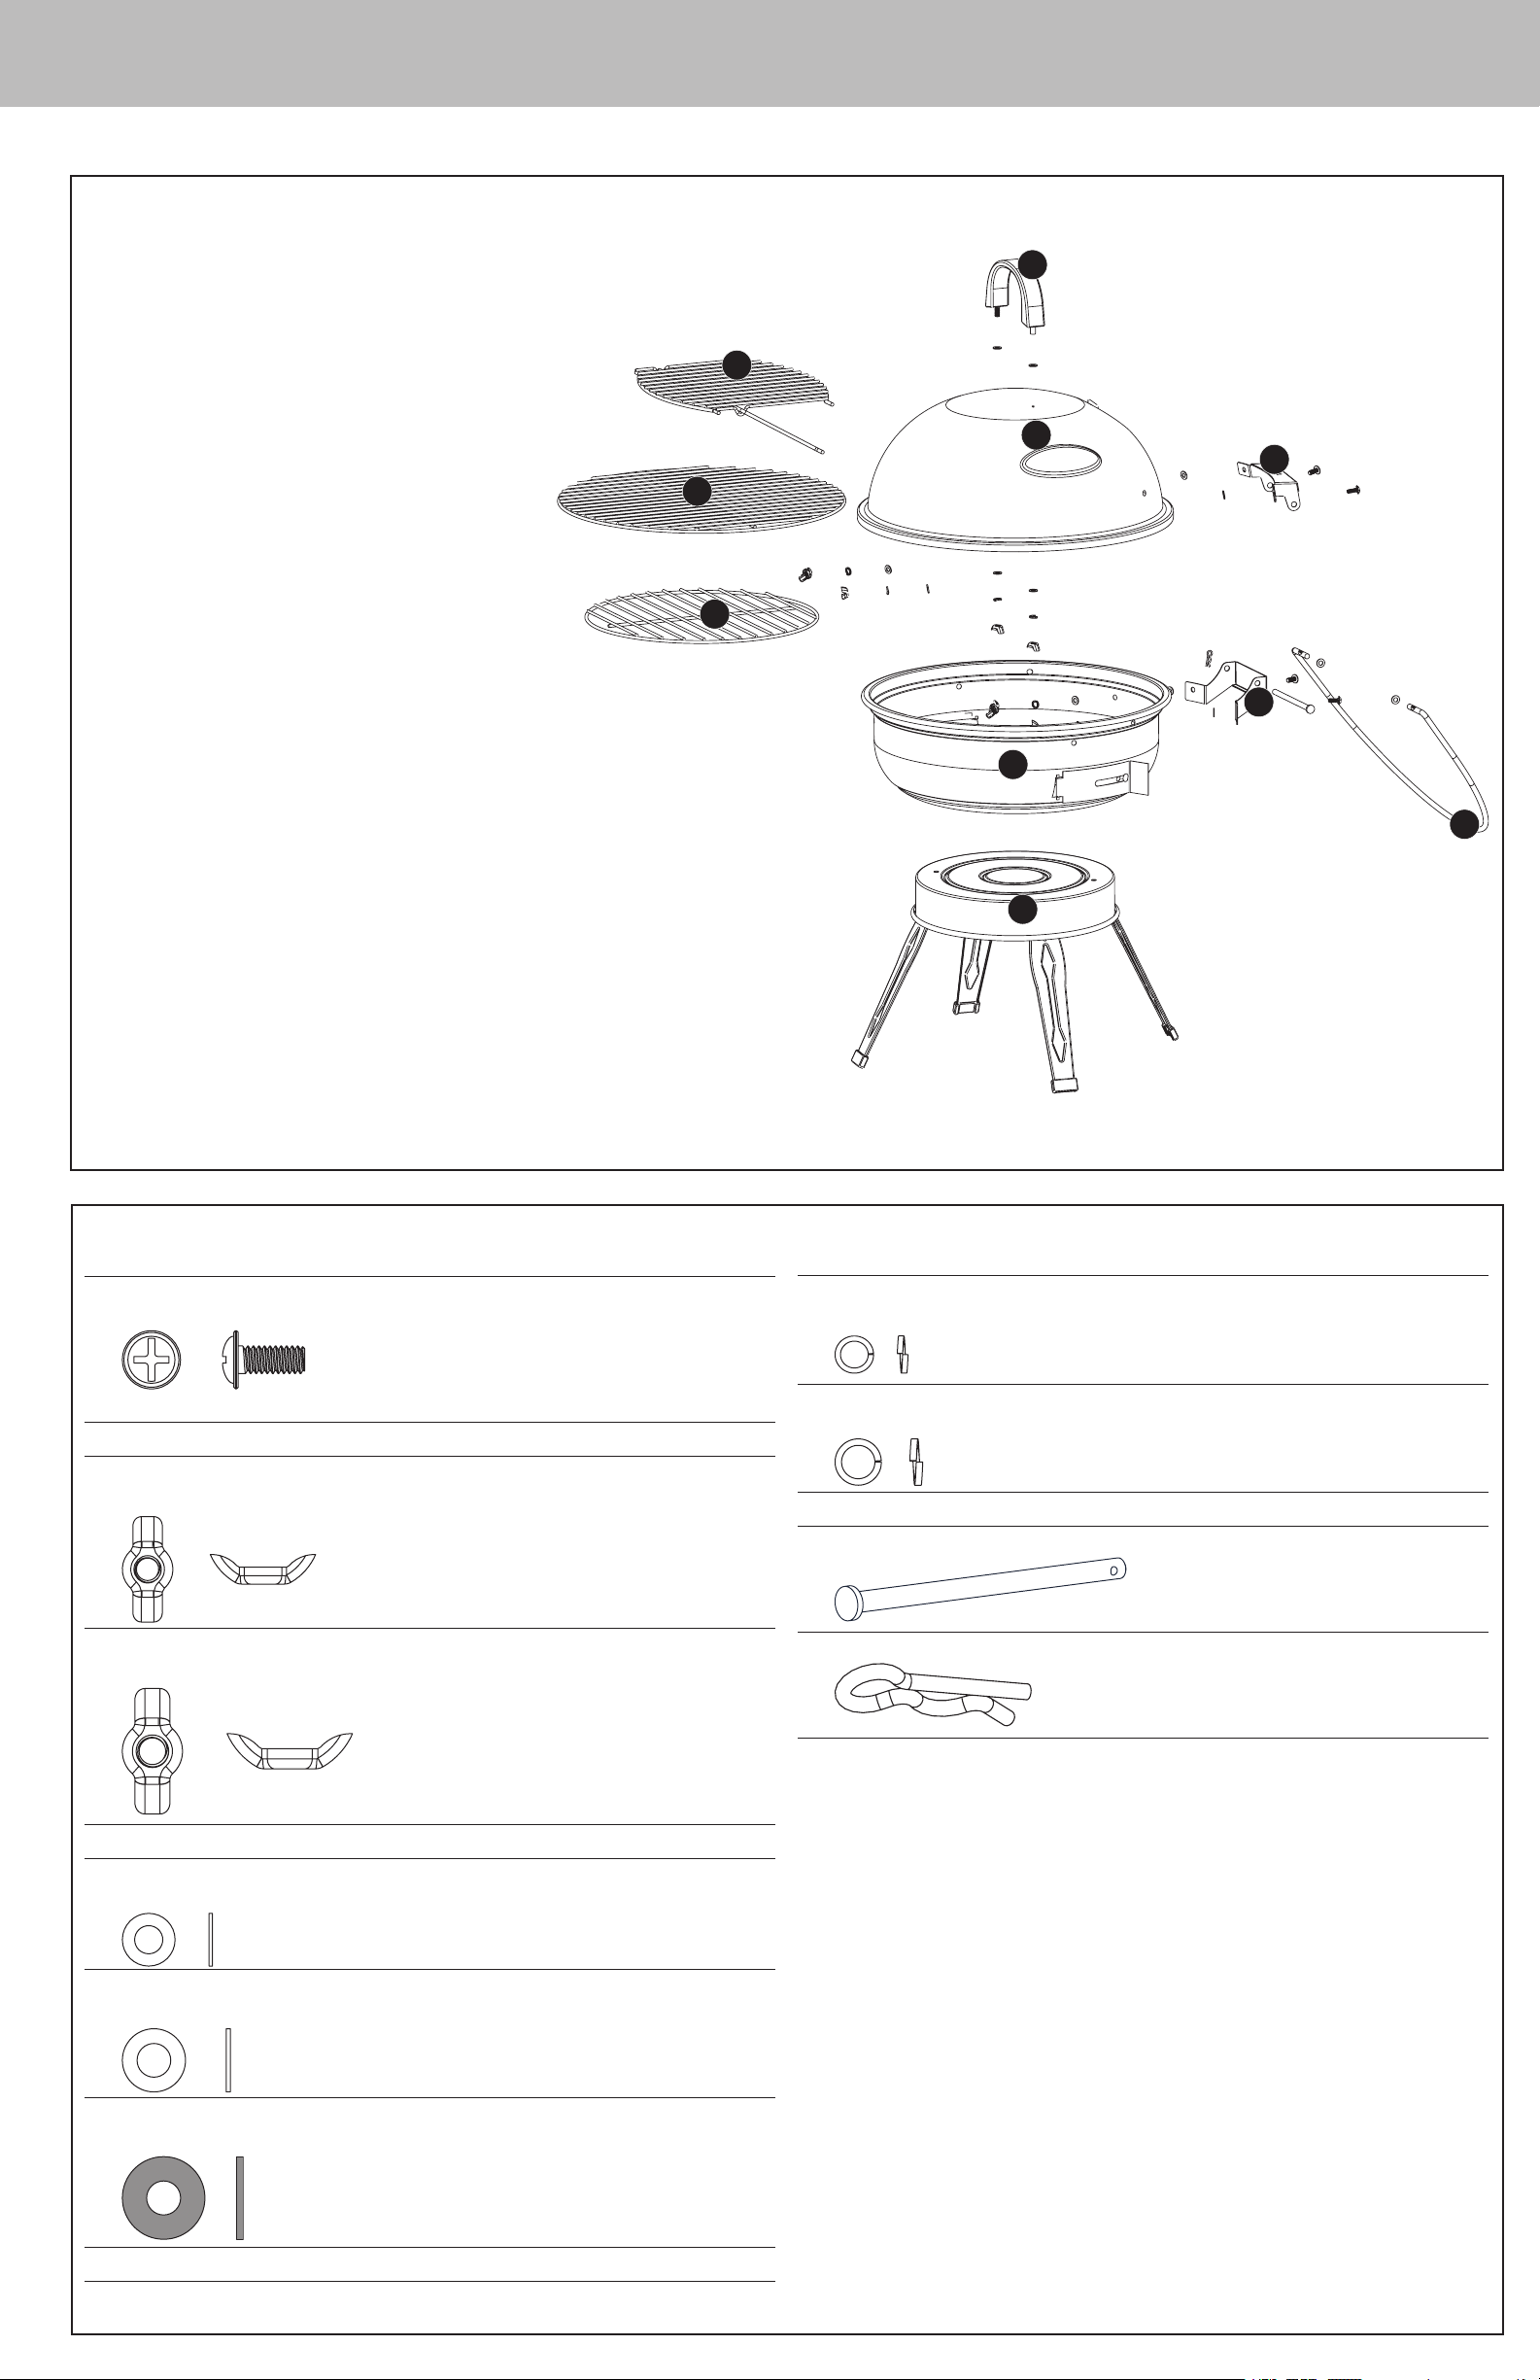
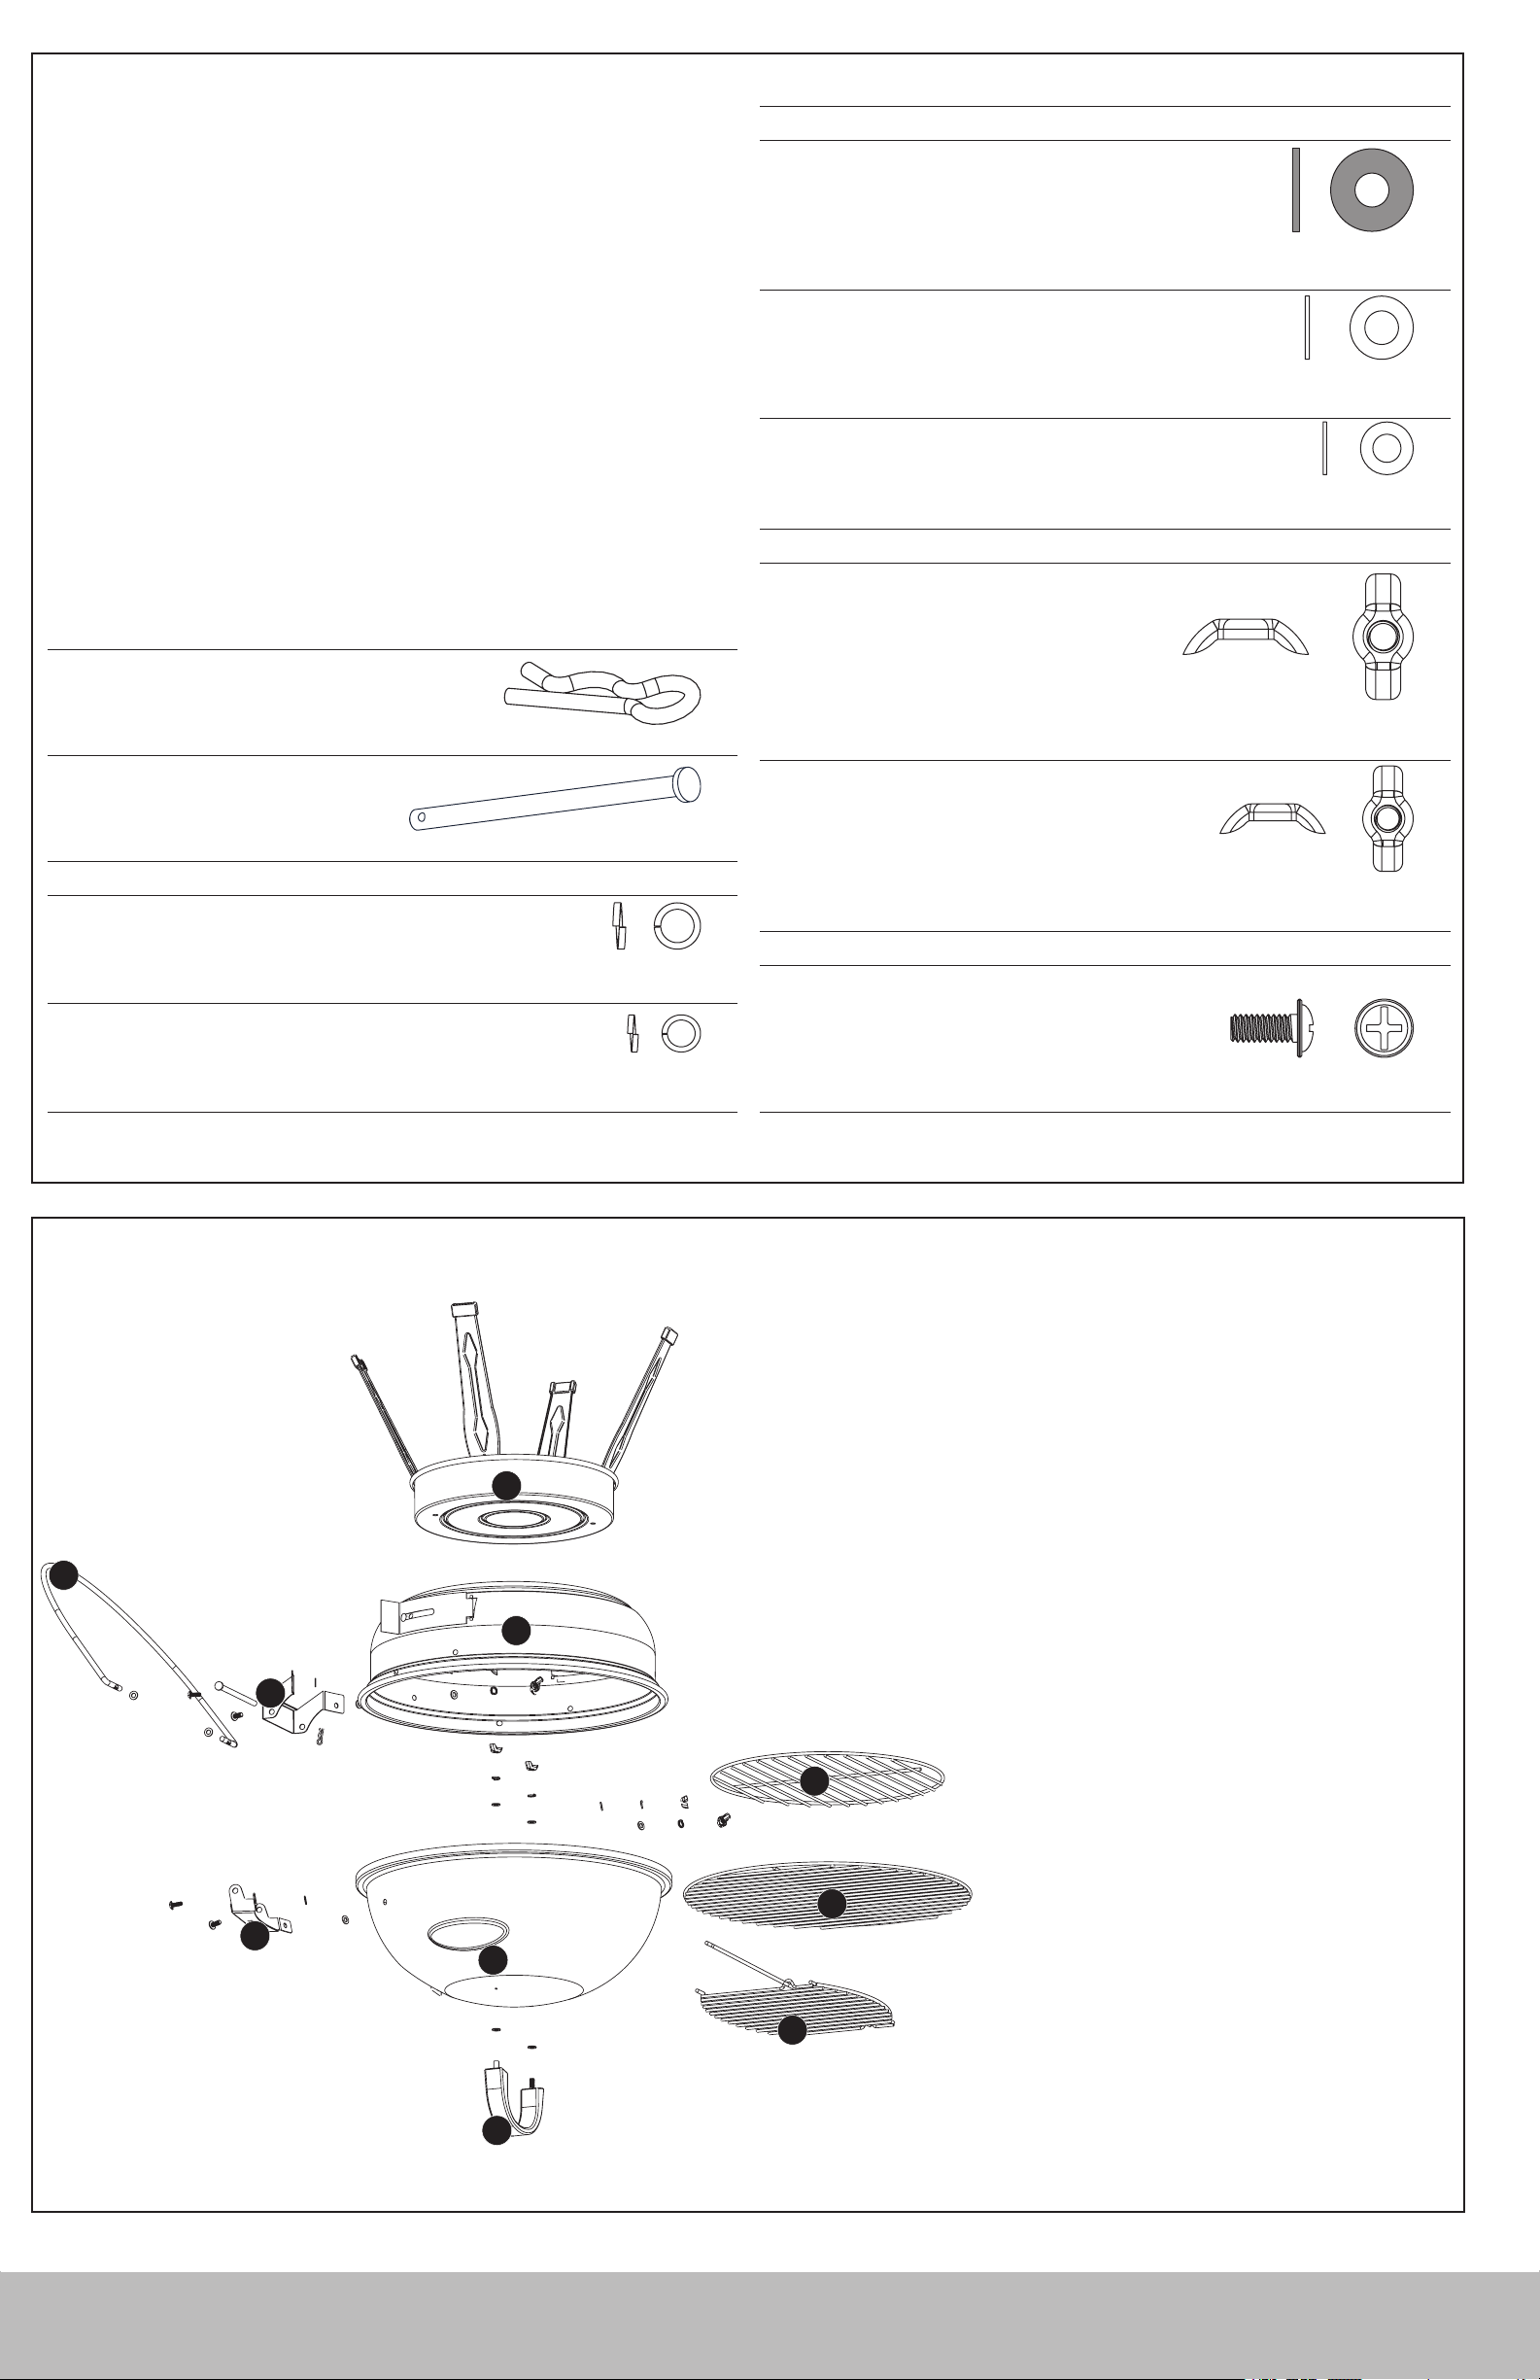
Exploded View
1. Lid . . . . . . . . . . . . . . . . . . . . . . . . . 55-14-765
2. Bottom Bowl. . . . . . . . . . . . . . . . . . 55-14-766
3. Cooking Grid. . . . . . . . . . . . . . . . . . 55-14-767
page no.
3
6
4. Charcoal Grid . . . . . . . . . . . . . . . . . 55-14-768
5. Warming Rack . . . . . . . . . . . . . . . . 55-14-769
6. Lid Handle . . . . . . . . . . . . . . . . . . . 55-14-770
7. Legs and Base . . . . . . . . . . . . . . . . 55-14-771
8. Wire Handle . . . . . . . . . . . . . . . . . . 55-14-772
9. Top Hinge . . . . . . . . . . . . . . . . . . . . 55-14-773
10. Bottom Hinge . . . . . . . . . . . . . . . . . 55-14-774
5
1
9
3
4
10
2
8
7
Hardware / Actual Size
A. Screw 6 pcs
M5x12 Zinc Plated Phillips Truss Head Screw
B. Small Wing Nut 6 pcs
M5 Steel Wing Nut
C. Large Wing Nut 2 pcs
M6 Steel Wing Nut
G. Small Lock Washer 6 pcs
ø5 Zinc Plated Lock Washer
H. Large Lock Washer 2 pcs
ø6 Zinc Plated Lock Washer
I. Pins* 1 pc
J. Cotter Pins* 1 pc
* Not shown at actual size.
D. Small Washer 6 pcs
ø5 Zinc Plated Washer
E. Large Washer 4 pcs
ø6 Zinc Plated Washer
F Heat Resistant Washer 6 pcs
ø6 Heat Resistant Washer
Outdoor Charcoal Barbecue Grill Model No. NBC1402
A
B
G
D
C
E
H
F
G
D
B
A
F
TOP
TOP
E
E
G
A
F
D
B
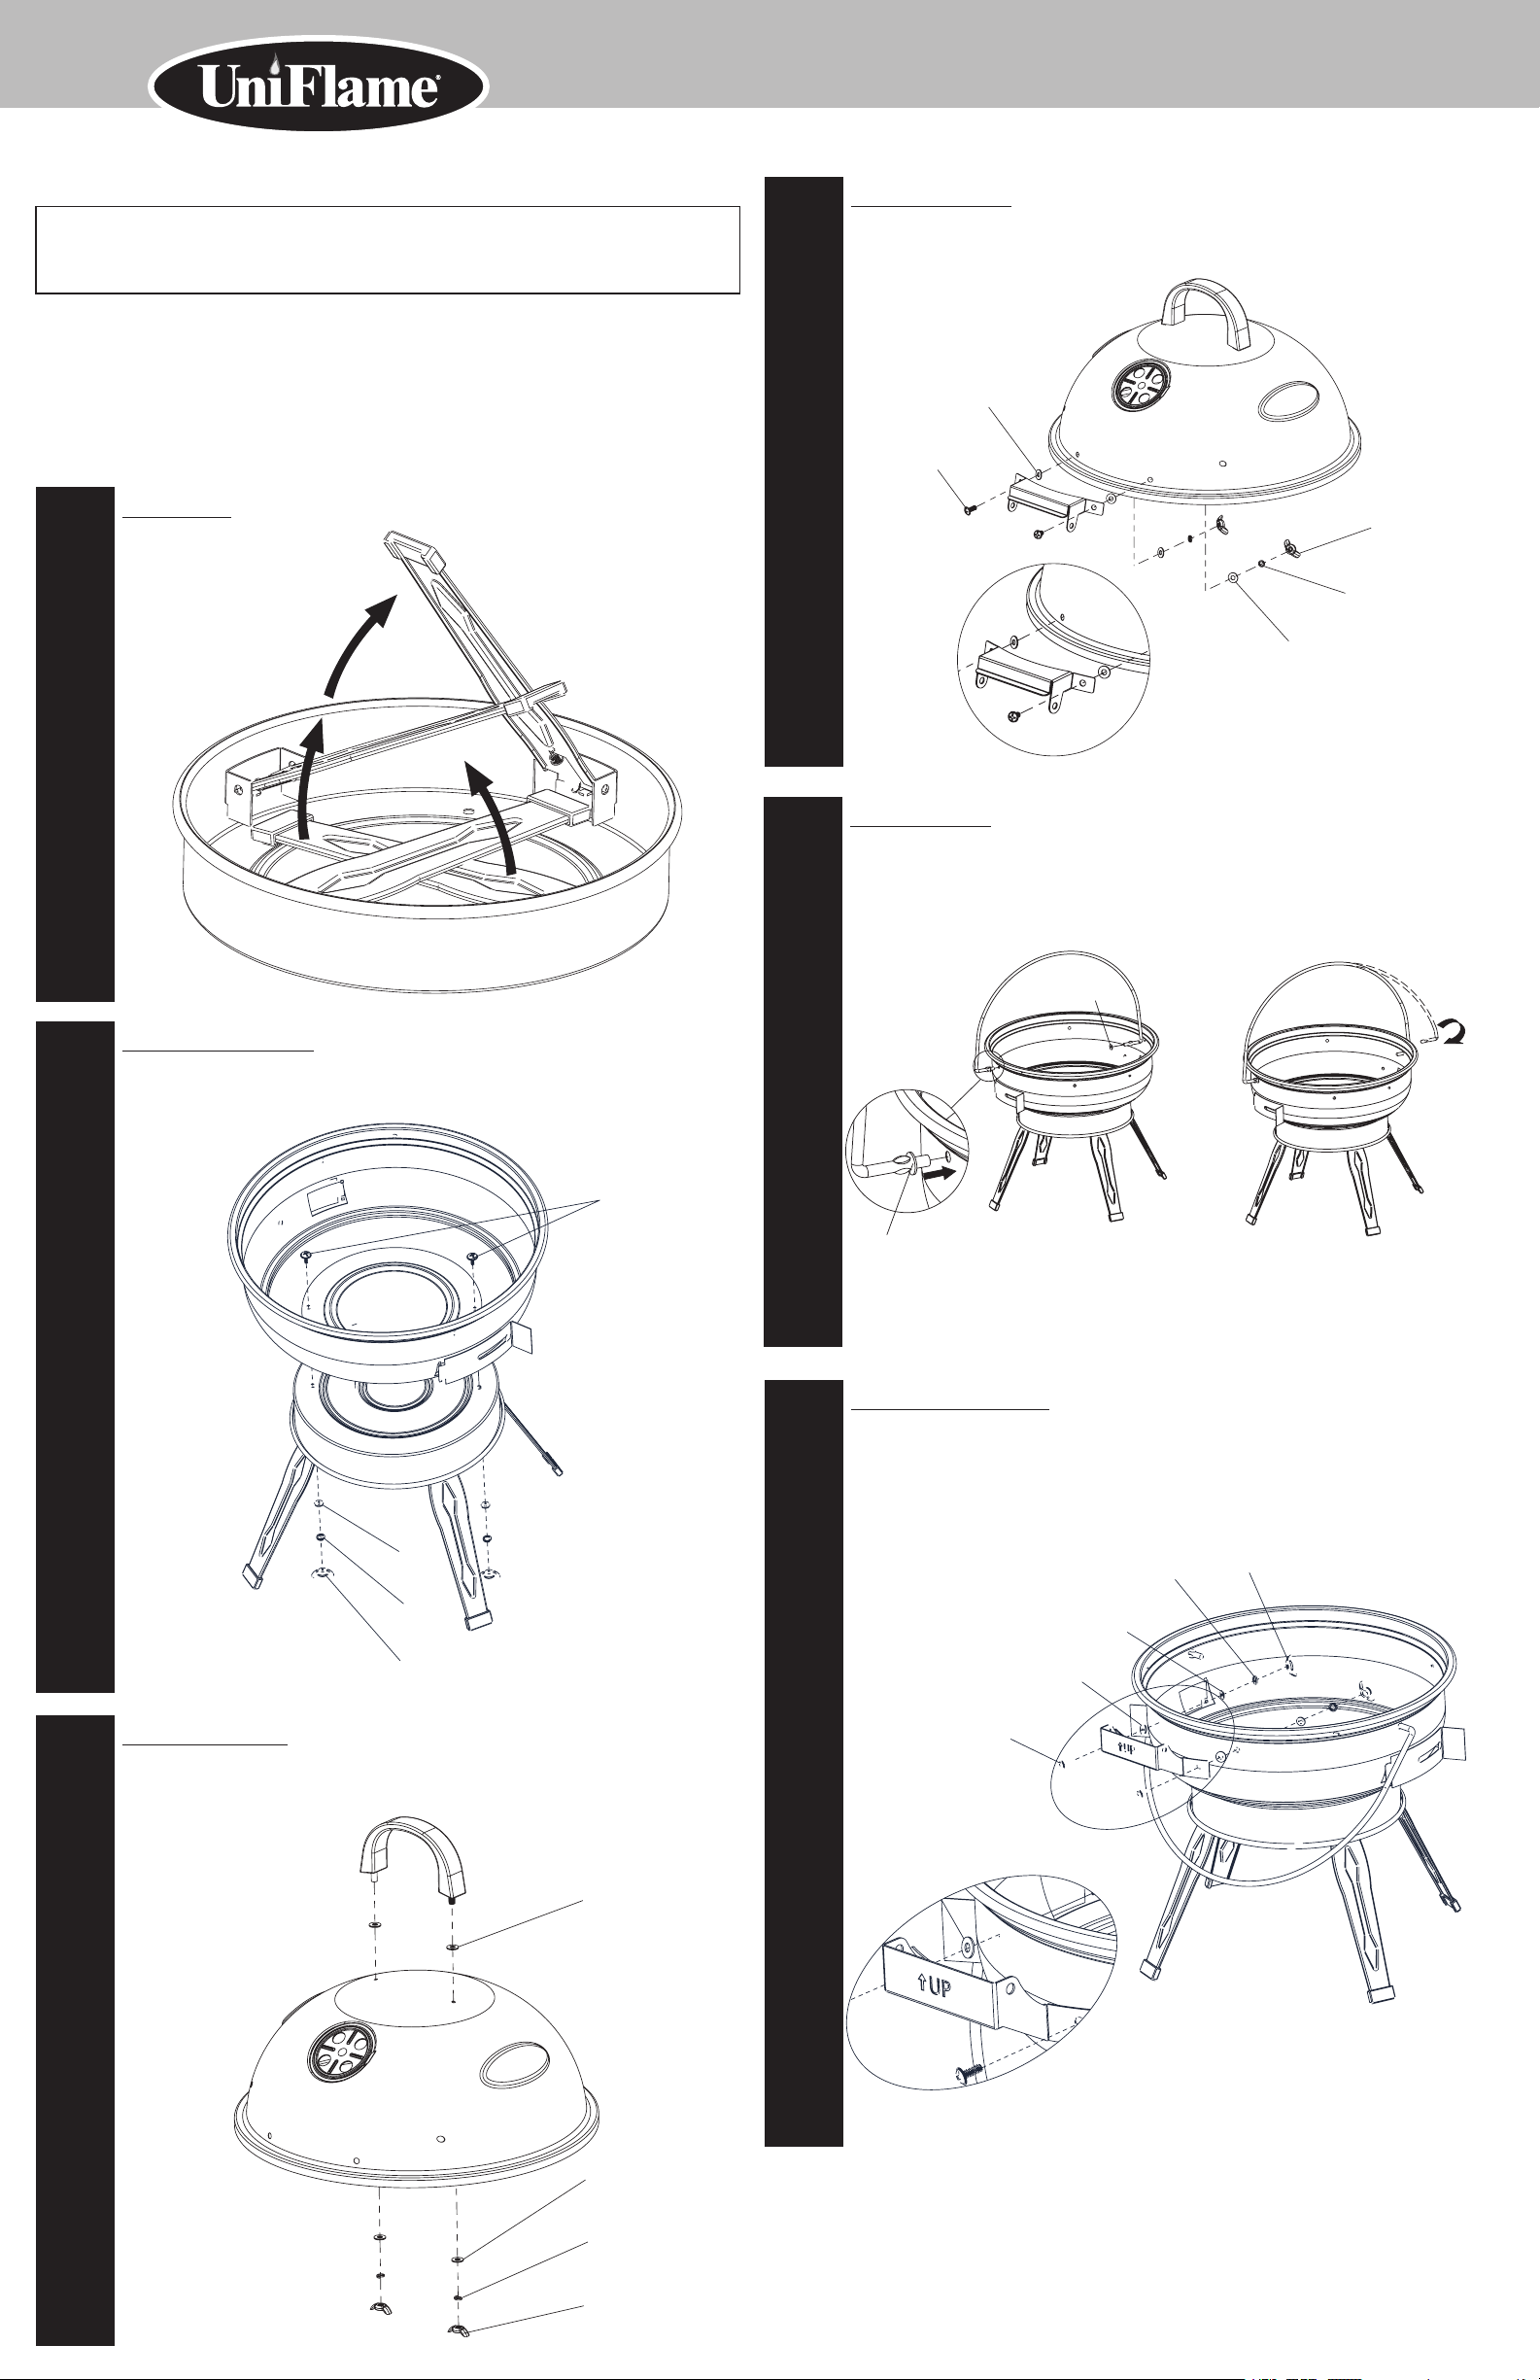
Assembly Instructions
DO NOT RETURN PRODUCT TO STORE.
For assistance call 1.800.762.1142 toll free. Please have your owner’s manual and serial
number available for reference.
For Easiest Assembly:
• To avoid losing any small components or hardware, assemble your product on a hard level
surface that does not have cracks or openings.
• Clear an area large enough to layout all components and hardware.
• When applicable, tighten all hardware connections by hand first. Once the step is
completed, go back and fully tighten all hardware.
• Follow all steps in order to properly assemble your product.
Step
Unfold legs
1
Step
4
Attach top hinge
Attach top hinge to lid using 2 sets of screws (A), heat resistant washers (F), small
washers (D), small lock washers (G) and small wing nuts (B).
Step
2
Attach bottom bowl
Attach bottom bowl to base using 2 sets of screws (A), small washers (D), small
lock washes (G), and small wing nuts (B).
Step
5
Attach handle
Insert handle into openings on side of bottom bowl using large washer (E).
Step
3
Attach lid handle
Attach lid handle to lid using 2 sets of heat resistant washers (F), large washers (E),
large lock washers (H) and large wing nuts (C).
Step
6
Attach bottom hinge
Attach bottom hinge to bottom bowl using 2 sets of screws (A), heat resistant
washers (F), small washers (D), small lock washers (G), and small wing nuts (B).

Contact 1.800.762.1142 for assistance. Do not return to place of purchase.
I
J
page no.
5
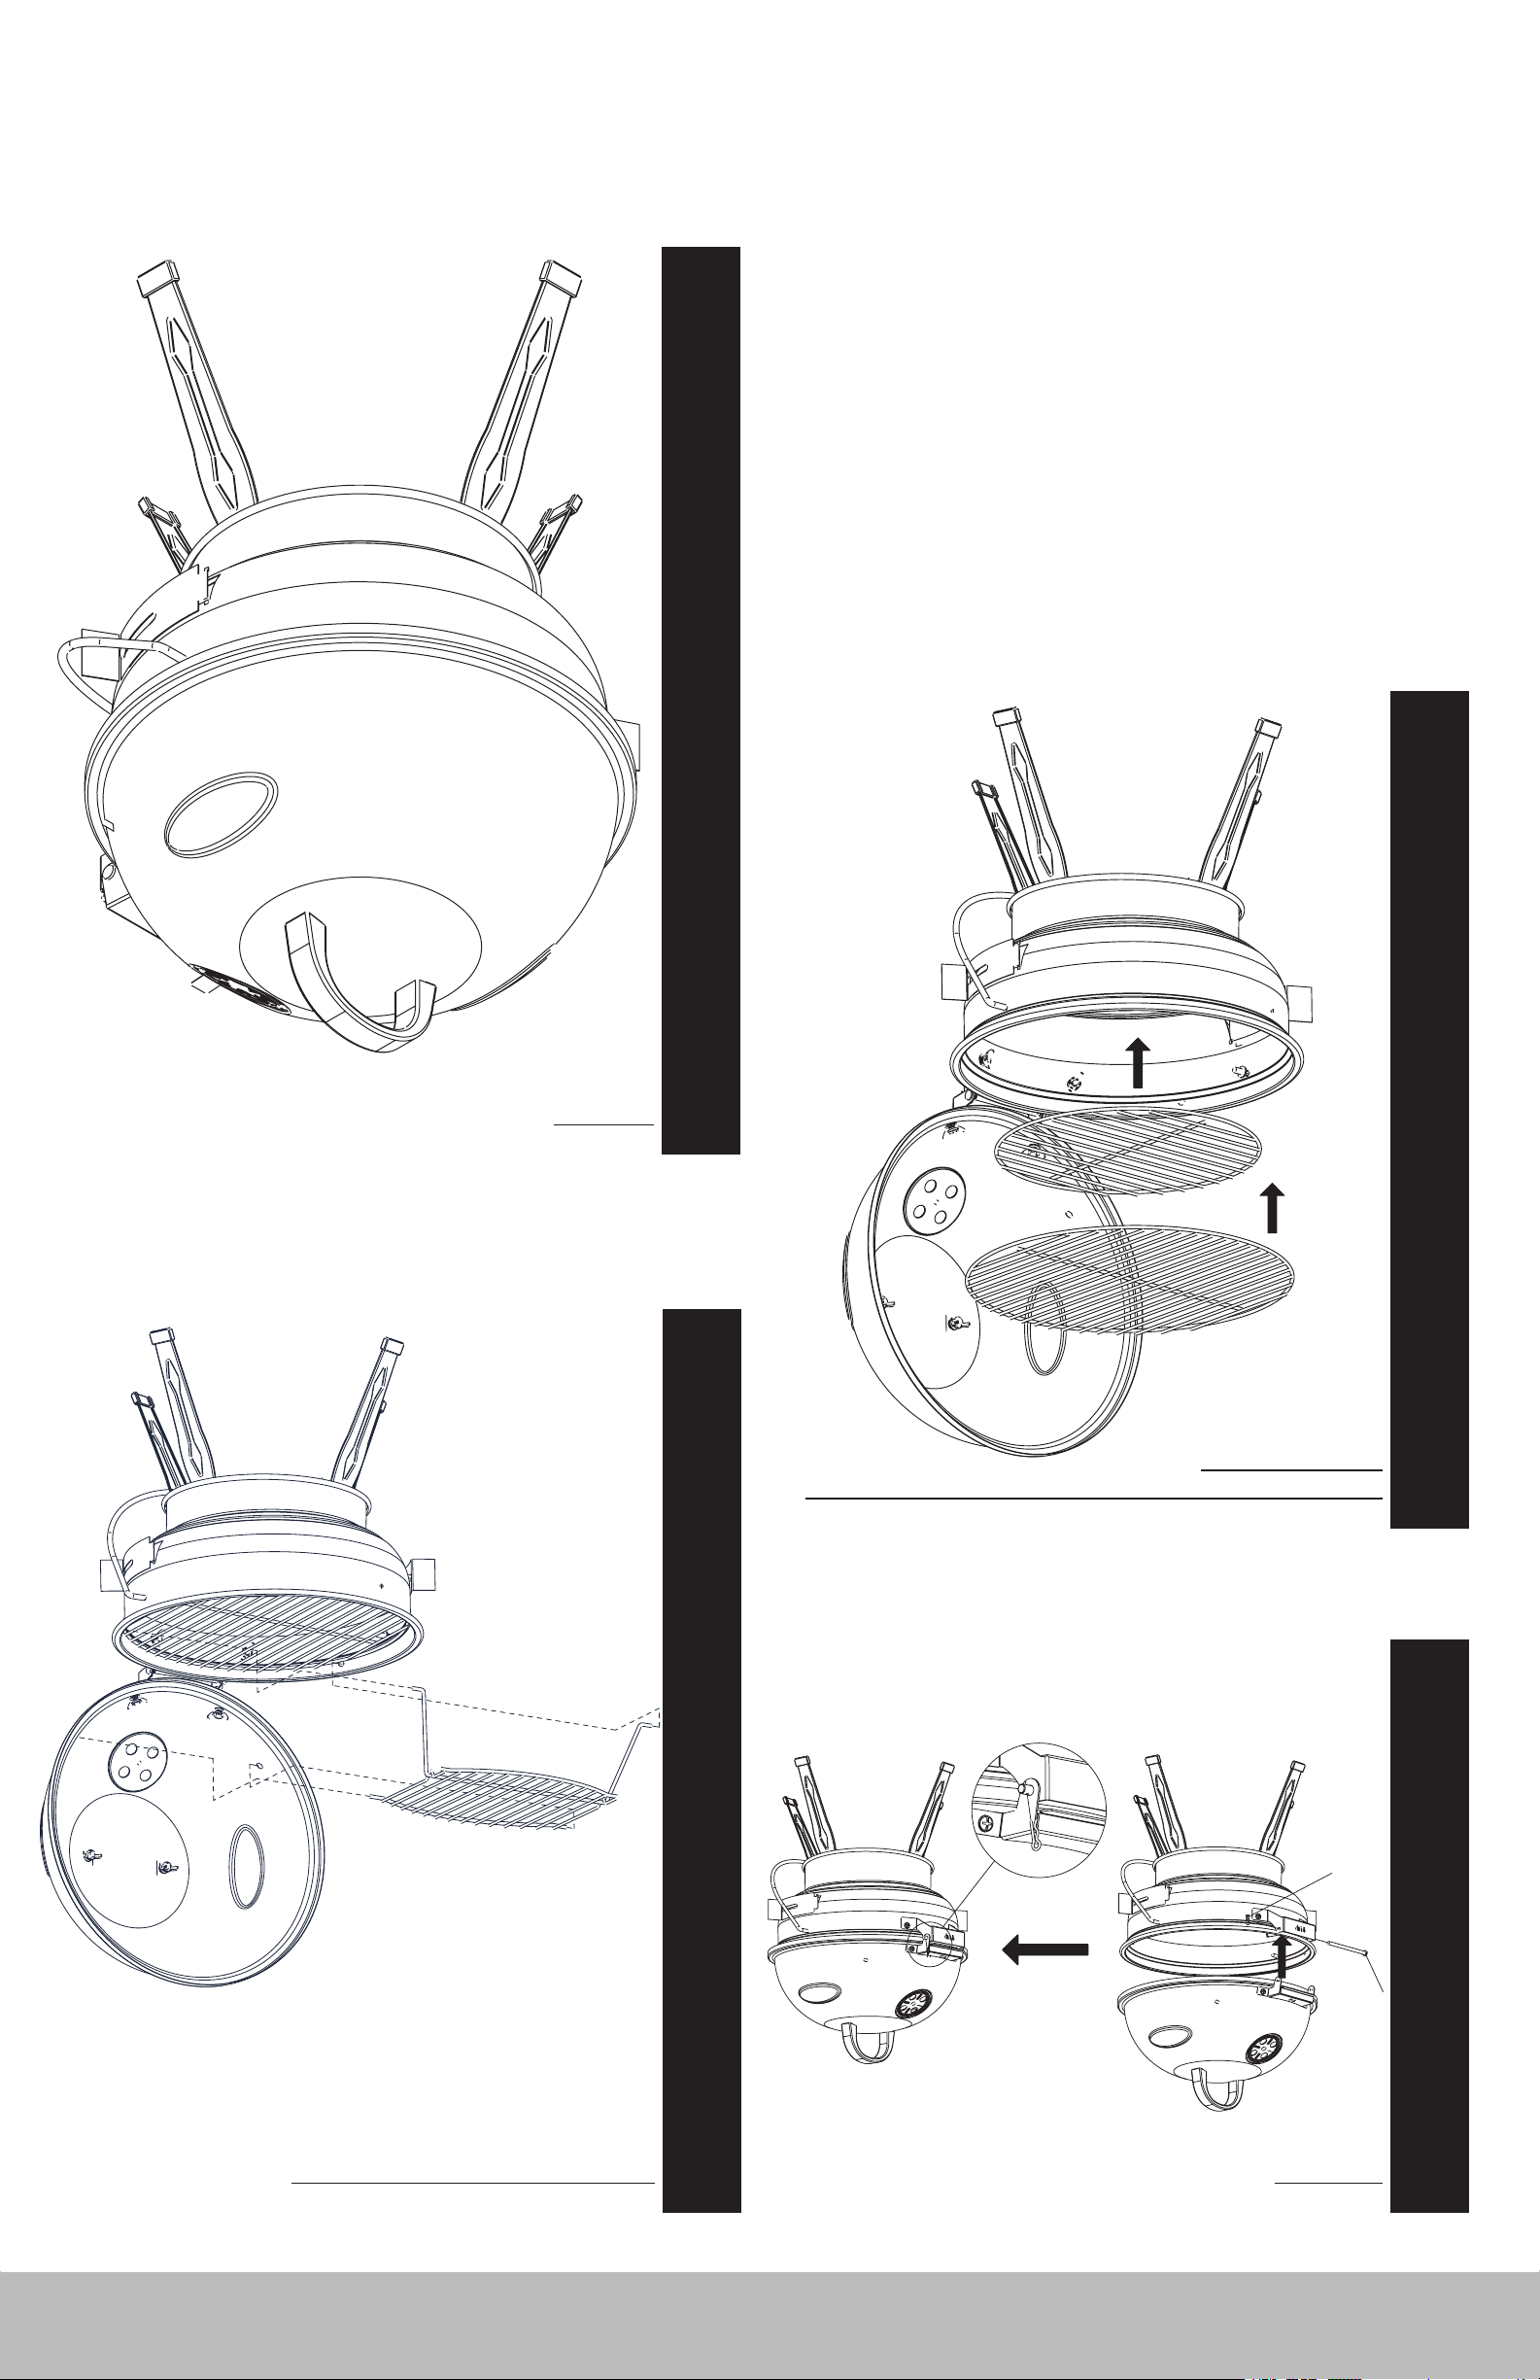
Step
7
Attach lid
Insert the top hinges into the bottom hinges. Secure with pin (I) and cotter pin (J).
Step
9
Insert warming rack
A. Slide warming rack into holes in lid and bottom bowl.
Note: Look for corresponding holes on side of lid. Insert short wire ends into lid
holes, one side at a time. Position warming rack legs into slots on grill body sides.
B. Cut zip tie on warming rack.
Step
8
Insert charcoal grid and cooking grid
Step
Completed
Congratulations your assembly is now complete. Read Operating Instructions
before proceeding.
10

Outdoor Charcoal Barbecue Grill Model No. NBC1402
Operating Instructions
This appliance is designed for use only with quality charcoal briquets, lump charcoal and cooking
wood.
Lighting
1. Open lid and vents.
2. Make sure ashes have been removed from grill.
3. Remove cooking grid.
4. Arrange and light fuel per instructions on fuel package.
5. Allow fuel time to ash into glowing coals before cooking.
Direct Cooking
1. While wearing protective gloves, carefully spread coals evenly across grid with a long
handle tool.
2. Carefully replace cooking grid.
3. Place food on cooking grid.
4. Cook with lid open or closed.
Indirect Cooking – Ideal for Roasts
1. While wearing protective gloves, carefully spread coals into a donut shape with a long
handle tool.
2. Place a metal tray in center of donut to catch drippings
3. Carefully replace cooking grid.
4. Place food on cooking grid directly over the metal pan.
5. Cook with lid closed.
Tips for Better Cookouts and Longer Product Life
1. Store fuel in a waterproof container away from sources of ignition.
2. Use a charcoal chimney for fast and easy startups.
3. Spray or coat cooking surfaces with vegetable oil before cooking to avoid sticking.
4. Place vegetables or delicate foods into aluminum foil pouches.
5. Use a quality grill brush after each event to keep cooking surfaces clean and rust free.
6. Remove all ash and dispose of properly after ever use, once extinguished and cool.
7. Once grill is cool, cover with a quality grill cover that is properly sized to your unit.
Cleaning and Care
Caution
1. All cleaning and maintenance should be done when grill is cool
and with the fuel supply disconnected.
Product Registration
Please register your product immediately at www.BlueRhino.com or call 1.800.762.1142.
Limited Warranty
Blue Rhino Global Sourcing, LLC (“Vendor”) warrants to the original retail purchaser
of this grill, and to no other person, that if this grill is assembled and operated in
accordance with the printed instructions accompanying it, then for a period of one
(1) year from the date of purchase, all parts in such grill shall be free from defects
in material and workmanship. Vendor may require reasonable proof of your date of
purchase from an authorized retailer or distributor. Therefore, you should retain your
sales slip or invoice. This Limited Warranty shall be limited to the repair or replacement
of parts, which prove defective under normal use and service and which Vendor shall
determine in its reasonable discretion upon examination to be defective. Before returning
any parts, you should contact Vendor’s Customer Service Department using the contact
information listed below. If Vendor conrms, after examination, a defect covered by this
Limited Warranty in any returned part, and if Vendor approves the claim, Vendor will
replace such defective part without charge. If you return defective parts, transportation
charges must be prepaid by you. Vendor will return replacement parts to the original
retail purchaser, freight or postage prepaid.
This Limited Warranty does not cover any failures or operating difculties due to
accident, abuse, misuse, alteration, misapplication, improper installation or improper
maintenance or service by you or any third party, or failure to perform normal and routine
maintenance on the grill, as set out in this owner’s manual. In addition, the Limited
Warranty does not cover damage to the nish, such as scratches, dents, discoloration,
rust or other weather damage, after purchase.
This Limited Warranty is in lieu of all other express warranties. Vendor disclaims all
warranties for products that are purchased from sellers other than authorized retailers
or distributors. AFTER THE PERIOD OF THE ONE (1)-YEAR EXPRESS WARRANTY, VENDOR
DISCLAIMS ANY AND ALL IMPLIED WARRANTIES, INCLUDING WITHOUT LIMITATION
THE IMPLIED WARRANTIES OF MERCHANTABILITY AND FITNESS FOR A PARTICULAR
PURPOSE. FURTHER, VENDOR SHALL HAVE NO LIABILITY WHATSOEVER TO PURCHASER
OR ANY THIRD PARTY FOR ANY SPECIAL, INDIRECT, PUNITIVE, INCIDENTAL, OR
CONSEQUENTIAL DAMAGES. Vendor assumes no responsibility for any defects caused by
third parties. This Limited Warranty gives the purchaser specic legal rights; a purchaser
may have other rights depending upon where he or she lives. Some jurisdictions do
not allow the exclusion or limitation of special, incidental or consequential damages, or
limitations on how long a warranty lasts, so the above exclusion and limitations may not
apply to you.
Vendor does not authorize any person or company to assume for it any other obligation
or liability in connection with the sale, installation, use, removal, return, or replacement of
its equipment, and no such representations are binding on Vendor.
Blue Rhino Global Sourcing, LLC
104 Cambridge Plaza Drive
Winston-Salem, North Carolina 27104 USA
(800) 762-1142
24 Hour Fax: (336) 659-6743
CustomerService@BlueRhino.com
2. DO NOT clean any grill part in a self cleaning oven. The extreme heat
will damage the finish.
Notices
1. Abrasive cleaners will damage this product.
2. Never use oven cleaner to clean any part of grill.
3. Do not clean any grill part in a self cleaning oven. The extreme heat will damage
the finish.
Cleaning Surfaces
1. Wipe surfaces clean with mild dishwashing detergent or baking soda.
2. For stubborn surfaces use a citrus based degreaser and a nylon scrubbing brush.
3. Rinse clean with water.

nylon.
hornear.
calor extremo dañará el terminado.
3. Enjuague las superficies con agua limpia.
2. En superficies de limpieza difícil, use un desengrasador a base de cítricos y un cepillo de
1. Limpie las superficies con un detergente suave de lavado de platos o con soda de
Limpieza de las Superficies
3. Nunca use ninguna pieza de esta parrilla en un horno de limpieza automática. El
2. No utilice nunca productos limpiahornos para limpiar cualquier pieza de la parrilla.
1. No use productos de limpieza abrasivos pues dañarán este aparato.
Avisos
automática. El calor extremo dañará el terminado.
2. NO limpie ninguna pieza de esta parrilla en un horno de limpieza
de propano líquido cerrado.
con la parrilla fría y con el suministro de combustible de la bombona
1. Todas la operaciones de limpieza y mantenimiento deben realizarse
CustomerService@BlueRhino.com
Fax las 24 horas: (336) 659-6743
Teléfono (800) 762-1142
Winston-Salem, North Carolina 27104 EE.UU.
104 Cambridge Plaza Drive
Blue Rhino Global Sourcing, LLC
o reemplazo de este equipo y cualquier representación de esta naturaleza no obliga al fabricante.
otra obligación a responsabilidad relacionada con la venta, instalación, uso, remoción, devolución
El fabricante no autoriza a ninguna persona o compañía para asumir por el fabricante cualquier
implícita, de manera que esta limitación puede no ser aplicable a usted.
residan. Ciertas jurisdicciones no permiten limitaciones en cuanto a la duración de una garantía
el comprador puede tener otros derechos según el lugar donde el comprador o la compradora
por terceras personas. Esta garantía limitada le da al comprador derechos legales específicos y
responsabilidad por garantías implícitas o expresas por defectos de mano de obra causados
INDIRECTOS, PUNITIVOS, INCIDENTALES O CONSECUENCIALES. El fabricante, además, no asume
ANTE EL COMPRADOR O ANTE CUALQUIER TERCERA PERSONA, POR DAÑOS ESPECIALES,
PROPOSITO PARTICULAR. ADEMAS, EL FABRICANTE NO ASUME NINGUNA RESPONSABILIDAD,
LIMITACIONES, LAS GARANTIAS IMPLICITAS DE COMERCIABILIDAD Y ADAPTABILIDAD PARA UN
HACE RESPONSABLE POR NINGUNA O CUALQUIER GARANTIA IMPLICITA INCLUYENDO, SIN
TERMINADO EL PERIODO DE UN (1) AÑO DE GARANTIA EXPRESA, EL FABRICANTE NO SE
garantía de comerciabilidad o la garantía de aptitud para un propósito en particular. UNA VEZ
o vendedores al detal autorizados. Esta exención de responsabilidad incluye cualquier
responsabilidad por garantías de productos vendidos por quienes no sean distribuidores
Esta garantía limitada reemplaza cualquier otra garantía. El fabricante no asume ninguna
causados por la intemperie después de la compra de la unidad.
de la unidad, tales como rasguños, abolladuras, descoloridos, oxidaciones y otros daños
prescribe en este manual del usuario. Además, la garantía limitada no cubre daños al terminado
o servicio inapropiado o falla en la realización de mantenimiento normal y rutinario como se
mal uso, alteración, empleo en usos inapropiados, instalación defectuosa o mantenimiento
Esta Garantía Limitada no cubre fallas o dificultades de operación debidas a accidente, abuso,
costo de transporte o envío prepagados.
costos de transporte deberán ser prepagados. El fabricante devolverá las partes al cliente con
reemplazar tales partes sin costo alguno. Si se le pide que devuelva las partes defectuosas, los
fabricante. Si el fabricante confirma el defecto y aprueba el reclamo, el fabricante decidirá
comuníquese con el Departamento de Servicio al Cliente (Customer Service Department) del
indique, a satisfacción del fabricante, que están defectuosas. Antes de devolver cualquier pieza,
piezas que resulten defectuosas en condiciones de servicio y uso normal y las que un examen
de venta o la factura. Esta Garantía Limitada estará limitada a la reparación o reemplazo de las
requerir prueba razonable de la fecha de compra. Por lo tanto, usted debe conservar el recibo
piezas de la parrilla estarán libres de defectos en material y mano de obra. El fabricante podrá
que la acompañan y por un período de un (1) año a partir de la fecha de compra. Todas las
parrilla/asador que si la unidad se arma y opera de acuerdo con las instrucciones impresas
Blue Rhino Sourcing, LLC (“el fabricante”) garantiza al comprador original, al detal, de esta
Garantia Limitada
Precaución
Limpieza y Cuidado
tamaño apropiado para su unidad.
7. Una vez que la parrilla se ha enfriado cúbrala con una cubierta de parrilla de calidad y de
6. Vacíe toda la ceniza después de cada uso y disponga de ella de manera apropiada.
superficie de cocción limpias y libres de oxidación.
5. Use un cepillo de calidad para parrilla después de usar la unidad para mantener las
4. Coloque las legumbres o alimentos delicados en envolturas de papel de aluminio.
alimento se pegue.
3. Rocíe o cubra las superficies con aceite vegetal antes de cocinar para evitar que el
2. Use una chimenea de carbón de leña para encender el fuego rápida y fácilmente.
de ignición.
1. Almacene la materia combustible en un contenedor a prueba de fuego, lejos de fuentes
Unidad
Sugerencias para Mejores Asados y Prolongación de la Vida Util de la
5. Cocine con la tapa cerrada.
4. Coloque el alimento en la parrilla de cocción directamente arriba de la bandeja de metal.
3. Vuelva a colocar cuidadosamente la parrilla de cocción.
2. Coloque una bandeja de metal en el centro del círculo para recoger los jugos que gotean.
circular, usando una herramienta de mango largo.
1. Con los guantes de protección puestos distribuya los carbones encendidos en forma
Cocción Indirecta, Ideal para Asados
4. Cocine con la tapa abierta o cerrada.
3. Coloque el alimento en la parrilla de cocción.
2. Vuelva a colocar cuidadosamente la parrilla de cocción.
parejamente en la rejilla, usando una herramienta de mango largo.
1. Con guantes de protección puestos, distribuya cuidadosamente los carbones encendidos,
Cocción Directa
cocinar.
5. Deje que la materia combustible se torne en carbones encendidos antes de comenzar a
4. Disponga la materia combustible de acuerdo con las instrucciones del empaque.
3. Saque la parrilla de cocción.
2. Asegúrese de remover la ceniza de la parrilla.
1. Abra la tapa y las aberturas de ventilación.
www.BlueRhino.com o llamando al 1.800.762.1142.
Sírvase registrar su unidad inmediatamente visitando nuestro sitio de internet
Registro del Producto
Parrilla de carbón de leña para exteriores, modelo nº NBC1402
Encendido
y leña para cocinar.
Esta unidad ha sido diseñada para ser usada con briquetas de calidad, carbón de leña en bloque
Instrucciones de Operación
I
J
seguir adelante.
Felicitaciones, el armado ha terminado. Lea las instrucciones de operación antes de
Terminado
10
Paso
8
parrilla de cocción
Coloque la rejilla para las briquetas de carbón de leña y la
Paso
B. Corte la atadura en la rejilla de calentamiento.
ranuras en los costados de cuerpo de la parrilla.
lado y, luego, en el otro. Coloque las patas de la rejilla de calentamiento en las
los 2 extremos cortos de alambre en las perforaciones de la tapa, primero en un
Nota: Busque las perforaciones correspondientes en el costado de la tapa. Inserte
A. Instale la rejilla de calentamiento en las perforaciones en la tapa y en el cuenco.
Introduzca la rejilla de calentamiento
5
página
9
Paso
y un pasador de horquilla (J).
Inserte las bisagras de arriba en las bisagras de abajo. Asegúrelas con un perno (I)
Fije la tapa
Si necesita ayuda llame al 1.800.762.1142. No vuelva al lugar de compra.
7
Paso

A
B
G
D
3
C
E
H
F
G
D
B
A
F
TOP
TOP
E
E
G
A
F
D
B
2 arandelas de cierre pequeñas (H) y 2 tuercaS de mariposa pequeñas (C).
Fije el cuenco a la base usando 2 tornillos (F), 2 arandelas pequeñas (E),
Fije la manija de la tapa
Paso
6
(G) y 2 tuercas de mariposa pequeñas (B).
resistentes al calor (F), 2 arandelas pequeñas (D), 2 arandelas de cierre pequeñas
Fije la bisagra de abajo al cuenco de abajo usando 2 tornillos (A), 2 arandelas
Fije la bisagra de abajo
Paso
2
de cierre grande (G) y tuerca de mariposa grande (B).
Fije el cuenco a la base usando un tornillo grande (A), arandela grande (D), arandela
Fije el cuenco de abajo
Paso
5
una arandela grande (E).
Inserte la manija en las perforaciones ubicadas en el costado del cuenco usando
Fije la manija
Paso
1
Desdoble las patas
(G) y 2 tuercas de mariposa pequeñas (B).
resistentes al calor (F), 2 arandelas pequeñas (D), 2 arandelas de cierre pequeñas
Fije la bisagra de arriba a la tapa usando 2 tornillos pequeños (A), 2 arandelas
Fije la bisagra de arriba
4
Paso
Parrilla de carbón de leña para exteriores, modelo nº NBC1402
Paso
• Siga todos los pasos en el orden indicado para armar debidamente esta unidad.
que ha terminado el paso, apriete completamente todos los elementos de ferretería.
• Cuando sea del caso, apriete a mano, en un principio, las conexiones de ferretería. Una vez
elementos de ferretería.
• Despeje un área suficientemente grande para disponer todos los componentes y los
en un lugar de piso plano sin aberturas ni hendijas.
• Evite la pérdida de componentes pequeños o elementos de ferretería, armando el producto
Para facilitar el armado:
el número de serie de la unidad, para referencia.
Si necesita ayuda llame, sin cargo, al 1.800.762-.1142. Por favor tenga a mano su manual y
NO DEVUELVA EL PRODUCTO AL LUGAR DE COMPRA
Instrucciones de Armado
Arandela resistente al calor de 6 mm de diám.
F Arandela resistente al calor 6
Arandela galvanizada de 6 mm de diám.
E. Arandela grande 4
Arandela galvanizada de 5 mm de diám.
D. Arandela pequeña 6
*Esta pieza no se ve a tamaño real.
J. Pasador de horquilla* 1
I. Perno* 1
Arandela de cierre galvanizada de 6 mm de diám.
H. Arandela de cierre grande 2
Arandela de cierre galvanizada de 5 mm de diám.
G. Arandela de cierre pequeña 6
Tuerca de mariposa de acero M6
C. Tuerca de mariposa grande 2
Tuerca de mariposa de acero M5
B. Tuerca de mariposa pequeña 6
Tornillo galvanizado de cabeza abombada Philips M5X12
A. Tornillo pequeño 4
Elementos de Ferretería / Tamaño Real
7
8
2
10
10. Bisagra de abajo. . . . . . . . . . . . . . . 55-14-774
4
9. Bisagra de arriba . . . . . . . . . . . . . . 55-14-773
8. Manija de alambre . . . . . . . . . . . . . 55-14-772
7. Patas y base. . . . . . . . . . . . . . . . . . 55-14-771
3
6. Manija de la tapa . . . . . . . . . . . . . . 55-14-770
9
1
5. Rejilla de calentamiento . . . . . . . . . 55-14-769
4. Rejilla para carbón de leña . . . . . . . 55-14-768
5
3. Parrilla de cocción . . . . . . . . . . . . . 55-14-767
2. Cuenco. . . . . . . . . . . . . . . . . . . . . . 55-14-766
6
1. Tapa. . . . . . . . . . . . . . . . . . . . . . . . 55-14-765
Diagrama de Explosión
3
página
Si necesita ayuda llame al 1.800.762.1142. No vuelva al lugar de compra.

producir daños a la propiedad, lesiones serias y hasta fatales.
34. El no seguir exactamente las instrucciones dadas arriba puede
ha quedado cocida a la temperatura apropiada.
33. Use siempre un termómetro para carne para asegurar que la comida
32. Mantenga todos los cables eléctricos lejos de una parrilla caliente.
combustible para mantener el nivel de temperatura deseada.
31 Use siempre guantes de protección cuando vaya a agregar materia
residuos antes de usar la parrilla y mientras la está usando.
30 Verifique que las aberturas de ventilación están libres de ceniza o
carbón de leña.
la materia combustible únicamente en la rejilla y bandeja para el
leña en bloque) directamente en el fondo de la parrilla. Coloque
29. No coloque materias combustibles (briquetas, madera o carbón de
extinguido completamente y esté fría.
28. Siempre quite la ceniza después de cada usado, una vez que se haya
incendio.
27. Briquetas y carbones encendidos pueden crear un riesgo de
enfriado y apagado.
26. No quite las cenizas antes de que éstas se hayan completamente
que no sea adecuada para este propósito.
no sea combustible. Una superficie de asfalto o de pavimento puede
25. Coloque siempre la parrilla sobre una superficie firme y nivelada que
ocasionarle severas quemaduras.
pues el calor y el vapor que hay dentro de la parrilla pueden
24. Abra siempre la tapa de la parrilla en forma cuidadosa y lentamente,
parrilla se enfríe antes de moverla o guardarla.
23. No intente mover la parrilla mientras esté encendida. Deje que la
momento.
mantenga los niños y las mascotas lejos de la parrilla en todo
22. No deje una parrilla encendida sin vigilancia, especialmente,
21. Nunca se apoye sobre la parrilla cuando la está encendiendo.
20. No utilice la parrilla si hace mucho viento.
el carbón para determinar si están calientes.
16. Nunca toque rejillas (de carbón de leña o de cocción), las cenizas o
de barbacoa, etc.
protección tales como guantes o almohadilla para las ollas, guantes
quemaduras, a menos que usted tenga puestos elementos de
enfriado completamente (alrededor de 45 minutos) para evitar
15. No toque las piezas de metal de la parrilla hasta que no se haya
“Encendido” que se encuentran en este manual.
14. No encienda esta unidad sin haber leído las instrucciones de
1.800.762.1142.
fábrica puede ser peligroso. Su uso invalida su garantía. Llame al
Global Sourcing, LLC. El uso de cualquier pieza no autorizada de
13. Use únicamente piezas autorizadas de fábrica de Blue Rhino
regular.
12. Esta parrilla debe limpiarse y verificarse completamente de manera
que todas las piezas estén bien fijadas y apretadas.
11. No utilice la parrilla a menos que esté completamente montada y
10. No altere la parrilla de ninguna forma.
estén debidamente protegidas.
debajo de aleros o cerca de construcciones combustibles que no
53 cm (21 pulg.) de la parrilla en todo momento. NO use esta parrilla
9. Mantenga todo material y superficies combustibles a por lo menos
abierta hasta que las briquetas se tornen en carbones encendidos.
temperatura durante su encendido inicial. Asegúrese de tener la tapa
8. Las briquetas de encendido instantáneo pueden arder a muy alta
menos de 25 pies (7,62 m) de esta unidad.
7. No guarde o use gasolina u otros líquidos o vapores inflamables a
vapor o líquido inflamable.
la parrilla libre de materiales combustibles, gasolina y cualquier otro
6. No utilice el equipo en una atmósfera explosiva. Mantenga la zona de
5. No utilice gasolina, queroseno o alcohol para encender la parrilla.
la asfixia.
gases tóxicos de monóxido de carbono pueden acumularse y provocar
4. NO use la parrilla para cocinar adentro o calentar el ambiente. Los
superficies combustibles.
cualquier otra una superficie combustible.
sobre ningún tipo de superficie de sobremesa.
19. Coloque la parrilla de manera que el viento no lleve cenizas a
18. NO instalar o utilizar en embarcaciones o vehículos de recreo.
17. No usar sobre terrazas de madera, muebles de madera o sobre
3. No es una parrilla de sobremesa. Por lo tanto, no coloque esta parrilla
2. Esta parrilla NO ha sido diseñada para uso comercial.
usarse en un edificio, garaje o cualquier otra área cerrada.
1. Esta parrilla es para ser usada al aire libre únicamente y no debe
PARA SU SEGURIDAD:
ADVERTENCIA
Parrilla de carbón de leña para exteriores, modelo nº NBC1402
. NBC1402-OM-106 ES
es una marca registrada de Blue Rhino Global Sourcing, LLC. Todos los derechos reservados.
®
UniFlame
© 2005 Blue Rhino Global Sourcing, LLC. Todos los derechos reservados.
1.800.762.1142, www.bluerhino.com
104 Cambridge Plaza Drive, Winston-Salem, NC 27104 EE.UU.
Blue Rhino Global Sourcing, LLC
Fabricado en China para:
entréguele este manual para futuras consultas.
Si está montando esta unidad para otra persona,
Conserve estas instrucciones para futuras consultas.
personales y hasta accidentes fatales.
consecuentes daños a la propiedad, lesiones
ocasionar un incendio o una explosión, con sus
3. El no seguir estas instrucciones puede
darle servicio.
equipo antes de instalarlo, ponerlo en marcha o
instalación, funcionamiento y mantenimiento del
2. Lea atentamente las instrucciones de
Garantia Limitada . . . . . . . . . . . . . . . . . . . . . . . . . . . . . . . . . . . . . . . . . . . . . . . . . . . . . . .6
Registro del producto . . . . . . . . . . . . . . . . . . . . . . . . . . . . . . . . . . . . . . . . . . . . . . . . . . . . 6
Limpieza y cuidado . . . . . . . . . . . . . . . . . . . . . . . . . . . . . . . . . . . . . . . . . . . . . . . . . . . . . . 6
Instrucciones de operación . . . . . . . . . . . . . . . . . . . . . . . . . . . . . . . . . . . . . . . . . . . . . . . . 6
Instrucciones de armado . . . . . . . . . . . . . . . . . . . . . . . . . . . . . . . . . . . . . . . . . . . . . . . . .4
Diagrama de Explosión y Elementos de Ferretería . . . . . . . . . . . . . . . . . . . . . . . . . . . . . . 3
Salvaguardias importantes . . . . . . . . . . . . . . . . . . . . . . . . . . . . . . . . . . . . . . . . . . . . . . . . 2
Indice
lesiones o daños a la propiedad.
o mantenimiento inadecuados puede causar
1. Una instalación, ajuste, alteración, reparación
PARA SU SEGURIDAD:
ADVERTENCIA
(fuera de cualquier recinto)
Solamente Para Uso En Exteriores
PARA SU SEGURIDAD:
ADVERTENCIA
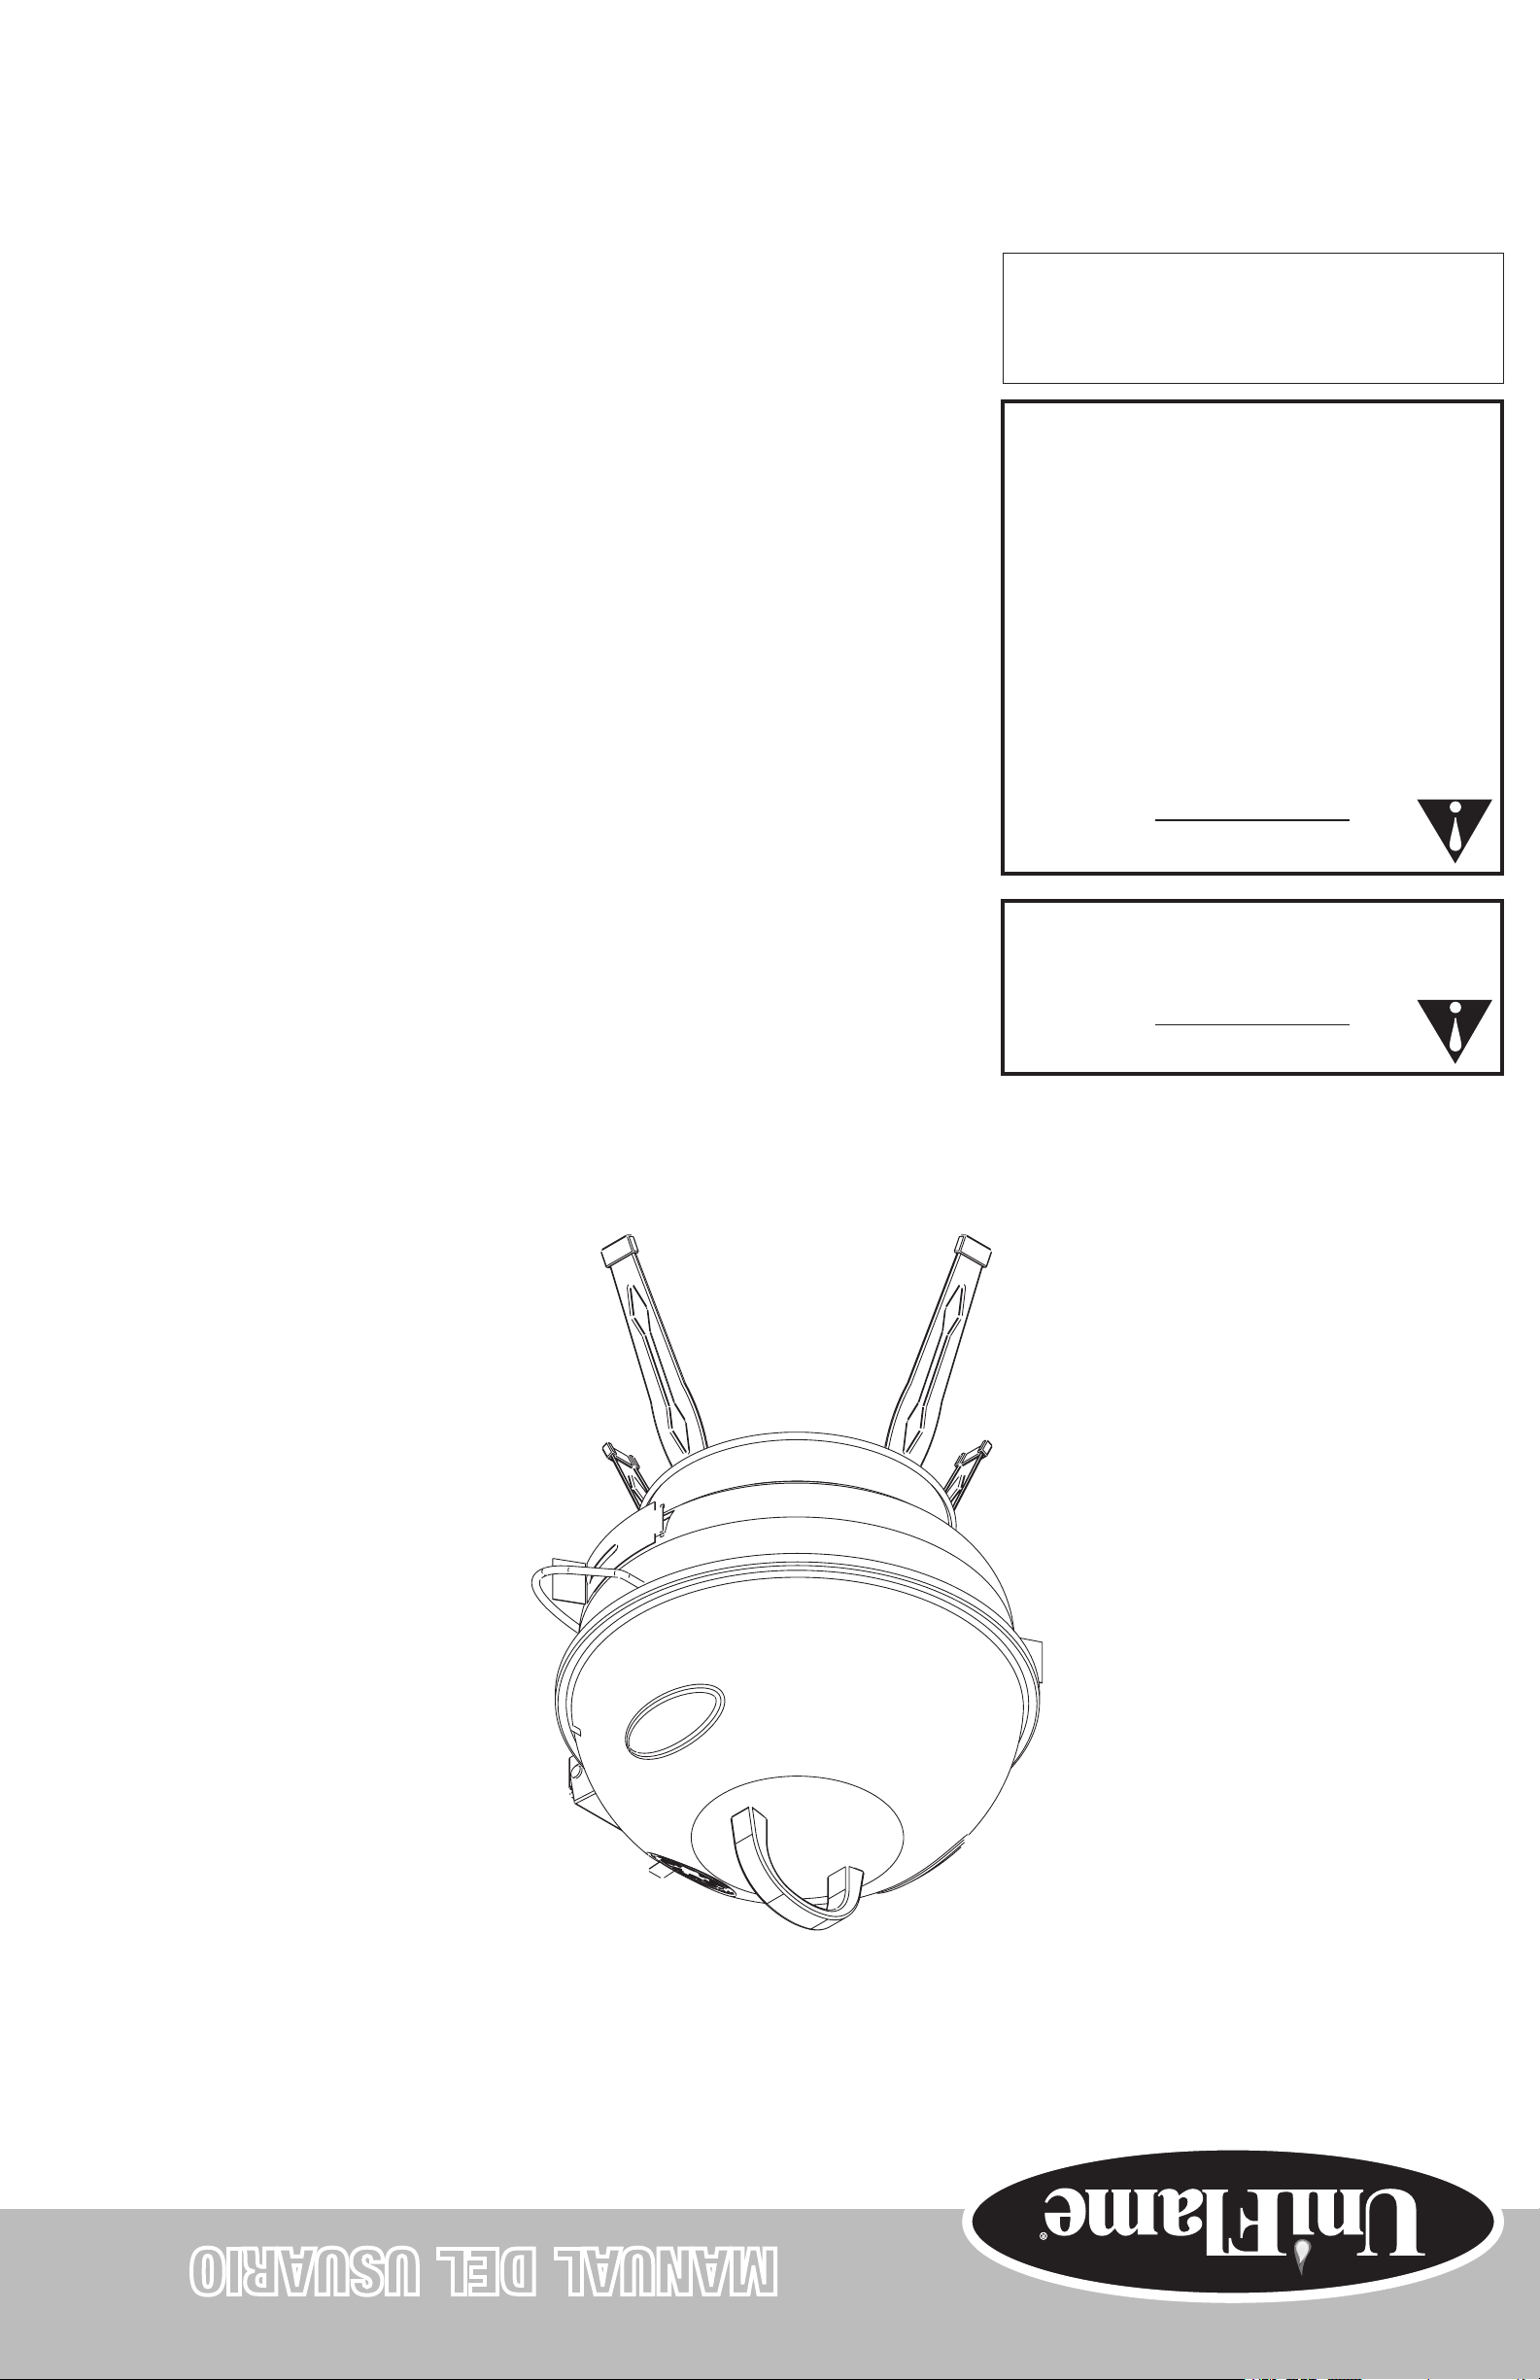
Modelo Nº NBC1402
Parrilla de Carbón de Leña para Exteriores
MANUAL DEL USUARIO
 Loading...