

Made from 75% Bagasse
(Environmentally Friendly Sugar
Cane Pulp By-product)
WARNING
FOR YOUR SAFETY:
For Outdoor Use Only
(outside any enclosure)
WARNING
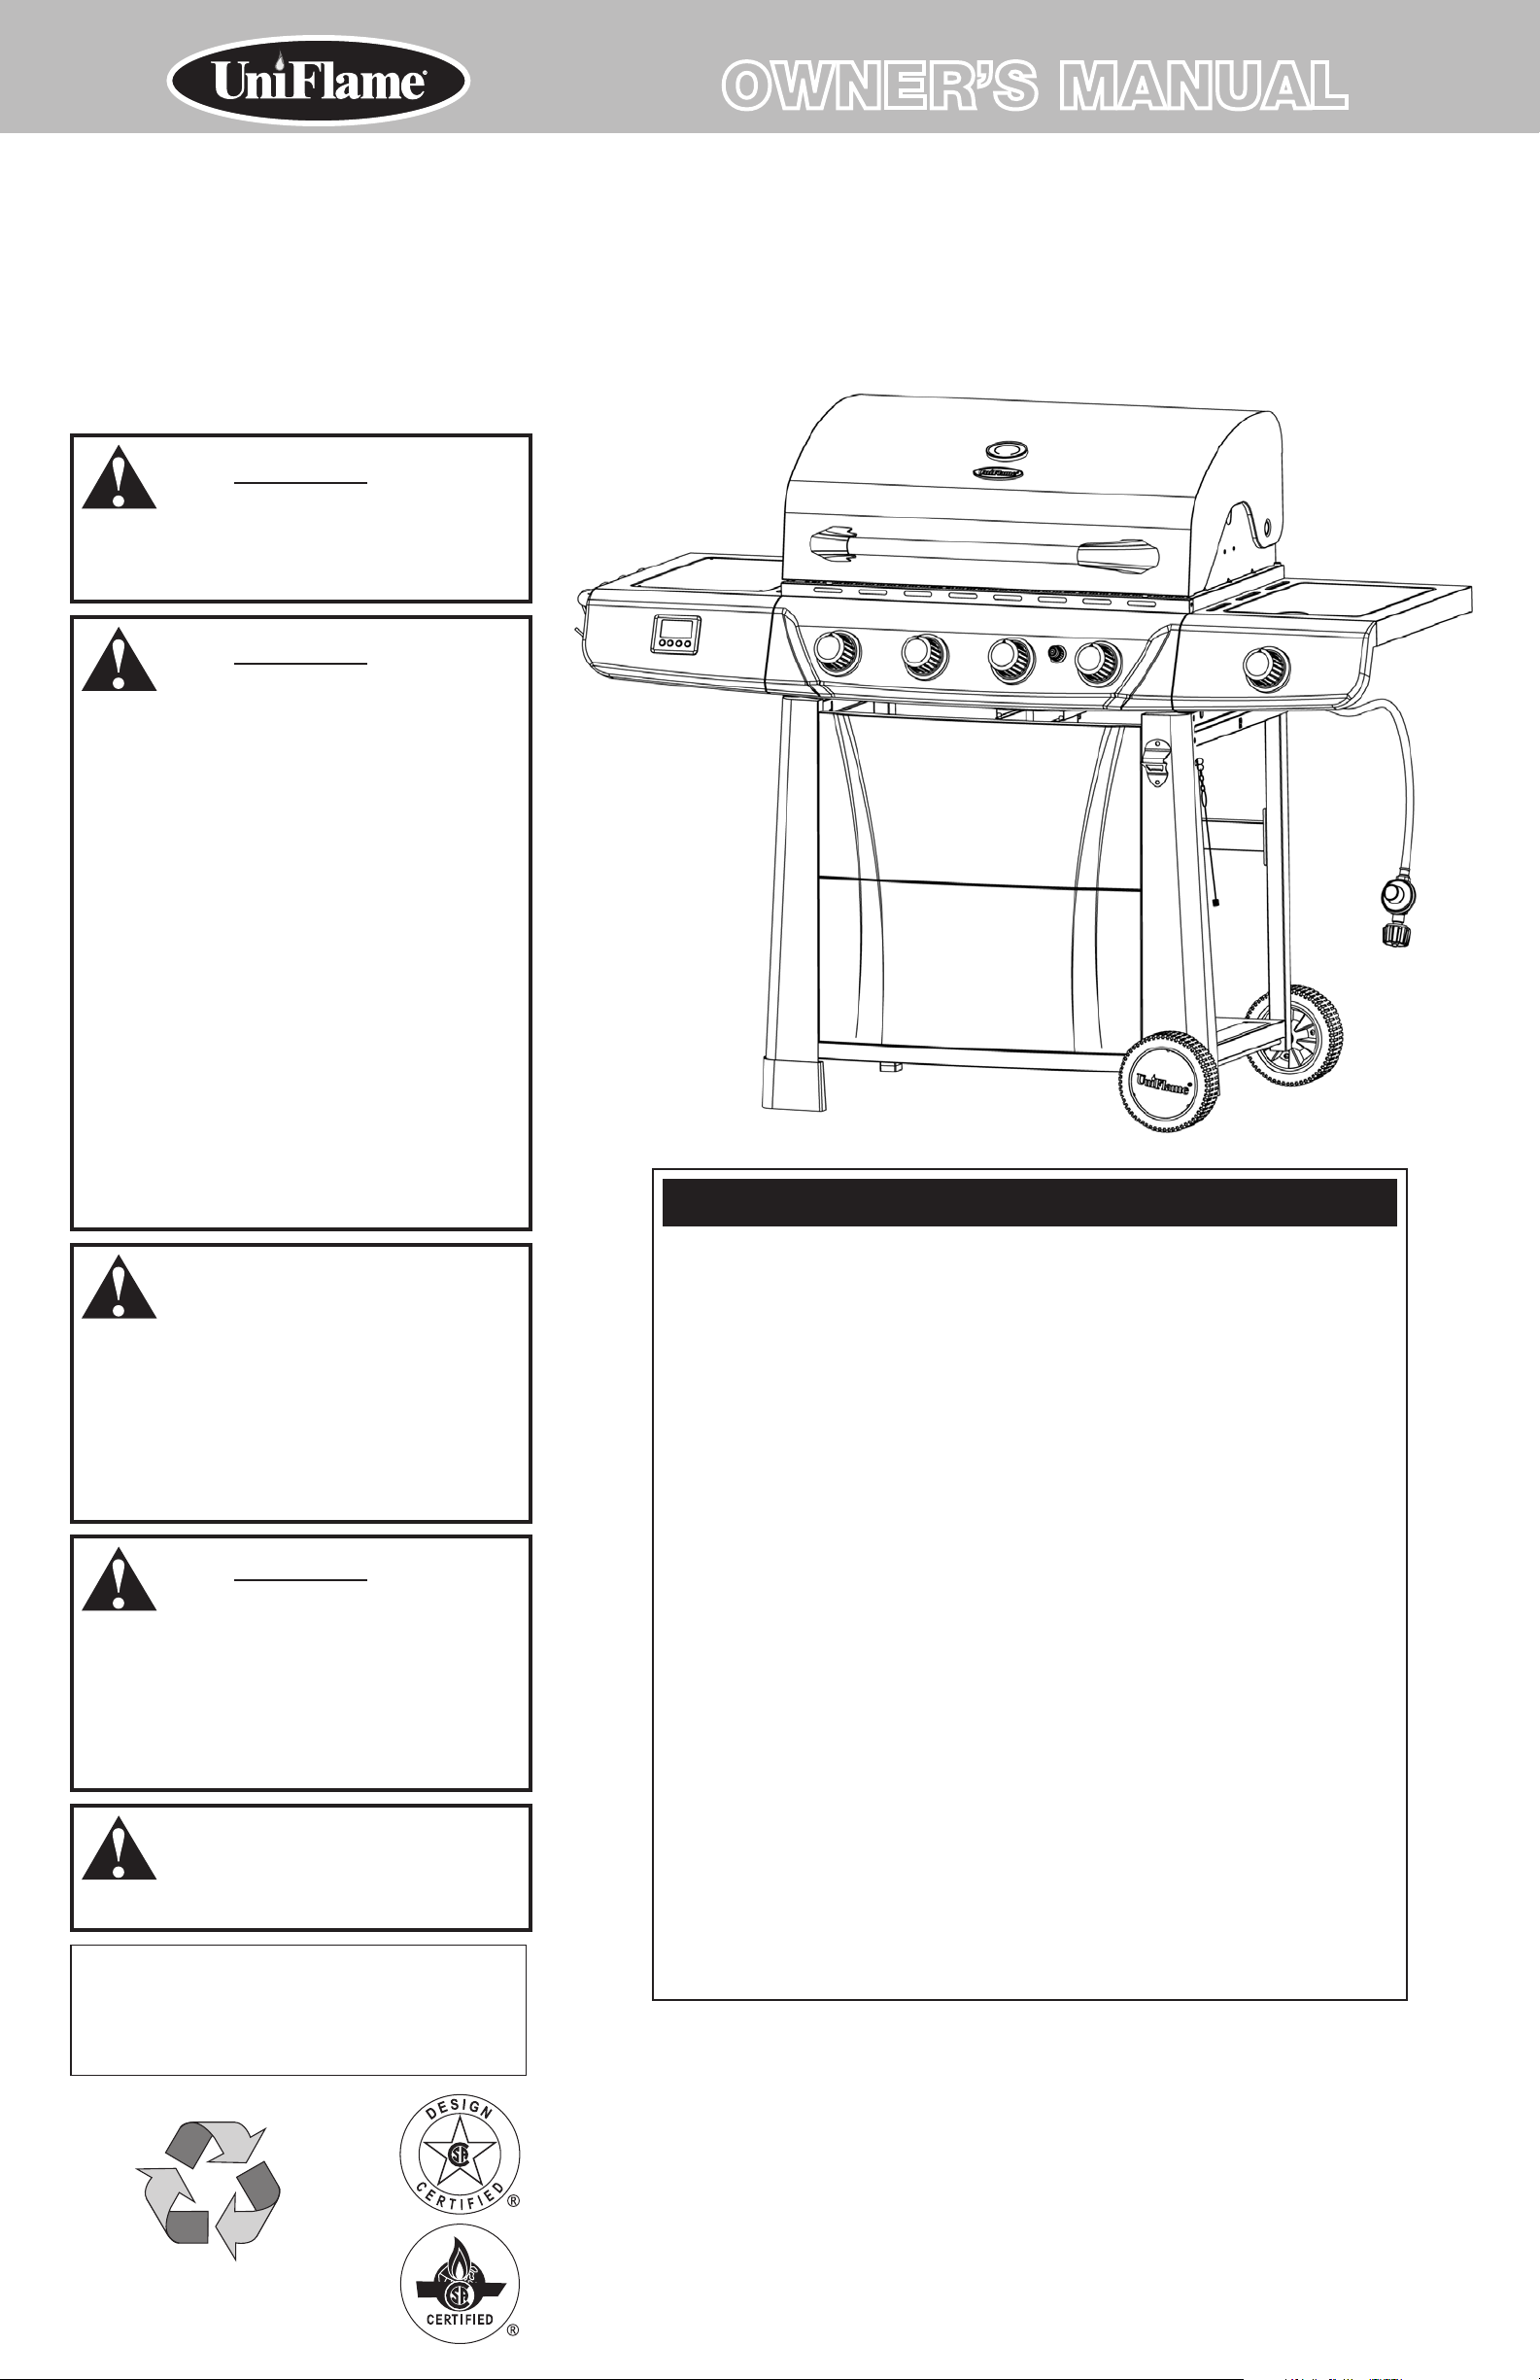
OWNER’S MANUAL
Outdoor LP Gas Barbecue Grill
Model No. GBC1143W-C
FOR YOUR SAFETY:
1. Improper installation, adjustment, alteration,
service or maintenance can cause injury or
property damage.
2. Read the installation, operation, and
maintenance instructions thoroughly before
installing or servicing this equipment.
3. Failure to follow these instructions could
result in fire or explosion, which could cause
property damage, personal injury, or death.
4. This instruction manual contains important
information necessary for the proper
assembly and safe use of the appliance.
5. Read and follow all warnings and
instructions before assembling and using
the appliance.
6. Follow all warnings and instructions when
using the appliance.
7. Keep this manual for future reference.
Table of Contents
DANGER
If you smell gas -
1. Shut off gas to appliance.
2. Extinguish any open flame.
3. Open lid.
4. If odor continues, keep away from the
appliance and immediately call your gas
supplier or your fire department.
WARNING
FOR YOUR SAFETY:
1. Do not store or use gasoline or other
flammable liquids or vapors in the vicinity of
this or any other appliance.
2. An LP cylinder not connected for use shall
not be stored in the vicinity of this or any
other appliance.
DANGER
Never operate this appliance unattended.
Save these instructions for future reference.
If you are assembling this unit for someone else,
give this manual to him or her to read and save
for future reference.
Important Safeguards . . . . . . . . . . . . . . . . . . . . . . . . . . . . . . . . . . . . . . . . . . . Page 2
Exploded View & Hardware. . . . . . . . . . . . . . . . . . . . . . . . . . . . . . . . . . . . . . . . . . . 3
Assembly Instructions. . . . . . . . . . . . . . . . . . . . . . . . . . . . . . . . . . . . . . . . . . . . . . . 4
Installling LP Gas Tank . . . . . . . . . . . . . . . . . . . . . . . . . . . . . . . . . . . . . . . . . . . . . . 9
Insert LP Gas Tank. . . . . . . . . . . . . . . . . . . . . . . . . . . . . . . . . . . . . . . . . . . . . . . . 9
Secure LP Gas Tank. . . . . . . . . . . . . . . . . . . . . . . . . . . . . . . . . . . . . . . . . . . . . . . 9
Connect LP Gas Tank. . . . . . . . . . . . . . . . . . . . . . . . . . . . . . . . . . . . . . . . . . . . . . 9
Disconnect LP Gas Tank . . . . . . . . . . . . . . . . . . . . . . . . . . . . . . . . . . . . . . . . . . . 9
Operating Instructions. . . . . . . . . . . . . . . . . . . . . . . . . . . . . . . . . . . . . . . . . . . . . . . 9
Checking for Leaks . . . . . . . . . . . . . . . . . . . . . . . . . . . . . . . . . . . . . . . . . . . . . . . 9
Operating Main Burners . . . . . . . . . . . . . . . . . . . . . . . . . . . . . . . . . . . . . . . . . . . 9
Operating Side Burner. . . . . . . . . . . . . . . . . . . . . . . . . . . . . . . . . . . . . . . . . . . . 10
Tips. . . . . . . . . . . . . . . . . . . . . . . . . . . . . . . . . . . . . . . . . . . . . . . . . . . . . . . . . . 10
Operating Digital Timer . . . . . . . . . . . . . . . . . . . . . . . . . . . . . . . . . . . . . . . . . . . 11
Cleaning and Care . . . . . . . . . . . . . . . . . . . . . . . . . . . . . . . . . . . . . . . . . . . . . . . . 11
Product Registration . . . . . . . . . . . . . . . . . . . . . . . . . . . . . . . . . . . . . . . . . . . . . . . 12
Limited Warranty . . . . . . . . . . . . . . . . . . . . . . . . . . . . . . . . . . . . . . . . . . . . . . . . . 12
Troubleshooting . . . . . . . . . . . . . . . . . . . . . . . . . . . . . . . . . . . . . . . . . . . . . . . . . . 13
The use and installation must conform with local codes or, in the absence of local
codes, with either the National Fuel Gas Code, ANSI Z223.1/NFPA 54, Natural Gas
and Propane Installation Code, CSA B149.1, or Propane Storage and Handling Code,
B149.2,or the Standard for Recreational Vehicles, ANSI A 119.2/NFPA 1192, and CSA
Z240 RV Series, Recreational Vehicle Code, as applicable.
Manufactured in China for: Blue Rhino Global Sourcing, Inc
Winston-Salem, NC USA • 1.800.762.1142, www.bluerhino.com
© 2011 Blue Rhino Global Sourcing, Inc. All Rights Reserved
UniFlame® is a Registered Trademark of Blue Rhino Global Sourcing, Inc.. All Rights Reserved. GBC1143W-C-OM-111 EF

Outdoor LP Gas Barbecue Grill Model No. GBC1143W-C
DANGER: Failure to follow the dangers, warning and cautions in this manual may result in serious bodily injury or death, or in a fire or an explosion causing damage
to property.
WARNING:
This grill is for outdoor use only, and shall not be used in a building,
garage, or any other enclosed area.
Do NOT operate, light or use this appliance within ten (10) feet (3.05 m)
of walls, structures or buildings.
For residential use only. This grill is NOT for commercial use.
This grill is not intended for and should never be used as a heater. TOXIC
fumes can accumulate and cause asphyxiation.
This grill is safety certified for use in the United States and/or Canada
only. Do not modify for use in any other location. Modification will result
in a safety hazard.
Apartment Dwellers: Check with management to learn the requirements
and fire codes for using an LP gas grill in your apartment complex. If
allowed, use outside on the ground floor with a ten (10) foot (3.05 m)
clearance from any structure. Do not use on or under balconies.
This grill is for use with liquid propane (LP) gas only. The conversion to
or attempted use of natural gas in this LP gas grill is dangerous and will
void your warranty.
LP gas Characteristics:
a. LP gas is flammable and hazardous if handled improperly. Become
aware of the characteristics before using any LP gas product.
b. LP gas is explosive under pressure, heavier than air, and settles and
pools in low areas.
c. LP gas in its natural state has no odor. For your safety, an odorant is
added that smells like rotten cabbage.
d. Contact with LP gas can cause freeze burns to skin.
LP gas tank needed to operate. Only tanks marked “propane” may be
used.
The LP gas tank must be constructed and marked in accordance
with the Specifications for LP gas Cylinders of the U.S. Department of
Transportation (DOT) or the National Standard of Canada, CAN/CSA-B339,
Cylinders, Spheres and Tubes for the Transportation of Dangerous Goods;
and Commission.
LP gas tank must be arranged for vapor withdrawal.
The LP gas tank must have a listed overfilling prevention device (OPD).
Only use LP gas cylinders equipped with a cylinder connection device
compatible with the connection for outdoor cooking appliances.
The LP gas tank must have a tank collar to protect the tank valve.
Never use an LP gas tank with a damaged body, valve, collar, or footing.
Dented or rusted LP gas tanks may be hazardous and should be checked
by your LP gas supplier prior to use.
The LP gas tank should not be dropped or handled roughly.
LP gas tanks must be stored outdoors out of the reach of children and
must not be stored in a building, garage, or any other enclosed area. Your
tank must never be stored where temperatures can reach over 125°F.
Do not insert any tool or foreign object into the valve outlet or safety
relief valve. You may damage the valve and cause a leak. Leaking
propane may result in explosion, fire, severe personal injury or death.
Do not block holes in sides or back of grill.
Never keep a filled LP gas tank in a hot car or car trunk. Heat will cause
the gas pressure to increase, which may open the relief valve and allow
gas to escape.
Place dust cap on cylinder valve outlet whenever the cylinder is not in
use. Only install the type of dust cap on the cylinder valve outlet that is
provided with the cylinder valve. Other types of caps or plugs may result
in leakage of propane.
If grill is not in use, the gas must be turned off at the supply tank and
disconnect.
Do not store a spare LP gas tank under or near this appliance.
Never fill the tank beyond 80 percent full.
A fire causing, serious injury or damage to property may occur if the
above is not followed exactly.
Never attempt to attach this grill to the self-contained LP gas system of a
camper trailer, motor home or house.
The use of alcohol, prescription or non-prescription drugs may impair the
consumer’s ability to properly assemble or safely operate the appliance.
Strong odors, colds, sinus congestion, etc. may prevent the detection of
propane. Use caution and common sense when testing for leaks.
Never use charcoal, lighter fluid, lava rocks, gasoline, kerosene or alcohol
with this product.
Your grill has been checked at all factory connections for leaks. Recheck
all connections as described in the “Operating Instructions” section of
the manual, as movement in shipping can loosen connections.
Check for leaks even if your unit was assembled for you by someone
else.
Do not operate if gas leak is present. Gas leaks may cause a fire or
explosion.
You must follow all leak-checking procedures before operating. To
prevent fire or explosion hazard when testing for a leak:
a. Always perform leak test before lighting the grill and each time the
tank is connected for use.
b. No smoking. Do not use or permit sources of ignition in the area
while conducting a leak test.
c. Conduct the leak test outdoors in a well-ventilated area.
d. Do not use matches, lighters, or a flame to check for leaks.
e. Do not use grill until any and all leaks are corrected.
If you are unable to stop a leak, disconnect the LP gas supply. Call a
gas appliance serviceman or your local LP gas supplier.
This grill is designed with to operate at an inlet pressure of: 11 inches
water column.
Do not store or use gasoline or other flammable liquids or vapors within
25 feet (7.62 m) of this appliance.
Do not use in an explosive atmosphere. Keep grill area clear and free
from combustible materials, gasoline and other flammable vapors and
liquids.
Minimum clearance from sides and back of unit to combustible
construction is
36 inches (91.4 cm). Do not use this appliance under any type of
overhang or roof.
It is essential to keep the grill’s valve compartment, burners, and
circulating air passages clean. Inspect grill before each use.
Do not alter grill in any manner. Any alteration will void your warranty.
Do not use the grill unless it is COMPLETELY assembled and all parts are
securely fastened and tightened.
Do not build this model of grill in any built-in or slide in construction.
Ignoring this warning could cause a fire or an explosion that can damage
property and cause serious bodily injury or death.
This grill should be thoroughly cleaned and inspected on a regular basis.
Clean and inspect the hose before each use of the appliance. If there is
evidence of abrasion, wear, cuts or leaks, the hose must be replaced prior
to the appliance being put into operation.
Use only the regulator and hose assembly provided. The replacement
regulator and hose assembly shall be that specified by the manufacturer.
Use only Blue Rhino Global Sourcing, Inc. factory authorized parts. The
use of any part that is not factory authorized can be dangerous. Doing so
will also void your warranty.
Do not operate this appliance without reading “Operating Instructions” in
this manual.
Do not touch metal parts of grill until it has completely cooled (about 45
min.) to avoid burns, unless you are wearing protective gear (pot holders,
gloves, BBQ mittens, etc.).
Do not install or use in or on boats or recreational vehicles.
When cooking, fire extinguishing materials shall be readily accessible. In
the event of an oil/grease fire, do not attempt to extinguish with water.
Use type BC dry chemical fire extinguisher or smother with dirt, sand or
baking soda.
Do not use grill in high winds.
Never lean over the grill when lighting.
Do not leave a lit grill unattended, especially keep children and pets
away from grill at all times.
Do not leave grill unattended while preheating or burning off food
residue on high. If grill has not been cleaned, a grease fire can occur that
may damage the product.
Do not place empty cooking vessels on the appliance while in operation.
Use caution when placing anything on the grill while the appliance is in
operation.
Do not attempt to move grill when in use. Allow the grill to cool before
moving or storing.
LP gas tank must be properly disconnected and removed prior to moving
this grill.
Storage of grill indoors is permissible only if the tank is disconnected,
removed from the grill and properly stored outdoors.
Always open grill lid carefully and slowly as heat and steam trapped
within grill can severely burn you.
Do not attempt to disconnect the gas regulator from the tank or any gas
fitting while the grill is in use.
Always place your grill on a hard, non-combustible, level surface. An
asphalt or blacktop surface may not be acceptable for this purpose.
Move gas hoses as far away as possible from hot surfaces and dripping
hot grease.
Keep all electrical cords away from a hot grill.
All electrical accessories (such as rotisserie) must be electrically
grounded in accordance with local codes, or National Electrical Code,
ANSI / NFPA 70 or Canadian Electrical Code, CSA C22.1. Keep any
electrical cords and/or fuel supply hoses away from any hot surfaces.
After a period of storage and/or nonuse, check for leaks, burner
obstructions and inspect for any abrasion, wear or cuts to the hose.
Failure to open lid while igniting the grill’s burners, or not waiting 5
minutes to allow the gas to clear if the grill does not light, may result in
an explosive flame-up.
Never operate grill without heat plates installed.
Always use a meat thermometer to ensure food is cooked to a safe
temperature.
Use protective gloves when assembling this product.
Do not force parts together as this can result in personal injury or
damage to the product.
Never cover entire cooking area with aluminum foil.
Deaths, serious injury or damage to property may occur if the above is
not followed exactly.
Contact 1.800.762.1142 for assistance. Do not return to place of purchase.
page no.
3
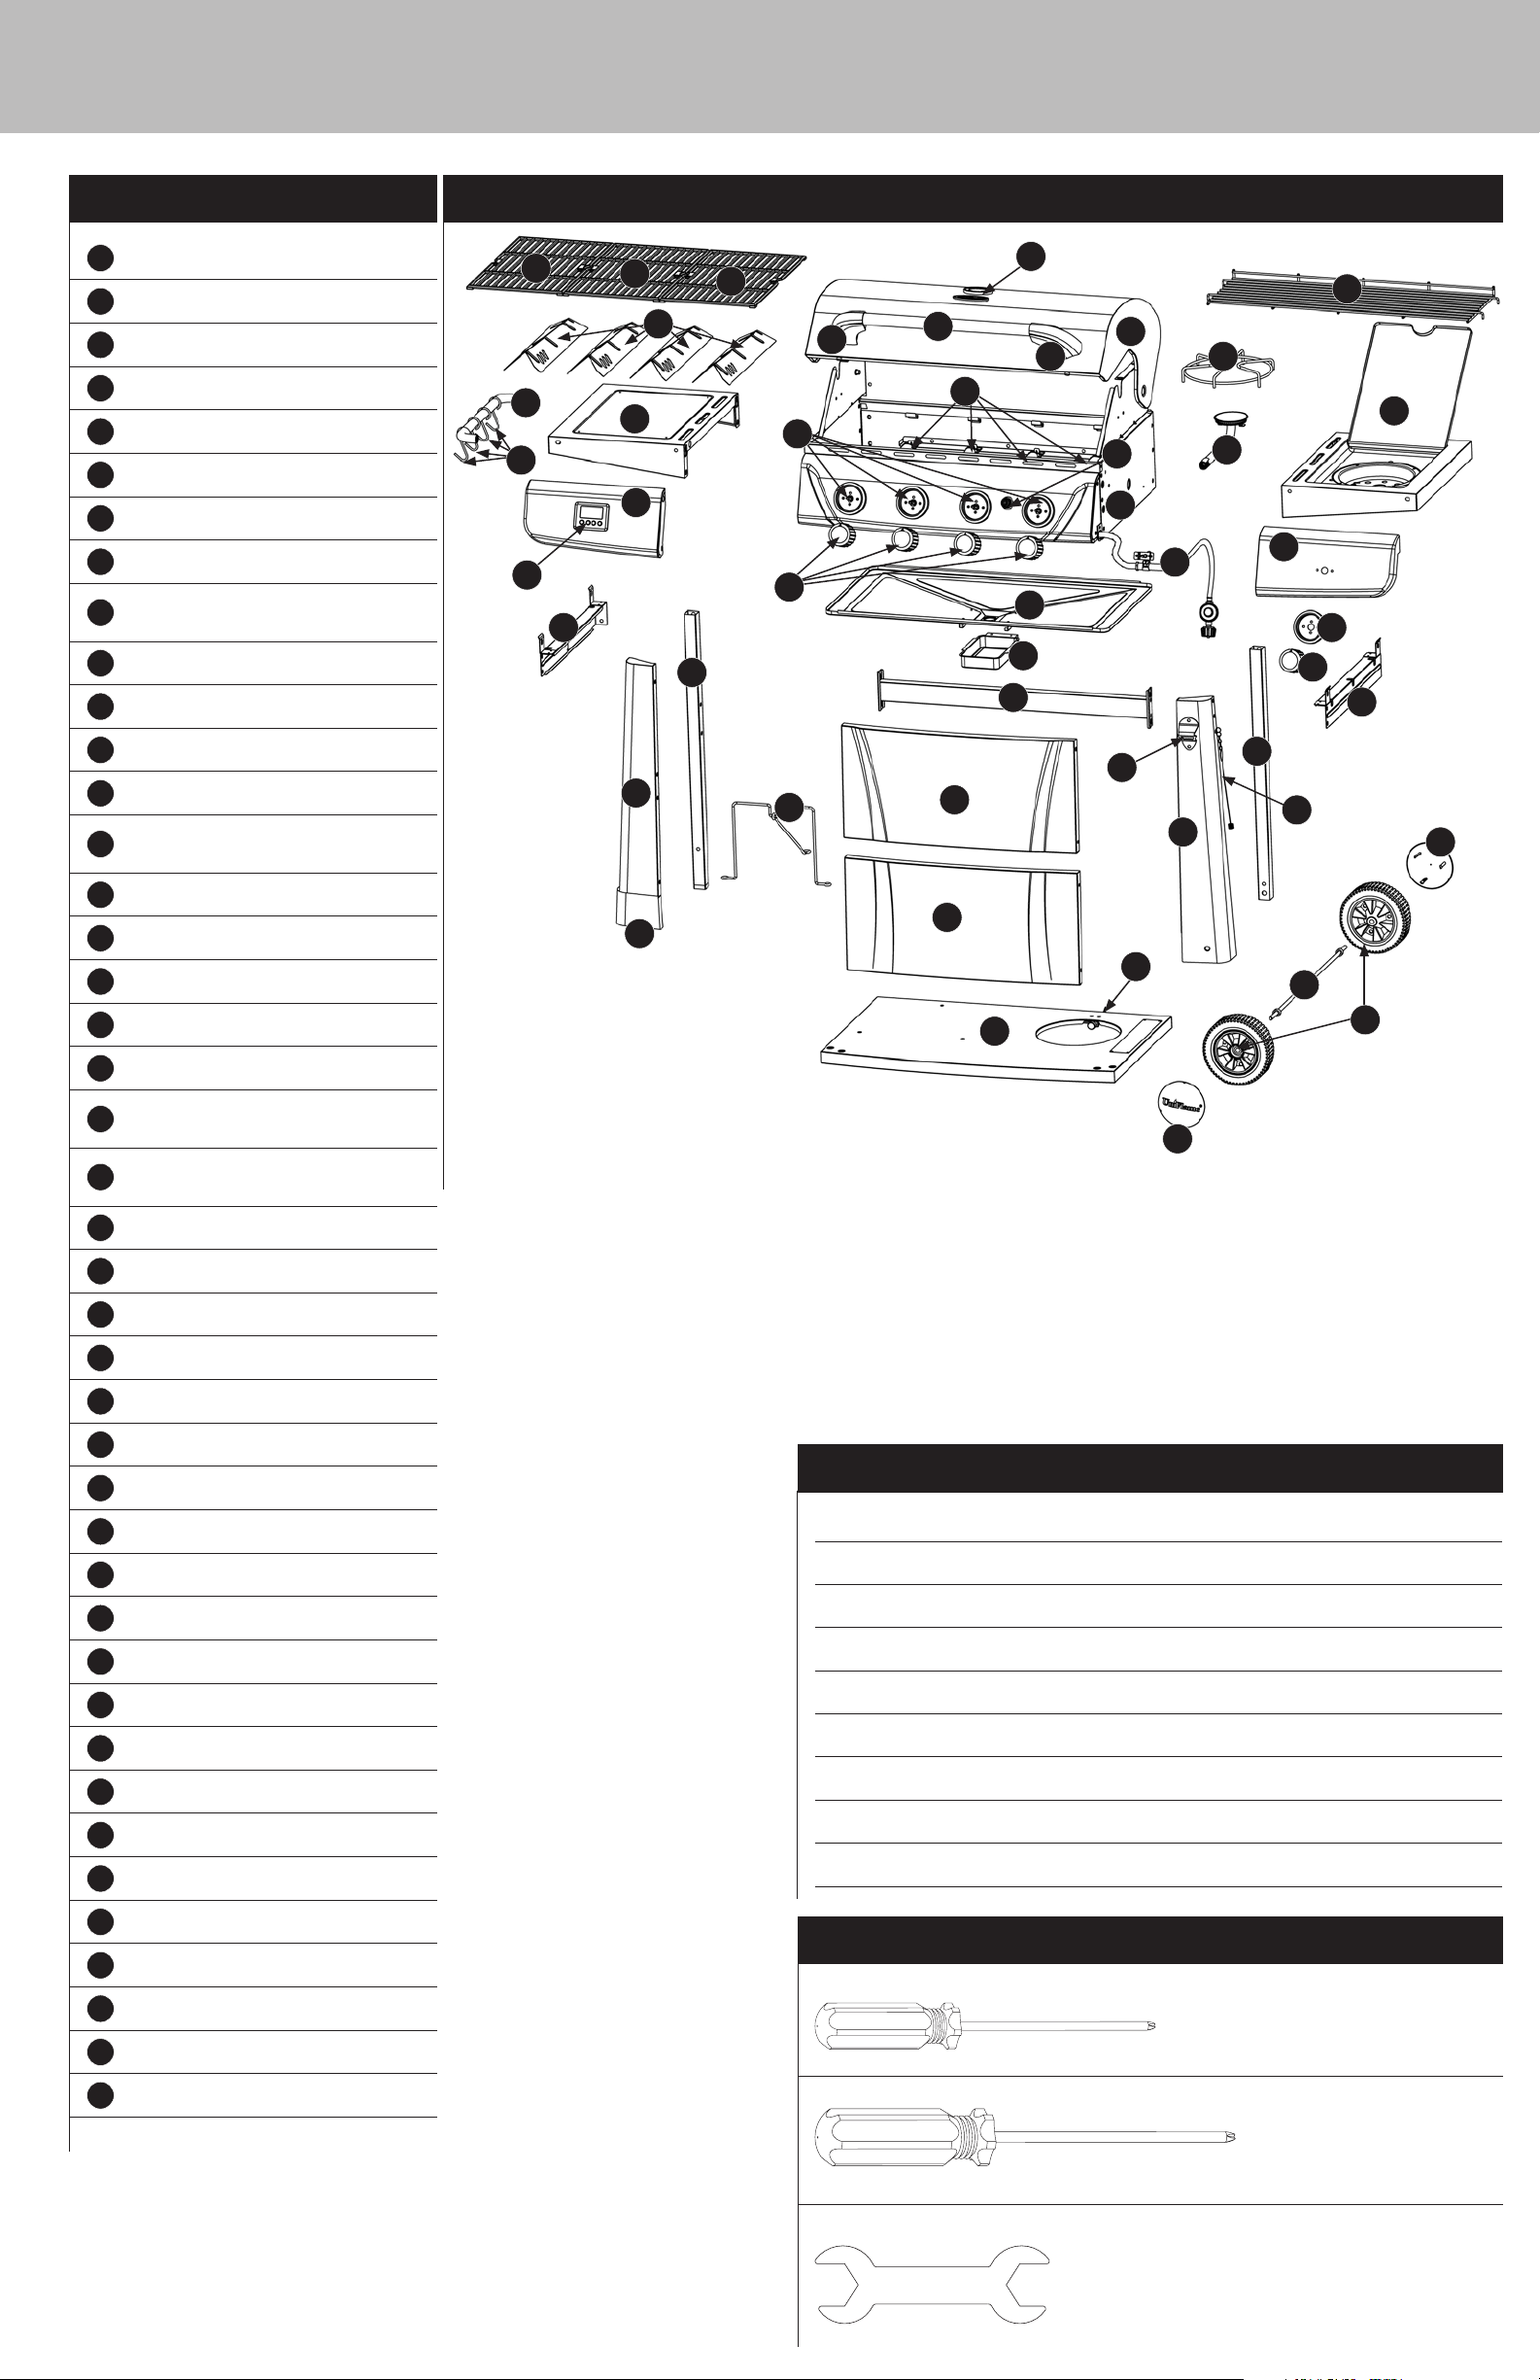
Parts List
1
Cooking Grid (3)
2
Warming Rack
3
Temperature Gauge*
4
Lid*
5
Lid Handle*
6
Lid Handle Side (2)*
7
Heat Plate (4)
8
Side Burner Grid
Right Side Shelf
9
Assembly
10
Side Burner
11
Towel Bar
12
Tool Hook (4)*
13
Left Side Shelf
Left Side Shelf Front
14
Panel
55-10-153
55-10-152
55-09-146
55-11-004
55-11-005
55-11-006
55-10-156
55-11-007
55-11-008
55-11-009
55-07-548
55-07-729
55-11-010
55-11-011
Exploded View
1
11
12
42
25
1
13
14
32
3
1
7
6
5
6
4
8
2
15
9
16
18
10
19
20
21
17
22
16
27
23
26
17
24
28
29
33
34
31
30
39
15
Main Burner (4)*
16
Control Knob Bezel (5)*
17
Control Knob (5)
18
Ignitor Button*
19
Grill Body Assembly*
Regulator/Hose
20
Assembly*
Right Side Shelf Front
21
Panel
22
Grease Tray
23
Grease Cup
24
Right Cart Frame Support
25
Left Cart Frame Support
26
Rear Cart Frame Support
27
Left Rear Leg
28
Right Rear Leg
29
Bottle Opener*
30
Lighting Hook*
31
Right Front Leg
32
Left Front Leg
33
Cart Frame Wire
34
Upper Front Panel
35
Lower Front Panel
36
Foot*
37
Bottom Shelf
55-11-012
55-11-013
55-09-006
55-07-322
55-11-014
55-11-015
55-11-016
55-11-017
55-11-018
55-11-019
55-11-020
55-11-021
55-11-022
55-11-023
55-11-024
55-10-173
55-11-025
55-11-026
55-11-027
55-11-028
55-11-029
55-11-030
55-11-031
36
Hardware
I
Screw
Screw
Screw
Bolt
Nut
Washer
Rubber Spacer
AAA Battery
AA Battery
A
B
C
D
E
F
G
H
35
37
38
41
39
M4x10 Nickel Plated Phillips Head
M6x16 Nickel Plated Phillips Truss Head
M6x40 Nickel Plated Phillips Truss Head
M6x16 Nickel Plated Hex Head
M10 Zinc Plated Hex
ø6.4 Nickel Plated
Rubber Spacer
AAA Battery
AA Battery
40
4 pcs
39 pcs
2 pcs
10 pcs
2 pcs
6 pcs
2 pcs
2 pcs
1 pc
38
Tank Bolt*
39
Hub Cap (2)
40
Wheel (2)
41
Axle
42
Timer*
* Pre assembled
55-11-032
55-15-170
55-15-211
55-11-033
55-11-203
Tools Required for Assembly (Included)
#1 Phillips Head Screwdriver 1 pc
#2 Phillips Head Screwdriver 1 pc
M6-M10 Wrench 2 pcs
Assembly Instructions
Outdoor LP Gas Barbecue Grill Model No. GBC1143W-C
1
DO NOT RETURN PRODUCT TO STORE.
For assistance call 1.800.762.1142 toll free. Please have
your owner’s manual and model number available for
reference.
Note: The model number can be found on the back or side of the cart
assembly.
For Easiest Assembly:
• To avoid losing any small components or hardware, assemble
your product on a hard level surface that does not have cracks
or openings.
• Clear an area large enough to layout all components and
hardware.
• When applicable, tighten all hardware connections by hand
first. Once the step is completed go back and fully tighten all
hardware.
• Follow all steps in order to properly assemble your product.
To complete assembly you will need:
• (1) Leak Detection Solution (Instructions on how to make
solution are included in the “Operating Instructions” section of
this manual)
• (1) Precision Filled LP Gas Grill Tank with Acme Type 1 external
threaded valve connection (4-5 gallon size)
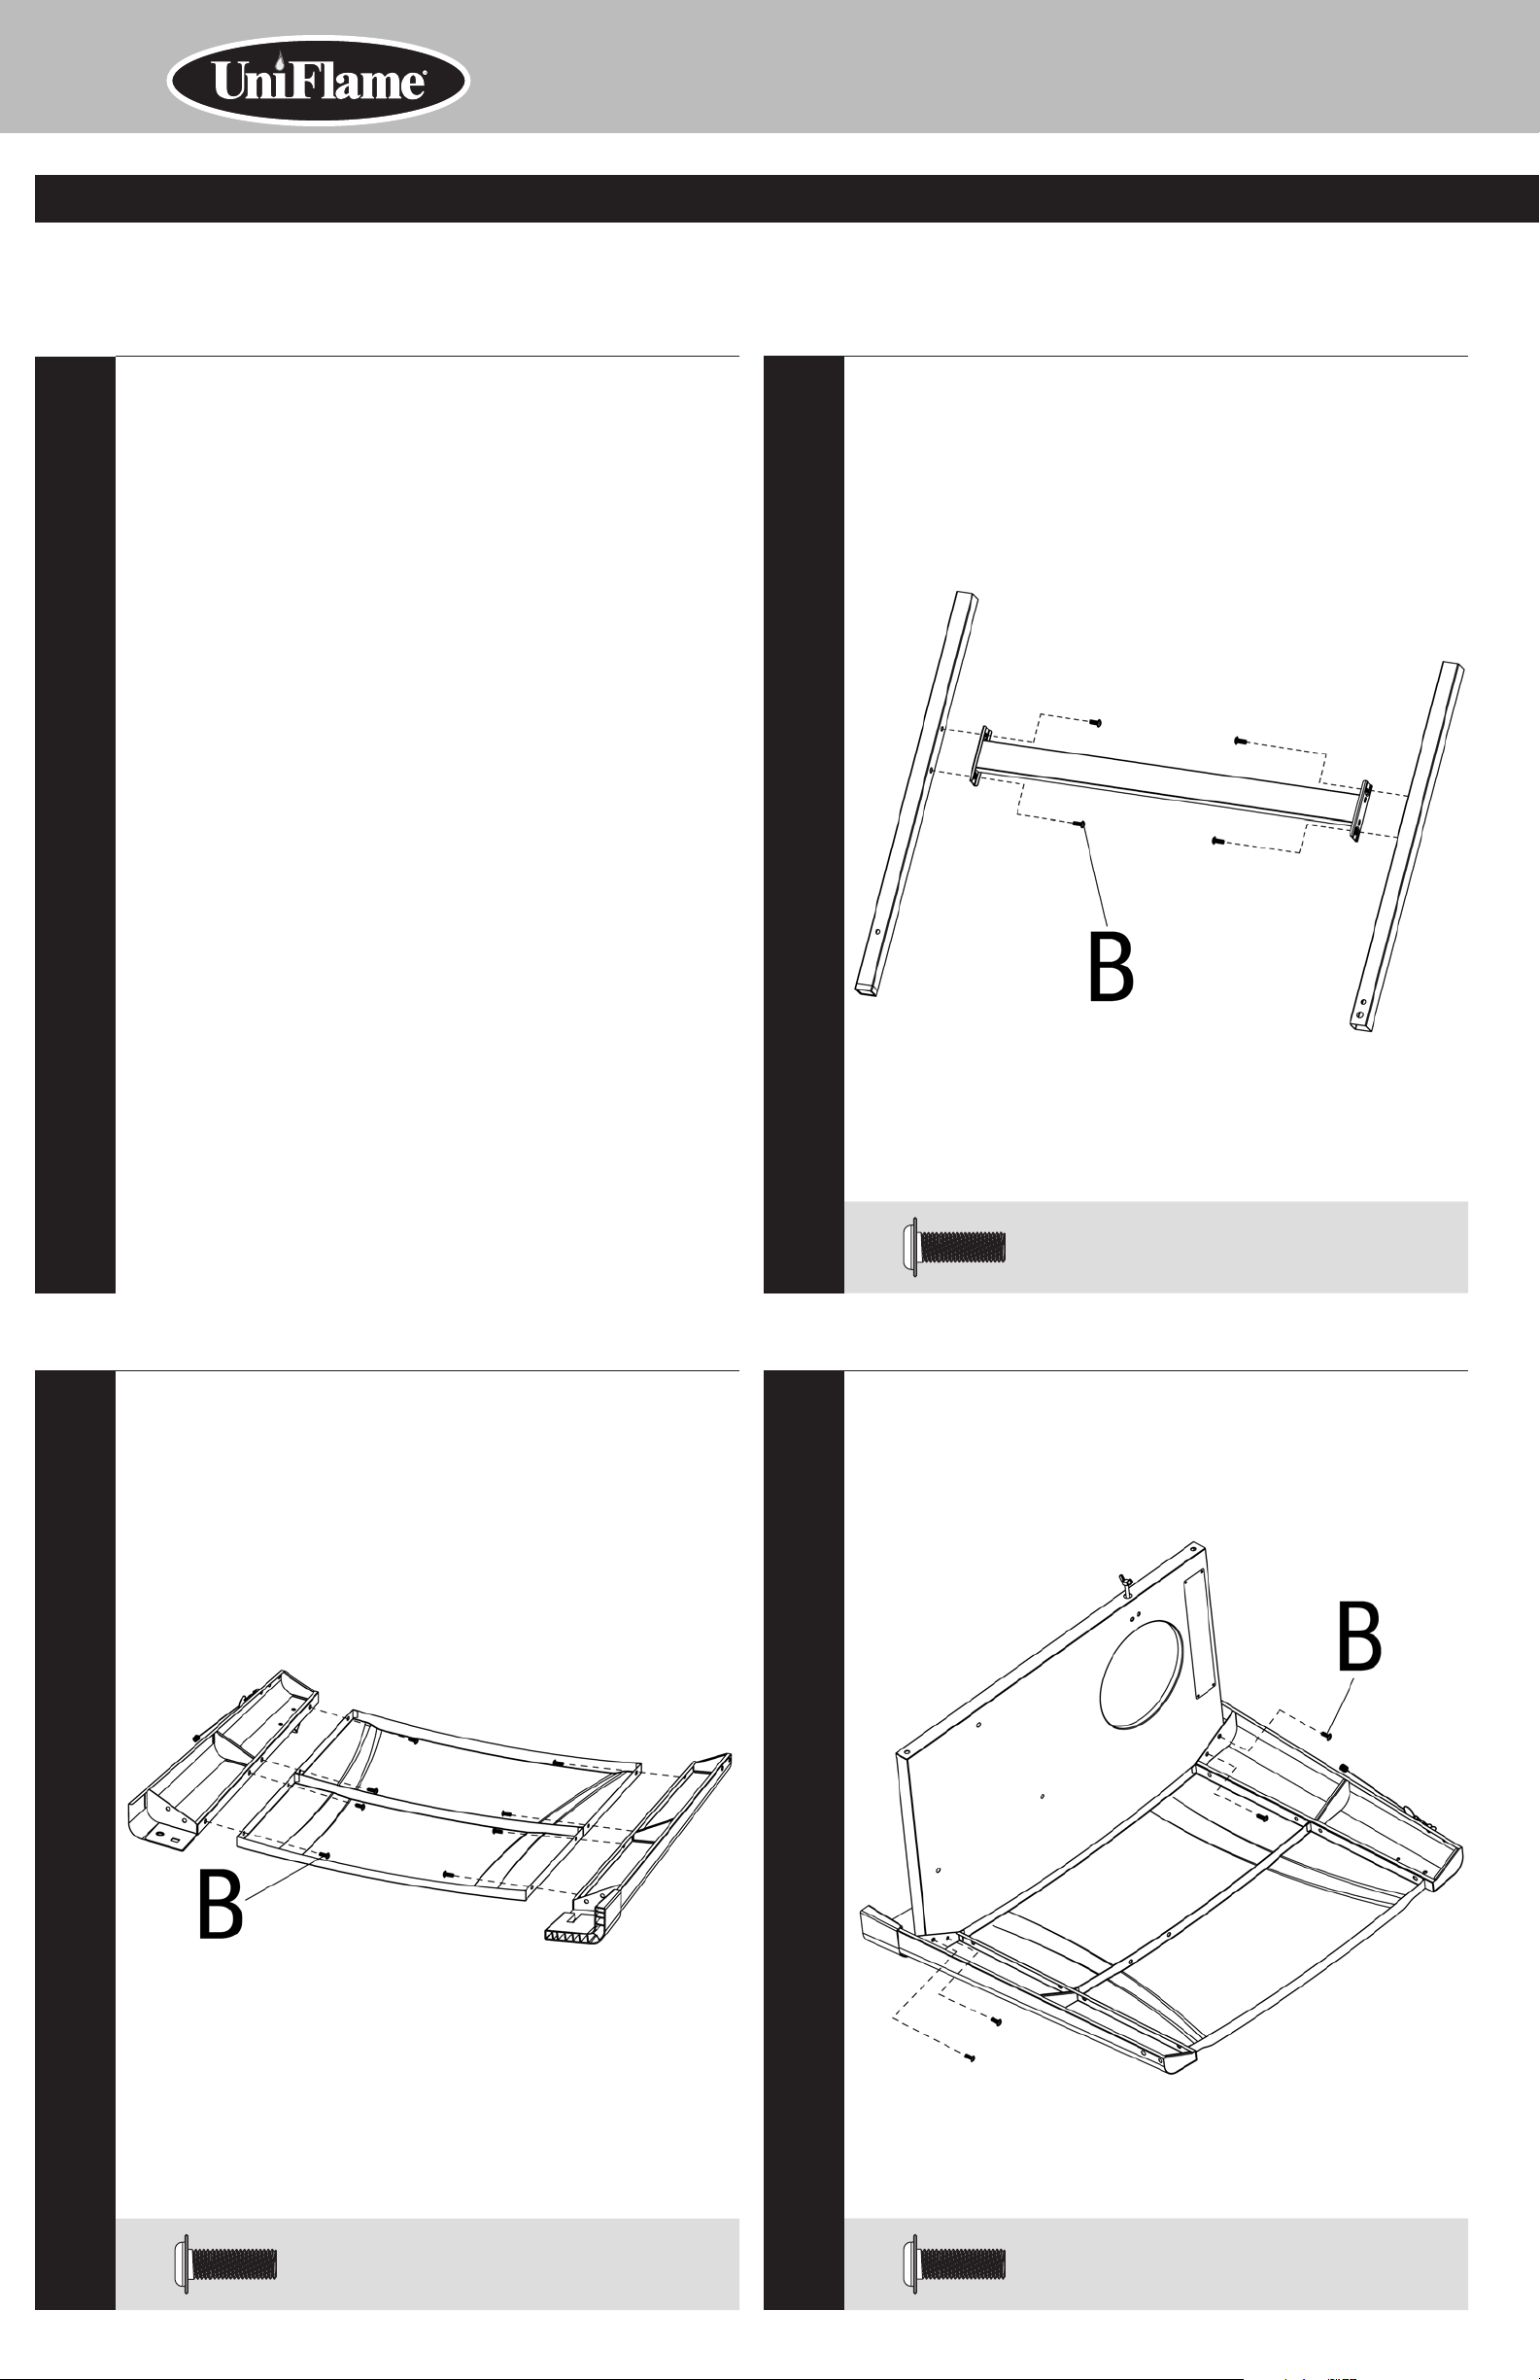
Attach Left Rear Leg, Rear Cart Frame Support, and
Right Rear Leg
2
3
Typical assembly: approximately 1 (one) hour.
Attach Front Legs and Front Panels
4
B
Attach Bottom Shelf
x 4
B
x 8
B
x 4
Contact 1.800.762.1142 for assistance. Do not return to place of purchase.
page no.
5
5
Attach Rear Cart Frame Assembly
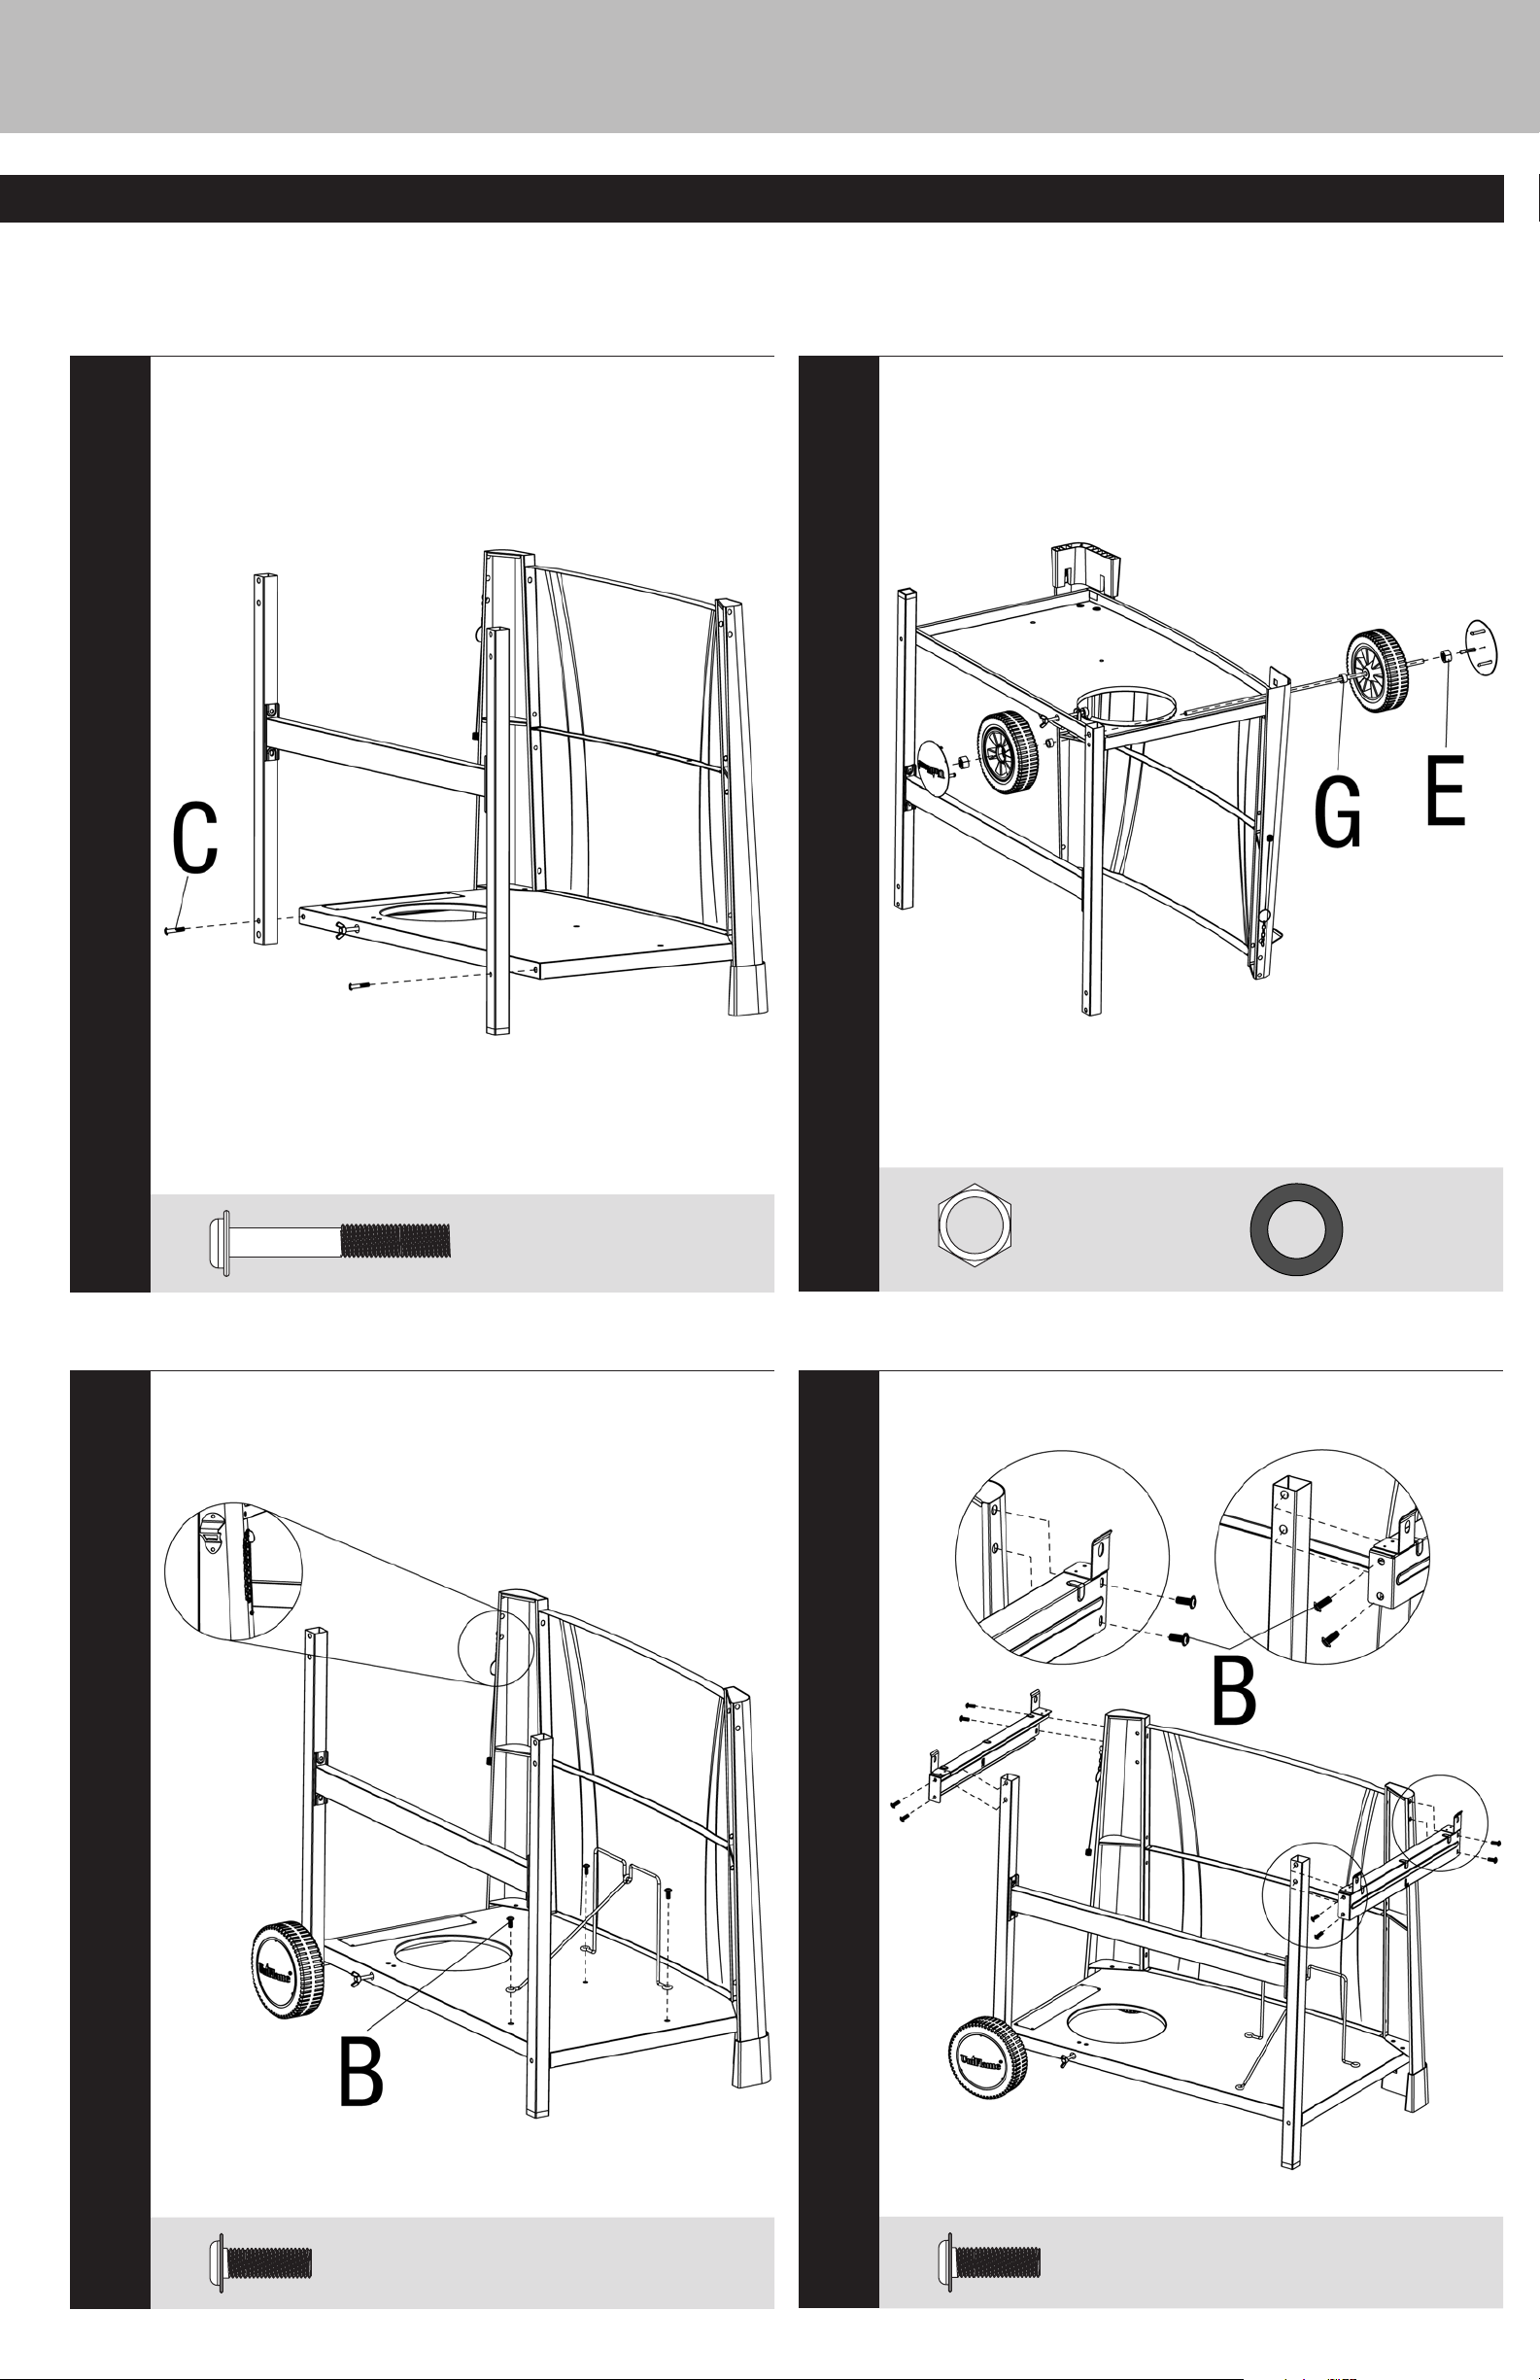
Attach Axle, Wheels and Hub Caps
6
7
C
Attach Cart Frame Wire and Place Lighting Hook
x 2
8
E
Attach Left and Right Cart Frame Supports
x 2
G
x 2
B
x 3
B
x 8
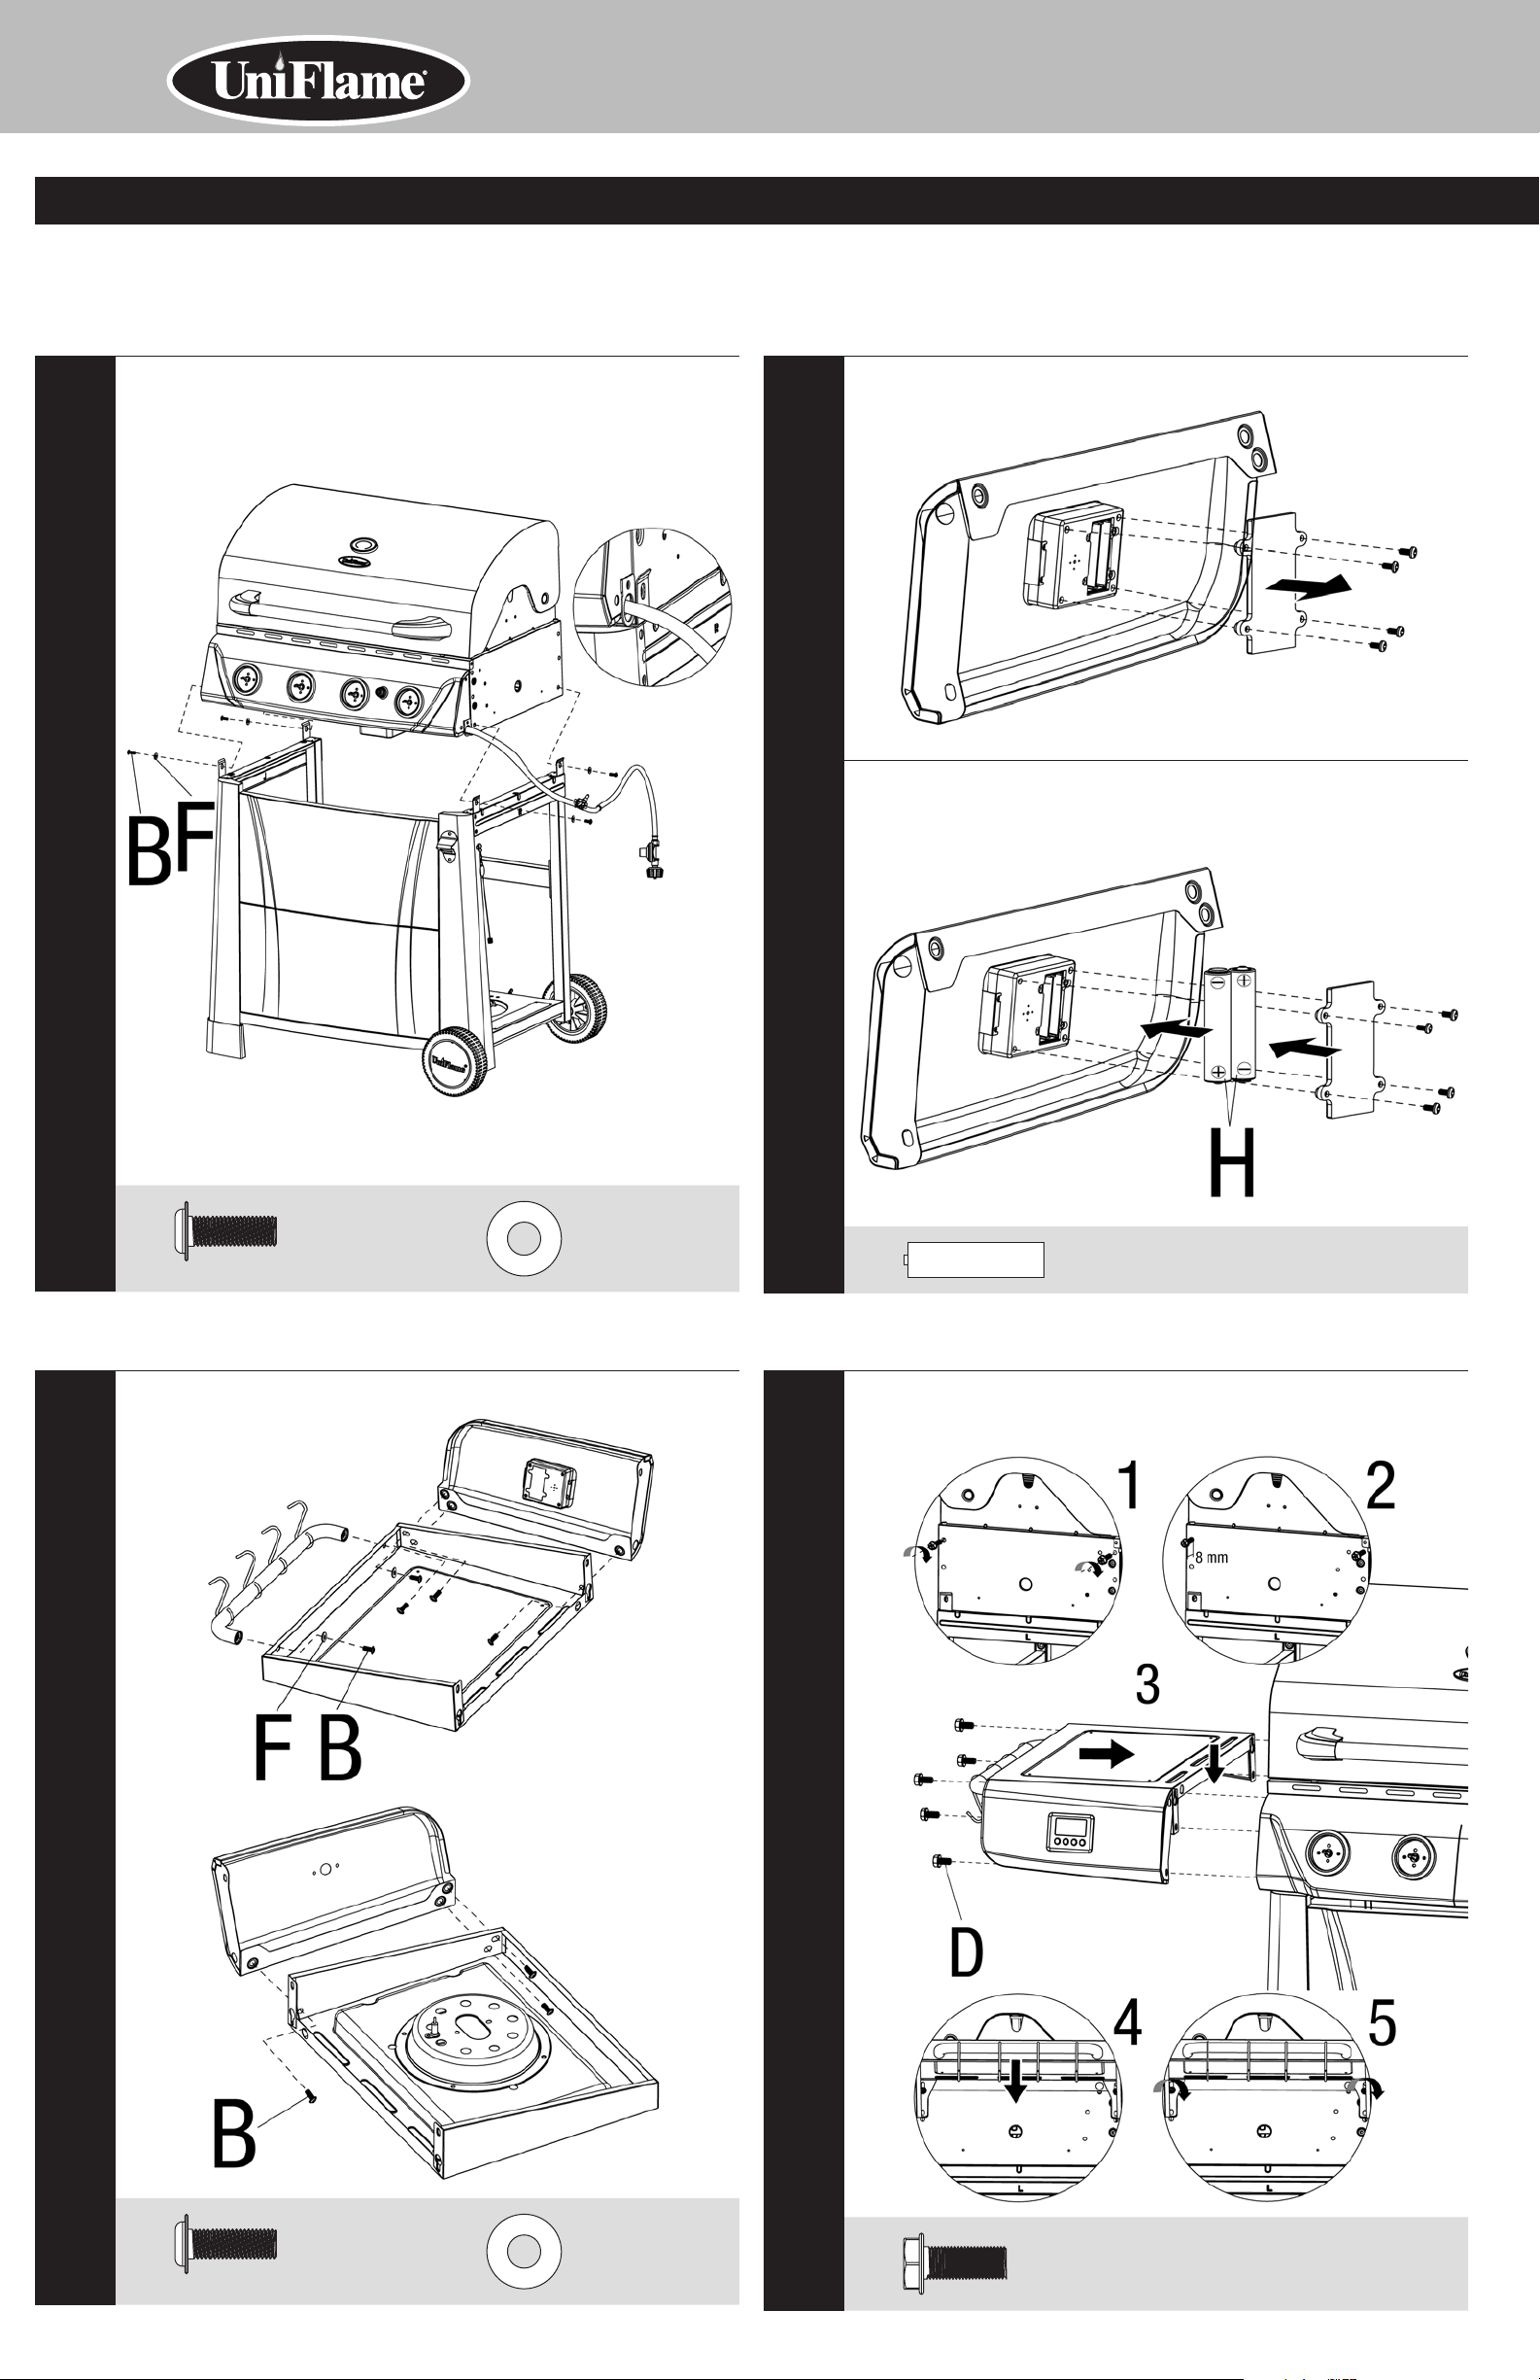
Assembly Instructions (continued)
Outdoor LP Gas Barbecue Grill Model No. GBC1143W-C
9
Attach Grill Body Assembly
Remove Digital Timer Battery Cover
10
Install AAA Battery (2) and Replace Cover
Note: Remove plastic wrapper before installing battery.
B
Attach Side Shelf Front Panels and Towel Bar
11
x 4
F
x 4
H
Attach Left Side Shelf Assembly
Note: Leave 8 mm of bolt threads exposed before placing side shelf assembly.
12
x 2
B
x 8
F
x 2
D
x 5
Contact 1.800.762.1142 for assistance. Do not return to place of purchase.
page no.
7
Attach Right Side Shelf Assembly
Note: Leave 8 mm of bolt threads exposed before placing side shelf assembly.
13
Attach Side Burner Control Knob Bezel and Control Knob
14
D
Attach Control Knobs
15
x 5
A
Attach Side Burner, Side Burner Igniter Wire and Side
Burner Grid
16
x 2
A
x 2
Assembly Instructions (continued)
Outdoor LP Gas Barbecue Grill Model No. GBC1143W-C
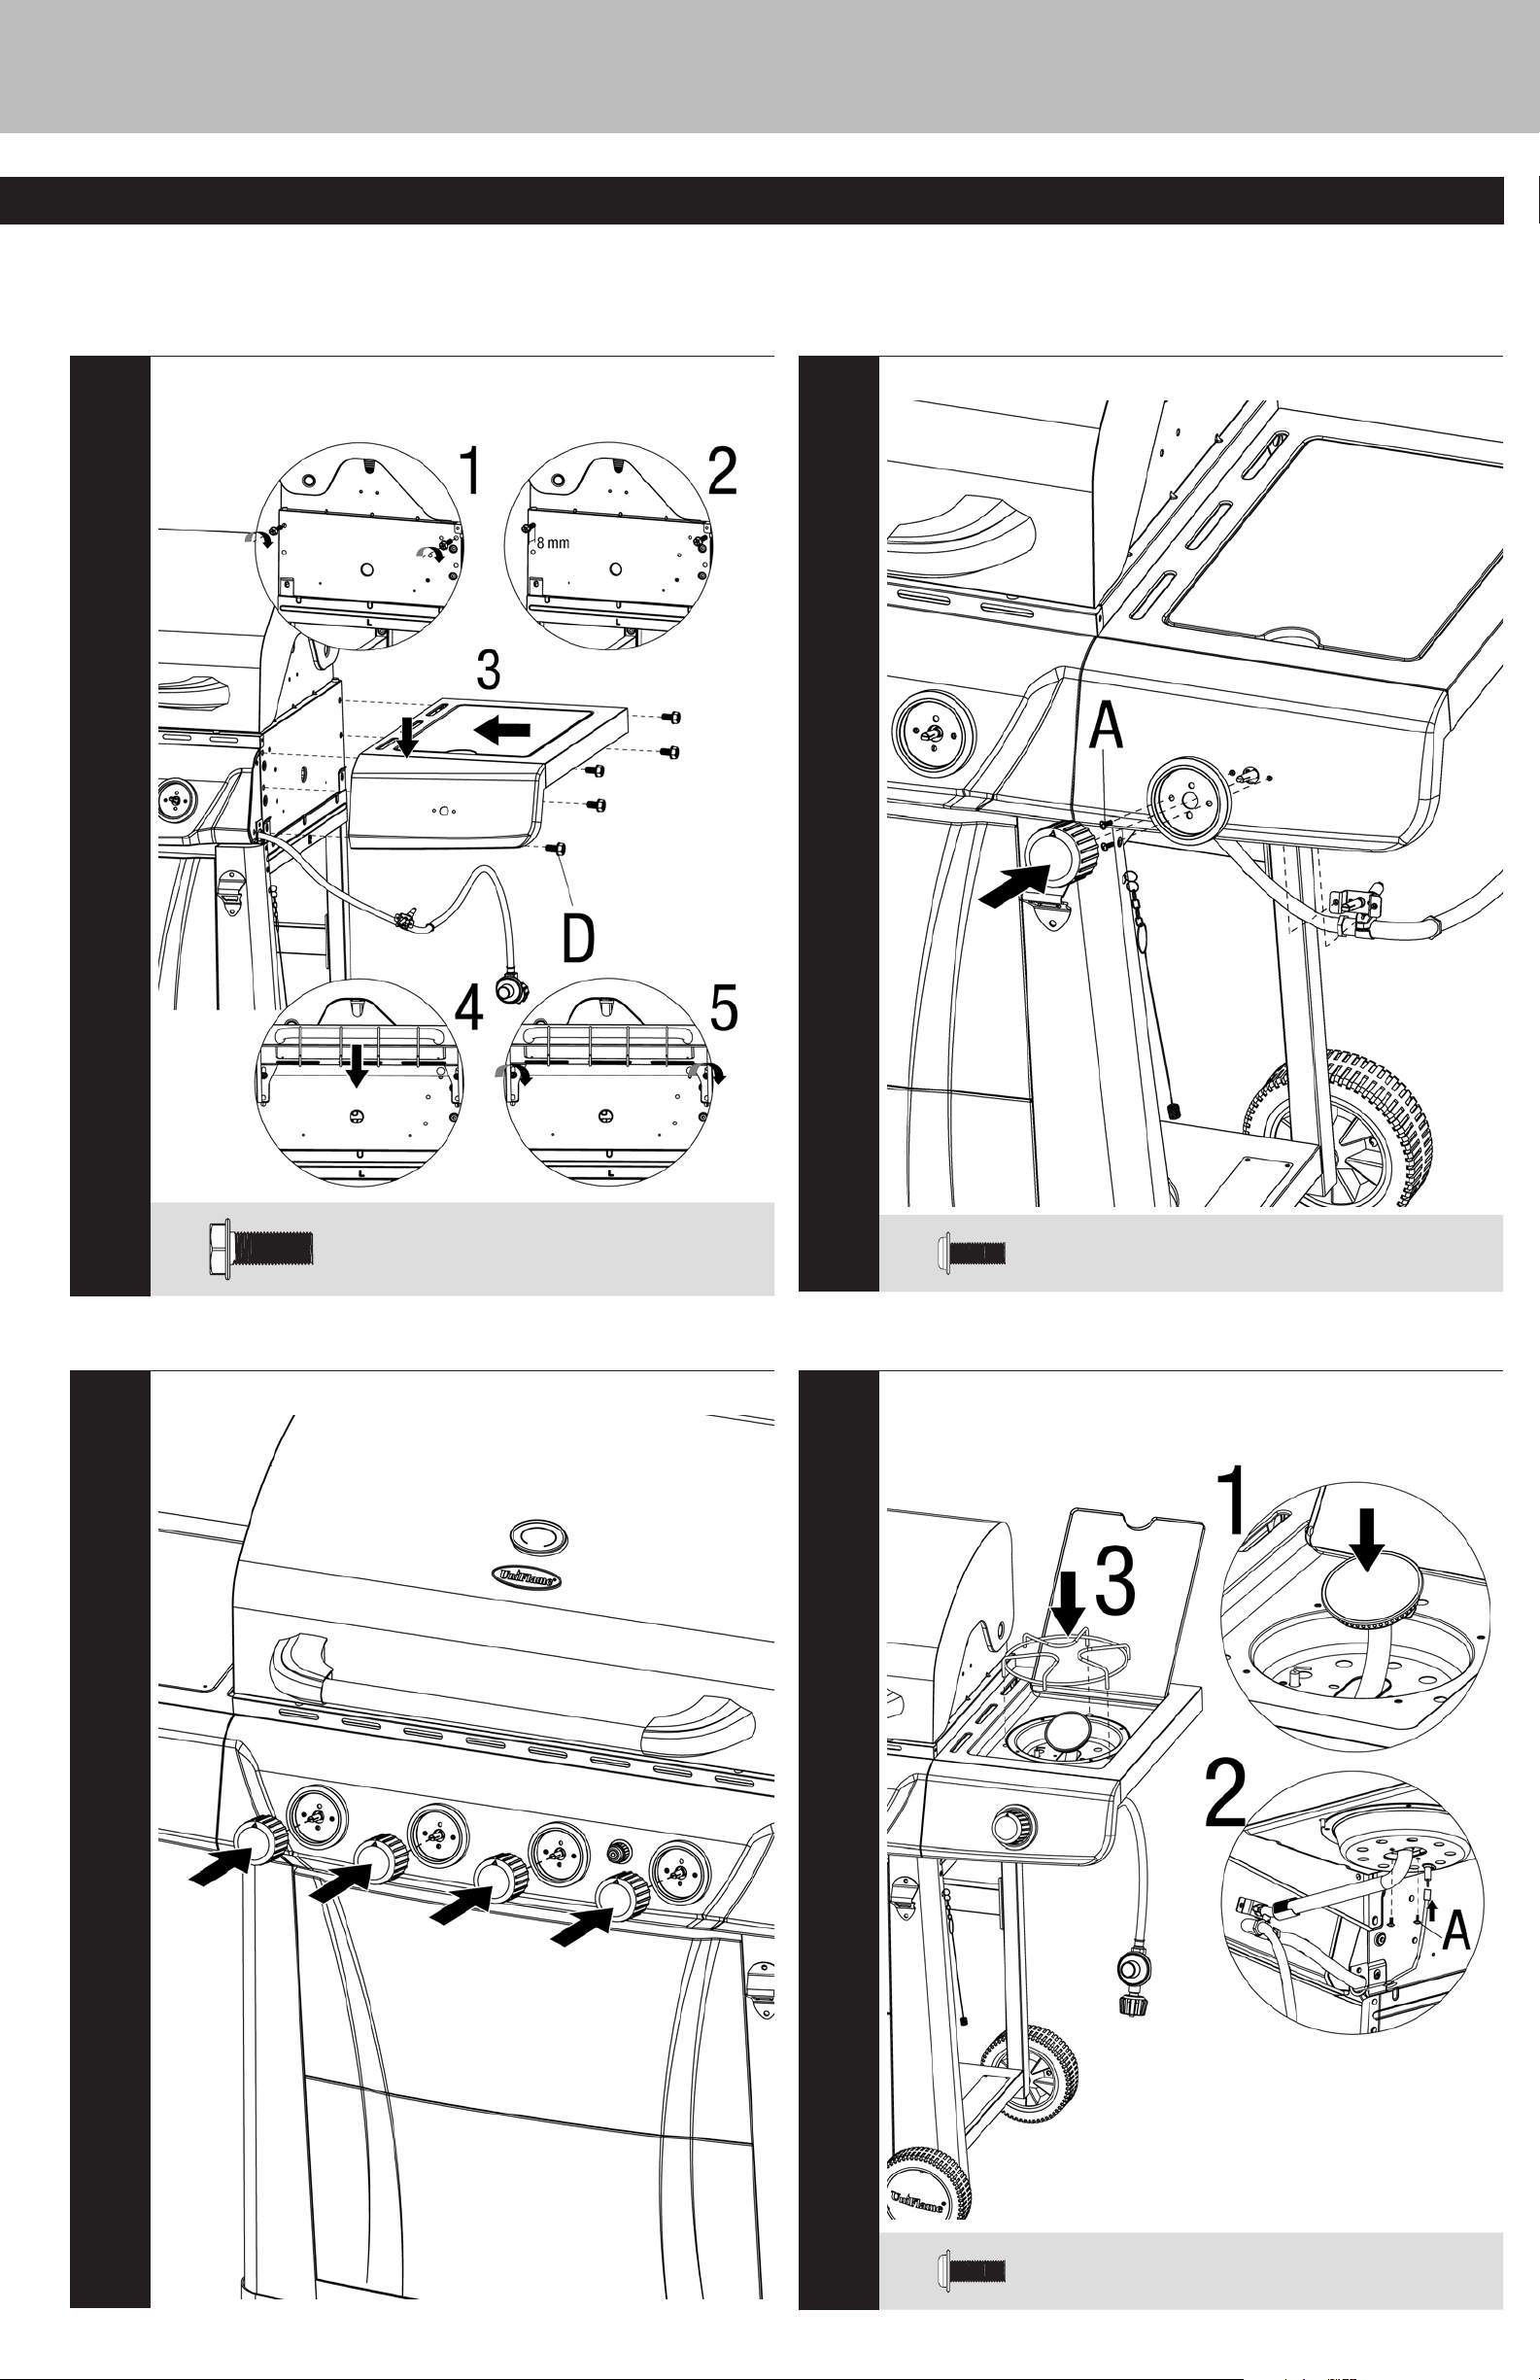
Insert Heat Plates and Cooking Grids
17
Insert Warming Rack
18
Insert AA Battery
Note: Remove plastic wrapper before installing battery.
19
Insert Grease Tray and Grease Cup
20
I
x 1
Contact 1.800.762.1142 for assistance. Do not return to place of purchase.
OFF
ARRÊT
X
X
X
X
X
page no.
9
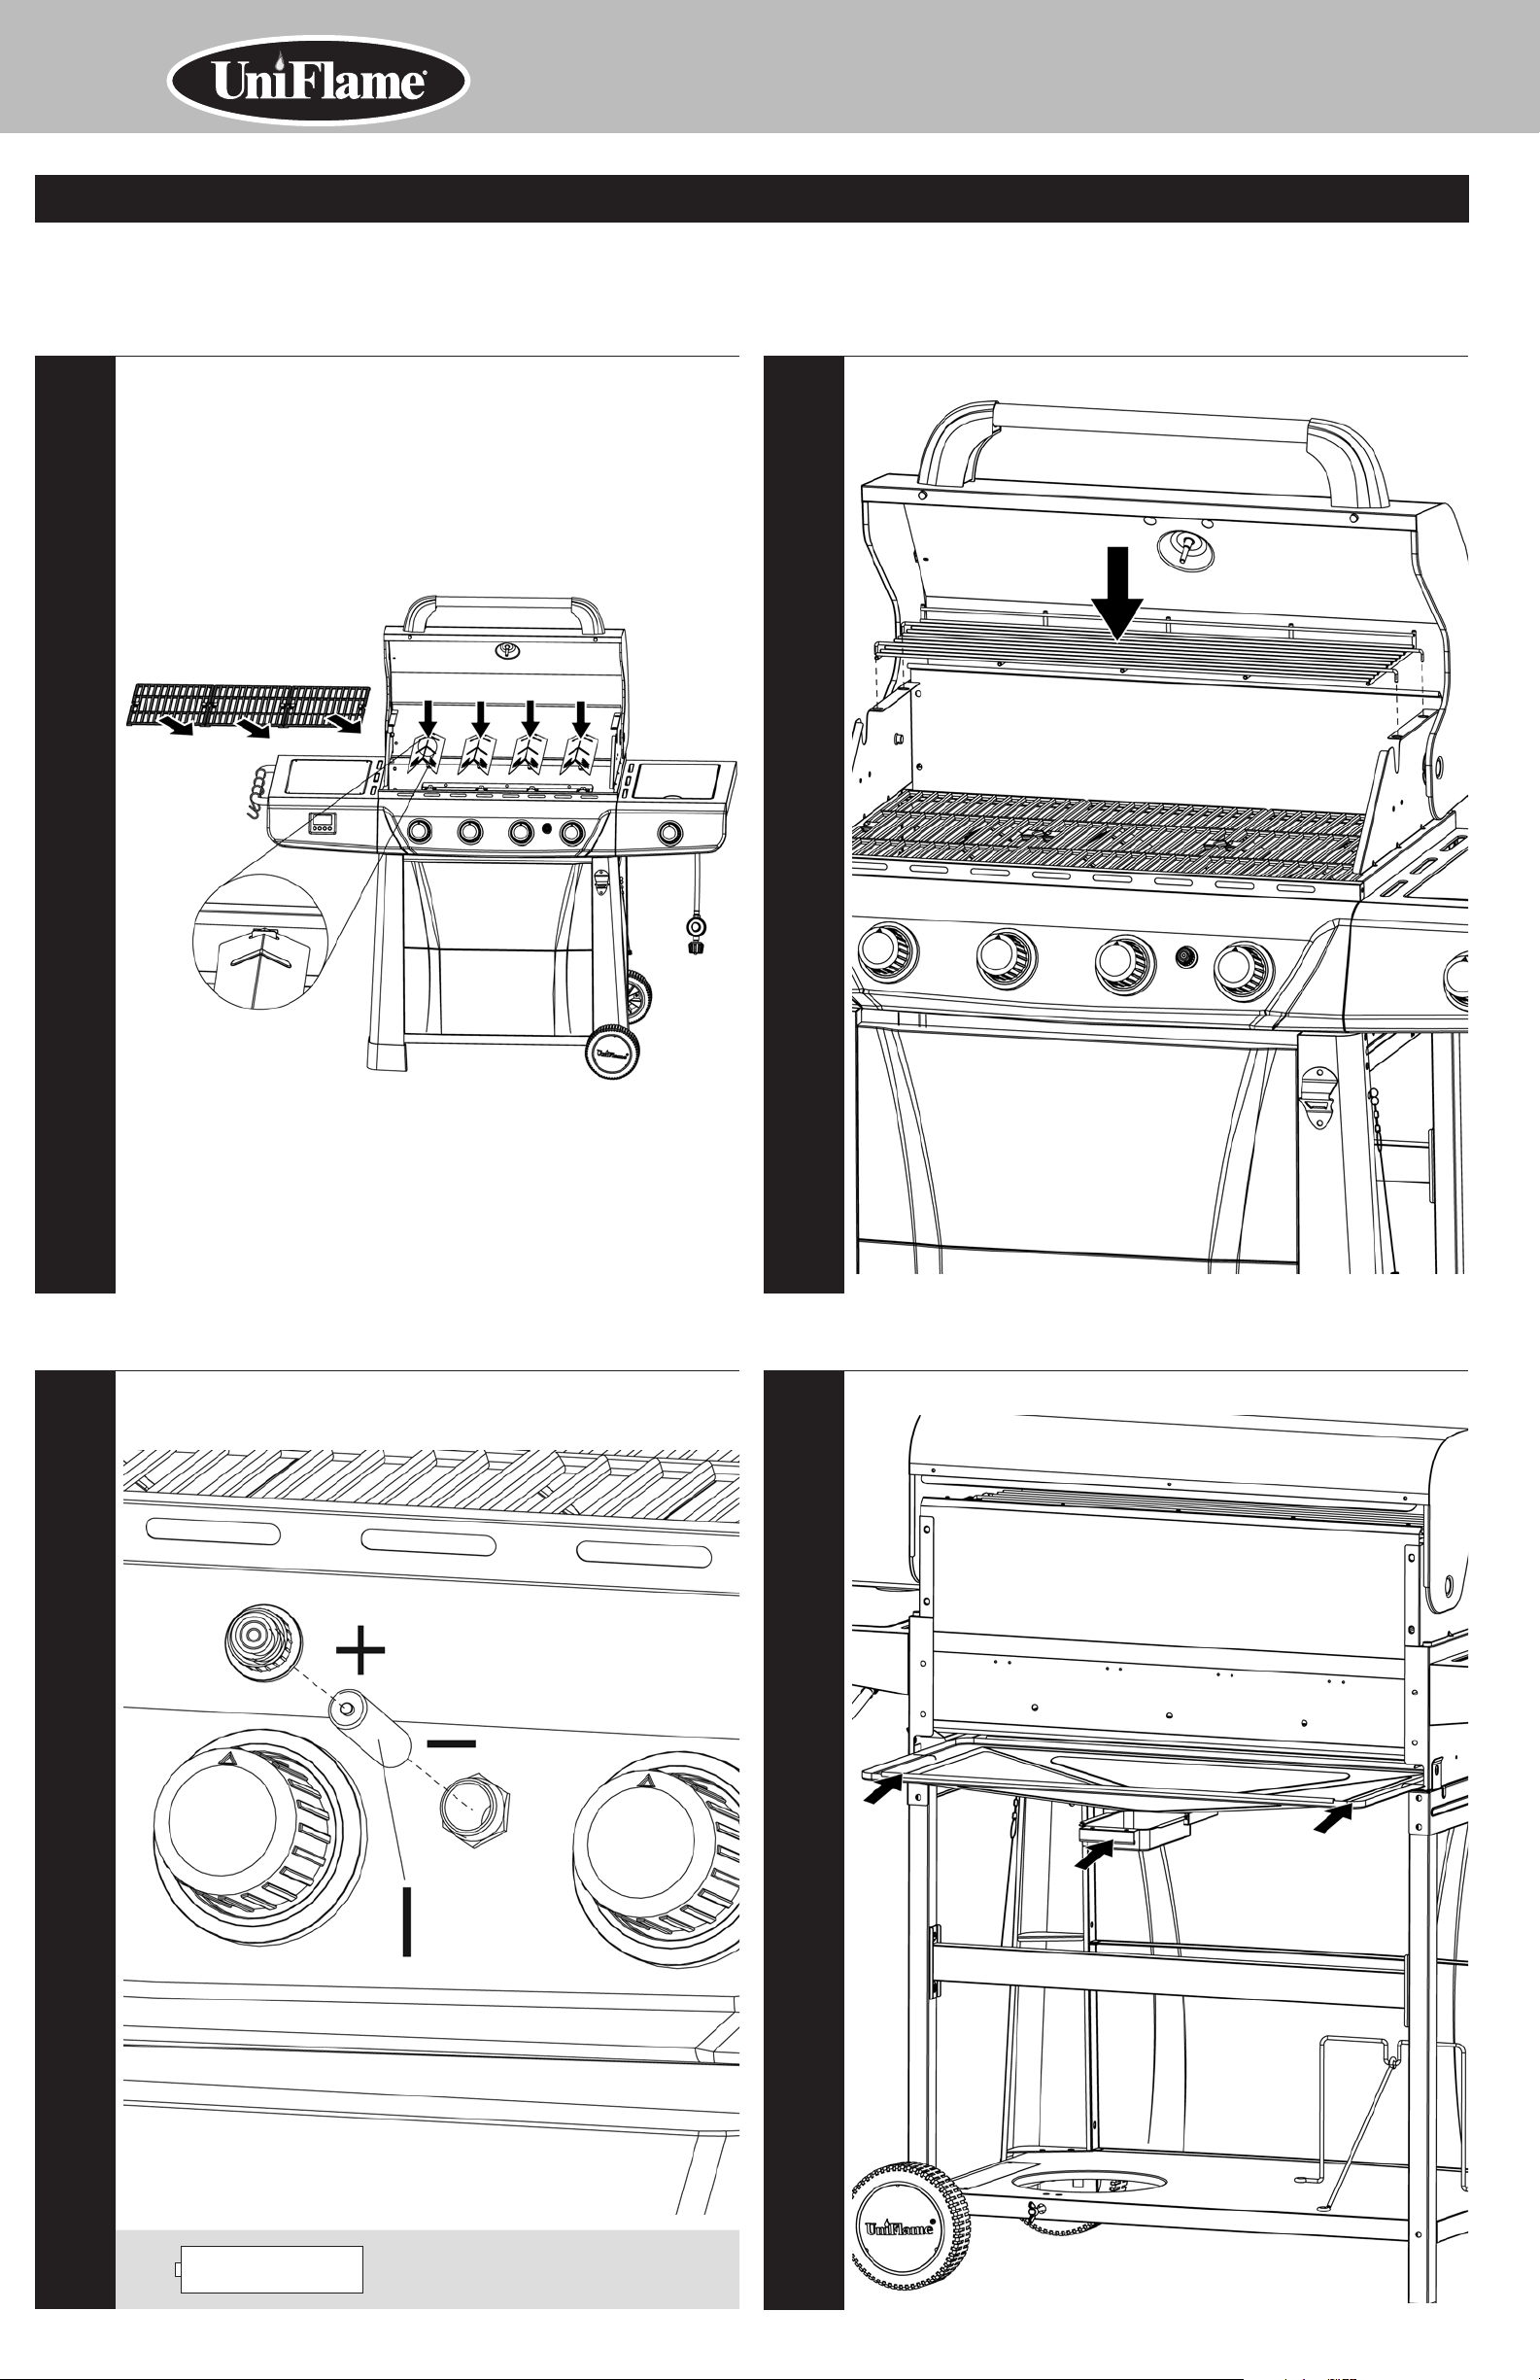
Installing LP Gas Tank
To operate you will need (1) precision-filled standard grill LP gas
tank (20#) with external valve threads.
Note: An empty standard grill LP gas tank weighs approximately
18 lbs. A precision-filled standard grill LP gas tank should weigh
no more than 38 lbs.
CAUTION: LP gas tank must be properly
disconnected and removed prior to moving this
grill.
Insert and Secure LP Gas Tank
Loosen LP Gas Tank Retainer Bolt by turning until counter-clockwise.
Place precision filled LP gas tank upright into hole in grill body so the tank valve is facing the
gas line connection.
Secure tank by turning LP Gas Tank Retainer Bolt clockwise until tight
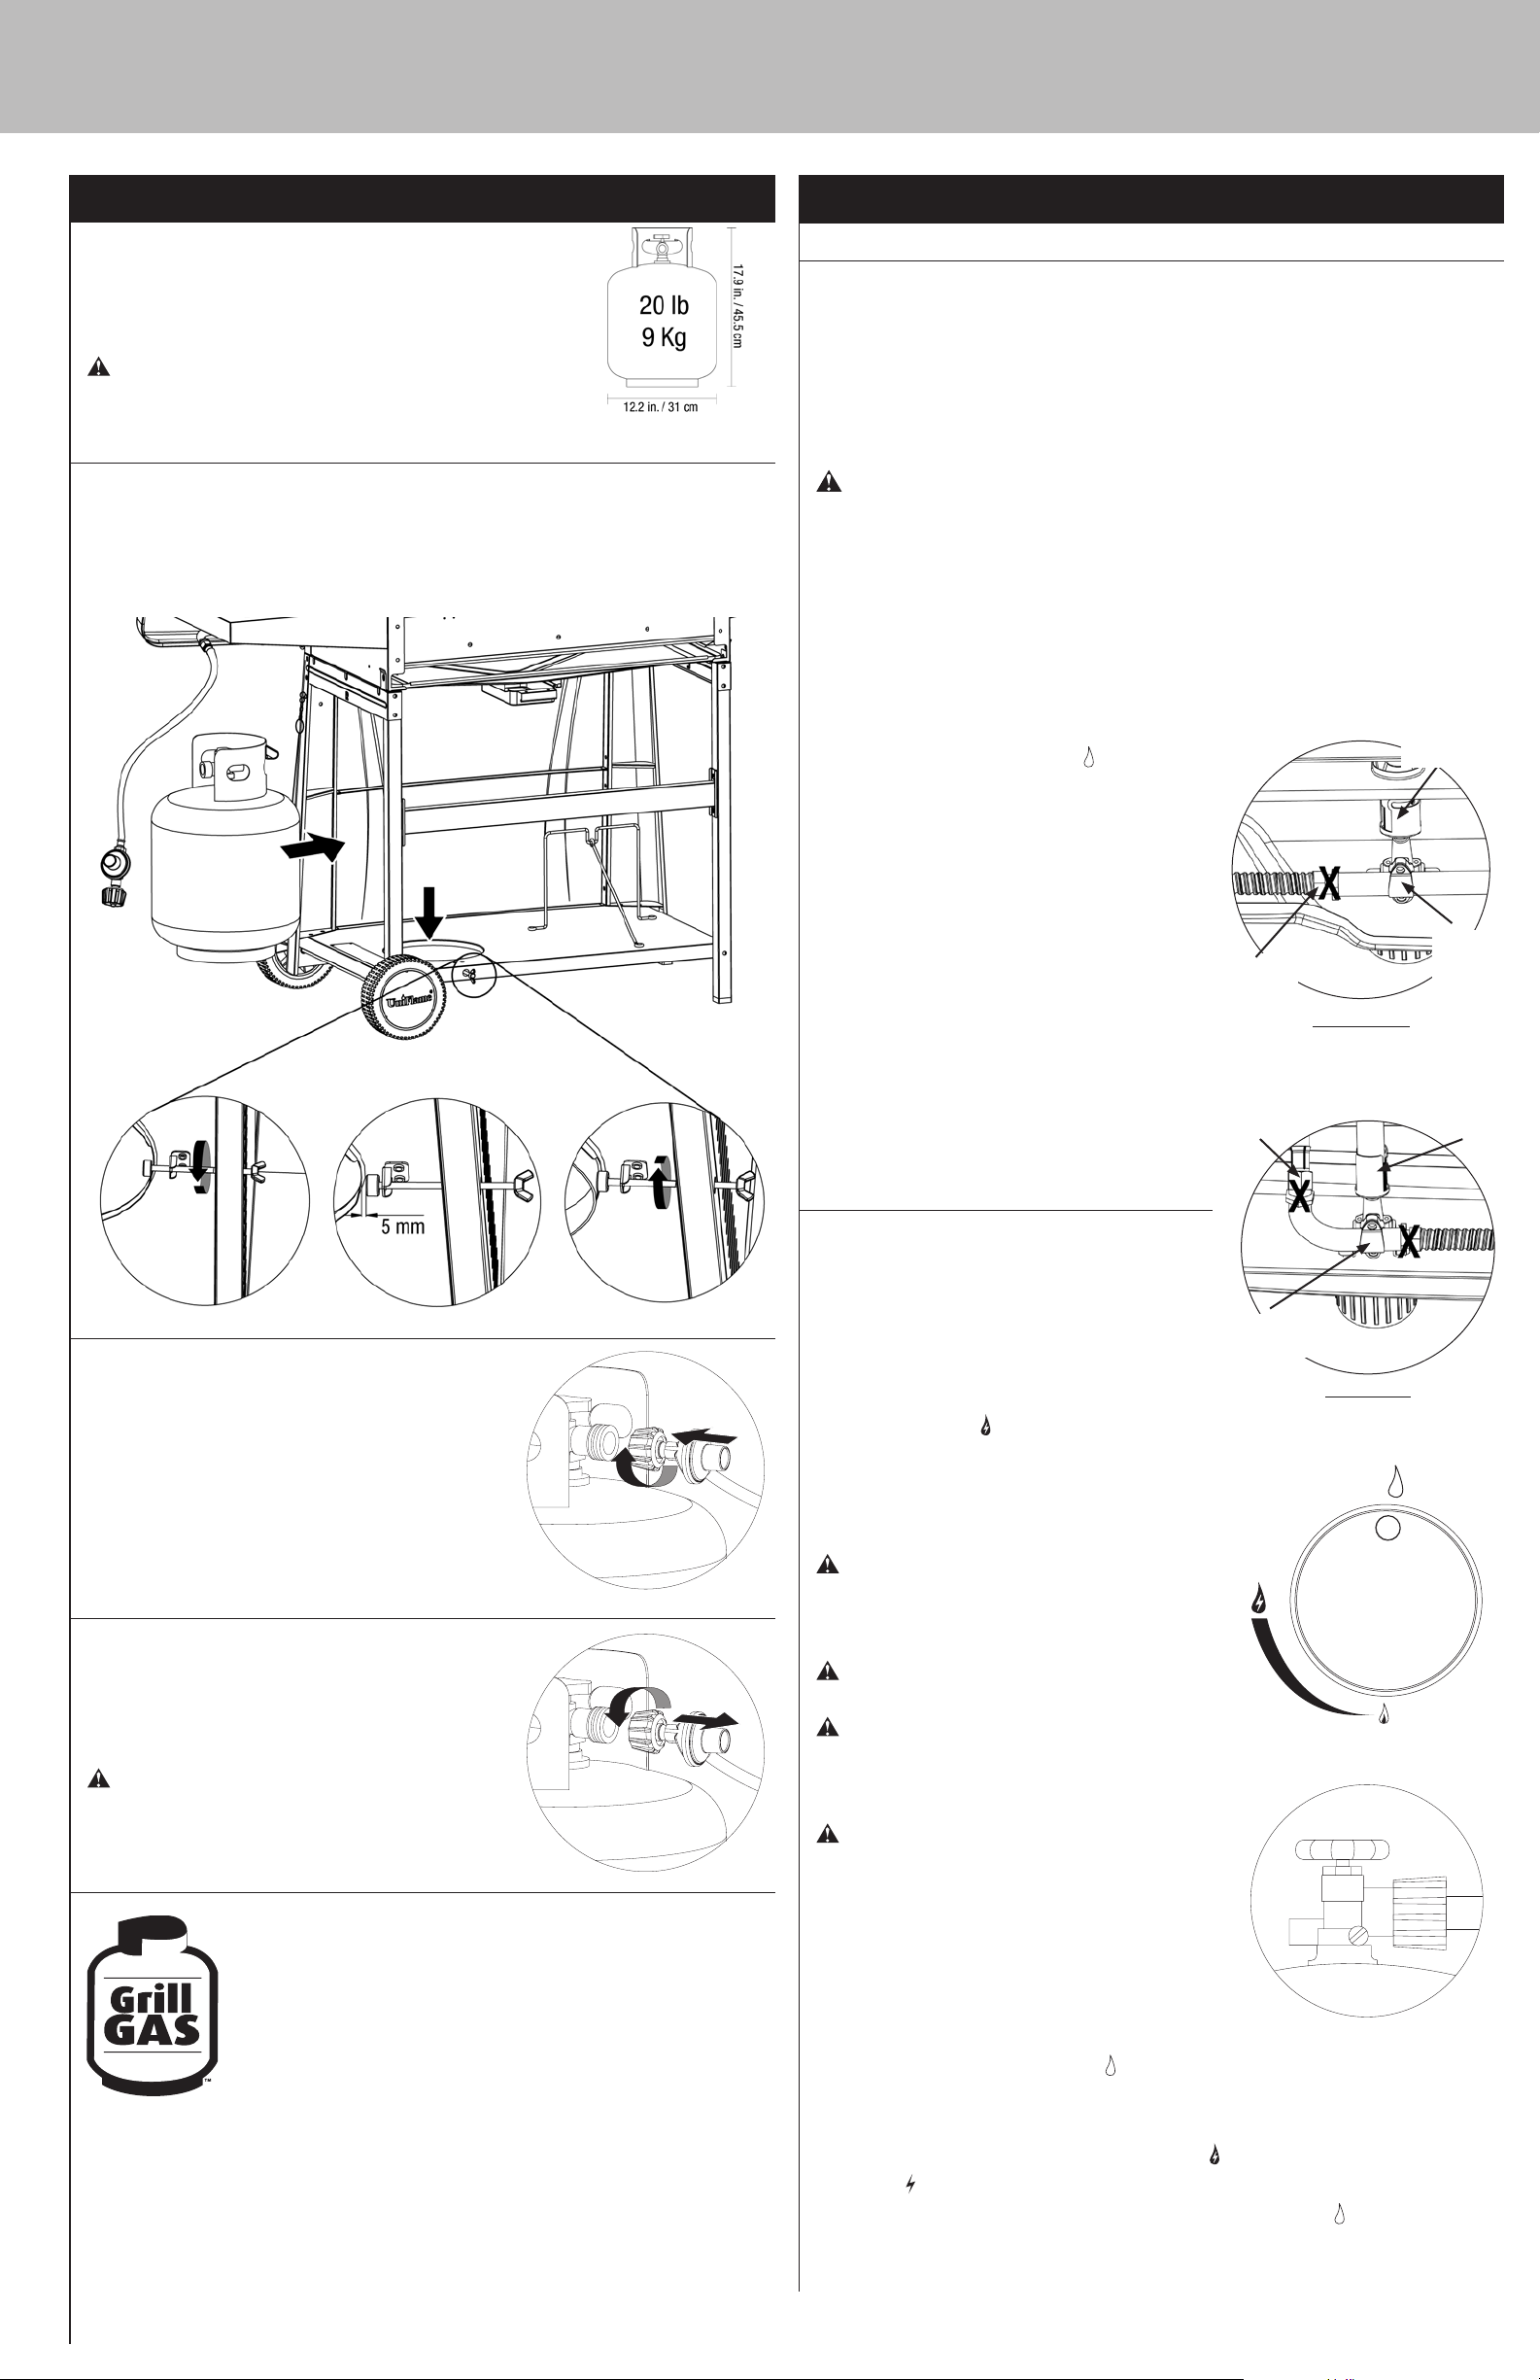
Operating Instructions
Checking for Leaks
Burner Connections
1. Make sure the regulator valve and hose connections are securely fastened to the burner and
the tank.
If your unit was assembled for you, visually check the connection between the burner venturi
pipe and orifice. Make sure the burner venturi pipe fits over the orifice.
WARNING: Failure to inspect this connection or follow these
instructions could cause a fire or an explosion which can cause death,
serious bodily injury, or damage to property.
2. Please refer to diagram for proper installation. (Figures 1 and 2)
3. If the burner pipe does not rest flush to the orifice, please contact 1.800.762.1142 for
assistance.
Tank/Gas Line Connection
1. Make 2-3 oz. of leak solution by mixing one part
liquid dishwashing soap with three parts water.
2. Make sure control knobs are “OFF ” position.
(Figure 3)
3. Connect LP gas tank per “Installing LP Gas Tank”
section.
4. Turn LP gas tank valve to “OPEN”.
5. Spoon leak check solution at all “X” locations
(Figures 1, 2 and 4)
a. If any bubbles appear turn LP gas tank valve to
“CLOSED”, reconnect and re-test.
b. If you continue to see bubbles after several
attempts, turn LP gas tank valve to “CLOSED” and
disconnect LP gas tank, per “Disconnect LP Gas
Tank” instructions, and contact 1.800.762.1142
for assistance.
c. If no bubbles appear after one minute turn LP gas
tank valve to “CLOSED”, wipe away solution and
proceed.
LP Gas
Connection
LP Gas
Connection
Figure 1
Burner venturi
pipe
LP Gas
Valve with
Orifice
Main Burners
Figure 2
Burner
venturi pipe
Connect LP Gas Tank
Before connecting, be sure that there is no debris caught in
the head of the LP gas tank, head of the regulator valve or
in the head of the burner and burner ports.
Connect regulator/hose assembly to tank by turning knob
clockwise until it stops.
Disconnect LP Gas Tank
Before disconnecting make sure the LP gas tank valve is
“CLOSED”.
Disconnect regulator/hose assembly from LP gas tank by
turning knob counterclockwise until it is loose.
CAUTION: LP gas tank must be properly
disconnected and removed prior to moving
this grill.
Need a tank of gas? Try tank exchange service. It’s easy, fast, safe,
and available at tens of thousands of conveniently located retail outlets
nationwide. You can purchase a new full tank or exchange your empty for
a precision filled one.
Operating Main Burners
First Use
1. Make sure all labels, packaging and protective films
have been removed from the grill.
2. Remove manufacturing oils before cooking on this
grill for the first time by operating the grill for at
least 15 minutes on (HIGH) with the lid closed. This
will “heat clean” the internal parts and dissipate
odors.
Lighting Instructions
Caution: Keep outdoor gas cooking
appliance area clear and free from
combustible materials, gasoline and
other flammable vapors and liquids.
Caution: Do not obstruct the flow of
combustion and ventilation air.
Caution: Check and clean burner/
venturi tubes for insects and insect
nests. A clogged tube can lead to a fire
beneath the grill.
Caution: Attempting to light the burner
with the lid closed may cause an
explosion.
1. Open lid.
2. Make sure there are no obstructions of airflow to
the burners. Spiders and insects can nest within
and clog the burner / venturi tube at the orifice. A
clogged burner tube can lead to a fire beneath the
appliance.
3. All control knobs must be in the “OFF ” position. (Figure 3)
4. Connect LP gas tank per “Installing LP Gas Tank” section.
5. Turn LP gas tank valve to “OPEN”.
6. Select burner to light. Push and turn control knob to (HIGH).
7. Press the (electronic igniter) button and hold for up to 5 seconds to light burner.
8. If ignition does not occur in 5 seconds, turn burner control knob “OFF ”, wait 5 minutes, and
repeat lighting procedure.
LP Gas Valve
with Orifice
Side Burner
Figure 3
Figure 4

OFF
ARRÊT
Operating Instructions (continued)
Outdoor LP Gas Barbecue Grill Model No. GBC1143W-C
9. If igniter does not light burner, use a lit match
secured with the lighting rod provided to light
burners manually. Access the burners through the
cooking grid and heat plates. Position the lit match
near side of the burner. (Figure 5)
Important: Always use the lighting rod provided when
lighting burners with a match.
10. After lighting, observe the burner flame, make sure
all burner ports are lit and flame height matches
illustration. (Figure 6)
Note: Each burner lights independently - repeat steps
5-10 for the other burners.
Figure 5
CAUTION: If burner flame goes out
during operation, immediately turn the
control knobs to the “OFF ” position,
turn the LP gas tank valve to “CLOSED”
and open lid to let the gas clear for 5
minutes before re-lighting.
Turning Off
1. Turn LP gas tank valve to “CLOSED”.
2. Turn all control knobs to the “OFF ” position.
Note: A “poof” sound is normal as the last of the LP gas is burned.
3. Disconnect LP gas tank per “Disconnect LP Gas Tank” instructions.
Direct Cooking
Caution: Do not leave grill unattended while preheating or burning off food
residue on (HIGH). If grill has not been cleaned, a grease fire can occur.
Cooking directly over lit burners is ideal for searing in juices and grilling food requiring less than
25 minutes of grilling time, such as steaks, hamburgers, hot dogs, chicken parts, vegetables
and fruit.
1. Open lid and ignite the desired burner(s) per “Lighting Instructions” section..
2. Close lid and preheat grill on (HIGH).
3. Wear protective gloves and use long handle tongs to place food onto cooking grids above the
lit burners.
4. Adjust controls to desired flame height.
5. With lid open or closed, cook until desired internal food temperatures are achieved.
6. Turn grill OFF per “Turning Off” instructions
For more tips on direct cooking please see “Tips for Better Cookouts and Longer Grill Life”
Indirect Cooking
Caution: Do not leave grill unattended while preheating or burning off food
residue on (HIGH). If grill has not been cleaned, a grease fire can occur.
Not cooking directly over lit burners is ideal for slow cooking and foods requiring more than 25
minutes such as most roasts, loins, chops, whole chickens, turkey, fish and baked goods.
1. Open lid and ignite the desired burner(s) per “Lighting Instructions” section..
2. Close lid and preheat grill on (HIGH).
3. Wear protective gloves and use long handle tongs to place food onto cooking grids above the
un-lit burners.
4. Adjust controls to desired flame height.
5. With lid closed, cook until desired internal food temperatures are achieved.
6. Turn grill OFF per “Turning Off” instructions
For more tips on indirect cooking please see “Tips for Better Cookouts and Longer Grill Life”
Controlling Flare-ups
Burner
Figure 6
Flame
Slight
Yellow
Slight
Blue
Dark
Blue
Caution: Putting out grease fires by closing the lid is not possible.
• Do not use water on a grease fire. This can cause the grease to
splatter and could result in serious burns, bodily harm or other
damage. If a grease fire develops, turn knobs “OFF ” and
LP gas tank valve “CLOSED”.
• Do not leave grill unattended while preheating or burning off food
residue on (HIGH). If grill has not been cleaned, a grease fire can
occur that may damage the product.
WARNING: When cooking, fire extinguishing materials shall be readily
accessible. In the event of an oil/grease fire, do not attempt to
extinguish with water. Use type BC dry chemical fire extinguisher or
smother with dirt, sand or baking soda.
Flare-ups are a part of cooking meats on a grill, and adds to the unique flavor of grilling.
Excessive flare-ups can over-cook your food and cause a dangerous situation for you
and your grill.
Important: Excessive flare-ups result from the build-up of grease in the bottom of your grill.
Minimize Flare-ups:
1. Trim excess fat from meats prior to cooking.
2. Cook high fat contents meats on (LOW) setting or indirectly.
3. Ensure that your grill is on hard, level, non-combustible surface and the grease is allowed to
drain into grease cup.
Operating Side Burner
NOTE: Side burner can be used while main burners are operating.
Never use side burner as a grill.
CAUTION: Maximum load for sideburner and side shelf is 33 lbs.
CAUTION: Using pots larger than 6 quarts in capacity could exceed
weight limit of the side burner shelf, resulting in failure of grill cart
components.
CAUTION: DO NOT lean on the side burner shelf.
Lighting
1. Open lid. Attempting to light the burner with the
lid closed may cause an explosion!
2. Make sure there are no obstructions of airflow to the
burner. Spiders and insects can nest within and clog
the burner / venturi tube at the orifice. A clogged
burner tube can lead to a fire beneath the appliance.
3. Control knob must be in the “OFF ” position.
(Figure 7)
4. Connect LP gas tank per “Installing LP Gas Tank”
section.
5. Turn LP gas tank valve to “OPEN”.
6. Push and turn control knob to (HIGH).
7. Press the (electronic igniter) button and hold for
up to 5 seconds to light burner.
8. If ignition does not occur in 5 seconds, turn burner
control knob “OFF ”, wait 5 minutes and repeat
lighting procedure.
9. If igniter does not light burner, use a lit match
secured with the lighting rod provided to light
burner manually. Position the lit match near side of
the burner. (Figure 8)
Important: Always use the lighting rod provided when
lighting burners with a match.
10. After lighting, observe the burner flame, make sure
all burner ports are lit and flame height matches
illustration. (Figure 9)
CAUTION: If burner flame goes out
during operation, immediately turn the
control knobs to the “OFF ” position,
turn the LP gas tank valve to “CLOSED”
and open lid to let the gas clear for 5
Burner
minutes before re-lighting.
Turning Off
1. Turn LP gas tank valve to “CLOSED”.
2. Turn all control knob to the “OFF ” position.
Note: A “poof” sound is normal as the last of the LP gas is burned.
3. Disconnect LP gas tank per “Disconnect LP Gas Tank” instructions.
Cooking
1. Open lid and ignite the side burner per “Lighting Instructions” section.
2. Adjust control knob to desired flame height.
3. Place pan on center of grid.
4. Cook and adjust temperature as needed.
6. Turn grill OFF per “Turning Off” instructions
Figure 7
Figure 8
Figure 9
Flame
Slight
Yellow
Slight
Blue
Dark
Blue
Tips for Better Cookouts and Longer Grill Life
1. For great recipes and tips, visit recipes.uniflame.com
2. For food safety tips visit: http://www.fsis.usda.gov/Fact_Sheets/Barbecue_Food_Safety/
3. Use the upper cooking grid (warming rack) for keeping cooked food warm, toasting breads or
cooking delicate foods in aluminum foil pouches.
4. Use the side burner of this appliance like a normal kitchen range for boiling, sautéing or
frying.
5. To keep food from sticking to the grids, spray or coat with cooking oil before lighting.
6. To reduce flare-up keep grill clean, use lean cuts of meat (or trim fat) and avoid cooking on
very high temperatures.
7. Place delicate foods like fish and vegetables in aluminum foil pouches and indirect cook or
place on upper cooking levels (warming rack).
WARNING: Never cover entire cooking area with aluminum foil.
8. To avoid losing natural juices, use long handled tongs or spatulas instead of forks and turn
foods over just once during cooking.
9. When direct cooking adjust your burners to different levels so foods can be prepared to
different internal temperatures in the same time frame.
10. When indirect cooking roasts and larger cuts of meat, place meat onto a roasting rack
inside a heavy gauge metal pan. Place pan over the un-lit burners.

Contact 1.800.762.1142 for assistance. Do not return to place of purchase.
1-2 in. /
25.4 - 50.8 mm
1-2 in. /
RESET / REMISE À ZÉRO
START/STOP
MARCHE/ARRÊT
MIN.
MINUTES
SEC.
SECONDES
LIGHT
LUMIÈRE
Cleaning and Care (continued)
page no.
11
11. Try water pans to reduce flare-ups and cook juicer meats. Before starting grill remove
cooking grids and place a heavy duty shallow pan directly on heat plates. Fill half way with
water, fruit juices or other flavored liquids. Replace cooking grids and position food over the
loaded pan.
12. Enhance food flavors by using wood chips in smoker boxes or aluminum foil pouches.
Follow the wood manufacturer’s instructions.
13. Rotisseries, grill baskets, vertical poultry holders and other accessories can enhance your
experiences, reduce cooking times and aid in clean-up.
14. Clean cooking grids and racks after every use with a quality grill bush designed for your
grid material. Wear protective gloves and gently remove the build-up while grids are hot.
15. After every use, allow grill to cool. Then protect clean cooking grids with a light coat of
cooking oil, empty grease pan, wipe outside surfaces with a suitable kitchen cleaner and
protect surfaces with a quality cover that properly fits your grill.
16. Watch barbecue themed TV shows or purchase related barbecue cookbooks to learn more
interesting tips like –
A gas grill is ideal for reheating leftover pizza. Set burners on low and place pizza slices
directly on preheated cooking grid. Close lid and cook until cheese starts to bubble.
Operating Digital Timer
Count-Up
1. Press “START/STOP” button. Timer will begin
counting up from 0:00.
2. Press “START/STOP” button. Timer will stop.
Figure 10
Digital Timer
Before Each Use:
1. Keep the grill area clean and free from any
combustible materials, gasoline, and other
flammable vapors and liquids.
2. Do not obstruct the flow of the combustion of LP
and the ventilation air.
3. Keep the ventilation opening(s) of the LP gas tank
area free and clear from debris.
4. Visually check the burner flames to make sure your
grill is working properly. (Figure 12)
5. See sections below for proper cleaning instructions.
6. Check and clean the burner/venturi tubes for insects
and insect nests. A clogged tube can lead to a fire
beneath the grill.
Cleaning Surfaces
1. Wipe surfaces clean with mild dishwashing
detergent or baking soda mixed with water.
2. For stubborn surfaces use a citrus based degreaser
and a nylon scrubbing brush.
3. Rinse clean with water.
4. Allow to air dry.
Cleaning Main Burners
Figure 12
Burner Flame Conditions
Use this chart check to see if your
burners need to be cleaned.
Normal: Soft blue flames with
yellow tips between 1 in. - 2 in.
hight.
Needs Cleaning: Noisy with hard
blue flames.
Count-Down
1. Press “MIN” button to set desired number of
minutes.
2. Press “SEC” button to set desired number of
seconds.
3. Press “START/STOP” button. Timer will begin
counting down from the pre-set time.
Remove Digital Timer Back
Figure 11
4. When timer reaches “0:00” a loud beep will sound
for up to 1 minute.
5. To stop count-down at any time or stop alarm from
sounding, press “START/STOP” button.
Light
Press “LIGHT” button. LCD will illuminate for 10
seconds.
Replace Digital Timer Back
Resetting the timer
If you have stopped timer during count-up or countdown mode, you can reset timer back to 0:00 by
pressing and holding the two buttons indicated by the
“RESET” lines.
Auto Shut-off
1. To prolong battery life, digital timer will automatically shut off when not in use after 3
minutes.
2. To turn it back on press “START/STOP” button.
Replacing the batteries (See Figure 11)
1. Remove digital timer back cover.
2. Replace AAA batteries (2).
3. Replace digital timer back cover.
Cleaning and Care
CAUTION:
1. All cleaning and maintenance should be done when grill is cool and
with the fuel supply disconnected.
2. DO NOT clean any grill part in a self cleaning oven. The extreme heat
will damage the finish.
3. Do not enlarge valve orifices or burner ports when cleaning the
valves or burners.
Notices
1. This grill should be thoroughly cleaned and inspected on a regular basis.
2. Abrasive cleaners will damage this product.
3. Never use oven cleaner to clean any part of grill.
1. Make sure control knobs are in the “OFF ” position
and LP gas tank valve to “CLOSED”.
Has to be cleaned: Wavy with
yellow flames.
2. Disconnect LP gas tank per “Disconnect LP Gas
Tank” instructions.
3. Remove cooking grids and heat plates.
4. Remove burners by removing the fasteners securing the burners to the grill bottom.
5. Lift burners up and away from gas valve orifice.
6. Disconnect wire from spark electrode.
7. Clean inlet (venturi) of each burner with small bottle brush or compressed air.
8. Remove all food residue and dirt on burner surfaces.
9. Clean any clogged ports with a stiff wire (such as an opened paper clip)
10. Inspect burners for any damage (cracks or holes). If damage is found, replace with new
burner(s) from manufacturer.
11. Reinstall burners, checking to insure that gas valve orifice is correctly positioned inside
each burner inlet (venturi). Also check position of spark electrode.
12. Replace heat plates and cooking grids.
13. Connect LP gas tank per “Installing LP Gas Tank” section.
14. Perform leak test. See “Checking for Leaks”.
Cleaning Side Burner
1. Make sure control knob is in the (OFF) position and LP gas tank valve to “CLOSED”.
2. Disconnect LP gas tank per “Disconnect LP Gas Tank” instructions.
3. Remove side burner grid.
4. Remove burner by removing the screws securing the burner to the side shelf.
5. Lift burner up and away from gas valve orifice.
6. Clean inlet (venturi) of burner with small bottle brush or compressed air.
7. Remove all food residue and dirt on burner surface.
8. Clean any clogged ports with a stiff wire (such as an opened paper clip)
9. Inspect burner for any damage (cracks or holes). If damage is found, replace with new burner
from manufacturer.
10. Reinstall burner, check to insure that gas valve orifice is correctly positioned inside burner
inlet (venturi). Also check position of spark electrode.
11. Replace cooking grid.
12. LP: Connect LP gas tank per “Installing LP Gas Tank” section.
13. Perform leak test. See “Checking for Leaks”.
Before Storing
1. Make sure control knob is in the “OFF ” position and LP gas tank valve to “CLOSED”.
2. Disconnect LP gas tank per “Disconnect LP Gas Tank” instructions.
3. Clean all surfaces.
4. Lightly coat the burners with cooking oil to prevent excess rusting.
5. If storing the grill indoors, disconnect the LP tank, see “Disconnect LP Gas Tank” section, and
leave the LP gas tank OUTDOORS.
6. Place the protective cap cover on the LP tank and store the tank outdoors in a well ventilated
area out of direct sunlight.
7. If storing the grill outdoors, cover the grill with a grill cover for protection from the weather.

Outdoor LP Gas Barbecue Grill Model No. GBC1143W-C
Product Registration
For faster warranty service, register your product immediately at www.bluerhino.com or call
1.800.762.1142.
Limited Warranty
Blue Rhino Global Sourcing, Inc (“Vendor”) warrants to the original retail purchaser of this
product, and to no other person, that if this product is assembled and operated in accordance
with the printed instructions accompanying it, then for a period of one (1) year from the date
of purchase, all parts in such product shall be free from defects in material and workmanship.
Vendor may require reasonable proof of your date of purchase. Therefore, you should retain
your sales slip or invoice. This Limited Warranty shall be limited to the repair or replacement of
parts, which prove defective under normal use and service and which Vendor shall determine
in its reasonable discretion upon examination to be defective. Before returning any parts, you
should contact Vendor’s Customer Service Department using the contact information listed
below. If Vendor confirms, after examination, a defect covered by this Limited Warranty in any
returned part, and if Vendor approves the claim, Vendor will replace such defective part without
charge. If you return defective parts, transportation charges must be prepaid by you. Vendor will
return replacement parts to the original retail purchaser, freight or postage prepaid.
This Limited Warranty does not cover any failures or operating difficulties due to accident,
abuse, misuse, alteration, misapplication, improper installation or improper maintenance or
service by you or any third party, or failure to perform normal and routine maintenance on
the product as set out in this owner’s manual. In addition, the Limited Warranty does not cover
damage to the finish, such as scratches, dents, discoloration, rust or other weather damage,
after purchase.
This Limited Warranty is in lieu of all other express warranties. Vendor disclaims all warranties
for products that are purchased from sellers other than authorized retailers or distributors,
including the warranty of merchantability or the warranty of fitness for a particular purpose.
VENDOR ALSO DISCLAIMS ANY AND ALL IMPLIED WARRANTIES, INCLUDING WITHOUT
LIMITATION THE IMPLIED WARRANTIES OF MERCHANTABILITY AND FITNESS FOR A PARTICULAR
PURPOSE. VENDOR SHALL HAVE NO LIABILITY TO PURCHASER OR ANY THIRD PARTY FOR ANY
SPECIAL, INDIRECT, PUNITIVE, INCIDENTAL, OR CONSEQUENTIAL DAMAGES. Vendor further
disclaims any implied or express warranty of, and assumes no responsibility for, defects in
workmanship caused by third parties.
This Limited Warranty gives the purchaser specific legal rights; a purchaser may have other
rights depending upon where he or she lives. Some jurisdictions do not allow the exclusion or
limitation of special, incidental or consequential damages, or limitations on how long a warranty
lasts, so the above exclusion and limitations may not apply to everyone.
Vendor does not authorize any person or company to assume for it any other obligation or
liability in connection with the sale, installation, use, removal, return, or replacement of its
equipment, and no such representations are binding on Vendor.
Blue Rhino Global Sourcing, Inc
Winston-Salem, North Carolina 27105 USA
1.800.762.1142

Contact 1.800.762.1142 for assistance. Do not return to place of purchase.
Troubleshooting
Problem Possible Cause Prevention/Cure
LP: Make sure regulator is securely attached to the LP gas tank, turn LP gas
LP gas tank valve is closed
NG main valve is closed
LP gas tank is low or empty Replace or refill LP gas tank
LP gas / NG leak
Burner will not light using ignitor
Wires or electrode covered with cooking residue Clean wire and/or electrode with rubbing alcohol
Electrode and burners are wet Wipe dry with cloth
Electrode cracked or broken - sparks at crack Replace electrode
Wire loose or disconnected Reconnect wire or replace electrode/wire assembly
Wire is shorting (sparking) between ignitor and electrode Replace ignitor wire/electrode assembly
Bad ignitor Replace ignitor
No gas flow
LP gas tank is low or empty Replace or refill LP gas tank
Burner will not light with match
LP gas / NG leak
Coupling nut and regulator not fully connected
Obstruction of gas flow
Disengagement of burner to valve Reengage burner and valve
Spider webs or insect nest in venturi Clean venturi and burner tube
Burner ports clogged or blocked Clean burner ports
LP: Out of gas Replace or refill LP gas tank
NG: No main line pressure Call your Natural Gas provider to inspect Natural Gas Line
tank valve to “OPEN”
NG: Make sure regultor and NG main line are securely attached, turn NG main
valve to “OPEN”
1. Turn LP gas tank / NG main valve to “CLOSED”
2. Wait 5 minutes for gas to clear
3. Follow “Checking for Leaks” in the owner’s manual
LP: Check if LP gas tank is empty
A. If empty, replace or refill
B. If LP gas tank is not empty, refer to “Sudden drop in gas flow or reduced
flame height”
NG: Check if NG main valve is connected
A. Make sure regultor and NG main line are securely attached, turn NG main
valve to “OPEN”
B. If NG main valve is “OPEN”, refer to “Sudden drop in gas flow or reduced
flame height”
1. Turn LP gas tank / NG main valve to “CLOSED”
2. Wait 5 minutes for gas to clear
3. Follow “Checking for Leaks” in the owner’s manual
Turning the coupling nut about one-half to three quarters additional turn until
solid stop. Tighten by hand only-do not use tools.
1. Clear burner tubes
2. Check for bent or kinked hose
page no.
13
Sudden drop in gas flow or reduced flame height
Irregular flame pattern, flame does not run the
full length of burner
Flame is yellow or orange
Flame blow out
Flare-up
1. Turn control knobs to “OFF ”
2. Wait 30 seconds and light grill
3. If flames are still too low, reset the excessive flow safety device:
a. Turn control knob(s) “OFF ”
b. Turn LP gas tank valve to “CLOSED”
LP: Excess flow; safety device may have been activated
Burner ports are clogged or blocked
New burner may have residual manufacturing oils. Burn grill for 15 minutes with the lid closed
Spider webs or insect nest in venturi Clean venturi
Food residue, grease, etc. Clean burner
Poor alignment of valve to burner venturi Assure burner venturi is properly engaged with valve
High or gusting winds Do not use grill in high winds
Low on LP Gas Replace or refill LP gas tank
Excess flow valve tripped Refer to “Sudden drop in gas flow or reduced flame height”
Grease buildup
Excess fat in meat Trim fat from meat before grilling
Excessive cooking temperature Adjust (lower) cooking temperature
c. Disconnect regulator
d. Turn control knobs to (HIGH)
e. Wait 1 minute
f. Turn control knobs to “OFF ”
g. Reconnect regulator and leak check connections
h. Slowly turn LP gas tank valve to “OPEN”
i. Wait 30 seconds and then light grill per “Lighting Instructions”
Clean burner ports
Remove and clean all grill parts per “Cleaning and Care” instructions in the
owner’s manual
Persistent grease fire
Flashback (fire in burner tube(s))
Inside of lid is peeling (like paint peeling)
1. Turn control knobs to “OFF ”
2. Turn LP gas tank valve / NG main valve to “CLOSED”
Grease trapped by food buildup around burner system
Burner and/or burner tubes are blocked Clean burner and/or burner tubes
The lid is stainless steel, not painted
The lid is coated/painted
For more assistance please visit us online at www.bluerhino.com or call 1.800.762.1142.
3. Leave lid in closed position and let fire burn out
4. After grill cools, remove and clean all parts per “Cleaning and Care”
instructions in the owner’s manual
Baked on grease buildup has turned to carbon and is flaking off, clean
thoroughly per “Cleaning and Care” instructions in the owner’s manual
• This can be from baked on grease buildup, that has turned into carbon and is
flaking off
• Clean thoroughly, per “Cleaning and Care” instructions in the owner’s manual
• After cleaning, if you can see steel, please call out Customer Care at
1.800.762.1142

Outdoor LP Gas Barbecue Grill Model No. GBC1143W-C

MANUEL D’UTILISATION
Fabriqué à partir de 75% de
bagasse de canne à sucre
(résidu de pulpe de canne à
sucre sans danger pour
l’environnement)
Barbecue d’extérieur
AVERTISSEMENT
POUR VOTRE SÉCURITÉ:
Pour usage à l’extérieur seulement
(hors de tout abri clos)
AVERTISSEMENT
POUR VOTRE SÉCURITÉ:
1. Toute installation défectueuse ou
modification incorrecte ainsi que tout
mauvais réglage ou entretien incorrect
risque d’entraîner des blessures ou des
dégâts matériels.
2. Lire complètement les instructions
d’installation, d’utilisation et d’entretien
avant de procéder à la maintenance de
l’appareil ou à son entretien.
3. Le non-respect de ces consignes risque de
provoquer un incendie ou une explosion
et entraîner des dégâts matériels, des
blessures graves voire la mort.
4. Ce manuel d’utilisation contient des
consignes de sécurité indispensables au
montage et au bon fonctionnement ce
l’appareil.
5. Lire et suivre toutes les mises en garde et
instructions avant d’assembler et d’utiliser
l’appareil.
6. Suivre toutes les mises en garde et
instructions lors de l’utilisation de l’appareil.
7. Conserver ce manuel afin de pouvoir s’y
référer ultérieurement.
au propane
Modèle nº GBC1143W-C
Table des matières
Consignes de sécurité importantes
Vue éclatée des pièces et quincaillerie . . . . . . . . . . . . . . . . . . . . . . . . . . . . . . . . . . . . . . . . 3
Instructions d’assemblage . . . . . . . . . . . . . . . . . . . . . . . . . . . . . . . . . . . . . . . . . . . . . . . . . 4
. . . . . . . . . . . . . . . . . . . . . . . . . . . . . . . . . . . . . . .
Page 2
DANGER
S’il y a une odeur de gaz :
1. Coupez l’admission de gaz de l’appariel.
2. Éteindre toute flamme nue.
3. Ouvrir le couvercle.
4. Si l’odeur persiste, éloignez-vous de
immédiatement le fournisseur de gaz ou
le service d’incendie.
AVERTISSEMENT
POUR VOTRE SÉCURITÉ:
1. Ne pas entreposer ni utiliser de l’essence ni
d’autres vapeurs ou liquides inflammables
dans le voisinage de l’appareil, ni de tout
autre appareil.
2. Une bouteille de propane qui n’est pas
raccordée en vue de son utilisation, ne doit
pas être entreposée dans le voisinage de cet
appareil ou de tout autre appareil.
Installer la bouteille de propane . . . . . . . . . . . . . . . . . . . . . . . . . . . . . . . . . . . . . . . . . . . . . 9
Insérer et fixer la bouteille de propane. . . . . . . . . . . . . . . . . . . . . . . . . . . . . . . . . . . . . . 9
Brancher la bouteille de propane . . . . . . . . . . . . . . . . . . . . . . . . . . . . . . . . . . . . . . . . . . 9
Débrancher la bouteille de propane . . . . . . . . . . . . . . . . . . . . . . . . . . . . . . . . . . . . . . . . 9
Installation de la conduite d’alimentation en gaz naturel . . . . . . . . . . . . . . . . . . . . . . . . . . . 9
Fonctionnement . . . . . . . . . . . . . . . . . . . . . . . . . . . . . . . . . . . . . . . . . . . . . . . . . . . . . . . . . 9
Rechercher une fuite potentielle . . . . . . . . . . . . . . . . . . . . . . . . . . . . . . . . . . . . . . . . . . 9
Fonctionnement des brûleurs principaux . . . . . . . . . . . . . . . . . . . . . . . . . . . . . . . . . . . . 9
Fonctionnement du brûleur latéral . . . . . . . . . . . . . . . . . . . . . . . . . . . . . . . . . . . . . . . . 10
Conseils . . . . . . . . . . . . . . . . . . . . . . . . . . . . . . . . . . . . . . . . . . . . . . . . . . . . . . . . . . . 11
Fonctionnement de la minuterie numérique. . . . . . . . . . . . . . . . . . . . . . . . . . . . . . . . . 11
Nettoyage et entretien . . . . . . . . . . . . . . . . . . . . . . . . . . . . . . . . . . . . . . . . . . . . . . . . . . . 12
Enregistrement de l’appareil. . . . . . . . . . . . . . . . . . . . . . . . . . . . . . . . . . . . . . . . . . . . . . . 12
Garantie limitée . . . . . . . . . . . . . . . . . . . . . . . . . . . . . . . . . . . . . . . . . . . . . . . . . . . . . . . . 12
Guide de dépannage. . . . . . . . . . . . . . . . . . . . . . . . . . . . . . . . . . . . . . . . . . . . . . . . . . . . . 13
Ne jamais laisser un barbecue allumé sans
surveillance.
Conservez ces instructions afin de pouvoir les
consulter ultérieurement. Si vous êtes en train
d’assembler cet appareil pour une autre personne,
veuillez lui fournir le manuel afin qu’elle puisse le
lire et le consulter plus tard.
DANGER
L’utilisation et l’installation de cet appareil doivent être conformes aux codes locaux. En
l’absence de codes locaux, suivez le Code national du gaz combustible, les normes ANSI
Z223.1/NFPA 54, le Code d’installation du gaz naturel et du propane, CAN/CGA-B149.1 ou
le Code sur le stockage et la manipulation du propane, B149.2, ou la norme pour véhicules
récréatifs ANSI A 119.2/NFPA 1192, la réglementation CSA Z240 pour séries VR, et le Code sur
les véhicules récréatifs selon le cas.
Fabriqué en Chine pour: Blue Rhino Global Sourcing, Inc
Winston-Salem, NC 27104 États-Unis • 1.800.762.1142, www.bluerhino.com
© 2011 Blue Rhino Global Sourcing, Inc. Tous droits réservés.
UniFlame® est une marque déposée de Blue Rhino Global Sourcing, Inc. Tous droits réservés. GBC1143W-C-OM-111 EF

Barbecue d’extérieur au propane, modèle nº GBC1143W-C
DANGER: Le non-respect des avis de danger, des mises en garde et des consignes de sécurité de ce manuel risque de provoquer un incendie ou une
explosion et d’entraîner des dégâts matériels, des blessures graves voire la mort.
AVERTISSEMENT:
Ce barbecue doit être utilisé uniquement à l’extérieur et ne doit pas être utilisé
dans un immeuble, un garage ou tout autre espace clos.
NE PAS utiliser ou allumer cet appareil à moins de dix (10) pieds (3 m) de tout
mur, construction ou immeuble.
Pour usage domestique seulement. Ce barbecue N’est PAS destiné à un usage
commercial.
Ce barbecue n’est pas sensé être utilisé pour se chauffer et ne devrait jamais
être utilisé en tant que chauffage d’appoint. Des émanations TOXIQUES peuvent
s’accumuler et provoquer l’asphyxie.
Ce barbecue est homologué afin de pouvoir être utilisé en toute sécurité
uniquement aux États-Unis et au Canada. Ne pas modifier ce barbecue afin
de pouvoir l’utiliser autre part. Toute modification ou altération présentera un
danger de fonctionnement.
Avis aux personnes habitant en appartements : Vérifier auprès de la gérance
pour connaître les conditions requises, la réglementation et le code de prévention
des incendies de votre complexe d’habitations collectives. Si permis, utiliser le
foyer en le posant au sol en laissant une distance de sécurité de dix (10) pieds (3
m) entre le barbecue et toute structure. Ne pas utiliser sous un balcon.
Ce barbecue doit être utilisé uniquement avec du propane (PL). Toute utilisation
de gaz naturel avec ce barbecue ou tentative de conversion au gaz naturel de ce
barbecue est dangereuse et rendra la garantie nulle et non avenue.
Caractéristiques du propane (PL) :
a. Le propane est un gaz inflammable et dangereux si ce dernier n’est pas
manipulé correctement. Il est indispensable de connaître les dangers encourus
avant d’utiliser tout appareil fonctionnant au propane.
b. Le propane est un gaz inflammable qui risque d’exploser sous pression. Le
propane qui risque d’exploser sous pression, est plus lourd que l’air, se dépose
et demeure au sol.
c. Le propane à l’état naturel est inodore. Pour votre sécurité, un odorisant ayant
l’odeur de choux avariés a été ajouté.
d. Tout contact du propane avec la peau risque d’entraîner des engelures.
Seules les bouteilles marquées « propane » peuvent être utilisées.
La bouteille de propane doit être fabriquée, marquée et mise en service
conformément à la Réglementation sur les bouteilles de gaz de pétrole liquéfié
établie par le Ministère des transports des États-Unis (DOT) ou répondre à la
Norme nationale du Canada, CAN/CSAB339 sur les bouteilles, sphères et tubes
destinés au transport de produits dangereux et la commission.
La bouteille de propane doit être placée et homologuée afin de permettre
l’extraction des vapeurs de gaz.
La bouteille de propane doit être équipée d’un système d’arrêt volumétrique
(OPD) empêchant tout remplissage excessif.
Utiliser uniquement des bouteilles de propane équipées d’un dispositif de
branchement compatible avec le raccord d’un appareil de cuisson de plein air.
La bouteille de propane doit posséder un col afin de protéger le robinet et la
soupape de la bouteille.
Ne jamais utiliser une bouteille de propane si le corps, la soupape, le col ou le
socle sont endommagés.
Toute bouteille bosselée ou présentant des traces de rouille risque d’être
dangereuse et devrait être vérifiée par votre fournisseur avant de l’utiliser.
Ne pas laisser tomber la bouteille ni la manipuler brusquement ou brutalement!
Les bouteilles de gaz doivent être entreposées à l’extérieur, hors de la portée des
enfants et ne doivent pas être entreposées dans un bâtiment, un garage ou dans
tout autre lieu fermé. Les bouteilles de gaz ne doivent jamais être entreposées
dans un endroit où la température risque de dépasser 51,6°C (125°F)!
Ne pas introduire d’outil ni de corps étranger dans la sortie du robinet de la
bouteille de gaz ni dans la soupape de sécurité. Vous risquez d’endommager la
soupape et de provoquer une fuite. Toute fuite de propane risque de provoquer
une explosion ou un incendie et d’entraîner des blessures graves voire la mort.
Ne pas bloquer ni boucher les trous sur les côtés ou à l’arrière du barbecue.
Ne jamais garder une bouteille de propane pleine dans une voiture ou dans
le coffre d’une voiture sous une forte chaleur. La chaleur peut provoquer une
augmentation de la pression du gaz, pouvant provoquer l’ouverture de la
soupape de sécurité et lui permettre de s’échapper.
Mettre un bouchon antipoussière sur la sortie du robinet d’une bouteille qui n’est
pas utilisée. Utiliser uniquement le type de bouchon antipoussière fourni avec
le robinet de la bouteille. D’autres types de bouchons pourraient ne pas être
étaches et permettre des fruites de propane.
Fermer le gaz et débrancher la bouteille lorsque le barbecue n’est pas utilisé.
Ne jamais entreposer une bouteille de propane de rechange sous ou à proximité
de cet appareil.
Ne jamais remplir la bouteille de propane à plus de 80% de sa capacité.
Les consignes ci-dessus doivent être strictement respectées et le non respect
de ces consignes risque de provoquer un incendie et d’entraîner des dégâts
matériels ou des blessures graves.
Ne jamais essayer de raccorder ce barbecue au circuit de propane d’une
caravane, autocaravane ou de votre maison.
La prise d’alcool, de médicaments ou de drogues risque de nuire à l’aptitude de
l’utilisateur à assembler ou à utiliser cet appareil en toute sécurité.
La présence de fortes odeurs, ou si vous avez une rhume ou des sinus bouchés,
risque de nuire à la détection d’une fuite de propane. Faites preuve de précaution
et de bon sens lorsque vous effectuez un test d’étanchéité et recherchez une
fuite.
Ne jamais utiliser de charbon de bois, de liquide allume-barbecue, de pierres de
lave, d’essence, de kérosène, de pétrole lampant ou d’alcool avec ce barbecue.
Votre barbecue a été vérifié en usine afin de s’assurer que les raccords ne
présentent aucune fuite. Vérifier à nouveau tous les raccords en suivant les
instructions du chapitre “Fonctionnement” du manuel car il est possible qu’ils se
soient desserrés lors du transport.
Vérifier que l’appareil ne présente aucune fuite même si ce dernier a été
assemblé pour vous par quelqu’un d’autre.
Ne pas utiliser le barbecue en cas de fuite de gaz. Toute fuite de gaz risque de
provoquer un incendie ou une explosion.
Il est obligatoire de suivre toutes les procédures de détection de fuite avant
d’utiliser cet appareil. Afin d’éviter tout risque d’incendie et d’explosion lorsque
l’on recherche une fuite :
a. Vérifier que le circuit ne présente pas de fuite en effectuant un “test
d’étanchéité” avant d’allumer le barbecue à chaque fois que la bouteille de
gaz est branchée afin de l’utiliser.
b. Interdiction de fumer. Ne pas utiliser ni laisser de sources d’ignition à
proximité du barbecue lorsque l’on recherche une fuite.
c. Effectuer le test d’étanchéité en plein air, dans un emplacement bien aéré.
d. Ne pas utiliser d’allumettes, de briquets ou de flamme nue afin de rechercher
une fuite.
e. Ne pas utiliser le barbecue avant d’avoir réparé toute les fuites.
S’il s’avère impossible d’arrêter une fuite, débrancher la bouteille de propane.
Contacter un réparateur ou votre fournisseur de bouteilles de propane.
Ce barbecue a été mis au point pour pouvoir fonctionner avec la pression
d’alimentation suivante : 11 po. (28 cm) de colonne d’eau.
Ne pas utiliser ni entreposer d’essence ou de liquides aux vapeurs inflammables
à moins de 7,6 m de cet appareil.
Ne pas utiliser le barbecue en présence de vapeurs et émanations explosives.
Veiller à ce que la zone autour du barbecue demeure dégagée et dépourvue de
matières combustibles, d’essence et d’autres liquides aux vapeurs inflammables.
S’assurer que toute matière combustible se trouve toujours à une distance de
sécurité minimum de 36 po. (92 cm) cm sur les côtés et derrière le barbecue. NE
PAS utiliser ce barbecue sous un toit ou une structure quelconque suspendue, en
saillie ou en surplomb au dessus du barbecue.
Il est primordial que le compartiment de la soupape de commande du barbecue,
les brûleurs et les passages par où l’air circule demeurent propres. Vérifier le
barbecue avant chaque utilisation.
Ne modifier en aucune façon le barbecue. Toute modification ou altération
entraînera l’annulation de la garantie.
Ne pas utiliser le barbecue à moins qu’il ne soit COMPLÈTEMENT assemblé et
que les pièces ne soient toutes fixées et serrées.
Ne pas placer ce type de barbecue dans un espace où le barbecue sera encastré.
Le non respect de cette mise en garde risque de provoquer une explosion ou un
incendie et d’entraîner des dégâts matériels, des blessures graves voire la mort.
Ce barbecue doit être vérifié et nettoyé en entier régulièrement. Nettoyer et
inspecter le tuyau à chaque fois, avant d’utiliser l’appareil. En cas d’abrasion,
d’usure, de coupures ou de fuite, le tuyau doit être remplacé avant que cet
appareil ne soit mis en fonctionnement.
Utiliser uniquement le régulateur et le tuyau fournis. Le régulateur et le tuyau de
rechange doivent être ceux spécifiés par le fabricant.
Utiliser uniquement des pièces agréées de l’usine Blue Rhino Global Sourcing,
Inc. L’emploi de toute pièce non agréée peut être dangereuse et entraînera
l’annulation de la garantie.
Ne pas utiliser cet appareil avant de lire le chapitre « Fontionnement » de ce
manuel.
Ne pas toucher les pièces métalliques du barbecue avant qu’il n’ait
complètement refroidi (attendre environ 45 minutes) afin de ne pas se brûler
à moins de porter des vêtements de protection (gants, maniques, attirail de
barbecue, etc.).
Ne pas installer ni utiliser cet appareil à bord d’un bateau ou d’un véhicule
récréatif.
Lors de la cuisson, conserver toujours à portée de main des articles ou matières
capables d’éteindre le feu. En cas de feu de graisse, ne tentez pas d’éteindre le
feu avec de l’eau. Utiliser un extincteur à poudre BC ou étouffez le feu avec de la
terre, du sable ou du bicarbonate de soude.
Ne pas utiliser le barbecue par grand vent.
Ne jamais se pencher au-dessus du barbecue pour l’allumer.
Ne jamais laisser un barbecue allumé sans surveillance surtout si des enfants ou
des animaux domestiques et de compagnie sont à proximité.
Ne pas laisser le barbecue sans surveillance lorsqu’il est en phase de
préchauffage ni après la cuisson pour éliminer des résidus de nourriture par
chaleur intense avec le bruleur réglé sur « HIGH » (max). Si le barbecue n’est pas
nettoyé, un feu de graisse risque de se produire et d’endommager le barbecue.
Ne pas placer de récipient vide sur le barbecue lorsqu’il est allumé.
Faire preuve de précautions au moment de placer quelque chose sur le barbecue
lorsqu’il est allumé.
Ne pas essayer de déplacer le barbecue quand il est allumé. Laisser le barbecue
refroidir avant de le déplacer ou de le remiser.
La bouteille de propane doit être débranchée et retirée avant de déplacer le
barbecue.
Le remisage du barbecue à l’intérieur est autorisé seulement si la bouteille a été
débranchée et retirée de l’appareil et correctement entreposée à l’extérieur.
Veiller à toujours ouvrir le couvercle du barbecue lentement et avec précaution
car la chaleur et la vapeur piégées à l’intérieur risquent de provoquer de graves
brûlures.
Ne pas tenter de débrancher le régulateur de gaz de la bouteille ou de
débrancher une pièce quelconque de l’alimentation du gaz lorsque le barbecue
est allumé.
Placer toujours le barbecue sur une surface plane et dure. Il est déconseillé de le
placer sur de l’asphalte ou du bitume.
Placer les tuyaux souples de gaz le plus loin possible des surfaces chaudes et de
l’égouttage des graisses brûlantes.
Veiller à ce que les câbles et cordons électriques demeurent toujours loin du
barbecue lorsqu’il est chaud.
Tous les accessoires électriques (tells que le tournebroche de la rôtisserie)
doivent être mis à la terre conformément aux codes locaux, ou le Code électrique
national, ANSI / NFPA 70 ou le Code électrique canadien et la réglementation
CSA C22.1. Veillez à ce que les cordons électriques et ou les tuyaux souples de
combustible demeurent à l’écart des surfaces chaudes.

Pour toute assistance, appeler le 1.800.762.1142. Ne pas retourner au point de vente.
page
3
Après une période de remisage ou si le barbecue n’a pas été utilisé pour une
certaine période, s’assurer qu’il n’y a pas de fuite et que les brûleurs ne sont pas
bouchés. Vérifier également que le tuyau ne présente pas de traces d’abrasion,
d’usure ou de coupures.
Le fait de ne pas maintenir le couvercle ouvert lors de l’allumage des brûleurs du
barbecue ou de ne pas attendre 5 minutes afin que le gaz se dissipe au cas où le
barbecue ne s’allume pas, risque de provoquer une flambée soudaine explosive.
Ne jamais utiliser le barbecue sans avoir installé auparavant le diffuseur de
chaleur.
Veiller à toujours utiliser un thermomètre à viande afin de s’assurer que la
nourriture est cuite à une température adéquate.
Porter des gants de protection pour assembler cet article.
Ne pas forcer les pièces les unes dans les autres afin d’éviter toute blessure et
éviter d’endommager cet article.
Liste des pièces
1
Grille de cuisson (3)
2
Grille de réchauffage
Indicateur de
3
température*
4
Couvercle*
5
Poignée du couvercle*
Support gauche de la
6
poignée du couvercle (2)*
55-10-153
55-10-152
55-09-146
55-11-004
55-11-005
55-11-006
Vue éclatée
1
11
12
13
1
1
7
14
7
Diffuseur de chaleur (4)
8
Grille du brûleur latéral
9
Tablette droite
55-10-156
55-11-007
55-11-008
42
25
10
Brûleur latéral
55-11-009
27
11
Porte-serviette
Crochets porte-
12
ustensiles (4)*
13
Tablette gauche
Panneau avant de la
14
tablette gauche
55-07-548
55-07-729
55-11-010
55-11-011
32
Ne jamais recouvrir complètement la zone de cuisson avec du papier
d’aluminium.
Les consignes ci-dessus doivent être strictement respectées et le non respect
de ces consignes risque de provoquer des dégâts matériels ou d’entraîner des
blessures graves voire la mort.
L’installation et les réparations doivent être effectuées par du personnel
qualifiée. Les consignes ci-dessus doivent être strictement respectées et le non
respect de ces consignes risque de provoquer un incendie et d’entraîner des
dégâts matériels ou des blessures graves.
Ne pas utiliser le barbecue pour se chauffer ou pour cuisiner à l’intérieur.
Des émanations TOXIQUES de monoxyde de carbone peuvent s’accumuler et
provoquer l’asphyxie.
3
2
6
5
6
4
8
15
9
16
18
10
19
20
21
17
22
16
23
26
17
24
28
29
33
34
30
31
39
15
Brûleur (4)*
Cadran du bouton de
16
commande (5)*
Bouton de commande du
17
brûleur (5)
18
Bouton de l’allumeur*
19
Cuve du barbecue*
20
Régulateur et tuyau*
Panneau avant de la
21
tablette droite
Plaque collectrice de
22
graisse
Godet collecteur de
23
graisse
Support du cadre du
24
chariot
Support du cadre du
25
chariot
Support arrière du cadre
26
du chariot
27
Pied arrière gauche
55-11-012
55-11-013
55-09-006
55-07-322
55-11-014
55-11-015
55-11-016
55-11-017
55-11-018
55-11-019
55-11-020
55-11-021
55-11-022
28
Pied arrière droit
29
Ouvre-bouteille*
30
Tige d’allumage*
31
Pied avant droit
32
Pied avant gauche
Tige rectangulaire du
33
cadre du chariot
34
Panneau avant supérieur
35
Panneau avant inférieur
36
55-11-023
55-11-024
55-10-173
55-11-025
55-11-026
55-11-027
55-11-028
55-11-029
36
37
38
39
40
41
42
* Prémonté
35
37
Pied*
Plaque de fond du
barbecue
Boulon de la bouteille de
gaz*
Enjoliveur (2)
Roue (2)
Essieu
Minuterie numérique*
38
41
40
39
55-11-030
55-11-031
55-11-032
55-15-170
55-15-211
55-11-033
55-11-203
Quincaillerie
A
B
C
D
E
F
G
H
I
Vis
Vis
Vis
Boulon
Écrou
Rondelle
Entretoise en
caoutchouc
Pile AAA
Pile AA
Niquelée, à tête bombée Phillips, M4x10
Niquelée, à tête bombée Phillips, M6x16
Niquelée, à tête bombée Phillips, M6x40
Niquelé, à tête hexagonale, M6x16
Galvanisée, à tête hexagonale, M10
Niquelée, ø6.4
Entretoise en caoutchouc
Pile AAA
Pile AA
4 pcs
39 pcs
2 pcs
10 pcs
2 pcs
6 pcs
2 pcs
2 pcs
1 pc
Outils requis pour l’assemblage (fournis)
Tournevis cruciforme Phillips nº 1 1 pc
Tournevis cruciforme Phillips nº 2 1 pc
Clé M10-M6 2 pcs

Instructions d’assemblage
Barbecue d’extérieur au propane, modèle nº GBC1143W-C
1
NE PAS RETOURNER AU MAGASIN AVEC CET
ARTICLE.
Pour toute assistance technique, appelez le numéro sans
frais 1.800.762.1142. Faites en sorte que votre manuel
d’utilisation et le modèle numéro soient à portée de main
afin de pouvoir vous y référer.
Remarque: Le numéro du modèle se trouve au dos du chariot.
Pour faciliter l’assemblage:
• Pour éviter de perdre des petites pièces ou la quincaillerie
d’installation, assemblez cet article sur une surface dure et
plane qui ne comporte pas de trous ni de fissures.
• Prévoyez une surface de travail suffisamment grande afin
d’étaler toutes les pièces et la quincaillerie d’installation.
• Lorsque nécessaire, serrez toute les fixations et la visserie en
premier, puis une fois l’étape terminée, serrez-les complètement.
• Suivez toutes les étapes dans l’ordre afin d’assembler
correctement cet article.
Fixez le pied arrière gauche, le support arrière du cadre
du chariot et le pied arrière droit
2
3
Pour effectuer l’assemblage, vous aurez besoin des choses suivantes:
• une (1) solution de détection de fuites (voir instructions sur la
préparation de la solution au chapitre « Fonctionnement »).
• une (1) bouteille de propane liquide pour barbecue (de 15 à 19
litres) remplie avec précision avec raccord de robinet à filetage
externe Acme de type 1.
Temps d’assemblage: environ une (1) heure.
Fixez les pieds et les panneaux avant
4
B
Fixez la plaque de fond
x 4
B
x 8
B
x 4

Pour toute assistance, appeler le 1.800.762.1142. Ne pas retourner au point de vente.
page
5
5
Fixez le cadre arrière du chariot
Fixez l’essieu, les roues et les enjoliveurs
6
7
C
Fixez la tige rectangulaire du cadre du chariot et
installez la tige d’allumage
x 2
8
E
Fixez les supports gauche et droit du cadre du chariot
x 2
G
x 2
B
x 3
B
x 8

Instructions d’assemblage (suite)
Barbecue d’extérieur au propane, modèle nº GBC1143W-C
9
Fixez la cuve du barbecue
Retirez le couvercle du compartiment à piles de la
minuterie numérique
10
Installez les piles AAA (2) et remettez en place le
couvercle
Remarque: Retirez l’emballage en plastique avant d’insérer la pile.
B
Fixez les panneaux avant des tablettes latérales puis le
porte-serviette
11
x 4
F
x 4
H
Fixez la tablette gauche
Remarque: Faites en sorte qu’au moins 8 mm du filetage des boulons demeurent
12
visibles.
x 2
B
x 8
F
x 2
D
x 5

Pour toute assistance, appeler le 1.800.762.1142. Ne pas retourner au point de vente.
page
7
Fixez la tablette droite
Remarque: Faites en sorte qu’au moins 8 mm du filetage des boulons demeurent
13
visibles.
Fixez le cadran du bouton de commande du brûleur
latéral puis son bouton de commande
14
D
Fixez les boutons de commande
15
x 5
A
Fixez le brûleur latéral, le fil de l’allumeur du brûleur
latéral puis la grille du brûleur latéral
16
x 2
A
x 2

Instructions d’assemblage (suite)
Barbecue d’extérieur au propane, modèle nº GBC1143W-C
Placez les diffuseurs de chaleur et les grilles de cuisson
17
Insérez la grille de réchauffage
18
Insérez la pile AA
Remarque: Retirez l’emballage en plastique avant d’insérer la pile.
19
Insérez la plaque collectrice de graisse et le godet
collecteur de graisse
20
I
x 1

Pour toute assistance, appeler le 1.800.762.1142. Ne pas retourner au point de vente.
OFF
ARRÊT
X
X
X
X
X
page
9
Installer la bouteille de propane
Il est nécessaire de brancher une bouteille de propane standard de
20 livres (9 kg) pour barbecue avec soupape à filetage externe.
Remarque: Une bouteille de propane standard vide pour barbecue
pèse environ 18 livres (8,1 kg). Une bouteille de propane standard
pour barbecue remplie avec précision ne devrait pas peser plus de
38 livres (17,2 kg).
Avertissement: La bouteille de propane doit être
correctement débranchée et retirée avant de
déplacer ce barbecue.
Insérer et fixer la bouteille de propane
Desserrez le bouton de fixation de la bouteille de propane en le tournant dans le sens inverse à
celui des aiguilles d’une montre.
Placez la bouteille de propane ayant été remplie avec précision debout, dans la cavité du
barbecue qui lui est réservée de manière à ce que le l’entrée du robinet de gaz se trouve face
au tuyau de gaz.
Fixez la bouteille en tournant le bouton de fixation de la bouteille de propane en le tournant
dans le sens des aiguilles d’une montre jusqu’à ce qu’il soit serré.
Brancher la bouteille de propane
Avant de procéder au branchement, assurez-vous de
l’absence de débris dans la tête de la bouteille de
propane, autour de la tête du régulateur ainsi que dans la
tête du brûleur et dans les orifices du brûleur.
Branchez le régulateur et son tuyau sur la bouteille en
tournant dans le sens des aiguilles d’une montre jusqu’au
blocage.
Débrancher la bouteille de propane
Fonctionnement
Rechercher une fuite potentielle
Raccordement des brûleurs
1. Assurez-vous que le régulateur et son tuyau ont été correctement raccordés au brûleur et
à la bouteille de gaz.
Si l’appareil a été assemblé pour vous, vérifiez visuellement le branchement du tube
de venturi du brûleur sur l’orifice. Assurez-vous que le tube de venturi du brûleur est
correctement placé sur l’orifice.
AVERTISSEMENT: Si vous ne vérifiez pas ce raccord et ne respectez
pas ces instructions, vous risquez de provoquer un incendie ou une
explosion pouvant entraîner des dégâts matériels, des blessures
graves voire la mort.
2. Reportez-vous à l’illustration afin d’effectuer correctement l’installation (illustrations 1 et 2).
3. Si le tube du brûleur ne repose pas au ras de l’orifice, veuillez appeler notre service à la
clientèle au 1.800.762.1142.
Raccordement de la bouteille et du tuyau de gaz
1. Préparez une solution d’environ 80 ml destinée à détecter les fuites en mélangeant un
volume de liquide à vaisselle et 3 volumes d’eau.
2. Assurez-vous que les boutons de commande du barbecue sont tous sur “ARRÊT ”.
Reportez-vous à l’illustration 3.
3. Branchez la bouteille de propane en suivant les instructions « Installer la bouteille de
propane ».
4. Ouvrez le gaz en réglant le robinet de la bouteille de propane sur « OPEN » (ouvert).
5. Versez quelques gouttes de la solution sur tous
les points de raccordement indiqués par un « X »
(illustrations 1, 2 et 4).
a. Si des bulles apparaissent, fermez le gaz en
réglant le robinet de la bouteille de propane sur
« CLOSED » (fermé), desserrez le raccord puis
rebranchez en vous assurant qu’il est étanche en
effectuant un autre test d’étanchéité.
b. Si des bulles persistent après plusieurs tentatives,
fermez le gaz en réglant le robinet de la bouteille
de propane sur « CLOSED » (fermé), débranchez
la bouteille en suivant les instructions »
Débrancher la bouteille de propane » et appelez le
1.800.762.1142.
c. S’il n’y a toujours pas de bulles après une minute,
fermez le gaz en réglant le robinet de la bouteille
de propane sur « CLOSED » (fermé), essuyez la
solution et continuez.
Fonctionnement des brûleurs
principaux
Utiliser le barbecue pour la première fois
1. Assurez-vous d’avoir retiré toutes les étiquettes
ainsi que tous les matériaux d’emballage et films
protecteurs du barbecue
2. Avant de cuire quoi que ce soit sur le barbecue
pour la première fois, faites fonctionner le barbecue
pendant environ 15 minutes avec le couvercle
fermé et le bouton de commande du gaz sur
(maximum). La chaleur « nettoiera » les pièces
internes et dissipera les odeurs.
Raccordement
du propane
Raccordement
du propane
Soupape de
commande du
propane avec
orifice
Illustration 1
Tube de venturi
du brûleur
Soupape de
commande
du propane
avec orifice
Brûleurs principaux
Illustration 2
Tube de
venturi du
brûleur
Brûleur latéral
Illustration 3
Avant de débrancher la bouteille, assurez-vous que le
robinet de la bouteille de propane se trouve sur
« CLOSED » (fermé).
Débranchez le régulateur et son tuyau de la bouteille
de propane en tournant le bouton dans le sens inverse
à celui des aiguilles d’une montre jusqu’à ce qu’il soit
desserré.
Avertissement: La bouteille de propane
doit être correctement débranchée et
retirée avant de déplacer ce barbecue.
Vous avez besoin d’une bouteille de gaz? Essayez notre service d’échange de bouteilles
de gaz. C’est un service facile, rapide, sans danger et présent dans des
dizaines de milliers de points de vente partout dans le pays. Achetez une
bouteille neuve ou échangez votre bouteille vide contre une bouteille déjà
remplie avec précision.
Pour allumer
Attention: Assurez-vous que la
zone autour du barbecue demeure
dégagée et dépourvue de matières
combustibles, d’essence et d’autres
liquides et vapeurs inflammables.
Attention: Ne pas bloquer ni empêcher
le débit d’air de combustion du
propane ni de ventilation.
Attention: Assurez-vous que les tubes
de venturi et des brûleurs ne sont pas
bouchés par des insectes et leurs nids
et nettoyez-les si nécessaire. Si la
tubulure du brûleur est bouchée, ceci
risque de provoquer un feu sous le
barbecue.
Attention: Toute tentative d’allumage
du brûleur avec le couvercle fermé peut
provoquer une explosion !
Illustration 4

Fonctionnement (suite)
OFF
ARRÊT
Barbecue d’extérieur au propane, modèle nº GBC1143W-C
1. Ouvrez le couvercle du barbecue.
2. Assurez-vous qu’il n’existe aucune obstruction et
que rien ne gêne le débit d’air vers les brûleurs. Des
araignées et autres insectes peuvent y élire domicile
et boucher le brûleur et le tube venturi au niveau de
l’orifice. Si la tubulure du brûleur est bouchée, ceci
risque de provoquer un feu en-dessous de l’appareil.
3. Tous les boutons de commande doivent être réglés
sur “ARRÊT ”. Reportez-vous à l’illustration 3.
4. Ouvrez le gaz en réglant le robinet de la bouteille de
propane sur « OPEN » (ouvert).
5. Ouvrez le gaz en réglant le robinet de la bouteille de
propane sur « OPEN » (ouvert).
6. Choisissez le brûleur que vous souhaitez allumer.
Poussez et tournez le bouton de commande sur
(max.).
7. Appuyez sur le bouton (allumeur électronique)
et maintenez-le appuyé pendant 5 secondes pour
allumer le brûleur.
8. Si l’appareil ne s’allume pas en 5 secondes, réglez
le bouton du brûleur sur “ARRÊT ”, attendez 5
minutes puis reprenez la procédure d’allumage
depuis de début.
9. Si l’allumeur ne parvient pas à allumer le brûleur, fixez une allumette allumée au bout de
la tige d’allumage fournie afin d’allumer manuellement les brûleurs. Accédez aux brûleurs
en introduisant l’allumette à travers la grille de cuisson et les diffuseurs de chaleur. Placez
l’allumette allumée sur le côté du brûleur (voir illustration 5).
Important: Veillez à toujours utiliser la tige d’allumage lorsque vous allumez les brûleurs avec
une allumette.
10. Après avoir allumé les brûleurs, veuillez observer la flamme du brûleur et vérifiez que tous
les orifices du brûleur sont allumés et que la hauteur de la flamme correspond à celle de
l’illustration (voir illustration 6).
Remarque : Chaque brûleur s’allume indépendamment des autres. Reprenez les étapes 5 à 10
pour les autres brûleurs.
Brûleur
Illustration 5
Illustration 6
Flamme
Légèrement
jaune
Légèrement
bleue
Bleue
foncée
ATTENTION: Si la flamme du brûleur s’éteint lors du fonctionnement
du barbecue, fermez immédiatement le gaz en réglant les boutons de
commande sur “ARRÊT ” et tournez le robinet de la bouteille de propane
sur « CLOSED » (fermé) et ouvrez le couvercle afin que le gaz se dissipe et
attendez 5 minutes avant de tenter à nouveau d’allumer le barbecue.
1. Ouvrez le couvercle et allumez les brûleurs désirés en suivant les instructions d’allumage du
manuel d’utilisation.
2. Fermez le couvercle et préchauffez le barbecue en le réglant sur (max.).
3. Portez des gants de protection et utilisez des pinces de cuisine à long manche pour disposer
les aliments sur les grilles de cuisson, au-dessus des brûleurs qui ne sont pas allumés.
4. Réglez les boutons sur la température désirée.
5. Avec le couvercle ouvert ou fermé, laissez la nourriture cuire jusqu’à ce que la température
interne désirée des aliments soit atteinte.
6. Éteignez le barbecue en suivant les instructions « Pour éteindre ».
Pour plus de conseils sur la cuisson indirecte, veuillez vous reporter au chapitre « Quelques
conseils pour de meilleures grillades et afin d’assurer la pérennité du barbecue ».
Éliminer les flambées soudaines:
Attention: Il n’est pas possible d’éteindre les feux de graisse en
fermant le couvercle du barbecue.
• Ne pas utiliser d’eau sur un feu de graisse. La graisse risque
de vous éclabousser et de provoquer des brûlures graves, des
blessures et autres dégâts matériels. En cas de feu de graisse,
tournez les boutons de commande sur “ARRÊT ” et le robinet de
la bouteille de propane sur « CLOSED » (fermé).
• Ne pas laisser le barbecue sans surveillance lorsqu’il est en phase
de préchauffage ni après la cuisson pour éliminer des résidus de
nourriture par chaleur intense avec le bruleur réglé sur (max).
Si le barbecue n’est pas nettoyé, un feu de graisse risque de se
produire et d’endommager le barbecue.
AVERTISSEMENT: Lors de la cuisson, conserver toujours à portée de
main des articles ou matières capables d’éteindre le feu. En cas de
feu de graisse ou d’huile, ne pas tenter d’éteindre le feu avec de l’eau.
Utiliser un extincteur à poudre BC ou étouffer le feu avec de la terre, du
sable ou du bicarbonate de soude.
Les flambées soudaines sont normales et se produisent régulièrement lorsque vous cuisez
de la viande au barbecue et donnent un goût unique à vos grillades. De trop nombreuses
flambées soudaines risquent de brûler vos aliments et de créer une situation dangereuse
pour vous et votre barbecue.
Important: Les trop nombreuses flambées soudaines résultent d’une accumulation de résidus
de graisse au fond du barbecue.
Minimiser les flambées soudaines:
Pour éteindre
1. Fermez le gaz en réglant le robinet de la bouteille de propane sur « CLOSED » (fermé).
2. Tournez tous les boutons de commande dans le sens des aiguilles d’une montre afin de les
régler sur “ARRÊT ” les uns après les autres.
Remarque : Vous entendrez un son étouffé, ceci est normal, il s’agit du reste du gaz venant
de se consumer.
3. Débranchez la bouteille en suivant les instructions « Débrancher la bouteille de propane ».
Pour une cuisson directe
Attention : Ne pas laisser le barbecue sans surveillance lorsqu’il est en phase
de préchauffage ni après la cuisson pour éliminer des résidus de nourriture
par chaleur intense avec le bruleur réglé sur (max). Si le barbecue n’est
pas nettoyé, un feu de graisse risque de se produire et d’endommager le
barbecue.
Laissez cuire les aliments directement sur les brûleurs chauds. Cette cuisson est idéale
afin de piéger le jus à l’intérieur des aliments et pour les aliments tels que les steaks, les
hambourgeois, les hot-dogs, le poulet, les légumes et les fruits dont la cuisson prendra moins
de 25 minutes.
1. Ouvrez le couvercle et allumez les brûleurs désirés en suivant les instructions d’allumage du
manuel d’utilisation.
2. Fermez le couvercle et préchauffez le barbecue en le réglant sur (max.).
3. Portez des gants de protection et utilisez des pinces de cuisine à long manche pour disposer
les aliments sur les grilles de cuisson, au-dessus des brûleurs allumés.
4. Réglez les boutons sur la température désirée.
5. Avec le couvercle ouvert ou fermé, laissez la nourriture cuire jusqu’à ce que la température
interne désirée des aliments soit atteinte.
6. Éteignez le barbecue en suivant les instructions « Pour éteindre ».
Pour plus de conseils sur la cuisson directe, veuillez vous reporter au chapitre suivant «
Quelques conseils pour de meilleures grillades et afin d’assurer la pérennité du barbecue ».
Pour une cuisson indirecte
Attention : Ne pas laisser le barbecue sans surveillance lorsqu’il est en phase
de préchauffage ni après la cuisson pour éliminer des résidus de nourriture
par chaleur intense avec le bruleur réglé sur (max). Si le barbecue n’est
pas nettoyé, un feu de graisse risque de se produire et d’endommager le
barbecue.
Cette cuisson consiste à ne pas cuire les aliments directement sur les brûleurs chauds. Cette
cuisson est idéale pour toute cuisson lente et pour les aliments dont la cuisson prend plus de
25 minutes comme les rôtis, les filets, les côtelettes ainsi que les poulets, dindes, et poissons
entiers et les articles de boulangerie.
1. Découpez le gras de la viande avant la cuisson.
2. Veillez à cuire les viandes très grasses à petit feu sur (min.) ou en effectuant une cuisson
indirecte.
3. Assurez-vous que le barbecue se trouve sur une surface dure et non combustible et que la
graisse puisse s’égoutter dans le godet collecteur.
Fonctionnement du brûleur latéral
REMARQUE : Le brûleur latéral peut être utilisé pendant que les brûleurs principaux
fonctionnent.
Ne jamais utiliser le brûleur latéral en tant que barbecue.
ATTENTION : La charge maximum pouvant être soutenue dans le
brûleur latéral est de 33 lb (15 kg).
ATTENTION : Si vous utilisez des casseroles de 5,6 litres vous risquez
de dépasser la limite de poids maximum de la tablette du brûleur
latéral et les pièces du barbecue risquent de se rompre.
ATTENTION : NE PAS se pencher sur la
tablette du brûleur latéral.
Pour allumer
1. Ouvrez le couvercle du barbecue. Toute tentative
d’allumage du brûleur avec le couvercle fermé
risque de provoquer une explosion!
2. Assurez-vous qu’il n’existe aucune obstruction et
que rien ne gêne le débit d’air vers les brûleurs. Des
araignées et autres insectes peuvent y élire domicile
et boucher le brûleur et tube de venturi au niveau
de l’orifice. Si la tubulure du brûleur est bouchée,
ceci risque de provoquer un feu en-dessous de
l’appareil.
3. Le bouton de commande doit être réglé sur
“ARRÊT ”. Reportez-vous à l’illustration 7.
4. Ouvrez le gaz en suivant les instructions « Installer
la bouteille de propane ».
5. Tournez le robinet de gaz de la bouteille de propane
sur « OPEN » (ouvert).
6. Pressez et tournez le bouton de commande dans le
sens des aiguilles d’une montre sur (max).
7. Pressez le bouton (allumeur électronique) et
maintenez-le pressé pendant 5 secondes pour
allumer le brûleur.
Illustration 7
Illustration 8

Pour toute assistance, appeler le 1.800.762.1142. Ne pas retourner au point de vente.
RESET / REMISE À ZÉRO
START/STOP
MARCHE/ARRÊT
MIN.
MINUTES
SEC.
SECONDES
LIGHT
LUMIÈRE
page
11
8. Si l’allumage ne se produit pas dans les 5 secondes
suivantes, tournez le bouton de commande du
brûleur à la position “ARRÊT ”; attendez 5 minutes
Illustration 9
Flamme
Légèrement
jaune
et répétez la procédure d’allumage.
9. Si l’allumeur ne parvient pas à allumer le brûleur,
fixez une allumette allumée au bout de la tige
d’allumage fournie afin d’allumer manuellement les
brûleurs. Placez l’allumette allumée sur le côté du
Brûleur
Légèrement
bleue
Bleue
foncée
brûleur (voir illustration 8).
Important: Veillez à toujours utiliser la tige d’allumage
lorsque vous allumez les brûleurs avec une allumette.
10. Après avoir allumé les brûleurs, veuillez observer la flamme du brûleur et vérifiez que tous
les orifices des brûleurs sont allumés et que la hauteur de la flamme correspond à celle de
l’illustration (voir illustration 9).
ATTENTION: Si la flamme du brûleur s’éteint lors du fonctionnement
du barbecue, fermez immédiatement le gaz en réglant les boutons
de commande sur “ARRÊT ” et tournez le robinet de la bouteille de
propane sur « CLOSED » (fermé) et ouvrez le couvercle afin que le gaz
se dissipe et attendez 5 minutes avant de tenter à nouveau d’allumer
le barbecue.
Pour éteindre
1. Fermez le gaz en réglant le robinet de la bouteille de propane sur « CLOSED » (fermé).
2. Tournez tous les boutons de commande dans le sens des aiguilles d’une montre afin de les
régler sur “ARRÊT ” les uns après les autres.
Remarque : Vous entendrez un son étouffé, ceci est normal, il s’agit du reste du gaz
venant de se consumer.
3. Débranchez la bouteille en suivant les instructions « Débrancher la bouteille de propane ».
Cuisson
1. Ouvrez le couvercle et allumez le brûleur en suivant les instructions d’allumage du manuel
d’utilisation.
2. Réglez le bouton de commande à la hauteur de flamme désirée.
3. Placez la casserole ou le bac contenant les aliments au centre de la grille de cuisson.
4. Procédez à la cuisson et réglez la température au besoin.
5. Éteignez le barbecue en suivant les instructions « Pour éteindre ».
15. Après chaque utilisation, laissez le barbecue refroidir. Ensuite, protégez les grilles
de cuisson propres en les enduisant d’une fine couche d’huile à friture, videz le bac
récupérateur de graisses, essuyez les surfaces externes du barbecue en utilisant un produit
de nettoyage de cuisine adéquat et protégez ces surfaces en recouvrant le barbecue avec
une housse de bonne qualité suffisamment grande pour ce type de barbecue.
16. Regardez les programmes télévisés consacrés à la cuisson au barbecue ou achetez des
livres de cuisine sur le même thème pour des conseils utiles supplémentaires comme
par exemple :
Un barbecue au gaz est idéal pour réchauffer des parts de pizza. Réglez les brûleurs sur
une flamme basse et placez les parts de pizza directement sur la grille de cuisson ayant
été auparavant préchauffée. Fermez le couvercle et laissez-les cuire jusqu’à ce que le
fromage commence à faire des bulles.
Fonctionnement de la minuterie numérique
Comptage progressif
1. Pressez la touche « START/STOP » (marche/arrêt).
La minuterie se mettra à compter à partir de 0:00.
2. Pressez la touche « START/STOP » (marche/arrêt).
La minuterie s’arrêtera.
Compte à rebours
1. Pressez la touche « MIN » pour programmer le
nombre désiré de minutes.
2. Pressez la touche « SEC » (secondes) pour
programmer le nombre désiré de secondes.
3. Pressez la touche « START/STOP » (marche/arrêt).
La minuterie commencera un compte à rebours à
partir du temps pré-programmé.
4. Lorsque la minuterie atteint 0:00, un signal sonore
retentira pendant 1 minute maximum.
5. Pour arrêter le compte à rebours à tout moment ou
arrêter le signal sonore, pressez sur la touche
« START/STOP » (marche/arrêt).
Retirer le panneau arrière de
Illustration 10
Minuterie numérique
Illustration 11
la minuterie
Quelques conseils pour de meilleures grillades et afin d’assurer
la pérennité du barbecue
1. Pour d’excellentes recettes et des bons conseils, veuillez consulter notre site
recipes.uniflame.com.
2. Pour des conseils sur la cuisson des aliments : http://www.fsis.usda.gov/Fact_Sheets/
Barbecue_Food_Safety/
3. Utilisez la grille de cuisson supérieure (grille de réchauffage) afin de maintenir au chaud les
aliments que vous venez de cuire, griller du pain ou cuire des aliments délicats dans des
pochettes de papier d’aluminium.
4. Utilisez le brûleur latéral de cet appareil en tant que cuisinière ordinaire pour faire bouillir,
sauter ou frire les aliments.
5. Pour éviter que les aliments ne collent aux grilles, vaporisez ou appliquez une couche d’huile
végétale sur les surfaces de cuisson avant d’allumer le barbecue.
6. Pour réduire les feux de graisse, veillez à ce que le barbecue demeure propre, utilisez de la
viande mince (découpez le gras) et évitez de cuire à de très hautes températures.
7. Placez les aliments délicats tels que le poisson et les légumes dans du papier d’aluminium et
placez-les sur la grille de cuisson supérieure (grille de réchauffage).
AVERTISSEMENT: Ne jamais recouvrir complètement la zone de
cuisson avec du papier d’aluminium.
8. Pour éviter que les aliments ne perdent leur jus, utilisez des pinces de cuisine à long manche
ou des spatules au lieu de fourchettes et retournez les aliments une seule fois pendant la
cuisson.
9. Lors d’une cuisson directe, réglez les brûleurs sur différents niveaux afin que les aliments
puissent être cuits à différentes températures internes dans la même tranche de temps.
10. Lors d’une cuisson indirecte pour les rôtis et les grosses tranches de viande, placez la
viande sur une grille de cuisson à l’intérieur d’un bac métallique robuste. Placez le bac sur
les brûleurs qui ne sont pas allumés.
11. Faites un essai en utilisant des bacs métalliques remplis d’eau pour réduire les feux de
graisse et cuire les viandes très juteuses. Avant d’allumer le barbecue, retirez les grilles de
cuisson et placez un bac d’eau robuste et peu profond directement sur les diffuseurs de
chaleur. Remplissez-le à moitié d’eau, de jus de fruits ou de tout autre liquide aromatisé.
Remettez en place les grilles de cuisson et placez les aliments au-dessus du bac rempli de
liquide.
12. Rehaussez le goût des aliments en les plaçant dans des pochettes d’aluminium ou dans
des fumoirs avec des copeaux de bois. Suivez les instructions du fabricant des copeaux de
bois.
13. Les tournebroches, les paniers à gril, les broches verticales à volailles et autres accessoires
peuvent améliorer la cuisson, réduire le temps de cuisson et faciliter le nettoyage.
14. Nettoyez les grilles de cuisson et les autres grilles après chaque utilisation en utilisant une
brosse de barbecue de bonne qualité conçue pour le type de matériau de votre grille. Portez
des gants de protection et retirez doucement les résidus demeurés sur les grilles pendant
qu’elles sont encore chaudes.
Lumière
Pressez la touche « LIGHT » (lumière) et l’écran LCD
s’allumera pendant 10 secondes.
Remettez en place le
panneau arrière de la
Remettre à zéro la minuterie
Si vous avez arrêté la minuterie pendant le comptage
ou pendant le compte à rebours, vous pouvez le
remettre à 0:00 en pressant et en maintenant les deux
touches indiquées par les lignes « RESET » (remise à
zéro).
Arrêt automatique
1. Pour prolonger la durée de vie de la pile, la minuterie numérique s’arrêtera automatiquement
lorsque vous ne l’utilisez pas après 3 minutes.
2. Pour la remettre en marche, pressez la touche « START/STOP » (marche/arrêt).
Remplacer les piles (voir Illustration 11)
1. Retirez le couvercle du compartiment à piles de la minuterie comme illustré.
2. Remplacez les deux piles AAA.
3. Remettez en place le couvercle du compartiment à piles de la minuterie.
minuterie

Nettoyage et entretien
1-2 in. /
25.4 - 50.8 mm
1-2 in. /
Barbecue d’extérieur au propane, modèle nº GBC1143W-C
ATTENTION:
1. Tout nettoyage ou entretien doit être effectué lorsque le barbecue
est froid et après avoir fermé et débranché l’alimentation en gaz.
2. NE placez AUCUNE pièce du barbecue dans un four autonettoyant.
La chaleur extrême endommagera le fini du barbecue.
3. NE PAS agrandir les orifices des soupapes ou des brûleurs lors du
nettoyage des soupapes ou des brûleurs.
Avis
1. Ce barbecue doit être vérifié et nettoyé en entier régulièrement.
2. N’utilisez pas de produits de nettoyage abrasifs car ils risquent d’endommager le
barbecue.
3. N’utilisez jamais de produit à nettoyer les fours sur une pièce quelle qu’elle soit du
barbecue.
Avant chaque utilisation:
1. Assurez-vous que la zone autour du barbecue
demeure dégagée et dépourvue de matières
combustibles, d’essence et d’autres liquides et
vapeurs inflammables.
2. Ne pas bloquer ni empêcher le débit d’air de
combustion du propane ni de ventilation.
3. Assurez-vous que la (les) ouverture(s) de ventilation
autour de la bouteille de propane demeurent
toujours propres et dépourvues de débris.
4. Vérifiez les flammes du brûleur afin de vous
assurer que le barbecue fonctionne correctement
(illustration 12).
5. Reportez-vous aux paragraphes ci-dessous pour les
instructions de nettoyage.
6. Vérifiez et nettoyez les tubes venturi et du brûleur
afin de vous assurer qu’ils ne sont pas bouchés pas
des insectes et leurs nids. Si la tubulure du brûleur
est bouchée, ceci risque de provoquer un feu sous
le barbecue.
État de la flamme du brûleur
suivantes pour savoir si vos brûleurs
Illustration 12
Reportez-vous aux illustrations
ont besoin d’être nettoyés
État normal: Flammes bleues
claires avec crêtes jaunes entre
2,5 et 5 cm de hauteur.
Necesita limpieza: Hace ruido y
la llama es de un azul vivo.
Nettoyage des surfaces du barbecue
5. Soulevez et éloignez le brûleur de l’orifice de la soupape de commande du gaz.
6. Nettoyez l’entrée (venturi) du brûleur avec un petit goupillon ou de l’air comprimé.
7. Nettoyez les restes de nourriture et la saleté de la surface du brûleur.
8. Nettoyez les orifices bouchés avec un fil métallique (un trombone ouvert, par exemple).
9. Vérifiez le brûleur à la recherche de détériorations (fissures ou trous). En cas de
détériorations, remplacez-le par un brûleur neuf du même fabricant.
10. Réinstallez le brûleur, vérifiez que l’orifice de la soupape de commande du gaz est
correctement positionné à l’intérieur de l’entrée du brûleur (venturi). Vérifiez également la
position de l’électrode d’allumage.
11. Remettez en place la grille du brûleur latéral.
12. Branchez la bouteille de propane en suivant les instructions « Installer la bouteille de
propane ».
13. Effectuez le test d’étanchéité afin de vous assurer que le raccord ne présente pas de fuite.
Avant le remisage
1. Assurez-vous que le bouton de commande se trouve “ARRÊT ” et que le robinet de la
bouteille de propane est sur « CLOSED » (fermé).
2. Débranchez la bouteille en suivant les instructions « Débrancher la bouteille de propane ».
3. Nettoyez toutes les surfaces du barbecue.
3. Pour aider à lutter contre la rouille, appliquez une légère couche d’huile de cuisson sur les
brûleurs.
4. Si vous comptez remiser le barbecue à l’intérieur, débranchez la bouteille de propane,
reportez-vous au chapitre « Débrancher la bouteille de propane » et laissez la bouteille de
propane à l’EXTÉRIEUR.
5. Placez le capuchon protecteur sur la bouteille de propane et entreposez la bouteille à
l’extérieur dans un endroit largement aéré et à l’abri des rayons direct du soleil.
6. Si vous remisez le barbecue à l’extérieur, couvrez le barbecue avec une housse de barbecue
pour la protéger des intempéries.
Enregistrement de l’appareil
Pour bénéficier plus rapidement du service offert par la garantie, veuillez enregistrer cet article
immédiatement sur le site internet www.bluerhino.com ou appelez le 1.800.762.1142.
Garantie limitée
1. Essuyez les surfaces du barbecue avec un liquide à
vaisselle doux ou du bicarbonate de soude mélangé
avec de l’eau.
2. Pour les tâches coriaces, utilisez un dégraissant au
citron et une brosse de nettoyage en nylon.
3. Rincez à l’eau.
4. Laissez le barbecue sécher à l’air libre.
Le brûleur doit être nettoyé:
Flammes jaunes ondulantes.
Nettoyage des brûleurs principaux
1. Assurez-vous que les boutons de commande sont tous sur “ARRÊT ” et que le robinet de la
bouteille de propane est sur « CLOSED » (fermé).
2. Débranchez la bouteille en suivant les instructions « Débrancher la bouteille de propane ».
3. Retirez les grilles de cuisson et les diffuseurs de chaleur.
4. Retirez les brûleurs en retirant les dispositifs de fixation retenant le brûleur à la partie
inférieure du barbecue.
5. Soulevez et éloignez les brûleurs de l’orifice de la soupape de gaz.
6. Déconnectez le fil de l’électrode d’allumage.
7. Nettoyez l’entrée (venturi) du brûleur avec un petit goupillon ou de l’air comprimé.
8. Nettoyez les restes de nourriture et la saleté de la surface du brûleur.
9. Nettoyez les orifices bouchés avec un fil métallique (un trombone ouvert, par exemple).
10. Vérifiez les brûleurs à la recherche de détériorations (fissures ou trous). En cas de
détériorations, remplacez le brûleur endommagé par un brûleur neuf du même fabricant.
11. Réinstallez les brûleurs, vérifiez que les orifices de la soupape de gaz sont correctement
positionnés à l’intérieur de l’entrée de chaque brûleur (venturi). Vérifiez également la
position de l’électrode d’allumage.
12. Remettez en place les diffuseurs de chaleur et les grilles de cuisson.
13. Branchez la bouteille de propane en suivant les instructions « Installer la bouteille de
propane ».
14. Effectuez le test d’étanchéité afin de vous assurer que le raccord ne présente pas de fuite.
Reportez-vous au chapitre « Rechercher une fuite potentielle ».
Nettoyage du brûleur latéral
1. Assurez-vous que les boutons de commande sont tous sur “ARRÊT ” et que le robinet de la
bouteille de propane est sur « CLOSED » (fermé).
2. Débranchez la bouteille en suivant les instructions « Débrancher la bouteille de propane ».
3. Retirez la grille du brûleur latéral.
4. Retirez le brûleur en retirant les vis retenant le brûleur à la tablette latérale.
La société Blue Rhino Global Sourcing, Inc (“le fabricant”) garantit cet article au premier
acheteur au détail et à aucune autre personne, contre tout vice de matériau et de fabrication
pendant un (1) an à partir de la date d’achat si cet article est monté et utilisé conformément
aux instructions fournies. Le fabricant vous demandera sans doute une preuve raisonnable
d’achat datée, veuillez donc conserver votre facture ou votre reçu. Cette garantie limitée se
limitera à la réparation ou au remplacement de pièces ayant été déterminées défectueuses
par le fabricant lors de conditions d’utilisation et d’entretien normales. Avant de renvoyer une
pièce, contactez le service à la clientèle du fabricant (Customer Service Department). Si le
fabricant confirme le défaut de fabrication et approuve la réclamation, ce dernier remplacera
gratuitement les dites pièces. Si vous devez renvoyer des pièces défectueuses, les pièces
devront être expédiés port-payé. Le fabricant s’engage à renvoyer les pièces à l’acheteur portpayé.
Cette garantie limitée ne couvre pas les pannes et dysfonctionnements survenant suite à tout
accident, mauvais usage, entretien incorrect de cet article, ou toute modification, mauvaise
installation ou négligence comme il a été établi dans ce manuel. De plus, cette garantie
limitée ne couvre pas les dommages au fini, à savoir les rayures, les bosses, les traces de
décoloration, de rouille ou les dommages résultant des intempéries après achat de l’article.
Cette garantie remplace toute autre garantie expresse et il n’existe aucune autre garantie
expresse à l’exception de la couverture indiquée ici. Le fabricant désavoue toute garantie
couvrant des produits ayant été achetés auprès de revendeurs autres que les revendeurs et
distributeurs agréés y compris toute garantie de commerciabilité et d’adaptation à un usage
particulier. LE FABRICANT DÉCLINE ÉGALEMENT TOUTE GARANTIE IMPLICITE Y COMPRIS
TOUTE GARANTIE DE COMMERCIABILITÉ ET D’ADAPTATION À UN USAGE PARTICULIER. LE
FABRICANT NE POURRA ÊTRE TENU RESPONSABLE PAR L’ACHETEUR OU UN TIERS POUR TOUS
DÉGÂTS ET DOMMAGES PARTICULIERS, INDIRECTS, PUNITIFS OU CONSÉCUTIFS. De plus, le
fabricant désavoue toute garantie expresse ou implicite et décline toute responsabilité en cas
de défaut de fabrication causés par un tiers.
Cette garantie limitée octroie des droits spécifiques à l’acheteur reconnus par la loi et il
est possible que ce dernier en possède d’autres selon sa localité. Certaines juridictions ne
permettent pas l’exclusion ni la limitation de dommages consécutifs ou accessoires ni la
limitation en temps d’une garantie et ces limitations peuvent ne pas être applicables à tous.
Le fabricant ne permet en aucun cas à une personne ou à une société de s’attribuer les
responsabilités et les obligations liées à la vente, l’installation, l’utilisation, la dépose ou le
remplacement de cet article, et aucune de ces représentations n’engage la responsabilité du
fabricant.
Blue Rhino Sourcing, Inc
Winston-Salem, North Carolina 27105, États-Unis
(800)-762-1142

Pour toute assistance, appeler le 1.800.762.1142. Ne pas retourner au point de vente.
Guide de dépannage
Problème Cause possible Prévention/mesure correctrice
Assurez-vous que le régulateur est solidement fixé à la bouteille de propane, ouvrez le
gaz en tournant le robinet de la bouteille de propane sur « OPEN » (Ouvert).
1. Fermez le gaz en tournant le robinet de la bouteille de propane ou de la conduite
principale d’alimentation en gaz naturel sur « CLOSED » (fermé).
2. Attendez 5 minutes pour que le gaz se dissipe.
3. Suivez les instructions du chapitre « Rechercher une fuite potentielle » du manuel.
Nettoyez le fil conducteur et/ou l’électrode avec de l’alcool isopropylique.
Remplacez l’électrode.
Remplacez l’ensemble électrode-fil conducteur.
Vérifiez si la bouteille de propane est vide.
A. Si elle est vide, remplacez-la ou remplissez-la.
B. Si la bouteille n’est pas vide, reportez-vous aux instructions “Baisse soudaine du
débit du propane ou hauteur réduite de flamme.”
1. Tournez le robinet de la bouteille de propane ou de la conduite principale
d’alimentation en gaz naturel sur « CLOSED » (fermé).
2. Attendez 5 minutes pour que le gaz se dissipe.
3. Suivez les instructions du chapitre « Rechercher une fuite potentielle » du manuel.
Tournez l’écrou de couplage viron un demi ou trois quart de tour de plus jusqu’à l’arrêt
complet. Serrez manuellement sans utiliser d’outils.
1. Nettoyez les tubes des brûleurs.
2. Assurez-vous que le tuyau n’est pas plié ou déformé.
Le brûleur ne s’allume pas en utilisant
l’allumeur électrique
Le brûleur ne s’allume pas avec une
allumette
Le robinet de la bouteille de propane est fermé.
La bouteille de propane est vide ou presque vide. Remplacez ou remplissez la bouteille de propane.
Il y a une fuite de propane ou de gaz naturel.
Les fils ou l’électrode sont recouverts de résidus de
cuisson.
L’électrode et les brûleurs sont mouillés. Essuyez avec un chiffon.
L’électrode est fendue ou brisée, des étincelles
apparaîssent au niveau de la fente.
Le fil est desserré ou déconnecté. Reconnectez le conducteur ou remplacez l’ensemble électrode-fil conducteur.
Court-circuit (étincelles) du fil conducteur entre
l’allumeur et l’électrode.
Allumeur défectueux. Remplacez l’allumeur.
Absence de gaz.
La bouteille de propane est vide ou presque vide. Remplacez ou remplissez la bouteille de propane.
Il y a une fuite de propane ou de gaz naturel.
L’écrou de couplage et le régulateur ne sont pas
complètement raccordés.
Obstruction du débit de gaz.
Le brûleur n’est plus raccordé à la soupape. Raccordez à nouveau le brûleur et la soupape.
Araignées ou insectes dans le venturi. Nettoyez le venturi.
Les orifices du brûleur sont bouchés ou bloqués. Nettoyez les orifices du brûleur.
Il n’y a plus de gaz. Remplacez ou remplissez la bouteille de propane.
page
13
Baisse soudaine du débit de propane ou
hauteur réduite de flamme
Flamme irrégulière, flamme ne se
répartissant pas sur toute la longueur du
brûleur
La flamme est jaune ou orange
La flamme s’éteint.
Le feu s’enflamme brusquement
1. Tournez les boutons de commande sur “ARRÊT ”.
2. Attendez 30 secondes puis allumez le barbecue.
3. Si les flammes demeurent trop basses, réarmez le dispositif de sécurité de limitation
de débit:
a. Tournez les boutons de commande sur “ARRÊT ”.
b. Tournez le robinet de la bouteille de propane sur « CLOSED » (fermé).
Débit excessif; le dispositif de sécurité de limitation
de débit a peut-être été déclenché.
Les orifices du brûleur sont bouchés ou bloqués. Nettoyez les orifices du brûleur.
Le nouveau brûleur peut contenir des huiles
résiduelles de fabrication.
Toiles d’araignées ou nid d’insectes dans le venturi. Nettoyez le venturi.
Résidus de nourriture, de graisse, etc. Nettoyez le brûleur.
Mauvaise alignement de la valve sur le venturi du
brûleur.
Vent fort ou bourrasques. Ne pas utiliser le barbecue les jours de vent fort.
La bouteille de propane est presque vide. Remplacez ou remplissez la bouteille de propane
La soupape de limitation de débit s’est déclenchée.
Accumulation de graisse.
La viande est trop grasse. Éliminez la graisse de la viande avant de la griller.
La température de cuisson est trop élevée. Réglez à la baisse la température.
c. Débranchez le régulateur.
d. Tournez les boutons de commande sur (max).
e. Attendez 1 minute.
f. Tournez les boutons de commande sur “ARRÊT ”.
g. Rebranchez le régulateur et assurez-vous que le raccord ne présente pas de fuite.
h. Ouvrez le robinet de gaz de la bouteille de propane en le tournant lentement sur
« OPEN » (ouvert).
i. Attendez 30 secondes puis allumez le barbecue en suivant les instructions
d’allumage “Pour allumer”.
Laissez le barbecue fonctionner pendant encore 15 minutes avec le couvercle fermé.
Nettoyez le brûleur.
Reportez-vous aux instructions du paragraphe “Baisse soudaine du débit du propane
ou hauteur réduite de flamme”.
Retirez et nettoyez toutes les pièces du barbecue en suivant les instructions
“Nettoyage et entretien” du manuel d’utilisation.
Feu de graisse persistant
Retour de flammes (feu dans le ou les tubes
de brûleurs)
1. Tournez les boutons de commande sur “ARRÊT ”.
Graisse piégée par accumulation de nourriture autour
des brûleurs.
Le brûleur et/ou ses tubes sont bouchés. Nettoyez le brûleur et/ou les tubes du brûleur.
2. Fermez le gaz en tournant le robinet de la bouteille de propane ou de la conduite
principale d’alimentation en gaz naturel sur « CLOSED » (fermé).
3. Laissez le couvercle fermé et laissez le feu se consumer.
4. Après que le barbecue ait refroidi, retirez et nettoyez toutes les pièces.

Guide de dépannage (suite)
L’intérieur du couvercle s’écaille comme de
la peinture.
Pour toute assistance, veuillez consulter notre site internet www.bluerhino.com ou appeler le 1.800.762.1142 pour une assistance immédiate.
Barbecue d’extérieur au propane, modèle nº GBC1143W-C
Le couvercle est en acier inoxydable sans peinture.
Le couvercle est peint.
L’accumulation de graisse cuite s’est transformée en carbone et s’écaille. Nettoyez
rigoureusement le couvrecle en suivant les instructions « Nettoyage et entretien » du
manuel.
• Il est possible que de la graisse cuite se soit accumulée puis transformée en carbone
et est en train de s’écailler.
• Nettoyez rigoureusement le couvercle en suivant les instructions « Nettoyage et
entretien » du manuel.
• Après le nettoyage, si vous pouvez voir l’acier du couvercle, veuillez appeler notre
service à la clientèle au 1.800.762.1142
 Loading...