

GOLD
OWNER’S MANUAL
Made from 70% Bagasse
(Environmentally Friendly Sugar
Cane Pulp By-product)
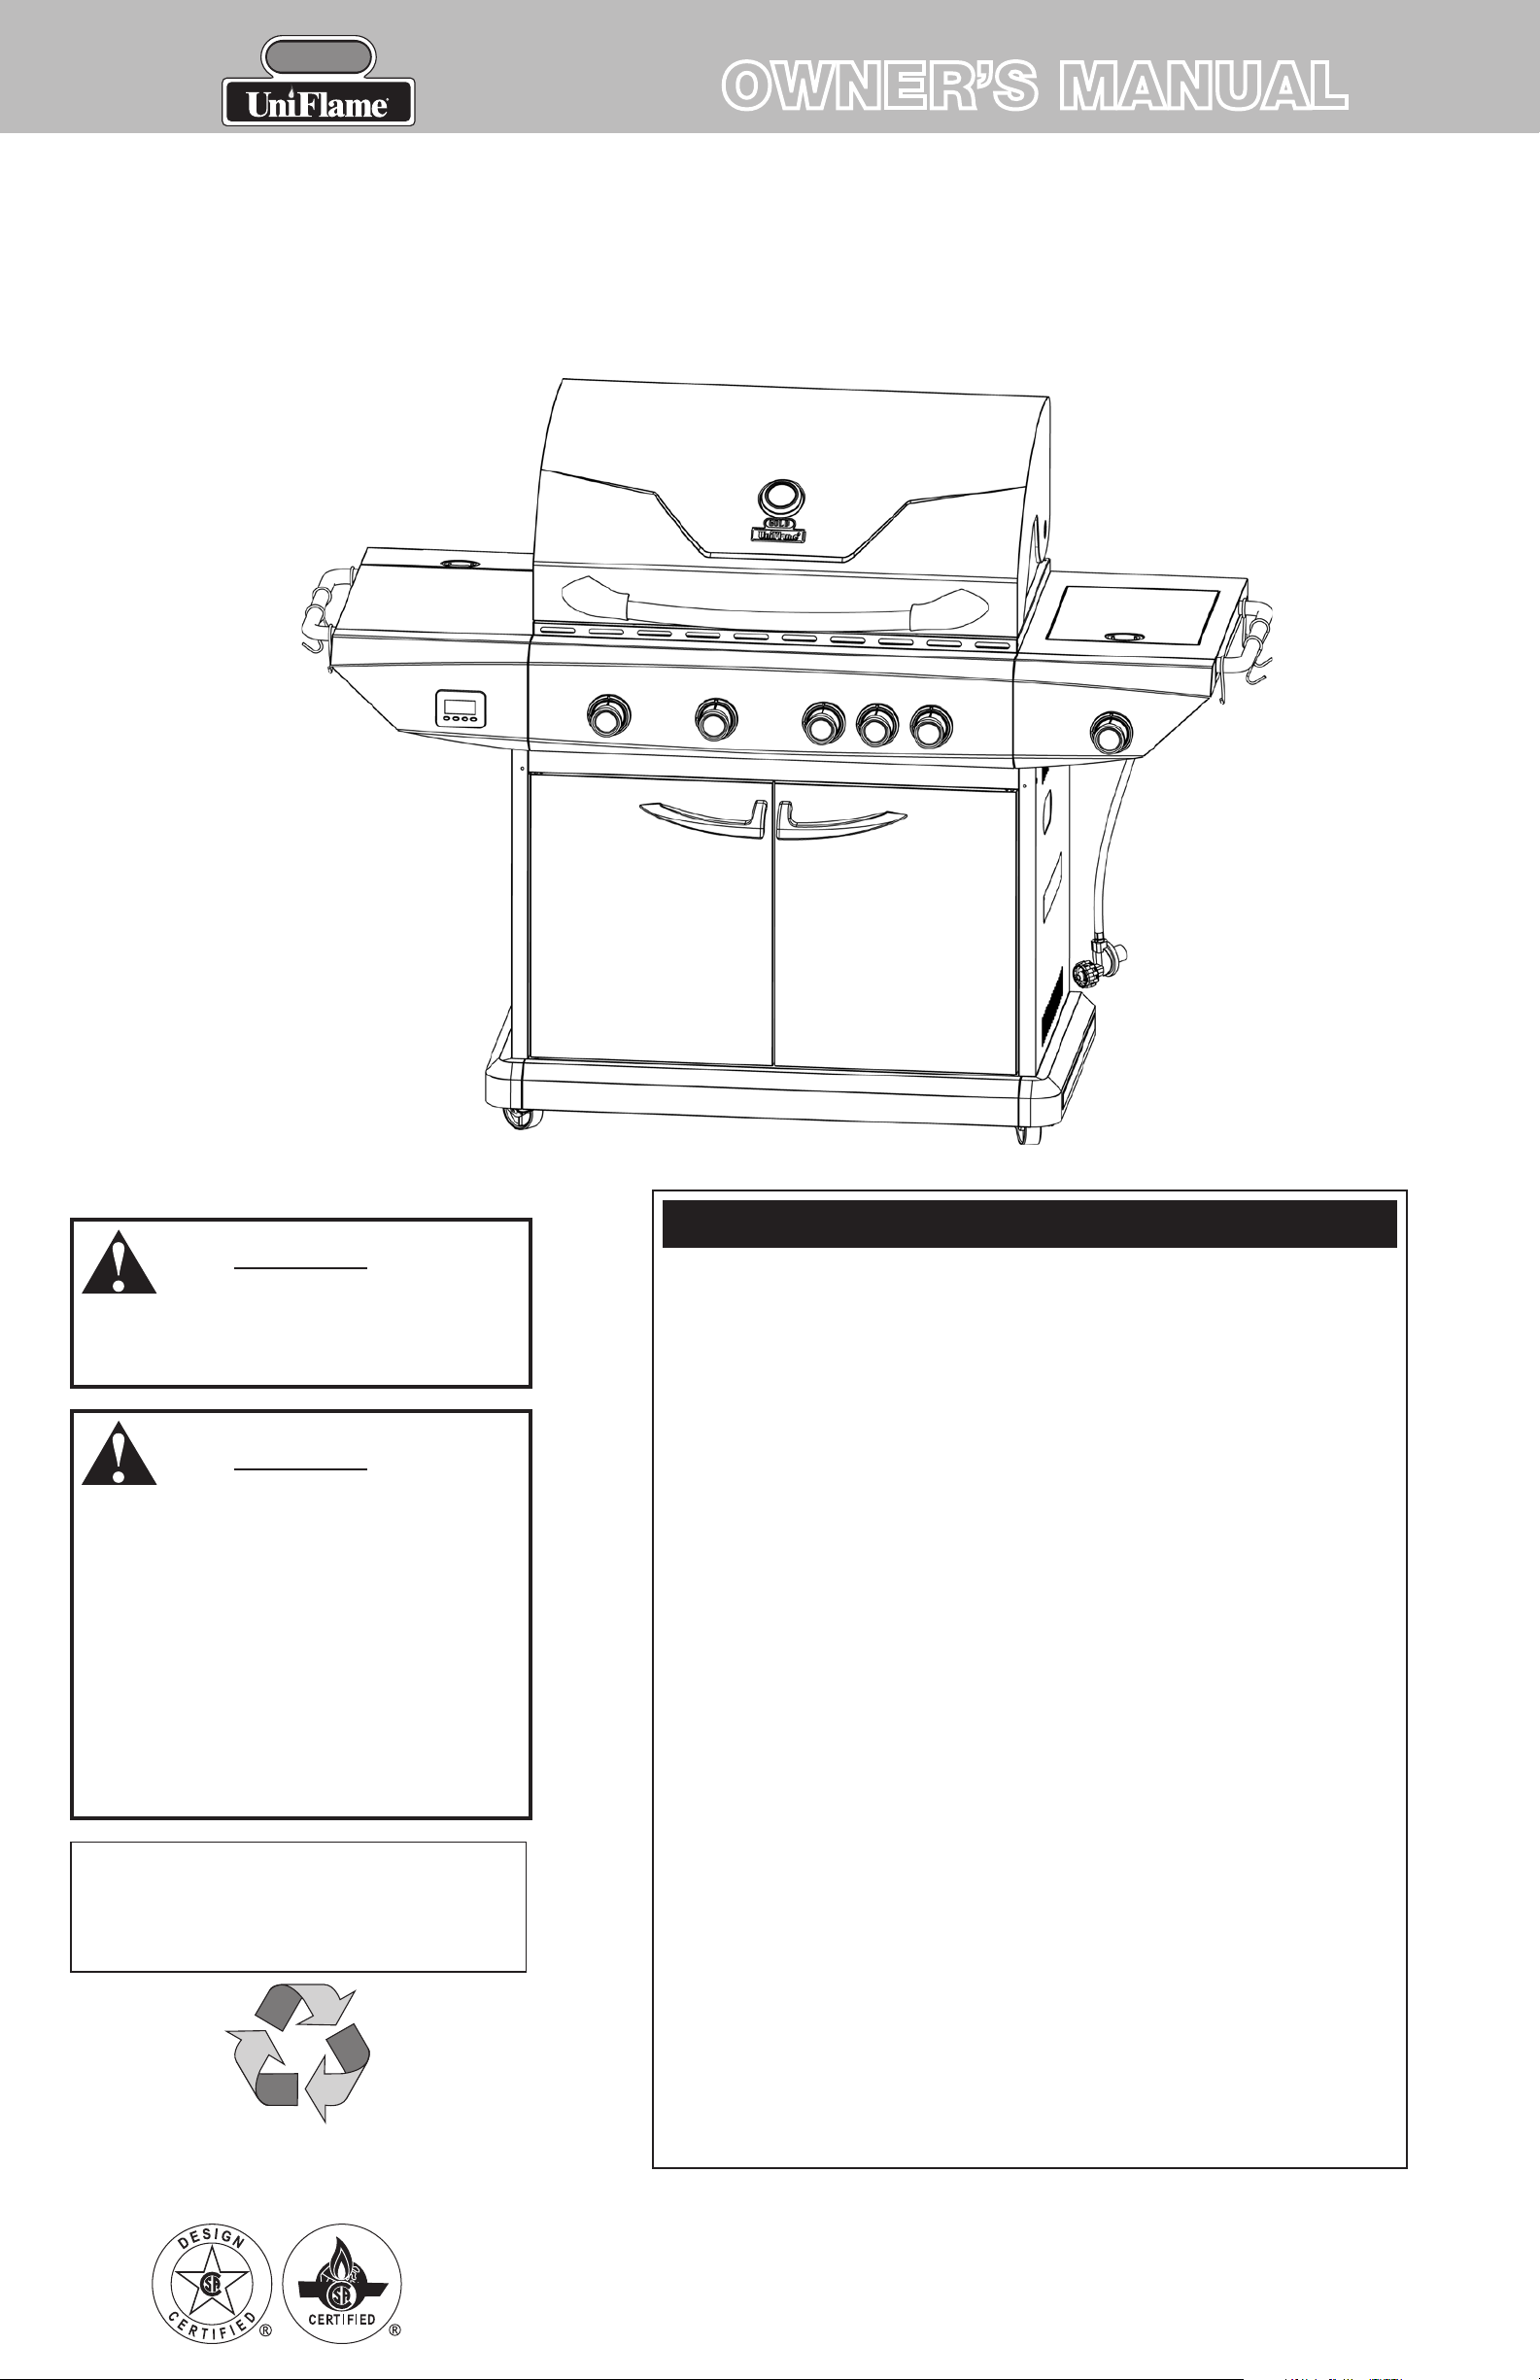
Outdoor LP Gas Barbecue Grill
Model No. GBC873W
WARNING
FOR YOUR SAFETY:
For Outdoor Use Only
(outside any enclosure)
WARNING
FOR YOUR SAFETY:
1. Improper installation, adjustment, alteration,
service or maintenance can cause injury or
property damage.
2. Read the installation, operation, and
maintenance instructions thoroughly before
installing or servicing this equipment.
3. Failure to follow these instructions could
result in fire or explosion, which could cause
property damage, personal injury, or death.
Table of Contents
Important Safeguards . . . . . . . . . . . . . . . . . . . . . . . . . . . . . . . . . . . . . . . . . . . Page 2
Exploded View & Hardware. . . . . . . . . . . . . . . . . . . . . . . . . . . . . . . . . . . . . . . . . . . 3
Assembly Instructions. . . . . . . . . . . . . . . . . . . . . . . . . . . . . . . . . . . . . . . . . . . . . . . 4
Installling LP Gas Tank . . . . . . . . . . . . . . . . . . . . . . . . . . . . . . . . . . . . . . . . . . . . . 10
Insert LP Gas Tank. . . . . . . . . . . . . . . . . . . . . . . . . . . . . . . . . . . . . . . . . . . . . . . 10
Secure LP Gas Tank. . . . . . . . . . . . . . . . . . . . . . . . . . . . . . . . . . . . . . . . . . . . . . 10
Connect LP Gas Tank. . . . . . . . . . . . . . . . . . . . . . . . . . . . . . . . . . . . . . . . . . . . . 10
Operating Instructions. . . . . . . . . . . . . . . . . . . . . . . . . . . . . . . . . . . . . . . . . . . . . . 11
Checking for Leaks . . . . . . . . . . . . . . . . . . . . . . . . . . . . . . . . . . . . . . . . . . . . . . 11
Operating Main Burners . . . . . . . . . . . . . . . . . . . . . . . . . . . . . . . . . . . . . . . . . . 11
Operating Sear Burner. . . . . . . . . . . . . . . . . . . . . . . . . . . . . . . . . . . . . . . . . . . . 11
Operating Side Burner. . . . . . . . . . . . . . . . . . . . . . . . . . . . . . . . . . . . . . . . . . . . 12
Operating Infrared Back Burner . . . . . . . . . . . . . . . . . . . . . . . . . . . . . . . . . . . . . 12
Operating Digital Timer . . . . . . . . . . . . . . . . . . . . . . . . . . . . . . . . . . . . . . . . . . . 12
Save these instructions for future reference.
If you are assembling this unit for someone else,
give this manual to him or her to read and save
for future reference.
Cleaning and Care . . . . . . . . . . . . . . . . . . . . . . . . . . . . . . . . . . . . . . . . . . . . . . . . 13
Product Registration . . . . . . . . . . . . . . . . . . . . . . . . . . . . . . . . . . . . . . . . . . . . . . . 13
Limited Warranty . . . . . . . . . . . . . . . . . . . . . . . . . . . . . . . . . . . . . . . . . . . . . . . . . 13
Troubleshooting . . . . . . . . . . . . . . . . . . . . . . . . . . . . . . . . . . . . . . . . . . . . . . . . . . 14
The use and installation of this product must conform to local codes. In absence of
local codes, use the National Fuel Gas Code, ANSI Z223.1/NFPA 54, CAN/CGA-B149.1,
Natural Gas and Propane Installation Code.
California Proposition 65: Chemicals known to the State of California to cause cancer,
birth defects, or other reproductive harm are created by the combustion of propane.
Manufactured in China for:
Blue Rhino Global Sourcing, Inc
Winston-Salem, NC USA
1.800.762.1142, www.bluerhino.com
© 2007 Blue Rhino Global Sourcing, Inc. All Rights Reserved
UniFlame® is a Registered Trademark of Blue Rhino Global Sourcing, Inc.. All Rights Reserved. GBC873W-OM-103 ES

GOLD
Outdoor LP Gas Barbecue Grill Model No. GBC873W
DANGER
If you smell gas -
1. Shut off gas to appliance.
2. Extinguish any open flame.
3. Open lid.
4. If odor continues, keep away from the appliance and immediately
call your gas supplier or your fire department.
DANGER: Failure to follow the dangers, warning and cautions in this manual may result in serious bodily injury or death, or in a fire or an explosion
causing damage to property.
WARNING:
This grill is for outdoor use only, and shall not be used in a building,
garage, or any other enclosed area.
Do NOT operate, light or use this appliance within 8 feet of walls,
structures or buildings.
This grill is NOT for commercial use.
This grill is for use with liquid propane (LP) gas only. The conversion to
or attempted use of natural gas in this LP gas grill is dangerous and will
void your warranty.
LP gas Characteristics:
a. LP gas is flammable and hazardous if handled improperly. Become
aware of the characteristics before using any LP gas product.
b. LP gas is explosive under pressure, heavier than air, and settles and
pools in low areas.
c. LP gas in its natural state has no odor. For your safety, an odorant is
added that smells like rotten cabbage.
d. Contact with LP gas can cause freeze burns to skin.
LP gas tank needed to operate. Only tanks marked “propane” may be
used.
The LP gas supply tank must be constructed and marked in accordance
with the Specifications for LP gas Cylinders of the U.S. Department of
Transportation (DOT) or the National Standard of Canada, CAN/CSA-B339,
Cylinders, Spheres and Tubes for the Transportation of Dangerous Goods;
and Commission.
LP gas tank must be arranged for vapor withdrawal.
The LP gas tank must have a listed overfilling prevention device (OPD).
Only use 20-pound cylinders equipped with a cylinder connection device
compatible with the connection for outdoor cooking appliances.
The LP gas tank must have a tank collar to protect the tank valve.
Never use an LP gas tank with a damaged body, valve, collar, or footing.
Dented or rusted LP gas tanks may be hazardous and should be checked
by your LP gas supplier prior to use.
The LP gas tank should not be dropped or handled roughly.
Tanks must be stored outdoors out of the reach of children and must not
be stored in a building, garage, or any other enclosed area. Your tank
must never be stored where temperatures can reach over 125°F.
Never keep a filled LP gas tank in a hot car or car trunk. Heat will cause
the gas pressure to increase, which may open the relief valve and allow
gas to escape.
Place dust cap on cylinder valve outlet whenever the cylinder is not in
use. Only install the type of dust cap on the cylinder valve outlet that is
provided with the cylinder valve. Other types of caps or plugs may result
in leakage of propane.
Do not store a spare LP gas tank under or near this appliance.
Never fill the tank beyond 80 percent full.
A fire causing serious injury or damage to property may occur if the
above is not followed exactly.
Never attempt to attach this grill to the self-contained LP gas system of
a camper trailer, motor home, or house.
The use of alcohol, or prescription or non-prescription drugs may
impair the consumer’s ability to properly assemble or safely operate the
appliance.
Never use charcoal, lighter fluid, lava rocks, gasoline, kerosene, or
alcohol with this product.
Your grill has been checked at all factory connections for leaks.
Recheck all connections as described in the “Operating Instructions”
section of the manual, as movement in shipping can loosen connections.
Check for leaks even if your unit was assembled for you by someone
else.
Do not operate if gas leak is present. Gas leaks may cause a fire or
explosion.
You must follow all leak-checking procedures before operating. To
prevent fire or explosion hazard when testing for a leak:
a. Always perform leak test before lighting the grill and each time the
tank is connected for use.
b. No smoking. Do not use or permit sources of ignition in the area
while conducting a leak test.
c. Conduct the leak test outdoors in a well-ventilated area.
d. Do not use matches, lighters, or a flame to check for leaks.
1. Do not store or use gasoline or other flammable liquids or vapors in the
vincinity of this or any other appliance.
2. An LP cylinder not connected for use shall not be stored in the vicinity of
this or any other appliance.
e. Do not use grill until any and all leaks are corrected.
If you are unable to stop a leak, disconnect the LP gas supply. Call a
gas appliance serviceman or your local LP gas supplier.
Do not store or use gasoline or other flammable liquids or vapors within
25 feet (7.62 m) of this appliance.
Do not use in an explosive atmosphere. Keep grill area clear and free
from combustible materials, gasoline and other flammable vapors and
liquids.
Minimum clearance from sides and back of unit to combustible
construction, 21 inches from side and 21 inches from back. Do not use
this appliance under overhead combustible surfaces.
It is essential to keep the grill’s valve compartment, burners, and
circulating air passages clean. Inspect grill before each use.
Do not alter grill in any manner.
Do not use the grill unless it is COMPLETELY assembled and all parts are
securely fastened and tightened.
This grill should be thoroughly cleaned and inspected on a regular basis.
Clean and inspect the hose before each use of the appliance. If there
is evidence of abrasion, wear, cuts, or leaks, the hose must be replaced
prior to the appliance being put into operation.
Use only the regulator and hose assembly provided. The replacement
regulator and hose assembly shall be that specified by the manufacturer.
Use only Blue Rhino Global Sourcing, Inc. factory authorized parts. The
use of any part that is not factory authorized can be dangerous. This will
also void your warranty.
Do not use this appliance without reading “Operating Instructions” in
this manual.
Do not touch metal parts of grill until it has completely cooled (about
45 min.) to avoid burns, unless you are wearing protective gear (pot
holders, gloves, BBQ mittens, etc.).
When cooking, fire extinguishing materials shall be readily accessible.
In the event of an oil grease fire, do not attempt to extinguish with water.
Use type BC dry chemical fire extinguisher or smother with dirt, sand or
baking soda.
Do not install or use in or on boats or recreational vehicles.
Do not use grill in high winds.
Never lean over the grill when lighting.
Do not leave a lit grill unattended, especially keep children and pets
away from grill at all times.
Do not attempt to move grill when in use. Allow the grill to cool before
moving or storing.
Storage of grill indoors is permissible only if the tank is disconnected,
removed from the grill and properly stored outdoors.
Always open grill lid carefully and slowly as heat and steam trapped
within grill can severely burn you.
Do not attempt to disconnect the gas regulator from the tank or any gas
fitting while the grill is in use.
Always place your grill on a hard non-combustible, level surface. An
asphalt or blacktop surface may not be acceptable for this purpose.
Move gas hoses as far away as possible from hot surfaces and dripping
hot grease.
Keep all electrical cords away from a hot grill.
Do not use grill for indoor cooking or heating. TOXIC fumes can
accumulate and cause asphyxiation.
After a period of storage and/or nonuse, check for leaks, burner
obstructions and inspect for any abrasion, wear, cuts to the hose.
Failure to open lid while igniting the grill’s burners, or not waiting 5
minutes to allow the gas to clear if the grill does not light, may result in
an explosive flame-up.
If grill is not in use, the gas must be turned off at the supply tank.
Never operate grill without heat plates installed.
Always use a meat thermometer to ensure food is cooked to a safe
temperature.
Please use protective gloves when assembling this product.
Do not force parts together as this can result in personal injury or
damage to the product.
Never cover entire cooking area with aluminum foil.
Deaths, serious injury or damage to property may occur if the above is
not followed exactly.
WARNING
FOR YOUR SAFETY
Contact 1.800.762.1142 for assistance. Do not return to place of purchase.
page no.
3
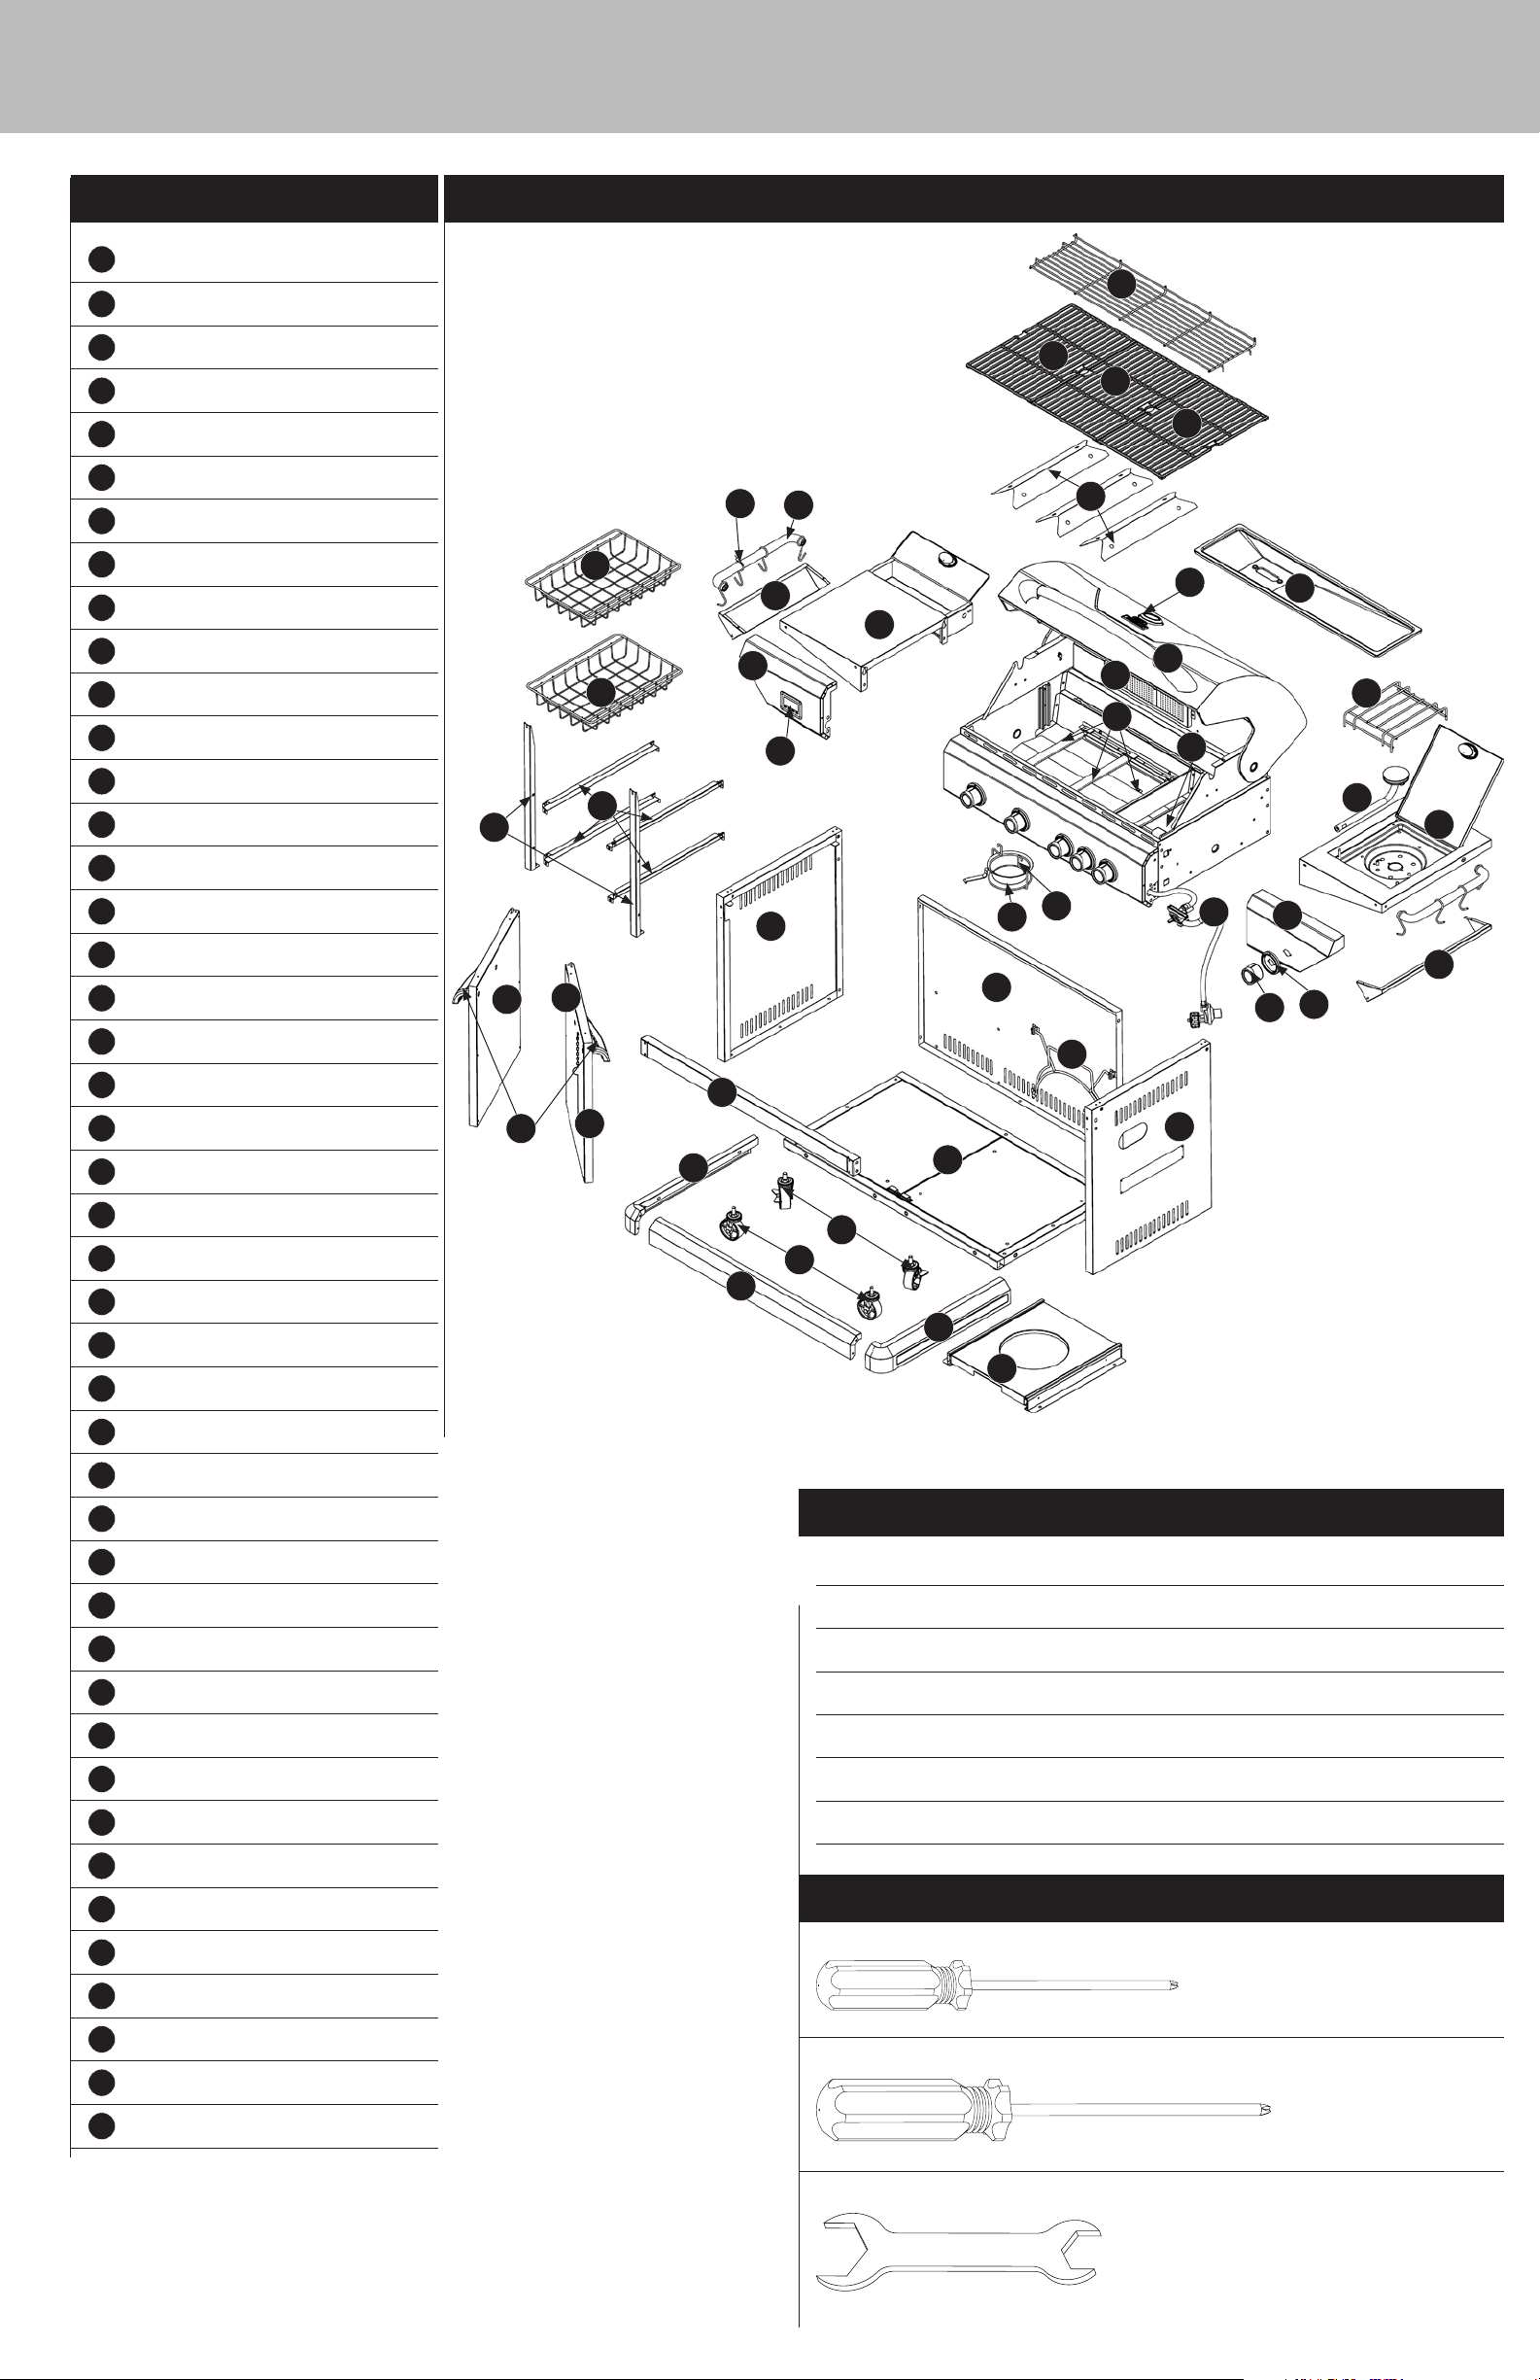
Parts List
1
Warming Rack
2
Cooking Grid (3)
3
Heat Plate (3)
4
Grease Tray
5
Thermometer
6
Basket (2)
7
Tool Hook (8)
8
Towel Bar (2)
9
Left Side Shelf Side
10
Left Side Shelf
11
Grill Body Assembly
12
Side Burner Grid
13
Left Side Shelf Front
14
Digital Timer
55-07-551
55-07-501
55-08-076
55-07-509
55-07-547
55-08-067
55-07-549
55-07-548
55-08-081
55-08-079
55-08-074
55-07-543
55-08-080
55-08-073
Exploded View
6
6
27
28
1
2
2
2
7
8
9
3
5
4
10
13
11
15
12
16
14
17
18
19
15
Infrared Back Burner
16
Main Burner (3)
17
Sear Burner
18
Side Burner
19
Right Side Shelf
20
Right Side Shelf Side
21
Grease Cup
22
Grease Cup Support
23
Regulator
24
Right Side Shelf Front
25
Control Knob Support (6)
26
Control Knob (6)
27
Basket Support A (4)
55-07-513
55-08-086
55-08-109
55-08-110
55-08-094
55-08-096
55-07-507
55-07-508
55-08-091
55-08-095
55-08-071
55-08-070
55-08-065
33
34
35
36
39
37
43
29
41
40
42
38
30
44
22
21
31
32
23
26
24
20
25
28
Basket Support B (2)
29
Left Cart Panel
30
Rear Cart Panel
31
Tank Retainer Wire
32
Right Cart Panel
33
Left Door
34
Door Handle (2)
35
Right Door
36
Lighting Rod
37
Front Cart Support
38
Base Cart Panel
39
Left Skirt
40
Locking Wheel (2)
55-08-066
55-08-077
55-08-090
55-07-522
55-08-092
55-08-078
55-08-011
55-08-093
55-07-520
55-07-505
55-08-064
55-08-082
55-07-528
Hardware
A
B
C
D
E
F
G
Screw
Screw
Screw
Screw
Nut
Washer
AAA Batteries 2 pcs
M4x8 Nickel Plated Phillips Truss Head
M6x15 Nickel Plated Phillips Truss Head
M6x15 Nickel Plated Hex Head
M6x46 Nickel Plated Phillips Truss Head
M6 Zinc Plated
ø6.5 Nickel Plated
Tools Required for Assembly (Included)
#1 Phillips Head Screwdriver
20 pcs
29 pcs
21 pcs
11 pcs
7 pcs
8 pcs
41
Wheel (2)
42
Right Skirt
43
Center Skirt
44
LP Gas Tank Tray
55-07-506
55-08-097
#2 Phillips Head Screwdriver
55-08-069
55-08-085
M10-M6 Wrench
GOLD
Assembly Instructions
Outdoor LP Gas Barbecue Grill Model No. GBC873W
1
DO NOT RETURN PRODUCT TO STORE.
For assistance call 1.800.762.1142 toll free. Please have
your owner’s manual and serial number available for
reference.
Note: The serial number can be found on the back of the cart
assembly.
For Easiest Assembly:
• To avoid losing any small components or hardware, assemble
your product on a hard level surface that does not have cracks
or openings.
• Clear an area large enough to layout all components and
hardware.
• When applicable, tighten all hardware connections by hand
first. Once the step is completed go back and fully tighten all
hardware.
• Follow all steps in order to properly assemble your product.
To complete assembly you will need:
• (1) Leak Detection Solution (Instructions on how to make
solution are included in the “Operating Instructions” section of
this manual)
• (1) Precision Filled LP Gas Grill Tank with Acme Type 1 external
threaded valve connection (4-5 gallon size)
Note: You must follow all steps to properly assemble the grill.
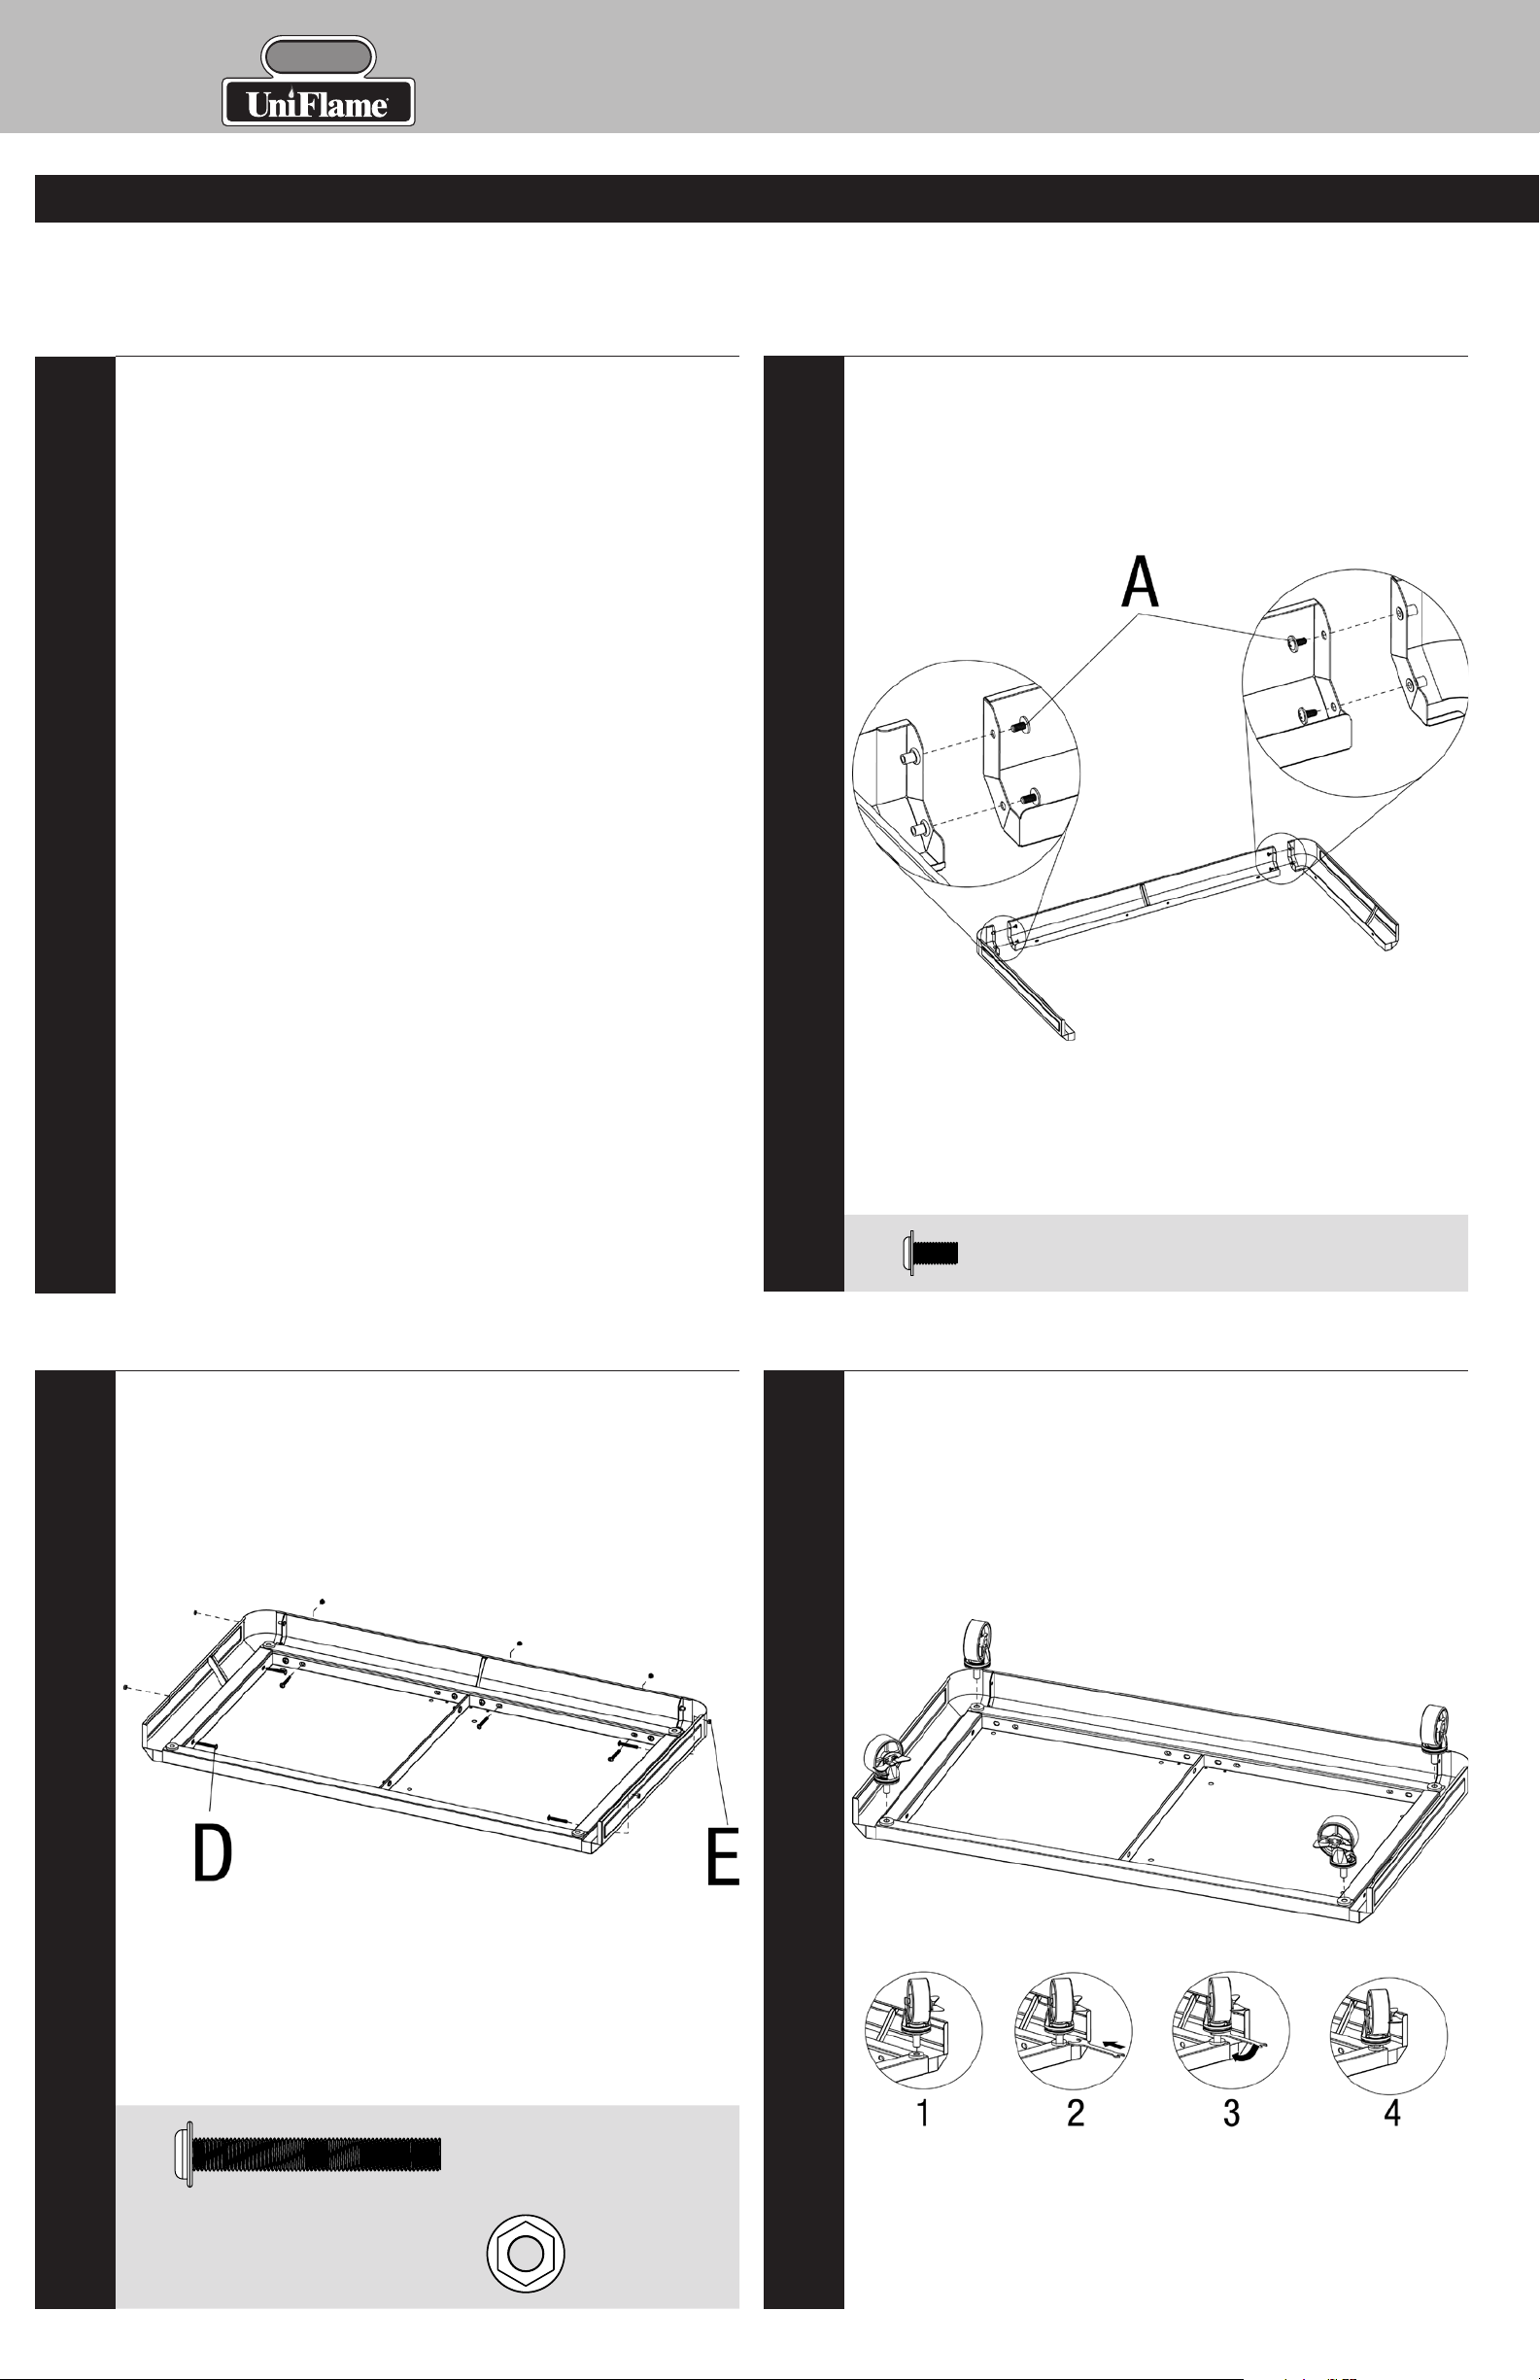
Assemble Skirt
2
3
Typical assembly: approximately 1 (one) hour.
Attach Skirt to Base Cart Panel
4
A
Attach Wheels
Note: Locking wheels should be placed at the back.
x 4
D
E
x 7
x 7
Contact 1.800.762.1142 for assistance. Do not return to place of purchase.
page no.
5
5
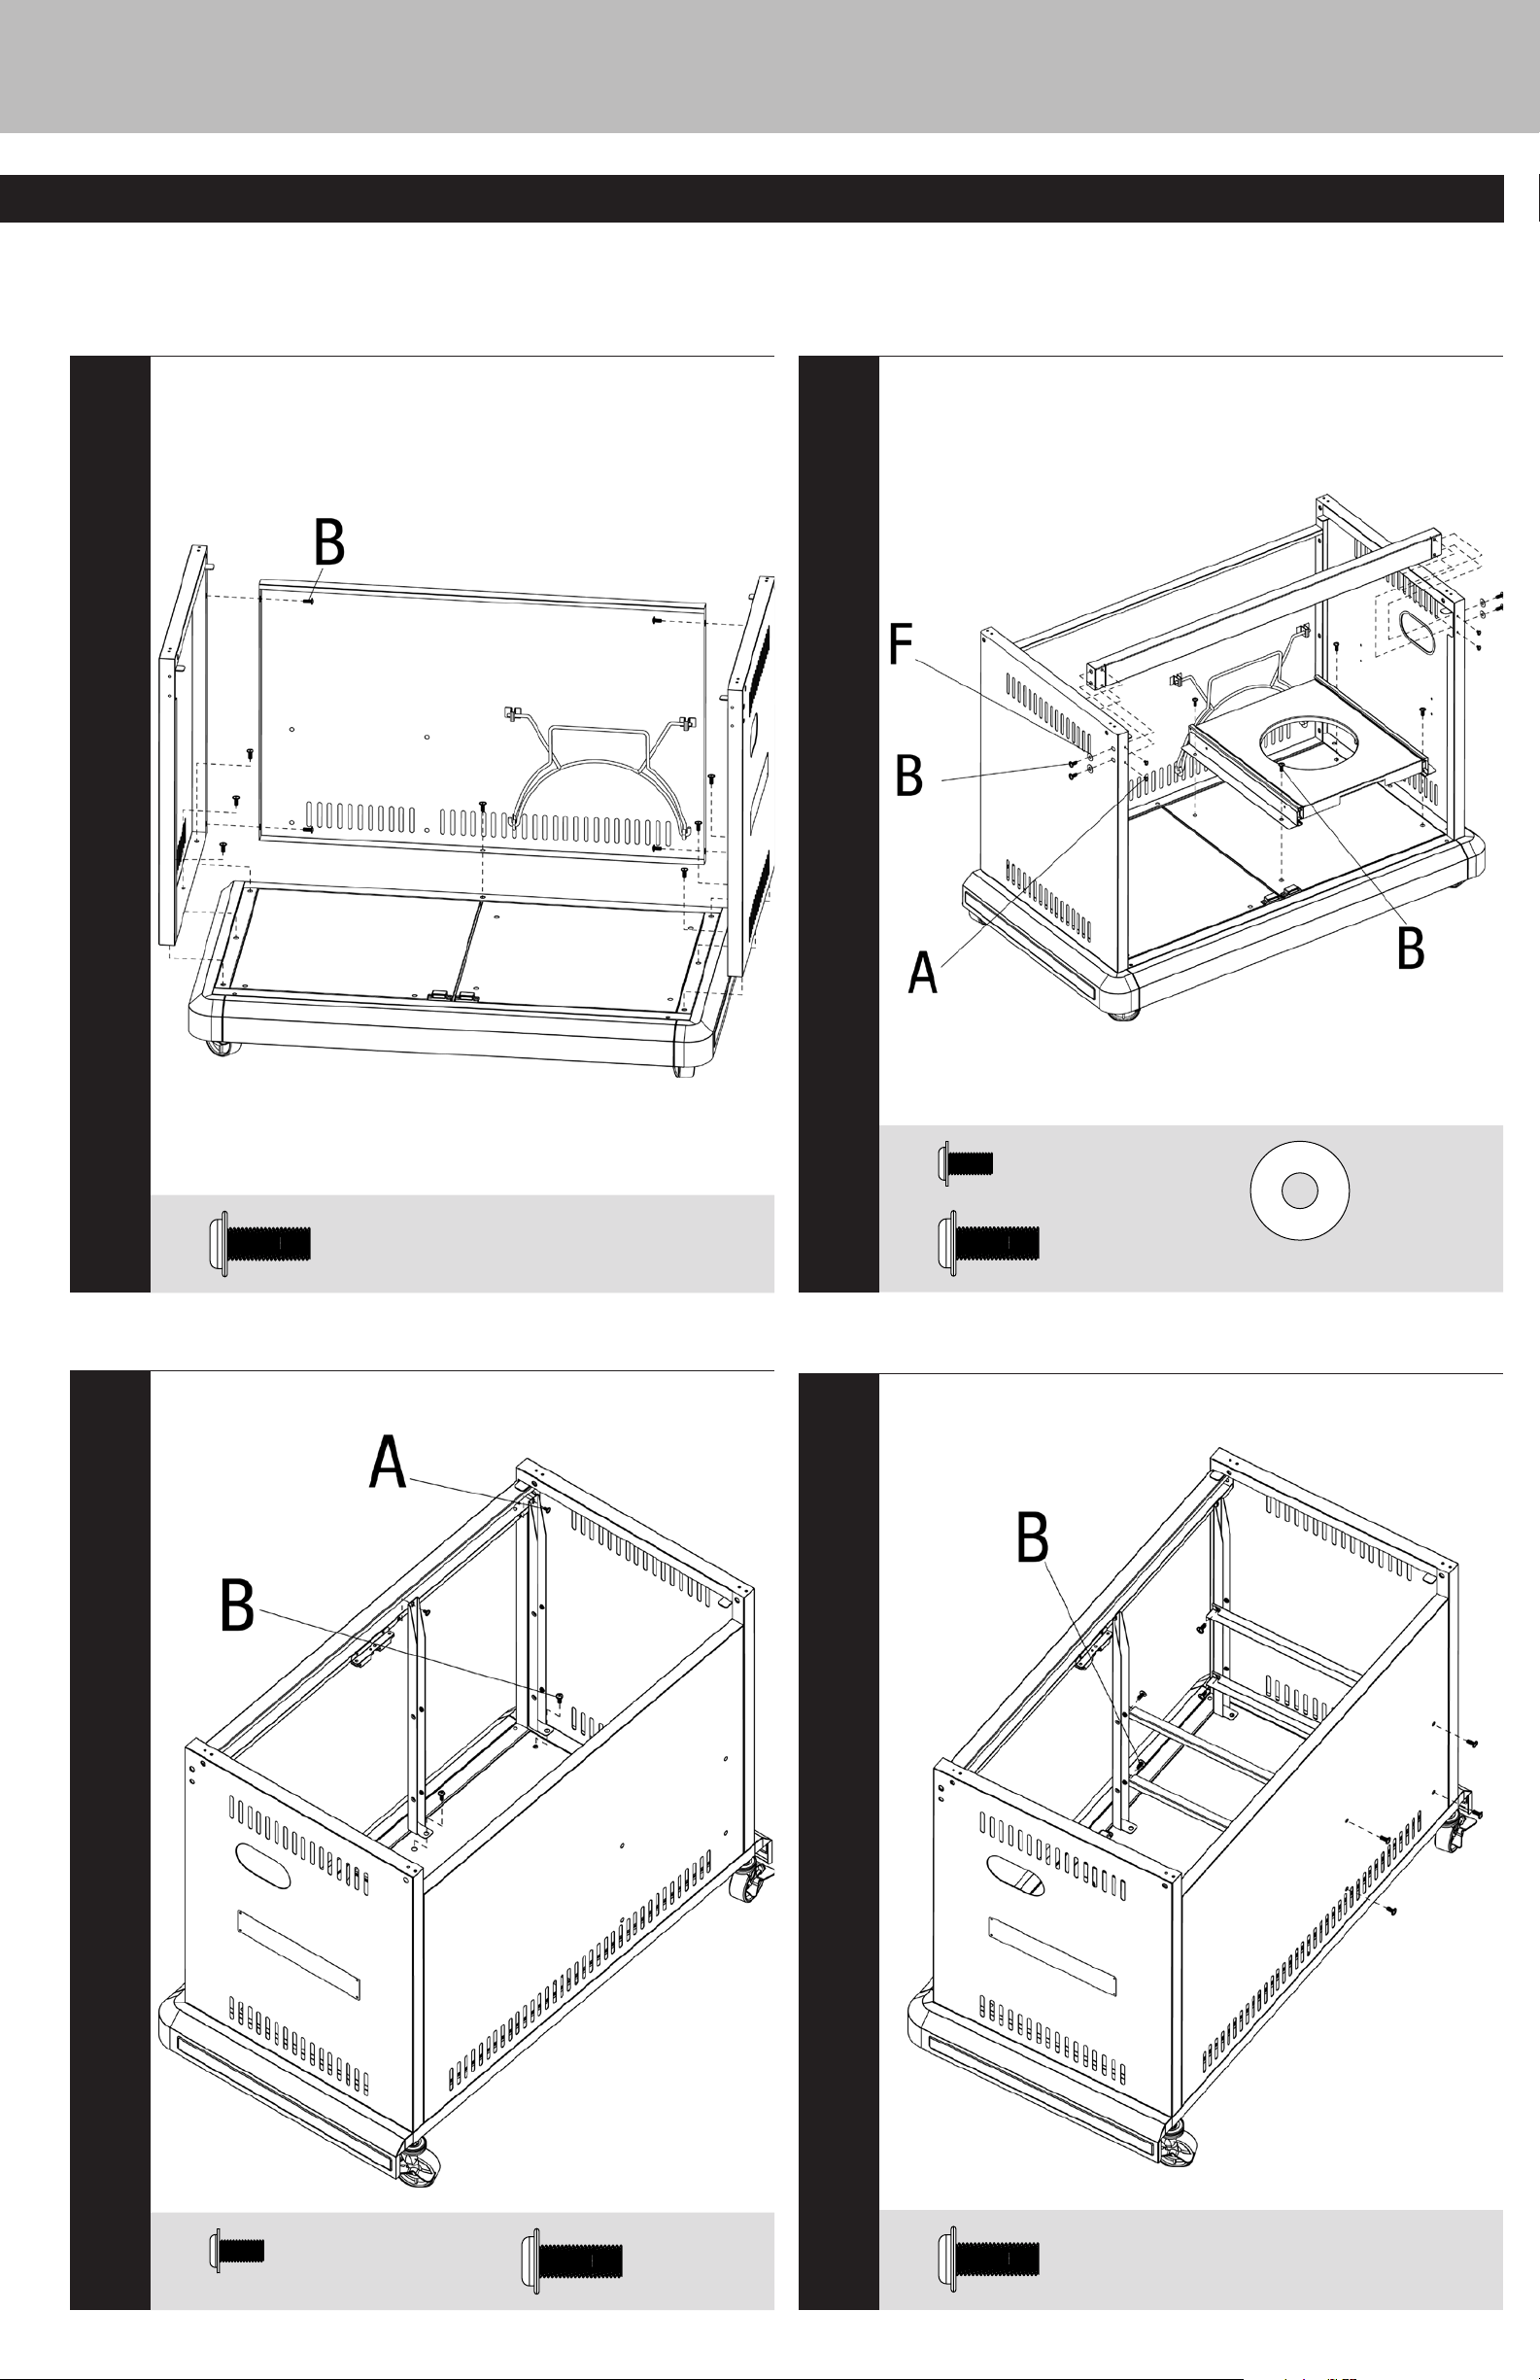
Attach Side Panels
Attach Front Cart Support and LP Gas Tank Tray
6
7
B
Attach Basket Supports B
x 11
8
A
B
Attach Basket Supports A
x 4
x 8
F
x 4
A
x 2
B
x 2
B
x 8
GOLD
Assembly Instructions (continued)
Outdoor LP Gas Barbecue Grill Model No. GBC873W
9
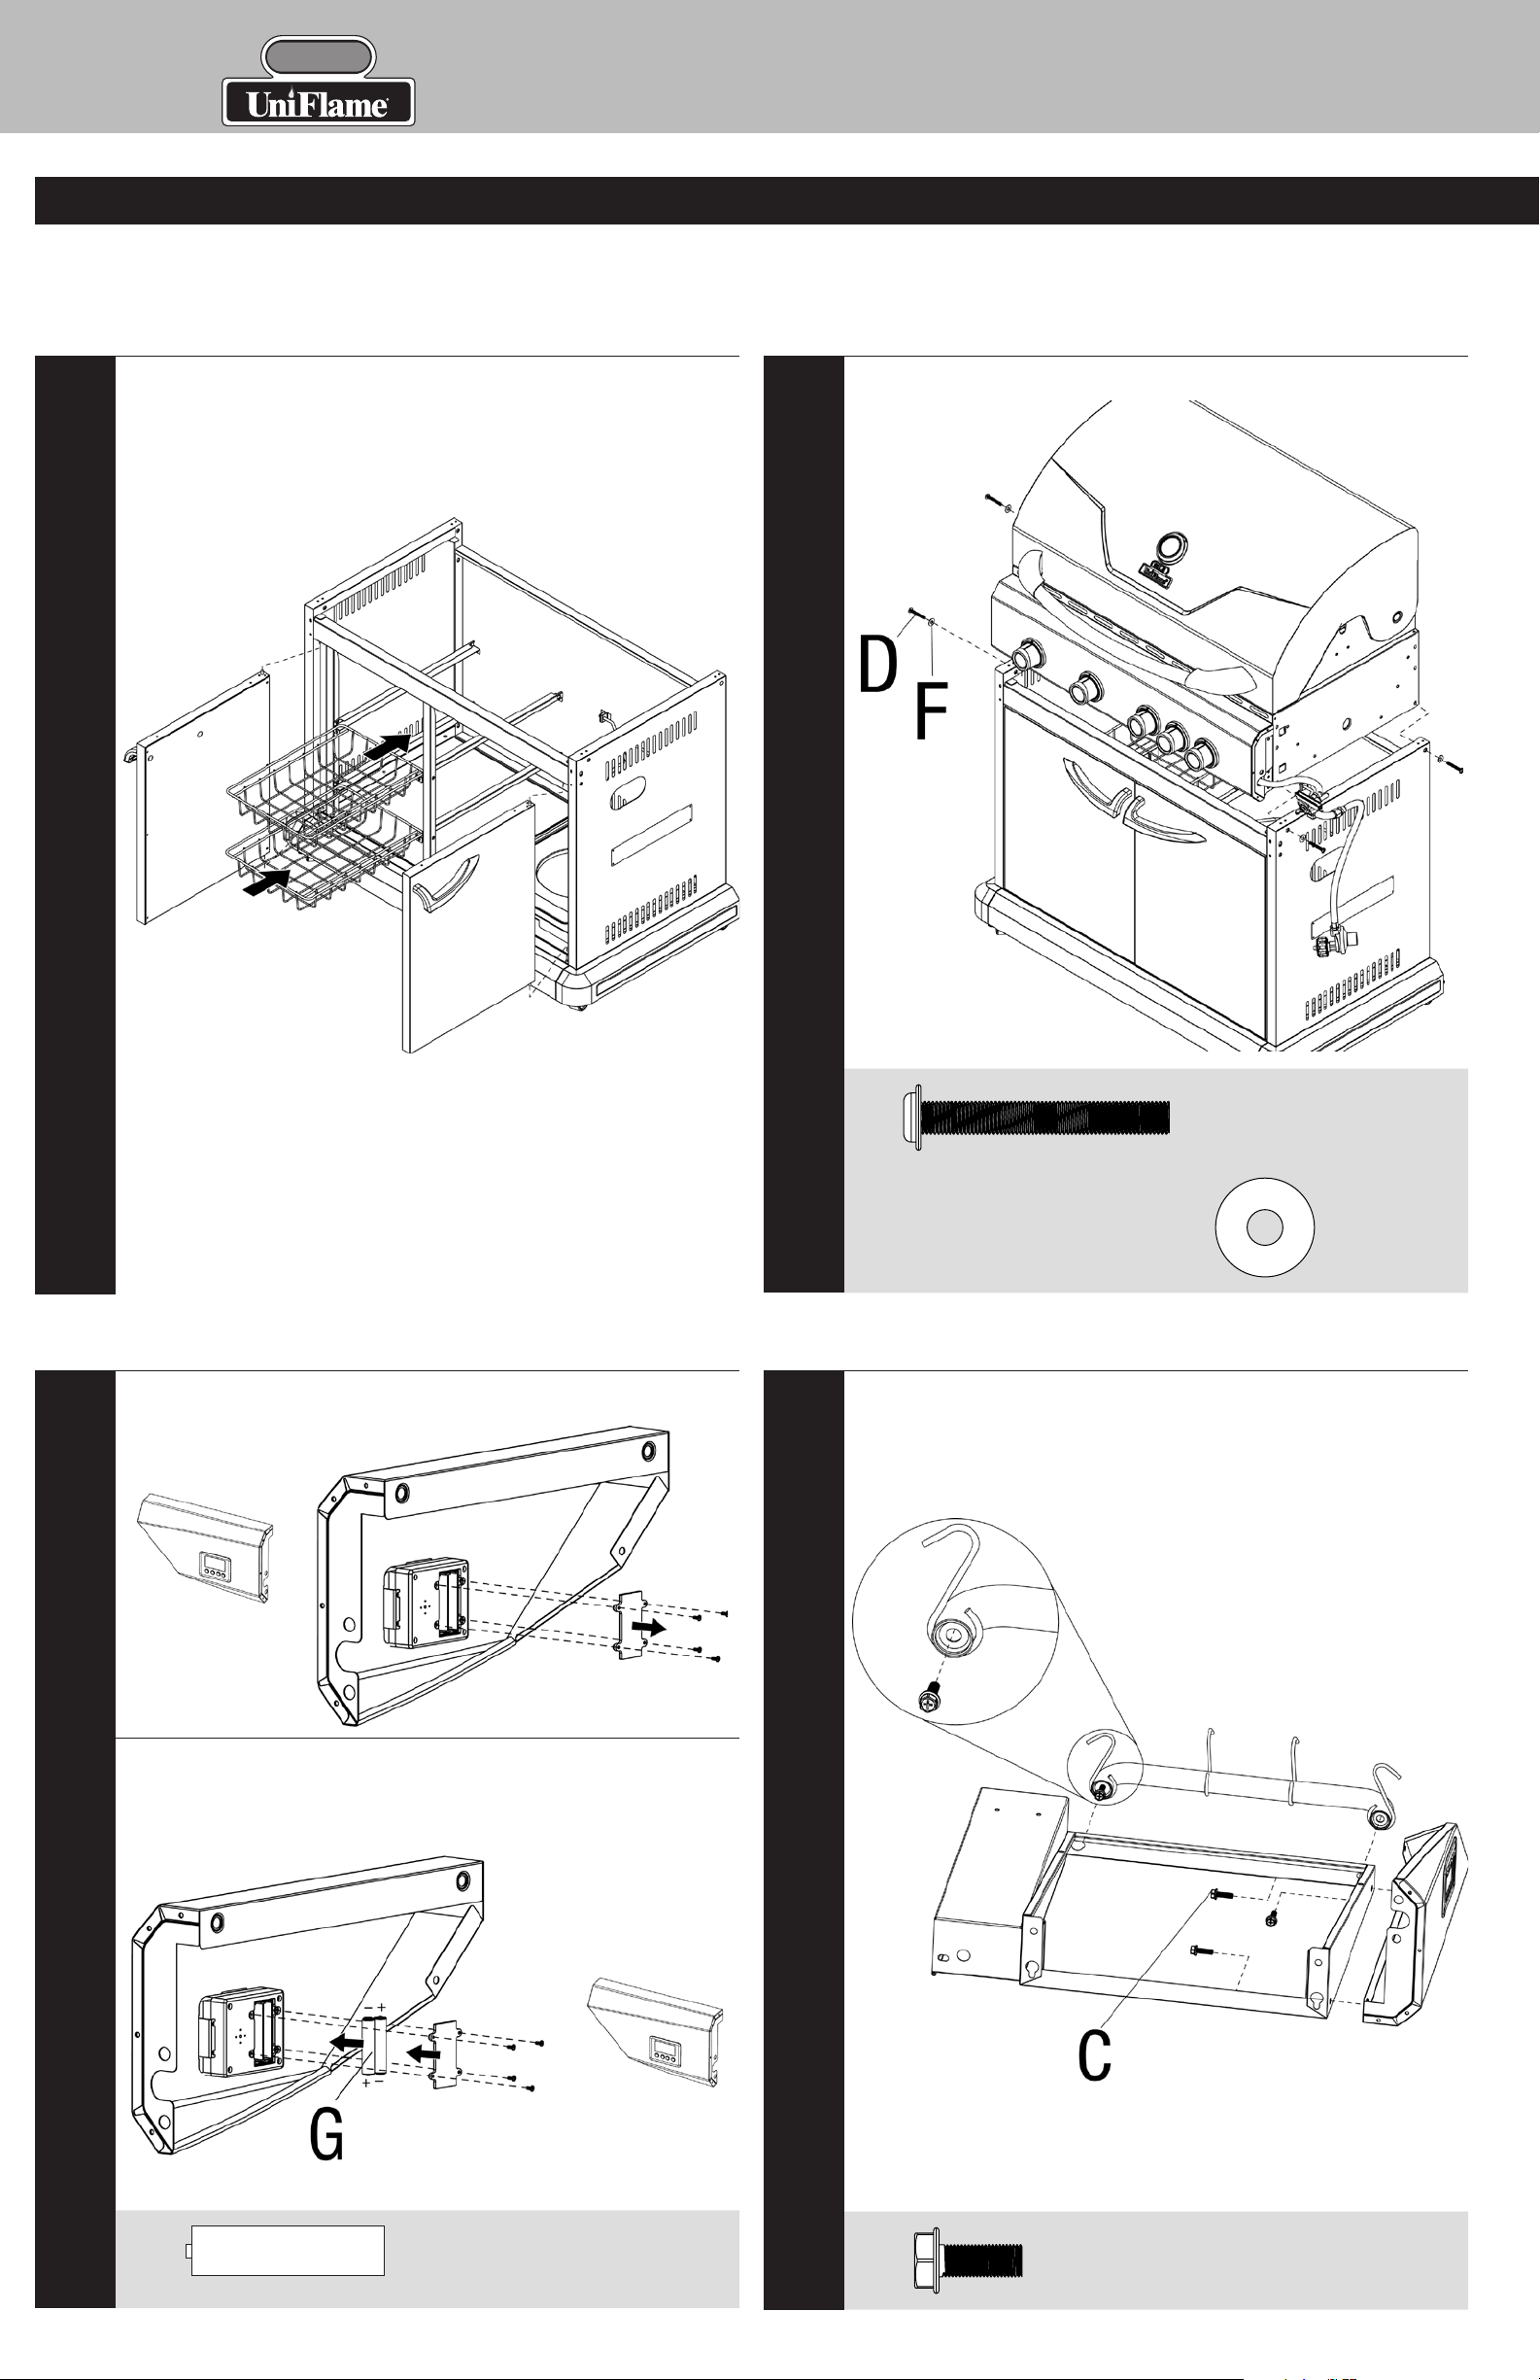
Attach Doors and Insert Baskets
Attach Grill Body
10
Remove Digital Timer Battery Cover
11
D
Attach Left Side Shelf Front and Towel Bar
12
F
x 4
x 4
Install Digital Timer AAA Batteries
G
x 2
C
x 4
Contact 1.800.762.1142 for assistance. Do not return to place of purchase.
page no.
7
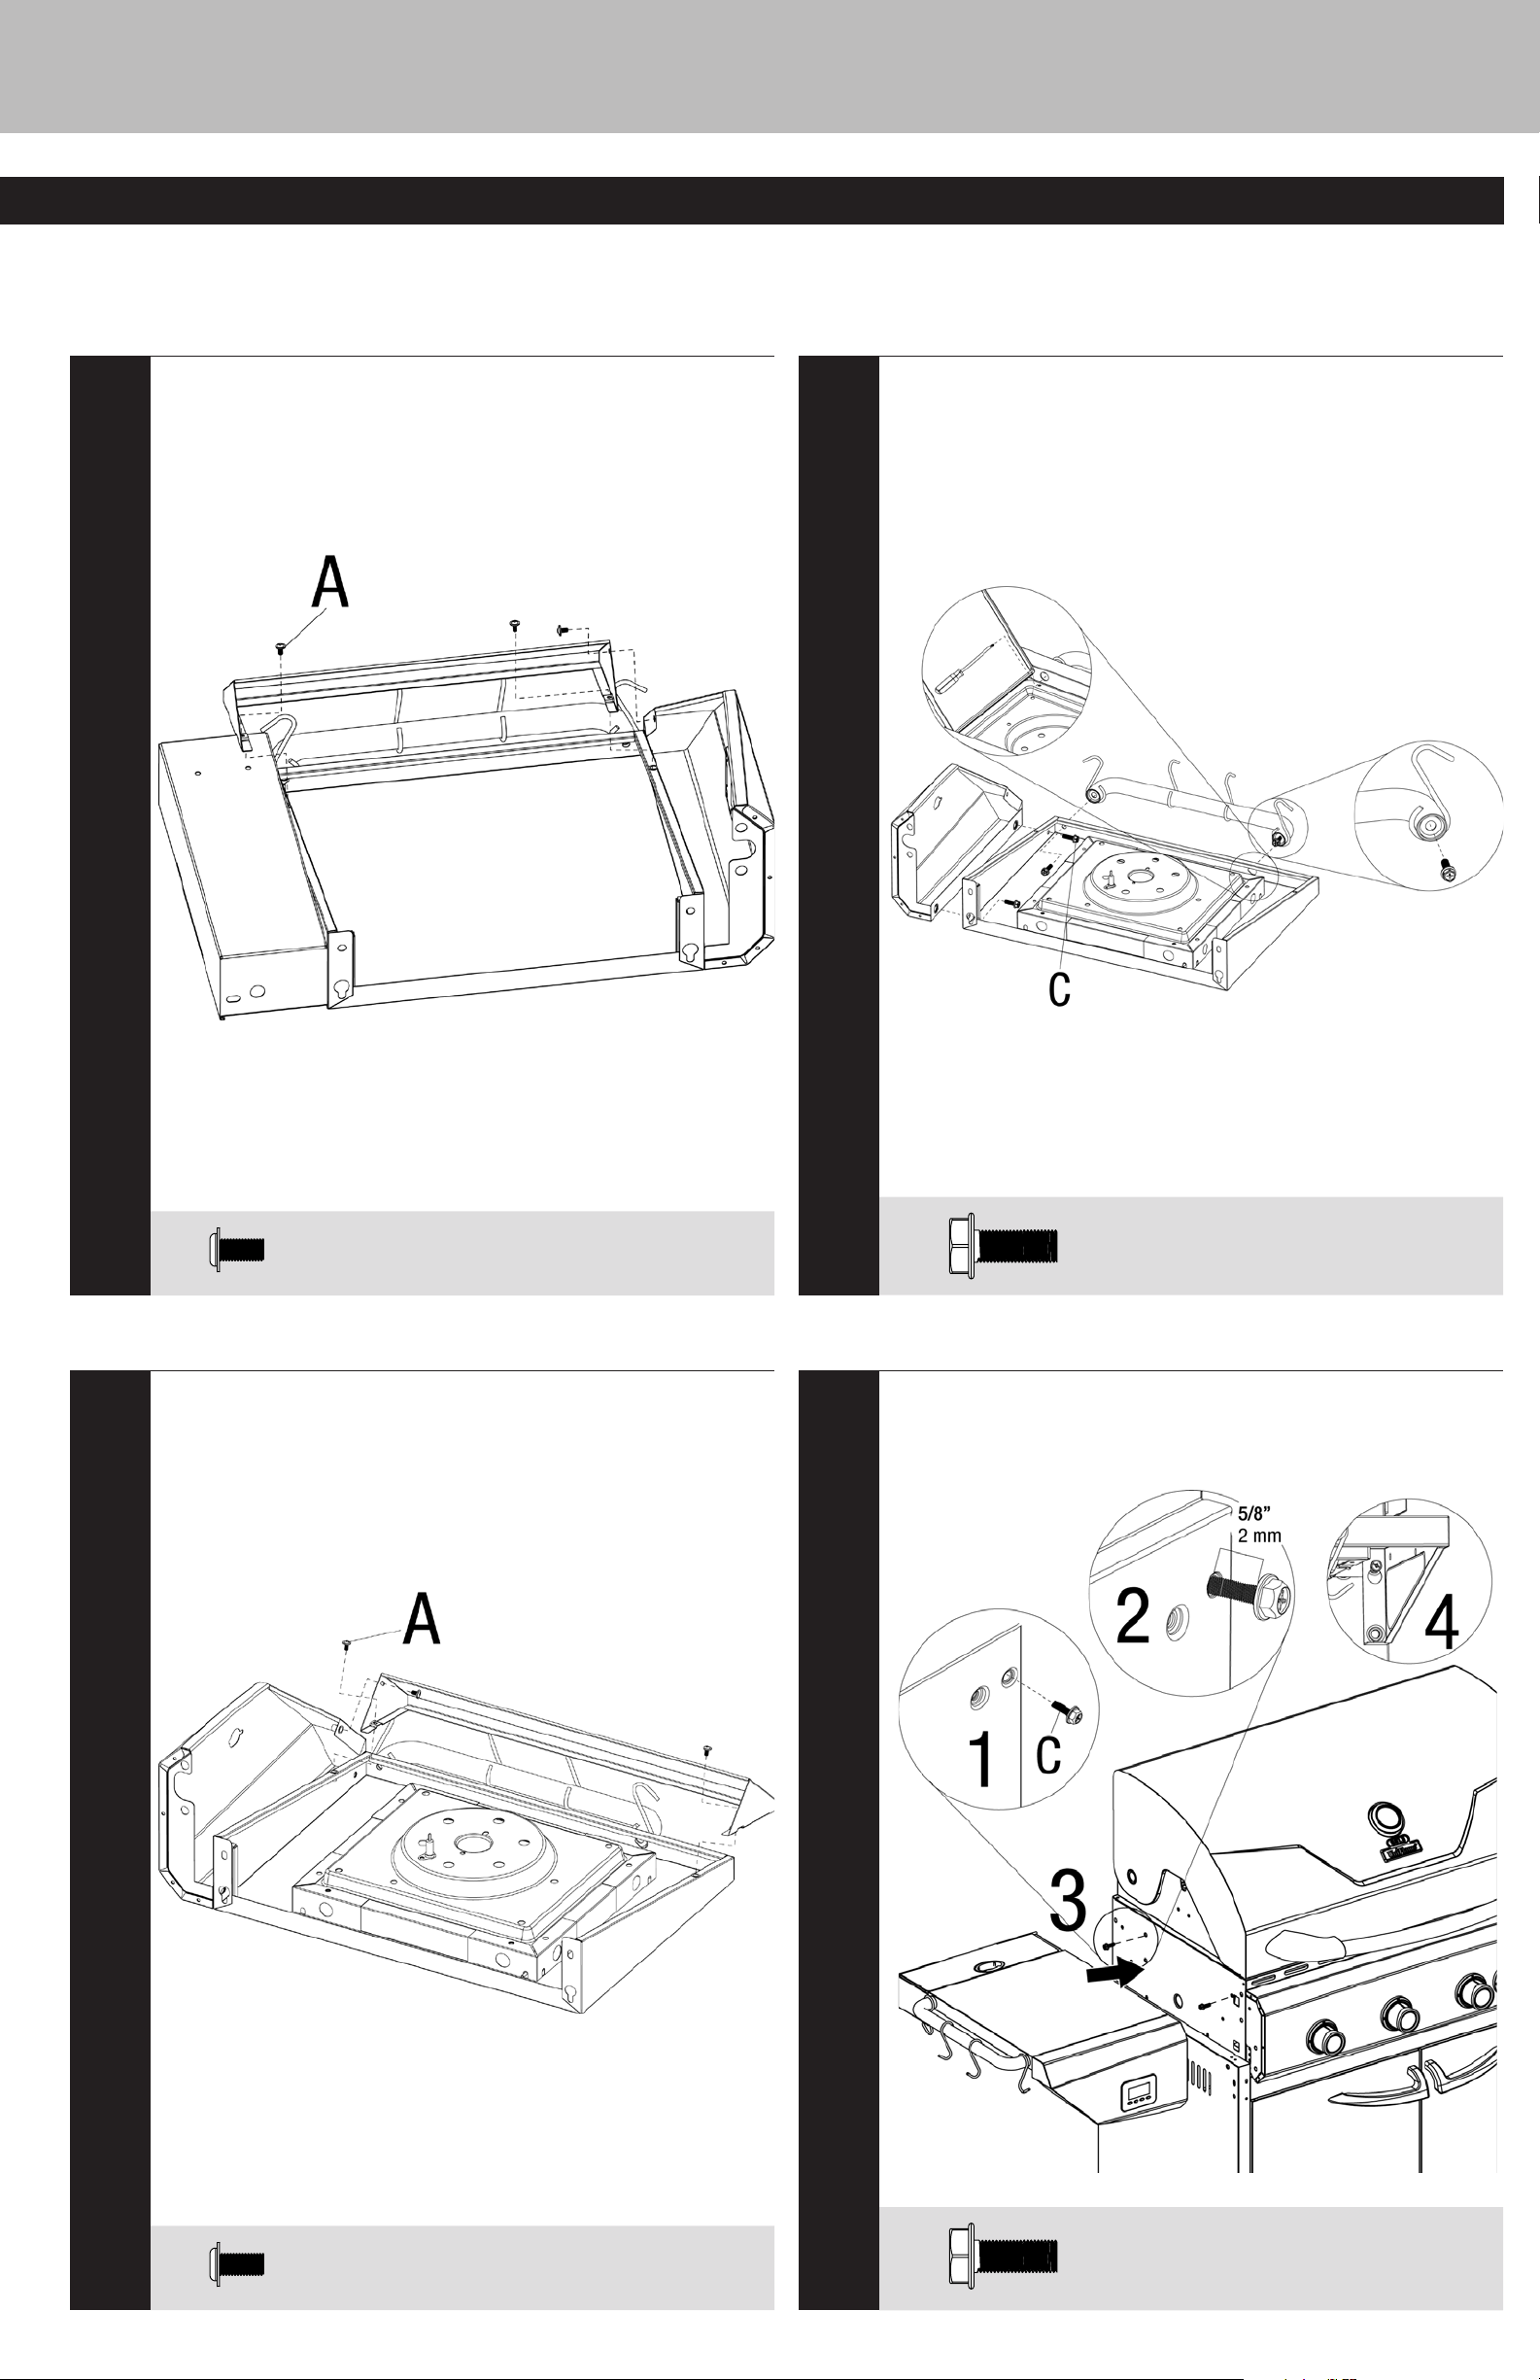
Attach Left Side Shelf Panel
13
Attach Right Side Shelf Front and Towel Bar
14
A
Attach Right Side Shelf Panel
15
x 3
C
Attach Left Side Shelf Assembly
Note: Leave 5/8” (2 mm) of bolt threads exposed. Do not fully tighen until step 18.
16
x 4
A
x 3
C
x 2
GOLD
Assembly Instructions (continued)
Outdoor LP Gas Barbecue Grill Model No. GBC873W
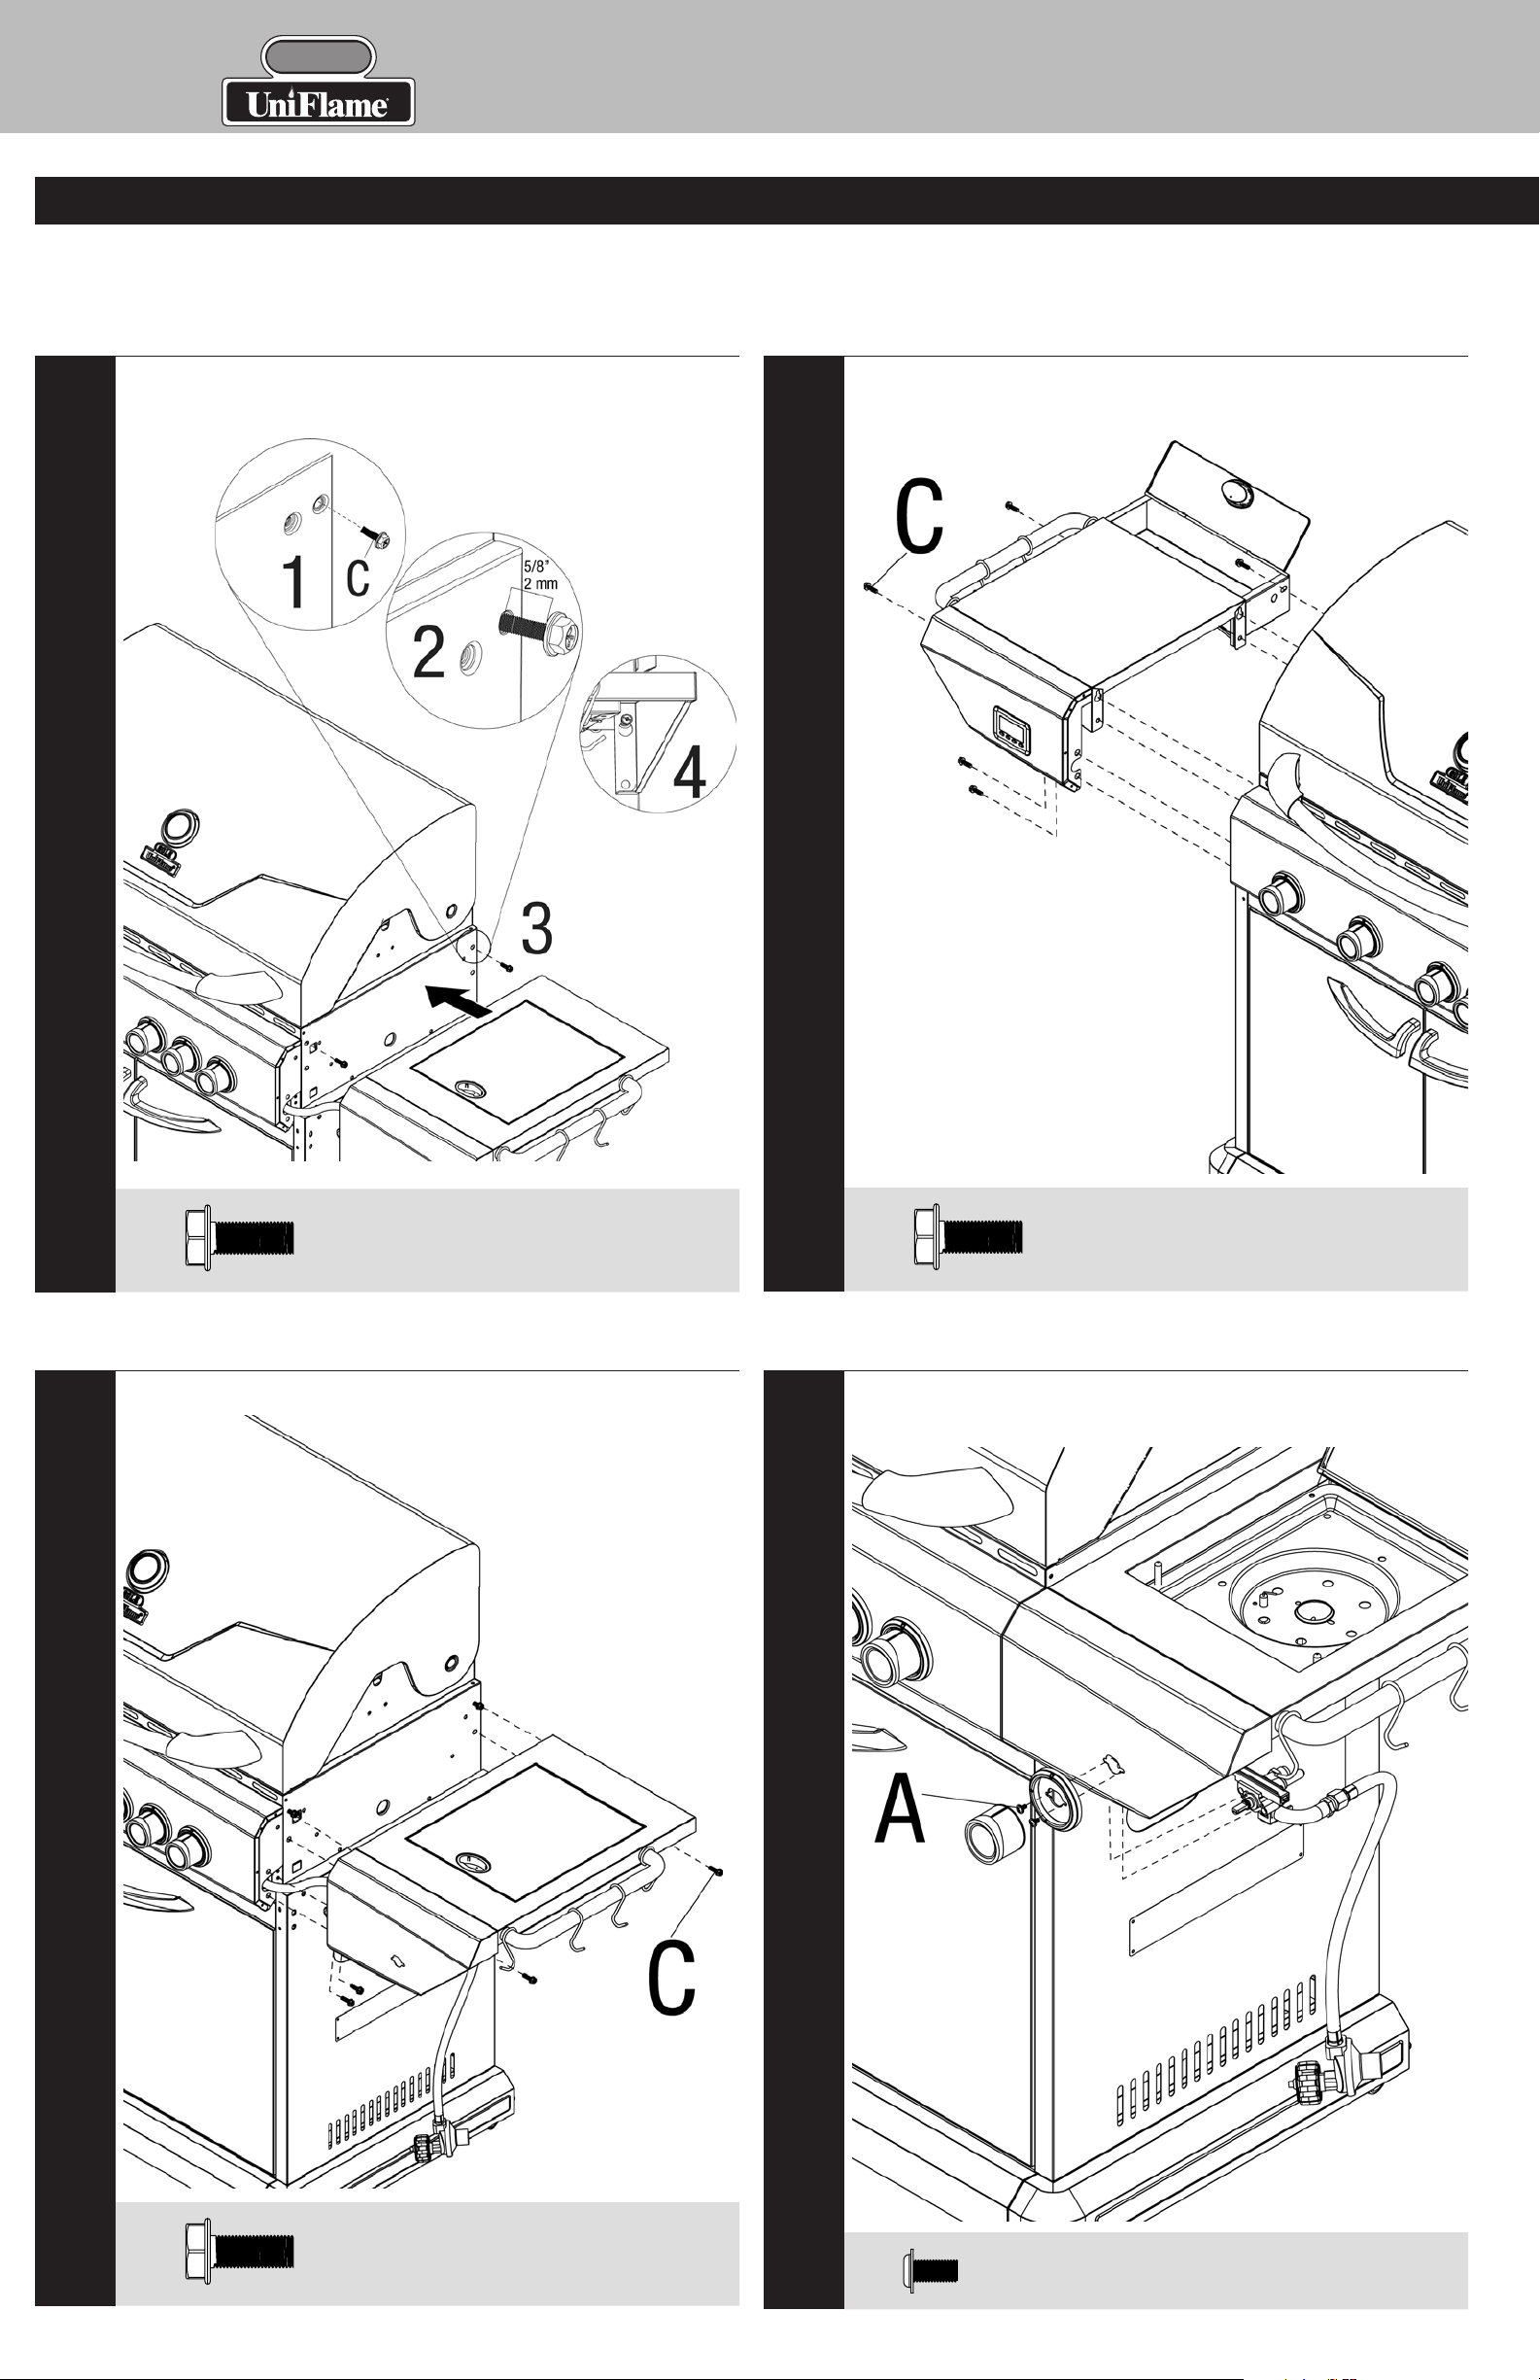
Attach Right Side Shelf Assembly
Note: Leave 5/8” (2 mm) of bolt threads exposed. Do not fully tighen until step 19.
17
Secure Left Side Shelf Assembly
18
C
Secure Right Side Shelf Assembly
19
x 2
C
Attach Regulator, Control Knob Support and Control
Knob
20
x 5
C
x 4
A
x 2
Contact 1.800.762.1142 for assistance. Do not return to place of purchase.
page no.
9
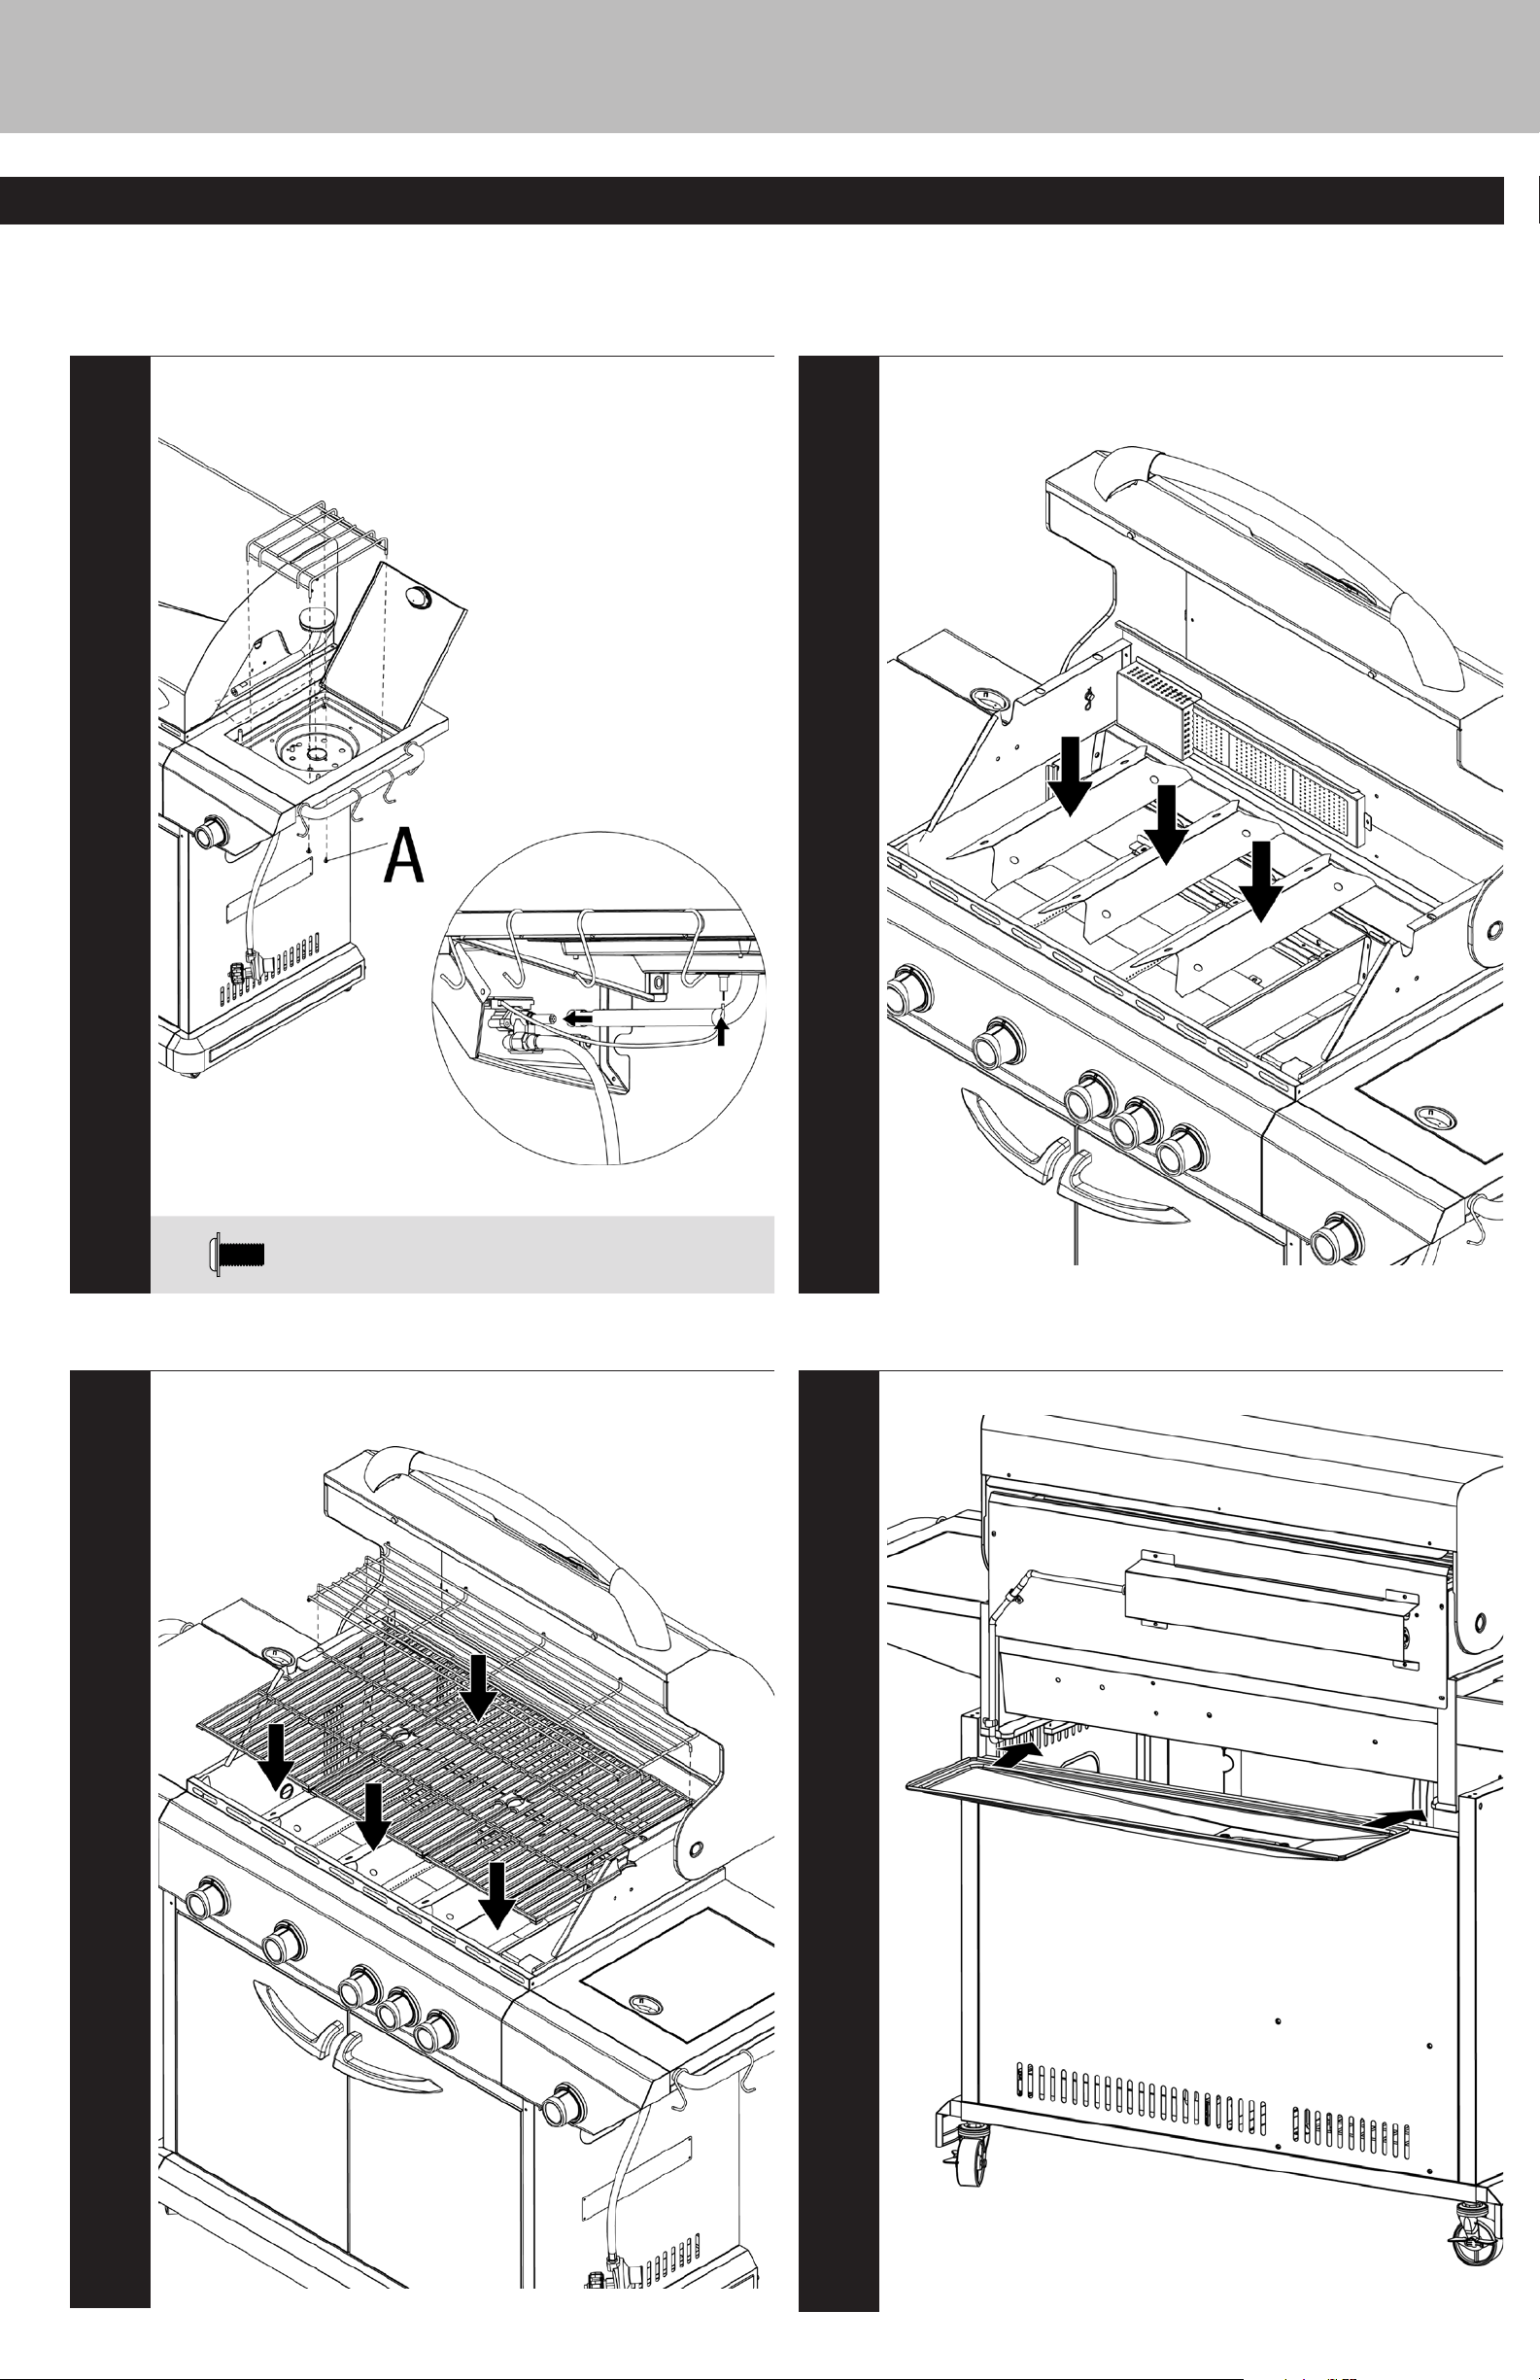
Attach Side Burner, Side Burner Grid, and Igniter Wire
21
Insert Heat Plates
22
A
Insert Cooking Grid and Warming Rack
23
x 2
Insert Grease Tray
24
GOLD
Outdoor LP Gas Barbecue Grill Model No. GBC873W
Assembly Instructions (continued)
Attach Grease Cup and Grease Cup Support
25
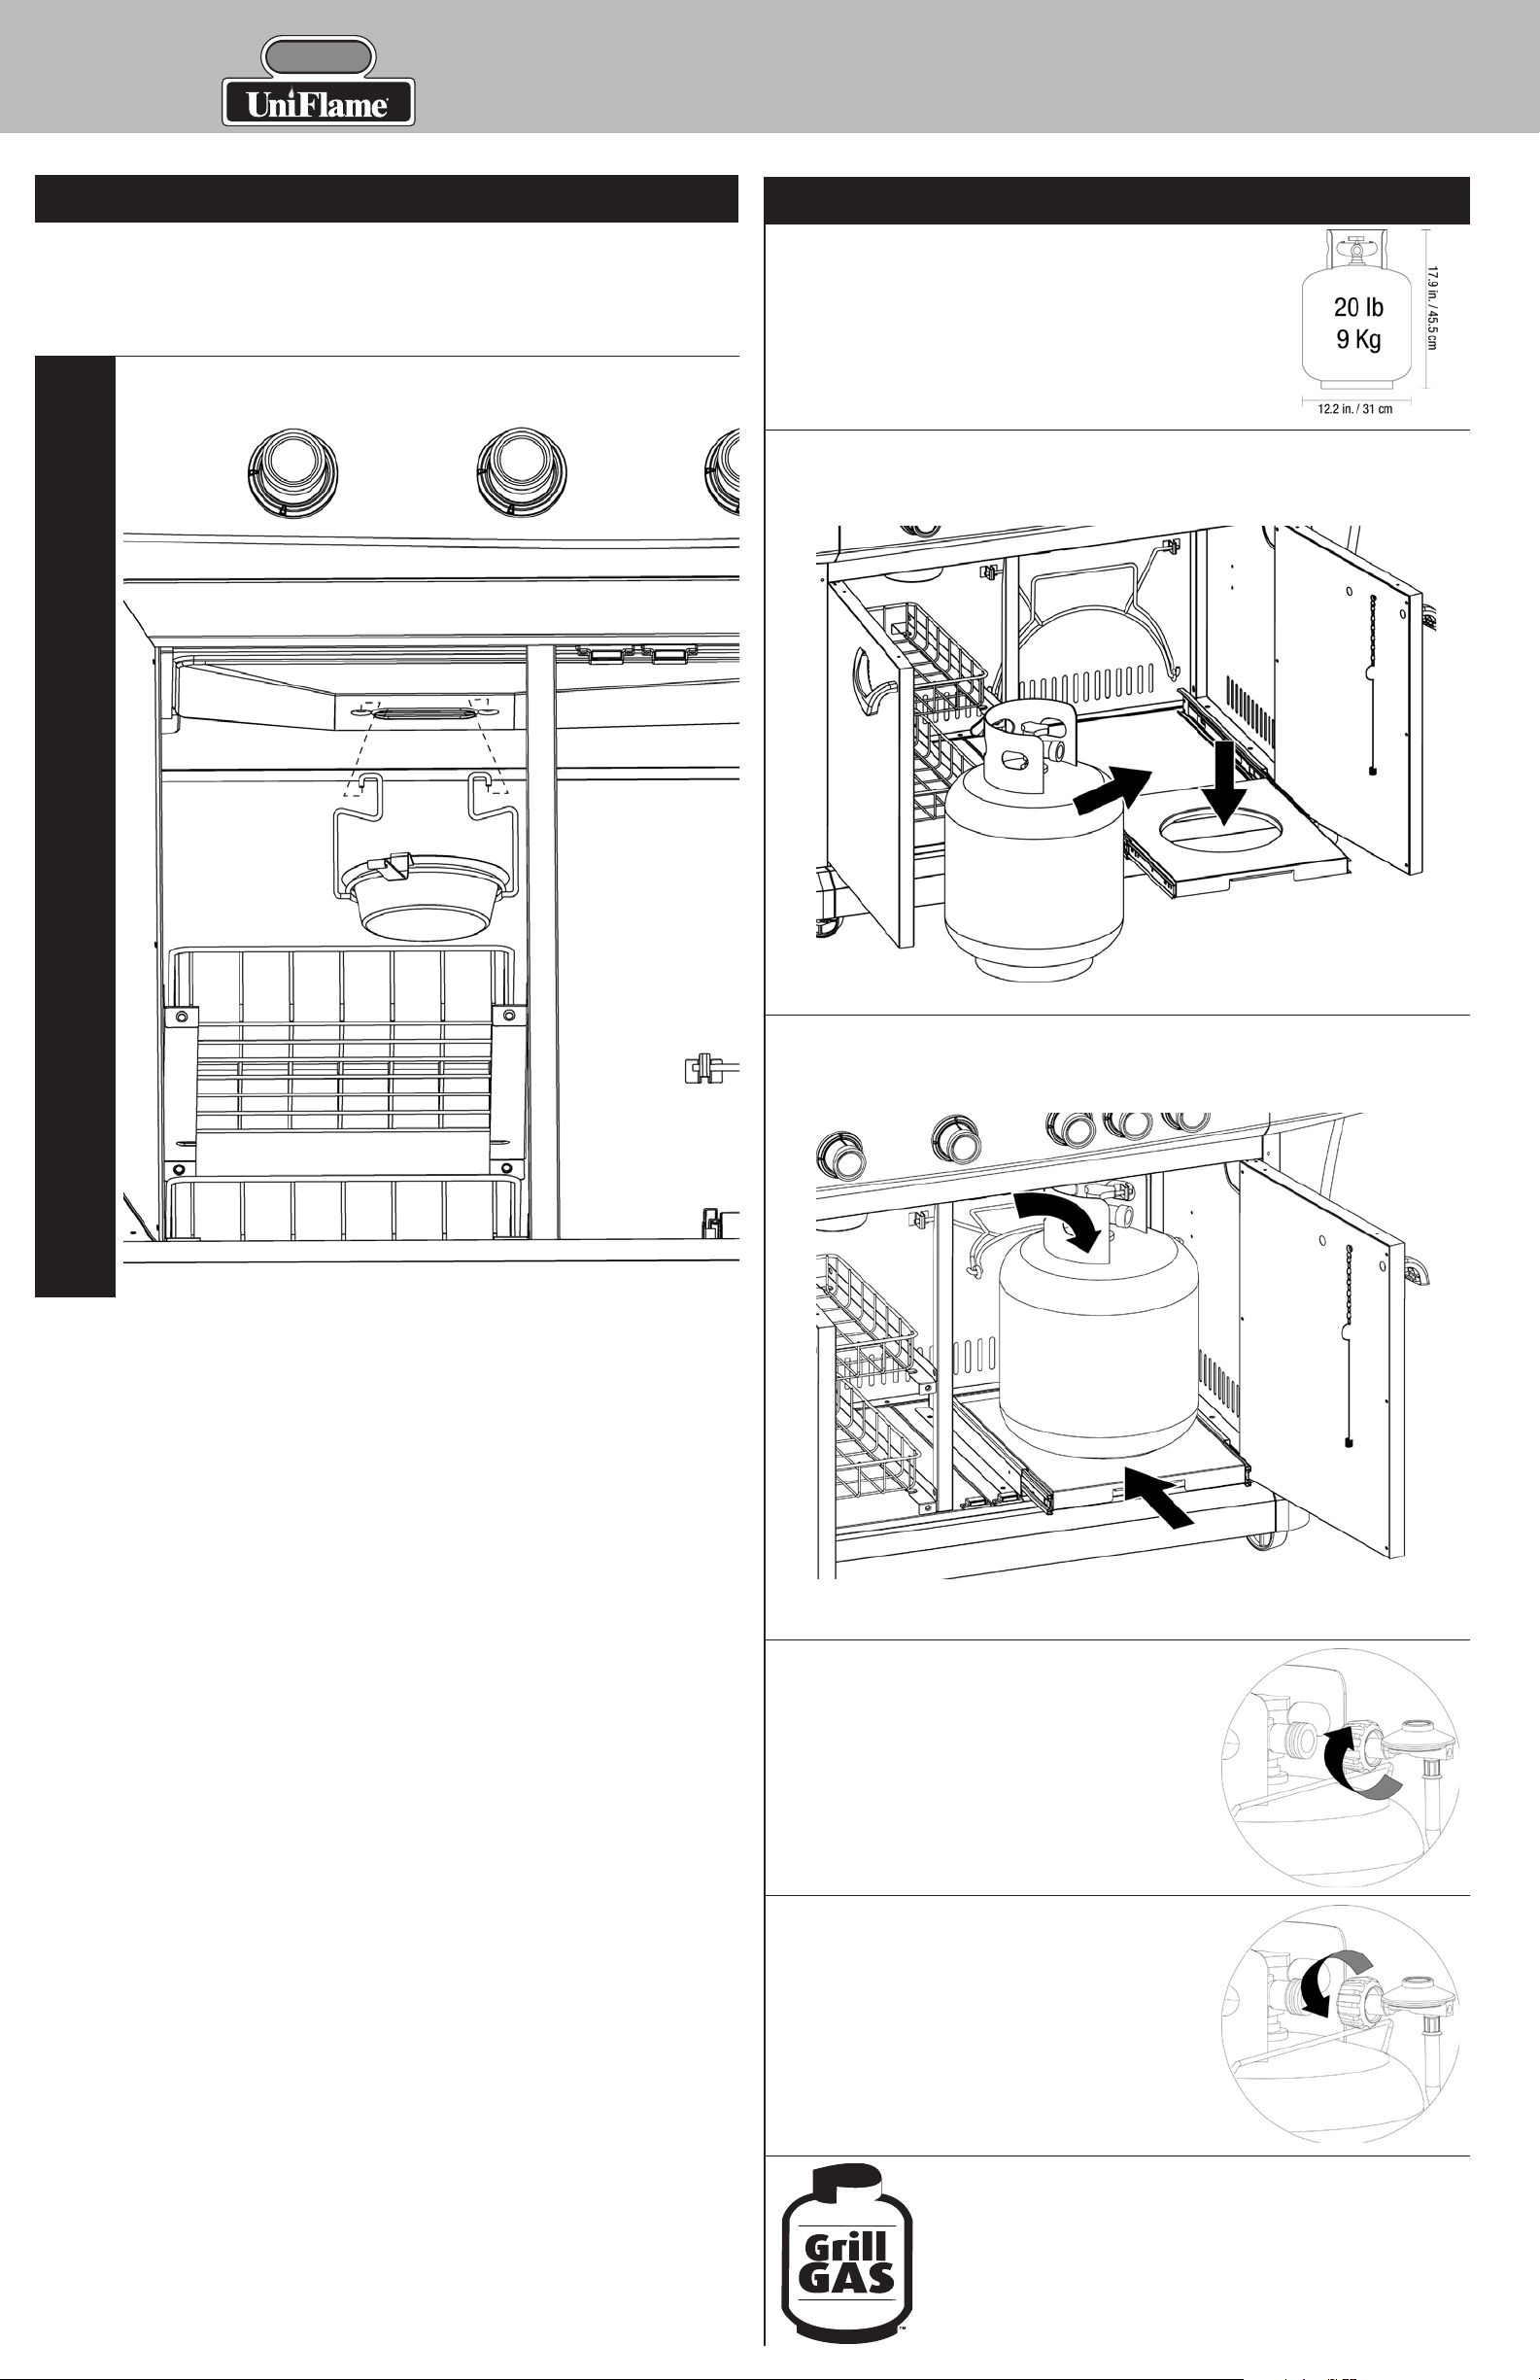
Installing LP Gas Tank
To operate you will need (1) precision-filled standard grill LP gas
tank (20#) with external valve threads.
Note: An empty standard grill LP gas tank weighs approximately
18 lbs. A precision-filled standard grill LP gas tank should weigh
no more than 38 lbs.
Insert LP Gas Tank
Place precision filled LP gas tank upright into hole in the tank tray so the tank valve is facing
the gas line connection.
Secure LP Gas Tank
Slide the tank tray all the way back and secure by sliding tank retainer wire over shoulder of LP
gas tank.
Connect LP Gas Tank
Before connecting, be sure that there is no debris caught in
the head of the LP gas tank, head of the regulator valve or
in the head of the burner and burner ports.
Connect gas line to tank by turning knob clockwise until it
stops.
Disconnect LP Gas Tank
Before disconnecting make sure the LP gas tank valve is
“OFF”.
Disconnect gas line from LP gas tank by turning knob
counterclockwise until it is loose.
Need a tank of gas? Try tank exchange service. It’s easy, fast, safe,
and available at tens of thousands of conveniently located retail outlets
nationwide. You can purchase a new full tank or exchange your empty for
a precision filled one.

Contact 1.800.762.1142 for assistance. Do not return to place of purchase.
X
X
X
X
X
Operating Instructions
page no.
11
Checking for Leaks
Burner Connections
1. Make sure the regulator valve and hose connections
are securely fastened to the burner and the tank.
If your unit was assembled for you, visually check
the connection between the burner venturi pipe and
orifice. Make sure the burner venturi pipe fits over
the orifice.
WARNING: Failure to inspect this
connection or follow these instructions
could cause a fire or an explosion
which can cause death, serious bodily
injury, or damage to property.
2. Please refer to diagram for proper installation.
(Figure 1 and 2)
3. If the burner pipe does not rest flush to the orifice,
please contact 1.800.762.1142 for assistance.
Tank/Gas Line Connection
LP Gas
Connection
LP Gas
Valve with
Orifice
Figure 1
Main Burners
Figure 2
Burner
venturi
pipe
LP Gas Valve
with Orifice
LP Gas
Connection
Caution: If burner flame goes out during operation, immediately turn
the gas “OFF” and open lid to let the gas clear for about 5 minutes
before re-lighting.
Turning Off
1. Turn gas OFF at LP gas tank.
2. Turn all control knobs clockwise to the “OFF” position.
Direct Cooking
Cooking directly over hot burners. Ideal for grilling food requiring less than 25 minutes of
grilling time, such as steaks, hamburgers, hot dogs, chicken parts, vegetables and fruit.
1. Open lid and ignite the desired amount of burners per lighting instructions in owner’s manual.
2. Close lid and preheat grill on “HIGH”.
3. Wear protective gloves and use long handle tongs to place food onto cooking grids above the
lit burners.
4. Adjust controls to desired temperature.
5. With lid open or closed, cook until desired internal food temperatures are achieved.
6. Turn grill OFF by first closing the valve on the propane tank. Burn off remaining gas in lines
by waiting 15 seconds then turn all burner controls to the OFF position. A “poof” sound is
normal as the last of the LP gas is burned.
1. Make 2-3 oz. of leak solution by mixing one part
liquid dishwashing soap with three parts water.
2. Make sure control knobs are “OFF”. (Figure 3)
3. Turn LP gas tank “ON” at valve.
4. Spoon leak check solution at all “X” locations
(Figure 4)
a. If any bubbles appear turn LP gas tank “OFF”,
reconnect and re-test.
b. If you continue to see bubbles after several
attempts, turn LP gas tank “OFF” and disconnect
LP gas tank and contact 1.800.762.1142 for
assistance.
c. If no bubbles appear after one minute turn tank
“OFF”, wipe away solution and proceed.
Operating Main Burners
First Use
1. Make sure all labels, packaging and protective films
have been removed from the grill.
2. Remove manufacturing oils before cooking on this
grill for the first time, by operating the grill for at
least 15 minutes on “HIGH” with the lid closed. This
will “heat clean” the internal parts and dissipate
odors.
Lighting
1. Open lid. Attempting to light the burner with the
lid closed may cause an explosion!
2. Make sure there are no obstructions of airflow to
the burners. Spiders and insects can nest within
and clog the burner / venturi tube at the orifice. A
clogged burner tube can lead to a fire beneath the
appliance.
3. All control knobs must be in the “OFF” position.
(Figure 3)
4. Turn ON gas at LP gas tank.
5. Push and turn control knob slowly about 1/4 turn
counter clockwise until a click is heard. The burner
should light. If the burner does not light, repeat up to
three times.
6. If ignition does not occur, turn control knob to “OFF”,
wait 5 minutes and repeat lighting procedure.
7. To light other burners, repeat the same procedure
for the adjacent burner and continue in sequence
until all desired burners are lit.
8. If igniter does not light burner, use a lit match
secured with the lighting rod provided to light
burners manually. Access the burners through the
cooking grid and heat plates. Position the lit match
near side of the burner. (Figure 5)
Important: Always use the lighting rod provided when
lighting burners with a match.
9. After lighting, observe the burner flame, make sure
all burner ports are lit and flame height matches
illustration. (Figure 6)
Burner
Side Burner
Figure 3
Figure 4
Figure 5
Figure 6
Flame
Burner
venturi pipe
Slight
Yellow
Slight
Blue
Dark
Blue
Indirect Cooking
Not cooking directly over hot burners. Ideal for slow cooking and foods requiring more than 25
minutes such as most roasts, loins, chops, whole chickens, turkey, fish and baked goods.
1. Open lid and ignite the desired amount of burners per lighting instructions in owner’s manual.
2. Close lid and preheat grill on “HIGH”.
3. Wear protective gloves and use long handle tongs to place food onto cooking grids above the
un-lit burners.
4. Adjust controls to desired temperature.
5. With lid closed, cook until desired internal food temperatures are achieved.
6. Turn grill OFF by first closing the valve on the propane tank. Burn off remaining gas in lines
by waiting 15 seconds then turn all burner controls to the “OFF” position. A “poof” sound is
normal as the last of the LP gas is burned.
For more tips on indirect cooking please see “Tips for Better Cookouts and Longer Grill Life”
Operating Sear Burner
First Use
1. Make sure all labels, packaging and protective films have been removed from the grill.
2. Remove manufacturing oils before cooking on this grill for the first time, by operating the grill
for at least 15 minutes on “HIGH” with the lid closed. This will “heat clean” the internal parts
and dissipate odors.
Lighting
NOTE: Infrared sear burner can be used while main burners are operating.
1. Open lid. Attempting to light the burner with the lid closed may cause an explosion!
2. Make sure there are no obstructions of airflow to the gas unit. Spiders and insects can nest
within and clog the burner / venturi tube at the orifice. A clogged burner tube can lead to a
fire beneath the appliance.
3. Control knob must be in the “OFF” position. (Figure 3)
4. Turn ON gas at LP gas tank.
5. Push and turn control knob slowly about 1/4 turn counter clockwise until a click is heard. The
burner should light. If the burner does not light, repeat up to three times.
6. Hold the knob 3 to 5 seconds to allow gas to reach and light the burner.
7. Burner should turn red after 2 to 3 minutes.
8. Turn control knob “OFF” if burner is not lit. Wait 5 minutes and repeat lighting procedure.
Caution: If burner flame goes out during operation, immediately turn
the gas “OFF” and open lid to let the gas clear for about 5 minutes
before re-lighting.
Turning Off
1. Turn gas OFF at LP gas tank.
2. Turn all control knobs clockwise to the “OFF” position.
Cooking
Ideal for searing in juices and flavor in food, such as steaks, roasts, and chicken parts.
1. Open lid and ignite the burner per lighting instructions.
2. Close lid and preheat grill on “HIGH”.
3. Wear protective gloves and use long handle tongs to place food onto cooking grids above the
burner.
4. Adjust control to desired temperature.
5. Keep an eye on the food to make sure the food does not burn, as it will take a very short time
to sear each side of the food. Turn as desired.

GOLD
Operating Instructions (continued)
Outdoor LP Gas Barbecue Grill Model No. GBC873W
6. Turn grill OFF by first closing the valve on the propane tank. Burn off remaining gas in lines
by waiting 15 seconds then turn all burner controls to the OFF position. A “poof” sound is
normal as the last of the LP gas is burned.
Operating Side Burner
NOTE: Side burner can be used while main burners
are operating.
Never use side burner as a grill.
Lighting
1. Open lid. Attempting to light the burner with the
lid closed may cause an explosion!
2. Make sure there are no obstructions of airflow to the
burner. Spiders and insects can nest within and clog
the burner / venturi tube at the orifice. A clogged
burner tube can lead to a fire beneath the appliance.
3. Control knob must be in the “OFF” position.
(Figure 7)
4. Turn ON gas at LP gas tank.
5. Push and turn control knob slowly about 1/4 turn
counter clockwise until a click is heard. The burner
should light. If the burner does not light, repeat up to
three times.
6. If ignition does not occur, turn control knob to “OFF”,
wait 5 minutes and repeat lighting procedure.
7. If ignition does not occur in 5 seconds, turn burner
control knob “OFF”, wait 5 minutes, and repeat
lighting procedure.
8. If igniter does not light burner, use a lit match
secured with the lighting rod provided to light
burners manually. Position the lit match near side of
the burner. (Figure 8)
Important: Always use the lighting rod provided when
lighting burners with a match.
9. After lighting, please observe the burner flame,
make sure all burner ports are lit and flame height
matches illustration. (Figure 9)
Burner
Figure 7
Figure 8
Figure 9
Flame
Slight
Yellow
Slight
Blue
Dark
Blue
CAUTION: If burner flame goes out during operation, immediately turn
the gas “OFF” and open lid to let the gas clear for about 5 minutes
before re-lighting.
Turning Off
1. Turn gas OFF at LP gas tank.
2. Turn all control knobs clockwise to the “OFF” position.
Tips for Better Cookouts and Longer Grill Life
1. For food safety tips visit: http://www.fsis.usda.gov/Fact_Sheets/Barbecue_Food_Safety/
2. Use the upper cooking grid (warming rack) for keeping cooked food warm, toasting breads or
cooking delicate foods in aluminum foil pouches.
3. Use the side burner of this appliance like a normal kitchen range for boiling, sautéing or
frying.
4. To keep food from sticking to the grids, spray or coat with cooking oil before lighting.
5. To reduce flare-up keep grill clean, use lean cuts of meat (or trim fat) and avoid cooking on
very high temperatures.
6. Place delicate foods like fish and vegetables in aluminum foil pouches and indirect cook or
place on upper cooking levels (warming rack).
7. To avoid losing natural juices, use long handled tongs or spatulas instead of forks and turn
foods over just once during cooking.
8. When direct cooking adjust your burners to different levels so foods can be prepared to
different internal temperatures in the same time frame.
9. When indirect cooking roasts and larger cuts of meat, place meat onto a roasting rack inside
a heavy gauge metal pan. Place pan over the un-lit burners.
10. Try water pans to reduce flare-ups and cook juicer meats. Before starting grill remove
cooking grids and place a heavy duty shallow pan directly on heat plates. Fill half way with
water, fruit juices or other flavored liquids. Replace cooking grids and position food over the
loaded pan.
11. Enhance food flavors by using wood chips in smoker boxes or aluminum foil pouches.
Follow the wood manufacturer’s instructions.
12. Rotisseries, grill baskets, vertical poultry holders and other accessories can enhance your
experiences, reduce cooking times and aid in clean-up.
13. Clean cooking grids and racks after every use with a quality grill bush designed for your
grid material. Wear protective gloves and gently remove the build-up while grids are hot.
14. After every use, allow grill to cool. Then protect clean cooking grids with a light coat of
cooking oil, empty grease pan, wipe outside surfaces with a suitable kitchen cleaner and
protect surfaces with a quality cover that properly fits your grill.
15. Visit websites like www.bluerhino.com, watch barbecue themed TV shows or purchase
related barbecue cookbooks to learn more interesting tips like –
A gas grill is ideal for reheating leftover pizza. Set burners on low and place pizza slices
directly on preheated cooking grid. Close lid and cook until cheese starts to bubble.
Operating Digital Timer
Turning Off
1. Turn gas OFF at LP gas tank.
2. Turn control knob clockwise to the “OFF” position.
Note: A “poof” sound is normal as the last of the LP gas is burned.
Cooking
1. Light burner.
2. Set burner to desired temperature
3. Place pan on center of grid.
4. Cook and adjust temperature as needed.
Operating Infrared Back Burner
First Use
1. Make sure all labels, packaging and protective films have been removed from the grill.
2. Remove manufacturing oils before cooking on this grill for the first time, by operating the grill
for at least 15 minutes on “HIGH” with the lid closed. This will “heat clean” the internal parts
and dissipate odors.
Lighting
NOTE: Infrared back burner can be used while main burners are operating.
1. Open lid. Attempting to light the burner with the lid closed may cause an explosion!
2. Make sure there are no obstructions of airflow to the gas unit. Spiders and insects can nest
within and clog the burner / venturi tube at the orifice. A clogged burner tube can lead to a
fire beneath the appliance.
3. Control knob must be in the “OFF” position. (Figure 3)
4. Turn ON gas at LP gas tank.
5. Push and turn control knob slowly about 1/4 turn counter clockwise until a click is heard. The
burner should light. If the burner does not light, repeat up to three times.
6. Hold the knob 3 to 5 seconds to allow gas to reach and light the burner.
7. Burner should turn red after 2 to 3 minutes.
8. Turn control knob “OFF” if burner is not lit. Wait 5 minutes and repeat lighting procedure.
Caution: If burner flame goes out during operation, immediately turn
the gas “OFF” and open lid to let the gas clear for about 5 minutes
before re-lighting.
Count-Up
1. Press the ‘Start/Stop’ button. The timer will begin
counting up from 0:00.
2. Press the ‘Start/Stop’ button. The timer will stop.
Count-Down
1. Press the ‘minute’ button to set the desired number
of minutes.
2. Press the ‘Seconds’ button to set the desired
number of seconds.
3. Press the ‘Start/Stop’ button. The timer will begin
counting down from the pre-set time.
4. When the timer reaches 0:00 a loud beep will sound
for up to 1 minute.
5. To stop the count-down at any time or stop the
alarm from sounding, press the ‘Start/Stop’ button.
Light
Press the ‘Light’ button and the LCD will illuminate for
10 seconds.
Resetting the timer
If you have stopped the timer during count-up or
count-down mode, you can reset it back to 0:00 by
pressing and holding the two buttons indicated by the
‘reset’ lines.
Auto Shut-off
In order to increase the battery life, the digital timer
will automatically shut off when not in use after 30
seconds. To turn it back on press the ‘Start/Stop’
button
Replacing the batteries
1. Remove the back cover off of the timer as shown.
(See Figure 11)
2. Remove the old batteries and insert 2 new AAA batteries
3. Replace the cover back onto the timer.
Figure 10
Digital Timer
Figure 11
Remove Digital Timer Back
Replace Digital Timer Back

Contact 1.800.762.1142 for assistance. Do not return to place of purchase.
1-2 in. /
25.4 - 50.8 mm
1-2 in. /
page no.
13
Cleaning and Care
CAUTION:
1. All cleaning and maintenance should
be done when grill is cool and with
the fuel supply disconnected.
Burner Flame Conditions
Use this chart check to see if your
2. DO NOT clean any grill part in a self
cleaning oven. The extreme heat will
damage the finish.
Notices
1. This grill should be thoroughly cleaned and
inspected on a regular basis.
2. Abrasive cleaners will damage this product.
3. Never use oven cleaner to clean any part of grill.
4. Do not clean any grill part in a self cleaning
oven. The extreme heat will damage the finish.
Before Each Use:
1. Keep the grill area clean and free from any
combustible materials, gasoline, and other
flammable vapors and liquids.
2. Do not obstruct the flow of the combustion of LP
and the ventilation air.
3. Keep the ventilation opening(s) of the LP gas tank
area free and clear from debris.
4. Visually check the burner flames, to make sure your
grill is working properly.
5. See sections below for proper cleaning instructions.
6. Check and clean the burner/venturi tubes for insects
and insect nests. A clogged tube can lead to a fire
beneath the grill.
Cleaning Surfaces
1. Wipe surfaces clean with mild dishwashing detergent or baking soda.
2. For stubborn surfaces use a citrus based degreaser and a nylon scrubbing brush.
3. Rinse clean with water.
Normal: Soft blue flames with
yellow tips between 1 in. - 2 in.
hight.
Needs Cleaning: Noisy with hard
blue flames.
Has to be cleaned: Wavy with
yellow flames.
Figure 12
burners need to be cleaned.
Limited Warranty
Blue Rhino Global Sourcing, Inc (“Vendor”) warrants to the original retail purchaser of this
product, and to no other person, that if this product is assembled and operated in accordance
with the printed instructions accompanying it, then for a period of one (1) year from the date
of purchase, all parts in such product shall be free from defects in material and workmanship.
Vendor may require reasonable proof of your date of purchase. Therefore, you should retain
your sales slip or invoice. This Limited Warranty shall be limited to the repair or replacement of
parts, which prove defective under normal use and service and which Vendor shall determine
in its reasonable discretion upon examination to be defective. Before returning any parts, you
should contact Vendor’s Customer Service Department using the contact information listed
below. If Vendor confirms, after examination, a defect covered by this Limited Warranty in any
returned part, and if Vendor approves the claim, Vendor will replace such defective part without
charge. If you return defective parts, transportation charges must be prepaid by you. Vendor will
return replacement parts to the original retail purchaser, freight or postage prepaid.
This Limited Warranty does not cover any failures or operating difficulties due to accident,
abuse, misuse, alteration, misapplication, improper installation or improper maintenance or
service by you or any third party, or failure to perform normal and routine maintenance on
the product as set out in this owner’s manual. In addition, the Limited Warranty does not cover
damage to the finish, such as scratches, dents, discoloration, rust or other weather damage,
after purchase.
This Limited Warranty is in lieu of all other express warranties. Vendor disclaims all warranties
for products that are purchased from sellers other than authorized retailers or distributors,
including the warranty of merchantability or the warranty of fitness for a particular purpose.
VENDOR ALSO DISCLAIMS AND ANY ALL IMPLIED WARRANTIES, INCLUDING WITHOUT
LIMITATION THE IMPLIED WARRANTIES OF MERCHANTABILITY AND FITNESS FOR A PARTICULAR
PURPOSE. VENDOR SHALL NO LIABILITY TO PURCHASER OR ANY THIRD PARTY FOR ANY
SPECIAL, INDIRECT, PUNITIVE, INCIDENTAL, OR CONSEQUENTIAL DAMAGES. Vendor further
disclaims any implied or express warranty of, and assumes no responsibility for, defects in
workmanship caused by third parties.
This Limited Warranty gives the purchaser specific legal rights; a purchaser may have other
rights depending upon where he or she lives. Some jurisdictions do not allow the exclusion or
limitation of special, incidental or consequential damages, or limitations on how long a warranty
lasts, so the above exclusion and limitations may not apply to everyone.
Vendor does not authorize any person or company to assume for it any other obligation or
liability in connection with the sale, installation, use, removal, return, or replacement of its
equipment, and no such representations are binding on Vendor.
Blue Rhino Global Sourcing, Inc
Winston-Salem, North Carolina 27105 USA
1.800.762.1142
Cleaning Main Burner
1. Turn gas “OFF” at the control knobs and LP gas tank.
2. Remove cooking grid and heat plates.
3. Remove burner by removing the fasteners securing the burner to the grill bottom.
4. Lift burner up and away from gas valve orifice.
5. Disconnect wire from spark electrode.
6. Clean inlet (venturi) of burner with small bottle brush or compressed air.
7. Remove all food residue and dirt on burner surface.
8. Clean any clogged ports with a stiff wire (such as an opened paper clip)
9. Inspect burner for any damage (cracks or holes). If damage is found, replace with new
burner.
10. Reinstall burner, check to insure that gas valve orifice is correctly positioned inside burner
inlet (venturi). Also check position of spark electrode.
11. Replace heat plate and cooking grid.
12. Perform leak test.
Cleaning Side Burner
1. Turn gas “OFF” at the control knobs and LP gas tank.
2. Remove side burner grid.
3. Remove burner by removing the screws securing the burner to the side shelf.
4. Lift burner up and away from gas valve orifice.
5. Clean inlet (venturi) of burner with small bottle brush or compressed air.
6. Remove all food residue and dirt on burner surface.
7. Clean any clogged ports with a stiff wire (such as an opened paper clip)
8. Inspect burner for any damage (cracks or holes). If damage is found, replace with new
burner.
9. Reinstall burner, check to insure that gas valve orifice is correctly positioned inside burner
inlet (venturi). Also check position of spark electrode.
10. Replace cooking grid.
11. Perform leak test.
Product Registration
For faster warranty service, please register your product immediately at www.bluerhino.com or
call 1.800.762.1142.

GOLD
Outdoor LP Gas Barbecue Grill Model No. GBC873W
Troubleshooting
Problem Possible Cause Prevention/Cure
Burner will not light using ignitor
Burner will not light with match
Sudden drop in gas flow or reduced flame height
Irregular flame pattern, flame does not run the full length
of burner.
Flame is yellow or orange.
Flame blow out
Flare-up
Persistent grease fire.
Flashback (fire in burner tube(s))
Inside of lid is peeling-like paint peeling
For more assistance please visit us online at www.bluerhino.com or call 1.800.762.1142 for immediate assistance.
Wires or electrode covered with cooking residue. Clean wire and/or electrode with rubbing alcohol.
Electrode and burners are wet. Wipe dry with cloth.
Electrode cracked or broken - sparks at crack. Replace electrode.
Wire loose or disconnected. Reconnect wire or replace electrode/wire assembly
Wire is shorting (sparking) between ignitor and electrode. Replace ignitor wire/electrode assembly
Bad ignitor. Replace ignitor
No gas flow. Check if LP gas tank is empty. If LP gas tank is not empty, refer
to “Sudden drop in gas flow (reduced flame height). If empty,
replace or refill.
Coupling nut and regulator not fully connected. Turning the coupling nut about one-half to three quarters
additional turn until solid stop. Tighten by hand only-do not use
tools.
Obstruction of gas flow. Clear burner tubes. Check for bent or kinked hose.
Disengagement of burner to valve. Reengage burner and valve.
Spider webs or insect nest in venturi. Clean venturi.
Burner ports clogged or blocked. Clean burner ports.
Out of gas. Replace or refill LP gas tank
Excess flow safety device may have been activated. Turn off knobs, wait 30 seconds and light grill. If flames are still
too low Reset the excessive flow safety device by turning off
knobs and LP gas tank valve. Disconnect regulator. Turn burner
control knobs to HIGH. Wait 1 minute. Turn burner control knobs
off. Reconnect regulator and leak check connections. Turn LP
gas tank valve on slowly, wait 30 seconds and then light grill.
Burner ports are clogged or blocked. Clean burner ports.
New burner may have residual manufacturing oils. Burn grill for 15 minutes with the lid closed
Spider webs or insect nest in venturi Clean venturi.
Food residue, grease or seasoning salt on burner. Clean burner.
Poor alignment of valve to burner venturi. Assure burner venturi is properly engaged with valve
High or gusting winds Turn front of grill to face wind or increase flame height to
“HIGH” setting
Low on LP Gas Replace or refill LP gas tank
Excess flow valve tripped Refer to “Sudden drop in gas flow”
Grease buildup. Clean grill.
Excess fat in meat. Trim fat from meat before grilling.
Excessive cooking temperature. Adjust (lower) temperature accordingly.
Grease trapped by food buildup around burner system Turn knobs to “OFF”. Turn gas off at LP gas tank. Leave lid in
closed position and let fire burn out. After grill cools, remove and
clean all parts.
Burner and/or burner tubes are blocked Clean burner and/or burner tubes
The lid is stainless steel, not paint. Baked on grease buildup has turned to carbon and is flaking off.
Clean thoroughly.

Contact 1.800.762.1142 for assistance. Do not return to place of purchase.
page no.
15

GOLD
Outdoor LP Gas Barbecue Grill Model No. GBC873W

GOLD
Parrilla de gas propano para exteriores, modelo no. GBC873W

desmenuzando. Límpiela complatamente.
todas las piezas.
se consuma. Una vez se haya enfriado la parrilla, quite y limpie
tanque de propano líquido. Deje la tapa cerrada y deje que el fuego
Gire las perillas a la posición “OFF” (apagado). Cierre el gas del
la llama a la graduación “HIGH” (alto).
adecuadamente a la válvula.
Haga funcionar la parrilla durante 15 minutos con la tapa cerrada.
parrilla.
propano líquido, espere 30 segundos y, a continuación, encienda la
comprobación de fugas. Abra lentamente la válvula del tanque de
a conectar las conexiones del regulador y del dispositivo de
perillas de control del quemador a la posición “OFF”. Vuelva
quemador a la posición “HIGH” (alto). Espere 1 minuto. Gire las
líquido. Desconecte el regulador. Gire las perillas de control del
las perillas a la posición “OFF” y la válvula del tanque de propano
bajas reinicie el dispositivo de seguridad de flujo excesivo girando
y encienda la parrilla. Si las llamas continúan siendo demasiado
Gire las perillas a la posición “OFF” (apagado), espere 30 segundos
torcida o doblada.
mano, sin utilizar ninguna herramienta.
de vuelta hasta que haga tope con firmeza. Apriete únicamente a
vacío, sustitúyalo o vuelva a llenarlo.
repentina del flujo de gas” (tamaño de llama insuficiente). Si está
de propano líquido no está vacío, consulte la sección “Caída
Sustituya el conjunto cable del encendedor/electrodo.
Para ayuda más detallada, sírvase visitarnos en www.bluerhino.com o llamarnos al 1.800.762.1142 para ayudarle inmediatamente.
La tapa es de acero inoxidable, no pintada. La acumulación de grasa se ha convertido en carbón y se está
El quemador y/o juegos de quemadores están bloqueados. Limpie el quemador y/o los tubos del quemador.
sistema de quemadores
Grasa atascada por la acumulación de comida alrededor del
Si está utilizando una temperatura excesiva para cocinar. Ajuste (baje) la temperatura según corresponda.
Carne con exceso de grasa. Retire la grasa de la carne antes de ponerla en la parrilla.
Formaciones de grasa. Limpie la parrilla.
Válvula de exceso de flujo obstruida. Consulte la sección “Caída repentina del flujo de gas”.
Nivel de gas del tanque de propano bajo. Sustituya el tanque o vuelva a llenarlo.
Vientos fuertes o racheados. Gire el frente de la parrilla de cara al viento o aumente la altura de
Alineación incorrecta entre la válvula y el quemador de venturi. Asegúrese de que el quemador venturi está conectado
Restos de alimentos, grasa o sal para condimentar en el quemador. Limpie el quemador.
Telarañas o nidos de insectos en el venturi. Limpie el venturi.
de fabricación.
Puede que el nuevo quemador tenga aceites residuales del proceso
Las bocas del quemador están atascadas u obstruidas. Limpie las bocas del quemador.
de flujo.
Puede que se haya activado el dispositivo de seguridad de exceso
Sin gas. Compruebe si hay gas en el tanque de propano líquido.
Bocas del quemador atascadas u obstruidas. Limpie las bocas del quemador.
Telarañas o nidos de insectos en el venturi. Limpie el tubo de venturi.
Desacoplamiento del quemador a la válvula. Vuelva a conectar el quemador y la válvula.
Obstrucción del flujo de gas. Limpie los tubos del quemador. Verifique que la manguera no esté
La tuerca de acoplamiento no está conectada por completo. Gire la tuerca de acoplamiento entre media vuelta y tres cuartos
No hay flujo de gas. Compruebe si el tanque de propano líquido está vacío. Si el tanque
Dispositivo de encendido defectuoso. Sustituya el encendedor.
electrodo.
El cable tiene un cortocircuito (chispeo) entre el encendedor y el
Cable suelto o desconectado. Vuelva a conectar el cable o sustituya el conjunto electrodo/cable.
Electrodo agrietado o roto; chispas en las grietas. Sustituya el electrodo.
Los electrodos y los quemadores están mojados. Séquelo con un paño.
Cables o electrodos cubiertos con restos de alimentos. Limpie el cable y/o electrodo con alcohol isopropílico.
pela la pintura.
El interior de la tapa se está pelando; igual que cuando se
Centelleos (hay fuego en el(los) tubo(s) del quemador).
La grasa provoca un fuego persistente
Fogonazo.
La llama se apaga.
La llama es de color amarillo o naranja.
longitud del quemador.
Falta de uniformidad en la llama, la llama no cubre toda la
insuficiente.
Caída repentina del flujo de gas o altura de la llama
El quemador no se enciende con una cerilla.
El quemador no se enciende utilizando el encendedor.
Problema Causa posible Prevención/solución
15
Resolución de problemas
Si necesita ayuda llame al 1.800.762.1142. No vuelva al lugar de compra.
página

GOLD
(800)-762-1142
Winston-Salem, North Carolina 27105, EE.UU.
Blue Rhino Sourcing, Inc
al fabricante.
devolución o reemplazo de este equipo y cualquier representación de esta naturaleza no obliga
otra obligación a responsabilidad relacionada con la venta, instalación, uso, remoción,
El fabricante no autoriza a ninguna persona o compañía para asumir por el fabricante cualquier
manera que esta limitación puede no ser aplicable a usted.
jurisdicciones no permiten limitaciones en cuanto a la duración de una garantía implícita, de
tener otros derechos según el lugar donde el comprador o la compradora residan. Ciertas
Esta garantía limitada le da al comprador derechos legales específicos y el comprador puede
garantías implícitas o expresas por defectos de mano de obra causados por terceras personas.
INCIDENTALES O CONSEQUENCIALES. El fabricante, además, no asume responsabilidad por
ANTE CUALQUIER TERCERA PERSONA POR DAÑOS ESPECIALES, INDIRECTOS, PUNITIVOS,
PARTICULAR. EL FABRICANTE NO ASUME RESPONSABILIDAD ANTE EL COMPRADOR O
LAS GARANTIAS IMPLICITAS DE COMERCIABILIDAD Y ADAPTABILIDAD A UN PROPOSITO
SE HACE RESPONSABLE POR NINGUNA GARANTIA IMPLICITA INCLUYENDO, SIN LIMITACIONES,
de comerciabilidad o la garantía de aptitud para un propósito en particular. EL FABRICANTE NO
vendedores al detal autorizados. Esta exención de responsabilidad incluye cualquier garantía
responsabilidad por garantías de productos vendidos por quienes no sean distribuidores o
Esta garantía limitada reemplaza cualquier otra garantía. El fabricante no asume ninguna
causados por la intemperie después de la compra de la unidad.
de la unidad, tales como rasguños, abolladuras, descoloridos, oxidaciones y otros daños
prescribe en este manual del usuario. Además, la garantía limitada no cubre daños al terminado
o servicio inapropiado o falla en la realización de mantenimiento normal y rutinario como se
mal uso, alteración, empleo en usos inapropiados, instalación defectuosa o mantenimiento
Esta garantía limitada no cubre fallas o dificultades de operación debidas a accidente, abuso,
costo de transporte o envío prepagados.
costos de transporte deberán ser prepagados. El fabricante devolverá las partes al cliente con
reemplazar tales partes sin costo alguno. Si se le pide que devuelva las partes defectuosas, los
fabricante. Si el fabricante confirma el defecto y aprueba el reclamo, el fabricante decidirá
comuníquese con el Departamento de Servicio al Cliente (Customer Service Department) del
indique, a satisfacción del fabricante, que están defectuosas. Antes de devolver cualquier pieza,
piezas que resulten defectuosas en condiciones de servicio y uso normal y las que un examen
de venta o la factura. Esta Garantía Limitada estará limitada a la reparación o reemplazo de las
requerir prueba razonable de la fecha de compra. Por lo tanto, usted debe conservar elrecibo
un (1) año a partir de la fecha de compra para todas las piezas restantes. El fabricante podrá
siguientes estipulaciones: dos (2) años a partir de la fecha de compra para los quemadores y
partes del mismo no presentarán defectos de materiales ni de mano de obra de acuerdo a las
de acuerdo con las instrucciones impresas que lo acompañan se garantiza que todas las
producto, y a ninguna otra persona, la garantía siguiente. Si el producto se ensambla y opera
Blue Rhino Global Sourcing, Inc (el “fabricante”) provee al comprador minorista de este
Garantia limitada
1.800.762.1142.
inmediatamente visitando nuestro sitio Internet www.bluerhino.com o llamando al
Para beneficiar del servicio de garantía más rapidamente, sírvase registrar su unidad
Registro del producto
11. Haga una prueba de fugas.
10. Vuelva a colocar la parrilla de cocción.
posición del electrodo de chispa.
colocados correctamente dentro de la entrada del quemador (venturi). También verifique la
9. Vuelva a instalar el quemador, verificando que los orificios de la válvula de gas quedan
daños, sustitúyalo con un nuevo quemador.
8. Inspeccione el quemador para verificar si tiene daños (grietas o perforaciones). Si encuentra
sujetapapeles abierto).
7. Limpie los puertos que se encuentren obstruidos, usando un alambre firme (tal como un
Limpieza y cuidado (continuación)
Parrilla de gas propano para exteriores, modelo no. GBC873W

quemador.
1-2 in. /
25.4 - 50.8 mm
1-2 in. /
25.4 - 50.8 mm
6. Remueva todo residuo de comida o desperdicio que haya quedado en la superficie del
chorro de aire comprimido.
5. Limpie la entrada del quemador (venturi) usando un cepillo pequeño de limpiar botellas o un
4. Saque el quemador, levantándolo y alejándolo del orificio de la válvula de gas.
lateral.
3. Remueva el quemador, quitando los dos tornillos que aseguran el quemador en la repisa
2. Remueva la parrilla del quemador lateral.
1. Cierre el gas en las perillas de control y en el tanque de propano líquido.
Limpieza del quemador lateral
3. Vuelva a colocar la cubierta de atrás en el temporizador.
2. Remueva las pilas usadas e inserte dos pilas nuevas AAA.
Figura 11.)
1. Remueva la cubierta de atrás del temporizador como se indica en el diagrama (vea la
amarilla y ondulante.
Debe limpiarse: La llama es
la llama es de un azul vivo.
Necesita limpieza: Hace ruido y
2,5 a 5 cm de altura
pálido con puntas amarillas de
Normal: Llama de color azul
necesario limpiar sus quemadores.
Use este cuadro para ver si es
los quemadores
Condiciones de la llama en
Figura 11
12. Haga una prueba de fugas.
11. Vuelva a colocar la placa de calentamiento y la parrilla de cocción.
posición del electrodo de chispa.
colocados correctamente dentro de la entrada del quemador (venturi). También verifique la
10. Vuelva a instalar el quemador, verificando que los orificios de la válvula de gas quedan
daños, sustitúyalo con un nuevo quemador.
9. Inspeccione el quemador para verificar si tiene daños (grietas o perforaciones). Si encuentra
sujetapapeles abierto).
8. Limpie puertos que se encuentren obstruidos, usando un alambre firme (tal como un
quemador.
7. Remueva todo residuo de comida o desperdicio que haya quedado en la superficie del
chorro de aire comprimido.
6. Limpie la entrada (venturi) del quemador usando un cepillo pequeño de limpiar botellas o un
5. Desconecte el alambre del electrodo que produce la chispa.
4. Saque el quemador, levantándolo y alejándolo del orificio de la válvula de gas.
parrilla.
3. Remueva el quemador, quitando los tres ganchos que aseguran el quemador al fondo de la
2. Remueva las parrillas de cocción y las placas de calentamiento.
1. Cierre el gas en las perillas de control y en el tanque de propano líquido.
del temporizador digital
Vuelva a colocar la cubierta
Limpieza del quemador principal
3. Enjuague las superficies con agua limpia.
nilón.
2. En superficies de limpieza difícil, use un desengrasador a base de cítricos y un cepillo de
1. Limpie las superficies con un detergente suave de lavado de platos o con soda de hornear.
Limpieza de las superficies
tubo atascado puede llevar a un incendio debajo de la parrilla.
6. Examine y limpie el quemador y los tubos del venturi de insectos y nidos de insectos. Un
apropiadamente.
5. Vea las instrucciones de limpieza más adelante para verificar que las observa
funcionando adecuadamente.
4. Visualmente examine la llama del quemador para estar seguro de que la parrilla está
basura.
tanque de gas propano líquido abiertas y libres de
3. Mantenga la abertura o aberturas de la zona del
líquido ni el aire de ventilación.
2. No obstruya el flujo aire de combustión del propano
vapores inflamables.
materiales combustibles, gasolina, y otros líquidos y
1. Mantenga el rededor de la unidad limpio y libre de
Figura 11
Figura 10
del temporizador digital
Remueva la cubierta
Temporizador digital
Cada vez que vaya a usar la unidad:
extremo dañará el terminado.
un horno de limpieza automática. El calor
4. Nunca use ninguna pieza de esta parrilla en
limpiar cualquier pieza de la parrilla.
3. No utilice nunca productos limpiahornos para
dañarán este aparato.
2. No use productos de limpieza abrasivos pues
completamente de manera regular.
1. Esta parrilla debe limpiarse y verificarse
Avisos
dañará el terminado.
limpieza automática. El calor extremo
pieza de esta parrilla en un horno de
PRECAUCION: NO limpie ninguna
de propano líquido cerrado.
suministro de combustible del tanque
realizarse con la parrilla fría y con el
de limpieza y mantenimiento deben
PRECAUCION: Todas la operaciones
Reemplazo de las pilas
“Start/Stop” (comienzo/parada).
cuando no se use en un lapso de 30 segundos. Para encenderlo nuevamente, oprima el botón
Para aumentar la vida útil de la pila, el temporizador digital se apagará automáticamente
Apagado automático
oprimidos los dos botones indicados por las líneas “Reset” (volver a la graduación inicial).
temporizador en 0:00 oprimiendo y mantenimiento
en disminución, usted puede volver a graduar el
en la modalidad de conteo de aumento o de conteo
Si ha detenido el temporizador durante su operación
Nueva graduación del temporizador
iluminará por 10 segundos.
Oprima el botón “Light” (luz) y la pantalla LCD se
Iluminación
oprima el botón “Start/Stop” (comienzo/ parada).
momento o para que la alarma deje de sonar,
5, Para detener el conteo en disminución en cualquier
alarma fuerte, hasta por un minuto.
4. Cuando el temporizador llega a 0:00 sonará una
el tiempo pre-fijado.
temporizador principiará contando en disminución
3. Oprima el botón “Start/Stop” (comienzo/ parada). El
número deseado de segundos.
2. Oprima el botón “Seconds” (segundos) para fijar el
duración deseada en minutos.
1. Oprima el botón “minute” (minutos) para fijar la
Conteo en disminución
El temporizador se detendrá.
2. Oprima el botón “Start/Stop” (comienzo/ parada).
0:00.
El temporizador principiará a contar a partir de
1. P resione el botón “Start/Stop” (comienzo/ parada).
Conteo en aumento
Operación del temporizador digital
el queso principie a hacer burbujas.
cocción, previamente calentada. Cierre la tapa y continúe el proceso de cocción hasta que
quemadores a nivel bajo y coloque las secciones de pizza directamente en la parrilla de
Una parrilla a gas es ideal para volver a calentar una porción de pizza. Gradúe los
sugerencias tales como:
a la parrilla o compre libros de cocina relacionados con este tema para obtener interesantes
www.bluerhino.com - vea programas de televisión relacionados con la cocción de asados
15. Visite páginas de Internet - tales como
una cubierta de calidad que se acomode apropiadamente su unidad.
superficies exteriores con un limpiador de cocina apropiado y proteja las superficies con
ya limpias con una ligera capa de aceite de cocina, vacíe la bandeja de la grasa, limpie las
14. Después de cada uso deje que la parrilla se enfríe. Luego proteja las parrillas de cocción
la acumulación de residuos en las parrillas mientras éstas están todavía calientes.
diseñado para el material de su parrilla. Use guantes de protección y remueva con cuidado
13. Limpie las parrillas de cocción y las rejillas después de cada uso con un cepillo de calidad
de limpieza.
pueden hacer más agradable su experiencia, reducir el tiempo de cocción y facilitar la labor
12. Las canastas de asar, asadores, sostenes verticales para la carne de ave y otros accesorios
madera para esta operación.
o bolsas de papel de aluminio. Siga las instrucciones del fabricante de las astillas de
11. Realce el sabor de los alimentos usando astillas de madera en cajas metálicas para humear
de cocción y ponga los alimentos en la parrilla sobre la olla con líquido.
mitad con agua, jugos de fruta u otros líquidos para dar sabor. Vuelva a colocar las parrillas
panda, para trabajo pesado, directamente sobre las placas de calor. Llene la olla hasta la
jugosas. Antes de encender la unidad remueva las parrillas de cocción y coloque una olla
10. Ensaye el uso de ollas con agua para reducir la combustión de grasa y cocer carnes muy
13
página
Limpieza y cuidado
Si necesita ayuda llame al 1.800.762.1142. No vuelva al lugar de compra.

GOLD
quemadores apagados.
carne en una parrilla de asar dentro de una olla de metal grueso. Coloque la olla sobre los
9. Cuando por cocción indirecta prepare asados y porciones grandes de carne, coloque la
lapso de tiempo.
los alimentos puedan prepararse a sus respectivas temperaturas internas durante el mismo
8. Cuando haga cocción directa, ajuste los quemadores a diferentes niveles de manera que
de tenedores, y voltee el alimento solamente una vez durante el proceso de cocción.
7. Para evitar la pérdida de jugos naturales, use tenacillas de mango largo o espátulas, en lugar
aluminio y coloque las bolsas en el nivel superior de cocción (rejilla de calentamiento).
6. Coloque alimentos delicados tales como pescado y legumbres en bolsas de papel de
grasa (o remueva el acceso de grasa) y evita cocerla a temperaturas demasiada altas.
5. Para reducir el encendido de la grasa, mantenga la parrilla limpia, use cortes de carne sin
cocina a las parrillas antes de encender la unidad.
4. Para evitar que los alimentos se peguen en las parrillas, aplique una capa de aceite de
cocina para hervir, freír o saltear.
3. Use el quemador lateral de esta unidad como se usa el elemento calórico normal de una
aluminio.
alimentos ya cocidos, pan tostado, o para cocer alimentos delicados en bolsas de papel de
2. Use la parrilla de cocción de arriba (rejilla de calentamiento) para mantener calientes los
Food_Safety/index.asp
1. Para sugerencias de seguridad visite: http: http://www.fsis.usda.gov/Fact_Sheets/Barbecue_
oscuro
Azul
azul
amarilla
Ligeramente
Llama
Ligeramente
Quemador
Figura 9
una vida útil más larga de la parrilla
Sugerencias para una mejor preparación de los alimentos y
(apagado).
2. Gire la perilla de control en la dirección de las manecillas del reloj a la posición “OFF”
1. Cierre el gas en el tanque de propano líquido.
Apagado:
antes de volver a encenderlo.
durante 5 minutos para dejar que la zona quede despejada de gas
funcionamiento, cierre el gas (“OFF”) inmediatamente y abra la tapa
Precaución: Si la llama del quemador se apaga durante el
encendido. Espere 5 minutos y repita el procedimiento para encenderlo.
8. Vuelva la perrilla de control a la posición “OFF” (apagado) si el quemador no se ha
7. El quemador debe ponerse rojo después de 2 o 3 minutos de encendido.
llegue al quemador y se encienda.
6. Mantenga la perrilla oprimida en esta posición, de 3 a 5 segundos, para permitir que el gas
veces.
quemador debe encenderse. Si el quemador no se enciende repita este proceso hasta tres
de reloj, más o menos 1/4 de giro, hasta que oiga un clic en la unidad. En este punto el
5. Oprima y gire la perilla de control lentamente en la dirección contraria a las manecillas
4. Abra el gas desde el tanque de propano líquido.
3. La perilla de control tiene que estar en la posición “OFF” (apagado), vea la Figura 3.
venturi. Un tubo de quemador obstruido puede provocar un incendio debajo del aparato.
otros insectos pueden formar sus nidos dentro y obstruir los orificios del quemador/tubo de
2. Asegúrese de que no hay nada que obstruya el flujo de aire en la unidad de gas. Arañas y
explosión!
1. Abra la tapa. ¡Si intenta encender el quemador con la tapa cerrada puede provocar una
principales cuando éstos están operando.
Nota: el quemador infrarrojo de atrás puede usarse simultáneamente con los quemadores
Encendido
unidad y hará que los olores se disipen.
(alto), con la tapa cerrada. Esto realizará una “limpieza por calor” en las piezas internas de la
primera vez, encendiendo la parrilla por lo menos por 15 minutos en la graduación “HIGH”
2. Remueva todo aceite de fabricación que encuentre en la unidad antes de usar la parrilla por
de la parrilla.
1. Verifique que todos los empaques, etiquetas y envolturas de protección han sido removidos
Figura 8
Figura 7
antes de volver a encenderlo.
durante 5 minutos para dejar que la zona quede despejada de gas
funcionamiento, cierre el gas (“OFF”) inmediatamente y abra la tapa
PRECAUCION: Si la llama del quemador se apaga durante el
a la del diagrama (vea Figura 9).
encendidos y que la altura de la llama corresponda
llama y asegúrese de que todos los orificios estén
9. Después de encender el quemador observe su
una cerilla.
incluye, cuando desee encender los quemadores con
Importante: Use siempre la vara de encendido que se
la cerilla al lado del quemador (vea Figura 8).
los quemadores manualmente. Acerque la llama de
vara de encendido que se acompaña para encender
quemador, use una cerilla encendida colocada en la
8. En caso de que el encendedor no encienda el
minutos y repita el procedimiento de encendido.
la perilla de control a “OFF” (apagado), espere 5
7. Si el quemador no se enciende en 5 segundos, gire
repita el procedimiento para encenderlo.
de control a la posición “OFF”, espere 5 minutos y
6. Si el quemador no se ha encendido, vuelva la perilla
este proceso hasta tres veces.
encenderse. Si el quemador no se enciende, repita
en la unidad. En este punto el quemador debe
más o menos 1/4 de giro, hasta que oiga un clic
la dirección contraria a las manecillas de reloj,
5. Oprima y gire la perilla de control lentamente en
4. Abra el gas desde el tanque de propano líquido.
“OFF” (apagado). Vea la Figura 7.
3. La perilla de control tiene que estar en la posición
debajo del aparato.
de quemador obstruido puede provocar un incendio
los orificios del quemador/tubo de venturi. Un tubo
insectos pueden formar sus nidos dentro y obstruir
flujo de aire en la unidad de gas. Arañas y otros
2. Asegúrese de que no hay nada que obstruya el
explosión!
con la tapa cerrada puede provocar una
1. Abra la tapa. ¡Si intenta encender el quemador
Encendido
Nunca use el quemador lateral como parrilla.
NOTA: Se puede usar el quemador lateral si los quemadores principales están encendidos.
Operación del quemador lateral
de gas propano licuado en la línea se ha extinguido.
del quemador a la posición “OFF” (apagado). El ruido de “puf” es normal cuando el residuo
extinga el gas que queda en las líneas, esperando 15 segundos antes de girar los controles
6. Apague la parrilla (OFF) cerrando primero la válvula del tanque de propano. Deje que se
soasarla por cada lado. Voltéela cuando lo desee.
5. Vigile la comida para estar seguro de que no se quema, pues toma muy poco tiempo el
4. Ajuste el control a la temperatura que desea.
parrillas de cocción, arriba del quemador.
3. Use guantes de protección y tenacillas de mango largo para colocar los alimentos en las
2. Cierre la tapa y haga un calentamiento previo de la parrilla en la graduación “HIGH” (alto).
1. Abra la tapa y encienda el quemador de acuerdo con las instrucciones de encendido.
Ideal para soasar en su jugo y sabor carnes como bistecs, asados y carnes de ave.
Cocción
Uso por primera vez
Operación del quemador infrarrojo trasero
4. Deje cocer los alimentos y ajuste la temperatura si es necesario.
3. Coloque la olla en el centro de la parrilla.
2. Gradúe el quemador al nivel deseado.
1. Encienda el quemador.
Cocción
extinguido.
Nota: El ruido de “puf” es normal cuando el residuo de gas propano líquido en la línea se ha
(apagado).
2. Gire la perilla de control en la dirección de las manecillas del reloj a la posición “OFF”
1. Cierre el gas (OFF) en el tanque de propano líquido.
Apagado:
(apagado).
2. Gire la perilla de control en la dirección de las manecillas del reloj a la posición “OFF”
1. Cierre el gas (OFF) en el tanque de propano líquido.
Apagado
antes de volver a encenderlo.
durante 5 minutos para dejar que la zona quede despejada de gas
funcionamiento, cierre el gas (“OFF”) inmediatamente y abra la tapa
Precaución: Si la llama del quemador se apaga durante el
encendido. Espere 5 minutos y repita el procedimiento para encenderlo.
8. Vuelva la perrilla de control a la posición “OFF” (apagado) si el quemador no se ha
7. El quemador debe ponerse rojo después de 2 o 3 minutos de encendido.
llegue al quemador y se encienda.
6. Mantenga la perrilla oprimida en esta posición, de 3 a 5 segundos, para permitir que el gas
encenderse. Si el quemador no se enciende repita este proceso hasta tres veces.
o menos 1/4 de giro, hasta que oiga un clic en la unidad. En este punto el quemador debe
5. Oprima y gire la perilla de control lentamente en la dirección de las manecillas de reloj, más
Parrilla de gas propano para exteriores, modelo no. GBC873W

X
X
X
X
X
4. Abra el gas (ON) desde el tanque de propano líquido.
3. La perilla de control tiene que estar en la posición “OFF” (apagado), vea la Figura 3.
venturi. Un tubo de quemador obstruido puede provocar un incendio debajo del aparato.
otros insectos pueden formar sus nidos dentro y obstruir los orificios del quemador/tubo de
2. Asegúrese de que no hay nada que obstruya el flujo de aire en la unidad de gas. Arañas y
explosión!
1. Abra la tapa. ¡Si intenta encender el quemador con la tapa cerrada puede provocar una
principales cuando éstos están operando.
NOTA: el quemador infrarrojo de soasar puede usarse simultáneamente con los quemadores
Encendido
oscuro
Azul
azul
Ligeramente
amarilla
Ligeramente
Quemador
Llama
Figura 6
unidad y hará que los olores se disipen.
(alto), con la tapa cerrada. Esto realizará una “limpieza por calor” en las piezas internas de la
primera vez, encendiendo la parrilla por lo menos por 15 minutos en la graduación “HIGH”
2. Remueva todo aceite de fabricación que encuentre en la unidad antes de usar la parrilla por
de la parrilla.
1. Verifique que todos los empaques, etiquetas y envolturas de protección han sido removidos
Uso por primera vez
repita el procedimiento para encenderlo.
de control a la posición “OFF”, espere 5 minutos y
6. Si el quemador no se ha encendido, vuelva la perilla
este proceso hasta tres veces.
encenderse. Si el quemador no se enciende, repita
en la unidad. En este punto el quemador debe
más o menos 1/4 de giro, hasta que oiga un clic
la dirección contraria a las manecillas de reloj,
5. Oprima y gire la perilla de control lentamente en
4. Abra el gas desde el tanque.
“OFF” (apagado). Vea la Figura 3.
3. Todas las perillas tienen que estar en la posición
debajo del aparato.
de quemador obstruido puede provocar un incendio
los orificios del quemador/tubo de venturi. Un tubo
insectos pueden formar sus nidos dentro y obstruir
flujo de aire en la unidad de gas. Arañas y otros
2. Asegúrese de que no hay nada que obstruya el
explosión!
con la tapa cerrada puede provocar una
1. Abra la tapa. ¡Si intenta encender el quemador
Operación del quemador de soasar
para una mejor preparación de los alimentos y una vida útil más larga de la parrilla”.
Para mayores sugerencias sobre cocción indirecta, por favor consulte la sección “Sugerencias
de gas propano licuado en la línea se ha extinguido.
del quemador a la posición “OFF” (apagado). El ruido de “puf” es normal cuando el residuo
extinga el gas que queda en las líneas, esperando 15 segundos antes de girar los controles
6. Apague la parrilla (OFF) cerrando primero la válvula del tanque de propano. Deje que se
interna del alimento se haya alcanzado.
5. Con la tapa abierta o cerrada haga la cocción de los alimentos hasta que la temperatura
4. Ajuste los controles a la temperatura deseada.
parrillas de cocción sobre los quemadores apagados.
3. Use guantes de protección y tenacillas de mango largo para colocar los alimentos en las
2. Cierre la tapa y haga un calentamiento previo de la parrilla en la graduación “HIGH” (alto).
del manual del usuario.
1. Abra la tapa y encienda los quemadores requeridos siguiendo las instrucciones de encendido
asados, lomos, chuletas, pollos enteros, pavos, pescado y alimentos horneados.
para cocer alimentos de lento cocimiento que requieren más de 25 minutos, tales como:
En este proceso la cocción no se hace directamente sobre las briquetas encendidas. Es ideal
Cocción indirecta
de gas propano licuado en la línea se ha extinguido.
del quemador a la posición “OFF” (apagado). El ruido de “puf” es normal cuando el residuo
extinga el gas que queda en las líneas, esperando 15 segundos antes de girar los controles
6. Apague la parrilla (OFF) cerrando primero la válvula del tanque de propano. Deje que se
interna del alimento se haya alcanzado.
5. Con la tapa abierta o cerrada haga la cocción de los alimentos hasta que la temperatura
4. Ajuste los controles a la temperatura deseada.
parrillas de cocción sobre los quemadores encendidos.
3. Use guantes de protección y tenacillas de mango largo para colocar los alimentos en las
2. Cierre la tapa y haga un calentamiento previo de la parrilla en la graduación “HIGH” (alto).
quemador
venturi del
Tubo
del manual del usuario.
1. Abra la tapa y encienda los quemadores requeridos siguiendo las instrucciones de encendido
hamburguesas, perros calientes, porciones de aves, legumbres y frutas.
cocer alimentos que requieran menos de 25 minutos de tiempo de asado, tales como bistec,
Cocción directa sobre los quemadores calientes. Ideal para chamuscar los jugos y para
Cocción directa
Figura 5
Figura 4
Figura 3
Quemador lateral
Encendido
olores se disipen.
en las piezas internas de la unidad y hará que los
cerrada. Esto realizará una “limpieza por calor”
minutos en la graduación “HIGH” (alto), con la tapa
vez, encendiendo la parrilla por lo menos por 15
en la unidad antes de usar la parrilla por primera
2. Remueva todo aceite de fabricación que encuentre
parrilla.
envolturas de protección han sido removidos de la
1. Verifique que todos los empaques, etiquetas y
Uso por primera vez
principales:
Operación de los quemadores
proceso.
gas y limpie la solución para continuar el
minuto, cierre (OFF) la válvula del tanque de
c. Si no aparecen burbujas por un lapso de un
1.800.762.1142 para notificar el defecto.
la fuente de propano y llame al teléfono
después de varios ensayos, desconecte
b. Si las burbujas continúan apareciendo
nuevamente.
a conectar la manguera y verifique
cierre la válvula del tanque (OFF), vuelva
a. Si en cualquier punto aparecen burbujas,
“X” (vea la Figura 4).
de escapes en todas las ubicaciones marcadas con
4. Aplique con una cuchara la solución de verificación
3. Abra el gas (ON) desde la válvula del tanque.
posición “OFF” (apagado). Vea la Figura 3.
2. Asegúrese de que las perillas de control están en la
para lavar platos y tres partes de agua.
si hay fugas mezclando una parte de jabón líquido
1. Prepare unos 80 ml de solución para comprobar
“OFF” (apagado).
2. Gire todas las perillas de control en la dirección de las manecillas del reloj a la posición
1. Cierre el gas (OFF) en el tanque de propano líquido.
Apagado:
gas propano
Conexión de
Figura 2
orificio
propano con
Válvula de gas
orificio, por favor llame al 1.800.762.1142.
3. Si el tubo del quemador no queda a ras con el
correctamente la instalación (Figuras 1 y 2).
2. Por favor, consulte el diagrama para llevar a cabo
Conexión de la línea de gas y del tanque
antes de volver a encenderlo.
durante 5 minutos para dejar que la zona quede despejada de gas
funcionamiento, cierre el gas (“OFF”) inmediatamente y abra la tapa
orificio
propano con
Válvula de gas
Quemadores principales
PRECAUCION: Si la llama del quemador se apaga durante el
estén encendidos y que la altura de la llama corresponda a la del diagrama (vea Figura 6).
9. Después de encender el quemador observe su llama y asegúrese de que todos los orificios
quemadores con una cerilla.
Importante: Use siempre la vara de encendido que se incluye, cuando desee encender los
calentamiento. Acerque la llama de la cerilla al lado del quemador (vea Figura 5).
Gane acceso a los quemadores por el espacio entre la rejilla de cocción y las placas de
en la vara de encendido que se acompaña para encender los quemadores manualmente.
8. En caso de que el encendedor no encienda el quemador, use una cerilla encendida colocada
que desea.
adyacente y continúe en esta secuencia hasta que haya encendido todos los quemadores
7. Para encender los otros quemadores, repita el mismo procedimiento en el quemador
quemador
venturi del
Tubo
propano
de gas
Conexión
Figura 1
o daños a la propiedad.
explosión ocasionando muerte, graves lesiones
instrucciones puede causar incendio o
conexión o seguir debidamente estas
ADVERTENCIA: El no inspeccionar esta
encaja sobre el orificio.
y el orificio. Asegúrese de que el tubo del quemador
visualmente la conexión entre el tubo del quemador
Si alguien armó la unidad para usted, verifique
del regulador al quemador y al tanque.
1. Asegúrese de conectar adecuadamente la válvula
Conexiones del quemador
Comprobar si hay fugas
Instrucciones de operación
11
página
Si necesita ayuda llame al 1.800.762.1142. No vuelva al lugar de compra.

GOLD
tanque lleno o cambiar su tanque vacío por un lleno.
de puestos de venta a lo largo de todo el país. Puede comprar un nuevo
tanques. Es sencillo, rápido, seguro y está disponible en decenas de miles
¿Necesita un tanque de gas? Pruebe nuestro servicio de intercambio de
floja.
dirección contraria a las manecillas de reloj hasta que esté
Desconecte la línea de gas al tanque girando la perilla en la
posición “OFF” (apagado).
válvula del tanque de gas propano líquido está en la
Antes de desconectar el tanque, asegúrese de que la
Desconecte el tanque de propano
dirección de las manecillas de reloj hasta su límite.
Conecte la línea de gas al tanque girando la perilla en la
puertos del quemador, están libres de cualquier suciedad.
cabeza del mismo como la del regulador y los orificios/
Antes de conectar el tanque, asegúrese de que tanto la
Conecte el tanque de propano
del tanque por sobre el hombro del tanque de propano.
Deslice la bandeja hasta el panel trasero y asegure el tanque pasando el alambre de retención
Asegure el tanque de propano
gas.
tanque de manera que la válvula del tanque quede orientada hacia la conexíon de la línea de
Coloque un tanque de propano, llenado con precisión, en posición vertical en la bandeja del
Inserte el tanque de propano
24
pesar más de 38 libras (17,2 kg).
gas propano líquido para parrilla llenado con precisión no debe
pesa aproximadamente 18 libras (8,1 kg). Un tanque estándar de
Nota: Un tanque estándar vacío de gas propano líquido para parrilla
con precisión y con rosca para la conexión de la válvula externa.
propano líquido de 20 libras (9 kg), para parrilla estándar, llenado
Para operar la parrilla usted necesitará un (1) tanque de gas
Instalación del tanque de gas propano líquido
Parrilla de gas propano para exteriores, modelo no. GBC873W
grasa
Instale la taza de grasa y el soporte para la taza de
Instrucciones de armado (continuación)

24
calentamiento
Insert Grease Tray
Coloque la parrilla de cocción y la rejilla de
23
x 2
A
22
lateral y el alambre del encendedor
Coloque las placas de calor
9
página
Si necesita ayuda llame al 1.800.762.1142. No vuelva al lugar de compra.
Instale el quemador lateral, la parrilla del quemador
21

GOLD
x 2
A
x 4
C
x 5
20
la perilla de control
Instale el regulador, el soporte de la perilla de control y
C
x 2
19
Asegure el conjunto de la repisa derecha
C
18
Asegure el conjunto de la repisa izquierda
Parrilla de gas propano para exteriores, modelo no. GBC873W
No apriete completamente los pernos hasta el paso 19.
Nota: Deje expuesto un segmento de la rosca del perno de unos 2 mm.
Instale el conjunto de la repisa derecha
17
Instrucciones de armado (continuación)

x 2
C
x 3
A
x 4
No apriete completamente los pernos hasta el paso 18.
Nota: Deje expuesto un segmento de la rosca del perno de unos 2 mm.
Instale el conjunto de la repisa izquierda
C
16
x 3
15
Instale el panel lateral de la repisa derecha
A
14
para las toallas
Instale el panel frontal de la repisa derecha y la barra
7
página
Si necesita ayuda llame al 1.800.762.1142. No vuelva al lugar de compra.
Instale el panel lateral de la repisa izquierda
13

GOLD
x 4
C
x 2
G
Instale las pilas AAA del temporizador digital
x 4
x 4
F
12
para las toallas
Instale el panel frontal de la repisa izquierda y la barra
D
11
digital
Remueva la cubierta de las pilas del temporizador
10
Instale el cuerpo de la parrilla
Parrilla de gas propano para exteriores, modelo no. GBC873W
Instale las puertas e inserte las canastas
9
Instrucciones de armado (continuación)

x 8
B
x 2
B
x 2
A
x 4
F
x 8
x 4
8
Instale los soportes A de la canasta
B
A
x 11
7
Instale los soportes B de la canasta
B
6
tanque de gas propano
Instale el soporte frontal del carro y la bandeja del
5
página
Si necesita ayuda llame al 1.800.762.1142. No vuelva al lugar de compra.
Instale los paneles laterales
5

GOLD
x 7
E
x 7
D
x 4
4
Nota: las ruedas con cierre deben colocarse atrás
Instale las ruedas
A
3
Instale la falda en el panel de base del carro
Tiempo de armado estimado: una (1) hora
de armado de la parrilla.
Nota: Es importante que siga en forma apropiada todos los pasos
para conexión de válvula.
parrilla, llenado con precisión y con rosca externa Acme Tipo 1
• (1) un tanque de gas propano líquido (de 15 a 19 litros), para
“Instrucciones de operación”.
cómo preparar esta solución se encuentran en la sección
• (1) solución para detección de fugas. Las instrucciones sobre
Para terminar el armado de la unidad necesitará:
debidamente esta unidad.
• Siga todos los pasos en el orden indicado para armar
apriete completamente todos los elementos de ferretería.
conexiones de ferretería. Una vez que ha terminado el paso,
• Cuando sea del caso, apriete a mano, en un principio, las
componentes y los elementos de ferretería.
• Despeje un área suficientemente grande para disponer todos los
aberturas ni hendijas.
ferretería, armando el producto en un lugar de piso plano sin
• Evite la pérdida de componentes pequeños o elementos de
Para facilitar el armado:
Nota: El número de serie se encuentra en la parte trasera del carro.
unidad, para referencia.
favor tenga a mano su manual y el número de serie de la
2
Arme la falda
Parrilla de gas propano para exteriores, modelo no. GBC873W
Si necesita ayuda llame, sin cargo, al 1.800.762.1142. Por
COMPRA.
NO DEVUELVA EL PRODUCTO AL LUGAR DE
1
Instrucciones de armado

Llave inglesa M10-M6
55-08-085
55-08-069
55-08-097
55-07-506
55-07-528
propano
44
Bandeja del tanque de
Falda central
43
Falda derecha
42
Rueda (2)
41
Rueda con cierre (2)
40
2 pzs
8 pzs
7 pzs
11 pzs
21 pzs
29 pzs
20 pzs
Destornillador en cruz (Phillips) no.2
Destornillador en cruz (Phillips) no.1
55-08-082
55-08-064
55-07-505
55-07-520
Falda izquierda
39
Panel de base del carro
38
Soporte frontal del carro
37
Vara de encendido
36
Herramientas necesarias para el armado (incluidas)
Puerta derecha
55-08-093
Pila AAA
Niquelada, ø6.5
Galvanizada, M6
Phillips de cabeza abombada, niquelado, M6x46
Niquelado, de cabeza hexagonal, M6x15
Phillips de cabeza abombada, niquelado, M6x15
Phillips de cabeza abombada, niquelado, M4x8
Arandela
Tuerca
Tornillo
Tornillo
Tornillo
Tornillo
G
F
E
D
C
B
A
Elementos de ferretería
55-08-011
55-08-078
55-08-092
55-07-522
55-08-090
55-08-077
55-08-066
55-08-065
35
Manija de puerta (2)
34
Puerta izquierda
33
Panel delantero del carro
32
tanque
31
Alambre de retención del
Panel trasero del carro
30
Panel izquierdo del carro
29
28
Soporte B de la canasta (2)
27
Soporte A de la canasta (4)
20
25
24
26
23
32
31
21
22
44
30
38
42
40
41
29
43
37
39
36
35
34
33
55-08-070
55-08-071
55-08-095
55-08-091
55-07-508
55-07-507
55-08-096
55-08-094
55-08-110
55-08-109
55-08-086
55-07-513
55-08-073
Perilla de control (6)
26
control (6)
25
Soporte de la perilla de
derecha
24
Panel frontal de la repisa
Regulador
23
grasa
22
Soporte de la taza para
Taza para grasa
21
derecha
20
Panel lateral de la repisa
Repisa derecha
19
Quemador lateral
18
Quemador de soasar
17
Quemador principal (3)
16
infrarrojo
15
Quemador trasero
Temporizador digital
14
19
12
18
izquierda
28
55-08-080
27
55-07-543
17
16
15
11
10
4
5
3
2
2
2
14
55-08-074
6
55-08-079
13
55-08-081
9
6
8
7
55-07-548
55-07-549
55-08-067
55-07-547
55-07-509
55-08-076
55-07-501
13
Panel frontal de la repisa
lateral
12
Rejilla del quemador
Cuerpo de la parrilla
11
Repisa izquierda
10
izquierda
9
Panel lateral de la repisa
Barra de toalla (2)
8
de cocción (8)
7
Gancho para utensilios
Canasta superior (2)
6
Termómetro
5
Bandeja para la ceniza
4
Placas de calor (3)
3
Parrilla de cocción (3)
2
1
Rejilla de calentamiento
55-07-551
1
Diagrama de explosión
3
página
Si necesita ayuda llame al 1.800.762.1142. No vuelva al lugar de compra.
Lista de piezas

GOLD
daños a la propiedad, lesiones serias y hasta fatales.
El no seguir exactamente las instrucciones dadas arriba puede producir
dañar el producto.
No trate de forzar las piezas juntas pues esto puede ocasionar lesiones o
Por favor, use guantes de protección cuando esté armando este producto.
quedado cocida a la temperatura apropiada.
Use siempre un termómetro para carne para asegurar que la comida ha
Nunca opere la parrilla antes de haber instalado las placas de calor.
suministro.
Si la parrilla no se está usando, el gas debe cerrarse en el tanque de
explosiva.
parrilla cuando el gas no se ha encendido, puede provocar una llamarada
parrilla, o el no esperar cinco minutos para permitir que el gas salga de la
El no abrir la tapa cuando se están encendiendo los quemadores de la
la manguera para detectar zonas gastadas o cortes en ella.
verifique que no haya fugas u obstrucciones en el quemador e inspeccione
Después de un período de almacenamiento o de falta de uso de la unidad,
gases TÓXICOS pueden acumularse y provocar la asfixia.
NO use la parrilla de gas para cocinar adentro o calentar el ambiente. Los
Mantenga todos los cables eléctricos lejos de una parrilla caliente.
calientes y de las zonas donde gotee grasa caliente.
Retire las mangueras de gas lo más lejos posible de las superficies
que no sea adecuada para este propósito.
de productos combustibles. Una superficie de asfalto o de pavimento puede
Coloque siempre la parrilla sobre una superficie firme y nivelada, alejada
accesorio de la línea de gas, mientras esté usando la parrilla.
No trate de desconectar el regulador de gas del tanque, o cualquier otro
quemaduras.
el calor y el vapor que hay dentro de la parrilla pueden ocasionarle severas
Abra siempre la tapa de la parrilla en forma cuidadosa y lentamente, pues
libre.
si el tanque está desconectado, desmontado del aparato y guardado al aire
El almacenamiento del aparato en un espacio cerrado sólo está permitido
enfríe antes de moverla o guardarla.
No intente mover la parrilla mientras esté encendida. Deje que la parrilla se
niños y las mascotas lejos de la parrilla en todo momento.
No deje una parrilla encendida sin vigilancia, especialmente, mantenga los
Nunca se apoye sobre la parrilla cuando la está encendiendo.
No utilice la parrilla si hace mucho viento.
NO instalar o utilizar en embarcaciones o vehículos de recreo.
seco tipo BC o ahogue el fuego con tierra, arena o soda de hornear.
trate de extinguir el fuego con agua. Use un extinguidor de material químico
extinguir un incendio. En caso de que la sustancia de freír se incendie no
Cuando esté cocinado, tenga fácilmente accesibles los elementos para
almohadilla para las ollas, guantes de barbacoa, etc.
que usted tenga puestos elementos de protección tales como guantes o
completamente (alrededor de 45 minutos) para evitar quemaduras, a menos
No toque las piezas de metal de la parrilla hasta que no se haya enfriado
que se encuentran en este manual.
No encienda esta unidad sin haber leído las instrucciones de “Encendido”
peligroso.
Sourcing, Inc. El uso de cualquier pieza no autorizada de fábrica puede ser
Use únicamente piezas autorizadas de fábrica de Blue Rhino Global
especificados por el fabricante.
regulador de repuesto y el conjunto de manguera de repuesto serán los
Utilice únicamente el regulador y el conjunto de manguera incluido. El
la manguera antes poner en marcha el aparato.
detecta alguna señal de abrasión, desgaste, cortes o fugas, deberá sustituir
regular. Limpie y revise la manguera antes de cada uso del aparato. Si
Esta parrilla de gas debe limpiarse y verificarse completamente de manera
todas las piezas estén bien fijadas y apretadas.
No utilice la parrilla a menos que esté COMPLETAMENTE montada y que
No altere la parrilla de ninguna forma.
parrilla antes de cada uso.
parrilla, los quemadores y los conductos de aire circulante. Inspeccione la
Es fundamental mantener limpio el compartimiento de la válvula de la
combustibles.
por el respaldo. No coloque esta unidad debajo de aleros de materiales
combustible debe ser de por lo menos 53 cm por los costados y 53 cm
La distancia mínima de la unidad a cualquier material o construcción
líquido inflamable.
parrilla libre de materiales combustibles, gasolina y cualquier otro vapor o
No utilice el equipo en una atmósfera explosiva. Mantenga la zona de la
7,62 m (25 pies) de esta unidad.
No guarde o use gasolina u otros líquidos o vapores inflamables a menos de
técnico o a su proveedor de propano local.
puede parar una fuga, desconecte el tanque de propano. Llame a un
e. No use la parrilla hasta que todas la fugas hayan sido reparadas. Si no
hay fugas.
d. No use cerillas o fósforos, encendedores o una llama para comprobar si
ventilación.
c. Siempre compruebe si hay fugas en exteriores donde hay una buena
hay fugas.
b. No fume. No use o permita fuentes de ignición en el área al comprobar si
que el tanque de gas está conectado.
a. Compruebe siempre si hay fugas antes de encender la parrilla, cada vez
explosión al comprobar si hay fugas:
verificar que no hay fugas de gas. Para evitar cualquier riesgo de fuego o de
Antes de operar esta unidad, debe observar todos los procedimientos para
provocar un fuego o una explosión.
No opere la unidad si hay una fuga de gas. Las fugas de gas pueden
persona.
Verifique que no haya fugas aún si el aparato ha sido armado por otra
ellas.
conexiones ya que el movimiento en transporte puede aflojar algunas de
en cuanto a fugas de gas. Sin embargo, pruebe la integridad de todas las
Todas las conexiones de gas de su parrilla han sido verificadas en fábrica
gasolina, queroseno o alcohol con este aparato.
No use nunca carbón de leña, líquido para encendedor, rocas de lava,
segura este aparato.
afectar la habilidad del usuario para armar debidamente u operar en forma
El uso de bebidas alcohólicas, medicamentos o drogas de farmacia puede
campero, de una casa móvil o de su propia casa.
No intente nunca acoplar esta parrilla al sistema de propano de un
incendio con daños a la propiedad, lesiones serias y hasta fatales.
El no seguir exactamente las instrucciones dadas arriba puede producir un
Nunca llene el tanque más allá de 80% de su capacidad.
parrilla.
Nunca guarde un tanque adicional de propano debajo o cerca de esta
propano.
válvula del tanque. Otros tipos de tapones o tapas pueden crear fugas del
lo esté usando. Unicamente use la tapa contra el polvo que viene con la
Ponga la tapa contra el polvo en la válvula de salida del tanque cuando no
abriría la válvula de seguridad y haría que se escapase el gas.
calientes. El calor podría hacer que la presión del gas aumentase, lo que
No ponga nunca un tanque de gas propano lleno en un carro o camioneta
temperatura supere los 125ºF (51,5ºC).
espacio cerrado. Nunca almacene tanques de gas en un lugar en el que la
siempre fuera del alcance de los niños y nunca en un garaje, edificio o
Los tanques deben almacenarse en exteriores, en un lugar al aire libre
No deje caer el tanque de gas propano líquido ni lo maneje bruscamente.
y deberían ser revisados por su proveedor de gas PL antes de utilizarlos.
Los tanques de propano líquido abollados u oxidados pueden ser peligrosos
collar o el anillo inferior presentan algún daño.
No utilice nunca un tanque de propano líquido si el cuerpo, la válvula, el
para proteger la válvula.
No utilice nunca un tanque de propano líquido si el cuerpo no tiene collar
dispositivo de conexión compatible con aparatos de cocción al aire libre.
Utilice únicamente tanques de gas de 20 libras (9 kg) que tienen un
sobrellenado del tanque (OPD).
El tanque de gas propano líquido debe tener un dispositivo que evite el
vapor.
Verifique que el tanque de gas cuenta con mecanismo de extracción de
peligrosas; y la comisión.
B339 sobre tanques, esferas y tubos para el transporte de mercancías
Transporte (DOT) de EE.UU. o del Estándar nacional de Canadá, CAN/CSAsegún las Especificaciones para tanques de gas PL del Departamento de
El tanque de gas propano líquido (PL) debe estar fabricado y comercializado
Unicamente tanques marcados “Propano” pueden usarse en esta unidad.
Se requiere un tanque de gas propano para hacer funcionar este aparato.
frías en la piel.
d. El contacto directo con el propano líquido puede causar quemaduras
se añade una esencia odorífera que huele a col podrida.
c. En su estado natural, el propano no tiene ningún olor. Para su seguridad,
asienta en pozos en zonas bajas.
b. El propano es un gas explosivo bajo presión, más denso que el aire y se
propano líquido, estudie detenidamente sus características.
inadecuadamente. Antes de utilizar cualquier producto que emplee
a. El propano es inflamable y resulta peligroso si se manipula
Características del propano líquido (PL):
ser usada con gas natural es peligroso e invalida la garantía de la unidad.
El convertir o tratar de convertir esta parrilla de gas propano líquido para
Esta parrilla utiliza únicamente gas de propano líquido como combustible.
Esta parrilla de gas NO ha sido diseñada para uso comercial.
estructuras o edificaciones.
NO opere, encienda o use esta unidad a menos de 2,43 m de paredes
un edificio, garaje o cualquier otra área cerrada.
Esta parrilla es para ser usada al aire libre únicamente y no debe usarse en
ADVERTENCIA:
daños a la propiedad, lesiones personales y hasta accidentes fatales.
PELIGRO: El no seguir los avisos de peligro, las advertencias y las precauciones, puede ocasionar un incendio o una explosión, con sus consecuentes
departamento de bomberos.
4. Si el olor persiste, llame inmediamente a su proveedor de gas o al
debe almacenar cerca de éste o cualquier otro aparato.
2. Un tanque de propano líquido que no esté conectado para su uso no se
vecindad de esta unidad o de cualquier otro aparato.
1. No guarde o use gasolina u otros líquidos o vapores inflamables en la
PARA SU SEGURIDAD:
ADVERTENCIA
PELIGRO
3. Abra la tapa.
2. Apague cualquier llama activa.
1. Cierre la entrada de gas al aparato.
Si huele a gas -
Parrilla de gas propano para exteriores, modelo no. GBC873W

es una marca registrada de Blue Rhino Global Sourcing, Inc. Todos los derechos reservados. GBC873W-OM-103 ES
GOLD
Hecho con 70% de bagazo
de caña
(subproducto de la caña de
azúcar respetuoso del
medio ambiente)
®
UniFlame
© 2007 Blue Rhino Global Sourcing, Inc. Todos los derechos reservados.
1.800.762.1142, www.bluerhino.com
Winston-Salem, NC EE.UU.
Blue Rhino Global Sourcing, Inc
Fabricado en China para:
congénitas u otros daños reproductivos.
considerados por el Estado de California como causantes de cáncer, malformaciones
Proposición 65 de California: La combustión del propano crea productos químicos
Instalación de Propano y Gas Natural.
para Gas y Combustibles, ANSI Z223.1/NFPA 54, CAN/CGA-B149.1, Código de
locales. Si no existen códigos locales, use las normas siguientes: Código Nacional
El uso e instalación de este producto ha de realizarse de acuerdo con los códigos
consultas.
otra persona, entréguele este manual para futuras
consultas. Si está montando esta unidad para
Conserve estas instrucciones para futuras
Resolución de problemas . . . . . . . . . . . . . . . . . . . . . . . . . . . . . . . . . . . . . . . . . . . 14
Garantia limitada . . . . . . . . . . . . . . . . . . . . . . . . . . . . . . . . . . . . . . . . . . . . . . . . . 13
Registro del producto . . . . . . . . . . . . . . . . . . . . . . . . . . . . . . . . . . . . . . . . . . . . . . 13
Limpieza y cuidado. . . . . . . . . . . . . . . . . . . . . . . . . . . . . . . . . . . . . . . . . . . . . . . . 13
Operación del temporizador digital . . . . . . . . . . . . . . . . . . . . . . . . . . . . . . . . . 12
Operación del quemador trasero infrarrojo. . . . . . . . . . . . . . . . . . . . . . . . . . . . 12
Operación del quemador lateral. . . . . . . . . . . . . . . . . . . . . . . . . . . . . . . . . . . . 11
Operación del quemador de soasar . . . . . . . . . . . . . . . . . . . . . . . . . . . . . . . . . 11
Operación de los quemadores principales . . . . . . . . . . . . . . . . . . . . . . . . . . . . 10
Comprobar si hay fugas. . . . . . . . . . . . . . . . . . . . . . . . . . . . . . . . . . . . . . . . . . 10
Instrucciones de operación. . . . . . . . . . . . . . . . . . . . . . . . . . . . . . . . . . . . . . . . . . 10
Conecte el tanque de propano . . . . . . . . . . . . . . . . . . . . . . . . . . . . . . . . . . . . . 10
Asegure el tanque de propano . . . . . . . . . . . . . . . . . . . . . . . . . . . . . . . . . . . . . 10
Inserte el tanque de propano . . . . . . . . . . . . . . . . . . . . . . . . . . . . . . . . . . . . . . 10
Instalación del tanque de gas propano líquido (PL) . . . . . . . . . . . . . . . . . . . . . . . . 10
Instrucciones de armado . . . . . . . . . . . . . . . . . . . . . . . . . . . . . . . . . . . . . . . . . . . . 4
Diagrama de explosión y elementos de ferretería . . . . . . . . . . . . . . . . . . . . . . . . . . 3
Salvaguardias importantes . . . . . . . . . . . . . . . . . . . . . . . . . . . . . . . . . . . . . Página 2
PARA SU SEGURIDAD:
ADVERTENCIA
PARA SU SEGURIDAD:
ADVERTENCIA
fatales.
lesiones personales y hasta accidentes
sus consecuentes daños a la propiedad,
ocasionar un incendio o una explosión, con
3. El no seguir estas instrucciones puede
servicio.
instalarlo, ponerlo en marcha o darle
mantenimiento del equipo antes de
de instalación, funcionamiento y
2. Lea atentamente las instrucciones
propiedad.
pueden causar lesiones o daños a la
reparación o mantenimiento inadecuados
1. Una instalación, ajuste, alteración,
(fuera de cualquier recinto)
Solamente para uso en exteriores
Indice
Modelo no. GBC873W
Parrilla de gas propano para exteriores
MANUAL DEL USUARIO
 Loading...