

TP-Link TL-WPA8630P KIT Quick Installation Guide
Ethernet Cable
Powerline
Internet
Quick Installation Guide
TL-WPA8630P KIT
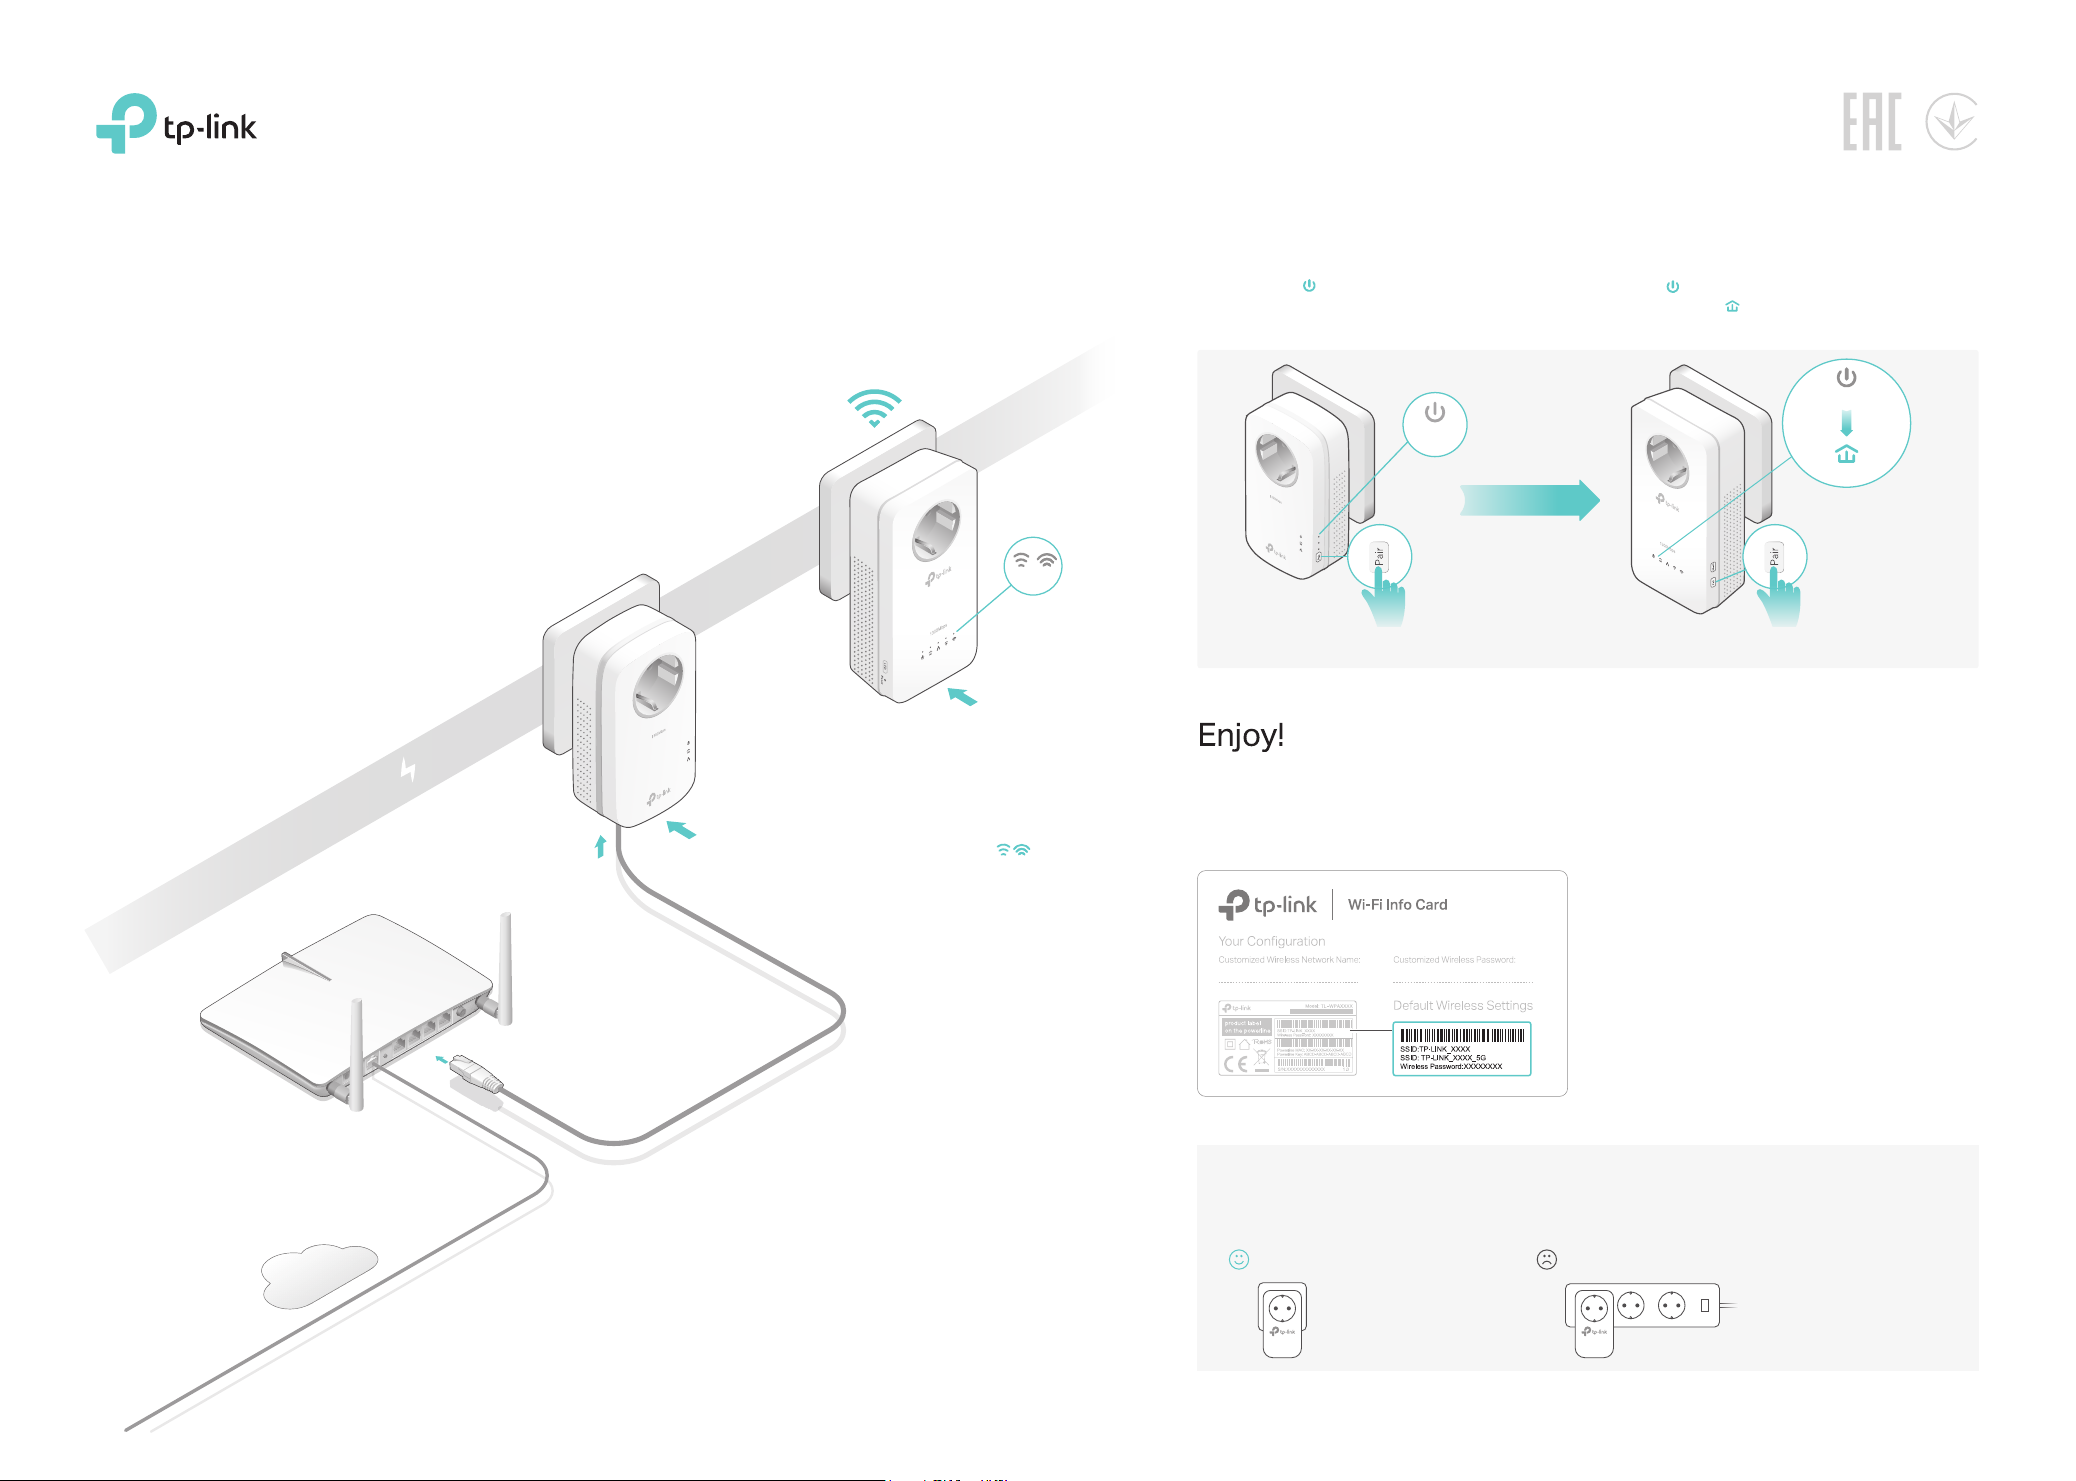
Pair the powerline devices.
3
Press the adapter‘s Pair button for 1 second.
A
The Power LED starts blinking.
Note: If the LED does not blink, press the
button again.
Within 2 minutes, press the extender’s Pair button for 1 second.
B
The Power LED starts blinking.
When the Powerline LED turns on, the pairing process is
complete.
* TL-WPA8630P KIT (European version) is
used for demonstration in this QIG.
Adapter
TL-PA8010P
Extender
TL-WPA8630P
Plug in the adapter and extender in the
2
same room. Wait until the extender’s
2.4GHz and 5GHz Wi-Fi LEDs turn on.
Note: If only one wall outlet is available, plug both
devices into a power strip for setup, then relocate
to wall outlets before enjoying the internet.
On
Blinking
Blinking
On
within 2 minutes
Adapter TL-PA8010P
Extender TL-WPA8630P
4
Relocate the extender to the Wi-Fi “dead zone” on the same electrical circuit. Connect your devices
to the internet using the default SSIDs (network names) and password on the Wi-Fi Info Card
provided.
Note: If the Powerline LED turns red, it means the signal strength is poor. Try another wall outlet.
Router
LAN
1
Tips:
Want to unify Wi-Fi networks or
personalize your network?
See the back page for instructions.
Attention
Plug powerline devices into wall outlets. Do not use power strips after setup.
Wall Outlet Power Strip
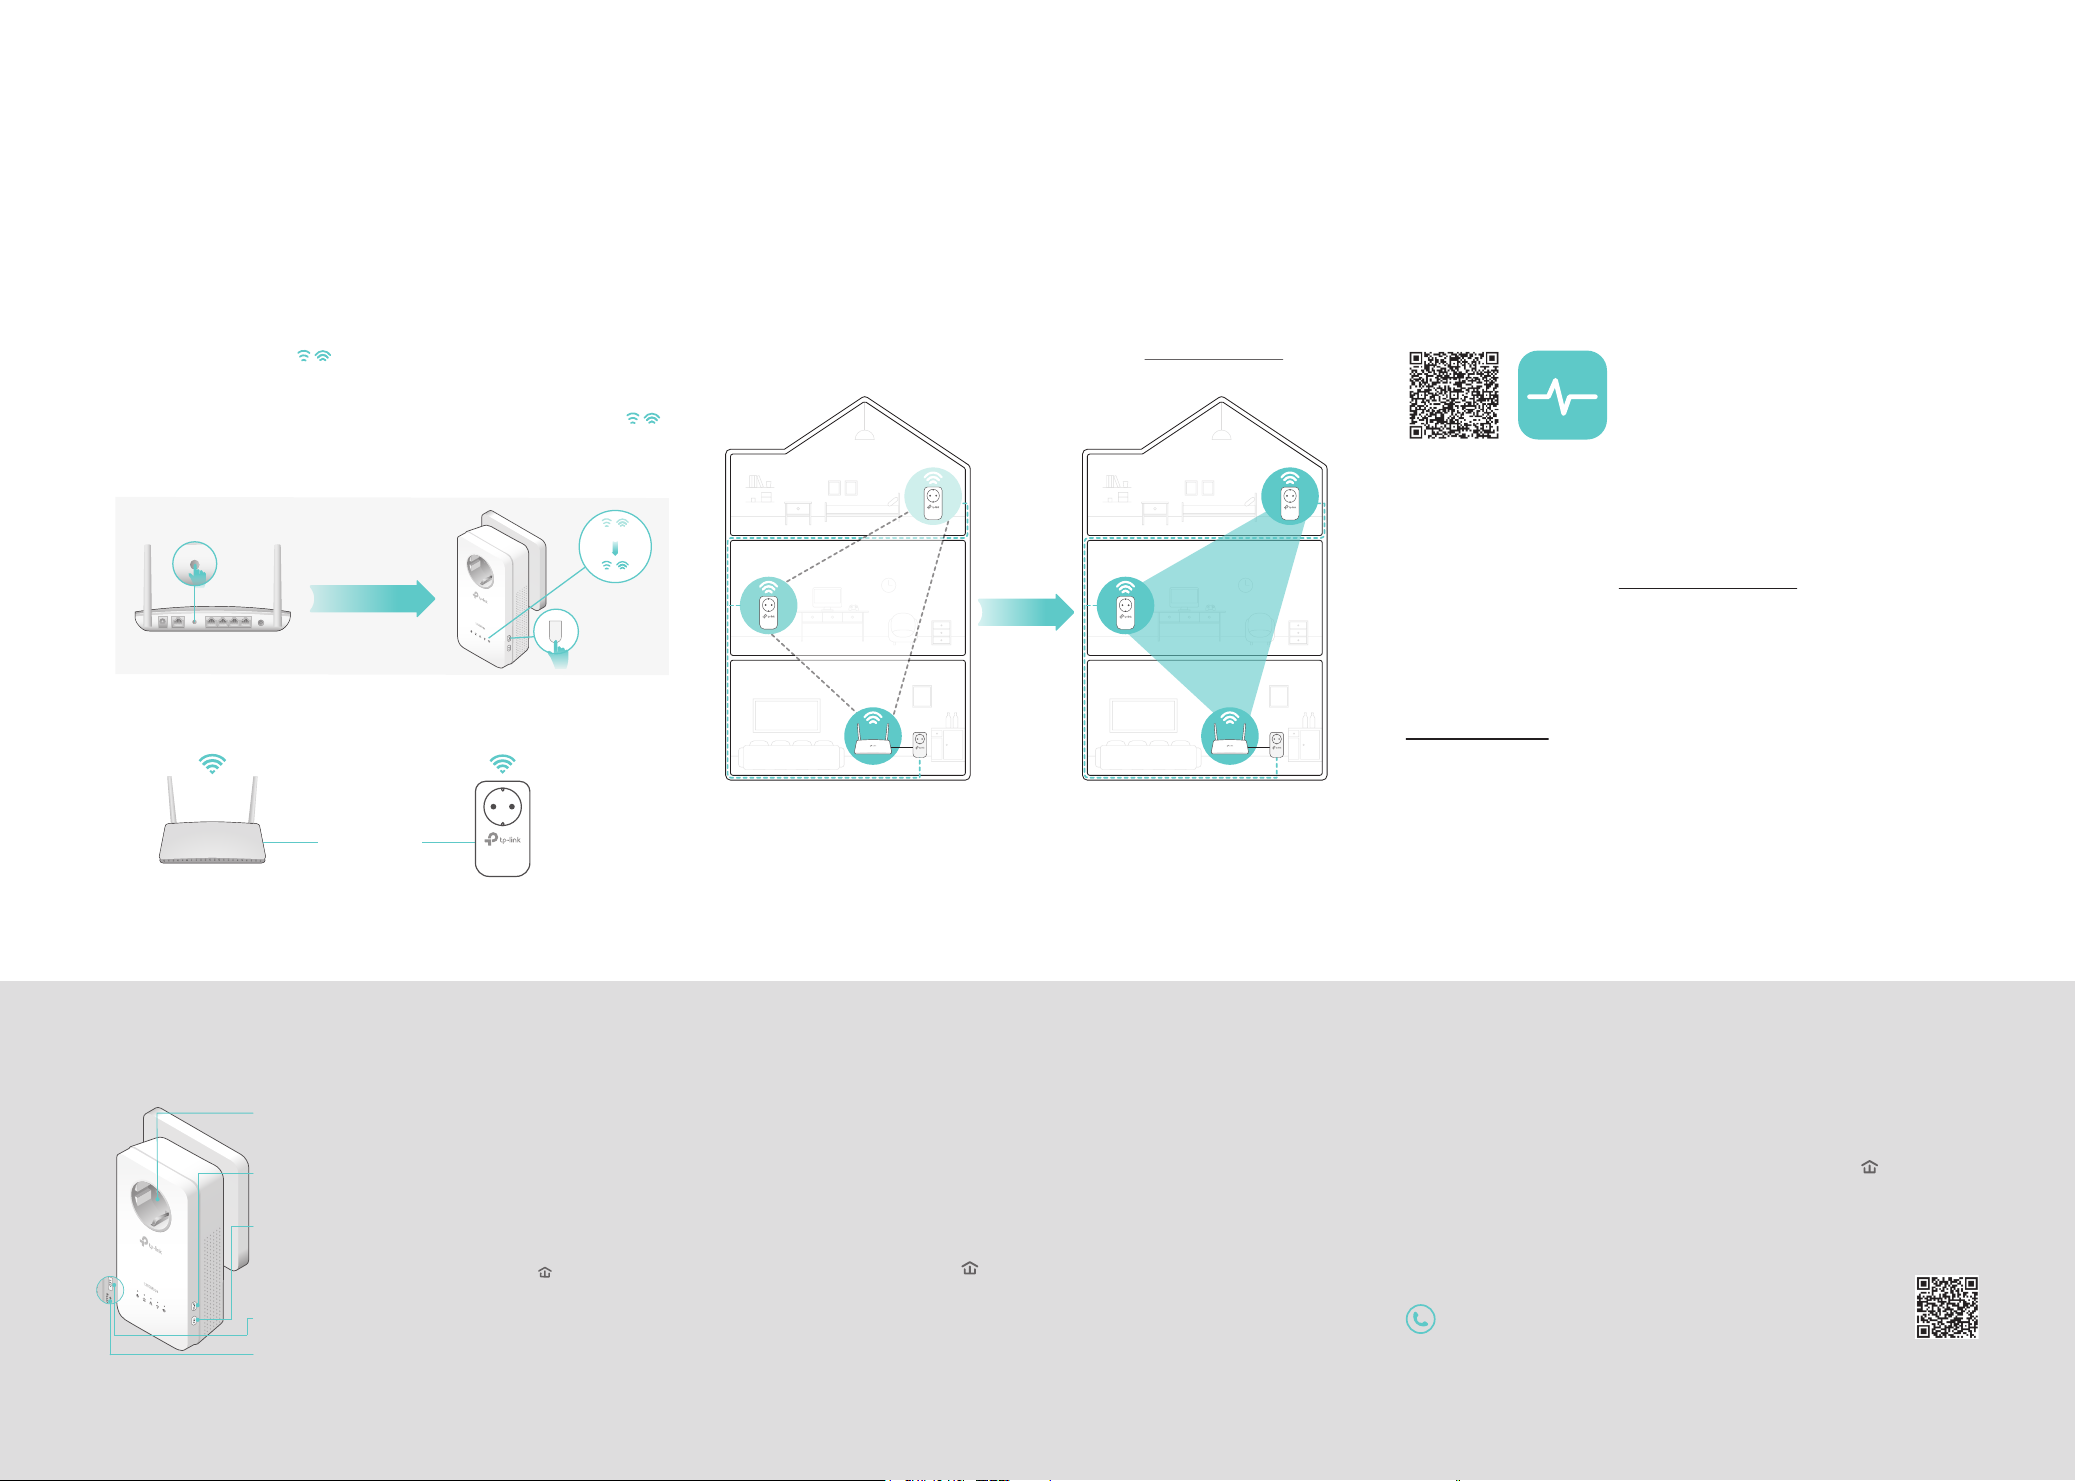
Unify Wi-Fi Networks via Wi-Fi Auto-Sync
WPS
Personalize Your Network
Wi-Fi Auto-Sync enables you to easily create one unied Wi-Fi network throughout your home.
Copy SSID and Password from Your Router via WPS
Note: If your router doesn’t have a WPS button, manually change the extender’s Wi-Fi
settings via the tpPLC app, tpPLC Utility, or web interface.
Auto-Sync Settings to More Extenders
If you have more extenders, simply plug in and pair each one with the existing
adapter to join the network. Then the Wi-Fi settings will automatically sync
from the existing extender to the new ones.
1. Plug in the extender in the same room as your router. Wait until the
extender’s Wi-Fi LEDs turn on.
Note: For more extender models that support Wi-Fi Auto-Sync, visit http://www.tp-link.com.
2. Press your router’s WPS button. Within 2 minutes, press the
extender’s Wi-Fi button for 1 second. The extender’s Wi-Fi LEDs
start blinking. When they stay on, Wi-Fi settings are copied.
Note: If Wi-Fi settings are not copied within 2 minutes, manually change the extender’s
Wi-Fi settings.
Blinking
Network B
DIFFERENT
SSID & Password
WPSWAN LAN
Wireless Router Extender
Within 2 minutes
On
Wi-Fi
3. Relocate the extender and enjoy the internet using your router’s SSID
and password.
Network A
Network C
Auto-Sync
Network A
Network A
Network A
SAME
SSID & Password
Manage your powerline devices using any of the methods below. You
can change the SSID and password, set Wi-Fi schedules, create a guest
network and more.
tpPLC App
For easy management via your smartphone or tablet, download the app
from the App Store or Google Play, or simply scan the QR code.
tpPLC AppScan to download
tpPLC Utility
For easy management via your computer, download the utility on the
product’s Support page at http://www.tp-link.com.
Note: For detailed instructions, refer to the utility manual on the product’s Support page.
Web Interface
To access all settings, connect to an extender wirelessly and visit
http://tplinkplc.net. Use ‘admin’ for both username and password upon
initial login.
Note: For detailed instructions, refer to the product manual on the product’s Support page.
SAME
SSID & Password
If you personalize any extender’s LED schedules or other Wi-Fi settings (such
as Wi-Fi schedules and guest network), the settings will also automatically
sync to other extenders in the same powerline network.
Physical Appearance Frequently Asked Questions
©2017 TP-Link 7106507590 REV2.1.0
Extender TL-WPA8630P
Integrated Electrical Socket
Used as a pass-through AC outlet to power other devices. It also reduces
some electrical noise that may interfere with powerline performance.
Wi-Fi Button
Press for 1 second to begin or stop copying Wi-Fi settings from the router.
Press for about 5 seconds to turn Wi-Fi on or o.
Pair Button
Press for 1 second on two powerline devices within two minutes to pair
them.
Press for about 8 seconds until the Powerline LED is o to leave the
current powerline network.
LED Button
Press for 1 second to turn all LEDs on or o.
Reset Button
Press for at least 5 seconds until all LEDs turn o to reset the extender to
factory default settings.
Q1. How do I reset my extender to factory default settings?
A. With the extender plugged into an electrical outlet, press and hold the Reset button until
all LEDs turn o. When the LEDs turn back on, the reset process is complete.
Q2. What should I do if there is no internet connection in my powerline
network?
A1. Make sure all powerline adapters and extenders are on the same electrical circuit.
A2. Make sure the Powerline LEDs are lit on all of your powerline devices. If they are not,
pair all devices again.
A3. Make sure all devices are correctly and securely connected.
A4. Check if you have an internet connection by connecting the computer directly to the
modem or router.
Q3. What should I do if a successfully-paired extender does not
reconnect after it is relocated?
A1. Make sure all powerline adapters and extenders are on the same electrical circuit.
A2. Try to pair the extender again, and make sure the Powerline LED is on.
A3. Check for possible interference due to a washing machine, air conditioner or
other household appliance that may be too close to one of the powerline devices.
Plug the appliance into the integrated electrical socket to remove the electrical
noise if your powerline device has an integrated electrical socket.
For technical support and more information, please visit
http://www.tp-link.com/support, or simply scan the QR code.
TP-Link hereby declares that the device is in compliance with the essential requirements and other relevant
provisions of directives 2014/53/EU, 2009/125/EC and 2011/65/EU.
The original EU declaration of conformity may be found athttp://www.tp-link.com/en/ce.
 Loading...