

Page 1

CONTENTS
Deutsch ���������������������������������������������������������������������������1
English �����������������������������������������������������������������������������9
Español��������������������������������������������������������������������������17
Ελληνικά ������������������������������������������������������������������������25
Français �������������������������������������������������������������������������33
Italiano ���������������������������������������������������������������������������41
Português ����������������������������������������������������������������������49
Suomi ����������������������������������������������������������������������������57
Nederlands ��������������������������������������������������������������������65
Svenska �������������������������������������������������������������������������73
Norsk �����������������������������������������������������������������������������81
Dansk ����������������������������������������������������������������������������89
Türkçe����������������������������������������������������������������������������97
Page 2

1
Deutsch
Hinweis: Dieses Dokument behandelt das WiFi-Powerline-Extender3er-Kit TL-WPA4220TKIT�
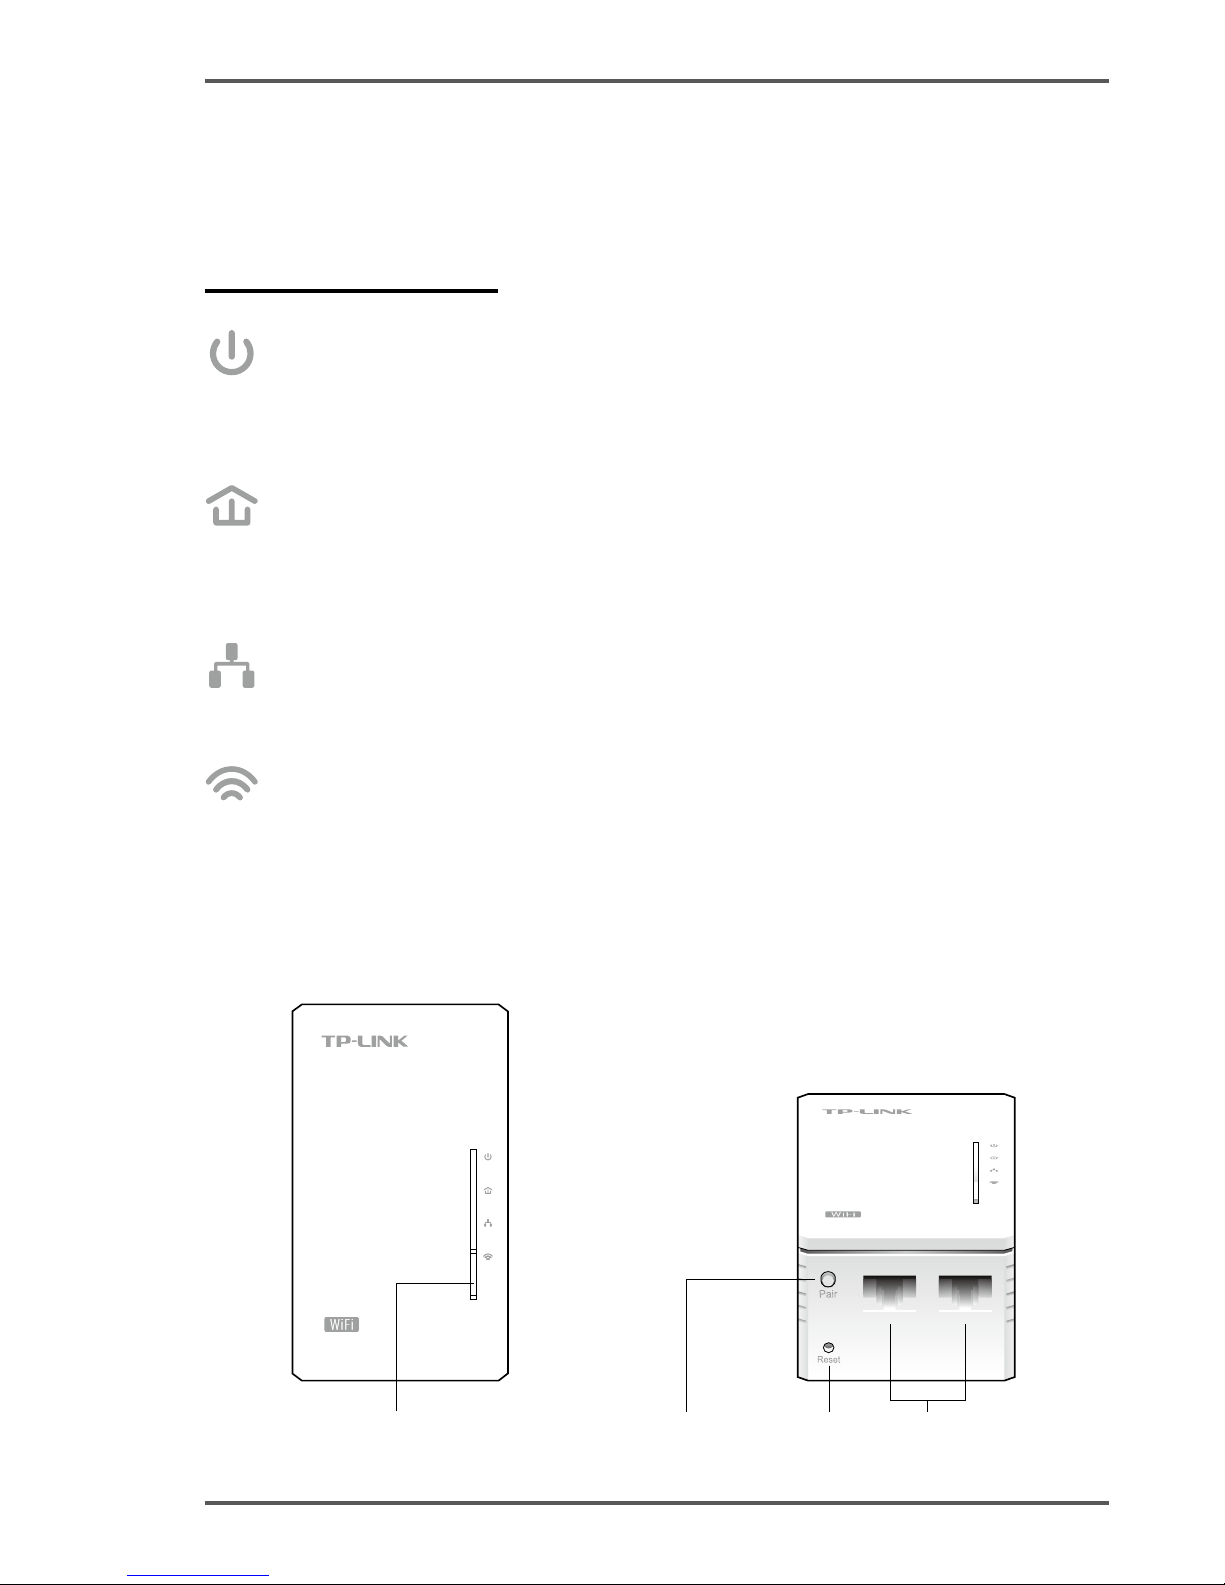
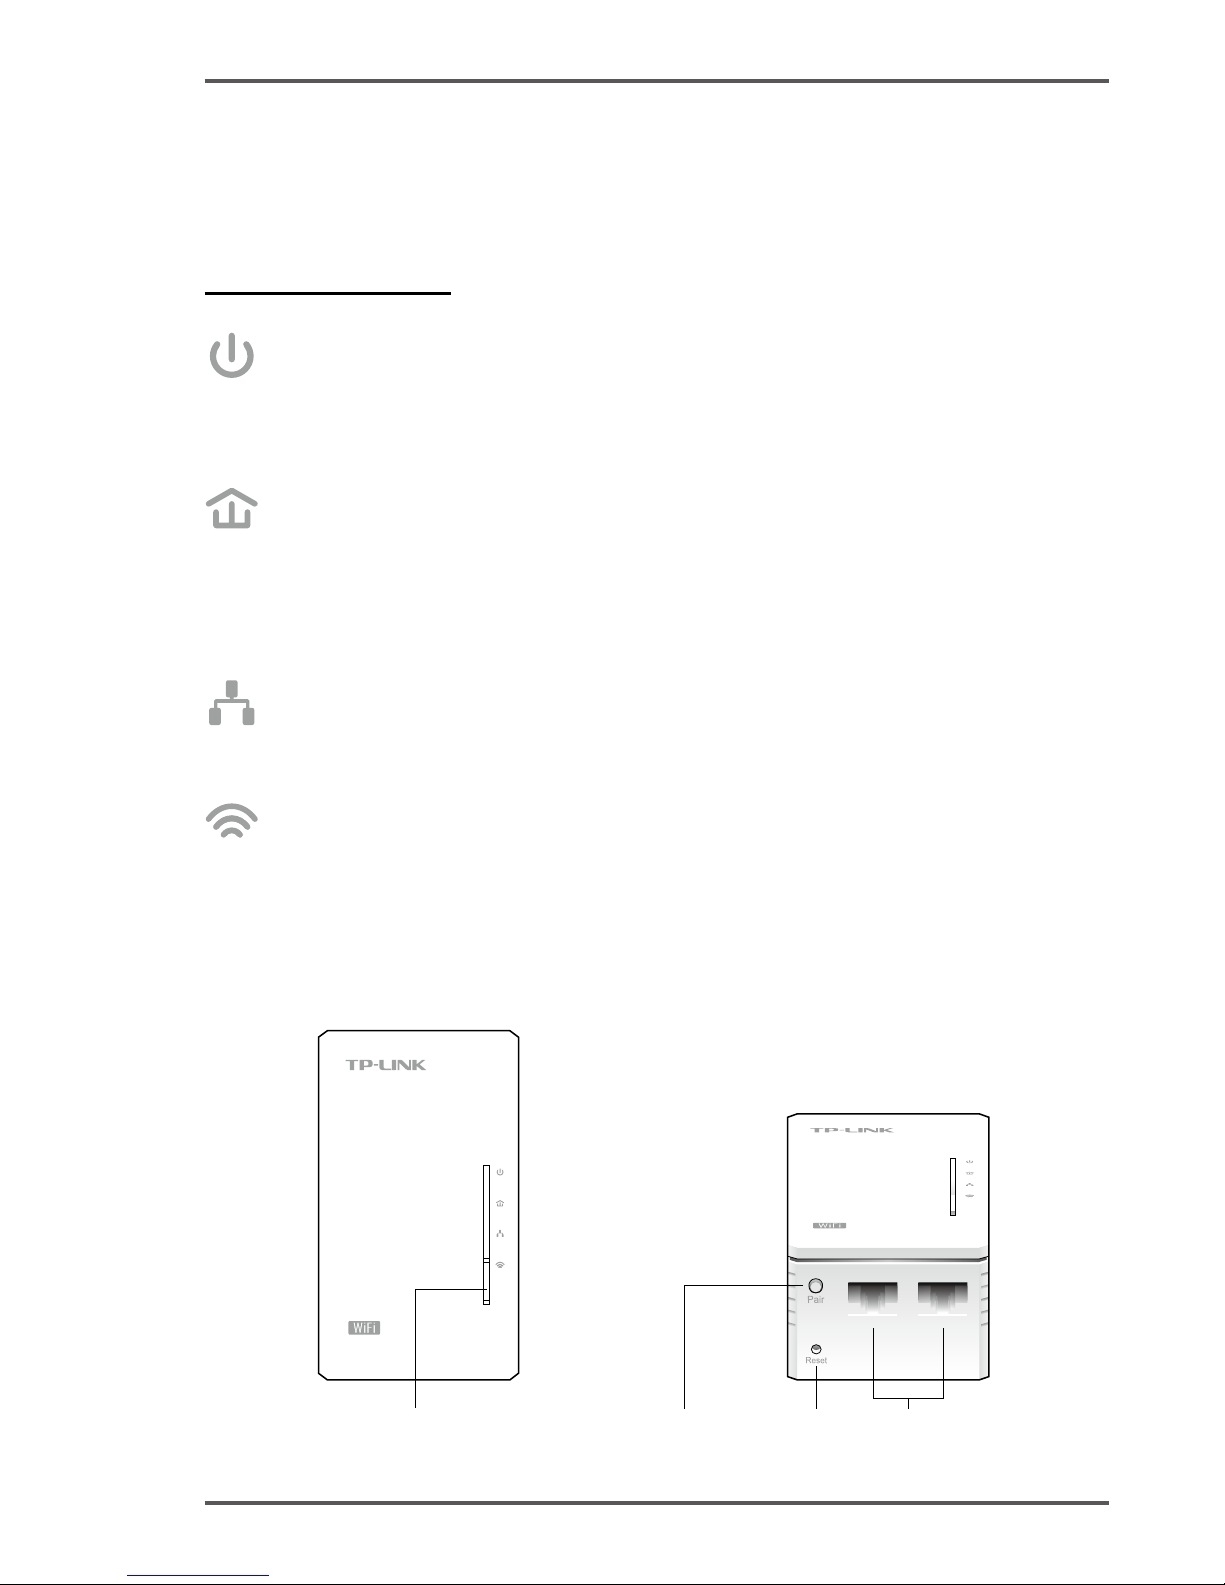
LEDs
Power
Ein: Das Gerät ist eingeschaltet�
Aus: Das Gerät ist ausgeschaltet�
Blinkt: Das Gerät bendet sich im Paarungsprozess.
Powerline
Ein: Das Gerät ist mit einem Powerlinenetz verbunden.
Aus: Das Gerät ist mit keinem Powerlinenetz verbunden.
Blinkt: Das Gerät überträgt Daten�
Ethernet
Ein: Mindestens ein Ethernetport ist verbunden�
Aus: Kein Ethernetport ist verbunden�
Wi-Fi
Aus: Die WLAN-Schnittstelle ist deaktiviert�
Blinkt schnell: Die WLAN-Schnittstelle ist aktiviert�
Blinkt im Sekundentakt: Das Gerät kopiert mittels WiFi-
Clone die Einstellungen von einem anderen WLAN�
AV500
AV500
WiFi-/WiFi-Clone-Taste Pair-Taste
Reset-Taste Ethernetports
Page 3
2
Deutsch
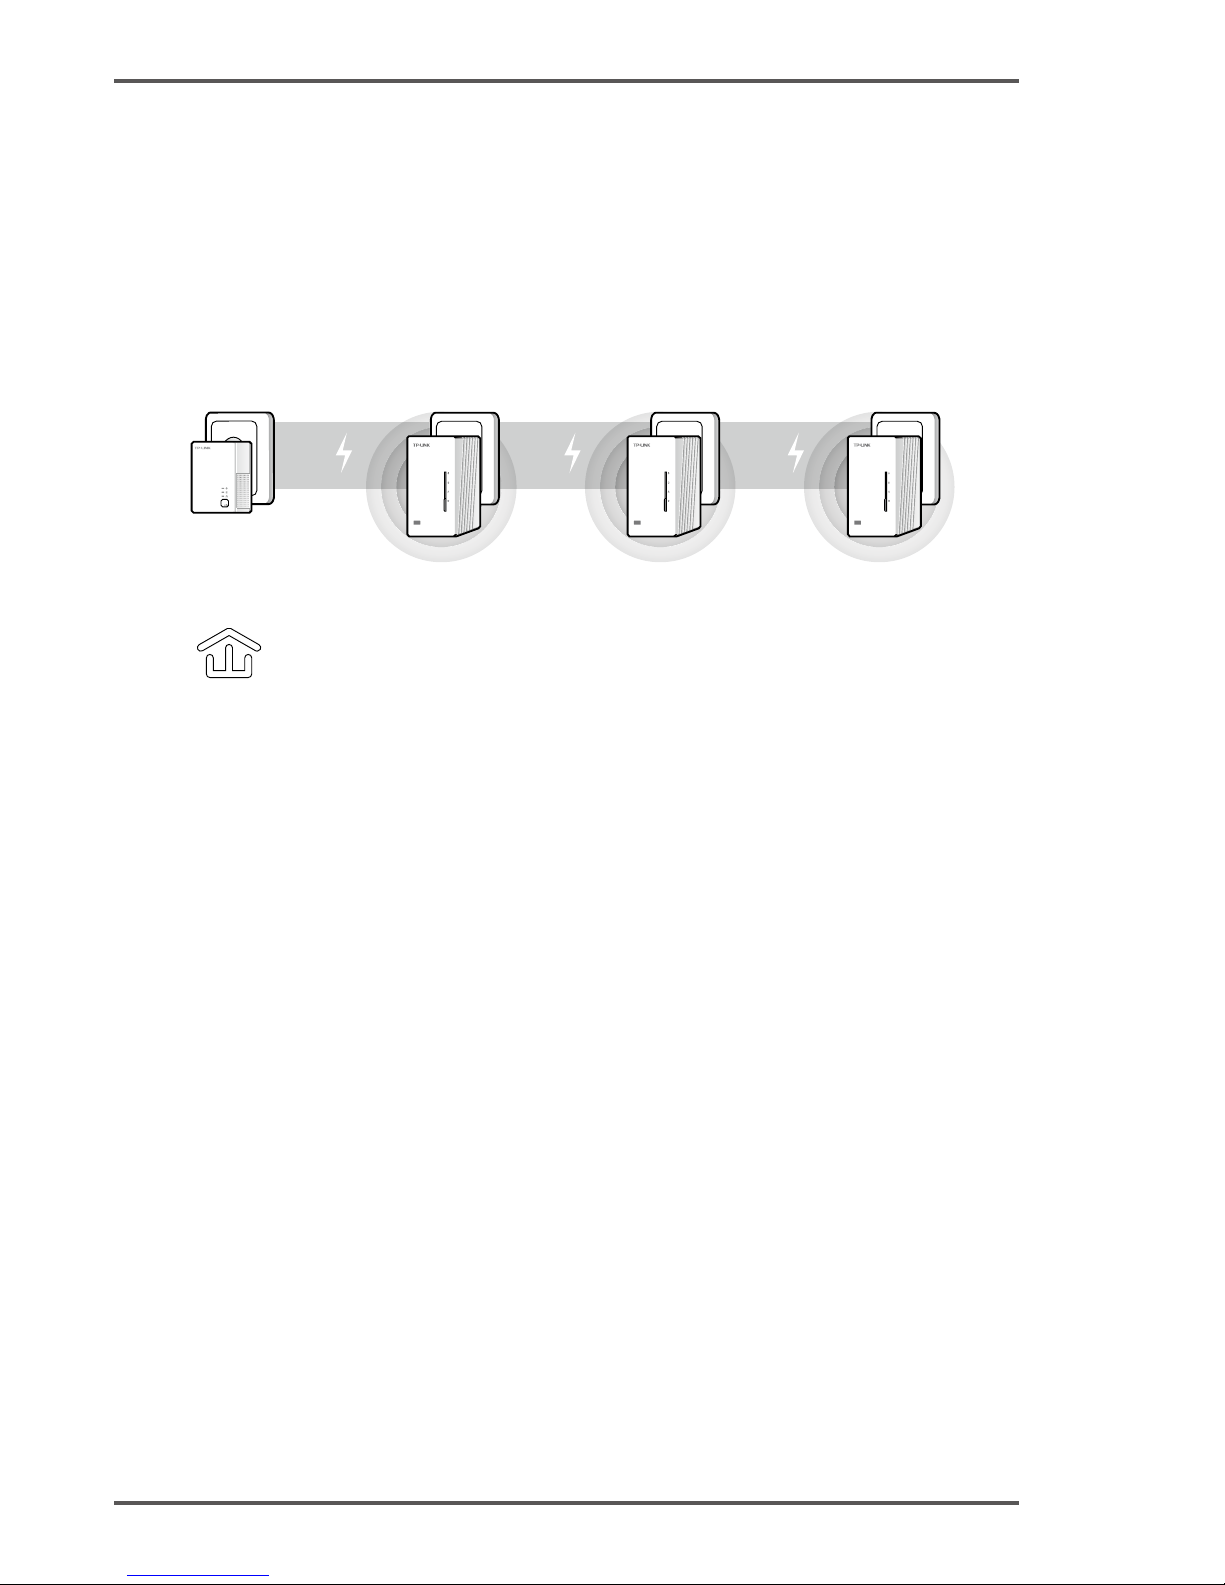
Ein Powerlinenetz besteht aus mindestens 2 Powerlinegeräten. In
diesem Beispiel wird ein TL-PA4010 in Verbindung mit einem TLWPA4220 in Betrieb genommen�
Hinweis: Sind an Ihrem Standort bereits Powerlineadapter in Betrieb,
entfernen Sie diese zunächst. Installieren Sie dann den TL-WPA4220
mittels Methode 1 oder Methode 2� Dann fügen Sie die alten Adapter
zu Ihrem Powerlinenetz hinzu.
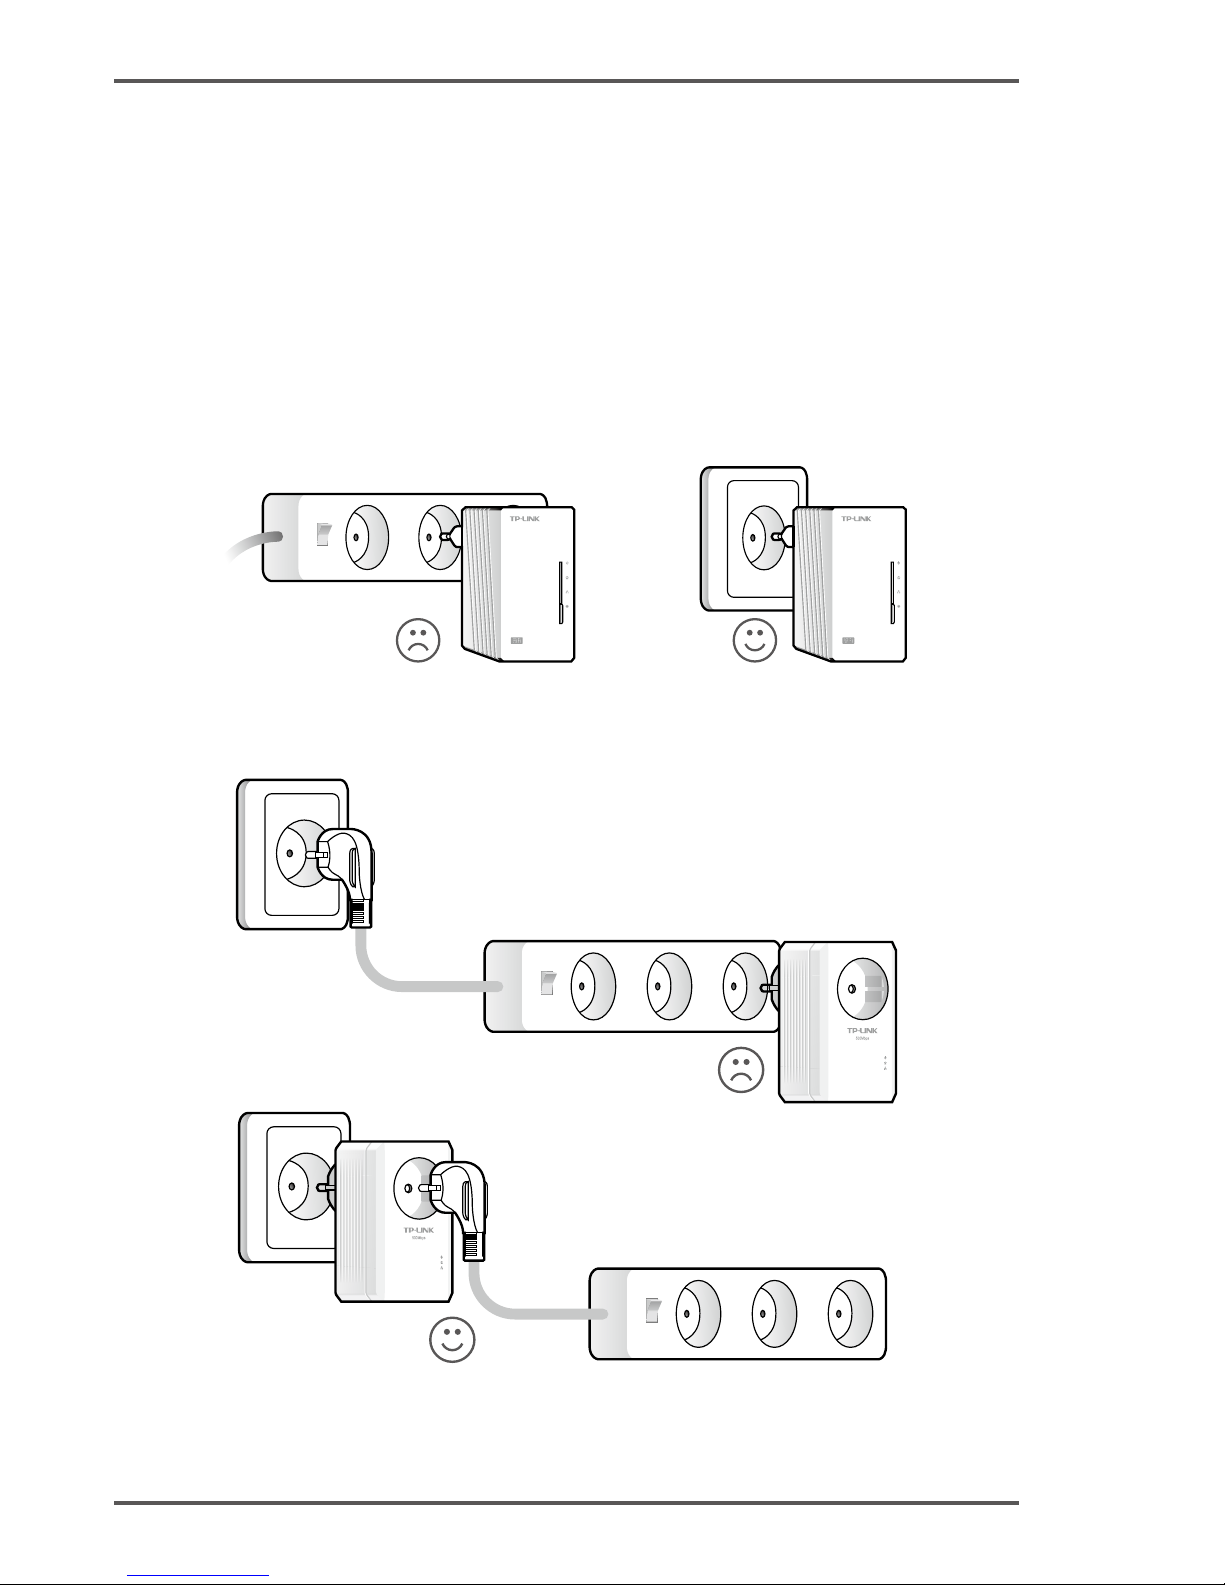
Gerät ohne Frontsteckdose
AV500 AV500
Gerät mit Frontsteckdose
Page 4

3
Deutsch
Methode 1: Plug and Play
Einrichtung eines neuen WLANs
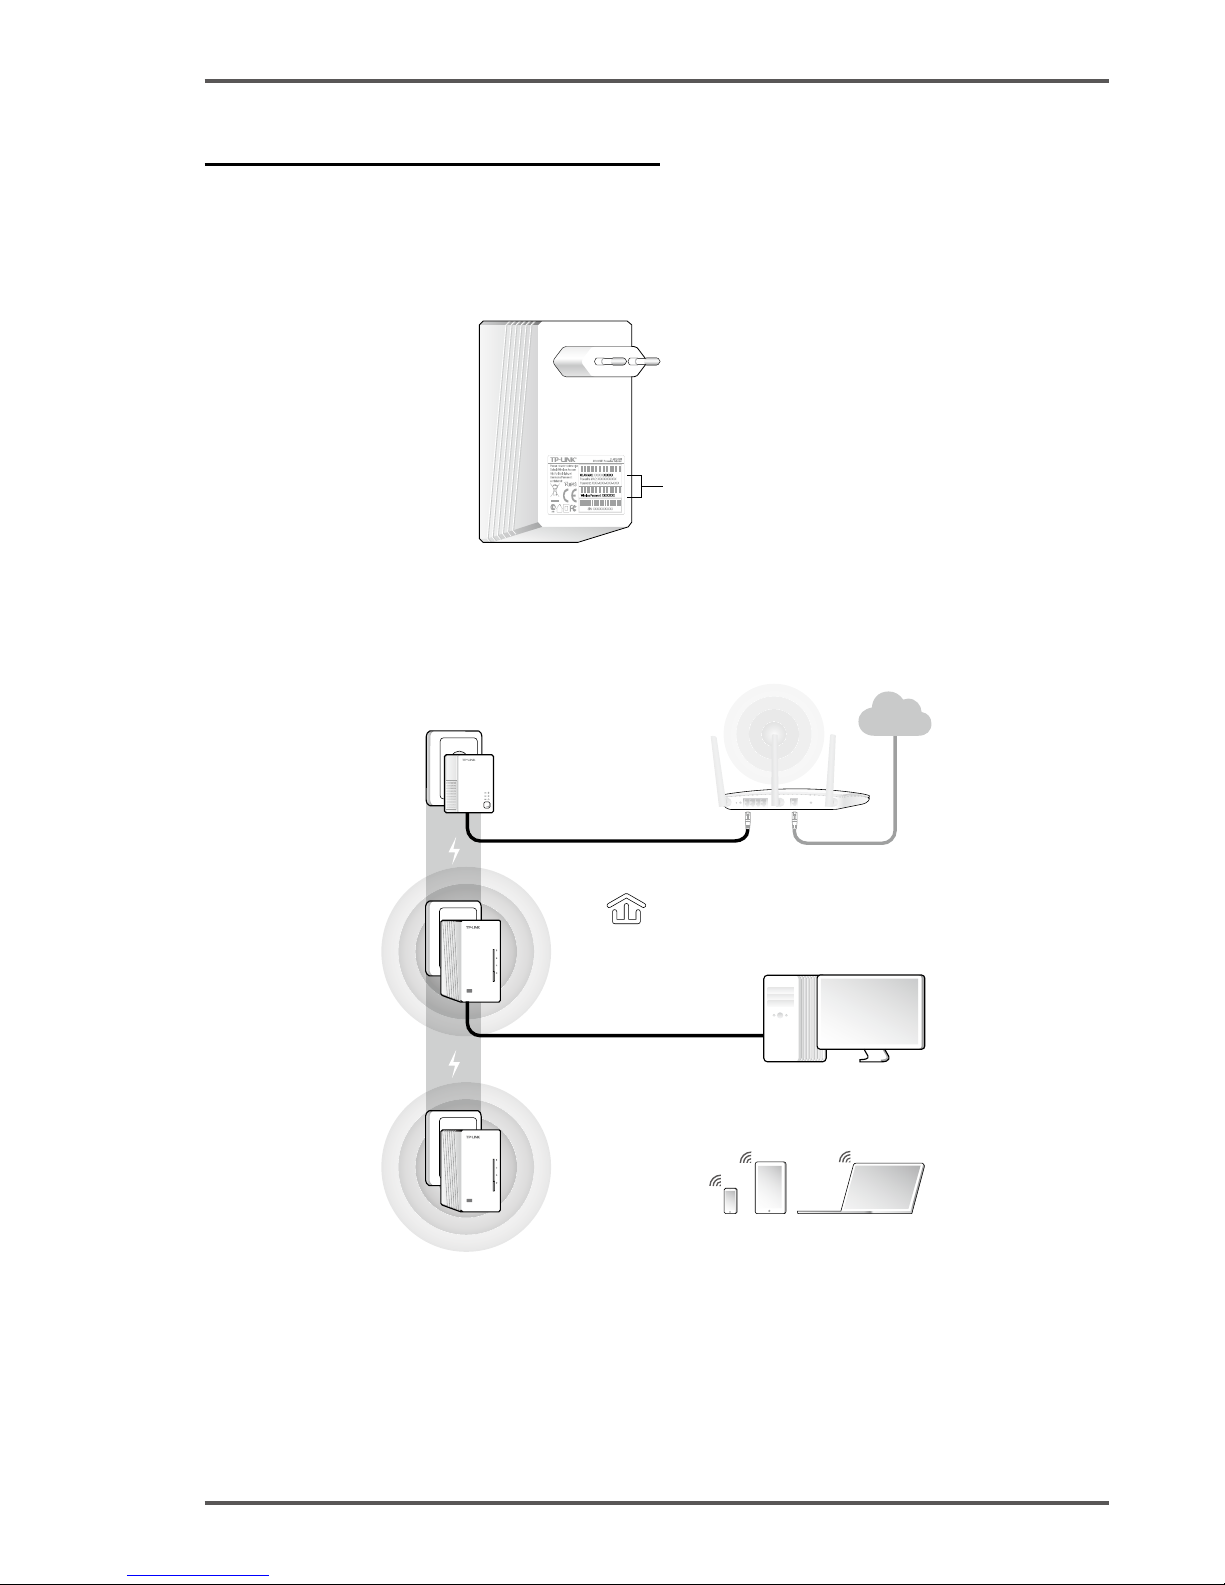
1� Schreiben Sie den Standard-WLAN-Namen (SSID) und das
Standard-WLAN-Passwort Ihres TL-WPA4220 auf�
WLAN-Name (SSID)*:
TP-LINK_XXXXXX
WLAN-Passwort:
XXXXXXXX
* Die Standard-SSID lautet TP-LINK_XXXXXX (wobei XXXXXX für die
letzten 6 Zeichen der WLAN-MAC-Adresse steht).
2� Schließen Sie Ihre Geräte an wie folgt�
AV500
AV500
LAN
Internet
WAN
SSID:
ABCDE
SSID:
TP-LINK_xxxxxx
SSID:
TP-LINK_yyyyyy
Die Powerline-LEDs sollten nach
einer Minute permanent leuchten�
TL-PA4010
TL-WPA4220
TL-WPA4220
Fertig! Benutzen Sie die Standard-SSID (TP-LINK_xxxxxx oder TPLINK_yyyyyy) und das zuvor notierte Passwort, um Internetzugriff zu
erlangen�
Leuchten die Powerline-LEDs nicht permanent, setzen Sie alle Ihre Powerlinegeräte
zurück oder erstellen Sie gemäß Frage 1 der FAQ ein neues Powerlinenetz.
Page 5

4
Deutsch
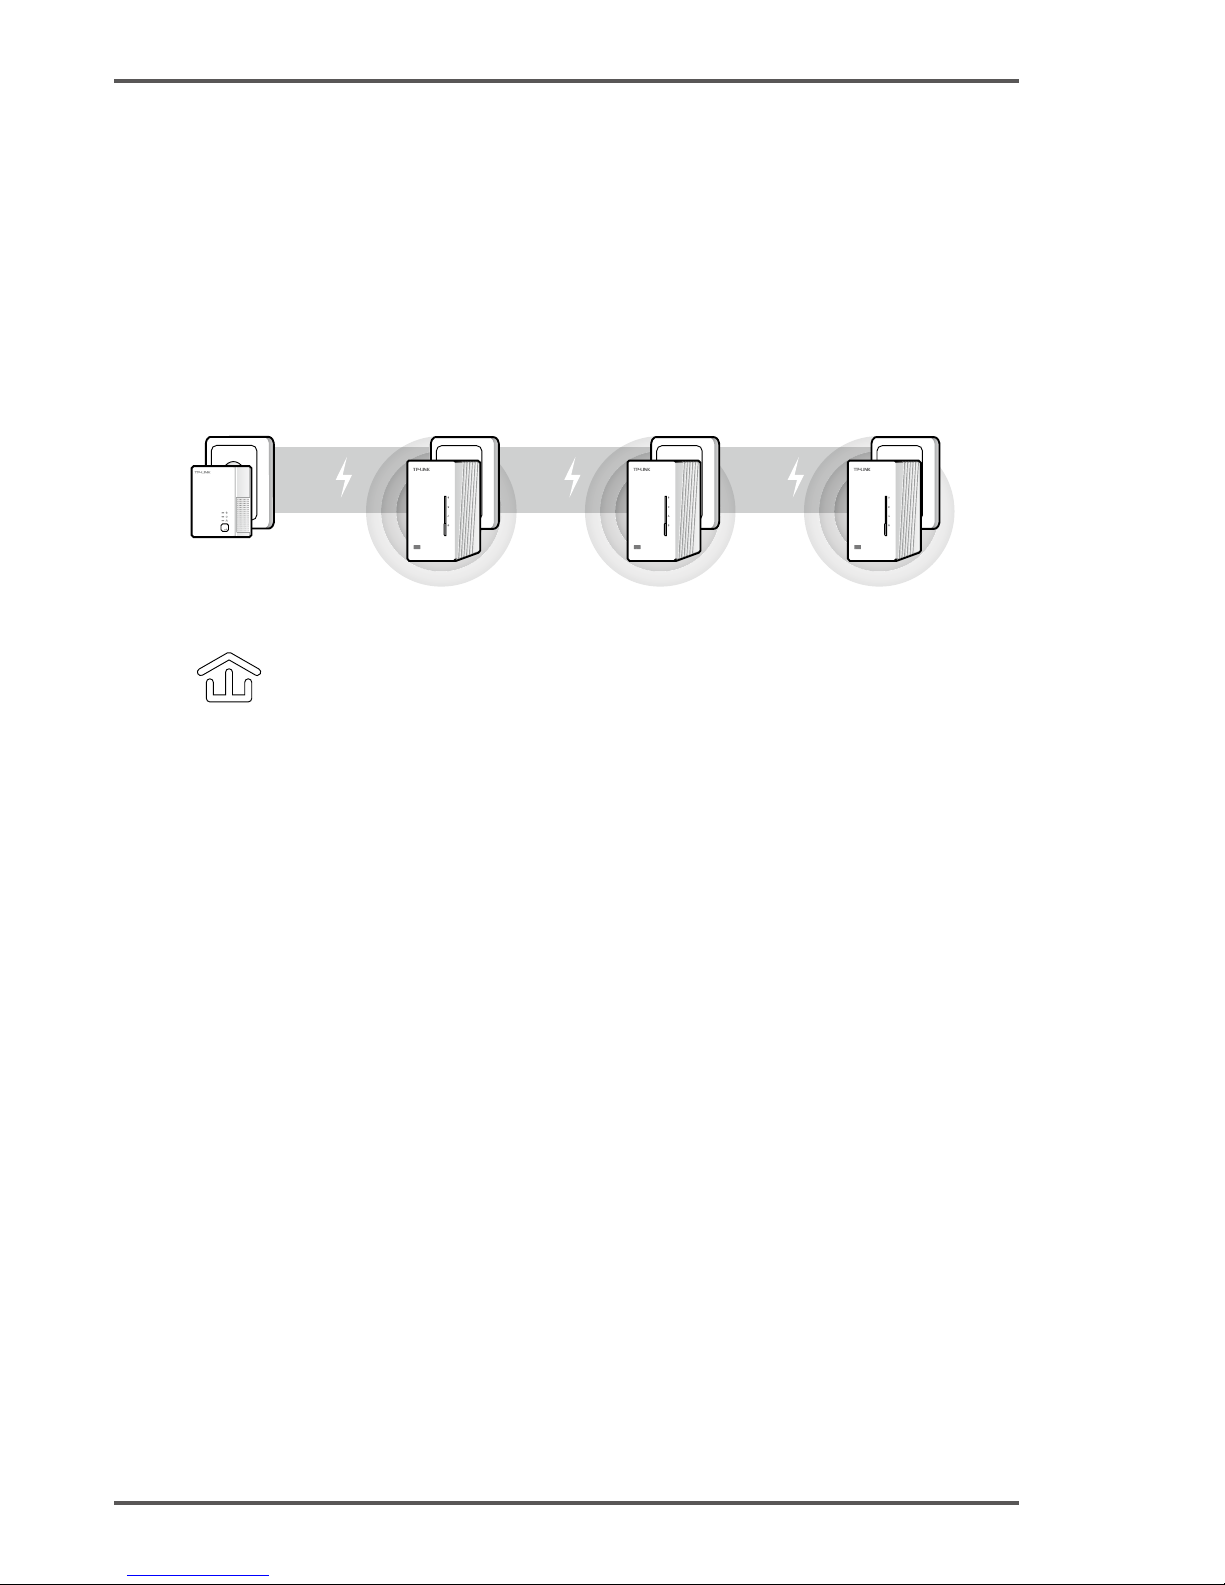
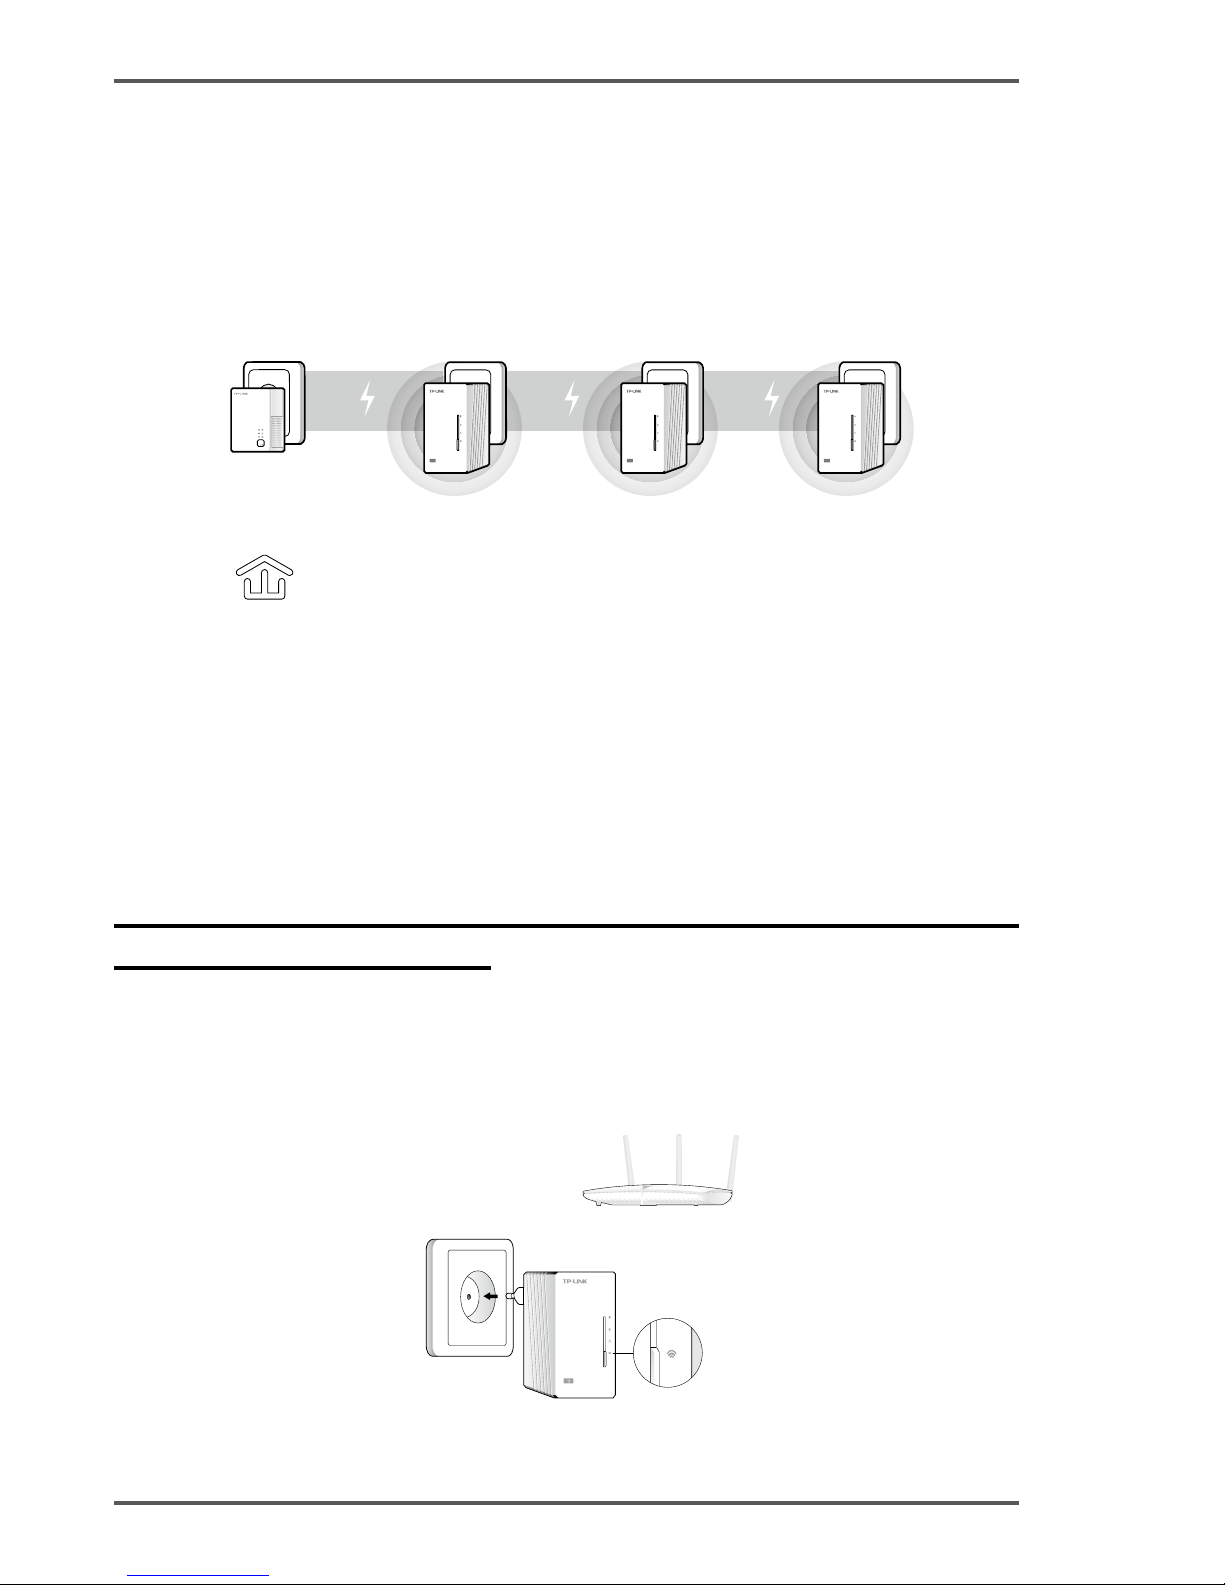
Hinzufügen zusätzlicher Geräte
1� Stellen Sie sicher, dass die neu hinzuzufügenden Geräte
zurückgesetzt sind.
2� Stecken Sie sie in die Steckdosen und warten Sie eine Minute, bis
die Powerline-LEDs permanent leuchten�
AV500 AV500 AV500
Die Installation ist abgeschlossen, wenn alle
Powerline-LEDs permanent leuchten�
Zusätzliches Gerät
TL-WPA4220TL-WPA4220
TL-PA4010
Leuchten die Powerline-LEDs nicht permanent, folgen Sie den Anweisungen
unter Frage 1 der FAQ.
1� Für die zwei zuvor angeschlossenen Geräte benutzen Sie die Pair-
Tasten, um ein Powerlinenetz zu erstellen (F1->A)� (Haben Sie dies
schon getan, können Sie diesen Schritt überspringen�)
2� Für weitere Geräte benutzen Sie die Pair-Tasten, um dem bestehenden
Netz beizutreten (F1->B)�
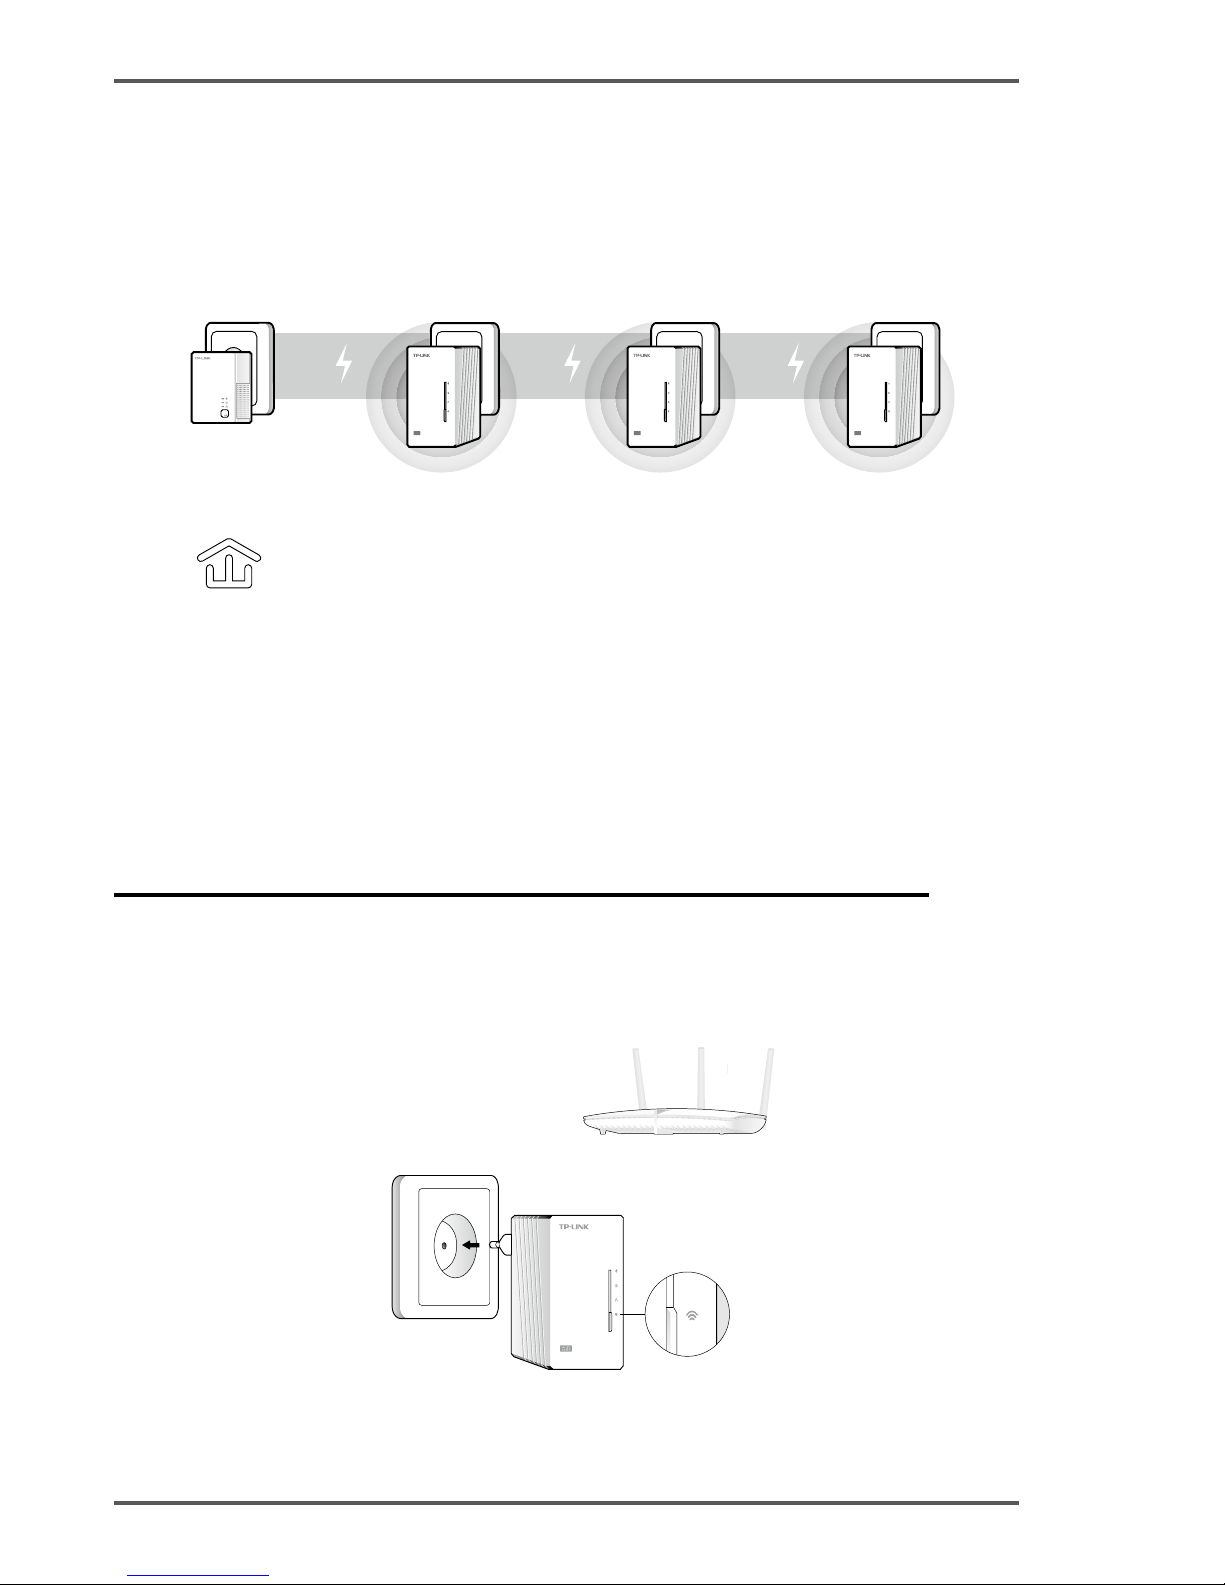
Methode 2: Installation mittels WiFi-Clone
Erweitern des WLANs Ihres Routers
1� Stecken Sie den TL-WPA4220 in eine Steckdose in der Nähe
Ihres Routers�
AV500
TL-WPA4220
Blinkt nach 15
Sekunden schnell�
WLAN-Router, der
WPS unterstützt.
Page 6
5
Deutsch
2� Drücken Sie die WPS-Taste an Ihrem Router� Innerhalb einer
Minute drücken Sie dann die WiFi-Clone-Taste Ihres TL-WPA4220�
AV500
WLAN-Router
TL-WPA4220
• Blinkt nach dem Drücken der WiFiClone-Taste im Sekundentakt�
• Blink während der Minute nach
erfolgreichem WiFi-Clone schnell�
WPS
Der TL-WPA4220 kopiert WLAN-Namen und -Passwort automatisch von
Ihrem bestehenden WLAN�
Um einen weiteren TL-WPA4220 hinzuzufügen, folgen Sie den
Schritten 1 und 2, um WiFi-Clone abzuschließen.
3� Verbinden Sie Ihre Geräte, wie im Folgenden beschrieben�
AV500
AV500
LAN
Internet
WAN
SSID:
ABCDE
SSID:
ABCDE
SSID:
ABCDE
Die Powerline-LEDs sollten nach
einer Minute permanent leuchten�
TL-PA4010
TL-WPA4220
TL-WPA4220
Fertig! Nach wie vor können Sie im Internet surfen, nachdem Sie sich
mit der SSID (ABCDE) unter Verwendung des passenden Passworts
verbunden haben�
Leuchten die Powerline-LEDs nicht permanent, setzen Sie alle Ihre Powerlinegeräte
zurück oder erstellen Sie gemäß Frage 1 der FAQ ein neues Powerlinenetz.
Page 7
6
Deutsch
Installation zusätzlicher Geräte
1� Stellen Sie sicher, dass die neu hinzuzufügenden Geräte
zurückgesetzt sind.
2� Verfügen die neuen Geräte über die WiFi-Clone-Funktion, folgen
Sie für deren Installation den Schritten 1 und 2 der Methode 2�
Falls nicht, überspringen Sie dies�
3� Stecken Sie sie in die Steckdosen und warten Sie eine Minute, bis
die Powerline-LEDs permanent leuchten�
AV500 AV500 AV500
Die Installation ist abgeschlossen, wenn alle
Powerline-LEDs permanent leuchten�
Zusätzliches Gerät
TL-WPA4220TL-WPA4220
TL-PA4010
Leuchten die Powerline-LEDs nicht permanent, folgen Sie den Anweisungen
unter Frage 1 der FAQ.
1� Für die zwei zuvor angeschlossenen Geräte benutzen Sie die Pair-
Tasten, um ein Powerlinenetz zu erstellen (F1->A)� (Haben Sie dies
schon getan, können Sie diesen Schritt überspringen�)
2� Für weitere Geräte benutzen Sie die Pair-Tasten, um dem bestehenden
Netz beizutreten (F1->B)�
Page 8

7
Deutsch
FAQ (Häug gestellte Fragen)
F1. Wie kann ich mittels der Pair-Taste ein Powerlinenetz neu
erstellen oder einem beitreten?
Mittels der Pair-Taste können nur zwei Geräte zugleich miteinander
verbunden werden�
A. Erstellung eines Powerlinenetzes
1� Drücken Sie die Pair-Taste des TL-WPA4220� Die Power-LED
blinkt�
2� Drücken Sie innerhalb von 2 Minuten die Pair-Taste des TL-
PA4010� Die Power-LED
blinkt�
3� Nach 1 Minute leuchten alle Powerline-LEDs
permanent�
B. Beitreten zu einem bestehenden Powerlinenetz
1� Drücken Sie am dritten Gerät die Pair-Taste� Die Power-LED
blinkt�
2� Drücken Sie innerhalb von 2 Minuten die Pair-Taste eines bereits
im Netz bendlichen Gerätes (TL-WPA4220 oder TL-PA4010). Die
Power-LED
blinkt�
3� Nach 1 Minute leuchten alle Powerline-LEDs
permanent�
F2. Wie setze ich den TL-WPA4220 zurück?
Im laufenden Betrieb drücken Sie die Reset-Taste des TL-WPA4220
mit einem geeigneten Gegenstand für mehr als 5 Sekunden�
Die Power-LED
geht zunächst aus und leuchtet dann längere
Zeit. Die WiFi-LED
blinkt schnell� Damit ist der Resetvorgang
abgeschlossen�
F3. Wie konguriere ich die WLAN-Einstellungen nach meinen
Wünschen?
1� (nur für Windows) Starten Sie das Tool auf der beiliegenden
CD oder nachdem Sie es sich von unserer Webpräsenz
heruntergeladen haben�
2� Klicken Sie im Tool auf Connect�
3� Loggen Sie sich in die Weboberäche ein, indem Sie Standard-
Page 9

8
Deutsch
Benutzernamen und -Passwort admin verwenden�
4� Kongurieren Sie auf der Seite Wireless > Wireless Settings die
SSID und klicken Sie Save�
5� Kongurieren Sie auf der Seite Wireless > Wireless Security Ihr
WLAN-Passwort und klicken Sie Save�
6� Klicken Sie unten auf der Seite click here, um das Gerät neu zu
starten�
F4. Was kann ich tun, wenn mein Computer keinen Internetzugriff
hat, nachdem er mit dem Powerlineadapter/-Extender verbunden
ist?
Überprüfen Sie die folgenden Punkte:
1� Verbinden Sie Ihren Computer direkt mit Ihrem Modem oder
Router, um Ihre Internetverbindung zu testen.
2� Stellen Sie sicher, dass die Verkabelung fehlerfrei ist�
3� Stellen Sie sicher, dass die Powerline-LEDs Ihrer Adapter/
Extender leuchten� Tun sie dies nicht, folgen Sie den Anweisungen
unter Frage 1�
4� Stellen Sie sicher, dass Ihr Computer seine IP-Konfiguration
automatisch bezieht.
Kann Ihr Computer nun immer noch nicht ins Internet, wenden Sie
sich bitte an unseren Technischen Kundendienst�
Weitere Informationen zu den
erweiterten Einstellungen nden
Sie im Handbuch�
Page 10
9
English
Note: The product model shown in this QIG for WiFi Powerline
Extender 3-pack Kit is “TL-WPA4220T KIT”, as an example�
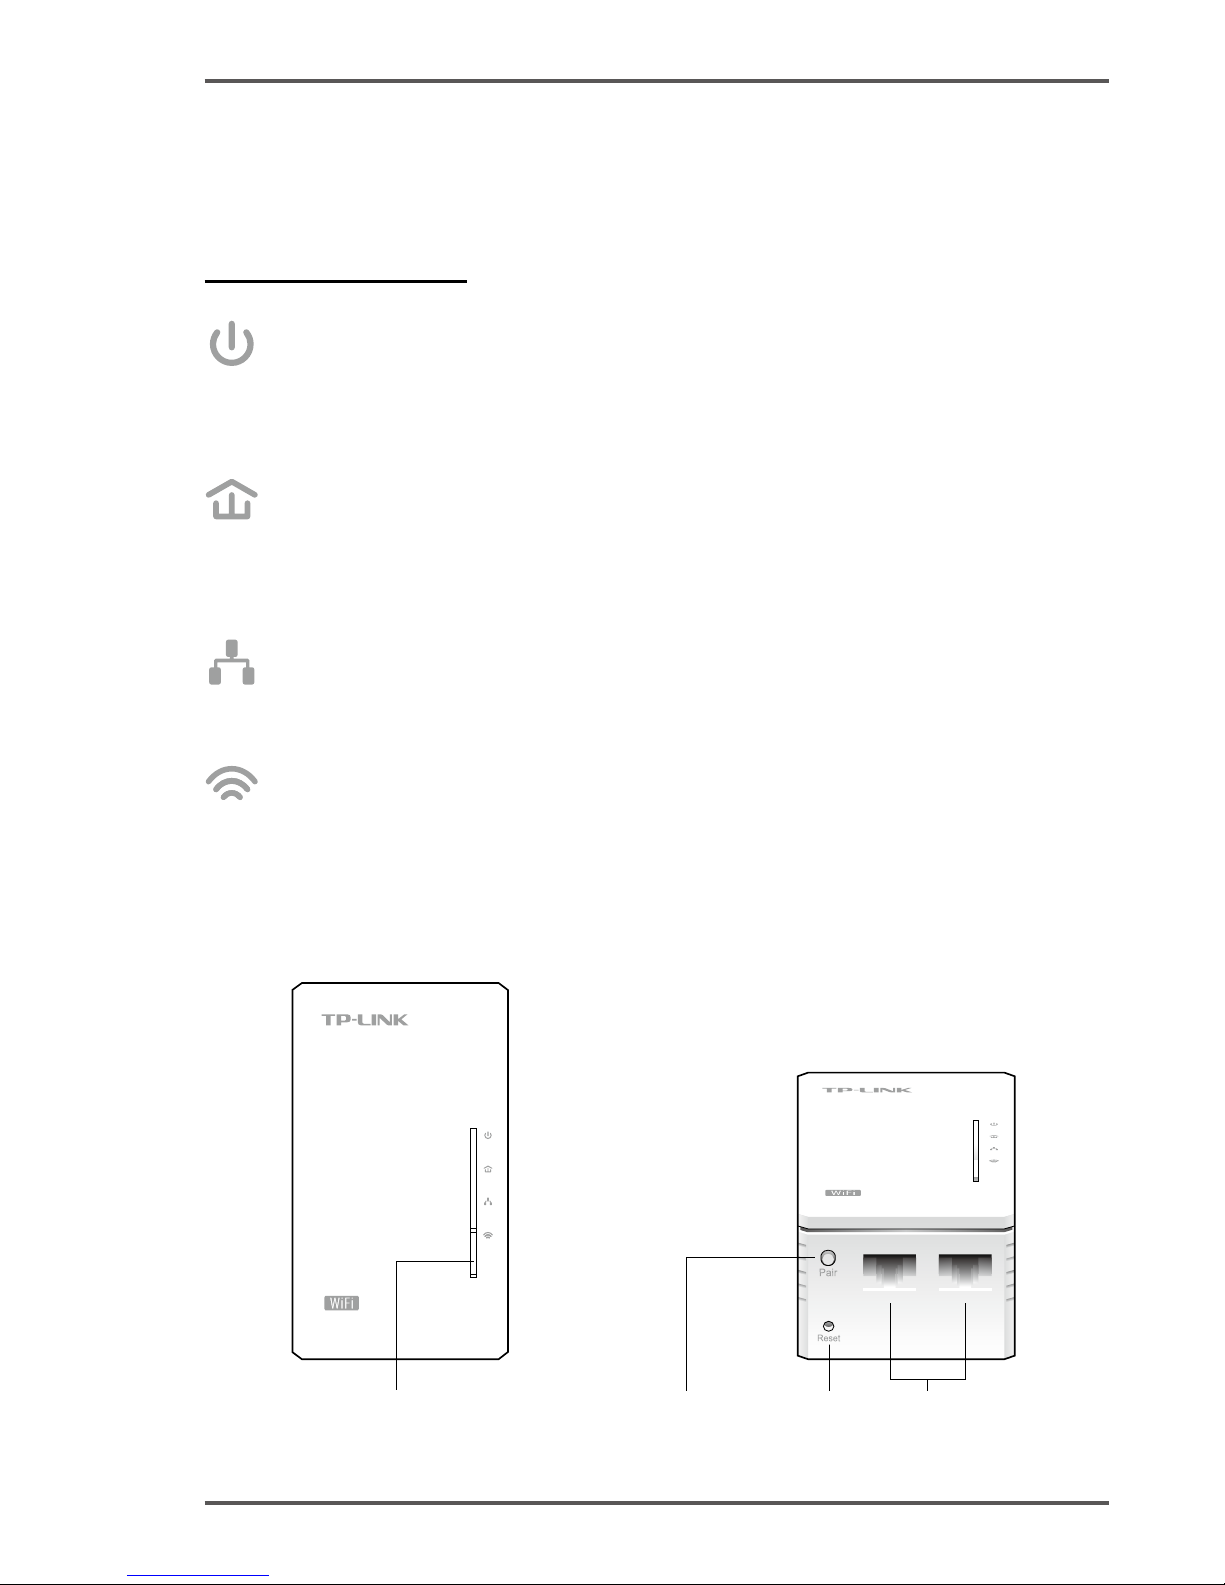
LED Indicators
Power
On: The device is on�
Off: The device is off�
Blinking: The device is pairing�
Powerline
On: The device is connected to a powerline network�
Off: The device isn’t connected to any powerline network�
Blinking: The device is transferring data�
Ethernet
On: At least one Ethernet port is connected�
Off: No Ethernet port is connected�
Wi-Fi
Off: The wireless function is disabled�
Blinking quickly: The wireless function is enabled�
Blinking every second: The device is cloning Wi-Fi settings
from a router�
AV500
AV500
Wi-Fi/Wi-Fi Clone
Button
Pair
Button
Reset
Button
Ethernet
Ports
Page 11
10
English
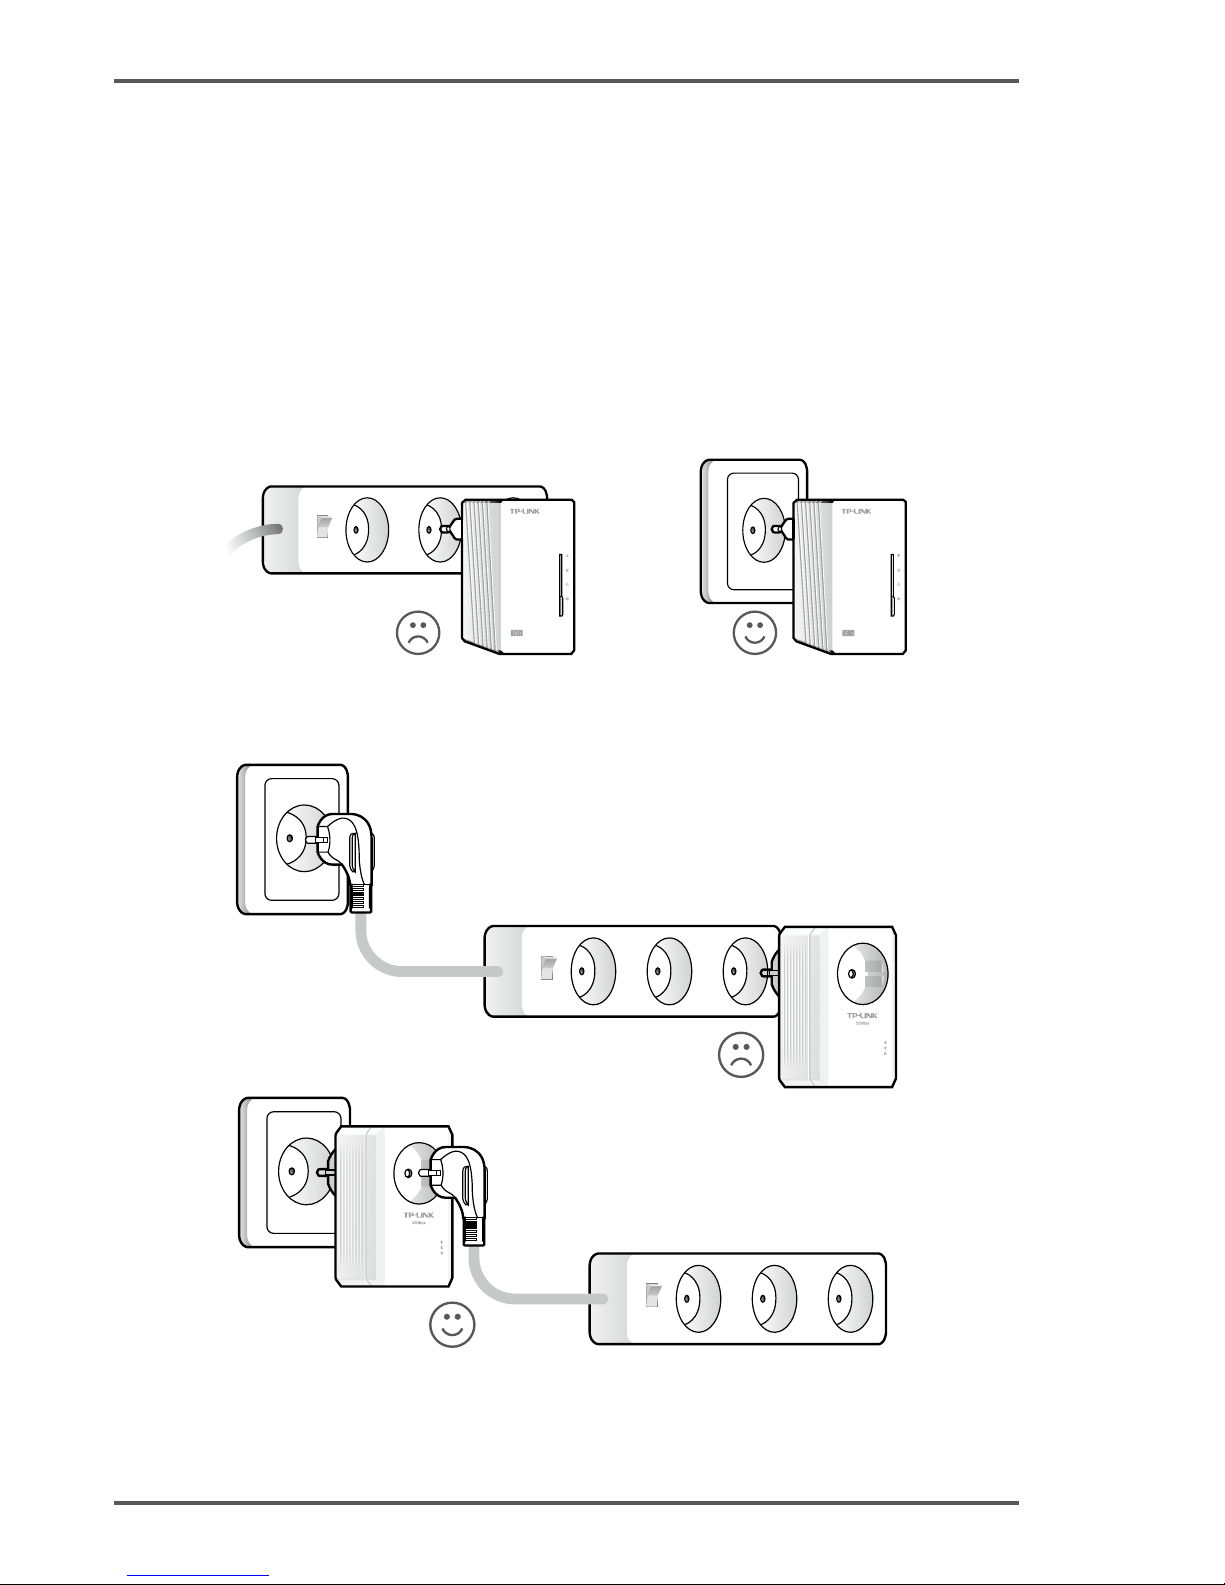
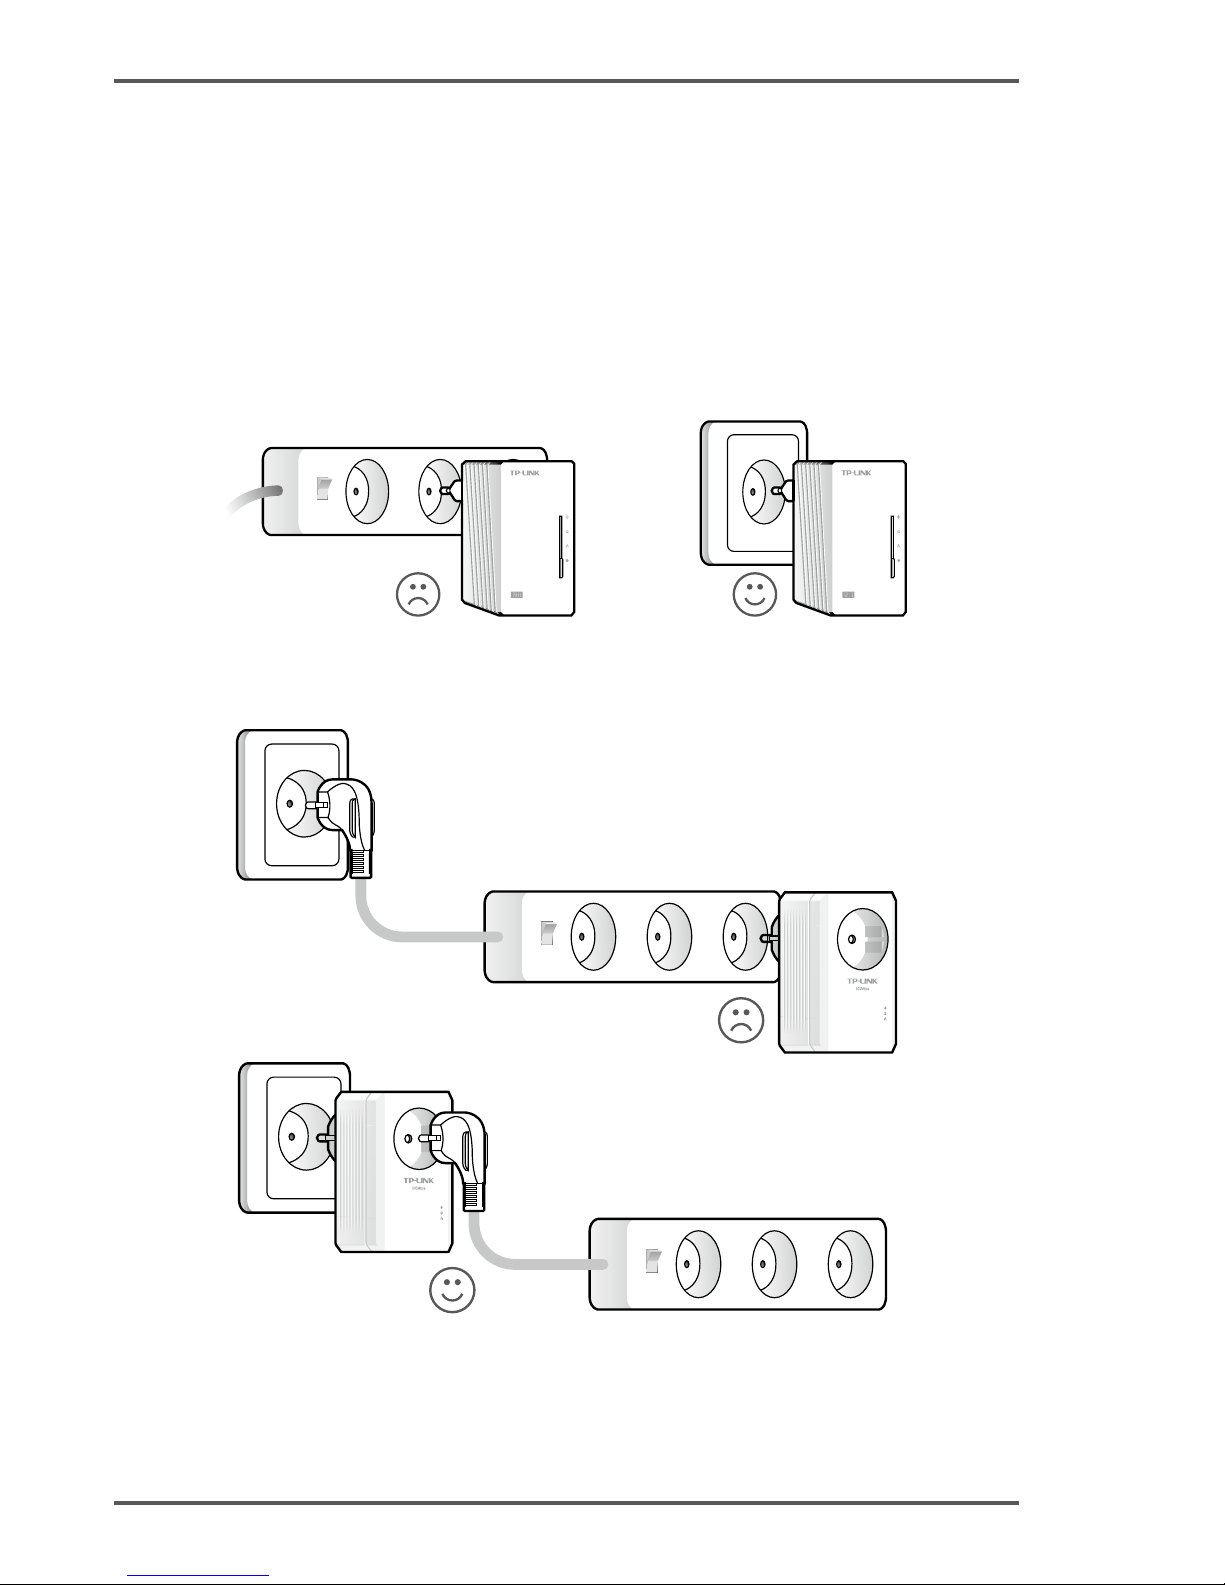
A powerline network requires at least two powerline devices� We use
the powerline adapter TL-PA4010 as an example to work with TLWPA4220�
Note: If your home or ofce already has powerline adapters, remove
them rst, install TL-WPA4220 using Method 1 or Method 2, and then
add your existing adapters to the powerline network�
For non-passthrough powerline device
AV500 AV500
For passthrough powerline device
Page 12
11
English
Method 1: Plug and Play
Create a New Wireless Network
1� Write down the default wireless network name (SSID) and
password of TL-WPA4220�
Wireless Network Name (SSID)*:
TP-LINK_XXXXXX
Wireless Password:
XXXXXXXX
* The default SSID is TP-LINK_XXXXXX� (XXXXXX indicates the last six
unique characters of the WLAN MAC address�)
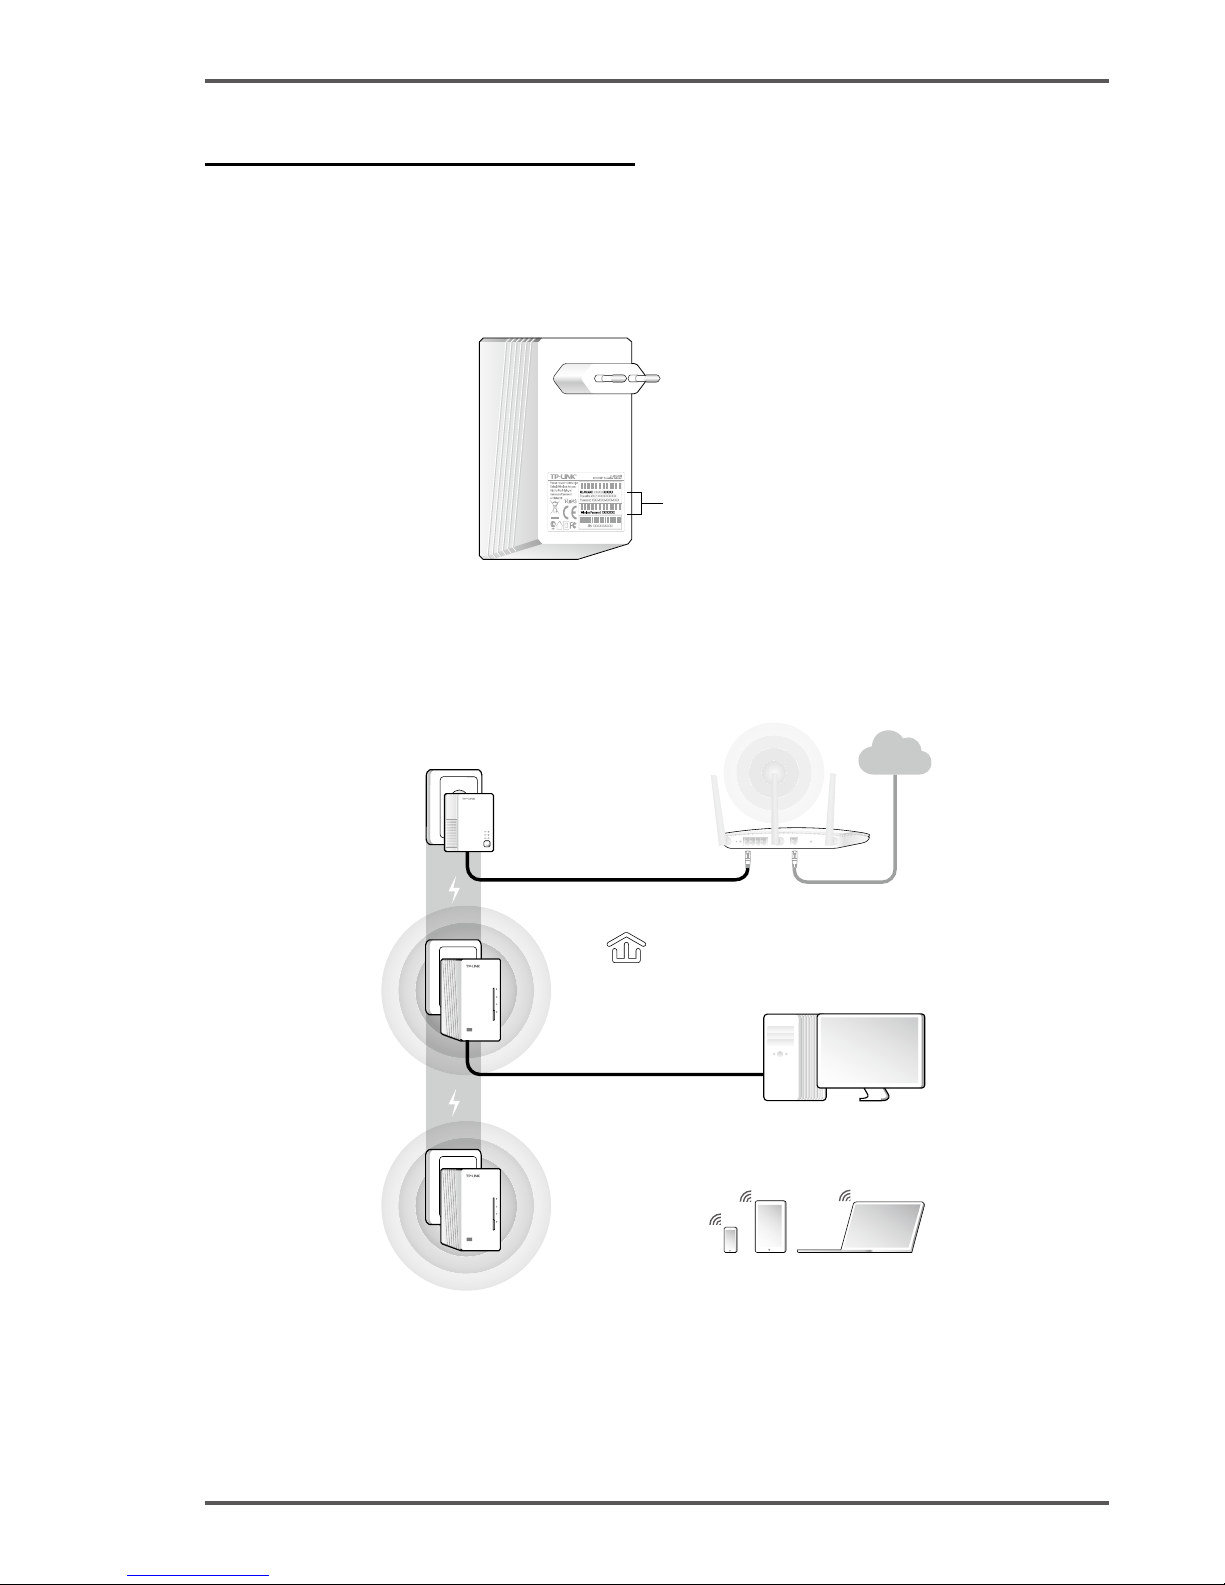
2� Connect your devices as follows�
AV500
AV500
LAN
Internet
WAN
SSID:
ABCDE
SSID:
TP-LINK_xxxxxx
SSID:
TP-LINK_yyyyyy
All the Powerline LEDs will
turn solid within 1 minute�
TL-PA4010
TL-WPA4220
TL-WPA4220
Enjoy! Use the default SSID (TP-LINK_xxxxxx or TP-LINK_yyyyyy)
and password you wrote down to access the Internet�
If the Powerline LEDs don’t turn solid, reset all the powerline devices, or
create a powerline network by referring to FAQ-Q1.
Page 13
12
English
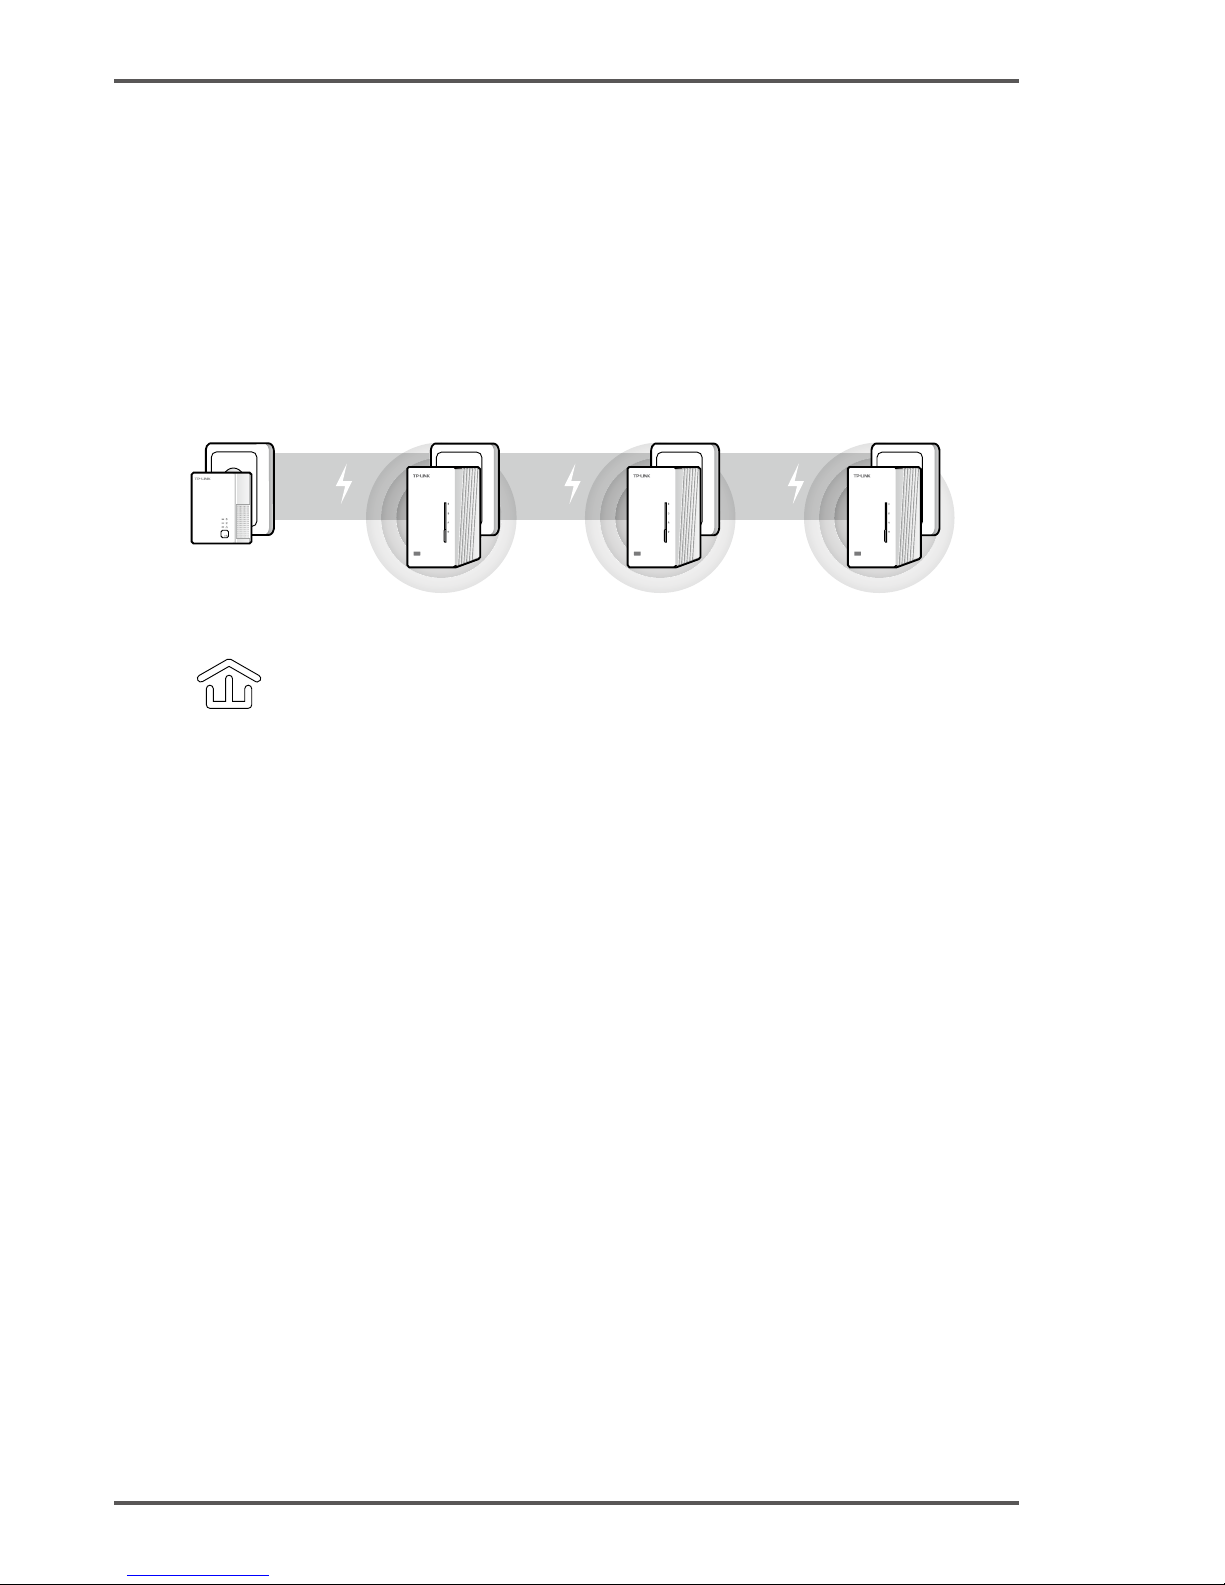
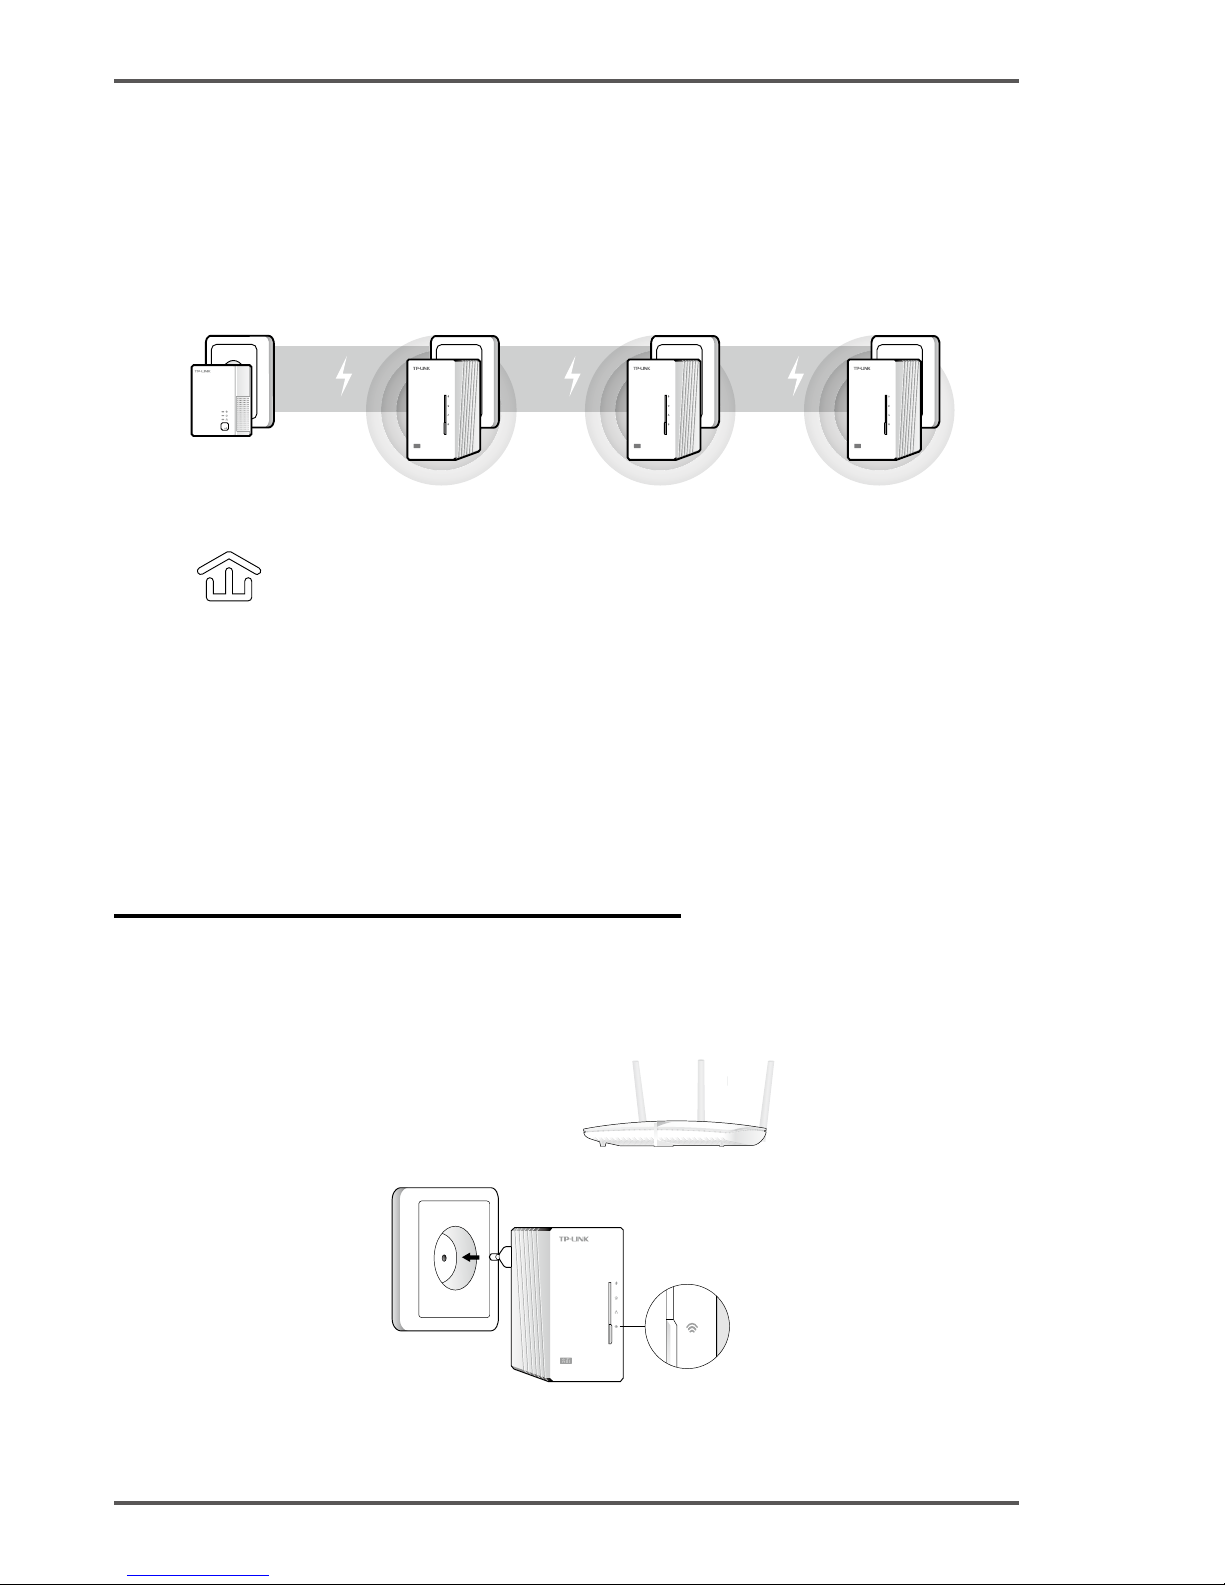
Read this to install additional devices
1� Make sure the additional devices use factory default settings� If
not, please reset them�
2� Plug them into the outlets and wait about 1 minute until their
Powerline LEDs turn solid�
AV500 AV500 AV500
Installation is completed when all the
Powerline LEDs turn solid�
Additional Device
TL-WPA4220TL-WPA4220
TL-PA4010
If the Powerline LEDs do not turn solid, please follow the instructions in
FAQ->Q1:
1� For the two devices connected before, use the Pair Button to create a
powerline network (Q1->A)� (Skip this step if you have already done this�)
2� For additional devices, use the Pair Button to join the existing powerline
network (Q1->B)�
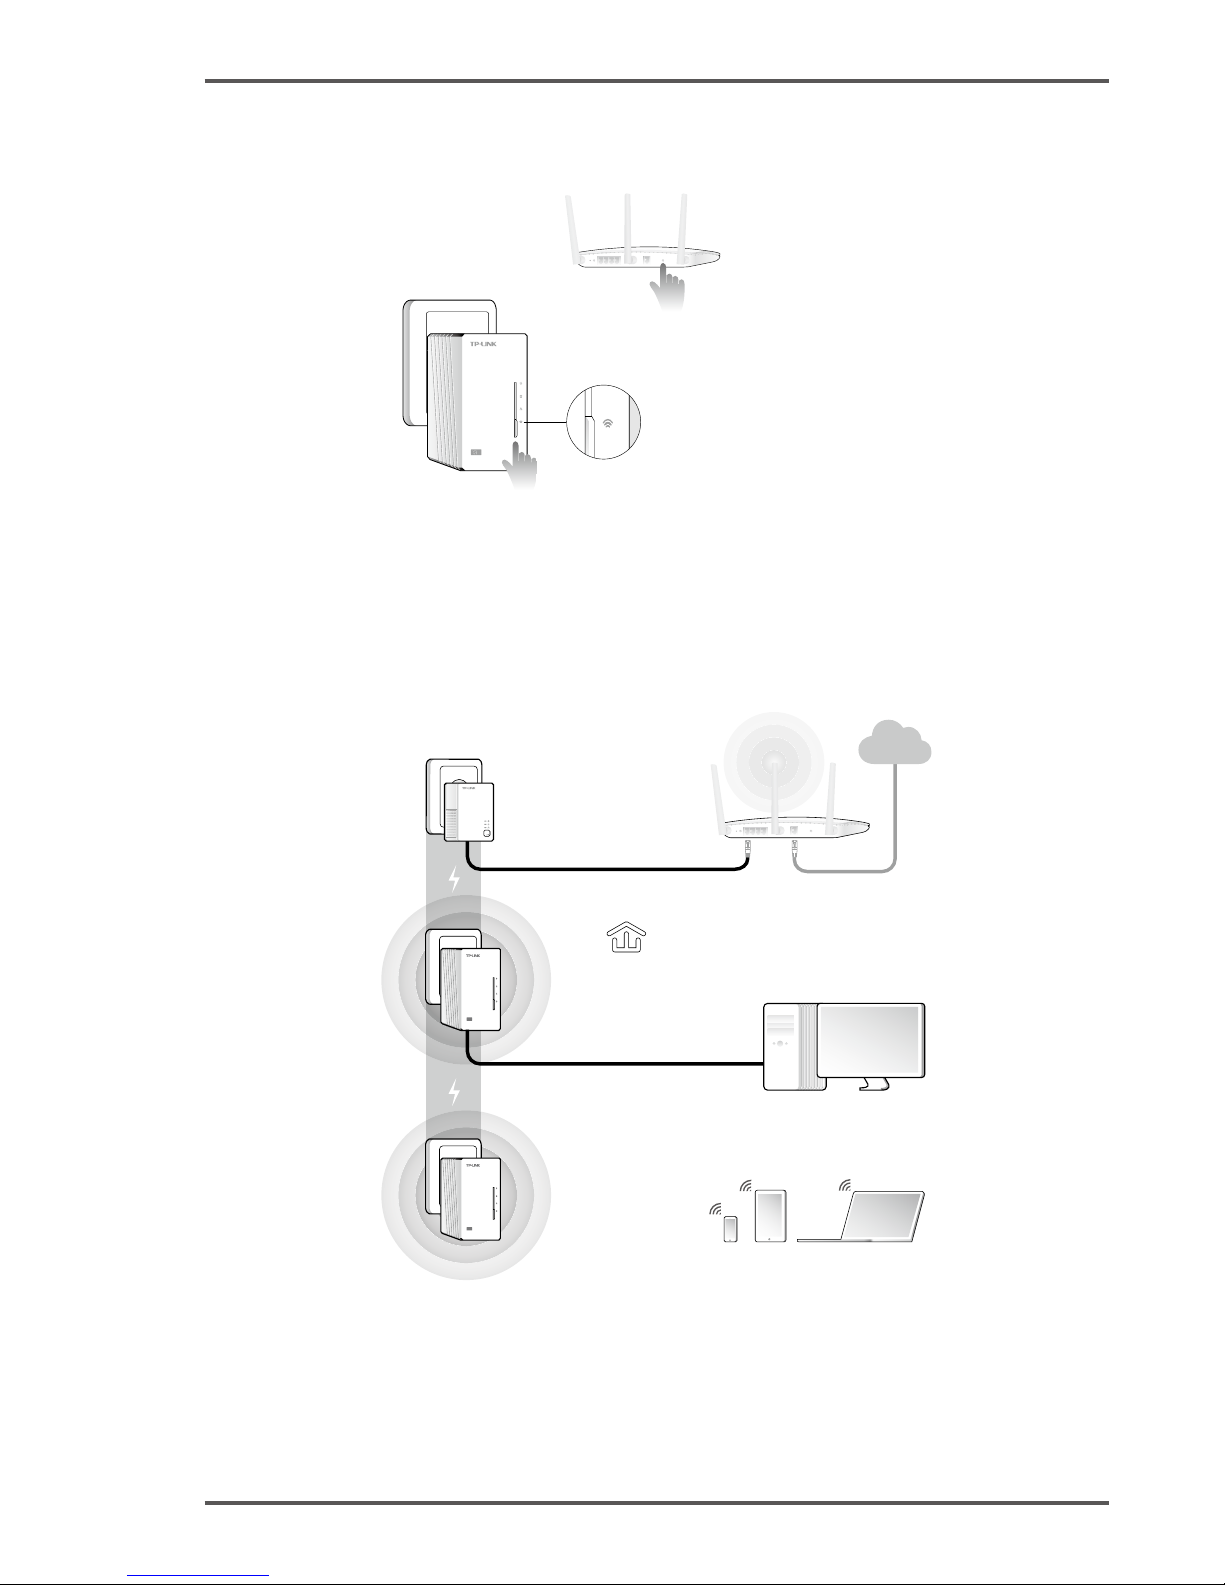
Method 2: Setup via Wi-Fi Clone
Extend the Router's Wireless Network
1� Plug TL-WPA4220 into a wall socket near your router�
AV500
TL-WPA4220
Blink quickly in about
15 seconds�
Wireless Router
(supporting WPS)
Page 14
13
English
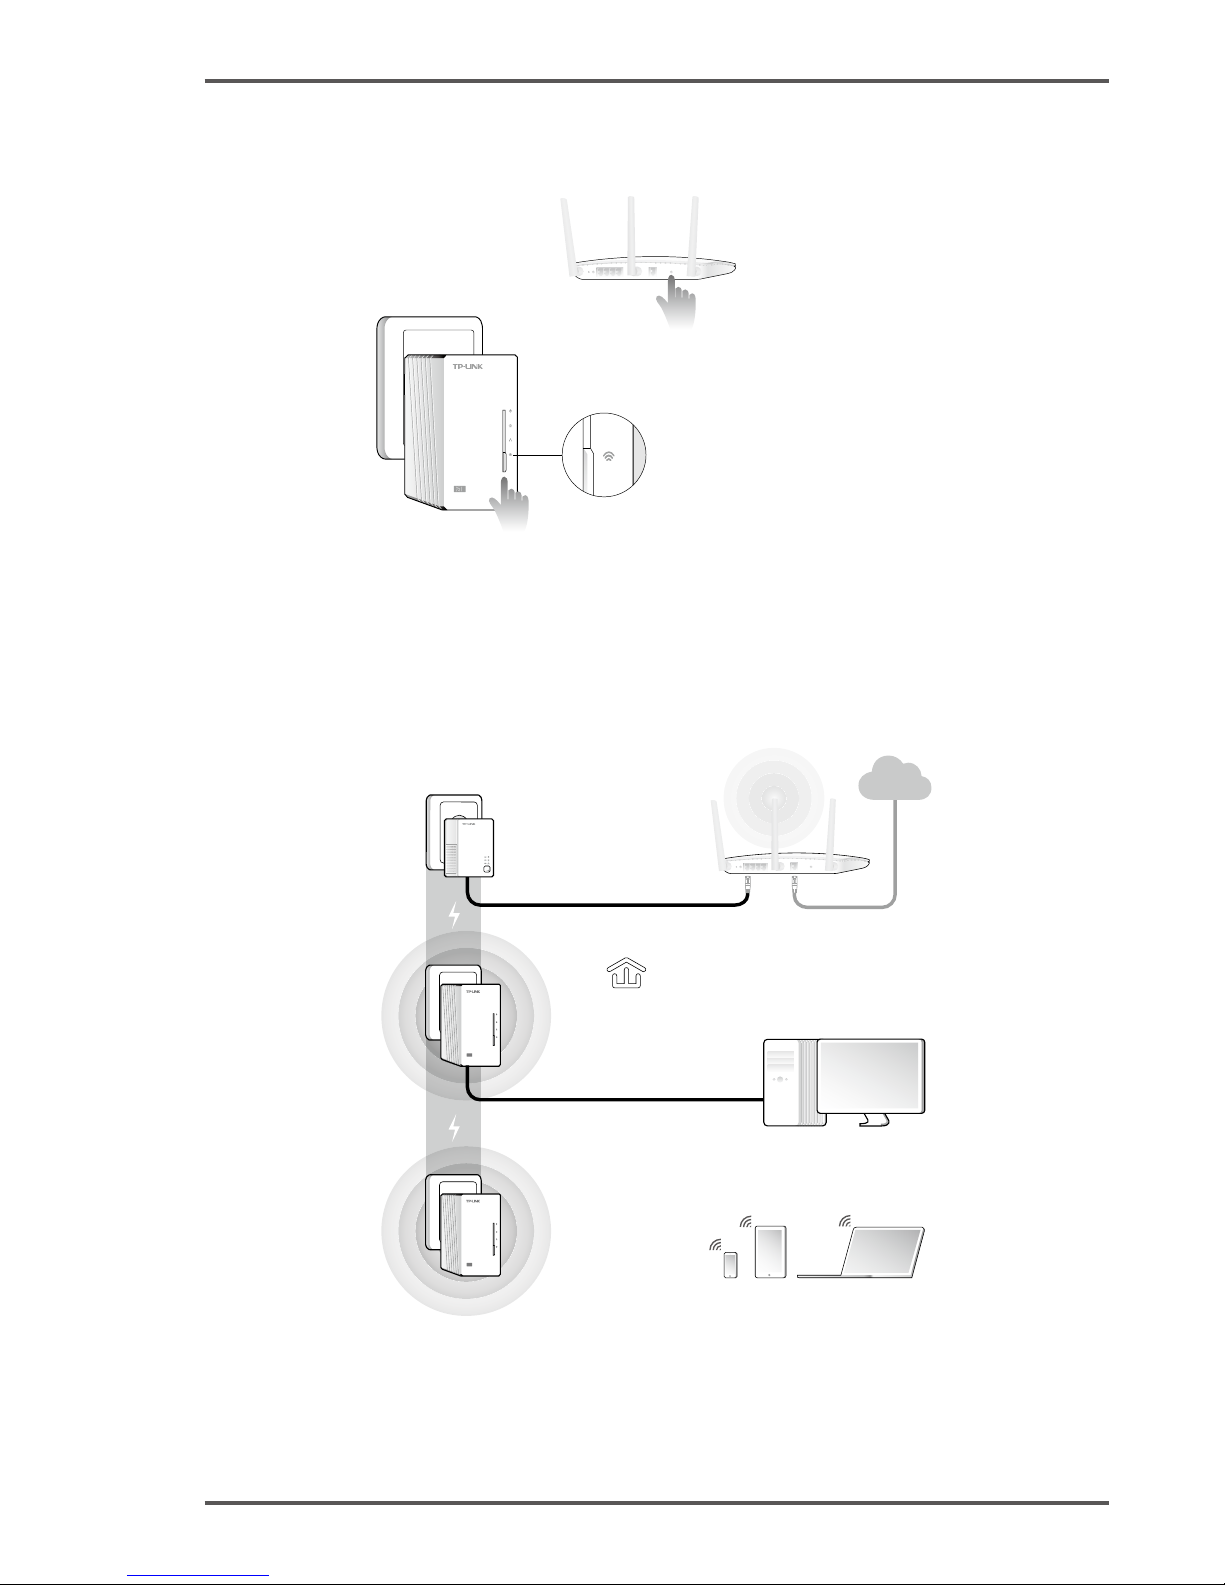
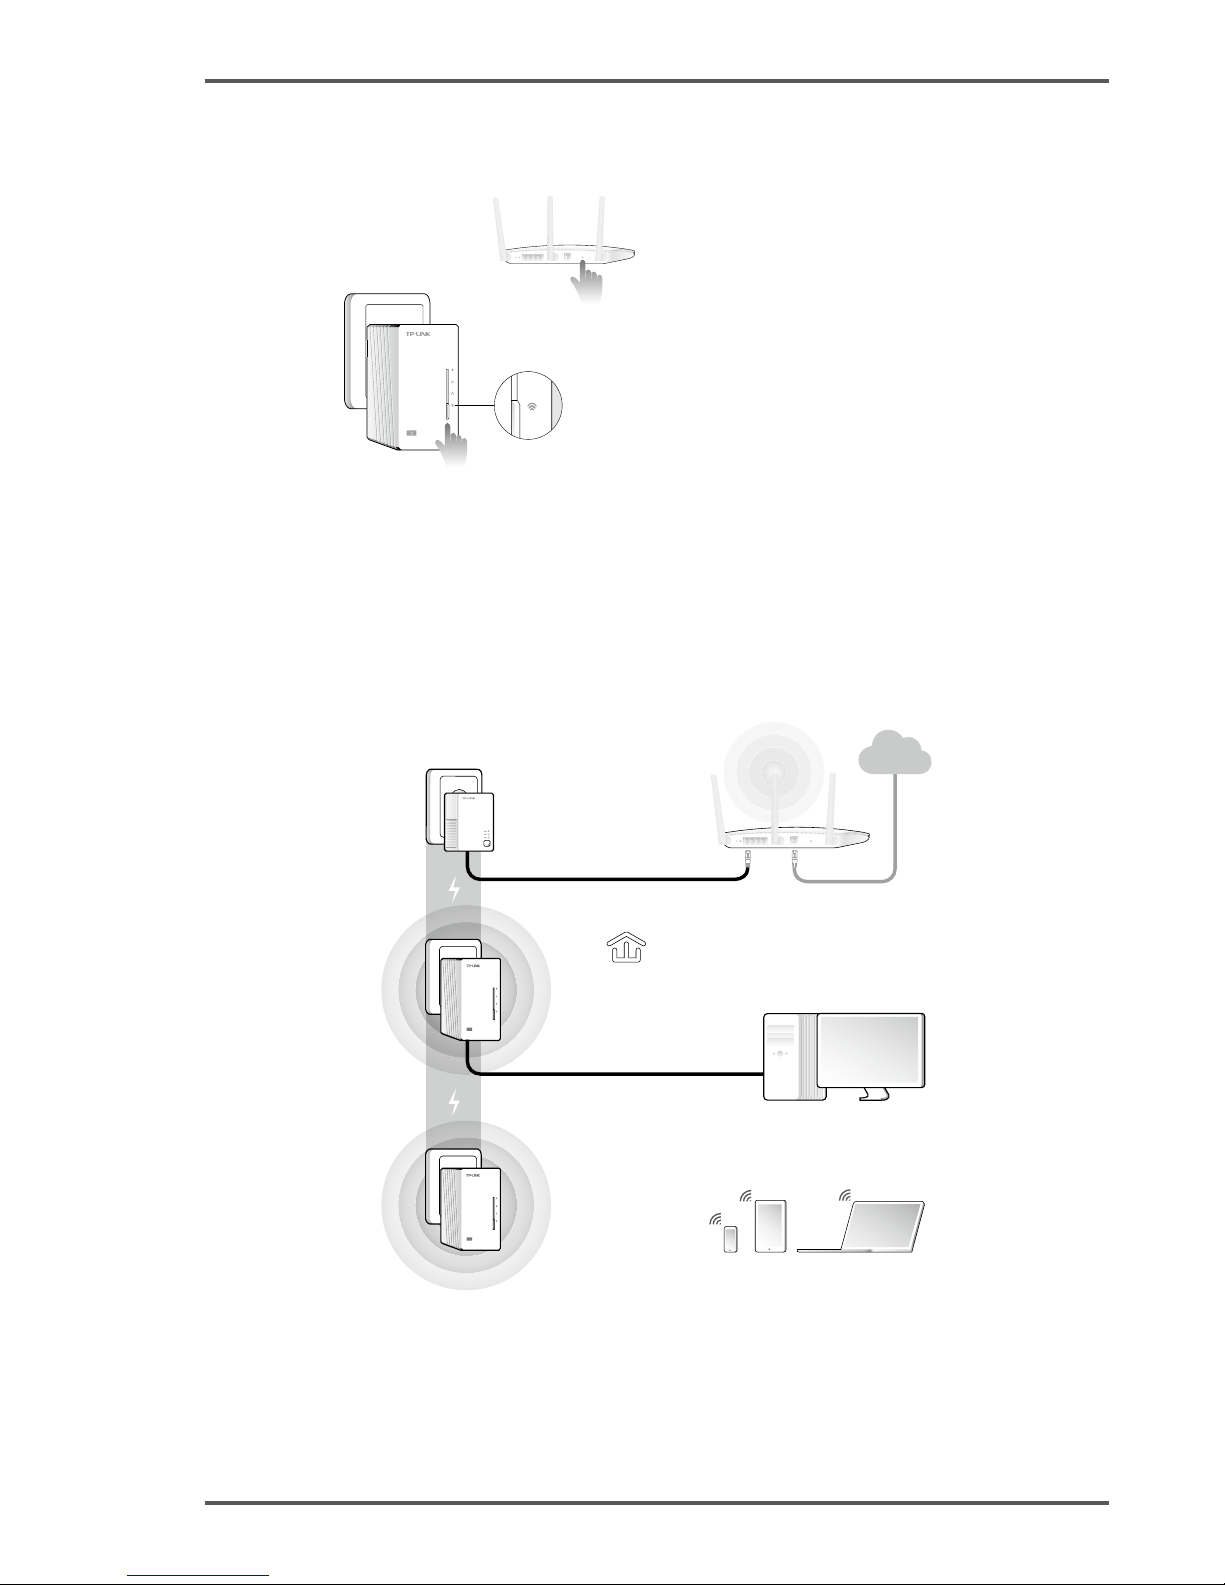
2� Press the WPS button on your router, and within 1 minute, press
the Wi-Fi Clone button on your TL-WPA4220�
AV500
Wireless Router
TL-WPA4220
• Blink every second after pressing
the Wi-Fi Clone button�
• Blink quickly within 1 minute when
Wi-Fi Clone is completed�
WPS
TL-WPA4220 will automatically copy the wireless network name and
password of the router when Wi-Fi clone is completed�
For another TL-WPA4220, follow step 1 and step 2 to complete Wi-Fi
Clone�
3� Connect your devices as follows�
AV500
AV500
LAN
Internet
WAN
SSID:
ABCDE
SSID:
ABCDE
SSID:
ABCDE
All the Powerline LEDs will
turn solid within 1 minute�
TL-PA4010
TL-WPA4220
TL-WPA4220
Enjoy! Use the router's SSID (ABCDE) and password to access the
Internet�
If the Powerline LEDs don’t turn solid, reset all the powerline devices, or
create a powerline network by referring to FAQ-Q1.
Page 15
14
English
Read this to install additional devices
1� Make sure the additional devices use factory default settings� If
not, please reset them�
2� If the additional devices have Wi-Fi Clone function, follow step 1
and 2 of Method 2 to install them� If not, skip this�
3� Plug them into the outlets and wait about 1 minute until their
Powerline LEDs turn solid�
AV500 AV500 AV500
Installation is completed when all the
Powerline LEDs turn solid�
Additional Device
TL-WPA4220TL-WPA4220
TL-PA4010
If the Powerline LEDs do not turn solid, please follow the instructions in
FAQ->Q1:
1� For the two devices connected before, use the Pair Button to create a
powerline network (Q1->A)� (Skip this step if you have already done this�)
2� For additional devices, use the Pair Button to join the existing powerline
network (Q1->B)�
Page 16

15
English
FAQ (Frequently Asked Questions)
Q1. How do I use the Pair button to create or join a powerline
network?
You can use the Pair button on only two devices at a time�
A. To create a powerline network
1� Press the Pair button on TL-WPA4220� The Power LED
will
blink�
2� Within 2 minutes, press the Pair button on TL-PA4010� The Power
LED
will blink�
3� In about 1 minute, all the Powerline LEDs
will turn solid�
B. To join an existing powerline network
1� Press the Pair button on a third powerline device� The Power LED
will blink�
2� Within 2 minutes, press the Pair button on either TL-WPA4220 or
TL-PA4010 you have paired� The Power LED
will blink�
3� In about 1 minute, all the Powerline LEDs
will turn solid�
Q2. How do I reset TL-WPA4220?
With TL-WPA4220 turned on, use a pin to press and hold the Reset
button for more than 5 seconds�
The Power LED
will be off momentarily before turning solid and the
Wi-Fi LED
will blink quickly� This indicates that the reset process is
completed�
Q3. How do I customize the wireless settings on the web
management page?
1� Find the utility on the provided CD (for Windows only) or download
it from our ofcial website.
2� Open the utility and click "Connect"�
3� Log in to the web management page using the default user name
and password (admin/admin)�
4� Congure the SSID and click "Save" on the "Wireless>Wireless
Settings" page�
Page 17

16
English
5� Configure the password and click "Save" on the "Wireless>
Wireless Security" page�
6� Click "click here" at the page bottom to reboot the extender�
Q4. What can I do if my computer can’t access the Internet after
it is connected to a powerline adapter/extender?
Check the following:
1� Connect your computer to the modem or router to test the Internet
connection�
2� Make sure the hardware connection is correct�
3� Make sure the Powerline LEDs light up on all of your adapters/
extenders� If not, create or join a powerline network by referring to
FAQ-Q1.
4� Make sure your computer is set to "Obtain an IP address
automatically"�
If your computer still can’t access the Internet after following
these steps, please contact our technical support�
For more information about the
advanced settings, please refer
to the User Guide�
Page 18
17
Español
Nota: El modelo de producto que se muestra en esta guía de
instalación rápida para los WiFi Powerline Extender Kit 3-pack es el
"TL-WPA4220T KIT" como ejemplo�
Indicadores LED
Power (Encendido)
On: El dispositivo está encendido
Off: El dispositivo está apagado
Parpadeando: El dispositivo se está emparejando
Powerline
On: El dispositivo está conectado a una red Powerline
Off: El dispositivo no está conectado a una red Powerline
Parpadeando: El dispositivo está transriendo datos
Ethernet
On: Al menos un dispositivo Ethernet está conectado
Off: El puerto Ethernet no está conectado
Wi-Fi
Off: La función inalámbrica está desconectada
Parpadeando rápidamente: La función inalámbrica está
conectada
Parpadeando cada segundo: El dispositivo está clonando
los ajustes inalámbricos del router
AV500
AV500
Wi-Fi/Botón de
clonado Wi-Fi
Botón
emparejar
Botón
RESET
Puertos
Ethernet
Page 19

18
Español
Una red powerline requiere al menos dos dispositivos Powerline�
Utilizamos el adaptador powerline TL-PA4010 como ejemplo para
trabajar con TL-WPA4220�
Nota: Si su casa u oficina ya cuenta con adaptadores Powerline,
retírelos primero, instale el TL-WPA4220 utilizando el método 1 o el
método 2; y luego añada los adaptadores existentes Powerline.
Para dispositivos Powerline sin paso de corriente
AV500 AV500
Para dispositivos Powerline con paso de corriente
Page 20

19
Español
Método 1: Plug and Play
Crear una nueva red inalámbrica
1� Escriba el nombre predeterminado de la red inalámbrica (SSID) y
la contraseña de TL-WPA4220�
Nombre de la red inalámbrica (SSID)*:
TP-LINK_XXXXXX
Contraseña de la red inalámbrica:
XXXXXXXX
* El SSID por defecto es TP-LINK_XXXXXX� (XXXXXX indica los últimos
seis caracteres de la dirección MAC de WLAN�)
2� Conecte sus dispositivos como se indica�
AV500
AV500
LAN
Internet
WAN
SSID:
ABCDE
SSID:
TP-LINK_xxxxxx
SSID:
TP-LINK_yyyyyy
Todos los LEDs se quedarán
jos en 1 minuto.
TL-PA4010
TL-WPA4220
TL-WPA4220
¡Disfrute! Utilice el SSID predeterminado (TP-LINK_xxxxxx o TP-
LINK_yyyyyy) y la contraseña que escribió para acceder a Internet�
Si los LED Powerline no se quedan jos, restablezca todos los dispositivos
Powerline o cree una red Powerline como se indica en FAQ-Q1.
Page 21
20
Español
Lea esto para instalar dispositivos adicionales
1� Asegúrese de que los dispositivos adicionales utilizan los ajustes
predeterminados de fábrica� Si no es así, por favor restáurelos�
2� Enchufelos en las tomas y espere aproximadamente 1 minuto
hasta que sus LEDs Powerline pasen a quedarse jos.
AV500 AV500 AV500
La instalación se completa cuando todos
los LED Powerline se quedan jos.
Dispositivo adicional
TL-WPA4220TL-WPA4220
TL-PA4010
Si los LED Powerline no se quedan jos, por favor siga las instrucciones de
la FAQ-> Q1:
1� Para los dos dispositivos conectados antes, utilice el botón Pair para
crear una red Powerline (Q1-> A)� (Omita este paso si ya ha hecho esto)
2� Para los dispositivos adicionales, utilice el botón Pair para unirse a la red
Powerline existente (Q1-> B)�
Método 2: Instalación mediante Clonado Wi-Fi
Extienda la red inalámbrica de su router
1� Enchufe el TL-WPA4220 en una toma de corriente cerca de su
router�
AV500
TL-WPA4220
Parpadeo rápido en
unos 15 segundos�
Router Inalámbrico
(con soporte WPS)
Page 22

21
Español
2� Presione el botón WPS en el router y en menos de 1 minuto,
pulse el botón Clone Wi-Fi en el TL-WPA4220�
AV500
Router Inalámbrico
TL-WPA4220
• Parpadeo cada segundo después
de presionar el botón Clone Wi-Fi�
• Parpadeo rápido en 1 minuto
cuando Wi-Fi Clone se completa�
WPS
TL-WPA4220 copiará automáticamente el nombre y la contraseña del router
cuando se complete el clonado Wi-Fi�
Para el otro TL-WPA4220, siga los pasos 1 y 2 para completar el
clonado Wi-Fi�
3� Conecte sus dispositivos de la siguiente manera�
AV500
AV500
LAN
Internet
WAN
SSID:
ABCDE
SSID:
ABCDE
SSID:
ABCDE
Todos los LEDs se quedarán
jos en 1 minuto.
TL-PA4010
TL-WPA4220
TL-WPA4220
¡Disfrute! Utilice el SSID (ABCDE) del router y la contraseña para
acceder a Internet�
Si los LED Powerline no se quedan jos, restablezca todos los dispositivos
Powerline o cree una red Powerline como se indica en FAQ-Q1.
Page 23
22
Español
Lea esto para instalar dispositivos adicionales
1� Asegúrese de que los dispositivos adicionales utilizan los ajustes
predeterminados de fábrica� Si no es así, por favor restáurelos�
2� Si los dispositivos adicionales tienen la función Clone Wi-Fi, siga
los pasos 1 y 2 del Método 2 para instalarlos. Si no es así, omita
este paso�
3� Enchufelos en las tomas y espere aproximadamente 1 minuto
hasta que sus LEDs Powerline pasen a quedarse jos.
AV500 AV500 AV500
La instalación se completa cuando todos
los LED Powerline se quedan jos.
Dispositivo adicional
TL-WPA4220TL-WPA4220
TL-PA4010
Si los LED Powerline no se quedan jos, por favor siga las instrucciones de
la FAQ-> Q1:
1� Para los dos dispositivos conectados antes, utilice el botón Pair para
crear una red Powerline (Q1-> A)� (Omita este paso si ya ha hecho esto)
2� Para los dispositivos adicionales, utilice el botón Pair para unirse a la red
Powerline existente (Q1-> B)�
Page 24

23
Español
FAQ (Ayuda)
Q1. ¿Cómo se utiliza el botón de PAIR (Emparejar) para crear o
unirse a una red Powerline?
Sólo se puede utilizar el botón de Pair en dos dispositivos a la vez.
A. Para crear una red Powerline
1� Presione el botón de Pair en el TL-WPA4220� El LED de
encendido
parpadeará�
2� Dentro de 2 minutos, pulse el botón de Pair en el TL-PA4010� El
LED de encendido
parpadeará�
3� En alrededor de 1 minuto, todos los LED Powerline
se
quedarán jos.
B. Para unirse a una red de línea eléctrica existente
1� Presione el botón de Pair en un tercer dispositivo Powerline� El
LED de encendido
parpadeará�
2� Dentro de 2 minutos, pulse el botón de Pair en cualquiera de los
dispositivos TL-WPA4220 o TL-PA4010 que ha emparejado� El
LED de encendido
parpadeará�
3� En alrededor de 1 minuto, todos los LED Powerline
se
quedarán jos.
Q2. ¿Cómo puedo restablecer el TL-WPA4220?
Con el TL-WPA4220 encendido, utilice un alfiler para pulsar y
mantener pulsado el botón de reinicio durante más de 5 segundos�
El LED de encendido
se apagará momentáneamente antes de
quedarse jo y el LED Wi-Fi
parpadeará rápidamente� Esto indica
que el proceso de restablecimiento se ha completado�
Q3. ¿Cómo puedo personalizar la conguración inalámbrica en
la página de administración web?
1� Busque la utilidad en el CD (sólo para Windows) o descárguela de
nuestra página web ocial.
2� Abra la utilidad y haga clic en Connect (Conectar)�
3� Inicie sesión en la página de administración Web con el nombre
Page 25

24
Español
predeterminado de usuario y contraseña (admin/admin)�
4� Configure el SSID y haga clic en Save (Guardar) en la
página Wireless > Wireless Settings (Red Inalámbrica >
Conguración)�
5� Configure la contraseña y haga clic en Save (Guardar) en la
página Wireless > Wireless Security (Red Inalámbrica >
Seguridad)�
6� Haga clic en click here (Clic Aquí) al final de la página para
reiniciar el extensor�
Q4. ¿Qué puedo hacer si mi ordenador no puede acceder
a Internet después de que esté conectado a un adaptador
powerline/extensor?
Compruebe lo siguiente:
1� Conecte el ordenador al módem o router para probar la conexión
a Internet�
2� Asegúrese de que la conexión de hardware es correcta�
3� Asegúrese de que los LED Powerline están encendidos en todos
sus adaptadores/extensores� Si no es así, cree o únase a una red
Powerline siguiendo la FAQ-Q1.
4� Asegúrese de que su equipo está congurado para "Obtener una
dirección IP automáticamente"�
Si su equipo aún no puede acceder a Internet después de seguir
estos pasos, póngase en contacto con nuestro soporte técnico.
Para obtener más información acerca
de configuraciones avanzadas, por
favor consulte la Guía del Usuario�
Page 26
25
Eλληνικά
Σημείωση: Το προϊόν που περιγράφεται ενδεικτικά σ' αυτόν τον
ΟΔΗΓΟ ΓΡΗΓΟΡΗΣ ΕΓΚΑΤΑΣΤΑΣΗΣ για WiFi Powerline Extender
Σετ 3 τεμαχίων είναι το "TL-WPA4220T KIT".
Ενδείξεις LED
Power
Αναμμένο: Η συσκευή είναι ενεργοποιημένη.
Σβηστό: Η συσκευή είναι απενεργοποιημένη.
Αναβοσβήνει: Η συσκευή συνδέεται.
Powerline
Αναμμένο: Η συσκευή είναι συνδεδεμένη σε δίκτυο powerline.
Σβηστό: Η συσκευή δεν είναι συνδεδεμένη σε δίκτυο
powerline�
Αναβοσβήνει: Η συσκευή μεταφέρει δεδομένα.
Ethernet
Αναμμένο: Είναι συνδεδεμένη τουλάχιστον μία θύρα Ethernet.
Σβηστό: Δεν είναι συνδεδεμένη καμία θύρα Ethernet.
Wi-Fi
Σβηστό: Η ασύρματη λειτουργία είναι απενεργοποιημένη.
Αναβοσβήνει γρήγορα: Η ασύρματη λειτουργία είναι
ενεργοποιημένη.
Αναβοσβήνει κάθε δευτερόλεπτο: Η συσκευή κλωνοποιεί
ρυθμίσεις Wi-Fi από κάποιο router.
AV500
AV500
Πλήκτρο Wi-Fi/Wi-Fi Clone
(Wi-Fi/ Κλωνοποίησης Wi-Fi)
Πλήκτρο Pair
(Σύνδεσης)
Πλήκτρο Reset
(Επαναφοράς)
Θύρες
Ethernet
Page 27
26
Eλληνικά
Ένα δίκτυο powerline χρειάζεται τουλάχιστον δύο συσκευές powerline
για να υφίσταται. Χρησιμοποιούμε ως παράδειγμα το powerline
adapter TL-PA4010 για σύνδεση με το TL-WPA4220.
Σημείωση: Αν το σπίτι ή το γραφείο σας διαθέτει ήδη powerline
adapters, αποσυνδέστε τα πρώτα, εγκαταστήστε το TL-WPA4220
χρησιμοποιώντας τη Μέθοδο 1 ή τη Μέθοδο 2, και στη συνέχεια
προσθέστε τα υφιστάμενα adapters στο δίκτυο powerline.
Για συσκευές powerline που δεν διαθέτουν πρίζα
AV500 AV500
Για συσκευές powerline που διαθέτουν πρίζα
Page 28
27
Eλληνικά
Μέθοδος 1: Plug and Play
Δημιουργία Νέου Ασύρματου Δικτύου
1� Σημειώστε το προεπιλεγμένο όνομα Ασύρματου δικτύου (SSID)
και τον κωδικό του TL-WPA4220.
Όνομα Ασύρματου Δικτύου (SSID)*:
TP-LINK_XXXXXX
Κωδικός Ασύρματου Δικτύου:
XXXXXXXX
* Το προεπιλεγμένο SSID είναι της μορφής TP-LINK_XXXXXX. (όπου
XXXXXX είναι οι έξι τελευταίοι αριθμοί της διεύθυνσης WLAN MAC).
2� Συνδέστε τις συσκευές σας ως ακολούθως.
AV500
AV500
LAN
Internet
WAN
SSID:
ABCDE
SSID:
TP-LINK_xxxxxx
SSID:
TP-LINK_yyyyyy
Όλες οι ενδείξεις LED Powerline θα
ανάψουν σταθερά εντός 1 λεπτού.
TL-PA4010
TL-WPA4220
TL-WPA4220
Απολαύστε! Χρησιμοποιήστε το προεπιλεγμένο SSID (TP-LINK_
xxxxxx ή TP-LINK_yyyyyy) και τον κωδικό που σημειώσατε
προηγουμένως, ώστε να έχετε πρόσβαση στο Internet.
Αν οι ενδείξεις LED Powerline δεν ανάψουν σταθερά, πραγματοποιήστε
επαναφορά (reset) όλων των συσκευών powerline ή δημιουργήστε ένα δίκτυο
powerline όπως αναφέρεται στην παράγραφο "Συχνές Ερωτήσεις" - Ε1.
Page 29
28
Eλληνικά
Διαβάστε παρακάτω για να προσθέσετε κι άλλες συσκευές
1� Βεβαιωθείτε ότι έχετε κάνει επαναφορά στις εργοστασιακές
ρυθμίσεις σε όλες τις άλλες συσκευές. Αν δεν το έχετε κάνει, σας
παρακαλούμε να το κάνετε τώρα.
2� Συνδέστε τις άλλες συσκευές σε πρίζες και περιμένετε περίπου 1
λεπτό μέχρι να ανάψουν σταθερά όλες οι ενδείξεις LED Powerline.
AV500 AV500 AV500
Η εγκατάσταση έχει ολοκληρωθεί και όλες οι ενδείξεις
LED Powerline θα ανάψουν σταθερά.
Άλλη Συσκευή
TL-WPA4220
TL-WPA4220
TL-PA4010
Αν οι ενδείξεις LED Powerline δεν ανάψουν σταθερά, ανατρέξτε στην
παράγραφο "Συχνές Ερωτήσεις" - Ε1.:
1� Για τις δύο προηγούμενα συνδεδεμένες συσκευές, χρησιμοποιήστε το
πλήκτρο Pair για να δημιουργήσετε δίκτυο powerline (Ε1->A). (Αν το
έχετε κάνει ήδη, παραλείψτε αυτό το βήμα).
2� Για άλλες συσκευές, χρησιμοποιήστε το πλήκτρο Pair (Σύνδεση) για να
τις συνδέσετε στο υφιστάμενο δίκτυο powerline (Ε1->B)�
Μέθοδος 2: Εγκατάσταση μέσω Wi-Fi Clone
(Κλωνοποίηση Wi-Fi)
Επέκταση του Ασύρματου Δικτύου του Router σας
1� Συνδέστε το TL-WPA4220 σε κάποια πρίζα ρεύματος που
βρίσκεται κοντά στο router σας.
AV500
TL-WPA4220
Αναβοσβήνει γρήγορα για
περίπου 15 δευτερόλεπτα.
Ασύρματο Router (που
υποστηρίζει WPS )
Page 30
29
Eλληνικά
2� Πιέστε το πλήκτρο WPS στο router σας, περιμένετε περίπου 1
λεπτό και πιέστε το πλήκτρο Wi-Fi Clone στο TL-WPA4220.
AV500
Ασύρματο
Router
TL-WPA4220
• Αναβοσβήνει κάθε δευτερόλεπτο αφού πιέσετε το
πλήκτρο Wi-Fi Clone.
• Αναβοσβήνει γρήγορα για 1 λεπτό αφού ολοκληρωθεί
η διαδικασία Wi-Fi Clone (Κλωνοποίηση Wi-Fi).
WPS
Το TL-WPA4220 θα αντιγράψει αυτόματα το όνομα του ασύρματου δικτύου
και τον κωδικό του Router αφού ολοκληρωθεί η διαδικασία Wi-Fi clone
(Κλωνοποίηση Wi-Fi).
Για άλλο TL-WPA4220, ακολουθήστε το βήμα 1 και το βήμα 2 για να
ολοκληρώσετε τη διαδικασία Wi-FI Clone (Κλωνοποίηση Wi-FI).
3� Συνδέστε τις συσκευές σας ως ακολούθως.
AV500
AV500
LAN
Internet
WAN
SSID:
ABCDE
SSID:
ABCDE
SSID:
ABCDE
Όλες οι ενδείξεις LED Powerline θα
ανάψουν σταθερά εντός 1 λεπτού.
TL-PA4010
TL-WPA4220
TL-WPA4220
Απολαύστε! Χρησιμοποιήστε το Όνομα Ασύρματου Δικτύου (SSID)
του Router (ABCDE) και τον κωδικό, για πρόσβαση στο Internet.
Αν οι ενδείξεις LED Powerline δεν ανάψουν σταθερά, πραγματοποιήστε
επαναφορά (reset) όλων των συσκευών powerline ή δημιουργήστε ένα δίκτυο
powerline όπως αναφέρεται στην παράγραφο "Συχνές Ερωτήσεις" - Ε1.
Page 31

30
Eλληνικά
Διαβάστε παρακάτω για να προσθέσετε κι άλλες συσκευές
1� Βεβαιωθείτε ότι έχετε κάνει επαναφορά στις εργοστασιακές
ρυθμίσεις σε όλες τις άλλες συσκευές. Αν δεν το έχετε κάνει, σας
παρακαλούμε να το κάνετε τώρα.
2� Αν οι άλλες συσκευές διαθέτουν λειτουργία Wi-Fi Clone,
ακολουθήστε το βήμα 1 και 2 της Μεθόδου 2 για εγκατάσταση. Σε
διαφορετική περίπτωση, παραλείψτε το.
3� Συνδέστε τις άλλες συσκευές σε πρίζες και περιμένετε περίπου 1
λεπτό μέχρι να ανάψουν σταθερά όλες οι ενδείξεις LED Powerline
που διαθέτουν.
AV500 AV500 AV500
Η εγκατάσταση έχει ολοκληρωθεί και όλες οι ενδείξεις
LED Powerline θα ανάψουν σταθερά.
Άλλη Συσκευή
TL-WPA4220
TL-WPA4220
TL-PA4010
Αν οι ενδείξεις LED Powerline δεν ανάψουν σταθερά, ανατρέξτε στην
παράγραφο "Συχνές Ερωτήσεις" - Ε1.:
1� Για τις δύο προηγούμενα συνδεδεμένες συσκευές, χρησιμοποιήστε το
πλήκτρο Pair για να δημιουργήσετε δίκτυο powerline (Ε1->A). (Αν το
έχετε κάνει ήδη, παραλείψτε αυτό το βήμα).
2� Για άλλες συσκευές, χρησιμοποιήστε το πλήκτρο Pair (Σύνδεση) για να
τις συνδέσετε στο υφιστάμενο δίκτυο powerline (Ε1->B)�
Page 32

31
Eλληνικά
Συχνές Ερωτήσεις
Ε1. Πώς μπορώ να χρησιμοποιήσω το πλήκτρο Pair (Σύνδεσης)
για να δημιουργήσω δίκτυο powerline ή για να προσθέσω
συσκευές;
Μπορείτε να χρησιμοποιήσετε το πλήκτρο Pair (Σύνδεσης) μόνο σε
δύο συσκευές τη φορά.
A. Για να δημιουργήσετε δίκτυο powerline
1� Πιέστε το πλήκτρο Pair (Σύνδεσης) στο TL-WPA4220. Το Power
LED
θα αναβοσβήσει.
2� Εντός 2 λεπτών, πιέστε το πλήκτρο Pair (Σύνδεσης) στο TL-
PA4010. Το Power LED
θα αναβοσβήσει.
3� Εντός 1 λεπτού περίπου, όλες οι ενδείξεις LED Powerline
θα
είναι σταθερά αναμμένες.
B. Για προσθήκη συσκευής σε υπάρχον δίκτυο powerline
1� Πιέστε το πλήκτρο Pair (Σύνδεσης) σε κάποια τρίτη συσκευή
powerline. Το Power LED
θα αναβοσβήσει.
2� Εντός 2 λεπτών, πιέστε το πλήκτρο Pair (Σύνδεσης) στο TL-
WPA4220 ή στο TL-PA4010. Το Power LED
θα αναβοσβήσει.
3� Εντός 1 λεπτού περίπου, όλες οι ενδείξεις LED Powerline
θα
είναι σταθερά αναμμένες.
Ε2. Πώς μπορώ να κάνω επαναφορά του TL-WPA4220 στις
εργοστασιακές ρυθμίσεις;
Με το TL-WPA4220 ενεργοποιημένο, χρησιμοποιήστε έναν ισιωμένο
συνδετήρα για να πιέσετε και να κρατήσετε πατημένο το πλήκτρο
Reset (Επαναφοράς) για περισσότερα από 5 δευτερόλεπτα.
Το Power LED
θα σβήσει για λίγο πριν ανάψει σταθερά με πράσινο
χρώμα και το Wi-Fi LED
θα αναβοσβήνει με γρήγορο ρυθμό. Αυτό
δείχνει ότι η διαδικασία επαναφοράς ήταν επιτυχής.
Ε3. Πώς μπορώ να προσαρμόσω τις ρυθμίσεις Ασύρματου
δικτύου μέσω της ιστοσελίδας διαχείρισης;
1� Βρείτε την εφαρμογή (Utility) που υπάρχει στο παρεχόμενο CD
(μόνο για Windows) ή κατεβάστε την από την επίσημη ιστοσελίδα
μας.
Page 33

32
Eλληνικά
2� Ανοίξτε την εφαρμογή και πιέστε ‘Connect‘ (Σύνδεση)�
3� Μπείτε στην ιστοσελίδα διαχείρισης χρησιμοποιώντας το
εργοστασιακό user name (όνομα χρήστη) και password (κωδικό):
admin/admin�
4� Ρυθμίστε το SSID (Όνομα Ασύρματου Δικτύου) και πιέστε ‘Save’
(Αποθήκευση), στη σελίδα ‘Wireless (Ασύρματο)>Wireless
Settings (Ρυθμίσεις Ασύρματου Δικτύου)’�
5� Ρυθμίστε τον κωδικό και πιέστε ‘Save’ (Αποθήκευση) στη
σελίδα ‘Wireless (Ασύρματο)> Wireless Security (Ασφάλεια
Ασύρματου Δικτύου)’�
6� Πιέστε ‘click here’ (πιέστε εδώ) στο κάτω μέρος της σελίδας για
να επανεκκινήσετε τη συσκευή.
Ε4. Τι μπορώ να κάνω αν ο υπολογιστής μου δεν έχει
πρόσβαση στο Internet ενώ τον έχω συνδέσει σε powerline
adapter/extender;
Ελέγξτε τα εξής:
1� Συνδέστε τον υπολογιστή σας απευθείας στο modem ή στο router
σας για να ελέγξετε αν λειτουργεί η σύνδεση Internet.
2� Βεβαιωθείτε ότι οι συνδέσεις έχουν πραγματοποιηθεί σωστά.
3� Βεβαιωθείτε ότι τα LED Powerline είναι όλα αναμμένα
στους adapters/extenders. Αν δεν είναι, δημιουργήστε ή
πραγματοποιήστε σύνδεση σε δίκτυο powerline, όπως
περιγράφεται στην ενότητα "Συχνές Ερωτήσεις" - Ε1.
4� Βεβαιωθείτε ότι έχετε κάνει την επιλογή ‘Αυτόματη απόδοση
διεύθυνσης IP’ στον υπολογιστή σας.
Αν και πάλι δεν μπορείτε να έχετε πρόσβαση στο Internet ενώ
πραγματοποιήσατε όλα τα παραπάνω βήματα, επικοινωνήστε με την
τεχνική υποστήριξη της εταιρείας μας.
Για περισσότερες πληροφορίες σχετικά
με πιο σύνθετες ρυθμίσεις, ανατρέξτε
στις αναλυτικές Οδηγίες Χρήσης.
Page 34

33
Français
Remarque : Ce guide pour Kit de 3 adaptateurs CPL AV500 Wi-Fi
utilise le TL-WPA4220T KIT en exemple
Indicateurs DELs
Power (Alimentation)
Allumé : L'appareil est sous tension
Eteint : L'appareil est hors tension
Clignote : L'appareil est en cours d'appairage
Powerline (CPL)
Allumé : L'appareil est connecté à un réseau CPL
Eteint : L'appareil n'est pas connecté à un réseau CPL
Clignote : L'appareil transfère des données
Ethernet
Allumé : L'un au moins des ports Ethernet de l'appareil est
connecté
Eteint : Aucun des ports Ethernet de l'appareil n'est connecté
Wi-Fi
Eteint : La fonction Wi-Fi est désactivée
Clignote rapidement : La fonction Wi-Fi est active
Clignote lentement (1 fois par seconde) : L'appareil est en
train de recopier les paramètres Wi-Fi d'un routeur
AV500
AV500
Bouton Wi-Fi Clone Bouton
Pair
Bouton
Reset
Ports
Ethernet
Page 35

34
Français
Un réseau CPL requiert au moins deux adaptateurs CPL. Dans les
exemples ci-après le TL-PA4010 sera utilisé pour former un réseau
CPL avec le TL-WPA4220�
Remarque : Si votre domicile ou votre bureau utilisent déjà un réseau
CPL, débranchez tous les adaptateurs CPL existants, procéder à la
conguration du TL-WPA4220 selon la méthode 1 ou la méthode 2,
ajouter ensuite tous les adaptateurs CPL au réseau CPL.
Pour les adaptateurs CPL dépourvus de prise gigogne
AV500 AV500
Pour les adaptateurs CPL pourvus de prise gigogne
Page 36

35
Français
Méthode 1: Branchez et Utilisez
Créer un nouveau réseau Wi-Fi
1� Noter les nom de réseau Wi-Fi (SSID) et mot de passe par défaut
du TL-WPA4220�
Nom de réseau Wi-Fi (SSID)*:
TP-LINK_XXXXXX
Mot de passe :
XXXXXXXX
* Le SSID par défaut est TP-LINK_XXXXXX. (XXXXXX correspond aux six
derniers caractères de l'adresse MAC Wi-Fi du TL-WPA4220)
2� Branchez vos appareils comme suit.
AV500
AV500
LAN
Internet
WAN
SSID:
ABCDE
SSID:
TP-LINK_xxxxxx
SSID:
TP-LINK_yyyyyy
Toutes les DEL CPL vont
s'allumer dans la minute
TL-PA4010
TL-WPA4220
TL-WPA4220
Protez ! Utilisez le SSID (TP-LINK_xxxxxx or TP-LINK_yyyyyy) et
le mot de passe que vous avez noté pour accéder à internet.
Si les DELs CPL ne s'allument pas, réinitialisez tous les appareils CPL ou
créez un réseau CPL en vous référant à la FAQ-01.
Page 37

36
Français
Lire ce qui suit pour ajouter d'autres adaptateurs CPL
1� Assurez vous que les autres adaptateurs utilisent les réglages
d'usine, à défaut réinitialisez les.
2� Branchez les dans des prises électriques puis patientez le temps
nécessaire à l'allumage des DELs CPL (soit environ 1 minute).
AV500 AV500 AV500
L'installation est terminée quand toutes
les DELs CPL sont allumées
Adaptateur additionnel
TL-WPA4220TL-WPA4220
TL-PA4010
Si la DEL CPL n'est pas allumée, merci de suivre les instructions suivantes
dans la FAQ -> Q1 :
1� Pour les deux adaptateurs connectés précédemment, utiliser le bouton
Pair pour créer un réseau CPL (Q1 -> A). (Sauter cette étape si vous l'avez
déjà fait)
2� Pour des adaptateurs additionnels, utiliser le bouton Pair pour rejoindre
le réseau CPL (Q1 -> B)
Méthode 2: Setup via clonage Wi-Fi
Etendre la couverture Wi-Fi du routeur
1� brancher le TP-WPA4220 à proximité de votre routeur
AV500
TL-WPA4220
Clignote rapidement
après 15s environ
Routeur sans l
(supportant WPS)
Page 38

37
Français
2� Appuyer sur le bouton WPS de votre routeur et dans la minute
appuyer sur le bouton de clonage Wi-Fi du TL-WPA4220�
AV500
Routeur Wi-Fi
TL-WPA4220
• Clignote lentement (1 fois par seconde)
après l'appui du bouton de clonage Wi-Fi
• Clignote rapidement après une minute
quand le Clonage Wi-Fi est achevé.
WPS
Le TL-WPA4220 va recopier automatiquement le nom du réseau Wi-Fi et son
mot de passe depuis le routeur source quand le clonage Wi-Fi est initié et réussi.
Pour reproduire le clonage sur un autre TL-WPA4220 reprendre
depuis l'étape 1 de la méthode
3� Connecter vos appareils comme suit �
AV500
AV500
LAN
Internet
WAN
SSID:
ABCDE
SSID:
ABCDE
SSID:
ABCDE
Toutes les DEL CPL vont
s'allumer dans la minute
TL-PA4010
TL-WPA4220
TL-WPA4220
Protez ! Utiliser le SSID (ABCDE) et le mot de passe du routeur
source pour accéder à internet.
Si les DELs CPL ne s'allument pas, réinitialisez tous les appareils CPL ou
créez un réseau CPL en vous référant à la FAQ-01.
Page 39

38
Français
Lire ce qui suit pour ajouter d'autres adaptateurs CPL
1� Assurez vous que les autres adaptateurs utilisent les réglages
d'usine, à défaut réinitialisez les.
2� Si les appareils additionnels sont pourvus d'un bouton de clonage
Wi-Fi suivre les étapes 1 et 2 de la méthode 2 pour les installer
sinon passez directement à l'étape 3 ci-après.
3� Branchez les dans des prises électriques puis patientez 1 minute
soit le temps nécessaire à l'allumage des DELs CPL.
AV500 AV500 AV500
L'installation est terminée quand toutes
les DELs CPL sont allumées
Adaptateur additionnel
TL-WPA4220TL-WPA4220
TL-PA4010
Si la DEL CPL n'est pas allumée, merci de suivre les instructions suivantes
dans la FAQ -> Q1 :
1� Pour les deux adaptateurs connectés précédemment, utiliser le bouton
Pair pour créer un réseau CPL (Q1 -> A). (Sauter cette étape si vous l'avez
déjà fait)
2� Pour des adaptateurs additionnels, utiliser le bouton Pair pour rejoindre
le réseau CPL (Q1 -> B)
Page 40

39
Français
FAQ (Questions fréquentes)
Q1. Comment dois-je utiliser le bouton Pair pour créer ou
rejoindre un réseau CPL ?
Vous pouvez utiliser le bouton Pair sur deux appareils maximum à la
fois
A. Pour créer un réseau CPL
1� Appuyer brièvement sur le bouton Pair du TL-WPA4220� la DEL
d'alimentation
va clignoter
2� Dans les 2 minutes, appuyer sur le bouton Pair du TL-PA4010� la
DEL d'alimentation
va clignoter
3� En 1 minute environ, toutes les DELs CPL
vont s'allumer�
B. Pour rejoindre un réseau CPL existant
1� Presser le bouton Pair d'un troisième adaptateur CPL, la DEL
d'alimentation
va clignoter�
2� Dans les 2 minutes, appuyer sur le bouton Pair du TL-PA4010
ou du TL-WPA4220 déjà appairé, la DEL d'alimentation
va
clignoter�
3� En 1 minute environ, toutes les DELs CPL
vont s'allumer�
Q2. Comment réinitialiser le TL-WPA4220
Le TL-WPA4220 étant sous tension, maintenir appuyé le bouton
Reset pendant plus de 5s�
La DEL d'alimentation
va s'éteindre brièvement avant de s'allumer
à nouveau et la DEL Wi-Fi
va se mettre à clignoter rapidement.
Cela indiquera que le processus de reset est achevé.
Q3. Comment dénir manuellement les paramètres Wi-Fi depuis
l'interface d'administration WEB. ?
1� Utiliser l'utilitaire Windows fourni sur le CD ou téléchargez le
depuis notre site�
2� Exécuter l'utilitaire puis cliquer sur 'Connect' (Connecter)�
3� Authentiez vous sur la page d'administration WEB avec le nom et
Page 41

40
Français
le mot de passe par défaut : admin (en minuscules)
4� Congurer le SSID et cliquer sur Sauvegarder dans la page:
‘Wireless>Wireless Settings' (Wi-Fi>Paramètres Wi-Fi)
5� Congurer le mot de passe et cliquer sur 'Save' (Sauvegarder)
dans la page:
‘Wireless>Wireless Security' (Wi-Fi>Sécurité Wi-Fi)
6� Cliquer sur 'click here' (Cliquer ici) en bas de page pour
redémarrer l'extenseur
Q4.Que puis-je faire si mon ordinateur ne peut accéder à internet
une fois connecté à un adaptateur ou un extenseur CPL.
Vérier les points suivants :
1� Connecter votre ordinateur au modem ou au routeur pour tester la
connexion internet�
2� Assurez vous que les branchements sont corrects.
3� Assurez vous que les DELs CPL sont allumées sur tous les
adaptateurs/extenseurs CPL. Sinon créez ou rejoignez un réseau
CPL en vous référant à la Q1 de la FAQ.
4� Assurez vous que votre ordinateur est conguré pour obtenir une
adresse IP automatiquement�
si votre ordinateur ne peut toujours pas accéder à internet après avoir
suivi ces étapes, merci de contacter notre support technique.
Pour plus d'informations a propos
des réglages avancés, merci de
vous référer au mode d'emploi.
Page 42

41
Italiano
Nota: la presente Guida d’Installazione Rapida per WiFi Powerline
Extender 3-pezzi Kit riporta, a titolo esemplicativo, “TL-WPA4220T KIT”.
Descrizione LED
Power
Acceso: Il dispositivo è acceso�
Spento: Il dispositivo è spento�
Lampeggiante: Il dispositivo si sta allineando�
Powerline
Acceso: Il dispositivo è connesso ad una rete powerline�
Spento: Il dispositivo non è connesso ad una rete powerline�
Lampeggiante: Il dispositivo sta trasferendo dati�
Ethernet
Acceso: Almeno un dispositivo connesso alla porta Ethernet�
Spento: Nessun dispositivo connesso alla porta Ethernet�
Wi-Fi
Spento: La funzione wireless è disabilitata.
Lampeggio frequente: La funzione wireless è abilitata.
Lampeggio ogni secondo: Il dispositivo sta clonando le
impostazioni Wi-Fi da un router.
AV500
AV500
Tasto Wi-Fi/Wi-Fi
Clone
Pulsante
Pair
Pulsante
Reset
Porte
Ethernet
Page 43

42
Italiano
Una rete powerline richiede almeno 2 dispositivi powerline� Trovate
qui riportati come esempio i dispositivi powerline TL-PA4010 e TLWPA4220�
Nota: Se i vostri casa o ufficio hanno già installati dispositivi
powerline, rimuoveteli, installate TL-WPA4220 usando il Metodo 1
o il Metodo 2, quindi aggiungete i dispositivi powerline già in vostro
possesso alla rete powerline�
Per dispositivi powerline non passthrough
AV500 AV500
Per dispositivi powerline passthrough
Page 44

43
Italiano
Metodo 1: Plug and Play
Create una Nuova Rete Wireless
1� Annotate il nome della rete wireless (SSID) e la password di
default del TL-WPA4220�
Nome Rete Wireless (SSID)*:
TP-LINK_XXXXXX
Password Wireless:
XXXXXXXX
* La SSID di default è TP-LINK_XXXXXX� (XXXXXX indica gli ultimi 6
caratteri dell'indirizzo MAC WLAN)
2� Connettete i vostri dispositivi come segue�
AV500
AV500
LAN
Internet
WAN
SSID:
ABCDE
SSID:
TP-LINK_xxxxxx
SSID:
TP-LINK_yyyyyy
Tutti i LED Powerline devono diventare
accesi ssi entro 1 minuto.
TL-PA4010
TL-WPA4220
TL-WPA4220
Fatto! Usate SSID (TP-LINK_xxxxxx o TP-LINK_yyyyyy) e password
di default che avete precedentemente annotato per accedere a Internet�
Se i LED Powerline non si accendono fissi, resettate tutti i dispositivi
powerline oppure create una rete powerline guardando la FAQ-Q1.
Page 45

44
Italiano
Leggete con attenzione per installare dispositivi aggiuntivi
1� Assicuratevi che i dispositivi powerline addizionali utilizzino le
impostazioni di fabbrica, altrimenti resettateli.
2� Inseriteli nelle prese elettriche a muro e attendete circa 1 minuto
nchè il LED powerline diventa acceso sso.
AV500 AV500 AV500
L'installazione è completata quando tutti
i LED Powerline sono accesi ssi.
Dispositivo aggiuntivo
TL-WPA4220TL-WPA4220
TL-PA4010
Se i LED Powerline non sono accesi ssi, seguite le istruzioni riportate in
FAQ->Q1:
1� Per i 2 dispositivi powerline già connessi usate il Tasto Pair per creare
una rete powerline (Q1->A) (Saltate questo passaggio se lo avete già
effettuato)�
2� Per dispositivi powerline aggiuntivi usate il Tasto Pair per aggiungerli alla
rete powerline esistente (Q1->B)�
Metodo 2: Impostazione tramite Wi-Fi Clone
Estendete la copertura wireless del Router
1� Inserite il TL-WPA4220 in una presa elettrica a muro vicino al
vostro router�
AV500
TL-WPA4220
Lampeggia velocemente
per circa 15 secondi�
Router Wireless (che
supporta WPS )
Page 46

45
Italiano
2� Premete il tasto WPS sul vostro router e, entro 1 minuto, premete
il tasto Wi-Fi Clone del vostro TL-WPA4220�
AV500
Router Wireless
TL-WPA4220
• Lampeggia ogni secondo dopo che è stato
premuto il tasto Wi-Fi Clone�
• Lampeggia velocemente per 1 minuto
quando la fase di Wi-Fi Clone è completata�
WPS
TL-WPA4220 copierà automaticamente il nome della rete wireless e la
password del router quando la fase di Wi-Fi clone sarà completata.
Per l'altro TL-WPA4220 seguite i passaggi 1 e 2 per completare il WiFi Clone�
3� Connettete i vostri dispositivi come segue�
AV500
AV500
LAN
Internet
WAN
SSID:
ABCDE
SSID:
ABCDE
SSID:
ABCDE
Tutti i LED Powerline devono diventare
accesi ssi entro 1 minuto.
TL-PA4010
TL-WPA4220
TL-WPA4220
Fatto! Usate SSID (ABCDE) e password del router per accedere a
Internet�
Se i LED Powerline non si accendono fissi, resettate tutti i dispositivi
powerline oppure create una rete powerline guardando la FAQ-Q1.
Page 47

46
Italiano
Leggete con attenzione per installare dispositivi aggiuntivi
1� Assicuratevi che i dispositivi powerline addizionali utilizzino le
impostazioni di fabbrica, altrimenti resettateli.
2� Se i dispositivi aggiuntivi hanno la funzione Wi-Fi Clone, seguite
i passaggi 1 e 2 del Metodo 2 per installarli� Altrimenti saltate
questo passaggio�
3� Inseriteli nelle prese elettriche a muro e attendete circa 1 minuto
nchè il LED powerline diventa acceso sso.
AV500 AV500 AV500
L'installazione è completata quando tutti
i LED Powerline sono accesi ssi.
Dispositivo aggiuntivo
TL-WPA4220TL-WPA4220
TL-PA4010
Se i LED Powerline non sono accesi ssi, seguite le istruzioni riportate in
FAQ->Q1:
1� Per i 2 dispositivi powerline già connessi usate il Tasto Pair per creare
una rete powerline (Q1->A) (Saltate questo passaggio se lo avete già
effettuato)�
2� Per dispositivi powerline aggiuntivi usate il Tasto Pair per aggiungerli alla
rete powerline esistente (Q1->B)�
Page 48

47
Italiano
FAQ (Domande Frequenti)
Q1. Come si usa il tasto Pair per creare o ampliare una rete
powerline ?
Potete usare il tasto Pair solo con 2 dispositivi powerline per volta�
A. Create una rete powerline
1� Premete il tasto Pair sul TL-WPA4220� Il LED Power
lampeggerà.
2� Premete entro 2 minuti il tasto Pair del TL-PA4010� Il LED Power
lampeggerà.
3� In circa 1 minuto, tutti i LED
Powerline diventeranno accesi
ssi.
B. Ampliate una rete powerline esistente
1� Premete il tasto Pair di un terzo dispositivo powerline. Il LED
Power
lampeggerà.
2� Premete entro 2 minuti i tasti Pair del TL-PA4010 e del TL-
WPA4220� I LED Power
lampeggeranno�
3� In circa 1 minuto, tutti i LED
Powerline diventeranno accesi
ssi.
Q2. Come si resetta TL-WPA4220?
Con TL-WPA4220 acceso, usate una punta metallica per premere il
tasto Reset per almeno 5 secondi�
Il LED Power
si spegnerà momentaneamente prima di diventare
sso e il LED Wi-Fi
lampeggerà velocemente. Ciò indica che il
processo di reset è stato completato�
Q3. Come posso personalizzare le impostazioni wireless nella
pagina di gestione web ?
1� Trovate la utility nel CD TP-Link (solo per Windows) o scaricatela
dal sito TP-Link�
2� Aprite la utility e fate clic su ‘Connect‘�
3� Accedete alla pagina di gestione web usando user name e
password di default (admin/admin)�
Page 49

48
Italiano
4� Configurate lo SSID e fate clic su ‘Save’ nella pagina
‘Wireless>Wireless Settings’�
5� Configurate la password e fate clic su ‘Save’ nella pagina
‘Wireless>Wireless Security’�
6� Fate clic su ‘click here’ al fondo della pagina per riavviare il
powerline�
Q4. Cosa posso fare se il mio computer non può accedere a
Internet dopo che si è connesso ad un powerline ?
Seguite i seguenti passaggi:
1� Collegate il vostro computer al modem/router per verificare la
connessione Internet�
2� Assicuratevi che la connessione hardware sia corretta�
3� Assicuratevi che i LED Powerline siano accesi in tutti i dispositivi
powerline, altrimenti create o ampliate la rete powerline guardando
la FAQ-Q1.
4� Assicuratevi che il vostro computer sia impostato su ‘Ottieni
automaticamente un indirizzo IP’.
Se il vostro computer non riesce ad accedere ad Internet dopo tutti
questi passaggi, contattate il supporto tecnico TP-Link�
Per maggiori informazioni riguardo
le impostazioni avanzate, visionate
la Guida Utente�
Page 50

49
Português
Nota: o modelo de produto apresentado neste GIR como exemplo de
WiFi Powerline Extender 3-pack Kit é o “TL-WPA4220T KIT”.
Indicadores LED
Ligar/Desligar
On: O dispositivo está ligado�
Off: O dispositivo está desligado�
A piscar: O dispositivo está a emparelhar�
Powerline
On: O dispositivo está ligado a uma rede powerline�
Off: O dispositivo não está ligado a qualquer rede powerline�
A piscar: O dispositivo está a transferir dados�
Ethernet
On: Pelo menos uma porta Ethernet está ligada�
Off: Nenhuma porta Ethernet está ligada�
Wi-Fi
Off: A função wireless está desactivada�
A piscar rapidamente: A função wireless está ligada�
A piscar a cada segundo: O dispositivo está a clonar os
parâmetros Wi-Fi do router�
AV500
AV500
Botão de Clonagem
Wi-Fi/Wi-Fi
Botão de
Emparelhamento
Botão
Reset
Portas
Ethernet
Page 51

50
Português
Uma rede powerline exige pelo menos dois dispositivos powerline�
Aqui usamos o adaptador powerline TL-PA4010 como um exemplo
para operar com o TL-WPA4220�
Nota: Se a sua casa ou escritório já possui adaptadores powerline ,
remova-os primeiro, instale o TL-WPA4220 usando os Métodos 1 ou 2,
e depois adicione os seus actuais adaptadores à rede powerline.
Para um dispositivo powerline não-passthrough
AV500 AV500
Para um dispositivo powerline passthrough
Page 52

51
Português
Método 1: "Plug and Play"
Criar uma Nova Rede Wireless
1� Aponte o nome da rede (SSID) e a password por defeito do TL-
WPA4220�
Nome da Rede Wireless (SSID)*:
TP-LINK_XXXXXX
Password Wireless:
XXXXXXXX
* O SSID por defeito é TP-LINK_XXXXXX. (XXXXXX indica os seis últimos
caracteres únicos do endereço WLAN MAC�) �
2� Ligue os seus dispositivos da seguinte maneira:
AV500
AV500
LAN
Internet
WAN
SSID:
ABCDE
SSID:
TP-LINK_xxxxxx
SSID:
TP-LINK_yyyyyy
Todas as LEDs do Powerline carão
xas cerca de 1 minuto.
TL-PA4010
TL-WPA4220
TL-WPA4220
Desfrute! Use o SSID (TP-LINK_xxxxxx or TP-LINK_yyyyyy) e
password por defeito que apontou antes para aceder à Internet.
Se os LEDs do Powerline não carem xos, reinicie todos os dispositivos powerline,
ou crie uma nova rede powerline - para tal consulte documento FAQ-Q1.
Page 53

52
Português
Leia para saber instalar dispositivos adicionais
1� Certique-se que os dispositivos adicionais usam os parâmetros
de fábrica� Caso contrário, faça reset a cada um deles�
2� Ligue-os às tomadas e espere cerca de 1 minuto até que os seus
LEDs Powerline quem xos.
AV500 AV500 AV500
A intalação está concluída quando todos
os LEDs Powerline carem xos.
Dispositivo Adicional
TL-WPA4220TL-WPA4220
TL-PA4010
Se os LEDs Powerline não ficarem fixos, consulte as instuções no
documento FAQ->Q1:
1� Para os dois dispositivos ligados antes, use o Botão Emparelhar para
criar uma rede powerline (Q1->A). (Ignore este passo se já fez esta
operação�)
2� Para dispositivos adicionais, use o Botão Emparelhar para os juntar à
rede powerline existente (Q1->B)�
Método 2: Instalação através de Clonagem da rede Wi-Fi
Ampliar a Rede Wireless do Router
1� Ligue o TL-WPA4220 a uma tomada de parede perto do router�
AV500
TL-WPA4220
Pisca rápido em cerca
de 15 segundos�
Router Wireless (com
suporte para WPS )
Page 54

53
Português
2� Pressione o botão WPS do router, e passado cerca de 1 minuto,
pressione o botão de Clonagem Wi-Fi do TL-WPA4220�
AV500
Wireless Router
TL-WPA4220
• Pisca a cada segundo depois de
pressionado o botão Wi-Fi Clone
• Pisca rapidamente passado um 1 minuto
quando a Clonagem Wi-Fi está concluída�
WPS
O TL-WPA4220 copia automaticamente o nome e password da rede wireless
do router quando a clonagem Wi-Fi está concluída�
Para adicionar outro TL-WPA4220, siga os passos 1 e 2 para realizar
a clonagem do sinal Wi-Fi �
3� Ligue os seus dispositivos da seguinte maneira:
AV500
AV500
LAN
Internet
WAN
SSID:
ABCDE
SSID:
ABCDE
SSID:
ABCDE
Todas as LEDs do Powerline carão
xas cerca de 1 minuto.
TL-PA4010
TL-WPA4220
TL-WPA4220
Desfrute! Use o SSID (ABCDE) e password do Router para aceder à
Internet�
Se os LEDs do Powerline não carem xos, reinicie todos os dispositivos powerline,
ou crie uma nova rede powerline - para tal consulte documento FAQ-Q1.
Page 55

54
Português
Leia isto para adicionar mais dispositivos
1� Certique-se que os dispositivos adicionais têm os parâmetros de
fábrica � Se não, reinicie-os�
2� Se os dispositivos adicionais tiverem um botão de Clonagem
Wi-Fi, siga os passos 1 e 2 do Método 2 para os instalar. Caso
contrário, ignore esta instrução�
3� Ligue-os às tomadas e espere 1 minuto até que os seus LEDs
Powerline quem xos.
AV500 AV500 AV500
A intalação está concluída quando todos
os LEDs Powerline carem xos.
Dispositivo Adicional
TL-WPA4220TL-WPA4220
TL-PA4010
Se os LEDs Powerline não ficarem fixos, consulte as instuções no
documento FAQ->Q1:
1� Para os dois dispositivos ligados antes, use o Botão Emparelhar para
criar uma rede powerline (Q1->A). (Ignore este passo se já fez esta
operação�)
2� Para dispositivos adicionais, use o Botão Emparelhar para os juntar à
rede powerline existente (Q1->B)�
Page 56

55
Português
FAQ (Questões Frequentes)
Q1. Como posso Usar o Botão Emparelhar para criar ou ligar a
uma rede powerline?
Só pode usar o botão Emparelhar em dois dispositivos em
simultâneo�
A. Para criar uma rede powerline
1� Pressione o Botão Emparelhar (Pair) do TL-WPA4220� O LED de
Ligar
irá piscar�
2� No intervalo de 2 minutos, pressione o botão Emparelhar do TL-
PA4010� O LED Ligar
irá piscar�
3� Passado 1 minuto, todos os LEDs Powerline LEDs
ficarão
xos.
B. Para ligar a uma rede powerline existente
1� Pressione o botão Emparelhar (Pair) num terceiro dispositivo
powerline� O Led de Ligar
irá piscar�
2� No intervalo de 2 minutos, pressione o botão Emparelhar do TL-
WPA4220 ou do TL-PA4010 que emparelhou� O LED Ligar
irá
piscar�
3� Passado 1 minuto, todos os LEDs Powerline
carão xos.
Q2. Como reinicio o TL-WPA4220?
Com o TL-WPA4220 ligado, use um clip para pressionar o botão
Reset durante mais de 5 segundos�
O Led Ligar
irá apagar-se momentaneamente antes de car xo e
o LED Wi-Fi
irá piscar rapidamente� Isto indica que o processo de
reinício foi concluído�
Q3. Como personalizo os parâmetros wireless na página de
gestão web?
1� Encontre o utilitário no CD fornecido (só para Windows ) ou faça o
download do site ocial.
2� Abra o utilitário e clique em Ligar (‘Connect‘)
3� Registe-se na página de gestão web usando o nome de utilizador
Page 57

56
Português
e password atribuídos por defeito (admin/admin)�
4� Configure o SSID e clique em Gravar (‘Save’) na página
‘Wireless>Wireless Settings’�
5� Configure a password e clique em Gravar (‘Save’) na página
‘Wireless> Wireless Security’�
6� Clique em Clicar Aqui (‘click here’) na parte de baixo da página
para reiniciar o extensor�
Q4. O que posso fazer se o meu computador não aceder à
Internet depois de ligado a um adaptador/extensor powerline?
Verique o seguinte:
1� Ligue o seu computador ao modem ou router para testar a ligação
à Internet .
2� Cerique-se que os cabos e portas usados estão correctos.
3� Verique se todos os LEDs Powerline acendem em todos os seus
adaptadores/extensores� Caso contrário, crie ou junte-se a uma
rede powerline já existente, consultando para tal o documento
FAQ-Q1.
4� Certique-se que o seu computador está denido para ‘obter um
Endereço IP automaticamente’�
Se, mesmo assim, o seu computador ainda não conseguir ligar-se à
Internet, por favor contacte o nosso suporte técnico.
para mais informações acerca dos
parâmetros avançados, consulte por
favor o Guia de Utilizador.
Page 58

57
Suomi
Huom. Tässä pika-asennusoppaassa esimerkkinä esitetty tuotemalli
WiFi Powerline Extender 3-pack Kit -sarjalle on "TL-WPA4220T KIT"�
Merkkivalot
Power (Virta)
On (Valo palaa): Laite on päällä�
Off (Valo ei pala): Laite on poissa päältä�
Vilkkuu: Laiteparia muodostetaan�
Powerline
On (Valo palaa): Laite on liitetty Powerline-verkkoon�
Off (Valo ei pala): Laite ei ole kytketty Powerline-verkkoon�
Vilkkuu: Laite siirtää tietoa�
Ethernet
On (Valo palaa): Vähintään yksi Ethernet-portti on kytketty�
Off (Valo ei pala): Ethernet-portteja ei ole kytketty�
Wi-Fi
Off (Valo ei pala): Langaton toiminto on poissa käytöstä�
Vilkkuu nopeasti: Langaton toiminto on käytössä�
Vilkkuu sekunnin välein: Laajennin kloonaa Wi-Fi-asetuksia
reitittimeltä�
AV500
AV500
Wi-Fi/Wi-Fi
Clone -painike
Parinmuodostuspainike
Nollauspainike Ethernet-
portit
Page 59

58
Suomi
Powerline-verkko vaatii vähintään kaksi Powerline-laitetta� Powerlinesovitinta TL-PA4010 käytetään esimerkkinä TL-WPA4220:n kanssa�
Huom. Jos kodissasi tai toimistossasi on jo Powerline-sovittimia,
irrota ne ensin, asenna TL-WPA4220 menetelmällä 1 tai menetelmällä
2 ja lisää sitten vanhat sovittimet Powerline-verkkoon�
Läpilaskematon Powerline-laite
AV500 AV500
Läpilaskeva Powerline-laite
Page 60

59
Suomi
Menetelmä 1: Plug and Play
Luo uusi langaton verkko
1� Kirjoita muistiin TL-WPA4220:n langattoman verkon oletusnimi
(SSID) ja salasana�
Langattoman verkon nimi (SSID)*:
TP-LINK_XXXXXX
Langattoman verkon salasana:
XXXXXXXX
* Oletus-SSID on TP-LINK_XXXXXX� (XXXXXX on WLAN-verkon MACosoitteen kuusi viimeistä ainutkertaista merkkiä�)
2� Kytke laitteesi seuraavasti�
AV500
AV500
LAN
Internet
WAN
SSID:
ABCDE
SSID:
TP-LINK_xxxxxx
SSID:
TP-LINK_yyyyyy
Kaikki Powerline-merkkivalot alkavat
palaa tasaisesti 1 minuutin kuluessa�
TL-PA4010
TL-WPA4220
TL-WPA4220
Hyviä hetkiä tuotteesi parissa! Käytä oletus-SSID:iä (TP-LINK_
xxxxxx tai TP-LINK_yyyyyy) ja salasanaa, jotka kirjoitit muistiin,
muodostaaksesi Internet-yhteyden�
Jos Powerline-merkkivalot eivät ala palaa tasaisesti, nollaa kaikki Powerline-
laitteet tai luo Powerline-verkko viittaamalla kohtaan FAQ-K1.
Page 61

60
Suomi
Lue tämä asentaaksesi lisää laitteita
1� Varmista, että uudet laitteet käyttävät tehdasasetuksia� Jos eivät,
nollaa ne�
2� Kytke ne pistorasioihin ja odota noin 1 minuutti, kunnes niiden
Powerline-merkkivalot palavat tasaisesti�
AV500 AV500 AV500
Asennus on valmis, kun kaikki Powerlinemerkkivalot palavat tasaisesti�
Uusi laite
TL-WPA4220TL-WPA4220
TL-PA4010
Jos Powerline-merkkivalot eivät ala palaa tasaisesti, noudata kohdan FAQ->K1
ohjeita:
1� Käytä kahdessa aiemmin kytketyssä laitteessa parinmuodostuspainiketta
luodaksesi Powerline-verkon (K1->A)� (Ohita tämä vaihe, jos olet jo
tehnyt niin�)
2� Käytä uusien laitteiden kohdalla parinmuodostuspainiketta liittyäksesi
olemassa olevaan Powerline-verkkoon (K1->B)�
Menetelmä 2: Asennus Wi-Fi-kloonauksella
Laajenna reitittimen langatonta verkkoa
1� Kytke TL-WPA4220 reitittimen lähellä olevaan pistorasiaan�
AV500
TL-WPA4220
Vilkkuu nopeasti noin
15 sekuntia�
Langaton reititin (tukee
WPS:ää)
Page 62

61
Suomi
2� Paina reitittimen WPS-painiketta ja paina sitten 1 minuutin
kuluessa Wi-Fi-kloonauspainiketta TL-WPA4220:ssä�
AV500
Langaton reititin
TL-WPA4220
• Vilkkuu sekunnin välein Wi-Fikloonauspainikkeen painamisen jälkeen�
• Vilkkuu nopeasti 1 minuutin kuluessa,
kun Wi-Fi-kloonaus on suoritettu�
WPS
TL-WPA4220 kopioi automaattisesti langattoman verkon nimen ja salasanan
reitittimeltä, kun Wi-Fi-kloonaus on valmis�
Suorita Wi-Fi-kloonaus toisen TL-WPA4220:n kohdalla vaiheiden 1 ja
2 mukaisesti�
3� Kytke laitteesi seuraavasti�
AV500
AV500
LAN
Internet
WAN
SSID:
ABCDE
SSID:
ABCDE
SSID:
ABCDE
Kaikki Powerline-merkkivalot alkavat
palaa tasaisesti 1 minuutin kuluessa�
TL-PA4010
TL-WPA4220
TL-WPA4220
Hyviä hetkiä tuotteesi parissa! Käytä reitittimen SSID�iä (ABCDE)
ja salasanaa muodostaaksesi Internet-yhteyden�
Jos Powerline-merkkivalot eivät ala palaa tasaisesti, nollaa kaikki Powerline-
laitteet tai luo Powerline-verkko viittaamalla kohtaan FAQ-K1.
Page 63

62
Suomi
Lue tämä asentaaksesi lisää laitteita
1� Varmista, että uudet laitteet käyttävät tehdasasetuksia� Jos eivät,
nollaa ne�
2� Jos uusissa laitteissa on Wi-Fi-kloonauspainike, asenna ne
menetelmän vaiheiden 1 ja 2 mukaisesti� Jos et, ohita tämä�
3� Kytke ne pistorasioihin ja odota noin 1 minuutti, kunnes niiden
Powerline-merkkivalot palavat tasaisesti�
AV500 AV500 AV500
Asennus on valmis, kun kaikki Powerlinemerkkivalot palavat tasaisesti�
Uusi laite
TL-WPA4220TL-WPA4220
TL-PA4010
Jos Powerline-merkkivalot eivät ala palaa tasaisesti, noudata kohdan FAQ->K1
ohjeita:
1� Käytä kahdessa aiemmin kytketyssä laitteessa parinmuodostuspainiketta
luodaksesi Powerline-verkon (K1->A)� (Ohita tämä vaihe, jos olet jo
tehnyt niin�)
2� Käytä uusien laitteiden kohdalla parinmuodostuspainiketta liittyäksesi
olemassa olevaan Powerline-verkkoon (K1->B)�
Page 64

63
Suomi
FAQ (usein kysytyt kysymykset)
K1. Miten luon Powerline-verkon tai liityn siihen
parinmuodostuspainikkeella?
Voit käyttää parinmuodostuspainiketta vain kahdessa laitteessa
kerrallaan�
A. Powerline-verkon luominen
1� Paina TL-WPA4220:n parinmuodostuspainiketta� Virran merkkivalo
alkaa vilkkua�
2� Paina TL-PA4010:n parinmuodostuspainiketta 2 minuutin
kuluessa� Virran merkkivalo
alkaa vilkkua�
3� Noin 1 minuutin kuluttua kaikki Powerline-merkkivalot
palavat
tasaisesti�
B. Olemassa olevaan Powerline-verkkoon liittyminen
1� Paina kolmannen Powerline-laitteen parinmuodostuspainiketta�
Virran merkkivalo
alkaa vilkkua�
2� Paina joko TL-WPA4220:n tai TL-PA4010:n parinmuodostuspainiketta
2 minuutin kuluessa� Virran merkkivalo
alkaa vilkkua�
3� Noin 1 minuutin kuluttua kaikki Powerline-merkkivalot palavat
tasaisesti�
K2. Miten nollaan TL-WPA4220:n?
Kun TL-WPA4220 on päällä, paina nollauspainiketta noin 5 sekuntia
neulalla�
Virran merkkivalo sammuu
hetkeksi ennen kuin alkaa palaa
tasaisen valkoisena ja Wi-Fi-merkkivalo
vilkkuu nopeasti� Tämä
tarkoittaa, että nollaus on suoritettu�
K3. Miten mukautan langattoman verkon asetukset Internethallintasivulla?
1� Etsi apuohjelma oheiselta CD:ltä (vain Windows) tai lataa sen
viralliselta sivustoltamme�
2� Avaa apuohjelma ja napsauta "Connect"�
Page 65

64
Suomi
3� Kirjaudu Internet-hallintasivulle oletuskäyttäjätunnuksella ja
-salasanalla (admin/admin)�
4� Määritä SSID ja napsauta "Save" sivulla "Wireless>Wireless
Settings"�
5� Määritä salasana ja napsauta "Save" sivulla "Wireless> Wireless
Security"�
6� Käynnistä laajennin uudelleen napsauttamalla "click here" sivun
alalaidassa�
K4. Mitä teen, jos tietokone ei saa yhteyttä Internetiin kun se
kytketään Powerline-sovittimeen/-laajentimeen?
Tarkista seuraavat asiat:
1� Kytke tietokone modeemiin tai reitittimeen tarkistaaksesi Internet-
yhteyden�
2� Tarkista, että laitteet on kytketty oikein�
3� Tarkista, että kaikkien sovittimien/laajentimien Powerline-
merkkivalot syttyvät� Jos eivät, luo Powerline-verkko tai liity siihen
viittaamalla kohtaan FAQ-K1.
4� Varmista, että tietokoneen asetus "Hanki IP-osoite automaattisesti"
on käytössä�
Jos tietokone ei saa yhteyttä Internetiin näiden vaiheiden
jälkeen, ota yhteys tekniseen tukeemme�
Lisätietoja lisäasetuksista on
käyttöoppaassa�
Page 66

65
Nederlands
NB: Het product “TL-WPA4220T” dat in deze installatie instructies
gebruikt wordt is enkel als voorbeeld bedoeld�
LED-lampjes
Aan/uit
Aan: het apparaat is aan�
Uit: het apparaat is uit�
Knippert: het apparaat is aan het verbinden�
Powerline
Aan: het apparaat is met een Powerline netwerk verbonden�
Uit: het apparaat is niet met een Powerline netwerk
verbonden�
Knippert: het apparaat is bezig met het overbrengen van
data�
Ethernet
Aan: er is een apparaat op ten minste één ethernet
aansluiting aangesloten�
Uit: er is op geen van de ethernet aansluitingen iets
aangesloten�
Wi-Fi
Uit: de draadloos functie is uitgeschakeld�
Knippert snel: de draadloos functie is ingeschakeld�
Knippert elke seconde: het apparaat is de Wi-Fi instellingen
van een router aan het klonen�
AV500
AV500
Wi-Fi/Wi-Fi kloon toets Verbindtoets
Reset
toets
Ethernet
aansluitingen
Page 67

66
Nederlands
Voor een Powerline netwerk zijn ten minste twee Powerline apparaten
nodig� Wij gebruiken de Powerline adapter TL-PA4010 als voorbeeld
in combinatie met de TL-WPA4220�
NB: Als er in uw woning of kantoor al Powerline adapters aanwezig
zijn, verwijdert u die eerst. Daarna installeert u de TL-WPA4220 m.b.v.
Methode 1 of Methode 2 en voegt u de bestaande adapters aan het
Powerline netwerk toe�
Powerline apparaten zonder ingebouwd stopcontact
AV500 AV500
Powerline apparaten met ingebouwd stopcontact
Page 68

67
Nederlands
Methode 1: Plug and Play
Een nieuw draadloos netwerk opzetten
1� Schrijf de standaard naam van het draadloze netwerk (SSID) en
wachtwoord van de TL-WPA4220 op�
Naam draadloos netwerk (SSID)*:
TP-LINK_XXXXXX
Draadloos wachtwoord:
XXXXXXXX
* Het standaard SSID is TP-LINK_XXXXXX. (XXXXXX geeft de laatste zes
unieke tekens van het WLAN MAC-adres aan�)
2� Sluit uw apparaten als volgt aan�
AV500
AV500
LAN
Internet
WAN
SSID:
ABCDE
SSID:
TP-LINK_xxxxxx
SSID:
TP-LINK_yyyyyy
Alle Powerline lampjes branden
continu binnen 1 minuut�
TL-PA4010
TL-WPA4220
TL-WPA4220
Veel plezier! Gebruik het standaard SSID (TP-LINK_xxxxxx of TPLINK_yyyyyy) en wachtwoord dat u hebt opgeschreven om toegang
tot het Internet te krijgen�
Als de Powerline lampjes niet continu gaan branden, voert u een reset
van alle Powerline apparaten uit, of stelt u een Powerline netwerk in zoals
beschreven bij Veel gestelde vragen - V1�
Page 69

68
Nederlands
Lees dit om meer apparaten te installeren
1� Zorg ervoor dat alle extra apparaten op de standaard fabrieks-
instellingen staan. Als dat niet zo is, voert u een reset uit.
2� Steek de apparaten elk in een stopcontact en wacht ca� 1 minuut
tot hun Powerline lampje continu brandt�
AV500 AV500 AV500
De installatie is voltooid zodra alle
Powerline lampjes continu branden�
Extra apparaat
TL-WPA4220TL-WPA4220
TL-PA4010
Als de Powerline lampjes niet (allemaal) continu gaan branden, volgt u de
instructies in Veel gestelde vragen -> V1 op�
1� Voor de twee apparaten die u eerder hebt aangesloten, gebruikt u de
verbindtoets om een Powerline netwerk op te zetten (V1->A). (Sla deze
stap over als u dit al gedaan hebt�)
2� Voor extra apparaten gebruikt u de verbindtoets om die met het
bestaande Powerline netwerk te verbinden (V1->B)�
Methode 2: Instellen m.b.v. Wi-Fi kloon
Het draadloze netwerk van de router uitbreiden
1� Steek de TL-WPA4220 in een stopcontact in de buurt van de
router�
AV500
TL-WPA4220
Knippert snel na ca�
15 seconden�
Draadloze router
(ondersteunt WPS)
Page 70

69
Nederlands
2� Druk op de WPS toets van de router en binnen 1 minuut op de Wi-
Fi kloon toets van de TL-WPA4220�
AV500
Draadloze router
TL-WPA4220
• Knippert elke seconde na drukken
op Wi-Fi kloon toets�
• Knippert snel binnen 1 minuut als
Wi-Fi klonen voltooid is�
WPS
De TL-WPA4220 kopieert automatisch de naam en het wachtwoord van het
draadloze netwerk van de router als het Wi-Fi klonen voltooid is.
Voor nog een TL-WPA4220 voert u stap 1 en 2 uit om het Wi-Fi
klonen te voltooien�
3� Sluit uw apparaten als volgt aan�
AV500
AV500
LAN
Internet
WAN
SSID:
ABCDE
SSID:
ABCDE
SSID:
ABCDE
Alle Powerline lampjes branden
continu binnen 1 minuut�
TL-PA4010
TL-WPA4220
TL-WPA4220
Veel plezier! Gebruik het SSID (ABCDE) en wachtwoord van de
router om toegang tot het Internet te krijgen�
Als de Powerline lampjes niet continu gaan branden, voert u een reset
van alle Powerline apparaten uit, of stelt u een Powerline netwerk in zoals
beschreven bij Veel gestelde vragen - V1�
Page 71

70
Nederlands
Lees dit om meer apparaten te installeren
1� Zorg ervoor dat alle extra apparaten op de standaard fabrieks-
instellingen staan. Als dat niet zo is, voert u een reset uit.
2� Als de extra apparaten over de Wi-Fi kloon functie beschikken,
voert u stap 1 en 2 van Methode 2 uit om die te installeren� Als dat
niet het geval is, slaat u deze stap over.
3� Steek de apparaten elk in een stopcontact en wacht ca� 1 minuut
tot hun Powerline lampje continu brandt�
AV500 AV500 AV500
De installatie is voltooid zodra alle
Powerline lampjes continu branden�
Extra apparaat
TL-WPA4220TL-WPA4220
TL-PA4010
Als de Powerline lampjes niet (allemaal) continu gaan branden, volgt u de
instructies in Veel gestelde vragen -> V1 op�
1� Voor de twee apparaten die u eerder hebt aangesloten, gebruikt u de
verbindtoets om een Powerline netwerk op te zetten (V1->A). (Sla deze
stap over als u dit al gedaan hebt�)
2� Voor extra apparaten gebruikt u de verbindtoets om die met het
bestaande Powerline netwerk te verbinden (V1->B)�
Page 72

71
Nederlands
Veel gestelde vragen
V1. Hoe gebruik ik de verbindtoets om een Powerline netwerk op
te zetten of daarmee te verbinden?
U kunt de verbindtoets maar op twee apparaten tegelijk gebruiken�
A. Een Powerline netwerk opzetten
1� Druk op de verbindtoets van de TL-WPA4220� Het Aan/uit lampje
gaat knipperen�
2� Binnen 2 minuten drukt u op de verbindtoets van de TL-PA4010�
Het Aan/uit lampje
gaat knipperen�
3� Na ca� 1 minuut gaan alle Powerline lampjes
continu branden�
B. Met een bestaand Powerline netwerk verbinden
1� Druk op de verbindtoets van een derde Powerline apparaat� Het
Aan/uit lampje
gaat knipperen�
2� Druk binnen 2 minuten op de verbindtoets van de TL-WPA4220
of TL-PA4010 die u al eerder verbonden hebt� Het Aan/uit lampje
gaat knipperen�
3� Na ca� 1 minuut gaan alle Powerline lampjes
continu branden�
V2. Hoe kan ik de TL-WPA4220 resetten?
Met de TL-WPA4220 ingeschakeld gebruikt u een speld om de Reset
toets langer dan 5 seconden ingedrukt te houden�
Het aan/uit lampje
gaat kort uit, waarna het continu gaat branden
en het Wi-Fi lampje
snel gaat knipperen� Dit geeft aan dat het
proces voltooid is�
V3. Hoe kan ik de draadloos instellingen via de webbeheerpagina
aanpassen?
1� Zoek het hulpprogramma op de meegeleverde CD (alleen voor
Windows), of download het van onze ofciële website.
2� Start het hulpprogramma en klik op 'Connect' (verbinden)�
3� Log in bij de webbeheerpagina met de standaard gebruikersnaam
en het wachtwoord (admin/admin)�
4� Configureer het SSID en klik op ‘Save’ (opslaan) op de
Page 73

72
Nederlands
pagina ‘Wireless>Wireless Settings’ (draadloos, draadloos
instellingen)�
5� Configureer het wachtwoord en klik op ‘Save’ (opslaan) op de
pagina ‘Wireless>Wireless Security’ (draadloos, draadloos
beveiliging)�
6� Klik op ‘click here’ (klik hier) onder aan de pagina om de
extender opnieuw op te starten�
V4. Wat kan ik doen als mijn computer geen toegang tot het
Internet heeft nadat hij met een Powerline adapter/extender
verbonden is?
Controleer het volgende:
1� Sluit uw computer op het modem of de router aan om de Internet
verbinding te testen�
2� Controleer of de hardware-verbinding in orde is�
3� Controleer of de Powerline lampjes van alle adapters/extenders
continu branden. Als dat niet het geval is, zet u een Powerline
netwerk op of maakt u daarmee verbinding zoals beschreven bij
Veel gestelde vragen - V1�
4� Zorg dat uw computer is ingesteld op "Automatisch een IP-adres
laten toewijzen".
Als uw computer na het uitvoeren van deze stappen nog steeds
niet met het Internet verbinding heeft, neemt u contact op met onze
afdeling Technical Support�
Voor meer informatie over
geavanceerde instellingen raadpleegt
u de gebruikershandleiding�
Page 74

73
Svenska
Obs! Den produktmodellen visas i denna QIG för WiFi-Powerline-
Extender 3-pack Kit är "TL-WPA4220T KIT" ,som ett exempel�
LED-indikatorer
Power
On: Enheten är på�
Off: Enheten är avstängd�
Blinkande: Enheten är ihopparning�
Powerline
On: Enheten är ansluten till ett nätverk via elnätet�
Off: Enheten är inte ansluten till något nätverk via elnätet�
Blinkande: Enheten överför data�
Ethernet
On: Minst en Ethernet-port är ansluten�
Off: Ingen Ethernet-port är ansluten�
Wi-Fi
Off: Den trådlösa funktionen är inaktiverad�
Blinkar snabbt: Den trådlösa funktionen är aktiverad�
Blinkar varje sekund: Enheten är kloning Wi-Fi -inställningarna
från routern�
AV500
AV500
Wi-Fi / trådlös kloningsknapp Parningsknapp
Återställ Ethernet-portar
Page 75

74
Svenska
Ett nätverk via elnätet kräver minst två powerline-enheter� Vi använder
Powerline-adaptern TL-PA4010 som ett exempel att arbeta med TLWPA4220�
Obs! Om ditt hem eller kontor har redan powerline-adaptrar, ta bort
dem först installerar TL-WPA4220-rackserver på köpet med metod 1
eller metod 2, och sedan lägga till ditt bentliga adaptrar till nätverk
via elnätet�
För icke-passthrough-enhet
AV500 AV500
För passthrough-enhet
Page 76

75
Svenska
Mehod 1: Plug and Play
Skapa ett nytt trådlöst nätverk
1� Anteckna standardinställningarna för trådlöst nätverk (SSID) och
lösenordet för TL-WPA4220�
Wireless Network Name (SSID)*:
TP-LINK_XXXXXX
Wireless Password:
XXXXXXXX
* Standard-SSID är TP-LINK_XXXXXX� (XXXXXX anger de senaste sex
unika tecknen hos WLAN MAC-adress�)
2� Anslut dina enheter på följande sätt�
AV500
AV500
LAN
Internet
WAN
SSID:
ABCDE
SSID:
TP-LINK_xxxxxx
SSID:
TP-LINK_yyyyyy
Alla Powerline lysdioder kommer
att ha fast sken inom 1 minut�
TL-PA4010
TL-WPA4220
TL-WPA4220
Njut! Använd standard-SSID (TP-LINK_xxxxxx eller TP-LINK_
yyyyyy) och lösenord som du skrev ner till tillgång internet�
Om Powerline lysdioder inte lyser med fast sken, återställ alla powerline-
enheter, eller skapa ett nätverk via elnätet genom att studera FAQ-Q1.
Page 77

76
Svenska
Läs detta för att installera ytterligare enheter
1� Se till att ytterligare enheter använder standardinställningarna� Om
inte bör du återställa dem�
2� Sätt in dem i de uttagen och vänta i 1 minut tills deras Powerline
lysdioder lyser med fast sken�
AV500 AV500 AV500
Installationen är avslutad när alla Powerline
lysdioderna lyser med fast sken�
Extra enhet
TL-WPA4220TL-WPA4220
TL-PA4010
Om Powerline lysdioderna inte lyser med fast sken, följ anvisningarna i
FAQ->Q1:
1� För de två enheter som är anslutna innan, använd knappen Pair för att
skapa ett nätverk via elnätet (Q1->A)� (Hoppa över detta steg om du
redan gjort detta�)
2� För ytterligare enheter, använd knappen Pair till bentliga nätverk via
elnätet (Q1->B)�
Metod 2: Setup via Wi-Fi -klon
Utöka routerns trådlösa nätverk
1� Sätt i kontakten till TL-WPA4220-rackserver i ett vägguttag nära
routern�
AV500
TL-WPA4220
Blinkar snabbt i ca 15
sekunder�
Trådlös router
( stöder WPS)
Page 78

77
Svenska
2� Tryck på WPS-knappen på routern, och inom 1 minut, tryck på
knappen Wi-Fi Clone på din TL-WPA4220�
AV500
Trådlös router
TL-WPA4220
• Blinkar varje sekund efter att du
tryckt på Wi-Fi clone�
• Blinkar snabbt inom 1 minut när
Wi-Fi -kloning är avslutad�
WPS
TL-WPA4220-rackserver kommer automatiskt att kopiera det trådlösa
nätverkets namn och lösenord på routern när Wi-Fi -kloningen är avslutad�
För ytterligare TL-WPA4220, följ steg 1 och steg 2 för att slutföra WiFi -klon�
3� Anslut dina enheter på följande sätt�
AV500
AV500
LAN
Internet
WAN
SSID:
ABCDE
SSID:
ABCDE
SSID:
ABCDE
Alla Powerline lysdioder kommer
att ha fast sken inom 1 minut�
TL-PA4010
TL-WPA4220
TL-WPA4220
Njut! Använd routerns SSID (ABCDE) och lösenord för åtkomst till
Internet�
Om Powerline lysdioder inte lyser med fast sken, återställ alla powerline-
enheter, eller skapa ett nätverk via elnätet genom att studera FAQ-Q1.
Page 79

78
Svenska
Läs detta för att installera ytterligare enheter
1� Se till att ytterligare enheter är fabriksinställningarna� Om inte bör
du återställa dem�
2� Om ytterligare enheter har Wi-Fi Clonefunktionen, följ steg 1 och 2
i metod 2 för att installera dem� Om inte, hoppa över det här�
3� Sätt in dem i uttagen och vänta i 1 minut tills deras Powerline
lysdioder stadigt�
AV500 AV500 AV500
Installationen är avslutad när alla Powerline
lysdioderna lyser med fast sken�
Extra enhet
TL-WPA4220TL-WPA4220
TL-PA4010
Om Powerline lysdioderna inte lyser med fast sken, följ anvisningarna i
FAQ->Q1:
1� För de två enheter som är anslutna innan, använd knappen Pair för att
skapa ett nätverk via elnätet (Q1->A)� (Hoppa över detta steg om du
redan gjort detta�)
2� För ytterligare enheter, använd knappen Pair till bentliga nätverk via
elnätet (Q1->B)�
Page 80

79
Svenska
FAQ (Vanliga frågor)
F1. Hur använder jag knappen Pair att skapa eller delta i ett
nätverk via elnätet?
Du kan använda knappen Pair på endast två enheter samtidigt�
A. För att skapa ett nätverk via elnätet
1� Tryck på knappen Pair på TL-WPA4220� Power-lysdioden
kommer att blinka�
2� Inom 2 minuter, tryck på knappen Pair på TL-PA4010� Power-
lysdioden
kommer att blinka�
3� Inom ca 1 minut, kommer alla Powerline lysdioderna
att lysa
med fast sken�
B. För att ansluta till ett bentligt nätverk via elnätet
1� Tryck på knappen Pair på en tredje powerline-enhet� Power-
lysdioden
kommer att blinka�
2� Inom 2 minuter, tryck på knappen Pair på antingen TL-WPA4220-
rackserver eller på TL-PA4010 du har parat ihop� Power-lysdioden
kommer att blinka�
3� Inom ca 1 minut, lyser alla Powerline lysdioderna
med fast
sken�
F2. Hur återställer jag TL-WPA4220?
Med TL-WPA4220-rackserver påslagen, använd ett spetsigt föremål
och tryck på och håll ned reset knappen i mer än 5 sekunder�
Power-lysdioden
släcks tillfälligt före fast sken och Wi-Fi -lysdioden
blinkar snabbt� Detta anger att återställningen är klar�
F3. Hur kan jag anpassa de trådlösa inställningarna på sidan web
management?
1� Hitta hjälpmedel på den medföljande CD (endast för Windows)
eller hämta den från vår ofciella webbplats.
2� Öppna verktyget och klicka på "Connect" (Anslut)�
3� Logga in på sidan web management med hjälp av standard
Page 81

80
Svenska
användarnamn och lösenord (admin/admin)�
4� Konfigurera SSID och klicka på "Save" (spara) på sidan
‘Wireless>Wireless Settings’�
5� Konfigurera lösenord och klicka på "Save" (spara) på sidan
‘Wireless>Wireless Settings’�
6� Klicka på "click here" på sidan längst ned för att starta om
extender�
F4. Vad kan jag göra om min dator inte får tillgång till Internet när
den är ansluten till en Powerline-adapter/extender?
Kontrollera följande:
1� Anslut datorn till modemet eller routern testa anslutningen till
Internet�
2� Kontrollera att hårdvaran är korrekt ansluten�
3� Kontrollera Powerline-lysdioder lyser på alla adaptrar/extenders�
Om inte, skapa eller ansluta till ett nätverk via elnätet genom att
hänvisa till FAQ-Q1.
4� Se till att din dator är inställd på "Erhåll IP-adress automatiskt"�
Om datorn fortfarande inte kan ansluta till Internet efter
följande steg, vänligen kontakta vår tekniska support�
Mer information om avancerade inställningar
nns i användarhandboken.
Page 82

81
Norsk
Merk: Produktmodellen som vises i denne
hurtiginstallasjonsveiledningen for WiFi Powerline Extender 3-pack
Kit er “TL-WPA4220T KIT”,som et eksempel�
LED-indikator
Power (strøm)
On (på): Enheten er på�
Off (av): Enheten er av�
Blinking: Enheten parer�
Powerline
On (på): Enheten er koblet til et powerline-nettverk�
Off (av): Enheten er ikke koblet til et powerline-nettverk�
Blinking: Enheten overfører data�
Ethernet
On (på): Minst én ethernet-port er tilkoblet.
Off (av): Ingen ethernet-port er tilkoblet�
Wi-Fi
Off (av): Trådløs-funksjonen er deaktivert�
Blinking quickly (rask blinking): Trådløs-funksjonen er
aktivert�
Blinking hvert sekund: Enheten kloner Wi-Fi-innstillinger fra
en ruter�
AV500
AV500
Wi-Fi/Wi-Fi-kloneknapp Pareknapp
Nullstillingsknapp Ethernet-porter
Page 83

82
Norsk
Et powerline-nettverk krever minst to powerline-enheter� Vi bruker
powerline-adapteren TL-PA4010 som et eksempel for å jobbe med
TL-WPA4220�
Merk: Hvis hjemmet eller kontoret ditt allerede har powerlineadaptere, fjern dem ført, installert TL-WPA4220 med metode 1
eller metode 2 og legg så de eksisterende adapterne til powerlinenettverket�
For enheter som ikke går gjennom powerline-enhet
AV500 AV500
For enheter som går gjennom powerline-enhet
Page 84

83
Norsk
Metode 1: Plug and Play
Opprett et nytt trådløst nettverk
1� Skriv ned standardnavn for trådløst nettverk (SSID) og passord for
TL-WPA4220�
Navn til trådløst nettverk (SSID)*:
TP-LINK_XXXXXX
Trådløst passord:
XXXXXXXX
* Standard-SSID-en er TP-LINK_XXXXXX� (XXXXXX markerer de seks siste
unike tegnene til WLAN MAC-adressen�)
2� Koble til enheten som følger�
AV500
AV500
LAN
Internet
WAN
SSID:
ABCDE
SSID:
TP-LINK_xxxxxx
SSID:
TP-LINK_yyyyyy
Alle Powerline-LED-ene vil
lyse fast innen 1 minutt�
TL-PA4010
TL-WPA4220
TL-WPA4220
Vel bekomme! Bruk standard-SSID-en (TP-LINK_xxxxxx eller TPLINK_yyyyyy) og passordet du skrev ned for å få tilgang til Internett�
Hvis Powerline-LED-ene ikke lyser fast, nullstill alle powerline-enheter eller
opprett et powerline-nettverk ved å lese OSS-S1�
Page 85

84
Norsk
Les dette for å installere ere enheter
1� Sørg for at de ytterligere enhetene bruker standardinnstillingene
fra fabrikken� Tilbakestill dem hvis de ikke gjør det�
2� Plugg dem inn i stikkontaktene og vent omtrent 1 minutt til
Powerline-LED-ene lyser fast�
AV500 AV500 AV500
Installasjon er fullført når alle
Powerline-LED-ene lyser fast�
Ytterligere enhet
TL-WPA4220TL-WPA4220
TL-PA4010
Hvis Powerline-LED-ene ikke lyser fast, følg instruksjonene i OSS->S1:
1� For de to enhetene som ble koblet tidligere, bruk pareknappen for å
opprette et powerline-nettverk (S1->A)� (Hopp over dette trinnet hvis du
allerede har gjort det�)
2� For ytterligere enheter, bruk pareknappen for å bli med i det eksisterende
powerline-nettverket (S1->B)�
Metode 2: Kongurering via Wi-Fi-klone
Utvid ruterens trådløse nettverk
1� Koble TL-WPA4220 til en stikkontakt i nærheten av ruteren�
AV500
TL-WPA4220
Blinker raskt om omtrent
15 sekunder�
Trådløs ruter
( støtter WPS )
Page 86

85
Norsk
2� Trykk WPS-knappen på ruteren og trykk Wi-Fi-kloneknappen på
TL-WPA4220 innen 1 minutt�
AV500
Trådløs ruter
TL-WPA4220
• Blink hvert sekund etter du
trykker Wi-Fi-kloneknappen�
• Blink raskt innen 1 minutt når
Wi-Fi-klone er fullført�
WPS
TL-WPA4220 vil automatisk kopiere navn og passord til det trådløse
nettverket fra ruteren når Wi-Fi-klone er fullført�
For en annen TL-WPA4220, følg trinn 1 og trinn 2 for å fullføre Wi-Fiklone�
3� Koble til enheten som følger�
AV500
AV500
LAN
Internet
WAN
SSID:
ABCDE
SSID:
ABCDE
SSID:
ABCDE
Alle Powerline-LED-ene vil
lyse fast innen 1 minutt�
TL-PA4010
TL-WPA4220
TL-WPA4220
Vel bekomme! Bruk ruterens SSID (ABCDE) og passord for å få
tilgang til Internett�
Hvis Powerline-LED-ene ikke lyser fast, nullstill alle powerline-enheter eller
opprett et powerline-nettverk ved å lese OSS-S1�
Page 87

86
Norsk
Les dette for å installere ere enheter
1� Sørg for at de ytterligere enhetene bruker standardinnstillingene
fra fabrikken� Tilbakestill dem hvis de ikke gjør det�
2� Hvis de ytterligere enhetene har Wi-Fi-klonefunksjon, følg trinn 1
og 2 av metode 2 for å installere dem� Hvis ikke, kan du hoppe
over dette�
3� Plugg dem inn i stikkontaktene og vent omtrent 1 minutt til
Powerline-LED-ene lyser fast�
AV500 AV500 AV500
Installasjon er fullført når alle
Powerline-LED-ene lyser fast�
Ytterligere enhet
TL-WPA4220TL-WPA4220
TL-PA4010
Hvis Powerline-LED-ene ikke lyser fast, følg instruksjonene i OSS->S1:
1� For de to enhetene som ble koblet tidligere, bruk pareknappen for å
opprette et powerline-nettverk (S1->A)� (Hopp over dette trinnet hvis du
allerede har gjort det�)
2� For ytterligere enheter, bruk pareknappen for å bli med i det eksisterende
powerline-nettverket (S1->B)�
Page 88

87
Norsk
OSS (Vanlige spørsmål)
S1. Hvordan bruker jeg pareknappen for å opprette eller bli med i
et powerline-nettverk?
Du kan kun bruke pareknappen på to enheter om gangen�
A. For å opprette et powerline-nettverk
1� Trykk pareknappen på TL-WPA4220� Strøm-LED-en
vil blinke�
2� Trykk pareknappen på TL-PA4010 innen 2 minutter� Strøm-LED-
en
vil blinke�
3� Om omtrent 1 minutt vil alle Powerline-LED-ene
lyse fast�
B. For å bli med i et eksisterende powerline-nettverk
1� Trykk pareknappen på en tredje powerline-enhet� Strøm-LED-en
vil blinke�
2� Trykk pareknappen på enten TL-WPA4220 eller TL-PA4010 du har
paret innen 2 minutter� Strøm-LED-en
vil blinke�
3� Om omtrent 1 minutt vil alle Powerline-LED-ene
lyse fast�
S2. Hvordan nullstiller jeg TL-WPA4220?
Med TL-WPA4220 slått på, bruk en nål for å holde nullstillingsknappen
i mer enn 5 sekunder�
Strøm-LED-en
blir slått av et øyeblikk før den lyser fast og Wi-Fi-
LED-en
vil blinke raskt� Dette viser at nullstillingsprosessen er
ferdig�
S3. Hvordan tilpasser jeg de trådløse innstillingene på
webbehandlingssiden?
1� Finn tilleggsprogrammet på CD-en som følger med (kun for
Windows) eller last det ned fra det ofsielle nettstedet vår.
2� Åpne tilleggsprogrammet og klikk Connect (koble til)�
3� Logg deg på webbehandlingssiden med standardbrukernavnet og
-passordet (admin/admin)�
4� Konfigurer SSID-en og klikk Save (lagre) på siden
Wireless>Wireless Settings (trådløs>trådløse innstillinger)�
Page 89

88
Norsk
5� Konfigurer passordet og klikk Save (lagre) på siden
Wireless>Wireless Security (trådløs>trådløs sikkerhet)�
6� Klikk click here (klikk her) nederst på siden for å starte
forlengeren på nytt�
S4. Hva kan jeg gjøre hvis datamaskinen ikke kan koble seg til
Internett etter den er koblet til en powerline-adapter/-forlenger?
Sjekk det følgende:
1� Koble datamaskinen til modemet eller ruteren for å teste Internett-
tilkoblingen�
2� Sørg for at maskinvaretilkoblingen er riktig�
3� Sørg for at Powerline-LED-ene lyser på alle adapterne/forlengerne�
Hvis de ikke gjør det, opprett eller bli med i et powerline-nettverk
ved å lese OSS-S1�
4� Sørg for at datamaskinen er kongurert til å Obtain an IP address
automatically (Hente en IP-adresse automatisk)�
Hvis datamaskinen fremdeles ikke kan koble seg til Internett etter du følger
disse trinnene, bør du kontakte vår tekniske støtte�
For mer informasjon om de
avanserte innstillingene,
henvis til brukerveiledningen�
Page 90

89
Dansk
Bemærk: Produktetmodellen der vises som eksempel i denne
Installationsvejledning for WiFi Powerline Extender 3-pakkesæt er
"TL-WPA4220T KIT", som et eksempel�
Lysdiodeindikatorer
Power (Strøm)
On (Tændt): Enheden er tændt�
Off (Slukket): Enheden er slukket�
Blinker: Enheden er igang med parring�
Powerline
On (Tændt): Enheden er tilsluttet til et powerline-netværk�
Off (Slukket): Enheden er ikke tilsluttet til et powerline-
netværk�
Blinker: Enheden overfører data�
Ethernet
On (Tændt): Mindst én Ethernet-port er forbundet.
Off (Slukket): Ingen Ethernet-port er forbundet�
WiFi (Trådløs)
Off (Slukket): Den trådløse funktion er deaktiveret�
Blinker hurtigt: Den trådløse funktion er aktiveret�
Blinker hvert sekund: Enheden kloner Wi-Fi-indstillinger fra
en router�
AV500
AV500
Wi-Fi/Knap for Wi-Fi Clone Par-knap
Nulstillingsknap Ethernet-porte
Page 91

90
Dansk
Et powerline-netværk kræver mindst to powerline-enheder� Vi
anvender powerline-netværksadapteren TL-PA4010 som et eksempel
på at arbejde med TL-WPA4220�
Bemærk: Hvis dit hjem eller kontor allerede har powerline-adaptere,
så fjern dem først, montér TL-WPA4220 ved hjælp af metode 1 eller 2,
og tilføj derefter dine eksisterende adaptere til powerline-netværket�
For ikke-gennemgående powerline-enhed
AV500 AV500
For gennemgående powerline-enhed
Page 92

91
Dansk
Metode 1: Plug-and-Play
Opret et nyt trådløst netværk
1� Skriv det standard trådløse netværksnavn (SSID) og adgangskode
af TL-WPA4220 ned�
Navn på trådløst netværk (SSID)*:
TP-LINK_XXXXXX
Trådløs adgangskode:
XXXXXXXX
* Standard-SSID er TP-LINK_XXXXXX� (XXXXXX angiver de sidste seks
unikke tegn af WLAN MAC-adressen�)
2� Tilslut dine enheder som følger�
AV500
AV500
LAN
Internet
WAN
SSID:
ABCDE
SSID:
TP-LINK_xxxxxx
SSID:
TP-LINK_yyyyyy
Alle Powerline-lysdioder vil lyse
konstant indenfor 1 minut�
TL-PA4010
TL-WPA4220
TL-WPA4220
Nyd! Brug den standard SSID (TP-LINK_xxxxxx eller TP-LINK_
yyyyyy) og adgangskode, du skrev ned for at få adgang til internettet�
Hvis Powerline-lysdioderne ikke starter at lyse konstant, så nulstil alle powerline-
enheder, eller opret et powerline-netværk ved at henvise til FAQ-SP1.
Page 93

92
Dansk
Læs dette for at installere ere enheder
1� Sørg for, at yderligere enheder bruger standardindstillingerne�
Hvis ikke, skal du nulstille dem�
2� Sæt dem i stikkontakter og vent ca� 1 minut, indtil deres Powerline-
lysdioder lyser konstant�
AV500 AV500 AV500
Installationen er afsluttet, når alle
Powerline-lysdioder lyser konstant�
Yderligere enhed
TL-WPA4220TL-WPA4220
TL-PA4010
Hvis Powerline-lysdioderne ikke lyser konstant, skal du følge instruktionerne
i FAQ->SP1:
1� For de to enheder tilsluttet før, brug knappen Par til at oprette et
powerline-netværk (SP1->A)� (Spring dette trin over, hvis du allerede har
gjort det�)
2� For yderligere enheder, skal du bruge knappen Par for at tilslutte sig til
det eksisterende powerline-netværk (SP1->B)�
Metode 2: Opsætning via Wi-Fi-klone
Udvide routerens trådløse netværk
1� Sæt TL-WPA4220 i en stikkontakt i nærheden af routeren�
AV500
TL-WPA4220
Blinker hurtigt i ca� 15
sekunder�
Trådløs router
(understøtter WPS )
Page 94

93
Dansk
2� Tryk på WPS-knappen på din router, og inden for 1 minut, tryk på
Wi-Fi-klon-knappen på din TL-WPA4220�
AV500
Trådløs router
TL-WPA4220
• Blinker hvert sekund efter at der
trykkes på Wi-Fi-klon knappen�
• Blinker hurtigt inden for 1 minut,
når Wi-Fi-kloning er afsluttet�
WPS
TL-WPA4220 bliver automatisk kopiere det trådløse netværks navn og
adgangskode til routeren, når Wi-Fi-kloning er afsluttet�
For en anden TL-WPA4220, følg trin 1 og trin 2 for at afslutte Wi-Fikloning�
3� Tilslut dine enheder som følger�
AV500
AV500
LAN
Internet
WAN
SSID:
ABCDE
SSID:
ABCDE
SSID:
ABCDE
Alle Powerline-lysdioder vil lyse
konstant indenfor 1 minut�
TL-PA4010
TL-WPA4220
TL-WPA4220
Nyd! Brug routerens SSID (ABCDE) og adgangskode, til at få adgang
til internettet�
Hvis Powerline-lysdioderne ikke starter at lyse konstant, så nulstil alle powerline-
enheder, eller opret et powerline-netværk ved at henvise til FAQ-SP1.
Page 95

94
Dansk
Læs dette for at installere ere enheder
1� Sørg for, at yderligere enheder bruger standardindstillingerne�
Hvis ikke, skal du nulstille dem�
2� Hvis ere enheder har Wi-Fi-klon funktion, skal du følge trin 1 og
2 i metode 2 til at installere dem� Hvis ikke, kan du springe dette
over�
3� Sæt dem i stikkontakter og vent ca� 1 minut, indtil deres Powerline-
lysdioder lyser konstant�
AV500 AV500 AV500
Installationen er afsluttet, når alle
Powerline-lysdioder lyser konstant�
Yderligere enhed
TL-WPA4220TL-WPA4220
TL-PA4010
Hvis Powerline-lysdioderne ikke lyser konstant, skal du følge instruktionerne
i FAQ->SP1:
1� For de to enheder tilsluttet før, brug knappen Par til at oprette et
powerline-netværk (SP1->A)� (Spring dette trin over, hvis du allerede har
gjort det�)
2� For yderligere enheder, skal du bruge knappen Par for at tilslutte sig til
det eksisterende powerline-netværk (SP1->B)�
Page 96

95
Dansk
FAQ (ofte stillede spørgsmål)
Spørgsmål 1 Hvordan bruger jeg et knappen Par til at oprette
eller forbinde til et powerline-netværk?
Du kan kun bruge Par-knappen på to enheder på en gang�
A. Sådan oprettes et powerline-netværk
1� Tryk på knappen Par på TL-WPA4220� Lysdioden Strøm
blinker�
2� Inden for 2 minutter, tryk på knappen Par på TL-PA4010�
Lysdioden Strøm
blinker�
3� Efter ca� 1 minut, vil Powerline-lysdioderne
lyse konstant�
B. Sådan oprettes forbindelse til et eksisterende powerline
netværk
1� Tryk på knappen Par på en tredje powerline-enhed� Lysdioden
Strøm
blinker�
2� Indenfor 2 minutter, tryk på knappen Par på enten TL-WPA4220
eller TL-PA4010 som du har parret� Lysdioden Strøm
blinker�
3� Efter ca� 1 minut, vil Powerline-lysdioderne
lyse konstant�
Spørgsmål 2 Hvordan nulstiller jeg TL-WPA4220?
Med TL-WPA4220 slået til, brug et ben til trykke på og hold
nulstillingsknappen nede i mere end 5 sekunder�
Lysdioden for strøm
er slukket et øjeblik før den lyser konstant og
Wi-Fi-lysdioden
blinker hurtigt� Dette indikerer, at nulstillingen er
fuldført�
Spørgsmål 3 Hvordan tilpasser jeg de trådløse indstillinger på
web-administrationssiden?
1� Find værktøjet på den medfølgende CD (kun Windows) eller
download det fra vores ofcielle hjemmeside.
2� Åben værktøjet og klik "Connect" (Opret forbindelse)�
3� Log på web-administrationssiden med standardbrugernavnet
"admin" og adgangskoden "admin" (admin/admin)�
4� Konfigurere SSID og klik på "Save" (Gem) på siden
Page 97

96
Dansk
'Wireless>Wireless Settings' (Trådløs>Trådløse indstillinger)�
5� Konfigurere adgangskoden og klik på "Save" (Gem) på siden
'Wireless>Wireless Security' (Trådløs>Trådløs sikkerhed)�
6� Klik på "click here" (klik her) nederst på siden for at genstarte
extenderen�
Spørgsmål 4 Hvad kan jeg gøre, hvis min computer ikke kan få
adgang til internettet efter at den er forbundet til en Powerlineadapter/extender?
Kontrollér følgende:
1� Tilslut din computer til modemet eller routeren for at teste
forbindelsen til internettet�
2� Sørg for, at hardwaren er tilsluttet korrekt�
3� Sørg for Powerline-lysdioderne lyser på alle dine adaptere/
extendere� Hvis ikke, kan du oprette eller forbinde til et powerline-
netværk ved at henvise til FAQ-SP1.
4� Sørg for at din computer er indstillet til "Hent en IP-adresse
automatisk"�
Hvis computeren stadig ikke kan få adgang til internettet efter
disse trin, skal du kontakte vores tekniske support�
For mere information om avancerede indstillinger,
henvises til Brugervejledningen�
Page 98

97
Türkçe
Not: Hızlı Kurulum Kılavuzu (QIG)'nda örnek olarak gösterilen ürün
modeli WiFi Powerline Genişletici 3-lü Paket Kit “TL-WPA4220T KIT”dir.
LED Göstergeleri
Power (Güç)
Etkin: Cihaz açık.
Devre Dışı: Cihaz kapalı.
Yanıp Sönüyor: Cihaz eşleşiyor.
Powerline
Etkin: Cihaz bir powerline ağına bağlı.
Devre Dışı: Cihaz bir powerline ağına bağlı değil.
Yanıp Sönüyor: Cihaz veri transferi yapıyor.
Ethernet
Etkin: En az bir Ethernet portu bağlı.
Devre Dışı: Ethernet portu bağlı değil.
Wi-Fi
Devre Dışı: Kablosuz fonksiyonu devre dışı.
Hızlı Yanıp Sönüyor: Kablosuz fonksiyonu etkin.
Her Saniye Yanıp Sönüyor: Cihaz bir router'dan Wi-Fi
ayarlarını klonluyor.
AV500
AV500
Wi-Fi/Wi-Fi Clone
(Klon) Butonu
Pair
Butonu
Reset
Butonu
Ethernet
Portları
Page 99

98
Türkçe
Bir powerline ağı kurmak için en az iki powerline cihazı gereklidir.
Örnek olarak TL-WPA4220 ile çalıştırmak için TL-PA4010 powerline
adaptör kullanıyoruz.
Not
: Eğer evinizde veya ofisinizde zaten kullanmış olduğunuz
powerline adaptörleriniz varsa, lütfen öncelikle onları sökünüz. Metod
1'i veya Metod 2'yi kullanarak TL-WPA4220'i kurunuz ve sonra mevcut
adaptörlerinizi powerline ağına ekleyiniz.
Harici elektrik prizi olmayan powerline cihazları için
AV500 AV500
Harici elektrik prizli powerline cihazları için
Page 100

99
Türkçe
Metod 1: Tak ve Çalıştır
Yeni Bir Kablosuz Ağ Oluşturma
1� TL-WPA4220'nin arkasındaki etikette varsayılan kablosuz ağ adı
(SSID) ve şifre yazılıdır.
Kablosuz Ağ Adı (SSID)*:
TP-LINK_XXXXXX
Kablosuz Şifre:
XXXXXXXX
* Varsayılan SSID TP-LINK_XXXXXX. (XXXXXX WLAN MAC adresi her
cihaza özgün son altı karakteri gösterir.)
2� Cihazlarınızı aşağıda gösterildiği gibi bağlayınız.
AV500
AV500
LAN
Internet
WAN
SSID:
ABCDE
SSID:
TP-LINK_xxxxxx
SSID:
TP-LINK_yyyyyy
Tüm Powerline LEDleri 1
dakika içinde sabitlenecek�
TL-PA4010
TL-WPA4220
TL-WPA4220
Keyni Sürün! Internet erişimi için aşağıda yazılı varsayılan SSID
(TP-LINK_xxxxxx veya TP-LINK_yyyyyy) ve şifreyi kullanınız.
Powerline LEDleri sabitlenmezse, tüm powerline cihazlarını resetleyiniz veya
SSS-S1'e bakarak bir powerline ağı oluşturunuz.
 Loading...