


User Guide
DOCSIS 3.0 Cable Modem
TC-7610
REV2.0.0 1910011894

Contents
About This Guide . . . . . . . . . . . . . . . . . . . . . . . . . . . . . . . . . . . . . . . . . . . . . . . . . . . . .1
Chapter 1. Get to Know Your Modem . . . . . . . . . . . . . . . . . . . . . . . . . . . . . . . . 2
1. 1. Product Overview. . . . . . . . . . . . . . . . . . . . . . . . . . . . . . . . . . . . . . . . . . . . . . . . . . . . . . . . . . . . 3
1. 2. Product Appearance. . . . . . . . . . . . . . . . . . . . . . . . . . . . . . . . . . . . . . . . . . . . . . . . . . . . . . . . . 3
1. 2. 1. Front Panel . . . . . . . . . . . . . . . . . . . . . . . . . . . . . . . . . . . . . . . . . . . . . . . . . . . . . . . . . . 3
1. 2. 2. Back Panel . . . . . . . . . . . . . . . . . . . . . . . . . . . . . . . . . . . . . . . . . . . . . . . . . . . . . . . . . . 4
Chapter 2. Quick Start . . . . . . . . . . . . . . . . . . . . . . . . . . . . . . . . . . . . . . . . . . . . . .6
2. 1. Prepare for the Installation . . . . . . . . . . . . . . . . . . . . . . . . . . . . . . . . . . . . . . . . . . . . . . . . . . . 7
2. 1. 1. Installation Environment . . . . . . . . . . . . . . . . . . . . . . . . . . . . . . . . . . . . . . . . . . . . . 7
2. 1. 2. System Requirements . . . . . . . . . . . . . . . . . . . . . . . . . . . . . . . . . . . . . . . . . . . . . . . 7
2. 2. Connect the Modem . . . . . . . . . . . . . . . . . . . . . . . . . . . . . . . . . . . . . . . . . . . . . . . . . . . . . . . . . 7
2. 3. Activate the Modem . . . . . . . . . . . . . . . . . . . . . . . . . . . . . . . . . . . . . . . . . . . . . . . . . . . . . . . . . 8
Chapter 3. Software Conguration . . . . . . . . . . . . . . . . . . . . . . . . . . . . . . . . 10
3. 1. Login . . . . . . . . . . . . . . . . . . . . . . . . . . . . . . . . . . . . . . . . . . . . . . . . . . . . . . . . . . . . . . . . . . . . . . . 11
3. 2. Basic Settings . . . . . . . . . . . . . . . . . . . . . . . . . . . . . . . . . . . . . . . . . . . . . . . . . . . . . . . . . . . . . . 11
3. 2. 1. View Device Information . . . . . . . . . . . . . . . . . . . . . . . . . . . . . . . . . . . . . . . . . . . . 12
3. 2. 2. View Network Information . . . . . . . . . . . . . . . . . . . . . . . . . . . . . . . . . . . . . . . . . . 12
3. 3. Advanced Settings . . . . . . . . . . . . . . . . . . . . . . . . . . . . . . . . . . . . . . . . . . . . . . . . . . . . . . . . . 12
3. 3. 1. View Connection Status . . . . . . . . . . . . . . . . . . . . . . . . . . . . . . . . . . . . . . . . . . . . 13
3. 3. 2. Change Account Password . . . . . . . . . . . . . . . . . . . . . . . . . . . . . . . . . . . . . . . . . 14
3. 3. 3. View System Logs. . . . . . . . . . . . . . . . . . . . . . . . . . . . . . . . . . . . . . . . . . . . . . . . . . 15
3. 4. Logout and Reboot . . . . . . . . . . . . . . . . . . . . . . . . . . . . . . . . . . . . . . . . . . . . . . . . . . . . . . . . . 15
Appendix: Troubleshooting . . . . . . . . . . . . . . . . . . . . . . . . . . . . . . . . . . . . . . . . . 16

About This Guide
This guide is a complement of Quick Installation Guide. The Quick Installation Guide
instructs you on quick Internet setup, and this guide provides details of each function
and shows you the way to configure these functions appropriate to your needs.
When using this guide, please notice that the product features may vary slightly
depending on the model and software version you have, and on your location, language,
and Internet service provider. All screenshots, images, parameters and descriptions
documented in this guide are used for demonstration only.
Conventions
In this guide, the following conventions are used:
Convention
Teal Italic
Teal
>
Note:
Tips:
Description
Hyperlinks are in teal and underlined. You can click to redirect to a website
or a specific section.
Contents to be emphasized and texts on the web page are in teal, including
the menus, items, buttons, etc.
The menu structures to show the path to load the corresponding page. For
example, Basic > Device Information
located in the Basic tab.
Ignoring this type of note might result in a malfunction or damage to the
device.
Indicates important information that helps you make better use of your
device.
means the Device Information page is
More Info
• The Quick Installation Guide (QIG) can be found inside the product package.
• Specifications and support materials can be found on the product page at
http://www.tp-link.com.
• A Technical Support Forum for discussing our products can be found at
http://forum.tp-link.com.
• Our Technical Support contact information can be found at the Contact Technical
Support page at http://www.tp-link.com/support.
1

Chapter 1
Get to Know Your Modem
This chapter introduces the modem and shows its appearance.
This chapter contains the following sections:
• Product Overview
• Product Appearance
Chapter 1
Get to Know Your Modem
1. 1. Product Overview
TP-LINK’s cable modem is designed for delivering data through coax used in HFC
(Hybrid Fiber-Coaxial) networks. It’s an incredibly robust device allowing users to
access Internet and share it with a Gigabit Ethernet port.
This modem complies with DOCSIS 3.0, supports channel bonding of up to 8 downstream
channels and 4 upstream, combined with Enhanced security of AES encryption, IPv4
and IPv6 dual stack, which makes it future-Proof.
1. 2. Product Appearance
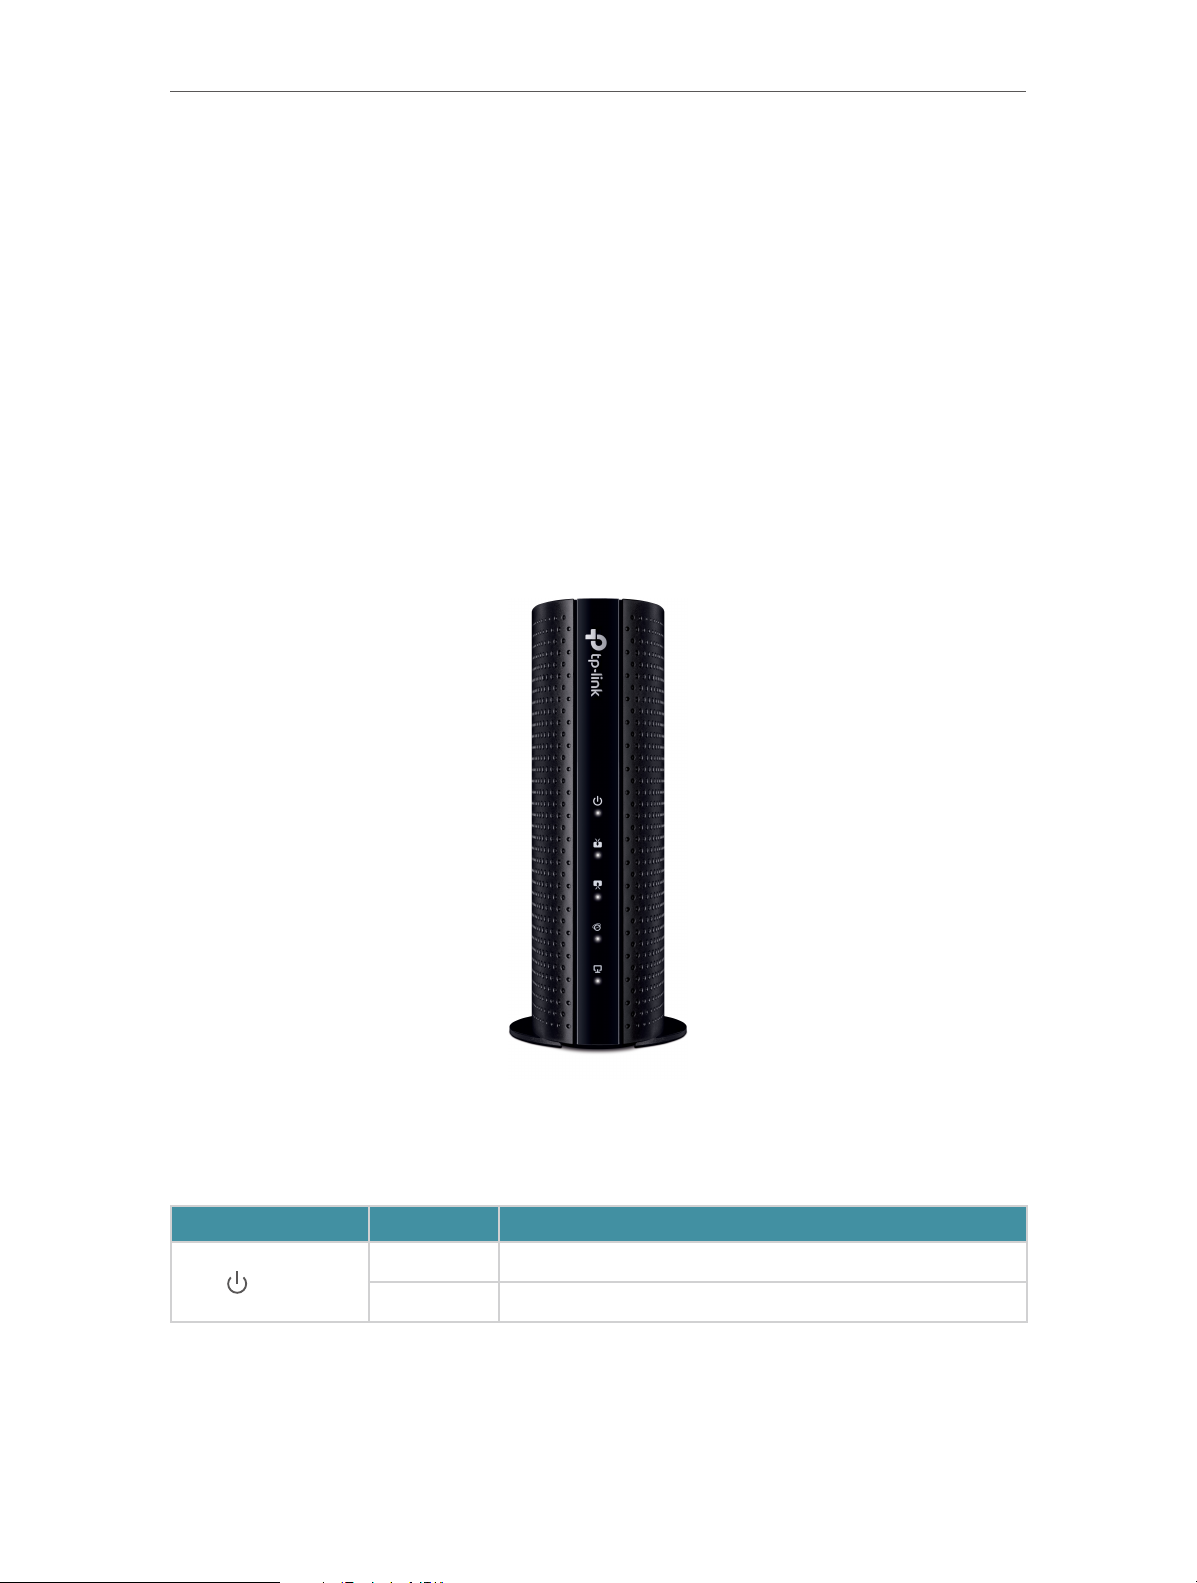
1. 2. 1. Front Panel
The modem’s LEDs are located on the front panel (view from top to bottom). They
indicate the device’s working status. For details, please refer to LEDs Explanation.
LEDs Explanation:
LED Status
Off The power is off.
Power
On The power is on.
Indication
3
Chapter 1
Get to Know Your Modem
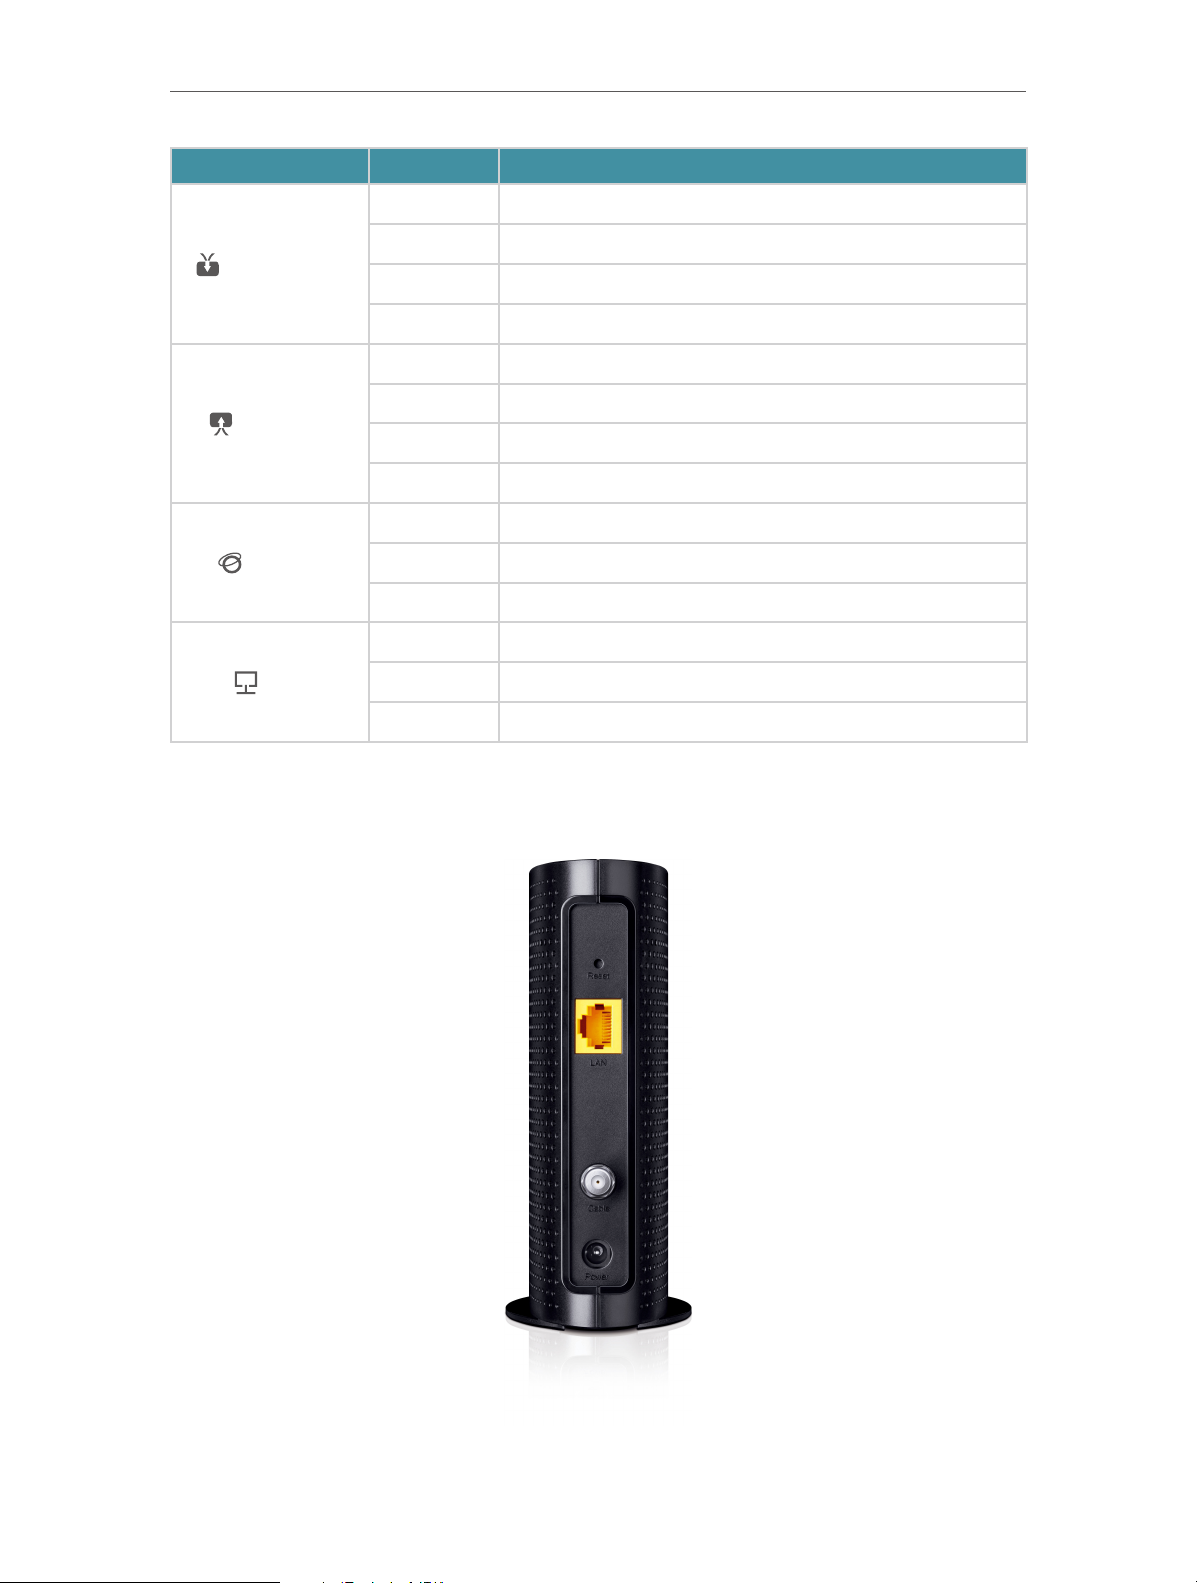
LED Status
Downstream
Upstream
Internet
LAN
Indication
Off The synchronization has not started or has failed.
White The modem has synchronized one channel.
Green The modem has synchronized more than one channel.
Flashing The modem is scanning for downstream channels.
Off The synchronization has not started or has failed.
White The modem has synchronized one channel.
Green The modem has synchronized more than one channel.
Flashing The modem is synchronizing upstream channels.
Off Internet service is unavailable.
On Internet service is available.
Flashing The modem is attempting to connect to the internet.
Off The LAN port is not connected to a powered-on device.
On The LAN port is connected to a powered-on device.
Flashing The LAN port is sending or receiving data.
1. 2. 2. Back Panel
4

Chapter 1
Get to Know Your Modem
The back panel provides the Reset button and several connection ports. Refer to the
following for detailed instructions.
Item
With the modem powered on, use a pin to press and hold the Reset
Reset Button
LAN Port
Cable Port Through this port, you can connect the modem to the coaxial cable.
Power Port The power plug where you will connect the power adapter.
button until all LEDs turn on momentarily. And the modem will be reset
to its factory default settings.
Through this port, you can connect the modem to your PC or an
Ethernet network device.
Description
5

Chapter 2
Quick Start
This chapter contains the following sections:
• Prepare for the Installation
• Connect the Modem
• Activate the Modem

Chapter 2
Quick Start
2. 1. Prepare for the Installation
2. 1. 1. Installation Environment
• The product should not be located where it will be exposed to moisture or excessive
heat.
• Place the modem in a location where it can be connected to the various devices as
well as to a power source.
• Make sure the cables and power cord are placed safely out of the way so they do not
create a tripping hazard.
• The modem can be placed on a shelf or desktop.
• Keep away from the strong electromagnetic radiation and the device of electromagnetic
sensitive.
2. 1. 2. System Requirements
• Broadband Internet access service (cable).
• PCs with a working Ethernet adapter and an Ethernet cable with RJ45 connectors.
• TCP/IP protocol on each PC.
• Web browser, such as Microsoft Internet Explorer, Mozilla Firefox or Apple Safari.
2. 2. Connect the Modem
Before installing the device, please make sure your broadband cable service provided
by your ISP is available. If there is any problem, please contact your ISP. Before cable
connection, cut off the power supply and keep your hands dry. You can follow the steps
below to install it.
1. Connect the coaxial cable to the modem.
2. Connect the power adapter to the modem.
3. Connect your computer to the modem using an Ethernet cable.
7

Chapter 2
Internet
Quick Start
3
Ethernet cable
Coaxial cablePower adapter
1
2
4. Wait until the Internet LED turns solid. The modem has synchronized with your
ISP’s server.
Note:
1. If the Internet LED does not turn solid after about 1 minute, call your ISP’s customer service.
2. The product should be connected to cable distribution system that grounded (earthed) in accordance with ANSI/
NFPA 70, the National Electrical Code (NEC), in particular Section 820.93 - Grounding of Outer Conductive Shield of
a Coaxial Cable.
2. 3. Activate the Modem
1. Get your Internet service account information and the modem’s Information Card
ready.
Serial Number
MAC Address
2. Make sure your computer is set to dynamically obtain an IP address. If not, refer to
Appendix: Troubleshooting > T5 for instructions.
3. Launch a web browser, and visit any website. You will be automatically redirected to
your ISP’s self-activation page.
4. Follow the on-screen instructions to activate the modem, and wait for about 10
minutes till the LEDs
If you have any problem activating the modem, call your ISP’s customer service.
turn solid.
8

Chapter 2
Quick Start
Contact information of major cable ISPs:
Bright House: 1-855-222-0102
Charter: 1-888-438-2427
Comcast: 1-855-OK-BEGIN (1-855-652-3446)
Cox: 1-888-556-1193
Time Warner Cable: 1-888-892-2253
The contact information listed might change. You can also find the contact information in
your monthly Internet service billing statement.
5. Now you can use your computer to surf the Internet.
If you want to share Internet access, connect a router to the modem. You will need
to reboot the modem to get the router connected to the Internet.
Note:
1. If you are unable to access the Internet, refer to Appendix: Troubleshooting > T1 for instructions.
2. For advanced settings, log into the modem’s web interface at http://192.168.100.1, and enter admin (all lowercase)
for both username and password when prompted.
9

Chapter 3
Software Configuration
This guide recommends using the Quick Installation Guide for first-time installation.
If you want to know more about this device, you can get help from this chapter to
configure the software through the web interface.
This chapter contains the following sections:
• Login
• Basic Settings
• Advanced Settings
• Logout and Reboot

Chapter 3
Software Conguration
3. 1. Login
To access the web interface, open a web-browser and type the default address
192.168.100.1 in the address field of the browser.
After a moment, a login window will appear. Enter admin for the username and password,
both in lower case letters. Then click Log in or press Enter.
3. 2. Basic Settings
Under the Basic menu, you can see the system information, including the device
information and network information.
11

Chapter 3
Software Conguration
3. 2. 1. View Device Information
Go to Basic > Device Information, then you can view the device information.
3. 2. 2. View Network Information
Go to Basic > Network Information, then you can view the network information.
3. 3. Advanced Settings
Under the Advanced menu, you can see the system tools, including the connection
status, account management, and system log.
12
Chapter 3
Software Conguration
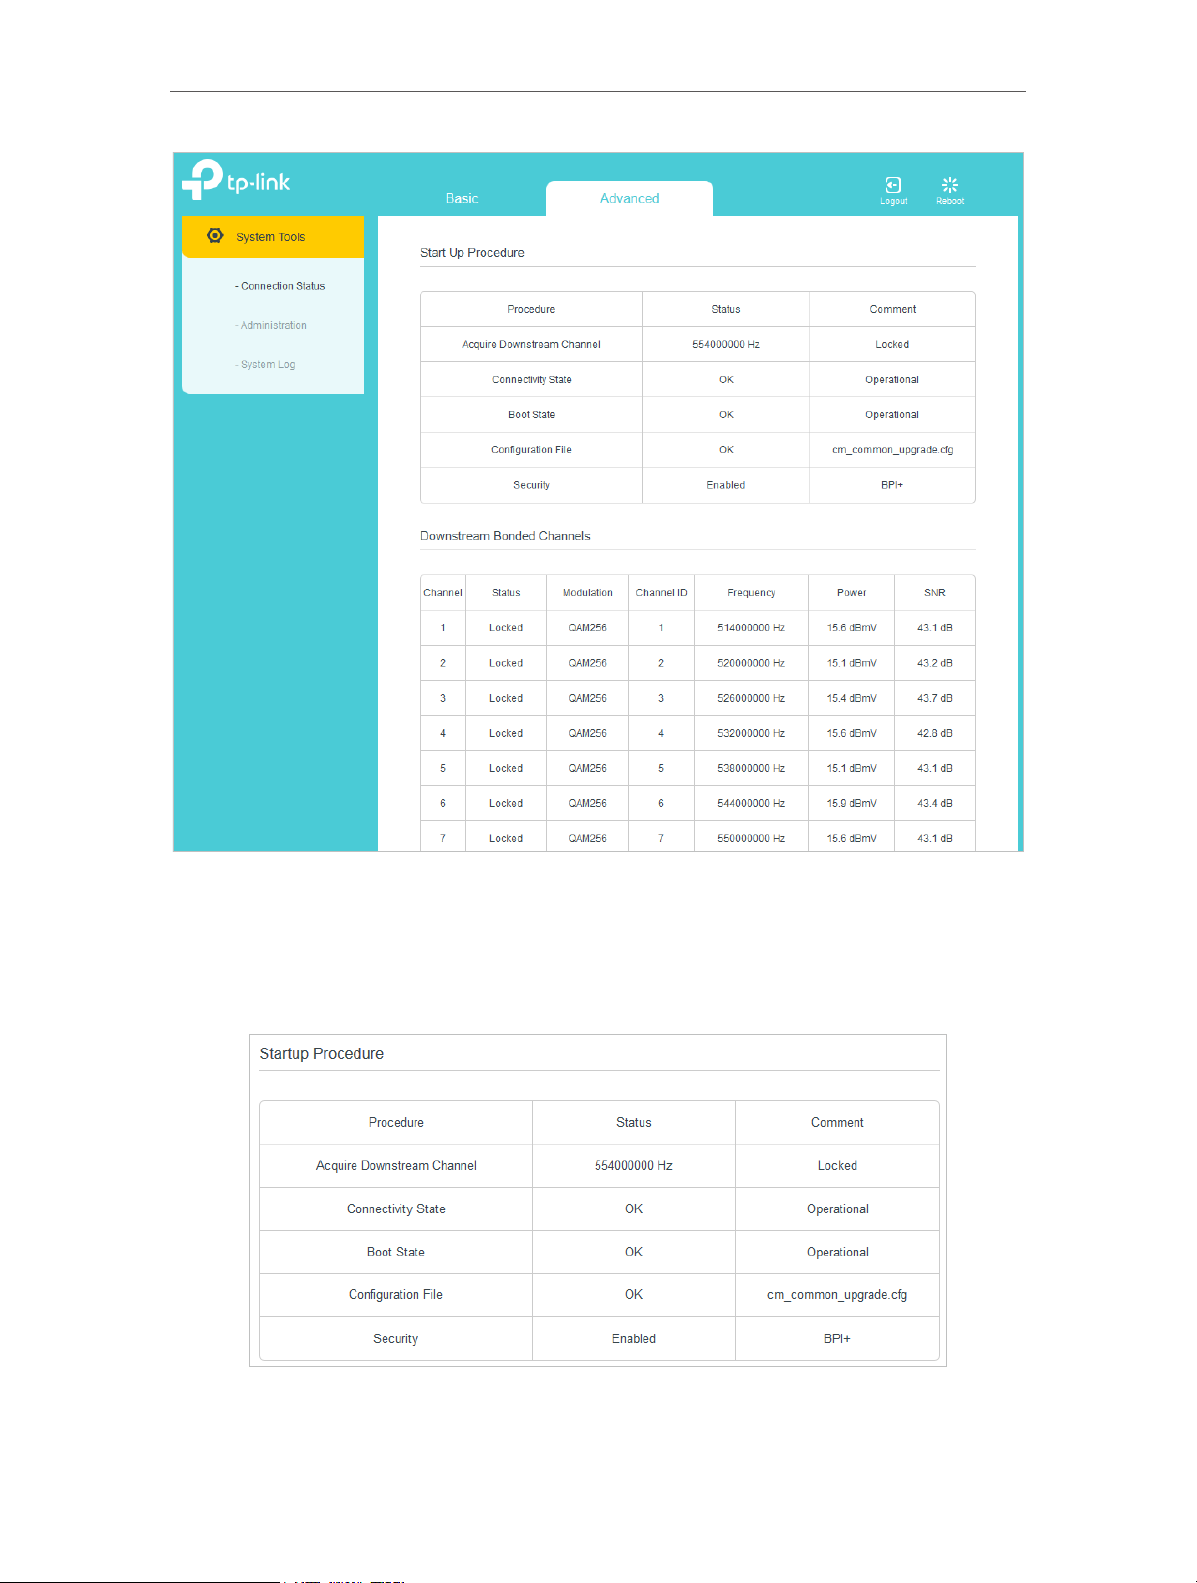
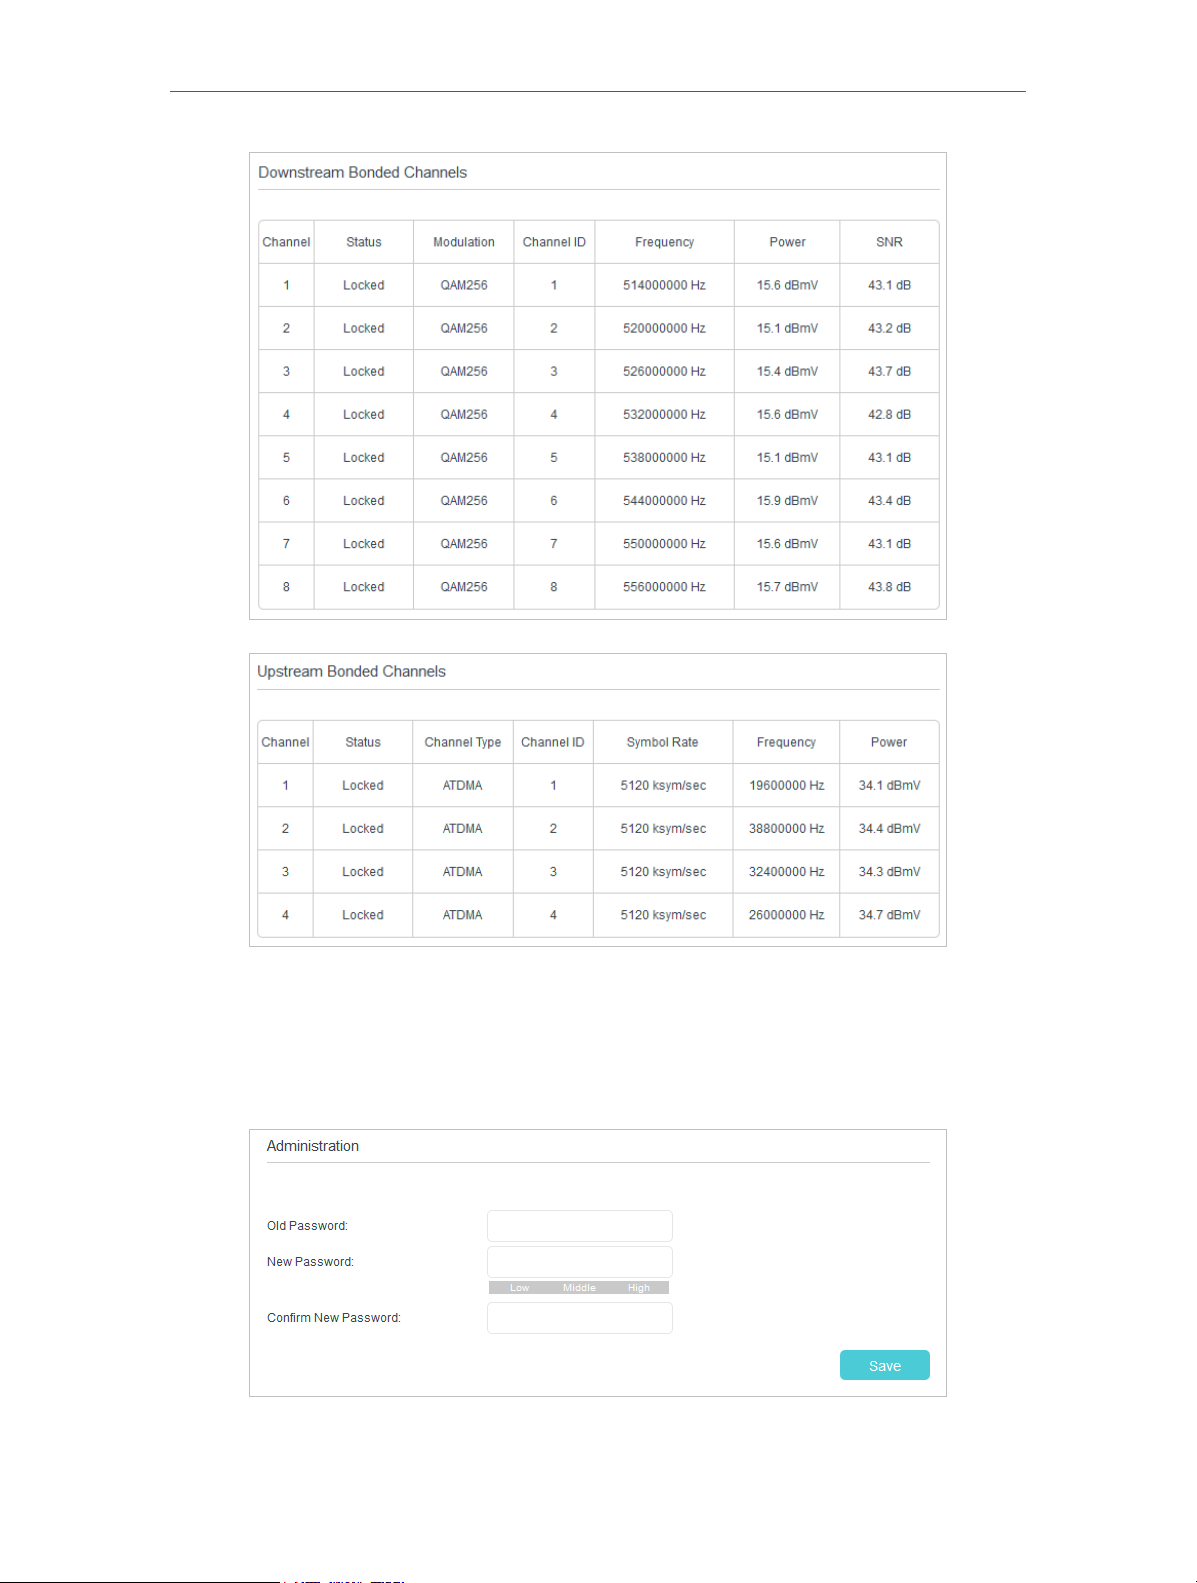
3. 3. 1. View Connection Status
Go to Advanced > Connection Status, then you can view the information of startup
procedure, downstream bonded channels, and upstream bonded channel.
13
Chapter 3
Software Conguration
3. 3. 2. Change Account Password
Go to Advanced > Administration, then you can see the screen below. Here you can set
a new login password for the modem’s web interface.
14
Chapter 3
Software Conguration
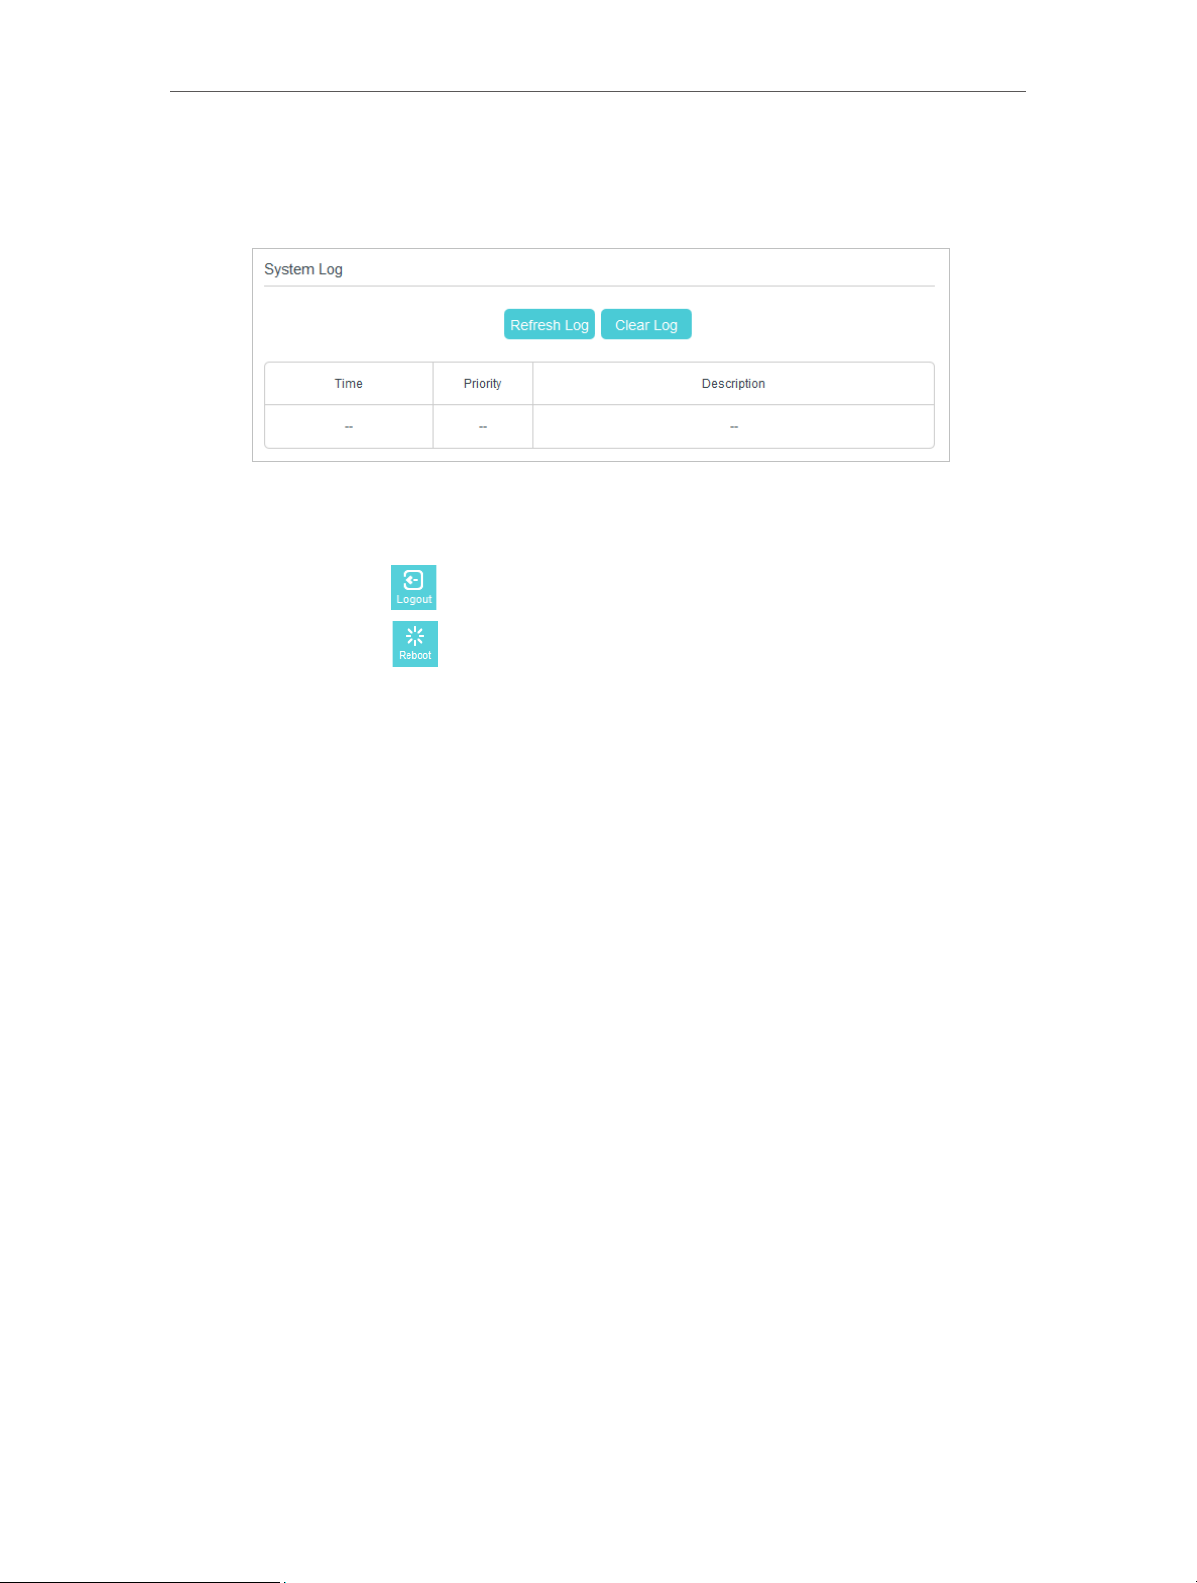
3. 3. 3. View System Logs
Go to Advanced > System Log, then you can view and clear the logs of the modem.
3. 4. Logout and Reboot
Click the Logout icon to log out of the web interface.
Click the Reboot icon
to reboot the modem.
15

Appendix: Troubleshooting
T1. What can I do if I cannot access the Internet?
1. Make sure that all cables are properly and securely connected to the modem.
2. Contact your ISP to ensure your modem is properly activated. If it isn’t, your ISP will
activate it for you.
3. Make sure that your computer is set to obtain an IP address automatically.
4. Power cycle the modem by unplugging the power adapter from the electrical outlet
and plugging it back in.
5. Reset the modem. Please refer to T4 for instructions.
6. Contact our Technical Support if the problem persists.
T2. What can I do if the login page of the modem’s web interface does
not appear?
1. Check if the computer is set to a static IP address. If so, change the setting to obtain
an IP address automatically.
2. Make sure http://192.168.100.1 is correctly entered in the web browser.
3. Use another web browser.
4. Unplug and reconnect both ends of the Ethernet cable.
T3. How can I reset the password to the modem’s web interface?
If you have forgotten your password, refer to T4 to reset the modem. This will reset
the password back to admin.
T4. How can I restore the modem to its factory default settings?
With the modem powered on, press and hold the Reset button on the back panel
until all LEDs turn on momentarily, then release the button.
T5. How can I change my computer‘s setting to obtain an IP address
automatically?
To change the computer’s network settings, follow the steps below.
• For MAC OS X:
1 ) Click the Apple icon, and select System Preferences from the drop-down list.
2 ) Click the Network icon.
3 ) Select Ethernet (for wired connection) or Wi-Fi (for wireless connection) in the
left panel, then click Advanced.
4 ) Click TCP/IP.
16

5 ) From the Configure IPv4 drop-down list, select Using DHCP.
6 ) Click OK.
• For Windows 7/8/8.1/10:
1 ) Right-click the Network icon on the taskbar and select Open Network and
Sharing Center > Change adapter settings.
2 ) Right-click your network connection (wired or wireless) and select Properties.
3 ) Double-click Internet Protocol Version 4 (TCP/IPv4).
4 ) Select both Obtain an IP address automatically and Obtain DNS server address
automatically, then click OK.
5 ) Click OK again to save your configuration.
• For Windows XP:
1 ) Right-click the Network icon on the taskbar and select Open Network
Connections.
2 ) Right-click your network connection (wired or wireless) and select Properties.
3 ) Double-click Internet Protocol (TCP/IP).
4 ) Select both Obtain an IP address automatically and Obtain DNS server address
automatically, then click OK.
5 ) Click OK again to save your configuration.
17

COPYRIGHT & TRADEMARKS
Specifications are subject to change without notice. is a registered
trademark of TP-LINK TECHNOLOGIES CO., LTD. Other brands and product names are
trademarks or registered trademarks of their respective holders.
No part of the specifications may be reproduced in any form or by any means or used
to make any derivative such as translation, transformation, or adaptation without
permission from TP-LINK TECHNOLOGIES CO., LTD. Copyright © 2016 TP-LINK
TECHNOLOGIES CO., LTD. All rights reserved.
http://www.tp-link.com
18

FCC STATEMENT
This equipment has been tested and found to comply with the limits for a Class B digital
device, pursuant to part 15 of the FCC Rules. These limits are designed to provide
reasonable protection against harmful interference in a residential installation. This
equipment generates, uses and can radiate radio frequency energy and, if not installed
and used in accordance with the instructions, may cause harmful interference to radio
communications. However, there is no guarantee that interference will not occur in a
particular installation. If this equipment does cause harmful interference to radio or
television reception, which can be determined by turning the equipment off and on, the
user is encouraged to try to correct the interference by one or more of the following
measures:
• Reorient or relocate the receiving antenna.
• Increase the separation between the equipment and receiver.
• Connect the equipment into an outlet on a circuit different from that to which the
receiver is connected.
• Consult the dealer or an experienced radio/ TV technician for help.
This device complies with part 15 of the FCC Rules. Operation is subject to the following
two conditions:
1 ) This device may not cause harmful interference.
2 ) This device must accept any interference received, including interference that
may cause undesired operation.
Any changes or modifications not expressly approved by the party responsible for
compliance could void the user’s authority to operate the equipment.
Safety Information
• When product has power button, the power button is one of the way to shut off the
product; when there is no power button, the only way to completely shut off power is
to disconnect the product or the power adapter from the power source.
• Don’t disassemble the product, or make repairs yourself. You run the risk of electric
shock and voiding the limited warranty. If you need service, please contact us.
• Avoid water and wet locations.
• Adapter shall be installed near the equipment and shall be easily accessible.
• The plug considered as disconnect device of adapter.
19

• The product should be connected to cable distribution system that grounded
(earthed) in accordance with ANSI/NFPA 70, the National Electrical Code (NEC), in
particular Section 820.93 - Grounding of Outer Conductive Shield of a Coaxial Cable.
Explanation of the symbols on the product label
Symbol
Explanation
DC voltage
RECYCLING
This product bears the selective sorting symbol for Waste electrical
and electronic equipment (WEEE). This means that this product must be
handled pursuant to European directive 2012/19/EU in order to be recycled
or dismantled to minimize its impact on the environment.
User has the choice to give his product to a competent recycling
organization or to the retailer when he buys a new electrical or electronic
equipment.
20
 Loading...