

Page 1
TOSHIBA HDD/DVD VIDEO RECORDER
Introduction
DIGITAL VIDEO
HDD/DVD VIDEO RECORDER
RD-85DTSB
RD-85DTSB
OPERATIONS
Read “INSTALLATION GUIDE” first.
OWNER’S MANUAL
Recording
Playback
Editing
Function Setup
RD-85DT_Ope_E_p001-146 3/28/06, 16:441
Printed in China
N PM00
2546101
© 2006 Toshiba Corporation
0
Others
Page 2

Introduction
Table of contents
Introduction
Caution for safety................................................ 4
About this product .............................................. 5
Compatible discs ................................................ 6
Recording format and disc selection .............. 11
Index to parts and controls .............................. 14
Front panel ............................................................... 14
Display ..................................................................... 15
Rear panel ............................................................... 16
Remote control ........................................................ 18
Before operating this recorder ........................ 20
Main function buttons....................................... 23
TV view operation ............................................. 24
DTV menu setting.............................................. 26
Recording
Before recording ............................................... 32
Initializing a disc ....................................................... 32
Setting for recording on a DVD-R/RW disc in Video
mode ........................................................................ 34
Checking disc space ................................................ 35
Selecting recording mode ........................................ 35
Programming a recording (REC MENU) .......... 36
Optional settings on REC MENU ............................. 40
Programming a recording (EPG) ..................... 43
Recording a TV programme ............................. 45
Recording an external source.......................... 47
Deleting recorded contents.............................. 50
To delete a title (chapter) ......................................... 50
Deleting multiple specified parts .............................. 50
Others ................................................................. 51
To protect recorded content ..................................... 51
Technical information ............................................... 51
Playback
Playing recorded contents
(CONTENT MENU) ............................................. 54
Playing at various speeds ........................................ 56
Folder function .................................................. 58
Creating folders ....................................................... 59
Moving into “GARBAGE” ......................................... 60
Emptying “GARBAGE” ............................................. 60
Moving a recorded title into a folder ......................... 61
Changing the order of folders .................................. 62
Removing a folder .................................................... 62
Using “LOCK” .......................................................... 63
Playing a DVD video disc ................................. 64
Locating a title using the top menu .......................... 64
Other playback functions ................................. 66
Playing a TV programme currently being recorded
(Chase Play) ............................................................ 66
Pausing a TV broadcast to resume later
(Pause TV) ............................................................... 67
Zooming a picture .................................................... 68
Locating by entering the number of a desired
section ..................................................................... 69
Locating a specific point by entering its elapsed time
(Time Search) .......................................................... 69
Selecting the sound ................................................. 70
Viewing JPEG files................................................... 72
Playing MP3 files ..................................................... 74
Checking the current status and settings ................. 76
Functions in Quick Menu ......................................... 78
Editing
Creating your own title ..................................... 82
Editing procedure ..................................................... 82
Basic flow ................................................................. 83
1: Changing the name of a recorded title ................. 84
2: Dividing a recorded title into several chapters ..... 85
3: Collecting necessary scenes ............................... 90
4: Dubbing to save ................................................... 95
2
RD-85DT_Ope_E_p002-013 3/30/06, 11:452
Page 3
Creating a DVD-Video using DVD-R/RW ....... 106
Other editing functions................................... 114
Changing the picture on CONTENT MENU ............ 114
Combining two titles (Original) into one .................. 116
Function Setup
Customizing the function settings ................ 122
DVD player settings ............................................... 123
Picture/Audio settings ............................................ 126
Display settings ...................................................... 128
Operational settings ............................................... 129
DVD recorder operation ......................................... 130
Management settings ............................................ 132
Introduction
Recording
Playback
Others
Entering characters ........................................ 136
Before calling service personnel ................... 138
Output sound conversion table ..................... 140
Error codes on the display window............... 141
Recording duration ......................................... 142
Language code list.......................................... 143
Table of languages and their abbreviations ........... 143
Specification .................................................... 144
Editing
Function Setup
Others
RD-85DT_Ope_E_p002-013 3/27/06, 19:393
3
Page 4

Introduction
Introduction
Caution for safety
Read “SAFETY PRECAUTIONS”, “IMPORTANT SAFETY INSTRUCTIONS”,
“Precautions” and others of the “INSTALLATION GUIDE” first.
4
RD-85DT_Ope_E_p002-013 3/27/06, 19:394
Page 5

Introduction
About this product
Introduction
Some differences
This DVD recorder is more similar to a computer than to
a standard DVD player. In addition to a microprocessor, it
contains a hard disc drive (an HDD), an operating
system, random access memory (RAM), and a DVDRAM/R/RW drive. The operating system includes
software stored on the HDD that is transferred to the
RAM when the machine is turned on and at other times
during operation. This transfer can take time. Therefore,
when you turn on the DVD recorder, it may take a minute
or so before it is ready to use. Likewise, other functions
may not be performed as quickly as they would on other
AV equipment. In addition, because programs stored on
the DVD-RAM/R/RW drive cannot be accessed as
quickly as those stored on the HDD, accessing those
programs (or deleting a program from a DVD-RAM or
DVD-RW disc) may take more time. Please take these
factors into consideration as you use the DVD recorder.
About the hard disc drive (HDD)
Like any HDD, the HDD in the DVD recorder is a fragile
device that is susceptible to partial or complete failure if it
is jarred or as a result of use over time. It will not last
forever. Therefore, do not use the HDD for longer term
storage of programs you wish to retain. If portions of the
HDD become damaged, programs recorded on those
portions may exhibit pixelization or block noise when
played back. Repeated playback of the program may
cause the problem to get worse and, eventually, the
program may become unplayable. If you notice such
noise in a program that you want to save, you should
transfer to a recordable DVD disc as soon as possible.
Recordable DVD discs are also susceptible to damage if
not handled and stored carefully, some or all of the
programs on them may become unplayable. You can
reduce these risks by using high quality DVD recordable
discs and checking their playability from time to time. If it
becomes necessary to service your DVD recorder, it may
be necessary to delete some or all of the programs on
the HDD.
Playback Restrictions
This owner’s manual explains the basic instructions for
this recorder. Some DVD video discs are produced in a
manner that allows specific or limited operation during
playback. As such, the recorder may not respond to all
operating commands. This is not a defect in the recorder.
Please refer to the notes on compatible discs later in this
Introduction and to the discussion of DVD playback and
features later in this manual.
” may appear on the TV screen during operation.
“
” means that the operation is not permitted by the
“
recorder or the disc.
Recording Restrictions
Copy-protected contents of DVD-Video disc, VIDEO CDs
or audio CDs on the market cannot be copied on this
recorder.
Contents without copy protection should be copied or
edited only in accordance with applicable copyright laws,
which may restrict copying or editing. Contents that
permit single copying (copy once contents) can be
recorded onto the HDD or a CPRM compatible DVDRAM, DVD-RW (VR mode) or DVD-R (VR mode). They
cannot be recorded onto a DVD-RW (Video mode) or
DVD-R (Video mode). Copy once contents recorded in
the HDD can be moved to a CPRM compatible DVDRAM, DVD-RW or DVD-R, with some dubbing and
editing restrictions.
Compatibility
In isolated cases, a disc bearing the DVD or CD logo
may not fully and properly play back all features. This
can be due, among other reasons, to problems and
errors that can occur during the creation or recording of
DVD and other software and the manufacture of software
discs (including blank discs). Moreover, because of
variations in the quality of discs, this recorder may not be
able to record on all discs that bear a DVD-RAM, DVD-R
or DVD-RW logo, but you should not encounter difficulty
if you use only high quality recordable DVD discs.
Recording
Playback
Editing
Function Setup
Others
RD-85DT_Ope_E_p002-013 3/30/06, 11:455
5
Page 6
Introduction
Compatible discs
When you want to play DVD or CD software or copy programmes from the HDD to a recordable DVD,
load an appropriate disc into the recorder. There are many types and formats of discs. Please use the
following information to select an appropriate disc.
Notes
• Handle the disc according to the disc instruction manual.
• Depending on the data recording method or the disc status, playback or recording on this recorder may not be possible, even
if the disc is labeled as below. Toshiba cannot assure that all discs bearing the DVD or CD logos will operate as expected.
Please see the discussion of compatibility on page 5.
For recording / playback
Disc Mark Specification Recording format Copy once contents
HDD 160GB VR mode Recordable
DVD-RAM
DVD-RW • Ver. 1.1 or later VR mode Recordable
DVD-R • 4.7GB For General Ver.2.0 VR mode Recordable
• Single sided 4.7GB (12cm (43/4 in.))
• Double sided 9.4GB (12cm (43/4 in.))
3
(12cm (4
(12cm (4
/4 in.)) (CPRM compatible
3
/4 in.)) (CPRM compatible
VR mode Recordable
Video mode Not recordable
Video mode Not recordable
On DVD-RAM discs
Use only DVD-RAM discs that comply with
DVD-RAM standard Version 2.0, 2.1 or 2.2.
The recorder cannot record on a disc formatted in any
other standard. When using such a disc, initialize it by
using the disc-format function of this recorder.
The recorder may not record, dub, or edit some DVDRAM discs, because they are edited/recorded with
another manufacture’s equipment or PC, contain a
large number of titles, or have little remaining capacity.
Also, a DVD-RAM disc may not be edited or recorded
if its title contains still pictures.
DVD-RAM discs formatted in UDF2.0 on a PC are not
compatible with this recorder. Before using these
discs, initialize them on this recorder.
Select a DVD-RAM disc that shows a statement on its
package such as “this disc can be used with video
recorders and drives compatible with 4.7GB DVDRAM discs” or “this disc can copy images that permit
single copying.” This recorder complies with current
copyright protection technology and can copy a disc
only when the disc permits copying once. When there
is no indication on the disc, copying will not be
allowed.
DVD-RAM discs with cartridges are
recommended for recording.
Two types of DVD-RAM discs are
available: ones with cartridges and ones
without cartridges. You can use either of
them with this recorder, but the former
ones are recommended.
In order to record highly detailed data, make sure the
disc is clean. DVD-RAM discs with cartridges are
easier to handle in this regard.
Do not open the cartridge shutter. The disc may not
play, or may not be recorded or edited once it
becomes dirty.
There are two types of DVD-RAM cartridges;
removable (TYPE 2/4) and not removable (TYPE 1). It
is recommended you do not remove the disc even
when you can.
Refer to the instruction manual that comes with the
disc if it is absolutely necessary to remove the disc.
Some commercially available cartridge discs cannot
be recorded or edited once the inside discs are
removed.
6
(CPRM compatible
disc only)
disc only)
disc only)
RD-85DT_Ope_E_p002-013 3/27/06, 19:396
Page 7
Introduction
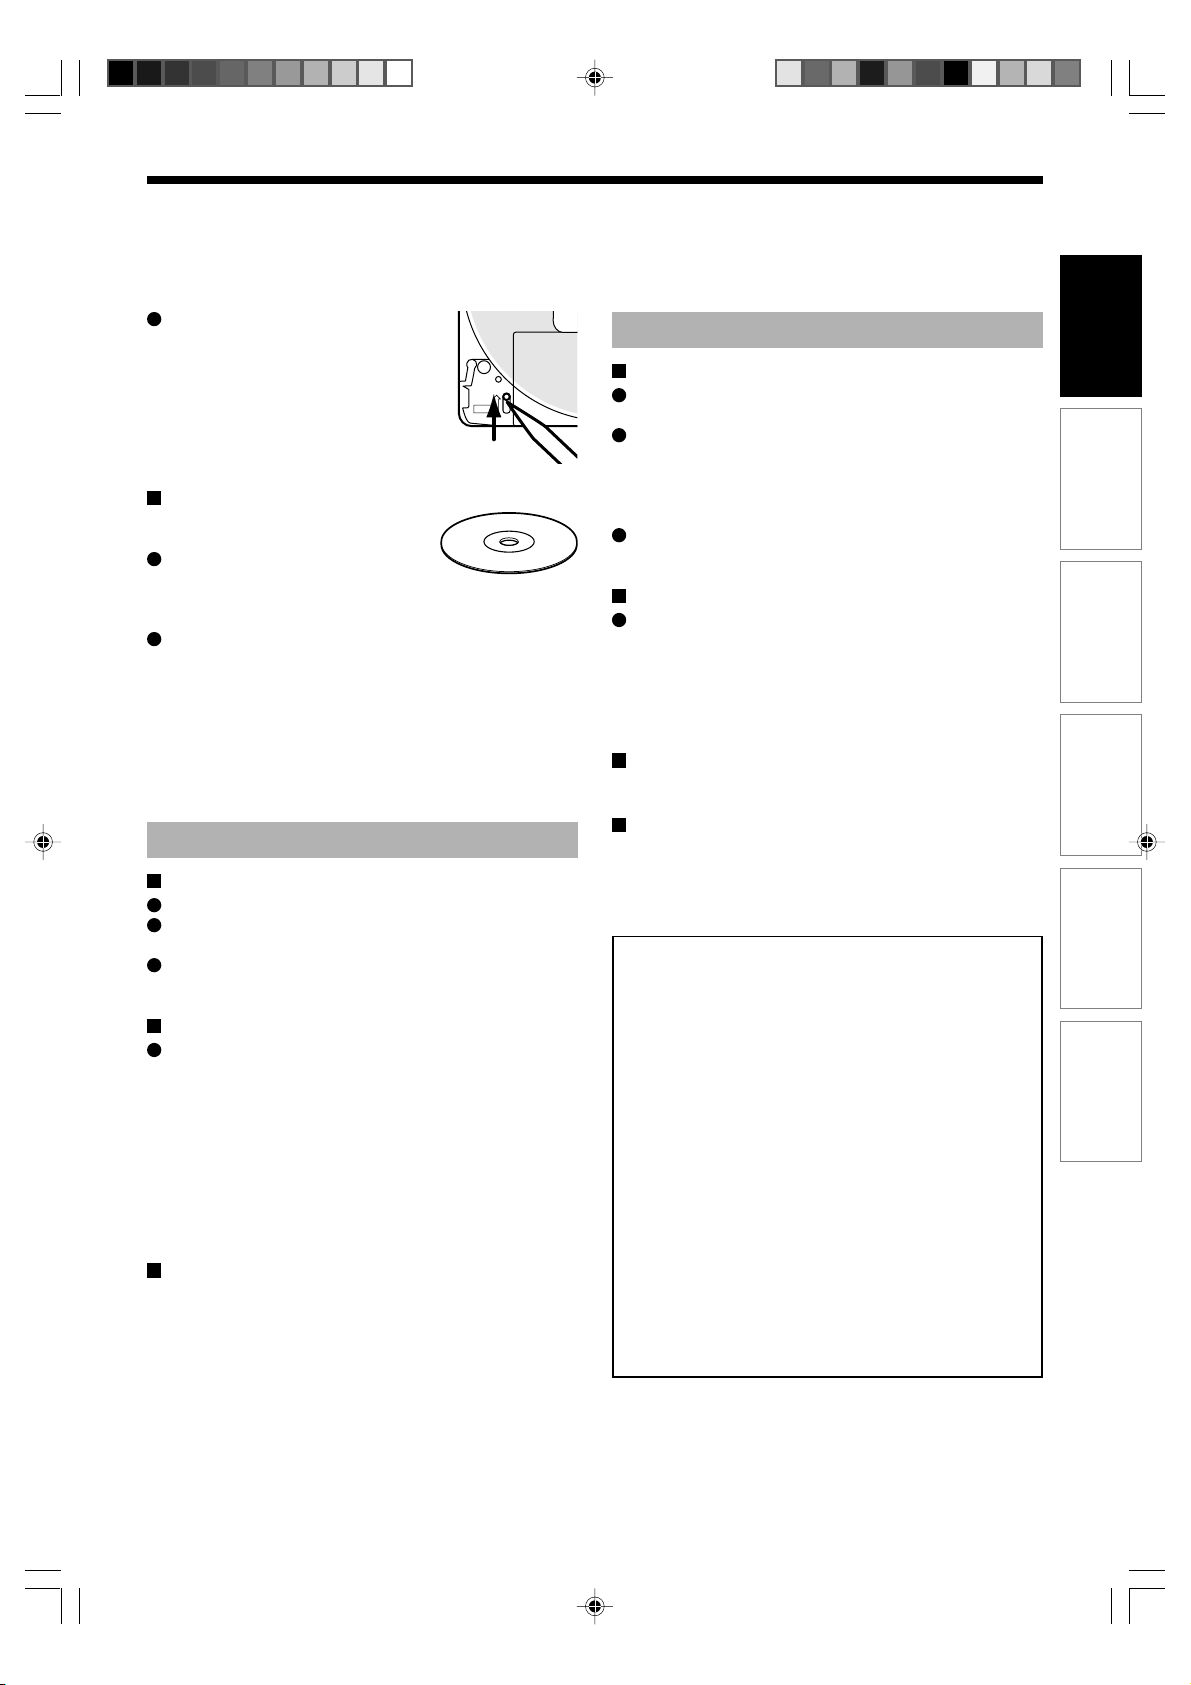
To protect recorded contents
Slide the write-protect tab to
“PROTECT” with something small
enough. The disc can play, but
cannot be edited or erased. Refer
to the instructions that come with
the disc.
When using a disc without a
cartridge (commercially
available discs)
Discs without cartridges can easily
attract fingerprints and dust, which
is the reason they are not recommended. If you
cannot avoid using them, handle with proper care.
When you write in a title column on a disc, use a pen
with a soft tip. Do not use a pen with a hard tip, such
as a ballpoint pen.
Recommended discs
The following discs have been tested with this recorder:
9.4 GB double-sided cartridge: Panasonic 2X, 3X, 5X
4.7 GB single-sided cartridge: Panasonic 2X, 3X, 5X
PROTECT
On DVD-RW discs
Standards
Discs labeled DVD-RW Ver.1.1 can be used.
Discs compatible with 2X speed recording (labeled
Ver.1.1/2X etc,) can also be used.
Select discs labeled “for video,” “for recording,” “120
min.” etc.
Recording conditions
Video mode cannot record contents with restrictions
on recording (copy once contents). To record such
contents, select a CPRM compatible disc and initialize
it in VR mode before recording. (You can initialize the
disc again either VR mode or Video mode. Initializing
erases all contents in the disc.)
If deterioration in writing area on a disc is advanced by
repeat erasing and recording, the disc may not be
played on other device even if it can be played on this
recorder.
Recommended discs*
JVC 2X, 4X
On DVD-R discs
Standards
DVD-R for General Ver.2.0 discs can be used for
recording and playback.
Discs compatible with the following recording speeds
can also be used:
Ver. 2.0/2X
Ver. 2.0/4X
Ver. 2.0/8X
Select discs labeled “for video,” “for recording,” “120
min.” etc.
Recording conditions
Video mode cannot record contents with restrictions
on recording (copy once contents). To record such
contents, select a CPRM compatible disc and initialize
it in VR mode before recording. (You cannot initialize
the disc again from VR mode to Video mode, or vice
versa.)
Recommended discs
That’s (Taiyo-Yuden) 4X, 8X
Tested discs
Panasonic 4X
*Operation has been confirmed with recommended discs
and tested discs, but some other discs may not be
usable.
• Toshiba is not liable for any damage or loss caused
directly or indirectly by the malfunction of this
recorder, including, without limitation, any one of the
following:
• Failure to record contents intended to be recorded
by the consumer.
• Failure to edit contents as intended by the
consumer.
• When a DVD-RAM/R/RW disc created on this
recorder is used (e.g., insertion, playback,
recording or editing) in another DVD player,
recorder or personal computer drive.
• When a DVD-RAM/R/RW disc that is used in the
manner described in the immediately preceding
bullet point is used again in this recorder.
• When a DVD-RAM/R/RW disc that was recorded
in another DVD recorder, or in a personal
computer drive is used in this recorder.
• Discs recorded in this recorder may not operate as
expected on other DVD players, recorders or
personal computer drives.
Recording
Playback
Editing
Function Setup
Others
RD-85DT_Ope_E_p002-013 3/27/06, 19:397
7
Page 8
Introduction
Compatible discs (Continued)
For playback only
Disc Specification Remarks
DVD video
disc
VIDEO CD
Audio CD
CD-R
Mark
DIGITAL VIDEO
• 12cm (43/4 in.) / 8cm (31/4 in.)
• Region number
or
2
• 12cm (43/4 in.) / 8cm (31/4 in.)
• Version 1.1 and 2.0
• 12cm (4
• 12cm (43/4 in.)
• CD-DA (audio CD) format
ALL
3
/4 in.) / 8cm (31/4 in.)
The region number of this DVD recorder is 2.
If region numbers, corresponding to a
specific playable area, are printed on your
DVD video disc and you do not find
ALL
, or the disc is encoded to permit
playback only in regions other than Region 2,
disc playback will not be allowed by the
recorder.
Depending on the disc status, playback may
not be possible.
CD-RW
2
or
• You cannot play discs other than those listed above.
• You cannot play non-standardized discs even if they may be labeled as above.
• You cannot play discs with specialized encoding (such as SACD discs) or the DVD audio portions of DVD Audio
discs.
• This recorder uses the PAL colour system for recording and playback. The NTSC colour system is used for playback
only, by selecting an appropriate setting. A disc may fail to play, if it has data in the PAL colour system and the NTSC
colour system. You cannot add the PAL colour system data to the disc with the data recorded in the NTSC colour
system even if they have region marks 2 or
• There may be some DVD discs designed for this market that cannot be played on this recorder. If you encounter
please contact TOSHIBA customer service.
• Toshiba cannot assure that all discs bearing the DVD or CD logos will operate as expected. Please see the
discussion of compatibility on
page 5.
ALL
.
8
RD-85DT_Ope_E_p002-013 3/27/06, 19:398
Page 9
Introduction
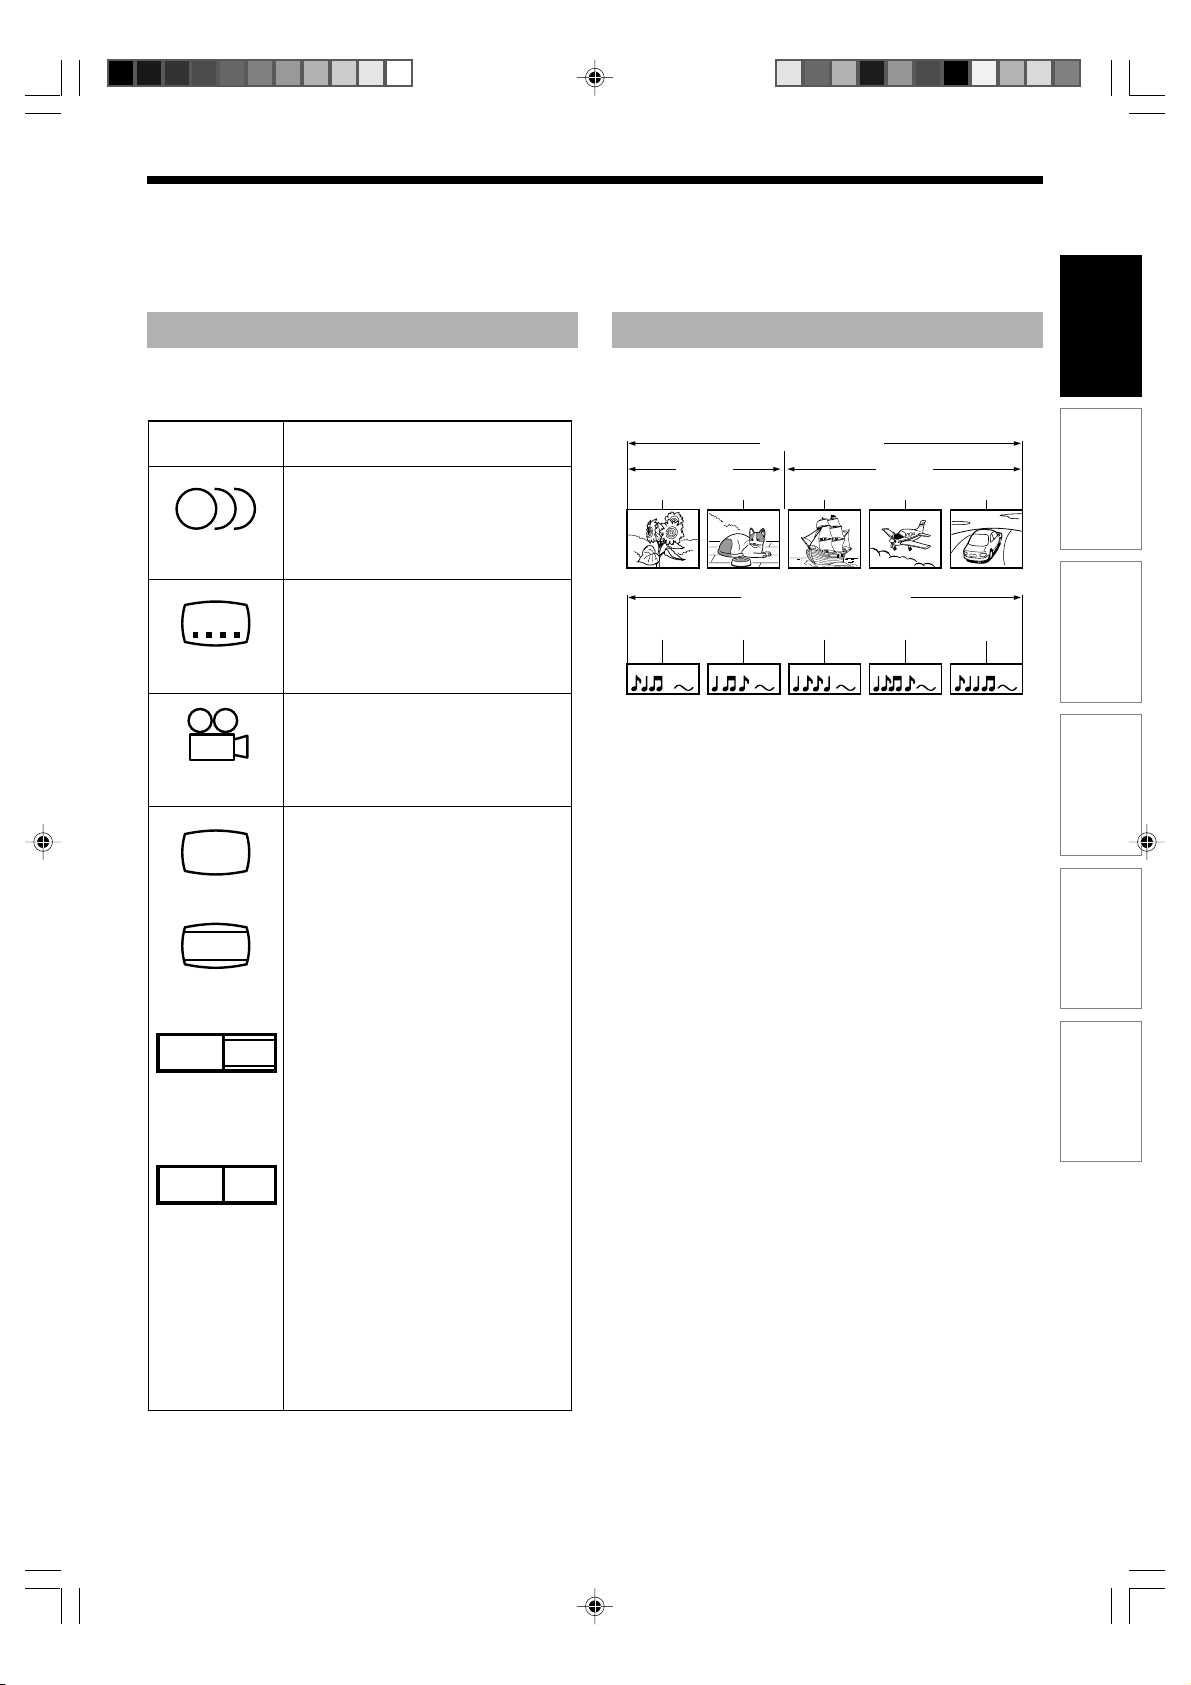
Marks on DVD video discs
The following are examples of marks and the meanings.
Mark Meanings
2
2
3
4:3
LB
16:9 LB
Number of audio streams
recorded in the disc.
(2 streams such as English and
Japanese in this example.)
Number of subtitle languages
recorded in the disc.
(2 subtitle languages are
recorded in this example.)
Number of camera angles
recorded in the disc.
(3 camera angles are recorded in
this example.)
Pictures are recorded in the
standard picture shape
(4:3 aspect ratio).
Pictures are recorded in the letter
box picture shape (4:3 aspect
ratio with horizontal black bars in
the top and bottom of pictures).
Pictures are recorded in the 16:9
wide picture shape.
TVs with 4:3 aspect ratio will
display them in the letter box
style.
Structure of disc contents
Normally, DVD video discs are divided into titles, and the
titles are subdivided into chapters.
VIDEO CDs/audio CDs are divided into tracks.
DVD video disc
Title 1 Title 2
Chapter 2 Chapter 1 Chapter 2 Chapter 3Chapter 1
VIDEO CD / audio CD
Track 1 Track 2 Track 3 Track 4 Track 5
Title: Divided contents of a DVD video disc.
Roughly corresponds to a story title in short
stories.
Chapter: Divided contents of a title. This corresponds
to a chapter in a story.
Track: Divided contents of a VIDEO CD or an audio
CD.
Each title, chapter, or track is assigned a number, which
is called “title number”, “chapter number”, or “track
number” respectively.
Some discs may not have these numbers.
When you record on the HDD or a DVD-RAM disc, one
recording will always equal one title. You can divide a title
into several chapters by marking borders in it to facilitate
scene search.
Recording
Playback
Editing
Function Setup
Others
16:9 PS
RD-85DT_Ope_E_p002-013 3/27/06, 19:399
Pictures are recorded in the 16:9
wide picture shape.
TVs with 4:3 aspect ratio will
display them in the pan scan style
(one or both sides of pictures
are cut).
Actual picture shape may vary
depending on the aspect ratio or
mode selection of the TV.
9
Page 10
Introduction
Compatible discs (Continued)
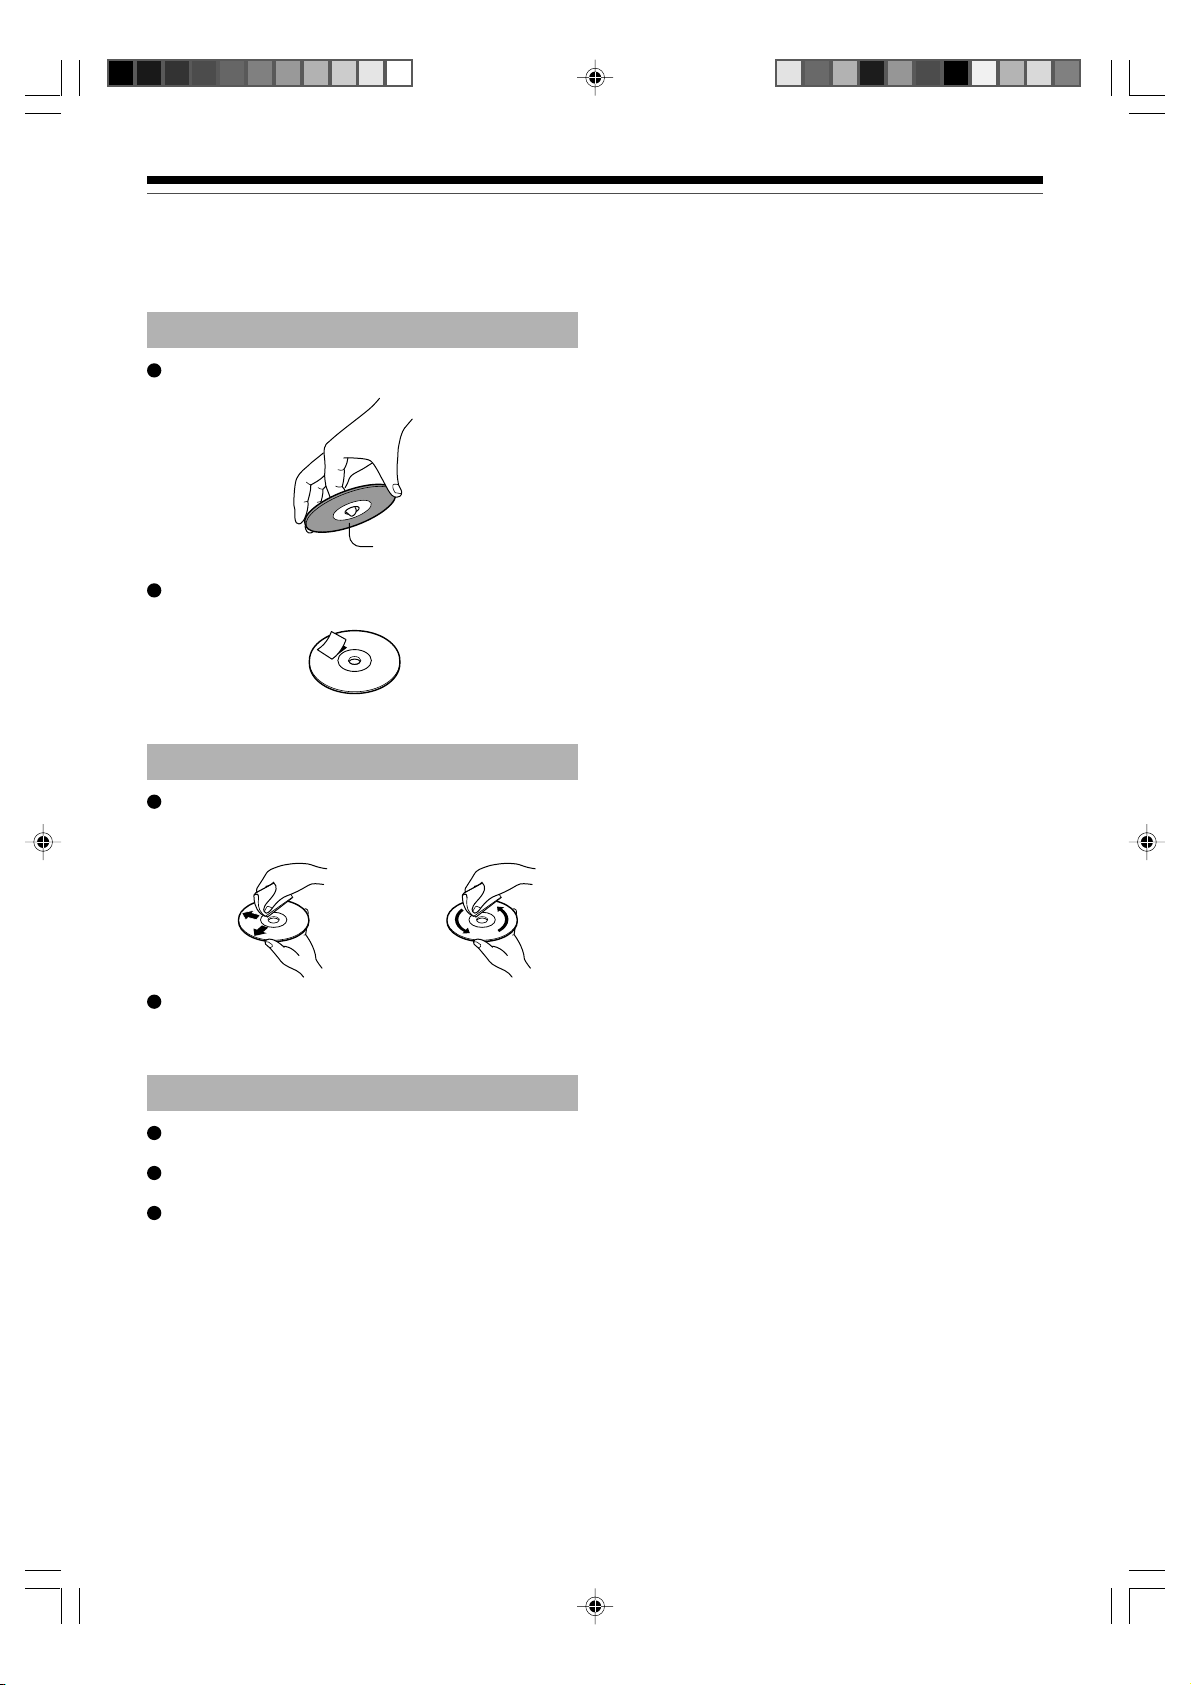
On handling discs
Do not touch the playback side of the disc.
Yes
Playback side
Do not stick paper or tape to discs.
No
On cleaning discs
Fingerprints and dust on the disc cause picture and
sound deterioration. Wipe the disc from the center
outwards with a soft cloth. Always keep the disc clean.
Yes No
Do not use any type of solvent such as thinner,
benzine, commercially available cleaners or antistatic
spray for vinyl LPs. It may damage the disc.
On storing discs
Do not store discs in a place subject to direct sunlight
or near heat sources.
Do not store discs in places subject to moisture and
dust such as a bathroom or near a humidifier.
Store discs vertically in a case. Stacking or placing
objects on discs outside of their case may cause
warping.
10
RD-85DT_Ope_E_p002-013 3/27/06, 19:3910
Page 11
Introduction
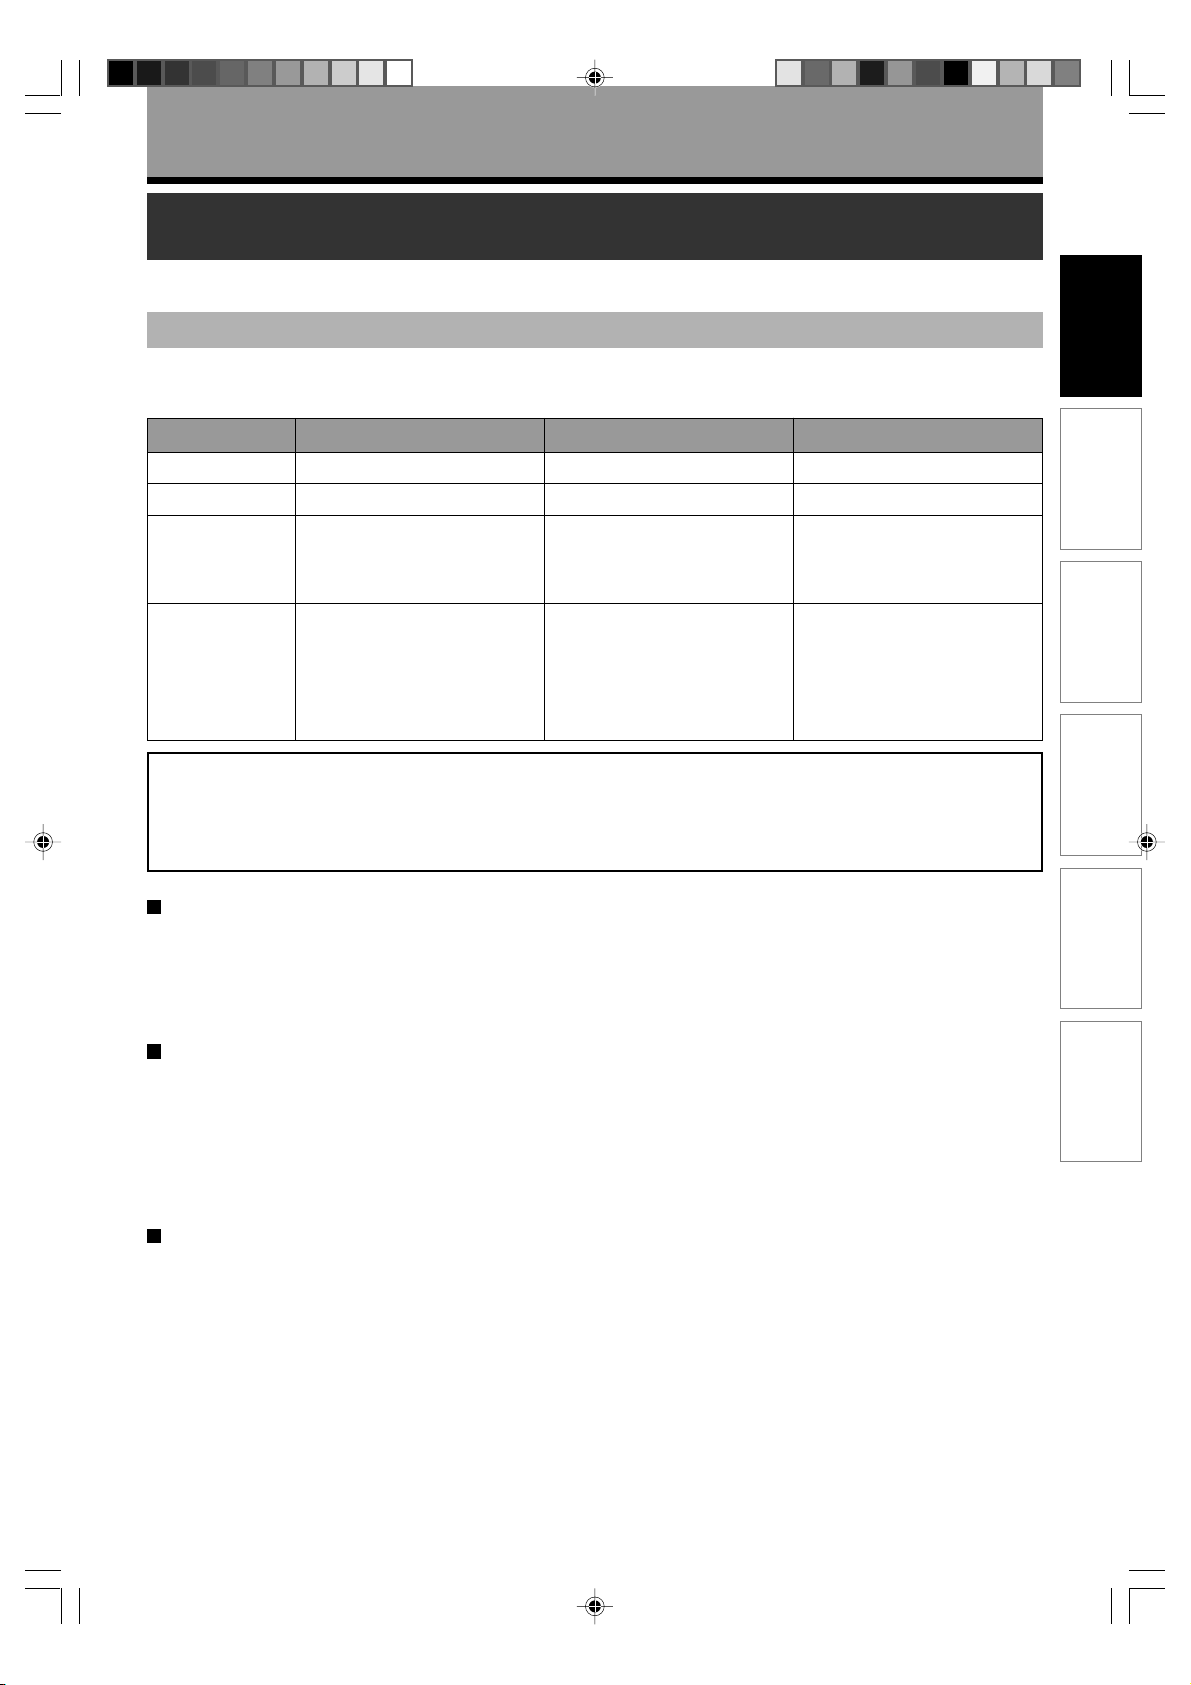
Recording format and disc selection
Introduction
Disc selection (for the first use of HDD & DVD recorder)
You can use the following 3 types of disc (DVD-RAM, DVD-RW, DVD-R) on this recorder.
Refer to the below to select discs.
Disc DVD-RAM DVD-R DVD-RW
Feature
Disc capacity
Recommended
usage
Feature
The following disc selection is recommended for the first use.
DVD-RAM / DVD-RW (Video mode) / DVD-R (Video mode)
The following is advanced choice. See the next page.
DVD-RW (VR mode) / DVD-R (VR mode)
Rewritable.
4.7GB/9.4GB
• Recording/editing in VR
mode
• Backup of recorded
contents
Can be played and edited on
devices such as DVD-RAM
compatible DVD recorders.
Cartridge of some types will
protect disc surface from
scratches and dusts.
Recordable only once.
4.7GB
• Creation of a DVD-Video
format disc.
Can be played on devices
such as DVD-R compatible
DVD players.
Rewritable.
4.7GB
• Writing test and creating of
a DVD-Video format disc.
• Backup of recorded
contents
Can be played on devices
such as DVD-RW compatible
DVD players.
To save favourite contents - DVD-RAM
Select DVD-RAM. DVD-RAM with cartridge is recommended, as even a double-sided disc is easy to handle, and the
cartridge gives the disc higher reservability. Recording restrictions are less on DVD-RAM. Copy once contents can
be recorded onto CPRM compatible DVD-RAM.
Please note that DVD-RAM may not be played on other DVD devices such as DVD players. Before playing DVDRAM on other DVD device, confirm that it is compatible with DVD-RAM.
Recording
Playback
Editing
Function Setup
To play on other DVD devices such as DVD players - DVD-R (Video mode)
Select DVD-R (Video mode), as the compatibility is wider.
If you start using a disc without initializing, it records contents in Video mode, which is compatible with other DVD
devices such as DVD players.
DVD-R can record only once. Erasing recorded contents is not possible. To play a recorded disc on other DVD
devices, finalize it on this recorder.
DVD-R (Video mode) has many recording restrictions, such as prohibition to recording copy once contents. Even a
CPRM compatible DVD-R cannot record copy once contents if it is used in Video mode.
To try copying before to DVD-R or to play on other DVD devices such as DVD players - DVD-RW (Video
mode)
Select DVD-RW (Video mode). You can try copying to test edited contents whether they can be copied to DVD-R.
Erasing recorded contents to record others is possible. Also, you can play a recoded disc on other DVD devices
such as DVD players.
It may be impossible to play on some DVD devices.
Be sure to initialize a disc in Video mode before using. To play a recoded disc on other DVD devices, finalize it on
this recorder. Recording restrictions of copy once contents are the same as DVD-R’s.
RD-85DT_Ope_E_p002-013 3/30/06, 11:4511
Others
11
Page 12
Introduction
Recording format and disc selection (Continued)
VR mode and Video mode
Available operations differ depending on the recording format of discs. Refer to the list below to select a disc and the
recording format.
VR mode (DVD Video recording) Video mode
Compatible disc
• HDD (Hard Disc)
• DVD-RAM (Ver.2.0/2.1/2.2)
Erasing and repeat recording is
possible.
• DVD-RW (Ver.1.1/1.2) (Video mode
initialized*1)
Erasing and repeat recording is
possible.
Edit function
Copy once contents
Compatibility with
other players
• DVD-RW (Ver.1.1/1.2) (VR mode initialized*1)
• DVD-R (Ver.2.0) VR mode initialized
Editing functions (deleting titles or chapters,
dividing into chapters, making a Playlist, etc.)
are available.
Contents permitted to be recorded only once
(Copy once contents) can be recorded.
(CPRM compatible disc only)
Recorded discs can be played only on DVD
players compatible with VR mode of each disc.
Disc which contains copy once contents can be
played only on DVD players compatible with
CPRM.
Erasing and repeat recording is
possible.
*2
Once you record contents, you
cannot erase them to record others
again. (Deleting a title or chapter is
possible by the editing function,
however the disc space cannot be
restored.)
• DVD-R (Ver.2.0)
Once you record contents, you
cannot erase them to record others
again. (When you copy contents
from the HDD to a DVD-R (Video
mode), be sure to record the
contents with “DVD compatible
mode” set to “On”. Otherwise,
there may be some errors in
dubbing, such as mixing both
sounds of bilingual contents.)
Editing functions are not available.
(Only dividing into chapters while recording is
possible.)
Contents permitted to be recorded only once
(Copy once contents) can not be recorded.
Recorded discs can be played only on
DVD players compatible with Video mode.
Finalizing a recorded disc on this recorder
makes it playable on other DVD players.
(Some players may not be compatible.)
*1 Before using a new DVD-RW, select the appropriate recording mode to initialize the disc. For initializing, see
page 32.
*2 If you use a DVD-R in VR mode, first initialize it in VR mode. Once you initialize a DVD-R, you cannot initialize it
again. A DVD-R initialized in VR mode has some restrictions in editing feature. For details, see
page 118.
12
RD-85DT_Ope_E_p002-013 3/27/06, 19:3912
Page 13

VR mode in DVD-R/RW (advanced use)
VR mode enables you to experience advanced DVD disc function. There are, however, some restrictions on practical
use. Therefore, this mode is not suitable for beginners of DVD recorders or users who record onto DVD-R/RW for the
purpose of playing on other DVD devices.
Read the followings and be sure to confirm the applicability to you, then use this mode.
What is VR mode?
VR mode is recording format with less recording restrictions, and can record copy once contents such as digital
broadcast programs onto CPRM compatible disc. Recordings onto the HDD or DVD-RAM are on this format. Also on
DVD-R/RW this recording format will be available if you initialize it on this recorder. Note that such DVD-R/RW
initialized in VR mode can be played only on DVD devices compatible with VR mode of each disc. (It is recommended
to finalize the DVD-R/RW when you play it on other devices.)
Notes on DVD-R/RW (VR mode)
• To record onto DVD-R/RW in VR mode, be sure to make the disc initializing (logical format) ( page 32) in VR
mode before recording.
• If you do not initialize a DVD-R, recording onto the disc will be in Video mode.
• To record copy once contents, select a new disc labeled “CPRM compatible”.
• Even if a disc is labeled “CPRM compatible” or “VR mode recording compatible”, be sure to initialize it before using
on this recorder.
• Some DVD-R may be able to be initialized in VR mode, even if they are not labeled “VR mode recording compatible”.
There is no guarantee that it functions properly.
• DVD-R/RW (VR mode) recorded on this recorder can be played only on this recorder or other VR mode
compatible devices.
If such a disc is loaded on a device which is not compatible with VR mode, damage or malfunction may
occur to the disc or the device. Toshiba is not liable for such damage or malfunction.
• CPRM labeled DVD-R/RW (VR mode) which are recorded on the recorder can be played only on this recorder
or other CPRM compatible device. Toshiba is not liable for such damage or malfunction.
• There is limitation on the number of times of editing contents recorded in DVD-R (VR mode). For details, see
page 118.
Introduction
Recording
Playback
Editing
Function Setup
RD-85DT_Ope_E_p002-013 3/27/06, 19:3913
Others
13
Page 14
Introduction
Index to parts and controls
See pages with arrows for details.
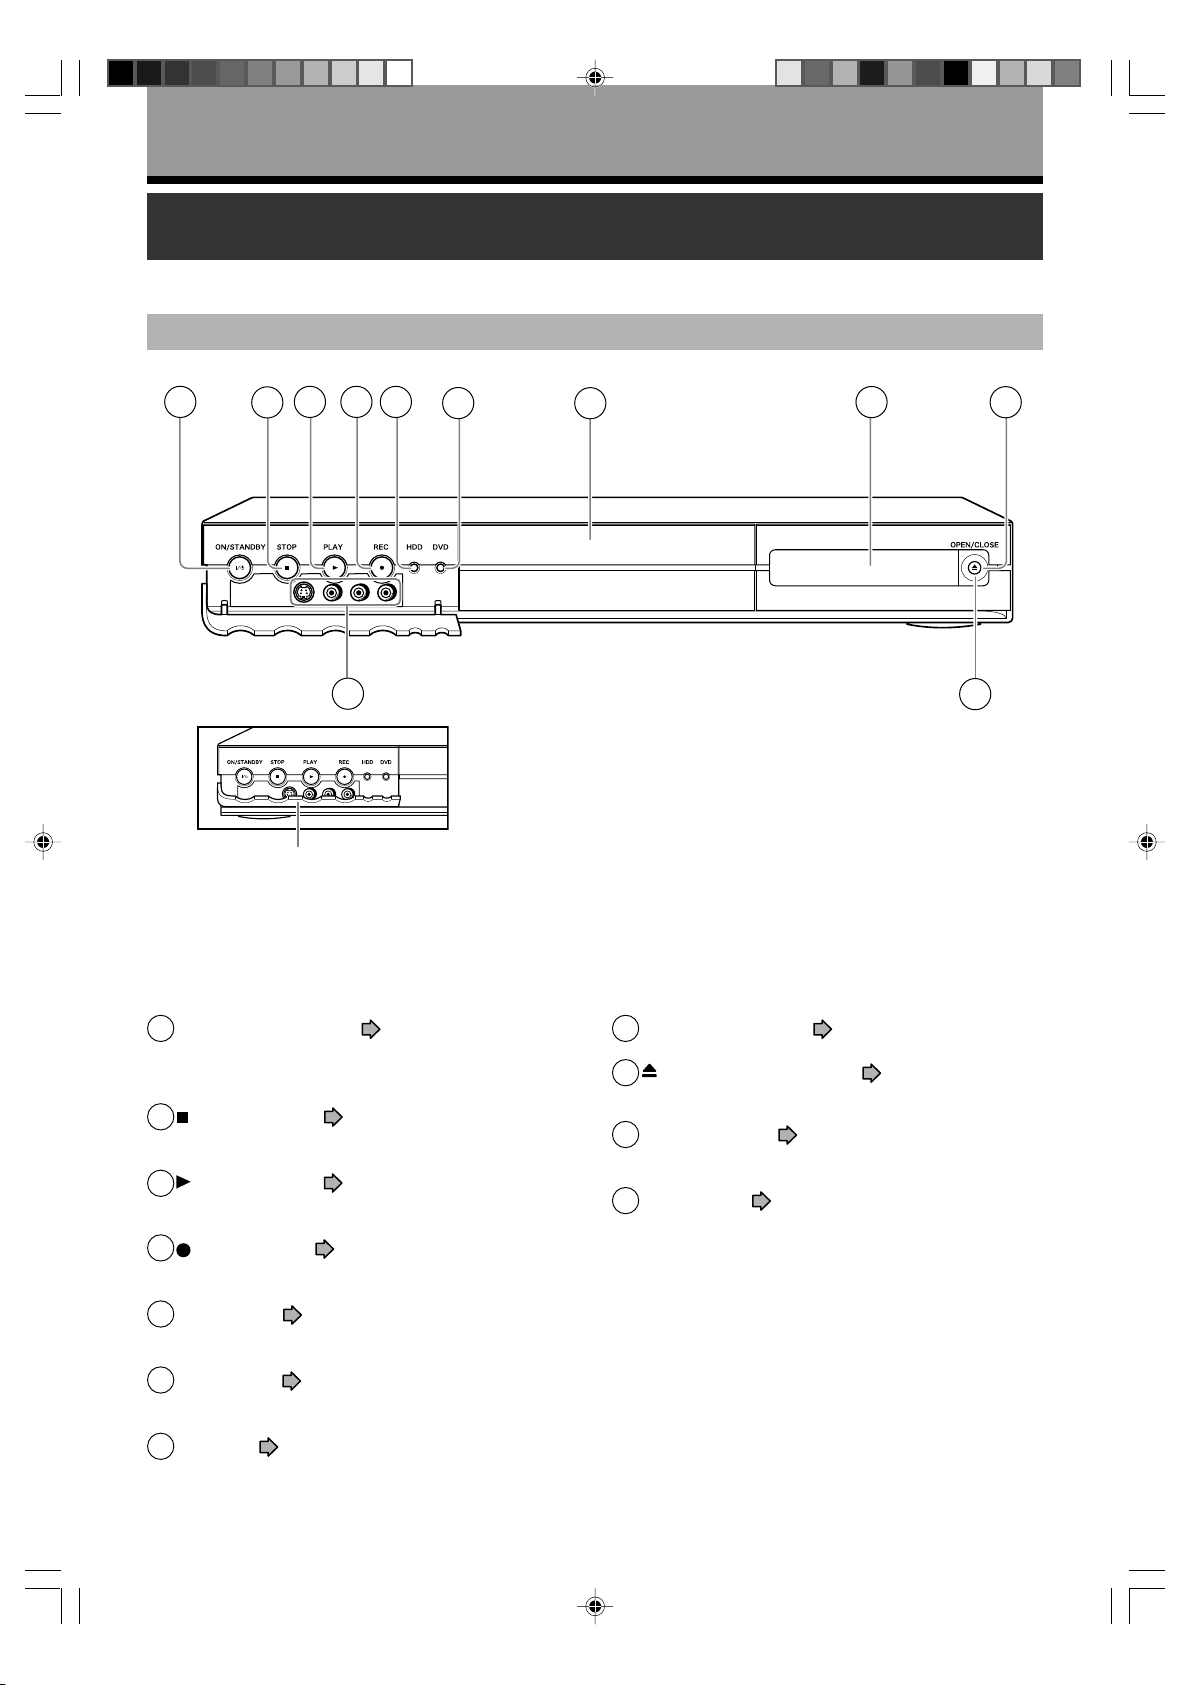
Front panelFront panel
1
Pull down here to open.
Note
• Do not place a heavy object on the cover while it is
open. Doing so may damage the recorder.
* The above illustration displays the front panel with the cover open. See the following page on how to open or close the cover.
3
4
2
5
6
7
11
8
9
10
1 ON/STANDBY button pages 20, 21
Turns the power on/restores the unit in the
standby mode.
2
(STOP) button page 46, 55
Stops playback or recording.
3
(PLAY) button page 64
Starts playback.
4
(REC) button page 45, 48
Starts recording.
5 HDD button
Press this to operate the HDD.
6 DVD button
Press this to operate a disc inside the disc tray.
7 Disc tray
Loads a disc into the disc drive.
page 45, 54
page 45, 54, 64
page 20
14
RD-85DT_Ope_E_p014-019 3/27/06, 19:4014
8 Front panel display
9 (OPEN/CLOSE) button page 20
Opens and closes the disc tray.
10 Remote sensor page 12 in “INSTALLATION
GUIDE”
11 INPUT jacks
Use this when recording from other input source
such as a VTR or a camcorder.
page 47
page 15
Page 15
Display
21
Introduction
Recording
Playback
7
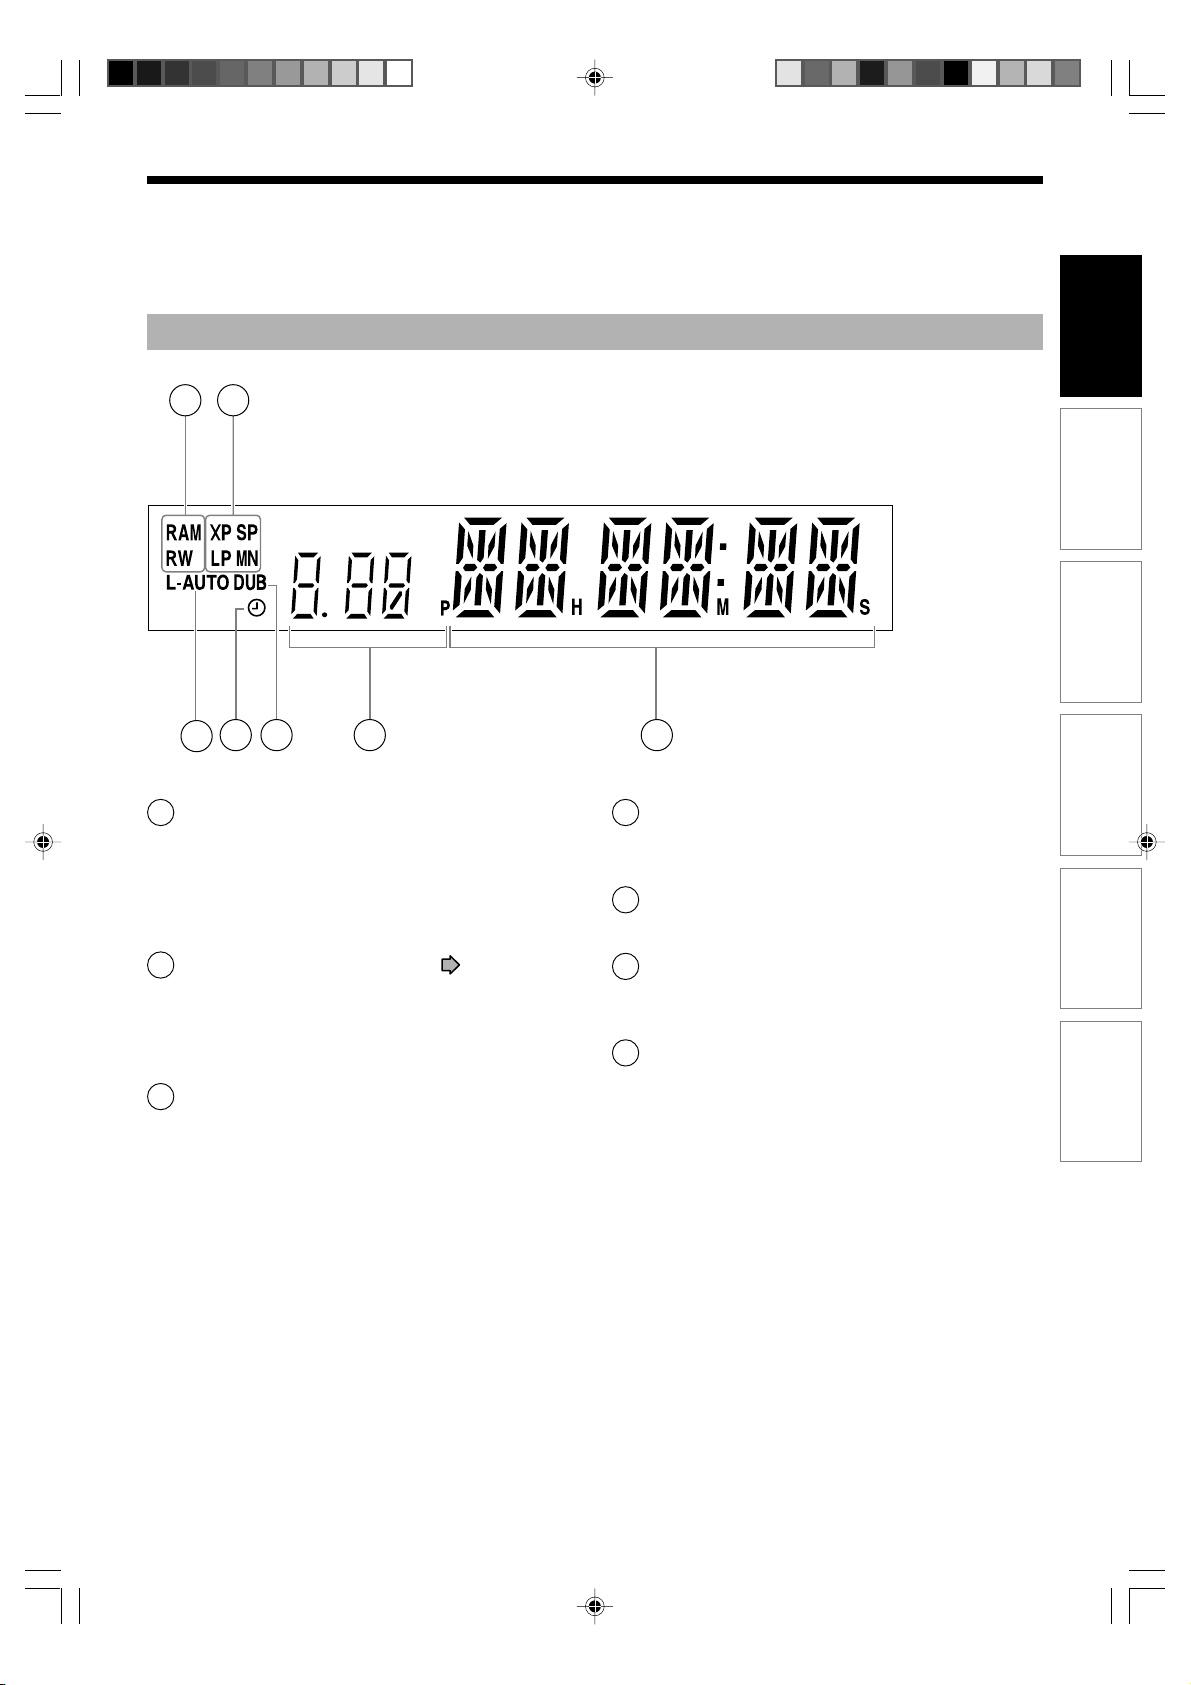
1 DISC indicators
RAM : Illuminates when a DVD-RAM disc is
loaded.
R : Illuminates when a DVD-R disc is loaded.
RW : Illuminates when a DVD-RW disc is
loaded.
2 Picture quality mode indicator
The current picture quality mode lights up.
The modes are: XP (High Quality)/SP (Standard
Play)/LP (Long Play)/MN (Manual)/
XP+SP+LP+MN (Auto)
3 Multi display
Displays the current time, elapsed time or remaining
time, etc
.
page 130
346 5
4 Channel indicator
Displays the current channel or other numbers
such as bit rate or input selection.
5 DUB (Dubbing) indicator
Illuminates when copying.
6 Programme recording indicator
Illuminates when the recorder holds a timer
programme.
7 L-AUTO indicator
Illuminates when LINE AUTO function is activated.
Editing
Function Setup
Others
RD-85DT_Ope_E_p014-019 3/27/06, 19:4015
15
Page 16
Introduction
Index to parts and controls (Continued)
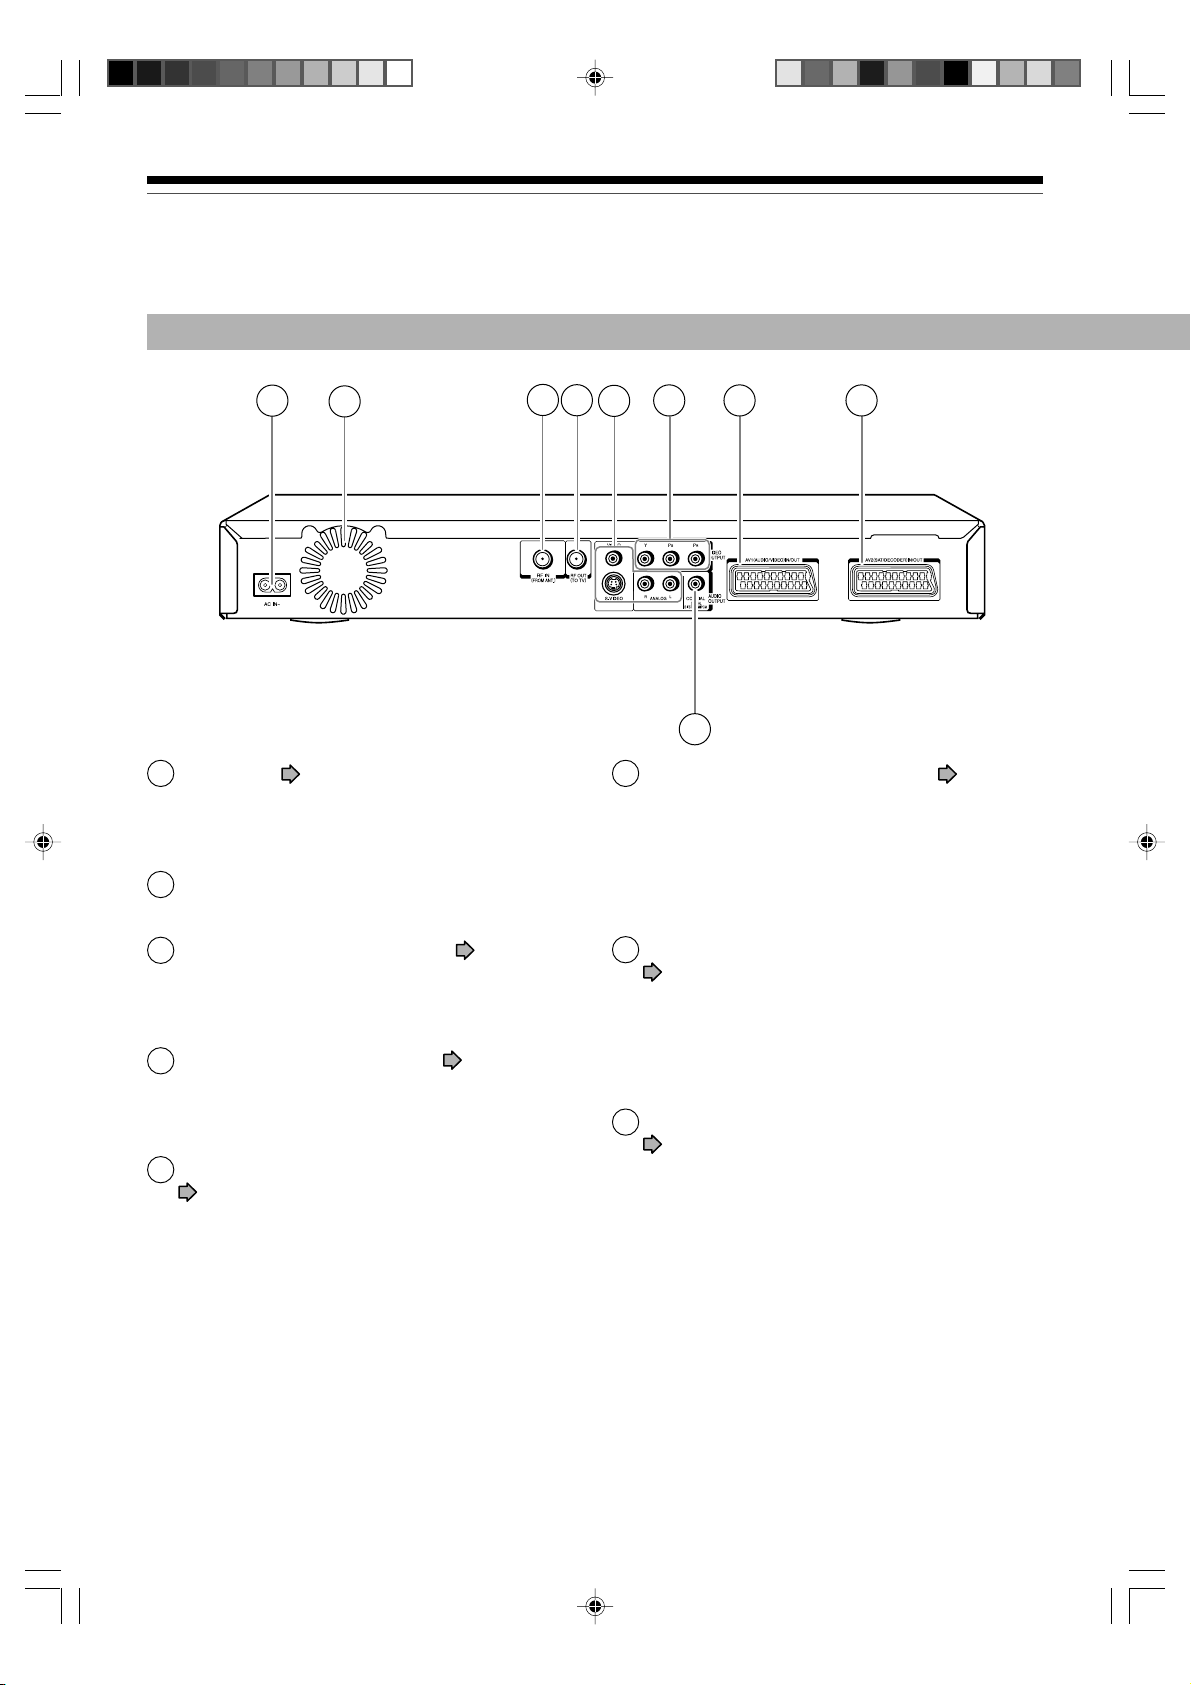
Rear panel
1
2
3
4
6 7 8
5
9
1 Power cord
GUIDE”
Connects the supplied power cord.
2 Ventilation fan
3 RF IN (FROM ANT.) input socket
“INSTALLATION GUIDE”
Connects to an aerial.
4 RF OUT (TO TV) output socket
“INSTALLATION GUIDE”
Connects the supplied coaxial cable to a TV.
5 VIDEO OUTPUT, AUDIO OUTPUT jacks
page 16 in “INSTALLATION GUIDE”
Outputs video and audio signals to a connected
TV or amplifier.
page 15 in “INSTALLATION
page 14 in
page 14 in
6 Component VIDEO OUTPUT jacks page 17
in “INSTALLATION GUIDE”
Outputs video signals to a connected TV or
monitor.
Connects to a TV or monitor equipped with
component video jacks.
7 AV1(AUDIO/VIDEO)IN/OUT socket (SCART)
page 47
• Use this socket when connecting the TV that has
the terminal in this shape.
• Use this socket when connecting the video or
other equipment that has a terminal of this type.
8 AV2(SAT/DECODER)IN/OUT socket (SCART)
page 47
Use this socket when connecting the video or
other equipment that has a terminal of this type.
16
RD-85DT_Ope_E_p014-019 3/30/06, 11:4516
Page 17
9 DIGITAL BITSTREAM/PCM COAXIAL AUDIO
OUTPUT jack
GUIDE”
Use this to connect the recorder to an audio
receiver equipped with a coaxial digital audio input
jack.
page 20 in “INSTALLATION
Introduction
Recording
Playback
Editing
Function Setup
RD-85DT_Ope_E_p014-019 3/27/06, 19:4017
Others
17
Page 18
Introduction
Index to parts and controls (Continued)
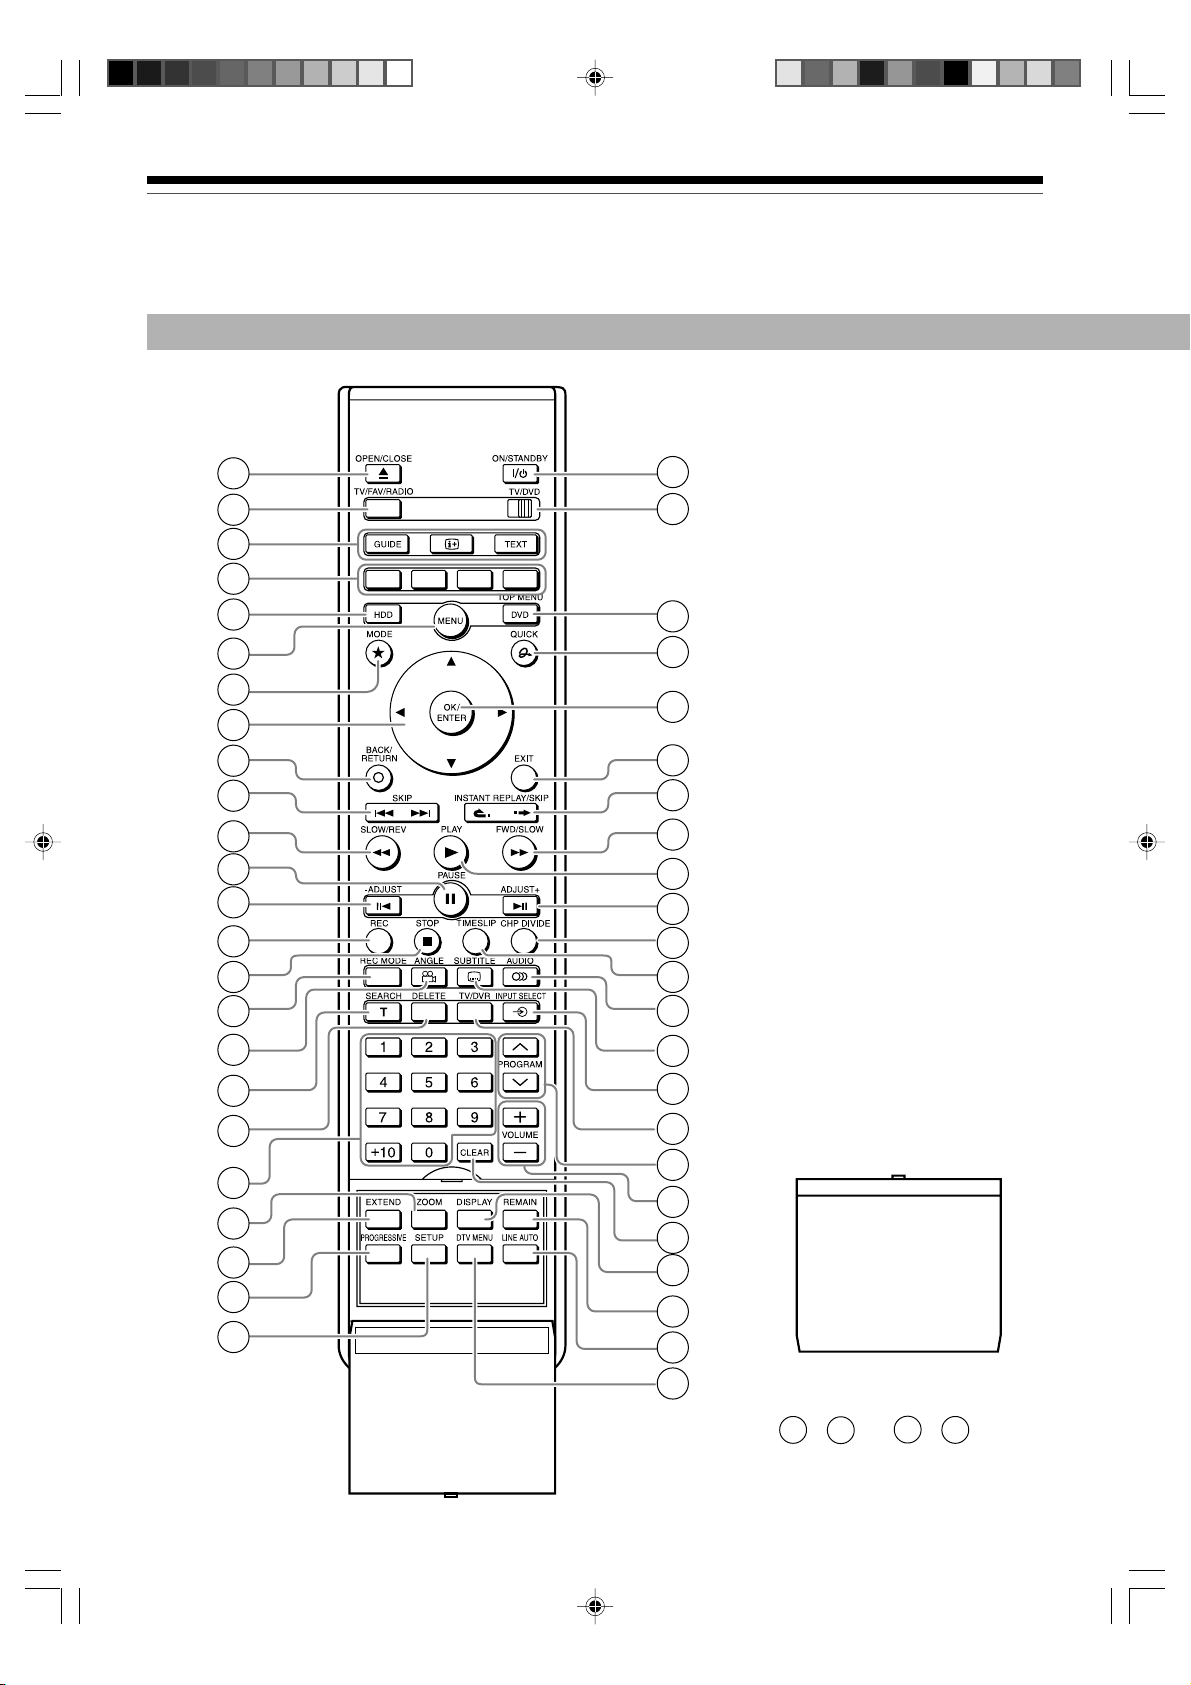
Remote control
1
2
3
4
5
6
7
8
9
10
11
12
13
14
15
16
17
25
26
27
28
29
30
31
32
33
34
35
36
37
38
18
19
20
21
22
23
24
18
RD-85DT_Ope_E_p014-019 3/28/06, 10:4418
39
40
41
42
43
44
45
46
47
Remote control lid
* 21 – 24 and 44 – 47 are in the
remote control lid.
Page 19

Introduction
1
OPEN/CLOSE button page 20, 21
TV/FAV/RADIO button page 24
2
DTV buttons page 24, 25
3
GUIDE / / TEXT
4
Colour buttons page 24, 25
5
HDD button page 45, 54
6
MENU button page 23
MODE button page 54
7
8
Direction buttons ( / / / ) page 54, 122
9
BACK/RETURN button *
10
SKIP button page 56
11
SLOW/REV button page 56
12
PAUSE button page 46, 55, 56
–ADJUST button page 43, 56
13
14
REC button page 45
15
STOP button page 38, 55
REC MODE button page 35
16
1
page 122
29
OK/ENTER button page 122
30
EXIT button page 43
31
INSTANT REPLAY/SKIP button page 55
32
FWD/SLOW button page 56
33
PLAY button page 64
34
ADJUST+ button page 43, 56
35
CHP DIVIDE button page 85
36
TIMESLIP button page 66, 67
37
AUDIO button page 65, 70
38
SUBTITLE button page 65
39
INPUT SELECT button page 39, 48
40
TV/DVR button page 46
41
PROGRAM buttons page 20, 45
42
VOLUME buttons page 34
in “INSTALLATION GUIDE”
CLEAR button page 69
43
DISPLAY button page 76
44
Recording
Playback
Editing
Function Setup
ANGLE button page 65
17
SEARCH button page 69
18
19
DELETE button page 50
20
Number buttons page 45, 69
21
ZOOM button page 68
22
EXTEND button page 42
23
PROGRESSIVE button page 17
in “INSTALLATION GUIDE”
24
SETUP button page 122
25
ON/STANDBY button page 20, 21
26
TV/DVD selector page 34
in “INSTALLATION GUIDE”
27
DVD button page 45, 54, 64,
TOP MENU button *
QUICK button page 23, 78
28
2
page 64
REMAIN button page 35
45
LINE AUTO button page 49
46
DTV MENU button page 26
47
*1BACK/RETURN
Returns to the previous screen (the screen may be
specified depending on the disc).
Refer to the instructions of the disc.
2
TOP MENU
*
Use this to display a menu screen that is recorded on
a DVD video disc.
Operate the menu screen as the same manner as
“Locating a title using the top menu (
A menu screen is not recorded on some discs.
page 64)”.
Others
19
RD-85DT_Ope_E_p014-019 3/27/06, 19:4019
Page 20
Introduction
Before operating this recorder
Is your recorder ready?
• Refer to the supplied “INSTALLATION GUIDE”
manual and finish the necessary preparations.
• Turn on the connected equipment such as a TV or
audio system and select the input from the recorder.
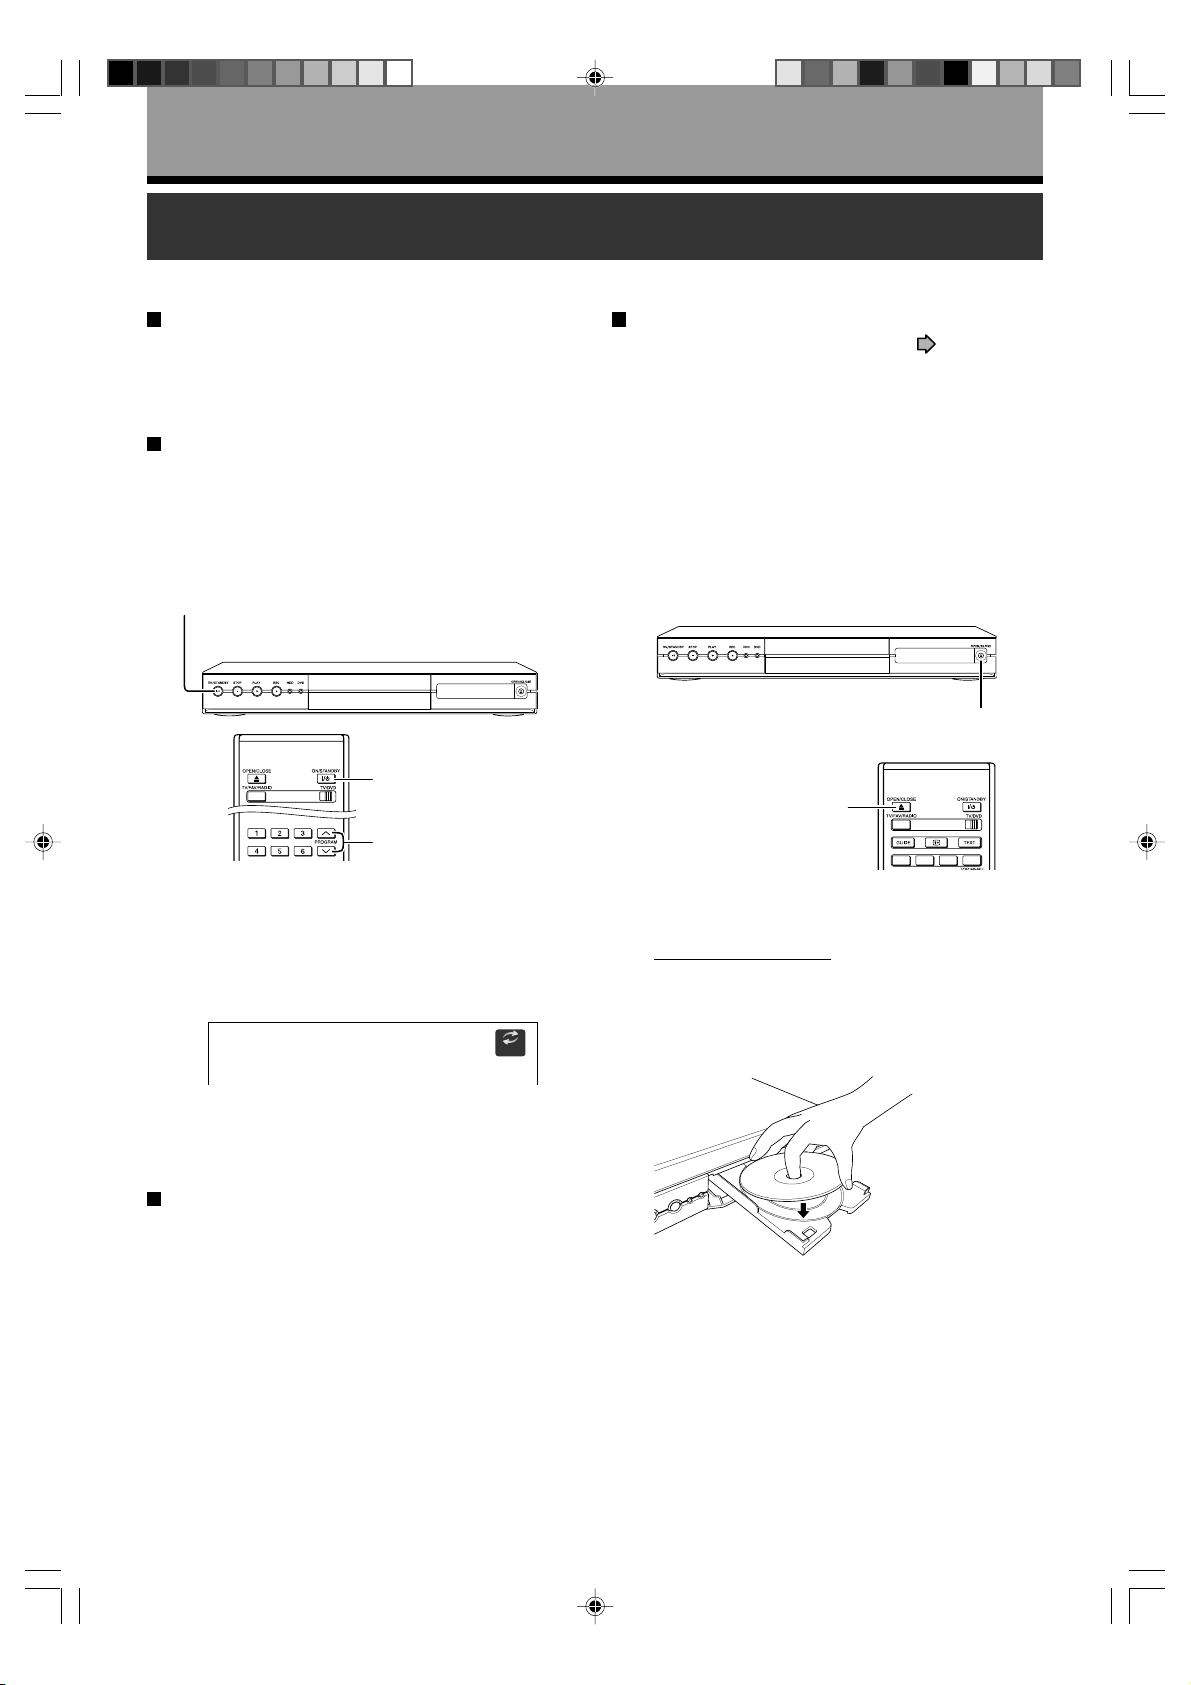
Turning the power on
(This owner’s manual instructions are based on
the assumption that all proper connections have
been completed and the TV is turned on.)
Press ON/STANDBY on the front panel of the
recorder or on the remote control.
ON/STANDBY button
ON/STANDBY button
PROGRAM buttons
When the power turns on, the ON/STANDBY indicator
changes colour from red (standby mode) to green
(operation).
After a few seconds, a start-up screen appears.
The following icon appears at the top right corner of
the screen.
e.g.
Loading
Loading a disc
Check disc compatibility beforehand ( page 6) and
use a proper playable disc.
Caution
• Keep your fingers well clear of the disc tray. Neglecting this
may cause serious personal injury. Keep a close watch on
children.
• Do not use a cracked, deformed, or repaired disc.
1 Open the disc tray.
Press OPEN/CLOSE on the front panel or the
remote control.
OPEN/CLOSE button
OPEN/CLOSE button
2 Insert a disc.
Disc without a cartridge
Insert with the playback side down.
There are two kinds of disc size. Place a disc to fit
the guide. If a disc is out of the guide, it may result
in damage to the disc or malfunction.
When this icon disappears, the recorder is ready to
operate. If the disc drive contains a disc, it takes a
little longer to start up.
Viewing TV channels through this recorder
After turning the power on, the recorder will output TV
channel signals to the connected TV (also in the stop
mode).
You can select a desired channel by pressing the
PROGRAM or the number buttons.
20
RD-85DT_Ope_E_p020-030 3/27/06, 19:4020
Place a disc in the
inside hollow.
Page 21
Introduction
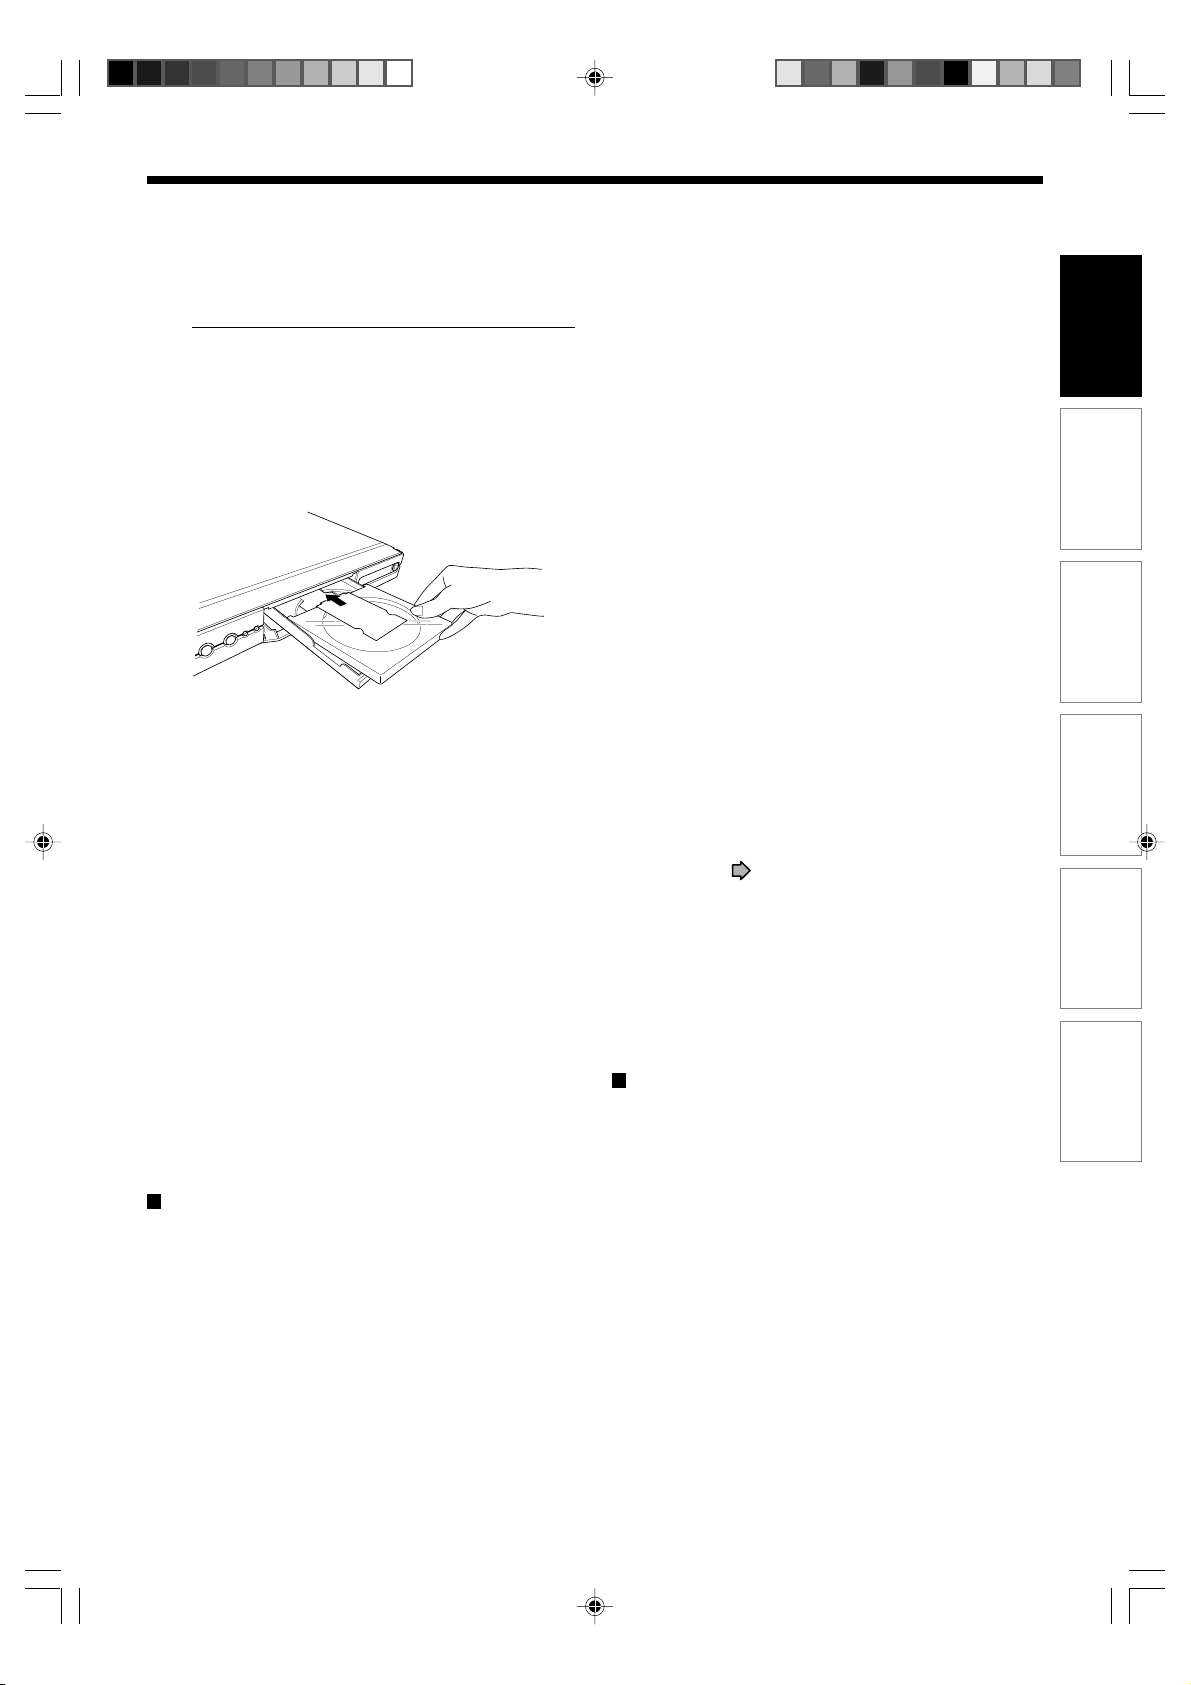
DVD-RAM disc with cartridge (TYPE1/TYPE2/TYPE4)
Single sided
Turn the printed side up, and insert the cartridge
into the tray frame following the direction of the
arrow on the cartridge.
Double sided
Turn the desired recording/playback side up, and
insert the cartridge into the tray frame following the
direction of the arrow on the cartridge.
3 Close the disc tray.
Press the OPEN/CLOSE button on the front panel
or the remote control.
Notes
• Use the button on the front panel or the remote control to
open and close the disc tray. Do not push or hold the disc
tray while it is moving. Doing so may cause the recorder to
malfunction.
• Do not insert a disc which is unplayable, or any object
other than a playable disc.
• Do not apply downforce to the disc tray. Doing so may
cause the recorder to malfunction.
• If the disc tray stops while closing, the mechanical
protection system of this recorder will open it. Do not force
it to close. Doing so may cause malfunction.
• If the disc tray will not open, turn the recorder off, and
press the OPEN/CLOSE button on the front panel or the
remote control. This may turn the recorder on and open the
disc tray. If it still won’t open, contact your nearest
TOSHIBA dealer.
Turning the power off
Press ON/STANDBY on the front panel of the
recorder or on the remote control.
The “Unloading” icon appears at the top right corner of
the screen, and the ON/STANDBY indicator turns red,
then the power turns off (standby mode.)
Caution
• If the power fails or the power cord is disconnected from a
wall outlet while the recorder is in operation, the HDD or a
loaded disc may become recording disabled. In such a
case, executing an initialization of the disc using the
formatting function of the recorder may refresh it. However,
all contents stored on the disc will be completely erased by
this initialization process.
• This recorder may indicate alert messages with some
DVD-RAM discs right after insertion. If such a disc is used
for playback or recording on other equipment, all data in
the disc may be damaged and the disc will not be played.
By executing an initialization of the disc using the
formatting function of the recorder, the disc will become
operational.
• If the recorder freezes and does not respond at all, leave it
alone for about 15 minutes or longer. This may restore the
recorder. After the recorder has recovered, turn it off once
and turn it on again to use as usual. If the recorder is still
inoperable after more than 15 minutes have passed, press
and hold the ON/STANDBY button on the front panel for
about 10 seconds or longer. The recorder is forced to quit
and the power turns off. Turn the recorder on again and
use it as usual. (This is an emergency measure, which may
cause loss and/or damage of data. Avoid casual use of this
measure. If you try this while the recorder is working
properly, especially while the “Loading” or “Unloading” icon
is flashing, it may result in initializing of the HDD.) (This 15minute measure is available only when “Screen protector”
is set to “On.” ( page 128))
Note
• If there are any performance malfunctions of the HDD or
the DVD-RAM drive, immediately discontinue use of this
recorder, and disconnect the power cord from a wall outlet,
then contact your dealer. Continuous use of the recorder in
such a condition will aggravate the condition and result in
increased cost and repair time.
Disc tray lock
You can lock the disc tray.
Press and hold PAUSE on the remote control for
longer than about 3 seconds.
To unlock, during stop press the button for longer than
about 3 seconds.
Note
• Turning the power off also unlocks the disc tray.
Recording
Playback
Editing
Function Setup
Others
RD-85DT_Ope_E_p020-030 3/30/06, 11:4621
21
Page 22
Introduction
x1/2
Title
End
Chapter
Divide
x1/2
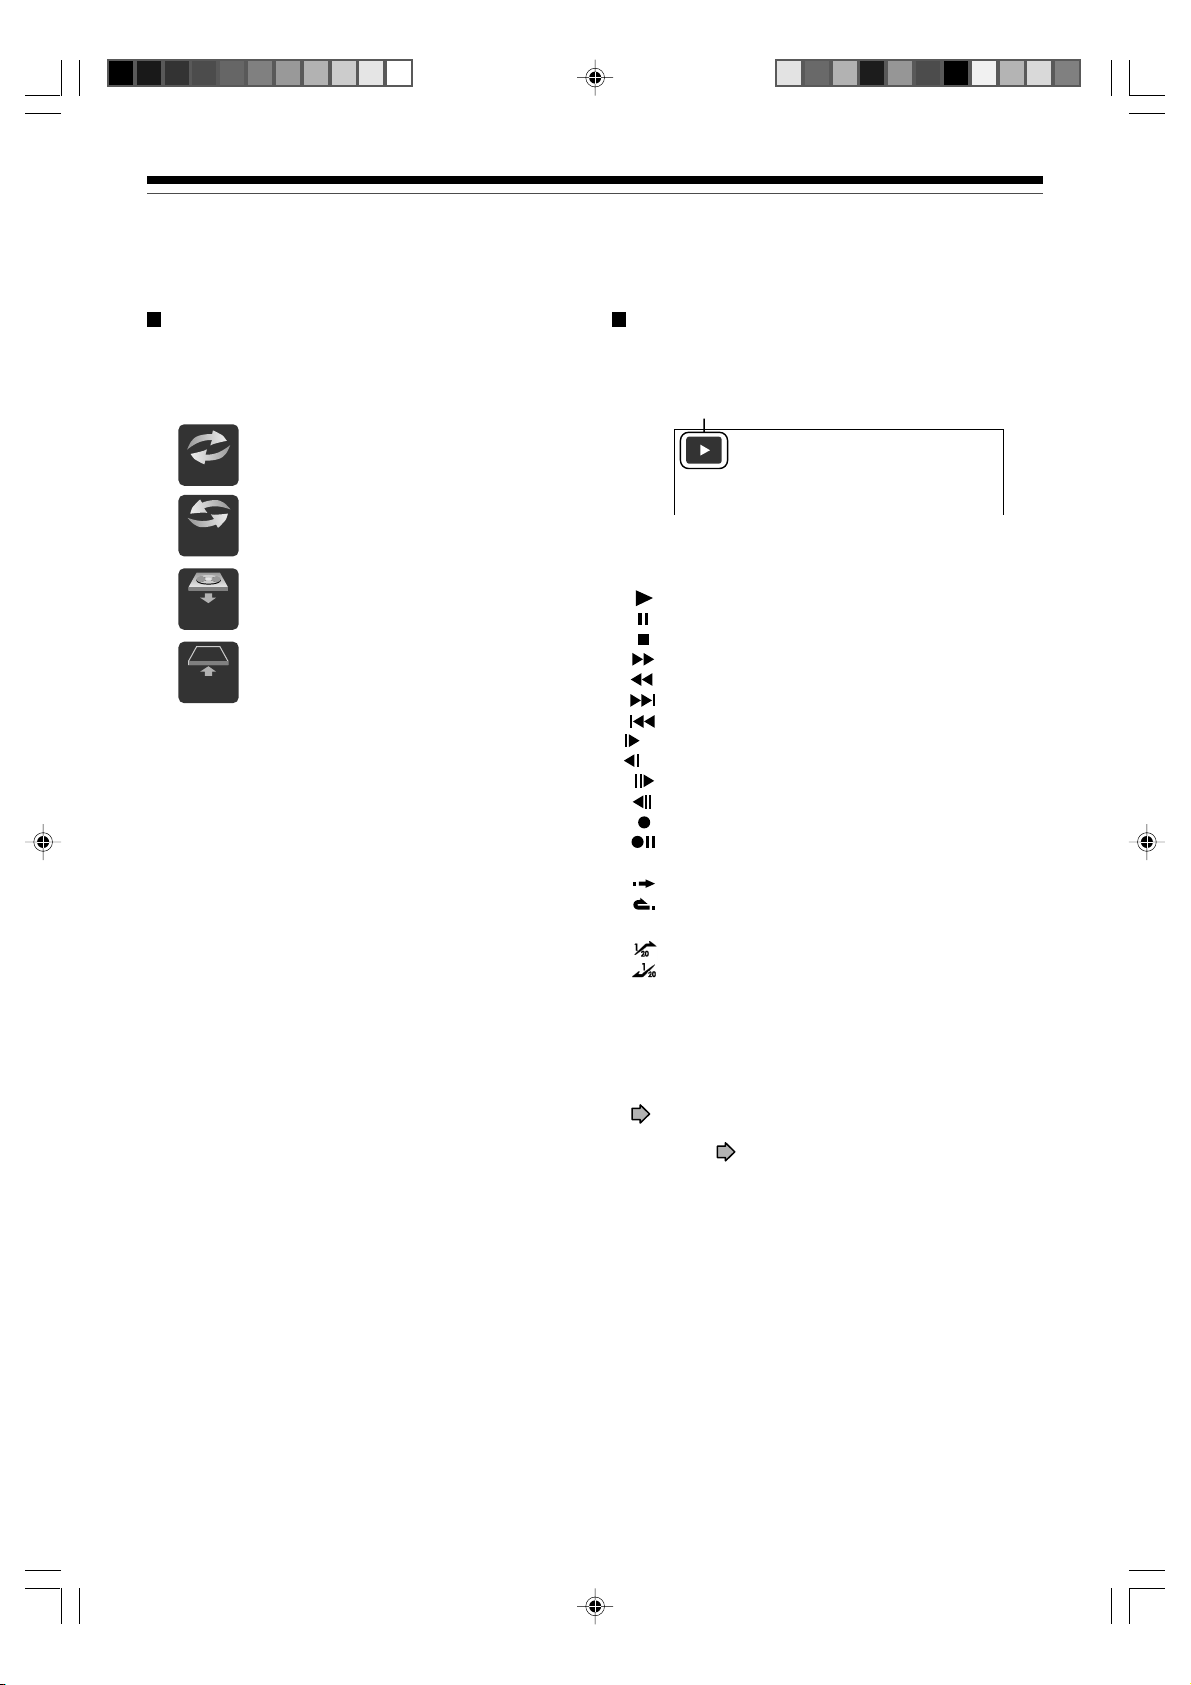
Before operating this recorder (Continued)
Start-up/Shutdown (closing) icons
These icons are displayed at the top right corner of
the screen when startup or finishing. While they are
flashing, the recorder is operating as follows:
Start-up, reading a disc, finishing the
Loading
recording
Unloading a disc, finishing the
Un
loading
Open
Close
operation
Opening the disc tray
Closing the disc tray
Status display
Each time you operate the recorder, the following
displays appear on the TV screen to indicate the
status of the recorder.
Status display
e.g.
Main on-screen displays
(Depending on the disc, some of these may not
appear.)
: Playback
: Pause
:Stop
: Fast-forward*
: Fast-reverse*
: Forward skip
: Reverse skip
: Forward slow-motion
: Reverse slow-motion
: Forward frame by frame playback
: Reverse frame by frame playback
: Recording
: Recording pause
: When title playback is completed
: Instant skip
: Instant replay
: Chapter division
: Forward skip by 1/20
: Reverse skip by 1/20
* The number of the mark varies according to the
playback speed you select.
Notes
• To disable the status display, set “On screen display”
( page 128) to “Off.”
• You can add the current status of the settings to this
display. See page 76.
22
RD-85DT_Ope_E_p020-030 3/30/06, 11:4622
Page 23
Introduction
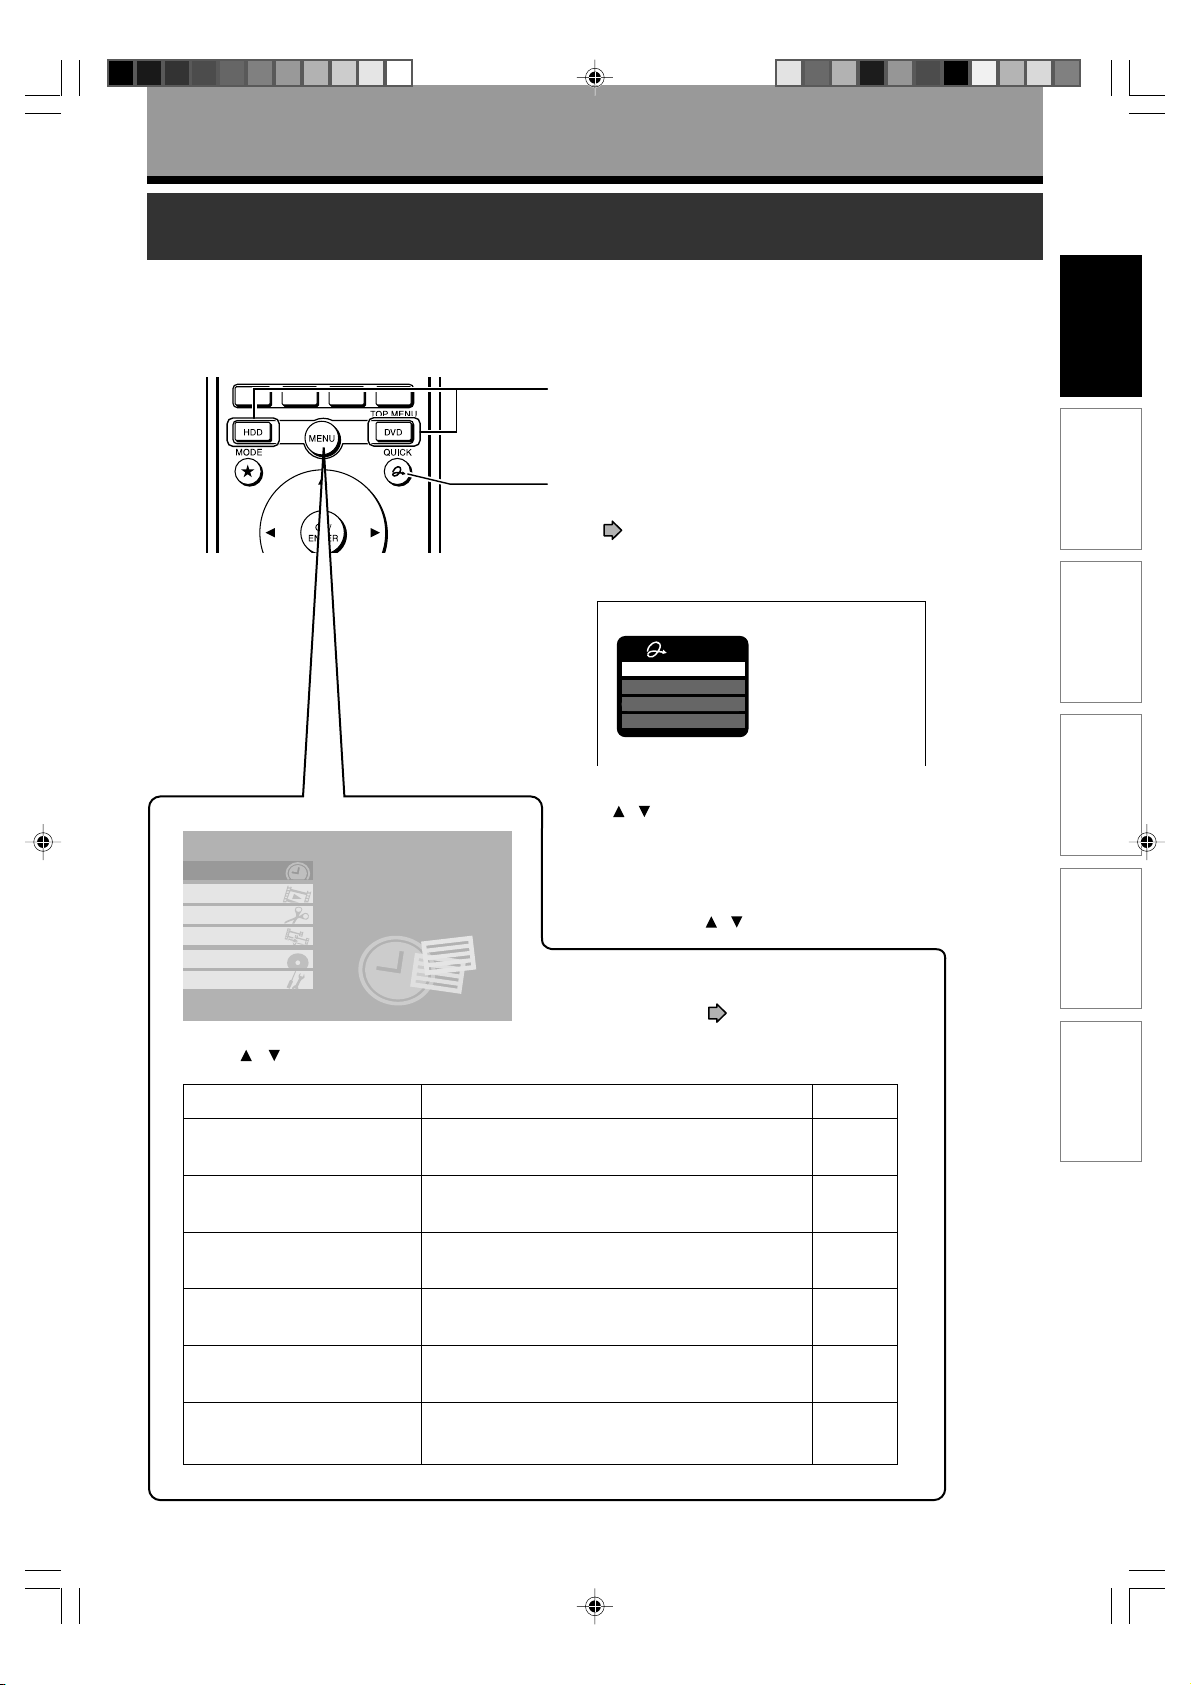
Main function buttons
These buttons are the main gate to various functions of this recorder. Whenever you press any of these
buttons, you can get a list or menu of functions to access to the desired one directly.
To select the drive to operate.
The recorded contents are displayed.
(To return to the current TV channel,
press the same button again.)
To display Quick Menu, a list of functions
which are available in the current mode.
See page 78 as well.
(Actual selections vary depending on operational
status.)
e.g.
Quick Menu
Restart title
Title information
Special playback mode
Exit
Introduction
Recording
Playback
Editing
Press
OK/ENTER.
Timer recording
Watch programme
Edit programme
Dubbing
Initialize DVD
Other settings
You can confirm/change
timer recording for
programmes or set timer
recording for a new
programme.
Set TVSelect
Menu
To exit the Quick Menu, press QUICK again.
Alternatively
Select “Exit” with
• This menu appears also when the recorder is
turned on. If you want to disable this feature,
change the setting ( page 128).
END
Press / to select an item, then press OK/ENTER.
Item Function Page
Timer recording
Watch programme
A list of timer programmes appears. 36
Recorded contents are listed in a thumbnail
view.
Edit programme
Dubbing
Initialize DVD
A menu of editing functions appears.
A menu of dubbing functions appears.
You can initialize a loaded disc.
/ to select an item, then press
Function Setup
/ , then press OK/ENTER.
Others
54
90
95
32
Other settings
RD-85DT_Ope_E_p020-030 3/27/06, 19:4023
A setup menu appears.
122
23
Page 24

Introduction
TV view operation
The following options are available while viewing TV channels via this recorder’s tuner.
1
1
2
3
TV/FAV/RADIO
To change the programme list.
Press this button, then press the / buttons to
select a programme list.
• FAV can store up to 4 sets of favourite channels.
page 29.)
(
4
5
6
7
2
GUIDE
To turn on/off EPG (Electronic Programme
Guide).
Watching TV
• Select a channel to watch the TV programme using
/ / / buttons, then press the OK/ENTER
the
button.
Recording a programme from EPG ( page 43)
• Select a channel to record the TV programme using
/ / / buttons, then press the OK/ENTER
the
button.
From the EPG screen, you can set timer recording,
as well as get programme information.
TEXT
3
To display the teletext screen.
Pressing the TEXT button to display the teletext
screen. The teletext can provide various information
with text on the screen.
8
24
RD-85DT_Ope_E_p020-030 3/27/06, 19:4024
Page 25

Introduction
4
To get the programme information.
Pressing the “ ” button to display the
programme information.
All PROGS
World TV
BBC PARLAMENT
Community
14:00 The world of Cat and
3628 minutes left
A cat watching a dog in the garden and ...
Showing also
EXIT
Tune Change progs
Page Up Page Down LanguagesShowing Also
Watch TV
TV/FAV
Programme information
Colour buttons
5
Use these buttons following the instruction
displayed on-screen.
EXIT
6
To exit the current mode to return to on-air
programme.
PROGRAM
7
To change the channels.
PROGRAM: CH1 → CH2 → CHX → ... CH15
* The PROGRAM buttons are not available when
AV1, AV2 or LINE is selected.
VOLUME
8
To adjust the volume of the TV.
Make the necessary setting ( page 34,
INSTALLATION GUIDE).
02: 14 Sat. 29 Apr.
15: 00 The Football
...
I/II
CULTURE
Notes
• You can change the subtitle pressing the SUBTITLE
button.
“Subtitles: On” → “Subtitles: Off” → “Subtitles: None”
• You can change the audio output pressing the AUDIO
button.
“I/II XXX” → “I/II ENGLISH” → “I/II
descriptor*)
* If you are visually impaired, this track provides an
additional audio track which describes the scene.
However, this track does not always contain audio,
please check the Guide to see if Audio Descriptor is
supported for a programme.
• If you record a programme while on-screen services and
information are displayed, they are also recorded as
they are on the programme.
ENGLISH” (Audio
When you select a programme from on-screen
services which you displayed by the
or
TEXT button
– The front panel display may not follow the channel
change, showing the one you have viewed before
you displayed the on-screen service.
– If you record the programme by pressing the REC
button, the recorded programme may have
information (e.g., title name, channel) of which you
have viewed before you displayed the on-screen
service.
GUIDE to RE-TUNING DIGITAL TV CHANNELS
From time-to-time, new or changed digital television
services may be broadcast. To view these, your recorder
should be re-tuned.
ANALOGUE SWITCH-OFF
This is a digital video recorder which allows use of digital
services. However, during the lifetime of this unit, it is
very likely that analogue services will be switched off to
allow for more new digital services.
This ‘switch-off’ will happen in a number of phases, and
will be advertised in your area well in advance. It is
recommended that at each phase the television is retuned to ensure that the existing and new services can
be viewed as they become available.
STANDBY
Your recorder has an optional feature that finds new
services automatically if you leave it in the standby mode
overnight occasionally. However, to ensure the most
updated digital services, it is recommended you also
auto-tune during major changes, such as analogue
switch-off.
RE-TUNING DIGITAL TV CHANNELS
Follow the procedure described on page 26,
OPERATIONS.
Recording
Playback
Editing
Function Setup
Others
RD-85DT_Ope_E_p020-030 3/27/06, 19:4025
25
Page 26

WARNING
All previous digital programmes and
settings will be deleted.
Continue?
DTV MENU
Yes
Cancel
Select
Introduction
DTV menu setting
You can make settings of the digital tuner from the DTV menu.
DTV menu pages
The DTV menu has two pages: SETUP MENU and
FEATURE MENU pages.
SETUP MENU may contain items for installation, and
FEATURE MENU for customization.
How to access a menu item screen
1) Press DTV MENU in the lid to open the DTV
menu.
At the top of the screen, you can see the SETUP
MENU and FEATURE MENU page icons, either of
which is selected (highlighted).
SETUP MENU
Languages
Auto tuning
Manual tuning
Programmes
Watch TV
DTV MENU
Enter
FEATURE MENU
Parental Control
Favourite and Locked Programmes
Favourites
Softwear Upgrade
OK
OK
OK
OK
OK
OK
All PROGS
OK
Exiting the menu mode
In any condition in the menu mode, pressing the EXIT
button directly exits the menu mode and returns to the
TV screen.
Press the DTV MENU button to back-up from any
menu function or pop-up window. Pressing several
times will exit the menu completely.
• If you do not make any operation for a minute, the
recorder automatically returns to the TV screen.
SETUP MENU
LANGUAGES
You can set the audio language and subtitle from the
“LANGUAGES” item.
LANGUAGES
ENGLISHAudio Language
OFFSubtitles
Watch TV
EXITDTV MENU
Back
Press the / buttons to select (highlight) a desired
item.
Audio Language
Press the
from ENGLISH, WELSH or GAELIC.
Subtitles
Press the
from ENGLISH, WELSH, GAELIC or OFF.
AUTO TUNING
This option allows you to perform a full auto-tune of
TV channels. Any previous channels and settings will
be lost (e.g. favourites, locked programmes, …).
/ buttons to select a desired language
/ buttons to select a desired language
2) To change the MENU page, press / .
3) Press
4) Press OK/ENTER to open the selected menu
26
RD-85DT_Ope_E_p020-030 3/27/06, 19:4026
Enter
item.
item.
Watch TV
DTV MENU
/ to select (highlight) a desired menu
If you select the “AUTO TUNING” and press the
OK/ENTER button on the main screen of the SETUP
MENU page, the confirmation screen appears.
Selecting “Yes” then pressing the OK/ENTER button
starts the auto tuning operation.
Page 27

Introduction
AUTO TUNING
17 programmes found
6 TV
Prog Name Type UHF Quality
22
Idal World
38
Men & Motors
53
YooPlay Games
80
BBC World Sv.
81
The Hits Radio
82
Smash Hits!
Change Watch Back
Page Up Page Down Sort
9 Radio 2 Text
Press OK to watch programme
DTV MENU
23
GOOD
23
GOOD
23
GOOD
23
GOOD
23
GOOD
23
GOOD
The progress of auto tuning
1) The recorder starts searching for channels.
2) The recorder displays received channels.
3) The recorder completes finding channels and
saves the data.
4) You can exit the menu mode by pressing
OK/ENTER.
AUTO TUNING
17 programmes found
6 TV
Prog Name Type UHF Quality
22
Idal World
38
Men & Motors
53
YooPlay Games
80
BBC World Sv.
81
The Hits Radio
82
Smash Hits!
Change Watch Back
Page Up Page Down Sort
9 Radio 2 Text
Press OK to watch programme
DTV MENU
23
GOOD
23
GOOD
23
GOOD
23
GOOD
23
GOOD
23
GOOD
MANUAL TUNING
This feature is available for service engineers or can
be used for direct channel entry if the multiplex
channel is known.
If you select the “MANUAL TUNING” and press the
OK/ENTER button on the main screen of the SETUP
MENU page, the tuning screen appears.
Selecting a channel by the number buttons starts the
manual tuning operation.
The progress of manual tuning
1) The recorder starts searching for channels.
2) The recorder displays received channels.
3) The recorder completes finding channels and
saves the data.
4) You can exit the menu mode by pressing
EXIT.
PROGRAMMES
If you select the “PROGRAMMES” item and press the
OK/ENTER button on the main screen of the SETUP
MENU page, the TV programme list screen appears.
PROGRAMMES
Prog Name
18
The HITS
21
TMF
22
Ideal World
38
Men & Motors
53
YooPlay Games
80
BBC Wolrd Sv.
Sort Rename Back
Page Up Page Down Delete
DTV MENU
EXIT
Watch TV
Recording
Playback
Editing
Function Setup
Others
RD-85DT_Ope_E_p020-030 3/30/06, 11:4627
You can sort the list or edit programme names.
Sorting the list
You can change the programme position to a desired
position in the list by the procedure below.
1) Select the desired programme you wish to sort
using
/ .
• To change the current page, use the red and
green buttons. Pressing the red button moves
one page up, while pressing the green button
moves one page down.
2) Press
to select “Sort”.
You can now move the programme selected in step
1).
3) Move the selected programme to the desired
position using
4) Press
to confirm the position.
/ .
27
Page 28

Introduction
DTV menu setting (Continued)
PROGRAMMES
Prog Name
18
The HITS
21
TMF
22
Ideal World
38
Men & Motors
53
YooPlay Games
80
BBC Wolrd Sv.
Sort Rename Back
Page Up Page Down Delete
DTV MENU
EXIT
Watch TV
Deleting a programme
To delete a programme, press the blue button while
the programme you want to delete is selected.
Renaming a programme
To rename a programme, press the OK/ENTER button
while the programme you want to rename is selected.
The RENAME screen appears.
RENAME
T h e H I T S
Select Change Store
You can now rename the programme by the methods
below.
• Press the
• Press the
/ buttons to select a character.
/ buttons to select the edit position.
• After you complete editing, press the OK/ENTER
button to confirm the editing.
FEATURE MENU
PARENTAL CONTROL
Mode
Change PIN
Back
Watch TV
EXITDTV MENU
ON
OK
Mode
Press the
/ buttons to select a desired option from
ON, LOCK MENU, LOCK INSTALL or OFF.
Change PIN
By pressing the OK/ENTER button after selecting
“Change PIN”, the following window appears.
You can set a new four-digit PIN for parental setting.
1) While “New PIN” is selected, enter the desired
PIN to the New PIN field using the numeric
buttons (0 through 9).
DEFINE PIN NUMBER
New PIN
Confirm PIN
0 9
Enter PIN
EXIT
Exit
– – – –
– – – –
2) Enter the desired PIN (same PIN as the one you
entered in step 1) to the Confirm PIN field using
the numeric buttons (0 through 9).
Notes
• Once a PIN has been entered, all functions and
programmes may be viewed thereafter. If you wish to
protect these functions again, press the ON/STANDBY
button (to go into standby mode) and ON/STANDBY button
again (to re-start). After that, all locked functions or
programmes will require a PIN to be entered.
• If you forget the PIN code, the master PIN code 1276 will
help you. Keep this code well secured.
PARENTAL CONTROL
This option allows you to set the level of parental
control and your PIN. For example, you can lock all
menus, just the install menus, or specific channels
only. After this a PIN code will be required to use these
locked features.
If you select the “PARENTAL CONTROL” item and
press the OK/ENTER button on the main screen of the
FEATURE MENU page, the PARENTAL CONTROL
window appears.
You can select the parental lock mode or change your
PIN (Personal Identification Number).
Press the
/ buttons to select between the items
(“Mode” and “Change PIN”).
28
RD-85DT_Ope_E_p020-030 3/28/06, 13:5128
Page 29

FAVOURITE AND LOCKED PROGRAMMES
If you select the “Favourite and Locked Programmes”
item and press the OK/ENTER button on the main
screen of the FEATURE MENU page, the
FAVOURITE AND LOCKED PROGRAMMES window
appears.
You can edit a favourite channel list or locked channel
list by selecting or deselecting appropriate channels.
Up to four favourite channel lists and a locked channel
list can be made.
FAVOURITE AND LOCKED PROGRAMMES
Favourite List 3: Yes
18
The HITS
19
UKTV Br'tideas
20
F tn
21
TMF
22
Ideal World
58
Men & Motors
DTV MENU
Deselect Back
Page Up Page Down Select all Deselect all
• Press the / buttons to select between channels.
• Press the
/ buttons to select between the
channel lists (Favourite lists 1 through 4 and Locked
list).
• Press the OK/ENTER button to switch between
“Deselect” and “Select”.
A selected box has a checkmark, while a deselected
box is empty.
• Press the red button to page up.
• Press the green button to page down.
• Press the yellow button to select all programs to the
current Favourite list.
• Press the blue button to deselect all programs from
the current Favourite list.
Notes
• These settings are cancelled when Auto Tuning is
performed.
• If you set a timer recording of a locked channel, the
recording will be executed but no signals will be recorded.
FAVOURITES
If you select the “Favourites” item on the main screen
of the FEATURE MENU page, you can select the
channel list to be shown when pressing the TV/FAV/
RADIO button.
While the “Favourites” item is selected, press the
buttons to select a desired option from ALL PROGS,
TV, RADIO, FAV-1, FAV-2, FAV-3 or FAV-4.
/
FEATURE MENU
Parental Control
Favourite and Locked Programmes
Favourites
Softwear Upgrade
Watch TV
DTV MENU
Enter
OK
OK
All PROGS
OK
Notes
• A favourite list which is not set (i.e. no programmes is
selected) is not included in the options for the “Favourites”
item.
• If no radio program exists in the stream, RADIO is not
included in the options for the “Favourites” item.
SOFTWARE UPGRADE
Your recorder can upgrade its software automatically.
If you select the “Software Upgrade” item and press
the OK/ENTER button on the main screen of the
FEATURE MENU page, the SOFTWARE UPGRADE
window appears.
In this window, there are three items below.
SOFTWARE UPGRADE
Back
EXIT
SLOT1: 0.9
ON
OK
Watch TV
Version
Auto upgrade
Search for New Software
0 9
Enter PIN
DTV MENU
Version
You can check which versions of software are loaded.
Use the
/ buttons and press the OK/ENTER
button to select between versions. This feature should
be used by a service engineer only.
Auto upgrade
You can select of the Auto upgrade function ON or
OFF.
When the Auto upgrade function is set to ON, the
software is automatically upgraded via the digital
broadcast at 3 o’clock a.m. every day.
Notes
• Even if “ON” is set, upgrade will not be executed in the
following cases:
- if a timer recording is programmed between 3:00 and
3:59.
- if the recorder is in LINE AUTO mode at 3 o’clock.
- if the recorder is operated (i.e. playing, recording,
displaying a menu, etc.) at 3 o’clock.
• To cancel upgrading in progress, press the ON/STANDBY
button.
• When upgrading completes, the recorder turns itself off.
Introduction
Recording
Playback
Editing
Function Setup
Others
RD-85DT_Ope_E_p020-030 3/30/06, 11:4629
29
Page 30

Introduction
DTV menu setting (Continued)
Search for New Software
Pressing the OK/ENTER button while this item is
selected pops up the “SEARCHING FOR NEW
SOFTWARE” window.
SEARCHING FOR NEW SOFTWARE
Searching for a new software upgrade for
this TV.
Searching
Stop
EXIT
If new software is found, upgrading starts.
DOWNLOADING NEW SOFTWARE
Version 5.0 for your TV is available.
Call
0800 888999
www.toshiba.co.uk. if you experience any
problems
Loading
Cancel Upgrade
EXIT
or visit
• While searching for new software, audio and video
signals are muted, the power indicator is lit in red,
and the HDD and DVD indicators are unlit.
Notes
•To cancel upgrading in progress, press the EXIT button.
• Upgrading will stop if the recorder begins preparing timer
recording.
30
RD-85DT_Ope_E_p020-030 3/31/06, 16:1430
Page 31

Hint on reading this manual
The following icons show the playable discs for each
function described on this instruction manual.
: HDD
HDD
: DVD-RAM disc
DVD-RAM
DVD-RW
: DVD-RW disc (VR mode)
(VR)
DVD-RW
: DVD-RW disc (Video mode)
(Video)
DVD-R
: DVD-R disc (VR mode)
(VR)
DVD-R
: DVD-R disc (Video mode)
(Video)
: DVD video disc
DVD-VIDEO
: VIDEO CD
VCD
: Audio CD
CD
Most instructions are based on remote control operation,
unless otherwise noted. You can use the buttons on the
remote control and those on the main unit as well when
they have the same function.
Recording
Recording variations for many types of programmes or
situations.
Before recording
Programming a recording (REC
MENU)
Programming a recording (EPG)
Recording a TV programme
Recording an external source
Deleting recorded contents
Others
Notes
• Note that all recording content may be deleted if the
unit is disconnected from a wall outlet, or a power
failure occurs, during recording.
• If a power failure occurs within 5 minutes prior to the
programmed recording start time, the programmed
recording may not be executed.
If copy protection signal is detected during
recording on this recorder, the recording
automatically pauses and a message appears. In
this case, the PAUSE button cannot release the
recording. (It is possible to end the recording by
pressing the STOP button.) If the copy protection
signal continues, the recording will terminate.
RD-85DT_Ope_E_p031-044 3/27/06, 19:4031
Page 32

Recording
Before recording
Please be sure to read this section to get ready for your recording.
Initializing a disc
Initialize a new DVD disc before using on this
recorder.
(Do not initialize a DVD-R if you use it in Video
mode.)
Disc type and initialization
HDD
DVD-RAM
DVD-RW
VR mode
Video mode
DVD-R
VR mode
Video mode
*1
The HDD which has become unoperatable because
of data corruption, may be recovered by initializing.
*2
There are 2 ways of initializing a DVD-RAM as
No need
Required
Required
Required
Required
No need
follows.
• Logical format: Normally use this method.
• Physical format: Use this method if a disc cannot
be recovered by the logical
format. (There is no guarantee
that all such discs can be
*3
Re-initializing is not possible to DVD-R.
recovered.)
*1
*2
*3
Initializing a disc (Logical format)
1) Load a disc.
2) Press MENU.
3) Press
OK/ENTER.
4) Select the recording mode and input the disc
data if necessary.
/ to select “Initialize DVD”, then press
Timer recording
Watch programme
Edit programme
Dubbing
Initialize DVD
Other settings
Select this menu when you want
to initialize a DVD.
Set TVSelect
DVD-RAM
DV D format
Edit
Disc Number
Disc Name
DVD mode
0 0 1 –
VR mode
Unformat
Start Cancel
Can be changed.
Edit
Can be changed.
Edit
Fixed to “VR mode”.
DVD-RW
Disc Number
Disc Name
DVD mode
Start Cancel
DV D format
– – – –
Video mode
Unformat
Can be changed when
Edit
“VR mode” is selected.
Edit
Can be changed.
Edit
Select “Video mode”
or “VR mode”.
DVD-R
DV D format
Edit
Disc Number
Disc Name
DVD mode
0 0 1 –
VR mode
Unformat
Start Cancel
Can be changed.
Edit
Can be changed.
Edit
Fixed to “VR mode”.
Menu
EXIT
32
RD-85DT_Ope_E_p031-044 3/30/06, 11:4732
Numbering a disc
The recorder automatically numbers discs when
initializing. However, you can assign a desired
number (using 3 digits) and designate sides A and
B on a double-sided disc.
(1)Press the
/ buttons to select “Edit” of “Disc
Number” then press the OK/ENTER button.
(2)Press the / / / buttons to enter digits.
(3)Press the OK/ENTER button.
Page 33

Introduction
Naming a disc
(1)Press the
/ buttons to select “Edit” of “Disc
Name” then press the OK/ENTER button.
(2)Enter a disc name following the procedure of
“Entering Characters” (
page 136).
(3)Press the MODE button to save the name then
exit.
Selecting the DVD mode
(1)Press the
/ buttons to select “Edit” of “DVD
mode” then press the OK/ENTER button.
(2)Press the / buttons to select the mode.
(3)Press the OK/ENTER button.
5) Press
/ / / to select “Start”, then press
OK/ENTER.
6) Read the message, and press
/ to select
“Start”, then press OK/ENTER.
DV D format
Entire disc contents will be
erased if disc is formatted.
Proceed?
Start Cancel
Initializing starts.
Notes
• Discs may be unusable if there are deterioration or defects
in it.
• When a finalized DVD-RW is loaded, playback starts
automatically. To initialize, stop the playback then follow
the above procedure.
Initializing a disc (Physical format)
Use this method when a DVD-RAM is not recovered by
logical format method or when the recorder does not
read a DVD-RAM which has been used. (There is no
guarantee that all such discs will be recovered.)
1) Load a DVD-RAM.
2) Open the lid of the remote control, and press
SETUP.
(Alternatively, press MENU and select “Other
settings” and press the OK/ENTER button.)
3) Press BACK/RETURN then
“Management settings”, and press OK/ENTER.
4) Press
/ to select “DVD-RAM physical
format” then press OK/ENTER.
5) Read the message, and press
“Yes”, then press OK/ENTER.
Warning: It will take approximately
70 minutes to format a 4.7GB DVD
and all data will be erased.
Confirm that timer programming is
not scheduled. Proceed?
Yes
6) Ask the question on shutting down using
then press OK/ENTER.
Notes
• The physical format process may fail if executed to a dirty
DVD-RAM. Also the disc may be difficult to record even it is
finished. Before executing DVD-RAM physical format
process, be sure to confirm the disc is not dirty. Clean it if
necessary. If the disc has scratches or dust beyond
cleaner’s efficacy, do not execute DVD-RAM physical
format process on the disc.
• The following DVD-RAM require physical formatting:
– A disc which is not formatted correctly.
– The disc which has some errors during writing because
of dirt on the disc, and cannot be further recorded, or
cannot initialize normally.
• Physical formatting does not work if the disc contains a lot
of voids beyond the limitation of the recorder.
• If an error occurs in physical formatting, “ERR-01” appears
in the front panel display. To turn it off, press the DISPLAY
button.
/ to select
/ to select
No
/ ,
Recording
Playback
Editing
Function Setup
Others
RD-85DT_Ope_E_p031-044 3/27/06, 19:4033
33
Page 34

Recording
Before recording (Continued)
Setting for recording on a DVD-R/RW disc in Video mode
Video mode recording enables playback of your favorite contents on other devices such as DVD players.
Finish this setting beforehand if you make a Video mode recording, that is;
- when you record on a DVD-R/RW (Video mode).
- when you record contents which will be copied from the HDD to a DVD-R/RW (Video mode).
Items to set up
When recording in Video mode, there are some
restrictions by DVD-Video standard.
Therefore, it is necessary to set up these items below.
Set up the items in advance before copying contents
from the HDD to a DVD-R/RW (Video mode) disc.
Aspect ratio(video mode)
“4:3” and “16:9” cannot be mixed in one title.
Therefore, set the aspect ratio before recording.
4:3: Set the aspect ratio to 4:3
16:9: Set the aspect ratio to 16:9
DVD-Video:CHP create
This is the setting to divide a title into some
chapters. It is convenient to skip scenes.
Off: Chapter dividing is not available.
5 min, 10 min, 15 min, 20 min:
Select an interval for chapter dividing.
Note
• When the number of chapters reaches a limit, chapters
are not divided anymore. The limit number of chapters is
dependent on conditions of a DVD-R/RW disc.
Note
• This setting is not effective in dubbing.
How to set up
Press SETUP during stop.
1
The setup menu appears.
Select “DVD recorder operation”
and press OK/ENTER.
2
e.g.
DVD recorder operation
AV record quality
Picture record mode
DVD-RW rec. mode setting
Video mode rec. setting
Relief recording
Select “Video mode rec.
setting” and press OK/ENTER.
3
e.g.
DVD recorder operation
AV record quality
Picture record mode
DVD-RW rec. mode setting Video mode
Video mode rec. setting
Relief recording
Video mode
On
On
34
RD-85DT_Ope_E_p031-044 3/27/06, 19:4034
Press / to select an item
4
then press
/ to change the
setting, and finally press
OK/ENTER.
Page 35

Introduction
Checking disc space
1) Press REMAIN.
The current capacity per disc is displayed at the
bottom of the screen. The current capacity of the
selected drive is displayed on the front panel display.
2) After checking the capacity, press the button
again to turn off the display.
Selecting recording mode
1) Select the drive by pressing HDD or DVD.
CONTENT MENU appears.
Pressing the same button turns it off.
2) Press REC MODE repeatedly to select the
recording mode.
Each time you press the button, the recording mode
display on the front panel changes.
e.g. When a 4.7GB single sided DVD-RAM is used
Recording time Picture quality
XP About 1 hour Superior to “SP”.
SP About 2 hour Standard quality.
LP About 4 hour Inferior to “SP”.
MN Adjustable.
Make the settings of “Manual mode set.”
page 130).
(
Note
• You cannot change the recording mode while recording.
Recording
Playback
Editing
Function Setup
RD-85DT_Ope_E_p031-044 3/30/06, 11:4735
Others
35
Page 36

Recording
DVD-RW
HDD
DVD-RAM
(VR)
DVD-RW
(Video)
DVD-R
(VR)
DVD-R
(Video)
DVD-VIDEO
VCD CD
Programming a recording (REC MENU)
Preparation
• When you record on a DVD-RAM/R/RW, load it into the recorder.
• When you record on a DVD-R/RW (Video mode) or when you record contents which will be copied to a DVD-R/
RW (Video mode), make the necessary settings (
page 34).
Press MENU.
1
The menu appears.
Start
Press
press OK/ENTER.
2
/
to select “Timer recording”, then
Press OK/ENTER.
3
“Ch” is ready for setting.
e.g.
REC
Basic
MENU
Ch Date
1 SP 4.6 D/M1------- -- -- -- --
Rec time –h ––m/ HDD remaining (excluding above) 51h 24m
Select an item by pressing / , then press
ADJUST (–/+) to set the item.
4
For details of the setting items, see page 39.
e.g.
REC
MENU
Start End Media Pict. Audio
Basic
HDD
4/23(Su)17:50
4/23(Su)17:50
36
RD-85DT_Ope_E_p031-044 3/27/06, 19:4036
Ch Date
1 SP 4.6 D/M110/30(Su) 7 00 – --
Rec time –h ––m/ HDD remaining (excluding above) 51h 24m
Rec folder
Genre
Edit title name Advanced Cancel Set timer
Start End Media Pict. Audio
ROOT
No genre
HDD
Page 37

Introduction
When complete, press OK/ENTER.
5
e.g.
REC
Basic
MENU
Ch Date
1 SP 4.6 D/M14/30(Su) 7 00 8 30
Rec time –h ––m/ HDD remaining (excluding above) 51h 24m
Press to select “Set timer” then press
OK/ENTER.
6
e.g.
Rec folder
Genre
Edit title name Advanced Cancel Set timer
To programme another recording, press to
move to the next line, then repeat steps 3 to 6.
7
Press EXIT to exit.
Your programme is entered.
8
• If you want to turn off the power, press the ON/STANDBY
button.
Start End Media Pict. Audio
ROOT
No genre
HDD
Recording
4/23(Su)17:50
Playback
Editing
Function Setup
Note
• The disc tray does not close automatically, even when the recording start time arrives. Set the recorder and load a
DVD-RAM/R/RW disc beforehand.
RD-85DT_Ope_E_p031-044 3/30/06, 11:4737
Others
37
Page 38

Recording
e.g.
4/23(Su)17:50
Disc budget calculation
REC
MENU
Ch Date Start End Pict.
Audio
Page
1/
1
1
10
42
4
-4/30(Su)
5/17(We)
5/20(Sa)
5/27(Sa)
7:00 8:30
-9:30 10:00
-10:30 11:30
- 8:30 11:30
MN 6.6
HDD
HDD
HDD
D/M2
MN 6.6
D/M2
LP 2.2
D/M1
SP 4.6
D/M2
DVD
DVD
DVD
Media
Result
Elapsed AvailableSelected(current)
()
Selected programme Available disc space
When the entry item is marked X, the recording will
not fit. Change the setting.
means this recording will not be executed due to
overlapping programme.
Programming a recording (REC MENU) (Continued)
Correcting a timer program
1) Press MENU.
2) Press
press OK/ENTER.
3) Press
to change, then press OK/ENTER.
4) Follow steps 4 to 6 (
the settings.
5) Press EXIT to exit.
Important
• You cannot correct a timer program within 5 minutes before
the recording start time. You can only delete the timer
program.
Deleting a timer program
The maximum timer program capacity is 32. Any new
program will be rejected if the recorder is full. To enter a
new program, you must cancel an existing one.
1) Press MENU.
2) Press
press OK/ENTER.
3) Press
to delete.
4) Press QUICK.
The Quick Menu appears.
5) Press
press OK/ENTER.
Check the message, then delete the entry.
Note
• You cannot delete a timer program while another is being
executed.
To stop a programmed recording
1) Select the recording drive by pressing HDD or
DVD twice.
2) Press STOP on the front panel twice.
When you press the STOP button once, a message
appears. While the message is displayed, press the
STOP button once again.
Note
• If you press the STOP button on the remote control, a
message appears. Select “Yes”, then press the OK/ENTER
button.
/ to select “Timer recording”, then
/ to select a timer program you want
page 36, 37) to change
/ to select “Timer recording”, then
/ to select a timer program you want
/ to select “Program cancel”, then
Checking the remaining volume
1) On REC MENU Timer Programming, press
QUICK.
2) Press
/ to select “Disc budget calculation”
then press OK/ENTER.
The Disc budget calculation menu appears.
3) Press
/ to select a timer program, then
press OK/ENTER.
The recorder calculates on a bar graph how much
a specific program (identified by a check mark) will
occupy on the disc.
Pressing the ADJUST button can display or remove
the check mark.
4) Correct the parameters of the timer program if
necessary.
(Skip to step 6) if you do not need this.)
Select an item you want to modify and press the
OK/ENTER button. The item will be ready to be
altered.
(When “High rate save” is set to “On”, “Pict.” cannot
be changed.)
Press the ADJUST button to modify. When
complete, press the OK/ENTER button.
5) Press MODE.
Program modification is registered.
6) Press EXIT to exit.
Notes
• The nearest 8 programs are calculated at a time.
• While the recorder is preparing for or executing a
programmed recording, any program modification cannot
be registered. Only programs which will start after 5
minutes or later can be modified.
• Available disc volume is not displayed for a DVD-R/RW
disc on which DVD-Video finalize process was executed.
38
RD-85DT_Ope_E_p031-044 3/30/06, 14:3438
Page 39

Setting items ( page 36)
√
Ch
Date
Start*
End*
Media
Pict.
Pict.
Audio
The digital recording technology for consumer products of Dolby Laboratories is used for D/M1 and D/M2. Dolby
Digital 192 kbps is set for D/M1 and Dolby Digital 384 kbps for D/M2.
Check mark on/off
1-999, L, AV1, AV2
Specified date (from today to 2
month later)
Every Sunday to Saturday, Monday
to Thursday, Monday to Friday,
Monday to Saturday, everyday.
0:00 - 23:59
0:00 - 23:59
DVD
HDD
XP
SP
LP
MN(Manual)
Auto
1.0, 1.4, 2.0-9.2
D/M1
D/M2
L-PCM
A timer program with this mark will be executed, To disengage, remove
this indicator.
Select a channel you want to record. (Selectable also by INPUT
SELECT.)
Select a date of a TV programme you want to record.
Enter a starting time of recording. (An initial setting is 10 minutes later.)
You can also use the number buttons.
Enter an end time. (Set the timer to begin recording no sooner than 2
minutes past the current time. Recording must not exceed 8 hours.)
You can also use the number buttons.
When you record on a DVD-RAM/RW/R disc.
When you record on the HDD.
For recording in the best picture quality, but shorter than “SP” in
recording time. (More disc capacity is required.)
Standard setting of recording time and picture quality.
For longer recording, but inferior to “SP” in picture quality.
Customized setting of rate (bit rate).
To set a rate automatically according to the remaining volume of the
disc. (If the disc does not have room for the TV programme, the
programme cannot be recorded to the end.)
When you select the HDD, the recorder records for a length of time
corresponding to that of a blank DVD-RAM disc (4.7GB). Not
applicable to a recording for 2.5 hours or longer.
Not applicable when “XP”, “SP”, “LP” or “Auto” is selected. You can set
a rate from 1.0, 1.4 and at intervals of 0.2Mbps from 2.0 to 9.2. (The
upper limit of the value depends on the “Audio” setting.)
Standard setting.
Superior to D/M1.Recommended for recording music programmes.
Uncompressed original digital audio. Equal quality to audio CD, but
recordable time will be shorter.
Introduction
Recording
Playback
Editing
Function Setup
Others
Notes
•“Start” and “End” accept time up to 30:59 if you use the number buttons. When you enter a time over 24:00 and press the
OK/ENTER button, “Date” will gain one day, and the time will be corrected to 0:00-6:59.
• If you record with setting the bit rate to about 4.0 Mbps or below, the recorded pictures may not be played properly if change
the playback speed. There will be noise, and the picture quality is lower than other rate settings.
RD-85DT_Ope_E_p031-044 3/27/06, 19:4039
39
Page 40

Recording
Programming a recording (REC MENU) (Continued)
Optional settings on REC MENU
The following setting options are available for each timer programme. Follow steps 1) to 3).
1) Select a desired one (1 - 7) using
/ / / , then press OK/ENTER.
A sub menu (or keyboard) appears.
2) Make the setting.
Refer to the descriptions below.
3) Finally select “Set timer” using
/ / / , then press OK/ENTER.
The settings are saved.
REC
Basic
MENU
Ch Date
1 SP 4.6 D/M110/30(Su) 7 00 8 30
Rec time –h ––m/ HDD remaining (excluding above) 51h 24m
Rec folder
1
Genre
2
Edit title name Advanced Cancel Set timer
Start End Media Pict. Audio
ROOT
No genre
4/23(Su)17:50
HDD
3
To cancel the current
timer prrogramme.
1 Rec folder
To select a folder into which the programme is
saved.
Available folders appear. Select one from them.
• For the folder function, see
page 58.
Switches by
either way.
or
4 Maximum quality rate and space saving mode
REC
MENU
Advanced
4/23(Su)17:50
4
Maximum quality rate and space saving mode
Picture ratio when recording DVD-Video
Auto chapter division when there is no sound
Chapter division when DVD-Video
Basic Set timer
Use this feature when you want to save space
while using the best picture quality rate for
recording. This will use 9.2 Mbps for recording
and reduce the rate temporarily for the portion
where the high rate is not required where picture
is fairly constant.
Off
4:3
Off
Off
5
6
7
2 Genre
To select a genre of the programme.
Available genres appear. Select one from them.
• For genres, see page 132.
3 Edit title name
To enter a name of the timer programme.
A keyboard appears.
• For keyboard operation, see
40
RD-85DT_Ope_E_p031-044 3/27/06, 19:4040
Off: This feature is disabled and the normal
recording is performed.
On: This feature is enabled.
Notes
• When the audio quality is set to “L-PCM”, the picture
quality is set to “MN 8.0 (Mbps)”. When the audio
quality is set to any other selection, the picture
quality is set to “MN 9.2 (Mbps)”.
•“On” returns to “Off” if you change “Pict.” setting.
• The space used may not change, depending on the
picture contents.
page 136.
Page 41

5 Picture ratio when recording DVD-Video
Make this setting when this timer programme is
(or will be) onto DVD-R/RW (Video mode).
Video mode cannot record a title which contains
both 4:3 pictures and 16:9 pictures.
4:3: Aspect ratio is fixed to 4:3 to record.
16:9: Aspect ratio is fixed to 16:9 to record.
6 Auto chapter division when there is no sound
This feature automatically creates divisions for
chapters when no audio (no audible sound)
portion is found.
For example, when you have recorded a
programme of music clips, you can use this
feature to jump to the beginning of a clip during
playback.
Introduction
Recording
Playback
Off: This feature is disabled.
On: Division for chapters are created when no
audio portion is found.
Notes
• Division for chapters may not be created, depending
on the contents of the programme or the condition of
no audio portion, or it may be created at different
positions. A division for a chapter may be created
within a music clip.
• Depending on the specification made for the
recording sound level, a division for a chapter may
not be created or it may be created at different
positions.
• Setting “On” may create chapters, and their number
may reach the maximum allowed. At that point, no
more chapters can be created. In this case, decrease
the chapters, for example, combining chapters.
• This feature is not available on DVD-R/RW discs
(Video mode). To create chapters automatically
during recording on DVD-R/RW disc (Video mode),
set “Chapter division when DVD-Video”.
7 Chapter division when DVD-Video
Make this setting when this timer programme is
(or will be) onto DVD-R/RW (Video mode).
This feature creates chapters automatically while
recording. Chapters enables skipping play of the
recorded disc.
Off: This feature is disabled.
5 min. / 10 min. / 15 min. / 20 min.:
Select the interval of chapters.
Notes
• If a number of chapters reaches the maximum, which
may vary depending on the disc condition, no more
chapters are created.
Editing
Function Setup
Others
RD-85DT_Ope_E_p031-044 3/27/06, 19:4041
41
Page 42

Recording
Programming a recording (REC MENU) (Continued)
Changing the default settings of recording
quality
1) While REC MENU Basic (e.g. step 4) is
displayed, press QUICK.
2) Press
/ to select “AV record quality”, then
press OK/ENTER.
3) Follow steps 1 to 3 (
REC
Basic
MENU
AV record quality
Ch Date
1 SP 4.6 D/M110/30(Su) 7 00 8 30
Rec time –h ––m/ HDD remaining (excluding above) 51h 24m
Rec folder
Genre
Edit title name Advanced Cancel Set timer
HDD rec
Start End Media Pict. Audio
DVD rec
Manual mode set.
Rate
ROOT
Audio quality
No genre
Total recording time: approx.
On(l)
(with 4.7 GB unused)
page 130).
9.2
XP
SP
9.2
D/M1
D/M1
HDD
4.6
D/M1
61min.
4/23(Su)17:50
Shifting a time period of a recording (Time
Shift)
If a prior TV programme extends beyond its scheduled
time and into one that you programmed, you can shift
the programmed start and end time of the recording.
13:00 13:54
Turning the power off automatically after
completing a programmed recording
1) While executing a programmed recording,
press QUICK.
2) Press
/ to select “End time”, then press
OK/ENTER.
3) Press
/ to select the recording end time and
power condition after the recording finishes.
/ to shift the cursor.)
(
End time:
Set the hour and minute.
Pwr Off:
On: Power will be on also after the recording.
Off: Power will turn off after the recording.
4) Press OK/ENTER.
Notes
• The recording end time cannot be changed in the following
cases;
– within 1 minute before the recording end time.
– advancing the recording end time.
– during recording in Auto mode.
• Even if you extend the recording end time, the recording
will stop when the HDD is filled up. Also at 8 hours from the
start time the recording will stop.
20 minutes
Time Shift
extend
13:20
1) Press MENU.
2) Press
/ to select “Timer recording”, then
press OK/ENTER.
3) Press
/ to select a timer programme you
want to shift the time period.
4) Press EXTEND in the lid.
“Start” and “End” are ready to be input.
5) Press EXTEND repeatedly.
Each time you press the button, “Start” and “End”
are shifted in 10 minutes intervals up to 60 minutes
later.
6) Press OK/ENTER.
7) Press
to select, “Set timer”, then press
OK/ENTER.
8) Press EXIT to exit.
Note
• After you shifted the time of a timer programme which will
be repeatedly daily or weekly, you should restore the
original start/end time for future recordings.
14:14
Relief recording
If you set a timer programme to a loaded DVD disc but
the disc does not have remaining space to record the
programme, the recorder records the whole
programme to the HDD instead of the loaded disc.
To use this function, set “Relief recording” (
page
131) to “On”.
Notes
• This function works also when you start a recording on a
loaded DVD disc by pressing the REC button and the
remaining space of the disc is under 10 minutes. (The
programme is not recorded on the disc.)
• This feature does not work when the HDD does not have
remaining space to record the programme.
• If the recording end time is extended after starting a timer
programmed recording, the programme is not recorded
onto the HDD. The loaded disc records the programme
until it is filled up then stops recording.
42
RD-85DT_Ope_E_p031-044 3/27/06, 19:4042
Page 43

Recording
Programming a recording (EPG)
Electronic programme guide (EPG) system enables you to programme a recording much easier. You
only choose a programme and enter the selection!
Preparation
• When you record on a DVD-RAM/R/RW, load it into the recorder.
• When you record on a DVD-R/RW (Video mode) or when you record contents which will be copied to a DVD-R/
RW (Video mode), make the necessary settings (
page 34).
Press GUIDE.
1
Start
Select a programme to record using / / /
2
OK/ENTER.
Electronic programme guide (EPG) appears.
(see page 24 for details), then press
REC MENU appears to show the programming data of
the selected programme.
e.g.
REC
MENU
Basic
4/23(Su)17:50
Introduction
Recording
Playback
Editing
Ch Date
1 SP 4.6 D/M14/30(Su) 7 00 8 30
Rec time –h ––m/ HDD remaining (excluding above) 51h 24m
Start End Media Pict. Audio
HDD
Confirm the programming data, and press
OK/ENTER.
3
Programming is complete.
The programme guide (EPG) returns.
If you correct the data:
1) Press
selected, then press OK/ENTER.
2) Select the item by
by
For details of the setting items, see
3) When complete, press OK/ENTER.
4) Press
to exit.
repeatedly until the programming data is
/ , then change the parameter
/ (or ADJUST -/+).
to select “Set timer”, then press OK/ENTER
Edit title name Advanced Cancel Set timer
To programme others, repeat steps 2 and 3.
To finish programming, press EXIT.
4
The current programme returns.
Function Setup
Others
page 39.
RD-85DT_Ope_E_p031-044 3/27/06, 19:4043
43
Page 44

Recording
Programming a recording (EPG) (Continued)
Notes
• To cancel the procedure, press the BACK/RETURN button (instead of the OK/ENTER button) at step 3.
• If the number of timer programmes reaches the maximum, a message will appear to tell you that your selection cannot be
accepted. Press the OK/ENTER button to exit.
44
RD-85DT_Ope_E_p031-044 3/27/06, 19:4044
Page 45

Recording
HDD
DVD-RAM
DVD-RW
(VR)
DVD-RW
(Video)
DVD-R
(VR)
DVD-R
(Video)
DVD-VIDEO
VCD CD
Recording a TV programme
To record a TV programme currently being broadcast, follow the procedures of this chapter.
Preparation
• When you record on a DVD-RAM/R/RW disc, load it into the recorder.
- Load a disc which has sufficient space available to record the programme.
- Make sure the loaded disc is not write-protected.
• When you record on a DVD-R/RW (Video mode) or when you record contents which will be copied to a DVD-R/
RW (Video mode), make the necessary settings (
1
Start
2
page 34).
Press HDD or DVD to select a media to record
on.
HDD : To record on the HDD.
DVD : To record on a DVD-RAM/R/RW disc.
CONTENT MENU appears.
Pressing the same button turns it off.
Press PROGRAM to select a channel to
record.
Introduction
Recording
Playback
Editing
3
The number buttons are also available.
Function Setup
Press REC.
Others
Recording starts.
RD-85DT_Ope_E_p045-049 3/27/06, 19:4145
45
Page 46

Recording
Recording a TV programme (Continued)
Notes
• The number of titles cannot exceed 99 for a DVD-RAM/RW/R disc or 396 for the HDD.
• One continuous recording cannot exceed in any case 8 hours. Recording automatically stops at 8 hours.
• You cannot start recording immediately before a programmed recording starts.
• During monaural sound recording, the same sound is recorded on both the left and right channels.
• When “Audio” is set to “L-PCM”, multi-channel sound is recorded as stereo sound.
• Depending on the disc condition, pressing the REC button may take a longer time to start recording.
•
When a starting time of a programmed recording comes, a recording in execution is stopped and the programmed recording
starts. If you do not want to stop the recording, cancel the timer program before it starts
• Even if you set “Aspect ratio(video mode)” (
DVD-R or DVD-RW disc with “Pict.” set to “1.0” (Mbps) or “1.4” (Mbps).
page 34) to “16:9”, images are recorded in 4:3 aspect ratio when using a
.
To stop recording
Press STOP.
To pause recording (to omit an unnecessary
portion)
During recording, press PAUSE.
To resume recording, press it again.
Note
• While recording onto a DVD disc, pressing PAUSE on the
recorder automatically creates a new chapter division at
that point.
To change a TV channel to be recorded
1) During recording, press PAUSE.
Recording pauses.
2) Press PROGRAM to change the channel.
3) Press PAUSE to resume recording.
To view a TV programme while recording
another
1) Start recording on this recorder.
2) Press TV/DVR.
3) Using the channel selector of the TV, select a
desired channel on the TV.
If you press the TV/DVR button again, you will go
back to the display that you are recording.
To set an end time of a recording which is in
progress
1) During recording, press QUICK.
The Quick Menu appears.
2) Press
/ to select “End time” then press
OK/ENTER.
3) Press
/ to select the recording end time and
power condition after the recording finishes.
/ to shift the cursor.)
(
End time:
Set the hour and minute.
Pwr Off:
On: Power will be on also after the recording.
Off: Power will turn off after the recording.
4) Press OK/ENTER.
Notes
• By setting an end time, it is memorized as a programmed
one, and the indicator in the front panel display
illuminates to indicate that the recorder holds a timer
program of recording.
• The programmed end time must be set for 5 minutes later
than the current time.
Note
• This function is available only when the TV is connected to
the AV1(AUDIO/VIDEO)IN/OUT socket.
46
RD-85DT_Ope_E_p045-049 3/27/06, 19:4146
Page 47

Recording
HDD
DVD-RAM
DVD-RW
(VR)
DVD-RW
(Video)
DVD-R
(VR)
DVD-R
(Video)
DVD-VIDEO
VCD CD
Recording an external source
You can record programmes from connected equipment on the HDD or a DVD-RAM/R/RW disc.
Connect according to A or B.
A: Using the AV socket on the rear of the recorder
AV2(SAT/DECODER)IN/OUT
Rear of the recorder
External equipment
To video
output jack
To audio
output jacks
Audio cable
Video cable
To AV socket
AV1(AUDIO/VIDEO)IN/OUT
B: Using the input jacks on the front of the recorder
Yellow White
Red
Introduction
Recording
Playback
Editing
Function Setup
• To record a clearer picture, use the
S-VIDEO jack.
The S-VIDEO jack has priority over
the VIDEO (yellow) jack.
INPUT (Line)
Preparation
• When you record on a DVD-RAM/R/RW disc, load it into the recorder.
– Load a disc which has sufficient remaining space to record the programme.
– Make sure the loaded disc is not write-protected.
Notes
• If a source of high quality sound track such as DVD audio is recorded with this recorder, the sound quality becomes regular
audio CD quality. Refer to the instructions of the connected equipment.
• When you record an external source onto a DVD-R/RW disc (Video mode) or the contents which will be copied to a DVD-R/
RW disc (Video mode) later on, set the connected equipment to output sound you want to record (if selectable such as
multiplex broadcasting), as the recorder records sounds of external source in stereo onto a DVD-R/RW disc.
• DVD-R/RW discs (Video mode) cannot record contents with copy restriction signal embedded (copy-protected or copy once
contents), the HDD, DVD-RAM disc, CPRM compatible DVD-R/RW (VR mode) can record copy once contents.
• Some satellite programmes via a connected tuner may contain both 4:3 pictures and 16:9 pictures. DVD-R/RW discs (Video
mode) cannot record such contents, under restriction of the DVD-Video standard. To record these programmes, use the HDD
or DVD-RAM discs.
(Continued)
Others
47
RD-85DT_Ope_E_p045-049 3/27/06, 19:4147
Page 48

Recording
Recording an external source (Continued)
1
2
Press INPUT SELECT repeatedly so that “L”,
“AV1” or “AV2” appears on the front panel
display, corresponding to the input in which
the device is connected.
Each time you press the button, the indicator changes.
L: To record pictures from equipment connected to
the INPUT jacks on the front panel.
AV1: To record pictures from equipment connected to
the AV1(AUDIO/VIDEO)IN/OUT socket on the
rear panel.
AV2: To record pictures from equipment connected to
the AV2(SAT/DECODER)IN/OUT socket on the
rear panel.
Press HDD or DVD to select a recording
media.
HDD : To record on the HDD.
DVD : To record on a DVD-RAM/R/RW disc.
48
Start
Press REC on this recorder to start recording.
3
Start playback of the source content on the
connected equipment.
4
When recording is completed, press STOP.
5
RD-85DT_Ope_E_p045-049 3/30/06, 11:4748
Page 49

Notes on recording from a connected VTR or camcorder
Check the condition of the source equipment before playing.
Set the equipment in good condition, e.g. clean the head or adjust the tracking, etc. to obtain optimum playback.
Bad conditions may produce noises in playback. These noises may be detected as copy protection signals,
resulting in stop of recording on this recorder.
Play a source in an usual mode. Avoid using any correcting or enhancing features, as they may add signals
which can be detected as copy protection signals.
Source quality or tape condition beyond adjustments on the source equipment may stop a recording on this
recorder.
Do not operate the source equipment during recording on this recorder.
Operations such as pausing, resuming, fast-forwarding (CUE) and fast-reversing (REVIEW), etc. may produce
noises, which may be detected as copy protection signals. Therefore, first start playback on the source
equipment to confirm that the desired source can be played properly, and then start recording on this recorder.
Do not operate the source equipment during recording. After completing the desired scene, stop the recording on
the recorder, and then stop the playback on the source equipment. Delete unnecessary scenes using editing
functions (
page 50). If you want to operate the source equipment during recording, pause or stop the
recording. After operating the source equipment, resume the recording as above.
When recording from a camcorder
Follow the above notes. Be sure to power the camcorder by its AC adapter, not batteries. If batteries are used,
palyback may stop before the recording has finished.
Automatic line input recording (LINE AUTO function)
Introduction
Recording
Playback
Editing
If an external device (e.g. satellite receiver) is connected
to the AV2(SAT/DECODER) IN/OUT socket of this
recorder using a SCART cable, the recorder can detect
signals from the connected device to automatically start
and finish recording according to the device’s signals.
This function can record onto the HDD only.
You can use this LINE AUTO function in the following
conditions:
• The recorder is powered on.
• The recorder’s clock setting is finished.
• The recorder is not playing or recording.
Note
• Depending on the device, this function may not be
available.
• To record satellite programmes using this method from a
satellite receiver, be sure to connect your receiver's
SCART socket which is allocated for TV connection, and
the AV2(SAT/DECODER)IN/OUT socket. If you use a
SCART socket which is not for TV to connect this recorder,
LINE AUTO function does not work.
• Refer to the device’s operating instructions as well.
To set the LINE AUTO standby mode
1) Press LINE AUTO.
A confirming message appears.
2) Select “Yes” by
/ , then press OK/ENTER.
The L-AUTO indicator on the front panel display
illuminates, and the recorder’s power turns off
(standby mode).
If a device’s signal comes (LINE AUTO
recording mode)
The recorder starts recording, and finishes when the
signal input stops.
After having finished the recording, the recorder
returns to LINE AUTO standby mode.
Note
• To cancel LINE AUTO standby mode, press LINE AUTO
again (or press ON/STANDBY) to turn off the L-AUTO
indicator on the front panel display.
• To stop recording in progress, press the ON/STANDBY
button if you wish to turn the recorder off, or the LINE
AUTO button to view a current channel of the recorder.
A message appears. Select “Yes”, and press the OK/
ENTER button.
• In LINE AUTO standby mode, any buttons other than LINE
AUTO or ON/STANDBY cannot be available.
• In LINE AUTO standby mode, the recorder does not start
automatic software upgrade (
• Timer recordings of this recorder have priority over LINE
AUTO recordings. A LINE AUTO recording will not start if a
timer recording is being executed. Also, a LINE AUTO
recording will stop itself about 2 minutes before a timer
recording starts, and will return to LINE AUTO mode after a
timer recording will have finished.
page 29).
Function Setup
Others
L-AUTO
indicator
RD-85DT_Ope_E_p045-049 3/28/06, 10:4549
49
Page 50

Recording
DVD-RW
HDD
DVD-RAM
(VR)
DVD-RW
(Video)
DVD-R
(VR)
DVD-R
(Video)
DVD-VIDEO
VCD CD
Deleting recorded contents
Important note
Any deleted title/chapter (original) cannot be restored. Before deleting, be sure to check contents on the disc.
On a finalized DVD-R/RW disc, this feature is not possible.
To delete a title (chapter)
Press HDD or DVD, then press / / / to
select a title to delete.
Start
1
To display chapters, press the MODE button.
e.g.
CONTENT
Title Thumbnail
MENU
Natures
03
001 002
003
1/ 5
Summer day
(0:53:45) (0:29:50)
Singing birds
004
Page
etc
...
HDD (VR)
Cat show
Fishing lesson
(0:54:30)(0:52:40)
Play List
Press DELETE.
2
Read the message and press / to select
“Yes,” then press OK/ENTER.
3
Deleting multiple specified parts
1) During play or stop, press MENU.
2) Press
press OK/ENTER.
3) Press HDD or DVD to select a disc that contains
titles or chapters you want to delete.
4) Press
press OK/ENTER.
“EDIT MENU Del Selected items” appears.
5) Select a part (a title or chapter) to delete.
(To select a part, see
/ to select “Edit programme”, then
/ to select “Del rec. programme”, then
page 91 – 92)
Select a title to delete pressing
Alternate method:
Press the QUICK button, then press the
select “Title delete” (“Chapter delete”) and press the OK/
ENTER button.
6) Press repeatedly to select “Start”, then press
OK/ENTER.
7) Read the message and press
“Yes”, then press OK/ENTER.
The recorder begins the deletion process.
To cancel deleting, press the
“No”, then press the OK/ENTER button.
Notes
•
On a DVD-RW disc, only
the disc capacity by being deleted.
•
On a DVD-R disc, deleting cannot restore the disc capacity
the last title recorded can restore
/ / / .
/ buttons to
/ to select
/ buttons to select
.
50
RD-85DT_Ope_E_p050-056 3/27/06, 19:4150
Page 51

Recording
Others
Introduction
To protect recorded content
You can protect recorded content from unexpected
deletion.
Protection is provided for each title (original).
1) Perform steps 1 and 2 in “Playing recorded
contents (CONTENT MENU)” (
select a title.
2) Press the QUICK button, and press the
/ buttons to select “Title information”. Then
press the OK/ENTER button.
3) Press the QUICK button, and press the
/ buttons to select “Lock” and then press
the OK/ENTER button.
The mark
Notes
• To cancel protection, repeat this procedure. At step 3),
select “Unlock”.
• Disc initialization erases all titles on a disc even if they are
protected.
• Executing “All HDD titles delete” ( page 132) erases all
titles on the HDD even if they are protected.
appears.
page 54) to
Technical information
About recording time
The recording time of a typical VCR (Video Cassette
Recorder) is determined by the length of a video tape
and recording speed (SP, LP, etc.). Video tapes with
various recording times are available in the market.
On the other hand, the recording time of a DVD-RAM/
R/RW depends on the bit rate (Mbps: amount of data
transmitted per second), which can be varied in
MPEG2 (Moving Picture Experts Group2)
compression technology.
As an example, when you pour water into a bucket
from a faucet, the faster the water flows, the sooner
the bucket is filled with water. On the other hand, the
slower the water flows, the more slowly the bucket is
filled. The DVD-RAM/R/RW is, so to speak, such a
bucket, and the degree you turn the faucet is bit rate,
the time required to fill the bucket with water is the
recording time available for a disc. The higher you set
the bit rate (making much more water flow), the
sooner a disc is filled. Consequently, the recording
time becomes shorter. The lower you set the bit rate,
the longer time it takes to fill a disc.
About picture quality (XP, SP, LP, Auto, MN
(Manual) mode)
The higher you set the bit rate, the more the volume of
information for the picture. The lower the bit rate, the
less the volume of picture information.
However a high bit rate does not always mean that the
picture quality is high. The difference between the 1.4
Mbps and 9.2 Mbps is obvious, but when comparing
similar bit rates, the difference may be insignificant.
Generally when you set the bit rate low for longer
recording time, the data volume shortage will result in
a lack of detail information. As a result, the picture
quality is decreased (more noticeable with dynamically
moving images). For example, square noises (block
noise) may occur in a scene with fast action or a
scene with light and shadows, such as a water
surface.
This recorder has several settings, for example 2 hour
recording at “SP” mode or 4 hour recording at “LP”
mode (both assume a blank 4.7 GB DVD-RAM). It is
recommended to consider the “SP” mode as a
standard mode and use the “LP” mode when you want
to record for long time regardless of the picture quality.
If you want to record for about 2 hours or are uncertain
which one to select, select the “Auto” mode.
On a blank 4.7 GB DVD-RAM disc, the “Auto” mode
automatically sets the appropriate bit rate
corresponded to the recording time from about 1 hour
to up to 2 and a half hours so that you can achieve the
best picture quality. If a part of a DVD-RAM disc has
already been recorded, the “Auto” mode sets the bit
rate suitable for the remaining space on the disc. (The
picture quality is determined referring the remaining
space just before recording. When the remaining
space is scarce in the disc, the picture quality may
decrease from what you set beforehand or the
recording may stop halfway.) “Auto” mode is available
also on DVD-R/RW recordings.
When you want to record a music program or
animation with high picture quality, it is recommended
that you select the “MN” mode. If you select more than
6 Mbps, you can usually record with considerably
higher picture quality. However the higher you set the
bit rate, the shorter the recording time.
D /M1, D /M2
Sound recording format onto DVD-RAM discs. When
recording, sounds are converted into digital signals
and compressed. In playback, they are extracted to
the original sound. The standard differenciates
M1 and
and
technology for consumer products of Dolby
Laboratories. Dolby Digital 192 kbps is set for
M1 and Dolby Digital 384 kbps for
D /M2 in data volume to use. D /M1
D /M2 are applied the digital recording
D /M2.
D /
D /
L-PCM (Linear PCM)
Sound recording format, like Dolby Digital. However,
sounds are converted into digital signals and recorded
as they are without compression. This process
requires more data than Dolby Digital.
Recording
Playback
Editing
Function Setup
Others
RD-85DT_Ope_E_p050-056 3/27/06, 19:4151
51
Page 52

RD-85DT_Ope_E_p050-056 3/27/06, 19:4152
Page 53

Playback
Play your favorite contents.
Playing recorded contents
(CONTENT MENU)
Folder function
Playing a DVD video disc
Other playback functions
RD-85DT_Ope_E_p050-056 3/27/06, 19:4153
Page 54

Playback
02
HDD
DVD-RAM
(VR)
DVD-RW
(Video)
DVD-R
(VR)
DVD-R
(Video)
DVD-VIDEO
VCD CD
DVD-RW
Playing recorded contents (CONTENT MENU)
Titles and chapters recorded on the HDD or a DVD-RAM/R/RW disc are displayed in thumbnail view, so
that you can easily locate a desired one.
Press HDD or DVD to select the drive.
1
HDD: Contents in the HDD
DVD: Contents in a loaded disc
Start
See “Folder function”
( page 58)
(Contents recorded on other devices or those in a
finalized DVD-R/RW are not displayed.)
The “CONTENT MENU Title Thumbnail” appears.
e.g.
CONTENT
MENU
HDD :
01
03
001
1/ 5
Title Thumbnail
Folder 1 Folder 2
Folder 3
Page
02
(0:00:00)
(0:00:00)
002
(0:53:45)
New New
HDD (VR)
(0:00:00)
GARBAGE
(0:00:00)
(0:55:00)
Press / / / to select a title (chapter).
2
You can view succeeding or prior pages by pressing the
SKIP (
To select a chapter, select a title and press the MODE
button.
The Chapter List appears.
By pressing the MODE button again, you can return to
the Title Thumbnail.
) or SKIP ( ) button.
Press OK/ENTER.
3
Playback starts from a selected title (chapter).
Notes
• In a CONTENT MENU, titles (Original) precede titles (Playlist), in order from the oldest one respectively.
• To turn off the CONTENT MENU, press the EXIT button. Absence of operations for longer than about 15 minutes also turns
off the CONTENT MENU.
• The mark is displayed in every thumbnail when “HDD/RAM title play” ( page 129) is set to “Title resume”. When set to
“Serial playback”, it is displayed in a thumbnail last operated.
• You can change a thumbnail picture. See page 114.
• You cannot display the CONTENT MENU for DVD-R/RW discs recorded on other devices.
• For playing a recorded title while recording another, see page 57.
• A black thumbnail with “Recording” means that the title is being recorded or its recording will start within 15 seconds. This
thumbnail cannot start playback.
54
RD-85DT_Ope_E_p050-056 3/27/06, 19:4154
Page 55

Introduction
Reading CONTENT MENU
Each recorded content is displayed as its thumbnail.
Each time you press the ZOOM button in the lid,
you can switch displays between title thumbnail and
title list.
etc
CONTENT
Title Thumbnail
MENU
HDD :
001 002
003 004
005 006
Summer day
(0:53:45) (0:29:50)
Singing birds
(0:52:40)
Cruise
(0:30:08)
1/ 5
Page
...
HDD (VR)
Cat show
Fishing lesson
(0:54:30)
Play List
Country life
(0:51:28)
A fictitious title created by editing is
marked with “Playlist”.
This shows that the recorder memorizes the location
you last stopped playback in each title.
To use this function, set “HDD/RAM title play” to
“Title resume”. ( page 129)
You can make the recorder memorize only the very
last point, regardless of the number of titles.
Set “HDD/RAM title play” to “Serial playback”. (
page 129)
Titles (Original) precede titles (Playlist) in order from
the oldest one.
To stop playback
Press STOP.
To pause playback (still playback)
Press PAUSE.
To skip the contents in pre-determined
increments
During playback, press INSTANT REPLAY/SKIP
).
(
Each time you press the button, you can skip by a
specified time.
You can select the interval per press of the button.
See “Instant skip interval” (
page 129).
To skip back in pre-determined increments
During playback, press INSTANT REPLAY/SKIP
).
(
Each time you press the button, you can go back by
the specified time to resume playback.
You can select the interval per press of the button.
See “Instant replay interval” (
page 129).
Notes
• This operation may not work for some discs.
• Depending on the structure of a disc, some operations may
be limited.
• Depending on playback conditions, some operations may
not work.
Erasing content
1) At step 2 on page 54, select an unnecessary
title (chapter).
2) Press DELETE.
• A message appears. Select “Yes ”, then press OK/
ENTER. The content will be deleted.
Note
• While selecting an unnecessary title (chapter), you can
delete by selecting “Title delete” or “Chapter delete” from
the “Quick Menu”.
Recording
Playback
Editing
Function Setup
Others
To resume normal playback, press the PLAY button or
the PAUSE button.
Note
• Sound is muted in still mode.
To skip by 1/20 of whole
During playback, press / .
Each time you press the button, you can skip by 1/20
of the current title or track if it is longer than 1 minute.
RD-85DT_Ope_E_p050-056 3/27/06, 19:4155
55
Page 56

Playback
Playing recorded contents (CONTENT MENU) (Continued)
Playing at various speeds
HDD
DVD-RW
DVD-RAM
Playing in fast reverse or fast forward
During normal playback, press SLOW/REV or FWD/SLOW.
: Fast forward playback
: Fast reverse playback
Each time you press the button, the playback speed changes.
During fast forward playback at “
reproduced. (Not available on VIDEO CD.)
• This function is not available when you play a title
recorded on a DVD-RAM disc while recording another.
Notes
• The playback speed may vary depending on the disc.
• Depending on the disc or data condition, picture and sound in fast forward
playback at “ ” speed may be disturbed.
(VR)
DVD-RW
(Video)
DVD-R
(VR)
DVD-R
DVD-VIDEO
(Video)
” speed, sound is
VCD CD
Playing in slow-motion (Not available in CD
playback)
Press PAUSE, then press SLOW/REV or
FWD/SLOW during playback.
: Forward slow-motion
: Reverse slow-motion
Each time you press the button, the
slow-motion speed changes.
• To resume normal playback
Press PLAY.
Notes
• Slow-motion does not provide smooth playback.
• When playing a VIDEO CD, reverse slow-motion playback
is not available.
• The speed level displayed is approximate.
Playing frame by frame
1) During playback, press PAUSE.
A still picture is displayed.
2) Press ADJUST.
: Playback direction
: Opposite direction
• To resume normal playback
Press PLAY or PAUSE.
Notes
• Sound is muted during frame by frame playback.
• Frame by frame playback cannot provide smooth playback.
• Picture may advance more than 1 frame at a time.
• Depending on scenes, some frames may not be played.
• When playing a VIDEO CD, reverse frame by frame
playback is not available.
Skipping to the next/previous chapter or track
Press SKIP repeatedly until the chapter or track
number you want appears.
Playback starts from the selected
chapter or track.
: Playback starts from the beginning
of the next chapter or track.
: Playback starts from the beginning
of the current chapter or track.
When you press twice, playback
starts from the beginning of the
previous chapter or track.
Notes
• Some titles may not display chapter numbers.
• When playing the HDD or a DVD-RAM disc, you can access
chapters only in the current title if “HDD/RAM title play” (
page 129) is set to “Title resume”. To access chapters in other
titles, set to “Serial playback”.
• When playing a DVD video disc or a DVD-R/RW disc
(Video mode), you can locate chapters only in the current
title if “DVD title stop” ( page 125) is set to “On”. To
access chapters in other titles, set to “Off”. However, in this
instance even though you press SKIP button ( ) to go
back to the previous title, playback will not start from the
last chapter of the title but from the first chapter.
DVD-RAM
Viewing still pictures
DVD-VIDEO
(Playing a disc that contains still pictures)
1) Press PLAY.
The first still picture on a disc is
displayed.
Some DVD video discs may allow you
to change the pictures using the
PLAY, OK/ENTER or SKIP button.
2) Press ADJUST.
: Displays the next still picture.
: Displays the previous still picture.
56
RD-85DT_Ope_E_p050-056 3/27/06, 19:4156
Page 57

Introduction
Resuming playback from the location last
stopped (Title resume)
The recorder memorizes the location you last stopped
playback to resume from there.
To use this function, set “HDD/RAM title play” (
page 129) to “Title resume.” The recorder will
memorize the location you last stopped at in each title,
so you can resume playback from there. For example,
if there are 6 titles, you can start each of them as if
you had stored 6 video tapes in the recorder.
• To return to the beginning of the title
During playback, press QUICK button, then press
/ buttons to select “Restart title,” then press OK/
ENTER button.
• To play another title
Press the HDD or DVD button to display “CONTENT
MENU Title Thumbnail,” then select a title.
You can make the recorder memorize only the very
last point, regardless of the number of titles. Set
“HDD/RAM title play” (
page 129) to “Serial
playback.”
• To return to the beginning of the title
Press SKIP (
) button repeatedly until the
beginning of the title appears.
• To play the other title
Press SKIP (
Notes
• Depending on conditions or contents, playback may not
start from the location last stopped at, but instead another
location. For example, from the beginning of the disc or
title.
• Depending on the disc, there may be a slight difference
between the location the recorder memorized and the
actual location where playback starts.
• This function is not available on DVD-R/RW discs.
• The resuming function will not work if the write-protect tab
is set to “PROTECT” ( page 7).
or ) button repeatedly.
Notes
• The playback picture may appear after a delay of several
seconds.
• While you are using this function, the following operations/
functions are not available.
- Programmed playback (repeat playback, etc.)
- Editing (Playlist programming, dubbing, title/chapter
naming, etc.)
Playing all titles (original/playlist) in a disc
Set “HDD/RAM title play” ( page 129) to “Serial
playback”. You can play all titles in the HDD and DVDRAM disc in the order of the thumbnails on CONTENT
MENU, as if they were recorded in one video tape.
Checking the background information on a
selected title
1) At step 2 on page 54, select a title (chapter)
then press QUICK.
The Quick Menu appears.
2) Press
/ to select “Title information”, then
press OK/ENTER.
Detailed information of a selected title (chapter)
appears. You can switch the chapters in the title by
pressing the SKIP (
Notes
• From the Quick Menu on the “CONTENT MENU Title
Information”, you can change the details such as name,
genre or time.
• You can protect the title from unexpected erasure
( page 51).
• To return to the previous display, press the BACK/RETURN
button.
or ) buttons.
Recording
Playback
Editing
Function Setup
Others
To play a recorded title while recording another
on the same disc (Recorded Title Play)
DVD-RAM
HDD
During recording, you can play a title recorded on the
same disc.
1) While recording, press HDD or DVD.
2) Press
/ / / to select a desired title, then
press OK/ENTER.
Playback of the selected title starts.
Pressing the STOP button stops playback, and the
content currently recorded returns. If you press the
PLAY button, playback resumes from the location
you last stopped.
RD-85DT_Ope_E_p057-067 3/27/06, 19:4257
57
Page 58

Playback
HDD
DVD-RAM
(VR)
DVD-RW
(Video)
DVD-R
(VR)
DVD-R
(Video)
DVD-VIDEO
VCD CD
DVD-RW
Folder function
You can create folders and put increasing recording titles into them to arrange.
• Each folder can be named such as serial drama, sports, movie or user
name.
• Contents in the folder can be protected so that it cannot be operated by
others. (“LOCK”)
• You can put titles you want to delete into “GARBAGE” so that you can delete
them collectively later.
The following folders are beforehand prepared in the HDD.
“Folder 1”, “Folder 2”, “Folder 3”
Start
“LOCK” (Invisible at factory set)
“GARBAGE”
You can add folders if needed.
You can create new folders also in a DVD-RAM or DVD-R/RW (VR mode).
(“Creating folders”,
page 59)
CONTENT
MENU
1
HDD :
01
03
4
Title Thumbnail
Folder 1 Comedy
(1:25:30)
Natures
2
(1:25:30) (0:00:00)
3
GARBAGE
(0:00:00)
“Title Thumbnail” on which
1/ 5
Page
“GARBAGE” is placed is
02
called ROOT.
HDD (VR)
(0:00:00)
LOCK
5
001
Cat show
(0:55:00)
To open the folder, press / / / to select
the folder, then press OK/ENTER.
To go back to the ROOT, press / / / to
select this icon, then press OK/ENTER.
CONTENT
Title Thumbnail
MENU
Natures
03
001 002
003
005 006
1
Folder number
Summer day
(0:53:45)
Singing birds
(0:52:40)
Cruise
(0:30:08)
1/ 5
004
Page
etc
...
HDD (VR)
Cat show
(0:29:50)
Fishing lesson
(0:54:30)
Play List
Country life
(0:51:28)
Folders are displayed in order from the smallest number.
You can change the order.
58
RD-85DT_Ope_E_p057-067 3/27/06, 19:4258
2
Folder name
You can change the name. (Depending on condition, it may not work.)
Total time of the recorded titles (Original) in a folder
3
“GARBAGE”
4
“LOCK” (To use this function, you need to select “On” in advance
5
page 63)
You can protect recorded titles.
This function is available only for the HDD.
Page 59

Introduction
Creating folders
DVD-RW
HDD
DVD-RAM
DVD-VIDEO
VCD CD
(VR)
DVD-RW
(Video)
The recorder provides 3 folders (“Folder 1”, “Folder 2”,
“Folder 3”) for recorded titles.
Including these, a maximum of 24 folders can be
created.
Cartoon
1) Press HDD or DVD to select the drive.
HDD: Contents in the HDD
DVD: Contents in a loaded disc
2) Press QUICK.
3) Press
/ to select “Folder function”, then
press OK/ENTER.
CONTENT
Title List
MENU
Quick Menu
Natures
03
Title information
4) Press
001 002
Create thumbnail
003
005 006
Summer day
Edit title name
Edit function
Disc information
Folder function
Move to bin
Title delete
Exit
(0:53:45) (0:29:50)
Singing birds
/ to select “Folder settings”, then
press OK/ENTER.
“Folder settings” menu appears.
5) Press
/ / / to select an untitled folder
then press OK/ENTER.
A keyboard appears.
6) Enter a folder name.
A maximum of 48 letters can be inputted.
A name which contains the following words cannot
be set;
ROOT, GARBAGE, LOCK
7) When finished, press MODE.
“Folder settings” menu returns. A new folder with
the name is created.
Football
games
1/ 5
004
DVD-R
(VR)
Page
DVD-R
(Video)
Historical
drama
etc
...
HDD (VR)
Cat show
Fishing lesson
(0:54:30)(0:52:40)
Play List
Notes
• You cannot create a folder in a folder.
• When programming a timer recording, you can set a
created folder for the title to be recorded. ( page 40)
• When you copy content in a folder from a loaded disc to
the HDD, they are copied on the ROOT. However, if you
create a folder of the same name in the HDD then execute
copying, the copied contents will be put in the folder of the
same name. (When copying from DVD-RAM or DVD-R/RW
(VR mode) to the HDD, the folder of the same name is
created automatically.)
• A DVD-RAM or DVD-R/RW (VR mode) which contains
folders created on this recorder may lose the folder
assortment or the titles may move onto the ROOT, if it is
used on other players (including TOSHIBA products) or
PC, etc.
To change the folder name
1) After step 1) of “Creating folders”, press
/ / / to select the folder to change its
name, then press QUICK.
2) Press
/ to select “Folder function”, then
press OK/ENTER.
3) Press
/ to select “Rename folder”, then
press OK/ENTER.
4) Repeat steps 6) to 7) of “Creating folders”.
Note
• If you change the name of a folder you set for a recorded
titles of timer recording, the name in “Rec folder” on REC
MENU changes automatically.
Recording
Playback
Editing
Function Setup
Others
RD-85DT_Ope_E_p057-067 3/27/06, 19:4259
59
Page 60

Playback
Folder function (Continued)
Moving into “GARBAGE”
You can put recorded titles you want to delete into
“GARBAGE” so that they are deleted collectively later.
The titles are not deleted automatically even though you
put into “GARBAGE”. The titles can be moved or played
unless “GARBAGE” is emptied.
THE END
Fin
You cannot move the following contents;
• A chapter only
• A title which is being recorded
• A protected title
• A title in “LOCK” which is locked (
1) Press HDD.
2) Press
put into “GARBAGE”.
3) Press QUICK.
4) Press
OK/ENTER.
5) Press
OK/ENTER.
To cancel, select “No”, then press OK/ENTER.
The lid of “GARBAGE” opens when a title is put in.
/ / / to select a title you want to
/ to select “Move to bin”, then press
/ to select “Yes”, then press
page 63)
Emptying “GARBAGE”
Titles in “GARBAGE” can be deleted collectively.
Once you execute the deleting process, it cannot be
cancelled.
You cannot execute in the following situations;
• While preparing for a timer recording
• While recording a programme
1) Press HDD.
2) Press
3) Press QUICK.
4) Press
OK/ENTER.
“Empty bin” is not displayed when “GARBAGE” is
empty.
5) Press
OK/ENTER.
To cancel, select “No”, then press OK/ENTER.
Note
• Even though parts of a Playlist are in “GARBAGE”, the
Playlist can be played. However, if you empty “GARBAGE”,
the parts are deleted from the Playlist.
/ / / to select “GARBAGE”.
/ to select “Empty bin”, then press
/ to select “Yes”, then press
60
RD-85DT_Ope_E_p057-067 3/27/06, 19:4260
Page 61

Introduction
Moving a recorded title into a
folder
Life with
companion
animal
You cannot move the following contents;
• A chapter only
• A title which is being recorded
• A protected title
• A title in “LOCK” which is locked (
1) Press HDD or DVD to select the drive.
HDD: Contents in the HDD
DVD: Contents in a loaded disc
2) Press
/ / / to select a title you want to
move into a folder.
3) Press QUICK.
4) Press
/ to select “Folder function”, then
press OK/ENTER.
5) Press
/ to select “Move to folder”, then
press OK/ENTER.
6) Press
/ / / to select a folder in which you
want to move the title, then press OK/ENTER.
e.g. Moving into “Comedy”
CONTENT
Title List
MENU
Select the moving destination folder
Natures
03
Cartoon
01
001 002
04
07
Summer day
1/ 5
Sports Comedy
02 03
05
(0:53:45) (0:29:50)
08
Page
page 63)
etc
...
Cat show
06
09
HDD (VR)
Deleting out from a folder
1) Select a title which you want to take out.
2) Press QUICK.
3) Press
/ to select “Folder function”, then
press OK/ENTER.
4) Press
/ to select “Move to folder”, then
press OK/ENTER.
5) Press
/ / / to select “ ”, then press
OK/ENTER.
Moving multiple titles into a folder
1) While displaying a Title List, press QUICK.
2) Press
/ to select “Folder function”, then
press OK/ENTER.
3) Press
/ to select “Move multiple to folder”,
then press OK/ENTER.
4) Press
/ / / to select a title you want to
move, then press OK/ENTER.
5) Press
/ to select a folder in which you want
to move the title, then press OK/ENTER.
An icon with the folder number appears.
e.g. When set to be moved to folder 03.
03
To cancel the title, press the QUICK button while
selecting the title, then select “Cancel Selected
Title”, and press OK/ENTER.
6) Repeat steps 4) to 5) to select a title and a
folder.
7) Press
to select “Start”, then press
OK/ENTER.
8) Press
/ to select “Yes”, then press
OK/ENTER.
Recording
Playback
Editing
Function Setup
Others
“LOCK”:
Unless you input the security code, the title cannot
be played.
Make the setting in advance. See
“GARBAGE”:
Select if you want to delete titles later. If you select
“Move to bin” at step 5), the title is moved into
“GARBAGE”. (Available only in the HDD.)
RD-85DT_Ope_E_p057-067 3/27/06, 19:4261
page 63.
61
Page 62

Playback
Folder function (Continued)
Changing the order of folders
Folders are displayed in order from the smallest number.
You can change the display position by swapping the
folder numbers.
Cartoon
Comedy
You cannot change the position of the following
folders;
• “LOCK”
• “GARBAGE”
• Folders which contain a protected title (Cancel the
protection)
1) Press HDD or DVD to select the drive.
HDD: Contents in the HDD
DVD: Contents in a loaded disc
2) Press
/ / / to select a folder you want to
move.
CONTENT
Title List
MENU
HDD :
01
03 04
Cartoon Sports
Comedy
2/ 5
Page
02
(1:25:30) (0:00:00)
e.g. Swapping “04 Drama” and “02 Sports”
3) Press QUICK.
4) Press
/ to select “Folder function”, then
press OK/ENTER.
5) Press
/ to select “Change folder order”,
then press OK/ENTER.
6) Press
/ / / to select another folder you
want to replace, then press OK/ENTER.
e.g. Selecting “02 Sports”
Comedy
Cartoon
HDD (VR)
Drama
Removing a folder
Unnecessary folders can be removed.
If a folder is removed, it will disappear and all the titles in
it will move onto the ROOT.
You cannot remove the following folders;
• “LOCK”
• “GARBAGE”
• Folders which contain a protected title (Cancel the
protection)
1) Press HDD or DVD to select the drive.
HDD: Contents in the HDD
DVD: Contents in a loaded disc
2) Press
remove, then press QUICK.
3) Press
press OK/ENTER.
4) Press
press OK/ENTER.
5) Press
OK/ENTER.
To cancel, select “No”, then press OK/ENTER.
Note
• It you remove a folder which was designated as a
recording folder, all the titles will be displayed on the
ROOT.
/ / / to select a folder you want to
/ to select “Folder function”, then
/ to select “Remove folder”, then
/ to select “Yes”, then press
CONTENT
MENU
HDD :
01
04
Title List
Cartoon
Drama
2005/10/24 7:00
Ch:4
1/ 5
Change folder order
Sports Comedy
02 03
05
7) Press / to select “Yes”, then press
OK/ENTER.
To cancel, select “No”, then press OK/ENTER.
62
RD-85DT_Ope_E_p057-067 3/30/06, 11:4862
Page
2005/10/24 23:00
06
Ch:6
HDD (VR)
Page 63

Introduction
Using “LOCK”
“LOCK” is the function to protect the titles. The titles in
“LOCK” cannot be deleted or played by others who do
not know the security code.
“LOCK” is the only folder as well as “GARBAGE”. You
cannot duplicate or rename it either.
To use this function, you need to select “On” in the
following setting in advance.
HDD
Setting of “LOCK”
1) During stop, press SETUP. (Open the lid of the
remote control.)
2) Press
then press OK/ENTER.
3) Press
then press OK/ENTER.
4) Press
Off:
Deactivates this function.
On “show”:
Activates this function.
“LOCK” is displayed on the ROOT. You need to
input the security code to play the title.
On “hide”:
Activates this function. “LOCK” is not displayed on
the ROOT. The operations such as playback or
deletion cannot be performed.
5) Input the four-digit security code by pressing
number buttons, then press OK/ENTER.
If you inputted wrong number, press the CLEAR
button to input again before pressing the
OK/ENTER button.
If you forget the security code or you want to cancel
it, press the STOP button 4 times, then press the
OK/ENTER button.
/ to select “Management settings”,
/ to select “Security folder setting”,
/ to select, then press OK/ENTER.
Operating “LOCK”
“LOCK” changes its status as follows;
Locked:
You can open this folder.
To play the title, you need to
input the security code (or open
the Quick Menu while selecting
this folder, and select “Folder
function” then “Unlock security
folder”.
Unlocked:
You can open this folder.
You can select and play (same
as normal folders).
To lock the folder:
1) While selecting “LOCK”, press QUICK.
2) Press
then press OK/ENTER.
3) Press
folder”, then press OK/ENTER.
The icon changes to the locked form.
Note
• Turning on the recorder locks the unlocked folder.
Invisible:
/ to select “Folder function”,
/ to select “Lock security
The folder is not displayed.
Selecting a title is impossible,
therefore operation is
unavailable.
Input important titles into
“LOCK”, and set to “On (hide)”.
The titles are protected from
operations by others.
Recording
Playback
Editing
Function Setup
Others
Notes
• It you change the setting from “On (show)” or “On (hide)” to
“Off”, all the titles which are in “LOCK” will move onto the
ROOT.
• Even though parts of a Playlist are in “LOCK”, the Playlist
can be played.
RD-85DT_Ope_E_p057-067 3/27/06, 19:4263
Notes
• All titles in “LOCK” will be deleted automatically by
executing “All HDD titles delete”.
• If you execute “All HDD titles delete”, the security code will
be cancelled.
63
Page 64

Playback
DVD-RW
HDD
DVD-RAM
(VR)
DVD-RW
(Video)
DVD-R
(VR)
DVD-R
(Video)
DVD-VIDEO
VCD CD
Playing a DVD video disc
You can also play VIDEO CDs, audio CDs or finalization processed DVD-R/RW discs (Video mode) in the
same manner.
To play recorded contents, follow the instructions on
Preparation
• Turn on a TV or audio system and select the corresponding input source that the recorder is connected to.
• Load a disc you want to play. (
page 20)
page 54.
Press DVD.
1
The DVD indicator on the front panel illuminates.
This status indicates that the recorder is ready to play a
disc in the disc tray (DVD mode).
Start
Press PLAY.
2
Playback starts.
• Depending on the disc, playback starts automatically
by loading the disc.
• The recorder may take a short time to start playback.
This occurs because the recorder is reading the data
of a disc.
Note
• DVD video disc provides high resolution pictures and a lot of information.
Because of this, you may notice some fine picture noises on TV screen, which
you have never seen with regular broadcast TV programme. While the amount
of noise depends on the TV you use with the recorder, you should generally
reduce the sharpness adjustment on your TV when viewing DVD video discs.
Locating a title using the top menu
DVD-RW
HDD
DVD-RAM
Some DVD video discs may include a top menu, on which you can view the structure of contents or
select a scene. Most of the top menus automatically appear in certain scenes, and also are displayed on
demand. Actual operation of the top menu depends on the disc. This section explains a general example
of how to operate a top menu. Also refer to the instructions of the disc itself.
1) Press DVD.
2) Press
If the titles in the top menu are assigned a number, you can directly locate a specific title by pressing its
designated number with the number buttons.
3) Press OK/ENTER.
Notes
• The instructions above describe basic procedures which may vary depending on the contents of the DVD video disc. If
different instructions appear on the TV screen, follow those instructions.
• If you display the top menu during playback and press the DVD button again without selecting any title, the recorder may
resume playback from the point where you first pressed the DVD button. (depending on the actual DVD video disc.)
• This method of locating a title is available only on a disc that contains a top menu.
• Instruction notes of discs may refer to the button that displays the top menu as the TITLE button.
• Depending on the disc, the menu is displayed by the MENU button instead of the DVD button.
/ / / to select the title you want.
(VR)
DVD-RW
(Video)
DVD-R
(VR)
DVD-R
(Video)
DVD-VIDEO
VCD CD
64
RD-85DT_Ope_E_p057-067 3/27/06, 19:4264
Page 65

Introduction
Selecting the sound
If a disc contains several languages, you can select a
preferred language from them to hear.
1) During playback, press AUDIO.
Each time you press the button, output sound
changes.
Selecting Subtitles
You can display subtitles on the TV screen and select
a subtitle language from those included on the disc.
1) Press SUBTITLE during playback.
The current subtitle setting appears.
e.g.
Subtitle
2) Press
1 – –
Status
Off
to select “Status”, then press
Setting number and language
The language code appears
instead of the language name.
Refer to the list of languages
and their abbreviations. (
page 143)
SUBTITLE to select “On”.
Skip to step 3 if “On” is already displayed.
3) Press
to select “Subtitle”, then press
SUBTITLE to select a language.
The subtitles of recorded languages appear.
The display turns off after about 3 seconds if you
do not make a selection.
• To turn the subtitles on or off
At step 2, select “Off” by pressing the SUBTITLE
button.
Notes
• Some DVD video discs are set to display subtitles
automatically.
• Depending on the scene, subtitles may not appear
immediately after you set the subtitle function to on.
• Some DVD video discs will allow you to change subtitle
languages and turn subtitles on or off only via the disc
menu.
Selecting the camera angle
If the scene was recorded with multiple angles, you
can easily change the camera angle of the scene you
are watching.
1) Press ANGLE while playing a scene recorded
with multiple angles.
While playing a scene recorded with multiple
angles, the angle icon appears on the TV screen.
Press the ANGLE button while the angle icon is
displayed.
e.g.
Angle
1 / 6
Total number of angles
Current selection
Angle icon
2) Press ANGLE while the angle number is
displayed on the TV screen.
You can also select the camera angle by pressing
the ANGLE button several times.
• The angle icon disappears after about 3 seconds
if no further selections are made.
Notes
• You can also change the camera angle during still
playback. The camera angle changes to the new setting
when you resume normal playback.
• If you pause a picture immediately after changing a camera
angle, the resumed playback picture may not display the
new camera angle.
• Depending on a disc, the camera angle may not change
even though the angle number changes.
Resuming playback from the location last
stopped (Resume Play)
You can resume playback from the location where you
stopped.
If you press the PLAY button after stopping playback,
playback resumes from the location you have stopped.
If you stop playback by pressing the STOP button
twice, the resume playback feature will be cancelled.
Notes
• Resume feature cannot function when:
– you select a disc menu language (
the parental lock setting (
– you play a PBC-featured VIDEO CD.
– you open the disc tray.
– you cancel the DVD-Video finalizing process of a DVD-RW
disc.
• There may be a difference in the location where playback
resumes depending on the disc.
• While the recorder retains a location in memory, initial
setting changes on menus on-screen may function only
after the memory is cleared.
page 124).
page 123) or change
Recording
Playback
Editing
Function Setup
Others
RD-85DT_Ope_E_p057-067 3/28/06, 10:4665
65
Page 66

Playback
Other playback functions
Playing a TV programme currently being
recorded (Chase Play)
DVD-RW
Start
HDD
DVD-RAM
(VR)
DVD-RW
You can begin playback from the beginning of a programme currently
being recorded.
You will find this function of great advantage on long programmes, as
you do not have to wait for the end of recording to begin playback.
1) While recording a TV programme on the HDD or a DVD-RAM disc, press
TIMESLIP.
The recorder displays a TV program as it is being recorded.
2) Go back to the beginning of the TV program using SKIP (
When you go back to the beginning, playback starts automatically.
3) Locate a scene you want through the following operations if necessary.
Fast-forward/fast-reverse:
Press the SLOW/REV (
Forward/reverse slow-motion:
First press the PAUSE button then press SLOW/REV (
).
(
Forward/reverse frame by frame play:
First press the PAUSE button then press the ADJUST button.
DVD-R
DVD-R
(Video)
(VR)
) or FWD/SLOW ( ) button.
(Video)
DVD-VIDEO
VCD CD
).
) or FWD/SLOW
• To resume normal playback, press the PLAY button.
• You can play in fast-forward to within 10 seconds prior to the current
broadcast.
4) Press TIMESLIP to exit.
The current broadcast returns.
Notes
• Time slip recording/playback stops when the disc is filled up. You can play up to a
location where the recorder stopped the recording. The time slip recording/playback
cannot begin if the disc is full.
• The playback picture may appear after a delay of several seconds.
• The playback location will never be identical to the record location in the
programme. It will always trail the record location by a few seconds.
• While using time slip recording/playback, you cannot program a recording.
• During the time slip mode, you cannot change the setting of the feature that turns
off the recorder after a programmed operation has finished.
• Even while “Pwr Off” of “End time” is set to “Off”, the recorder does not turn off if the
recording end time comes during playback of a programme being recorded.
• Playback may jump a few seconds back or pause depending on the disc or data
condition.
66
RD-85DT_Ope_E_p057-067 3/27/06, 19:4266
Page 67

Start
Pausing a TV broadcast to resume later (Pause TV)
DVD-RW
HDD
DVD-RAM
(VR)
DVD-RW
This function enables you to pause a TV broadcast and resume
viewing at a later, more convenient time, by storing the TV broadcast
temporarily on the HDD.
1) While viewing a TV broadcast via this recorder or immediately before it
starts, press TIMESLIP.
When Pause TV mode is ready, playback starts automatically.
The recorder begins to store the broadcast on the HDD the moment you
press the TIMESLIP button.
2) Locate a scene you want by the following methods.
Fast-forward/fast-reverse:
Press the SLOW/REV (
Forward/reverse slow-motion:
Press the PAUSE button, then press the SLOW button.
Forward/reverse frame by frame play:
First press the PAUSE button then press the ADJUST button.
• To resume normal playback, press the PLAY button.
• You can play in fast-forward to within 10 seconds prior to the current
broadcast.
3) Press TIMESLIP to exit this mode.
The recorder stops storing the broadcast on the HDD.
A message appears and asks you whether you will save the stored data or
erase it.
Press the
/ buttons to select, then press the OK/ENTER button.
DVD-R
DVD-R
(Video)
(VR)
(Video)
DVD-VIDEO
) or FWD/SLOW ( ) button.
VCD CD
Introduction
Recording
Playback
Editing
Function Setup
Notes
• This function is not available during recording.
• Pause TV recording stops when the HDD is filled up. It will not begin if the HDD is
full.
• While using this pause TV recording, you cannot program a recording.
• Playback may jump a few seconds back or pause depending on the disc or data
condition.
Others
67
RD-85DT_Ope_E_p057-067 3/27/06, 19:4267
Page 68

Playback
Other playback functions (Continued)
You can magnify areas within a picture.
1) Press ZOOM in the lid.
2) Select a zoom point and magnification level.
Zooming a picture
DVD-RW
HDD
DVD-RAM
(VR)
DVD-RW
A zoom scope appears.
MODE :
Raises the magnification level.
BACK/RETURN :
Lowers the magnification level.
/ / / :
Moves the zoom point. (only after the image has been magnified)
CLEAR: Returns the zoom point to the center of the picture.
(Video)
DVD-R
DVD-R
(VR)
(Video)
Zoom scope
DVD-VIDEO
VCD CD
Start
Notes
• Some discs may not respond to zoom feature.
• During some scenes, the buttons may not work as described.
• The zoom feature is canceled when the disc menu is operated.
• The magnification level varies depending on the picture size you select
( page 32, in “INSTALLATION GUIDE”).
• The zoom feature is not available while displaying on the screen menu.
• The zoom feature is canceled when you stop playback or start playback.
To cancel the zoom
Press ZOOM.
68
RD-85DT_Ope_E_p068-074 3/27/06, 19:4268
Page 69

Locating by entering the number of a desired section
DVD-RW
HDD
DVD-RAM
(VR)
DVD-RW
Normally titles, chapters, and tracks are numbered. By entering these
numbers, you can access a desired section.
1) Press SEARCH.
e.g.
Search
Title
001
0001Chapter
(Video)
DVD-R
(VR)
DVD-R
(Video)
DVD-VIDEO
VCD CD
If you are using a VIDEO
CD/audio CD, skip step 2.
Introduction
Recording
Start
2) Press
e.g.
/ to select a section (title or chapter) you want to locate.
Search
Title
Chapter
001
0001
When you want to locate a
chapter.
3) Press the number buttons to enter a number of the section.
e.g. To enter 25, press “2”, then press “5”.
4) Press OK/ENTER.
Notes
• Pressing CLEAR button resets the numbers. To clear the display, press SEARCH
button several times (depending on a disc).
• This method of locating a title is available only on a disc that contains title numbers.
• If a title is erased, the numbers of the following titles decrease respectively.
• When you record a new title (Original) on the HDD or a DVD-RAM disc, it is added
prior to current titles (Playlist), and each following title (Playlist) reference number
will advance by a factor of 1.
Locating a specific point by entering its elapsed time (Time Search)
HDD
DVD-RAM
DVD-RW
(VR)
DVD-RW
(Video)
DVD-R
(VR)
DVD-R
(Video)
DVD-VIDEO
VCD CD
1) Press SEARCH.
You may have to press repeatedly, depending on a disc. Press the
button until the following display appears.
001
e.g.
2) Press the number buttons and
Search
Title
Time
::
00 00 00
/ to enter the desired time location
on the disc.
e.g. To enter 1 hour, 25 minutes, and 30 seconds
“0” → “1” → “ ” → “2” → “5” → “ ” → “3” → “0”
hour minute second
3) Press OK/ENTER.
Notes
• Some discs may not respond to this process.
• Some scenes may not be accessed precisely as you specified.
• This method for accessing specific locations is available only within the current title
of the HDD or a DVD-RAM/R/RW/DVD video disc or within a current track of a
VIDEO CD/audio CD.
• Pressing CLEAR button resets the numbers.
Playback
Editing
Function Setup Others
RD-85DT_Ope_E_p068-074 3/27/06, 19:4269
69
Page 70

Playback
VCD
Other playback functions (Continued)
DVD-RW
Selecting the sound
HDD
DVD-RAM
(VR)
DVD-RW
(Video)
You can select a preferred language and a sound format.
Press AUDIO during playback or while
receiving a broadcast.
1
The current audio setting appears.
The language code appears instead of the language
name. Refer to the list of languages and their
abbreviations. (
Press AUDIO while the audio setting is
displayed on the TV screen.
2
DVD-R
(VR)
DVD-R
(Video)
page 143)
DVD-VIDEO
VCD CD
Start
Variation of channels depends on the disc or the type of
TV broadcast.
HDD
•
Stereo sound
→ “Stereo” (left channel and right channel)
→ “Stereo L” (left channel)
→ “Stereo R” (right channel)
(→ Back to “Stereo”)
The following discs can be switched by pressing the
AUDIO button.
DVD-RW
(Video)
Language name / sound recording system / No. of
channels
e.g.
•
“Stereo” → “Stereo L” → “Stereo R” (→ Back to “Stereo”)
The display turns off if you do not operate for more than
3 seconds.
If you press the
select the audio output setting (
the ADJUST button.
DVD-R
(Video)
Sound
Output
DVD-RW
DVD-RAM
DVD-VIDEO
English
1
PCM
DVD-R
, TV channel signals
(VR)
(VR)
2ch
/ buttons to select “Output,” you can
page 127) by using
70
RD-85DT_Ope_E_p068-074 3/27/06, 19:4270
Page 71

Notes
• Some discs allow you to change audio selections only via the disc menu. If this is the case, press the MENU button and
choose the appropriate language from the selections on the disc menu.
• When you turn on the recorder or replace a disc, the recorder returns to the initial default setting. ( page 123)
Depending on the disc, the sound that is specified the disc is played back.
• Immediately after you have switched sounds, there may be a temporary discrepancy between the display and actual sound.
Introduction
Recording
Playback
Editing
Function Setup Others
RD-85DT_Ope_E_p068-074 3/27/06, 19:4271
71
Page 72

Playback
Other playback functions (Continued)
Viewing JPEG files
You can play JPEG files that have been recorded on a CD-R or CD-ROM on the recorder.
Preparations
• Prepare a compatible disc ( page 73) that contains JPEG files you want to view.
• Set “Priority contents” (
• Make your TV shape conform to the 4:3 aspect ratio. Only 4:3 pictures can be played regardless of the function
settings via the on-screen displays of the recorder (
to other sizes, e.g. “WIDE,” images will appear to be horizontally expanded. For details, refer to the owner’s
manual of your TV.
page 129) to “Photo”.
page 32, “INSTALLATION GUIDE”). If the TV is adjusted
Press DVD.
1
Start
Load a CD that contains JPEG files.
2
Each photo appears for about 3 seconds (slide show).
If a slide show does not start, press the PLAY button.
Depending on the disc, the “CONTENT MENU Picture
List” appears. See “On the “CONTENT MENU Picture
List”” (
Notes
• Some files may not display their own entire images depending on the size.
• JPEG picture playback is not available during recording on the HDD.
• Operation to JPEG file will be disabled at about 5 minutes before a programmed recording starts.
To stop playback (slide show)
Press STOP.
If you press the PLAY button after pressing the STOP
button, playback will start from the photo you stopped.
To pause playback (slide show)
Press PAUSE.
To resume, press the PAUSE button again or press
the PLAY button.
page 73) to operate.
To rotate a picture
Press ANGLE repeatedly.
Each time you press the button, the picture rotates by
90° degree.
Notes
• The rotated image is displayed after its original posture
appears momentarily.
To magnify a picture
Follow the procedure on page 68.
To skip photos
During playback, press SKIP repeatedly.
: To skip forward.
: To skip backward.
72
RD-85DT_Ope_E_p068-074 3/27/06, 19:4272
Notes
• The magnified image is displayed after its original posture
appears momentarily.
• For small pictures, the reduction level may be limited.
Page 73

Viewing a specified photo (single view)
Full screen still view.
2 ways are available:
On the “CONTENT MENU Picture List”
1) Press DVD.
The “CONTENT MENU Picture List” appears.
Depending on the disc, the recorder creates either
temporary folder, “Auto” or “All”.
“Auto”: For CD of which compatibility confirmed by
TOSHIBA. Only playable files are listed.
e.g.
CONTENT
Picture List Page
MENU
Auto
001
DH100001
004
DH100004
007
DH100003
010
DH100006
013
DH100009
File number
016
DH100012
If you select this icon and press the OK/ENTER
019
DH100015
button, upper folders appear.
022
DH100018
002
005
008
011
014
017
020
023
1/ 3
DH100002
DH100001
DH100004
DH100007
DH100010
DH100013
DH100016
DH100019
003
006
009
012
015
018
021
024
CD
DH100001
DH100002
DH100005
DH100008
DH100011
DH100014
DH100017
DH100020
“All”: For CD other than above. All files are listed.
e.g.
CONTENT
MENU
001
004
Picture List
All
DH100001
DH100004
002
005
1/ 3
DH100002
DH100001
Page
003
006
CD
DH100001
DH100002
• Some CDs may not comply with the above.
2) Press
Pressing the SKIP (
/ / / to select a folder or photo.
or ) button turns the
pages.
If you press the MODE button, the list changes to
thumbnail view (“CONTENT MENU Pictures”).
e.g.
CONTENT
MENU
/ / JPEG
Pictures
1/ 8
Page
CD
Pressing the ANGLE button rotates the picture. The
rotation of pictures is kept until the CD is ejected.
To return to the previous list, press the MODE
button again.
3) Press OK/ENTER.
If you select a folder at step 2), repeat steps 2) and
3) until your favorite file appears.
The selected photo appears in full screen.
Notes
• The “CONTENT MENU Picture List” cannot show all the
files in a disc, but only ones regarded as objects of regular
play of the disc.
• The larger the file size is, the longer the thumbnail takes
time to appear.
• Letters of a file/folder name overflowing the given space
are not displayed.
Direct input of a photo number
1) During playback or stop, press SEARCH.
An input window appears.
e.g.
Search
Photo
001
2) Input a photo number using the number
buttons or ADJUST.
3) Press OK/ENTER.
The selected photo appears in full screen.
To change the playback order
1) Press QUICK.
2) Press
/ to select an item, then press
OK/ENTER.
To shift the cursor, press the
Reverse
Repeat
: To reverse the order.
: To repeat the current folder.
/ buttons.
Playback in the selected mode starts.
If it does not start, press PLAY.
JPEG files compatibility
Discs whose compatibility with this recorder has been
confirmed by TOSHIBA are as follows.
CANON QuickCD
FUJICOLOR CD
Kodak Picture CD
NORITSU QSS CD
JPEG disc compatibility with this recorder is limited as
follows:
• Playable discs:
CD-ROM, CD-R
CD-RW is not recommendable.
• CD physical format:
Mode 1, Mode 2 XA Form 1
• File system:
ISO9660 Level 1, 2 or Joliet
• File name:
A file name should be in alphabet and
numerals only, and must incorporate “JPG”
e.g.“********.JPG”
• Total number of folders:
Less than 256
• Total number of files:
Less than 1000
Some files may not display their own entire image
depending on the size.
Some discs may not permit this operation. Especially,
the following conditions of included files will increase
the disc’s disability.
1. Pixels over 5000 x 5000 in height and/or width
2. File format except Exif
extension.
Introduction
Recording
Playback
Editing
Function Setup Others
RD-85DT_Ope_E_p068-074 3/27/06, 19:4273
73
Page 74

Playback
Other playback functions (Continued)
Playing MP3 files
You can play MP3 files that have been recorded on a CD-R or CD-ROM on this recorder.
Preparations
• Make sure that a disc you want to play is compatible with this recorder. See page 75.
• Set “Priority contents” (
page 129) to “Audio”.
Press DVD.
1
Start
Load a CD that contains MP3 files.
2
Playback starts from the first track of a current folder.
If playback does not start, press the PLAY button.
Notes
• The BITSTREAM/PCM COAXIAL AUDIO OUTPUT jack outputs MP3 sounds in the linear PCM format regardless of the
current “Audio out select” ( page 127) selection.
• You cannot change the playback speed of MP3 playback.
To stop playback
Press STOP.
If you press the PLAY button after pressing the STOP
button, playback will start from the beginning of the
track.
To pause playback
Press PAUSE.
To resume, press the PAUSE button again or press
the PLAY button.
To skip tracks
During playback, press SKIP repeatedly.
: To skip forward.
: To skip backward.
Selecting a track in the disc
2 ways are available:
On the “CONTENT MENU Audio List”
1) Press DVD.
The “CONTENT MENU Audio List” appears.
e.g.
CONTENT
MENU
001
004
007
010
File number
If you select this icon and press the OK/ENTER
button, upper folders appear.
e.g.
CONTENT
MENU
JPG_MP3
003
Disc name
Current folder
Audio List Page
MP3
MP3_0001
MP3_0004
MP3_0007
MP3_0010
Audio List Page
MP3
MP3c
MP3_0003
1/ 1
002
MP3_0002
005
MP3_0005
008
MP3_0008
011
MP3_0011
1/ 1
MP3a MP3b
001
MP3_0001
004
MP3_0004
The recorder creates temporary
folder “All”, which contains all
playable files.
002
003
006
009
012
CD
MP3_0003
MP3_0006
MP3_0009
MP3_0012
CD
All
MP3_0002
74
RD-85DT_Ope_E_p068-074 3/27/06, 19:4274
Page 75

Introduction
2) Press / / / to select a track or folder.
Pressing the SKIP (
or ) button turns the
pages.
3) Press OK/ENTER.
If you select a folder at step 2), repeat steps 2) and
3) until your favorite file appears.
Notes
• The “CONTENT MENU Audio List” cannot show all the
tracks in a disc, but only ones regarded as objects of
proper play of the disc.
• Letters of a file/folder name overflowing the given space
are not displayed.
Direct input of a track number
1) During playback or stop, press SEARCH.
An input window appears.
e.g.
Search
Track
001
2) Input a track number using the number buttons
or ADJUST.
3) Press OK/ENTER.
To change the playback order
1) During playback or stop, press QUICK.
2) Press
/ to select “Special playback mode”,
then press OK/ENTER.
e.g.
Notes
• To cancel these modes, stop the playback or select the
cancel command from the Quick Menu.
Playable files
MP3 disc compatibility with this recorder is limited as
follows:
• Playable discs:
CD-ROM, CD-R
CD-RW is not recommendable.
• Sampling Frequency / Bitrate:
MP3: 8 kHz, 11.025 kHz, 12kHz, 16 kHz,
22.05 kHz, 24 kHz / 8-160 kbps (CBR),
VBR
32 kHz, 44.1 kHz, 48 kHz / 32-320 kbps
(CBR), VBR
• CD physical format:
Mode 1, Mode 2 XA Form 1
• File system:
ISO9660 Level 1, 2 or Joliet
• File name:
A file name should be in alphabet and
numerals only, and must incorporate “MP3”
extension.
e.g.“********.MP3”
• Total number of folders:
Less than 256
• Total number of files:
Less than 1000
* This recorder supports ID3v2 (ID3 Tag Version 2) of MP3,
to display text data such as names of title and artist.
Some characters may not be displayed properly.
Recording
Playback
Editing
Function Setup Others
Quick Menu
Special playback mode
Exit
3) Press
/ to select an item, then press
OK/ENTER.
Folder repeat
Track repeat
Track random
: To repeat the current folder.
: To repeat the current file.
: To play files in the current
folder in a random order.
RD-85DT_Ope_E_p075-080 3/27/06, 19:4275
Folder repeat
Track repeat
Track random
This recorder requires discs/recordings to meet certain
technical standards in order to achieve optimal playback
quality. Pre-recorded DVDs are automatically set to these
standards. There are many different types of recordable
disc formats (including CD-R containing MP3 files). Given
the fact that technology in this area is still maturing,
Toshiba cannot guarantee that all genre of recordable
discs will produce optimal playback quality. The technical
criteria set out in this owner’s manual are meant as a
guide only.
Customers should also note that permission is required in
order to download MP3 files and music from the internet.
Toshiba has no right to grant such permission. Permission
should always be sought from the copyright owner.
75
 Loading...