

Page 1
INSTRUCTION MANUAL
LASER SCANNER
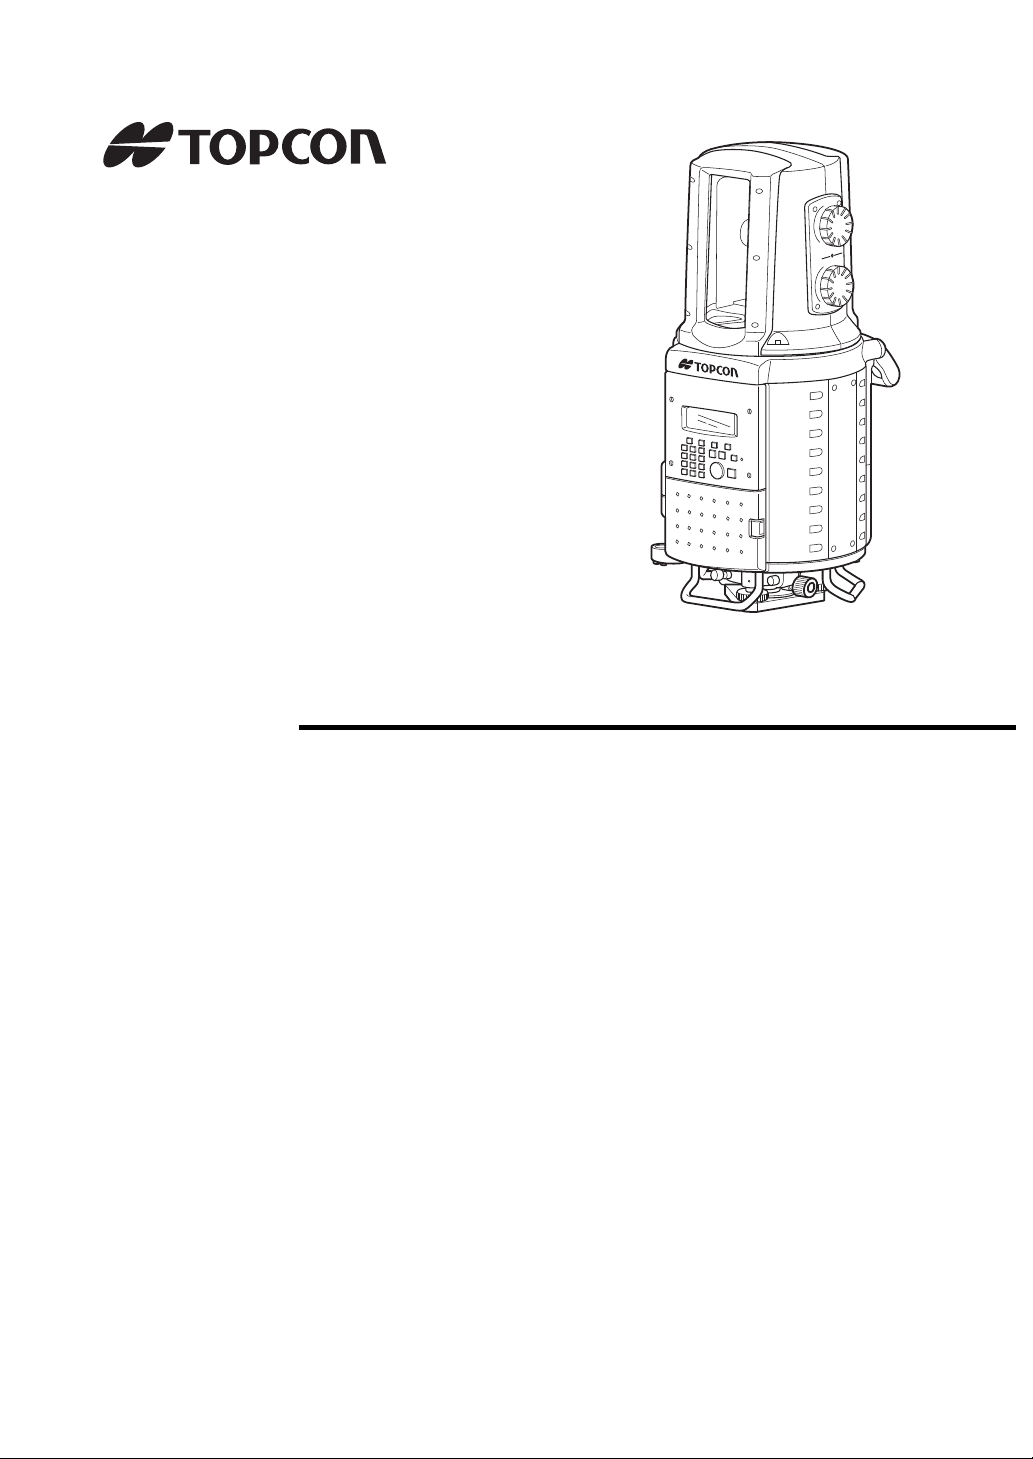
GLS-1000
SERIES
64650 90070
Page 2

Page 3

FOREWORD
Thank you for purchasing the TOPCON Laser Scanner, GLS-1000 series.
For the best performance of the instruments, please carefully read these instructions
and keep them in a convenient location for future reference.
1
Page 4

General Handling Precautions
Before starting work or operation, be sure to check that the instrument is
functioning correctly with normal performance.
Using the instrument on rainy days
It may not be possible to use the instrument if there are water drops on the glass of the
windows.
It is also not possible to scan wet objects.
Horizontally rotating part (head)
Do not turn the head with your hands while the power is ON. If it has been turned by force, turn
the power ON again.
Waterproof property
The instrument is designed based on the International Standard IPX2, therefore it can
withstand light rain. However, in case of heavy rain, there is no guarantee that the instrument
will be protected from waterdrops.
Setting the instrument on a tripod
When mounting the instrument on a tripod, use a wooden tripod.
Do not use a metallic tripod.
Installing the tribrach
If the tribrach is installed incorrectly, the measuring precision could be effected. Occasionally
check the adjusting screws on the tribrach. Make sure the base fixing lever is locked and the
base fixing screws are tightened.
Guarding the instrument against shocks
When transporting the instrument, provide some protection to minimize risk of shocks. Heavy
shocks may cause the measurement to be faulty.
Exposing the instrument to extreme heat.
Do not leave the instrument in extreme heat for longer than necessary. It could adversely
affect its performance.
Sudden changes of temperature
Any sudden change of temperature to the instrument may result in a reduction of measuring
distance range, i.e when taking the instrument out from a heated vehicle. Let instrument
acclimate itself to ambient temperature.
Battery level check
Confirm battery level remaining before operating.
Battery use
Always use four batteries as one set, and operate the instrument with batteries that have been
charged and discharged the same number of times. Do not mix old and new batteries, or
batteries that have been charged and discharged a different number of times.
Taking the battery out
It is recommended not to take the battery out during the power is on. Please do your
assembling or taking the battery out after the power is off.Refer to Chapter 4.5 “Replacing the
Battery” if you need to replace the batteries during scanning.
External power source
Use only recommended batteries or external power source. Use of batteries or an external
power source not recommended by us may result in equipment failure.
Carrying the instrument
Because this instrument is heavy,
make sure to carry it carefully using
both the handle and the handgrip.
There is a possibility that the
instrument may topple and fall
resulting in possible injury. Incorrect
lifting posture may also result in
hurting your back.
Handle
Handgrip
2
Page 5

Display for Safe Use
WARNING
CAUTION
In order to encourage the safe use of products and prevent any danger to the operator and others or
damage to properties, important warnings are put on the products and inserted in the instruction
manuals.
We suggest that everyone understand the meaning of the following displays and icons before reading
the “Safety Cautions” and text.
Display Meaning
Ignoring or disregard of this display may lead to the danger of death or
serious injury.
Ignoring or disregard of this display may lead to personal injury or physical damage.
• Injury refers to hurt, burn, electric shock, etc.
• Physical damage refers to extensive damage to buildings or equipment and furniture.
Safety Cautions
WARNING
• There is a risk of fire, electric shock or physical harm if you attempt to disassemble or repair
the instrument yourself.
This is only to be carried out by TOPCON or an authorized dealer, only!
• High temperature may cause fire.
Do not cover the charger while it is charging.
• Risk of fire or electric shock.
Do not use damaged power cable, plug and socket.
• Risk of fire or electric shock.
Do not use a wet battery or charger.
• May ignite explosively.
Never use an instrument near flammable gas, liquid matter, and do not use in a coal mine.
• Battery can cause explosion or injury.
Do not dispose in fire or heat.
• Risk of fire or electric shock.
Do not use any power voltage except the one given on manufacturers instructions.
• Battery can cause outbreak of fire.
Do not use any other type of charger other than the one specified.
• Risk of fire or electric shock.
Do not use an AC cable incompatible with the power supply voltage in use.
• Because this instrument is heavy, make sure to carry it carefully using both the handle and
the handgrip.
There is a possibility that the instrument may topple and fall resulting in possible injury, and incorrect lifting posture
may also result in hurting your back.
• The short circuit of a battery can cause a fire.
Do not short circuit battery when storing it.
3
Page 6

CAUTION
• Use of controls or adjustment or performance of procedures other than those specified herein may result in hazardous radiation exposure.
• Risk of injury by overturn the carrying case.
Do not stand or sit on the carrying cases.
• Please note that the tips of tripod can be hazardous, be aware of this when setting up or carrying the tripod.
• Risk of injury by falling down the instrument or case.
Do not use a carrying case with a damaged which grips or casters.
• Do not allow skin or clothing to come into contact with acid from the batteries, if this does occur then wash off with
copious amounts of water and seek medical advice.
• Ensure that you mount the Tribrach correctly, failing to do so may result in injury if the tribrach were to fall over.
• It could be dangerous if the instrument falls over, please check that you fix the instrument to the tripod correctly.
• Risk of injury by falling down a tripod and an instrument.
Always check that the screws of tripod are tightened.
• The appliance is not intended for use by young children or infirm persons without supervision.
Young children should be supervised to ensure that they do not play with the appliance.
User
1)This product is for professional use only!
The user is required to be a qualified surveyor or have a good knowledge of surveying, in order to
understand the user and safety instructions, before operating, inspecting or adjusting.
2)Wear the required protectors (safety shoes, helmet, etc.) when operating.
Exceptions from Responsibility
1)The user of this product is expected to follow all operating instructions and make periodic checks of the
product’s performance.
2)The manufacturer, or its representatives, assumes no responsibility for results of a faulty or intentional
usage or misuse including any direct, indirect, consequential damage, and loss of profits.
3)The manufacturer, or its representatives, assumes no responsibility for consequential damage, and
loss of profits by any disaster, (an earthquake, storms, floods etc.).
A fire, accident, or an act of a third party and/or a usage any other usual conditions.
4)The manufacturer, or its representatives, assumes no responsibility for any damage, and loss of profits
due to a change of data, loss of data, an interruption of business etc., caused by using the product or
an unusable product.
5)The manufacturer, or its representatives, assumes no responsibility for any damage, and loss of profits
caused by usage except for explained in the user manual.
6)The manufacturer, or its representatives, assumes no responsibility for damage caused by wrong
movement, or action due to connecting with other products.
4
Page 7
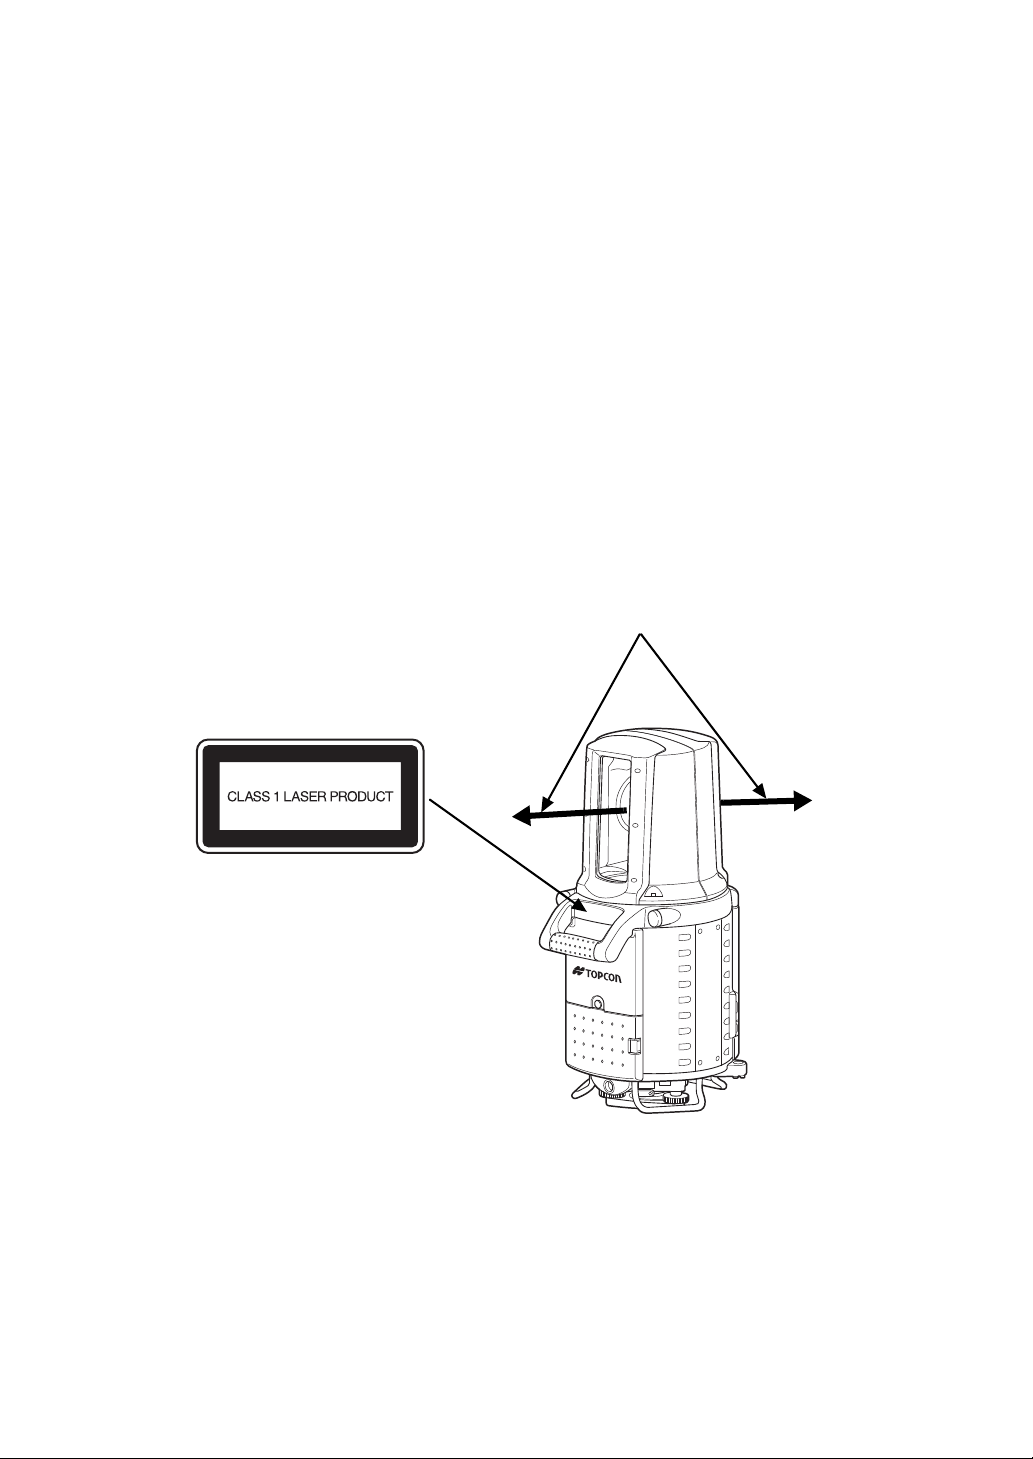
Laser Safety
Explanatory Label
(Only for U.S.A.)
Laser aperture
Laser beam comes out from here.
The GLS-1000 series emits an invisible laser beam when the power is turned ON.
The GLS-1000 series are manufactured and sold in accordance with "Performance Standards for LightEmitting Products" (FDA/BRH 21 CFR 1040) or "Radiation Safety of Laser Products, Equipment
Classification, Requirements and User`s Guide" (IEC Publication 60825-1) provided on the safety
standard for laser beam.
"Complies with FDA performance standards for laser products except for deviations pursuant to Laser
Notice No. 50, dated (July 26, 2001)"
As per the said standard, the GLS-1000 series is classified as "Class 1 Laser Products".
In case of any failure, do not disassemble the instrument. Contact TOPCON or your TOPCON dealer.
Labels
Find the labels which describes the caution and safety about the laser beam as follows in GLS-1000
series.
We request you to replace it one anytime the caution labels are damaged or lost and paste a new one
at the same place. You can get the labels from Topcon or your dealer.
5
Page 8

Contents
FOREWORD . . . . . . . . . . . . . . . . . . . . . . . . . . . . . . . . . . . . . . . . . . . . . . . . . . 1
General Handling Precautions. . . . . . . . . . . . . . . . . . . . . . . . . . . . . . . . . . . . . . . . . . . . . . . . .2
Display for Safe Use . . . . . . . . . . . . . . . . . . . . . . . . . . . . . . . . . . . . . . . . . . . . . . . . . . . . . . . .3
Safety Cautions . . . . . . . . . . . . . . . . . . . . . . . . . . . . . . . . . . . . . . . . . . . . . . . . . . . . . . . . . . . .3
User . . . . . . . . . . . . . . . . . . . . . . . . . . . . . . . . . . . . . . . . . . . . . . . . . . . . . . . . . . . . . . . . . . . . .4
Exceptions from Responsibility . . . . . . . . . . . . . . . . . . . . . . . . . . . . . . . . . . . . . . . . . . . . . . . .4
Laser Safety. . . . . . . . . . . . . . . . . . . . . . . . . . . . . . . . . . . . . . . . . . . . . . . . . . . . . . . . . . . . . . .5
Labels . . . . . . . . . . . . . . . . . . . . . . . . . . . . . . . . . . . . . . . . . . . . . . . . . . . . . . . . . . . . . . . . . . .5
Contents . . . . . . . . . . . . . . . . . . . . . . . . . . . . . . . . . . . . . . . . . . . . . . . . . . . . . . . . . . . . . . . . .6
Standard Components. . . . . . . . . . . . . . . . . . . . . . . . . . . . . . . . . . . . . . . . . . . . . . . . . . . . . . .8
Attaching/removing casters on the carrying case . . . . . . . . . . . . . . . . . . . . . . . . . . . . . . . . . .9
1 NOMENCLATURE AND FUNCTIONS . . . . . . . . . . . . . . . . . . . . . . . . . . . 1-1
1.1 Nomenclature . . . . . . . . . . . . . . . . . . . . . . . . . . . . . . . . . . . . . . . . . . . . . . . . . . . . . . . . 1-1
1.2 Display . . . . . . . . . . . . . . . . . . . . . . . . . . . . . . . . . . . . . . . . . . . . . . . . . . . . . . . . . . . . . 1-3
1.3 Operating Key. . . . . . . . . . . . . . . . . . . . . . . . . . . . . . . . . . . . . . . . . . . . . . . . . . . . . . . . 1-4
2 Preparations before Use . . . . . . . . . . . . . . . . . . . . . . . . . . . . . . . . . . . . .2-1
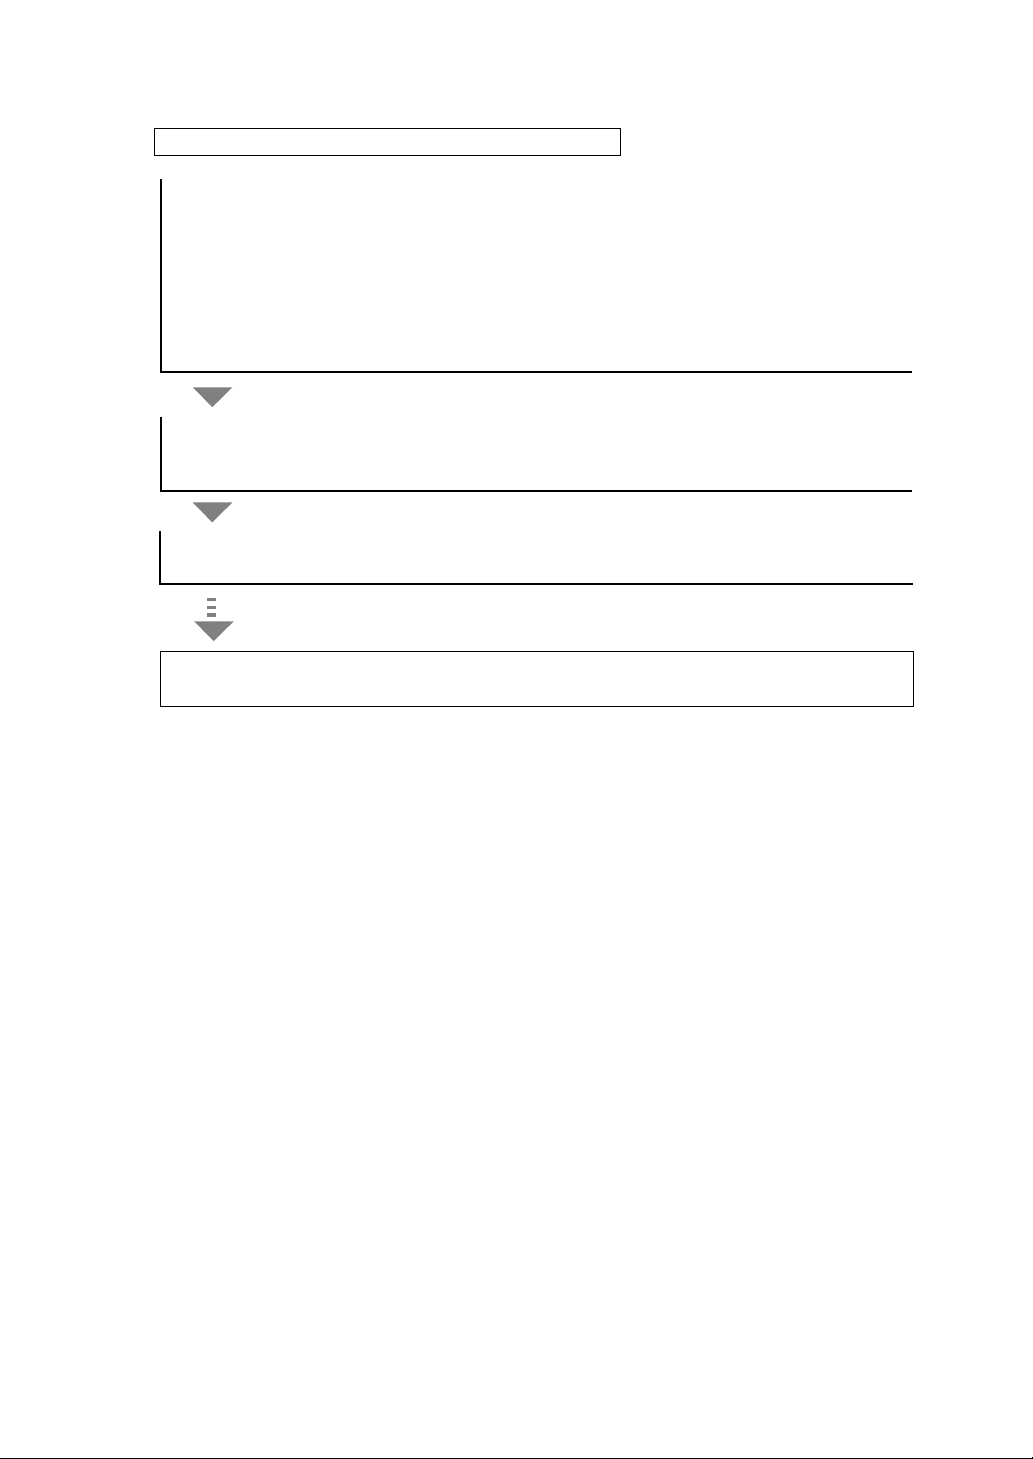
3 Overview of Scanning . . . . . . . . . . . . . . . . . . . . . . . . . . . . . . . . . . . . . . .3-1
3.1 Procedure for Scanning . . . . . . . . . . . . . . . . . . . . . . . . . . . . . . . . . . . . . . . . . . . . . . . . 3-1
3.2 Display and Functions . . . . . . . . . . . . . . . . . . . . . . . . . . . . . . . . . . . . . . . . . . . . . . . . . 3-3
3.3 Screen Flowchart . . . . . . . . . . . . . . . . . . . . . . . . . . . . . . . . . . . . . . . . . . . . . . . . . . . . . 3-4
4 PREPARATION FOR MEASUREMENT . . . . . . . . . . . . . . . . . . . . . . . . . .4-1
4.1 Detach/Attach of Tribrach. . . . . . . . . . . . . . . . . . . . . . . . . . . . . . . . . . . . . . . . . . . . . . . 4-1
4.2 Mount the Instrument to the Tripod. . . . . . . . . . . . . . . . . . . . . . . . . . . . . . . . . . . . . . . . 4-2
4.2.1 Leveling and Centering the Instrument. . . . . . . . . . . . . . . . . . . . . . . . . . . . . . . . 4-2
4.3 Power Switch Key ON . . . . . . . . . . . . . . . . . . . . . . . . . . . . . . . . . . . . . . . . . . . . . . . . . 4-6
4.4 Battery Power Remaining Display . . . . . . . . . . . . . . . . . . . . . . . . . . . . . . . . . . . . . . . . 4-7
4.5 Replacing the Battery . . . . . . . . . . . . . . . . . . . . . . . . . . . . . . . . . . . . . . . . . . . . . . . . . . 4-7
4.6 How to Collimate to a Target. . . . . . . . . . . . . . . . . . . . . . . . . . . . . . . . . . . . . . . . . . . . . 4-8
4.7 How to Enter Alphanumeric Characters . . . . . . . . . . . . . . . . . . . . . . . . . . . . . . . . . . . . 4-9
4.7.1 Switching between Numerical Input Mode and Alphabetical Input Mode . . . . . . 4-9
4.8 Target . . . . . . . . . . . . . . . . . . . . . . . . . . . . . . . . . . . . . . . . . . . . . . . . . . . . . . . . . . . . . 4-11
4.8.1 Selecting the Target Sheet . . . . . . . . . . . . . . . . . . . . . . . . . . . . . . . . . . . . . . . . 4-11
4.8.2 Assembling the Target . . . . . . . . . . . . . . . . . . . . . . . . . . . . . . . . . . . . . . . . . . . . 4-11
5 Instrument Settings . . . . . . . . . . . . . . . . . . . . . . . . . . . . . . . . . . . . . . . . . 5-1
5.1 Settings by the Star Key . . . . . . . . . . . . . . . . . . . . . . . . . . . . . . . . . . . . . . . . . . . . . . . . 5-1
5.1.1 Star Key Screen Flowchart . . . . . . . . . . . . . . . . . . . . . . . . . . . . . . . . . . . . . . . . . 5-1
5.1.2 Tilt Setting . . . . . . . . . . . . . . . . . . . . . . . . . . . . . . . . . . . . . . . . . . . . . . . . . . . . . . 5-2
5.1.3 Zoom Control (Zoom setting) . . . . . . . . . . . . . . . . . . . . . . . . . . . . . . . . . . . . . . . . 5-2
5.1.4 Camera Setting . . . . . . . . . . . . . . . . . . . . . . . . . . . . . . . . . . . . . . . . . . . . . . . . . . 5-3
5.1.5 Contrast Adjust . . . . . . . . . . . . . . . . . . . . . . . . . . . . . . . . . . . . . . . . . . . . . . . . . . 5-3
5.1.6 Backlight Adjust . . . . . . . . . . . . . . . . . . . . . . . . . . . . . . . . . . . . . . . . . . . . . . . . . . 5-3
5.1.7 Setting Example Using the Star Key . . . . . . . . . . . . . . . . . . . . . . . . . . . . . . . . . . 5-3
5.2 Using the Setting Menu . . . . . . . . . . . . . . . . . . . . . . . . . . . . . . . . . . . . . . . . . . . . . . . . 5-4
5.2.1 Setting Menu Screen Flowchart. . . . . . . . . . . . . . . . . . . . . . . . . . . . . . . . . . . . . . 5-4
5.2.2 Network Settings (when the instrument is used connected to a PC) . . . . . . . . . . 5-5
5.2.3 Editing the SD Card Data (data management) . . . . . . . . . . . . . . . . . . . . . . . . . . 5-7
5.2.4 Setting the Temperature and Atmospheric Pressure . . . . . . . . . . . . . . . . . . . . . 5-10
5.2.5 Displaying the Last Calibration Date and Time . . . . . . . . . . . . . . . . . . . . . . . . . 5-11
5.2.6 Setting the Date and Time . . . . . . . . . . . . . . . . . . . . . . . . . . . . . . . . . . . . . . . . . 5-11
5.2.7 Changing the Units . . . . . . . . . . . . . . . . . . . . . . . . . . . . . . . . . . . . . . . . . . . . . . 5-12
5.2.8 Adjusting the Tilt Sensor Installation Error. . . . . . . . . . . . . . . . . . . . . . . . . . . . . 5-13
6 Project Settings . . . . . . . . . . . . . . . . . . . . . . . . . . . . . . . . . . . . . . . . . . . .6-1
6.1 Creating a New Project. . . . . . . . . . . . . . . . . . . . . . . . . . . . . . . . . . . . . . . . . . . . . . . . . 6-2
6.2 Selecting from Existing Projects . . . . . . . . . . . . . . . . . . . . . . . . . . . . . . . . . . . . . . . . . . 6-3
6
Page 9

7 Station Setting . . . . . . . . . . . . . . . . . . . . . . . . . . . . . . . . . . . . . . . . . . . . .7-1
7.1 Creating a New Station. . . . . . . . . . . . . . . . . . . . . . . . . . . . . . . . . . . . . . . . . . . . . . . . . 7-2
7.2 Selecting from Existing Stations . . . . . . . . . . . . . . . . . . . . . . . . . . . . . . . . . . . . . . . . . . 7-3
7.3 Setting the Occupied Point Name and the Backsight Point Name . . . . . . . . . . . . . . . . 7-4
8 Scanning . . . . . . . . . . . . . . . . . . . . . . . . . . . . . . . . . . . . . . . . . . . . . . . . . . 8-1
8.1 Target Scanning . . . . . . . . . . . . . . . . . . . . . . . . . . . . . . . . . . . . . . . . . . . . . . . . . . . . . . 8-2
8.2 3D Scanning . . . . . . . . . . . . . . . . . . . . . . . . . . . . . . . . . . . . . . . . . . . . . . . . . . . . . . . . . 8-5
8.2.1 Scanning Area . . . . . . . . . . . . . . . . . . . . . . . . . . . . . . . . . . . . . . . . . . . . . . . . . . . 8-5
8.2.2 Setting the Scanning Density. . . . . . . . . . . . . . . . . . . . . . . . . . . . . . . . . . . . . . . . 8-5
8.2.3 Performing 3D Scanning . . . . . . . . . . . . . . . . . . . . . . . . . . . . . . . . . . . . . . . . . . . 8-6
9 Charging the Internal Power Source (BT-65Q) . . . . . . . . . . . . . . . . . . .9-1
10 PRECAUTIONS . . . . . . . . . . . . . . . . . . . . . . . . . . . . . . . . . . . . . . . . . . .10-1
11 SPECIAL ACCESSORIES . . . . . . . . . . . . . . . . . . . . . . . . . . . . . . . . . .11-1
12 ERROR DISPLAYS . . . . . . . . . . . . . . . . . . . . . . . . . . . . . . . . . . . . . . . . 12-1
13 SPECIFICATIONS . . . . . . . . . . . . . . . . . . . . . . . . . . . . . . . . . . . . . . . . .13-1
7
Page 10
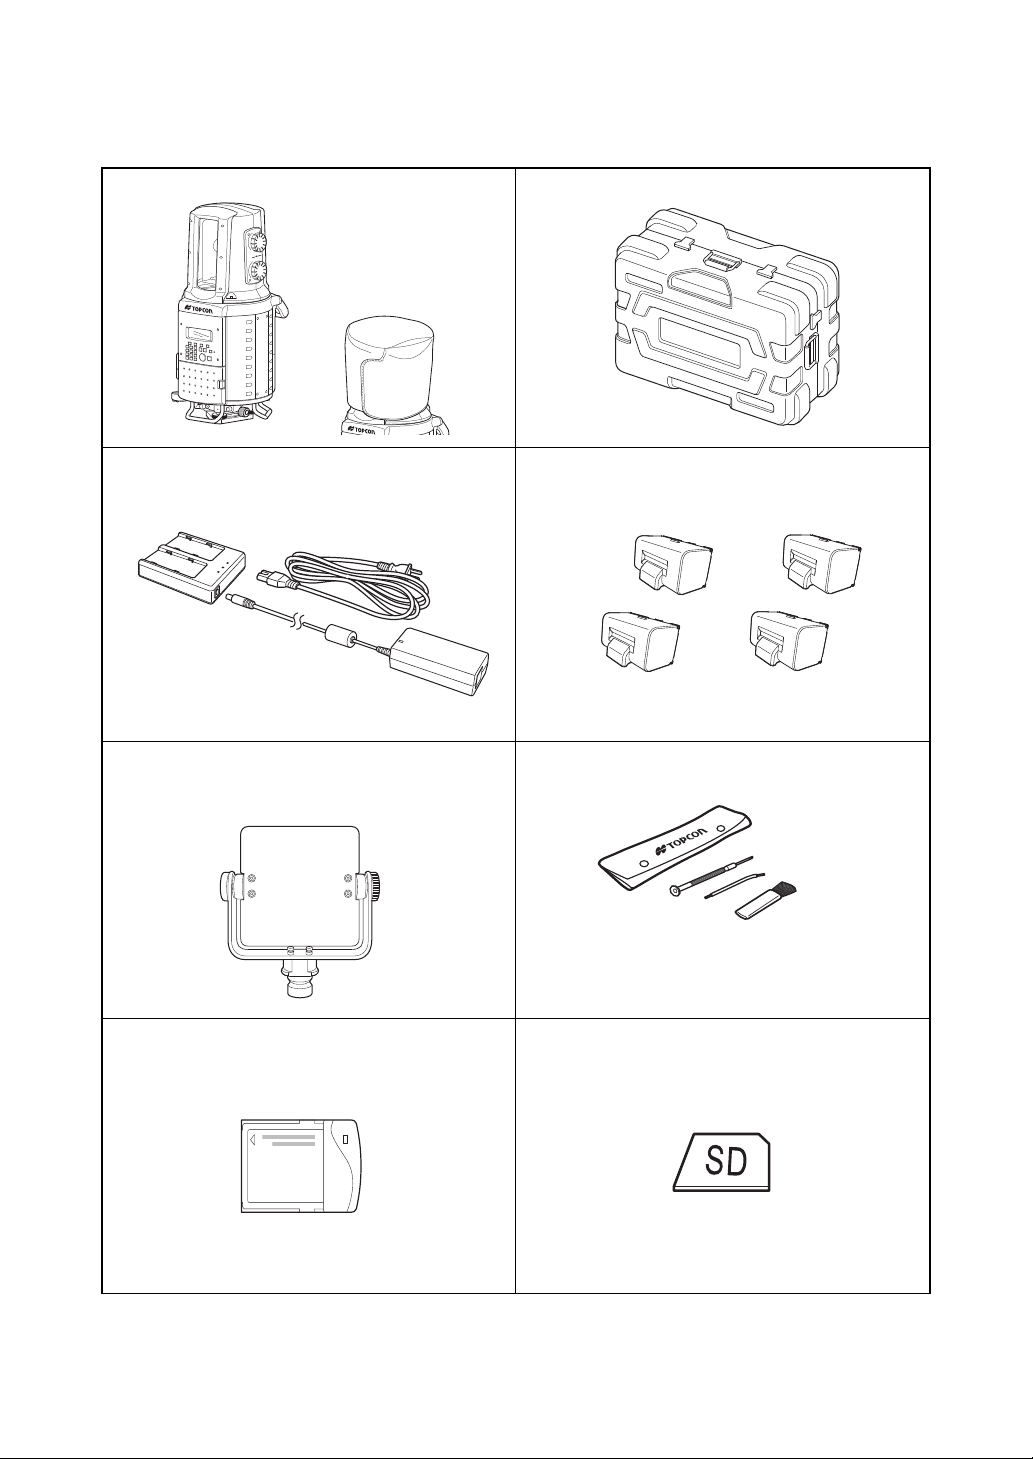
Standard Components
The numerical value in parentheses shows the quantity.
GLS-1000 with head cover(1) Plastic carrying case [Casters included](1)
Battery charger BC-30D(2)
[Charger(2), AC/DC Converter AD-12(2), AC-Cable(2)]
Target board [small](1)
Attach a [M (middle)] or [S (small)] target sheet
(magnet type).
Wireless LAN card(1) SD card(1)
Battery BT-65Q(4)
Tool kit with case(1)
[ rod pin(2), screwdriver(1), cleaning brush(1) ]
8
Page 11
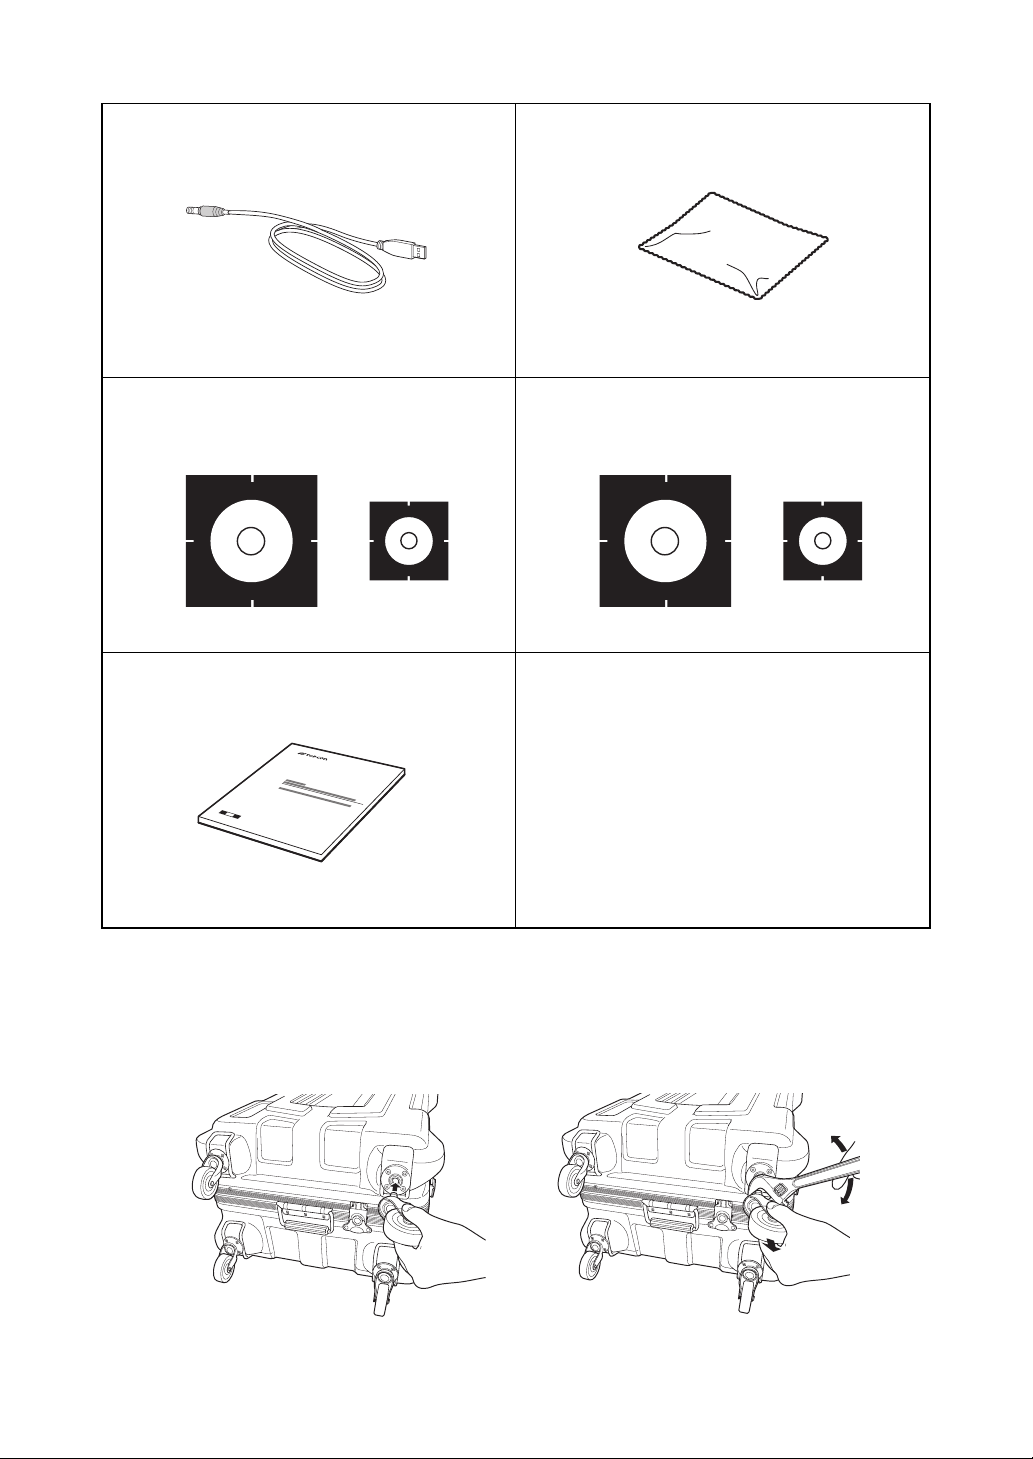
USB cable F-25(1) Silicon cloth(1)
Attachment
Removal
If you cannot remove casters by pulling them with your
hand, use commercially available tools sold in stores.
Target sheet [Magnet type] : Middle(1), Small(1) Target sheet : Middle(10), Small(5)
Instruction manual(1)
Make sure that all of the above items are with the instrument when purchased.
Attaching/removing casters on the carrying case
At the time of purchase, casters are stored inside the case. Remove them from the case and attach as
necessary.
9
Page 12
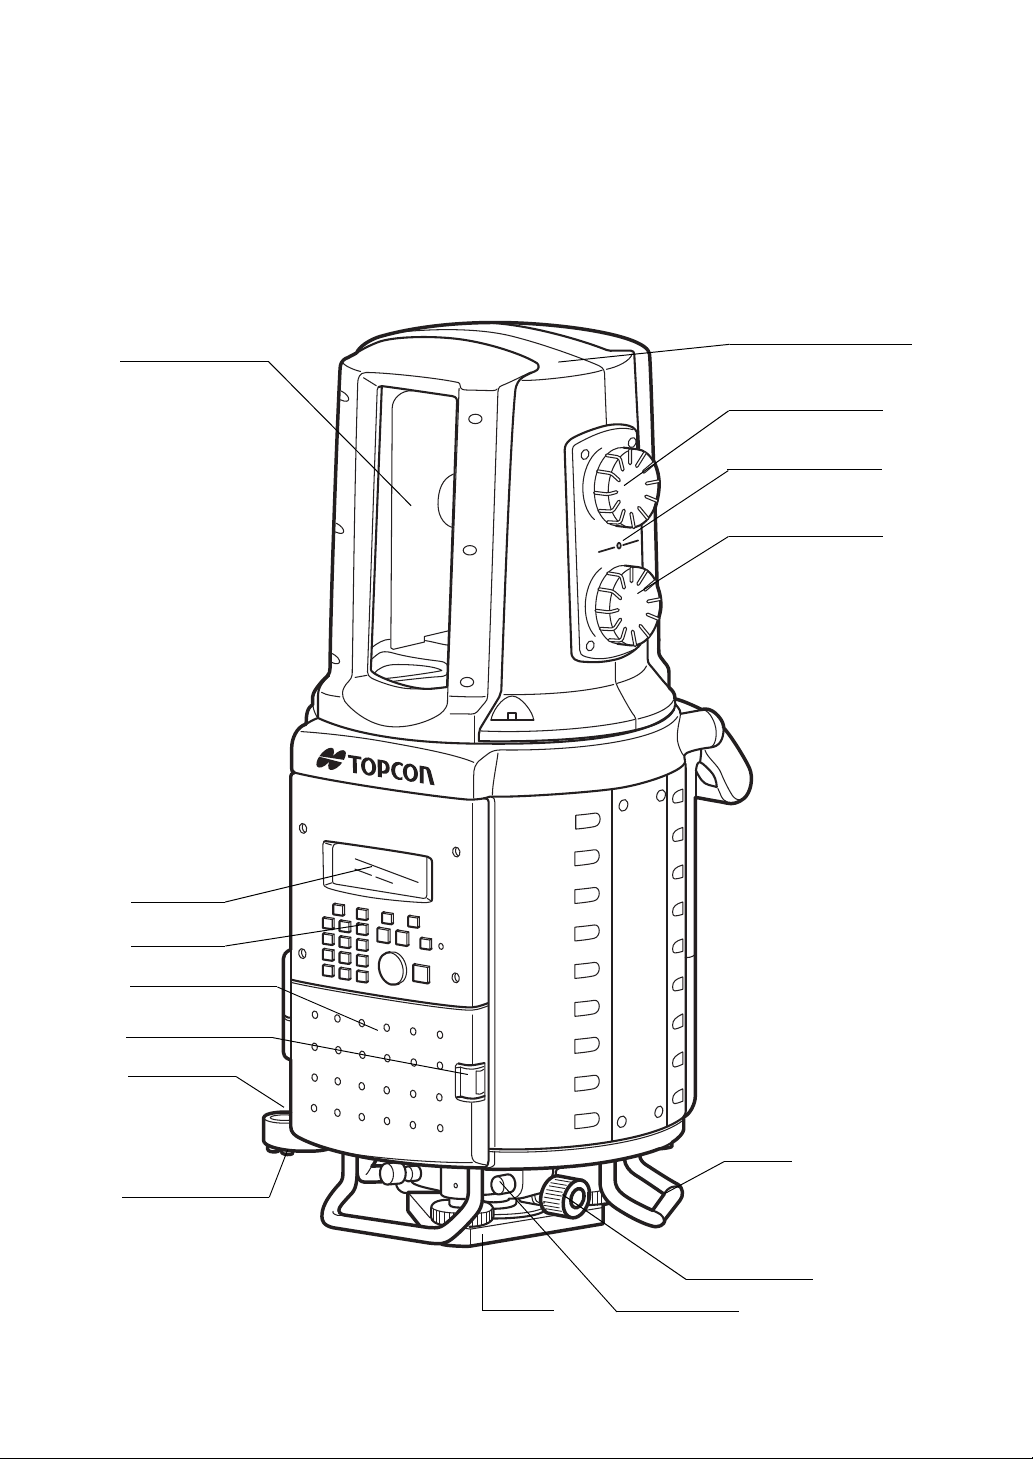
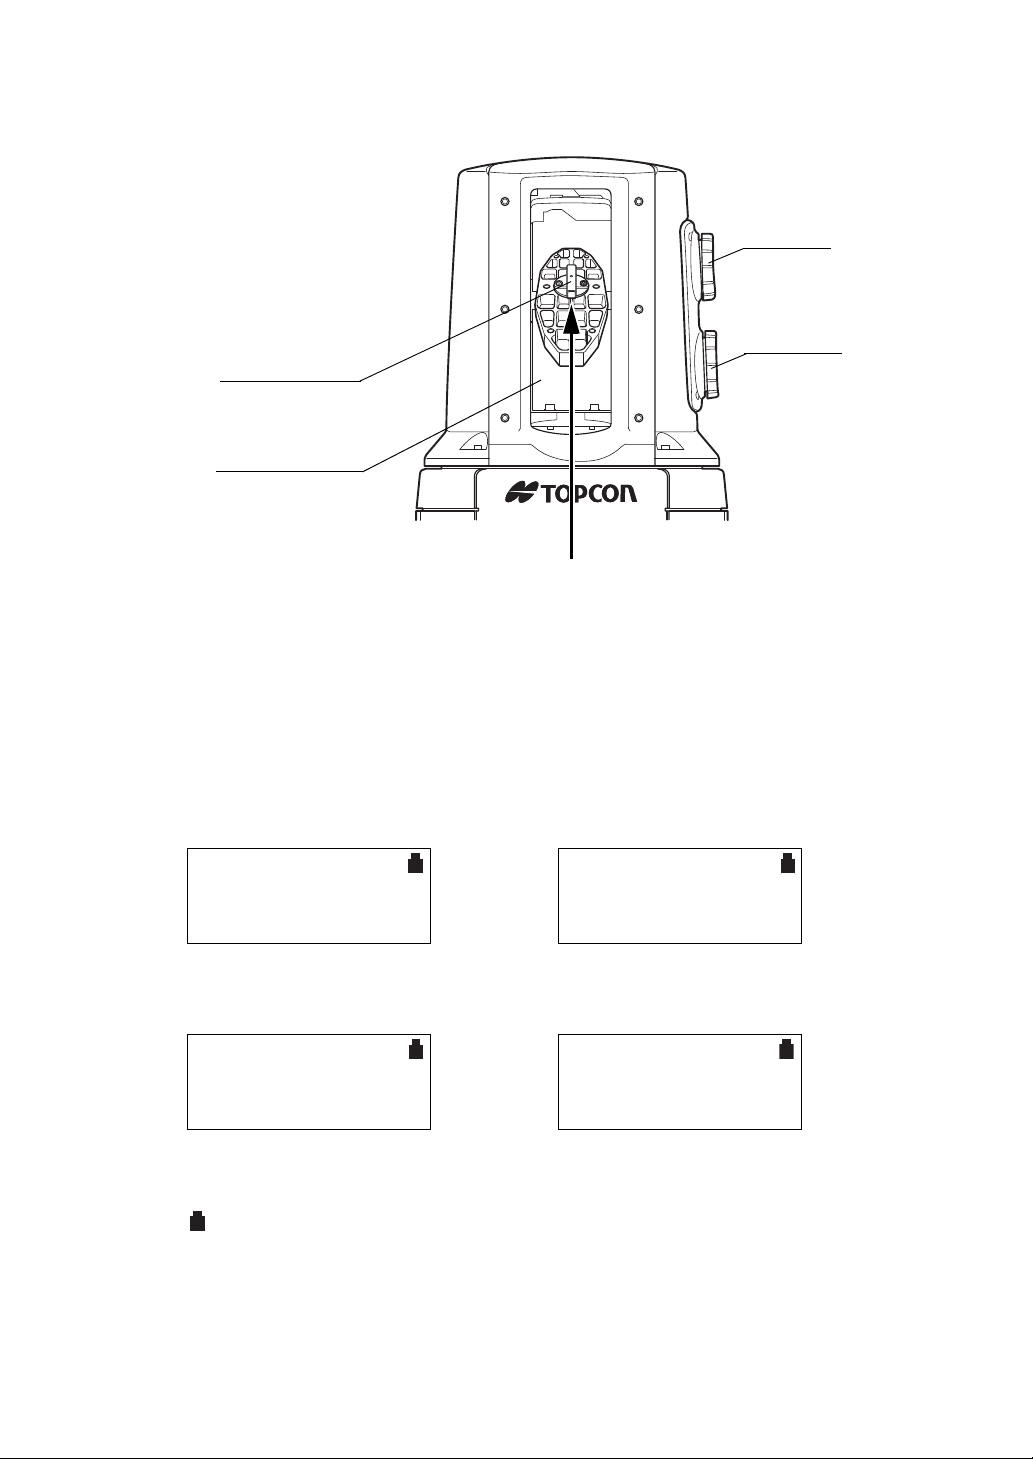
1 NOMENCLATURE AND FUNCTIONS
Instrument
center mark
Tribrach
Display
Circular level
Adjustment screw
for circular level
Battery cover lever
Battery cover
Vertical jog
Horizontal jog
Operation key
Collimating window
Handle
Optical plummet
telescope
Battery connector
Horizontally rotating part
(head)
1.1 Nomenclature
1 NOMENCLATURE AND FUNCTIONS
1-1
Page 13

USB memory cannot be
used.
I/O cards cannot be used.
Handgrip
Tribrach fixing lever
Leveling screw
Window
SD card slot
Cover screw
Wireless LAN cover
USB connector
Back battery cover
1 NOMENCLATURE AND FUNCTIONS
1-2
Page 14
1 NOMENCLATURE AND FUNCTIONS
Sighting collimator
Collimating window
Vertical jog
Horizontal jog
Collimate from here
STATION MENU
F1 NEW STATION
F2 SELECT STATION
F3 OCC/BS SETTING
SCAN MENU
F1 3D SCANNING
F2 TARGET SCANNING
PROJECT MENU
F1 NEW PROJECT
F2 SELECT PROJECT
Refer to Chapter 4.4 “Battery Power
Remaining Display”.
:Battery power remaining mark
SETTING MENU
F1 NETWORK SETTING
F2 DATA MANAGE
P1/3
↓
↑
1.2 Display
z Display
The display uses a character-type LCD which has 4 lines and 20 characters per line.
z Contrast and Illumination
The contrast and illumination of display window are adjusted. See 5.1 “Settings by the Star Key”.
z Example
STATION MENU SCAN MENU
PROJECT MENU SETTING MENU
1-3
Page 15
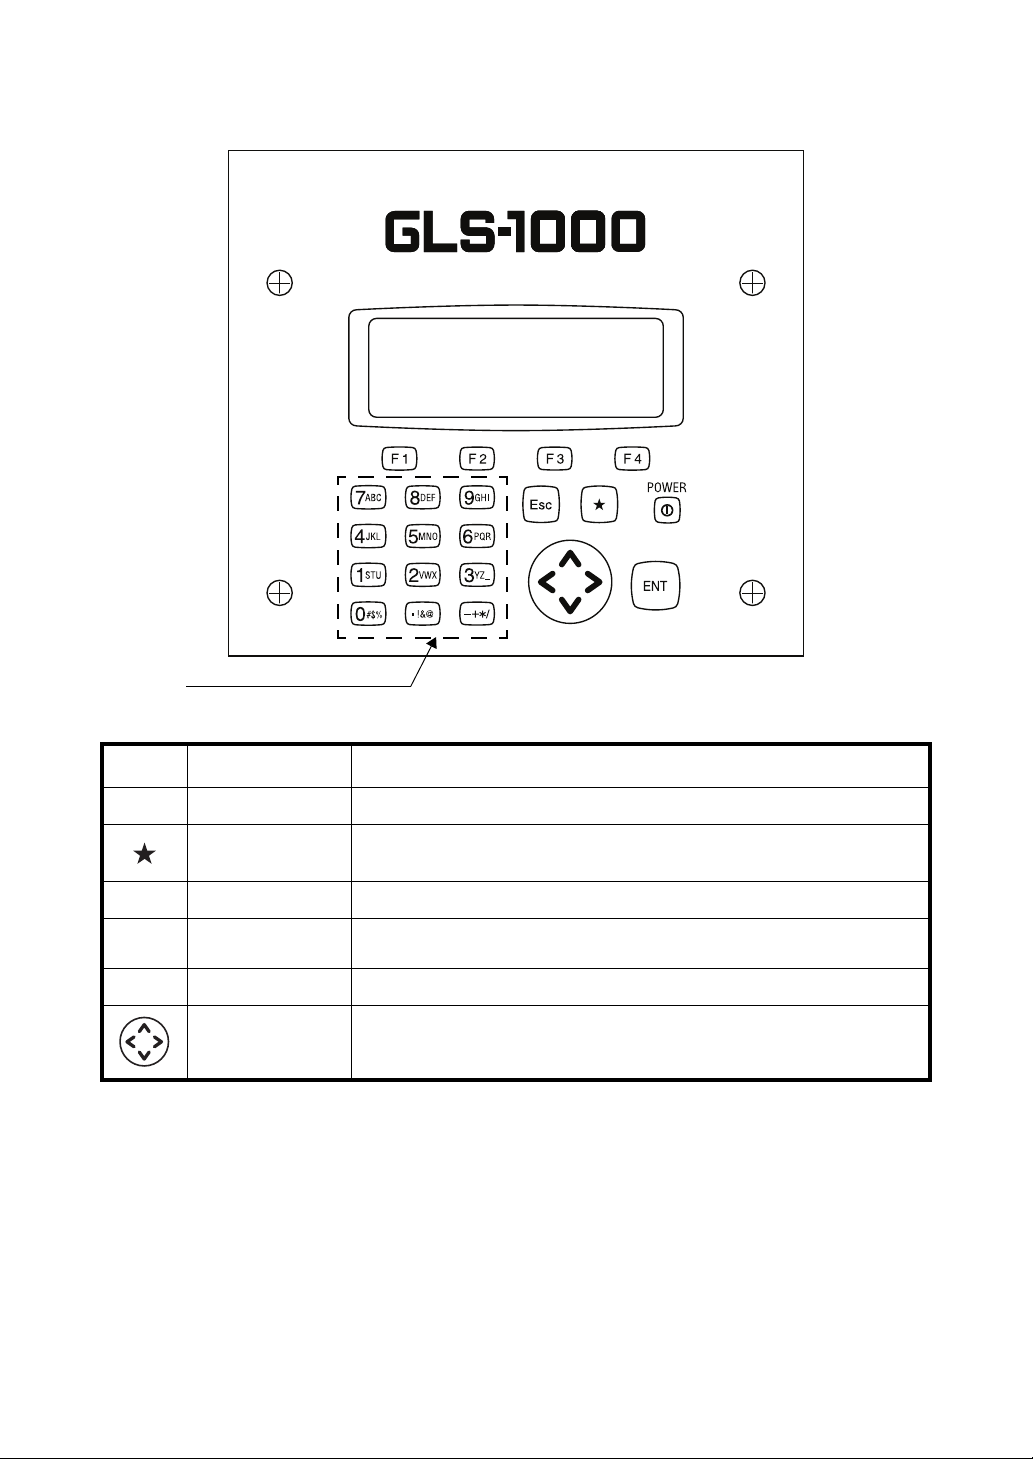
1.3 Operating Key
Alphanumeric characters key
1 NOMENCLATURE AND FUNCTIONS
Keys Name of Key Function
POWER Power source key ON/OFF of power source
Star key
ESC Escape key Returning to the previous display.
F1–F4
ENT Enter key Press at the end of inputting values.
Soft key
(Function key)
Cursor key Moves the selected item or the cursor laterally and vertically.
Star key mode is used for each presetting or displaying.
To select function of Star key, see Chapter 5.1 “Settings by the Star Key” .
Responds to the message displayed.
1-4
Page 16
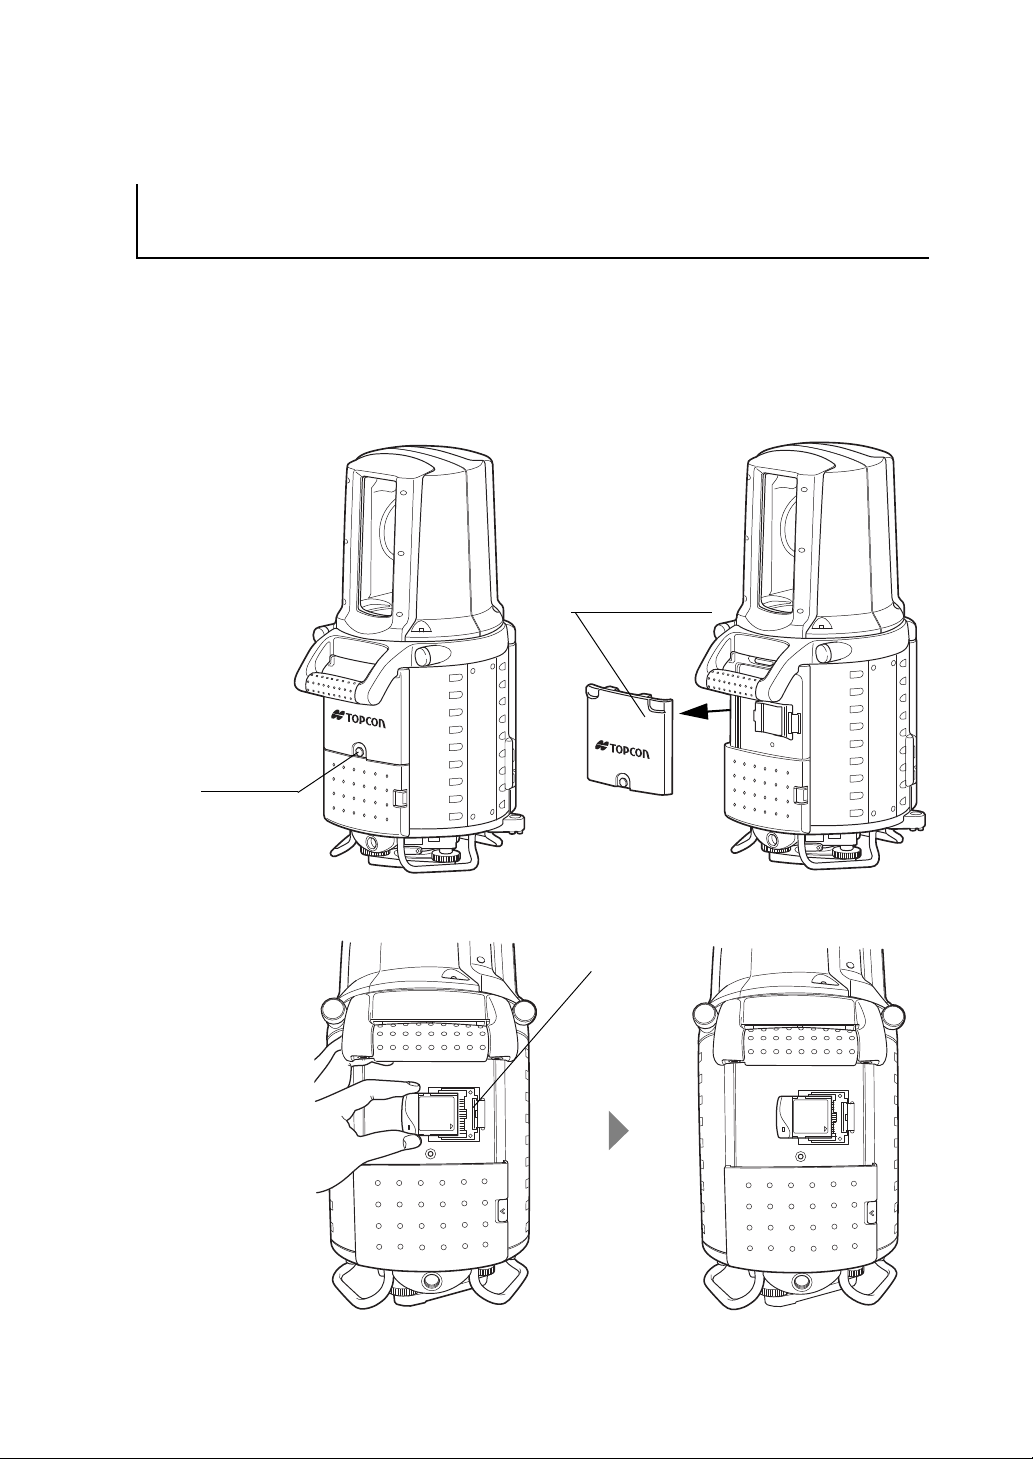
2 Preparations before Use
1.
Inserting a wireless LAN card (when the instrument is used
connected to a PC)
Cover screw
Wireless LAN cover
LAN port
2 Preparations before Use
The following are the preparation procedures before use.
It is necessary to insert a wireless LAN card for wireless communication between the instrument and
the PC.
Insert a wireless LAN card after purchasing the instrument.
1 Use a coin to remove the cover screw.
2 Remove the wireless LAN cover.
3 Insert a wireless LAN card.
4 Replace the wireless LAN cover.
5 Replace the cover screw.
2-1
Page 17
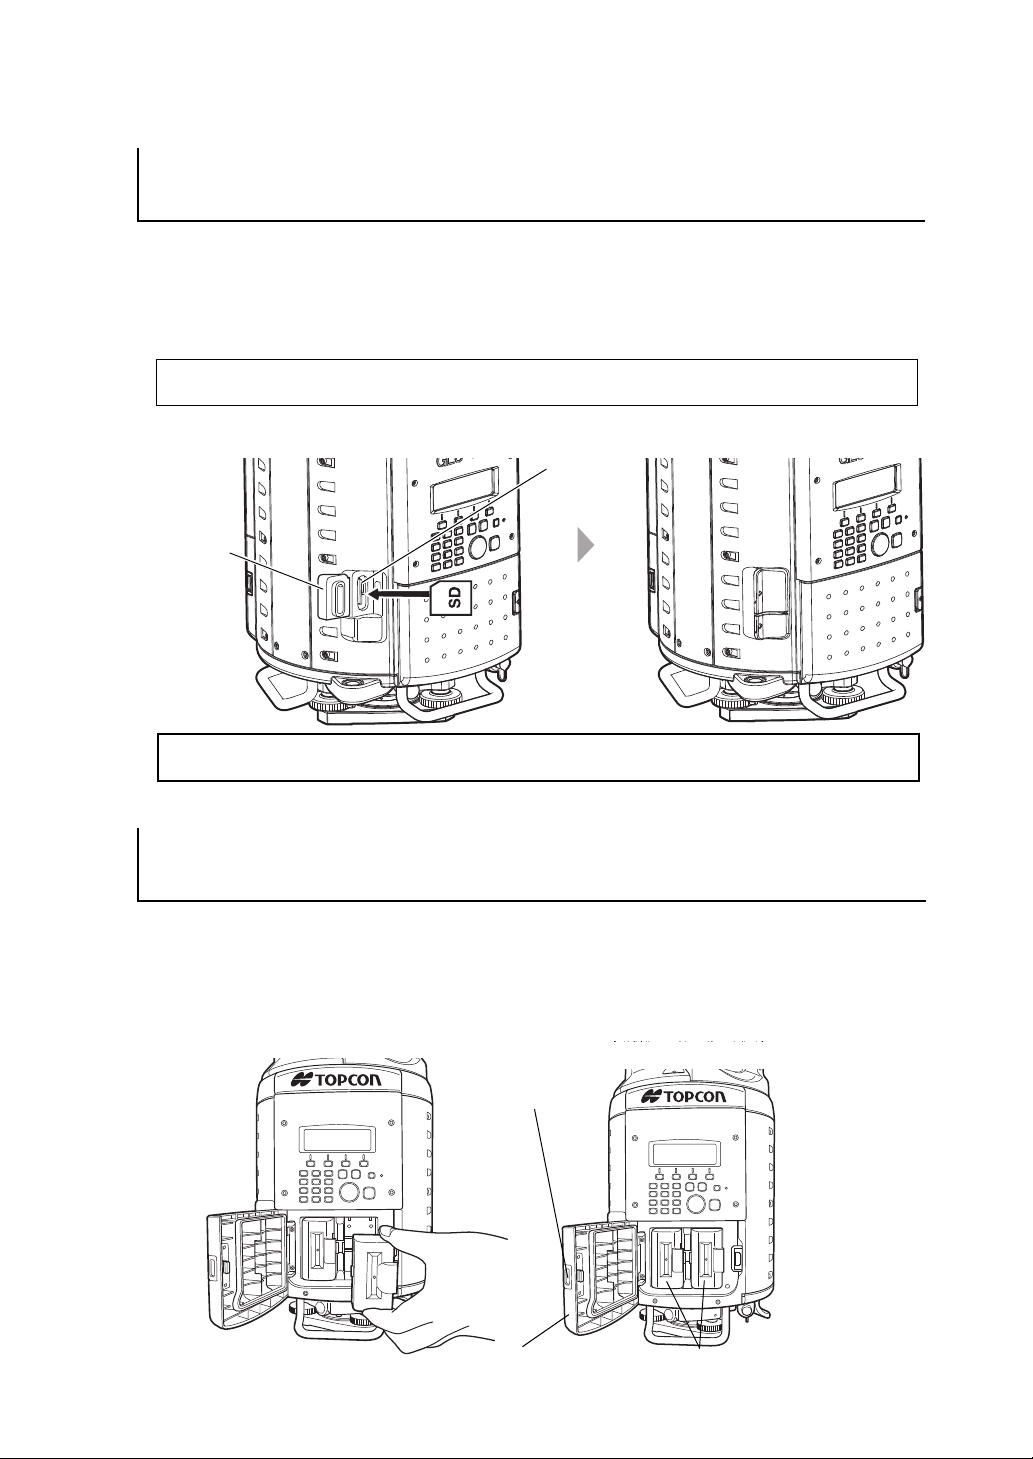
2 Preparations before Use
2.
Inserting an SD card (when the instrument is used alone (stand alone))
Please make sure you have the front and back of the SD card facing correctly when inserting into
the card slot.
Card slot
cover
Card slot
When [SCANNING IN PROGRESS] and [PAUSING] is being displayed, do not remove the SD card.
Otherwise, the data may be destroyed.
3.
Connecting to a power source
Battery cover lever
Battery cover
BT-65Q
All of the data including project, station information, and scanning data will be recorded on the SD card.
Make sure to insert an SD card before scanning.
1 Open the card slot cover.
2 Insert a SD card to the card slot..
3 Close the card slot cover.
z When using the internal BT-65Q power source
1
Open the battery cover, and place four batteries in the instrument.
2 Shut the battery cover until click sound can be heard.
2-2
Page 18
2 Preparations before Use
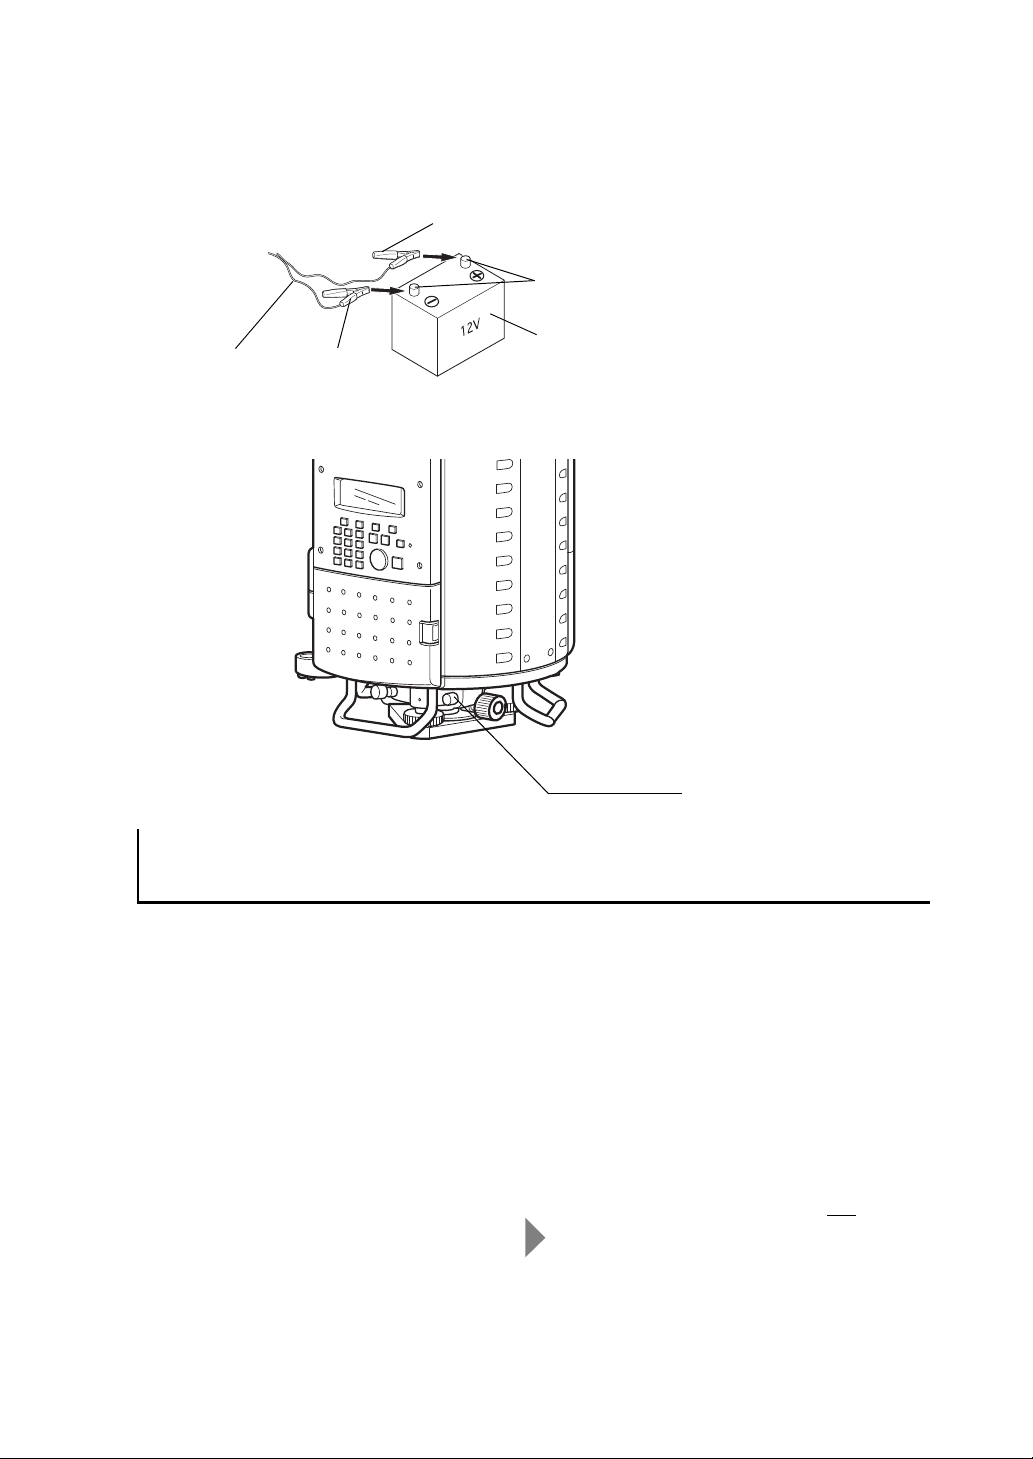
External battery
Battery terminal
Red clip (+)
Black clip (-)
PC-21
Battery connector
4.
Network Settings (when the instrument is used connected to a PC)
[Initial setting of the instrument at shipping]
IP address : 192.168.0.1
SUBNET address : 255.255.255.0
SSID : gls1000
Refer to Chapter 5.2.2 “Network Settings (when the instrument is used connected to a PC)” for PC
settings.
If you want to change the IP address, subnet address, or SSID of the instrument, Refer to Chapter
5.2.2 “Network Settings (when the instrument is used connected to a PC)”
[Example of the setting on the user's PC]
IP address* : 192.168.0.240
SUBNET address : 255.255.255.0
SSID : gls1000
* "240" at the end of the IP address is
arbitrarily-specified.
z When using an external power source
1
Connect the clips of the external power source cable (PC-21) to the terminals of the external power
source (12V, commercially available).
2 Connect the external power source cable (PC-21) to the battery connector.
Use one of the following methods to connect the instrument to the PC.
z Connection via Wireless LAN cards
Network setting is necessary if the instrument is connected to the PC via wireless LAN cards. After
purchasing the instrument, make sure the IP address, subnet address, and SSID of this instrument
correspond to those of the PC.
1 Move to the network setting screen.
Refer to Chapter 5.2.2 “Network Settings (when the instrument is used connected to a PC)”
2 Match the PC setting with the instrument setting.
2-3
Page 19
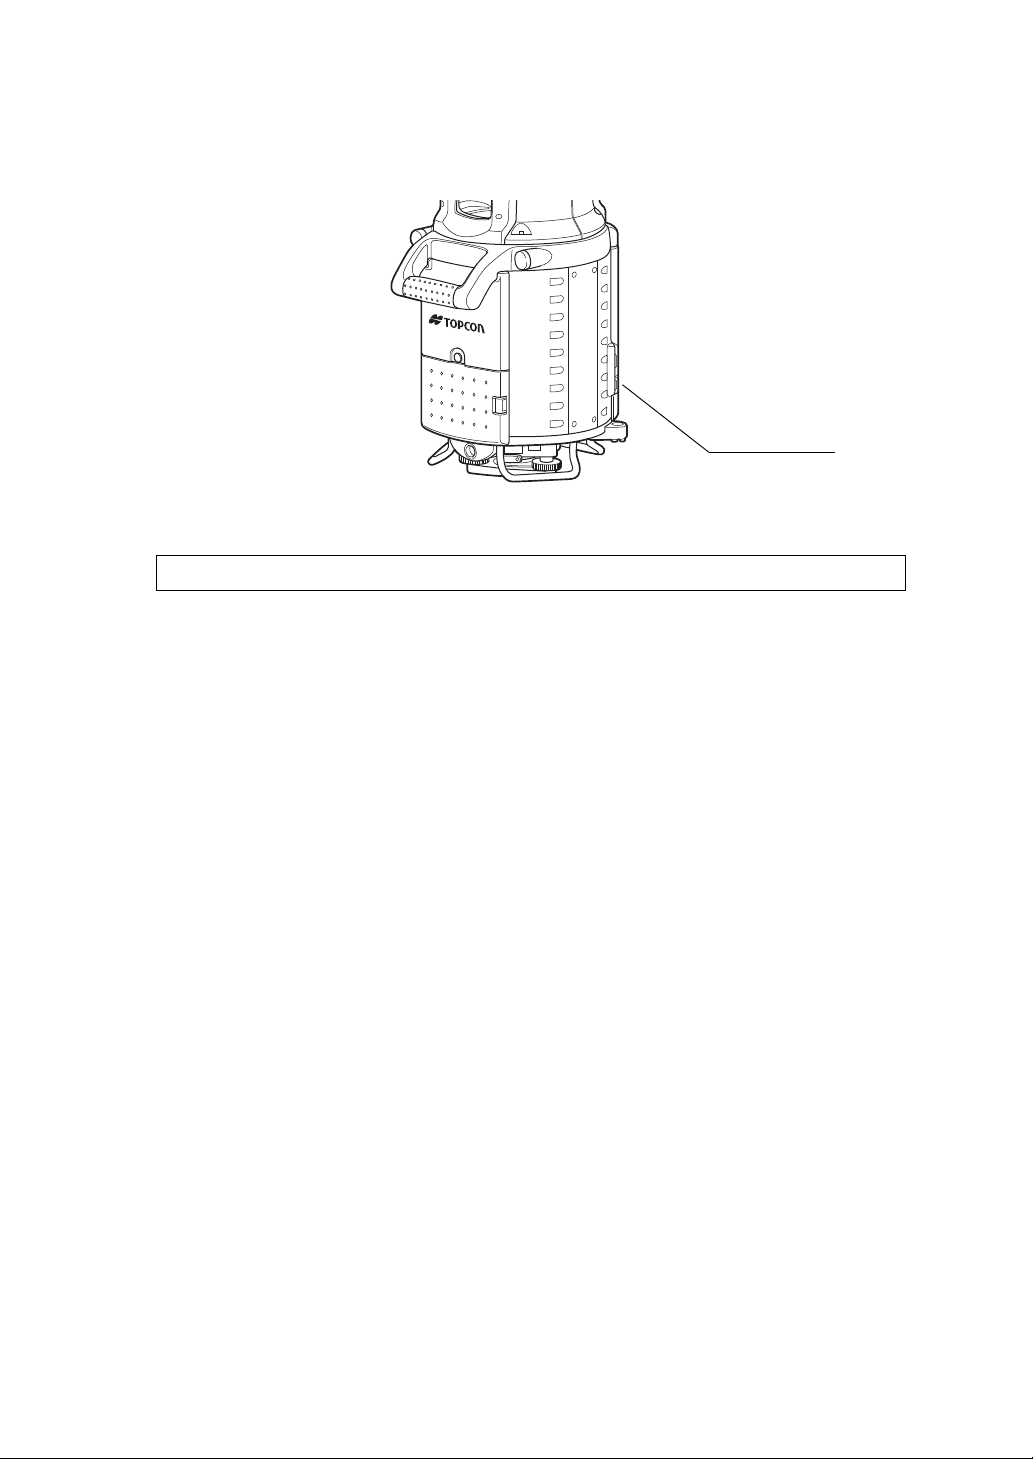
2 Preparations before Use
USB connector
USB connector is for connection to PC, and USB memory cannot be connected.
z Connection via USB cable
1 Connect a USB cable(F-25) to the USB connector.
The USB connection is automatically recognized and [PC CONTROL MODE] is displayed.
2-4
Page 20
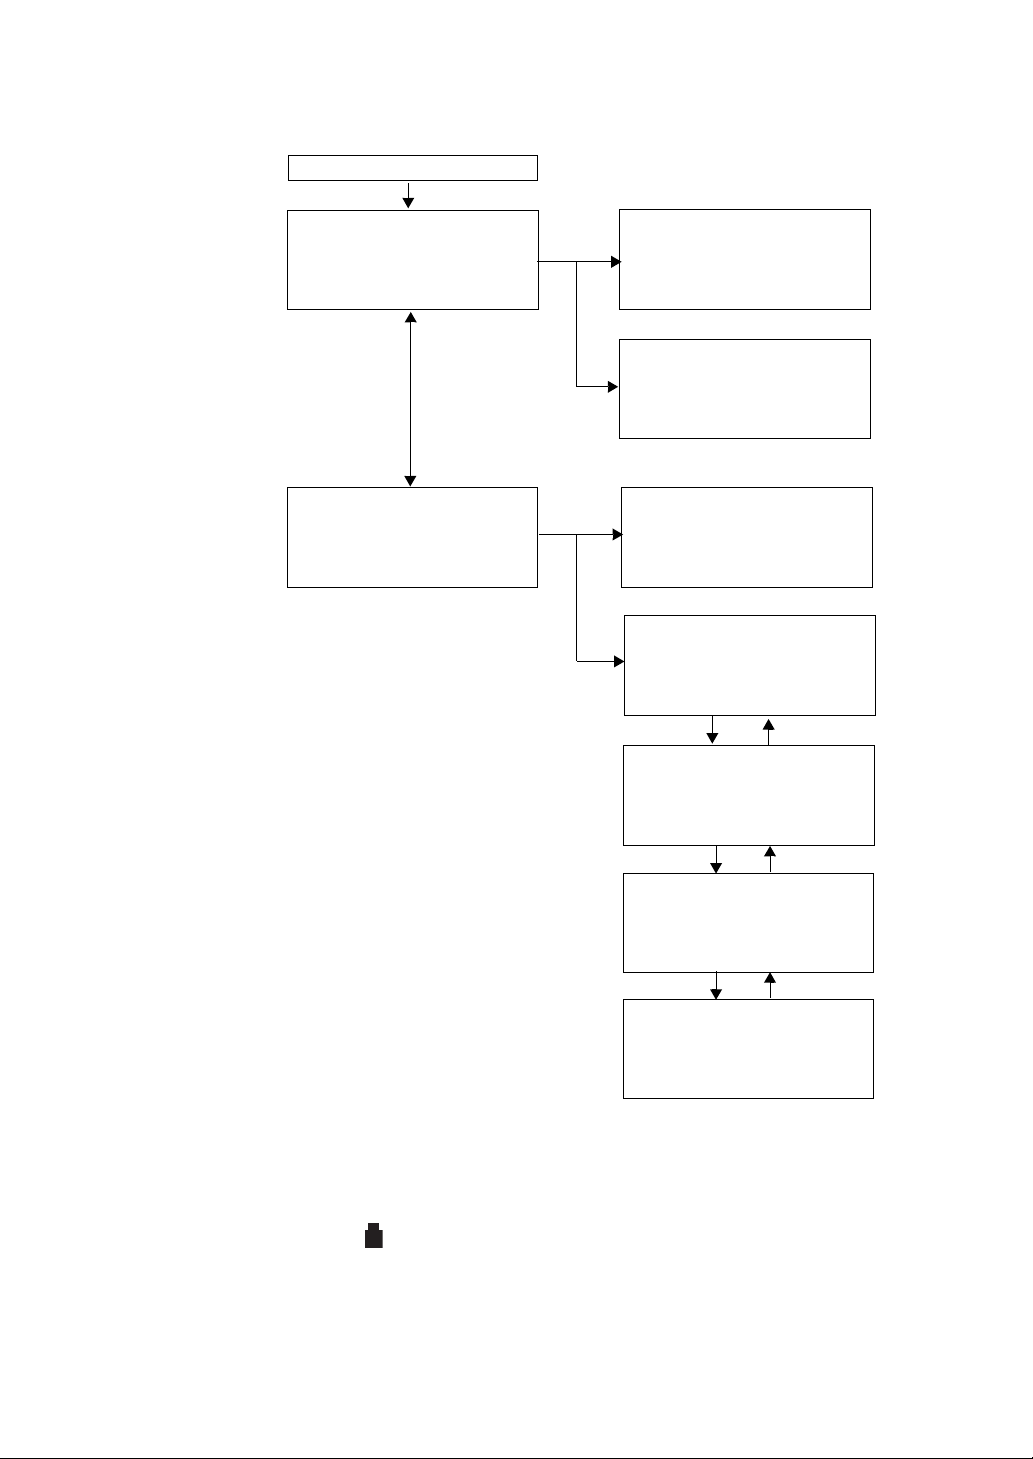
3 Overview of Scanning
Scanning
Setting the stations
Setting the project
1
. Scan the target.
2
. Perform the 3D scanning.
1
. Set the backsight point name and the occupied point name.
2
. Turn the power ON.
1
. Mount and level the instrument.
Scanning Preparation
Turning the power OFF
When scanning another target within the same project, move the instrument to the next station
and repeat the procedures above.
Refer to Chapter 4.2 “Mount the Instrument to the Tripod”.
Refer to Chapter 4.3 “Power Switch Key ON”.
Refer to Chapter 6 “Project Settings”.
Refer to Chapter 7 “Station Setting”.
Refer to Chapter 7.3 “Setting the Occupied Point Name and the Backsight Point Name”.
Refer to Chapter 8 “Scanning”.
Refer to Chapter 8.1 “Target Scanning”.
Refer to Chapter 8.2 “3D Scanning”.
z When the instrument is used alone
2
. Scan the backsight point.
3.1 Procedure for Scanning
The following are the procedures for scanning.
3 Overview of Scanning
3-1
Page 21
3 Overview of Scanning
Using the PC, enter settings and perform the scanning
2
. Turn the power ON.
1
. Mount and level the instrument.
Scanning Preparation
Turning the power OFF
When scanning another target within the same project, move the instrument to the next station
and repeat the procedures above.
Refer to Chapter 4.2 “Mount the Instrument to the Tripod”.
Refer to Chapter 4.3 “Power Switch Key ON”.
z When the instrument is used connected to a PC
Refer to the Instruction Manual for Scan Master.
3-2
Page 22

3.2 Display and Functions
STATION MENU
F1 NEW STATION
F2 SELECT STATION
F3 OCC/BS SETTING
Main Menu
Sub Menu
Display
The following are examples of the displays and its functions.
Display
3 Overview of Scanning
Main
Menu
STATION
MENU
SCAN
MENU
PROJECT
MENU
SETTING
MENU
Sub
Menu
NEW STATION
SELECT STATION
OCC/BS SETTING
3D SCANNING
TARGET SCANNING
NEW PROJECT
SELECT PROJECT
NETWORK SETTING
DATA MANAGE
TEMP.&PRES. SET
LAST CALIB. DATE
TIME ADJUST
UNIT SET
TILT 0 ADJUST
Function
Set a new station.
Refer to Chapter 7.1 “Creating a New Station”.
Select an existing station.
Refer to Chapter 7.2 “Selecting from Existing Stations”.
Set the backsight point name and the occupied point name.
Refer to Chapter 7.3 “Setting the Occupied Point Name and the
Backsight Point Name”.
Perform a 3D scanning of the designated area.
Refer to Chapter 8.2 “3D Scanning”.
Scan the target.
Refer to Chapter 8.1 “Target Scanning”.
Set a new project.
Refer to Chapter 6.1 “Creating a New Project”.
Select an existing project.
Refer to Chapter 6.2 “Selecting from Existing Projects”.
Set the network.
Refer to Chapter 5.2.2 “Network Settings (when the instrument is
used connected to a PC)”.
Edit the data.
Refer to Chapter 5.2.3 “Editing the SD Card Data (data
management)”.
Set the temperature and air pressure.
Refer to Chapter 5.2.4 “Setting the Temperature and
Atmospheric Pressure”.
Display the last calibration date.
Refer to Chapter 5.2.5 “Displaying the Last Calibration Date and
Time”.
Set the time.
Refer to Chapter 5.2.6 “Setting the Date and Time”.
Set the units.
Refer to Chapter 5.2.7 “Changing the Units”.
Adjust the tilt sensor installation error.
Refer to Chapter 5.2.8 “Adjusting the Tilt Sensor Installation
Error”.
3-3
Page 23
3.3 Screen Flowchart
STATION MENU
F1 NEW STATION
F2 SELECT STATION
F3 OCC/BS SETTING
SELECT MENU
F1 STATION MENU
F2 SCAN MENU
P1/2
↓
SCAN MENU
F1 3D SCANNING
F2 TARGET SCANNING
SELECT MENU
F1 PROJECT MENU
F2 SETTING MENU
P2/2
↑
F1
F2
F1
Press the power key
: Battery marks omitted
F3
PROJECT MENU
F1 NEW PROJECT
F2 SELECT PROJECT
F2
SETTING MENU
F1 NETWORK SETTING
F2 DATA MANAGE
P1/4
↓
SETTING MENU
F1 TEMP.&PRES. SET
F2 LAST CALIB. DATE
P2/4
↓
↑
SETTING MENU
F1 TIME ADJUST
F2 UNIT SET
P3/4
↓
↑
F3
F4
ESC key : Returning to the previous display.
First page
Second page
Second page
Third page
First page
F3
F4
SETTING MENU
F1 TILT 0 ADJUST
P4/4
↑
Fourth page
F3
F4
3 Overview of Scanning
3-4
Page 24

4 PREPARATION FOR MEASUREMENT
Securing screw
Tribrach fixing lever
Tribrach alignment groove
Tribrach fixing screw
Tribrach circular level
Optical plummet telescope
Alignment piece
Tribrach alignment groove
4 PREPARATION FOR MEASUREMENT
When attaching the instrument on a tripod, first attach only the tribrach on the tripod, then attach the
instrument after leveling and centering.
4.1 Detach/Attach of Tribrach
The instrument is easily detached or attached to the tribrach.
z Detachment
1 Loosen the tribrach fixing screw.
2 Loosen the tribrach fixing lever by turning counterclockwise.
(When the tribrach fixing lever securing screws are screwed in, use the driver provided in the
package to loosen.)
3 Lift the instrument straight upwards and off.
z Attachment
1 Coincide the white alignment piece on the lower part of the instrument with the tribrach alignment
groove.
2 Tighten the tribrach fixing lever firmly by turning clockwise.
3 Tighten the tribrach fixing screw.
z Locking the tribrach fixing lever
1 The tribrach fixing lever can be locked from being moved accidentally.
This is useful if the upper instrument section is not being detached very often. Simply tighten the
securing screw on the fixing lever with the accessory screw driver.
4-1
Page 25

4 PREPARATION FOR MEASUREMENT
Leveling
screw A
Leveling screw C
Leveling screw B
Tribrach circular level
Point
Center mark
4.2 Mount the Instrument to the Tripod
First, mount the tribrach to the tripod. Roughly level and center the tribrach.
Next, mount the instrument to the tribrach. Level and center the instrument precisely.
Level and center the instrument precisely to insure the best performance.
Use tripods with a tripod screw of 5/8 in. diameter and 11 threads per inch, such as the Type E
TOPCON wide-frame wooden tripod. Do not use a metallic tripod.
4.2.1 Leveling and Centering the Instrument
1
Setting up the Tripod
1) First, extend the extension legs to suitable lengths and tighten the screws on their midsections.
2) Remove the tribrach from the instrument, and place the tribrach carefully on the tripod head.
3) Loosen the tripod screw and slide the instrument. When the instrument is directly above the point,
lightly tighten the tripod screw.
2 Roughly Leveling the Tribrach by Using the Tribrach circular level
1) Turn the leveling screws A and B and adjust the bubble to stay at the top or bottom of the circular
level.
2) Turn the leveling screw C to bring the bubble to the center of the tribrach circular level.
3 Centering by Using the Optical Plummet Telescope
1) Adjust the eyepiece of the optical plummet telescope to your eyesight.
2) Slide the instrument by loosening the tripod screw, place the point on the center mark, and then
tighten the tripod screw.
Try to keep the tribrach from rotating when sliding it so as to minimize the dislocation of the bubble.
3) Repeat step 2 and 3 if necessary.
4-2
Page 26

4 PREPARATION FOR MEASUREMENT
Circular level
TILT SETTING [ON]
X :+0°01'02"
Y :-0°04'05"
ON OFF
4 Mounting the instrument on the tribrach
1) Mount the instrument on the tribrach and tighten the tribrach fixing lever and the tribrach fixing
screw.
Refer to Chapter 4.1 “Detach/Attach of Tribrach”.
5 Leveling the instrument using the circular level on the instrument
1) Level the instrument as in procedure 2 using the circular level on the instrument.
6 Completely Leveling the Instrument by Using the Tilt Sensor of the Instrument
1) Turn the power ON.
2) After initialization of the instrument is complete, turn the tilt sensor ON, and wait until inclination of
the instrument is shown on the display.
Refer to Chapter 5.1.7 “Setting Example Using the Star Key”.
4-3
Page 27

4 PREPARATION FOR MEASUREMENT
Collimating window
Tribrach
Horizontal jog
Leveling screw A
Leveling screw B
TILT SETTING [ON]
X :+0°03'45"
Y : 0°00'00"
ON OFF
Leveling screw C
TILT SETTING [ON]
X : 0°00'00"
Y :+0°00'06"
ON OFF
3) Use the horizontal jog to turn the instrument as shown in the figure. Make the collimating window
parallel to the line connecting the leveling screws A and B of the tribrach (or make a random choice
of any two).
4) Turn the leveling screws A and B, and adjust the Y-inclination on the display to ±6' or less.
5) Turn the leveling screw C, and adjust the X-inclination on the display to ±6' or less.
4-4
Page 28

4 PREPARATION FOR MEASUREMENT
TILT SETTING [ON]
X :+0°00'08"
Y :+0°00'06"
ON OFF
NOTE:
Since the level may change slightly while
scanning, we recommend leveling the
instrument as precisely as possible.
Notes on the Tribrach:
Note that the angle measuring precision may be effected directly if the tribrach has
not been installed firmly.
1 If there is any slack between the leveling screws and the base, loosen
the set screw of the holding ring and tighten the holding ring with
adjusting pin, until it is properly adjusted. Re-tighten the set screw on
completing the adjustment.
Leveling screw
Holding ring
Set screw
6) Use the horizontal jog to make sure the X and Y inclinations are ±6' or less (within the calibration
range of the tilt sensor), regardless of the direction the collimating window faces.
Leveling of the instrument is complete.
7 Checking centering
1) Re-check the centering with an optical plummet telescope. If there is misalignment, adjust the
instrument to align.
2) Repeat the above described steps 6-7 until both leveling and centering are matched.
4-5
Page 29

4.3 Power Switch Key ON
SELECT MENU
F1 STATION MENU
F2 SCAN MENU
P1/2
↓
Battery power remaining display
Project name display
Station name display
TOPCON LASER SCANNER
Version 1.00
WARMING UP NOW
TOPCON LASER SCANNER
PROJECT: pr-1
STATION: st-1
PLEASE WAIT..
It takes 3 minutes after the power has been
switched ON to initialize the instrument and
warm up the laser.
Do not turn the head or operate any keys
while the head and mirror are turning.
Note:
Do not turn the head with your hands while the power is ON.
If it has been turned by force, turn the power ON again.
TOPCON LASER SCANNER
[CALIBRATING] display
[CALIBRATING] will be displayed on the screen once every 20 minutes or when ambient
temperature fluctuates during operation. When displayed, distance measurement is being
adjusted internally. Please wait for the display to disappear.
1 Press the power key.
4 PREPARATION FOR MEASUREMENT
4-6
Page 30

4 PREPARATION FOR MEASUREMENT
Measurement is possible.
The power is poor. Please replace
with fully charged batteries.
Measurement is impossible.Please
replace with fully charged batteries.
4.4 Battery Power Remaining Display
Battery power remaining display indicates the power condition.
Note: 1 The battery operating time will vary depending on the environmental conditions such as
ambient temperature, charging time, the number of times of charging and discharging
etc. It is recommended for safety to charge the battery beforehand or to prepare spare
full charged batteries.
2 For general usage of the battery, Refer to Chapter 9 “Charging the Internal Power
Source (BT-65Q)”.
4.5 Replacing the Battery
Replace all (4) batteries with fully charged batteries when replacing the internal batteries.
z How to replace the batteries without turning the instrument's power switch OFF
If the battery power becomes low while scanning, replace the batteries by following the below steps.
The scanning can be continued.
1 Press the F2 key (stop) while scanning. The scanning will pause.
2 Open the front battery cover, and replace 2 batteries.
3 Close the front battery cover.
4 Open the back battery cover, and replace 2 batteries.
5 Close the back battery cover.
6 Press the F1 key (start) to resume scanning.
4-7
Page 31

4 PREPARATION FOR MEASUREMENT
Sighting collimator
Collimating window
Vertic al j og
Horizontal jog
Collimate from here
Sighting collimator
Target
4.6 How to Collimate to a Target.
1 From the collimating window, use the vertical and horizontal jogs to set the sighting collimator
approximately on the target.
2 Look into the sighting collimator.
3 Use the vertical and horizontal jogs to adjust the peak of the triangle inside the sighting collimator to
the target.
4-8
Page 32

4 PREPARATION FOR MEASUREMENT
Alphanumeric characters key
OCC/BS SETTING
INPUT OCC NAME
[ ]
ALPH <-
Numerical input mode
Cursor key
[F1] [F2] [F3] [F4]
Soft keys
Soft key
The Soft Key message is displayed at the bottom line
of display. The functions are according to the displayed
message.
Letters that can be entered:
All alphabets (small letter) a to z, Numeric 0 to 9,
'_', '!', '@', '&', '-', '#', '$', '%'can be entered.
'+' cannot be entered.
Number of characters that can be entered: up to 8
<- [F3] or Cursor key []
Press the [F3] or Cursor key [ ] to delete an entry.
ALPHA [F1] key
Press the [F1] key to enter alphabetical input mode.
OCC/BS SETTING
INPUT OCC NAME
[ ]
ALPH <-
NUME [F1] key
Press the [F1] key to enter numerical input mode.
OCC/BS SETTING
INPUT OCC NAME
[ ]
NUME <-
[F1]
Alphabetical input mode
4.7.1 Switching between Numerical Input Mode and Alphabetical Input Mode
4.7 How to Enter Alphanumeric Characters
When entering the station, instrument height, backpoint, etc., you can enter alphanumeric (small
letters) characters.
4-9
Page 33

[Example setting] Occupied point name : [a-1]
SELECT MENU
F1 STATION MENU
F2 SCAN MENU
P1/2 DOWN
STATION MENU
F1 NEW STATION
F2 SELECT STATION
F3 OCC/BS SETTING
OCC/BS SETTING
INPUT OCC NAME
[ ]
NUME <-
OCC/BS SETTING
INPUT OCC NAME
[a ]
NUME <-
OCC/BS SETTING
INPUT OCC NAME
[a- ]
NUME <-
OCC/BS SETTING
INPUT OCC NAME
[a- ]
ALPH <-
OCC/BS SETTING
INPUT OCC NAME
[a-1 ]
ALPH <-
OCC/BS SETTING
INST HEIGHT INPUT
[ ]
NUME <-
Operating procedure Operation Display
4 PREPARATION FOR MEASUREMENT
1 Press the [F1](STATION MENU) key.
2 Press the [F3](OCC/BS SETTING) key.
3 Press the [7] key to select “a”.
4 Press the [-+*/] key to select “-”.
5 Press the [F1](NUME) key.
The instrument switches to numerical input mode.
6 Press the [1] key to select “1”.
[F1]
[F3]
[7]
[-+*/]
[F1]
[1]
7 Press the [ENT] key.
Occupied point name is set.
z When you want to delete an entry, press the [F3] or Cursor key [ ]. Then the entry will be deleted.
[ENT]
4-10
Page 34

4 PREPARATION FOR MEASUREMENT
Tribrach fixing lever
Prism adapter (Sold separately)
Alignment piece
Tribrach (Sold separately)
Settlement
screw
Center mark
Target board
Target sheet
Center mark
4.8 Target
4.8.1 Selecting the Target Sheet
Select the target sheet (large, medium, small) based on the distance to the object being scanned.
(Target sheet (large) is sold separately)
Target sheet
Large 50-200
Middle 10-100
Small 2-50
Distance to the object
being scanned (m)
4.8.2 Assembling the Target
1
Coincide the alignment piece on the lower part of the prism-adapter with the tribrach alignment
groove.
2 Tighten the tribrach fixing lever firmly by turning clockwise.
3 Install the target board in the arrow point as shown in the illustration.
4 Tighten the settlement screw surely.
5 Put the magnetic target sheet on the target board.
At this point, adjust the center marks (4) of the target sheet and the target board exactly.
4-11
Page 35

5 Instrument Settings
F1 TILT [ON ]
F2 ZOOM COTROL
P1/3
↓
Press the star key
TILT SETTING [ON]
X :+0°01'02"
Y :-0°04'05"
ON OFF
ZOOM CONTROL
SELECT DISTANCE
F1 UNDER 50M
F2 OVER 50M
F 1
F2
F1 CAMERA [HIGH]
2/3
↓
↑
F3
F1 CONTRAST [ 5 ]
F2 BACKLIGHT [ON :5]
3/3
↑
CAMERA SETTING
F1 HIGH MODE
F2 MIDDLE MODE
F1
CONTRAST ADJUST
LEVEL 6
↑
↓
BACKLIGHT ADJ
F1 : ON [OFF : 9]
F2 : OFF
F3 : LEVEL
F1
F2
F4
First page
Second page
Third page
F3
F4
5.1 Settings by the Star Key
z Items to be set by the star key
Display Function
5 Instrument Settings
TILT SETTING
ZOOM CONTROL
CAMERA SETTING
CONTRAST ADJUST
BACKLIGHT ADJ
Set the tilt sensor ON/OFF.
Choose the best optical zoom system setting for the scanning.
Set the image quality mode of the camera.
Adjust the contrast of the display.
Adjust the backlight of the display.
5.1.1 Star Key Screen Flowchart
5-1
Page 36

5 Instrument Settings
Zenith
Standing
axis
Inclination of the standing
axis in the X direction
Zenith
Inclination of the standing
axis in the Y direction
Trunnion axis
Horizontal
Standing axis
5.1.2 Tilt Setting
When the auto tilt correction function of the vertical and horizontal angles is turned ON, the 2-axis tilt
sensor is activated, and tilts in vertical and horizontal angles due to inclination of the standing axis will
be corrected automatically.
To ensure precise scanning, use the instrument with the auto tilt correction ON. If the tilt is out of
automatic compensation range, [TILT OVER] display will appear on the screen. In such case, level the
instrument. When the tilt comes into the automatic compensation range after the leveling, the screen
will automatically return to the display before the [TILT OVER] display.
z GLS-1000 compensates both the vertical angle and the horizontal angle readings due to inclination
of the standing axis in the X and Y directions.
z The display of Vertical or Horizontal angle is unstable when instrument is on an unstable stage or a
windy day. You can turn off the auto tilt correction function of V/H angle in this case.
5.1.3 Zoom Control (Zoom setting)
The zoom control function is used to select the best optical zoom system based on the scanning
distance, scanning precision, and scanning time. The GLS-1000 is equipped with three types of optical
zoom systems and the ability to change the size of the beam spot according to the scanning object,
which allows you the choice of obtaining a highly precise three-dimensional data or a quick scan.
Select the following two items below according to the scanning conditions.
Selection item (1)
UNDER 50m
OVER 50m
Selection item (2)
NORMAL Use one optical zoom system. Scanning time is quickest.
FINE Use two optical zoom systems which measure with high precision.
SFINE Select the optimum use of three optical zoom systems which measure
The setting will become invalid when the power is turned off. Please set the scanning mode each time
the instrument is used for measurement.
Select when the distance between the instrument and the scanning
object is 50 m or less.
Select when the distance between the instrument and the scanning
object is over 50 m.
Scanning time is about twice that of NORMAL mode.
with the highest accuracy. Scanning time is three times that of
NORMAL mode.
5-2
Page 37

5 Instrument Settings
F1 TILT [ON ]
F2 ZOOM COTROL
P1/3
↓
TILT SETTING [ON]
X :+0°01'02"
Y :-0°04'05"
ON OFF
TILT SETTING [OFF]
ON OFF
F1 TILT [OFF]
F2 ZOOM COTROL
P1/3
↓
5.1.4 Camera Setting
When scanning, the internal camera automatically takes pictures of the entire scanning area, and
keeps the data in the image file (if [SCAN+IMG] or [IMAGE] has been selected. Refer to Chapter 8.2.2
“Setting the Scanning Density”.)
Several photographs are taken in order to cover the entire scanning area. As the scanning area
becomes larger, number of photographs taken will increase.
Also, as the quality of the image becomes higher, the file size will increase. Select the image quality
based on your needs.
Selection item
HIGH MODE High image(1600x1200 pixels) quality mode, large file size
MIDDLE MODE Standard image(800x600 pixels) quality mode, small file size
5.1.5 Contrast Adjust
Adjust the contrast of the display according to the surrounding conditions. The contrast range is from 1
[light] to 10 [dark].
5.1.6 Backlight Adjust
Use the backlight when the display is difficult to read; for example at dusk or when you are inside a
tunnel. There is a switch to keep the backlight always ON or always OFF. When selecting the backlight
is always ON, the brightness can be adjusted. The range is from 1 [dark] to 10 [light].
5.1.7 Setting Example Using the Star Key
Example: set the tilt sensor OFF
Operating procedure Operation Display
1 Press the [ ] key.
2 Press [F1] key.
3 Press the [F2] key.
4 Press the [F4] key.
[]
[F1]
[F2]
[F4]
5-3
Page 38

5.2 Using the Setting Menu
SETTING MENU
F1 NETWORK SETTING
F2 DATA MANAGE
P1/4
↓
NETWORK SETTING
→ IP :192.168.1.0
SUB:255.255.255.0
P1/2 EDIT
↑
↓
DATA MANAGE(PRO)
→ pr-1
pr-2
OPEN
↑
↓
EDIT
F 1
F2
SETTING MENU
F1 TEMP.&PRES. SET
F2 LAST CALIB. DATE
P2/4
↓
↑
F3
SETTING MENU
F1 TIME ADJUST
F2 UNIT SET
P3/4
↓
↑
TEMP.&PRES. SET
→TMP. 20.0 °C
PRES. 1017.0 hPa
EDIT
↓
LAST CALIB. DATE
2008/04/28
F1
F2
TIME ADJUST
→DATE 2008/12/24
TIME 22:00
EDIT
↓
UNIT SET
→TEMP.&PRES
ANGLE
P1/2
↑
↓
EDIT
F1
F2
F4
F3
F4
UNIT SET
→DISTANCE
FEET
P2/2
↑
↓
EDIT
F3
F4
First page
Second page
Third page
SETTING MENU
F1 TILT 0 ADJUST
P4/4
↑
Fourth page
F3
F4
z Selection items in the setting menu
Display Function
NETWORK SETTING
DATA MANAGE
TEMP.&PRES. SET
LAST CALIB. DATE
TIME ADJUST
UNIT SET
TILT 0 ADJUST
5.2.1 Setting Menu Screen Flowchart
Set the network.
Edit the data on the SD card.
Set the temperature and air pressure.
Display the date of the last calibration.
Set the date and time.
Set the scanning units.
Adjust the tilt sensor installation error.
5 Instrument Settings
5-4
Page 39

5 Instrument Settings
The IP address, subnet address, and SSID can be entered on the PC and the GLS-1000.
If a wireless connection is used, make sure the addresses on the PC and the GLS-1000
corresponds.
[Initial setting of the instrument at shipping]
IP address : 192.168.0.1
SUBNET address : 255.255.255.0
SSID : gls1000
[Example of the setting on the user's PC]
IP address* : 192.168.0.240
SUBNET address : 255.255.255.0
SSID : gls1000
* "240" at the end of the IP address is
arbitrarily-specified.
SELECT MENU
F1 STATION MENU
F2 SCAN MENU
P1/2
↓
SELECT MENU
F1 PROJECT MENU
F2 SETTING MENU
P2/2
↑
SETTING MENU
F1 NETWORK SETTING
F2 DATA MANAGE
P1/4
↓
↑
NETWORK SETTING
→IP:
SUB:
P1/2 EDIT
↑
↓
5.2.2 Network Settings (when the instrument is used connected to a PC)
You can connect the instrument to a PC either using a wireless LAN connection with a wireless LAN
card, or through a USB cable. Here we describe how to select one of the connections, and connect via
wireless LAN.
Selectable networks and selection items
Wireless LAN
: IP address
(ID numbers assigned to the individual PC and the GLS-1000)
: SUBNET address
(Numbers identifying the network that connects the PC and the GLS-1000)
:SSID
(Identifier assigned to the PC and the GLS-1000 in order to prevent crossed
signals. Up to 15 characters can be used.)
USB
: No setting is necessary to connect the USB cable and PC.
(It is automatically recognized.)
[Example]
z GLS-1000 settings
Operating procedure Operation Display
1 Press F3 (
main menu.
↓
) key to display the second page of the
2 Press the [F2](SETTING MENU) key to select
SETTING MENU.
[F3]
[F2]
3 Press the [F1](NETWORK SETTING) key to
select NETWORK SETTING.
5-5
[F1]
Page 40

5 Instrument Settings
NETWORK SETTING
INPUT IP ADDRESS
[ ]
<-
NETWORK SETTING
INPUT IP ADDRESS
[192.168.0.1 ]
<-
NETWORK SETTING
IP:192.168.0.1
→SUB:
P1/2 EDIT
↑
↓
NETWORK SETTING
INPUT SUBNET ADDRESS
[255.255.255.0 ]
<-
NETWORK SETTING
SSID:
P2/2 EDIT
↑
↓
NETWORK SETTING
INPUT SSID
[ ]
NUME <-
NETWORK SETTING
INPUT SSID
[gls1000 ]
NUME <-
NETWORK SETTING
SSID: gls1000
P2/2 EDIT
↑
↓
NETWORK SETTING
WLAN AdHoc SET!
PRESS ENT KEY
4 Press the [F2](EDIT) key to edit IP address.
5 Input IP address [192.168.0.1].
6 Press the [ENT] key.
Press the [F4] key and move the curser to
SUBNET.
7 Input SUBNET address [255.255.255.0].
8 Press the [ENT] key.
Press the [F4] key and move the page to SSID.
9 Press the [F2](EDIT) key to edit SSID.
[F2]
Input
IP
address
[ENT]
[F4]
Input
SUBNET
address
[ENT]
[F4]
[F2]
10 Input SSID [gls1000].
11 Press the [ENT] key.
12 Press the [ENT] key.
WLAN AdHoc is set.
Input
SSID
[ENT]
[ENT]
5-6
Page 41

5 Instrument Settings
Make sure to check before deleting folders.
Once a folder is deleted, all the data under the directory will be deleted.
z Data management operation
SETTING MENU
F1 NETWORK SETTING
F2 DATA MANAGE
P1/3
↓
↑
DATA MANAGE(PRO)
→ pr-1
pr-2
OPEN
↑ ↓
EDIT
F2
z PC settings (for Windows XP)
Following are the procedures to set the IP address, subnet address, and SSID on the PC.
1 Click [Start] → [Control Panel] → [Network Connections] → [Wireless Network Connection]
2 Right-click [Wireless Network Connection] and select [Properties]. [Wireless Network Connection
Properties] will be displayed.
3 Select [Wireless Network] tab.
4 Select [Add], displayed under [Preferred networks].
5 Click [Association] tab in [Wireless Network Connection Properties]
6 Set the following
Network name → gls1000
Network authentication → Open
Data encryption → Disabled
7 Select [Advanced] under [Preferred networks].
8 Select [Computer-to-computer (ad hoc) networks only] under [Network to access].
9 Enter the IP address, subnet address, and SSID.
Settings are complete.
5.2.3 Editing the SD Card Data (data management)
You can delete or rename the folders on the SD card.
Data that can be renamed or deleted : Project data
: Station data
: 3D scan data
: Target data
5-7
Page 42

5 Instrument Settings
Project1
Station1
Statio n2
3D Scan1
3D Scan2
3D Scan3
3D Scan4
Project1 (Directory)
Station1 (Directory)
3D Scan1 (Directory)
Target Scan1 (Directory)
Station information file (sta file format)
Point cloud file of back sight (clt file format)
Project information file (.prj)
3D coordinate of back sight (trg file format)
Camera orientation/calibration data (binEXT file format)
3D Scan2 (Directory)
Station2 (Directory)
Station information file (sta file format)
Point cloud file of back sight (clt file format)
3D coordinate of back sight (trg file format)
Camera orientation/calibration data (binEXT file format)
Project2 (Directory)
Station21 (Directory)
Station information file (sta file format)
Point cloud file of back sight (clt file format)
Project information file (.prj)
3D coordinate of back sight (trg file format)
Camera orientation/calibration data (binEXT file format)
Point cloud file (clr file format)
JPEG file e.g) 0001.jpg,0002.jpg
Angle file e.g) 0001.ang,0002.ang
3D Scan3 (Directory)
3D Scan4 (Directory)
Point cloud file (clt file format)
3d coordinate file(trg file format)
Tilt orientation file e.g) 0001.tor,0002.tor
z Data structure in an SD card
SD card data is saved under the following directory structure.
An object should be 3D scanned several times from multiple positions, and the results should be kept
together as a single project.
5-8
Page 43

z Renaming folders
SELECT MENU
F1 STATION MENU
F2 SCAN MENU
P1/2
↓
SELECT MENU
F1 PROJECT MENU
F2 SETTING MENU
P2/2
↑
SETTING MENU
F1 NETWORK SETTING
F2 DATA MANAGE
P1/3
↓
↑
DATA MANAGE(PRO)
→ pr-1
pr-2
OPEN
↑ ↓
EDIT
DATA MANAGE(STA)
→ st-1
st-2
OPEN
↑ ↓
EDIT
DATA MANAGE(STA)
st-1
F1 RENAME
F2 DELETE
DATA MANAGE(STA)
INPUT STATION NAME
[st-1 ]
NUME SPC <-
DATA MANAGE(STA)
INPUT STATION NAME
[st-9 ]
NUME SPC <-
DATA MANAGE(PRO)
→ pr-1
pr-2
OPEN
↑ ↓
EDIT
Refer to the below when deleting or renaming folders
[Example] Rename station [st-1] --> [st-9]
Operating procedure Operation Display
5 Instrument Settings
1 Press the [F3](
the main menu.
↓
)key to display the second page of
2 Press the [F2](SETTING MENU) key to select the
menu.
3 Press the [F2](DATA MANAGE) key to select the
DATA MANAGE.
The projects list will be shown.
4 Choose the project file (Project containing the
station you want to rename) by pressing the [F2]
(
↑
) or [F3] (↓) key
5 Press the [F1](OPEN) key to open the project file.
The stations list will be showen.
6 Choose the station file (you want to rename) by
pressing the [F2] (
↑
) key or the [F3] (↓) key.
7 Press the [F4](EDIT) key.
8 Press the [F1](RENAME) key.
[F3]
[F2]
[F2]
[F2]or[F3]
[F1]
[F2]or[F3]
[F4]
[F1]
9 Press the [F3] (<-) key to move the curser.
10 Rename the station name.
[ST-1] --> [ST-9]
11 Press the [ENT] key.
The station name has been changed.
[F3]
Rename
[ENT]
5-9
Page 44

5 Instrument Settings
SELECT MENU
F1 STATION MENU
F2 SCAN MENU
P1/2
↓
SELECT MENU
F1 PROJECT MENU
F2 SETTING MENU
P2/2
↑
SETTING MENU
F1 NETWORK SETTING
F2 DATA MANAGE
P1/3
↓
↑
SETTING MENU
F1 TEMP.&PRES. SET
F2 LAST CALIB. DATE
P2/3
↓
↑
TEMP.&PRES. SET
→TMP. 20.0 °C
PRES. 1017.0 hPa
EDIT
↓
TEMP.&PRES. SET
INPUT TMP.
[20.0]
<-
TEMP.&PRES. SET
INPUT TMP.
[22.5
]
<-
TEMP.&PRES. SET
→TMP. 22.5 °C
PRES. 1017.0 hPa
EDIT
↓
5.2.4 Setting the Temperature and Atmospheric Pressure
In order to calibrate the scanning data, enter the temperature and atmospheric pressure at the time of
scanning.
Setting range
Temperature : -10°C to +50°C (0.1°C step) (Factory preset: +20°C)
: -14°F to +122°F (0.1°F step) (Factory preset: 1013.3hPa)
Pressure : 560hPa to 1066.0hPa (0.1hPa step)
: 420mmHg to 800mmHg (0.1mmHg step)
: 16.5inHg to 31.5inHg (0.1inHg step)
Example: Entering a temperature of 22.5°C.
Operating procedure Operation Display
1 Press the [F3] (
of the main menu.
↓
) key to display the second page
2 Press the [F2](SETTING MENU) key.
3 Press the [F3] (
↓
) key to display the second page.
4 Press the [F1](TEMP.&PRES. SET) key.
5 Press the [F2](EDIT) key.
6 Press the [F3] (<-) key to move the curser.
7 Input a temperature. [22.5°C]
[F3]
[F2]
[F3]
[F1]
[F2]
[F3]
Input a
tempera-
ture.
8 Press the [ENT] key.
[ENT]
5-10
Page 45

5 Instrument Settings
SELECT MENU
F1 STATION MENU
F2 SCAN MENU
P1/2
↓
SELECT MENU
F1 PROJECT MENU
F2 SETTING MENU
P2/2
↑
SETTING MENU
F1 NETWORK SETTING
F2 DATA MANAGE
P1/3
↓
↑
SETTING MENU
F1 TEMP.&PRES. SET
F2 LAST CALIB. DATE
P2/3
↓
↑
LAST CALIB. DATE
2008/04/28
PRESS ENT KEY
SELECT MENU
F1 STATION MENU
F2 SCAN MENU
P1/2
↓
SELECT MENU
F1 PROJECT MENU
F2 SETTING MENU
P2/2
↑
SETTING MENU
F1 NETWORK SETTING
F2 DATA MANAGE
P1/3
↓
↑
SETTING MENU
F1 TIME ADJUST
F2 UNIT SET
P3/3
↓
5.2.5 Displaying the Last Calibration Date and Time
The GLS-1000 can display the date and time of the last calibration (precision calibration of scanning
distance and scanning angle).
It is recommended that precision calibration be performed within one year after the last calibration.
Operating procedure Operation Display
1 Press the [F3] (
of the main menu.
↓
) key to display the second page
2 Press the [F2](SETTING MENU) key.
3 Press the [F3] (
↓
) key to display the second page.
4 Press the [F2](LAST CALIB. DATE) key.
5.2.6 Setting the Date and Time
Enter the date and time in order to record the date of the scanning.
Example: Date: 2008 01 01 Time 22:30
Operating procedure Operation Display
[F3]
[F2]
[F3]
[F2]
1 Press the [F3] (
of the main menu.
2 Press the [F2](SETTING MENU) key.
3 Press the [F3] (
page.
↓
) key to display the second page
↓
) key twice to display the third
[F3]
[F2]
[F3]
[F3]
5-11
Page 46

5 Instrument Settings
TIME ADJUST
→ DATE 2007/12/24
TIME 22:00
EDIT
↓
TIME ADJUST
INPUT DATE
[20080101]
NUME SPC <-
TIME ADJUST
→ DATE 2008/01/01
TIME 22:00
EDIT
↓
TIME ADJUST
DATE 2008/01/01
→ TIME 22:00
EDIT
↓
TIME ADJUST
INPUT TIME
[2230]
NUME SPC <-
TIME ADJUST
→ DATE 2008/01/01
TIME 22:30
EDIT
↓
SELECT MENU
F1 STATION MENU
F2 SCAN MENU
P1/2
↓
SELECT MENU
F1 PROJECT MENU
F2 SETTING MENU
P2/2
↑
SETTING MENU
F1 NETWORK SETTING
F2 DATA MANAGE
P1/4
↓
↑
4 Press the [F1](TIME ADJUST) key.
5 Press the [F2](EDIT) key.
6 Press the [F3] (<-) key to move the curser.
7 Input date.(20080101)
8 Press the [ENT] key.
9 Press the [F4](
↓
) key.
10 Press the [F2](EDIT) key.
11 Press the [F3] (<-) key to move the curser.
12 Input time.(2230)
13 Press the [ENT] key.
[F1]
[F2]
[F3]
Input date
[ENT]
[F4]
[F2]
[F3]
Input time
5.2.7 Changing the Units
Select the units for temperature, angle, and distance.
Units that can be selected
Temperature : °C / °F
Angle : DEG / GON / MIL
Distance : METER / FEET / US SURVE / INTERNATIONAL
[Example] Changing the Distance unit to METER
1 Press the [F3](
2 Press the [F2](SETTING MENU) key.
Operating procedure Operation Display
↓
) key.
[F3]
[F2]
5-12
Page 47

5 Instrument Settings
SETTING MENU
F1 TIME ADJUST
F2 UNIT SET
P3/4
↑
UNIT SET
→TEMP.&PRES
ANGLE
P1/2
↑
↓
EDIT
UNIT SET
→DISTANCE
FEET
P2/2
↑
↓
EDIT
UNIT SET
DISTANCE [ft+in]
F1:METER F2:FEET
F3:FEET+INCH SET
UNIT SET
DISTANCE [mt]
F1:METER F2:FEET
F3:FEET+INCH SET
UNIT SET
→DISTANCE
METER
P2/2
↑
↓
EDIT
SELECT MENU
F1 STATION MENU
F2 SCAN MENU
P1/2
↓
SELECT MENU
F1 PROJECT MENU
F2 SETTING MENU
P2/2
↑
SETTING MENU
F1 NETWORK SETTING
F2 DATA MANAGE
P1/4
↓
↑
SETTING MENU
F1 TILT 0 ADJUST
P4/4
↑
3 Press the [F3](
page P3/3.
↓
) key twice to turn to the menu
4 Press the [F2](UNIT SET) key.
5 Press the [F3](
↓
) key.
6 Press the [F4](EDIT) key.
7 Press the [F1](METER) key to select “METER”.
8 Press the [F4](SET) key.
[F3]
[F3]
[F2]
[F3]
[F4]
[F1]
[F4]
5.2.8 Adjusting the Tilt Sensor Installation Error
Calibrate tilt sensor 0 datum.
1 Press the [F3] (
of the main menu.
2 Press the [F2](SETTING MENU) key.
3 Press the [F3] (
page.
Operating procedure Operation Display
↓
) key to display the second page
↓
) key 3 times to display the fourth
[F3]
[F2]
[F3]
[F3]
[F3]
5-13
Page 48

5 Instrument Settings
TILT 0 ADJUST
X :+0°00'25"
Y :+0°00'20"
START
TILT 0 ADJUST
PROCESSING..
PLEASE WAIT..
TILT 0 ADJUST
SET!
PRESS ENT KEY
4 Press the [F1](TILT 0 ADJUST) key.
5 Turn the leveling screw to level the unit to within
30".
6 Press the [F4](START) key.
Begin the calibration of tilt sensor 0 datum.
When [TILT OVER] is displayed while calibrating,
press the [ENT] key and level the unit once again.
[F1]
[F4]
5-14
Page 49

6 Project Settings
Station1
Station2
Station3
Station4
Project1
pt01
pt02
pt03
pt04
pt05
pt06
pt04
pt05
pt06
Ta rg e t
The GLS-1000 scans an object from several directions. All the scanned data are managed and stored
as one project.
The station information of each scanning is stored inside the same project.
Create a new project when you scan a new object.
If you continue scanning for the same project or control the existing data, select from the existing
projects.
6 Project Settings
6-1
Page 50

Project data is saved on the SD card.
Project1 (Directory)
Station1 (Directory)
3D Scan1 (Directory)
Target Scan1 (Directory)
Station information file (sta file format)
Point cloud file of back sight (clt file format)
Project information file (.prj)
3D coordinate of back sight (trg file format)
Camera orientation/calibration data (binEXT file format)
3D Scan2 (Directory)
Point cloud file (clr file format)
JPEG file e.g) 0001.jpg,0002.jpg
Angle file e.g) 0001.ang,0002.ang
Tilt orientation file e.g) 0001.tor,0002.tor
F3
z Project menu operation
SELECT MENU
F1 STATION MENU
F2 SCAN MENU
P1/2
↓
SELECT MENU
F1 PROJECT MENU
F2 SETTING MENU
P2/2
↑
PROJECT MENU
F1 NEW PROJECT
F2 SELECT PROJECT
F1
SELECT MENU
F1 STATION MENU
F2 SCAN MENU
P1/2
↓
SELECT MENU
F1 PROJECT MENU
F2 SETTING MENU
P2/2
↑
PROJECT MENU
F1 NEW PROJECT
F2 SELECT PROJECT
NEW PROJECT
INPUT PROJECT NAME
[ ]
NUME <-
6 Project Settings
6.1 Creating a New Project
[Example] Project name: p03
1 Press the [F3] (
of the main menu.
2 Press the [F1](PROJECT MENU) key.
3 Press the [F1](NEW PROJECT) key to input the
project name.
Operating procedure Operation Display
↓
) key to display the second page
6-2
[F3]
[F1]
[F1]
Page 51

6 Project Settings
NEW PROJECT
INPUT PROJECT NAME
[p03 ]
NUME <-
PROJECT MENU
F1 NEW PROJECT
F2 SELECT PROJECT
SELECT MENU
F1 STATION MENU
F2 SCAN MENU
P1/2
↓
SELECT MENU
F1 PROJECT MENU
F2 SETTING MENU
P2/2
↑
PROJECT MENU
F1 NEW PROJECT
F2 SELECT PROJECT
SELECT PROJECT
→ p01
p02
↑
↓
SELECT
SELECT PROJECT
p01
→ p02
↑
↓
SELECT
PROJECT MENU
F1 NEW PROJECT
F2 SELECT PROJECT
4 Input project name [p03].
5 Press the [ENT] key.
Project "p03" is set.
6.2 Selecting from Existing Projects
[Example] Select project name: p02
Operating procedure Operation Display
1 Press the [F3] (
of the main menu.
2 Press the [F1](PROJECT MENU) key.
↓
) key to display the second page
Input
project
name
[ENT]
[F3]
[F1]
3 Press the [F2](SELECT PROJECT) key.
4 Select the project [p02] by pressing the [F2] or [F3]
key.
5 Press the [F4](SELECT) key.
Project "p02" is selected.
[F2]
[F2] or [F3]
[F4]
6-3
Page 52

7 Station Setting
Station1
Backpoint1
Station1
Project1 (Directory)
Station1 (Directory)
3D Scan1 (Directory)
Target Scan1 (Directory)
Station information file (sta file format)
Point cloud file of back sight (clt file format)
Project information file (.prj)
3D coordinate of back sight (trg file format)
Camera orientation/calibration data (binEXT file format)
3D Scan2 (Directory)
Point cloud file (clr file format)
JPEG file e.g) 0001.jpg,0002.jpg
Angle file e.g) 0001.ang,0002.ang
Tilt orientation file e.g) 0001.tor,0002.tor
Data related to the scanning (occupied point name, backsight point name, target data, 3D data, etc.)
are stored in the station.
Create a new station when moving to another station to scan the object.
To continue scanning from the same station, or to control existing data, select from the existing stations.
7 Station Setting
Station data is saved on the SD card.
7-1
Page 53

7 Station Setting
F1
F2
F1
z Station menu operation
SELECT MENU
F1 STATION MENU
F2 SCAN MENU
P1/2
↓
STATION MENU
F1 NEW STATION
F2 SELECT STATION
F3 OCC/BS SETTING
NEW STATION
INPUT STATION NAME
[ ]
NUME <-
SELECT STATION
→ st-1
st-2
↑
↓
SELECT
OCC/BS SETTING
INPUT OCC NAME
[ ]
NUME <-
F3
SELECT MENU
F1 STATION MENU
F2 SCAN MENU
P1/2
↓
STATION MENU
F1 NEW STATION
F2 SELECT STATION
F3 OCC/BS SETTING
NEW STATION
INPUT STATION NAME
[ ]
NUME <-
NEW STATION
INPUT STATION NAME
[st-4 ]
NUME <-
SELECT MENU
F1 STATION MENU
F2 SCAN MENU
P1/2
↓
7.1 Creating a New Station
[Example] Station name: st-4
Operating procedure Operation Display
1 Press the [F1](STATION MENU) key to select the
station menu.
2 Press the [F1](NEW STATION) key.
3 Input station name [st-4].
4 Press the [ENT] key.
Station "st-4" is set.
[F1]
[F1]
Input
station
name
[ENT]
7-2
Page 54

7.2 Selecting from Existing Stations
SELECT MENU
F1 STATION MENU
F2 SCAN MENU
P1/2
↓
STATION MENU
F1 NEW STATION
F2 SELECT STATION
F3 OCC/BS SETTING
SELECT STATION
→ st-1
st-2
↑
↓
SELECT
SELECT PROJECT
st-1
→ st-2
↑
↓
SELECT
STATION MENU
F1 NEW STATION
F2 SELECT STATION
F3 OCC/BS SETTING
[Example] Select station name: st-2
Operating procedure Operation Display
7 Station Setting
1 Press the [F1](STATION MENU) key to select the
station menu.
2 Press the [F2](SELECT STATION) key.
3 Select the station [st-2] by pressing the [F2] or [F3]
key.
4 Press the [F4](SELECT) key.
Station "st-2" is selected.
[F1]
[F2]
[F2] or [F3]
[F4]
7-3
Page 55

7 Station Setting
z The only target you can use is Topcon target sheets.
z The target sheet to use differs depending on the scanning distance. Refer to Chapter 4.8.1
“Selecting the Target Sheet”.
SELECT MENU
F1 STATION MENU
F2 SCAN MENU
P1/2
↓
STATION MENU
F1 NEW STATION
F2 SELECT STATION
F3 OCC/BS SETTING
OCC/BS SETTING
INPUT OCC NAME
[ ]
NUME <-
OCC/BS SETTING
INPUT OCC NAME
[a-1 ]
NUME <-
OCC/BS SETTING
INPUT HEIGHT
[ ]
NUME <-
OCC/BS SETTING
INPUT HEIGHT
[1.5 ]
NUME <-
OCC/BS SETTING
INPUT BS NAME
[ ]
NUME <-
7.3 Setting the Occupied Point Name and the Backsight Point Name
The occupied point name and backsight point name must be set in order to obtain the coordinates of
the scanning object relative to a known point.
Enter the occupied point name, instrument height, backsight point name, and target name. Collimate
the backsight point.
Start the target scanning, and record the backsight point data.
[Example] Use the following settings.
Occupied point name : a-1
Instrument height : 1.5m (Entry range: -999.999m-999.999m)
Backsight point name : b-1
Target name : t-1
Operating procedure Operation Display
1 Press the [F1](STATION MENU) key to select the
station menu.
2 Press the [F3](OCC/BS SETTING) key to input the
occupied point name.
3 Input the occupied point name [a-1].
[F1]
[F3]
Input
occupied
point name
4 Press the [ENT] key.
5 Input instrument height [1.5m].
Input unit is meters (m).
6 Press the [ENT] key.
7-4
[ENT]
Input
instrument
height
[ENT]
Page 56

7 Station Setting
OCC/BS SETTING
INPUT BS NAME
[b-1 ]
ALPH <-
OCC/BS SETTING
AREA SELECT
AIM TO TARGET
AND PRESS ENT KEY
OCC/BS SETTING
SCANNING IN PROGRESS
REMAIN 10S
PAUSE STOP
OCC/BS SETTING
FINISHED
PRESS ENT KEY
OCC/BS SETTING
PLEASE PEEP TARGET
F1 FINISH F2 REVOKE
F3 SCAN AGAIN
STATION MENU
F1 NEW STATION
F2 SELECT STATION
F3 OCC/BS SETTING
TILT OVER
PRESS ENT KEY
TARGET SCANNING
SCAN START
PRESS ENT KEY
ENT
After leveling the instrument,
press the [ENT] key.
7 Input backsight point name [b-1].
8 Press the [ENT] key.
9 Collimate to the center of backpoint target by
using Horizontal/Vertical jog.
10 Press the [ENT] key.
Scanning of the backsight point will start.
REMAIN: remaining time of the scan
11 When scanning of the backsight point is correctly
completed, an end message will be displayed.
Then, press the [ENT] key. *1) *2)
Input
backsight
point name
[ENT]
Collimate to
a target
[ENT]
[ENT]
12 The mirror will rotate toward the backsight point.
Look into the sighting collimator and confirm the
position of the backsight point that was scanned.
When the backsight point is correctly collimated,
select the F1 (FINISH) key.
When the backsight point is not correctly
collimated, there is a possibility of a reflecting
object other than the target being scanned. Select
either the F2 (REVOKE) or F3 (SCAN AGAIN) key
and redo.
The backsight point name and the occupied point
name are set.
*1) If the instrument is tilted 10' or more, the screen
shown below will be displayed.
[F1]
7-5
Page 57

7 Station Setting
DEVIATION IS LARGE!!
ANG_DEV : 14.5asec
DIST_DEV: 12mm
OK NG RETRY
TARGET SCANNING
FINISHED
PRESS ENT KEY
SCAN MENU
F1 3D SCANNING
F2 TARGET SCANNING
TARGET SCANNING
AREA SELECT
AIM TO TARGET
AND PRESS ENT KEY
F1
F2
F3
*2) If the scan result exceeds the following conditions, the screen below will be displayed.
Under unfavorable weather conditions or when scanning is interrupted, deviation may become large.
Select OK, NG or RETRY depending on the precision you are seeking.
Angle deviation (deviation of measured angle) : 10"
Distance deviation (deviation of measured distance) : 10mm
7-6
Page 58

8 Scanning
Project1 (Directory)
Station1 (Directory)
3D Scan1 (Directory)
Station information file (sta file format)
Point cloud file of back sight (clt file format)
Project information file (.prj)
3D coordinate of back sight (trg file format)
Camera orientation/calibration data (binEXT file format)
Point cloud file (clr file format)
JPEG file e.g) 0001.jpg,0002.jpg
Angle file e.g) 0001.ang,0002.ang
Tilt orientation file e.g) 0001.tor,0002.tor
F2
z Measurement menu operation
SELECT MENU
F1 STATION MENU
F2 SCAN MENU
P1/2
↓
SCAN MENU
F1 3D SCANNING
F2 TARGET SCANNING
3D SCANNING
F1 SCAN WIZARD
F2 MEASUREMENT
F2
TARGET SCANNING
TARGET NAME INPUT
[pt_ ]
NUME <-
F1
There are two types of scanning: target scanning, which measures only the target and 3-D scanning,
which obtains 3-D data.
Scanning data is kept in the Station folder on the SD card.
Target scanning
Target scanning is used to scan a target set in the 3-D scanning area.
Target scanning data is used in the after-processing to align 3-D scanning data obtained from multiple
points.
In target scanning, the coordinates of the center of the target are obtained.
8 Scanning
3-D scanning
3-D scanning is used to obtain three-dimensional data.
Determine the scanning area first, and set the parameters (scanning density).
8-1
Page 59

8.1 Target Scanning
z The only target you can use is Topcon target sheets.
z In order to coordinate positional information of the data, scanning data on 3 or more targets is
needed. Set targets at 3 or more locations where it is possible to collimate from each station.
z 3D data cannot be obtained where the target sheets are placed, so avoid putting them on
important scanning locations.
z Do not set the targets on a straight line. Also, spread out the targets equally so that they can cover
the 3D scanning area fully.
z Use the appropriate target sheets depending on the scanning distance. Refer to Chapter 4.8.1
“Selecting the Target Sheet”.
pt03
pt02
pt01
pt04
pt05
pt06
SELECT MENU
F1 STATION MENU
F2 SCAN MENU
P1/2
↓
SCAN MENU
F1 3D SCANNING
F2 TARGET SCANNING
TARGET SCANNING
TARGET NAME INPUT
[_ ]
NUME <-
Target scanning is necessary to coordinate positional information of multiple 3D scanning in the afterprocessing of the data.
It is therefore necessary to set the target so that it is also visible from the next station.
Place the target on or near the scanning object, and perform the scanning.
8 Scanning
Example of Settings: Targets from pt01 to pt03 are to be scanned.
Operating procedure Operation Display
8-2
[F2]
[F2]
1 Press the [F2](SCAN MENU) key to select the
scan menu.
2 Press the [F2](TARGET SCANNING) key to input
target name.
Page 60

8 Scanning
TARGET SCANNING
TARGET NAME INPUT
[pt01 ]
NUME <-
TARGET SCANNING
AREA SELECT
AIM TO TARGET
AND PRESS ENT KEY
TARGET SCANNING
SCAN START
PRESS ENT KEY
TARGET SCANNING
SCANNING IN PROGRESS
REMAIN 10S
TARGET SCANNING
FINISHED
PRESS ENT KEY
TARGET SCANNING
PLEASE PEEP TARGET
F1 FINISH F2 REVOKE
F3 SCAN AGAIN
SCAN MENU
F1 3D SCANNING
F2 TARGET SCANNING
TARGET SCANNING
TARGET NAME INPUT
[ ]
NUME <-
TARGET SCANNING
TARGET NAME INPUT
[pt02 ]
NUME <-
3 Input target name [pt01].
4 Press the [ENT] key.
5 Aim to a target [pt01] by using Horizontal/Vertical
jog.
6 Press the [ENT] key.
7 Press the [ENT] key.
Scanning starts.
REMAIN: remaining time of the scan
Target scanning is finished.
8 When target scan is correctly completed, an end
message will be displayed. Then, press the [ENT]
key. *1) *2)
Input
target
name
[ENT]
Aim to
target
[pt01]
[ENT]
[ENT]
[ENT]
9 The mirror will rotate toward the target. Look into
the sighting collimator and confirm the position of
the target that was scanned.
When the target is correctly collimated, select the
F1 (FINISH) key.
When the target is not correctly collimated, there is
a possibility of a reflecting object other than the
target being scanned. Select either the F2
(REVOKE) or F3 (SCAN AGAIN) key and redo.
[pt01] target scanning is finished.
10 Press the [F2](TARGET SCANNING) key to input
the target name.
11 Input the target name [pt02].
[F1]
[F2]
Input
target
name
8-3
Page 61

8 Scanning
TILT OVER
PRESS ENT KEY
TARGET SCANNING
SCAN START
PRESS ENT KEY
ENT
After leveling the instrument,
press the [ENT] key.
DEVIATION IS LARGE!!
ANG_DEV : 14.5asec
DIST_DEV: 12mm
OK NG RETRY
TARGET SCANNING
FINISHED
PRESS ENT KEY
SCAN MENU
F1 3D SCANNING
F2 TARGET SCANNING
TARGET SCANNING
AREA SELECT
AIM TO TARGET
AND PRESS ENT KEY
F1
F2
F3
12 Repeat step4 - 9 to scan target name [pt03].
*1) If the instrument is tilted 10' or more, the screen shown below will be displayed.
*2) If the result of the target scanning exceeds the following conditions, the screen below will be displayed.
Under unfavorable weather conditions or when scanning is interrupted, deviation may become large.
Select OK, NG or RETRY depending on the precision you are seeking.
Angle deviation (deviation of measured angle) : 10"
Distance deviation (deviation of measured distance) : 10mm
8-4
Page 62

8.2 3D Scanning
Scanning area
Upper left
Lower right
3D scanning obtains 3D data of the scanning object.
To start 3D scanning, determine the scanning area, and set the various settings related to the scanning.
If target scanning data is to be used, make sure the scanning area includes the common targets.
8.2.1 Scanning Area
To determine the scanning area, collimate the upper left corner and lower right corner of the area to be
scanned. The internal camera will take a photograph of the provided area (if [SCAN + IMG] or [IMAGE]
has been selected).
8 Scanning
8.2.2 Setting the Scanning Density
Set the scanning density of the scanning area determined.
Set the scanning density in both vertical and horizontal directions of the scanning area.
The horizontal and vertical scanning density settings can be entered by any of the following three ways.
Each value will be linked.
1: Enter the horizontal distance and the intervals between scanning points. (Distance, Interval V,H)
2: Enter the total number of scanning points (Point Num V,H)
(Maximum VxH point value: 100000000 points)
3: Enter the angle between scanning points (Scan Degree V,H)
Selecting items Range What is set
DISTANCE (m)
INTERVAL V (mm) 0.1-1000
1
INTERVAL H (mm)
POINT NUM
2
3
V (point)
POINT NUM H
(point)
SCAN DEGREE V
(deg)
SCAN DEGREE H
(deg)
1-300
0.1-1000
10-129600
10-25200
0.0027-10
0.0027-10
Enter the rough distance between the instrument and the target.
Enter the vertical distance between scanning points in the
scanning area.
Enter the horizontal distance between scanning points in the
scanning area.
Enter the number of scanning points in the vertical direction of
the scanning area.
Enter the number of scanning points in the horizontal direction of
the scanning area.
Enter the angle between scanning points in the vertical direction
of the scanning area.
Enter the angle between scanning points in the horizontal
direction of the scanning area.
8-5
Page 63

8.2.3 Performing 3D Scanning
SELECT MENU
F1 STATION MENU
F2 SCAN MENU
P1/2
↓
SCAN MENU
F1 3D SCANNING
F2 TARGET SCANNING
P1/2
↓
3D SCANNING F1
F1 SCAN WIZARD
F2 MEASUREMENT
3D SCANNING
AREA SELECT
AIM TO LEFT-TOP
AND PRESS ENT KEY
3D SCANNING
AREA SELECT
AIM TO RIGHT-BTTM
AND PRESS ENT KEY
3D SCANNING
AREA SELECT COMPLETE
PRESS ENT KEY
→ DISTANCE [100 ]
INTERVAL V [0.5 ]
INTERVAL H [0.5 ]
UNIT EDIT
↑
↓
3D SCANNING
POINT NUM H [100 ]
POINT NUM V [100 ]
UNIT EDIT
↑
↓
3D SCANNING
→SCAN DEGREE H[0.3]
SCAN DEGREE V[0.3]
UNIT EDIT
↑
↓
3D SCANNING
INPUT SCAN DEGREE H
[0.3 ]
<-
Example: SCAN DEGREE H:0.1°, SCAN DEGREE V:0.1°, SCAN NAME:hill
Operating procedure Operation Display
[Setting the scanning area]
8 Scanning
1 Press the [F2](SCAN MENU) key to select the
scan menu.
2 Press the [F1](3D SCANNING) key.
3 Press the [F1](SCAN WIZARD) key.
4 Aim to upper left by using Horizontal/Vertical jog.
5 Press the [ENT] key.
6 Aim to lower right by using Horizontal/Vertical jog.
7 Press the [ENT] key.
The scanning area has been set.
[F2]
[F1]
[F1]
Aim to
upper left
[ENT]
Aim to
lower right
[ENT]
8 Press the [ENT] key.
If F4 "PRBE" is pressed, range of a center point of
scan area is measured and number of the range is
entered as DISTANCE automatically. 削除
[Setting the scanning density]
<Example: setting the SCAN DEGREE>
9 Press the [F1](UNIT) key.
10 Press the [F1](UNIT) key.
11 Select SCAN DEGREE H by pressing [F3](↑) or
[F4](
↓
) key.
12 Press the [F2](EDIT) key to input the scan degree.
[ENT]
[F1]
[F1]
[F3] or [F4]
[F2]
8-6
Page 64

8 Scanning
3D SCANNING
INPUT SCAN DEGREE H
[0.1 ]
<-
3D SCANNING
→SCAN DEGREE H[0.1]
SCAN DEGREE V[0.3]
UNIT EDIT
↑
↓
3D SCANNING
SCAN DEGREE H[0.1]
→SCAN DEGREE V[0.3]
UNIT EDIT
↑
↓
3D SCANNING
INPUT SCAN DEGREE V
[0.3 ]
<-
3D SCANNING
INPUT SCAN DEGREE V
[0.1 ]
<-
3D SCANNING
SCAN DEGREE H[0.1]
→SCAN DEGREE V[0.1]
UNIT EDIT
↑
↓
3D SCANNING
INPUT SCAN NAME
[SCAN001 ]
NUME <-
3D SCANNING
INPUT SCAN NAME
[hill ]
NUME <-
3D SCANNING
F1 [SCAN+IMG]
F2 SCAN
F3 IMAGE
3D SCANNING
SCAN 15m 10s
IMAGE 7m 05s
PRESS ENT KEY
13 Input horizontal scan degree [0.1].
Input unit is degrees.
14 Press the [ENT] key.
15 Select SCAN DEGREE V by pressing [F3](↑) or
[F4](
↓
) key.
16 Press the [F2](EDIT) key to input the scan degree.
17 Input vertical scan degree [0.1].
18 Press the [ENT] key.
Input
horizontal
scan
degree
[ENT]
[F3] or [F4]
[F2]
Input
vertical
scan
degree
[ENT]
19 Press the [ENT] key.
20 Input scan name [hill].
21 Press the [ENT] key.
22 Select the desired type of data.*1)
F1:SCAN + IMG: 3D data and image data
F2:SCAN: 3D data only
F3:IMAGE: image data only
The scanning settings are finished, and 3D
scanning information is displayed.
SCAN: remaining time of the 3D scan *2)
(approximate figures)
IMAGE: remaining time of the image scan
(approximate figures)
Scanning settings are finished.
[ENT]
Input
scan name
[ENT]
[F1]
8-7
Page 65

[Starting 3D scanning]
3D SCANNING
SCANNING START
PRESS ENT KEY
3D SCANNING
SCANNING IN PROGRESS
REMAIN 10M 30S
PAUSE STOP
3D SCANNING
FINISHED
PRESS ENT KEY
3D SCANNING
F1 [SCAN+IMG]
F2 SCAN
F3 IMAGE
Memory capacity required for scanning is
insufficient.
Replace with an SD card having sufficient
memory capacity and press the [ENT] key.
Battery capacity required for scanning is
insufficient.
Replace with fully-charged batteries
and press the [ENT] key.
3D SCANNING
SDCARD LACKS SPACE!
CHANGE SDCARD
PRESS ENT KEY
3D SCANNING
BATTERY LOW LEVEL!
CHANGE BATTERY
PRESS ENT KEY
3D SCANNING
SCAN 15m 10s
IMAGE 7m 05s
PRESS ENT KEY
ENT
ENT
3D SCANNING
F1 SCAN+IMG
F2 SCAN
F3 IMAGE
8 Scanning
23 Press the [ENT] key.
24 If the displayed scanning information is correct,
press the ENTER key.
Scanning starts.
REMAIN: remaining time of the scan
[F2]PAUSE:
Scanning paused. Press again to restart.
[F3]STOP:
Scanning stopped.
When the 3D scanning is finished, the screen
shown on the right will be displayed.
Press the [ENT] key, and the screen shown on the
right will be displayed.
[F4]
[ENT]
[ENT]
*1)Depending on the condition of the battery and the SD memory card, one of the warning screens below
may be displayed at this point.
*2) Remaining time of the scan is a rough estimate.
8-8
Page 66

9 Charging the Internal Power Source (BT-65Q)
BT-65Q
BC-30D
AC-cable
Power LED
Charge LED
AD-12
Charge LED
9 Charging the Internal Power Source (BT-65Q)
• To charge
1 Connect the AC/DC converter and AC-Cable to the charger. *1)
2 Plug the AC-Plug into the outlet. (The Power LED will light.)
3 Attach the battery in the charger. Charging will start. (The Charge LED will Orange.)
Charging will take approximately 5 hours per discharged battery. (The Charge LED will Green.)
If two batteries are attached to the charger, it will take about 10 hours to charge them completely.
In this case, the batteries are charged one by one.
If battery power is at a very low level when beginning charging, such as after the instrument has
been in storage over an extended period of time in a discharge state, a full charge may not be
possible with a single charging. In such a case, recharge a second time.
4 After charging, remove the battery from the charger.
Remove the charger from the outlet.
The power LED
Red ON : Power is on.
The charge LED will indicate charging status;
OFF : Wait for charging.
Orange ON : Charging.
Green ON : Charging completed.
Orange Flashing: Charging error.
*1) Always use the AC/DC converter provided with the product.
Charge LED will flash when the battery life is over or the battery is
broken down. Replace the battery to new one.
9-1
Page 67

9 Charging the Internal Power Source (BT-65Q)
• Do not charge continuously, otherwise the battery and the charger may be deteriorated.
If charging is necessary, use the charger after stopping charge for approximately 30 minutes.
• Do not charge the battery in right after the battery is charged, it causes deterioration of the battery
in rare cases.
• The charger may develop heat while charging, there is no problem of it.
• Recharging should take place in a room with an ambient temperature range of 10°C to 40°C (50°F
to 104°F).
• If charging is done at high temperature, charging time of the battery may take longer.
• Exceeding the specified charging time may shorten the life of the battery and should be avoided if
possible.
• The battery source will discharge when stored and should be checked before using with
instrument.
• If the instrument is not used over an extended period of time, store in a place at 30°C or below in
a 50% charged state.
Over discharge will lower performance and a full charge may become impossible. Please charge
once every few months.
9-2
Page 68

10 PRECAUTIONS
(
4
1
0
6
Instrument with head cap
Tool case
Batteries
Battery charger
Case caster
USB cable
AC-DC converter
AC cable
10 PRECAUTIONS
1) For cleaning the instrument after use, remove dust using a cleaning brush, then wipe off with a
cloth.
2) For cleaning the window surface, use a cleaning brush to remove the dust, then use a clean lintless
cotton cloth. Moisten it with alcohol (or mixture with ether ) to wipe gently in a rotational motion from
the center out.
3) The instrument should be stored in the room temperature range of -10°C to +60°C.
4) To remove the dust on the case, never use thinner or benzine. Use a clean cloth moistened with
neutral detergent.
5) Do not store the wet instrument in the case.
If the instrument is wet, wipe off any moisture with a soft cloth, let dry, and store in the case.
6) If the tripod is used for a long time, some parts may wear away; the tips may loosen up and the
butterfly screw may break. From time to time, check each part.
7) When storing the instrument in the case, make sure to attach the head cap, and to place the
instrument so it fits into the concave shape inside the case.
10-1
Page 69

11 SPECIAL ACCESSORIES
11 SPECIAL ACCESSORIES
Power cord PC-21
z Connect to an external power source (12V,
commercially available)
Target sheet [Large, Middle, Small]
z Special target sheets for the GLS-1000.
Select the target sheet based on the scanning
distance.
Tribrach
z Holds the prism adapter
Target board (Large, Small)
z Place the target sheet(magnet type) and attach to
the prism holder.
Target sheet(Magnet type) [Large, Middle, Small]
z Special target sheets for the GLS-1000.
Select the target sheet based on the scanning
distance.
Prism adapter
z Holds the target board
11-1
Page 70

12 ERROR DISPLAYS
Message code Description Countermeasures
BATTERY CTRL ERROR
An error occurred in the battery
control.
12 ERROR DISPLAYS
Unable to scan or photograph.
Long-push the power key and
restart. If long-pushing the power
key does not work, remove the
internal and external batteries
and restart. If the error persists,
have the instrument repaired.
ROTARY LINK ERROR
NETWORK INIT ERROR
SERVO ERROR
CALIBRATION ERROR
APD ERROR
INTERNAL ERROR
LEASER ERROR
An error occurred during internal
data transfer.
Failed to initialize a wireless
network.
An error occurred in the mirror or
drive.
Failed internal calibration
required at initialization.
An error occurred in the laser
beam receiving system.
An error occurred in the built-in
calculator.
An error occurred in the laser
beam emitting system.
Unable to scan or photograph.
Turn the power off and restart. If
the error persists, have the
instrument repaired.
Unable to operate with the PC
control mode. Open the WLAN
cover and check that the LED
lamp on the WLAN card is lit.
(You can still operate the
instrument using a USB
connection or stand-alone.)
Unable to scan or photograph.
Turn the power off and restart. If
the error persists, have the
instrument repaired.
Unable to scan. Turn the power
off and restart. If the error
persists, have the instrument
repaired.
Unable to scan or photograph.
Turn the power off and restart. If
the error persists, have the
instrument repaired.
Unable to scan. Turn the power
off and restart. If the error
persists, have the instrument
repaired.
TILT CONTROL ERROR
SDCARD NOT SEATED
PLEASE RE-SEAT
SDCARD LACKS SPACE!
NAME NOT DIRECTORY
PLEASE START OVER
FILE NAME EXISTS
ENTER NEW NAME
Failed to communicate with the tilt
controller.
An SD card was not recognized.
The remaining capacity of an SD
card is lower than required for the
data to be scanned.
Displayed when attempting to
open a file instead of a directory.
A designated filename already
exists.
12-1
Unable to use the tilt sensor.
Turn the power off and restart. If
the error persists, have the
instrument repaired.
Check that the SD card is
inserted correctly. If the error
persists, have the instrument
repaired.
Delete unnecessary data in the
SD card or insert an SD card
with sufficient capacity.
Designate a directory.
Enter a different name.
Page 71

TILT OVER
TILT ERROR
At the tilt ON setting, the
instrument is tilted 6' or more and
under 10'.
At the tilt ON setting, the
instrument is tilted 10' or more.
12 ERROR DISPLAYS
Accurately level the instrument.
SCAN AREA TOO SMALL
PLEASE START OVER
INAPPROPRIATE VALUE
PLEASE INUPUT AGAIN
TOO MANY H POINTS
PLEASE INUPUT AGAIN
TOO FEW H POINTS
PLEASE INUPUT AGAIN
TOO MANY V POINTS
PLEASE INUPUT AGAIN
TOO FEW V POINTS
PLEASE INUPUT AGAIN
TOO MANY TOTAL PTS
PLEASE INUPUT AGAIN
TOO FEW TOTAL PTS
PLEASE INUPUT AGAIN
H INTERVAL TOO SMALL
PLEASE INUPUT AGAIN
H INTERVAL TOO LARGE
PLEASE INUPUT AGAIN"
V INTERVAL TOO SMALL
PLEASE INUPUT AGAIN
The starting point and end point
of the designated scan range are
too close together.
The entered value is out of the
limited range.
Designate a wider range.
Enter a value within the limited
range.
Enter a value not exceeding the
maximum horizontal points.
Enter a value equal to or above
the minimum horizontal points.
Enter a value not exceeding the
maximum vertical points.
Enter a value equal to or above
the minimum vertical points.
Enter a value not exceeding the
maximum total points
Enter a value equal to or above
the minimum total points.
Enter a value equal to or above
the minimum horizontal interval.
Enter a value not exceeding the
maximum horizontal interval.
Enter a value equal to or above
the minimum horizontal angle.
V INTERVAL TOO LARGE
PLEASE INUPUT AGAIN
INTERNAL SCAN ERROR
PLEASE START OVER
BATTERY LOW LEVEL!
CAN NOT FIND TARGET
PLEASE START OVER
MEASUREMENT FAILED
PLEASE START OVER
An error occurred during
scanning.
The battery is low. Or the battery
may become depleted while
scanning.
The target center cannot be
found.
An error occurred during target
center measurement.
Enter a value not exceeding the
maximum horizontal angle.
Unable to scan. Long-push the
power key and restart. If longpushing the power key does not
work, remove the internal and
external batteries and restart. If
the error persists, have the
instrument repaired.
Replace with fully-charged
batteries.
The target may not be correctly
collimated or may have been
blocked during scanning.
Reconfirm the position and scan
again. If the error persists, restart
the instrument and scan once
again. If correction is still not
seen, adjustment will be
required.
z If error still persist after attempting to clear them, contact your local Topcon dealer or Topcon head
office.
12-2
Page 72

13 SPECIFICATIONS
13 SPECIFICATIONS
General specification
Dimensions Instrument : 240 (D)x240 (W)x566 (H) mm
Weight Instrument : 16kg (without battery, tribrach)
Instrument height : 410mm (from the attaching surface of the tribrach to the center
Input voltageInternal battery : 7.4V
External battery : 14±1V
Operation temperature range : 0°C to +40°C
Conservation temperature range : -10°C to +60°C
Protection against water and dust : IP52 (Based on the standard IEC60529) Dust-proof category 2
Scanning Unit
Range*1)
18% reflectivity : 150m
90% reflectivity : 330m
Single Point Accuracy*1), *2)
Distance : 4mm (
Angle (vertical) : 6"
Angle (horizontal) : 6"
Scan Rate*3) : Maximum 3,000Hz
Scan Density (Resolution)
Spot Size : 6mm or less (1m to 40m) (1/e2)
Sample Density : Maximum 1mm at 100m (Selectable)
Maximum point number*4) : VxH :
Field-of-view (Per scan)
Horizontal : 360°(maximum)
Vertical : ±35°(maximum)
Laser
Laser class : Class1 (IEC EN60825-1)
Wave Lengths : 1535nm (invisible)
Maximum peak output : 815W
Maximum average output : 10mW
Pulse duration : 3.6nsec (maximum)
Pulse frequency : 3400Hz (maximum)
Target detection accuracy*1) : 3"[σ] at 50m
carrying case : 760x540x380 mm (excluding casters)
carrying case : 8.5kg (excluding casters)
of the rotating mirror)
(Commercially available 12-volt lead car battery is enabled.)
σ) (at 1 - 150m)
Approximately 16mm at 100m
100,000,000 points
*1) Differs depending on weather condition and atmospheric stability.
*2) Differs depending on the reflectivity and surface condition of the scanning target.
*3) Differs depending on scanning range.
*4) When used stand-alone.
Camera Unit
Field of view : Approximately 22deg (V) x Approximately 16.5deg (H)
Number of the pixels : 2M pixel (1600x1200)
Tilt Unit
Model : Automatic adjustment of vertical angle and horizontal angle
Compensation range : ±6'
Correction unit : 1"
Display
Type : Character-type LCD
Number of the indication letters : 20 character x 4 line
: LED with Backlight
Interface
Complying with the SD memory card/SDHC memory card standards
Wireless LAN : IEEE 802.11b
USB : Rev. 2.0
Type m ini B
13-1
Page 73

13 SPECIFICATIONS
Level
Shape : Circular type
Sensitivity : 10'/2mm
Plummet
Magnification : 2.2x
Focusing : Fixed type :1.4m (Using range 0.7-1.8m)
Image : Erect
Field of view : 5°
On-Board Battery(BT-65Q)
Capacity : 5000mAh
Voltage : 7.4V
Weight : 0.2kg
Operating time(+20°C) : 4h/4pcs *1) (Continuous scanning use)
*1) Operating time depends on the ambient temperature, and the instrument's condition of use.
Battery
Input voltage : AC100V to 240V
Frequency : 50/60Hz
Operating temperature range : -10°C to +40°C
Charging time : Approx 5h /pc
Weight : 0.4kg
Charger(BC-30D)
13-2
Page 74

EMC NOTICE
©2008 TOPCON CORPORATION
ALL RIGHTS RESERVED
Page 75

Page 76

7400 National Drive, Livermore, CA 94551, U.S.A.
Phone: 925-245-8300 Fax: 925-245-8599 www.Topconpositioning.com
3380 Industrial Blvd, Suite 105, West Sacramento, CA 95691, U.S.A.
Phone: 916-374-8575 Fax: 916-374-8329
Essebaan 11, 2908 LJ Capelle a/d IJssel, The Netherlands.
Phone: 010-458-5077 Fax: 010-284-4941 www.topconeurope.com
Giesserallee 31, 47877 Willich, GERMANY
Phone: 02154-885-100 Fax: 02154-885-111 info@topcon.de
www.topcon.de
89, Rue de Paris, 92585 Clichy, Cedex, France.
Phone: 33-1-41069490 Fax: 33-1-47390251 topcon@topcon.fr
Phone: 031-7109200 Fax: 031-7109249
Topcon House Kennet Side, Bone Lane, Newbury, Berkshire RG14 5PX U.K.
Phone: 44-1635-551120 Fax: 44-1635-551170
survey.sales@topcon.co.uk laser.sales@topcon.co.uk
Blk 192 Pandan Loop, #07-01 Pantech Industrial Complex, Singapore 128381
Phone: 65-6778-3456 Fax: 65-6773-6550 www.topcon.com.sg
77/162 Sinn Sathorn Tower, 37th Fl.,
Krungdhonburi Rd., Klongtonsai, Klongsarn, Bangkok 10600 Thailand.
Phone: 66-2-4401152~7 Fax: 66-2-4401158
No.D1, (Ground, Lower Ground & 1st Floor), Jalan Excella 2, O Jalan Ampang
Putra, Taman Ampang Hilir, 55100 Kuala Lumpur, Malaysia
Phone: 60-3-42709866 Fax: 60-3-42709766
Block No.9, Kangding Street
Beijing Economic-Technological Development Area, Beijing, 100176, China
Phone: 86-10-6780-2799 Fax: 86-10-6780-2790
P. O Box293705, Oce C-25(row C-2), Dubai Airport Free Zone, Dubai, UAE
Phone: 971-4-2995900 Fax: 971-4-2995901 marketing@Topcon.ae
Unit 69 Western Parkway Business Center
Phone: 01460-0021 Fax: 01460-0129
Lower Ballymount Road, Dublin 12, Lreland
7G
 Loading...