

Page 1

ALLURE 300
USER GUIDE
GEBRAUCHSANWEISUNG
MANUAL DE USUARIO
1.2
Page 2

Important
To use ‘Caller ID’ (display caller), this service has to be activated on your phone line.
Normally you need a separate subscription from your telephone company to activate this
function. If you don’t have the Caller ID function on your phone line, the incoming telephone
numbers will NOT be shown on the display of your telephone.
Wichtig
Zur Verwendung der ‘Rufnummernanzeige’ muss dieser Dienst erst für Ihre Telefonleitung
freigegeben werden. Zur Aktivierung dieser Dienstleistung benötigen Sie meistens ein
separates Abonnement Ihrer Telefongesellschaft.Wenn Sie für Ihre Telefonleitung keine
Rufnummernanzeigefunktion haben, erscheinen die eingehenden
Telefonnummern NICHT im Display Ihres Gerätes.
Importante
Para poder usar la función “Identificación de llamadas,este servicio tiene que estar dado de
alta en su línea telefónica. Normalmente es necesario abonarse a dicho serviciopara que la
compañía telefónica active esta función. Si su línea telefónica no dispone de la
funciónIdentificación de llamadas, la pantalla del aparato no mostrará los números de
teléfono de las llamadas entrantes.
The CE symbol indicates that the unit complies with the essential
requirements of the R&TTE directive.
Die Übereinstimmung des Gerätes mit den grundlegenden Anforderungen der
R&TTE-Directive ist durch das CE-Kennzeichen bestätigt..
El sello CE corrobora la conformidad del equipo con los requerimientos
básicos de la directiva R&TTE.
This product is in compliance with the essential requirements and other relevant provisions of the R&TTE directive 1999/5/EC.
The Declaration of conformity can be found on :
http://www.topcom.net/support/cedeclarations.php
GB The features described in this manual are published with reservation to
modifications.
D Die in dieser Bedienungsanleitung umschriebenen Möglichkeiten, werden
vorbehaltlich Änderungen publiziert.
ES Las características descritas en este manual pueden ser objeto de futuras
modificaciones.
Page 3

Topcom Allure 300
1 Before Initial use 5
1.1 Intended Purpose 5
1.2 Caller ID 5
1.3 Connection 5
2 Cleaning 5
3 Disposal cautions 5
4 Safety advice 6
5 Getting to know your telephone 7
5.1 Buttons / LED 7
5.2 Display 8
6 Getting started 8
6.1 Installation 8
6.2 Initialisation 8
7 Settings 9
7.1 Setting the language of the display text 9
7.2 Setting the display contrast 9
7.3 Setting the Date and Time 10
7.4 Setting the Local Prefix (5 digits) 10
7.5 Setting the Dial Prefix 10
7.6 Parallel telephone allow/forbid 11
7.7 Tone/Pulse setting 11
8 Making a phone call 11
8.1 Last number redial 11
8.2 Deactivating the microphone (mute) 11
8.3 Music on hold 12
8.4 Ringer volume 12
8.5 Flash Key 12
9 Caller ID 12
9.1 General information 12
9.2 Call list 12
9.3 VIP list 13
9.4 Voice mail 13
10 Phone Book 14
10.1 Use of the alphanumerical keypad 14
10.2 Adding a number to the Phone Book 14
10.3 Selecting and calling a number from the Phone Book 14
10.4 Changing a number and name from the Phone Book 14
10.5 Erasing a number and name from the Phone Book 15
11 Memory numbers 15
11.1 Adding a number to a Direct Memory 15
11.2 Calling a Direct Memory number 15
12 Alarm 15
12.1 To set the alarm 15
12.2 To activate/deactivate the alarm 15
ENGLISH
Topcom Allure 300 3
Page 4

Topcom Allure 300
13 Default settings 16
14 Technical specifications 16
15 Topcom warranty 16
15.1 Warranty period 16
15.2 Warranty handling 16
15.3 Warranty exclusions 16
To be connected to the public analogue telephone network.
4 Topcom Allure 300
Page 5

1 Before Initial use
Thank you for purchasing this new desktop caller ID telephone.
1.1 Intended Purpose
Topcom Allure 300
This product is intend to be connected indoor to an analogue PSTN telephone line.
1.2 Caller ID
Caller ID is a network provider service. After subscribing to Caller ID, this phone will display
the caller’s phone number.
To use ‘Caller ID’ (display caller), this service has to be activated on your
phone line. Normally you need a separate subscription from your
telephone company to activate this function. If you don’t have the Caller
ID function on your phone line, the incoming telephone numbers will NOT
be shown on the display of your telephone.
1.3 Connection
This device has been designed and manufactured to comply with the 98/482/EC rule,
referent to the Pan European connection of a terminal to the Public Switching Telephone
Network (PSTN) and following the established guidelines by the 1999/5/EC Directive about
radio electric equipments and the reciprocal acknowledge of their conformity. However, due
to the fact that there are some differences in the PSTNs from one country to another, the
verifying measurements by themselves do not set up an unconditional guarantee for an
optimal working in every connection point to the PSTN of any country .If any problem comes
up, get in touch firstly with the distributor.
ENGLISH
In any case, use conditions for which the product has been created should be respected as
well as avoid its use in public or private networks with technical requirements clearly different
to those established in the EU.
2 Cleaning
Clean the telephone with a slightly damp cloth or with an anti-static cloth. Never use cleaning
agents or abrasive solvents.
3 Disposal cautions
• Dispose of batteries and maintain the telephone in an environmentfriendly manner.
• You have to dispose of batteries in an environment friendly manner
according to your country regulations.
Topcom Allure 300 5
NiMH
Page 6

Topcom Allure 300
4 Safety advice
The following safety advice must always be followed before using
electrical equipment.
Please read carefully through the following information concerning
safety and proper use. Make yourself familiar with all the functions of the
equipment. Be careful to keep these advice notes and if necessary pass
them on to a third party.
• Do not operate the equipment if the telephone cable or the equipment itself is damaged.
• If the equipment is dropped, it must be checked by an electrician before further use.
• Dangerous voltages are present inside the equipment. Never open the housing or insert
objects through the ventilation holes.
• Do not allow liquids to get into the equipment. In case of emergency, pull out the plug
from the socket.
• Similarly, if a fault develops during use or before you start to clean the equipment, pull
the plug out of the socket.
• Do not touch plug contacts with sharp or metal objects.
• Do not carry out any modifications or repairs to the equipment yourself. Have repairs
done to the equipment or the mains cable only by a specialist service centre.
Unsatisfactory repairs can lead to considerable danger for the user.
• Children frequently underestimate the dangers associated with electrical equipment.
Therefore you must never leave children unsupervised in the vicinity of electrical
equipment.
• The equipment is not to be used in a damp room (e.g. bathrooms) or rooms where there
is a lot of dust.
• Equipment connected to the telephone line during a thunderstorm can be damaged by
lightning. Therefore you should pull the plug out of the main socket during a storm.
• To completely disconnect the equipment from the electricity supply, the plug must be
removed from the socket. When doing this, always pull on the plug itself and never on
the cable.
6 Topcom Allure 300
Page 7
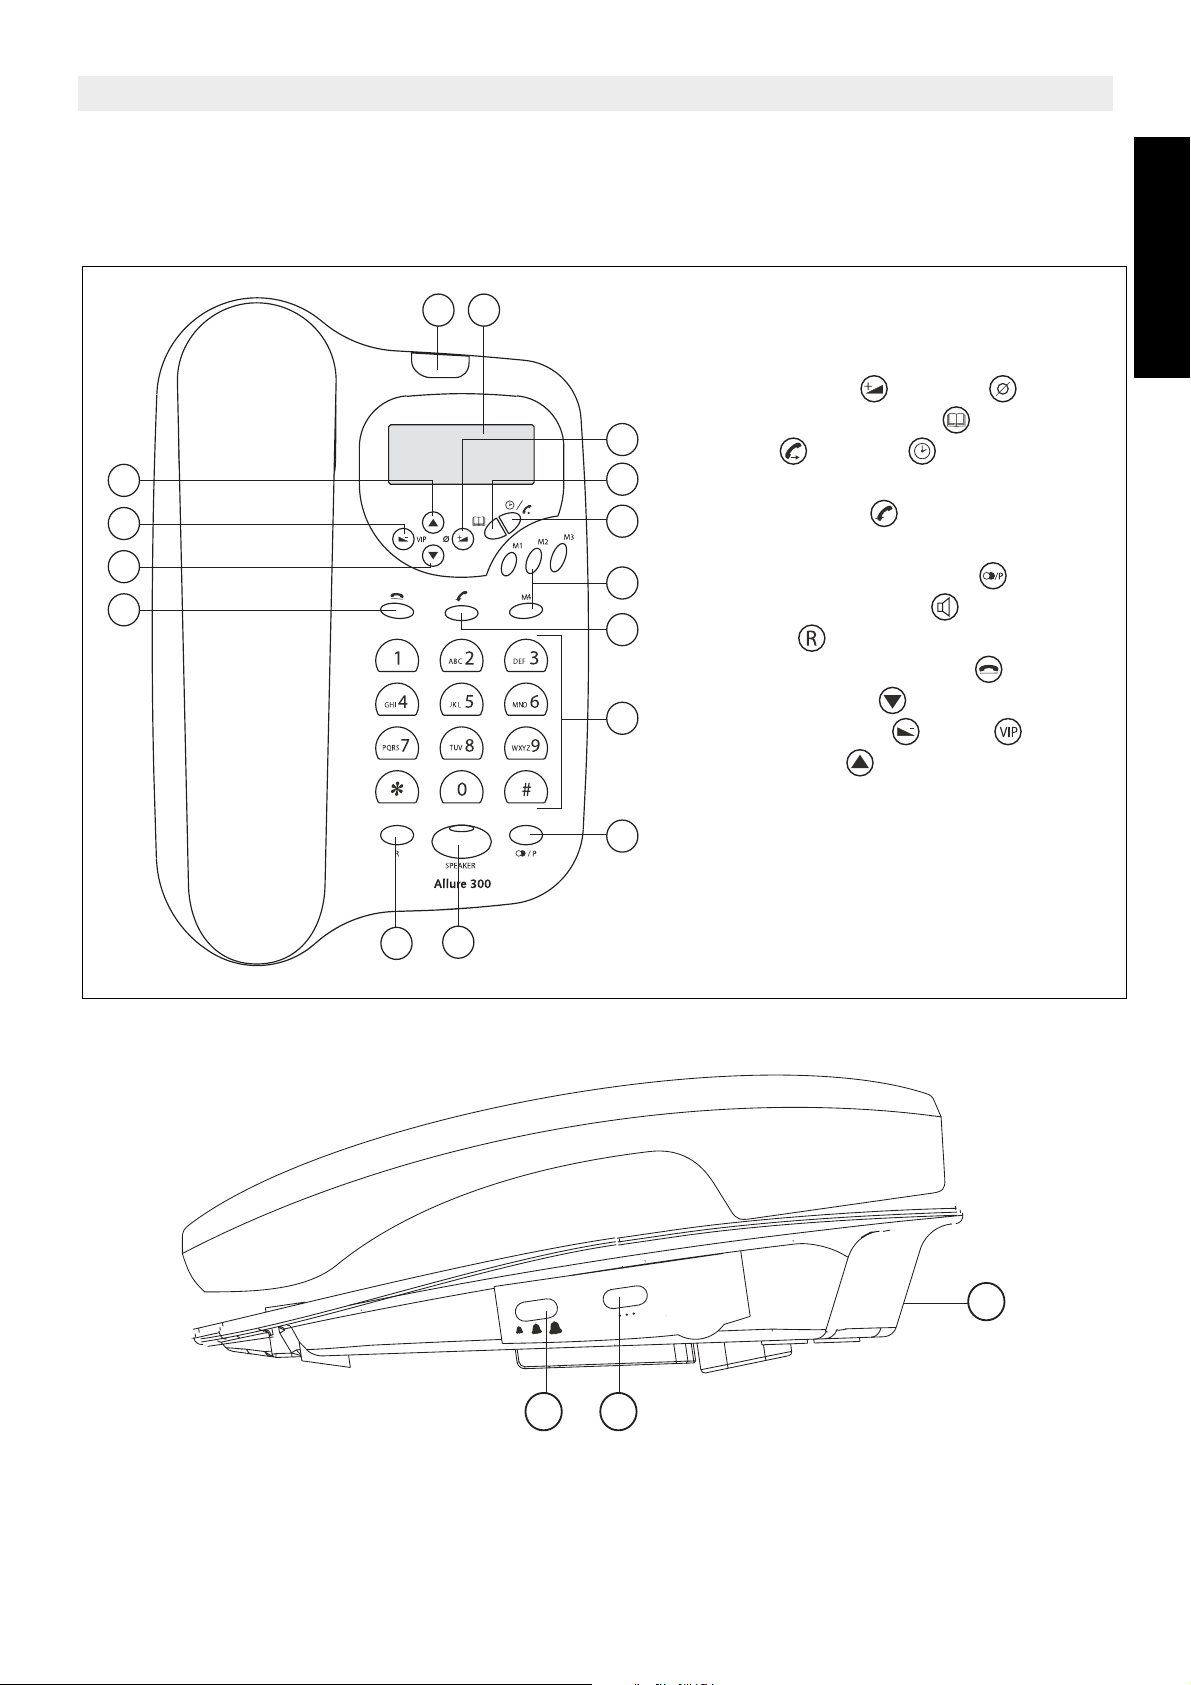
5 Getting to know your telephone
5.1 Buttons / LED
Topcom Allure 300
15
14
13
12
1 2
1. ‘New Calls’ indicator
2. Display
3. Volume Up / Delete button
4. Phonebook button
3
5. Dial / Alarm button
4
6. Direct Memory buttons (M1-M4)
7. Mute button
5
8. Alphanumerical keyboard
9. Redial / Pause button
6
10. Handsfree button
7
11. Flash
12. Music on Hold button
13. Down button
8
14. Volume Down / VIP button
15. Up button
16. Line cord connector + connector
9
to parallel telephone or modem.
17. Flashtime switch
18. Ring volume setting
ENGLISH
11
10
ER
ING
R
600 100
300
16
1718
Topcom Allure 300 7
Page 8
Topcom Allure 300
"AAA"A"
RIE
5.2 Display
You received new messages in the telephone network mailbox.
XX
REP
VIP
NEW
You have received ‘XX’ new messages in your call list.
You have received the call more than once.
You have selected the number as VIP and cannot be erased out of
the call list.
The battery is almost empty and needs to be replaced.
The alarm is enabled.
6 Getting started
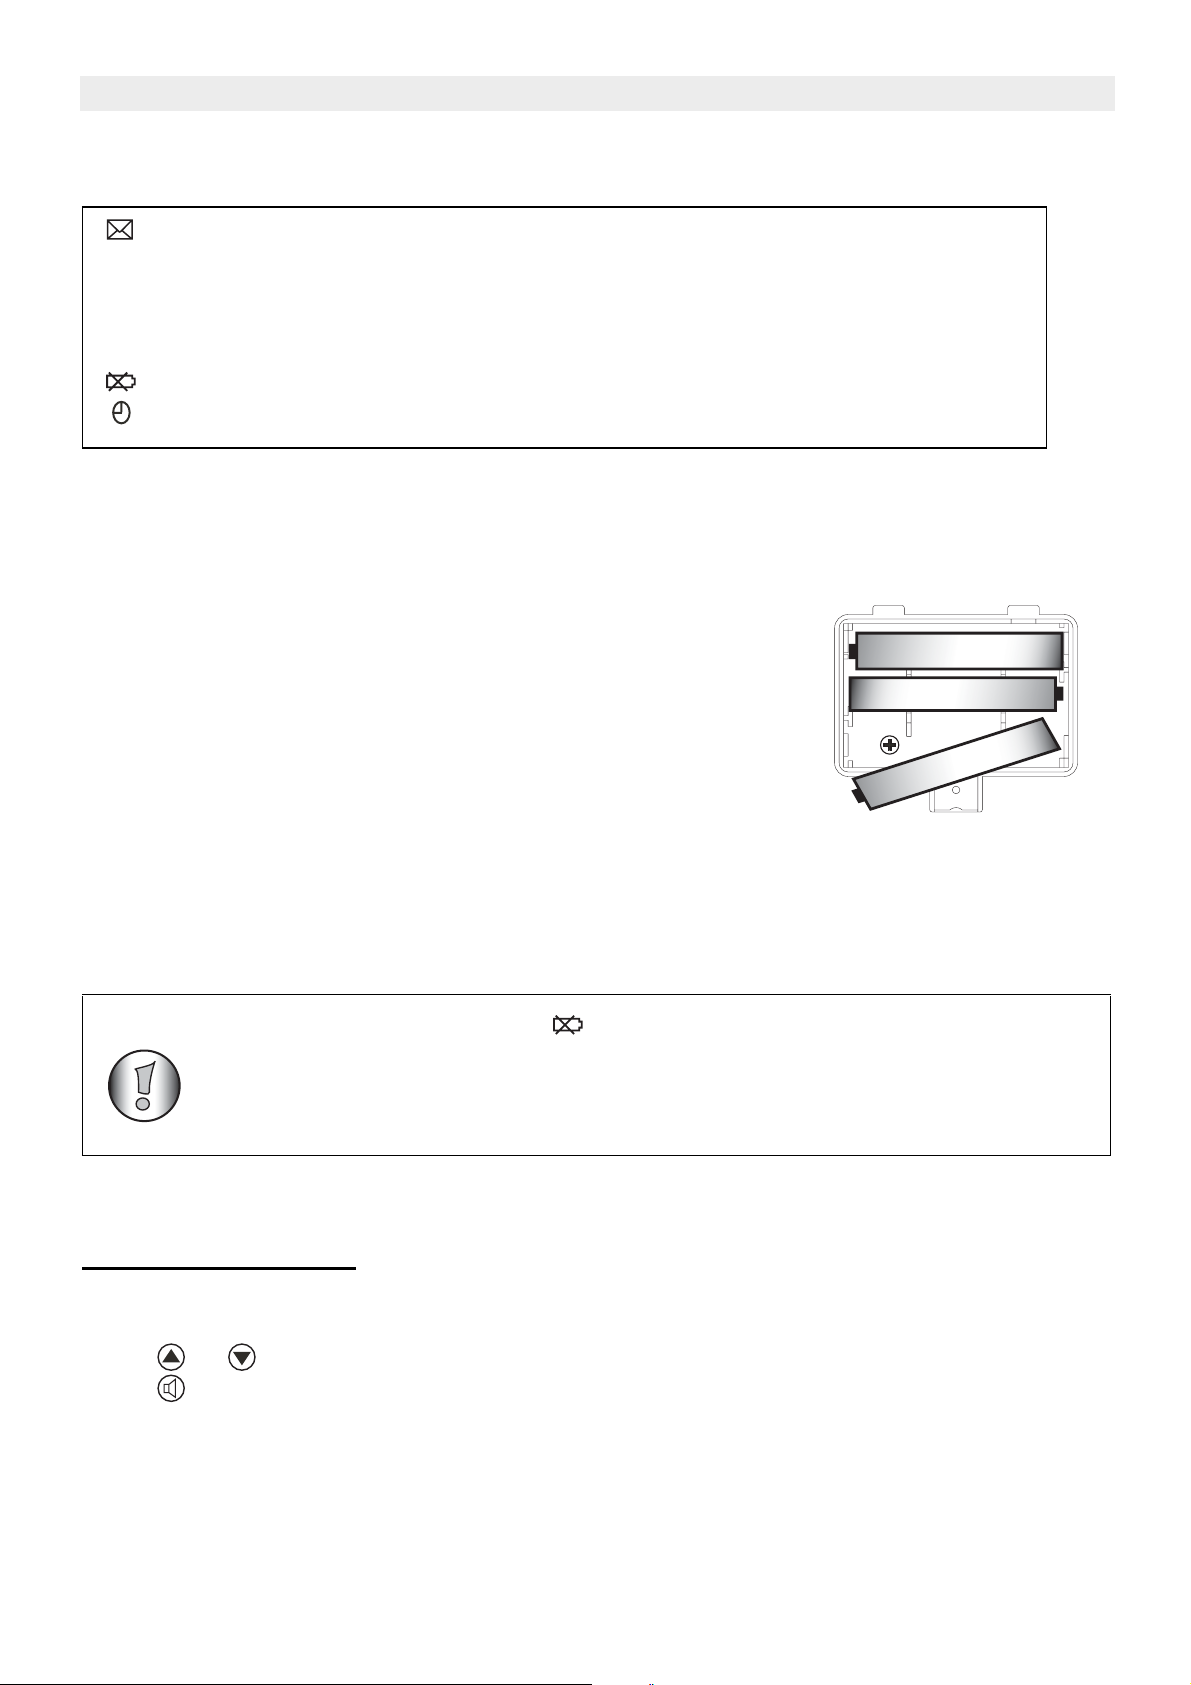
6.1 Installation
Put batteries in the battery compartment to activate the display :
+
-
• Open the battery compartment at the bottom of the unit.
• Insert 3 AAA Alcaline batteries (1,5V).
• Close the battery compartment.
• Connect one end of the line cord to the telephone line wall
+
-
USE 3 S3SIZE "AA
BATTERIE
S
+
-
socket and the other end to the bottom of the phone.
• The connector ‘DATA’ can be used to connect a telephone in parallel or to connect an
analogue modem.
When the battery indicator is shown, the batteries must be replaced.
When the batteries are removed, you have 5 minutes to replace them.
After that time, the memory will be lost.
Never change batteries when the telephone line is connected !
6.2 Initialisation
6.2.1 Display language
After installing the batteries, the default display language is shown.
Press or to select the desired display language.
Press to go to the next setting ‘Memory capacity’.
8 Topcom Allure 300
Page 9

Topcom Allure 300
6.2.2 Memory capacity
The maximum capacity of the Allure 300 is 110 entries including names and numbers.
This number can be dedicated to the Phonebook and/or to the Caller ID list. In this setting
you have to select the capacity of the Phonebook.
Press or to select the phonebook memory ‘MAX DATABANK = XXX (default 032)’
Press to confirm the phonebook memory.
The Caller ID list memory size will be displayed briefly and the unit will go to standby mode.
To have access to the memory setting, you have to remove the batteries
for more than 10 minutes. All stored information will be erased after
initialisation.
7 Settings
ENGLISH
7.1 Setting the language of the display text
When you did not change the language during initialisation, you can select it as follow:
• Press button for 3 seconds.
• Press or to select the desired display language.
• Press to go to the next setting.
If no button is pressed within 10 seconds, the unit will return to standby mode.
!!! Only the words on the 3rd line of the display will be indicated in the
selected language. In standby the display will indicate ‘ALL CALLS 000’
for indicating the number of stored calls in the call list only in English.
7.2 Setting the display contrast
You can select the desired contrast as follows:
• Press for 3 seconds, the display language is shown.
• Press again.
• Press or to select the desired display contrast.
• Press to go to the next setting.
If no button is pressed within 10 seconds, the unit will return to standby mode.
Topcom Allure 300 9
Page 10

Topcom Allure 300
7.3 Setting the Date and Time
When you have a subscription to the Caller ID service and your telephone provider sends the
date and time together with the telephone number, the phone’s clock will be set
automatically. The year must be set manually.
It is also possible to set the clock manually:
• Press for 3 seconds, the display language is shown.
• Press 2 times. The year will blink.
• Press or button to set the year.
• Press to confirm the year and change to month.
• Repeat the previous steps for changing and confirming month, day, hour and minutes.
• After confirming the minutes, you will go to the next setting.
If no button is pressed within 10 seconds, the unit will return to standby mode.
7.4 Setting the Local Prefix (5 digits)
The Local prefix must be set, when you are not allowed to dial out your own area code.
If there is an incoming call, starting with the programmed prefix, the code will not be displayed
and not be stored in the call list.
ex. When 012 is programmed and 0123456789 is the incomming call number, 3456789 is
displayed and stored in the call list.
• Press for 3 seconds, the display language is shown.
• Press repeatedly until ‘SET LOCAL CODE ‘ is displayed.
• Press or to select the first digit of the local code (0-9 or ‘-’ to unselect).
• Press confirm the first digit and change to the next digit.
• Repeat the previous steps for the 5 digits.
• When no local prefix must be set select (- - - - -).
• After confirming the last digit, you will go to the next setting.
If no button is pressed within 10 seconds, the unit will return to standby mode.
7.5 Setting the Dial Prefix
If you need to dial out a one digit prefix before a telephone number from the call list or
phonebook, you have to set the Dial Prefix.
• Press for 3 seconds, the display language is shown.
• Press repeatedly until ‘PREFIX‘ is displayed.
• Press or button to select prefix (0-9 or ‘-’ to unselect).
• Press the Volume Up / Delete / button confirm the prefix.
If no button is pressed within 10 seconds, the unit will return to standby mode.
To dial out the prefix before the selected number out of the call list of phonebook,
press the dial button twice.
10 Topcom Allure 300
Page 11

Topcom Allure 300
7.6 Parallel telephone allow/forbid
You can forbid that another telephone can be placed in parallel with the Allure 300. If you
activate this function the parallel telephone call will be disturbed.
• Press for 3 seconds, the display language is shown.
• Press repeatedly until ‘Parallel Allow‘ is display.
• Press or to select ‘Parallel Forbid’.
• Press to confirm the setting.
!!!! This function will not work when installed behind a PABX.
7.7 Tone/Pulse setting
To change the dial mode, press for 3 seconds in standby mode.
The selected mode is displayed.
8 Making a phone call
There are 2 ways to make a phone call :
1. Enter the telephone number. If needed, you can erase the last digits by pressing the
button. Pick up the handset or press . The phone number will be dialled
automatically in handsfree mode.
2. Pick up the receiver or . Enter the telephone number.
Note: The call duration timer is shown on the 1st line of the display [h:mm:ss].
In handsfree mode, the speaker volume can be adjusted by using or . The
speaker volume is displayed.
ENGLISH
8.1 Last number redial
The Allure 300 saves the 8 last dialled telephone numbers in the memory with indication of
the call duration.
Press to scroll through the Redial memory. When the desired number appears on the
display, there are two ways to call back :
1. Press the Dial button . The desired number will be dialled automatically in handsfree.
2. Pick up the receiver. The number will be dialled automatically.
To redial immediately the last dialled number, pick up the handset and press
Note: The Redial button can also be used as a Pause button while entering a
telephone number ! The letter ‘P’ appears on the display on the location where you
have added a pause of 3 sec.
8.2 Deactivating the microphone (mute)
It is possible to deactivate the microphone during a conversation by pressing . You can
now talk freely without the caller hearing you.
Press again if you want to resume your conversation.
Topcom Allure 300 11
Page 12

Topcom Allure 300
8.3 Music on hold
It is possible to put the caller on hold during a conversation by pressing . You can now talk
freely without the caller hearing you. The caller will hear a digital melody. The melody can be
changed by pressing or .
Press again if you want to resume your conversation.
8.4 Ringer volume
When you receive a phone call, the unit will ring. The ring volume can be adjusted by means
of the Ring Volume switch at the side of the phone (Hi-, Lo-).
8.5 Flash Key
Press the to use certain services as ‘Call Waiting’ (if this service is provided by your
telephone company); or to transfer phone calls when you are using a telephone exchange
(PABX).
The flashtime can be selected by the switch at the side of the phone (100/300/600ms).
9 Caller ID
9.1 General information
When you have a subscription to the Caller ID service, the caller’s phone number and name
(when supported by the network) will appear on the display. If you saved the telephone
number with the name in the Phonebook, the programmed name will be shown on the display
(name tagging function).
9.2 Call list
The size of the call list has been set when initializing the telephone. The phone numbers you
have received more than once, will not be stored, but the repeat indicator REP will be
displayed. Every incoming number is saved in the Call List with indication of date and time.
In standby mode the number of new received calls is shown on the display ‘ALL CALLS 000’
(always English). The new message LED will blink until you have checked all new messages.
9.2.1 Scrolling through the Call List
• You can scroll through the Call list by pressing or .
• If no button is pressed within 15 seconds, you will return to standby mode.
12 Topcom Allure 300
Page 13
Topcom Allure 300
9.2.2 Calling a number from the Call List
• Select the desired telephone number.
• Press . The number will be dialled automatically in handsfree mode.
• If you want to dial the dial prefix (see §7.5), press twice.
• Pick up the handset if you want to communicate over the handset.
9.2.3 Erasing numbers from the Call List
a) Erasing one number
• Select the number you wish to erase.
• Press briefly. “ERASED” appears on the display.
The next number in the call list is displayed.
b) Erasing the entire Call List
• Enter the Call List and select a number not indicated with VIP (see §9.3)
• Press the Erase button for 2 seconds , “ALL ERASED“ appears on the display.
When erasing the entire call list, VIP numbers will remain saved (see §9.3).
ENGLISH
9.3 VIP list
Numbers can be protected to be removed out of the call list when selecting ‘erase all’.
Therefore the number must be assigned as VIP.
All VIP numbers are visible in the Call list, but can also be checked in a separate VIP list.
9.3.1 Assigning a number to the VIP list.
• Scroll through the Call list by pressing or .
• Press . The VIP icon will be displayed.
9.3.2 Selecting and calling a number from the VIP List
• Press repeatedly to scroll through the VIP list.
• Press . The number will be dialled automatically in handsfree mode.
• Pick up the handset if you want to communicate over the handset.
9.3.3 Erasing individual numbers from the VIP List
• Select the VIP number you wish to erase out of the Call list.
•Press briefly. “ERASED” appears on the display.
• The next number in the call list is displayed.
9.4 Voice mail
When you have received a voice mail message in your Personal Voice Mail Box, the Voice
Mail symbol appears on the display. As soon as you have listened to the messages in the
mailbox, the symbol disappears.
* Voice mail is a network feature. Check with your network operator if this is available
on your line.
Topcom Allure 300 13
Page 14

Topcom Allure 300
10 Phone Book
The size of the phonebook has been set when initializing the telephone. Default, 32
telephone numbers with name can be stored (see §6.2).
10.1 Use of the alphanumerical keypad
Use the alphanumerical keypad to enter text. To select a letter, press the corresponding
button. For ex. if you press numerical button ‘5’, the first character (J) will be shown on the
display. Press multiple times if you want to select another character under this button.
Press button ‘2’ twice to select the letter ‘B’. If you want to select ‘A’ as well as ‘B’, press
button ‘2’ once to select ‘A’, wait for 2 seconds until the cursor has moved to the next location
and press then button ‘2’ twice to select ‘B’. To add a space, press 1. Wrong entered
characters can be erased by pressing .
10.2 Adding a number to the Phone Book
•Press .
•Press .
• Enter the name by means of the alphanumerical keypad and press to confirm.
• Enter the desired telephone number and press to confirm.
• Follow the previous steps for adding another number or press twice to leave the
setting.
10.3 Selecting and calling a number from the Phone Book
•Press .
•Press .
• Enter the first letter of the desired name by means of the alphanumerical keypad.
• Numbers will be sorted on the first letter only.
• Search for the name in the Phone Book by pressing or .
• When the desired name is shown on the display, pick up the handset or press . The
number will be dialled automatically.
10.4 Changing a number and name from the Phone Book
• Select the desired number from the Phone Book by name as mentioned in §10.3.
•Press .
• Edit the name when necessary.
•Press .
• Edit the nummer when necessary.
•Press .
• Press twice to leave the phonebook.
14 Topcom Allure 300
Page 15

Topcom Allure 300
10.5 Erasing a number and name from the Phone Book
• Select the desired number from the Phone Book by name as mentioned in §10.3.
• Press for 2 seconds , “ERASED“ appears on the display.
• Press to leave the menu.
11 Memory numbers
You can program 4 Direct numbers (max 16 digits). These memory numbers can be dialled
by pressing M1-M4.
11.1 Adding a number to a Direct Memory
• Press M1 for 2 seconds.
• Enter the telephonenumber.
• Press the desired Direct Memory key (M1-M8).
Direct memories can only be overwritten not erased.
11.2 Calling a Direct Memory number
• Press the desired Direct Memory key, the stored number is displayed.
• Press handsfree or pick up the handset.
12 Alarm
The Allure 300 has an alarm function.
ENGLISH
12.1 To set the alarm
Press for 2 seconds.
Press or to select the hours.
Press to confirm.
Press or to select the minutes.
Press to confirm.
12.2 To activate/deactivate the alarm
Press briefly to switch the alarm ON or OFF.
When ON, the alarm icon is shown on the display.
The alarm sound is the same melody as the ‘music on hold’ melody (see §8.3)
When the alarm sound is heard, press twice, otherwise the melody will continue for one
minute.
Topcom Allure 300 15
Page 16

Topcom Allure 300
13 Default settings
Flashtime: 100ms
Dial mode: Tone
Display language: English
14 Technical specifications
Dialling options: DTMF (tone) / Pulse
Flashtime: 100/300/600 ms
Batteries: 3 x 1,5V, AAA non-rechargeable
Ambient temperature: +5°C to +45°C
Permitted relative air humidity: 25 to 85%
15 Topcom warranty
15.1 Warranty period
The Topcom units have a 24-month warranty period. The warranty period starts on the day
the new unit is purchased.
Consumables or defects causing a negligible effect on operation or value of the equipment
are not covered.
The warranty has to be proven by presentation of the original purchase receipt, on which the
date of purchase and the unit-model are indicated.
15.2 Warranty handling
A faulty unit needs to be returned to a Topcom service centre including a valid purchase note.
If the unit develops a fault during the warranty period, Topcom or its officially appointed
service centre will repair any defects caused by material or manufacturing faults free of
charge.
Topcom will at its discretion fulfil its warranty obligations by either repairing or exchanging
the faulty units or parts of the faulty units. In case of replacement, colour and model can be
different from the original purchased unit.
The initial purchase date shall determine the start of the warranty period. The warranty period
is not extended if the unit is exchanged or repaired by Topcom or its appointed service
centres.
15.3 Warranty exclusions
Damage or defects caused by incorrect treatment or operation and damage resulting from
use of non-original parts or accessories not recommended by Topcom are not covered by
the warranty.
The warranty does not cover damage caused by outside factors, such as lightning, water and
fire, nor any damage caused during transportation.
No warranty can be claimed if the serial number on the units has been changed, removed or
rendered illegible.
16 Topcom Allure 300
Page 17

Topcom Allure 300
1 Vor der ersten Verwendung 19
1.1 Verwendungszweck 19
1.2 Rufnummernerkennung 19
1.3 Anschluss 19
2 Reinigung 19
3 Entsorgungshinweise 20
4 Sicherheitshinweis 20
5 Ihr Telefon kennen lernen 21
5.1 Tasten / LED 21
5.2 Display 22
6 Vorbereitung 22
6.1 Installation 22
6.2 Initialisierung 22
7 Einstellungen 23
7.1 Einstellen der Sprache des Displaytexts 23
7.2 Einstellen des Displaykontrasts 23
7.3 Datum und Uhrzeit einstellen 24
7.4 Einstellen der lokalen Vorwahl (5 Ziffern) 24
7.5 Einstellen des Wahlvorsatzes 24
7.6 Paralleles Telefon zulassen/verbieten 25
7.7 Ton-/Impulswahl 25
8 Einen Anruf tätigen 25
8.1 Wahlwiederholung der letzten Nummer 25
8.2 Deaktivierung des Mikrofons (Stummschaltung) 26
8.3 Warteschleife mit Musik 26
8.4 Klingellautstärke 26
8.5 Flash-Taste 26
9 Rufnummernanzeige 26
9.1 Allgemeine Informationen 26
9.2 Anrufliste 26
9.3 VIP Liste 27
9.4 Sprachbox 28
10 Telefonbuch 28
10.1 Verwendung der alphanumerischen Tastatur 28
10.2 Eine Nummer im Telefonbuch speichern 28
10.3 Eine Nummer aus dem Telefonbuch selektieren und anrufen 28
10.4 Eine Nummer und einen Namen im Telefonbuch ändern 29
10.5 Eine Nummer und einen Namen aus dem Telefonbuch löschen 29
11 Speichernummern 29
11.1 Eine Nummer in einem Direktwahlspeicher speichern 29
11.2 Eine Direktwahlnummer anrufen 29
12 Alarm 29
12.1 Zum Einstellen des Alarms 29
12.2 Zum Aktivieren/Deaktivieren des Alarms 30
DEUTSCH
Topcom Allure 300 17
Page 18

Topcom Allure 300
13 Standardeinstellungen 30
14 Technische Eigenschaften 30
15 Garantie 30
15.1 Garantiezeit 30
15.2 Abwicklung des Garantiefalles 30
15.3 Garantieausschlüsse 31
Kompatibel für den analogen telefonanschluss.
18 Topcom Allure 300
Page 19

Topcom Allure 300
1 Vor der ersten Verwendung
Wir danken Ihnen für den Kauf dieses neuen Schreibtischtelefons mit
Rufnummernerkennung.
1.1 Verwendungszweck
Dieses Produkt ist zum Anschluss an einen analogen PSTN-Telefonanschluss im Haus
hergestellt.
1.2 Rufnummernerkennung
Die Rufnummernerkennung ist ein Service der Telefongesellschaft. Wenn Sie die
Rufnummernerkennung abonniert haben, zeigt dieses Telefon die Telefonnummer des
Anrufers an.
Zur Verwendung der ’Rufnummernerkennung’ (Anzeige des Anrufers),
muss dieser Service für Ihren Telefonanschluss aktiviert werden.
Normalerweise benötigen Sie ein separates Abonnement bei ihrer
Telefongesellschaft um diese Funktion zu aktivieren. Wenn Sie keine
Rufnummernerkennungsfunktion für Ihren Telefonanschluss haben,
werden die eingehenden Telefonnummern NICHT im Display Ihres
Telefons angezeigt.
DEUTSCH
1.3 Anschluss
Dieses Gerät wurde entsprechend der Richtlinie 98/482/EG, unter Einhaltung der
paneuropäischen Verbindung eines Terminals mit dem Public Switching Telephone Network
(PSTN) und nach den geltenden Bestimmungen der Richtlinie 1999/5/EG zu
funkelektrischen Geräten und der gegenseitigen Anerkennung ihrer Konformität entwickelt
und produziert. Wegen der Tatsache, dass es einige Unterschiede in den PSTNs der
einzelnen Länder geben kann, bilden jedoch die Prüfmessungen an sich keine
uneingeschränkte Garantie für eine optimale Funktion in jedem Anschlusspunkt des PSTN
aller Länder. Wenn ein Problem auftreten sollte, sollten Sie sich zuerst an den Händler
wenden.
In jedem Fall sollten die Umstände, für welche das Produkt entwickelt wurde, eingehalten
werden, sowie vermieden werden, dass es in öffentlichen oder privaten Netzwerken
verwendet wird, deren technische Anforderungen sich eindeutig von denen der EU
unterscheiden.
2 Reinigung
Reinigen Sie das Telefon mit einem feuchten Tuch oder mit einem antistatischen Tuch.
Verwenden Sie nie Reinigungsmittel oder Scheuermittel.
Topcom Allure 300 19
Page 20

Topcom Allure 300
3 Entsorgungshinweise
• Entsorgen Sie die verwendeten Batterien und warten Sie das
Telefon umweltfreundlich.
• Entsorgen Sie die Batterien umweltfreundlich und entsprechend der
Gesetzgebung Ihres Landes.
4 Sicherheitshinweis
Der folgende Sicherheitshinweis muss immer eingehalten werden, wenn
Sie elektrische Geräte verwenden.
Lesen Sie die folgenden Angaben bezüglich Sicherheit und korrekter
Verwendung sorgfältig. Machen Sie sich mit allen Funktionen des Geräts
vertraut. Bewahren Sie diese Empfehlungen sorgfältig und geben Sie sie
eventuell an Dritte weiter.
NiMH
• Betreiben Sie das Gerät nicht, wenn das Telefonkabel oder das Gerät selbst beschädigt
ist.
• Wenn das Gerät gefallen ist, muss es vor dem weiteren Betrieb von einem Elektriker
kontrolliert werden.
• Im Gerät gibt es gefährliche Spannungen. Öffnen Sie das Gehäuse nie und stecken Sie
keine Gegenstände durch die Belüftungsöffnungen.
• Sorgen Sie dafür, dass keine Flüssigkeiten in das Gerät gelangen können. Ziehen Sie
im Notfall den Stecker aus der Steckdose.
• Ziehen Sie den Stecker auch dann aus der Steckdose, wenn beim Gebrauch ein Fehler
auftritt oder bevor Sie das Gerät warten möchten.
• Berühren Sie die Steckkontakte nicht mit scharfen oder metallischen Gegenständen.
• Ändern oder reparieren Sie das Gerät nicht selbst. Lassen Sie Reparaturen am Gerät
oder dem Stromanschlusskabel nur von einem spezialisierten Kundendienst
durchführen. Unzulängliche Reparaturen können beträchtliche Gefahren für den
Benutzer verursachen.
• Kinder unterschätzen oft die Gefahren elektrischer Geräte. Lassen Sie Kinder darum nie
ohne Aufsicht in der Nähe von elektrischen Geräten.
• Das Gerät sollte nicht in einem feuchten Raum (z.B. Badezimmer) oder Räumen mit viel
Staub betrieben werden.
• Geräte, die bei einem Gewitter an der Telefonleitung angeschlossen sind, können durch
Blitzschlag beschädigt werden. Darum sollten Sie bei einem Sturm den Stecker aus
dem Telefonanschluss ziehen.
• Um das Gerät vollständig vom Stromnetz abzuschließen, muss der Stecker aus der
Steckdose gezogen werden. Ziehen Sie dabei immer an dem Stecker selbst und nie am
Kabel.
20 Topcom Allure 300
Page 21

5 Ihr Telefon kennen lernen
5.1 Tasten / LED
Topcom Allure 300
15
14
13
12
11
1 2
10
1. Anzeige ’New Calls’
2. Display
3. Lautstärke hoch /
Lösch -Taste
4. Telefonbuch-Taste
3
5. Wählen / Alarm -Taste
4
6. Direktwahltasten (M1-M4)
7. Stummschalttaste
5
8. Alphanumerische Tastatur
9. Wahlwiederholung /
6
Pausentaste
7
10. Freisprechtaste
11. Flash
12. Taste für Warteschleife mit
8
Musik
13. Nach-unten-Taste
14. Lautstärke runter /
9
VIP -Taste
15. Nach-oben-Taste
16. Anschluss für Telefonkabel +
Anschluss für paralleles Telefon
oder Modem.
17. Flashtime-Schalter
18. Einstellungen Klingellautstärke
DEUTSCH
ER
ING
R
600 100
300
16
1718
Topcom Allure 300 21
Page 22

Topcom Allure 300
USE
IZE
"AA
RIE
5.2 Display
Sie haben neue Nachrichten in der Mailbox des Telefonanbieters.
XX
REP
VIP
NEW
Sie haben ’XX’ neue Nachrichten in Ihrer Anrufliste erhalten.
Sie haben den Anruf mehrmals erhalten.
Sie haben diesen Nummer als VIP selektiert und sie kann nicht aus
der Anrufliste gelöscht werden.
Die Batterie ist fast leer und muss ersetzt werden.
Der Alarm ist aktiviert.
6 Vorbereitung
6.1 Installation
Legen Sie die Batterien in das Batteriefach ein um das Display
zu aktivieren:
• Öffnen Sie das Batteriefach an der Rückseite des Geräts.
• Legen Sie 3 AAA Nickeleisen Batterien (1,5V) ein.
• Schließen Sie das Batteriefach.
• Verbinden Sie ein Ende des Telefonkabels mit dem
Telefonwandanschluss und das andere Ende mit der
Rückseite des Telefons.
+
-
USE
3 S3SIZE
"AA
BATTERIE
+
-
+
-
A"
S
• Den Anschluss ’DATA’ können Sie verwenden um ein paralleles Telefon oder ein
analoges Modem anzuschließen.
Wenn die Batterieanzeige erscheint, müssen die Batterien ersetzt
werden. Wenn die Batterien entfernt wurden, haben Sie 5 Minuten Zeit um
sie zu ersetzen. Nach dieser Zeit wird der Speicher gelöscht.
Wechseln Sie die Batterien nie, wenn das Telefonkabel angeschlossen
ist!
6.2 Initialisierung
6.2.1 Displaysprache
Nachdem Sie die Batterien eingelegt haben, wird die Standarddisplaysprache angezeigt.
Drücken Sie oder um die gewünschte Displaysprache zu selektieren.
Drücken Sie um zur nächsten Einstellung ’MAX.TEL.BUCH’ zu gelangen.
22 Topcom Allure 300
Page 23

Topcom Allure 300
6.2.2 Speicherkapazität
Die maximale Kapazität des Allure 300 ist 110 Einträge einschließlich Namen und Nummern.
Diese Anzahl gilt für das Telefonbuch und/oder die Rufnummernerkennungsliste. In dieser
Einstellung müssen Sie die Kapazität des Telefonbuchs selektieren.
Drücken Sie oder um den Telefonbuchspeicher ’MAX.TEL.BUCH = XXX (Standard
032)’ zu selektieren.
Drücken Sie um den Telefonbuchspeicher zu bestätigen.
Die Größe des Speichers der Rufnummernerkennungsliste wird kurz angezeigt und das
Gerät kehrt zum Stand-by-Modus zurück.
Um die Speichereinstellungen öffnen zu können, müssen Sie länger als
10 Minuten die Batterien entfernen. Nach der Initialisierung sind alle
gespeicherten Informationen gelöscht.
7 Einstellungen
DEUTSCH
7.1 Einstellen der Sprache des Displaytexts
Wenn Sie die Sprache bei der Initialisierung nicht geändert haben, können Sie das wie folgt
tun:
• Drücken Sie 3 Sekunden lang die -Taste.
• Drücken Sie oder um die gewünschte Displaysprache zu selektieren.
• Drücken Sie um zur nächsten Einstellung zu gelangen.
Wenn 10 Sekunden lang keine Taste betätigt wird, kehrt das Gerät zum Stand-by-Modus
zurück.
!!! Nur die Worte der 3. Zeile des Displays werden in der selektierten
Sprache angezeigt. Im Stand-by zeigt das Display ’ALL CALLS 000’ an,
wenn die Anzahl der gespeicherten Anrufe in der Anrufliste nur in
Englisch erfolgt.
7.2 Einstellen des Displaykontrasts
Sie können den gewünschten Kontrast wie folgt selektieren:
• Drücken Sie 3 Sekunden lang die , die Displaysprache erscheint.
• Drücken Sie erneut .
• Drücken Sie oder um den gewünschten Displaykontrast zu selektieren.
• Drücken Sie um zur nächsten Einstellung zu gelangen.
Wenn 10 Sekunden lang keine Taste betätigt wird, kehrt das Gerät zum Stand-by-Modus
zurück.
Topcom Allure 300 23
Page 24

Topcom Allure 300
7.3 Datum und Uhrzeit einstellen
Wenn Sie ein Abonnement für die Rufnummernerkennung haben und Ihre
Telefongesellschaft schickt das Datum und die Uhrzeit zusammen mit der Telefonnummer,
wird automatisch die Uhr des Telefons eingestellt. Das Jahr muss manuell eingestellt
werden.
Die Uhr kann auch manuell eingestellt werden:
• Drücken Sie 3 Sekunden lang die , die Displaysprache erscheint.
• Drücken Sie zweimal . Das Jahr blinkt.
• Drücken Sie oder um das Jahr einzustellen.
• Drücken Sie um das Jahr zu bestätigen und zum Monat zu wechseln.
• Wiederholen Sie die vorigen Schritte um den Monat, den Tag, die Stunde und die
Minuten zu ändern und zu bestätigen.
• Nachdem Sie die Minuten bestätigt haben, gelangen Sie zur nächsten Einstellung.
Wenn 10 Sekunden lang keine Taste betätigt wird, kehrt das Gerät zum Stand-by-Modus
zurück.
7.4 Einstellen der lokalen Vorwahl (5 Ziffern)
Die lokale Vorwahl muss eingestellt werden, wenn Sie nicht Ihre eigene Ortsvorwahl wählen
dürfen.
Wenn es einen eingehenden Anruf gibt, der mit der programmierten Vorwahl beginnt, wird
die Vorwahl nicht angezeigt und nicht in der Anrufliste gespeichert.
bsp. Wenn 012 programmiert wurde und der eingehende Anruf 0123456789 ist, wird
3456789 angezeigt und in der Anrufliste gespeichert.
• Drücken Sie 3 Sekunden lang die , die Displaysprache erscheint.
• Drücken Sie wiederholt bis ’ORTSKENNZAHL’ angezeigt wird.
• Drücken Sie oder um die erste Ziffer der lokalen Vorwahl zu selektieren (0-9 oder
’-’ für keine Auswahl).
• Drücken Sie um die erste Ziffer zu bestätigen und zur nächsten Ziffer zu wechseln.
• Wiederholen Sie die vorigen Schritte für die 5 Ziffern.
• Wenn keine lokale Vorwahl eingestellt werden muss, selektieren Sie (- - - - -).
• Nachdem Sie die letzte Ziffer bestätigt haben, gelangen Sie zur nächsten Einstellung.
Wenn 10 Sekunden lang keine Taste betätigt wird, kehrt das Gerät zum Stand-by-Modus
zurück.
7.5 Einstellen des Wahlvorsatzes
Wenn Sie vor einer Telefonnummer aus der Anrufliste oder dem Telefonbuch eine einstellige
Vorwahl wählen müssen, müssen Sie den Wahlvorsatz einstellen.
• Drücken Sie 3 Sekunden lang die , die Displaysprache erscheint.
• Drücken Sie wiederholt bis ’VORWAHL SETZEN’ angezeigt wird.
• Drücken Sie oder um die Vorwahl zu selektieren (0-9 oder ’-’ für keine Auswahl).
• Drücken Sie die Lautstärke nach oben /Löschen / -Taste um die Vorwahl zu bestätigen.
24 Topcom Allure 300
Page 25

Topcom Allure 300
Wenn 10 Sekunden lang keine Taste betätigt wird, kehrt das Gerät zum Stand-by-Modus
zurück.
Um die Vorwahl vor der selektieren Nummer der Anrufliste des Telefonbuchs zu
wählen, drücken Sie zweimal die Wahltaste.
7.6 Paralleles Telefon zulassen/verbieten
Sie können verbieten, dass ein anderes Telefon parallel zum Allure 300 angeschlossen wird.
Wenn Sie diese Funktion aktivieren, wird das parallele Telefon gestört.
• Drücken Sie 3 Sekunden lang die , die Displaysprache erscheint.
• Drücken Sie wiederholt bis ’PARALLEL ERLAUBT’ angezeigt wird.
• Drücken Sie oder um ’PARALLEL VERBOT’ zu selektieren.
• Drücken Sie um die Einstellung zu bestätigen.
!!!! Diese Funktion ist gegenstandslos, wenn das Gerät an einer Telefonzentrale
angeschlossen wird.
7.7 Ton-/Impulswahl
DEUTSCH
Zum Ändern des Wahlmodus drücken Sie im Stand-by-Modus 3 Sekunden lang .
Der selektierte Modus wird angezeigt.
8 Einen Anruf tätigen
Es gibt 2 Möglichkeiten einen Anruf zu tätigen:
1. Geben Sie die Telefonnummer ein. Falls nötig können Sie die letzte Ziffer mit
der -Taste löschen. Heben Sie das Mobilteil ab oder drücken Sie . Die
Telefonnummer wird automatisch im Freisprechmodus gewählt.
2. Nehmen Sie den Empfänger ab oder . Geben Sie die Telefonnummer ein.
Anmerkung: In der ersten Zeile des Displays wird die Anrufdauer angezeigt [h:mm:ss].
Im Freisprechmodus können Sie die Lautsprecherlautstärke mit oder
einstellen. Die Lautsprecherlautstärke wird angezeigt.
8.1 Wahlwiederholung der letzten Nummer
Das Allure 300 speichert die 8 zuletzt gewählten Telefonnummern im Speicher unter Angabe
der Anrufdauer.
Drücken Sie um durch den Wahlwiederholungsspeicher zu scrollen. Wenn die
gewünschte Nummer im Display erscheint, gibt es zwei Möglichkeiten zurückzurufen:
1. Drücken Sie die Wähltaste. Die gewünschte Telefonnummer wird automatisch im
Freisprechmodus gewählt.
2. Nehmen Sie den Empfänger ab. Die Nummer wird automatisch gewählt.
Um sofort die zuletzt gewählte Nummer zu wählen, nehmen Sie das Mobilteil ab und
drücken
Anmerkung: Die Wahlwiederholungstaste kann bei der Eingabe einer
Telefonnummer auch als Pausentaste verwendet werden! Im Display erscheint an der
Stelle, an der Sie eine 3-sekündige Pause eingefügt haben, der Buchstabe ’P’.
Topcom Allure 300 25
Page 26

Topcom Allure 300
8.2 Deaktivierung des Mikrofons (Stummschaltung)
Es ist möglich das Mikrofon während eines Gesprächs zu deaktivieren, indem man
drückt. Sie können nun frei sprechen, ohne dass der Anrufer Sie hört.
Drücken Sie erneut , wenn Sie zu Ihrem Gespräch zurückkehren möchten.
8.3 Warteschleife mit Musik
Es ist möglich den Anrufer während eines Gesprächs in die Warteschleife zu hängen, indem
man drückt. Sie können nun frei sprechen, ohne dass der Anrufer Sie hört. Der Anrufer
hört eine digitale Melodie. Die Melodie können Sie ändern, indem Sie eine der beiden Tasten
drücken: oder .
Drücken Sie erneut , wenn Sie zu Ihrem Gespräch zurückkehren möchten.
8.4 Klingellautstärke
Wenn Sie einen Telefonanruf erhalten, klingelt das Gerät. Die Klingellautstärke kann mit dem
Klingellautstärkeschalter an der Seite des Telefons (Hi-, Lo-) eingestellt werden.
8.5 Flash-Taste
Drücken Sie um diverse Dienste wie ’Call Waiting’ (wenn dieser Service von Ihrer
Telefongesellschaft unterstützt wird) zu nutzen; oder Anrufe weiterzuleiten, wenn Sie eine
Telefonzentrale (PABX) verwenden.
Die Flash-Zeit kann mit dem Schalter an der Seite des Telefons selektiert werden (100/300/
600ms).
9 Rufnummernanzeige
9.1 Allgemeine Informationen
Wenn Sie ein Abonnement für den Rufnummernerkennungsdienst haben, erscheint im
Display die Telefonnummer und der Name (wenn das Netzwerk das unterstützt) des
Anrufers. Wenn Sie die Telefonnummer mit dem Namen im Telefonbuch gespeichert haben,
erscheint der programmierte Name im Display (Namensindentifikationsfunktion).
9.2 Anrufliste
Die Größe der Anrufliste wurde beim Initialisieren des Telefons eingestellt. Die
Telefonnummern, die Sie mehrmals angerufen haben, werden nicht gespeichert, aber die
Anzeige für wiederholtes Anrufen REP wird angezeigt. Jede eingehende Telefonnummer
wird in der Anrufliste unter Angabe von Datum und Uhrzeit gespeichert.
Im Stand-by-Modus wird die Anzahl der neu eingegangenen Anrufe im Display ’ALL CALLS
000’ (immer in Englisch) angezeigt. Die LED für neue Nachrichten blinkt, bis Sie alle neuen
Nachrichten abgerufen haben.
26 Topcom Allure 300
Page 27

Topcom Allure 300
9.2.1 Durch die Anrufliste scrollen
• Sie können durch die Anrufliste scrollen, indem Sie eine der beiden Tasten drücken:
oder .
• Wenn 15 Sekunden lang keine Taste betätigt wird, kehrt das Gerät zum Stand-by-Modus
zurück.
9.2.2 Eine Telefonnummer aus der Anrufliste wählen
• Selektieren Sie die gewünschte Telefonnummer.
• Drücken Sie . Die Telefonnummer wird automatisch im Freisprechmodus gewählt.
• Wenn Sie die Vorwahl wählen möchten (siehe §˜7.5), drücken Sie zweimal .
• Nehmen Sie das Mobilteil auf, wenn Sie über das Mobilteil sprechen möchten.
9.2.3 Telefonnummern aus der Anrufliste löschen
a) Eine Nummer löschen
• Selektieren Sie die Nummer, die Sie löschen möchten.
• Drücken Sie kurz . GELOESCHT erscheint im Display.
Es wird die nächste Nummer der Anrufliste angezeigt.
DEUTSCH
b) Die gesamte Anrufliste löschen
• Öffnen Sie die Anrufliste und selektieren Sie eine Nummer, die nicht mit VIP
gekennzeichnet ist (siehe §9.3)
• Drücken Sie 2 Sekunden lang die Löschtaste, im Display erscheint "ALLE
GELOESCHT".
Wenn Sie die gesamte Anrufliste löschen, bleiben VIP-Nummern gespeichert
(siehe § 9.3).
9.3 VIP Liste
Nummern können vor Löschen aus der Anrufliste geschützt werden, wenn man ’ALLE
GELOESCHT’ selektiert. Dafür müssen die Nummern als VIP gekennzeichnet werden.
Alle VIP-Nummern sind in der Anrufliste sichtbar, können aber auch in einer separaten VIPListe angezeigt werden.
9.3.1 Eine Nummer zu der VIP-Liste fügen.
• Scrollen Sie durch die Anrufliste, indem Sie eine der beiden Tasten drücken:
oder .
• Drücken Sie . Das VIP-Symbol wird angezeigt.
9.3.2 Eine Nummer aus der VIP-Liste selektieren und anrufen
• Drücken Sie wiederholt um durch den die VIP-Liste zu scrollen.
• Drücken Sie . Die Telefonnummer wird automatisch im Freisprechmodus gewählt.
• Nehmen Sie das Mobilteil auf, wenn Sie über das Mobilteil sprechen möchten.
9.3.3 Einzelne Telefonnummern aus der VIP-Liste löschen
• Selektieren Sie die VIP-Nummer, die Sie aus der Anrufliste löschen möchten.
• Drücken Sie kurz . GELOESCHT erscheint im Display.
• Es wird die nächste Nummer der Anrufliste angezeigt.
Topcom Allure 300 27
Page 28

Topcom Allure 300
9.4 Sprachbox
Wenn Sie eine Sprachmitteilung in Ihrer persönlichen Sprachbox erhalten haben, erscheint
im Display das Sprachbox-Symbol. Wenn Sie die Nachrichten in der Mailbox abgehört
haben, verschwindet das Symbol.
* Sprachmitteilungen sind eine Netzwerkfunktion. Überprüfen Sie mit Ihrem
Netzwerkbetreiber, ob diese Funktion für Ihren Anschluss verfügbar ist.
10 Telefonbuch
Die Größe des Telefonbuchs wurde beim Initialisieren des Telefons eingestellt.
Normalerweise können 32 Telefonnummern mit Namen gespeichert werden (siehe §6.2).
10.1 Verwendung der alphanumerischen Tastatur
Mit der alphanumerischen Tastatur können Sie Text eingeben. Um einen Buchstaben zu
selektieren, drücken Sie die entsprechende Taste. Wenn Sie beispielsweise die numerische
Taste ’5’ drücken, erscheint das erste Zeichen (J) im Display. Drücken Sie mehrfach, wenn
Sie ein anderes Zeichen auf dieser Taste selektieren möchten.
Drücken Sie zweimal die Taste ’2’ um den Buchstaben ’B’ zu selektieren. Wenn Sie sowohl
’A’ als auch ’B’ selektieren möchten, drücken Sie
einmal ’2’ um ’A’ zu selektieren, warten dann 2 Sekunden lang, bis der Cursor auf die nächste
Stelle gesprungen ist und drücken dann zweimal ’2’ um ’B’ zu selektieren. Drücken Sie ’1’
um ein Leerzeichen einzufügen. Um falsch eingegebene Zeichen zu löschen, drücken
Sie .
10.2 Eine Nummer im Telefonbuch speichern
• Drücken Sie .
• Drücken Sie .
• Geben Sie mit der alphanumerischen Tastatur den Namen ein und drücken Sie als
Bestätigung.
• Geben Sie die gewünschte Telefonnummer ein und drücken Sie als Bestätigung.
• Wiederholen Sie diese Schritte um eine andere Nummer einzugeben oder drücken Sie
zweimal um die Einstellung zu verlassen.
10.3 Eine Nummer aus dem Telefonbuch selektieren und anrufen
• Drücken Sie .
• Drücken Sie .
• Geben Sie mit der alphanumerischen Tastatur den ersten Buchstaben des gewünschten
Namens ein.
• Die Nummern werden nur nach dem ersten Buchstaben sortiert.
• Suchen Sie den Namen im Telefonbuch, indem Sie eine der beiden Tasten drücken:
oder .
• Wenn der gewünschte Name im Display angezeigt wird, nehmen Sie das Mobilteil auf
oder drücken auf . Die Nummer wird automatisch gewählt.
28 Topcom Allure 300
Page 29

Topcom Allure 300
10.4 Eine Nummer und einen Namen im Telefonbuch ändern
• Selektieren Sie die gewünschte Nummer nach dem Namen aus dem Telefonbuch, wie
unter §10.3 angegeben.
• Drücken Sie .
• Bearbeiten Sie den Namen, wenn notwendig.
• Drücken Sie .
• Bearbeiten Sie die Nummer, wenn notwendig.
• Drücken Sie .
• Drücken Sie zweimal um das Telefonbuch zu verlassen.
10.5 Eine Nummer und einen Namen aus dem Telefonbuch löschen
• Selektieren Sie die gewünschte Nummer aus dem Telefonbuch, wie unter §10.3
angegeben.
• Drücken Sie 2 Sekunden bis GELOESCHT angezeigt wird.
• Drücken Sie um das Menü zu verlassen.
11 Speichernummern
DEUTSCH
Sie können 4 Direktwahlnummer (max. 16 Zeichen) speichern. Diese Speichernummern
können gewählt werden, indem man M1-M4 drückt.
11.1 Eine Nummer in einem Direktwahlspeicher speichern
• Drücken Sie 2 Sekunden lang M1.
• Geben Sie die Telefonnummer ein.
• Drücken Sie die gewünschte Direktwahltaste (M1-M8).
Direktwahlspeicher können nur überschrieben, nicht gelöscht werden.
11.2 Eine Direktwahlnummer anrufen
• Drücken Sie die gewünschte Direktwahltaste. Die gespeicherte Nummer wird angezeigt.
• Drücken Sie Freisprechanlage oder nehmen Sie das Mobilteil auf.
12 Alarm
Das Allure 300 hat eine Alarmfunktion.
12.1 Zum Einstellen des Alarms
Drücken Sie 2 Sekunden lang .
Drücken Sie oder um die gewünschte Stunde zu selektieren.
Drücken Sie zum Bestätigen.
Drücken Sie oder um die gewünschten Minuten zu selektieren.
Drücken Sie zum Bestätigen.
Topcom Allure 300 29
Page 30

Topcom Allure 300
12.2 Zum Aktivieren/Deaktivieren des Alarms
Drücken Sie kurz um den Alarm an- oder auszuschalten (ON-OFF).
Bei ON wird das Alarmsymbol im Display angezeigt.
Der Alarmton hat dieselbe Melodie wie die Melodie der ’Warteschleife mit Musik’ (siehe §8.3)
Wenn der Alarmton erklingt, drücken Sie zweimal , sonst ertönt die Melodie eine Minute
lang.
13 Standardeinstellungen
Flashtime: 100ms
Wahlmodus: Ton
Displaysprache: Englisch
14 Technische Eigenschaften
Wahloptionen: MFV (Ton) / Impuls
Flashtime: 100/300/600 ms
Batterien: 3 x 1,5V, AAA nicht aufladbar
Umgebungstemperatur: +5Å‹C bis +45Å‹C
Zugelassene relative Luftfeuchtigkeit:25 bis 85%
15 Garantie
15.1 Garantiezeit
Topcom Geräte habe eine 24-monatige Garantiezeit.Die Garantiezeit beginnt an dem Tag,
an dem das neue Gerät erworben wurde. Die Garantie für Batterien ist auf 6 Monate nach
Erwerb begrenzt.Verschleißartikel oder Mängel, die den Wert oder die
Gebrauchstauglichkeit des Gerätes nur unerheblich beeinflussen, sind von der Garantie
ausgeschlossen.
Der Garantieanspruch muss durch den Originalkaufbeleg, auf dem das Kaufdatum und das
Gerätemodell ersichtlich sind, nachgewiesen werden.
15.2 Abwicklung des Garantiefalles
Senden Sie das fehlerhafte Gerät mit dem gültigen Kaufbeleg an ein Topcom Service
Zentrum.
Tritt ein Gerätefehler innerhalb der Garantiezeit auf, übernimmt Topcom oder ein
autorisiertes Service Zentrum unentgeltlich die Reparatur jedes durch einen Material- oder
Herstellerfehler aufgetretenen Defekts.
Topcom wird nach eigenem Ermessen die Garantieansprüche mittels Reparatur oder
Austausch des fehlerhaften Gerätes oder von Teilen des fehlerhaften Gerätes erfüllen.Bei
einem Austausch können die Farbe und das Modell vom eigentlich erworbenen Gerät
abweichen.
30 Topcom Allure 300
Page 31

Topcom Allure 300
Das ursprüngliche Kaufdatum bestimmt den Beginn der Garantiezeit.Die Garantiezeit
verlängert sich nicht, wenn das Gerät von Topcom oder von einem seiner autorisierten
Service Zentren ausgetauscht oder repariert wird.
15.3 Garantieausschlüsse
Schäden oder Mängel, die durch unsachgemäße Handhabung oder Betrieb verursacht
wurden, sowohl als auch Defekte, die durch die Verwendung von Nicht-Originalteilen oder
die Verwendung von nicht von Topcom empfohlenen Zubehör entstehen, werden nicht von
der Garantie abgedeckt.
Schnurlose Telefone von Topcom wurden so konstruiert, dass sie ausschließlich mit
wiederaufladbaren Batterien funktionieren.Ein durch nicht-wiederaufladbare Batterien
verursachter Schaden fällt nicht unter die Garantieleistung.
Die Garantie deckt keine Schäden ab, die durch äußere Einflüsse entstanden sind, wie z.B.
Blitzeinschlag, Wasser, Brände oder auch jegliche Transportschäden.
Wenn die Seriennummer des Gerätes verändert, entfernt oder unleserlich gemacht wurde,
kann keine Garantie in Anspruch genommen werden.
Alle Garantieansprüche erlöschen, wenn das Gerät durch den Käufer oder durch
unqualifizierte und nicht offiziell anerkannte Topcom Service Zentren repariert, verändert
oder umgebaut wurde.
DEUTSCH
Topcom Allure 300 31
Page 32

Topcom Allure 300
1 Antes del uso Inicial 34
1.1 Propósito deseado 34
1.2 Identificador de llamada entrante 34
1.3 Conexión 34
2 Limpieza 34
3 Mantenimiento 34
4 Consejo de seguridad 35
5 Conozca su teléfono 36
5.1 Botones / LED 36
5.2 Pantalla 37
6 Empezando 37
6.1 Instalación 37
6.2 Inicialización 37
7 Ajustes 38
7.1 Ajuste del idioma del texto de la pantalla 38
7.2 Ajuste del contraste de la pantalla 38
7.3 Ajuste de la fecha y la hora (ajuste automático con la 1ra. llamada) 39
7.4 Ajuste del Prefijo Local (5 dígitos) 39
7.5 Ajuste del Prefijo de Marcado 39
7.6 Permitir/prohibir teléfono paralelo 40
7.7 Ajuste de tono/pulso 40
8 Hacer una llamada telefónica 40
8.1 Volver a marcar el último número 40
8.2 Desactivación del micrófono (silencio) 40
8.3 Música en espera 41
8.4 Volumen del timbre 41
8.5 Ajuste Tecla R 41
9 Identificador de llamada entrante 41
9.1 Información General 41
9.2 Lista de llamadas 41
9.3 Lista VIP 42
9.4 Buzón de voz 42
10 Agenda 43
10.1 Uso del teclado alfanumérico 43
10.2 Añadir un número a la Agenda 43
10.3 Selección y llamada a un número de la Agenda 43
10.4 Cambio de un número y nombre de la Agenda 43
10.5 Borrar un número y nombre de la Agenda 44
11 Números de la memoria 44
11.1 Añadir un número a la Memoria Directa 44
11.2 Llamar a un número de la Memoria Directa 44
12 Alarma 44
12.1 Para poner la alarma 44
12.2 Para activar/desactivar la alarma 44
13 Valores predeterminados 45
32 Topcom Allure 300
Page 33

Topcom Allure 300
14 Especificaciones técnicas 45
15 Garantia Topcom 46
15.1 Periodo de garantía 46
15.2 Tratamiento de la garantía 46
15.3 Exclusiones de la garantía 46
ESPAÑOL
Conexión a la red telefónica analógica.
Topcom Allure 300 33
Page 34

Topcom Allure 300
1 Antes del uso Inicial
Gracias por comprar este teléfono nuevo con Identificador de llamada entrante.
1.1 Propósito deseado
Este producto está pensado para conectarlo en interior a una línea de teléfono analógica
PSTN.
1.2 Identificador de llamada entrante
Este es un servicio que lo provee la red. Después de suscribir el identificador de llamada
entrante, este teléfono visualiza el número de teléfono que llama.
Para usar el Identificador de llamada entrante, se tiene que activar este
servicio en su línea telefónica. Normalmente necesita una suscripción
independiente de su compañía telefónica para activar esta función. Si no
tiene esta función en su línea telefónica, NO se mostrarán en la pantalla
de su teléfono los números de teléfono entrantes.
1.3 Conexión
Este aparato se ha diseñado y fabricado cumpliendo con la norma 98/482/EC, referente a la
conexión Pan Europea de una terminal para la Red Pública de Telefonía Conmutada (PSTN)
y siguiendo las pautas establecidas por la Directiva 1999/5/EC sobre los equipos
electrónicos de radio y el reconocimiento recíproco de su conformidad. No obstante, debido
al hecho de que hay algunas diferencias en las PSTNs de un país a otro, las medidas de
verificación por ellos mismos no establecen una garantía incondicional para el
funcionamiento óptimo en cada punto de conexión de la PSTN de cualquier país. Si surge
algún problema, póngase en contacto primero con el distribuidor.
En cualquier caso, se debe respetar el uso de las condiciones para las que se creó el
producto además de evitar su uso en redes públicas o privadas con requisitos técnicos
claramente diferenciados de los establecidos en la UE.
2Limpieza
Limpie el teléfono con un trapo ligeramente húmedo o con un trapo antiestático. No use
nunca agentes limpiadores o disoluciones abrasivas.
3 Mantenimiento
• Tire las baterías y mantenga el teléfono de una forma respetuosa con
el medioambiente.
• Tiene que eliminar las baterías de una forma respetuosa con el
medioambiente de acuerdo con las regulaciones de su país.
34 Topcom Allure 300
NiMH
Page 35

Topcom Allure 300
4 Consejo de seguridad
Se deben seguir siempre los siguientes consejos de seguridad antes de
usar un equipo eléctrico.
Por favor lea con cuidado la información siguiente relacionada con la
seguridad y el uso adecuado. Familiarícese con todas las funciones del
equipo. Tenga cuidado con cumplir estas notas de consejo y si es
necesario páselas a una tercera parte.
• No ponga en funcionamiento el equipo si el cable telefónico o el equipo mismo están
dañados.
• Si se cae el equipo, lo debe revisar un técnico antes de utilizarlo más.
• Dentro del equipo hay voltajes peligrosos. No lo abra nunca ni introduzca objetos por los
agujeros de ventilación.
• No deje que entren líquidos en el equipo. En caso de emergencia, saque el enchufe de
la toma de corriente.
• De igual manera, si se produce un fallo durante el uso o antes de empezar a limpiar el
equipo, saque el enchufe de la toma de corriente.
• No toque los contactos del enchufe con objetos afilados o metálicos.
• No haga ninguna modificación o reparación al equipo usted mismo. Las reparaciones al
equipo o a los cables de la red las debe hacer solo un centro de reparación especialista.
Reparaciones insatisfactorias pueden conducir a un daño considerable para el usuario.
• Los niños con frecuencia subestiman los daños relacionados con el equipo eléctrico.
Por lo tanto no deje nunca a los niños sin vigilarlos cerca del equipo eléctrico.
• El equipo no es para utilizarlo en una habitación húmeda (p.ej. cuartos de baño) o
habitaciones donde hay mucho polvo.
• Si el equipo está conectado a la línea telefónica durante una tormenta lo puede dañar
un rayo. Por lo tanto debe sacar el enchufe de la toma de corriente de red antes de
comenzar la tormenta.
• Para desconectar completamente el equipo del suministro eléctrico, se debe sacar el
enchufe de la toma de corriente. Cuando haga esto, tire siempre del enchufe y nunca
del cable.
ESPAÑOL
Topcom Allure 300 35
Page 36

Topcom Allure 300
5 Conozca su teléfono
5.1 Botones / LED
1 2
15
14
13
12
10
11
1. Indicador de ’Llamadas Nuevas’
2. Pantalla
3. Botón de Subir Volumen /
3
4. Botón de Agenda
4
5. Botón de Marcar / Alarma
5
Borrar
6. Memoria Directa (M1-M4)
7. Botón de Silencio
6
8. Teclado Alfanumérico
7
9. Botón de Volver a Marcar/ Pausa
10. Botón de Manos Libres
11. Botón de Destello
8
12. Botón de Música en Espera
13. Botón de Bajar
14. Botón de Bajar Volumen / VIP
9
15. Botón de Subir
16. Conector del cable de línea +
conector al teléfono paralelo o
módem.
17. Interruptor del tiempo de flash
18. Ajustes del volumen de timbre
ER
ING
R
600 100
300
16
1718
36 Topcom Allure 300
Page 37

Topcom Allure 300
USE
IZE
"AA
RIE
5.2 Pantalla
Recibió un mensaje nuevo en el buzón electrónico de la red
telefónica.
XX
REP
VIP
NEW
Ha recibido ’XX’ mensajes nuevos en su lista de llamadas.
Ha recibido la llamada más de una vez.
Ha seleccionado el número como VIP y no se puede borrar de la lista
de llamadas.
La batería está casi vacía y es necesario cambiarla.
La alarma está desactivada.
6 Empezando
6.1 Instalación
Ponga las baterías en el compartimento de la batería para
activar la pantalla:
• Abra el compartimento de la batería de la parte de atrás de
la unidad.
• Inserte 3 baterías alcalinas AAA (1,5V).
• Cierre el compartimento de la batería.
• Conecte un extremo del cable de línea al enchufe de la
pared de la línea telefónica y el otro extremo a la parte de
atrás del teléfono.
• Se pueden usar los ’DATOS’ del conector para conectar el teléfono en paralelo o para
conectar un módem analógico.
+
-
USE
3 S3SIZE
"AA
BATTERIE
+
-
+
-
A"
S
ESPAÑOL
Cuando aparezca el indicador de batería , se deben cambiar las
baterías. Cuando se quiten las baterías, tiene 5 minutos para cambiarlas.
Después de ese tiempo, se perderá la memoria.
¡Nunca cambie las baterías cuando esté conectada la línea telefónica!
6.2 Inicialización
6.2.1 Idioma de la pantalla
Después de instalar las baterías, aparece el idioma de la pantalla por defecto.
Pulse o para seleccionar el idioma de la pantalla deseado.
Pulse para ir al ajuste siguiente ’Capacidad de memoria’.
Topcom Allure 300 37
Page 38

Topcom Allure 300
6.2.2 Capacidad de memoria
La capacidad máxima del Allure 300 es 110 entradas incluyendo nombres y números.
Este número se puede dedicar a la Agenda y/o a la lista de llamada entrante. En este ajuste
puede seleccionar la capacidad de la Agenda.
Pulse o para seleccionar la memoria de la agenda ’DIRECTORIO M= XXX (por
defecto 032)’
Pulse para confirmar la memoria de la agenda.
Se visualizará brevemente el tamaño de la memoria de la lista de ID de Llamante y la unidad
irá al modo en espera.
Para tener acceso al ajuste de la memoria, tiene que quitar las baterías
durante más de 10 minutos. Toda la información guardada se perderá
después de la inicialización.
7 Ajustes
7.1 Ajuste del idioma del texto de la pantalla
Cuando no cambie el idioma durante la inicialización, puede seleccionarlo de la forma
siguiente:
• Pulse el botón durante 3 segundos.
• Pulse o para seleccionar el idioma de la pantalla deseado.
• Pulse para ir al ajuste siguiente.
Si no se pulsa ningún botón en 10 segundos, la unidad volverá al modo en espera.
¡Sólo las palabras de la 3ª línea de la pantalla se indicarán en el idioma
seleccionado. En espera la pantalla indicará ’ALL CALLS 000’ para
indicar el número de llamadas guardadas en la lista de llamadas sólo en
inglés!
7.2 Ajuste del contraste de la pantalla
Puede seleccionar el contraste deseado de la forma siguiente:
• Pulse durante 3 segundos, aparece el idioma de la pantalla.
• Pulse otra vez.
• Pulse o para seleccionar el contraste de la pantalla deseado.
• Pulse para ir al ajuste siguiente.
Si no se pulsa ningún botón en 10 segundos, la unidad volverá al modo en espera.
38 Topcom Allure 300
Page 39

Topcom Allure 300
7.3 Ajuste de la fecha y la hora (ajuste automático con la 1ra. llamada)
Se ajusta automáticamente con la 1ra. llamada recibida utilizando el servicio de Identificador
de llamadas. Cuando su proveedor telefónico envíe la fecha y hora junto el número de
teléfono, el reloj del teléfono se pondrá automáticamente. El año se debe poner
manualmente.
También es posible poner el reloj manualmente:
• Pulse durante 3 segundos, aparece el idioma de la pantalla.
• Pulse 2 veces. Parpadeará el año.
• Pulse el botón o para poner el año.
• Pulse para confirmar el año y cambiar el mes.
• Repita los pasos anteriores para cambiar y confirmar mes, día, hora y minutos.
• Después de confirmar los minutos, irá al ajuste siguiente.
Si no se pulsa ningún botón en 10 segundos, la unidad volverá al modo en espera.
7.4 Ajuste del Prefijo Local (5 dígitos)
También se ajusta automáticamente con la 1ra. llamada recibida, utilizando el Identificador
de llamada. El prefijo Local se debe fijar cuando no le esté permitido marcar fuera del código
de su propia área.
Si hay una llamada entrante, que empieza por el prefijo programado, no se visualizará el
código y no se guardará en la lista de llamadas.
ej. Cuando está programado 012 y el número de la llamada entrante es 0123456789, se verá
y guardará en la lista de llamadas 3456789.
ESPAÑOL
• Pulse durante 3 segundos, aparece el idioma de la pantalla.
• Pulse repetidamente hasta que se visualice ’PROGRAMAR CODIGO’.
• Pulse o para seleccionar el primer dígito del código local (0-9 o ’-’ para
deseleccionar).
• Pulse para confirmar el primer dígito y cambiar al dígito siguiente.
• Repita los pasos anteriores para los 5 dígitos.
• Cuando no se vaya a poner ningún prefijo local seleccione (- - - - -).
• Después de confirmar el último dígito, irá al ajuste siguiente.
Si no se pulsa ningún botón en 10 segundos, la unidad volverá al modo en espera.
7.5 Ajuste del Prefijo de Marcado
Si tiene que marcar un prefijo de un dígito antes del número de teléfono de la lista de
llamadas o de la agenda, tiene que poner el Prefijo de Marcado.
• Pulse durante 3 segundos, aparece el idioma de la pantalla.
• Pulse repetidamente hasta que se visualice ’PREFIJO LARGO’.
• Pulse el botón o para seleccionar el prefijo (0-9 o ’-’ para deseleccionar).
• Pulse el botón de Subir Volumen / Borrar para confirmar el prefijo.
Si no se pulsa ningún botón en 10 segundos, la unidad volverá al modo en espera.
Para marcar el prefijo antes del número seleccionado de la lista de llamadas de la
agenda, pulse el botón de marcar dos veces.
Topcom Allure 300 39
Page 40

Topcom Allure 300
7.6 Permitir/prohibir teléfono paralelo
Puede prohibir que se pueda colocar otro teléfono en paralelo con el Allure 300. Si activa
esta función la llamada del teléfono paralelo se interrumpirá.
• Pulse durante 3 segundos, aparece el idioma de la pantalla.
• Pulse repetidamente hasta que se visualice ’CHARLA PARALELA’.
• Presionar o para seleccionar ’PROHIBIR’.
• Pulse para confirmar el ajuste.
¡Esta función no funcionará cuando se instale detrás de una centralita!
7.7 Ajuste de tono/pulso
Para cambiar el modo de marcado, pulse durante 3 segundos en el modo en espera.
Se visualiza el modo seleccionado.
8 Hacer una llamada telefónica
Hay 2 formas de hacer una llamada telefónica:
1. Introduzca el número de teléfono. Si es necesario, puede borrar los últimos dígitos
pulsando el botón . Descuelgue el microteléfono o pulse . El número de teléfono
se marcará automáticamente en el modo manos libres.
2. Descuelgue el auricular o . Introduzca el número de teléfono.
Nota: Aparece el cronómetro de duración de la llamada en la 1ª línea de la pantalla
[h:mm:ss].
En el modo manos libres, se puede ajustar el volumen del altavoz usando o . Se
visualiza el volumen del altavoz.
8.1 Volver a marcar el último número
El Allure 300 guarda en la memoria los 8 últimos números de teléfono marcados indicando
la duración de la llamada.
Pulse para desplazarse por la memoria de Volver a Marcar. Cuando aparezca en la
pantalla el número deseado, hay dos formas de volver a llamar:
1. Pulse el botón de Marcar. El número de teléfono se marcará automáticamente en
manos libres.
2. Descuelgue el auricular. El número se marcará automáticamente.
Para volver a marcar inmediatamente el último número marcado, descuelgue el
microteléfono y pulse
Nota: ¡El botón de Volver a Marcar también se puede usar como un botón de Pausa
mientras se introduce un número de teléfono! Aparece en la pantalla la letra ’P’ en el
lugar donde ha añadido una pausa de 3 seg.
8.2 Desactivación del micrófono (silencio)
Se puede desactivar el micrófono durante una conversación pulsando . Ahora puede
hablar libremente sin que le oiga el llamante.
Pulse otra vez si quiere volver a su conversación.
40 Topcom Allure 300
Page 41

Topcom Allure 300
8.3 Música en espera
Se puede poner al llamante en espera durante una conversación pulsando . Ahora puede
hablar libremente sin que le oiga el llamante. El llamante oirá una melodía digital. Se puede
cambiar la melodía pulsando o .
Pulse otra vez si quiere volver a su conversación.
8.4 Volumen del timbre
Cuando reciba una llamada telefónica, la unidad sonará. Se puede ajustar el volumen del
timbre por medio del interruptor de Volumen de Timbre en el lateral del teléfono (Hi-, Lo-).
8.5 Ajuste Tecla R
Pulse el para usar ciertos servicios como ’Llamada en Espera’ (si su compañía telefónica
proporciona este servicio); o para pasar llamadas telefónicas cuando esté usando una
centralita telefónica (PABX).
El tiempo de flash se puede seleccionar con el interruptor lateral del teléfono (100/300/
600ms).
9 Identificador de llamada entrante
9.1 Información General
Cuando tenga activado este servicio, aparecerán en la pantalla el número de teléfono del
llamante y el nombre (cuando lo soporte la red). Si guardó el número de teléfono con el
nombre en la Agenda, aparecerá en la pantalla el nombre programado (función de
etiquetado del nombre).
9.2 Lista de llamadas
El tamaño de la lista de llamadas se ha fijado cuando se inicializó el teléfono. Los números
de teléfono que ha recibido más de una vez, no se guardarán, pero se visualizará el
indicador de repetido REP. Cada número entrante se guardará en la Lista de Llamadas
indicando la fecha y hora.
En el modo en espera el número de llamadas recibidas nuevas aparece en la pantalla ’ALL
CALLS 000’ (siempre en inglés). El LED de mensaje nuevo parpadeará hasta que revise
todos los mensajes nuevos.
9.2.1 Desplazamiento por la Lista de Llamadas
• Puede desplazarse por la Lista de Llamadas pulsando o .
• Si no se pulsa ningún botón en 15 segundos, volverá al modo en espera.
ESPAÑOL
9.2.2 Llamar a un número de la Lista de Llamadas
• Seleccione el número de teléfono deseado.
• Pulse . El número se marcará automáticamente en el modo manos libres.
• Si quiere marcar el prefijo de marcado (ver §7.5), pulse dos veces.
• Descuelgue el microteléfono si quiere comunicarse por el microteléfono.
Topcom Allure 300 41
Page 42

Topcom Allure 300
9.2.3 Borrar números de la Lista de Llamadas
a) Borrar un número
• Seleccione el número que quiere borrar.
• Pulse brevemente. "BORRAR" aparece en la pantalla.
Se visualiza el número siguiente de la lista de llamadas.
b) Borrar la Lista de Llamadas entera
• Entre en la Lista de Llamadas y seleccione un número no indicado con VIP (ver §9.3)
• Pulse el botón de Borrar durante 2 segundos, "BORRAR TODO" aparece en la
pantalla.
Cuando borre la lista de llamadas entera, los números VIP permanecerán guardados
(ver §9.3).
9.3 Lista VIP
Se pueden proteger los números para que no se borren de la lista de llamadas cuando se
selecciona ’borrar todo’. Para ello el número se debe asignar como VIP.
Todos los números VIP están visibles en la Lista de Llamadas, pero también se pueden
comprobar en una lista VIP independiente.
9.3.1 Asignación de un número a la lista VIP.
• Desplácese por la Lista de Llamadas pulsando o .
• Pulse . Se visualizará el icono VIP.
9.3.2 Selección y llamada a un número de la Lista VIP
• Pulse repetidamente para desplazarse por la lista VIP.
• Pulse . El número se marcará automáticamente en el modo manos libres.
• Descuelgue el microteléfono si quiere comunicarse por el microteléfono.
9.3.3 Borrar números individuales de la Lista VIP
• Seleccione el número VIP que quiere borrar de la Lista de Llamadas.
• Pulse brevemente. "BORRAR" aparece en la pantalla.
• Se visualiza el número siguiente de la lista de llamadas.
9.4 Buzón de voz
Cuando ha recibido un mensaje de voz en su Buzón de Voz Personal, aparece en la pantalla
el símbolo de Correo de Voz. Tan pronto como haya escuchado los mensajes del buzón,
desaparece el símbolo.
* El buzón de voz es una característica de red. Verifique con su operador de red si está
disponible en su línea.
42 Topcom Allure 300
Page 43

Topcom Allure 300
10 Agenda
El tamaño de la agenda se ha fijado cuando se inicializó el teléfono. Por defecto, se pueden
guardar 32 números de teléfono con nombre (ver §6.2).
10.1 Uso del teclado alfanumérico
Uso del teclado alfanumérico para introducir texto. Para seleccionar una letra, pulse el botón
correspondiente. Por ej. si pulsa el botón numérico ’5’, aparecerá en la pantalla el primer
carácter (J). Pulse varias veces si quiere seleccionar otro carácter de este botón.
Pulse el botón ’2’ dos veces para seleccionar la letra ’B’. Si quiere seleccionar ’A’ además
de ’B’, pulse
el botón ’2’ una vez para seleccionar ’A’, espere 2 segundos hasta que el cursor se haya
movido a la posición siguiente y pulse luego el botón ’2’ dos veces para seleccionar ’B’. Para
añadir un espacio, pulse 1. Se pueden borrar los caracteres erróneos introducidos
pulsando .
10.2 Añadir un número a la Agenda
• Pulse .
• Pulse .
• Introduzca el nombre por medio del teclado alfanumérico y pulse para confirmar.
• Introduzca el número de teléfono deseado y pulse para confirmar.
• Siga los pasos previos para añadir otro número o pulse dos veces para salir del
ajuste.
10.3 Selección y llamada a un número de la Agenda
• Pulse .
• Pulse .
• Introduzca la primera letra del nombre deseado por medio del teclado alfanumérico.
• Los números se seleccionarán solo por la primera letra.
• Busque el nombre en la Agenda pulsando o .
• Cuando aparezca en la pantalla el nombre deseado, descuelgue el microteléfono y
pulse . El número se marcará automáticamente.
10.4 Cambio de un número y nombre de la Agenda
• Seleccione el número deseado de la Agenda por el nombre como se mencionó en
§10.3.
• Pulse .
• Edite el nombre cuando sea necesario.
•Pulse .
• Edite el número cuando sea necesario.
• Pulse .
• Pulse dos veces para salir de la agenda.
ESPAÑOL
Topcom Allure 300 43
Page 44

Topcom Allure 300
10.5 Borrar un número y nombre de la Agenda
• Seleccione el número deseado de la Agenda por el nombre como se mencionó en
§10.3.
• Pulse durante 2 segundos , "BORRAR" aparece en la pantalla.
• Pulse para salir de menú.
11 Números de la memoria
Puede programar 4 números Directos (máx. 16 dígitos). Estos números de la memoria se
pueden marcar pulsando M1-M4.
11.1 Añadir un número a la Memoria Directa
• Pulse M1 durante 2 segundos.
• Introduzca el número de teléfono.
• Pulse la tecla de Memoria Directa deseada (M1-M8).
Las memorias directas solo se pueden sobrescribir no borrar.
11.2 Llamar a un número de la Memoria Directa
• Pulse la tecla de Memoria Directa deseada, se visualiza el número guardado.
• Pulse manos libres o descuelgue el microteléfono.
12 Alarma
El Allure 300 tiene una función de alarma.
12.1 Para poner la alarma
Pulse durante 2 segundos.
Pulse o para seleccionar las horas.
Pulse para confirmar.
Pulse o para seleccionar los minutos.
Pulse para confirmar.
12.2 Para activar/desactivar la alarma
Pulse brevemente para Encender o Apagar la alarma.
Cuando la encienda, aparecerá en la pantalla el icono de alarma .
El sonido de la alarma es la misma melodía que la de ’música en espera’ (ver §8.3).
Cuando se oiga el sonido de la alarma, pulse dos veces, si no lo hace la melodía seguirá
durante un minuto.
44 Topcom Allure 300
Page 45

13 Valores predeterminados
Tiempo de destello: 100ms
Modo de marcado: Tono
Idioma de la pantalla:Inglés
14 Especificaciones técnicas
Opciones de marcado: DTMF (tono) / Pulso
Tiempo de destello: 100/300/600 ms
Baterías: 3 x 1,5V, AAA no-recargable
Temperatura ambiente: +5°C a +45°C
Humedad relativa del aire permitida:25 a 85%
Topcom Allure 300
ESPAÑOL
Topcom Allure 300 45
Page 46

Topcom Allure 300
15 Garantia Topcom
15.1 Periodo de garantía
Las unidades Topcom tienen un periodo de garantía de 24 meses. El periodo de garantía
empieza el día que se compra la unidad nueva. La garantía en las baterías está limitada a 6
meses desde la compra. Los Consumibles o defectos que tienen un efecto insignificante
para el funcionamiento o valor del equipo no están cubiertos.
La garantía se tiene que probar presentando el recibo original de compra, en el que se
indique la fecha de compra y el modelo del aparato.
15.2 Tratamiento de la garantía
La unidad defectuosa hay que devolverla al centro de reparación de Topcom incluyendo una
nota de compra válida.
Si el aparato desarrolla un fallo durante el periodo de garantía, Topcom o su centro de
reparación designado oficialmente repararan cualquier defecto causado por fallos
materiales o de fabricación gratis.
Topcom satisfará a su discreción sus obligaciones de garantía reparando o cambiando las
unidades o piezas de la unidades defectuosas. En caso de cambio, el color y modelo pueden
ser diferentes de la unidad original comprada.
La fecha de compra inicial determinará el comienzo del periodo de garantía. No se ampliará
el periodo de garantía si se cambia o repara la unidad por Topcom o sus centros de
reparación designados.
15.3 Exclusiones de la garantía
Los daños o defectos causados por tratamiento o utilización incorrectos y los daños
resultantes del uso de piezas o accesorios no originales no recomendados por Topcom no
están cubiertos por la garantía.
La garantía no cubre los daños causados por factores externos, como rayos, agua y fuego,
ni los daños causados durante el transporte.
No se podrá reclamar la garantía si se ha cambiado, quitado o si ha quedado ilegible el
número de serie de las unidades.
Cualquier reclamación de la garantía se invalidará si la unidad ha sido reparado, alterado o
modificado por el comprador o por centros de reparación no cualificados o no designados
oficialmente por Topcom.
46 Topcom Allure 300
Page 47

Page 48

U8006404
visit our website
www.topcom.net
 Loading...