Thunder Tiger S3 EB-4 User Manual



 1/8th
1/8th


 Nitro
Nitro


 Powered


 4WD
4WD


 Rally
Rally


 Car
Car


Engine and electrics are not included in the kit. |
No.6232-K10 |
 Please read all instructions thoroughly before assembling the kit.
The contents are subject to change without prior notice due to product improvements and specification changes.
Thunder Tiger Corporation guarantees this model kit to be free from defects in both material and workmanship. The total monetary value under warranty will in no case exceed the cost of the original kit purchased. This warranty does not cover any components damaged by use or modification. Part or parts missing from this kit must be reported within 60 days of purchase. No part or parts will be sent under warranty without proof of purchase. To receive part or parts under warranty, the service center must receive a proof of purchase and/or the defective part or parts. Should you find a defective or missing part, contact the authorized Thunder Tiger Service/Distributor nearest you. Under no circumstances can a dealer or distributor accept return of a kit if assembly has started.

|
|
|
|
|
|
|
|
|
|
|
|
|
|
|
|
|
|
|
|
|
|
|
|
|
|
|
|
|
|
|
|
|
|
|
|
|
|
|
|
|
|
|
|
|
|
|
|
|
|
|
|
|
|
|
|
|
|
|
|
|
INTRODUCTION |
|
|
|
|
|
|
|
|
|
|
|
|
|
|
|
|
|
|
|
|
The Thunder Tiger EB-4 S3 was designed as a whole new off-road 4WD nitro-racing buggy, |
|
|
|
|
|
|
|
|
|
|
|
|
|
|
|
|
|
|
|
|
especially on a high-speed and bumpy off-road track. There's no doubt that the innovation |
|
|
|
|
|
|
|
|
|
|
|
|
|
|
|
|
|
|
|
|
would be the very first priority of our design team. We have set this buggy far ahead of |
|
|
|
|
|
|
|
|
|
|
|
|
|
|
|
|
|
|
|
|
the current form of existing buggy design in the market in terms of the future designing |
|
|
|
|
|
|
|
|
|
|
|
|
|
|
|
|
|
|
|
|
trend. The new EB-4 S3 comes with some totally new settings that have never been applied |
|
|
|
|
|
|
|
|
|
|
|
|
|
|
|
|
|
|
|
|
on 1/8th scale nitro buggy before, such as the super low center of gravity, radical engineering |
|
|
|
|
|
|
|
|
|
|
|
|
|
|
|
|
|
|
|
|
of a car construction and more than innovative, good looking and high performance |
|
|
|
|
|
|
|
|
|
|
|
|
|
|
|
|
|
|
|
|
suspension. This is a look into the future for 1/8th scale cars and the future is here with |
|
|
|
|
|
|
|
|
|
|
|
|
|
|
|
|
|
|
|
|
Thunder Tiger. However there is no compromise between the innovation and quality. Thunder |
|
|
|
|
|
|
|
|
|
|
|
|
|
|
|
|
|
|
|
|
Tiger guarantees you should have many hours of trouble free use from this R/C product. |
|
|
|
|
|
|
|
|
|
|
|
|
|
|
|
|
|
|
|
|
We race and test our products around the world to bring you state-of-the-art R/C products. |
|
|
CAUTION |
|
|
|||||||||||||||||
|
Thank you for purchasing a Thunder Tiger Product. |
|||||||||||||||||||
|
|
|
|
|
|
|
|
|
|
|
|
|
|
|
|
|
|
|
Please read all instructions and familiarize yourself with the products and controls |
|
|
|
|
|
|
|
|
|
|
|
|
|
|
|
|
|
|
|
|
before operation. |
|
|
|
|
|
|
|
|
|
|
|
|
|
|
|
|
|
|
|
|
1. This product is not a toy. It is a high performance model product. It is important to familiarize |
|
|
|
|
|
|
|
|
|
|
|
|
|
|
|
|
|
|
|
|
yourself with the model, its manual, and its construction before assembly or operation. |
|
|
|
|
|
|
|
|
|
|
|
|
|
|
|
|
|
|
|
|
A child operating under the supervision of the adults is necessary. |
|
|
|
|
|
|
|
|
|
|
|
|
|
|
|
|
|
|
|
|
2. Always keep this instruction manual ready at your hand for your assembling and operating |
|
|
|
|
|
|
|
|
|
|
|
|
|
|
|
|
|
|
|
|
reference, even after completing the assembly. |
|
|
|
|
|
|
|
|
|
|
|
|
|
|
|
|
|
|
|
|
3. Make sure all the screws are properly tightened and all the parts are checked after running |
|
|
|
|
|
|
|
|
|
|
|
|
|
|
|
|
|
|
|
|
the car for a long period of time. |
|
|
|
|
|
|
|
|
|
|
|
|
|
|
|
|
|
|
|
|
4. For the best performance, it is important to make sure all the moveable parts work free |
|
|
|
|
|
|
|
|
|
|
|
|
|
|
|
|
|
|
|
|
without binding. |
|
|
|
|
|
|
|
|
|
|
|
|
|
|
|
|
|
|
|
|
5. Do not operate model products in rain, on public roads, near crowds, near airport, or |
|
|
|
|
|
|
|
|
|
|
|
|
|
|
|
|
|
|
|
|
near areas with restricted radio operation. |
|
|
|
|
|
|
|
|
|
|
|
|
|
|
|
|
|
|
|
|
6. Always keep fuel away from heat and open flame. Only operate in open, well-ventilated |
|
|
|
|
|
|
|
|
|
|
|
|
|
|
|
|
|
|
|
|
area. Store fuel in cool, dry area. Keep the fuel bottle cap tightly closed. Clean up any |
|
|
|
|
|
|
|
|
|
|
|
|
|
|
|
|
|
|
|
|
leak or excess fuel before starting the engine. |
|
|
|
|
|
|
|
|
|
|
|
|
|
|
|
|
|
|
|
|
7. This product, its parts, and its construction tools can be harmful to your health. Always |
|
|
|
|
|
|
|
|
|
|
|
|
|
|
|
|
|
|
|
|
exercise extreme caution when assembling and/or operating this product. Do not touch |
|
|
|
|
|
|
|
|
|
|
|
|
|
|
|
|
|
|
|
|
any part of the model that rotates. |
|
|
|
|
|
|
|
|
|
|
|
|
|
|
|
|
|
|
|
|
8. Check your radio frequency with the proper operating frequency of the area or country. |
|
|
|
|
|
|
|
|
|
|
|
|
|
|
|
|
|
|
|
|
Always check to see if there are any modelers operating on the same frequency as yours. |
|
|
|
|
|
|
|
|
|
|
|
|
|
|
|
|
|
|
|
|
Also, check your radio for proper operation before operating a model. |
|
INDEX
INTRODUCTION 2 |
STEP 9 RADIO BOX & FUEL TANK 17 |
||
IMPORTANT NOTES & WARNING 3 |
STEP10 ENGINEMOUNT&CLUTCHSET 19 |
||
ITEMS REQUIRED FOR ASSEMBLE 4 |
STEP11THROTTLEANDBRAKELINKAGE 20 |
||
STEP 1 STEERING SERVO SAVER 5 |
STEP 12 AIR FILTER 22 |
||
STEP 2 GEAR DIFFERENTIALS 7 |
STEP 13 |
SHOCK ABSORBERS 23 |
|
STEP 3 FRONT & REAR BULKHEAD 8 |
STEP 14 |
REAR WING 24 |
|
STEP4 CENTERDIFFMOUNT&BRAKE 9 |
STEP 15 |
WHEEL AND TIRE 26 |
|
STEP 5 |
CENTER DRIVE TRAIN 11 |
STEP16 FOAMBUMPERINSTRUCTION 26 |
|
STEP 6 |
FRONT SUSPENSION 12 |
SET UP 27 |
|
STEP 7 |
REAR SUSPENSION 14 |
SET UP SHEET 31 |
|
STEP 8 |
SIDE GUARD 16 |
|
|
IMPORTANT NOTES & WARNING
FUEL SELECTION
ENGINE
1.Choose a fuel from a reputable, brand name company that is approved for car/truck use. Do not use airplane or boat fuels in your car/truck. Choose methanol based model engine glow fuel that has a nitro content in the range 10%-30% and 5% to 18% caster/synthetic oil content for lubrication. Lower nitro percentages will generally result in a cooler engine running temperature and therefore last longer before needing a rebuild; cooler-running engines also generally produce less power. 20% nitro is the most widely used fuel.
2.Fuel color is for identification purpose only and is not important to performance or durability of your engine.
3.Be careful. If the tank overflows it might get on your radio gear or on your brakes and it may create an unsafe driving situation. Always keep your fuel bottle closed when not in use.
4.Do not dispose of fuel or empty fuel containers in a fire. It may possibly cause fire or explosion.
1.For proper engine break-in procedure, please refer to the manual of your engine.
2.Never run your vehicle without the air filter .If the vehicle will be operated in an area with fine dust, use filter oil or caster oil on the air filter element. It is important that the foam is only moist to trap dirt and allow air passage. With the foam too wet, limited air can pass through; therefore, limiting engine performance.
3.The parts around engine could be dangerously hot after operation. Do not touch it without any protection!
RADIO |
OPERATION |
1.When turning radio on, first turn on the transmitter and extend the transmitter antenna.
2.Then, turn on the receiver. When turning off, first turn the receiver off, then the transmitter off.
FIRST AID
WARNING
1.If you drink nitro fuel by accident, immediately drink large quantities of water and try to induce vomiting. Consult with physician right after then.
2.If the nitro fuel gets into your eyes, rinse them well with water. Consult with physician right after then.
3.If the fuel gets onto your skin, wash it well with soap and water.
1.Improper operations may cause personal and/or property damage. Thunder Tiger and its distributor have no control over damage resulting from shipping, improper construction, or improper usage.
2.Thunder Tiger assumes and accepts no responsibility for personal and/or property damages resulting from the use of improper building materials, equipment and operations. By the act of assembling or operating this product, the user accepts all resulting liability. If the buyer is not prepared to accept this liability, then he/she should return this kit in new, unassembled, and unused condition to the place of purchase.
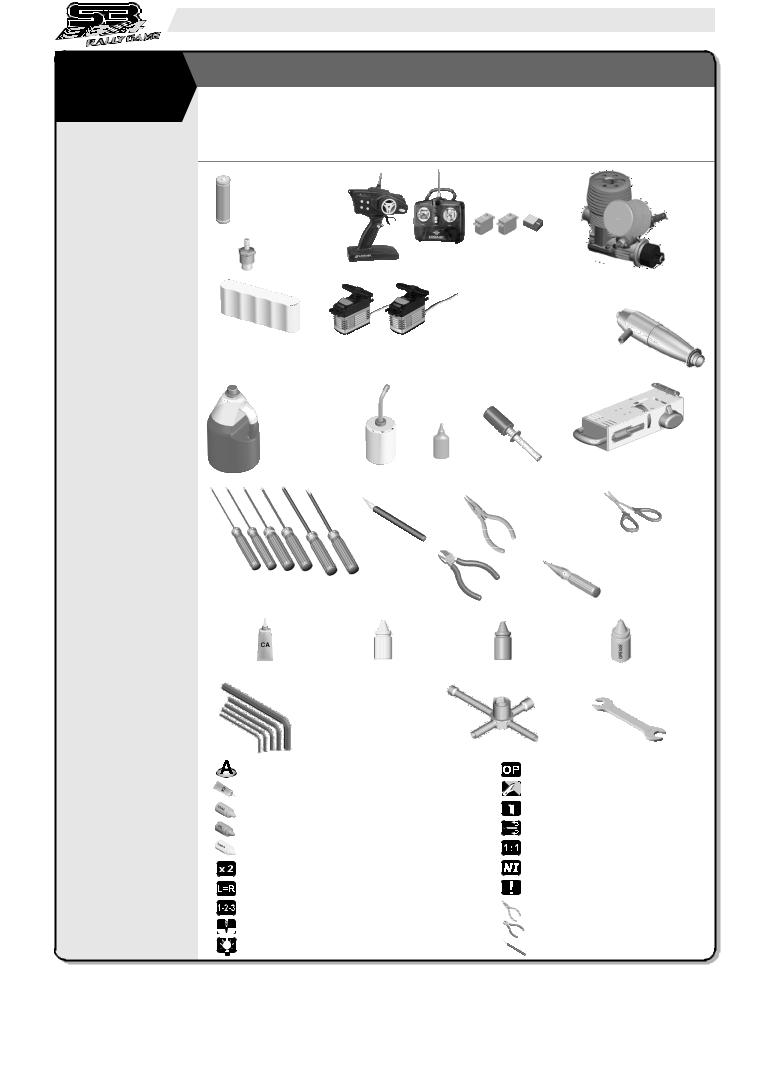
1. ADDITIONAL ITEMS NEEDED FOR COMPLETION
ITEMS REQUIRED FOR ASSEMBLY
Notice: The following items are required for completion of the EB-4 S3. Some of them are not included with this kit (unless noted), and should be obtained from the local hobby shop nearby you. (For separate purchasing products, please refer to Thunder Tiger professional R/C model products.)
AA-Size Batteries for transmitter / NiCd or NiMh Battery recommended
Glow Plug
2 Channel Radio Set/ FM/PCM recommended
.21 Class Rear Exhaust Engine (Ref:
TTR PRO-21B-R Engine No.9474)
2.ADDITIONAL ITEMS NEEDED FOR STARTING ENGINE
3.TOOLS NEEDED FOR ASSEMBLY
4.EQUIPMENT NEEDED FOR ASSEMBLY
5.TOOLS INCLUDED IN KIT
6.SYMBOL USED THROUGHOUT THE INSTRUCTION MANUAL
|
|
|
Muffler, Joining Pipe or Manifold & |
|||
4.8V~6.0V Rx Battery Pack |
Torque Digital Servo |
Spring(Ref: TTR Muffler & Manifold |
||||
No.9796, No.9797) |
|
|||||
recommended (Flat pack) |
(No.8119, No.8123) |
|
|
|
||
|
|
|
|
|
|
|
|
|
Fuel Bottle |
|
|
|
|
Glow Fuel |
|
|
|
|
Starter Box with AC/DC Power |
|
(Ref: R/C Model Fuel ) |
Air Filter Oil |
Glow Starter |
||||
(Ref: TTR Starter Box No.2409) |
||||||
|
|
|||||
|
|
|
|
|
||
|
|
|
|
Needle Nose Pliers |
||
|
|
Hobby knife |
|
|
Lexan Cutter/Scissors |
|
|
|
|
|
Special Reamer |
||
|
|
|
|
|
||
Phillips type screwdrivers & hex wrenches |
|
Wire Cutter |
(Ref: TTR Hole Punch/ |
|||
(Ref: TTR screw Drive Set ) |
|
|
|
Reamer No.1120) |
||
|
|
|
|
|
||
|
|
|
|
CA Glue |
Thread Locking Glue |
Silicon Oil |
Grease |
||||||||
|
|
|
|
Hex Wrench |
|
|
|
|
|
|
|
|
|
|
|
|
|
|
|
1.5mm, 2mm, 2.5mm, |
|
|
|
|
|
|
|
|
|
|
|
|
|
|
|
3mm, 5mm |
5-way Nut Wrench |
||||||||||
|
|
|
|
|
|
||||||||||
|
|
|
|
|
|
|
|
|
|
|
|
|
|
|
|
|
|
bag Part bag used |
|
|
|
|
|
|
|
|
|
|
Optional Parts |
||
|
|
|
|
|
|
|
|
|
|
|
|
||||
|
|
|
|
|
|
|
|
|
|
|
|
||||
|
|
|
|
|
|
|
|
|
|
|
|
||||
|
|
|
|
Apply C.A Glue |
|
|
|
|
|
|
|
|
|
|
Cut off shaded portion |
|
|
|
|
|
|
|
|
|
|
|
|
|
|
||
|
|
|
|
|
|
|
|
|
|
|
|
|
|
||
|
|
|
|
Apply Grease |
|
|
|
|
|
|
|
|
|
|
Tentatively tighten |
|
|
|
|
|
|
|
|
|
|
|
|
|
|
||
|
|
|
|
|
|
|
|
|
|
|
|
|
|
||
|
|
|
|
Apply silicon oil |
|
|
|
|
|
|
|
|
|
|
Check out non-binding movement |
|
|
|
|
|
|
|
|
|
|
|
|
|
|
||
|
|
|
|
Apply thread locking glue |
|
|
|
|
|
|
|
|
|
True-to-scale diagram |
|
|
|
|
|
|
|
|
|
|
|
|
|
|
|||
|
|
|
|
|
|
|
|
|
|
|
|
|
|||
|
|
|
|
|
|
|
|
|
|
|
|
|
|||
|
|
|
|
Assemble two times |
|
|
|
|
|
|
|
|
|
|
Must be purchased separately |
|
|
|
|
|
|
|
|
|
|
|
|
|
|
||
|
|
|
|
|
|
|
|
|
|
|
|
|
|
||
|
|
|
|
|
|
|
|
|
|
|
|
|
|
||
|
|
|
|
Assemble left and right side the same way |
|
|
|
|
|
|
|
|
|
Pay attention here |
|
|
|
|
|
|
|
|
|
|
|
|
|
|
|||
|
|
|
|
|
|
|
|
|
|
|
|
|
|||
|
|
|
|
Assemble in right order |
|
|
|
|
|
|
|
|
|
Use pliers |
|
|
|
|
|
|
|
|
|
|
|
|
|
|
|||
|
|
|
|
|
|
|
|
|
|
|
|
|
|||
|
|
|
|
Drill holes with the specified diameter (mm) |
|
|
|
|
|
|
|
|
|
Wire Cutter |
|
|
|
|
|
|
|
|
|
|
|
|
|
|
|||
|
|
|
|
|
|
|
|
|
|
|
|
|
|||
|
|
|
|
|
|
|
|
|
|
|
|
|
|||
|
|
|
|
Hint |
|
|
|
|
|
|
|
|
|
|
Hobby knife |
|
|
|
|
|
|
|
|
|
|
|
|
|
|
||
|
|
|
|
|
|
|
|
|
|
|
|
|
|
||
|
|
|
|
|
|
|
|
|
|
|
|
|
|
||
|
|
|
|
|
|
|
|
|
|
|
|
|
|
||
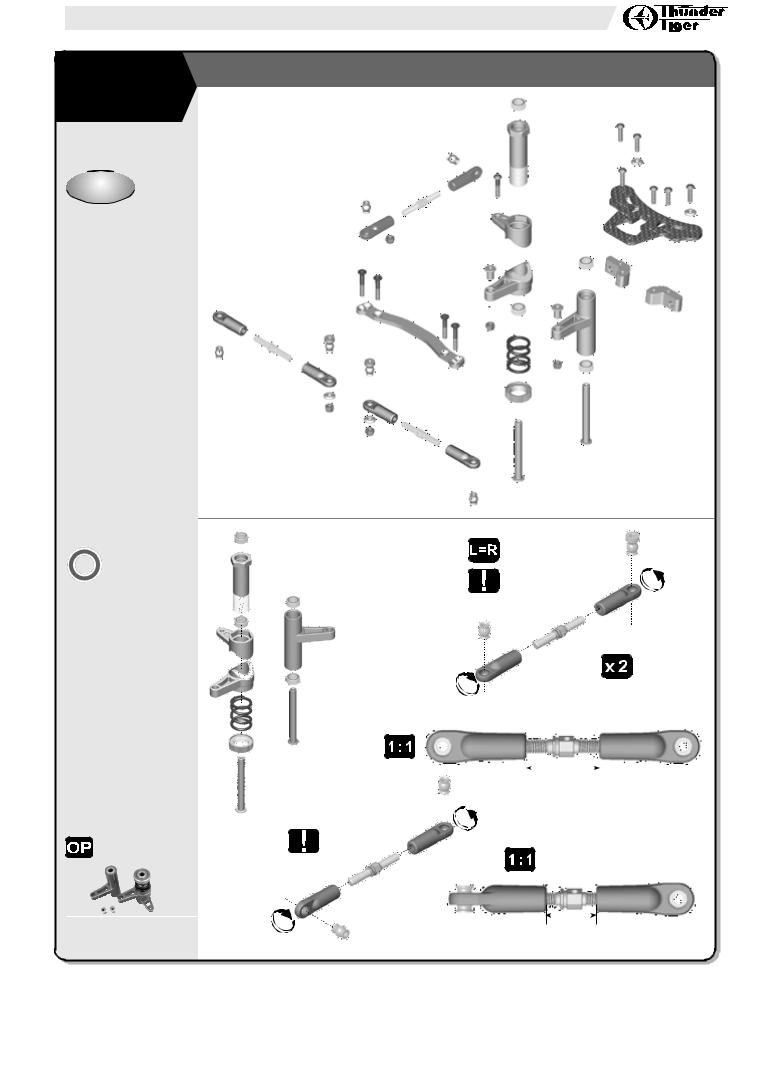
1 STEERING SERVO SAVER

 A
A


bag
1.1
Crank |
Steering rod |
|
ø5x10mm Bearing
1.2 |
|
|
|
|
|
|
|
|
|
|
|
|
Note Left thread, Right thread |
||||||||||||||
|
|
|
|
|
|
|
|
|
|
|
|
Inner |
|
|
|
|
|
|
|
|
|
|
Outer |
||||
|
|
|
|
|
|
|
|
|
|
|
|
|
|
|
|
|
|
|
|
|
|
||||||
|
|
|
|
|
|
|
|
|
|
|
|
|
|
|
|
|
|
|
|
|
|
||||||
|
|
|
|
|
|
|
|
|
|
|
|
|
|
|
|
|
|
|
|
|
|
||||||
|
|
|
|
|
|
|
|
|
|
|
|
|
|
|
|
|
20mm |
|
|||||||||
|
|
|
|
|
|
|
|
|
|
|
|
|
|
||||||||||||||
|
|
|
|
|
Servo tie rod |
|
|
|
|
|
|
|
|
|
|
|
|||||||||||
|
|
|
|
|
|
|
|
|
|
|
|
|
|
|
|
|
|
|
|
|
|
|
|
|
|
|
|
|
|
|
|
|
|
|
|
|
|
|
|
|
|
|
|
|
|
|
|
|
|
|
|
|
|
|
|
|
|
|
|
|
|
|
|
|
|
|
|
|
|
|
|
|
|
|
|
|
|
|
|
|
|
|
|
|
|
|
|
|
|
|
|
|
|
|
|
|
|
|
|
|
|
|
|
|
|
|
|
|
|
|
|
|
|
|
|
|
|
|
|
|
|
|
|
|
|
|
|
|
|
|
|
|
|
|
|
|
|
|
|
|
|
|
|
|
|
|
|
|
|
|
|
|
|
|
|
|
|
|
|
|
|
|
|
|
|
|
|
|
|
|
|
|
|
|
|
|
|
|
|
|
|
|
|
|
|
|
|
|
|
|
|
|
|
|
|
|
|
|
|
|
|
|
|
|
|
|
|
|
|
|
|
|
|
|
|
|
|
|
|
|
|
|
|
|
|
|
|
|
|
|
|
|
|
|
|
|
|
|
|
|
|
|
|
|
|
|
|
|
|
|
|
|
|
|
|
|
|
|
|
|
|
|
|
|
|
|
|
|
|
|
|
|
|
|
|
|
|
|
|
|
|
|
|
|
|
|
|
|
|
|
|
|
|
|
|
|
|
|
|
|
|
|
|
|
|
|
|
|
|
|
|
|
|
|
|
|
|
|
|
|
|
|
|
|
|
|
|
|
|
|
|
|
|
|
|
|
|
|
|
|
|
|
|
|
|
|
|
|
|
|
|
|
|
|
|
|
|
|
|
|
|
|
|
PD1857 ALUM SERVO SAVER |
|
13mm |
SET |
|
|
Ball joints must be 90˚ to each other
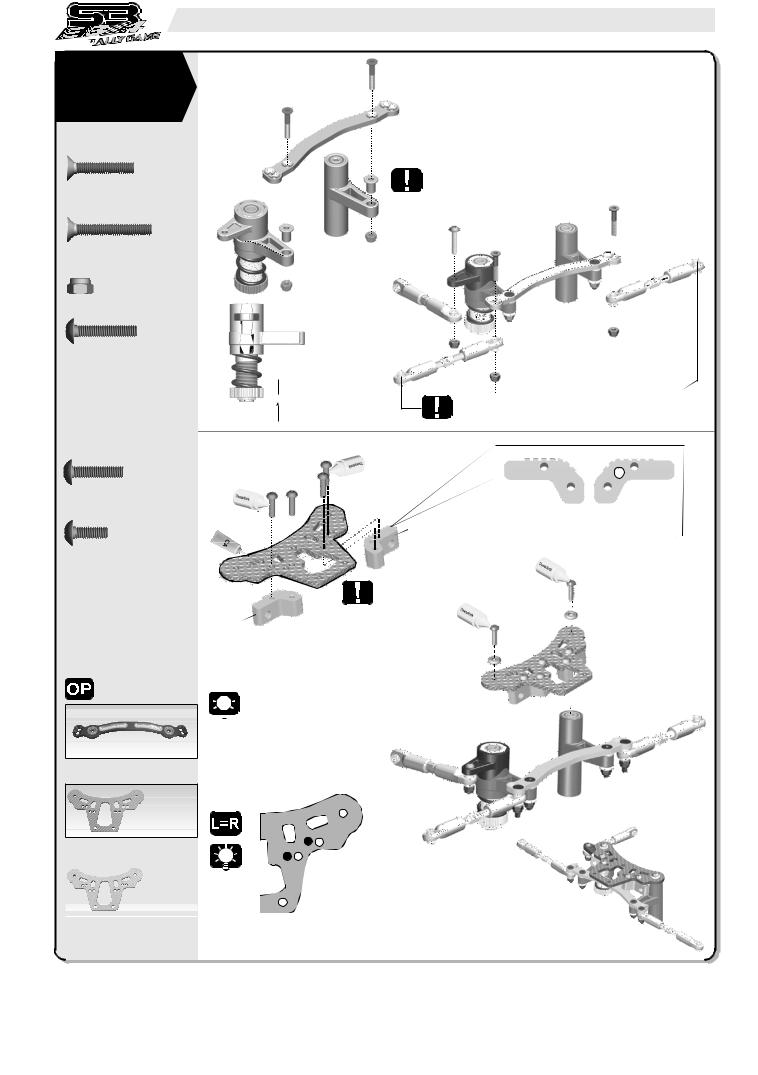


 1
1
3x16mm
1.3
M3x16mm
Flat Head Hex Screw
M3x20mm
Flat Head Hex Screw
Lock Nut, M3
M3x16mm
Button Head Hex Screw
 1.0mm
1.0mm
1.4
3x16mm

 Note the direction of
 curve side
3x20mm
3x16mm 3x20mm

 Note the orientation. The small pivot balls

 are outside.
M3x12mm |
3x12mm |
|
Right |
Left |
||||
|
||||||||
|
|
|
|
|
|
|||
Button Head Hex Screw |
|
|
|
|
|
|
||
|
|
|
|
|
Left |
|
Refer to P.29 for Camber Adjustment |
|
M3x8mm |
|
|
|
|
|
|
|
|
Button Head Hex Screw |
|
|
|
|
|
|
|
|
|
|
|
|
|
|
|
|
3x12mm |
|
|
|
|
|
|
|
|
|
|
|
|
|
|
|
|
|
|
|
|
|
|
|
|
|
|
|
Righ |
|
Note the direction |
|
3x12mm |
|
|||
|
|
|
|
|
|
|
|
|


 Apply few drops of CA


 glue around the profile
edge of the carbon plate
for added strength.
PD1858 A7075 LITE ST SLIDER
W/BB
(IMOLA RED)
PD1843-R CARBON SERVO SAVER
TOP PLATE(R) OPT
|
|
|
|
|
|
|
|
|
|
|
|
|
|
|
|
|
|
|
|
|
|
|
|
|
|
|
|
|
|
|
|
|
|
|
|
|
|
|
|
|
|
|
|
|
|
|
|
|
|
|
|
|
|
|
|
|
|
|
|
|
|
|
|
SILVER) |
|
|
|
|
|
|
|
|
|
|
|
|
|
|
|
|
PD1843-S CARBON SERVO SAVER |
|
|
Intial Position |
|||||
|
TOP PLATE(S) OPT |
Refer to P.29 for Camber Adjustment |
||||||
|
|
|||||||
|
|
|
|
|
|
|
|
|
|
|
|
|
|
|
|
|
|

2 GEAR DIFFERENTIALS
B |
|
|
|
|
|
|
|
|
|
x3 |
|||||
|
|
|
|
|
|||
|
|||||||
bag |
|
|
|
|
|
||
|
|
|
|
|
|
|
|
2.1
Roll Pin, ø2.5x11mm
O-ring, ø5.8x9.6mm
O-ring, ø4.4x0.8mm
0.15mm Gear Shim
PD1998 STEEL MAIN GEAR, 48T

 Center diff out
 drive cup
Hint: Use tweezer |
to insert pin |
3x14mm
3x14mm
2.2


 Hint: Oil on the paper


 gasket will hold it in place
M3x14mm Flat Head Hex Screw
Fill the diff case with
silicone oil 80% full
0.2mm Satelite Gear Shim
Front & Rear |
Center |
differential |
differential |


 The initial setting of the Diffs oil meets most off-road


 tracks for stable handling. Thicker silicon oil will decrease the vehicle's turning capability and increase its forward traction. Thinner oil is just the opposite that gives you different handling. Ask an experienced modeler or your hobby shop for further advice at your local track.
Front diff silicon oil: 5,000
Center diff silicon oil: 3,000
Rear diff silicon oil: 1,000


 3
3

 C
C


bag
3.1
M3x22mm
Button Head Hex Screw
M3x12mm
Socket Head Hex Screw
M3x16mm
Socket Head Hex Screw
3.2
M3x25mm
Button Head Hex Screw
M3x12mm
Button Head Hex Screw
M3x12mm
Socket Head Hex Screw
M3x16mm
Socket Head Hex Screw
Lock Nut, M3
M5x4mm
 Set Screw
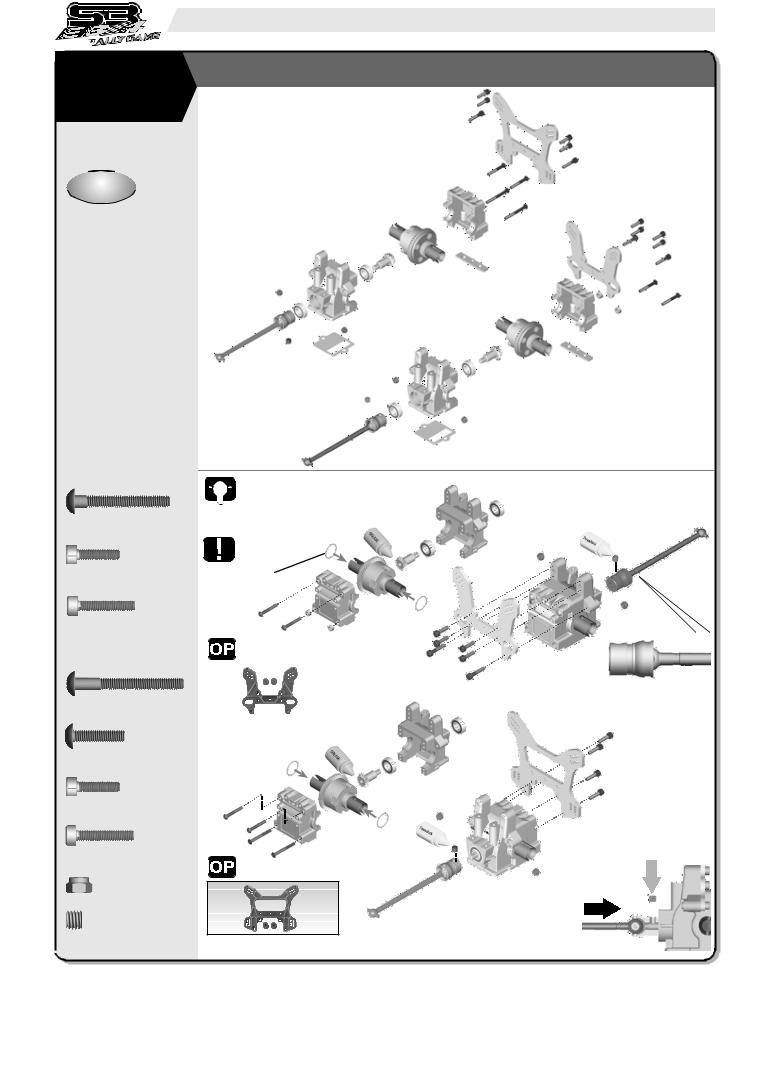
FRONT & REAR BULKHEADS


 Hint: Use supplied shims in bag B

 to adjust the proper gearmesh. Carefully when assembling, do not bend shims.
5x4mm
From B bag
|
|
|
3x22mm |
3x12mm |
|
|
|
|
|
|
|
|
|
|
|
|
Marked |
|
|||
|
|
|
|
|
||||||
|
|
|
|
|
||||||
|
|
|
|
3x16mm |
|
|
|
|
|
|
|
|
|
|
3x12mm |
3x16mm |
|
|
|
|
|
|
|
|
|
|
Front Drive Train |
|||||
|
|
|
|
|
|
|||||
|
|
|
|
|
|
|
||||
|
|
|
|
|
|
|||||
|
|
|
|
|
|
|
|
|
|
|
|
|
|
|
|
|
3x12mm |
||||
|
|
|
|
|
|
|||||
PD1840 A7075 FR SHOCK |
|
|
||||||||
|
|
|
3x12mm |
|||||||
|
|
|
TOWER,S3 OPT |
|
|
|
||||
|
|
|
|
|
|
|
3x16mm |
|||
|
|
|
|
|
|
|
3x12mm |
|||
|
|
|
|
|
|
|
3x16mm |
|||
3x22mm |
|
|
|
|
|
|
|
|||
|
|
3x25mm |
5x4mm |
|
|
|
|
|
|
|
Pushing universal joint against the pinion gear to remove gap. And then tighten set screw
PD1841 A7075 RR SHOCK onto the gear flat spot.
TOWER,S3 OPT


 4
4

 D
D


bag
4.1
M3x16mm
Brake Pad Fixing Screw
4.2
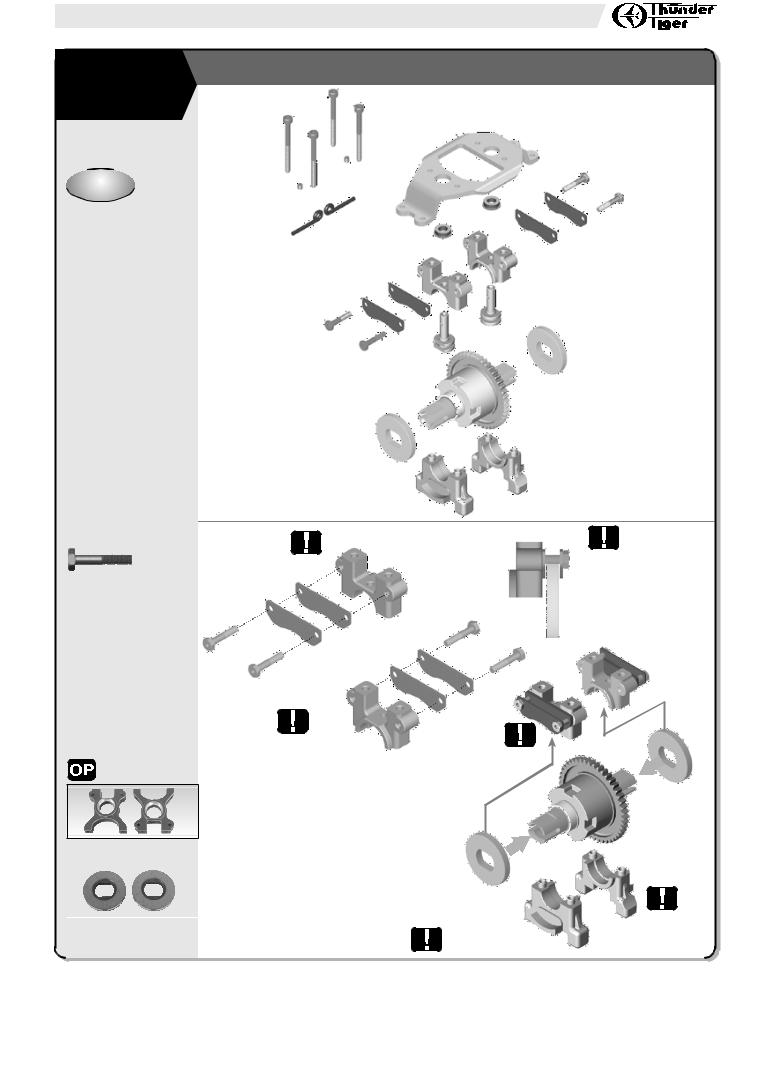
GEAR DIFFERENTIALS
|
|
|
|
|
|
|
|
|
|
|
|
|
|
|
|
|
|
|
|
Marked "F" |
Temporarily insert |
||||||||
|
|
|
|
|
brake disk here for |
||||
|
|
|
|
|
|||||
|
|
|
|
|
proper gap between |
||||
|
|
|
|
|
pads. |
||||
|
|
|
|
|
3x16mm |
||||
3x16mm
Marked "R"
Note orientation
PD1845 CTR DIFF MOUNT, S3 OPT |
Insert brake |
disk |
|||||||||||||||
|
|
|
|||||||||||||||
|
|
|
between brake Pads. |
||||||||||||||
|
|
|
|||||||||||||||
|
|
|
|
|
|
|
|
|
|
|
|
|
|
|
|
|
|
|
|
|
|
|
|
|
|
|
|
|
|
|
|
|
|
|
|
|
|
|
|
|
|
|
|
|
|
|
|
|
|
|
|
||
|
|
|
|
|
|
|
|
|
|
|
|
|
|
|
|
||
|
|
|
|
|
|
|
|
|
|
|
|
|
|
|
|||
|
|
|
|
|
|
|
|
|
|
|
Marked "R" |
||||||
PD1861 HEATSINK DISC BRAKE, |
|
|
|
|
|
|
|
|
|
|
|||||||
|
|
|
|
|
|
|
|
|
|||||||||
|
S3 OPT |
|
|
|
|
|
Marked "F" |
|
|
|
|
|
|
|
|
||
|
|
|
|
|
|
|
|
|
|
|
|
|
|
||||
|
|
|
|
|
|
|
|
|
|
|
|
|
|
|
|
|
|
|
|
|
|
|
|
|
|
|
|
|
|
|
|
|
|
|
|
|
|
|
|
|
|
|
|
|
|
|
|
|
|
|
|
|
|

|
|
|
|
|
|
|
|
|
|
|
|
|
|
|
|
|
|
|
|
|
|
|
|
|
|
|
|
|
|
|
|
|
|
|
|
|
|
|
|
|
|
4 |
|
|
||||||||||||||||||
3x35mm |
||||||||||||||||||||
|
|
|
|
|
|
|
|
|
|
|
|
|
|
|
|
|
|
|||
4.3 |
|
|
|
|
|
|
|
|
|
|
|
|
3x35mm |
|||||||
M3x35mm |
|
|
||||||||||||||||||
Socket Head Hex Screw |
|
|
||||||||||||||||||
3x3mm
4.4
M3x3mm
Set Screw
3mm |
3mm |
|||||
|
|
|
|
|
|
|
4.5
 Loading...