

Page 1
Europe, Middle East
ENGLISH
FRANÇAIS
DEUTSCH
NEDERLANDS
ITALIANO
ESPAÑOL
PORTUGUÊS
РУССКИЙ
ČESTINA
TÜRKÇE
POLSKI
SVENSKA
SUOMI
SLOVENCINA
MAGYAR NYELV
תירבע
ﺔﻴﺑﺮﻌﻟا
North America/
Norteamérica
ENGLISH
FRANÇAIS
ESPAÑOL
Latin America/
América Latina
ENGLISH
ESPAÑOL
PORTUGUÊS
Asia Pacic
日本語
简体中文
繁體中文
한국어
ENGLISH
Page 2

1/8
1. Throttle
throttle
7. Handle resistance adjustment dial
TECHNICAL FEATURES
PlayStation®5 - PlayStation®4
User Manual
2. USB connector
3. Rudder connector: RJ12 Thrustmaster
Rudder (sold separately) connector
4. Rudder function via twisting handle
5. Rudder locking screw on handle
6. Allen key to install or separate the
8. Rudder via rocking button
9. Action buttons
10. PS button with LED
11. Multidirectional "Point Of View" hat-
switch
Page 3

2/8
GETTING TO KNOW YOUR HOTAS JOYSTICK
THROTTLE
Your joystick features a large throttle which you can use to easily control the acceleration of
your aircraft.
The throttle is detachable and may be positioned in 2 different ways, either:
Detached and separated from the joystick
(to re-create authentic piloting conditions)
Attached to the joystick
(for greater stability and to take up less space).
By default, the throttle comes detached from the joystick.
To attach the throttle to the joystick:
1. Turn both items upside down (the throttle and the joystick).
2. Take the Allen key (6) attached underneath the base of the joystick.
3. Position the throttle to the left of the joystick.
Insert the connecting tab on the left of the joystick's base into the opening on the right
hand side of the throttle.
4. Using the key, tighten the two Allen screws underneath the base
(located on the left-hand side of the joystick's base).
5. Wind up the throttle cable and thread it through the cable guide slot.
6. Put the Allen key back in its place so as not to lose it.
Carry out this procedure in reverse to detach the throttle from the joystick.
ADJUSTABLE HANDLE RESISTANCE
Depending on your style of gaming, you may wish to have an ultra-sensitive joystick, which
responds to the slightest touch, or you may prefer to have a firmer joystick, which offers
some resistance when you move it.
Your joystick's handle resistance is adjustable, in order to adapt to all players. To adjust it,
use the handle resistance adjustment dial (7) located underneath your joystick's base.
Page 4

3/8
RUDDER FUNCTION
Your joystick features a rudder function, which in a plane corresponds to the pedals used by
the pilot to turn the steering, allowing the plane to pivot around its vertical axis (therefore
making the plane turn left or right). This rudder function is accessible on your joystick by
rotating the handle to the left or right.
This rudder function is accessible in two ways:
- on your joystick by rotating the handle (4) to the left or right.
- or via the rocking button (8) on the throttle.
If you are only using the rocking button (or if you are not using the rudder function), you can
disable the handle's rotation thanks to the locking screw (5) located on the base of the
joystick. Use a flat head screwdriver to change the screw’s position and thus lock/unlock the
rudder function.
MULTIDIRECTIONAL "POINT OF VIEW" HAT-SWITCH
Your joystick features a “Point Of View” hat-switch (11) which, as its name indicates, allows
you (in games which permit) to instantly view everything that’s going on around your plane.
To do so, simply go to your game’s configuration menu and program the different views (rear
view, left view, right view, and also external views) onto the directions of the “Point Of View”
hat-switch.
Of course, you can also use the “Point Of View” hat-switch for other functions instead (firing,
etc.).
Page 5

4/8
PLAYSTATION®5 / PLAYSTATION®4
INSTALLATION ON PLAYSTATION®5 / PLAYSTATION®4
1. Connect the USB connector (2) to one of your system’s USB ports.
2. Switch on your system.
3. The joystick’s led turns RED.
4. Press the joystick’s PS button (10) and sign in to your Sony Entertainment Network
account, in order to be able to use the joystick.
5. Launch a game that supports the Flight Stick mode.
You are now ready to play!
LIST OF COMPATIBLE PLAYSTATION®5 / PLAYSTATION®4 GAMES
On PlayStation ®5 / PlayStation®4, the T.Flight Hotas 4:
- Is only compatible with the games that support the Flight Stick mode.
- Is recognized in games as a real joystick and not a gamepad, for better responsiveness
and enhanced precision, and possibility to access the joystick’s options in these games.
A list of PlayStation ®5 / PlayStation®4 games compatible with the joystick is available at
https://support.thrustmaster.com/. Go to Joysticks / T.Flight Hotas 4, then select Games
Settings.
This list will be added to regularly, with the arrival of new PS5™ / PS4™ games compatible
with T.Flight Hotas 4.
Page 6

5/8
UPDATING YOUR JOYSTICK’S FIRMWARE
The firmware included in your joystick’s base can be updated to a more recent version
featuring product enhancements.
To display the firmware version that your joystick is currently using and update it if required:
on PC, visit https://support.thrustmaster.com/, click Joysticks / T.Flight Hotas 4, then
select Firmware and follow the instructions describing the download and installation
procedure.
TROUBLESHOOTING AND WARNINGS
• My joystick doesn’t function correctly or appears to be improperly calibrated:
- Switch off your system, disconnect your joystick, reconnect your joystick and then relaunch your game.
- When connecting your joystick: Leave the handle, rudder and throttle centered and do not
move them (to avoid any calibration problems).
- Exit the game, unplug your joystick, plug it again, then press the PS button (10) on the
joystick. Sign in to your Sony Entertainment Network account, in order to be able to use the
joystick.
• My joystick is too sensitive or not sensitive enough:
- Your joystick self-calibrates on its own after you have made a few movements on the
different axes.
- In your game’s “Options / Controller / Gamepad or Joystick” menu: Adjust the sensitivity or
dead zones for your controller (if this option is available).
- Adjust the handle resistance using the dial (7) located under your joystick’s base.
• The rudder function is too sensitive:
- Disable the handle's rotation using the locking screw (5) located on the base of the joystick
and use the rocking button for the rudder function.
HELP FILES AND FAQS (NOT INCLUDED IN THIS MANUAL)
Please visit https://support.thrustmaster.com/. Click Joysticks / T.Flight Hotas 4, and then
select Manual or FAQ.
Page 7

6/8
CONSUMER WARRANTY INFORMATION
Worldwide, Guillemot Corporation S.A., whose registered office is located at Place du Granier, B.P. 97143, 35571
Chantepie, France (hereinafter “Guillemot”) warrants to the consumer that this Thrustmaster product shall be free from
defects in materials and workmanship, for a warranty period which corresponds to the time limit to bring an action for
conformity with respect to this product. In the countries of the European Union, this corresponds to a period of two (2) years
from delivery of the Thrustmaster product. In other countries, the warranty period corresponds to the time limit to bring an
action for conformity with respect to the Thrustmaster product according to applicable laws of the country in which the
consumer was domiciled on the date of purchase of the Thrustmaster product (if no such action exists in the corresponding
country, then the warranty period shall be one (1) year from the original date of purchase of the Thrustmaster product).
Notwithstanding the above, rechargeable batteries are covered by a warranty period of six (6) months from the date of
original purchase.
Should the product appear to be defective during the warranty period, immediately contact Technical Support, who will
indicate the procedure to follow. If the defect is confirmed, the product must be returned to its place of purchase (or any
other location indicated by Technical Support).
Within the context of this warranty, the consumer’s defective product shall, at Technical Support’s option, be either replaced
or returned to working order. If, during the warranty period, the Thrustmaster product is subject to such reconditioning, any
period of at least seven (7) days during which the product is out of use shall be added to the remaining warranty period (this
period runs from the date of the consumer’s request for intervention or from the date on which the product in question is
made available for reconditioning, if the date on which the product is made available for reconditioning is subsequent to the
date of the request for intervention). If permitted under applicable law, the full liability of Guillemot and its subsidiaries
(including for consequential damages) is limited to the return to working order or the replacement of the Thrustmaster
product. If permitted under applicable law, Guillemot disclaims all warranties of merchantability or fitness for a particular
purpose.
This warranty shall not apply: (1) if the product has been modified, opened, altered, or has suffered damage as a result of
inappropriate or abusive use, negligence, an accident, normal wear, or any other cause unrelated to a material or
manufacturing defect (including, but not limited to, combining the Thrustmaster product with any unsuitable element,
including in particular power supplies, rechargeable batteries, chargers, or any other elements not supplied by Guillemot for
this product); (2) if the product has been used for any use other than home use, including for professional or commercial
purposes (game rooms, training, competitions, for example); (3) in the event of failure to comply with the instructions
provided by Technical Support; (4) to software, said software being subject to a specific warranty; (5) to consumables
(elements to be replaced over the product’s lifespan: disposable batteries, audio headset or headphone ear pads, for
example); (6) to accessories (cables, cases, pouches, bags, wrist-straps, for example); (7) if the product was sold at public
auction.
This warranty is nontransferable.
The consumer’s legal rights with respect to laws applicable to the sale of consumer goods in his or her country are not
affected by this warranty.
Additional warranty provisions
During the warranty period, Guillemot shall not provide, in principle, any spare parts, as Technical Support is the only party
authorized to open and/or recondition any Thrustmaster product (with the exception of any reconditioning procedures which
Technical Support may request that the consumer carry out, by way of written instructions – for example, due to the
simplicity and the lack of confidentiality of the reconditioning process – and by providing the consumer with the required
spare part(s), where applicable).
Given its innovation cycles and in order to protect its know-how and trade secrets, Guillemot shall not provide, in principle, any
reconditioning notification or spare parts for any Thrustmaster product whose warranty period has expired.
In the United States of America and in Canada, this warranty is limited to the product’s internal mechanism and external
housing. In no event shall Guillemot or its affiliates be held liable to any third party for any consequential or incidental
damages resulting from the breach of any express or implied warranties. Some States/Provinces do not allow limitation on
how long an implied warranty lasts or exclusion or limitation of liability for consequential or incidental damages, so the above
limitations or exclusions may not apply to you. This warranty gives you specific legal rights, and you may also have other
rights which vary from State to State or Province to Province.
Page 8

7/8
TECHNICAL SUPPORT
Liability
If permitted under applicable law, Guillemot Corporation S.A. (hereinafter “Guillemot”) and its subsidiaries disclaim all
liability for any damages caused by one or more of the following: (1) the product has been modified, opened or altered; (2)
failure to comply with assembly instructions; (3) inappropriate or abusive use, negligence, an accident (an impact, for
example); (4) normal wear; (5) the use of the product for any use other than home use, including for professional or
commercial purposes (game rooms, training, competitions, for example). If permitted under applicable law, Guillemot and its
subsidiaries disclaim all liability for any damages unrelated to a material or manufacturing defect with respect to the product
(including, but not limited to, any damages caused directly or indirectly by any software, or by combining the Thrustmaster
product with any unsuitable element, including in particular power supplies, rechargeable batteries, chargers, or any other
elements not supplied by Guillemot for this product).
DECLARATION OF CONFORMITY
CANADIAN COMPLIANCE NOTICE: this Class B digital apparatus meets all requirements of the Canadian InterferenceCausing Equipment Regulations.
USA COMPLIANCE NOTICE: this equipment has been tested and found to comply with the limits for a Class B digital
device, pursuant to Part 15 of the FCC rules. Operation is subject to the following two conditions:
(1) This device may not cause harmful interference, and
(2) This device must accept any interference received, including interference that may cause undesired operation.
These limits are designed to provide reasonable protection against harmful interference in a residential installation. This
equipment generates, uses and can radiate radio frequency energy and, if not installed and used in accordance with the
instructions, may cause harmful interference to radio communications. However, there is no guarantee that interference will
not occur in a particular installation. If this equipment does cause harmful interference to radio or television reception, which
can be determined by turning the equipment on and off, the user is encouraged to try to correct the interference by one or
more of the following measures:
- Reorient or relocate the receiving antenna.
- Increase the separation between the equipment and receiver.
- Connect the equipment into an outlet on a circuit different from that to which the receiver is connected.
- Consult the dealer or an experienced radio/TV technician for help.
https://support.thrustmaster.com
UK: 020 3147 4889
US: (866) 889-5036
Page 9

8/8
COPYRIGHT
*
*
©2022 Guillemot Corporation S.A. All rights reserved. Thrustmaster® is a registered trademark of Guillemot
Corporation S.A. M anufactured and distributed by Guillemot Corporation S.A. All other trademarks and
brand names are hereby acknowledged and are the property of their respective owners. Contents, de sign,
and specifications are subject to changes without notice and may vary from one country to another.
Photos and illustrations not binding. Designed in North America and Europe, made in China.
For use exclusively with PlayStation
“1”, “PlayStation”, “PS5”, “PS4” and “PlayStation Shapes Logo” are registered trademarks or trademarks
of Sony Interactive Entertainment Inc. All rights reserved. All other trademarks are the property of their
respective own ers. Manufactured and distributed under l icense from Sony Interactive Entertainment LLC.
WARNING: This product can expose you to chemicals including Bisphenol A (BPA)
which is known to the State of California to cause birth defects or other reproductive harm. For
more information go to http://www.p65warnings.ca.gov/
ENVIRONMENTAL PROTECTION RECOMMENDATION
In the European Union and Turkey: At the end of its working life, this product should not be
disposed of with standard household waste, but rather dropped off at a collection point for
the disposal of Waste Electrical and Electronic Equipment (WEEE) for recycling.
This is confirmed by the symbol found on the product, user manual or packaging.
Depending on their characteristics, the materials may be recycled. Through recycling and
other forms of processing Waste Electrical and Electronic Equipment, you can make a
significant contribution towards helping to protect the environment.
For all other countries: Please adhere to local recycling laws for electrical and electronic equipment.
Retain this information. Colors and decorations may vary.
Plastic fasteners and adhesives should be removed from the product before it is used.
www.thrustmaster.com
Please contact your local authorities for information on the collection point nearest you.
®5 consoles, PlayStation®4 consoles.
*Applicable to EU, UK and Turkey only
Page 10

1/8
1 Manette des gaz
manette des gaz du manche
7 Molette de réglage de la
PlayStation®5 - PlayStation®4
Manuel de l'utilisateur
CARACTÉRISTIQUES TECHNIQUES
2 Connecteur USB
3 Connecteur de palonnier RJ12
Thrustmaster Rudder (vendu
séparément)
4 Palonnier par rotation du manche
5 Vis de blocage du palonnier sur le
manche
6 Clé Allen pour installer ou séparer la
résistance
8 Palonnier par bouton bascule
9 Boutons d’action
10 Bouton PS avec Led
11 Croix multidirectionnelle Point de
vue
Page 11

2/8
À LA DÉCOUVERTE DE VOTRE JOYSTICK HOTAS
MANETTE DES GAZ
Votre joystick dispose d’une imposante manette des gaz grâce à laquelle vous pourrez
aisément contrôler l’accélération de votre appareil.
La manette des gaz est amovible et peut-être positionnée de 2 manières différentes :
- Soit détachée et séparée du manche
(pour récréer les véritables conditions de pilotage)
- Soit fixée au manche
(pour un gain de stabilité et de place).
La manette des gaz est livrée par défaut détachée du manche.
Pour fixer la manette des gaz au manche :
1. Retournez les 2 éléments (manette des gaz et manche)
2. Prenez la clé Allen (6) fixée sous la base du manche.
3. Positionnez la manette des gaz à gauche du manche.
Insérez le crochet qui est situé sur la gauche du manche dans la fente qui est situé à droite
de la manette des gaz.
4. A l’aide de la clé, vissez les deux vis Allen sous la base
(situées à l’extrémité gauche de la base du manche).
5. Enroulez et fixez le câble de la manette des gaz dans le passe-fil prévu à cet effet.
6. Remettez la clé Allen dans son emplacement pour ne pas l’égarer. Effectuez l’opération
inverse pour détacher la manette des gaz du manche.
RESISTANCE DU MANCHE AJUSTABLE
Selon votre façon de jouer, vous voudrez un joystick ultra-sensible, qui réponde à la moindre
impulsion, ou au contraire un joystick plus dur, qui présente une certaine résistance lorsque
vous le manipulez.
La résistance du manche de votre Joystick est ajustable pour s’adapter à tous les joueurs.
Utilisez pour cela la molette de réglage de la résistance (7) située sous la base de
votre joystick.
Page 12
3/8
FONCTION PALONNIER
Votre joystick dispose d’une fonction palonnier, qui correspond dans un avion aux pédales
actionnées par le pilote pour faire braquer la gouverne de direction, permettant de faire
pivoter l’avion autour de son axe vertical (entraînant ainsi un virage de l’avion vers la gauche
ou la droite).
Cette fonction palonnier est accessible de deux façons :
- sur votre Joystick par rotation du manche (4) vers la gauche ou la droite
- ou via le bouton bascule (8) sur la manette des gaz.
Si vous utilisez uniquement le bouton bascule (ou que vous n’utilisez
palonnier), vous pouvez alors désactiver la rotation du manche grâce à la vis de blocage (5)
située à la base du manche. Utilisez un tournevis à tête plate pour modifier sa position et
ainsi verrouiller/déverrouiller la rotation du manche.
pas la
fonction
CROIX MULTIDIRECTIONNELLE POINT DE VUE
Votre joystick est doté d’une croix Point de Vue (11) qui, comme son nom l’indique, vous
permettra (dans les jeux le permettant) de surveiller instantanément tout ce qui se
passe autour de votre avion. Il vous suffit pour cela, depuis le menu de configuration de
votre jeu, de programmer les différentes vues (vue arrière, vue sur la gauche, vue sur la
droite, mais
Vous pouvez bien entendu réserver la Croix Point de vue à d’autres utilisations (tir, etc.).
aussi vues externes) sur les directions de la croix Point de vue.
Page 13

4/8
PLAYSTATION®5 / PLAYSTATION®4
INSTALLATION SUR PLAYSTATION®5 / PLAYSTATION®4
1. Branchez le connecteur USB (2) sur un port USB de la console.
2. Allumez votre console.
3. La led du joystick s’allume en ROUGE.
4. Appuyez sur le bouton PS (10) du joystick, puis connectez-vous à votre compte Sony
Entertainment Network pour que votre Joystick soit fonctionnel.
5. Lancez un jeu compatible (supportant le mode Flight Stick)
Vous êtes maintenant prêt à jouer !
LISTE DES JEUX PLAYSTATION®5 / PLAYSTATION®4 COMPATIBLES
Sur PlayStation®5 / PlayStation®4, le T.Flight Hotas 4 :
- n’est compatible qu’avec les jeux supportant le mode Flight Stick.
- est reconnu dans les jeux comme un véritable Joystick (et non comme une manette). Ceci
pour une réactivité et une précision maximale ainsi que pour l’accès aux options joystick
disponibles dans ces jeux.
Liste des jeux PlayStation®5 / PlayStation®4 compatibles avec le joystick disponible sur
https://support.thrustmaster.com/
Cette liste s’étoffera régulièrement avec l’arrivée des nouveaux jeux PS5™ / PS4™
compatibles avec le T.Flight Hotas 4.
dans la rubrique Joysticks / T.Flight Hotas 4.
Page 14

5/8
METTRE A JOUR LE FIRMWARE DU JOYSTICK
Le firmware inclus dans la base du Joystick peut être mis à jour (ce qui signifie qu’il peut être
mis à jour par des versions plus récentes comportant des améliorations produits).
Pour afficher la version de firmware de votre joystick et le mettre à jour si nécessaire : sur
PC, allez sur https://support.thrustmaster.com/
puis Firmware et suivez les instructions et la procédure de téléchargement et d’installation.
DEPANNAGE ET AVERTISSEMENT
•
Mon joystick ne fonctionne pas correctement ou semble mal calibré :
- Eteignez votre console, déconnectez votre joystick, rebranchez et relancez votre jeu.
- Lorsque vous branchez votre joystick : laissez le manche, le palonnier et la manette des
gaz centrés et évitez de les déplacer (pour éviter tout problème de calibration).
- Quittez votre jeu, débranchez votre joystick, rebranchez le tout, appuyez sur le bouton PS
(10) du joystick, puis connectez-vous à votre compte Sony Entertainment Network pour que
votre Joystick soit fonctionnel.
•
Mon joystick est trop ou pas assez sensible :
- Votre joystick s’auto-calibre de manière autonome après quelques mouvements effectués
sur les différents axes.
- Dans le menu Options / Contrôleur / Manettes ou Joystick de votre jeu, ajustez la
sensibilité et les zones mortes de votre contrôleur (si l’option est disponible).
- Ajustez la résistance du manche à l’aide de la molette (7) située sous la base de
votre joystick.
•
La fonction palonnier est trop sensible
- Désactivez la rotation du manche grâce à la vis de blocage (5) située à la base du manche
et utilisez le bouton bascule pour la fonction palonnier.
AIDES & FAQ DIVERSES (non notifiées dans ce manuel)
Allez sur https://support.thrustmaster.com/. Cliquez sur Joystick / T.Flight Hotas 4 puis
Manuel utilisateur ou FAQ.
, cliquez sur Joysticks / T.Flight Hotas 4,
Page 15

6/8
INFORMATIONS RELATIVES A LA GARANTIE AUX CONSOMMATEURS
Dans le monde entier, Guillemot Corporation S.A., ayant son siège social Place du Granier, B.P. 97143, 35571 Chantepie,
France (ci-après « Guillemot ») garantit au consommateur que le présent produit Thrustmaster est exempt de défaut
matériel et de vice de fabrication, et ce, pour une période de garantie qui correspond au délai pour intenter une action en
conformité de ce produit. Dans les pays de l’Union Européenne, ce délai est de deux (2) ans à compter de la délivrance du
produit Thrustmaster. Dans les autres pays, la durée de la période de garantie correspond au délai pour intenter une action
en conformité du produit Thrustmaster selon la législation en vigueur dans le pays où le consommateur avait son domicile
lors de l’achat du produit Thrustmaster (si une telle action en conformité n’existe pas dans ce pays alors la période de
garantie est de un (1) an à compter de la date d’achat d’origine du produit Thrustmaster).
Si, au cours de la période de garantie, le produit semble défectueux, contactez immédiatement le Support Technique qui
vous indiquera la procédure à suivre. Si le défaut est confirmé, le produit devra être retourné à son lieu d’achat (ou tout
autre lieu indiqué par le Support Technique).
Dans le cadre de la garantie, le consommateur bénéficiera, au choix du Support Technique, d'un remplacement ou d'une
remise en état de marche du produit défectueux. Si, pendant la période de garantie, le produit Thrustmaster fait l'objet
d'une telle remise en état, toute période d'immobilisation d'au moins sept jours vient s'ajouter à la durée de la garantie qui
restait à courir (cette période court à compter de la demande d'intervention du consommateur ou de la mise à disposition
pour remise en état du produit en cause, si cette mise à disposition est postérieure à la demande d'intervention). Lorsque la
loi applicable l’autorise, toute responsabilité de Guillemot et ses filiales (y compris pour les dommages indirects) se limite à
la remise en état de marche ou au remplacement du produit Thrustmaster. Lorsque la loi applicable l’autorise, Guillemot
exclut toutes garanties de qualité marchande ou d’adaptation à un usage particulier.
Cette garantie ne s’appliquera pas : (1) si le produit a été modifié, ouvert, altéré, ou a subi des dommages résultant d’une
utilisation inappropriée ou abusive, d’une négligence, d’un accident, de l’usure normale, ou de toute autre cause non liée à un
défaut matériel ou à un vice de fabrication (y compris, mais non limitativement, une combinaison du produit Thrustmaster avec
tout élément inadapté, notamment alimentations électriques, batteries, chargeurs, ou tous autres éléments non-fournis par
Guillemot pour ce produit) ; (2) si le produit a été utilisé en dehors du cadre privé, à des fins professionnelles ou commerciales
(salles de jeu, formations, compétitions, par exemple). (3) en cas de non respect des instructions du Support Technique ; (4) aux
logiciels, lesdits logiciels faisant l’objet d’une garantie spéci fique ; (5) aux consommables (éléments à remplacer pendant la durée
de vie du produit : piles, coussinets de casque audio, par exemple) ; (6) aux accessoires (câbles, étuis, housses, sacs,
dragonnes, par exemple) ; (7) si le produit a été vendu aux enchères publiques.
Cette garantie n’est pas transférable.
Les droits légaux du consommateur au titre de la législation applicable dans son pays à la vente de biens de consommation
ne sont pas affectés par la présente garantie.
Par exemple, en France, indépendamment de la présente garantie, le vendeur reste tenu de la garantie légale de
conformité mentionnée aux articles L. 217-4 à L.217-12 du code de la consommation et de celle relative aux défauts (vices
cachés) de la chose vendue, dans les conditions prévues aux articles 1641 à 1648 et 2232 du code civil. La loi applicable
(c'est-à-dire la loi française) impose de reproduire les extraits de la loi française suivants :
Article L. 217-4 du code de la consommation :
Le vendeur livre un bien conforme au contrat et répond des défauts de conformité existant lors de la délivrance.
Il répond également des défauts de conformité résultant de l'emballage, des instructions de montage ou de l'installation
lorsque celle-ci a été mise à sa charge par le contrat ou a été réalisée sous sa responsabilité.
Article L. 217-5 du code de la consommation :
Le bien est conforme au contrat :
1° S'il est propre à l'usage habituellement attendu d'un bien semblable et, le cas échéant :
- s'il correspond à la description donnée par le vendeur et possède les qualités que celui-ci a présentées à l'acheteur sous
forme d'échantillon ou de modèle ;
- s'il présente les qualités qu'un acheteur peut légitimement attendre eu égard aux déclarations publiques faites par le
vendeur, par le producteur ou par son représentant, notamment dans la publicité ou l'étiquetage ;
2° Ou s'il présente les caractéristiques définies d'un commun accord par les parties ou est propre à tout usage spécial
recherché par l'acheteur, porté à la connaissance du vendeur et que ce dernier a accepté.
Article L. 217-12 du code de la consommation :
L'action résultant du défaut de conformité se prescrit par deux ans à compter de la délivrance du bien.
Article L. 217-16 du code de la consommation :
Lorsque l'acheteur demande au vendeur, pendant le cours de la garantie commerciale qui lui a été consentie lors de
l'acquisition ou de la réparation d'un bien meuble, une remise en état couverte par la garantie, toute période
d'immobilisation d'au moins sept jours vient s'ajouter à la durée de la garantie qui restait à courir.
Cette période court à compter de la demande d'intervention de l'acheteur ou de la mise à disposition pour réparation du
bien en cause, si cette mise à disposition est postérieure à la demande d'intervention.
Page 16
7/8
SUPPORT TECHNIQUE
Article L. 1641 du code civil :
Le vendeur est tenu de la garantie à raison des défauts cachés de la chose vendue qui la rendent impropre à l'usage
auquel on la destine, ou qui diminuent tellement cet usage que l'acheteur ne l'aurait pas acquise, ou n'en aurait donné
qu'un moindre prix, s'il les avait connus.
Article L. 1648 alinéa 1er du code civil :
L'action résultant des vices rédhibitoires doit être intentée par l'acquéreur dans un délai de deux ans à compter de la
découverte du vice.
Stipulations additionnelles à la garantie
Pendant la période de garantie, Guillemot ne fournira, en principe, pas de pièce détachée car le Support Technique est
seul habilité tant à ouvrir qu'à remettre en état tout produit Thrustmaster (à l'exception des remises en état que le Support
Technique demanderait, par instructions écrites, au consommateur d'effectuer -par exemple en raison de la simplicité et de
l'absence de confidentialité du processus de remise en état-, en lui fournissant, le cas échéant, la ou les pièces détachées
nécessaires).
Compte tenu de ses cycles d'innovation et pour préserver ses savoir-faire et secrets, Guillemot ne fournira, en principe, ni
notice de remise en état, ni pièce détachée pour tout produit Thrustmaster dont la période de garantie est expirée.
Aux États-Unis d’Amérique et au Canada, la présente garantie est limitée au mécanisme interne et au boîtier externe du produit. En
aucun cas, Guillemot ou ses sociétés affiliées ne sauraient être tenues responsables envers qui que ce soit de tous dommages
indirects ou dommages accessoires résultant du non respect des garanties expresses ou implicites. Certains États/Provinces
n’autorisent pas la limitation sur la durée d’une garantie implicite, ou l’exclusion ou la limitation de responsabilité pour les dommages
indirects ou accessoires, de sorte que les limitations ou exclusions ci-dessus peuvent ne pas vous être appl icables. Cette garantie vous
confère des droits spécifiques ; vous pouvez également bénéficier d’autres droits qui peuvent dif férer d’un État/Province à l’autre.
Responsabilité
Lorsque la loi applicable l’autorise, Guillemot Corporation S.A. (ci-après « Guillemot ») et ses filiales excluent toute responsabilité
pour tous dommages causés par un ou plusieurs des faits suivants: (1) le produit a é té modifié, ouvert, altéré, (2) l’irrespect des
instructions de montage, (3) l’utilisation inappropriée ou abusive, la négligence, l’accident (un choc, par exemple), (4) l’usure
normale du produit, (5) l’utilisation du produit en dehors du cadre privé, à des fins professionnelles ou commerciales (salles de
jeu, formations, compétitions, par exemple). Lorsque la loi applicable l’autorise, Guillemot et ses filiales excluent toute
responsabilité pour tout dommage dont la cause n’est pas liée à un défaut matériel ou à un vice de fabrication du produit (y
compris, mais non limitativement, tout dommage causé directement ou indirectement par tout logiciel, ou par une combinaison du
produit Thrustmaster avec tout élément inadapté, notamment alimentations électriques, batteries, chargeurs, ou tous autres
éléments non-fournis par Guillemot pour ce produit).
Déclaration de conformité
UTILISATEURS CANADIEN S :
Cet appareil numérique de la classe B respecte toutes les exigences du Règlement sur le matériel brouilleur du Canada.
https://support.thrustmaster.com
Page 17

8/8
COPYRIGHT
*
*
© 2021 Guillemot Corporation S.A. Tous droits réservés. Thrustmaster® est une marque déposée de
Guillemot Corporation S.A. Fabriqué et distribué par Guillemot Corporation S.A. Toutes les autres marques
déposées et noms commerciaux sont reconnus par les présentes et sont la propriété de leurs
propriétaires respectifs. Le contenu, la conception et les spécifications sont susceptibles de changer sans
préavis et de varier selon les pays. Photos et illustrations non contractuelles. Conçu en Amérique du Nord
et en Europe, fabriqué en Chine.
À utiliser exclusivement avec les consoles PlayStation
“1”, “PlayStation”, “PS5", “PS4” et "PlayStation Shapes Logo" sont des marques déposées ou des
marques de Sony Interactive Entertainment Inc. Tous droits réservés. Toutes les autres marques s ont l a
propriété de leurs propriétaires respectifs. Fabriqué et distribué sous licence de Sony Interactive
Entertainment LLC.
RECOMMANDATION RELATIVE A LA PROTECTION DE L’ENVIRONNEMENT
Informations à conserver. Les couleurs et décorations peuvent varier.
Il est recommandé de retirer les attaches en plastique et les adhésifs avant d’utiliser le produit.
www.thrustmaster.com
*Applicable à l’UE, au RU et la Turquie uniquement
Dans l’Union Européenne et en Turquie : En fin de vie, ce produit ne doit pas être éliminé avec les
déchets ménagers normaux mais déposé à un point de collecte des déchets d'équipements
électriques et électroniques en vue de son recyclage.
Ceci est confirmé par le symbole figurant sur le produit, le manuel utilisateur ou l’emballage.
En fonction de leurs caractéristiques, les matériaux peuvent être recyclés. Par le recyclage et par
les autres formes de valorisation des déchets d'équipements électriques et électroniques, vous
contribuez de manière significative à la protection de l’environnement. Veuillez consulter les
autorités locales qui vous indiqueront le point de collecte concerné.
Dans les autres pays : Veuillez-vous reporter aux législations locales relatives au recyclage des
équipements électriques et électroniques.
®5 et les consoles PlayStation®4.
Page 18

1/8
1. Gashebel (Drosselklappe)
resp. Abschrauben des Gashebels
7. Einstellscheibe für Widerstand Handgriff
PlayStation®5 - PlayStation®4
Benutzerhandbuch
TECHNISCHE MERKMALE
2. USB-Stecker
3. Ruderanschluss: RJ12 Thrustmaster
Ruderanschluss (separate erhältlich)
4. Ruderfunktion via Handgriffdrehung
5. Ruder-Blockerschraube am
Handgriff
6. Inbusschlüssel zum Anschrauben,
8. Ruder via Kipphebel
9. Action-Buttons
10. PS Button mit LED
11. Multidirektionaler "Point Of View"-
Kopfschalter
Page 19

2/8
LERNEN SIE IHREN HOTAS JOYSTICK KENNEN
GASHEBEL (DROSSELKLAPPE)
Ihr Joystick hat einen großen Gashebel, mit dem Sie wirklich einfach die Beschleunigung Ihres
Flugzeugs steuern können.
Der Gashebel kann abmontiert werden und somit in zwei unterschiedlichen Varianten genutzt werden:
Vom Joystick getrennt (Um authentische Flugbedingungen zu simulieren).
Mit dem Joystick verbunden (Zur Verbesserung der Stabilität und um Platz zu sparen).
Standardmäßig wird der Gashebel vom Joystick getrennt ausgeliefert.
Um den Gashebel am Joystick zu montieren:
1. Drehen Sie die Unterseiten beider Teile nach oben (Gashebel und Joystick).
2. Nehmen Sie den Inbusschlüssel (6), der unten an der Basis des Joysticks befestigt ist.
3. Positionieren Sie den Gashebel auf der linken Seite des Joysticks.
Stecken Sie die Zunge an der linken Seite der Joystick-Basis in die Öffnung an der echten
Seite des Gashebels.
4. Mit dem Inbusschlüssel ziehen Sie die beiden Inbusschrauben unterhalb der Basis fest.
(Diese befinden sich links auf der Basis des Joysticks).
5. Wickeln Sie das Kabel des Gashebels ab und fädeln dies durch die Kabelführung.
6. Befestigen Sie den Inbusschlüssel wieder an seinem vorgesehenen Platz, so dass Sie ihn
nicht verlieren können.
Führen Sie diese Prozedur in umgekehrter Reihenfolge aus, um den Gashebel wieder vom
Joystick zu trennen.
EINSTELLEN DES HANDGRIFFWIDERSTANDES
Je nach Ihrem persönlichen Spielstil könnten Sie einen hochsensitiven Joystick bevorzugen,
der auf die kleinste Bewegung reagiert. Umgekehrt wünschen Sie sich vielleicht einen festeren
Joystick, der Ihnen beim Benutzen einen gewissen Widerstand entgegensetzt. Kein Problem,
denn der Widerstand Ihres Joysticks ist je nach Ihrem Gusto verstellbar. Um den Widerstand
Ihres Joysticks zu verstellen, nutzen Sie einfach die Einstellscheibe für Widerstand Handgriff
(7), die sich unterhalb an der Joystick-Basis befindet.
Page 20

3/8
RUDERFUNKTION
Ihr Joystick beinhaltet eine Ruderfunktion. Diese entspricht den Pedalen, die Piloten zur
Steuerung benutzen, Pedalen eines Flugzeugs entsprechen und dazu verwendet werden, das
Flugzeug um die vertikale Achse zu drehen. Dadurch bewegt sich das Flugzeug nach rechts
oder links. Diese Ruderfunktion ist durch die Drehung Ihres Handgriffs nach rechts oder links
verfügbar.
Die Ruderfunktion kann auf zweierlei Arten ausgeführt werden:
- durch Drehung des Handgriffs (4) nach links resp. rechts,
- oder via des Kipphebels (8) am Gashebel.
Falls Sie nur den Kipphebel nutzen (oder die Ruderfunktion überhaupt nicht nutzen), können
Sie die Drehung des Handgriffs dank der Ruder Blockierschraube (5) an der Joystick-Basis
blockieren. Zur Änderung der Schraubenposition benutzen Sie bitte einen FlachkopfSchraubendreher, um die Ruderfunktion zu blockieren/freizugeben.
MULTIDIREKTIONALER "POINT OF VIEW"-KOPFSCHALTER
Ihr Joystick verfügt über einen “Point Of View”-Kopfschalter (11), der Ihnen – wie der Name
schon sagt – eine Rundumsicht (bei Spielen, die diese Funktion unterstützen) um das
Flugzeug ermöglicht. Um dies zu ermöglichen, gehen Sie bitte in das Einstellungsmenü Ihres
Spiels und programmieren die verschiedenen Ansichten (rückwärtig, links, rechts aber auch
externe Ansichten) auf dem “Point Of View”-Kopfschalter.
Sie können stattdessen den “Point Of View”-Kopfschalter aber auch für andere Funktionen
nutzen (Feuern, etc.).
Page 21

4/8
PLAYSTATION®5 / PLAYSTATION®4
INSTALLATION AUF DER PLAYSTATION®5 / PLAYSTATION®4
1. Stecken Sie den USB-Stecker (2) in einen USB-Port Ihres Systems.
2. Schalten Sie Ihr System ein.
3. Die LED des Joysticks leuchtet ROT.
4. Drücken Sie den PS Button (10) an Ihrem Joystick und loggen sich in Ihren Sony
Entertainment Network Account ein, um Ihren Joystick nutzen zu können.
5. Starten Sie ein Spiel, das den Flight-Stick-Modus unterstützt.
Sie sind nun spielbereit!
LISTE DER KOMPATIBLEN PLAYSTATION®5/PLAYSTATION®4-SPIELE
Auf der PlayStation®5 / PlayStation®4 mit dem T.Flight Hotas 4:
- Nur kompatibel mit Spielen, die den Flight-Stick-Modus unterstützen.
- Wird im Spiel als echter Joystick erkannt und nicht als Gamepad.
Für besseres Ansprechverhalten und verbesserte Präzision sowie Zugriff auf die JoystickEinstellungen im Einstellungsmenü dieser Spiele.
Eine Liste der kompatiblen Spiele auf der PlayStation®5 / PlayStation®4 mit diesem Joystick
finden Sie auf https://support.thrustmaster.com/
Die Liste wird regelmäßig bei Veröffentlichungen von neuen PS5™ / PS4™ Spielen, die mit
dem T.Flight Hotas 4 kompatibel sind, aktualisiert.
: gehen Sie auf Joystick / T.Flight Hotas 4.
Page 22

5/8
FIRMWARE-AKTUALISIERUNG IHRES JOYSTICKS
Die in Ihrem Joystick implementierte Firmware kann mit einer neueren Version der Firmware
aktualisiert werden, um in den Genuss von Produktverbesserungen zu kommen.
Um die aktuelle Version der Firmware Ihres Joysticks anzuzeigen und ob eine Aktualisierung
eventuell verfügbar ist, rufen Sie auf Ihrem PC die Website
https://support.thrustmaster.com/
wählen Firmware aus und folgen den Anweisungen zum Download und der Installation.
FEHLERBEHEBUNG UND WARNHINWEISE
• Mein Joystick funktioniert nicht richtig oder ist falsch kalibriert:
- Schalten Sie Ihr System aus. Trennen Sie den Joystick vom System und schließen ihn
danach erneut an. Starten Sie Ihr Spiel erneut.
- Beim Anschluss Ihres Joysticks: Stellen Sie Handgriff, Ruder und Gashebel mittig und
bewegen diese danach nicht mehr (um Kalibrierungsprobleme zu vermeiden).
- Beenden Sie das Spiel, trennen Ihren Joystick vom System und stecken ihn danach wieder
ein. Drücken Sie dann den PS Button (10) am Joystick. Loggen Sie sich in Ihren Sony
Entertainment Network Account, um den Joystick benutzen zu können.
• Mein Joystick ist zu empfindlich oder nicht empfindlich genug:
- Ihr Joystick kalibriert sich automatisch von allein, nachdem Sie einige Bewegungen auf
verschiedenen Achsen ausgeführt haben.
- Im Einstellungsmenü “Options / Controller / Gamepad oder Joystick” Ihres Spiels: Stellen Sie
die Empfindlichkeit oder die Totzonen für Ihren Controller ein (falls diese Option verfügbar ist).
- Justieren Sie den Widerstand des Handgriffes mittels der Einstellscheibe (7), die sich
unterhalb Ihrer Joystick-Basis befindet.
• Die Ruderfunktion ist zu empfindlich:
- Deaktivieren Sie die Handgriffdrehung mittels der Blockierschraube (5) an der Joystick-Basis
und nutzen stattdessen den Kipphebel für die Ruderfunktion.
HILFEDATEIEN UND HÄUFIG GESTELLTE FRAGEN (NICHT IN DIESEM
HANDBUCH ENTHALTEN)
Gehen Sie bitte auf https://support.thrustmaster.com/. Dann klicken Sie auf Joystick /
T.Flight Hotas 4 und wählen dann Benutzerhandbuch oder FAQ aus.
auf. Dann klicken Sie auf Joystick / T.Flight Hotas 4,
Page 23

6/8
Kunden-Garantie-Information
Guillemot Corporation S.A. mit Hauptfirmensitz in Place du Granier, B.P. 97143, 35571 Chantepie, France
(fortfolgend “Guillemot”) garantiert Kunden weltweit, daß dieses Thrustmaster Produkt frei von Mängeln in
Material und Verarbeitung für eine Gewährleistungsfrist ist, die mit der Frist für eine Mängelrüge bezüglich
des Produktes übereinstimmt. In den Ländern der Europäischen Union entspricht diese einem Zeitraum von
zwei (2) Jahren ab Kaufdatum des Thrustmaster Produktes. In anderen Ländern entspricht die
Gewährleistungsfrist der zeitlichen Begrenzung für eine Mängelrüge bezüglich des Thrustmaster Produktes
in Übereinstimmung mit anwendbarem Recht des Landes, in dem der Kunde zum Zeitpunkt des Erwerbs
eines Thrustmaster Produktes wohnhaft ist. Sollte eine entsprechende Regelung in dem entsprechenden
Land nicht existieren, umfasst die Gewährleistungspflicht einen Zeitraum von einem (1) Jahr ab dem
originären Kaufdatum des Thrustmaster Produktes.
Sollten bei dem Produkt innerhalb der Gewährleistungsfrist Defekte auftreten, kontaktieren Sie unverzüglich
den technischen Kundendienst, der die weitere Vorgehensweise anzeigt. Wurde der Defekt bestätigt, muß
das Produkt an die Verkaufsstelle (oder an eine andere Stelle, je nach Maßgabe des technischen
Kundendienstes) retourniert werden.
Im Rahmen dieser Garantie sollte das defekte Produkt des Kunden, je nach Entscheidung des technischen
Kundendienstes, entweder ausgetauscht oder repariert werden. Sollte während der Garantiezeit das
Thrustmaster Produkt einer derartigen Instandsetzung unterliegen und das Produkt während eines
Zeitraums von mindestens sieben (7) Tagen nicht benutzbar sein, wird diese Zeit der restlichen Garantiezeit
hinzugefügt. Diese Frist läuft ab dem Zeitpunkt, an dem der Wunsch des Verbrauchers bezüglich einer
Intervention vorliegt oder ab dem Tag, an dem das fragliche Produkt zur Instandsetzung zur Verfügung
steht, falls das Datum, an dem das Produkt zur Instandsetzung zur Verfügung steht, dem Datum des
Antrags auf Intervention nachfolgt. Wenn nach geltendem Recht zulässig, beschränkt sich die volle Haftung
von Guillemot und ihrer Tochtergesellschaften auf die Reparatur oder den Austausch des Thrustmaster
Produktes (inklusive Folgeschäden). Wenn nach geltendem Recht zulässig, lehnt Guillemot alle
Gewährleistungen der Marktgängigkeit oder Eignung für einen bestimmten Zweck ab.
Der Gewährleistungsanspruch verfällt: (1) Falls das Produkt modifiziert, geöffnet, verändert oder ein
Schaden durch unsachgemäßen oder missbräuchlichen Gebrauch hervorgerufen wurde, sowie durch
Fahrlässigkeit, einen Unfall, Verschleiß oder irgendeinem anderen Grund – aber nicht durch Material- oder
Herstellungsfehler (einschließlich, aber nicht beschränkt auf, die Kombination der Thrustmaster Produkte mit
ungeeigneten Elementen, insbesondere Netzteile, Akkus, Ladegeräte, oder andere Elemente, die von
Guillemot für dieses Produkt nicht mitgeliefert wurden); (2) Falls das Produkt für eine andere Nutzung als
zum privaten Hausgebrauch, einschließlich für professionelle oder kommerzielle Zwecke (z. B. Spielhallen,
Training, Wettkämpfe) verwendet wird; (3) Im Falle der Nichteinhaltung der durch den technischen Support
erteilten Anweisungen; (4) Durch Software. Die besagte Software ist Gegenstand einer speziellen Garantie;
(5) Bei Verbrauchsmaterialien (Elemente, die während der Produktlebensdauer ausgetauscht werden, wie z.
B. Einwegbatterien, Ohrpolster für ein Audioheadset oder für Kopfhörer); (6) Bei Accessoires (z. B. Kabel,
Etuis, Taschen, Beutel, Handgelenk-Riemen); (7) Falls das Produkt in einer öffentlichen Versteigerung
verkauft wurde.Diese Garantie ist nicht übertragbar.
Die Rechte des Kunden in Übereinstimmung mit anwendbarem Recht bezüglich des Verkaufs auf
Konsumgüter im Land der/der Kunden/Kundin wird durch diese Garantie nicht beeinträchtigt.
Page 24
7/8
Zusätzliche Gewährleistungsbestimmungen
Während der Garantiezeit bietet Guillemot grundsätzlich keine Ersatzteile an, da der technische
Kundendienst der einzige autorisierte Partner zum Öffnen und/oder Instandsetzen jedweden ThrustmasterProdukts ist (mit Ausnahme von irgendwelchen Instandsetzungsprozeduren, die der Kunde nach Maßgabe
des technischen Kundendienstes und durch schriftliche Instruktionen sowie der Zurverfügungstellung
des/der eventuell erforderlichen Ersatzteil(s)(e) selbst in der Lage ist durchzuführen – zum Beispiel aufgrund
der Einfachheit und einer nicht erforderlichen Geheimhaltung des Instandsetzungsverfahrens).
Aufgrund seiner Innovationszyklen und um sein Know-how und seine Geschäftsgeheimnisse zu schützen,
bietet Guillemot grundsätzlich keine Instandsetzungs-Benachrichtigung oder Ersatzteile für alle Thrustmaster
Produkte an, deren Garantiezeit abgelaufen ist.
Haftung
Wenn nach dem anwendbaren Recht zulässig, lehnen Guillemot Corporation S.A. (fortfolgend "Guillemot") und
ihre Tochtergesellschaften jegliche Haftung für Schäden, die auf eine oder mehrere der folgenden Ursachen
zurückzuführen sind, ab: (1) das Produkt wurde modifiziert, geöffnet oder geändert; (2) Nichtbefolgung der
Montageanleitung; (3) unangebrachte Nutzung, Fahrlässigkeit, Unfall (z. B. ein Aufprall); (4) normalem
Verschleiß; (5) Die Verwendung des Produkts für jedwede andere Nutzung als zum privaten Hausgebrauch,
einschließlich professionelle oder kommerzielle Zwecke (z. B. Spielhallen, Training, Wettkämpfe). Wenn nach
anwendbarem Recht zulässig, lehnen Guillemot und seine Niederlassungen jegliche Haftung für Schäden, die
nicht auf einen Material- oder Herstellungsfehler in Bezug auf das Produkt beruhen (einschließlich, aber nicht
beschränkt auf, etwaige Schäden, die direkt oder indirekt durch Software oder durch die Kombination der
Thrustmaster Produkte mit ungeeigneten Elementen, insbesondere Netzteile, Akkus, Ladegeräte, oder andere
Elemente, die von Guillemot für dieses Produkt nicht geliefert wurden), ab.
TECHNISCHER SUPPORT
https://support.thrustmaster.co
m
Page 25

8/8
COPYRIGHT
*
*
©2021 Guillemot Corporation S.A. Alle Rechte vorbehalten. Thrustmaster® ist eine eingetragene
Marke von Guillemot Corporation S.A. Alle anderen Marken sind im Besitz Ihrer jeweiligen
Eigentümer. Inhalte, Designs und Spezifikationen können ohne vorherige Ankündigung geändert
werden und können von Land zu Land unterschiedlich sein. Fotos und Illustrationen nicht
verbindlich. Entwickelt in Nordamerika und Europa. Hergestellt in China
Ausschließlich zur Verwendung mit PlayStation®5-Konsolen und PlayStation®4-Konsolen.
"1", "PlayStation", "PS5", "PS4" und “PlayStation Shapes Logo“ sind eingetragene Marken oder
Warenzeichen von Sony Interactive Entertainment Inc. Alle Rechte vorbehalten. Alle anderen
Marken sind im Besitz ihrer jeweiligen Eigentümer. Hergestellt und vertrieben unter Lizenz von Sony
Interactive Entertainment LLC.
HINWEISE ZUM UMWELTSCHUTZ
In der Europäischen Union: Dieses Produkt darf nach Ende seiner Lebensdauer nicht über
den Hausmüll entsorgt werden, sondern muss an einem Sammelpunkt für das Recycling
von elektrischen und elektronischen Geräten abgegeben werden.
Das Symbol auf dem Produkt, der Gebrauchsanleitung oder der Verpackung weist darauf hin.
Die Werkstoffe sind gemäß ihrer Kennzeichnung wiederverwertbar. Mit der
Wiederverwertung, der stofflichen Verwertung oder anderen Formen von Altgeräten
leisten Sie einen wichtigen Beitrag zum Schutz unserer Umwelt. Bitte erfragen Sie bei der
Gemeindeverwaltung die zuständige Entsorgungsstelle.
Für alle anderen Länder: Bitte beachten Sie die lokalen Entsorgungsrichtlinien/-Gesetze bezüglich
elektrischen und elektronischen Equipments.
Wichtige Informationen. Die Farben und Verzierungen können abweichen.
Plastikhalterungen und Aufkleber bitte vor der Nutzung des Produktes entfernen.
www.thrustmaster.com
* Nur in der E U, dem Vereinigten Königreich und der Türkei anwendbar
Page 26

1/8
1. Throttle
vastzetten van throttle
7. Wieltje voor aanpassen stickweerstand
PlayStation®5 - PlayStation®4
Handleiding
TECHNISCHE KENMERKEN
2. USB-connector
3. Roer-connector: RJ12 Thrustmaster
Rudder (wordt apart verkocht) connector
4. Roerfunctie via schommelstick
5. Roerfixatieschroef op stick
6. Inbussleutel voor losmaken of
8. Roerbediening via rocking-knop
9. Actieknoppen
10. PS-knop met LED
11. Multidirectionele "Point-of-View" hat-switch
Page 27

2/8
DE DIVERSE FUNCTIES VAN DE HOTAS-JOYSTICK
THROTTLE
De joystick beschikt over een grote throttle die uitermate geschikt is voor het bedienen van de
stuwkracht van een vliegtuig.
De throttle is afneembaar en kan op twee verschillende manieren worden gebruikt:
Losgemaakt en apart van de joystick (voor een authentieke pilootbeleving)
Bevestigd aan de joystick (voor meer stabiliteit en minder ruimtebeslag).
Standaard wordt de throttle los van de joystick geleverd.
De throttle aan de joystick bevestigen:
1. Zet beide items op hun kop (de throttle en de joystick).
2. Maak de inbussleutel (6) los die onderop de voet van de joystick is vastgeklemd.
3. Plaats de throttle links van de joystick.
Steek de aansluitlip aan de linkerkant van de joystickvoet in de opening op de rechterkant van
de throttle.
4. Draai de twee inbusbouten onderop de voet vast met de inbussleutel
(de bouten bevinden zich aan de linkerkant van de joystickvoet).
5. Rol de throttle-kabel op en leid deze door de kabeldoorgang.
6. Klem de inbussleutel terug op zijn plaats om hem niet kwijt te raken.
Voer deze procedure in omgekeerde volgorde uit om de throttle los te maken van de joystick.
STICK MET INSTELBARE WEERSTAND
Bij de ene game wilt u graag een supergevoelige joystick die reageert op de minste of geringste
aanraking en bij een andere game wilt u een stick met meer weerstand die pas in actie komt als u
er flink tegen duwt.
De weerstand van deze stick is gelukkig instelbaar zodat u er elk type game mee kunt spelen. U
kunt de weerstand instellen met behulp van het wieltje voor het aanpassen van de stickweerstand
(7). Dit wieltje bevindt zich onderop de voet van de joystick.
Page 28
3/8
ROERFUNCTIE
De joystick beschikt over een roerfunctie die correspondeert met de pedalen in een vliegtuig
waarmee de piloot het stuur bedient om het vliegtuig om de verticale as te kantelen (om een
bocht naar links of rechts te maken). Deze roerfunctie is beschikbaar op de joystick door de
stick naar links of rechts te draaien.
Deze roerbediening is op twee manieren beschikbaar:
- op de joystick door de stick (4) naar links of rechts te draaien.
- of via de rocking-knop (8) op de throttle.
Als u alleen de rocking-knop gebruikt (of als u de roerfunctie niet nodig hebt), kunt u de
draaiing van de stick vergrendelen met de fixatieschroef (5) in de voet van de joystick.
Gebruik een gewone schroevendraaier om de roerfunctie vast of los te zetten.
MULTIDIRECTIONELE POINT-OF-VIEW HAT-SWITCH
De joystick beschikt over een Point-of-View hat-switch (11) waarmee u in één keer een
overzicht krijgt van alles wat er rondom uw vliegtuig gebeurt (indien de game deze
mogelijkheid biedt). Als u deze functie wilt gebruiken, hoeft u alleen maar in het
instellingenmenu van uw game de verschillende weergaven (links, rechts, naar voren, naar
achteren) op de richtingen van de Point-of-View hat-switch te programmeren.
De Point-of-View hat-switch kan natuurlijk ook voor andere functies worden gebruikt zoals
schieten.
Page 29

4/8
PLAYSTATION®5 / PLAYSTATION®4
INSTALLATIE OP DE PLAYSTATION®5 / PLAYSTATION®4
1. Sluit de USB-connector (2) aan op een van de USB-poorten van de computer.
2. Zet uw systeem aan.
3. De LED van de joystick gaar ROOD branden.
4. Druk op de joystick op de PS-knop (10) en login op uw Sony Entertainment Network account
om de joystick te kunnen gebruiken.
5. Start een game die de Flight Stick modus ondersteunt.
Nu kan er gespeeld worden!
LIJST VAN COMPATIBELE PLAYSTATION®5/PLAYSTATION®4-GAMES
Op PlayStation®5 / PlayStation®4, de T.Flight Hotas 4:
- is alleen compatibel met de games die de Flight Stick modus ondersteunen.
- wordt in games herkend als een echte joystick in plaats van een gamepad. Dit zorgt voor
een veel betere respons en nauwkeurigheid, en maakt het mogelijk de joystick-opties in de
game te gebruiken.
Een lijst van PlayStation®5/PlayStation®4-games die compatibel zijn met deze joystick is te
vinden op https://support.thrustmaster.com/
Deze lijst wordt regelmatig aangevuld zodra er nieuwe PS5™/PS4™-games uitkomen die
compatibel zijn met de T.Flight Hotas 4.
: ga naar Joysticks / T.Flight Hotas 4.
Page 30

5/8
DE FIRMWARE VAN HET JOYSTICK BIJWERKEN
De firmware in de voet van de joystick kan worden bijgewerkt naar een nieuwere verbeterde
versie wanneer een dergelijke versie beschikbaar komt.
Om de huidige versie van de firmware van de joystick weer te geven en deze bij te werken
indien gewenst: ga op een PC naar https://support.thrustmaster.com/
T.Flight Hotas 4, selecteer Firmware en volg de instructies voor het downloaden en
installeren.
PROBLEMEN OPLOSSEN EN WAARSCHUWINGEN
• Mijn joystick werkt niet goed of lijkt niet goed gekalibreerd te zijn
- Zet uw systeem uit, koppel uw joystick los, sluit de joystick opnieuw aan en start de game
opnieuw op.
- Bij het aansluiten van de joystick: laat de stick, het roer en de throttle tijdens het aansluiten van de
joystick in het midden staan en raak deze niet aan (dit ter voorkoming van problemen met de
kalibratie).
- Sluit de game af, ontkoppel de joystick, sluit hem opnieuw aan en druk op de PS-knop (10) op
de joystick. Login op uw Sony Entertainment Network account om de joystick te kunnen
gebruiken.
• Mijn joystick reageert te gevoelig of reageert niet gevoelig genoeg:
- De joystick wordt automatisch gekalibreerd wanneer u deze een paar maal in de richting van
de verschillende assen hebt bewogen.
- Ga in de game naar het menu met opties voor de controller, gamepad en joystick. Pas de
gevoeligheid of dode zones van de controller aan (indien deze optie beschikbaar is).
- Pas de weerstand van de stick aan met het wieltje (7) onderop de voet van de joystick.
• De roerbediening is te gevoelig:
- Schakel de draaiing van de stick uit met behulp van de fixatieschroef (5) op de voet van de
joystick en gebruik de rocking-knop voor de bediening van het roer.
HELPBESTANDEN EN FAQS (NIET OPGENOMEN IN DEZE
HANDLEIDING)
Ga naar https://support.thrustmaster.com/. Klik op Joystick / T.Flight Hotas 4 en selecteer
vervolgens Handleiding of FAQ.
. Klik op Joystick /
Page 31

6/8
Informatie met betrekking tot kopersgarantie
Wereldwijd garandeert Guillemot Corporation S.A., het statutair adres gevestigd aan de Place du Granier,
B.P. 97143, 35571 Chantepie, Frankrijk, (hierna te noemen “Guillemot”) aan de de koper dat dit
Thrustmaster-product vrij zal zijn van materiaal- en fabricagefouten gedurende een garantieperiode gelijk
aan de tijd maximaal vereist om een restitutie/vervanging voor dit product te claimen. In landen van de
Europese Unie komt dit overeen met een periode van twee (2) jaar vanaf het moment van levering van
het Thrustmaster-product. In andere landen komt de garantieperiode overeen met de tijd maximaal vereist
om een restitutie/vervanging voor dit Thrustmaster-product te claimen zoals wettelijk is vastgelegd in het
land waarin de koper woonachtig was op de datum van aankoop van het Thrustmaster-product. Indien
een dergelijk claimrecht niet wettelijk is vastgelegd in het betreffende land, geldt een garantieperiode van
één (1) jaar vanaf datum aankoop van het Thrustmaster-product.
Indien u in de garantieperiode een defect meent te constateren aan dit product, neem dan onmiddellijk
contact op met Technical Support die u zal informeren over de te volgen procedure. Als het defect wordt
bevestigd, dient het product te worden geretourneerd naar de plaats van aankoop (of een andere locatie
die wordt opgegeven door Technical Support).
Binnen het gestelde van deze garantie wordt het defecte product van de koper gerepareerd of vervangen,
zulks ter beoordeling van Technical Support. Indien het Thrustmaster- product tijdens de garantieperiode
is onderworpen aan een dergelijk herstel, wordt elke periode van ten minste zeven (7) dagen waarin het
product niet in gebruik is, opgeteld bij de resterende garantieperiode (deze periode loopt vanaf de datum
van verzoek van de consument voor interventie of vanaf de datum waarop het product in kwestie
beschikbaar is gesteld voor herstel als de datum waarop het product ter beschikking wordt gesteld voor
herstel later is dan de datum van het verzoek om interventie). Indien toegestaan door van toepassing
zijnde wetgeving, beperkt de volledige aansprakelijkheid van Guillemot en haar dochterondernemingen
(inclusief de aansprakelijkheid voor vervolgschade) zich tot het repareren of vervangen van het
Thrustmaster-product. Indien toegestaan door van toepassing zijnde wetgeving, wijst Guillemot elke
garantie af met betrekking tot verhandelbaarheid of geschiktheid voor enig doel.
Deze garantie is niet van kracht: (1) indien het product aangepast, geopend of gewijzigd is, of beschadigd
is ten gevolge van oneigenlijk of onvoorzichtig gebruik, verwaarlozing, een ongeluk, normale slijtage, of
enige andere oorzaak die niet gerelateerd is aan een materiaal- of fabricagefout (inclusief maar niet
beperkt tot het combineren van het Thrustmaster-product met enig ongeschikt element waaronder in het
bijzonder voedingsadapters, oplaadbare batterijen, opladers of enig ander element niet geleverd door
Guillemot voor dit product); (2) als het product is gebruikt voor enig ander doel dan thuisgebruik, zoals
maar niet exclusief een professioneel of commercieel doel (bijvoorbeeld game rooms, training,
wedstrijden); (3) indien u zich niet houdt aan de instructies zoals verstrekt door Technical Support; (4) op
software die onder een specifieke garantie valt; (5) op verbruiksartikelen (elementen die tijdens de
levensduur van het product worden vervangen zoals bijvoorbeeld batterijen of pads van een headset of
koptelefoon); (6) op accessoires (zoals bijvoorbeeld kabels, behuizingen, hoesjes, etui's, draagtassen of
polsbandjes); (7) indien het product werd verkocht op een openbare veiling.
Deze garantie is niet overdraagbaar.
De wettelijke rechten van de koper die in zijn/haar land van toepassing zijn op de verkoop van
consumentproducten worden op generlei wijze door deze garantie beperkt.
Page 32

7/8
TECHNISCHE ONDERSTEUNING
Aanvullende garantiebepalingen
Gedurende de garantieperiode zal Guillemot in principe nooit reserveonderdelen leveren omdat Technical
Support de enige partij is die bevoegd is een Thrustmaster-product te openen en/of te herstellen (met
uitzondering van een herstelprocedure die de klant door Technical Support gevraagd wordt uit te voeren
met behulp van schriftelijke instructies – omdat deze procedure bijvoorbeeld eenvoudig is en het
herstelproces niet vertrouwelijk is – en door het verstrekken aan de consument van de benodigde
onderdelen, indien van toepassing).
Gezien de innovatiecycli en om haar knowhow en handelsgeheimen te beschermen, zal Guillemot in
principe nooit een herstelbeschrijving of reserveonderdelen verstrekken voor een Thrustmaster-product
waarvan de garantieperiode is verstreken.
Aansprakelijkheid
Indien toegestaan door van toepassing zijnde wetgeving, wijzen Guillemot Corporation S.A. (hierna te
noemen “Guillemot”) en haar dochterondernemingen alle aansprakelijkheid af voor enige schade
veroorzaakt door één van de volgende oorzaken: (1) indien het product aangepast, geopend of gewijzigd
is; (2) de montage-instructies niet zijn opgevolgd; (3) oneigenlijk of onvoorzichtig gebruik, verwaarlozing,
een ongeluk (bijvoorbeeld stoten); (4) normale slijtage; (5) het gebruik van het product voor enig ander
doel dan thuisgebruik, zoals maar niet exclusief een professioneel of commercieel doel (bijvoorbeeld
game rooms, training, wedstrijden). Indien toegestaan onder van toepassing zijnde wetgeving, wijzen
Guillemot en haar dochterondernemingen alle aansprakelijkheid af voor enige schade aan dit product niet
gerelateerd aan een materiaal- of fabricagefout (inclusief maar niet beperkt tot enige schade direct of
indirect veroorzaakt door enige software, of door het combineren van het Thrustmaster-product met enig
ongeschikt element waaronder in het bijzonder voedingsadapters, oplaadbare batterijen, opladers of enig
ander element niet geleverd door Guillemot voor dit product).
https://support.thrustmaster.com
Page 33

8/8
COPYRIGHT
*
*
©2021 Guillemot Corporation S.A.. Alle rechten voorbehouden. Thrustmaster® is een
geregistreerd handelsmerk van Guillemot Corporation S.A.. Gefabriceerd en gedistribueerd door
Guillemot Corporation S.A.. Alle andere handelsmerken en merknamen worden hierbij erkend en
zijn eigendom van de respectieve eigenaren. Inhoud, ontwerp en specificaties kunnen zonder
voorafgaande kennisgeving worden gewijzigd en kunnen per land verschillen. Aan foto's en
illustraties kunnen geen rechten worden ontleend. Ontworpen in Europa en Noord-Amerika.
Gefabriceerd in China.
Voor exclusief gebruik met de PlayStation®5-consoles en PlayStation®4-consoles.
"1", "PlayStation", "PS5", "PS4" en het “PlayStation Shapes Logo” zijn geregistreerde
handelsmerken of handelsmerken van Sony Interactive Entertainment Inc.. Alle rechten
voorbehouden. Alle andere handelsmerken zijn het eigendom van hun respectieve eigenaren.
Geproduceerd en gedistribueerd door Guillemot Corporation S.A. onder licentie van Sony
Interactive Entertainment LLC.
AANBEVELINGEN VOOR DE BESCHERMING VAN HET MILIEU
Neem contact op met uw gemeente voor informatie over een inzamelpunt bij u in de buurt.
In alle andere landen: houd u aan de plaatselijk milieuwetgeving voor elektrische en elektronische apparaten.
Bewaar deze informatie. De kleuren en decoraties kunnen variëren.
Plastic bevestigingen en hechtmaterialen moeten van het product worden verwijderd voordat het wordt
gebruikt.
www.thrustmaster.com
*Alleen van toepassing in de EU, het VK en Turkije
In de Europese Unie: Gooi dit product na het einde van de levensduur niet weg met het
normale afval, maar breng het naar het door uw gemeente aangewezen inzamelpunt
voor elektrische en/of computerapparatuur.
Ter herinnering is hiertoe op het product, de gebruikshandleiding of de verpakking een
symbool aangebracht.
De meeste materialen kunnen worden gerecycled. Door recycling en andere methoden
voor verantwoorde verwerking van afgedankte elektrische en elektronische apparaten
kunt u een belangrijke bijdrage leveren aan de bescherming van het milieu.
Page 34

1/8
1. Manetta
manetta
7. Disco per la regolazione della resistenza
CARATTERISTICHE TECNICHE
PlayStation®5 - PlayStation®4
Manuale d’uso
2. Connettore USB
3. Connettore timone: connettore RJ12 per
Timone Thrustmaster (venduto
separatamente)
4. Funzione timone tramite rotazione
impugnatura
5. Vita di bloccaggio del timone
sull’impugnatura
6. Chiave Allen per installare o separare la
dell’impugnatura
8. Timone tramite pulsante oscillante
9. Pulsanti azione
10. Pulsante PS con LED
11. Hat-switch "Point Of View" multidirezionale
Page 35

2/8
INTRODUZIONE AL TUO JOYSTICK HOTAS
MANETTA
Il tuo joystick è dotato di un’ampia manetta che potrai utilizzare per controllare facilmente
l’accelerazione del tuo aeroplano.
La manetta è rimuovibile e può essere collocata in 2 diverse posizioni:
Staccata e separata dal joystick (per ricreare le autentiche condizioni di pilotaggio), oppure
Attaccata al joystick (per una maggiore stabilità e per occupare minor spazio possibile).
Per default, la manetta si presenta separata dal joystick.
Per attaccare la manetta al joystick:
1. Ribalta entrambi gli elementi (la manetta e il joystick).
2. Prendi la chiave Allen (6) attaccata sotto la base del joystick.
3. Posiziona la manetta alla sinistra del joystick.
Inserisci la placca di aggancio presente nella parte sinistra della base del joystick
nell’apposita apertura nella parte destra della manetta.
4. Utilizzando la chiave, stringi le due viti Allen presenti sotto la base
(si trovano sulla parte sinistra della base del joystick).
5. Riavvolgi il cavo della manetta e fallo passare attraverso il relativo slot di alloggiamento.
6. Rimetti a posto la chiave Allen, in modo tale da non perderla.
Per staccare la manetta dal joystick, ripeti questa procedura al contrario.
IMPUGNATURA A RESISTENZA REGOLABILE
In base al tuo stile di gioco, potresti desiderare un joystick sensibilissimo, in grado di
rispondere anche al più lieve tocco, oppure potresti preferire un joystick più rigido, in grado di
offrire una maggiore resistenza ai movimenti da te effettuati.
L’impugnatura del tuo joystick è dotata di resistenza regolabile, per potersi adattare a tutti i
giocatori. Per regolarla, utilizza l’apposito disco di regolazione (7) presente sotto la base del
tuo joystick.
Page 36

3/8
FUNZIONE TIMONE
Il tuo joystick è dotato di una funzione timone, che in un aereo corrisponde ai pedali utilizzati
dal pilota per girare l’ipotetico sterzo, facendo oscillare l’aereo lungo il proprio asse verticale
(ossia facendolo girare verso destra o sinistra). Questa funzione timone è accessibile dal tuo
joystick ruotando l’impugnatura verso destra o verso sinistra.
È possibile accedere alla funzione timone in due diversi modi:
- sul tuo joystick, ruotando l’impugnatura (4) verso destra o sinistra;
- oppure utilizzando il pulsante oscillante (8) sulla manetta.
Qualora dovessi utilizzare unicamente il pulsante oscillante (o se non stai utilizzando la
funzione timone), puoi disattivare la rotazione dell’impugnatura tramite la vite di bloccaggio (5)
presente sulla base del joystick. Per cambiare la posizione della vite, bloccando/sbloccando
così la funzione timone, puoi utilizzare un cacciavite piatto.
HAT-SWITCH "POINT OF VIEW" MULTIDIREZIONALE
Il tuo joystick dispone di un hat-switch “Point Of View” (11) che, come il nome stesso sta a
indicare, ti permette (nei giochi che lo consentono) di vedere istantaneamente qualunque cosa
attorno al tuo aeroplano. Per far questo, non devi far altro che accedere al menu di
configurazione del tuo gioco e programmare le varie visuali (posteriore, verso sinistra, verso
destra, oltre alle visuali esterne), associandole alle varie direzioni dell’hat-switch “Point Of
View”.
Naturalmente, in alternativa, puoi utilizzare l’hat-switch “Point Of View” anche per altre funzioni
(fuoco, ecc.).
Page 37

4/8
PLAYSTATION®5 / PLAYSTATION®4
INSTALLAZIONE SU PLAYSTATION®5 / PLAYSTATION®4
1. Collega il connettore USB (2) ad una delle porte USB del tuo sistema.
2. Accendi il tuo sistema.
3. Il LED del joystick si illuminerà di rosso.
4. Per poter utilizzare il joystick, premi il pulsante PS del joystick (10) e accedi al tuo account
su Sony Entertainment Network.
5. Avvia un gioco che supporti la modalità Flight Stick.
Ora sei pronto per giocare!
ELENCO DEI GIOCHI PLAYSTATION®5 / PLAYSTATION®4 COMPATIBILI
Su PlayStation®5 / PlayStation®4, il T.Flight Hotas 4:
- È compatibile soltanto con i giochi che supportano la modalità Flight Stick.
- Nei giochi, viene riconosciuto come un vero e proprio joystick e non come gamepad, per una
migliore risposta e una maggiore precisione, oltre alla possibilità di accedere alle opzioni per il
joystick di questi giochi.
Un elenco di giochi PlayStation®5 / PlayStation®4 compatibili con il joystick è disponibile sul
sito https://support.thrustmaster.com/
Questo elenco viene costantemente aggiornato, a seconda dell’uscita di nuovi giochi per
PS5™ / PS4™ compatibili con il T.Flight Hotas 4.
: vai su Joystick / T.Flight Hotas 4.
Page 38

5/8
AGGIORNARE IL FIRMWARE DEL TUO JOYSTICK
Il firmware presente nella base del tuo joystick può essere aggiornato ad una versione più
recente, per apportare dei miglioramenti al prodotto.
Per visualizzare la versione del firmware attualmente utilizzata dal tuo joystick e, se
necessario, aggiornarla: su PC, collegati al sito https://support.thrustmaster.com/
Joystick / T.Flight Hotas 4, dopodiché seleziona Firmware e segui le istruzioni per la
procedura di scaricamento e installazione.
RACCOMANDAZIONI E RISOLUZIONE DEI PROBLEMI
• Il mio joystick non funziona correttamente o non sembra essere ben calibrato:
- Spegni il tuo sistema, scollega il tuo joystick, ricollega il tuo joystick e riavvia il tuo gioco.
- Quando colleghi il tuo joystick: lascia centrati l’impugnatura, il timone e la manetta, senza
muoverli (al fine di evitare problemi di calibrazione).
- Esci dal gioco, scollega il tuo joystick, ricollegalo, dopodiché premi il pulsante PS (10) sul
joystick. Per poter utilizzare il tuo joystick, accedi al tuo account su Sony Entertainment
Network.
• Il mio joystick è troppo sensibile o non abbastanza sensibile:
- Il tuo joystick si auto-calibra dopo aver compiuto alcuni movimenti lungo i vari assi.
- Tramite il menu “Options / Controller / Gamepad o Joystick” del tuo gioco: regola la sensibilità
o le zone morte del tuo controller (qualora questa opzione fosse disponibile).
- Regola la resistenza dell’impugnatura tramite il disco (7) presente sotto la base del tuo
joystick.
• La funzione timone è troppo sensibile:
- Disattiva la rotazione dell’impugnatura tramite la vite di bloccaggio (5) presente sulla base del
joystick e attiva la funzione timone utilizzando il pulsante oscillante.
FILE DI AIUTO E FAQ (NON INCLUSI NEL PRESENTE MANUALE)
Visita il sito https://support.thrustmaster.com/. Clicca su Joystick / T.Flight Hotas 4, quindi
seleziona Manuale o FAQ.
. Clicca su
Page 39

6/8
Informazioni sulla garanzia al consumatore
A livello mondiale, Guillemot Corporation S.A., avente sede legale in Place du Granier, B.P. 97143, 35571
Chantepie, Francia (d’ora in avanti “Guillemot”) garantisce al consumatore che il presente prodotto
Thrustmaster sarà privo di difetti relativi ai materiali e alla fabbricazione, per un periodo di garanzia
corrispondente al limite temporale stabilito per la presentazione di un reclamo riguardante la conformità del
prodotto in questione. Nei paesi della Comunità Europea, tale periodo equivale a due (2) anni a partire dalla
consegna del prodotto Thrustmaster. In altri paesi, la durata della garanzia corrisponde al limite temporale
stabilito per la presentazione di un reclamo riguardante la conformità del prodotto Thrustmaster in base alle
leggi applicabili nel paese in cui il consumatore risiedeva alla data di acquisto del prodotto Thrustmaster
(qualora nel paese in questione non esistesse alcuna norma a riguardo, il periodo di garanzia corrisponderà
a un (1) anno a partire dalla data originale di acquisto del prodotto Thrustmaster).
Qualora, durante il periodo di garanzia, il prodotto dovesse apparire difettoso, contatti immediatamente
l’Assistenza Tecnica, che le indicherà la procedura da seguire. Qualora il difetto dovesse essere confermato,
il prodotto dovrà essere riportato al luogo di acquisto (o qualsiasi altro luogo indicato dall’Assistenza
Tecnica).
Nel contesto della presente garanzia, il prodotto difettoso di proprietà del consumatore potrà essere
sostituito o reso nuovamente funzionante, a discrezione dell’Assistenza Tecnica. Se, durante il periodo
coperto dalla garanzia, il prodotto Thrustmaster fosse oggetto di tale rimessa in operatività, alla rimanente
durata della garanzia dovrà essere aggiunto un periodo di almeno sette (7) giorni, durante il quale il prodotto
risulta non utilizzabile (tale periodo intercorre dalla data della richiesta di intervento da parte del
consumatore o dalla data in cui il prodotto in questione è reso disponibile per la rimessa in operatività,
questo nel caso in cui tale data sia successiva alla data di richiesta di intervento). Qualora le leggi applicabili
in materia lo consentano, la totale responsabilità di Guillemot e delle sue controllate (compresi i danni
conseguenti) si limita alla rimessa in operatività o alla sostituzione del prodotto Thrustmaster. Qualora le
leggi applicabili in materia lo consentano, Guillemot declina ogni garanzia sulla commerciabilità o la
conformità a finalità particolari.
La presente garanzia non potrà essere applicata: (1) se il prodotto è stato modificato, aperto, alterato o ha
subito danni derivanti da un uso inappropriato o non autorizzato, da negligenza, da un incidente, dalla
semplice usura, o da qualsiasi altra causa non riconducibile a difetti nei materiali o nell'assemblaggio
(compresi, ma non i soli, prodotti Thrustmaster combinati con elementi inadatti, tra cui, in particolare, batterie
ricaricabili, caricatori o qualsiasi altro elemento non fornito da Guillemot per questo prodotto); (2) nel caso in
cui il prodotto sia stato utilizzato per qualsiasi altro scopo al di fuori dell’uso domestico, comprese finalità
professionali o commerciali (esempio: sale giochi, allenamenti, concorsi); (3) in caso di mancato rispetto
delle istruzioni fornite dall'Assistenza Tecnica; (4) in caso di software, ovvero software soggetto a una
specifica garanzia; (5) ai materiali di consumo (elementi che richiedono la loro sostituzione al termine della
loro durata di esercizio come, ad esempio, batterie di tipo convenzionale o cuscinetti protettivi per auricolari
o cuffie); (6) agli accessori (ad esempio, cavi, custodie, borsette, borse, cinturini); (7) se il prodotto è stato
venduto ad un'asta pubblica.
La presente garanzia non è trasferibile.
I diritti legali del consumatore, stabiliti dalle leggi vigenti in materia di vendita di beni di consumo nel relativo
paese, non vengono intaccati dalla presente garanzia.
Page 40

7/8
Disposizioni addizionali sulla garanzia
Per tutta la durata della garanzia, in linea di principio, Guillemot non fornirà alcuna parte di ricambio, in
quanto la sola Assistenza Tecnica è la parte autorizzata ad aprire e/o rimettere in funzionamento tutti i
prodotti Thrustmaster (fatta eccezione per eventuali procedure di rimessa in operatività che l’Assistenza
Tecnica potrebbe richiedere al consumatore, attraverso istruzioni scritte – viste, ad esempio, la semplicità e
la mancanza di riservatezza della procedura di rimessa in operatività – e fornendo al consumatore le
necessarie parti di ricambio, se ve ne fosse l’esigenza).
Considerando i propri cicli di innovazione e per proteggere il proprio know-how e i propri segreti commerciali,
in linea di principio, Guillemot non fornirà alcuna notifica o parte di ricambio finalizzata alla rimessa in attività
di un qualunque prodotto Thrustmaster il cui periodo di garanzia risultasse scaduto.
Responsabilità
Qualora le leggi applicabili in materia lo consentano, Guillemot Corporation S.A. (d'ora in avanti “Guillemot”)
e le sue controllate declinano ogni responsabilità per qualsiasi danno derivante da almeno una delle
seguenti condizioni: (1) il prodotto è stato modificato, aperto o alterato; (2) mancato rispetto delle istruzioni di
installazione; (3) uso inappropriato o non permesso, negligenza, incidente (come, ad esempio, un impatto);
(4) semplice usura; (5) utilizzo del prodotto per qualsiasi altro scopo al di fuori dell’uso domestico, comprese
finalità professionali o commerciali (esempio: sale giochi, allenamenti, concorsi). Qualora le leggi applicabili
in materia lo consentano, Guillemot e le sue controllate declinano ogni responsabilità per qualsiasi danno
non riconducibile a difetti nei materiali o nella fabbricazione del prodotto (compresi, ma non i soli, potenziali
danni causati direttamente o indirettamente da un qualunque software, oppure dall’uso del prodotto
Thrustmaster in combinazione con elementi inadatti, tra cui, in particolare, batterie ricaricabili, caricatori o
qualsiasi altro elemento non fornito da Guillemot per questo prodotto).
ASSISTENZA TECNICA
https://support.thrustmaster.com
Page 41
8/8
COPYRIGHT
*
*
©2021 Guillemot Corporation S.A. Tutti i diritti riservati. Thrustmaster® è un marchio registrato di
proprietà di Guillemot Corporation S.A. Fabbricato e distrubuito da Guillemot Corporation S.A. Tutti
gli altri marchi e nomi commerciali vengono qui citati previa autorizzazione e appartengono ai
legittimi proprietari. Contenuti, design e caratteristiche possono essere oggetto di modifiche senza
preavviso e potrebbero variare da una nazione all'altra. Foto e illustrazioni puramente indicative.
Progettato in Europa e Nord America, fabbricato in Cina.
Utilizzabile esclusivamente con console PlayStation®5 e console PlayStation®4.
“1”, “PlayStation”, “PS5”, “PS4” e “PlayStation Shapes Logo” sono marchi o marchi registrati di
proprietà di Sony Interactive Entertainment Inc. Tutti i diritti riservati. Tutti gli altri marchi
appartengono ai legittimi proprietari. Prodotto e distribuito su licenza di Sony Interactive
Entertainment LLC.
RACCOMANDAZIONI SULLA TUTELA DELL’AMBIENTE
fornire un importante contributo per la salvaguardia dell’ambiente.
Per conoscere i punti di raccolta più vicini a te, contatta le autorità locali competenti.
In tutti gli altri Paesi: per favore, rispetta le leggi locali sul riciclo dei materiali elettrici ed elettronici.
Informazioni da conservare. I colori e le decorazioni possono variare.
I ganci di plastica e gli adesivi dovrebbero essere rimossi dal prodotto prima che quest’ultimo venga
utilizzato.
www.thrustmaster.com
*Valido solo in UE, Regno Unito e Turchia
Nell’Unione Europea: Al termine della sua vita operativa, questo prodotto non dovrebbe
essere gettato assieme ai comuni rifiuti, ma dovrebbe essere portato ad un apposito
punto di raccolta destinato al riciclaggio del Materiale Elettrico ed Elettronico.
Ciò è confermato dal simbolo riportato sul prodotto, nel manuale d’uso o sulla
confezione.
A seconda delle proprie caratteristiche, i materiali potrebbero essere riciclati. Tramite il
riciclaggio ed altre forme di trattamento del Materiale Elettrico ed Elettronico, è possibile
Page 42

1/8
1. Mando de potencia
mando de potencia
7. Rueda ajuste de resistencia de palanca
CARACTERÍSTICAS TÉCNICAS
PlayStation®5 - PlayStation®4
Manual del usuario
2. Conector USB
3. Conector de timón: conector de RJ12
Thrustmaster Rudder (vendido por
separado)
4.
5. Tornillo bloqueo de timón en palanca
6. Llave Allen para instalar o separar el
Función de timón con palanca giratoria
8. Timón mediante botón de sacudida
9. Botones de acción
10. Botón PS con LED
11. Hat-switch multidireccional "Punto de
vista"
Page 43

2/8
LAS PARTES DE TU JOYSTICK HOTAS
MANDO DE POTENCIA
Tu joystick incorpora un gran mando de potencia que
la aceleración de tu avión.
El mando de potencia es desmontable y se puede colocar de 2 formas diferentes:
- Desmontado y separado
(para recrear condiciones de
del joystick
pilotaje auténticas)
- Unido al joystick
(para mayor estabilidad y para que ocupe
De forma predeterminada, el mando de potencia viene separado del joystick.
Para unir el mando de potencia al joystick:
menos espacio).
puedes utilizar
para controlar fácilmente
1. Dale la vuelta a ambos elementos (el mando de
2. Toma la llave Allen (6) colocada debajo de la base del joystick.
3. Coloca el mando de potencia a la izquierda del joystick.
Inserta la pestaña de conexión de la parte izquierda de la base del joystick en la abertura de la
parte derecha del mando de potencia.
4. Utilizando la llave, aprieta los dos tornillos Allen de debajo de la base
(situados en el lado izquierdo de la base
5. Enrolla el cable del mando de potencia y pásalo por la ranura
6. Vuelve a poner la llave Allen en su sitio para no perderla.
del joystick).
potencia
y el joystick).
de la
guía del cable.
Realiza este procedimiento a la inversa para desmontar el mando de potencia del joystick.
PALANCA CON RESISTENCIA AJUSTABLE
Dependiendo de tu estilo de juego, puede que quieras tener un joystick ultra-sensible, que
responda al más ligero toque, o puede
ofrezca algo de resistencia cuando lo muevas.
La resistencia de la palanca del joystick se puede ajustar, pera adaptarlo a todos los
jugadores. Para ajustarla, utiliza la rueda de ajuste de la resistencia (7) situada debajo de la
base del joystick.
que prefieras
tener un joystick más firme, que
Page 44

3/8
FUNCIÓN DE TIMÓN
Tu joystick incorpora una función de timón, que en un avión
el piloto utiliza para girar la dirección, permitiendo que el avión pivote sobre su eje vertical
(por lo tanto haciendo que el avión gire a la izquierda o a la derecha). Esta función de timón
es accesible
en el
joystick rotando la palanca a la izquierda o a la derecha.
corresponde a
los pedales que
A esta función de timón se accede de dos maneras:
- en el joystick rotando la palanca (4) a la izquierda o a la derecha.
- o mediante el botón de sacudida (8) en el mando de potencia.
Si sólo estás utilizando el botón de sacudida (o si no vas a utilizar la función de
timón), puedes deshabilitar la rotación de la palanca con el tornillo de bloqueo (5)
situado en la base del joystick. Utiliza un destornillador de cabeza plana para cambiar
la posición del tornillo
y de
este modo bloquear/desbloquear la función de timón.
HAT-SWITCH MULTIDIRECCIONAL "PUNTO DE VISTA"
Tu joystick incorpora un hat-switch “Punto de vista” (11) que, como su nombre indica, te
permite (en juegos que incorporen esa función) ver instantáneamente lo que está pasando
alrededor de tu avión. Para ello, dirígete al menú de configuración del juego y programa las
diferentes vistas (vista trasera, vista izquierda, vista derecha y también las vistas externas)
en las direcciones del hat-switch “Punto de vista”.
Por supuesto, también puedes utilizar el hat-switch “Punto de
diferentes (disparar, etc.).
vista” para
otras funciones
Page 45

4/8
PLAYSTATION®5 / PLAYSTATION®4
INSTALACIÓN EN PLAYSTATION®5 / PLAYSTATION®4
1. Enchufa el conector USB (2) en uno de los puertos USB del sistema.
2. Enciende el sistema.
3. El LED del joystick se ilumina en ROJO.
4. Pulsa el botón PS (10) del joystick e inicia sesión en tu cuenta de Sony Entertainment
Network para poder usar el joystick.
5. Ejecuta un juego compatible con el modo Flight Stick.
¡Ya estás preparado para jugar!
LISTA DE JUEGOS DE PLAYSTATION®5 / PLAYSTATION®4 COMPATIBLES
En PlayStation®5 / PlayStation®4, el T.Flight Hotas 4:
- Solo es compatible con los juegos que admiten el modo Flight Stick.
- En los juegos se reconoce como un joystick auténtico y no como un gamepad, para lograr
una mayor receptividad y una precisión mejorada, y la posibilidad de acceder a las opciones
del joystick en esos juegos.
En https://support.thrustmaster.com/ hay una lista de juegos de PlayStation®5 /
PlayStation®4 compatibles con el joystick: dirígete a Joysticks / T.Flight Hotas 4.
Esta lista se actualizará con regularidad, con la llegada de nuevos juegos de PS5™ / PS4™
compatibles con T.Flight Hotas 4.
Page 46

5/8
ACTUALIZACIÓN DEL FIRMWARE DEL JOYSTICK
El firmware incluido en la base del joystick se puede actualizar a una versión más reciente
que incluya mejoras del producto.
Para mostrar la versión de firmware que está usando actualmente tu joystick y actualizarla si
es necesario: en PC, visita https://support.thrustmaster.com/
T.Flight Hotas 4, después selecciona Firmware y sigue las instrucciones que describen el
procedimiento de descarga e instalación.
RESOLUCIÓN DE PROBLEMAS Y ADVERTENCIAS
• El joystick no funciona correctamente o parece que la calibración es incorrecta:
- Apaga el sistema, desconecta el joystick, vuelve a conectarlo y luego inicia de nuevo el
juego.
- Al conectar el joystick: deja la palanca, el timón y el mando de potencia centrados y no los
muevas (para evitar problemas de calibración).
- Sal del juego, desconecta el joystick, vuelve a conectarlo y luego pulsa el botón PS (10) en
el joystick. Inicia sesión en tu cuenta de Sony Entertainment Network para poder usar el
joystick.
• Mi joystick es demasiado sensible o no es lo bastante sensible:
- El joystick se autocalibra por sí solo después de que hagas algunos movimientos en los
distintos ejes.
- En el menú "Opciones / Mando / Gamepad o Joystick" del juego: ajusta la sensibilidad o
las zonas muertas del mando (si esta opción está disponible).
- Ajusta la resistencia de la palanca usando la rueda (7) situado bajo la base del joystick.
• La función de timón es demasiado sensible:
- Desactiva la rotación de la palanca usando el tornillo de bloqueo (5) situado en la base del
joystick y usa el botón basculante para la función de timón.
ARCHIVOS DE AYUDA Y FAQ (NO INCLUIDOS EN ESTE MANUAL)
Visita https://support.thrustmaster.com/. Haz clic en Joystick / T.Flight Hotas 4 y luego
selecciona Manual o PF.
. Haz clic en Joystick /
Page 47

6/8
INFORMACIÓN DE GARANTÍA AL CONSUMIDOR
En todo el mundo, Guillemot Corporation S.A., cuyo domicilio legal se encuentra en Place du Granier, B.P. 97143, 35571
Chantepie, Francia (en lo sucesivo “Guillemot”) garantiza al consumidor que este producto de Thrustmaster estará libre de
defectos de materiales y mano de obra, durante un período de garantía que corresponde al límite de tiempo para
interponer una acción legal referida a la conformidad en relación con este producto. En los países de la Unión Europea,
esto corresponde a un período de dos (2) años a partir de la entrega del producto de Thrustmaster. En otros países, el
período de garantía corresponde al límite de tiempo para interponer una acción legal referida a la conformidad en relación
con este producto de Thrustmaster según las leyes aplicables del país en el que el consumidor estuviese domiciliado en la
fecha de compra del producto de Thrustmaster (si no existiese una acción similar en el país correspondiente, entonces el
período de garantía será de un (1) año a partir de la fecha de compra original del producto de Thrustmaster).
Si el producto resultase defectuoso durante el período de garantía, hay que ponerse en contacto inmediatamente con el
Soporte Técnico, que indicará el procedimiento a seguir. Si se confirma el defecto, el producto debe devolverse a su lugar
de compra (o a cualquier otra ubicación indicada por el Soporte Técnico).
Dentro del contexto de esta garantía, el producto defectuoso del consumidor será sustituido o restaurado su
funcionamiento correcto. Si, durante el período de garantía, el producto de Thrustmaster fuese sometido a dicho
reacondicionamiento, cualquier período de cómo mínimo siete (7) días durante el que el producto no se pueda usar se
añadirá al período de garantía restante (este período va desde la fecha de petición de intervención del consumidor o desde
la fecha en la que el producto se entrega para el reacondicionamiento, si la fecha en la que el producto se entrega para el
reacondicionamiento fuese posterior a la fecha de la petición de intervención). Si la ley aplicable lo permite, toda la
responsabilidad de Guillemot y sus filiales (incluso por daños resultantes) se limita a la restauración del funcionamiento
correcto o la sustitución del producto de Thrustmaster. Si la ley aplicable lo permite, Guillemot renuncia a todas las
garantías de comerciabilidad o adecuación para un propósito determinado.
Esta garantía no se aplicará: (1) si el producto ha sido modificado, abierto, alterado o ha sufrido daños como resultado de
un uso inapropiado o abuso, negligencia, accidente, desgaste normal, o cualquier otra causa no relacionada con un
defecto de materiales o fabricación (incluyendo, pero no de forma exclusiva, la combinación del producto de Thrustmaster
con cualquier elemento no adecuado, incluyendo en particular fuentes de alimentación, baterías recargables, cargadores o
cualquier otro elemento no suministrado por Guillemot para este producto); (2) si el producto se ha empleado para otro uso
distinto del doméstico, incluyendo fines profesionales o comerciales (salones de juego, entrenamiento, competiciones, por
ejemplo); (3) en caso de incumplimiento de las instrucciones proporcionadas por el Soporte Técnico; (4) a software, es
decir software sujeto a una garantía específica; (5) a consumibles (elementos que se tienen que reemplazar a lo largo de la
vida del producto: por ejemplo, baterías desechables o almohadillas para auriculares de audio); (6) a accesorios (por
ejemplo, cables, cajas, bolsas, bolsos o muñequeras); (7) si el producto se ha vendido en una subasta pública.
Esta garantía no es transferible.
Los derechos legales del consumidor en relación con las leyes aplicables a la venta de productos de consumo de su país
no se ven afectados por esta garantía.
Page 48

7/8
SOPORTE TÉCNICO
Provisiones de garantía adicionales
Durante el período de garantía, Guillemot no proporcionará, en principio, ninguna pieza de repuesto, ya que el Soporte
Técnico es el único autorizado para abrir y/o reacondicionar los productos de Thrustmaster (con la excepción de los
procedimientos de reacondicionamiento que el Soporte técnico puede solicitar que lleve a cabo el consumidor, mediante
instrucciones por escrito – por ejemplo, debido a la simplicidad y la falta de confidencialidad del proceso de
reacondicionamiento – y suministrando al consumidor las piezas de repuesto necesarias, si hiciese falta).
Debido a sus ciclos de innovación y para proteger su know-how y secretos comerciales, Guillemot no proporcionará, en
principio, ninguna pieza de repuesto ni instrucciones de reacondicionamiento para los productos de Thrustmaster cuyo
período de garantía haya vencido.
En los Estados Unidos de América y en Canadá, esta garantía está limitada al mecanismo interno del producto y al
alojamiento externo. En ningún caso, Guillemot ni sus filiales serán responsables ante terceros por daños resultantes o
fortuitos resultado del incumplimiento de cualquier garantía expresa o implícita. En algunos estados o provincias no se
permite la limitación de la duración de una garantía implícita ni la exclusión o limitación de responsabilidad por daños
resultantes o fortuitos, por lo que las limitaciones o exclusiones anteriores pueden no ser aplicables. Esta garantía ofrece
derechos legales específicos al consumidor, que también puede tener otros derechos que pueden variar de un estado a
otro o de una provincia a otra.
Responsabilidad
Si la ley aplicable lo permite, Guillemot Corporation S.A. (en lo sucesivo “Guillemot”) y sus filiales renuncian a toda
responsabilidad por los daños causados por uno o más de los siguientes motivos: (1) el producto ha sido modificado,
abierto o alterado; (2) incumplimiento de las instrucciones de montaje; (3) uso inapropiado o abuso, negligencia, accidente
(un impacto, por ejemplo); (4) desgaste normal; (5) el producto se ha empleado para otro uso distinto del doméstico,
incluyendo fines profesionales o comerciales (salones de juego, entrenamiento, competiciones, por ejemplo). Si la ley
aplicable lo permite, Guillemot y sus filiales renuncian a toda responsabilidad por los daños no relacionados con defectos
de materiales o fabricación en relación con el producto (incluyendo, pero no de forma exclusiva, los daños causados de
forma directa o indirecta por cualquier software, o por combinar el producto de Thrustmaster con cualquier elemento no
adecuado, incluyendo en particular fuentes de alimentación, baterías recargables, cargadores o cualquier otro elemento no
suministrado por Guillemot para este producto).
DECLARACIÓN DE CONFORMIDAD
NOTICIA DE CONFORMIDAD EN USA: este dispositivo cumple con los límites para dispositivos de computación de Clase
B de acuerdo con la Parte 15 de las reglas FCC.
https://support.thrustmaster.com
Page 49

8/8
COPYRIGHT
* * *
© 2021 Guille mot Corporation S.A. Todos los derechos reser vados. Thr ustmaster® es una marca comercial registrada
de Guillemot Corporation S.A. Fabricado y distribuido por Guillemot Corporation S.A. Todas las demás marcas
comerci ales y nombres de marca se r econocen por l a presente y son propiedad de sus respectivos dueños. Los
contenidos, diseños y especificaciones están sujetos a cambios sin previo aviso y pueden variar de un país a otro.
Fotos e ilus traciones no vinculantes. Diseñado en Nort eamérica y Europa, fabricado en China.
Para usar exclusivamente con consolas PlayStation
"1", "PlayStation", "PS5", "PS4" y el “Pl ayStation Shapes Logo” son marcas comerciales registradas o marcas
comerciales de Sony Inter active Ente rtainm ent Inc. Todos los derechos reservados. Todas las demás marcas
comerci ales son propiedad de sus respectivos dueños. Fabr icado y distribuido con licencia d e Sony Interactive
Entertainment LLC.
®5 y consolas PlayStation®4.
RECOMENDACIÓN DE PROTECCIÓN AMBIENTAL
En la Unión Europea: Al terminar su vida útil, este producto no debe tirarse en un
contenedor de basuras estándar, sino que debe dejarse en un punto de recogida de
desechos eléctricos y equipamiento electrónico para ser reciclado.
Esto viene confirmado por el símbolo que se encuentra en el producto, manual del
usuario o embalaje.
Dependiendo de sus características, los materiales pueden reciclarse. Mediante el
reciclaje y otras formas de procesamiento de los desechos eléctricos y el
equipamiento electrónico puedes contribuir de forma significativa a ayudar a proteger
el medio ambiente.
Contacta con las autoridades locales para más información sobre el punto de recogida más cercano.
Para los demás países: cumpla las leyes locales sobre reciclaje de equipos eléctricos y electrónicos.
Esta información debe conservarse. Los colores y motivos decorativos pueden variar.
Los adhesivos y los cierres de plástico se deben quitar del producto antes de utilizarlo.
www.thrustmaster.com
*Aplicable únicamente a la UE, Reino Unido y Turquía
Page 50

1/8
1. Manete de potência
separar a manete de potência
7. Mostrador de ajuste da resistência do
CARACTERÍSTICAS TÉCNICAS
PlayStation®5 - PlayStation®4
Manual do Utilizador
2. Conector USB
3. Conector do leme de direção: conector
RJ12 Thrustmaster Rudder (vendido à
parte)
4. Função de leme de direção via
manípulo giratório
5. Parafuso de travamento do leme de
direção no manípulo
6. Chave sextavada para instalar ou
manípulo
8. Leme de direção via botão oscilante
9. Botões de ações
10. Botão PS com LED
11. Hat switch multidirecional de “ponto de
vista”
Page 51

2/8
FAMILIARIZAÇÃO COM O SEU JOYSTICK HOTAS
MANETE DE POTÊNCIA
O seu joystick possui uma manete de potência grande que pode utilizar para controlar facilmente
a aceleração do seu avião.
A manete de potência é destacável e pode ser posicionada de 2 formas diferentes:
Destacada e separada do joystick
(para recriar condições de pilotagem autênticas).
Fixada ao joystick
(para maior estabilidade e ocupar menos espaço).
Por predefinição, a manete de potência é fornecida destacada do joystick.
Para fixar a manete de potência ao joystick:
1. Vire ambos os itens ao contrário (a manete de potência e o joystick).
2. Retire a chave sextavada (6) presa por baixo da base do joystick.
3. Posicione a manete de potência do lado esquerdo do joystick.
Insira a patilha de ligação situada no lado esquerdo da base do joystick na abertura existente
no lado direito da manete de potência.
4. Com a chave, aperte os dois parafusos sextavados por baixo da base
(situados no lado esquerdo da base do joystick).
5. Estique o cabo da manete de potência e passe-o através da ranhura de guiamento do cabo.
6. Volte a colocar a chave sextavada na base do joystick para não a perder.
Execute este procedimento no sentido inverso para destacar a manete de potência do joystick.
RESISTÊNCIA AJUSTÁVEL DO MANÍPULO
Consoante o seu estilo de jogo, poderá preferir um joystick ultrassensível, que responda ao mínimo
toque, ou um joystick mais firme, que ofereça alguma resistência quando o move.
A resistência do manípulo do joystick é ajustável, para se adaptar a todos os jogadores. Para ajustála, utilize o mostrador de ajuste da resistência do manípulo (7) situado por baixo da base do joystick.
Page 52

3/8
LEME DE DIREÇÃO
O joystick dispõe de uma função de leme de direção, que numa aeronave corresponde aos
pedais utilizados pelo piloto para mover o leme de direção, permitindo assim à aeronave
rodar no seu eixo vertical (e, por conseguinte, virar à esquerda ou à direita). Esta função
está acessível no joystick fazendo rodar o manípulo para a esquerda ou direita.
Esta função de leme de direção está acessível de duas formas:
- No joystick rodando o manípulo (4) para a esquerda ou direita, ou
- Através do botão oscilante (8) na manete de potência.
Se utilizar apenas o botão oscilante (ou não estiver a utilizar a função de leme de direção),
pode desativar a rotação do manípulo graças ao parafuso de travamento (5) situado na
base do joystick. Utilize uma chave de fendas de cabeça chata para mudar a posição do
parafuso e, dessa forma, bloquear/desbloquear a função de leme de direção.
HAT SWITCH MULTIDIRECIONAL DE “PONTO DE VISTA”
O joystick possui um botão de “ponto de vista” (11), que, como o nome indica, lhe permite
(nos jogos que o suportam) ver imediatamente tudo o que se passa à volta da aeronave.
Para tal, basta aceder ao menu de configuração do jogo e programar as diferentes vistas
(retaguarda, esquerda, direita e também as vistas externas) nas direções do botão de “ponto
de vista”.
Evidentemente, em vez disso também pode utilizar o botão de “ponto de vista” para realizar
outras funções (disparar, etc.).
Page 53

4/8
PLAYSTATION®5 / PLAYSTATION®4
INSTALAÇÃO NA PLAYSTATION®5 / PLAYSTATION®4
1. Ligue o conector USB (2) a uma das portas USB do sistema.
2. Ligue o sistema.
3. O LED do joystick fica VERMELHO.
4. Prima o botão PS (10) do joystick e inicie sessão na sua conta Sony Entertainment Network,
para poder utilizar o joystick.
5. Inicie um jogo que suporte o modo Manípulo de voo.
Está pronto para começar a jogar!
LISTA DE JOGOS COMPATÍVEIS COM A PLAYSTATION®5 / PLAYSTATION®4
Na PlayStation®5 / PlayStation®4, o T.Flight Hotas 4:
- Apenas é compatível com os jogos que suportam o modo Manípulo de voo.
- É reconhecido nos jogos como um joystick verdadeiro e não como um gamepad, para uma
melhor capacidade de resposta e uma precisão otimizada, sendo possível aceder às opções
do joystick nestes jogos.
Uma lista de jogos para a PlayStation®5 / PlayStation®4 compatíveis com o joystick está
disponível em https://support.thrustmaster.com/
Esta lista será atualizada regularmente com a chegada de jogos para a PS5™ / PS4™
compatíveis com o T.Flight Hotas 4.
: aceda a Joysticks / T.Flight Hotas 4.
Page 54

5/8
ATUALIZAÇÃO DO FIRMWARE DO JOYSTICK
O firmware incluído na base do joystick pode ser atualizado para uma versão mais recente
que inclua melhoramentos do produto.
Para visualizar a versão do firmware que o joystick utiliza atualmente e atualizá-la, se
necessário: no PC, aceda a https://support.thrustmaster.com/
T.Flight Hotas 4, em seguida selecione Firmware e siga as instruções que descrevem o
procedimento de transferência e instalação.
RESOLUÇÃO DE PROBLEMAS E AVISOS
• O meu joystick não funciona corretamente ou parece estar mal calibrado:
- Desligue o sistema, desligue o joystick, volte a ligar o joystick e em seguida reinicie o jogo.
- Ao ligar o joystick: deixe o manípulo, o leme de direção e a manete centrados e não os
mova (para evitar quaisquer problemas de calibração).
- Saia do jogo, desligue o joystick, volte a ligá-lo e em seguida prima o botão PS (10) no
joystick. Inicie sessão na sua conta Sony Entertainment Network, para poder utilizar o
joystick.
• O meu joystick é demasiado sensível ou não é suficientemente sensível:
- O seu joystick calibra-se automaticamente sozinho assim que executar alguns movimentos
nos diferentes eixos.
- No menu “Options / Controller / Gamepad or Joystick” do jogo: ajuste a sensibilidade ou as
zonas mortas do controlador (se esta opção estiver disponível).
- Ajuste a resistência do manípulo utilizando o mostrador (7) situado por baixo da base do
joystick.
• A função de leme de direção é demasiado sensível:
- Desative a rotação do manípulo através do parafuso de travamento (5) situado na base do
joystick e utilize o botão oscilante para a função de leme de direção.
FICHEIROS DE AJUDA E FAQ (NÃO INCLUÍDOS NESTE MANUAL)
Aceda a https://support.thrustmaster.com/. Clique em Joysticks / T.Flight Hotas 4 e em
seguida selecione Manual ou FAQ.
. Clique em Joysticks /
Page 55

6/8
INFORMAÇÕES SOBRE A GARANTIA PARA O CONSUMIDOR
A Guillemot Corporation S.A., com sede social sita em Place du Granier, B.P. 97143, 35571 Chantepie,
França (a seguir designada como “Guillemot”) garante a nível mundial ao consumidor que este produto
Thrustmaster está livre de defeitos em termos de materiais e fabrico durante um período de garantia que
corresponde ao limite de tempo para intentar uma ação de conformidade relativamente a este produto.
Nos países da União Europeia, isto corresponde a um período de dois (2) anos desde a entrega do
produto Thrustmaster. Noutros países, o período de garantia corresponde ao limite de tempo para
intentar uma ação de conformidade relativamente ao produto Thrustmaster de acordo com a legislação
em vigor do país no qual o consumidor residia à data de compra do produto Thrustmaster (se a dita ação
não existir no país correspondente, então o período de garantia será de um (1) ano a partir da data de
compra original do produto Thrustmaster.
No caso de o produto apresentar algum defeito durante o período da garantia, contacte imediatamente o
Suporte Técnico, que lhe indicará o procedimento a tomar. Se esse defeito se confirmar, o produto terá
de ser devolvido ao respetivo local de compra (ou qualquer outro local indicado pelo Suporte Técnico).
No âmbito da presente garantia, e por opção do Suporte Técnico, o produto defeituoso do consumidor
será substituído ou reparado. Se, durante o período da garantia, o produto Thrustmaster for submetido à
dita reparação, qualquer período mínimo de (7) dias durante o qual o produto estiver fora de serviço será
adicionado ao período da garantia restante (este período decorre desde a data do pedido intervenção
pelo consumidor ou desde a data em que o produto em questão é disponibilizado para reparação, se a
data em que o produto é disponibilizado para reparação for posterior à data do pedido de intervenção).
Se for permitido pela legislação em vigor, a responsabilidade total da Guillemot e das respetivas filiais
(incluindo para danos indiretos) está limitada à reparação ou à substituição do produto Thrustmaster. Se
for permitido pela legislação em vigor, a Guillemot rejeita todas as garantias de comercialização ou
adequação a um fim específico.
A presente garantia não se aplicará: (1) se o produto tiver sido modificado, aberto, alterado ou danificado
em resultado de utilização inadequada ou abusiva, negligência, acidente, desgaste normal ou qualquer
outra casa relacionada com um defeito de material ou fabrico (incluindo, mas sem limitação, combinar o
produto Thrustmaster com qualquer elemento inadequado, incluindo, em particular, fontes de
alimentação, baterias recarregáveis, carregadores ou quaisquer outros elementos não fornecidos pela
Guillemot para este produto); (2) se o produto tiver sido utilizado fora do âmbito da utilização doméstica,
incluindo para fins profissionais ou comerciais (salas de jogos, treino e competições, por exemplo); (3) na
eventualidade de incumprimento das instruções fornecidas pelo Suporte Técnico; (4) a software, estando
o mesmo sujeito a uma garantia específica; (5) a consumíveis (elementos para substituir ao longo da vida
útil do produto: baterias descartáveis, auscultadores de áudio ou auriculares de auscultadores, por
exemplo); (6) a acessórios (cabos, estojos, bolsas, sacos e correias de pulso, por exemplo); (7) se o
produto foi vendido num leilão público.
A presente garantia não é transmissível.
Os direitos legais do consumidor no que concerne à legislação aplicável à venda de bens de consumo no
seu país não são afetados pela presente garantia.
Page 56

7/8
Disposições de garantia adicionais
Durante o período da garantia, a Guillemot não fornecerá, em princípio, quaisquer peças de substituição,
uma vez que o Suporte Técnico é a única parte autorizada a abrir e/ou reparar qualquer produto
Thrustmaster (à exceção de quaisquer procedimentos de reparação que o Suporte Técnico possa pedir
ao consumidor para realizar, através de instruções por escrito – por exemplo, devido à simplicidade e à
falta de confidencialidade do processo de reparação – e fornecendo ao consumidor a(s) peça(s) de
substituição necessária(s), quando aplicável).
Tendo em conta os seus ciclos de inovação, e a fim de proteger o seu know-how e segredos comerciais,
a Guillemot não fornecerá, em princípio, qualquer notificação de reparação ou peças de substituição para
produtos Thrustmaster cujo período da garantia tenha expirado.
Responsabilidade
Se for permitido ao abrigo da legislação aplicável, a Guillemot Corporation S.A. (a seguir designada
“Guillemot”) e as respetivas filiais rejeitam qualquer responsabilidade por danos resultantes de uma ou
mais das seguintes causas: (1) o produto foi modificado, aberto ou alterado; (2) incumprimento das
instruções de montagem; (3) utilização inadequada ou abusiva, negligência ou acidente (um impacto, por
exemplo); (4) desgaste normal; (5) utilização do produto fora do âmbito além da utilização doméstica,
incluindo para fins profissionais ou comerciais (salas de jogos, treino e competições, por exemplo). Se for
permitido ao abrigo da legislação aplicável, a Guillemot e as respetivas filiais rejeitam qualquer
responsabilidade por danos relacionados com um defeito de material ou fabrico relativamente ao produto
(incluindo, mas sem limitação, quaisquer danos causados direta ou indiretamente por qualquer software
ou por combinar o produto Thrustmaster com qualquer elemento inadequado, incluindo, em particular,
fontes de alimentação, baterias recarregáveis, carregadores ou quaisquer outros elementos não
fornecidos pela Guillemot para este produto).
SUPORTE TÉCNICO
https://support.thrustmaster.com
Page 57

8/8
DIREITOS DE AUTOR
*
*
©2021 Guillemot Corporation S.A. Todos os direitos reservados. Thrustmaster® é uma marca registada da Guillemot Corporation S.A.
Fabricado e distribuído pela Guillemot Corporation S.A. Todas as outras marcas comerciais e nomes de marcas são por este meio
reconhecidos e pertencem aos respetivos proprietários. Os conteúdos, os desenhos e as especificações estão sujeitos a alteração
sem aviso prévio e poderão variar consoante o país. As fotografias e ilustrações não são vinculativas. Concebido na América do Norte
e Europa, fabricado na China.
Para utilização exclusivamente com consolas PlayStation
“1”, “PlayStation”, “PS5”, “PS4” e “PlayStation Shapes Logo” são marcas registadas ou marcas comerciais da Sony Interactive
Entertainment Inc. Todos os direitos reservados. Todas as outras marcas comerciais pertencem aos respetivos proprietários.
Fabricado e distribuído sob licença da Sony Interactive Entertainment LLC.
®5 e consolas PlayStation®4.
RECOMENDAÇÕES DE PROTECÇÃO AMBIENTAL
Contacte as autoridades locais para saber onde fica o ponto de recolha mais perto da sua área de
residência.
Relativamente a todos os outros países: Respeite a legislação local sobre a reciclagem de equipamento
eléctrico e electrónico.
Informações a reter. As cores e as decorações podem variar.
Os fechos e os adesivos devem ser removidos do produto antes da utilização.
www.thrustmaster.com
*Aplicável apenas à União Europeia, Reino Unido e Turquia
Na União Europeia: Quando este produto chegar ao fim da sua vida útil, não o elimine
juntamente com os resíduos domésticos normais; em vez disso, deixe-o num ponto de
recolha de resíduos de equipamento eléctrico e electrónico (REEE) para posterior
reciclagem.
O símbolo presente no produto, no manual de utilizador ou na caixa confirma-o.
Os materiais podem ser reciclados, dependendo das suas características. Através da
reciclagem e de outras formas de processamento de resíduos de equipamento eléctrico
e electrónico, pode dar um importante contributo no sentido de ajudar a proteger o
ambiente.
Page 58
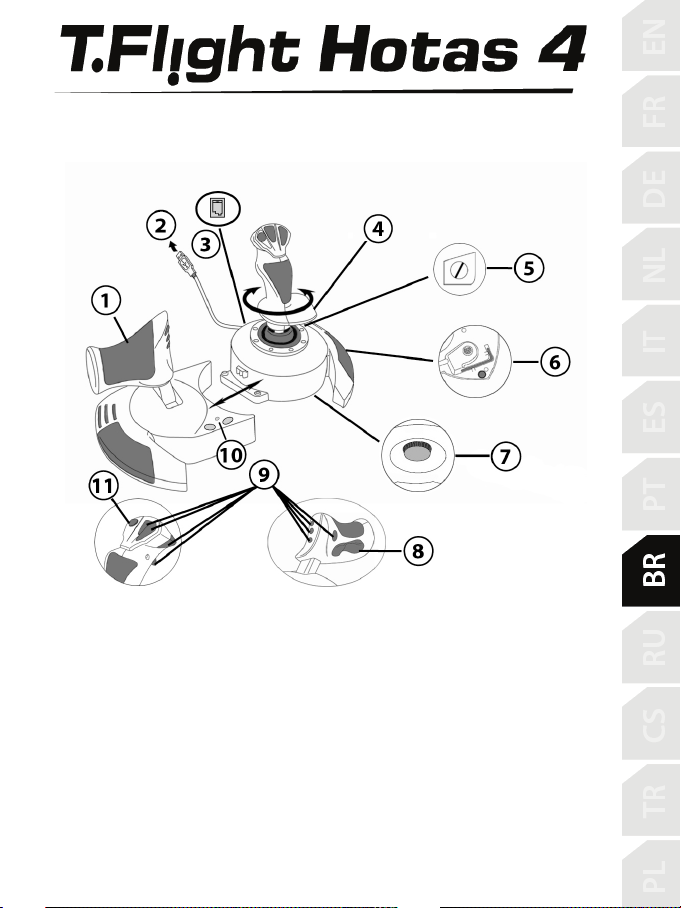
1/8
1. Manete
manete
7. Ajuste da resistência da alavanca
CARACTERÍSTICAS TÉCNICAS
PlayStation®5 - PlayStation®4
Manual do Usuário
2. Conector USB
3. Conector do leme: conector RJ12
Thrustmaster Rudder (vendido
separadamente)
4. Leme via alavanca giratória
5. Parafuso de bloqueio do leme
6. Chave Allen para instalar ou separar o
8. Leme via botão oscilatório
9. Botões de ação
10. Botão PS com LED
11. Hat-switch multidirecional de “ponto de
vista”
Page 59

2/8
CONHEÇA SEU JOYSTICK HOTAS
MANETE
O joystick possui um grande manete que você pode usar para controlar facilmente a
aceleração da aeronave.
O manete é destacável e pode ser posicionado de duas maneiras diferentes:
- Destacado e separado do
(para recriar condições de pilotagem autênticas);
joystick
- Fixo ao joystick
(para oferecer maior estabilidade e ocupar menos espaço).
Por padrão, o manete é fornecido destacado do joystick.
Para fixar o manete ao joystick:
1. Vire os dois itens (o manete e o joystick) de cabeça para baixo.
2. Retire a chave Allen (6) presa sob a base do joystick.
3. Coloque o manete à esquerda do joystick.
Insira a aba de conexão que se encontra à esquerda da base do joystick na abertura do lado
direito do manete.
4. Usando a chave, aperte os dois parafusos Allen embaixo da base
(situados no lado esquerdo da base do
5. Desenrole o cabo do manete e passe-o através da ranhura de guiamento do cabo.
6. Recoloque a chave Allen no lugar para não perdê-la.
joystick).
Execute este procedimento no sentido inverso para destacar o manete do joystick.
RESISTÊNCIA AJUSTÁVEL DA ALAVANCA
Dependendo do seu estilo de jogo, você pode preferir um joystick ultrassensível, que
responda ao mínimo toque, ou talvez um joystick mais firme, que ofereça uma certa
resistência ao movê-lo.
A resistência da alavanca do joystick é ajustável, a fim de se adaptar a todos os jogadores.
Para ajustá-la, use o ajuste de resistência da alavanca (7), situado sob a base do joystick.
Page 60

3/8
FUNÇÃO DE LEME
O joystick possui uma função de leme de direção, que num avião corresponde aos pedais
usados pelo piloto para mudar de direção, permitindo à aeronave girar no seu eixo vertical
(e, consequentemente, fazê-la virar à esquerda ou direita). Para acessar esta função do
leme no joystick, gire a alavanca para a esquerda ou direita.
Você pode acessar a função de leme de duas maneiras:
- No joystick, girando a alavanca (4) para a esquerda ou direita;
- Através do botão oscilatório (8) no manete.
Se você usa apenas o botão oscilatório (ou caso não use a função de leme), é possível
desativar a rotação da alavanca ao parafuso de bloqueio (5) situado na base do joystick.
Use uma chave de fenda de cabeça plana para mudar a posição do parafuso e com isso
bloquear/desbloquear a função do leme.
HAT-SWITCH MULTIDIRECIONAL DE “PONTO DE VISTA”
O joystick possui um hat-switch de “ponto de vista” (11) que, tal como o nome indica,
permite (nos jogos que o autorizam) ver imediatamente o que se passa à volta do avião.
Para fazer isso, basta acessar o menu de configuração do jogo e programar as diferentes
vistas (traseira, esquerda, direita e também as vistas externas) nas direções do hat-switch
de “ponto de vista”.
Evidentemente, você também pode usar o hat-switch de “ponto de vista” para realizar
outras funções (disparar, etc.).
Page 61

4/8
PLAYSTATION®5 / PLAYSTATION®4
INSTALAÇÃO NO PLAYSTATION®5 / PLAYSTATION®4
1. Conecte o conector USB (2) a uma das portas USB do sistema.
2. Ligue o sistema.
3. O LED do joystick fica vermelho.
4. Pressione o botão PS do joystick (10) e acesse sua conta da Sony Entertainment
Network para poder usar joystick.
5. Inicie um jogo compatível com o modo de manche.
Você está pronto para jogar!
LISTA DE JOGOS COMPATÍVEIS PARA PLAYSTATION®5 / PLAYSTATION®4
No PlayStation®5 / PlayStation®4, o T.Flight Hotas 4:
- Só é compatível com os jogos que suportam o modo de manche.
- É reconhecido em jogos como um joystick e não como um controle, oferecendo melhor
resposta e precisão e a possibilidade de acessar as opções do joystick nesses jogos.
Uma lista de jogos para PlayStation®5 / PlayStation®4 compatíveis com o joystick está
disponível em https://support.thrustmaster.com/
A lista será atualizada regularmente, com a chegada de novos jogos para PS5™ / PS4™
compatíveis com o T.Flight Hotas 4.
. Acesse Joysticks / T.Flight Hotas 4.
Page 62
5/8
ATUALIZANDO O FIRMWARE DO JOYSTICK
O firmware incluído na base do joystick pode ser atualizado para uma versão mais recente,
contendo melhorias do produto.
Para exibir a versão do firmware usada pelo joystick e atualizá-la se necessário: no
computador, visite https://support.thrustmaster.com/
Hotas 4, selecione Firmware e siga as instruções que descrevem o procedimento de
download e instalação.
SOLUÇÃO DE PROBLEMAS E AVISOS
• Meu joystick não funciona corretamente ou parece estar incorretamente calibrado:
- Desligue o sistema, desconecte o joystick, reconecte-o e reinicie o jogo.
- Ao conectar o joystick: deixe a alavanca, o leme e o manete centralizados e não mova-os
(para evitar problemas de calibragem).
- Saia do jogo, desconecte o joystick, conecte-o novamente e pressione o botão PS (10) no
joystick. Acesse sua conta da Sony Entertainment Network para poder usar o joystick.
• Meu joystick é sensível demais ou não é sensível o suficiente:
- O joystick é calibrado automaticamente quando você faz alguns movimentos em eixos
diferentes.
- No menu “Opções / Controle / Gamepad ou Joystick” do jogo: ajuste a sensibilidade ou as
zonas mortas do controle (se esta opção estiver disponível).
- Ajuste a resistência da alavanca usando o controle (7) localizado abaixo da base do
joystick.
• A função de leme é sensível demais:
- Desative a rotação da alavanca usando o parafuso de bloqueio (5) localizado na base do
joystick e use o botão oscilatório para a função de leme.
ARQUIVOS DE AJUDA E FAQS (NÃO INCLUÍDOS NESTE MANUAL)
Visite https://support.thrustmaster.com/ e clique em Joysticks / T.Flight Hotas 4 e
selecione Manual ou FAQ.
. Clique em Joysticks / T.Flight
Page 63

6/8
INFORMAÇÕES SOBRE A GARANTIA PARA O CONSUMIDOR
A Guillemot Corporation S.A., com sede social situada em Place du Granier, B.P. 97143, 35571
Chantepie, França (a seguir designada como “Guillemot”) garante a nível mundial ao consumidor que
este produto Thrustmaster está livre de defeitos em termos de materiais e fabricação durante um período
de garantia que corresponde ao limite de tempo para intentar uma ação de conformidade relativamente a
este produto. Nos países da União Europeia, isto corresponde a um período de dois (2) anos desde a
entrega do produto Thrustmaster. Em outros países, o período de garantia corresponde ao limite de
tempo para intentar uma ação de conformidade relativamente ao produto Thrustmaster de acordo com a
legislação em vigor do país no qual o consumidor residia na data de compra do produto Thrustmaster (se
tal ação não existir no país correspondente, então o período de garantia será de um (1) ano a partir da
data de compra original do produto Thrustmaster).
Não obstante o supracitado, as baterias recarregáveis são cobertas por um período de garantia de seis
(6) meses a partir da data de compra original.
No caso de o produto apresentar algum defeito durante o período da garantia, contate imediatamente o
Suporte Técnico, que lhe indicará o procedimento a tomar. Se o defeito se confirmar, o produto deverá
ser devolvido ao respetivo local de compra (ou qualquer outro local indicado pelo Suporte Técnico).
No âmbito da presente garantia, e por opção do Suporte Técnico, o produto defeituoso do consumidor
será substituído ou reparado. Se, durante o período da garantia, o produto Thrustmaster for submetido à
dita reparação, qualquer período mínimo de (7) dias durante o qual o produto estiver fora de serviço será
adicionado ao período da garantia restante (este período decorre desde a data do pedido intervenção
pelo consumidor ou desde a data em que o produto em questão é disponibilizado para reparação, se a
data em que o produto é disponibilizado para reparação for posterior à data do pedido de intervenção).
Se for permitido pela legislação em vigor, a responsabilidade total da Guillemot e das respectivas
subsidiárias (incluindo para danos indiretos) está limitada à reparação ou à substituição do produto
Thrustmaster. Se for permitido pela legislação em vigor, a Guillemot rejeita todas as garantias de
comercialização ou adequação a um fim específico.
A presente garantia não se aplicará: (1) se o produto tiver sido modificado, aberto, alterado ou danificado
como resultado de utilização inadequada ou abusiva, negligência, acidente, desgaste normal ou qualquer
outra causa relacionada a um defeito de material ou fabricação (incluindo, mas sem limitação, combinar o
produto Thrustmaster com qualquer elemento inadequado, incluindo, em particular, fontes de
alimentação, baterias recarregáveis, carregadores ou quaisquer outros elementos não fornecidos pela
Guillemot para este produto); (2) se o produto tiver sido usado para qualquer outro propósito além do uso
doméstico, inclusive para fins profissionais ou comerciais (salas de jogos, treinamento ou competições,
por exemplo); (3) na eventualidade de não cumprimento das instruções fornecidas pelo Suporte Técnico;
(4) a software, estando o mesmo sujeito a uma garantia específica; (5) a consumíveis (elementos para
substituir ao longo da vida útil do produto, como baterias descartáveis e almofadas de fones de ouvido,
por exemplo); (6) a acessórios (cabos, estojos, bolsas, sacos e correias de pulso, por exemplo); (7) se o
produto foi vendido num leilão público.
A presente garantia não é transmissível.
Os direitos legais do consumidor no que concerne à legislação aplicável à venda de bens de consumo no
seu país não são afetados pela presente garantia.
Page 64

7/8
SUPORTE TÉCNICO
Disposições de garantia adicionais
Durante o período da garantia, a Guillemot não fornecerá, em princípio, quaisquer peças de substituição,
uma vez que o Suporte Técnico é a única parte autorizada a abrir e/ou reparar qualquer produto
Thrustmaster (exceto por quaisquer procedimentos de reparação que o Suporte Técnico possa pedir ao
consumidor para realizar, através de instruções por escrito – por exemplo, devido à simplicidade e à falta
de confidencialidade do processo de reparação – e fornecendo ao consumidor a(s) peça(s) de
substituição necessária(s), quando aplicável).
Tendo em conta os seus ciclos de inovação, e a fim de proteger o seu know-how e segredos comerciais,
a Guillemot não fornecerá, em princípio, qualquer notificação de reparação ou peças de substituição para
produtos Thrustmaster cujo período da garantia tenha expirado.
Nos Estados Unidos da América e no Canadá, a presente garantia está limitada ao mecanismo interno e
à caixa do produto. Em nenhuma circunstância serão a Guillemot ou as respectivas subsidiárias
consideradas responsáveis perante terceiros por quaisquer danos indiretos ou acidentais resultantes da
violação de quaisquer garantias expressas ou implícitas. Alguns estados/províncias não permitem a
limitação da duração de uma garantia implícita ou a exclusão ou limitação de responsabilidade por danos
indiretos ou acidentais, portanto as limitações ou exclusões supracitadas podem não se aplicar a você. A
presente garantia concede-lhe direitos legais específicos, e você também pode ter outros direitos, que
variam de acordo com o estado ou a província.
Responsabilidade
Se for permitido pela legislação em vigor, a Guillemot Corporation S.A. (a seguir designada como
“Guillemot”) e as respectivas subsidiárias rejeitam qualquer responsabilidade por quaisquer danos
resultantes de uma ou mais das seguintes causas: (1) o produto foi modificado, aberto ou alterado; (2)
não cumprimento das instruções de montagem; (3) utilização imprópria ou abusiva, negligência ou
acidente (um impacto, por exemplo); (4) desgaste normal; (5) utilização do produto para qualquer outro
propósito além do uso doméstico, inclusive para fins profissionais ou comerciais (salas de jogos,
treinamento ou competições, por exemplo). Se for permitido ao abrigo da legislação aplicável, a Guillemot
e as respectivas subsidiárias rejeitam qualquer responsabilidade por danos relacionados a um defeito de
material ou fabricação relativamente ao produto (incluindo, mas sem limitação, quaisquer danos
causados direta ou indiretamente por qualquer software ou por combinar o produto Thrustmaster com
qualquer elemento inadequado, incluindo, em particular, fontes de alimentação, baterias recarregáveis,
carregadores ou quaisquer outros elementos não fornecidos pela Guillemot para este produto).
https://support.thrustmaster.com
Page 65

8/8
DECLARAÇÃO DE CONFORMIDADE
Aviso de Cumprimento dos EUA: Este equipamento foi testado e considerado em conformidade com os
limites para um dispositivo digital Classe B, conforme a Parte 15 das regras da FCC.
DIREITOS AUTORAIS
©2021 Guillemot Corporation S.A. Todos os direitos reservados. Thrustmaster® é uma marca registrada da
Guillemot Corporation S.A. Fabricado e distribuído pela Guillemot Corporation S.A. Todas as outras
marcas são por este meio reconhecidas e pertencem aos seus respectivos proprietários. O conteúdo, o
design e as especificações estão sujeitos a alterações sem aviso prévio e podem variar de um país para
outro. Fotografias e ilustrações não são vinculativas. Projetado na América do Norte e Europa, fabricado
na China.
Para uso exclusivo com consoles PlayStation
“1”, “PlayStation”, “PS5”, “PS4” e “PlayStation Shapes Logo” são marc as registradas ou marcas
comerciais da Sony Interactive Entertainment Inc.Todos os direitos reservados. Todas as outras marcas
comerciais são de propriedade de seus respectivos proprietários. Fabricado e distribuído sob licença da
Sony Interactive Entertainment LLC.
RECOMENDAÇÕES DE PROTEÇÃO AMBIENTAL
®5 e consoles PlayStation®4.
Respeite a legislação local sobre a reciclagem de equipamento elétrico e eletrônico.
Guarde estas informações. As cores e as decorações podem variar.
Os prendedores de plástico e os adesivos devem ser removidos do produto antes da utilização.
www.thrustmaster.com
Page 66

1/8
1. Рычаг управления
на рукоятке
6. Шестигранный ключ для
точки обзора
ТЕХНИЧЕСКИЕ ХАРАКТЕРИСТИКИ
PlayStation®5 - PlayStation®4
Инструкция по эксплуатации
2. Разъем USB
3. Разъем для руля направления: для
подключения руля направления
Thrustmaster RJ12 (приобретается
отдельно)
4. Управление полетом вращающейся
рукояткой
5. Винт блокировки руля направления
установки/отсоединения рычага
управления
7. Регулятор сопротивления рукоятки
8. Управление полетом шарнирной
кнопкой
9. Функциональные кнопки
10. Кнопка PS с индикатором
11. Многопозиционный переключатель
Page 67

2/8
ЗНАКОМСТВО С ДЖОЙСТИКОМ HOTAS
РЫЧАГ УПРАВЛЕНИЯ
В комплект джойстика входит большой рычаг управления, с помощью которого удобно
управлять ускорением самолета.
Рычаг управления является съемным и предполагает два варианта установки:
отдельно от джойстика
(для создания реалистичных условий пилотирования);
с креплением к джойстику
(для большей устойчивости и экономии места).
По умолчанию рычаг управления поставляется отсоединенным от джойстика.
Чтобы прикрепить рычаг управления к джойстику:
1. Переверните рычаг и джойстик вверх дном.
2. Возьмите шестигранный ключ (6), закрепленный на базе джойстика.
3. Разместите рычаг управления слева от джойстика.
Вставьте выступ на левой стороне базы джойстика в паз с правой стороны рычага
управления.
4. С помощью ключа затяните два винта на нижней стороне базы
(с левой стороны базы джойстика).
5. Смотайте кабель рычага управления и проведите его через направляющий слот.
6. Верните шестигранный ключ на место, чтобы не потерять его.
Для отсоединения рычага управления от джойстика выполните эти действия в обратном
порядке.
РЕГУЛИРУЕМОЕ СОПРОТИВЛЕНИЕ РУКОЯТКИ
В зависимости от стиля игры, может потребоваться повышенная чувствительность
джойстика и реакция на малейшее касание или большая жесткость его работы с
некоторым сопротивлением при сдвигании.
Сопротивление рукоятки джойстика можно настраивать в соответствии с предпочтениями
геймера. Для настройки служит регулятор сопротивления рукоятки (7), расположенный на
нижней стороне базы джойстика.
Page 68

3/8
Функция управления полетом
Джойстик оснащен функцией управления полетом, которой в самолете соответствуют
педали, с помощью которой пилот осуществляет рулевое управление с вращением
самолета вокруг вертикальной оси (для поворота самолета влево или вправо). Для
использования функции управления полетом джойстика следует повернуть рукоятку
влево или вправо.
Воспользоваться функцией можно двумя способами:
- повернуть рукоятку на джойстике (4) влево или вправо;
- воспользоваться шарнирной кнопкой (8) на рычаге управления.
Если используется только шарнирная кнопка (или если функция управления полетом
не используется), поворотную функцию рукоятки можно отключить с помощью винта
блокировки (5), расположенного на базе джойстика. С помощью отвертки с плоским
шлицем измените положение винта, заблокировав или разблокировав таким образом
функцию управления полетом.
МНОГОПОЗИЦИОННЫЙ ПЕРЕКЛЮЧАТЕЛЬ ТОЧКИ ОБЗОРА
Джойстик оснащен переключателем точки обзора (11), которая, как следует из
названия, позволяет (если это поддерживается игрой) моментально обозревать все
происходящее вокруг самолета. Для этого просто перейдите в меню конфигурации
игры и запрограммируйте различные точки обзора (вид сзади, вид слева, вид справа, а
также виды снаружи) для позиций переключателя точки обзора.
Разумеется, переключатель точки обзора может также служить для других функций
(стрельба и пр.).
Page 69

4/8
PLAYSTATION®5 / PLAYSTATION®4
УСТАНОВКА НА PLAYSTATION®5 / PLAYSTATION®4
1. Подключите USB-кабель (2) к одному из USB-портов системы.
2. Включите систему.
3. Индикатор джойстика загорается КРАСНЫМ.
4. Нажмите кнопку PS на джойстике (10) и войдите в свою учетную запись Sony
Entertainment Network, чтобы можно было использовать джойстик.
5. Запустите игру, поддерживающую режим Flight Stick.
Теперь все готово для игры!
СПИСОК СОВМЕСТИМЫХ ИГР ДЛЯ PLAYSTATION®5 / PLAYSTATION®4
Использование джойстика T.Flight Hotas 4 на PlayStation®5 / PlayStation®4:
- совместимость только с играми, поддерживающими режим Flight Stick;
- распознается в играх как настоящий джойстик, а не игровой пульт — для
оптимальной реактивности и повышенной точности, а также для обеспечения доступа
к параметрам джойстика в соответствующих играх.
Список игр для PlayStation®5 / PlayStation®4, совместимых с данным джойстиком,
можно найти на сайте: https://support.thrustmaster.com/
T.Flight Hotas 4.
Этот список будет постоянно обновляться по мере выхода новых игр для PS5™ /
PS4™, совместимых с джойстиком T.Flight Hotas 4.
. Откройте раздел Джойстики /
Page 70

5/8
ОБНОВЛЕНИЕ ПРОШИВКИ ДЖОЙСТИКА
Прошивку в базе джойстика можно обновить до более поздней версии, содержащей
усовершенствования.
Для просмотра установленной в данный момент версии прошивки и ее обновления при
необходимости откройте сайт https://support.thrustmaster.com/
T.Flight Hotas 4, затем Прошивка выполните указания по загрузке и установке.
УСТРАНЕНИЕ НЕИСПРАВНОСТЕЙ И ПРЕДУПРЕЖДЕНИЯ
• Джойстик не работает должным образом или кажется неверно
откалиброванным
Выключите систему, отключите джойстик, подключите его снова и перезагрузите игру.
При подключении джойстика: оставьте рукоятку, руль направления и рычаг
управления в центральном положении и не сдвигайте их (во избежание проблем
калибровки).
Выйдите из игры, отключите джойстик, подключите его снова и нажмите кнопку PS (10)
на джойстике. Войдите в свою учетную запись Sony Entertainment Network, чтобы
можно было использовать джойстик.
• Слишком высокая или недостаточная чувствительность джойстика
- Джойстик самостоятельно выполняет автокалибровку, после того как пользователь
совершает несколько движений на различных осях.
- В игре, в разделе «Параметры / Контроллер»: настройте чувствительность или
мертвые зоны для контроллера (если эта опция доступна).
- Настройте сопротивление рукоятки с помощью регулятора (7) на нижней стороне
базы джойстика.
• Слишком высокая чувствительность функции управления полетом
- Выключите вращение рукоятки с помощью винта блокировки (5) на нижней части
базы джойстика и используйте для функции управления полетом шарнирную кнопку.
СПРАВКА И ОТВЕТЫ НА ЧАСТЫЕ ВОПРОСЫ (НЕ
ПРИВЕДЕННЫЕ В НАСТОЯЩЕМ РУКОВОДСТВЕ)
Посетите сайт https://support.thrustmaster.com/. Щелкните Джойстики / T.Flight
Hotas 4 и выберите Инструкция по эксплуатации или Часто задаваемые вопросы.
. Выберите Джойстики /
Page 71

6/8
Сведения о потребительской гарантии
Корпорация Guillemot Corporation S.A., зарегистрированная по адресу Place du Granier, B.P. 97143, 35571
Chantepie, Франция, (далее — «Guillemot») гарантирует своим клиентам во всем мире, что в данном
изделии Thrustmaster не будет выявлено никаких дефектов материалов и производства в течение
гарантийного периода, который равен сроку предъявления претензии по соответствию для данного
изделия. В странах Европейского Союза этот срок соответствует двум (2) годам с момента поставки
изделия Thrustmaster. В других странах гарантийный период равен сроку предъявления претензии по
соответствию для изделия Thrustmaster, определяемому соответствующим законодательством страны, в
которой проживал потребитель на момент приобретения изделия Thrustmaster (если подобные претензии
не действуют в соответствующей стране, гарантийный период равняется одному (1) году с
первоначальной даты приобретения изделия Thrustmaster).
В случае обнаружения дефектов изделия во время гарантийного периода незамедлительно обратитесь в
службу технической поддержки, сотрудники которой определят дальнейшую процедуру. Если дефект
будет подтвержден, изделие следует вернуть по месту приобретения (или в любое другое место,
указанное службой технической поддержки).
В рамках действия гарантии дефектное изделие будет, по усмотрению службы технической поддержки,
заменено или возвращено в рабочее состояние. Если в течение гарантийного срока изделие Thrustmaster
будет подвержено такому восстановлению, к оставшемуся гарантийному сроку прибавляется период
времени, но не менее семи (7) дней, во время которого изделие находилось вне употребления (началом
этого периода считается дата запроса покупателя о вмешательстве или дата предоставления дефектного
изделия для восстановления, если изделие было предоставлено для восстановления позднее, чем был
сделан запрос о вмешательстве). В мере, разрешенной применимым законодательством, полная
ответственность компании Guillemot и ее дочерних компаний (в том числе косвенный ущерб)
ограничивается восстановлением рабочего состояния или заменой изделия Thrustmaster. В мере,
разрешенной применимым законодательством, компания Guillemot отказывается от любых гарантий
коммерческой пригодности или пригодности для определенной цели.
Настоящая гарантия не распространяется: (1) на ситуации, когда изделие было видоизменено, открыто,
модифицировано или получило повреждения в результате недопустимого или неправильного
использования, небрежности или несчастного случая, естественного износа или любой другой причины,
не связанной с дефектом материалов или производства (включая, помимо прочего, использование
изделия Thrustmaster совместно с любыми неподходящими элементами, в частности — с блоками
питания, аккумуляторами, зарядными устройствами и любыми другими элементами, не входящими в
комплектацию Guillemot для данного изделия); (2) на случаи использования продукта в любых целях,
кроме бытовых, в том числе на случаи профессионального или коммерческого применения (например, в
игровых залах, для проведение обучения и соревнований); (3) на ситуации, когда указания службы
технической поддержки не были выполнены; (4) на ПО, так как на такое ПО распространяется отдельная
гарантия; (5) на расходные материалы (элементы, предназначенные для замены в течение срока службы
изделия: например, батарейки и ушные подушки для гарнитур или наушников); (6) на аксессуары
(например, кабели, чехлы, сумки, футляры, наручные ремешки); (7) на случаи продажи изделия с
открытого аукциона.
Данная гарантия не подлежит передаче.
Настоящая гарантия не ущемляет прав потребителя, предоставляемых ему применимыми законами в
отношении продажи потребительских товаров в соответствующей стране.
Page 72

7/8
Дополнительные условия гарантии
В течение гарантийного срока компания Guillemot, в общем и целом, не предоставляет никаких запасных
частей, так как вскрытие и/или модификацию любых изделий Thrustmaster вправе осуществлять только
служба технической поддержки (за исключением каких-либо процедур по модификации, которые служба
технической поддержки может предложить выполнить клиенту путем письменных инструкций и
предоставления, при необходимости, требуемых запасных частей: например, в связи с отсутствием
статуса сложности или конфиденциальности у такой восстановительной процедуры).
С учетом периода освоения новых изделий и в целях защиты своих ноу-хау и коммерческих тайн
компания Guillemot, в общем и целом, не предоставляет каких-либо уведомлений о восстановлении или
запасных частей для любых изделий Thrustmaster с истекшим гарантийным сроком.
Ответственность
В мере, разрешенной применимым законодательством, компания Guillemot Corporation S.A. (далее —
«Guillemot») и ее дочерние предприятия отказываются от любой ответственности за любой ущерб,
вызванный одним или несколькими из следующих факторов: (1) видоизменение, вскрытие или
модификация изделия; (2) несоблюдение инструкций по сборке; (3) недопустимое или неправильное
использование, небрежность, несчастный случай (например, физическое воздействие); (4) естественный
износ; (5) использование продукта в любых целях, кроме бытовых, в том числе профессиональное или
коммерческое применение (например, в игровых залах, для проведение обучения и соревнований). В
мере, разрешенной применимым законодательством, компания Guillemot и ее дочерние предприятия
отказываются от любой ответственности за любой ущерб, не связанный с дефектами материалов или
изготовления, в отношении данного изделия (включая, помимо прочего, любой ущерб, вызванный прямо
или опосредованно любым программным обеспечением или использованием изделия Thrustmaster с
любыми неподходящими элементами, в частности — блоками питания, аккумуляторами, зарядными
устройствами и любыми другими элементами, не входящими в комплектацию Guillemot для данного
изделия).
ТЕХНИЧЕСКОЙ ПОДДЕРЖКИ
https://support.thrustmaster.com
Page 73

8/8
АВТОРСКИЕ ПРАВА
© Guillemot Corporation S.A., 2021. Все права защищены. Thrustmaster® является
зарегистрированным товарным знаком корпорации Guillemot Corporation S.A. Выпускается
и распространяется корпорацией Guillemot Corporation S.A. Все прочие товарные знаки и
названия брендов подтверждаются настоящим документом и являются собственностью их
соответствующих владельцев. Содержимое, дизайн и технические характеристики могут
меняться без предварительного уведомления и отличаться в зависимости от страны.
Фотографии и иллюстрации могут не соответствовать внешнему виду или функциям
конкретного изделия. Разработан в Северной Америке и Европе. Изготовлен в Китае.
Для эксклюзивного использования с консолями PlayStation®5 и консолями PlayStation®4.
«1», «PlayStation», «PS5», «PS4» и «PlayStation Shapes Logo» являются
зарегистрированными товарными знаками или товарными знаками компании Sony
Interactive Entertainment Inc. Все права защищены. Все прочие товарные знаки являются
собственностью их соответствующих владельцев. Выпускается и распространяется по
лицензии компании Sony Interactive Entertainment LLC.
При пользовании изделием учитывайте следующее: цвета и дизайн могут различаться.
Пластиковые стяжки и клейкую ленту следует снять перед использованием изделия.
www.thrustmaster.com
Page 74
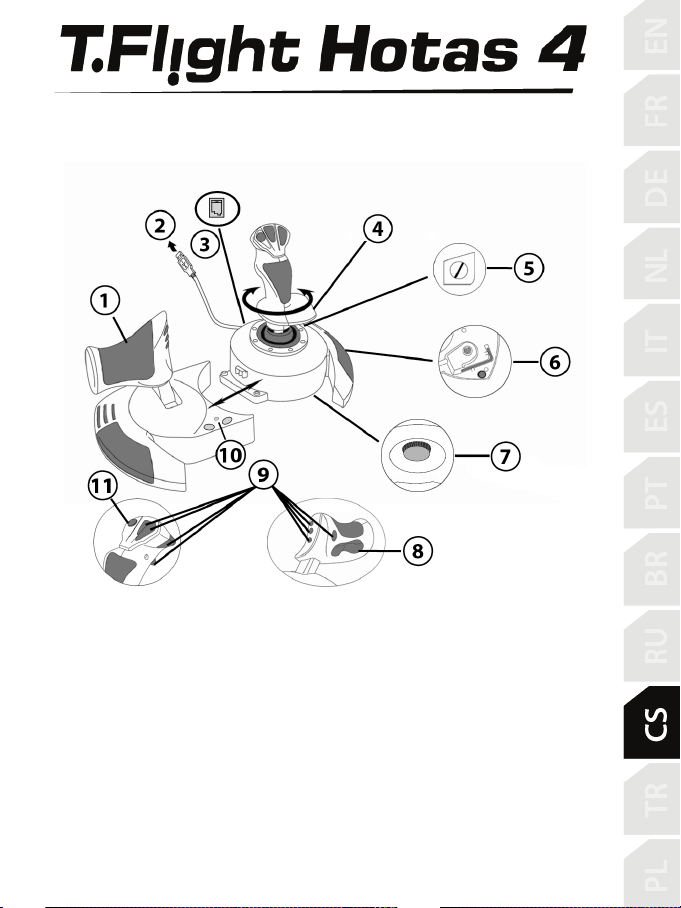
1/8
1. Plyn
odpojení plynu
7. Kolečko pro nastavení odporu kniplu
TECHNICKÉ VLASTNOSTI
PlayStation®5 - PlayStation®4
Uživatelský manuál
2. USB konektor
3. Konektor rudderu (kormidla): Konektor
RJ12 Thrustmaster Rudder (prodává
se samostatně)
4. Funkce rudderu (kormidla) pomocí
otočné rukojeti
5. Zajišťovací šroub rudderu (kormidla)
na rukojeti
6. Imbusový klíč k instalaci nebo
8. Rudder (kormidlo) pomocí kolébkového
tlačítka
9. Akční tlačítka
10. Tlačítko PS s LED
11. Vícesměrový kloboukový přepínač "Point
Of View"
Page 75

2/8
SEZNÁMENÍ S JOYSTICKEM HOTAS
PLYN
Váš joystick má velký plyn, kterým můžete snadno ovládat zrychlení svého letadla.
Plyn je odnímatelný a lze jej umístit dvěma různými způsoby:
Odepnutý a oddělený od joysticku
(pro napodobení autentických podmínek pilotování)
Připojený k joysticku
(pro větší stabilitu a úsporu místa).
Ve výchozím nastavení je plyn odpojen od joysticku.
Pro připojení plynu k joysticku:
1. Obě položky otočte vzhůru nohama (plyn a joystick).
2. Vyjměte imbusový klíč (6) připevněný pod základnou joysticku.
3. Umístěte plyn vlevo od joysticku.
Vložte spojovací jazýček na levé straně základny joysticku do otvoru na pravé straně
plynu.
4. Pomocí klíče utáhněte dva imbusové šrouby pod základnou (umístěné na levé straně
základny joysticku).
5. Natáhněte kabel plynu a provlékněte jej otvorem pro vedení kabelu.
6. Vložte imbusový klíč zpět na své místo, abyste jej neztratili.
Pro odpojení plynu od joysticku proveďte tento postup v opačném pořadí.
NASTAVITELNÝ ODPOR KNIPLU
V závislosti na vašem stylu hraní si můžete přát mít ultra citlivý joystick, který reaguje na
sebemenší dotek, nebo můžete mít raději pevnější joystick, který vám při pohybu nabídne
určitý odpor.
Odpor kniplu vašeho joysticku je nastavitelný, aby se přizpůsobil všem hráčům. Chcete-li jej
upravit, použijte kolečko pro nastavení odporu kniplu (7) umístěné pod základnou joysticku.
Page 76

3/8
OVLÁDÁNÍ RUDDERU (KORMIDLA)
Váš joystick je vybaven funkcí rudderu (kormidla), který v letadle odpovídá pedálům
používaným pilotem k otáčení řízení, což letadlu umožňuje otáčet se kolem své svislé osy
(takže se letadlo otáčí doleva nebo doprava). Tato funkce rudderu (kormidla) je přístupná na
vašem joysticku otočením kniplu doleva nebo doprava.
Tato funkce rudderu (kormidla) je přístupná dvěma způsoby:
- na joysticku otočením kniplu (4) doleva nebo doprava.
- nebo pomocí kolébkového tlačítka (8) na plynu.
Pokud používáte pouze kolébkové tlačítko (nebo nepoužíváte funkci kormidla), můžete
deaktivovat otáčení kniplu pomocí zajišťovacího šroubu (5) umístěného na základně
joysticku. Pomocí plochého šroubováku změňte polohu šroubu a tím zamkněte/odemkněte
funkci kormidla.
VÍCESMĚROVÝ KLOBOUKOVÝ PŘEPÍNAČ "POINT OF VIEW"
Váš joystick je vybaven kloboukovým přepínačem „Point Of View“ (11), který, jak jeho název
napovídá, umožňuje (ve hrách, které to dovolují) okamžitě zobrazit vše, co se děje kolem
vašeho letadla. Chcete-li tak učinit, jednoduše přejděte do konfiguračního menu vaší hry a
naprogramujte různá zobrazení (zadní pohled, levý pohled, pravý pohled a také externí
pohledy) na směry kloboukového přepínače „Point Of View“.
Samozřejmě můžete místo toho použít kloboukový přepínač „Point Of View“ pro další funkce
(střelba atd.).
Page 77

4/8
PLAYSTATION®5 / PLAYSTATION®4
INSTALACE NA PLAYSTATION®5 / PLAYSTATION®4
1. Připojte konektor USB (2) k jednomu z portů USB vašeho systému.
2. Zapněte svůj systém.
3. LED joysticku se rozsvítí ČERVENĚ.
4. Stiskněte tlačítko PS na joysticku (10) a přihlaste se ke svému účtu Sony Entertainment
Network, abyste mohli joystick používat.
5. Spusťte hru, která podporuje režim Flight Stick.
Nyní jste připraveni hrát!
SEZNAM KOMPATIBILNÍCH HER S PLAYSTATION®5 / PLAYSTATION®4
Na PlayStation®5 / PlayStation®4 je T.Flight Hotas 4:
- kompatibilní pouze s hrami, které podporují režim Flight Stick.
- rozpoznán ve hrách jako skutečný joystick a ne jako gamepad, pro lepší odezvu a
vylepšenou přesnost a pro možnost přístupu k volbám joysticku v těchto hrách.
Seznam PlayStation®5 / PlayStation®4 her kompatibilních s joystickem je k dispozici na
https://support.thrustmaster.com/
Games Settings.
Tento seznam bude pravidelně aktualizován s příchodem nových her PS5™/PS4™
kompatibilních s T.Flight Hotas 4.
. Přejděte na Joysticks / T.Flight Hotas 4, poté zvolte
Page 78
5/8
AKTUALIZACE FIRMWARU VAŠEHO JOYSTICKU
Firmware obsažený v základně vašeho joysticku lze aktualizovat na novější verzi s
vylepšeními produktu.
Chcete-li zobrazit verzi firmwaru, kterou váš joystick aktuálně používá, a v případě potřeby ji
aktualizovat: na PC navštivte https://support.thrustmaster.com/
T.Flight Hotas 4, poté zvolte Firmware a postupujte podle pokynů popisujících postup
stahování a instalace.
ODSTRAŇOVÁNÍ ZÁVAD A VAROVÁNÍ
• Můj joystick nefunguje správně nebo se zdá být nesprávně kalibrovaný:
- Vypněte systém, odpojte joystick, znovu připojte joystick a poté znovu spusťte hru.
- Při připojování joysticku: knipl, rudder (kormidlo) a plyn nechte vycentrované a nehýbejte s
nimi (aby nedocházelo k problémům s kalibrací).
- Ukončete hru, odpojte joystick, znovu jej připojte a poté stiskněte tlačítko PS (10) na
joysticku. Chcete-li používat joystick, přihlaste se ke svému účtu Sony Entertainment
Network.
• Můj joystick je příliš citlivý nebo nedostatečně citlivý:
- Váš joystick se sám kalibruje poté, co provedete několik pohybů v různých osách.
- V nabídce hry „Možnosti / Ovládání / Gamepad nebo Joystick“: Upravte citlivost nebo mrtvé
zóny ovladače (pokud je tato možnost k dispozici).
- Upravte odpor rukojeti pomocí kolečka (7) umístěného pod základnou joysticku.
• Funkce rudderu (kormidla) je příliš citlivá:
- Pomocí zajišťovacího šroubu (5) umístěného na základně joysticku deaktivujte otáčení
kniplu a pomocí kolébkového tlačítka aktivujte funkci kormidla.
POMOCNÉ SOUBORY A NEJČASTĚJŠÍ DOTAZY (NEJSOU
SOUČÁSTÍ TÉTO PŘÍRUČKY)
Navštivte prosím https://support.thrustmaster.com/. Zvolte Joysticks / T.Flight Hotas 4,
a poté zvolte Manual nebo FAQ.
, zvolte Joysticks /
Page 79

6/8
SPOTŘEBITELSKÉ INFORMACE O ZÁRUCE
Celosvětově, Guillemot Corporation S.A., jejíž sídlo se nachází na Place du Granier, B.P. 97143, 35571
Chantepie, France (dále jen “Guillemot”) zaručuje spotřebiteli, že tento výrobek od Thrustmasteru bude
bez závad materiálu a zpracování, po dobu záruční doby od okamžiku převzetí výrobku ve shodě
s ohledem na tento výrobek. V zemích Evropské Unie, tato doba odpovídá dvěma (2) letům od dodání
výrobku Thrustmaster. V ostatních zemích, záruční doba odpovídá časovému intervalu od převzetí
výrobku Thrustmaster v souladu s platnými zákony země, ve které měl spotřebitel trvalý pobyt ke dni
nákupu výrobku Thrustmaster (pokud žádné takové opatření v příslušné zemi neexistuje, záruční doba
bude jeden (1) rok od data nákupu výrobku Thrustmaster).
Bez ohledu na výše uvedené podmínky, je záruční doba na dobíjecí baterie omezena na dobu šesti (6)
měsíců od původního datumu nákupu.
Pokud se u výrobku během záruční doby objeví závada, neprodleně kontaktujte Technickou podporu, kde
vám naznačí postup, jak záruku uplatnit. Pokud bude závada uznána, výrobek musí být vrácen
prodávajícímu, kde byl zakoupen (nebo na jiné místo, které určí Technická podpora).
V rámci této záruky, bude vadný výrobek podle Technické podpory buď vyměněn nebo uveden do funkčního
stavu. Pokud bude během záruční doby výrobek Thrustmasteru opravován, bude záruční doba o dobu, kdy nebylo
možné výrobek používat prodloužena, nejméně alespoň o sedm (7) dní (tato doba začíná datem, kdy zákazník
požádal o vyřízení reklamace nebo od data, kdy dotyčný produkt byl k dispozici pro opravu, pokud datum předání
výrobku k opravě je po datu žádosti o vyřízení reklamace). Pokud to umožňují platné zákony, je plná odpovědnost
společnosti Guillemot a jejích dceřiných společností (včetně následných škod) omezena na navrácení produktu do
provozuschopného stavu nebo na výměnu výrobku Thrustmaster. Pokud to umožňují platné zákony, Guillemot se
zříká všech záruk obchodovatelnosti nebo vhodnosti pro určitý účel.
Tato záruka se nevztahuje na: (1) pokud byl výrobek modifikován, otevřen, změněn nebo utrpěl poškození
v důsledku nevhodného nebo nesprávného používání, nedbalosti, nehody, běžného opotřebení, nebo jakékoliv
jiné příčiny, nesouvisející s vadou materiálu nebo zpracování (včetně, ale ne pouze, při kombinaci výrobku
Thrustmaster s jakýmkoliv nevhodným prvkem, včetně zejména napájecích adaptérů, nabíjecích baterií, nabíječky,
nebo jiných prvků, které nebyly k tomuto výrobku dodány společností Guillemot; (2) pokud byl výrobek používán
pro jiné účely než domácí použití, včetně profesionálních a komerčních účelů (např. v hernách, při tréninku, při
závodech); (3) v případě nedodržení pokynů poskytovaných Technickou podporou; (4) software, na zmíněný
software je poskytována zvláštní záruka; (5) spotřební materiál (prvky, které mohou být vyměněny v průběhu
životnosti produktu: baterie na jedno použití, náhlavní sluchátkové soupravy nebo např. náušníky sluchátek); (6)
příslušenství (například kabely, pouzdra, brašny, zápěstní řemínky); (7) pokud byl výrobek prodán ve veřejné
aukci.
Tato záruka je nepřenositelná.
Zákonná práva spotřebitele vzhledem k platným zákonům vztahujícím se na prodej spotřebního zboží v jeho nebo
její zemi nejsou touto zárukou ovlivněny.
Page 80

7/8
https://support.thrustmaster.com
Další ustanovení o záruce
V průběhu záruční doby, Guillemot zásadně nedodává žádné náhradní díly, neboť Technická podpora je
jedinou stranou autorizovanou k demontáži a opravě jakéhokoliv produktu Thrustmaster (s výjimkou jakékoliv
opravy, o kterou zákazníka požádá Technická podpora prostřednictvím písemných pokynů, například
z důvodu jednoduchosti a neutajovaného postupu opravy a poskytnutím požadovaných náhradních dílů, jsouli použitelné.
Vzhledem ke svému inovačnímu cyklu a s cílem ochrany know-how a obchodního tajemství, nesmí Guillemot
zásadně poskytovat jakékoliv vyrozumění o opravách nebo náhradních dílech jakéhokoliv výrobku
Thrustmaster, jehož záruční doba již vypršela.
Odpovědnost
Pokud to povolují příslušné zákony, Guillemot Corporation S.A. (dále jen “Guillemot”) a její dceřiné
společnosti se zříkají veškeré odpovědnosti za škody způsobené jedním nebo více následujícími body: (1)
výrobek byl modifikován, otevřen nebo pozměněn; (2) nedodržení návodu k montáži; (3) nevhodné nebo
nesprávné používání, nedbalost, nehoda (například náraz); (4) běžné opotřebení; (5) použití výrobku pro
jakékoliv jiné než domácí použití, včetně profesionálního nebo komerčního použití (například v hernách,
pro výcvik, při soutěžích). Pokud to povolují příslušné zákony, Guillemot a její dceřiné společnosti se
zříkají veškeré odpovědnosti za jakékoliv škody, které nesouvisí s použitými materiály nebo výrobní
vadou příslušného výrobku (včetně, ale nikoliv výhradně, veškerých škod způsobených přímo nebo
nepřímo softwarem, nebo kombinací výrobku Thrustmaster s jakýmkoliv nevhodným prvkem včetně
zejména napájecími zdroji, dobíjecími bateriemi, nabíječkami nebo jakýmikoliv jinými prvky, které nebyly
společností Guillemot k tomuto výrobku dodány).
TECHNICKÁ PODPORA
Page 81
8/8
AUTORSKÁ PRÁVA
*
*
©2021 Guillemot Corporation S.A. Všechna práva vyhrazena. Thrustmaster® je registrovaná
ochranná známka společnosti Guillemot Corporation S.A. Vyrábí a distribuuje společnost
Guillemot Corporation S.A. Všechny ostatní ochranné známky a názvy značek se tímto uznávají a
jsou majetkem příslušných vlastníků. Obsah, design a specifikace se mohou bez předchozího
upozornění změnit a mohou se v jednotlivých zemích lišit. Fotografie a ilustrace nejsou závazné.
Navrženo v Severní Americe a Evropě, vyrobeno v Číně.
K použití výhradně s konzolemi PlayStation®5 a konzolemi PlayStation®4.
„1“, „PlayStation“, „PS5“, „PS4“ a „PlayStation Shapes Logo” jsou registrované ochranné známky
nebo ochranné známky společnosti Sony Interactive Entertainment Inc. Všechna práva
vyhrazena. Všechny ostatní obchodní známky jsou majetkem jejich příslušných vlastníků.
Vyrobeno a distribuováno pod licencí společnosti Sony Interactive Entertainment LLC.
DOPORUČENÁ OCHRANA ŽIVOTNÍHO PROSTŘEDÍ
V zemích Evropské unie: Na konci životnosti by tento výrobek neměl být vhozen do
standardního směsného odpadu, ale odevzdán do sběrného dvoru na recyklaci
elektrických a elektronických zařízení.
Toto je potvrzeno symbolem, který je na výrobku, v uživatelském manuálu nebo na
obalu.
V závislosti na charakteristice materiálů, mohou být tyto recyklovány. Recyklací a
dalšími formami zpracování odpadních elektrických a elektronických zařízení můžete
významným způsobem přispět k ochraně životního prostředí.
Pro informace o nebližším sběrném dvoru se obraťte na místní úřad.
Pro všechny ostatní země: Dodržujte prosím místní předpisy týkající se recyklace elektrických a
elektronických zařízení.
Tyto informace si uchovejte. Barvy a dekorace se mohou lišit.
Před použitím by měly být z výrobku odstraněny plastové spojovací lepící materiály.
www.thrustmaster.com
*Platné pouze pro EU, Spojené království a Turecko
Page 82

1/8
1. Gaz kolu
allen anahtarı
7. Kol direnci ayarlama düğmesi
PlayStation®5 - PlayStation®4
Kullanma Kılavuzu
TEKNİK ÖZELLİKLER
2. USB konektörü
3. Dümen konektörü. RJ12 Thrustmaster
Dümen (ayrı olarak satılır) konektörü
4. Döner kolla dümen fonksiyonu
5. Kolda dümen kilitleme vidası
6. Gaz kolunu takmak veya sökmek için
8. Mafsallı düğmeyle dümen
9. Eylem düğmeleri
10. LED’li PS düğmesi
11. Çok yönlü “Görüş Açısı” başlık düğmesi
Page 83

2/8
HOTAS JOYSTİCK’İ TANIYALIM
GAZ KOLU
Joystick’iniz uçağınızın hızını kolayca kontrol etmeniz için kullanabileceğiniz büyük bir gaz kolu
içerir.
Gaz kolu ayrılabilir ve 2 farklı şekilde konumlandırılabilir:
Sökülü ve joystick’den ayrı
(otantik pilotaj şartları oluşturmak için)
Joystick’e takılı
(daha üstün stabilite ve daha az yer kaplaması için).
Normal olarak gaz kolu joystick’den sökülü olarak gelir.
Gaz kolunu joystick’e takmak için:
1. Her iki öğeyi (gaz kolu ve joystick) baş aşağı çevirin.
2. Joystick tabanının alt kısmına takılı Allen anahtarını (6) alın.
3. Gaz kolunu joystcik’in soluna yerleştirin.
Joystick tabanının solundaki bağlantı tırnağını gaz kolunun sağ tarafındaki deliğe sokun.
4. Anahtarı kullanarak tabanın altındaki iki Allen vidasını sıkın
(joystick tabanının sol tarafında bulunur).
5. Gaz kolu kablosunu sararak kablo kılavuzu yuvasından geçirin.
6. Allen anahtarını kaybetmemek için yerine geri koyun.
Gaz kolunu joystick’den ayırmak için bu prosedürü ters sırayla uygulayın.
AYARLANABİLİR KOL DİRENCİ
Oyun oynama stilinize bağlı olarak en ufak dokunuşa bile tepki veren çok hassas bir joystick
isteyebileceğiniz gibi hareket ettirdiğinizde bir miktar direnç gösteren daha sıkı bir joystick’i de
tercih edebilirsiniz.
Joystick'inizin kol direnci, tüm oyunculara uyum sağlamak için ayarlanabilir. Ayarlamak için
joystick tabanının alt kısmında bulunan kol direnci ayarlama düğmesini (7) kullanın.
Page 84

3/8
DÜMEN FONKSİYONU
Joystick’iniz uçakta uçağın dikey ekseni etrafında dönmesini sağlayan (uçağı sağa veya sola
döndüren) dümeni döndürmek için pilot tarafından kullanılan pedallara karşılık gelen bir
dümen fonksiyonu içerir. Bu dümen fonksiyonu joystick’inizde kolu sağa veya sola
döndürerek kullanılabilir.
Bu dümen fonksiyonuna iki şekilde erişilebilir:
- joystick’inizde kolu (4) sağa veya sola döndürerek.
- veya gaz kolu üzerindeki mafsallı düğme (8) ile.
Sadece mafsallı düğmeyi kullanacaksanız (veya dümen fonksiyonunu kullanmıyorsanız)
joystick tabanında bulunan kilitleme vidası (5) sayesinde kolun dönüşünü devre dışı
bırakabilirsiniz. Vidanın pozisyonunu değiştirerek dümen fonksiyonunu kilitlemek/kilidini
açmak için düz tornavida kullanın.
ÇOK YÖNLÜ “GÖRÜŞ AÇISI” BAŞLIK DÜĞMESİ
Joystick’iniz adından da anlaşılacağı üzere (izin veren oyunlarda) uçağınızın çevresinde olan
her şeyi anında görmenizi sağlayan bir "Görüş Açısı" başlık düğmesi (11) içerir. Bunun için
oyunun ayarlar menüsüne giderek farklı görünümleri (arkadan görünüm, soldan görünüm,
sağdan görünüm ve dıştan görünümler) “Görüş Açısı” başlık düğmesinin yönlerine
programlayın.
İsterseniz “Bakış Açısı” başlık düğmesini başka amaçlarla da (ateşleme, vb.) kullanabilirsiniz.
Page 85

4/8
PLAYSTATİON®5 / PLAYSTATION®4
PLAYSTATİON®5/PLAYSTATION®4'TE KURULUM
1. USB konektörünü (2) sisteminizin USB bağlantı noktalarından birine bağlayın.
2. Sisteminizi açın.
3. Joystick’in led'i kırmızıya döner.
4. Joystick'i kullanabilmek için joystick'in PS düğmesine (10) basın ve Sony Entertainment
Network hesabınıza giriş yapın.
5. Uçuş Kolu modunu destekleyen bir oyun başlatın.
Artık oynamaya hazırsınız!
UYUMLU PLAYSTATİON®5 / PLAYSTATION®4 OYUNLARI LİSTESİ
PlayStation®5/PlayStation®4'te T.Flight Hotas 4:
- Sadece Uçuş Kolu modunu destekleyen oyunlarla uyumludur.
- Daha iyi tepki ve gelişmiş hassasiyet ile oyunlarda joystick'in seçeneklerine erişmek için bu
oyunlarda oyun pedi olarak değil gerçek bir joystick olarak algılanır.
Joystick ile uyumlu PlayStation®5 / PlayStation®4 oyunlarının listesi için bkz.:
https://support.thrustmaster.com/
Bu liste, T.Flight Hotas 4 ile uyumlu PS5™ / PS4™ oyunları çıktıkça düzenli olarak
güncellenecektir.
. Joysticks / T.Flight Hotas 4 seçeneklerine tıklayın.
Page 86

5/8
JOYSTICK'İNİZİN DONANIM YAZILIMINI GÜNCELLEME
Joystick'inizin tabanında bulunan donanım yazılımı ürün geliştirmeleri içeren daha yeni
sürümlere güncellenebilir.
Joystick'inizin halihazırda kullandığı donanım yazılımı sürümünü görmek ve gerektiğinde
güncellemek için: PC'de https://support.thrustmaster.com/
T.Flight Hotas 4 seçeneklerine tıklayın, ardından Firmware seçeneğini seçerek indirme ve
kurulum işlemini anlatan talimatları izleyin.
SORUN GİDERME VE UYARILAR
• Joystick’im düzgün çalışmıyor ya da uygun kalibre edilmemiş gözüküyor:
- Sisteminizi kapatın, joystick’inizi ayırın, joystick’inizi yeniden bağlayın ve oyununuzu tekrar
başlatın.
- Joystick’inizi bağlarken: Kolu, dümeni ve gaz kolunu ortada bırakın ve her türlü kalibrasyon
sorununa engel olmak için bunları hareket ettirmeyin.
- Oyundan çıkın, joystick'i çıkarın, tekrar takın, ardından joystick üzerindeki PS düğmesine
(10) basın. Joystick'i kullanabilmek için Sony Entertainment Network hesabınıza giriş yapın.
• Joystick’im çok hassas veya yeterince hassas değil:
- Joystick’iniz farklı eksenlerde birkaç hareket yaptığınızda kendini otomatik olarak kalibre
eder.
- Oyununuzun “Seçenekler / Kumanda / Gamepad veya Joystick” menüsünden: Kumanda
biriminiz için hassasiyeti veya ölü bölgeleri (bu seçenekler mevcutsa) ayarlayın.
- Joystick tabanının alt kısmında bulunan düğmeyi (7) kullanarak kol direncini ayarlayın.
• Dümen fonksiyonu çok hassas:
- Joystick tabanında bulunan kilitleme vidasını (5) kullanarak kol dönüşünü devre dışı bırakın
ve dümen fonksiyonu için mafsallı düğmeyi kullanın.
YARDIM DOSYALARI VE SIK SORULAN SORULAR (BU KILAVUZDA
GEÇMEZ)
Lütfen bkz. https://support.thrustmaster.com/. Joysticks / T.Flight Hotas 4'ye tıklayın ve
Manual veya FAQ'yu seçin.
adresine gidin. Joysticks /
Page 87

6/8
TÜKETICI GARANTI BILGISI
İşbu Thrustmaster ürünü, malzeme ve işçilik hatalarına karşı, müşterinin kusurlu ürünün ücretinin iade
edilmesi veya değiştirilmesi talebinde bulunabileceği süreye karşılık gelen garanti süresince dünya
çapında tescil edilmiş merkezi Place du Granier, B.P. 97143, 35571 Chantepie, Fransa’da bulunan
Guillemot Corporation S.A. (bundan sonra “Guillemot” olarak ifade edilecektir) garantisi altındadır. Avrupa
Birliği ülkelerinde bu süre, Thrustmaster ürününün tesliminden itibaren iki (2) seneye karşılık gelir. Diğer
ülkelerde garanti süresi, Thrustmaster ürünü ile ilgili olarak, Thrustmaster ürününün satın alındığı tarihte
müşterinin ikamet ettiği ülkede geçerli yasalara uygun şekilde, müşterinin kusurlu ürünün ücretinin iade
edilmesi veya değiştirilmesi talebinde bulunabileceği süreye karşılık gelir (İlgili ülkede bu tür bir
düzenleme mevcut değilse garanti süresi Thrustmaster ürününün satın alındığı asıl tarihten itibaren bir (1)
yıl olacaktır).
Garanti süresi içinde üründe hata veya kusur tespit edilmesi durumunda derhal izlenecek yöntem ile ilgili
size bilgi verecek olan Teknik Destek servisimize başvurun. Hata veya kusur onaylanırsa ürünün satın
alındığı yere (ya da Teknik Destek servisi tarafından belirtilen yere) iade edilmesi gerekmektedir.
İşbu garanti kapsamında müşterinin kusurlu ürünü, Teknik Destek servisinin insiyatifine bağlı olarak,
değiştirilecek veya çalışır hale getirilecektir. Garanti süresince Thrustmaster ürününün onarım işlemine
tabi tutulması durumunda, ürünün kullanım dışı olduğu en az yedi (7) günlük tüm süreler kalan garanti
süresine eklenecektir (bu süre, ürünün onarılması için hazır bulundurulduğu tarih müdahale edilmesi için
talepte bulunduğu tarihi takip ediyor ise müşterinin müdahale edilmesi için talepte bulunduğu tarihten veya
bahse konu ürünün onarılması için hazır bulundurulduğu tarihten başlar). Yürürlükte olan yasaların izin
verdiği durumlarda, Guillemot ve bağlılarının tüm sorumluluğu (dolaylı hasarlar da dahil olmak üzere)
Thrustmaster ürününün çalışır hale getirilmesi veya değiştirilmesi ile sınırlıdır. Yürürlükte olan yasaların
izin vermesi halinde Guillemot, ticarete elverişlilik veya belirli bir amaca uygunluk ile ilgili tüm garantileri
reddeder.
İşbu garanti aşağıdaki durumlar için geçerli değildir: (1) Ürün modifiye edilmişse, açılmışsa, üzerinde
değişiklik yapılmışsa, uygunsuz veya kötü kullanım, ihmal, kaza, normal aşınma ya da malzeme veya
üretim hatası ile ilgili olmayan nedenlerden dolayı hasar görmüşse (ancak bununla sınırlı kalmamak
üzere, Thrustmaster ürününü herhangi uygun bir elemanla birleştirmek, buna dahil olarak özellikle güç
kaynakları, yeniden doldurulabilir piller, şarj cihazları veya bu ürün için Guillemot tarafından tedarik
edilmemiş tüm diğer elemanlar); (2) ürün, evde kullanım dışında, profesyonel veya ticari maksatlı olanlar
da dahil olmak üzere (örneğin oyun salonları, eğitim, yarışlar) başka maksatlarla kullanılmışsa; (3) Teknik
Destek servisi tarafından sağlanan talimatlara uyulmamışsa; (4) yazılım için, işbu garanti geçerli değildir,
söz konusu yazılım için sağlanan özel garanti hükümlerine tabidir; (5) sarf malzemeleri için (ürünün
kullanım süresi içinde değiştirilecek elemanlar: örneğin; tek kullanımlık piller, kulaklık yastıkları); (6)
aksesuarlar için (örneğin; kablolar, kılıflar, cepler, çantalar, bileklikler); (7) ürün açık artırma ile satılmışsa.
Bu garanti devrolunamaz.
Tüketim mallarının tüketicinin ülkesinde satışına ilişkin tüketicinin yasal hakları işbu garantiden
etkilenmemektedir.
Page 88

7/8
TEKNIK DESTEK
Ek garanti hükümleri
Garanti süresince, tüm Thrustmaster ürünlerini açmaya ve/veya onarmaya yetkili tek taraf Teknik Destek
Servisi olduğundan prensip olarak Guillemot tarafından hiçbir yedek parça sağlanmayacaktır
(Uygulanabilir olması durumunda yazılı talimatlarla ve müşteriye gerekli yedek parça(lar) sağlanarak
Teknik Destek Servisinin müşteri tarafından yapılmasını isteyebileceği tüm onarım prosedürleri hariç –
örneğin onarım işleminin basit olmasından ve gizlilik içermemesinden dolayı).
İnovasyon döngülerini dikkate almak ve bilgi birikimi ile ticari sırlarını korumak için Guillemot, prensip
olarak garanti süresi dolmuş hiç bir Thrustmaster ürünü için onarım bilgisi veya yedek parça
sağlamayacaktır.
Sorumluluk
Yürürlükte olan yasaların izin vermesi halinde, Guillemot Corporation S.A. (bundan sonra “Guillemot”
olarak ifade edilecektir) ve bağlıları aşağıdakilerin biri veya daha fazlasından kaynaklanan her türlü
hasara karşı tüm sorumluluğu reddeder: (1) Ürün modifiye edilmişse, açılmışsa, üzerinde değişiklik
yapılmışsa; (2) montaj talimatlarına uyulmamışsa; (3) uygunsuz veya kötü kullanım, ihmal, kaza (örneğin
bir darbe); (4) normal aşınma; (5) ürünün, evde kullanım dışında, profesyonel veya ticari maksatlı olanlar
da dahil olmak üzere (örneğin oyun salonları, eğitim, yarışlar) başka maksatlarla kullanılması. Yürürlükte
olan yasaların izin vermesi halinde, Guillemot ve bağlıları ürünle ilgili malzeme veya üretim hatası ile ilgili
olmayan her türlü hasara karşı tüm sorumluluğu reddeder (ancak bununla sınırlı kalmamak üzere,
herhangi bir yazılımdan veya Thrustmaster ürününün herhangi bir uygun olmayan elemanla
birleştirilmesinden doğrudan veya dolaylı olarak kaynaklanan tüm hasarlar, buna dahil olarak özellikle güç
kaynakları, yeniden doldurulabilir piller, şarj cihazları veya bu ürün için Guillemot tarafından tedarik
edilmemiş tüm diğer elemanlar).
https://support.thrustmaster.com
Page 89

8/8
TELİF HAKKI
*
*
©2021 Guillemot Corporation S.A. Tüm hakları saklıdır. Thrustmaster®, Guillemot Corporation
S.A.'nın tescilli ticari markasıdır. Guillemot Corporation S.A. tarafından üretilmekte ve
dağıtılmaktadır. Diğer tüm ticari markalar ile marka adları işbu belgede tanınmış olup ilgili
sahiplerine aittir. İçindekiler, tasarım ve teknik özellikler önceden haber vermeksizin
değiştirilebilir ve ülkeden ülkeye farklılık gösterebilir. Fotoğraflar ve resimler bağlayıcı değildir.
Kuzey Amerika ve Avrupa'da tasarlanmıştır, Çin'de üretilmiştir.
Yalnızca PlayStation®5 konsolları ve PlayStation®4 konsolları ile kullanım için.
"1", "PlayStation", "PS5", "PS4" ve “PlayStation Shapes Logo”, Sony Interactive Entertainment
Inc.'in ticari veya tescilli ticari markalarıdır. Tüm hakları saklıdır. Diğer tüm ticari markalar ilgili
sahiplerine aittir. Sony Interactive Entertainment LLC lisansıyla üretilmekte ve dağıtılmaktadır.
ÇEVRE KORUMA ÖNERİLERİ
Cihazların geri dönüşümü veya diğer işleme yöntemleri sayesinde çevrenin korunmasına yönelik önemli
bir katkıda bulunabilirsiniz. Size en yakın toplama merkezleri hakkında bilgi almak için lütfen yerel
yetkililerle iletişime geçin.
Diğer ülkeler için: Lütfen elektrikli ve elektronik cihazların geri dönüşümü için yerel yasalara uyunuz
AEEE Yönetmeliğine Uygundur.
Bu belgeyi saklayın. Renkler ve süslemeler değişiklik gösterebilir.
Plastik tutturucular ve bantlar, kullanmadan önce üründen çıkarılmalıdır.
www.thrustmaster.com
*Sadece AB, İngiltere ve Türkiye için geçerlidir
Avrupa Birliği’nde: Cihazın kullanım ömrü sona erdiğinde, standart ev atıkları ile
atılmamalı, geri dönüşüm için Atık Elektrikli ve Elektronik Cihazların toplandığı bir yere
bırakılmalıdır.
Bu, ürünün, kullanım kılavuzunun veya paketin üzerinde bulunan sembol ile
onaylanmıştır.
Özelliklerine bağlı olarak malzemeler geri dönüştürülebilir. Atık Elektrik ve Elektronik
Page 90
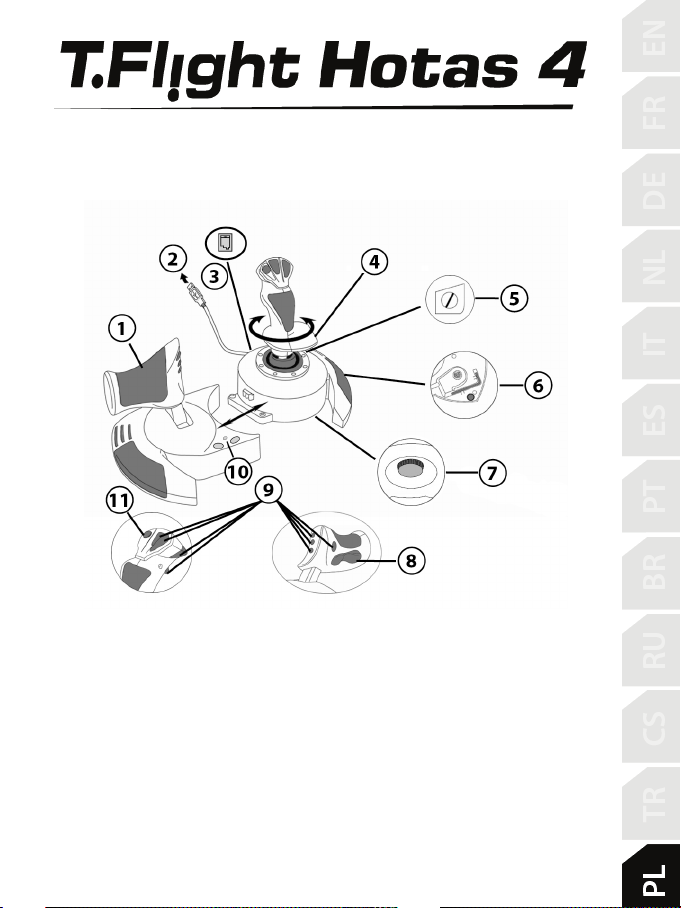
1/8
1. Przepustnica
odłączania przepustnicy
7. Pokrętło regulacji oporu uchwytu
ELEMENTY
PlayStation®5 - PlayStation®4
Instrukcja obsługi
2. Złącze USB
3. Złącze steru kierunku: RJ12 do steru
Thrustmaster (do nabycia osobno)
4. Funkcja steru kierunku obsługiwana
przez skręcanie uchwytu
5. Śruba blokująca ster kierunku (na
uchwycie)
6. Klucz imbusowy do mocowania i
8. Obsługa steru kierunku przy użyciu
przycisku wahadłowego
9. Przyciski czynności
10. Przycisk PS z diodą
11. Wielokierunkowy przełącznik widoku (hat
switch)
Page 91

2/8
INFORMACJE NA TEMAT JOYSTICKA HOTAS
PRZEPUSTNICA
Joystick jest wyposażony w dużą dźwignię przepustnicy, która umożliwia łatwe sterowanie
przyspieszeniem samolotu.
Przepustnica jest odłączana, dzięki czemu można jej używać w dwóch różnych ustawieniach:
Odłączoną od joysticka
(podobnie jak przy pilotowaniu prawdziwego samolotu)
Zamocowaną do joysticka
(większa stabilność i mniejsza ilość zajmowanego miejsca)
Fabrycznie przepustnica nie jest zamocowana do joysticka.
Aby zamocować przepustnicę do joysticka:
1. Obróć oba elementy (przepustnicę i joystick) dołem do góry.
2. Wyjmij klucz imbusowy (6) znajdujący się pod podstawą joysticka.
3. Umieść przepustnicę po lewej stronie joysticka.
Włóż wypustkę łączącą umieszczoną z lewej strony podstawy joysticka w otwór znajdujący się
po prawej stronie przepustnicy.
4. Kluczem przykręć dwie śruby imbusowe pod podstawą joysticka
(znajdujące się po jej prawej stronie).
5. Zwiń kabel przepustnicy i poprowadź go przez gniazdo prowadzące.
6. Włóż klucz imbusowy z powrotem na miejsce, aby się nie zgubił.
Chcąc odłączyć przepustnicę od joysticka, wykonaj procedurę w odwrotnej kolejności.
REGULOWANY OPÓR UCHWYTU
W zależności od swojego stylu gry możesz preferować joystick bardzo czuły, reagujący nawet na
najdelikatniejszy dotyk, lub bardziej
Aby joystick odpowiadał preferencjom różnych graczy, opór jego uchwytu można regulować. W
tym celu należy użyć pokrętła regulacji oporu uchwytu (7) znajdującego się pod podstawą
joysticka.
„twardy”, czyli stawiający podczas ruchu pewien opór.
Page 92

3/8
FUNKCJA STERU KIERUNKU
Joystick jest wyposażony w funkcję steru kierunku. Odpowiada ona pedałom znajdującym
się w samolocie, za pomocą których pilot porusza sterem kierunku, umożliwiając samolotowi
obracanie się wokół osi pionowej (i powodując skręcanie samolotu w lewo lub w prawo). Aby
w joysticku użyć funkcji steru kierunku, należy obrócić uchwyt w lewo lub w prawo.
Funkcji steru kierunku można użyć na dwa sposoby:
— obracając uchwyt joysticka (4) w lewo lub w prawo,
— za pomocą przycisku wahadłowego (8) na dźwigni przepustnicy.
Jeśli korzystasz wyłącznie z przycisku wahadłowego (lub nie używasz funkcji steru
kierunku), możesz zablokować obrót uchwytu za pomocą śruby blokującej (5) znajdującej się
na podstawie joysticka. Śrubokrętem z płaską końcówką zmień położenie śruby, blokując lub
odblokowując funkcję steru kierunku.
WIELOKIERUNKOWY PRZEŁĄCZNIK WIDOKU
Joystick jest wyposażony w przełącznik widoku (11), tzw. grzybek lub hat switch. Jak
sugeruje nazwa, umożliwia on szybkie wzrokowe sprawdzenie, co dzieje się wokół samolotu.
Aby uzyskać tę możliwość, należy wejść do menu konfiguracji gry i przypisać poszczególne
widoki (tylny, lewy, prawy, a także widoki zewnętrzne) odpowiednim kierunkom przełącznika
widoku.
Oczywiście przełącznika widoku można także używać do innych celów (np. do strzelania).
Page 93

4/8
PLAYSTATION®5 / PLAYSTATION®4
INSTALACJA W SYSTEMIE PLAYSTATION®5 / PLAYSTATION®4
1. Podłącz złącze USB (2) do jednego z portów USB systemu.
2. Włącz system.
3. Dioda joysticka zacznie świecić na CZERWONO.
4. Naciśnij przycisk PS joysticka (10) i zaloguj się na swoje konto Sony Entertainment Network,
aby umożliwić korzystanie z joysticka.
5. Uruchom grę obsługującą tryb Flight Stick.
Teraz możesz zacząć grać!
LISTA ZGODNYCH GIER NA PLAYSTATION®5 / PLAYSTATION®4
W systemie PlayStation®5 / PlayStation®4 joystick T.Flight Hotas 4:
— Jest zgodny tylko z grami obsługującymi tryb Flight Stick.
— Jest rozpoznawany w grach jako prawdziwy joystick, a nie kontroler (gamepad). Zapewnia
to lepszą czułość i precyzję oraz możliwość dostępu do opcji joysticka w tych grach.
Listę gier na PlayStation®5 / PlayStation®4 zgodnych z joystickiem można znaleźć na
stronie https://support.thrustmaster.com/
Lista jest regularnie uzupełniana wraz z wprowadzaniem nowych gier na PS5™ / PS4™
zgodnych z joystickiem.
: wybierz Joystick / T.Flight Hotas 4.
Page 94
5/8
AKTUALIZACJA OPROGRAMOWANIA SPRZETOWEGO
JOYSTICKA
Oprogramowanie zawarte w podstawie joysticka można zaktualizować do nowszej wersji,
zawierającej rozszerzenia różnych funkcji.
Aby wyświetlić i w razie potrzeby zaktualizować wersję oprogramowania sprzętowego, z
której obecnie korzysta joystick, na komputerze wejdź na stronę
https://support.thrustmaster.com/
Firmware, a następnie postępuj zgodnie z instrukcją pobierania i instalacji.
ROZWIĄZYWANIE PROBLEMÓW I OSTRZEŻENIA
• Joystick nie działa prawidłowo lub wydaje się niewłaściwie skalibrowany:
— Wyłącz system, odłącz joystick, podłącz go ponownie, a następnie uruchom ponownie grę.
— Podczas podłączania joysticka: pozostaw uchwyt, ster kierunku i przepustnicę w
położeniu środkowym oraz nie poruszaj nimi (aby uniknąć problemów z kalibracją).
— Wyjdź z gry, odłącz joystick, podłącz go ponownie, a następnie naciśnij przycisk PS (10)
na joysticku. Zaloguj się na swoje konto Sony Entertainment Network, aby umożliwić
korzystanie z joysticka.
• Joystick jest zbyt czuły lub niewystarczająco czuły:
— Joystick kalibruje się automatycznie, gdy wykonasz nim kilka ruchów wzdłuż
poszczególnych osi.
— W menu opcji/kontrolera/gamepada dostępnym w grze ustaw odpowiednią czułość lub
martwe strefy joysticka (jeśli tego rodzaju opcje są dostępne).
— Wyreguluj opór uchwytu za pomocą pokrętła (7) znajdującego się pod podstawą joysticka.
• Funkcja kierunku jest zbyt czuła:
— Zablokuj obrót uchwytu za pomocą śruby blokującej (5) znajdującej się na podstawie
joysticka i obsługuj funkcję steru kierunku przyciskiem wahadłowym.
PLIKI POMOCY I CZĘSTO ZADAWANE PYTANIA
(NIEZAMIESZCZONE W NINIEJSZEJ INSTRUKCJI)
Wejdź na stronę https://support.thrustmaster.com/. Kliknij Joysticks / T.Flight Hotas 4, a
następnie wybierz Manual lub FAQ.
. Kliknij Joysticks / T.Flight Hotas 4, następnie wybierz
Page 95

6/8
INFORMACJE DOTYCZĄCE GWARANCJI DLA KLIENTA
Firma Guillemot Corporation S.A. z siedzibą pod adresem Place du Granier, B.P. 97143, 35571
Chantepie, Francja („Guillemot”) udziela klientowi obowiązującej na całym świecie gwarancji, że niniejszy
produkt Thrustmaster będzie wolny od wad materiałowych i produkcyjnych przez okres gwarancji równy
limitowi czasu, w którym klient może występować z roszczeniami z tytułu wad niniejszego produktu. W
krajach Unii Europejskiej jest to okres dwóch (2) lat od dostarczenia produktu Thrustmaster. W innych
krajach okres gwarancji jest równy limitowi czasu, w którym klient może występować z roszczeniami z
tytułu wad produktu Thrustmaster zgodnie z przepisami obowiązującymi w kraju, w którym klient mieszkał
w dniu zakupu produktu Thrustmaster. (Jeśli przepisy danego kraju nie przewidują występowania z takimi
roszczeniami, okres gwarancji będzie wynosić jeden (1) rok od pierwotnej daty zakupu produktu
Thrustmaster).
Jeśli w okresie gwarancji wystąpią objawy mogące świadczyć o wadzie produktu, należy niezwłocznie
skontaktować się z działem pomocy technicznej, który wskaże dalszy sposób postępowania. W razie
potwierdzenia wady produkt należy zwrócić w punkcie zakupu (lub innym miejscu wskazanym przez dział
pomocy technicznej).
W ramach niniejszej gwarancji wadliwy produkt zostanie wymieniony lub przywrócony do stanu
sprawności użytkowej, zgodnie z decyzją działu pomocy technicznej. Jeśli w okresie gwarancji produkt
Thrustmaster zostanie poddany czynnościom mającym na celu przywrócenie go do stanu użytkowego,
dowolny okres co najmniej siedmiu (7) dni, podczas których produkt nie jest użytkowany, zostanie dodany
do pozostałego okresu gwarancji (okres ten liczy się od dnia, w którym klient poprosi o interwencję, lub od
dnia, w którym dany produkt zostanie udostępniony celem przywrócenia do stanu użytkowego, jeśli data
udostępnienia celem przywrócenia do stanu użytkowego następuje po dacie prośby o interwencję). Jeśli
zezwala na to obowiązujące prawo, całkowita odpowiedzialność firmy Guillemot i jej podmiotów zależnych
(łącznie z odpowiedzialnością za szkody wtórne) ogranicza się do przywrócenia do stanu użytkowego lub
wymiany produktu Thrustmaster. Jeśli zezwala na to obowiązujące prawo, firma Guillemot wyłącza
wszelkie gwarancje pokupności i przydatności do określonego celu.
Niniejsza gwarancja nie obowiązuje: (1) w przypadku, gdy produkt został zmodyfikowany, otwarty,
zmieniony albo uszkodzony na skutek nieodpowiedniego lub nadmiernego użytkowania, niedbałości,
wypadku, normalnego zużycia lub z innego powodu niezwiązanego z wadą materiałową ani produkcyjną
(w tym między innymi z powodu połączenia produktu Thrustmaster z nieodpowiednim elementem, w tym
w szczególności z zasilaczem, akumulatorem, ładowarką lub jakimkolwiek innym elementem
niedostarczonym przez firmę Guillemot dla tego produktu); (2) w przypadku używania produktu w sposób
inny niż użytek domowy, w tym do celów zawodowych lub komercyjnych (na przykład w salonach gier
albo do prowadzenia szkoleń lub zawodów); (3) w razie nieprzestrzegania instrukcji podanych przez dział
pomocy technicznej; (4) w odniesieniu do oprogramowania, jako że oprogramowanie to jest objęte
odrębną szczegółową gwarancją; (5) w odniesieniu do materiałów eksploatacyjnych (elementów
wymienianych w czasie eksploatacji produktu, na przykład baterii jednorazowych, muszli/nakładek na
uszy do zestawów słuchawkowych lub słuchawek); (6) w odniesieniu do akcesoriów (na przykład kabli,
pokrowców, etui, torebek, pasków na rękę); (7) w przypadku sprzedania produktu na aukcji publicznej.
Niniejsza gwarancja nie podlega przeniesieniu.
Niniejsza gwarancja nie wpływa na prawa klienta wynikające z przepisów dotyczących sprzedaży dóbr
konsumenckich w kraju klienta.
Page 96

7/8
Dodatkowe postanowienia gwarancyjne
W okresie gwarancji firma Guillemot zasadniczo nie udostępnia jakichkolwiek części zamiennych,
ponieważ jedynym podmiotem upoważnionym do otwarcia jakiegokolwiek produktu Thrustmaster i/lub
przywrócenia go do stanu użytkowego jest dział pomocy technicznej (oprócz ewentualnych procedur
przywracania produktu do stanu użytkowego, o wykonanie których dział pomocy technicznej może
poprosić klienta przez przekazanie pisemnych instrukcji — np. ze względu na prostotę i jawność procesu
przywracania do stanu użytkowego — oraz, w razie potrzeby, przez udostępnienie klientowi wymaganych
części zamiennych).
Ze względu na realizowane cykle innowacji oraz konieczność zapewnienia ochrony swojej specjalistycznej
wiedzy i tajemnic handlowych firma Guillemot zasadniczo nie udostępnia powiadomień dotyczących
przywracania do stanu użytkowego ani części zamiennych w przypadku produktów Thrustmaster, których
okres gwarancji upłynął.
Odpowiedzialność
Jeśli zezwala na to obowiązujące prawo, firma Guillemot Corporation S.A. („Guillemot”) i jej podmioty
zależne nie ponoszą żadnej odpowiedzialności za szkody spowodowane przez co najmniej jeden z
następujących czynników: (1) modyfikację lub otwarcie produktu bądź wprowadzenie w nim zmian; (2)
nieprzestrzeganie instrukcji montażu; (3) nieodpowiednie lub nadmierne użytkowanie, niedbałość,
wypadek (na przykład uderzenie); (4) normalne zużycie; (5) używanie produktu w sposób inny niż użytek
domowy, w tym do celów zawodowych lub komercyjnych (na przykład w salonach gier albo do
prowadzenia szkoleń lub zawodów). Jeśli zezwala na to obowiązujące prawo, firma Guillemot i jej
podmioty zależne nie ponoszą żadnej odpowiedzialności za szkody niezwiązane z wadą materiałową lub
produkcyjną produktu (w tym między innymi za szkody spowodowane bezpośrednio lub pośrednio przez
jakiekolwiek oprogramowanie lub na skutek połączenia produktu Thrustmaster z nieodpowiednim
elementem, w tym w szczególności z zasilaczem, akumulatorem, ładowarką lub jakimkolwiek innym
elementem niedostarczonym przez firmę Guillemot dla tego produktu).
WSPARCIE TECHNICZNE
https://support.thrustmaster.com
Page 97

8/8
PRAWA AUTORSKIE
*
*
©2021 Guillemot Corporation S.A. Wszelkie prawa zastrzeżone. Thrustmaster® jest zastrzeżonym
znakiem towarowym firmy Guillemot Corporation S.A. Produkt wytwarzany i dystrybuowany
przez firmę Guillemot Corporation S.A. Wszystkie inne znaki towarowe i nazwy marek są za takie
uznawane i stanowią własność odpowiednich podmiotów. Zawartość, wzór i dane techniczne
mogą ulec zmianie bez powiadomienia i różnić się w zależności od kraju. Zdjęcia i ilustracje nie są
wiążące prawnie. Zaprojektowano w Ameryce Północnej i Europie, wyprodukowano w Chinach
Do użytku wyłącznie z konsolami PlayStation®5 i konsolami PlayStation®4.
„1”, „PlayStation”, „PS5”, „PS4” i „PlayStation Shapes Logo” są zastrzeżonymi znakami
towarowymi lub znakami towarowymi firmy Sony Interactive Entertainment Inc. Wszelkie prawa
zastrzeżone. Wszystkie inne znaki towarowe stanowią własność odpowiednich podmiotów.
Produkt wytwarzany i dystrybuowany na licencji firmy Sony Interactive Entertainment LLC.
ZALECENIE DOTYCZACE OCHRONY ŚRODOWISKA
Na terenie Unii Europejskiej: gdy okres przydatności produktu do eksploatacji
dobiegnie końca, produktu nie należy pozbywać się wraz ze zwykłymi odpadami z
gospodarstwa domowego, ale oddać do recyklingu w punkcie zbiórki zużytego
sprzętu elektrycznego i elektronicznego. Potwierdza to symbol znajdujący się na
produkcie, w instrukcji obsługi lub na opakowaniu.
Zależnie od swoich właściwości materiały zawarte w produkcie mogą nadawać się do
recyklingu. Dzięki recyklingowi i innym formom utylizacji zużytych urządzeń
elektrycznych i elektronicznych klient może w znacznym stopniu przyczynić się do ochrony środowiska.
Aby uzyskać informacje o najbliższych punktach zbiórki odpadów, należy skontaktować z miejscowymi
władzami.
We wszystkich innych krajach: należy przestrzegać miejscowych przepisów dotyczących recyklingu
sprzętu elektrycznego i elektronicznego.
Niniejsze informacje należy zachować. Kolorystyka i elementy ozdobne mogą różnić się od
przedstawionych.
Przed korzystaniem z produktu należy zdjąć z niego plastikowe elementy mocujące oraz naklejki.
www.thrustmaster.com
*Dotyczy wyłącznie UE, Wielkiej Brytanii i Turcji
Page 98

1/8
1.
2.
3.
4.
5.
6.
7.
8.
9.
10.
11.
PlayStation®5 - PlayStation®4
技術的特徴
スロットル
USB コネクター
RJ12 Thrustmaster ラダー用(別売)コネ
クター
ツイストラダー(ロック機構装備)
ラダーロックネジ
スロットルユニット分解・組立用六角レンチ
ユーザーマニュアル
スティックテンション調整ダイヤル
ロッカースイッチ
アクションボタン
PS ボタン(LED 付き)
POV ハットスイッチ
Page 99

2/8
保証規定
※ 本製品を使用される前に必ずお読みください。
この度は、本製品をお買い上げいただき誠にありがとうございます。以下の保証規定をお読みいただき
内容を同意の上、本製品をご使用ください。
初期不良対応期間はお買い上げ日から1週間とさせていただいております。
保証期間はお買い上げ日から 1 年間です。
注意:
個人売買(インターネット等)で購入された際の購入日は、保証開始日として起算できません。
社会的信用のある販売店での購入時のみ、購入日を保証開始日としますので、個人売買の場合は、商
品の発売日から保証開始日として起算させて頂きます。
購入日が確認できるレシートは大切に保管してください。
製品がユーザーマニュアル記載の通常の使用方法により正常に動作しなくなった場合は、弊社の判断
で無償にて交換/修理いたします。完売等の場合は同等品と無償で交換いたします。
交換の場合、お客様からお送りいただいた製品等は返却いたしかねます。また、修理の際に取り外した
部品等も返却いたしかねます。
保証期間内でも、次の場合は保証が受けられません。
1. 弊社製品と判断出来ない場合。
2. ハードウェア自身の消耗に起因する故障または損傷(本製品は性質上、物理的な機構の耐
久性能に依存する製品寿命がございます)。
3. 火災、地震、水害、落雷、ガス害、塩害、その他の天災地変、公害や異常電圧による故障または
損傷。
4. お買い上げ後の輸送、移動時の落下などお取り扱いが不適当なため生じた故障・損傷。
5. ご使用時の不備あるいは接続している他の機器によって生じた故障または損傷。
6. ユーザーマニュアルの記載内容に反するお取り扱いによって生じた故障または損傷。
7. 弊社以外で改造、調整、部品交換などをされた場合。
8. 本製品の故障に起因するデータ損失などの付随する損害に関しては一切保証できません。
9. ご使用環境との相性問題に関しての返品、返金等。
10. ゲームソフトとの相性問題に関しての返品、返金等。
11. 一般家庭以外(例えば業務用)でのご使用による故障、損傷または不具合。
12. その他、弊社が、交換を認め難い不適切な行為があると判断した場合。
13. 購入日が確認できるレシートがない場合
Page 100

3/8
カスタマーサポート
本製品に異常を感じられた場合は、すぐに使用を中止し、カスタマーサポートへご相談ください。
■保証を受ける際に用意するもの
購入店と購入した日付が分かる書類(購入時のレシート、保証書シール、保証書レシート、通販の代引
伝票など)が必要となります。
それらは決して捨てたりせずに大切に保管してください。
ご購入日付を証明する書類をご呈示いただけない場合、保証期間内であっても有償での修理対応とな
りますので、あらかじめご了承下さい。
又、保証を受ける権利はご購入者以外(保証の譲渡)が所有する事はできません。
■ご送付についてのご案内
本製品に異常が発生した場合、カスタマーサポートにご相談頂いた後に、本製品をカスタマーサポートま
でご送付いただく場合がございます。現象、環境等の詳細をお書き添え頂き、配送業者様の送り状(伝
票)に“不良検証品”と明記の上、お買い上げ時のレシート等と共に本製品をお送りください。
発送される際は、紛失等のトラブルを防ぐため、必ず受領確認の取れる宅配便でご送付ください。
封書、郵便小包等の郵送は固くお断り申し上げます。
※ なお、輸送中の事故については、弊社にて責任を負いかねます。あらかじめご了承ください。
■交換/修理依頼時のご注意
以下の点をご了承の上、交換/修理をご依頼頂けますようお願いいたします。
1. 交換/修理のご依頼について:交換/修理のご依頼は日本国内にお住まいの方とさせて頂きます。
2. 代替機の貸出について:交換/修理に伴う代替機の貸出等は行っておりません。
3. 製品の交換について:修理が困難な場合には、修理せずに同等品と交換させて頂く事がございます。
この場合、お客様にて貼られたシールなどはお返しできません。
4. お客様が設定されたデータについて:弊社にて修理作業を行う際にお客様が設定されたデータを消
去する場合があります。この場合は、工場出荷初期状態でお返しすることとなります。(製品ごと交換
する場合も同様です)
■送料について
1. 初期不良対応期間内(お買い上げ日から1週間) :初期不良対応期間の送料は往復共に弊社が負
担させていただきます。
2. 初期不良対応期間終了以降~保証期間終了まで :弊社にご送付頂く際の送料はお客様にてご負担願
います。
3. 製品を返送する際の送料は弊社にて負担させて頂きます。
 Loading...