

Page 1

THT700
Digitaler
Terrestrischer
HD Receiver
Bedienungsanleitung
User Manual
Evolution. Emotion. Passion.
www.thomsonstb.net
Page 2
Page 3
Page 4

THOMSON ist eine Marke von TECHNICOLOR S.A. lizenziert zur Nutzung an STRONG Europe
Vertreten durch STRONG Ges.m.b.H. • Franz-Josefs-Kai 1 • 1010 Wien • Österreich
Email: support_at@thomsonstb.net
24 Nov 2014 17:33
Page 5

LICENSES
ANY USE OF THIS PRODUCT IN ANY MANNER OTHER THAN PERSONAL USE THAT COMPLIES WITH
THE MPEG-2 STANDARD FOR ENCODING VIDEO INFORMATION FOR PACKAGED MEDIA IS EXPRESSLY
PROHIBITED WITHOUT A LICENSE UNDER APPLICABLE PATENTS IN THE MPEG-2 PATENT PORTFOLIO,
WHICH LICENSE IS AVAILABLE FROM MPEG LA, LLC, 6312 S. Fiddlers Green Circle, Suite 400E, Greenwood
Village, Colorado 80111 U.S.A.
THIS PRODUCT IS LICENSED UNDER THE AVC PATENT PORTFOLIO LICENSE FOR THE PERSONAL AND
NONCOMMERCIAL USE OF A CONSUMER TO (i) ENCODE VIDEO IN COMPLIANCE WITH THE AVC
STANDARD (“AVC VIDEO”) AND/OR (ii) DECODE AVC VIDEO THAT WAS ENCODED BY A CONSUMER
ENGAGED IN A PERSONAL AND NON-COMMERCIAL ACTIVITY AND/OR WAS OBTAINED FROM A
VIDEO PROVIDER LICENSED TO PROVIDE AVC VIDEO. NO LICENSE IS GRANTED OR SHALL BE IMPLIED
FOR ANY OTHER USE. ADDITIONAL INFORMATION MAY BE OBTAINED FROM MPEG LA, L.L.C. SEE
HTTP://WWW.MPEGLA.COM
This product contains one or more programs protected under international and U.S. copyright laws as
unpublished works. They are confidential and proprietary to Dolby® Laboratories. Their reproduction
or disclosure, in whole or in part, or the production of derivative works therefrom without the express
permission of Dolby® Laboratories is prohibited. Copyright 2003-2009 by Dolby® Laboratories. All rights
reserved.
English
08 Jan 2015 22:37
P1
Page 6

TABLE OF CONTENT
1.0 INTRODUCTION 3
1.1 Safety Instructions 3
1.2 Storage 3
1.3 Equipment Set-up 3
1.4 Scope of delivery 4
1.5 Usage of external USB devices 4
2.0 RECEIVER 4
2.1 Front panel 4
2.2 Rear panel 4
2.3 Remote control 5
2.4 Installing the batteries 5
2.5 Using the remote control 5
3.0 CONNECTIONS 6
3.1 Connecting the antenna 6
3.2 Connecting to TV 6
3.3 Connecting a digital audio amplifier 6
3.4 Connecting a USB storage device 6
3.5 Connecting an infrared extender 6
4.0 STARTING UP FOR THE FIRST TIME 7
4.1 Language and TV setup 7
4.2 Antenna adjustment 7
4.3 Channel Search 7
4.4 Watching TV programmes after the first installation 7
5.0 QUICK GUIDE FOR USING YOUR RECEIVER 8
5.1 Switching the channels 8
5.2 Viewing programme schedule information 9
5.3 Selecting audio language 10
5.4 Selecting subtitle language 10
5.5 Viewing Videotext 10
5.6 Entering the PIN code 10
6.0 MAIN MENU 10
6.1 Channel Organiser 10
6.2 System Setup 12
6.3 Timer & Update 13
6.4 Information 14
7.0 TROUBLESHOOTING 14
8.0 TECHNICAL SPECIFICATIONS 16
THOMSON declares that this item complies with the basic requirements and other relevant regulations of directives CE 2006/95/EC and
73/23/EC, RoHS 2011/65/EU.
Subject to alterations. In consequence of continuous research and development technical specifications, design and appearance of products
may change. Irdeto is a registered trademark of Irdeto Access BV. Manufactured under license from Dolby® Laboratories. Dolby® and the
double-D symbol are registered trademarks of Dolby® Laboratories, HDMI, the HDMI logo and High-Definition Multimedia Interface are
trademarks or registered trademarks of HDMI Licensing LLC in the United States and other countries. All other product names are trademarks
or registered trademarks of their respective owners: ® simpli services GmbH & Co KG.
© THOMSON 2015. All rights reserved.
P2
Page 7

1.0 INTRODUCTION
1.1 Safety Instructions
DO NOT INSTALL YOUR RECEIVER:
• In a closed or poorly ventilated cabinet; directly on top of or under any other equipment; on a surface
which might obstruct the ventilation slots.
DO NOT EXPOSE THE RECEIVER OR ITS ACCESSORIES:
• To direct sunlight or any other equipment that generates heat; to rain or intense moisture; to intense
vibration and to any shock which may cause permanent damage to your receiver or to any magnetic
objects, such as loudspeakers, transformers, etc.
• Do not use a damaged power cord. It may cause a fire or an electric shock. Do not touch a power cord
with wet hands. It may cause an electric shock.
• When the receiver is not used for a long period of time, you should unplug the power cord from the wall
socket.
• Do not use alcohol or ammonia based liquids to clean the receiver. If you wish, you may clean your
receiver with a soft lint-free cloth slightly made damp with a mild soap solution, and only after
disconnecting from the mains voltage supply. Make sure no foreign objects fall through the ventilation
slots because this could cause fire or an electric shock.
• Do not place any objects on top of the receiver because this might prevent proper cooling of the
components inside.
Safety Precautions
• Never try to open the receiver. It is dangerous to touch the inside of the receiver due to high voltages
and possible electrical hazards. Opening the receiver will void the warranty of the product. Refer all
maintenance or servicing to suitably qualified personnel.
• When you are connecting cables, be sure that the receiver is disconnected from the mains supply voltage.
Wait a few seconds after switching off the receiver before you move the receiver or disconnect any
equipment.
• It is a necessity that you only use an approved extension and compatible wiring that is suitable for the
electrical power consumption of the installed equipment. Please ensure that the electrical power supply
corresponds with the voltage on the electrical identification plate at the back of the receiver.
If the receiver does not operate normally, even after strictly following the instructions in this user manual it
is recommended to consult your dealer or the appropriate service for your country.
1.2 Storage
Your receiver and its accessories are stored and delivered in a packaging designed to protect against
electric shocks and moisture. When unpacking it, make sure that all the parts are included and keep the
packaging away from children. When transporting the receiver from one place to another or if you are
returning it under warranty conditions, make sure to repack the receiver in its original packaging with its
accessories. Failing to comply with such packaging procedures could damage the product and void your
warranty.
1.3 Equipment Set-up
We recommend you to consult a professional installer to set up your equipment. Otherwise, please follow
the instructions below:
• Refer to the user manual of your TV and your antenna.
• Make sure that the cables and outdoor components are in a good condition and the connections are well
shielded and of good quality.
This user manual provides complete instructions for installing and using this receiver. The symbols will
serve as follows:
English
P3
INTRODUCTION
Page 8

WARNING Indicates warning information.
NOTE Indicates any other additional important or helpful information.
MENU Represents a button on the remote control or the receiver. (Bold characters)
Move to Represents a menu item within a screen. (Italic characters)
1.4 Scope of delivery
• 1 receiver
• 1 quick installation guide
• 1 remote control
• 1 power adapter
• 1 cable 3.5mm jack - 3 RCA (Cinch)
• 2 batteries (ААА)
NOTE: The batteries must not be recharged, disassembled, electrically short-circuited, be
mixed or used with other types of batteries. If rechargeable accumulators instead of
batteries are going to be used, we recommend using (e.g. NiMH) types with low selfdischarge to ensure long time operation of remote control.
1.5 Usage of external USB devices
• It is recommended to use USB 2.0 storage devices. If your device is not compatible to USB 2.0
specifications, it might not work properly.
• THOMSON cannot guarantee compatibility with all types of USB storage devices.
• It is advised not to store important information on USB storage devices used with the receiver. Always
make backups of data on your USB storage device before using it with this receiver. THOMSON will not
take responsibility for any loss of information or circumstances caused by loss of information.
• Please ensure that either the USB device is already formatted to FAT32.
2.0 RECEIVER
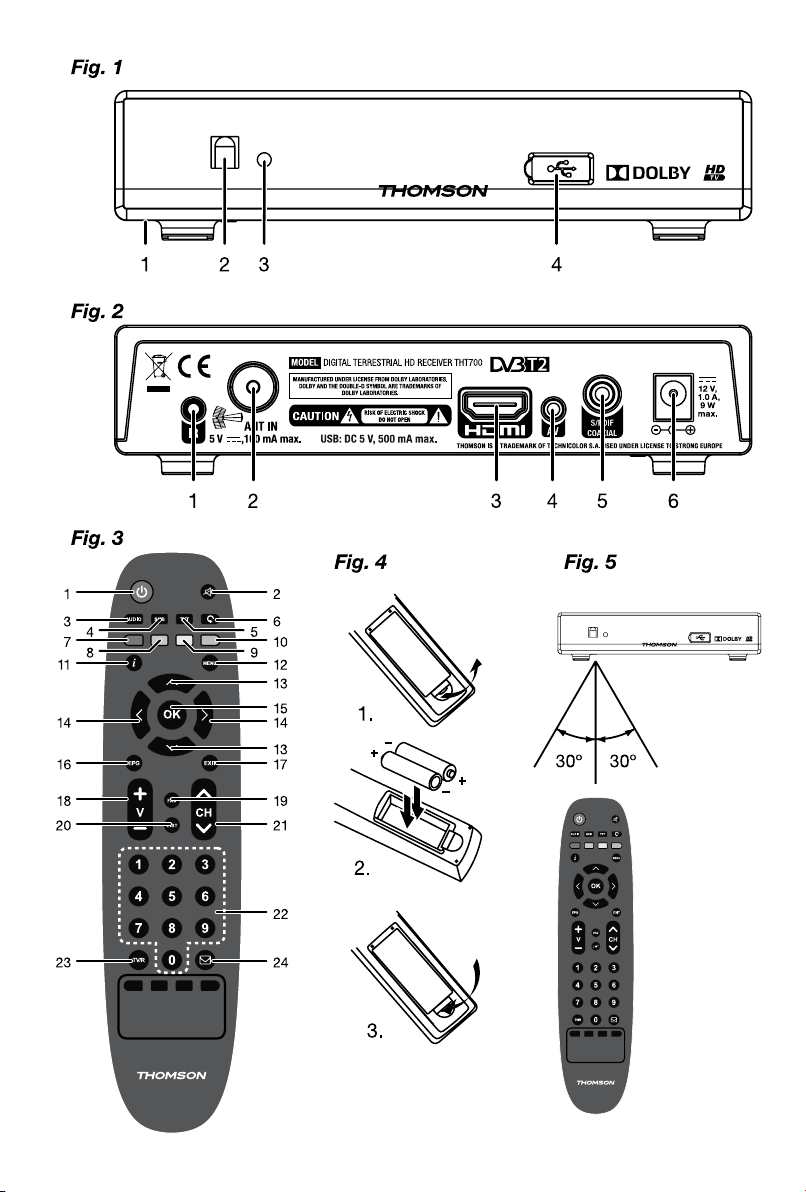
2.1 Front panel
1. Slot for smart-card:
The slot is located on the lower bottom side of the receiver. It is intended for
service functions only and is not used during operation.
2. Remote sensor: Receives signals from the remote control.
3. Indicator LED: Lights up in green in operating mode and red in standby mode.
4. USB port: For connecting an external USB storage device.
2.2 Rear panel
1. IR To connect an infrared extender (not included)
2. ANT IN To connect to the antenna
3. HDMI To connect an HDMI cable with your HDTV
4. AV To connect the corresponding RCA inputs of the TV or analogue audio system
with your receiver.
5. S/PDIF (coaxial) To connect the digital audio amplifier/ home theatre.
6. DC POWER To connect the supplied power adapter with the receiver (Input 110-240 V 50 ~
60 Hz/output 12 V/1.0 A DC max ).
Fig. 1
Fig. 2
P4
RECEIVER
Page 9

2.3 Remote control
Fig. 3
1. q Switches the receiver On/Standby
2. ! Mutes the audio output of the receiver in every mode incl. Videotext
3. AUDIO Opens the list of audio languages
4. SUB Opens the DVB subtitle selection if available
5. TXT Opens the Videotext if available
6. 9 Switches between the two last watched channels
7. RED In menu for specific functions
8. GREEN In menu for specific functions
9. YELLOW In menu for specific functions
10. BLUE In menu for specific functions
11. i Shows the current channel information (2x event details and signal information)
12. EPG Shows the EPG (Electronic Programme Guide) in TV mode
13. pq Menu Off: Change channel to next/previous. Menu On: Moves the cursor up/
down.
14. tu Menu Off: Decreases/increases the volume level. Menu On: Change settings for
specific menus and for navigation
15. OK Menu Off: Displays the current channel list. Menu On: Opens the highlighted
setting or for confirmation
16. MENU Opens the main menu and from main menu you will get one step back
17. EXIT Exits from the menu, sub-menu or cancels actions
18. V+/V- Increases/decreases the volume in all modes incl. Videotext
19. FAV Opens the favourite list selection
20. LIST Opens the channel list in viewing mode; inside the channel list and channel
manager it changes between the channel list modes
21. CH+/CH- Change channel to next/previous
22. 0~9 Channel selection or value input
23. TV/R Toggles between TV and RADIO mode
24. Gives direct access to Irdeto mails from your service provider
2.4 Installing the batteries
Fig. 4
Open the cover on the remote control and insert 2x AAA batteries into the compartment. Correct position
of the polar diagram shows the batteries inside the compartment.
1. Open the cover.
2. Insert the batteries.
3. Close the lid.
WARNING: The batteries should not be recharged, disassembled, electrically short-circuited, be
mixed or used with other types of batteries.
English
2.5 Using the remote control
Fig. 5
To use the remote control, point it towards the front of your receiver. The remote control supports a range
of up to 5 meters distance to the receiver at an angle of up to approx. 30 degrees.
NOTE: Control of the receiver will be limited or not possible if there are obstacles between
the remote control sensor (at the front panel of the receiver) and the remote control.
Direct sunlight or very bright light can reduce or disturb the reception of the remote
control signals.
RECEIVER
P5
Page 10

3.0 CONNECTIONS
WARNING: Please remove all the protective covers from the front panel and top cover of the
receiver. Make sure that devices are disconnected from their main power supplies
before connecting them to the receiver.
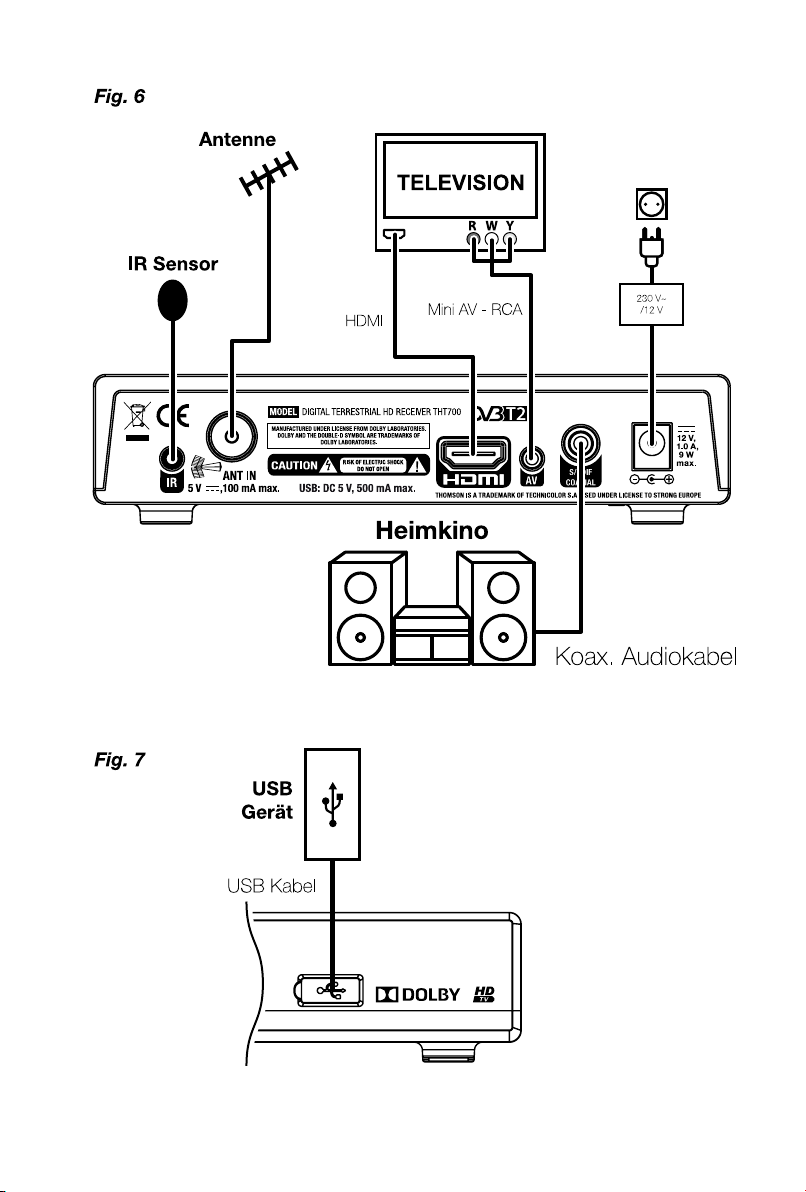
3.1 Connecting the antenna
To receive digital signals, your receiver has to be connected to a terrestrial indoor or outdoor antenna. Use
the antenna cable to connect the antenna with the ANT IN connector on the back of your receiver. Please
ensure that a properly shielded antenna cable and suitable connectors are used. If you are using an active
indoor or outdoor antenna you can support it with power via the receiver.
Fig. 6
3.2 Connecting to TV
There are two ways of connecting the receiver to the TV.
1. Mini AV-3RCA (included):
Connect the AV cable connectors on one side to the AV output of the receiver and on the other
side to the inputs of the TV. Connect according to the colours of the connectors.
NOTE: After turning on the TV and receiver it is necessary to switch the TV to video operation
mode. See section 4. Starting up for the first time for more details.
2. HDMI cable (not included):
Connect one end of the included HDMI cable to the HDMI connector of your receiver and the other
end to the HDMI input of your TV set.
NOTE: After switching on the TV and receiver it is necessary to select the corresponding
HDMI input on the TV. See section 4. Starting up for the first time for more details.
Fig. 6
3.3 Connecting a digital audio amplifier
Connect one end of a good quality coaxial audio cable to the S/PDIF output of your receiver and the other
end to the coaxial audio input of your home theatre, amplifier or any other device supporting digital audio.
Fig. 6
3.4 Connecting a USB storage device
Make sure that the external USB storage device does not consume more than 500 mA. If the USB device
consumes more, connect an external power supply.
Fig. 7
3.5 Connecting an infrared extender
With an IR extender you can place the receiver out of sight (e.g. a closed cabinet) while still being able
to control it. Plug the IR extender into the IR connector on the back of the receiver. Locate the extender
at a position allowing direct sight to the remote control. Once a suitable location is found, remove the
protection foil from the adhesive tape on the bottom of the extender and fix it by slightly pressing it down
on the surface it should be placed on.
The IR extender is not included.
NOTE: We recommend considering the standard adhesive notes (dust-free, fat free, not to
coarse materials, etc.)!
Fig. 6
P6
CONNECTIONS
Page 11

4.0 STARTING UP FOR THE FIRST TIME
Ensure that your antenna signal is of good quality and that all connections are properly setup. In case of
difficulties or questions, ask your local dealer for assistance. It is recommended to follow the Installation
Guide step by step. It will guide you through the basic installation and channel searching process. You can
enjoy watching digital HD TV within just a few minutes.
4.1 Language and TV setup
OSD language Press tu to select the OSD language.
TV Format With tu you can choose between the following formats: 16:9, 16:9 Stretch, 4:3
LetterBox, 4:3 Pan & Scan and Auto.
HDMI Resolution With tu you can choose between the following resolutions: 720p, 1080i, 1080p
(50Hz), 576i and 576p.
After all the settings have been made, continue by pressing the YELLOW button.
NOTE: If you have set an HDMI resolution which is not supported by your TV, it is no
problem. If you don’t press any buttons, the receiver will automatically switch to the
last used resolution after ~10 sec . However, if you can see the displayed message,
confirm the selected resolution with OK.
4.2 Antenna adjustment
Region Press tu to set the area in which you live. The reference channel for this area will
be adjusted automatically.
Channel Additionally you can use tu to adjust a channel carrying broadcast signals.
Antenna Power Use tu to switch the antenna power off or on. Please refer to the user manual
of your antenna before you connect. Select On, if you use an active antenna
compatible to 5V/100 mA max. If not, then select Off.
Channel order Use tu to select between two channel lists: the simpliTV list will sort Austrian HD
services first and the Standard list will sort Austrian SD services first. Select the list
you prefer. After the channel search is finished you can still select the other list in
the Channel Search menu.
After all the settings have been made, continue by pressing the YELLOW button or OK.
4.3 Channel Search
The receiver will scan for available channels now. The progress of the channel search together with the
scanned frequencies and already found TV and radio stations will be displayed. As soon as the scan is
finished, the first found channel will be displayed.
NOTE: You can cancel the search process by pressing EXIT, if necessary. However, we highly
recommend waiting until the scan process is finished.
If no channels are found after the scan, a message is displayed. A possible reason can be that the antenna
was aligned/setup incorrectly. See 6.1.1 Channel Search for more information.
4.4 Watching TV programmes after the first installation
After the first installation the receiver will probably show a message concerning temporary lack of rights
for watching encrypted channels. These rights are necessary for receiving the additional data to start
decoding. In this case it is necessary to wait until the channel is displayed on screen. Do not switch
channels at that time. Follow the instructions on the TV screen. If the message concerning lack of rights
does not disappear from the screen, refer to the technical support service via the Support-Hotline
0810 96 97 98 (throughout Austria max. € 0.1/min, last updated 05/2014) or visit www.simplitv.at.
English
STARTING UP FOR THE FIRST TIME
P7
Page 12

NOTE: Your receiver is pre-activated for most of the digital terrestrial encrypted channels
For questions regarding reception, please contact the support hotline 0810 96 97 98 (throughout Austria
max. € 0.1/min, last updated 05/2014) or visit www.simplitv.at.
broadcasted by the operator. Some channels are not included and require a
registration or a subscription. Use the included registration form or sign up online at
www.simplitv.at to register/subscribe.
5.0 QUICK GUIDE FOR USING YOUR RECEIVER
This section of the manual deals with the most frequently used receiver functions.
To switch your receiver ON or to Standby, press q on the remote control. If you will not use the receiver for
a longer time, disconnect the power supply by unplugging the power adapter from the outlet or from the
receiver.
Choose a channel with pq or the CH+/CH- buttons. Alternatively, you can digit the channel number
with the 0~9 buttons on the remote control or press OK in viewing mode to display the channel list.
The volume can be adjusted with tu or V+/V-.
P+/P- enable you to scroll page wise in all list modes to make your channel or other selection as
comfortable as possible.
NOTE: 15 minutes after the receiver has been set to standby mode, it switches into the deep
5.1 Switching the channels
There are three ways to switch channels:
1. Via direct input with the 0 ~ 9 buttons
2. Via the channel list
3. By using the buttons CH+/CH- or p q.
5.1.1 Direct input
For switching directly to a certain channel number you can press the channel number with the 0 ~ 9
buttons on the remote control. The number can be up to four digits long. Entering a number with less
than four digits is also possible. After entering a channel, wait a few seconds and the receiver will switch to
it.
5.1.2 Switching channels in the channel list
For switching channels in the channel list make the following steps: Press OK in the channel display mode.
The channel list screen will appear on screen. Press pq to choose a channel and press OK. The channel
list disappears from the screen and the receiver displays your channel of choice. Additionally you can press
LIST to change the channel list mode in the channel list. You can edit My list in the Channel Manager. If you
are using the My list mode the same channel order is applied to the EPG.
5.1.3 Switching between TV, radio and favourite channels
The receiver supports the following channel lists:
The TV channel list.
The radio channel list.
Four lists with favourite channels: Movies, News, Sports and Music. For the details on creating favourite
lists, see section 6.1.2. Channel Manager.
Press TV/R to switch between TV and radio channels.
Press FAV for choosing favourites in the channel display mode and select a list by pressing tu. Select a
channel by pressing pq and press OK to confirm.
sleep mode. During this time, the receiver can be started up quickly. The start-up
from the power-saving mode takes about 30 seconds.
P8
QUICK GUIDE FOR USING YOUR RECEIVER
Page 13

5.2 Viewing programme schedule information
5.2.1 Information bar
Each time you switch channels the information bar appears at the bottom of the screen. You can also
display the information bar by pressing
The bar displays the following information:
• number and name of the channel;
• current time and date;
• the beginning and end of the current programme*;
• the beginning and end of the next programme*;
• graphic symbols, displaying the availability of additional services provided by the channel.
The information bar automatically disappears from the screen after the set time interval (see section 6.2.3.
OSD Settings).
*Availability depends on the operator
Symbols used:
– the channel is broadcasted in Standard Definition resolution.
– the channel is broadcasted in High Definition resolution.
– the yellow colour indicates the availability of Videotext service.*
– the yellow colour indicates the availability of subtitles service.
– the yellow colour indicates an encrypted channel.
– the yellow colour indicates that the channel is blocked and that it is required to enter the PIN for
watching it.
– indicates a programme broadcasted in 4:3 format.
– indicates a programme broadcasted in 16:9 format.
- the yellow colour indicates that audio tracks in Dolby® Digital* are supported on this channel.
*Dolby® and the double-D symbol are registered trademarks of Dolby® Laboratories.
Press i twice to see the programme information of the current or next programme. For current
programme information use tu to switch between the current and next programme. In the programme
information you can scroll with pq if necessary.
The advanced information bar displays the following information:
• Channel name (at the information bar header).
• Broadcasting frequency of the channel.
• Signal strength and quality indicator.
To exit the advanced information bar press i or EXIT.
*Availability depends on broadcaster.
5.2.2 Electronic Programme Guide (EPG)
The Electronic TV Programme Guide (EPG) gives you the opportunity to view the programme schedule for
the next 7 days. The availability of the service and the provision time depends on the service operator.
Press EPG to display the EPG menu.
It displays the channel list on the left and the programme schedule on the right of the screen.
The schedule displays programme information for the next couple of hours. When you switch channels
the programme information adapts to the current channel.
The date is displayed under the programme schedule.
Use pq to select a channel and tu to select an event.
i while in the channel display mode.
English
QUICK GUIDE FOR USING YOUR RECEIVER
P9
Page 14

The information about the selected programme is displayed at the top of the EPG screen with beginning
and end of the programme as well as the programme name.
Press i to view advanced information about the selected programme. To exit the information press EXIT.
To view programme information for the next day press the BLUE button. To return to the previous day
press the YELLOW button. It is not possible to see information about past programmes. To return to the
information on the current programme press the GREEN button.
5.3 Selecting audio language
Press AUDIO in viewing mode to view the list of the available languages for audio tracks. Press pq to
select language and confirm by pressing OK.
5.4 Selecting subtitle language
Press SUB in viewing mode to view the list of available languages for subtitles. Select the subtitles
language by pressing pq and confirm the selection by pressing OK.
5.5 Viewing Videotext
Press TXT in viewing mode to view Videotext. Use the COLOUR BUTTONS to navigate through the
Videotext pages and enter the number of the Videotext page with the buttons 0-9. To exit the Videotext
mode press EXIT.
5.6 Entering the PIN code
The receiver might require entering of the PIN code before some operations. This prevents from accidental
modification of important functions. The default PIN code is 0000.
6.0 MAIN MENU
The main menu allows you to make all necessary receiver settings, control channel lists, book timers,
access information about the receiver, the selected programme or the status of the embedded
Conditional Access System. The main menu contains the following submenus: Channel Organiser, System
Setup, Timer&Update and CA&Information.
Press MENU to access the main menu. Press EXIT to exit.
6.1 Channel Organiser
Press MENU and choose the Channel Organiser with tu.The screen displays the list with submenus:
Channel Search, Channel Manager, Auto Update and Delete all.
6.1.1 Channel Search
In this menu you can search for channels as well on a certain channel. To perform a manual channel search
on one Channel, navigate to this item with pq and use tu to select the a channel. Then press OK to
start searching on this channel.
Region Press tu to set the area in which you live. The reference channel for this area will
Channel Additionally you can use tu to adjust a channel carrying broadcast signals.
Antenna Power Use tu to switch the antenna power off or on. Please refer to the user manual
Channel order Use tu to select between two channel lists: the simpliTV list will sort Austrian HD
be adjusted automatically.
of your antenna before you connect. Select On, if you use an active antenna
compatible to 5V/100 mA max. If not, then select Off.
services first and the Standard list will sort Austrian SD services first. Select the list
you prefer. After the channel search is finished you can still select the other list in
this menu.
P10
MAIN MENU
Page 15

If you are searching only for one channel and are changing the Channel order, a warning message appears
because previously installed channels may appear in a different order than installed. If you like to change
confirm the message accordingly.
After all the settings have been made, you can continue by pressing the YELLOW button if you want to
perform a full channel scan. This will delete your previous channel lists made and install all channels under
(maybe) different order.
6.1.2 Channel Manager
To access the Channel Manager you will need to enter the receiver PIN code DEFAULT PIN CODE: 0000.
Now your TV channel list will be shown. Use the pq buttons to navigate within the list.
In this menu 2 modes are available for editing of your channels: the All List and My list modes (applicable to
TV and radio channels). In My list the channels appear as per defined channel order (standard or simpliTV
list), but can also be moved to another position. If channels are added to the channel list by the operator,
they can be found at the end of your channel list in the My list mode. In the All List mode the channels
appear as defined by the operator.
Move*
Follow these instructions to move a channel to a new position in a list:
1. Select a channel in the list.
2. Press the RED button. Next to the channel name the symbol is shown.
3. Use pq to move to the selected position and press the RED button to confirm.
*This function is only available in the My list mode.
Hide
Channels marked with will be ignored when switching through the channels in viewing mode. Follow
these instructions to hide a channel:
1. Select a channel in the list.
2. Press the GREEN button.
3. To cancel press the GREEN button once more.
Lock
To watch a locked channel you need to enter the PIN code. You can now lock selected channels for
children. Follow these instructions to lock a channel:
1. Select a channel in the list.
2. Press the YELLOW button. The symbol is shown next to the channel.
3. To cancel the channel lock, select it in the list and press YELLOW button once more.
FAV
Follow these instructions to add a channel to the favourites list:
4. Select a channel in the list.
5. Press FAV.
6. Select one or more of the displayed favourite groups to which you want to add the channel.
7. The symbol is shown near the channel name.
8. To exit the FAV mode press EXIT.
6.1.3 Auto update
With this function you can update your channel list automatically. This is executed one time every 24 hours
when the receiver is in standby mode.
6.1.4 Delete all
Use this function carefully! It will delete all stored channels and settings! To execute this function you will
be requested to enter the PIN. After you have performed this action you will be guided to the Installation
English
P11
MAIN MENU
Page 16

Wizard again! When you delete channels, all system settings made earlier such as language preferences,
output settings, parental control settings will remain.
6.2 System Setup
6.2.1 Language Setting
In this menu you can set your language of choice for menus, audio and subtitles.
Menu Language: Set according to your preferences.
Audio Language: Digital TV allows transmission of more than one audio track/language. If a
Subtitle Language: Digital TV allows transmission of more than one subtitle language. Select the
6.2.2 Output Setting
In this menu you can set the output parameters of the receiver according to the connected TV set and for
the connected audio amplifier if applicable.
TV Mode: Mostly PAL is used in Austria. In some cases it might be required to use another
Screen Mode: Adjust this setting in accordance with the aspect ratio of your TV set (4:3 or 16:9)
HDMI Resolution: Allows you to change the resolution of the HDMI output. If the connected TV
Audio on HDMI: Keep the factory default setting. Change only after consultation of our support /
Audio on S/PDIF: Keep the factory default setting. Change only after consultation of our support /
6.2.3 OSD Settings
In this menu you can adjust the transparency level of menus and set the banner time-out.
6.2.4 Time Settings
In this menu you can specify the synchronising method for date and time, manually set date and time and
set the duration for displaying the information banner.
channel has multiple audio tracks/languages, the receiver will select the audio
track/language automatically according to your selection.
preferable subtitle language and the receiver will automatically show subtitles in
the selected language (availability depends on the operator). If you do not want
to display subtitles, adjust the setting to Off. Please consider that events may
contain “built in” subtitles which can’t be disabled.
standard.
and the preferred conversion.
If a TV with 4:3 aspect ratio is connected the best mode is 4:3 LB. 4:3 will not
be converted and video in 16:9 will be converted to display it fully and without
geometrical distortion (black horizontal lines on the top and bottom of the
screen).
If a TV with 16:9 aspect ratio is connected the best mode is 16:9 PB. 4:3 will be
displayed without geometrical conversions (black vertical lines on the left and on
the right and bottom of the screen) and video in 16:9 will be displayed without
conversion and fill the whole screen.
Try the settings and find the variant which suits you best. Do not forget about the
possibility to manage the format from the menu of your TV (depends on your TV
model).
does not support the set resolution you will see a black screen. In this case, wait
for 10-15 seconds without pressing any buttons on the remote control of the
receiver and the previous value will be recovered automatically.
service/ hotline.
service/ hotline.
P12
MAIN MENU
Page 17

Time Offset: Choose Auto to synchronise time and time zone automatically, or Manual to
specify the time zone manually.
Region: The country cannot be adjusted because there is only one time zone within
Austria.
Time Zone: This setting is only available when Time Offset is set to Manual.
When switching from wintertime to Summer Time, at the Manual time setup you will need to adjust the
correct setting here.
6.2.5 Energy Saving Setting
Deep Standby After: Set the time period during which the receiver will switch from standby mode to
Off mode. The receiver consumes less power in standby mode than in On mode.
It consumes even less power in deep sleep mode, but it takes about 30 seconds
to power on from deep sleep mode.
Auto Standby After: Set the time period after which the receiver shall automatically switch to standby
mode, if no input signal is detected during that period.
This is the additional way of reducing the energy consumption of the receiver.
6.2.6 Parental Control
The Parental Control function mostly depends on information broadcasted by operator and channels. The
operator can set age restrictions for programmes according to the legislation of the country where the
broadcast takes place.
You can also change the PIN code of the receiver in this menu. Enter the current PIN code, then the new
PIN code and confirm the new PIN code.
6.2.7 Factory default
For user convenience, the receiver provides the function reset to factory settings. In this menu, the PIN
code and all settings, channels and lists are reset to the factory settings.
DEFAULT PIN CODE: 0000.
Also, the PIN code of the receiver is reset to the factory setting: 0000. If necessary, change the PIN code in
the Parental Control menu. See section 6.2.6 Parental Control.
6.3 Timer & Update
English
6.3.1 Timers
Use the timer function to switch the receiver on according to the defined settings.
6.3.2 Software update via USB
Follow the instructions for the software update carefully in order to update the software on an USB storage
device.
NOTE:
• Please wait until the software update is completed. Avoid any actions until the update process is finished
or an error message appears.
• Do not unplug the receiver from the mains until the software update is completed.
• Do not disconnect the USB storage device from the receiver until the software update is completed.
Failure to follow the above instructions can lead to receiver failure and as a result the warranty will void.
6.3.3 OTA Update
From time to time software updates might be necessary when the receiver is in operation mode. This
depends on continuous improvements of the receiver functions, removal of detected defects and safety
protection of the Conditional access system.
MAIN MENU
P13
Page 18

Normally the software of the receiver is detected automatically via the broadcasted signal. In this case you
can decide if you want to update the software now or after you switch into standby.
While processing the OTA the loader is displayed at the screen during the software update. The update
process is displayed as a green indicator with the progress bar displayed on the left. After completing the
software update the receiver will reboot automatically and switch to the last viewed channel.
NOTE:
• Please wait until the software update is completed. Avoid any actions until the update process is finished
or an error message appears.
• Do not unplug the receiver from the mains until the software update is completed.
• Do not disconnect the antenna until the software update is completed.
Failure to follow the above instructions can lead to receiver failure and as a result the warranty will void.
6.3.4 Remove the USB device
This menu only appears if a USB device is connected. Select it and press OK to safely remove the USB
device from your receiver.
6.4 Information
This menu mainly contains information on the receiver hardware and software as well as the embedded
CA system. Certain circumstances might occur when you need this information.
6.4.1 Information
Find technical information about this receiver as model, hardware and software versions. This information
might be asked for if you contact the service or hotline.
6.4.2 Service Status
In this menu you will find information about the service descrambling status.
6.4.3 Loader Status
In this menu you will find information about the software loader status, date and time of the last software
update.
6.4.4 Product Status
This menu shows the current subscription status information of the product(s) you have subscribed to by
your operator as well as date and duration of the subscribed product.
6.4.5 Client Status
This menu displays all details of the embedded conditional access system and its capabilities.
6.4.6 Region Status
If available, this menu displays specific regional data according to the country this product is developed
for.
6.4.7 Mailbox
This menu contains mails from the operator. Use pq to move in the mail box and OK to read content.
7.0 TROUBLESHOOTING
There may be various reasons for abnormal operation of the receiver. Check the receiver according to
the procedures shown below. If the receiver does not work properly after checking it, please contact
your dealer or the local Service Hotline. Do NOT try to open or disassemble the receiver. It may cause a
dangerous situation and warranty will be void.
P14
TROUBLESHOOTING
Page 19

Problem Possible reason Remedy
The standby mode indicator
does not light up.
No signal found. The antenna is disconnected. Connect the antenna cable.
No picture or sound. The plug is not connected
The receiver is disconnected
from the mains.
The receiver is connected
to the main power via an
extension cord and the switch
on the extension cable is OFF.
The antenna is damaged or
misaligned.
The cable between the antenna
and the receiver is damaged
or the cable is not connected
properly.
An active antenna is connected
that requires a power supply via
the signal cable.
The input on the TV was not
chosen corresponding to the
output of the receiver.
properly.
Check whether the power
adapter is connected to a
suitable outlet.
Check if the connector of the
power adapter is connected to
the receiver.
Turn on the power switch.
Check the antenna and its
position.
Check the condition of
the cable and check that
everything is connected.
Activate the power to the
antenna in the menu of the
receiver.
Select the correct input of the
TV for connecting the receiver.
Check the cable.
Check that the cables are
properly connected to the
outputs of the TV and the
receiver. Disconnect the
receiver and the TV from the
mains. Disconnect the cable
that connects the receiver
and the TV from both devices.
Connect the cable again,
convince yourself that it is
properly connected and that
the cable is steadily plugged
into the ports.
English
P15
TROUBLESHOOTING
Page 20

Problem Possible reason Remedy
Poor picture or sound quality Weak signal level due to bad
Message about encrypted
channel.
The remote control does not
operate the receiver
Forgotten PIN code for the
encrypted channels
weather conditions.
The antenna is damaged or
iced or frozen (for outdoor or
roof antennas).
The cable from the antenna to
the receiver is damaged.
The indoor antenna was
moved, and the signal strength
is poor.
The supply of the active
antenna is turned off.
The channel is encrypted. It is possible that the sender is
The batteries are empty.
Keep the remote control sensor
area clear from obstacles.
The receiver is turned off.
8.0 TECHNICAL SPECIFICATIONS
For stable signal reception in
bad weather usage of a higher
quality antenna might be
required.
Check the condition of the
antenna and the cable.
Check the condition of the
antenna and the cable.
Place the antenna back to
where a constant reception
was possible. Check the signal
strength and quality.
Activate the power to the
antenna in the menu of the
receiver.
not included in the package
that was activated by your
operator. Contact the hotline
on 0810 96 97 98 (throughout
Austria max. € 0.1/min, last
updated 05/2014) or via
www.simplitv.at
Replace the batteries.
Point the remote control at the
infrared sensor.
Remove obstacles from sensor
area.
Turn the receiver off and on.
Contact the support via the
website www.thomsonstb.net
Video
Aspect ratio: 4:3 and 16:9
Video resolution: 576p, 720p, 1080i, 1080р
Audio
Audio mode: MonoL/R, Stereo
Tuner
Input frequency range: VHF: 177.5 ~ 226.5 MHz
Antenna power: 5 V DC, max 100 mA, short cut protected
P16
TECHNICAL SPECIFICATIONS
UHF: 474 ~ 858 MHz
Page 21

Connectors
ANT IN - IEC Female
AV (3,5mm stereo jack)
S/PDIF (coaxial)
USB 2.0, Type A connector (5 V/500 mA)
HDMI
IR IN –infrared extender connector
General data
Power supply: АС 100 – 240 V ~ 50/60 Hz
Input voltage: DC 12 V, 1.0 A
Power consumption: 9.00 W max., 6.00 W typ.
Power consumption in standby: max 0.5 W
Operating temperature range: 0 °C ~ +40 °C
Storage temperature: -10 °C ~ +50 °C
Operating humidity range: 0 ~ 93% RH, non-condensing
Dimensions (W x D x H) in mm: 162 x 117 x 37
Weight in kg: 0.22
English
P17
TECHNICAL SPECIFICATIONS
Page 22

P18
TECHNICAL SPECIFICATIONS
 Loading...