


20LB040S5
20LB040S5U
23LB040S5
23LB040S5U
User manual


Contents
Chapter 1: Getting started |
Chapter 4: Other information |
Important information .................................................................... |
2 |
Sockets ............................................................................................ |
15 |
Safety .................................................................................................... |
2 |
Connecting headphones ................................................................ |
15 |
LCD panel............................................................................................ |
2 |
Connecting a video recorder ........................................................ |
15 |
Care .................................................................................................... |
2 |
|
|
Switching on ...................................................................................... |
3 |
|
|
Remote control TV functions .......................................................... |
4 |
|
|
O Using the remote control for other equipment........................ |
5 |
|
|
Programming the remote control.................................................. |
5 |
|
|
EN
Chapter 2: Channel set-up |
|
Initial set-up ...................................................................................... |
6 |
Organiser .......................................................................................... |
6 |
Arranging channels in order............................................................ |
6 |
Deleting channels .............................................................................. |
6 |
Naming or renaming channels ........................................................ |
7 |
Manual channel set-up...................................................................... |
7 |
Chapter 3: Operation |
|
General operation ............................................................................ |
8 |
Switching the television set on or to standby ............................ |
8 |
Volume.................................................................................................. |
8 |
Displaying status information .......................................................... |
8 |
Accessing channels ............................................................................ |
8 |
Accessing AV programmes .............................................................. |
8 |
Zoom .................................................................................................... |
8 |
OAdjusting the sound ...................................................................... |
9 |
Graphic equaliser .............................................................................. |
9 |
Adjusting the picture...................................................................... |
10 |
Setting the time .............................................................................. |
11 |
Setting the time................................................................................ |
11 |
Calendar ............................................................................................ |
11 |
Programming the wake-up timer ................................................ |
11 |
Schedule automatic shut-off.......................................................... |
11 |
Programme a sleep time ................................................................ |
11 |
Parental control .............................................................................. |
12 |
Locking a channel or AV programme ........................................ |
12 |
Locking the appliance’s buttons .................................................. |
12 |
Modifying your personal code...................................................... |
12 |
Operation (TV mode) .................................................................... |
12 |
Teletext ............................................................................................ |
13 |
Accessing Teletext............................................................................ |
13 |
Navigation bar .................................................................................. |
13 |
Changing the character set temporarily .................................... |
13 |
Other Teletext functions ................................................................ |
14 |
Newsflash .......................................................................................... |
14 |
Subtitles.............................................................................................. |
14 |
Direct access to subpages ............................................................ |
14 |
Alarm page ........................................................................................ |
14 |
Fastext................................................................................................ |
14 |
This manual applies to several TV set models. Some features may not be available on the model you purchased. Refer to the feature table provided with this manual to find out the main features of the relevant model.
Optional functions are indicated by the following symbol: O
The model number of your TV set is on a label at the back of the set and on the cover of this manual.
 This publication is printed on recycled paper.
1
Chapter 1 |
Getting started |
Important information
Safety
Ensure that your domestic mains supply voltage matches the voltage indicated on the identification sticker located at the back of your set.
The TV set's components are sensitive to heat.The maximum
EN ambient temperature should not exceed 35° Celsius. Do not cover the vents at the back or sides of the TV set. Leave sufficient space around it to allow adequate ventilation. Install the appliance away from any source of heat (fireplace, ...) or appliances creating strong magnetic or electric fields.
Moisture in rooms where the set is installed should not exceed 85% humidity. If you have to use the TV set outdoors, do not expose it to rain or splashing water.Therefore be careful not to place any object containing a liquid (vase, glass, bottle,...) on or near your appliance. Moving the set from a cold place to a warm one can cause condensation on the screen (and on some components inside the TV set). Let the condensation evaporate before switching the TV set on again.
If you intend to be away for a long period, switch the TV set off at the on/standby switch B. Even when off, some components remain in contact with the mains electricity supply.To completely isolate the set you must remove the plug from the mains supply socket.
During thunderstorms, we recommend that you disconnect the TV set from the mains and aerial so that it is not affected by electrical or electromagnetic surges that could damage it. For this reason, keep the mains and aerial sockets accessible so they can be disconnected, if necessary.
Unplug the TV set immediately if you notice it giving off a smell of burning or smoke.You must never, under any circumstances, open the TV set yourself, as you run the risk of an electric shock in doing so.
LCD panel
The LCD panel used in this product is made of glass.Therefore, it can break when the product is dropped or impacted upon by other objects.
The screen of your LCD TV is protected by a glass shield. Under certain conditions (changes of temperature and humidity) moisture may form between the glass and the screen. If this relatively rare condition arises, it is only necessary to switch on the LCD TV for around twenty minutes, to make it disappear.
The LCD panel is a very high technology product, giving you finely detailed pictures. Occasionally, a few non-active pixels may appear on the screen as a fixed point of blue, green or red.This does not affect the performance of your product.
In order to ensure long performance of your set and reduce the risk of screen burning, please observe the following precautions.
-Do not display still images (still computer and video game images, logos, pictures, text and images displayed in 4:3) for extended periods of time;
-Use a screen saver when using a computer;
Care
Use a glass-cleaning product to clean the screen and a soft cloth and mild detergent to clean the rest of the set.
Important: Using strong detergents, alcohol-based and abrasive products may damage the screen.
Dust the vents at the back and sides regularly. Using solvents, abrasive or alcohol-based products could damage the TV set.
Never open the appliance yourself since this may put you at risk or damage the appliance.
THOMSON disclaims any liability if the TV set is not used in accordance with this manual.
Before setting up your television set, make sure that the surface you want to put the set on can support its weight (see the list of specifications provided with the booklet).
Don’t place the set on an unstable surface (e.g. moving shelf, very edge of a unit) and make sure that the front of the television set does not overhang the surface it is sitting on.
 HELPLINE
You can contact THOMSON by dialling: 0871 712 1312 (for United Kingdom, £0.10/mn inc VAT)
www.thomson-europe.com
In the interest of improving the quality of our products, we reserve the right to modify their features.The information in this manual is, therefore, subject to change and does not represent any kind of contract.
2
Getting started
Switching on
Follow the instructions on this page on how to switch on your TV set and the remote control before going on to following pages describing how to use the remote control and the channel set-up procedure.
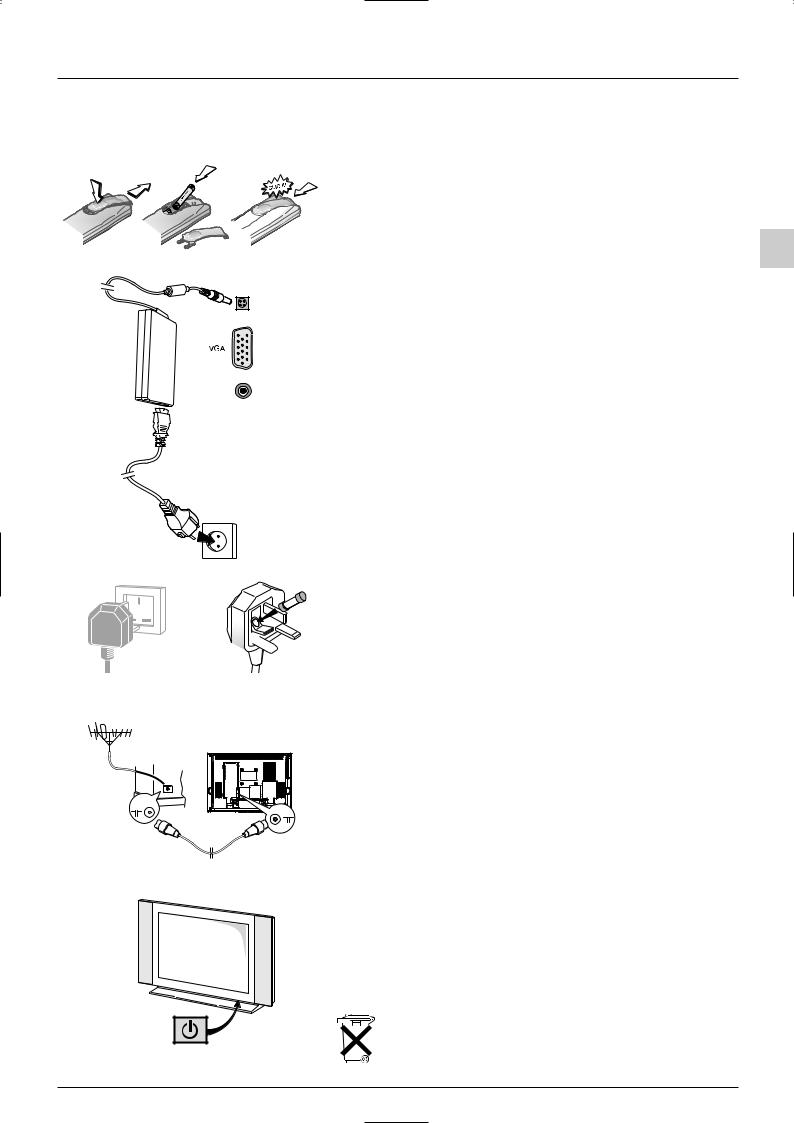
1. Insert two LR03 or AAA batteries in the remote control.
Precautions on using batteries:
-Only use the battery types specified.
-Make sure you use the correct polarity.
-Do not mix new and used batteries.
-Do not use rechargeable batteries.
-Do not expose batteries to excessive heat, throw them in a fire, recharge them or
try to open them, as this could cause them to leak or explode.
-Remove the batteries from the remote control if you are not using it for a long period of time (several weeks).
EN
Audio in
Mains socket in continental Europe
220 - 240 V ~ 50 Hz
5A
Mains socket for 

UK and Ireland
2.Plug the female socket on the mains lead into the mains adapter.
3.Connect the mains adapter to the power socket on the back of the TV set (towards the left).
This supplies electricity to the TV set, which must be powered exclusively by a 12V or 24V DC supply (depending on the model).
4.Plug the male plug on the mains lead into a 220 - 240V ~ AC 50Hz mains outlet.
Equipment for the UK and Ireland is supplied with a mains cable fitted with a moulded plug.
This plug contains safety components and must not be replaced by one sold by general retailers. It is fitted with a fuse that protects your television. If your set has stopped working, the fuse may have blown. If it has, replace it with an identical ASTA or BSI certified (BS1362) 5-amp fuse.
5.Connect the outside aerial or cable network to the g socket at the back of the TV set.
The aerial socket (75 Ohms - VHF / UHF / cable) can be used for connecting an external aerial or other equipment fitted with a modulator (video recorder, satellite receiver, etc.).
We recommend that you do not connect other equipment (video recorder, satellite receiver, etc.) to your TV set to begin with, so as not to complicate the set-up procedure with the additional steps involved. Connect them when you have finished setting up the channels by referring to page 14 of this manual.
6. Switch the TV on by pressing the on/standby button B on the front.
You will find a description of how to use the remote control on page 4. Then go to page 6 for information on the initial set-up, or to page 7 for information on manual set-up (if the channels have already been set up on your TV).
Please respect the environment and the relevant regulations. Before you dispose of batteries (or accumulators), ask your dealer whether they require special recycling and if he is able to take them back.
3
Getting started
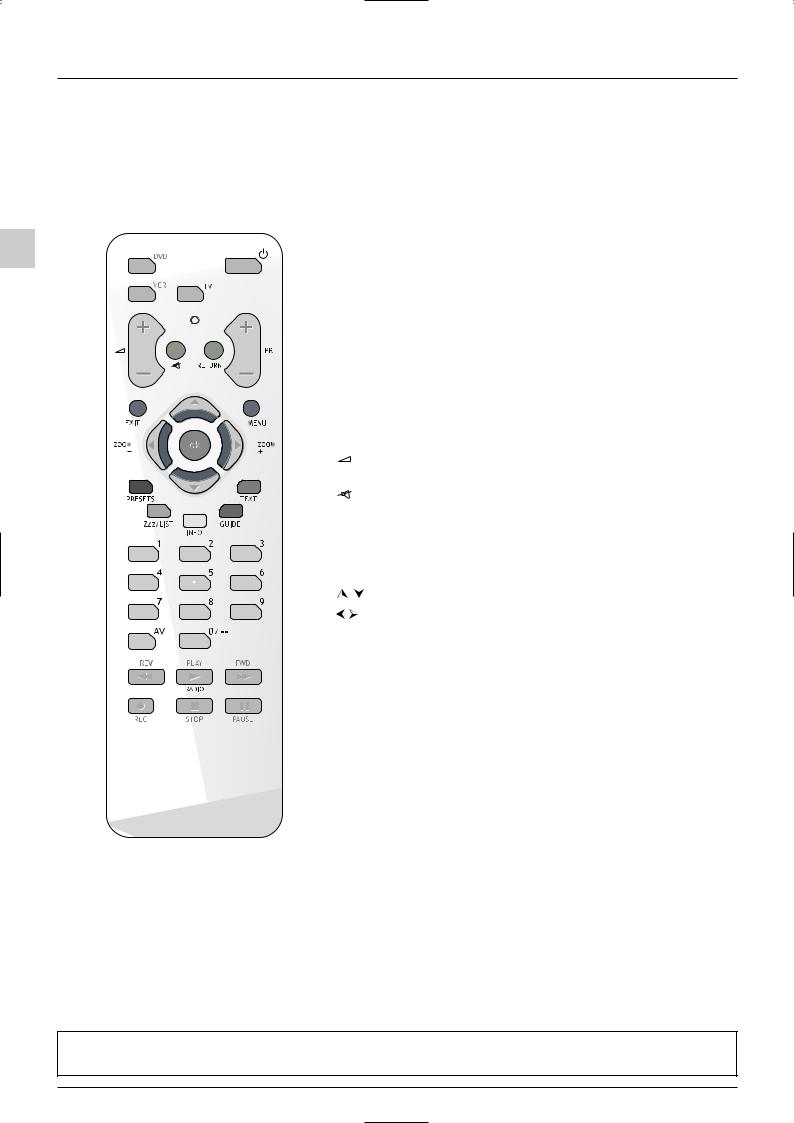
Remote control TV functions
Most of your television’s functions are available via the menus that appear on the screen.The remote control supplied with your set can be used to navigate through the menus and to configure all the general settings.The remote control and its functions may vary depending on the model of television.The rest of this page contains the description of the most comprehensive remote control. Optional remote control features are indicated by the symbol O.
|
B |
Standby / quit standby. |
|
EN |
O DVD |
To access DVD mode. |
|
O VCR |
To access VCR mode. |
||
|
|||
|
O TV |
To access TV mode. |
|
|
|
Press this button to control the television. If you do not have |
|
|
|
this button on your remote control, it means that you can |
|
|
|
access the TV functions directly, without pressing a button |
|
|
|
beforehand. |
|
|
O light |
To provide information: |
|
|
|
- it lights up when you press a button, |
|
|
|
- it indicates the status when the remote control is being |
|
|
|
programmed (see page 5), |
|
|
|
- if the batteries are run down, it flashes when you press a |
|
|
|
button. |
|
|
+/- |
To control the volume. |
|
|
|
This function is also available in VCR and DVD modes. |
|
|
|
To switch the sound off and back on again. |
|
|
RETURN |
To return to the previous menu. |
|
|
PR+/PR- |
To change channels. |
|
|
EXIT |
To close a menu. |
|
|
MENU |
To access the OVERVIEW menu. |
|
|
|
To select menu options. |
|
|
|
To set functions, change values, enable and disable functions. |
|
|
|
4/3 models: to select the picture format |
|
|
|
16/9 models: to select the zoom function. |
|
|
OK |
To confirm a selection. |
|
|
|
Coloured buttons: |
|
|
PRESETS |
(red button) image and sound presets. |
|
|
Zzz/LIST |
(green button) sleep timer. |
|
|
INFO |
(yellow button) status information. |
|
|
GUIDE |
(blue button) disabled in TV mode. |
|
|
TEXT |
(purple button) Teletext. |
The coloured buttons can also be used for operating Teletext.
0-9 |
To select a channel by its number. |
|
In the case of channel numbers with two digits: |
|
- press the two digits quickly, or |
|
- press 0 twice to display “--”, then enter the channel number. |
AV |
To select an appliance connected to an AV socket. |
O RADIO |
Not active. |
Important:
If the batteries in your remote control are run down, you can use the buttons on the front of your set, as they have the same functions as those on the remote control.
4
 Loading...