


User Manual
LP8 400 VR01
EN
www.teka.com
Dear C ustomer,
Please careful ly read this manu al b efore usin g the
dishw ash er, it will help you to use and mai ntain the
dishw ash er properly.
Keep i t to r efer to it at a l ater date.
Pass i t on to any sub sequent owner of the app liance.
This m anu al contain s sections on sa fet y Instruct ion s,
Operatin g Instruct ion s, Install ation Inst ruc tio ns and
Tro uble sho oti ng Tip s, e tc.
To review the section on troub les hoo ting Tips
will h e lp you to s olve some common p roblems
by yo urself .
If yo u can not so lve th e prob lems by yo urself ,
pleas e ask for th e help of profess ion al tech nicians.
Control Panel...... ......... . ......... ....... ......... . .. ....... 3
Dishw ash er F eatu res.... .......... ... ...... .... ...... ... ...3
A Wat er S o ftener. ...... . ............ .... ...... ... ... . ......4、
B Load ing the Salt i nto the Softener.. ... .... ........5、
C Fill the Rin se Aid Dispens er..... ............. .......5、
D Func tion of Deterge n t .......... ...... ............. ....6、
Re commen g ation .......... ............. ... . ...... ... ... . ...9
For washing in th e dis hwasher the
folliwin g cut lery/dishe s .......... ... ...... . ... ... ........9
Atte ntio n before or a fte r lo ad ing the
Dish washer Baskets .... ...... ... .... ...... ... . ... ...... ..9
Removing the Dishes..... ... .......... .. ....... ...... . ..9
Th e Meth od L oading Nor mal Dishware.. ... ... . .. .10
Was h Cycle Tab le..... .... ......... .... ... .......... ... .....11
Turning on the Applia nce... . ............ ... . ............11
Ch ang e the P rogr amme............ ...... ............. ...1 2
At the end of the Was h Cycle.. ....... ... ... .......... ..12
The manu f act ure r, following a pol icy of con sta nt
developm ent and upda ting of the p roduct , may
make modifica tion s with out giving prior notice.
This u ser manual shall a lso be go t from the
manufact urer or resp ons ibl e vendor.
Filte rin g Syst em......... ............. ............. ..........13
Cari ng for the D ishwasher..... ... .... ...... ... . ... ...... 14
Posit io n ing th e Applia n ce.............................. .15
About Po wer Co nne ction... ............ ........ ...... ...1 5
Wat er C o nnect i on.. . ... ............ . ... ......... ...........16
Start of dish washer........ ... .... ...... ... .......... ...... 17
Before calling for serv ice.... ....... ... ... ....... ... ......18
Error codes. ............. ......... . ...... ...... . ......... .....19
Technical i nfor mation.......... ... ... .... ....... ... ...... .20

When using your dishwasher,
follow the precautions listed below:
This appliance is intended to be used in household
and similar applications such as:
-staff kitchen areas in shops, offices and other
working environments;
-farm houses;
-by clients in hotels, motels and other residential type
environments;
-bed and breakfast type environments.
This appliance can be used by children aged from 8
years and above and persons with reduced physical,
sensory or mental capabilities or lack of experience
and knowledge if they have been given supervision
or instruction concerning use of the appliance in a
safe way and understand the hazards involved.
Children shall not play with the appliance. Cleaning
and user maintenance shall not be made by children
without supervision. For EN60335-1
( )
This appliance is not intended for use by persons
(including children )with reduced physical, sensory
or mental capabilities, or lack of experience and
knowledge ,unless they have been given supervision
or instruction concerning use of the appliance by a
person responsible for their safety. For IEC60335-1
( )
This appliance is for indoor use only, for household
use only.
To protect against the risk of electrical shock, do not
immerse the unit, cord or plug in water or other liquid.
Please unplug before cleaning and maintenance the
appliance .
Use a soft cloth moisten with mild soap, and then use
a dry cloth to wipe it again.

This appliance must be earthed. In the event of a
malfunction or breakdown, earthing will reduce the risk
of anelectric shock by providing a path of least
resistance of electric current. This appliance is equipped
with a cord having an equipment-earthing conductor
and a grounding plug.
The plug must be plugged into an appropriate outlet that
is installed and earthed in accordance with all local
codes and ordinances.
Improper connection of the equipment-earthing
conductor can result in the risk of an electric shock.
Check with a qualified electrician or service
representative if you are in doubt whether the appliance
is properly grounded.
Do not modify the plug provided with the appliance;
If it does not fit the outlet.
Have a proper outlet installed by a qualified electrician.
Do not abuse, sit on, or stand on the door or dish rack of
the dishwasher.
Do not operate your dishwasher unless all enclosure
panels are properly in place.
Open the door very carefully if the dishwasher is
operating, there is a risk of water squirting out.
Do not place any heavy objects on or stand on the door
when it is open. The appliance could tip forward.
When loading items to be washed:
1) Locate sharp items so that they are not likely to
damage the door seal;

2) Warning: Knives and other utensils with sharp points
must be loaded in the basket with their points down or
placed in a horizontal position.
Check that the detergent powder is empty after
completion of the wash cycle.
Do not wash plastic items unless they are marked
dishwasher safe or the equivalent.
For plastic items n
recommendations.
Use only detergent and rinse additives designed for
an automatic dishwasher.
Never use soap, laundry detergent, or hand washing
detergent in your dishwasher.
Children should be supervised to ensure that they do not
play with the appliance.
The door should not be left open, since this could increase
the risk of tripping.
If the supply cord is damaged, it must be replaced by the
manufacturer or its service agent or a similarly qualified
person in order to avoid a hazard.
During installation, the power supply must not be
ot so marked,
check the manufacturer's
excessively or dangerously bent or flattened.
Do not tamper with controls.
The appliance is to be connected to the water mains using
new hose sets and that old hose-sets should not be reused.
The maximum number of place settings to be washed
is 9.
The maximum permissible inlet water pressure is 1MPa.
The minimum permissible inlet water pressure is 0.04MPa.
Dispose of the dishwasher packaging material
correctly.
All packaging materials can be recycled.
Plastic parts are marked with the standard
international abbreviations:
PE for polyethylene, e.g. sheet wrapping material
PS for polystyrene, e.g. padding material
POM polyoxymethylene, e.g. plastic clips
PP polypropylene, e.g. Salt filler
ABS Acrylonitrile Butadiene Styrene, e.g. Control
Panel .
Packaging material could be dangerous for children!
For disposing of package and the appliance please
go to a recycling centre. Therefore cut off the power
supply cable and make the door closing device
unusable.
Cardboard packaging is manufactured from recycled
paper and should be disposed in the waste paper
collection for recycling.
By ensuring this product is disposed of correctly, you
will help prevent potential negative consequences
for the environment and human health, which could
otherwise be caused by inappropriate waste handling
of this product.
For more detailed information about recycling of this
product, please contact your local city office and your
household waste disposal service.
DISPOSAL: Do not dispose this product as unsorted
municipal waste. Collection of such waste separately
for special treatment is necessary.

To get th e best pe rformance from your dishwasher, read al l ope rating in structions
be fore usin g it for the f irst time.
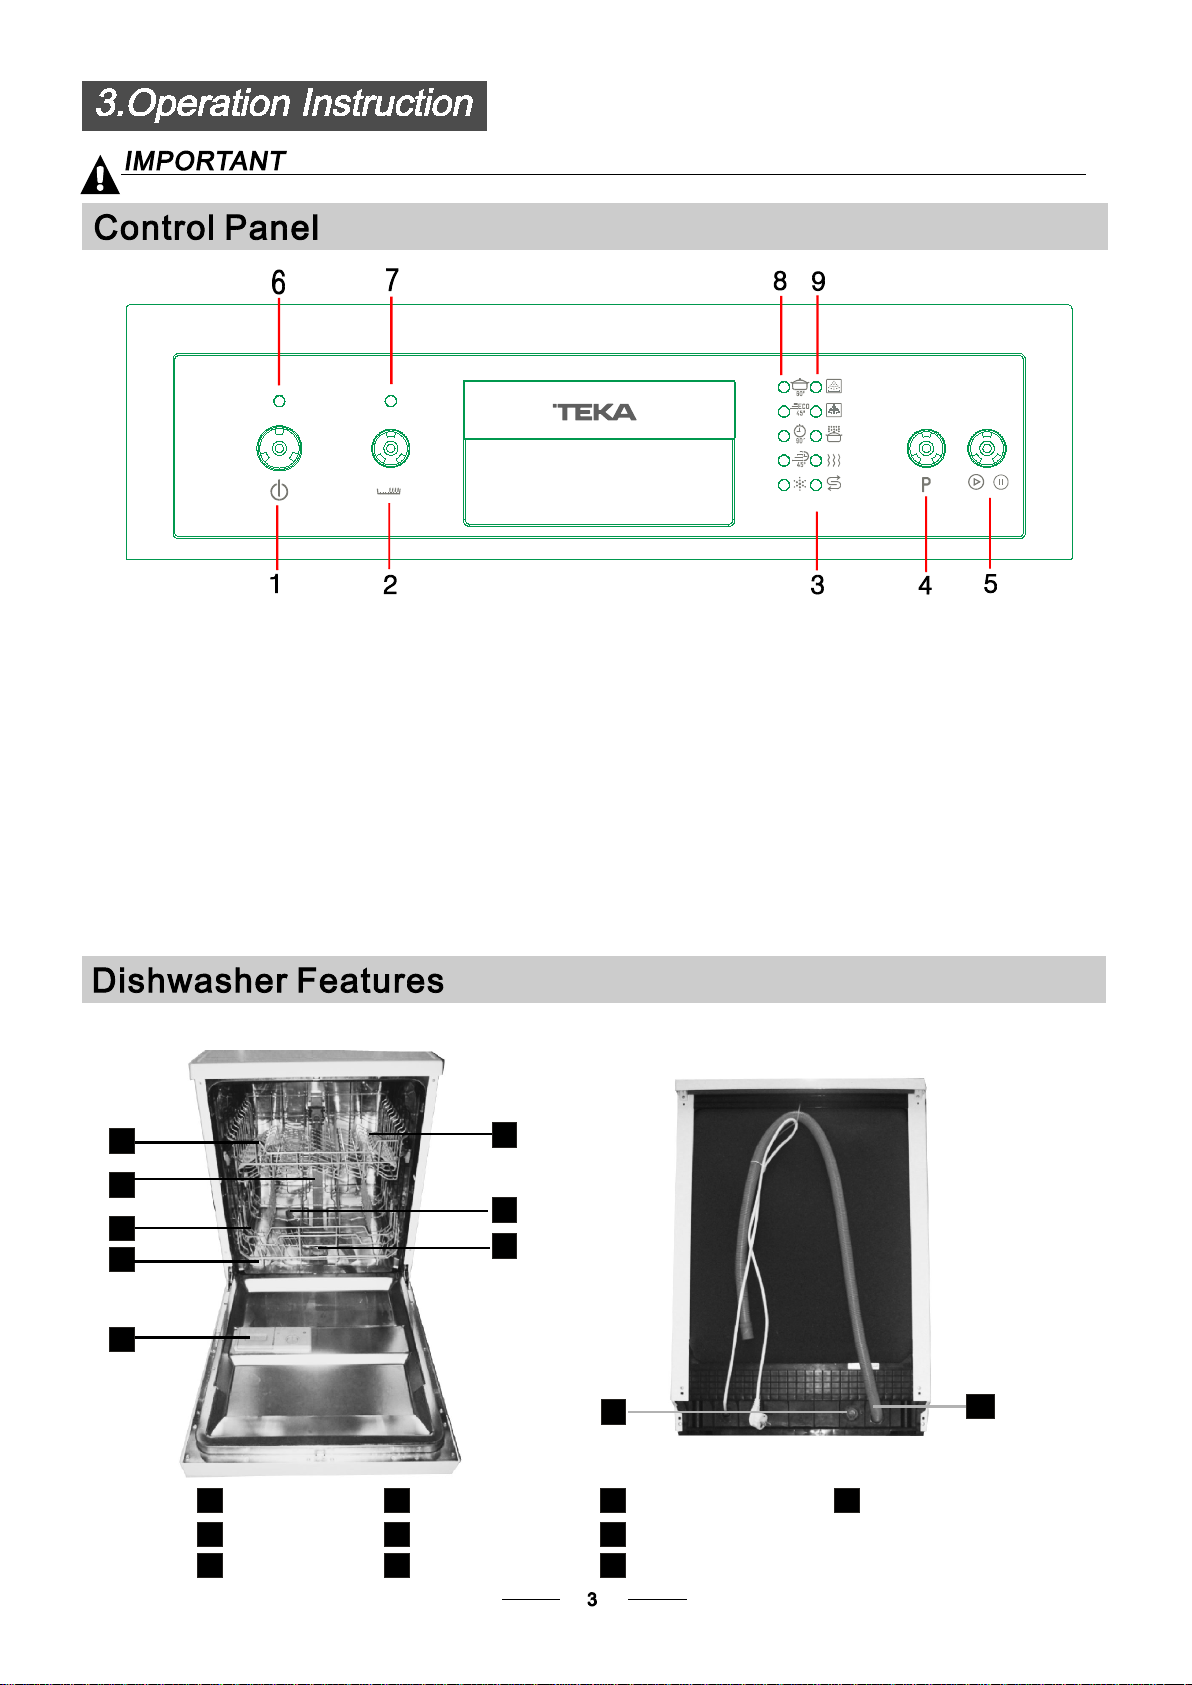
1---O n/O ff B utt on
2---H alf lo ad functions Butto n: To sele ct Half load
function s. (Wi th this Half load f unc tio n you can
only u se it whe n you have only abou t or less th an
6 plac e sett ing dish wave, an d you wil l see less
water an d ener gy consumption , can only be used with
Inten siv e, EC O and 90 min . )
3---Salt an d rins e aid warning li ghts: To show
when t he salt container or disp enser need to be
refil led .
LP8 400
4---Program Button
5 Start /Pause Butt on: To sta rt the se lec ted
---
washi ng p rogram o r paus e the w ashing p rog ram
when t he m achine is work ing .
6---P ower indicato r
7---H alf lo ad indicator
8---P rogr am indicators
9---Washin g step i ndicators
Fron t vie w
1
6
Back Vie w
2
7
3
4
8
5
10
Upper Basket
1
Inner pipe
2
Lower Basket
3
Salt Con ta iner
4
Di spe nser
5
Cu p S he lf
6
9
Spra y a rm s
7
Fi lt e r ass em bly
8
In le t p ipe con necto r
9
10
Drai n p ipe

Before usin g your dishwas her for t he fir st time:
A. Set the wate r soft ener
B. Add 1.5Kg dishwash er salt and the n full fill th e salt co ntainer wi th w ate r
C. Fill t he r inse aid dispens er
D. Fill i n dete rgent
The water soft ener must be set manu ally, usin g the wat er har dnes s dial .
The water soft ener is designed to remov e mineral s and salts from the wate r, whic h would have
a detrime ntal or adverse e ffect o n the operati on o f the appliance.
The high er the co nte nt of the se mine rals and s alt s, the h ard er you r water is.
The softene r should be adjuste d acco rdi ng to the hardnes s of the wat er in your area. Your local Water Aut hority
can advise you on th e hard ness of the water in your ar ea.
Adjusting Salt Consumption
The dish was her is desi gne d to allo w for adj ustment in th e amou nt of sal t cons umed ba sed on the hard nes s of
the wate r used . This is inten ded to optim ise and customise the l evel o f salt c onsumption.
Please foll ow t he steps belo w for adjustment in salt c onsumption.
1. Swit ch o n the appliance;
2. Press the S tart/Pause bu tto n for more than 5 seconds to s tart the water
softener se t model within 6 0seconds after the a ppliance was
switched on ;
3. Press the butto n to select the prop er set according to
your l ocal envi ronm ent, the set s will change in t he fol lowing
sequence : H1->H2->H3->H4->H5->H6;
4. Press the O n/O ff bu tto n or no operation for 5 se conds to end the s et u p model.
Start/Pa use
WATER HA RDNESS
dH
6- 11
18 -22 31-40 22-28 3.1-4 .0
23-3 4 4.1- 6.0
35 -55 61-98 43-69 6.1-9 .8
fH
0~ 90~5 0~ 0.94
10-20
21-3012-1 7 2.1- 3.0
41-60
Clar ke
0~6
7-14
15-2 1
29-4 2
mm ol /l
1.0-2.0
Select or Po sitio n
H1( Ra pi d L ig ht br igh t)
H2(90 Mi n )Ligh t br igh t
H3( Ra pid )、90 M in Ligh t bri ght
H4(ECO )Li gh t b ri gh t
H5(ECO Ra pid L ig ht brig ht)、
H6(ECO 90 M i n Light b right )、
Sa lt con sumpt io n
(gra m/cyc le )
0
9
12
20
30
60
dH =1.25 Clarke =1.7 8 fH= 0.178mmol/l1
DH: German degree
fH: French de gree
Clark: Briti sh d egr ee
The m anufact ory setting: H 3(EN 5024 2)
Conta ct y our loca l water board for informatio n on the har dness of your water suppl y.
If your model does not have any water softener, you may skip this section.
WATER SOFTENER
The hardness of the wate r var ies f rom pl ace to plac e. I f ha rd w ater is used in the dishwas her, depo sits will
form o n the dishes and ut ensils .
The appl iance is equi pped with a spec ial soft ene r that u ses a salt c ont ainer spe cif ical ly d esi gned to eliminate
lime a nd mineral s from the w ater.

Alway s use t he sal t in ten ded for use w ith dish washer.
The salt conta ine r is locat ed ben eath the low er basket a nd s hould be filled a s explained
in the following:
Attention!
Only use sal t speci fic ally desi gned fo r the use in dishw ashers! Every other ty pe of
salt not spec ifi cally des igned for t he use in a dis hwasher, espec ially tab le sal t, wil l
da mag e the water soften e r. In case of dam ages ca use d by the use of unsuit able
salt the manu fac turer d o es n ot give any w a rra nty nor is l iable f or a n y damages caus ed.
Only f ill wit h s a lt jus t befo re star tin g one of t he comple te wash ing pr ograms.
Th is will prevent any grains of salt or salt y wa ter, which may have been spill ed,
re mai ning on th e b o tto m of the mac hin e for a n y peri od of tim e, whi ch may cause
corrosion.
A After the low er basket has be en rem ove d, uns crew and remove the cap fro m the s alt conta i ner.
B Place the end o f the f u nnel (supplie d) into the h o le and intr odu ce about 1 .5kg of dish washer salt.
Full f ill the salt c ont ain e r with water,It is norm al for a small amou nt of wate r to come out of the
C
salt c o ntaine r.
D Aft er fill i ng the con tainer , scre w the cap tightly back c lockwise.
E The salt warni ng light will st op being aft er the salt cont a ine r has been f illed w ith s alt.
F I mmediately afte r filling the salt into the salt container, a washin g prog ram sho uld be started
program Ot herwise the f ilt er system, pu mp o r ot he r im por tant parts of th e m achin e may be damag ed
by sa lty wate r. This is out o f wa rra nty.
).
1. The sal t cont ainer mus t only be refil led w hen th e salt warn ing li ght in th e cont rol panel come s on.
Depen ding on how w ell th e salt dis solves, th e salt wa rni ng light may s til l be on even thoug h the
salt c ontainer is filled .
If there is no salt warning li ght in the co ntrol panel (for so me M ode ls),you can estimat e when to fil l
the salt into t he soften er b y the cycle s that the dish was her h as r un.
2. If there are s pil ls of t he s alt, a soak or a rapi d prog ram shou ld b e run to remove the e xcessive salt.
(We s uggest to use a short


Consider bu yin g uten sils which ar e iden tified as dish washer- proof.
Use a mild dete rge nt that is descr ibe d as 'kin d to dish es'. If necessar y, see k furth er
informat ion from the dete rge nt manufactur ers .
For particu lar it ems, select a pro gra m with as low a te mperature a s poss ible.
To pr eve nt dam age, do not take glass an d cutlery out o f the d ishwash er imm ediately
after the program me has en ded.
Are not suitable Are of limited suitability
Cutle ry w ith wood en, horn ch ina or
mo ther-of-pearl ha ndles
Plast ic items t hat a re n ot heat resistan t
Older cutle ry with glued parts that a re not
temperat ure resistant
Bonde d cutl ery items or dish es
Pewter or copp er items
Cryst al g lass
Steel items su bje ct to rusting
Wood en pla tters
Items made f rom synthet ic fib res
(For b est pe rformance o f the d ishw ash er, follow thes e loading guideline s.
Features an d appearance o f baskets and cutl ery bask ets may vary fr om your model.)
Some t ypes of glasses can become
dull a fte r a large numb er o f washes
Silver and alu minum parts have a
tende ncy to di sco lour durin g wash ing
Glaze d patt ern s may fade if machine
washe d freq uently
Scrap e off any larg e amou nts of left ove r food. Soften remn ant s of burnt food in pans .
It is not nece ssa ry t o rinse the dish es u nde r runni ng w ate r.
Place ob jec ts in the di shwasher in foll owi ng way:
1.Items such as cu ps, glas ses , pots /pans, e tc. ar e face d downward s.
2.Curv ed i tems, or ones wi th r ecesses , shou ld b e loaded asla nt s o that wate r can run off.
3.All u ten sils are stacked se curely and can not t ip o ver.
4.All u ten sils are placed i n the way that the spra y arms can rota te f reely duri ng was hing.
Very small item s shou ld not b e wash ed i n the dishwasher as th ey c ould easil y fall ou t of the bas ket.
Load h ollow items such as cups, gl ass es, pans etc. With t he ope nin g facing down war ds so tha t
water canno t coll ect in the c ont ainer or a dee p base.
Di she s and ite ms of cut lery must n ot lie inside o ne another, or cover each other.
To av oid da mag e to glasses, they m ust not t ouch.
Load large items which are m ost diffic ult to clean into th e lower basket.
The uppe r bask et i s desig ned to hold mor e deli cate and lighter di shw are s uch as gl ass es, coffe e
and tea c ups
Long bla ded knives stored in an upright po sit ion are a poten tial hazar d!
Long and /or sharp items o f cutl ery such as carvi ng kni ves mu st be positioned
horiz ontally in the uppe r bask et.
Pleas e do not o verl oad your d ishwasher. This i s impo rtant for g ood re sults and for
reaso nable consumptio n of energy.
To preve nt w ater dripp ing fr om the upper basket int o the lower basket, we re com men d that you
em pty th e lowe r bask et fir st and then th e upper basket.

The uppe r bask et i s desig ned to hold mor e deli cate
and ligh ter di shware such as glass es, coffee and
tea cups and sauc ers, as well as plat es, sm all bowls
and shal low pa ns (as lo ng as they are not too d irt y).
Posit ion th e dishes and cookware s o that they will
not get m ove d by the spray of water.
Please be remi nded that:
Pots, servi ng bowls, etc, mu st a lways be plac ed t op down.
Deep p ots sh ould be slanted to a llow water to flow o ut.
The Bottom Basket featu res f old ing spik es so t hat larg er or mor e pots and pans c an b e load ed.
We suggest that yo u place larg e items and the most
diff icult to clean items are t o be plac ed into the lower
baske t: su ch as p ots, pans, lids, se rving dishes an d
bowls , as show n in the fig ure below. It is pref era ble to
place servi ng d ishe s and l ids on the s ide of the racks
in order to avoid bl ocking t he r otation of the top spray
arm.
Adjusting the Upper Basket
The heig ht o f the upp er basket c an b e adjusted in or der to
creat e more sp ace fo r large utensils bo th for th e uppe r
/lowe r bask et. The he igh t of the uppe r bask et can be
adjusted b y plac ing the whe els on differ ent height of the
rails. Long it ems, serving c utl ery, sal ad servers and kniv es
should be plac ed on t he shelf so that they d o not obstruct
the rotatio n of the spr ay a r ms. .
Folding back the cup shelives
Fo r bett er s tacking of pots a nd pan s,
the spik es can be folded down as
sh ow i n the p icture r ight.
Folding Spikes of Lower Basket
For better s tacking of po ts a nd pan s,
the spikes can be fo lde d down as
show i n the p icture r ight.
Cutle ry s houl d be plac ed i n the cutlery baske t with the hand les at the b ott om. If the rack has s ide baskets , the
spoons shou ld be loa ded sepa rately into t he a ppropri ate slot s, e special ly l ong utensils s hould be plac ed i n the
horizont al pos itio n at the f ron t of the upp er basket as show n in the picture.
Do not let any item extend through the bottom.
Always load sharp utensils with the sharp
point down!

( )
Me ans: need to fill rin se into the Rinse-A id Dispenser.
Intensive
(*EN 50242 )
90 min
Rapid
For heav ies t soiled crocker y,
and normall y soiled pots
pans dishes etc with dri e d
、
、
on soiling.
Th is is stand ard progr a mme, it is
suit abl e to c lea n n ormally soile d
ta blewa re and i t is the mo st eff icien t
pr ogram me in ter ms of i ts combi ne d
en ergy and wa ter c ons umpti on for
th at type of table w ar e.
For lightly so ile d load s that
do not need ex cel lent drying
efficiency.
A shorter w ash for l igh t ly soil ed
loads and quic k wash.
Pr ewa sh 50
Wash 60
Rinse
Rinse
Rinse 70
Dryin g
Prewash
Was h (45 )
Rinse(65 )
Drying
Was h(65 )
Rinse
Rinse (65 )
Dryin g
Wash (45 )
Ri nse (5 0 )
Ri nse (5 5 )
( ℃)
( ℃)
( ℃)
℃
℃
℃
℃
℃
℃
℃
5/22 g
(1 p iece)
5/22 g
(1 p iece)
27g
(1 p iece)
20g
165
19 0
90
30
*E N 50242 : Thi s programm e is the t est cycle. The informa tio n for comparabil ity te st
in accordan ce w ith EN 50242, as f ollows:
Capac ity : 9 settin g
Posit ion Upper baske t: upper whee ls on r ails
Rinse ai d set ting: 6
PI:0. 49w ;Po:0.45w
1.4
0.75
1.15
0.7
16 .5
9.5
11.5
10
Starting a c ycle wash
Dr aw o ut the lowe r and uppe r bask et, load the dishes and pu sh t hem back .
1
It is comme nde d to lo ad t he lower bask et f irs t, the n the u pper one (see the sec tion entitled
Loadi ng the D ishwash er ).
“ ”
Pour i n the det erg ent (see the sect ion en tit led Salt, Det ergent and Rinse Aid ).
2
Inser t the plug into t he socket. The power sup ply is 220-240 VAC /50 HZ, th e specification
3
“ ”
of the socket i s 10A 250VAC. Ma ke s ure that the water supply i s turned on to full pressure.
Close the door, pr ess the On /Off button, an d the light will t urn on.
4
Tur n the pro gram bu tton , t he w ash p rog ram will be chan ged as follows direct ion:
5
On/Off
Intensive ->ECO->90 min- >Rapid;
If a program i s selected, th e resp ons e ligh t will light. Then press the Start/P aus e button, the
dishw ash er beg ins t o st art .

Premise:
A cycle that is und erw ay can onl y be modifie d if it has o nly been running for a short time. Othe rwi se, the
1
detergent may have already been rele ase d, and the applia nce may h ave a lre ady drained the wash water.
If this i s the cas e, the de ter g ent dispe nse r must b e refille d (s ee t he secti on e n tit led " Load ing the
Detergen t " ).
Pr ess the Star t/Pause butto n
3s then you can ch ang e the program to the desired cycle setti ng (see the section entitle d " Starting a wash
cycle . . ." ) .
, the m ach ine wil l be in standby state, press th e program butt on more than
If you open the do or , the machine will pause. The program light will
during a wash cycle
sto p blinking an d the buzzer will mooing ever y minute unless you close the door . Aft er
you close the door ,th e ma chine will keep on wo rking after 10 seco nds.
If your model ha s broken remember funct ion, the machine will go on to finish the sele c ted
program .after the power cut
A forgotten dish can be added any time before the detergent cup opens.
Press the Start/Pause Button to stop the washing.
1 4
Open the door a little .
2
After the spray arms stop working, you can open the door
3
completely.
When t he wor king cycle has fini shed, the buzzer o f the dishwasher wi ll s ound for 8 sec ond s, then stop. Turn off
the appl ian ce usi ng the Powe r swit ch button, shut o ff t he w ate r supply and o pen the door o f the d ish washer.
Wai t for a few minut es b efore unlo adi ng the dish was her to avoid hand ling the dis hes a nd u tensils wh ile th ey
are stil l hot a nd more suscepti ble to breakag e. They will als o dry better.
Add forgotten dishes.
Close the door
5
Press the , the dishwasher will run
6
after 10 seconds.
Start/Pause Button
Switch Off the Dishwasher
The program li ght is on but is not b linking, only in th is c ase t he p rogramme has e nde d.
1.Switch o ff the dishwasher by press ing th e On/O ff bu tton.
2.Turn off th e wate r tap!
Open the door carefully.
Hot dishes a re sen siti ve t o knocks. The di shes should ther efore be allowed to cool d own around 15 minut es
befor e remo vin g from the app lia nce.
Open t he d ishwash er' s door, leav e it ajar an d wait a few minutes be for e removing the dish es. In th is w ay they
will be cool er and the dryi ng will be impro ved .
Unloading the dishwasher
It is normal that th e dish washer is wet i nside.
Empty the lower basket first and then th e upper one. Thi s will avoid wate r dripping from t he u pper Baske t onto
the dish es i n the low er one.
It is dangerous to open the door when washing,
because the hot water may scald you.

The filter pre ven ts larger r emnants of food or othe r obje cts from ge tti ng inside t he p ump.
The resi due s may blo ck the filter, in t his case th ey m ust be remo ved.
The filter sys tem consist s of a coarse f ilter,a fl at (Main f ilter)
And a mic rofilter(Fine filte r).
1
2
3
2
1
3
Main filter
Food a nd s oil part icles trapped in this f ilter are pulv eri zed by a
speci al j et on the lower spra y arm a nd washed d own to drai n.
Coarse filter
Larger items, suc h as piec es of bones or glas s, t hat coul d block
the drain are t rap ped in the c oars e filt er. To remo ve the it ems
caught by the f ilter, gently s queeze t he t ap o n the top o f this
filte r and lif t out.
Fine filter
This f ilter holds soil and food re sidues in the s ump area and
prevents it fr om b eing deposite d on the d ishe s duri ng w ash cycle.
Filter assembly
The filter efficiently
For best pe rfo rma nce and result s, the filter must b e cleaned regularly. t his reas on, it is a g ood idea to
remove the l arger food pa rti cle s trap ped in the f ilter afte r each wa sh cyc le by rin sing the semi cir cular filter and
cup unde r runn ing wate r. To remo ve the filter d evi ce, pull th e cup han dle in the upward direction.
removes f ood particl es fro m the wash water, allowing it to be rec ycled duri ng the cycle.
For
The dish was her must ne ver be us ed without the f ilt ers.
Impro per re placeme nt o f the filter may reduce the perf ormance level of th e appl ian ce
and dama ge dis hes and u tensils.
2
1
St e p 1 Tu rn t he filter i n anti -clockwise di rec tio n,:
Step 2 l ift t he f ilter a ssy up:
When following this procedure from step1 to step 2, the filter system will be removed;
when following it from Step 2 to Step 1, the filter system will be installed.

Remarks:
- I nsp ect the f ilters for blo cking after every time th e dish washer has been us ed.
- By unscrew ing the c oarse filt er, y ou can remo ve t he filter syste m. Remove any food remna nts an d
clean the filt ers under runn ing water.
The entire filter assembly should be cleaned once a week.
Cleaning the Filter
To cl ean th e coar se filter and the fi ne fil ter, u se a cl eaning b rus h. Rea ssemble the filt er parts as shown in the f igu res
on the last pa ge a nd rei nsert the e ntire assembl y in the d ish washer, p ositioning it in its seat and pres sing downw ard s.
When cleani ng th e fil ters, don 't knock on them . Ot herwise, the filters could be
contorted an d the per formance of th e dishwas her could be decrease d.
The cont rol pa nel can be clea ned by usin g a lightl y dampe ned cl oth .
After clean ing, make sure to dry it thor oug hly.
For the e xte rio r, use a good appl ian ce polish w ax.
Never use shar p obje cts, scouring pa ds or h arsh clean ers on any part of th e dish washer.
Cleaning the Door
To cl ean th e edge aroun d the door, you shou ld u se only a s oft warm, da mp clo th.
To av oid pe netration o f water into t he d oor lock and elec trical comp onents, do not
use a spray cle aner of any kind.
Never use a spray cleaner to clean th e doo r panel as it may dama ge the door lock
and elec tri cal comp one nts.
Abras ive agent s or some p aper towels should no t be used b ecause of the r isk of
scratchi ng or leaving spots on the stainless s teel surface.
Protect Against Freezing
please take fr ost pr otection meas ure s on the dishwasher in winte r. Ever y fter w ash ing cycles,
please oper ate as foll ows
1.Cut off the e lectrical pow er t o the dishwasher.
2.Turn off th e wate r supp ly and discon nec t the w ater inlet pi pe f rom the water valve .
3.Drai n the w ater from the inl et pip e and water valve. (Us e a pan to gather t he w ater )
4.Reconne ct t he water inle t pipe to the wate r valve.
5.Remove the fi lter at the bot tom of the t ub and use a spong e to soak up water in the s ump .
:
If your d ishwas her cann ot w ork b ecause of the ice,
please cont act profession al service pe rso ns.
time a
Cleaning the Spray Arms
It is neces sar y to clean the spray arms regul arly for hard
water chemicals will c log th e spra y arm jet s and bear ing s.
To remove the u pper spray ar m, h old the nut, rotat e the arm
clock wis e to remo ve it.
To remove the l ower spray arm, p ull out t he spray arm upwa rd.
Was h the arms in soapy and warm wa ter and use a so ft brush to
clean th e jets . Repl ace them after ri nsi ng them thoro ugh ly.

After Every Wash
After every wa sh, turn off t he water supp ly t o the
applianc e and lea ve the d oor sl igh tly open so th at
mo ist ure an d odours are not t rapped insi de.
Remove the Plug
Before clea ning or performing mai ntenance, a lways
remove the p lug from th e sock et.
No Solvents or Abrasive Cleaning
To cl ean th e exte rior and rubb er p arts of th e dish wash er,
do not use s olv ents or abrasive cl eaning produc ts.
Only use a cloth with wa rm soapy wate r.
To remov e spot s or stains from the surf ace of the
inter ior, us e a cloth damp ene d with wat er an a little
vineg ar, or a cleaning p rod uct m ade specif ically f or
dishw ash ers.
Posit ion th e appl ian ce in the desi red locatio n. The b ack sh ould rest ag ain st the wall be hin d it, and th e sides,
along the adja cen t cabi nets or walls . The dish washer is eq uipped wi th wat er s uppl y and d rain hoses that can
be posit ion ed eit her to the r igh t or the l eft s ide s to facilitate proper i nst allation.
When not in Use fo r a LongTime
It is recomm end th at y ou run a wash c ycl e with the
dishw ashe r empty and then remove the p lug from th e
socket, turn off the wate r supp ly and leav e the door of
the appl i anc e slightly open. This wi ll help the door
seals to l ast long er a nd prevent odours from fo rming
withi n the appl iance.
Moving the Appliance
If the appl ian ce must be moved, try to k eep it in the
ve rti cal po sition. If ab sol ute ly necessary, it can be
position ed on its back .
Seals
One of the f actors that cause odours t o form in the
dishw ash er is food that remains trapp ed in the seals.
Perio dic clean ing w ith a damp sponge w ill prevent this
from o ccurring.
Once t he appliance i s positioned f or l evel lin g, the he ight of the dishwasher
ma y be a ltered v ia a djustm ent of the screwing leve l of the f eet. In any case,
the appl iance should n ot be inclined more t han 2 .
For personal safety:
Do not use an extension cord or an adapter plug
with this appliance.
Do not, under any circumstances, cut or remove the
earthing
Connection from the power cord.
Please look at the rating label to k now t he r ating volt age an d connect the dis hwas her to th e appr opriate power suppl y.
Use the re quired f use 10 amp, time d ela y fuse o r circ uit br eaker recomme nde d and p rov ide s epa rate circuit serving
only this ap pli anc e.
Ensur e the vol tage and freq uen cy o f the p ower be ing corresponds to
those on the rati ng plate. O nly inse r t the p lug into an electrical so cket which is earthed
prope rly. If t he ele ctrical socket to which the a ppli ance must be connect ed is not
appro priate for the plug , r eplace the sock et, rathe r than using a adaptor s or the lik e as
they c ould cause overh eating a nd burn s.

Conne ct t he col d water suppl y hose to a threaded 3/4(i nch ) conn ector and m ake su re
that it is fast ene d tightly in plac e.
If the water pipes are n ew or have no t been used f or an ext ended period o f time , let the
water run to make sure t hat the water is clear. This pr eca ution is needed t o avoi d the
risk o f the w ater inlet to be blocked and dama ge t he app liance.
Please close t he hydr a nt afte r using .
Inser t the dra in hose into a drain pi pe w ith a minimum d iame ter of 40 mm, or le t it run int o the s ink, ma kin g sure to
avoid be ndi ng or cri mpi ng it. The top o f the hos e must be less th an 1 000mm.
Front
NOTE
The top of the hose
must be less than
1000mm.
Drain pipe
Counter
A
B
φ 40mm
16

How to Drain Excess Water From Hoses
If the sink is 1000 h igher fro m the floo r, the e xcess water in hoses cann ot be d rained d irectly
into t he sin k. It wil l be nece ssar y to drai n exce ss water from hoses in to a bo wl or sui table
containe r that is he ld outside and lower than th e sink .
Water Outlet
Conne ct th e water drain hose. The drain hose must b e corr ectly fitted t o avoi d water leaks.
Ensur e that th e wate r drain hose is not k ink ed or squashe d.
Extension Hose
If you need a drai n hose extension, make su re to use a s imilar d rain hose .
It must be no long er tha n 4 metres; other wise the cleanin g effect o f the d ish washer cou ld be red uce d.
Syphon Connection
The waste conn ection m ust be at a h eig ht less than 1000 mm (m aximum) from t he b ottom of the d ish.
The water drai n hose sh ould be fixed .
The following things should be checked before starting the dishwasher.
The dishwasher is level and fixed properly
1
The inlet valve is open
2
Inlet hose connections are fully tightened and not leaking
3
The wires are tightly connected
4
The power is switched on
5
The inlet and drain hoses are knotted
6
All packing materials and printings should be taken out from the dishwasher
7
Aft er installation, please make sure to keep this manual .
The content of this manual is very help ful to the users.

Fuse blown, or the
circuit breaker acted
Replace fuse or reset circuit breaker. Remove any other
appliances sharing the same circuit with the dishwasher
Power supply is not
turned on
Water pressure is low
Door of dishwasher
not properly closed.
Kink in drain hose
Filter clogged
Kitchen sink clogged
Improper detergent
Spilled rinse-aid
Make sure the dishwasher is turned on and the door is
closed securely.
Make sure the power cord is properly plugged into the
wall socket.
Check that the water supply is connected properly and
the water is turned on.
Make sure to close the door properly and latch it.
Check drain hose.
Check the coarse filter
(see section titled )" Cleaning The Filter "
Check the kitchen sink to make sure it is draining well.
If the problem is the kitchen sink not draining ,you may
need a plumber rather than a serviceman for dishwashers.
Use only the special dishwasher detergent to avoid suds.
If this occurs, open the dishwasher and let suds evaporate.
Add 1 gallon of cold water to the tub. Close and latch the
dishwasher, then select any cycle. Dishwasher will drain
out the water at the first step.Open the door after draining
is stop and check if the suds is disappeared.
Repeat if necessary.
Always wipe up rinse-aid spills immediately.
Detergent with
colourant was used
Hard water minerals
The affected items are
not corrosion resistant.
A programme was not
run after dishwasher
salt was added.
Traces of salt have
gotten into the wash cycle.
The lid of the softer
is loose
A sp ay arm is
r
knocking against
an item in a basket
Items of crockery
are loose in the
wash cabinet
This may be caused
by on-site installation
or the cross-section of
the piping.
Make sure that the detergent is the one without
colourant.
To clean the interior, use a damp sponge with
dishwasher detergent and wear rubber gloves.
Never use any other cleaner than dishwasher
detergent for the risk of foaming or suds.
Always run the quick wash programme .
without any crockery in the dishwasher and
without selecting the Turbo function (if present),
after adding dishwasher salt.
Check the lid .Ensure the fix is fine.
Interrupt the programme, and rearrange the items
which are obstructing the sp ay arm.r
Interrupt the programme,
and rearrange the items of crockery.
This has no influence on the dishwasher function.
if in doubt, contact a suitably qualified plumber.

The dishes were not
loaded correctly.
See notes in " Loading the Dishwasher Baskets ".
The programme was
not powerful enough.
Not enough detergent
was dispensed.
Items are blocking
the path of sp ay arms.r
The filter combination
in the base of wash
cabinet is not clean or
is not correctly fitted.
This may cause
the sp ay arm jets
r
to get blocked.
Combination of soft
water and too much
detergent.
Aluminum utensils
have rubbed against
dishes.
Dishes block
detergent cups.
Improper loading
Too little rinse-aid
Select a more intensive programme.
See" Wash Cycle Table ."
Use more detergent, or change your detergent.
Rearrange the items so that the sp ay can rotate freely.r
Clean and/or fit the filter combination correctly.
Clean the sp ay arm jets. See "Cleaning the Spray
Arms".
Use less detergent if you have soft water and select
a shortest cycle to wash the glassware and to get
them clean.
Use a mild abrasive cleaner to eliminate those marks.
Re-loading the dishes properly.
Load the dishwasher as suggested in the directions.
Increase the amount of rinse-aid/refill the rinse-aid
dispenser.
r
Dishes are removed
too soon
Wrong program
has been selected
Use of cutlery with
a low-quality coating
Do not empty your dishwasher immediately after
washing. Open the door slightly so that the steam can
escape. Begin unloading the dishwasher only once t
he dishes are barely warm to the touch. Empty the low
basket first. This prevents water form dropping off
dishes in the upper basket.
In short program the washing temperature is lower.
This also lowers cleaning performance. Choose
a program with a long washing time.
Water drainage is more difficult with these items.
Cutlery or dishes of this type are not suitable for
washing in the dishwasher.
When some malfunctions come on, the appliance will display error codes to warn you:
The Rapid light flicker fl eet l y
The ECO l i ght flick er f l eetly
The Rapid and 9 0Min light fl icke r flee tl y
Longer inlet time.
Overflow.
Not reaching required temperature.
Faucets is not opened, or water intake is
restricted,or water pressure is too low.
Some element of dishwasher leaks .
Malfunction of heating element.
If overflow occurs, turn off the main water supply before calling a service.
If there is water in the base pan because of an overfill or small leak,
the water should be removed before restarting the dishwasher.

Height : 845mm
Width : 448 mm
Depth : 600mm
(with the doo r closed)
Water pressure: 0.04-1.0MPa
Power supply: see rating label
Capacity: 9 place settings


Technical Data Sheet
Sheet of ho use hol d dishwasher a ccordin g to EU Directi ve 1059/2010:
Ma nufact urer
Type / Descri ption
Stand ard pl ace sett ing s
Energ y efficiency class
Annua l ener gy consumption
Energ y cons umption of the standard clea ning cycle
Power co nsu mption o f off -mode
Power co nsu mption o f left -on mo de
Annua l wate r consumption
Dryin g efficiency cl ass
Stand ard cl eaning cycl e
Program d uration of the stan dard cleaning cycle
Noise le vel
Mo unting
Could be bu ild -in
TEKA
LP8 400 VR01
9
A+
215 kWh
0.75 k Wh
0.45 W
0.49 W
2660 l itre
A
EC O 45℃
190 min
49dB( A) r e 1 pW
Free s tan ding
Yes
Heigh t
Width
Depth (with co nnectors)
Power co nsu mption
Rated volta ge / freque ncy
Wat er pressure (flow pres sure) 0.4-1 0 bar = 0. 04-1 Mpa
NOTE:
A + + + ( hig hest effi cie ncy) to D (low est eff ici ency)
Energ y cons umption 215 kWh pe r year, base d on 280 s tan dard clean ing cycles u sin g cold wate r fill an d
the cons ump tion of the low powe r mode s. Actual e ner gy consump tion will de pend on how the applian ce is used.
Wat er consumptio n 26 60 li tre per year, ba sed on 280 s tan dard cleaning cy cles. Actual wa ter co nsumption
will depe nd on how t he a ppliance is used .
A (h igh est eff iciency) to G (lo wes t efficiency )
This p rog ram is suit abl e for cleaning soil ed nor mally soiled tablew are and that i t is the
mo st e ff icie nt p rogramme in term s of its c ombined en erg y and w ater consumption for
that type of ta bleware .
The devi ce m eets the Europea n stan dards and the directives in the current versi on at delivery:
- LVD 2 014/35/ EU
- EMC2 014/30/EU
- ErP 2009/12 5/EC
“ ”
“ ”
84.5 c m
44.8 c m
60 cm
1760- 210 0W
220 ~240 50 H zV
The abov e valu es hav e been measured i n accordan ce w ith standar ds under specified ope rat ing cond itions.
Resul ts m ay var y great ly a ccordin g to quantit y and pol lution o f the d ishes, w ater hardness,
am ount of dete rge nt, etc.
The manu al i s based on the Europea n Unio n's standar ds a nd rules.


www.teka.com
Asped mos eriatius sit atet hicil et velit
 Loading...