

DW8 70 FI VR01
14 place settings
Alt function
Auto program
Dear Custo mer,
Please car efully read t his manual before u sin g the
dishw ash er, it will help you to use and main tai n the
dishw ash er pr ope rly.
Keep it to ref er to it at a la ter date .
Pass it on to any subsequent owner of the applia nce.
This ma nual contai ns se ctions on safety Instr uct ion s,
Operatin g Ins tru cti ons , Install ati on In struct ions and
Tro ubleshooting Tip s, etc.
Control Pa nel. ......... ...... ... ...... ... ... ... ...... . .. ...... ..3
Dishwasher Fe atu res.... ...... ... ... ... ... ... ...... ..... ...3
A Wat er Softener. ... ............ . ......... ..... . ... ...... ..4、
B Load ing the Salt into th e Soft ener... ... .. ... ......5、
C Fill the Ri nse Aid Dispenser.......... .... ... ........5、
D Funct ion of Deter gent ... ....... ..... .... ... ...... ... ..6、
Atte ntio n bef ore or aft er loadi ng the Dish washer
Baskets....... ......... ...... ... ...... ... ...... ................ 9
Load ing the up per ................. ...... ...... ..1 0Basket
Loading the Lower ..... ... ... ... ... ... ...... ... ..10Ba ske t
To review t he se cti on on t rou blesho oti ng Tips
will help yo u to so lve s ome common pr oblems
by y oursel f .
If you can not s olve the problems by yo urself ,
pleas e ask f or th e hel p of profe ssiona l technicians.
The manufacturer, fo llowing a policy o f co nst ant
developm ent an d upd ati ng of t he produ ct, may
make modif ications without giving prio r notice.
This user ma nual shall also be got from th e
manufacturer or respon sib le ve ndor.
Wash Cyc le Table..... ... .... ..... ....... ............ .......11
Tur ning on the Appl ian ce.... ......... .......... ...... ... 11
Chan ge the Prog ramme. ..... . ... ... . ..... ..... .... ..12....
At the end of th e Wa sh Cycle.. .... ..... ....... .........12
Filt eri ng Syste m. ......... ... ..................... ......... ..1 3
Cari ng for the Dishw ash er..... ... ......... .... .........1 4.
..... .. ... .... ... ......... ... ..... 15Inst all atio n pr epar at ion
...1 6Ae sth etic panel's dimensions and in st all a tio n
.............. 18Tension adjustm ent of the door s pring
....... ......... ... .... ..... .. 18Conne ction of d rain hos es
.............. ......... .. 19Dish washer i nstallati on ste ps
Abou t Electr icit y Connectin g..... ... ......... ..........20
Cold Water Co nnecti on. ......................... ........ 21
Before calli n g for ser vice. .. ....... .. . ...... .. . ..... ... ..22.
Error cod es..... . ........ . ...... ... ...... ... ... .... ...... ....23.
Techni cal i nforma t ion ... ........................... .....24..
When using your dishwasher,
follow the precautions listed below:
This appliance is intended to be used in household
and similar applications such as:
-staff kitchen areas in shops, offices and other
working environments;
-farm houses;
-by clients in hotels, motels and other residential type
environments;
-bed and breakfast type environments.
This appliance can be used by children aged from 8
years and above and persons with reduced physical,
sensory or mental capabilities or lack of experience
and knowledge if they have been given supervision
or instruction concerning use of the appliance in a
safe way and understand the hazards involved.
Children shall not play with the appliance. Cleaning
and user maintenance shall not be made by children
without supervision. For EN60335-1
( )
This appliance is not intended for use by persons
(including children )with reduced physical, sensory
or mental capabilities, or lack of experience and
knowledge ,unless they have been given supervision
or instruction concerning use of the appliance by a
person responsible for their safety. For IEC60335-1
( )
This appliance is for indoor use only, for household
use only.
To protect against the risk of electrical shock, do not
immerse the unit, cord or plug in water or other liquid.
Please unplug before cleaning and maintenance the
appliance .
Use a soft cloth moisten with mild soap, and then use
a dry cloth to wipe it again.

This appliance must be earthed. In the event of a
malfunction or breakdown, earthing will reduce the risk
of anelectric shock by providing a path of least
resistance of electric current. This appliance is equipped
with a cord having an equipment-earthing conductor
and a grounding plug.
The plug must be plugged into an appropriate outlet that
is installed and earthed in accordance with all local
codes and ordinances.
Improper connection of the equipment-earthing
conductor can result in the risk of an electric shock.
Check with a qualified electrician or service
representative if you are in doubt whether the appliance
is properly grounded.
Do not modify the plug provided with the appliance;
If it does not fit the outlet.
Have a proper outlet installed by a qualified electrician.
Do not abuse, sit on, or stand on the door or dish rack of
the dishwasher.
Do not operate your dishwasher unless all enclosure
panels are properly in place.
Open the door very carefully if the dishwasher is
operating, there is a risk of water squirting out.
Do not place any heavy objects on or stand on the door
when it is open. The appliance could tip forward.
When loading items to be washed:
1) Locate sharp items so that they are not likely to
damage the door seal;

2) Warning: Knives and other utensils with sharp points
must be loaded in the basket with their points down or
placed in a horizontal position.
Check that the detergent powder is empty after
completion of the wash cycle.
Do not wash plastic items unless they are marked
dishwasher safe or the equivalent.
For plastic items n
recommendations.
Use only detergent and rinse additives designed for
an automatic dishwasher.
Never use soap, laundry detergent, or hand washing
detergent in your dishwasher.
Children should be supervised to ensure that they do not
play with the appliance.
The door should not be left open, since this could increase
the risk of tripping.
If the supply cord is damaged, it must be replaced by the
manufacturer or its service agent or a similarly qualified
person in order to avoid a hazard.
During installation, the power supply must not be
ot so marked,
check the manufacturer's
excessively or dangerously bent or flattened.
Do not tamper with controls.
The appliance is to be connected to the water mains using
new hose sets and that old hose-sets should not be reused.
The maximum number of place settings to be washed
is 14.
The maximum permissible inlet water pressure is 1MPa.
The minimum permissible inlet water pressure is 0.04MPa.

Dispose of the dishwasher packaging material
correctly.
All packaging materials can be recycled.
Plastic parts are marked with the standard
international abbreviations:
PE for polyethylene, e.g. sheet wrapping material
PS for polystyrene, e.g. padding material
POM polyoxymethylene, e.g. plastic clips
PP polypropylene, e.g. Salt filler
ABS Acrylonitrile Butadiene Styrene, e.g. Control
Panel .
Packaging material could be dangerous for children!
For disposing of package and the appliance please
go to a recycling centre. Therefore cut off the power
supply cable and make the door closing device
unusable.
Cardboard packaging is manufactured from recycled
paper and should be disposed in the waste paper
collection for recycling.
By ensuring this product is disposed of correctly, you
will help prevent potential negative consequences
for the environment and human health, which could
otherwise be caused by inappropriate waste handling
of this product.
For more detailed information about recycling of this
product, please contact your local city office and your
household waste disposal service.
DISPOSAL: Do not dispose this product as unsorted
municipal waste. Collection of such waste separately
for special treatment is necessary.
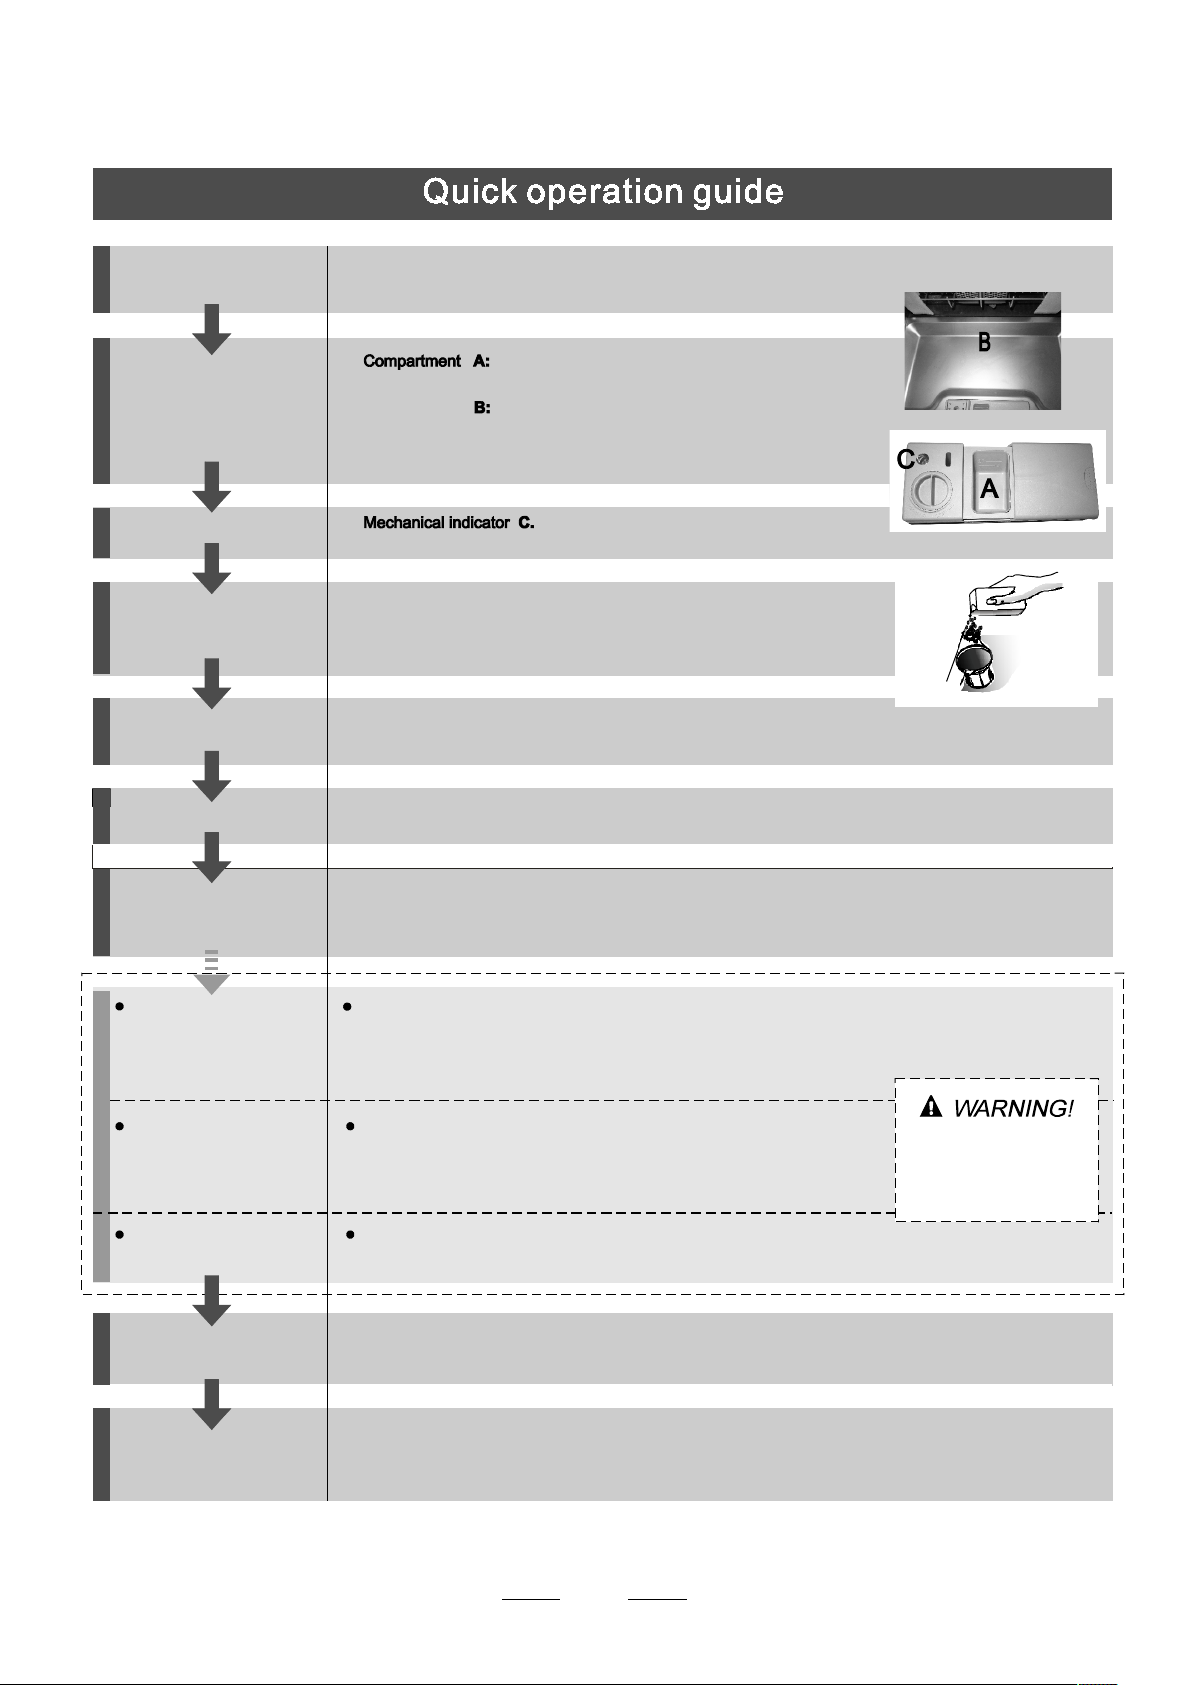
For d etailed operating m ethod read the corresponding content on the inst ruct ion manual.
Switch on the appliance Open the door,press the On/Off button to switch on the appliance .
With each wash cycle.
Fill the detergent dispenser
Compartment
For programmes with pre-wash only.
(Follow the user instructions!)
Check the rinse aid level
Check the regeneration
salt level
Load the baskets
Select a programme
Changing the programme
Electric indicator on control panel (if provided).
(On models with water softener system only.)
Electric indicator on control panel (if provided).
If there is no salt warning light in the control panel
(for some models), you can estimate when to fill the salt into
the softener by the number of cycles the dishwasher has run.
Scrape off any large amount of leftover food. Soften remnants of burnt food in pans,
then load the baskets. Refer to the dishwasher loading instructions.
Press the Programme Button until the selected programme lights up.
( See the section entitled Operation instruction )“ ”
T urn on the water tap ,close the door . The machine will start working after about 10 seconds.Running the dishwasher
1. A running cycle can only be modified if it has been running for a short time. Otherwise the detergent
may have already been released and the water already drained. If this is the case, the detergent
dispenser must be refilled.
2. Press the for more than 3 seconds to cancel the running programme.
3. Select a new programme.
4. Restart the dishwasher.
Programme Button
Add forgotten dishes in the
dishwasher.
If the appliance is switched
off during a wash cycle.
Switch off the appliance
Turn off the water tap,
unload the baskets
1.Open the door a little to stop the dishwasher.
2.After the spray arms stop working, you can open the door completely.
3.Add the forgotten dishes.
4.Close the door, the dishwasher will start running again after 10 seconds.
If the appliance is switched off during a wash cycle, when switched
on again, please re-select the washing cycle and operate the dishwasher
according to the original Power-on state ).
When the working cycle has finished, the buzzer of the
dishwasher will sound 8 times, then stop.
Turn off the appliance using the On/Off Button.
Warning: wait a few minutes (about 15 minutes) before unloading the dishwasher to avoid handling
the dishes and utensils while they are still hot and more susceptible to break.
They will also dry better.Unload the appliance, starting from the lower basket.
Op en the do or car efu ll y.
Ho t stea m ma y escape
wh en the do or is op ened!
2
To get the best performance from your dis hwasher, read al l operating instruct ion s
be fore using it for the first time.
Alt
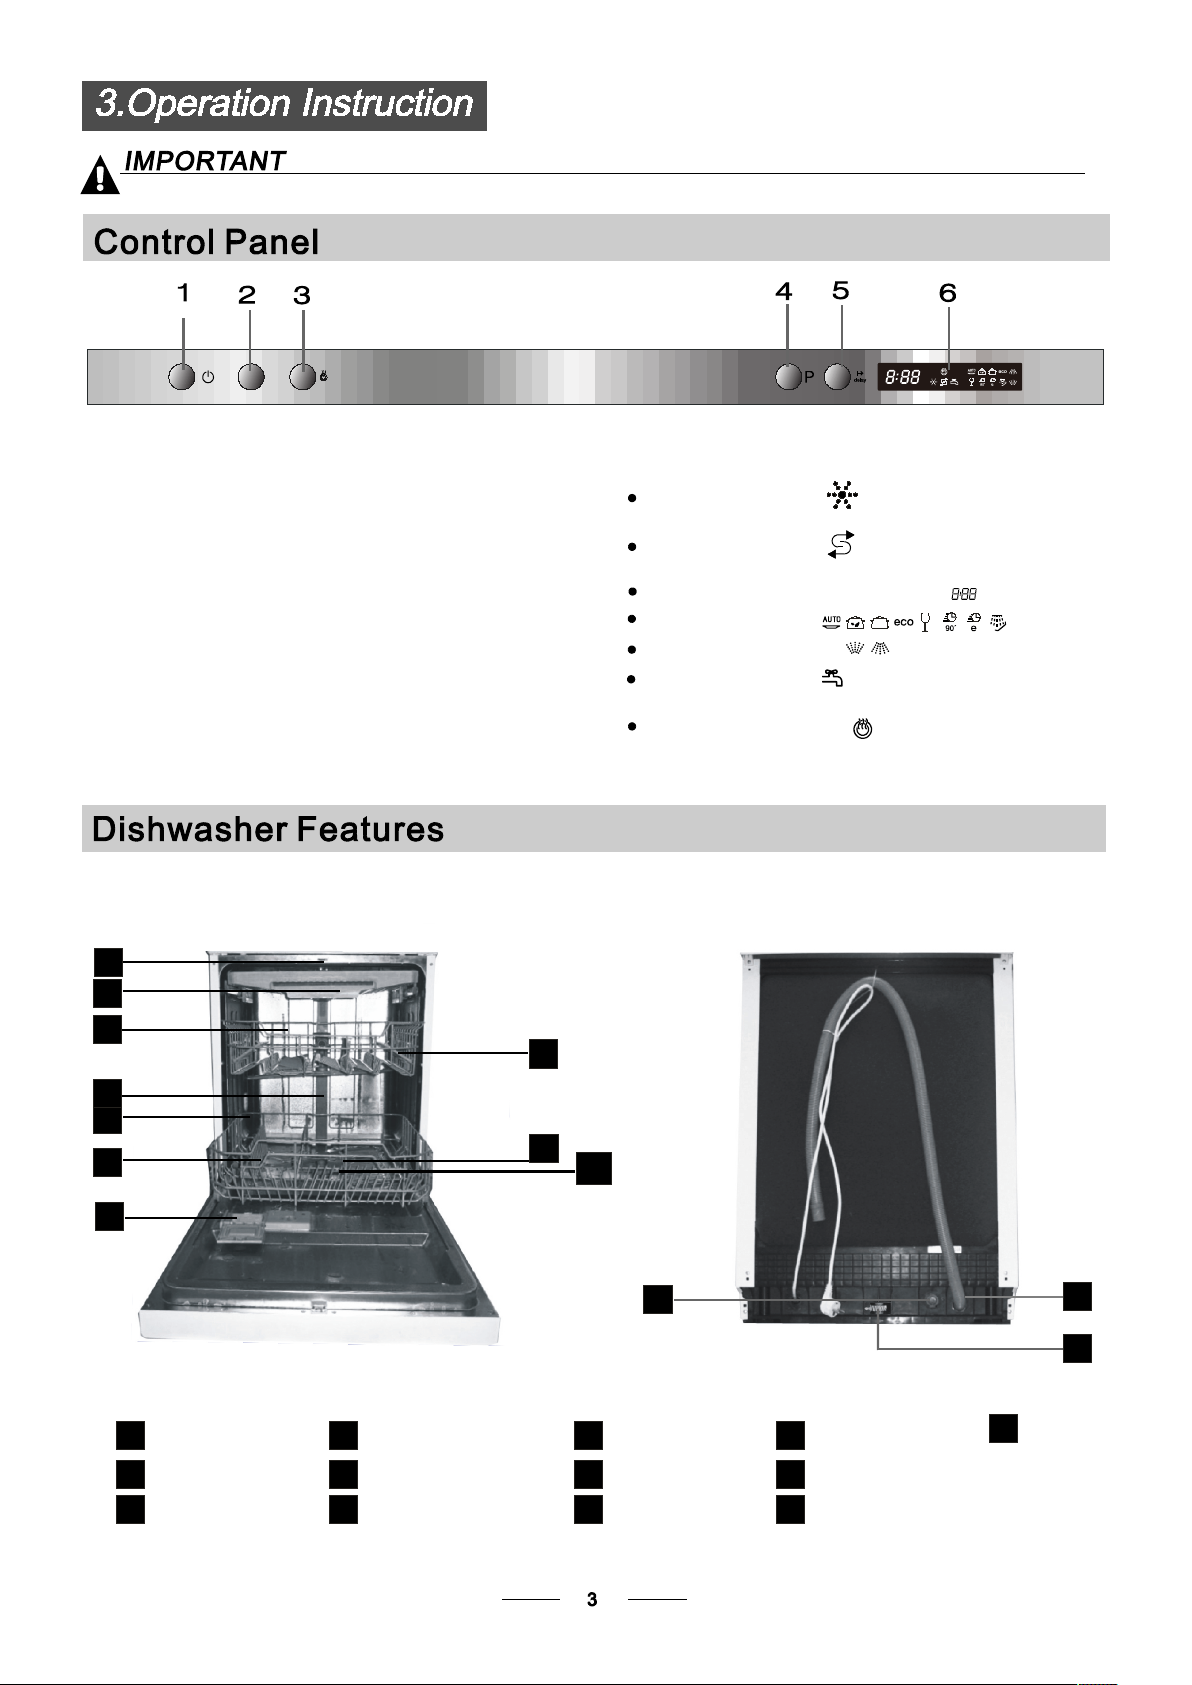
1.On/Off But ton : To tur n on/off the power s upp ly.
2. Alt Button: Dua l zon e wash functi on, pres s the
butto n to se lec t either u pper bas ket o r low er ba ske t
loade d.
3.Extra dryin g Button:
Extra drying can be us e when choose Inte nsive
Normal Eco Glass 1ho ur.
4.Program Button : To Press the b utt on to s ele ct a
wa sh Progr am.
5.Delay Button : To Press the button to delay.
and the response indicator will l ight.
Front view
1
2
3
6. Display screen: to show the erro r cod e,d ela y tim e etc .
Rinse Aid indica tor :
Indicates when the disp ens er ne eds t o be re fil led .
Add salt indica tor :
Indicates when the disp ens er ne eds t o be re fil led .
Delay time or error codes indi cator:
Program indic ators:
Alt functions indicat or:
Infall Warning Ligh t :
Being on Wh en fa uce ts is n ot op ene d.
Extra drying indic ators:
Back View
8
4
5
6
7
1
2
3
Top spray arm
Cutlery rack
Upper basket
Inner pipe
4
Lower basket
5
Salt container
6
9
10
11
12
13
Adjuster
Dispe nser
7
Cup shelf
8
Spray arms
9
Filte r ass embly
10
11
Inlet pipe conn ector
12
Drain p ipe
13

Before using your dishwash er fo r the f irs t tim e:
A. Set the water softener
B. Add 1 .5Kg dis hwasher salt and then full fill the salt container w ith water
C. Fill the rin se ai d dis penser
D. Fill in detergent
The water softe ner must be set manuall y, us ing the water hard ness dial.
The water softe ner is des igned to r emo ve mi ner als a nd salts from the water, which would have
a detrimen tal or advers e effect on the operation of the applianc e.
The higher t he co ntent of thes e min era ls an d salts, t he ha rde r you r wat er is.
The soften er shoul d be adjus ted a cco rdi ng to t he ha rdn ess of the w ate r in your ar ea. Your local Wate r Auth ority
can adv ise you on the hardness o f the water in yo ur ar ea.
Adjusting Salt Consumption
The dishwasher is designed t o all ow fo r adj ustmen t in th e amo unt of sal t con sumed based on the hard ness of
the water used. Thi s is in ten ded t o opt imise and customise the level o f salt consumption.
Please fol low the st eps belo w for a dju stm ent i n sal t con sum ption.
1. Open the door ,Switch on the appli anc e;
2. Press the Program button fo r mor e than 5 sec ond s to st art t he wa ter s oft ene r
set model withi n 60s eco nds a fte r the a ppl iance was swi tched on( The S alt and
Rinse aid wa rni ngligh ts wi ll be on per iod ically when it get in the set model );
3. Press the Program button to s elect th e pro per set accor din g to your lo cal envi ronment,
the sets will change i n the f oll owi ng se que nce : H1- >H2 ->H 3->H4->H5->H6 ;
4. Press the Power button to end the set up mo del.
WATER HAR DN ESS
dH
6- 11
18-2 2 31-40 22-2 8 3.1 -4 .0
23-3 4 4.1 -6.0 30
35-5 5 61-98 43-6 9 6.1 -9 .8
fH
0~90~5 0~0. 94 0
10-20
21- 3012-17 2.1- 3.0 12
41- 60
Clar ke
0~6
7-14
15-2 1
29-4 2
mm ol /l
1.0- 2. 0 9
Select or Po sit io n
H1
H2
H3
H4
H5
H6
Sa lt consumpti on
(gra m/ cycle )
20
60
dH =1.25 Clar ke =1.7 8 fH=0.178mmol/l1
dH: German deg ree
fH: Fren ch degree
Clark: Bri tish degree
The manuf act ory s etting : H 4 (E N 5024 2)
Contact your local w ater boa rd for inf orm ati on on the ha rdn ess of you r wat er supply.
If your model d oes not have any water softener, you may skip this section.
WATER SOFTENER
The hardne ss of the water varies fr om pl ace t o pla ce. I f hard w ater is us ed in the d ish washer, depos its w ill
form on the di she s and utensils.
The applia nce is equipped with a speci al so ftener t hat uses a salt conta iner sp ecifically designe d to eliminate
lime an d minerals from the wat er.
4
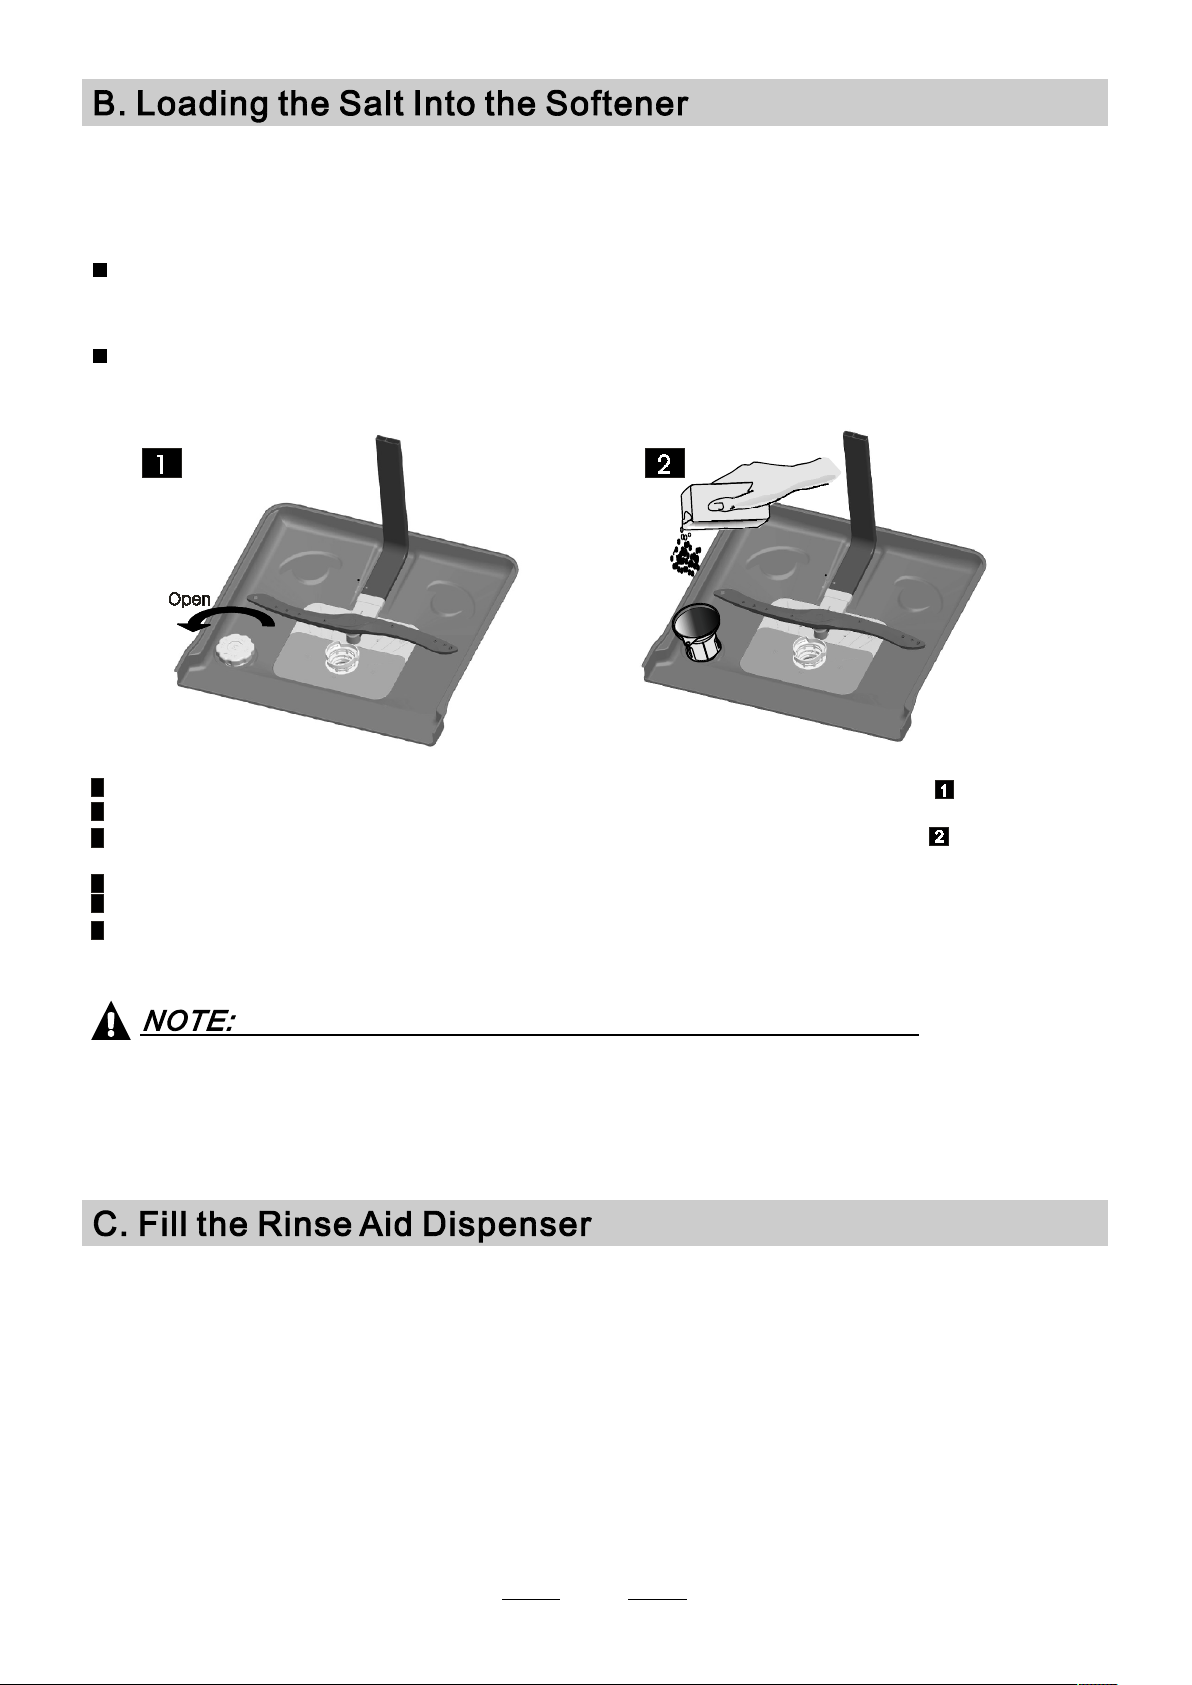
Alway s use the salt in ten ded for us e wit h dis hwasher.
The sal t con tai ner i s loc ate d ben eat h the lowe r basket and shoul d be filled as explained
in the following:
Attention!
Only us e sal t spe cifica lly desi gned for the use in di shwashers! E ve ry other ty pe of
salt not spe cif ica lly designe d for the use in a dishwasher, especi all y tab le salt, w ill
da mag e the wate r soften er. In case of dam ages caused by the use of un suitable
salt th e man ufactu rer d oes not give any warranty nor is liabl e for a ny dam ages ca u sed .
Only fill with sa lt ju st befor e starting one of th e comple te wa shing progra ms.
Th is wi ll pr event an y grains of salt or salty water, which may hav e been spi lled,
re mai nin g on the bottom of the mach ine for an y period of tim e, wh ich may cause
corrosion.
A After the lower basket has been removed, unscr ew and rem ove t he ca p fro m the s alt c ontainer.
B Place the end of the funn el (s upplie d) into the hole and intr odu ce abo ut 1.5kg of dishwashe r sal t.
Full fill the salt container wi th water,It is nor m al for a sm a ll amou nt of water to come out o f the
C
salt conta ine r.
D After filling th e con tainer , scre w the cap tight ly bac k clo ck wis e.
E T he salt wa rni n g li g ht will st op being af ter the salt conta iner has been fill ed with salt.
F Imm ediate ly af ter filling the salt into th e sal t con tainer, a wash ing program shoul d be started
progr am Ot herwise the filter system, pu mp or other important pa rts of the m achine may be d ama ged
by s alty water. This is out of warranty.
).
1. The salt container must only be refilled when the salt warni ng li ght in the c ontrol p anel co mes on .
Depending on how well the salt dissolves, the salt warning light may still be on ev en thoug h the
salt contain er is filled.
If there is n o sal t warn ing l igh t in th e con trol pan el (f or some Model s),you can estimate w hen to fil l
the salt in to th e softener by the cyc les that the dishw asher has run.
2. If there are sp ill s of the s alt , a soak or a ra pid p rog ram s hou ld be r un to r emo ve th e excessive salt.
(We su ggest to use a short
Rinse Aid Dispenser
Th e ri nse aid is release d during th e final ri nse t o prevent wat er fr om fo rmin g droplets on your dishes, whic h can
le av e spo ts an d s tre aks . It al so im proves dry i ng by allowing wat er to roll off t he dishes . Your di shwas her is
de signe d to use l iquid ri nse a ids. The rinse aid dis penser is l ocated insi de the doo r ne xt to th e det erg ent dispens er.
To fill the di sp e nse r, open the cap and pour the r inse aid into t he dispense r until th e level in dic ator turns com plete l y
bl ac k . The vol ume of the rinse aid cont ain er is about 110ml.
Function of Rinse Aid
Rinse aid is a uto ma t ically adde d dur ing the la st ri nse , ens uri ng th orough rinsing, and spot an d str eak free dryi ng.
Attention!
Only use branded rin se aid for d ishwas her. Neve r fill the rinse aid dispenser with any o ther substance s
(e.g. Dishwas her cleani ng age nt, liqu id de tergen t). This would damage the appli anc e.
5
 Loading...