


User Manual
DW8 41 FI VR01
EN
www.teka.com
A Water Softener.......... ....... .. ........... ........... ..6、
Dear C ustomer,
Plea se care full y read t his manua l before usin g the
dish washer, it will he lp you to use a nd maintain the
dish washer proper ly.
Keep i t to ref er to it at a later d at e.
Pass i t on to any sub sequent o wn er of the appli ance.
This m anual contain s section s on safety Instr uctions,
Operat ing Instruc tions, In st allation In structions an d
Tro ubleshoot ing Tips, etc.
Contro l Panel......... ....... .... ........... .. ........... .......5
Dish wa sher Fe at ures.......... ............. ........... .. ...5
B Loading the Sal t into the Softener............ .. ...7、
C Fill the Rinse Aid Dispenser.... .. ........... ........7、
D Fu nction of D eter ge nt ........ ................. ....... .8、
Atte nt ion before or aft er loading the Di shwasher
Basket s.......... .. ......... .. ........... .. ........... ......... 11
Loadin g th e up per Bas ket. .. ..... .... .. ........... .. ....12
Load in g the Lower Bas ke t.......... .... ......... .... ....12
To review the section on tr oubleshooti ng Tips
will h elp you to solve some common problems
by y ourself .
If you can not solve th e pr ob lems by yourself ,
plea se ask for the help o f professiona l technicia ns.
The ma nu factu re r, following a p ol icy of constant
develo pment a nd updating of the product, may
make mod ifica tions without g iv ing prior notice.
This u ser man ual shall also be got from th e
manufa cture r or respon si ble vendor.
Wash Cycle Table............................ ....... ........13
Tur ning on the Appl iance...... .. ........... .. ......... ..13
Chan ge the Programm e..... ..... ........... ........... ..14
At the e nd o f the Wa sh Cyc le....... .... ..... .. .... ..... 14
Filterin g Syst em.. ...... ....... ...... ....... .... .. ........... 15
Caring for the Di shwasher...... .. ........... ............1 6
.... ...... ....... .... .. ....... .... 1 7Installation prep aratio n
Aesthe tic panel's d imen sions and i nstall ation...1 8
.... ..........2 0Tension a djus tment of th e door s pring
........ ...................... 20Con nection of drain ho ses
......................... 21Dishwa sher i nstallati on steps
About Electr icity C onne cting................. ..........2 2
Cold Water Conne ctio n............ ........... ....... .... 23
Before c alli ng for serv ice......... .... ......... .... ....... 24
Error codes............... ..... .... ......... .. ................2 5
Technical in formati on........... .. ........... .. ..... ......26

When using your dishwasher,
follow the precautions listed below:
This appliance is intended to be used in household
and similar applications such as:
-staff kitchen areas in shops, offices and other
working environments;
-farm houses;
-by clients in hotels, motels and other residential type
environments;
-bed and breakfast type environments.
This appliance can be used by children aged from 8
years and above and persons with reduced physical,
sensory or mental capabilities or lack of experience
and knowledge if they have been given supervision
or instruction concerning use of the appliance in a
safe way and understand the hazards involved.
Children shall not play with the appliance. Cleaning
and user maintenance shall not be made by children
without supervision. For EN60335-1
( )
This appliance is not intended for use by persons
(including children )with reduced physical, sensory
or mental capabilities, or lack of experience and
knowledge ,unless they have been given supervision
or instruction concerning use of the appliance by a
person responsible for their safety. For IEC60335-1
( )
This appliance is for indoor use only, for household
use only.
To protect against the risk of electrical shock, do not
immerse the unit, cord or plug in water or other liquid.
Please unplug before cleaning and maintenance the
appliance .
Use a soft cloth moisten with mild soap, and then use
a dry cloth to wipe it again.

This appliance must be earthed. In the event of a
malfunction or breakdown, earthing will reduce the risk
of anelectric shock by providing a path of least
resistance of electric current. This appliance is equipped
with a cord having an equipment-earthing conductor
and a grounding plug.
The plug must be plugged into an appropriate outlet that
is installed and earthed in accordance with all local
codes and ordinances.
Improper connection of the equipment-earthing
conductor can result in the risk of an electric shock.
Check with a qualified electrician or service
representative if you are in doubt whether the appliance
is properly grounded.
Do not modify the plug provided with the appliance;
If it does not fit the outlet.
Have a proper outlet installed by a qualified electrician.
Do not abuse, sit on, or stand on the door or dish rack of
the dishwasher.
Do not operate your dishwasher unless all enclosure
panels are properly in place.
Open the door very carefully if the dishwasher is
operating, there is a risk of water squirting out.
Do not place any heavy objects on or stand on the door
when it is open. The appliance could tip forward.
When loading items to be washed:
1) Locate sharp items so that they are not likely to
damage the door seal;

2) Warning: Knives and other utensils with sharp points
must be loaded in the basket with their points down or
placed in a horizontal position.
Check that the detergent powder is empty after
completion of the wash cycle.
Do not wash plastic items unless they are marked
dishwasher safe or the equivalent.
For plastic items n
recommendations.
Use only detergent and rinse additives designed for
an automatic dishwasher.
Never use soap, laundry detergent, or hand washing
detergent in your dishwasher.
Children should be supervised to ensure that they do not
play with the appliance.
The door should not be left open, since this could increase
the risk of tripping.
If the supply cord is damaged, it must be replaced by the
manufacturer or its service agent or a similarly qualified
person in order to avoid a hazard.
During installation, the power supply must not be
ot so marked,
check the manufacturer's
excessively or dangerously bent or flattened.
Do not tamper with controls.
The appliance is to be connected to the water mains using
new hose sets and that old hose-sets should not be reused.
The maximum number of place settings to be washed
is 10.
The maximum permissible inlet water pressure is 1MPa.
The minimum permissible inlet water pressure is 0.04MPa.

Dispose of the dishwasher packaging material
correctly.
All packaging materials can be recycled.
Plastic parts are marked with the standard
international abbreviations:
PE for polyethylene, e.g. sheet wrapping material
PS for polystyrene, e.g. padding material
POM polyoxymethylene, e.g. plastic clips
PP polypropylene, e.g. Salt filler
ABS Acrylonitrile Butadiene Styrene, e.g. Control
Panel .
Packaging material could be dangerous for children!
For disposing of package and the appliance please
go to a recycling centre. Therefore cut off the power
supply cable and make the door closing device
unusable.
Cardboard packaging is manufactured from recycled
paper and should be disposed in the waste paper
collection for recycling.
By ensuring this product is disposed of correctly, you
will help prevent potential negative consequences
for the environment and human health, which could
otherwise be caused by inappropriate waste handling
of this product.
For more detailed information about recycling of this
product, please contact your local city office and your
household waste disposal service.
DISPOSAL: Do not dispose this product as unsorted
municipal waste. Collection of such waste separately
for special treatment is necessary.


To get the best pe rformanc e from your dis hwasher, read all o perating i nstructions
be fore using it for the first time.
1.Ha lf loa d indictato rs: To show Half load funct io ns starting
up o r no t.
2.Ri ns e aid war ning lights: To be on when di sp enser need
to be refi ll ed.
3.Sa lt warning lights : To be on w hen the salt cont ai ner
need t o be r efilled.
4.Ha lf loa d func tions Button: To select Hal f load function s.
(With th is Half load function you c an o nl y use it when you
have onl y ab out or less tha n6 place setting dish wave,
and you wi ll see less water a nd energy consump tion ,
can only b e used withInte nsive, Normal , ECO,Glass and
90 Min .)
5. Extra dry ing ind icator s:To show Ext ra d ry ing funct ions
star ti ng up or not.
6. Exp ress wash i ndic ators:To show Exp ress wash functio ns
star ti ng up or not.
Fron t view
1
7. E xtra washing indicators:To show Extra was hing
fu nction s starting up or not.
Function butto n( only Intensive, Normal, E CO ,
8.
Glass have this f un ction).
9.De la y Button : To Pr ess the button to del ay.
10.D is play screen : to s how the remindi ng time
(del ay time ).
11.Program in dicator s: t o sh ow which prog ra m
yo u have chose.
12.P ro gram But ton : To Pre ss the button to se lect
appr opriate Program .
13.On/ Off Bu tton: To turn on/off the power su pply.
Back View
2
3
4
5
6
Cup shel f
1
2
Inne r pi pe
3
Lowe r basket
4
Salt con tainer
5
Disp enser
6
8
7
9
10
Cutl er y rack
7
Spra y ar ms
8
Filt er assembly
9
Inle t pi pe connector
10
Drai n pipeUppe r basket
11
11

Befo re u si ng your dishw as her for the first t ime:
A. Set the wat er softener
B. Add 1.5Kg di shwasher salt a nd then full fill the sal t container w ith water
C. Fill th e ri nse aid dispe nser
D. Fill in det ergent
The wa ter softener mu st be set manuall y, usin g th e water hardnes s di al.
The wa ter softener is des igned to remove m inerals and s alts from the w ater, which wo ul d have
a detrim ental or advers e effe ct o n the operati on o f the appliance .
The hi gh er the content of t hese minera ls a nd salts, the har der your water is.
The so ft ener should b e ad justed accord ing to the hardne ss of the water in yo ur area. Your local Water Author ity
can ad vise you on the hardn ess of the water in y our area.
Adjusting Salt Consumption
The di shwasher is des igned to allow fo r ad justment in the a mount of salt c onsumed based on th e ha rdness of
the wa ter used. This is inten ded to optimise a nd c ustomise the le vel o f salt consum ption.
Plea se f ollow the steps bel ow for adjust ment in salt cons um ption.
1. Open the door , Sw itch on the appli ance;
2. Press the Pro gr am button for m or e than 5 seconds to start the water soft ener
set mo del with in 60seconds afte r the appliance w as switched on( The Sal t an d
Rins e ai d warning li ghts will be on per io dically whe n it get in the set model ) ;
3. Press the Pro gr am button to se lect the proper set a cc ording to y ou r local environ ment,
the se ts will chang e in the followin g sequence: H3 H4 H5 H6 H1 H 2 H3;
4. Press the Power b utton to end the se t up model.
→ → → → → →
WATE R HA RDNESS
dH
6- 11
18-22 31-40 22-28 3.1- 4.0
23-34 4.1-6.0 3 0
35-55
fH
0~90~5 0~0.94 0
10 -2 0
21-3012-17 2.1-3.0 1 2
41-60
61- 98
Cl arke
0~ 6
7- 14
15-21
29-42
43-69
mmol/l
1.0-2.0
6.1-9.8
Selector Posi ti on
H1
H2
H3
H4
H5
H6
Salt c onsumptio n
(gram/c yc le )
9
20
60
dH =1.2 5 Cl ar ke=1.78 fH=0.178mmol/l1
DH: Germ an deg re e
fH: Fren ch d egree
Clark: British de gr ee
The manufa ctory setting : H3 (EN 50242)
Cont ac t your local water boar d for in formation on the hardne ss o f yo ur water supply.
If your model does not have any water softener, you may skip this section .
WATER SO FTENER
The ha rd ness of t he w ater var ies from pl ac e to place. If hard water is used in the d ishwasher, dep osits wil l
form o n the dishes and utensils.
The ap pliance i s equipped with a speci al softener tha t uses a salt c on tainer specific ally design ed to elimi nate
lime a nd minerals f rom the water.
4
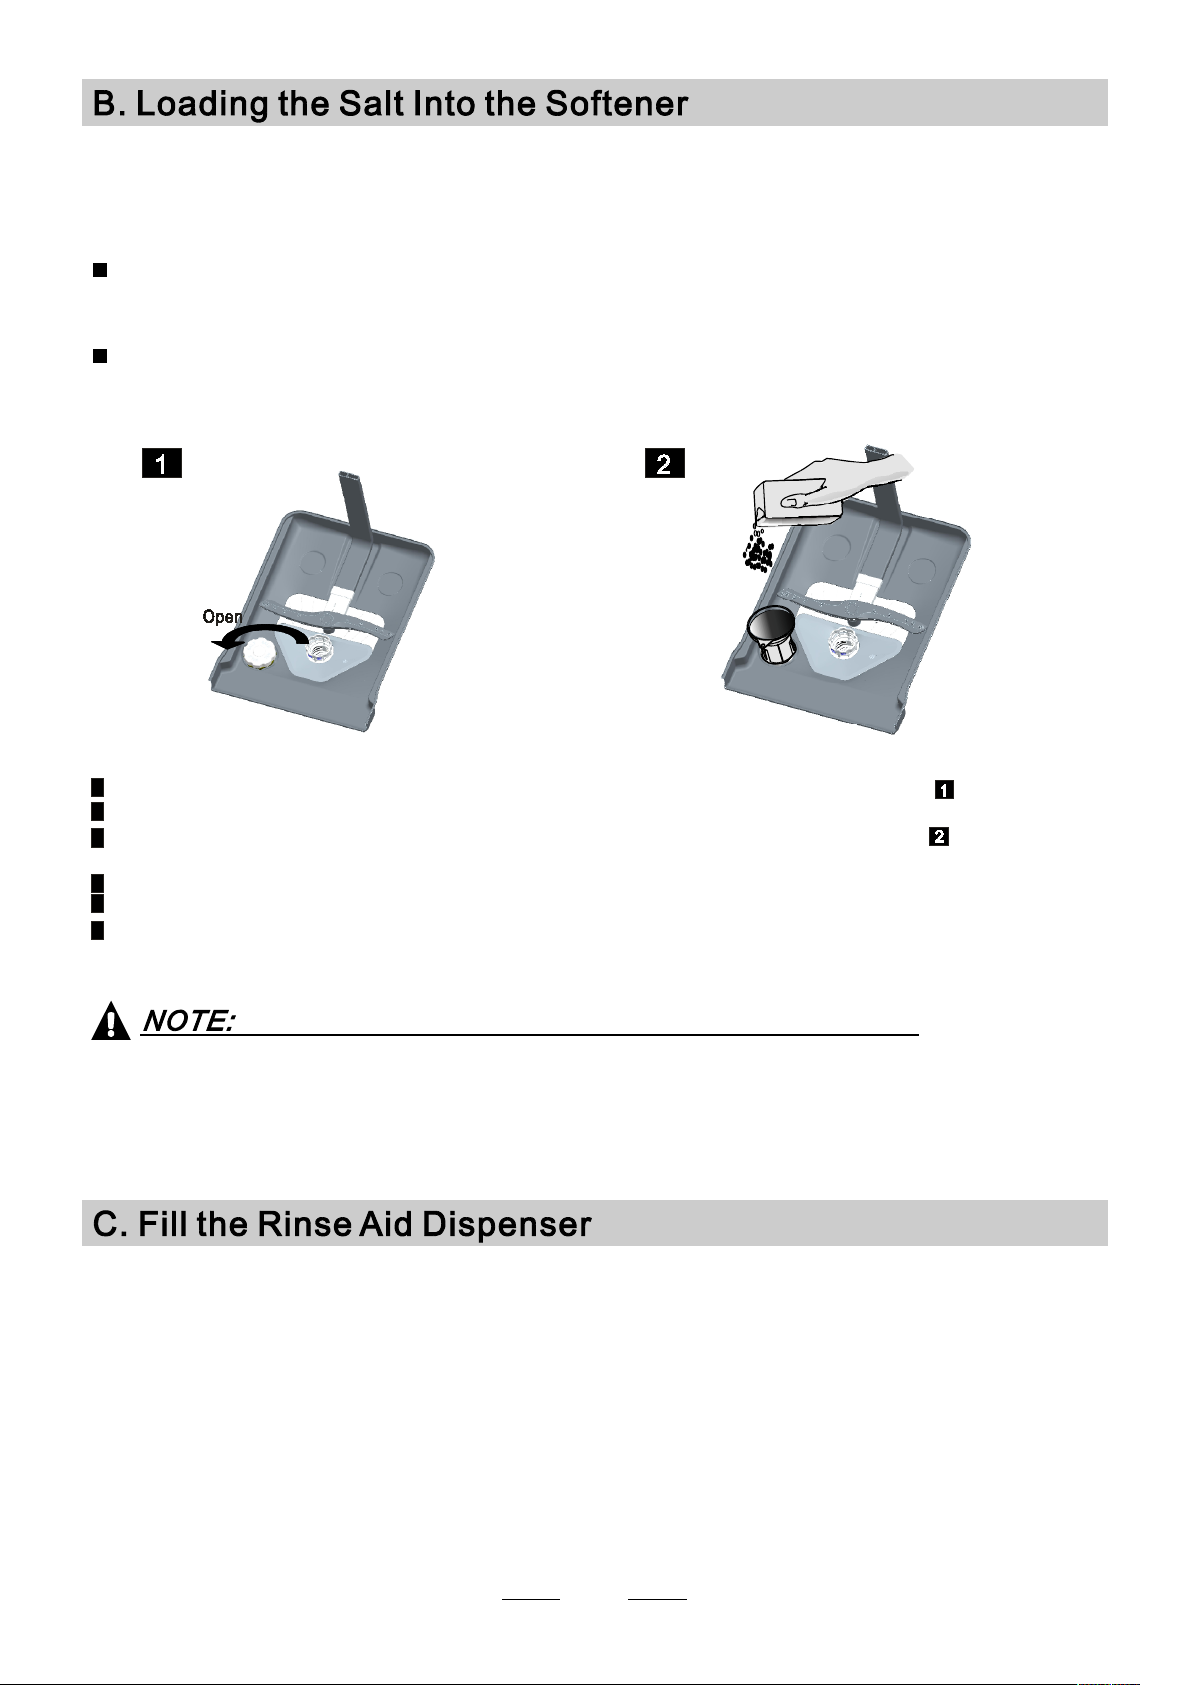
Alwa ys use the salt inten ded f or use wit h dishwas he r.
The sa lt container is l oc ated beneath the lower baske t and should be f il led as expl aine d
in the f ollow ing:
Attention!
Only use salt speci fi cally desig ned for the use in dishwashers ! Every other typ e of
salt not spec ifically desi gned for the us e in a d is hwasher, e sp ec ially table sal t, will
da mage the wate r so ft en er. In cas e of dam ages caused by th e us e of un suit ab le
salt the ma nu facturer do es not give any w arranty nor is liable for a ny dama ges ca used.
Only f il l with salt j ust be fore st ar ting one of the c omplete washing p rograms.
Th is will prevent any grains of sa lt or salt y water, which may have b ee n sp illed,
re ma ining on th e bo ttom of the machine for an y pe ri od of tim e, whi ch may cause
corr osion.
A Af ter the low er b aske t has been removed, unsc rew and remove th e ca p from the salt c onta iner.
B Place the en d of t he funnel (supplied) into the ho le and int roduce ab out 1. 5kg of dish washer salt .
Full fil l the s alt cont ai ner wit h wate r,It is norm al for a small amount of w ater to come out of the
C
salt container.
D After filli ng the cont ai ne r , scre w the cap t ightly back clock wise.
E The salt warni ng light will stop being after th e sa lt container ha s been fill ed with salt.
F Immediately af ter filling the salt i nt o th e sa lt contai ner, a washing program should be st ar ted (We suggest t o us e a short
program) . Other wi se the filter s ys tem, p ump or other im portant par ts of the mach ine may be damaged
by s alty water. This is out o f wa rranty.
1. The salt contai ner mus t on ly be refi lled when the sal t warning lig ht i n th e control panel com es o n.
Depe nding on how we ll t he salt dissolv es, the salt warn ing light may still b e on even though th e
salt c ontainer is fil led.
If the re is no s al t warning light in the c ontrol panel (for s ome Models),you c an e stimate when to f il l
the sa lt int o the softe ner by the cycl es t hat the dishw as her has run.
2. If there are spills o f the sal t, a soak or a rapid prog ra m should be run to re move the excessiv e sa lt.
Rinse Aid Dispenser
Th e ri nse ai d is released during t he fin al rinse to p revent w ater from f orming drop lets on yo ur dish es, wh ich can
le av e spots an d streaks . It also impro ve s drying by allowing wa ter to roll off the d ishes. Your dis hwas he r is
de si gned to use liqui d rinse aids. The rin se a id dis pense r is l ocated insi de the door next to the deterg ent di sp enser.
To fill th e di sp enser, open the ca p and pou r the ri nse aid into the dispenser unt il the level indicator turns com pletely
bl ac k. The vol um e of the rins e ai d container is ab out 110ml .
Function of Rinse Aid
Rins e aid is automa ti ca lly added dur ing th e last rins e, ensuring thorough rinsing , an d spot and st re ak free drying.
Attention!
Only u se branded ri nse aid for dishwas her. Never fil l th e rinse aid dispe nser with any o th er substanc es
(e.g . Di shwasher clea ni ng agent, liq uid detergent ). This would damage th e ap pliance .
5
 Loading...