


User Manual
DW1 455 FI VR01
EN
www.teka.com
Dear C ustomer,
Please careful ly read this manu al b efore usin g the
dishw ash er, it will help you to use and mai ntain t he
dishw ash er properly.
Keep i t as a ref er in the late r days .
Pass i t on to any sub sequent owner of the app liance.
This m anu al contain s sections on sa fet y Instruc tio ns,
Operatin g Instruct ion s, Install ation Inst ruc tions and
Tro uble sho oti ng Tip s, e tc.
To review the section on troub les hoo ting Tips
will h e lp you to s olve some common p roblems
by yo urself .
If yo u can not so lve th e prob lems by yo urself ,
pleas e ask for th e help of profess ion al tech nicians.
Control Pane l... ....... ......... . ......... ....... ......... . .. ...3
Dishwash er F eatu res.... ............. .......... ... ... . .. ...3
A Water Softener........ . ...... .... ............ . ... ........4、
B Load ing t he Sal t into th e Softener. ... ...... ....... 5、
C Fill the Rins e A id Di spenser... ... ...... . ... .........5、
D Funct ion of Deter gen t ........ ... ... ....... ... ... ......6、
Atte ntio n before o r after loadi ng the Di shwasher
Baskets . ... ... ...... . ... ... ...... . ... ............. ............. ..9
Loading the up per ........ ............. ... ....... 10Basket
Loading the Lo wer ........ ... ... ....... ...... ....10Basket
Wash Cycle Tab le..... .... ......... .... ... ...... .... ... .....11
Turning on the Appliance... . ... ...... ...... .... ... ... ...11
Chang e the P rogram me.. ... ....... .. ..... ...... .....12.. ..
At the end of the Wash Cycle.. ... . ............... .... ..12
Filt erin g System..... .... ......... .... ......... .... ......... .13
Caring for the Dishwasher.... ... .......... .... ........ .14.
The manu fac tur e r, following a pol icy of con sta nt
developm ent and up dating o f the p roduct, may
make modi ficatio ns with out giving prior notice.
..... .. .... ......... .... ......... . 15Inst alla tion preparation
...1 6Aesth etic panel 's dimensions an d installatio n
.. ....... .. ...1 8Tensi on adj ustm ent of th e doo r spring
.... ... . ... ...... .... ... ...... 18Conne ction of drai n hose s
.. ......... .... ......... . 19D is hwasher in s tal lation s teps
Abou t El ectric ity Conn ect ing... .... ............. .......20
Cold Water Connect ion. ......... .... .... .. .... ......... . 21
Before call ing for serv ice.... ... ....... ... ....... ... .. ...23.
Error codes. ... ............. ....... ......... ... . ...... ... ....24.
Techni cal infor mation.. ...... ... ... .......... .... .. .... .25..
When using your dishwasher,
follow the precautions listed below:
This appliance is intended to be used in household
and similar applications such as:
-staff kitchen areas in shops, offices and other
working environments;
-farm houses;
-by clients in hotels, motels and other residential type
environments;
-bed and breakfast type environments.
This appliance can be used by children aged from 8
years and above and persons with reduced physical,
sensory or mental capabilities or lack of experience
and knowledge if they have been given supervision
or instruction concerning use of the appliance in a
safe way and understand the hazards involved.
Children shall not play with the appliance. Cleaning
and user maintenance shall not be made by children
without supervision. For EN60335-1
( )
This appliance is not intended for use by persons
(including children )with reduced physical, sensory
or mental capabilities, or lack of experience and
knowledge ,unless they have been given supervision
or instruction concerning use of the appliance by a
person responsible for their safety. For IEC60335-1
( )
This appliance is for indoor use only, for household
use only.
To protect against the risk of electrical shock, do not
immerse the unit, cord or plug in water or other liquid.
Please unplug before cleaning and maintenance the
appliance .
Use a soft cloth moisten with mild soap, and then use
a dry cloth to wipe it again.

This appliance must be earthed. In the event of a
malfunction or breakdown, earthing will reduce the risk
of anelectric shock by providing a path of least
resistance of electric current. This appliance is equipped
with a cord having an equipment-earthing conductor
and a grounding plug.
The plug must be plugged into an appropriate outlet that
is installed and earthed in accordance with all local
codes and ordinances.
Improper connection of the equipment-earthing
conductor can result in the risk of an electric shock.
Check with a qualified electrician or service
representative if you are in doubt whether the appliance
is properly grounded.
Do not modify the plug provided with the appliance;
If it does not fit the outlet.
Have a proper outlet installed by a qualified electrician.
Do not abuse, sit on, or stand on the door or dish rack of
the dishwasher.
Do not operate your dishwasher unless all enclosure
panels are properly in place.
Open the door very carefully if the dishwasher is
operating, there is a risk of water squirting out.
Do not place any heavy objects on or stand on the door
when it is open. The appliance could tip forward.
When loading items to be washed:
1) Locate sharp items so that they are not likely to
damage the door seal;

2) Warning: Knives and other utensils with sharp points
must be loaded in the basket with their points down or
placed in a horizontal position.
Check that the detergent powder is empty after
completion of the wash cycle.
Do not wash plastic items unless they are marked
dishwasher safe or the equivalent.
For plastic items n
recommendations.
Use only detergent and rinse additives designed for
an automatic dishwasher.
Never use soap, laundry detergent, or hand washing
detergent in your dishwasher.
Children should be supervised to ensure that they do not
play with the appliance.
The door should not be left open, since this could increase
the risk of tripping.
If the supply cord is damaged, it must be replaced by the
manufacturer or its service agent or a similarly qualified
person in order to avoid a hazard.
During installation, the power supply must not be
ot so marked,
check the manufacturer's
excessively or dangerously bent or flattened.
Do not tamper with controls.
The appliance is to be connected to the water mains using
new hose sets and that old hose-sets should not be reused.
The maximum number of place settings to be washed
is 10.
The maximum permissible inlet water pressure is 1MPa.
The minimum permissible inlet water pressure is 0.04MPa.

Dispose of the dishwasher packaging material
correctly.
All packaging materials can be recycled.
Plastic parts are marked with the standard
international abbreviations:
PE for polyethylene, e.g. sheet wrapping material
PS for polystyrene, e.g. padding material
POM polyoxymethylene, e.g. plastic clips
PP polypropylene, e.g. Salt filler
ABS Acrylonitrile Butadiene Styrene, e.g. Control
Panel .
Packaging material could be dangerous for children!
For disposing of package and the appliance please
go to a recycling centre. Therefore cut off the power
supply cable and make the door closing device
unusable.
Cardboard packaging is manufactured from recycled
paper and should be disposed in the waste paper
collection for recycling.
By ensuring this product is disposed of correctly, you
will help prevent potential negative consequences
for the environment and human health, which could
otherwise be caused by inappropriate waste handling
of this product.
For more detailed information about recycling of this
product, please contact your local city office and your
household waste disposal service.
DISPOSAL: Do not dispose this product as unsorted
municipal waste. Collection of such waste separately
for special treatment is necessary.

For detaile d operating method read the corresponding content on the instructi on manual.
Switch on the appliance Open the door,press the On/Off button to switch on the appliance .
With each wash cycle.
Fill the detergent dispenser
Compartment
For programmes with pre-wash only.
(Follow the user instructions!)
Check the rinse aid level
Check the regeneration
salt level
Load the baskets
Select a programme
Changing the programme
Electric indicator on control panel (if provided).
(On models with water softener system only.)
Electric indicator on control panel (if provided).
If there is no salt warning light in the control panel
(for some models), you can estimate when to fill the salt into
the softener by the number of cycles the dishwasher has run.
Scrape off any large amount of leftover food. Soften remnants of burnt food in pans,
then load the baskets. Refer to the dishwasher loading instructions.
Press the Programme Button until the selected programme lights up.
( See the section entitled Operation instruction )“ ”
T urn on the water tap ,close the door . The machine will start working after about 10 seconds.Running the dishwasher
1. A running cycle can only be modified if it has been running for a short time. Otherwise the detergent
may have already been released and the water already drained. If this is the case, the detergent
dispenser must be refilled.
2. Open the door.
3. Press the Programme Button for more than 3 seconds to cancel the running programme.
4. Select a new programme.
5. Restart the dishwasher.
Add forgotten dishes in the
dishwasher.
If the appliance is switched
off during a wash cycle.
Switch off the appliance
Turn off the water tap,
unload the baskets
1.Open the door a little to stop the dishwasher.
2.After the spray arms stop working, you can open the door completely.
3.Add the forgotten dishes.
4.Close the door, the dishwasher will start running again after 10 seconds.
If the appliance is switched off during a wash cycle, when switched
on again, please re-select the washing cycle and operate the dishwasher
according to the original Power-on state ).
When the working cycle has finished, the buzzer of the
dishwasher will sound 8 times, then stop.
Turn off the appliance using the On/Off Button.
Warning: wait a few minutes (about 15 minutes) before unloading the dishwasher to avoid handling
the dishes and utensils while they are still hot and more susceptible to break.
They will also dry better.Unload the appliance, starting from the lower basket.
Op en the doo r car efu ll y.
Ho t stea m may escape
wh en the doo r i s o pened !
2
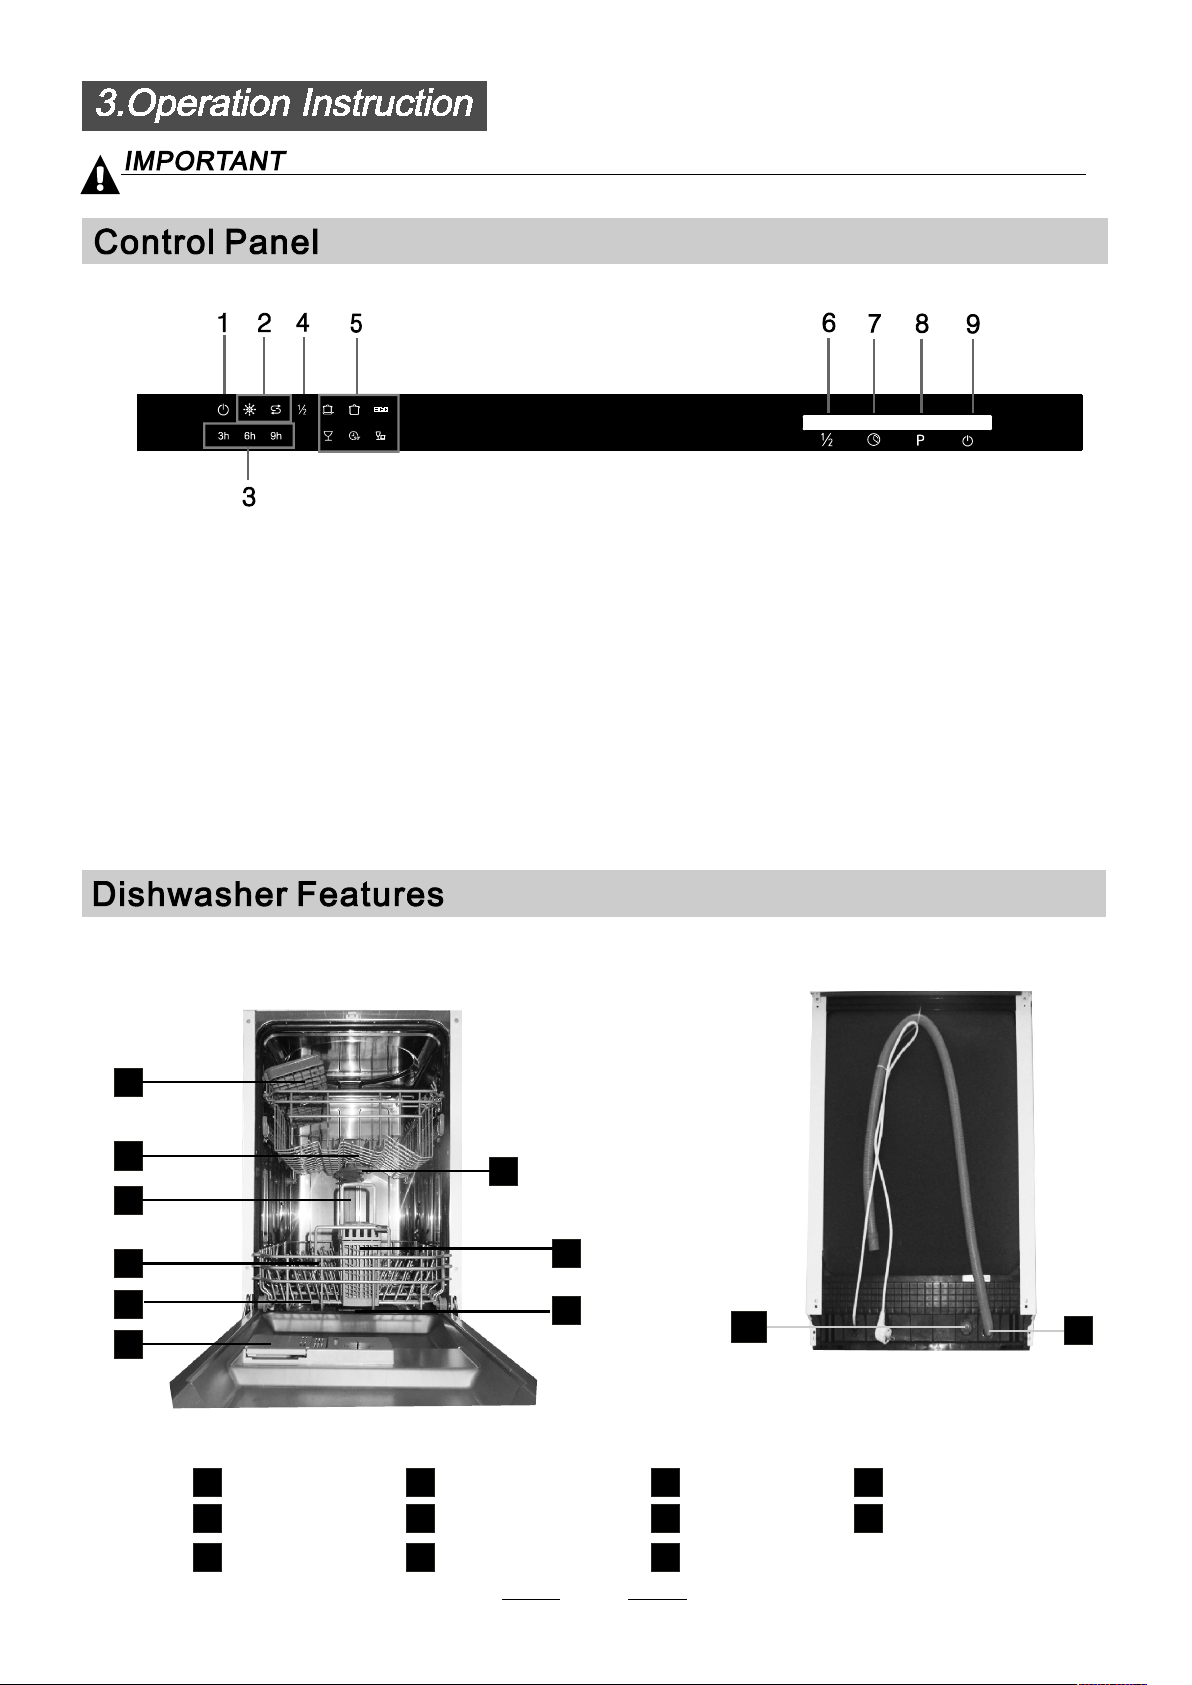
To get th e best pe rformance from your dishwasher, read al l ope rating in structions
be fore usin g it for the f irst time.
1.Power i ndicato r: To show wh en the po wer on.
2.Sal t and rinse aid warning li ghts: To s how
when th e salt cont ainer or dispenser nee d to be
refi lled
3.Del ay i ndicato rs: to sh ow t he delay tim e
(3h/6 h/9 h/ )
4.Haf t load indi cat or : To sh ow w hen y ou sele ct the
haft l oa d fu nct ion .
5.Program in dicato rs: to show whi ch program
you hav e chose ;
Front view
Front view
1
6.Hal f load f unc tion s Butt on: To select Half load
funct ion s. (With this Half l oad function you can
only u se it whe n you have only abou t or less than
5 p lac e sett ing dish wa ve, and you wil l see less
wa ter an d ener gy consumptio n , can only be used
wi th I ntensive, N ormal, E co, Glass and 1 Hour . )
7.Del ay B utton : To Pr ess the b utton to delay.
8. Progr am B utton : To Pr ess the b utt on to select a
wa sh P rogram.
9.On/Off Button: To turn on/off the power supp ly.
Back View
Back View
2
3
4
5
6
Cup shelf
1
2
Inner pipe
3
Lower ba ske t
4
Salt c ont ainer
5
Dispe nse r
6
8
7
9
10
Cutle ry r ack
7
Spray arms
8
Filte r asse mbly
9
3
Inlet pipe c onnector
10
Drain pipeUpper ba ske t
11
11

Before usin g your dishwas her for t he fir st time:
A. Set the water softene r
B. Add 1. 5Kg dish was her salt and t hen fu ll fil l the sal t containe r with water
C. Fill the rins e aid dis penser
D. Fill in deterge nt
The water soft ener must be set manu ally, usin g the wat er har dnes s dial .
The water soft ener is designed to remov e mineral s and salts from the wate r, whic h would have
a detrime ntal or adverse e ffect o n the operati on o f the appliance.
The high er the co nte nt of the se mine rals and s alt s, the h ard er you r water is.
The softene r should be adjuste d acco rdi ng to the hardnes s of the wat er in your area. Your local Water Aut hority
can advise you on th e hard ness of the water in your ar ea.
Adjusting Salt Consumption
The dish was her is desi gne d to allo w for adj ustment in th e amou nt of sal t cons umed ba sed on the hard nes s of
the wate r used . This is inten ded to optim ise and customise the l evel o f salt c onsumption.
Please foll ow t he steps belo w for adjustment in salt c onsumption.
1. Open the door ,Swit ch on the appl ian ce;
2. Press the P rogram butt on for more than 5 se conds to start the wate r soft ener
set mode l wit hin 60se con ds aft er the appl iance was swit ched on( The Sal t and
Rinse ai d warn inglights w ill be on periodi cal ly when it get in the s et m ode l );
3. Press the P rogram butt on to select t he p roper set a cco rding to your local en vir onment,
the sets wi ll c han ge in the f oll owi ng sequenc e: H1- >H2 ->H3 ->H 4-> H5->H6;
4. Press the P owe r button to end t he set up mode l.
WATER HA RDNESS
dH
6- 11
18-22 31-40 22-28 3.1 -4. 0
23-3 4 4.1 -6.0 H5 (G lass Rap id)、 50 30
35-55 61-98 43-69 6.1 -9. 8
fH
0~ 90~5 0~0. 94
10-20
21-3012-1 7 2.1- 3.0
41-60
Clar ke
0~6
7-14
15-2 1
29-4 2
mm ol /l
1.0- 2. 0 H2(90 Mi n) 20 60
Selector Pos ition
H1( Ra pi d )
H3( Rapid )、90 M in
H4(Glass )
H6(Glass 9 0 Mi n)、
Sa lt con sumpt io n
(gra m/cyc le )
0 /
30 50
40
60
Auto nomy
(cyc le s/1 kgs)
40
20
dH =1.25 Clarke =1.7 8 fH= 0.178mmol/l1
DH: Ger man deg ree
fH: French de gree
Clark: Briti sh d egr ee
The m anufact ory setting: H 3 (EN 5 0242 )
Conta ct y our loca l water board for informatio n on the har dness of your water suppl y.
If your model does not h ave any wa t e r softener, you may skip this section.
WATER SOFTENER
The hardness of the wate r var ies f rom pl ace to plac e. I f ha rd w ater is used in the dishwas her, depo sits will
form o n the dishes and ut ensils .
The appl iance is equi pped with a spec ial soft ene r that u ses a salt c ont ainer spe cif ical ly d esi gned to eliminate
lime a nd mineral s from the w ater.
4
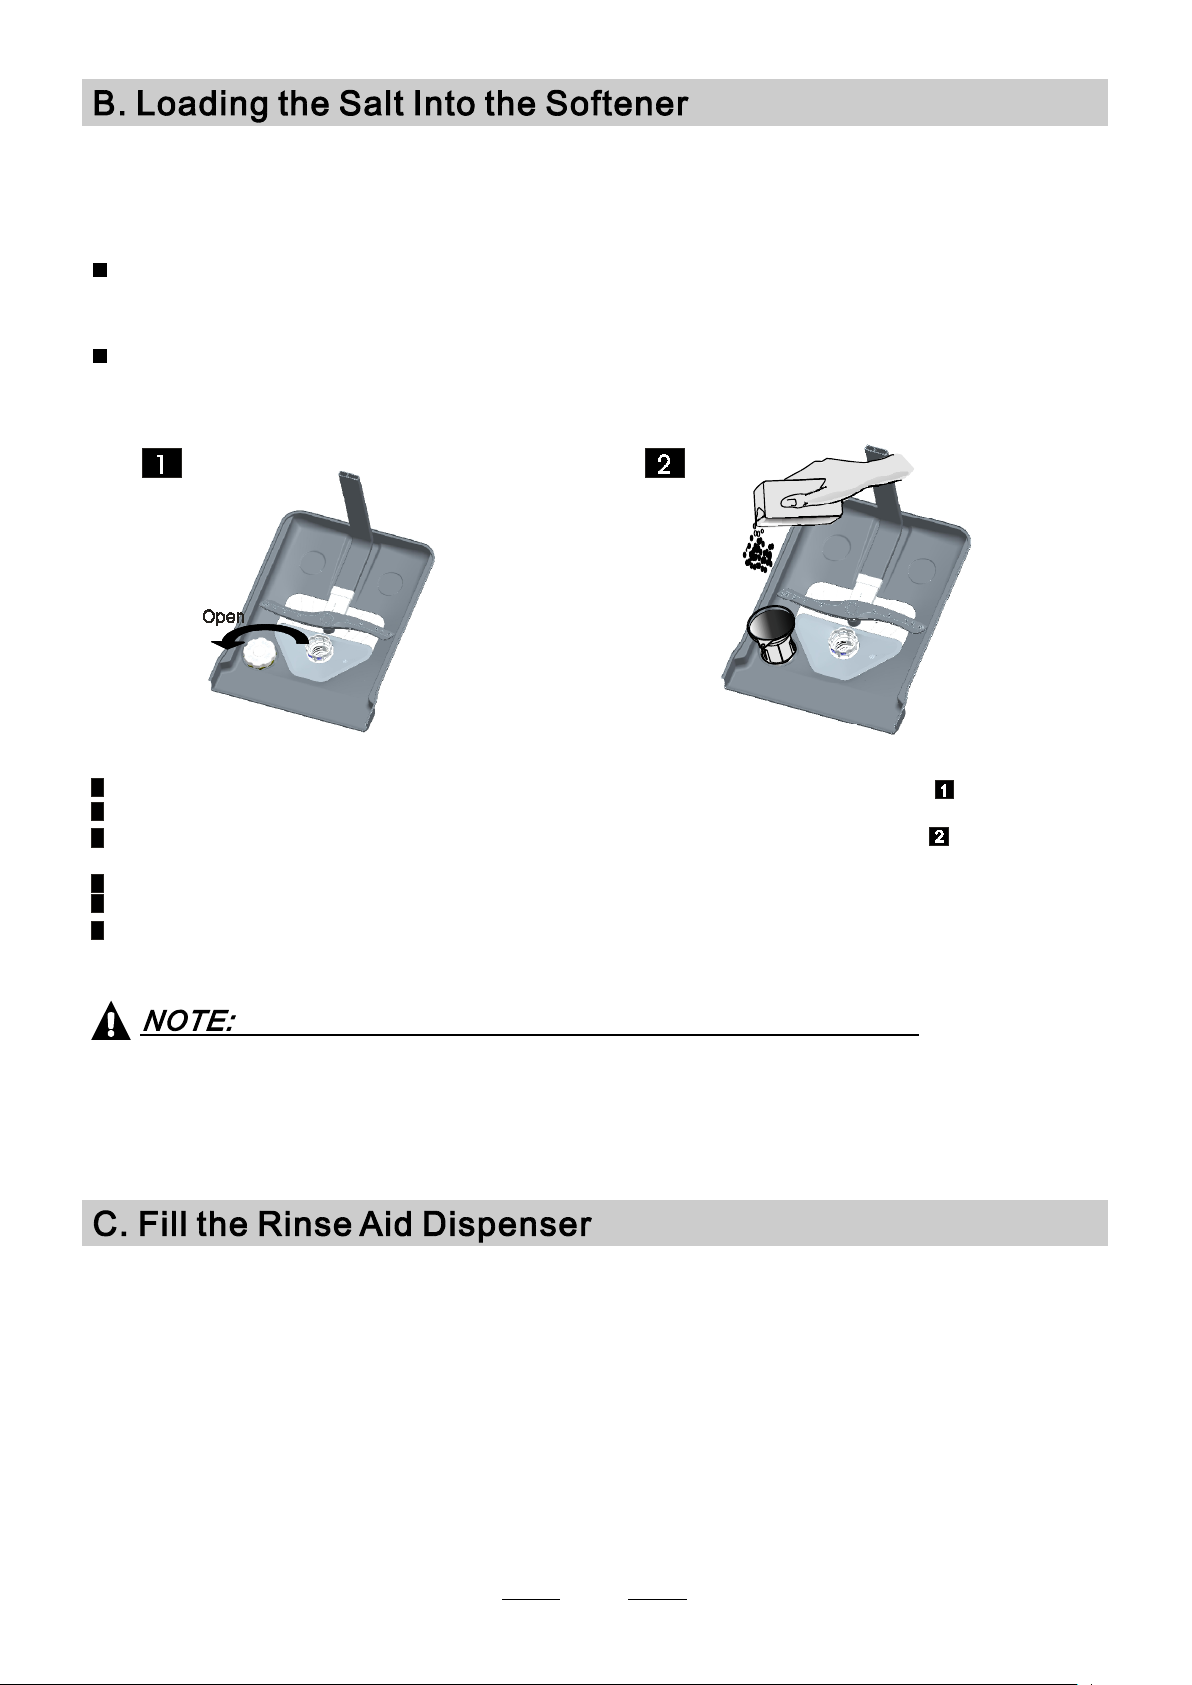
Alway s use t he sal t in ten ded for use w ith dish washer.
The salt conta ine r is locat ed ben eath the low er basket a nd s hould be filled a s explained
in the following:
Attention!
Only use sal t speci fic ally desi gned fo r the use in dishw ashers! Every other ty pe of
salt not spec ifi cally des igned for t he use in a dis hwasher, espec ially tab le sal t, wil l
da mag e the water soften e r. In case of dam ages ca use d by the use of unsuit able
salt the manu fac turer d o es n ot give any w a rra nty nor is l iable f or a n y damages caus ed.
Only f ill wit h s a lt jus t befo re star tin g one of t he comple te wash ing pr ograms.
Th is will prevent any grains of salt or salt y wa ter, which may have been spill ed,
re mai ning on th e b o tto m of the mac hin e for a n y peri od of tim e, whi ch may cause
corrosion.
A Aft er the lower ba ske t has been removed, unscr ew and re mov e the cap f rom the salt con tainer.
B Place the end of the funne l (sup plied) into th e hole an d introdu ce about 1.5 kg of dishwas her sa lt.
Full f ill the salt c ont ain e r with water,It is norm al for a small amou nt of wate r to come out of the
C
salt c o ntaine r.
D Aft er fill i ng the con tainer , scre w the cap tightly back c lockwise.
E The salt warn i ng light will stop being aft er the salt cont a iner has been f ill ed w i th s alt.
F I mmediately afte r filling the salt into the salt con tain er, a washing program shoul d be star ted
program Otherwise th e fil ter sys tem, pump o r other important part s of the m achine may be dama ged
by sa lty wate r. This is out o f wa rra nty.
).
1. The sal t contain er m ust only be refill ed w hen t he s alt warn ing li ght in the c ont rol panel co mes o n.
Depen din g on how w e ll the salt dissolve s, the salt warni ng l ight may still be on even thou gh the
salt c ont ain er is fill ed.
If there is no salt warning light in the cont rol pa nel (for so me M ode ls),you can estimate when to fill
the salt into the so fte n er b y the cyc les that the dish was her h as r un.
2. If there are spills o f th e salt, a soak or a rapi d prog ram shou ld b e run to remove the exce ssi ve salt .
(We s uggest to use a short
Rinse Aid Dispenser
Th e r i nse aid is released during the f ina l rinse to prevent wa t er f rom formin g drop let s on your dish es, wh ich c an
le ave spots an d streaks. It also impr oves dryin g by allowi n g wate r to roll off the dishes. Your dishwas her i s
de signed to use liqu id rinse aids. T he rinse aid d isp ense r is loca ted in side the door next to t he d etergen t dispenser.
To fi ll t he dispenser, o pen the cap and po ur the rinse aid into the dispense r unti l the level indicat or t urns complete ly
bl ack . The vo lum e of th e r i nse aid c ont ain er is a bout 110ml.
Function of Rinse Aid
Rinse ai d is auto matically a dde d during the l ast ri nse, ensuring th orough rinsin g, and spot a nd streak f ree dr ying.
Attention!
Only u se bra nded ri nse ai d for d ishwasher. N eve r fill the r inse aid dispenser w ith a ny oth er s ubst anc es
(e.g. Dishwasher cleani ng agent, liq uid detergent). This would da mage the app lian ce.
5

When to Refill the Rinse Aid Dispenser
If there is no rinse-ai d warn ing light in the control panel, y ou can estimate the a mou nt fro m the col our
of the opti cal level in dicato r C located next to the c ap. When the rin se-aid c ont ainer is full, the w hol e
indicato r will be dark .As the rins e-a id dim inishes, the size of the dark dot de creases. You shou ld never let
the rinse aid l eve l fall 1 / 4 full.
As the rinse aid d iminishes, th e size of th e blac k dot
on the rinse aid l evel indicato r chan ges, as illustrated below.
Full
3 / 4 f ull
1 / 2 f ull
1 / 4 f ull - S hould refill t o elim ina te spottin g
Empty
" "
To open the di spenser, turn the c ap to the "op e n" (le ft) arrow and l ift it out .
1
Pour the rinse a id i nto t he dispen ser, bein g careful not to overfill.
2
Replace the ca p by inse rting it ali gne d with "o pen" arrow and turnin g it to the clo s ed (right) arrow.
3
Clean up an y rins e aid s pilled w hile during fill ing with an absor ben t clot h to avoid excessiv e foaming
durin g the nex t wash. Don't forget to replace th e cap bef ore you c lose dishwash er d oor.
Adjusting Rinse Aid Dispenser
The rins e aid dis penser h as s ix or four settings. Always s tar t with th e dispenser
set on "4". If spots an d poor dr yin g are a prob le m, incr ease the amount of r ins e
ai d disp ens ed by removing the dispens er lid a nd r otating the dial to "5". If the
di sh es still are not drying p roperl y or are show spot s , adju st t h e dial to th e next
hi gher lever until your dishes are spot -free. The recommende d sett ing is "4".
(Fact ory value is "4". )
Incre as e th e dose if there a r e drop s of wate r or lime spots on t he d ishes aft er wash ing.
Reduc e it if there are s ticky whi tish stains on your dishes or a bl uish film o n glassware o r
knife bl ades.
Deterge nts with its c hemical in gredients are ne ces sar y to remo ve dir t, crus h dirt an d tran sport it o ut of the dishwashe r.
Most of the c omme rc ial qua lity deterge nts are suita ble fo r this purpo se.
Attention!
Prope r Use o f Detergen t
Use only deter gen t specificall y made for the use in dish was her s. Keep your dete rgent fresh and d ry.
Don't put powd ered detergen t into the disp enser until you're rea dy to wash dishes.
6
 Loading...