

Page 1
Operating Instructions
MultyMac 6
MADE IN GERMANY
TechniSat Satellitenfernsehprodukte GmbH · Postfach 560 · 54541 Daun · Germany
TechniSat
Page 2
2
3
4
5
6
7
8
9
0
1
PROGRAMM
SIZE
STOP
TXT
LIST
TERR/SAT
MENU
OK
TV/RADIO
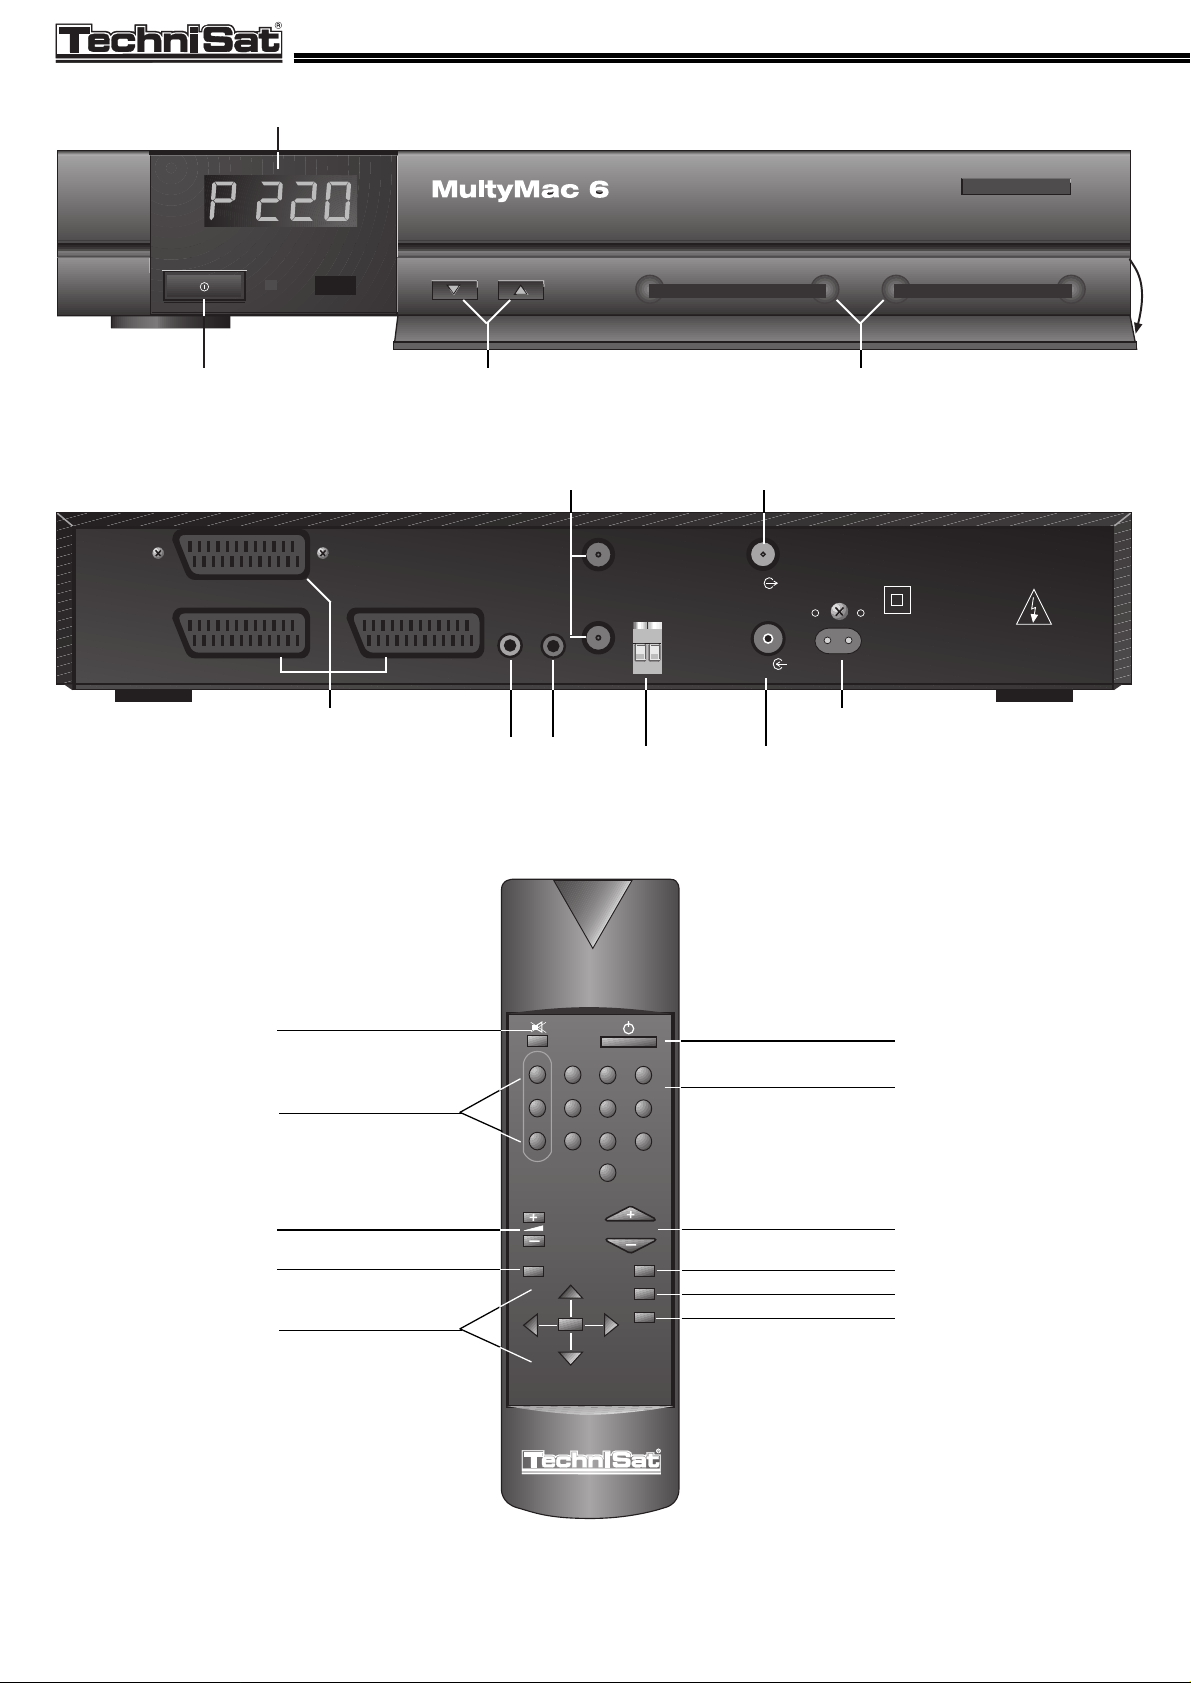
Ten-key keypad
On/Standby
Sound ON/OFF
Teletext operation
Menu control
(function keys)
Volume control
TV/Radio
Channel selection
Channel list
Switching terr./sat.
Menu display
2
TechniSat
DECODER TV
LNB
DC 13/18V
MAX 0,4A
( )
VCR
E2
E1
VORSICHT!
ELEKTROSCHOCK-GEFAHR
NICHT ÖFFNEN!
CAUTION!
RISK OF ELECTRIC SHOCK
DO NOT OPEN!
TV
ANT
B(R)-AUDIO-(L)A
POL
T
MADE IN GERMANY
230 - 240V~
50 Hz
max 35 VA
4-digit LED display
LNB inputs TV output modulator
Mains switch Channel selection
Card readers
Scart sockets
right left
Mains socket
Pol. switch Antenna input
modulator
Audio output
(cinch)
Page 3

1 Illustrations 2
2 Please read first 4
3 Safety precautions 4
4 Connections 5
4.1 Outdoor unit 5
4.2 Television 5
4.3 Amplifier 6
4.4 Video Cassette Recorder (VCR) 6
4.5 Decoder 6
5 Installation 6
5.1 Language 6
5.2 Copying pre-programmation 6
5.3 Standard outdoor unit 7
5.4 Special outdoor unit 7
5.4.1 Changing LNB voltage 14/18 V 7
5.4.2 LOF setting 7
5.4.3 Individual satellite combinations 7
5.5 OSD 8
5.6 Menu overview 8
6 Operation 9
6.1 Switching on and off 9
6.2 Channel selection 9
6.3 Volume 9
6.4 TV/Radio control 9
6.5 Displaying current channel name 9
6.6 Setting the timer 9
6.7 Setting the clock 10
6.8 Marking a channel 10
6.9 Menu overview 11
7 Eurocrypt reception 12
7.1 Calling the EC menu 12
7.2 Subtitles 12
7.3 Subscription 12
7.4 Access control 13
7.5 Automatic On-Screen Display 14
7.6 Menu overview 15
8 Teletext 16
8.1 Page selection 16
8.2 Switching the background 16
8.3 Text size adjustment 16
8.4 Hidden text information 16
8.5 Help functions 16
9 Changing basic programmation 16
9.1 Copying channels 16
9.2 Changing channel name 17
9.3 New channels 17
9.4 Automatic frequency control (AFC) 18
9.5 Menu overview 19
10 Pre-programmation 20
10.1 Types of outdoor units 20
10.2 Audio types 21
10.3 Channel lists 22
11 Troubleshooting notes 26
12 Technical terms 27
13 Technical data 28
MultyMac 6
3
Issue 07/96 • Instructions are subject to changes due to technological advance
Contents
Page 4

~
B(R)-A
UDIO
-(L)A
M
ADE IN G
ERM
ANY
I
G
TEST
VIDEO
ANT
TV
LNB
DC 13/18V
M
AX 0,4A
( )
KANAL
230-240V
50 Hz
m
ax. 24 V
A
VCR/D
ECO
DER
TV
DECO
DER
2 Please read first!
Reading the operating instructions
Carefully read the safety precautions (chapter 3) before connecting the
receiver.
Chapters 4 and 5 explain how to connect and adapt the receiver to the
outdoor unit (antenna, LNB,...), the TV set, etc. The set-up is required
only once; you only need to make amendments in case the outdoor unit
installation has changed or additional equipment has been connected,
e.g. a decoder.
Chapter 6 describes all functions necessary for every-day
use, such as channel selection or volume control.
Chapter 7 describes the Eurocrypt decoder functions.
Chapter 8 gives you information on the teletext.
Chapter 9 gives you information on how to set up new channels or how
to change the channel order.
Chapter 10 lists the pre-programmed channels.
Troubleshooting notes can be found in chapter 11.
Technical terms used in the operating instructions are explained in
chapter 12.
Important notes on device control
The use of a so-called “On-Screen Display” simplifies receiver control
and reduces the number of keys on the remote control. All functions are
displayed on the TV screen and can be controlled with few key strokes.
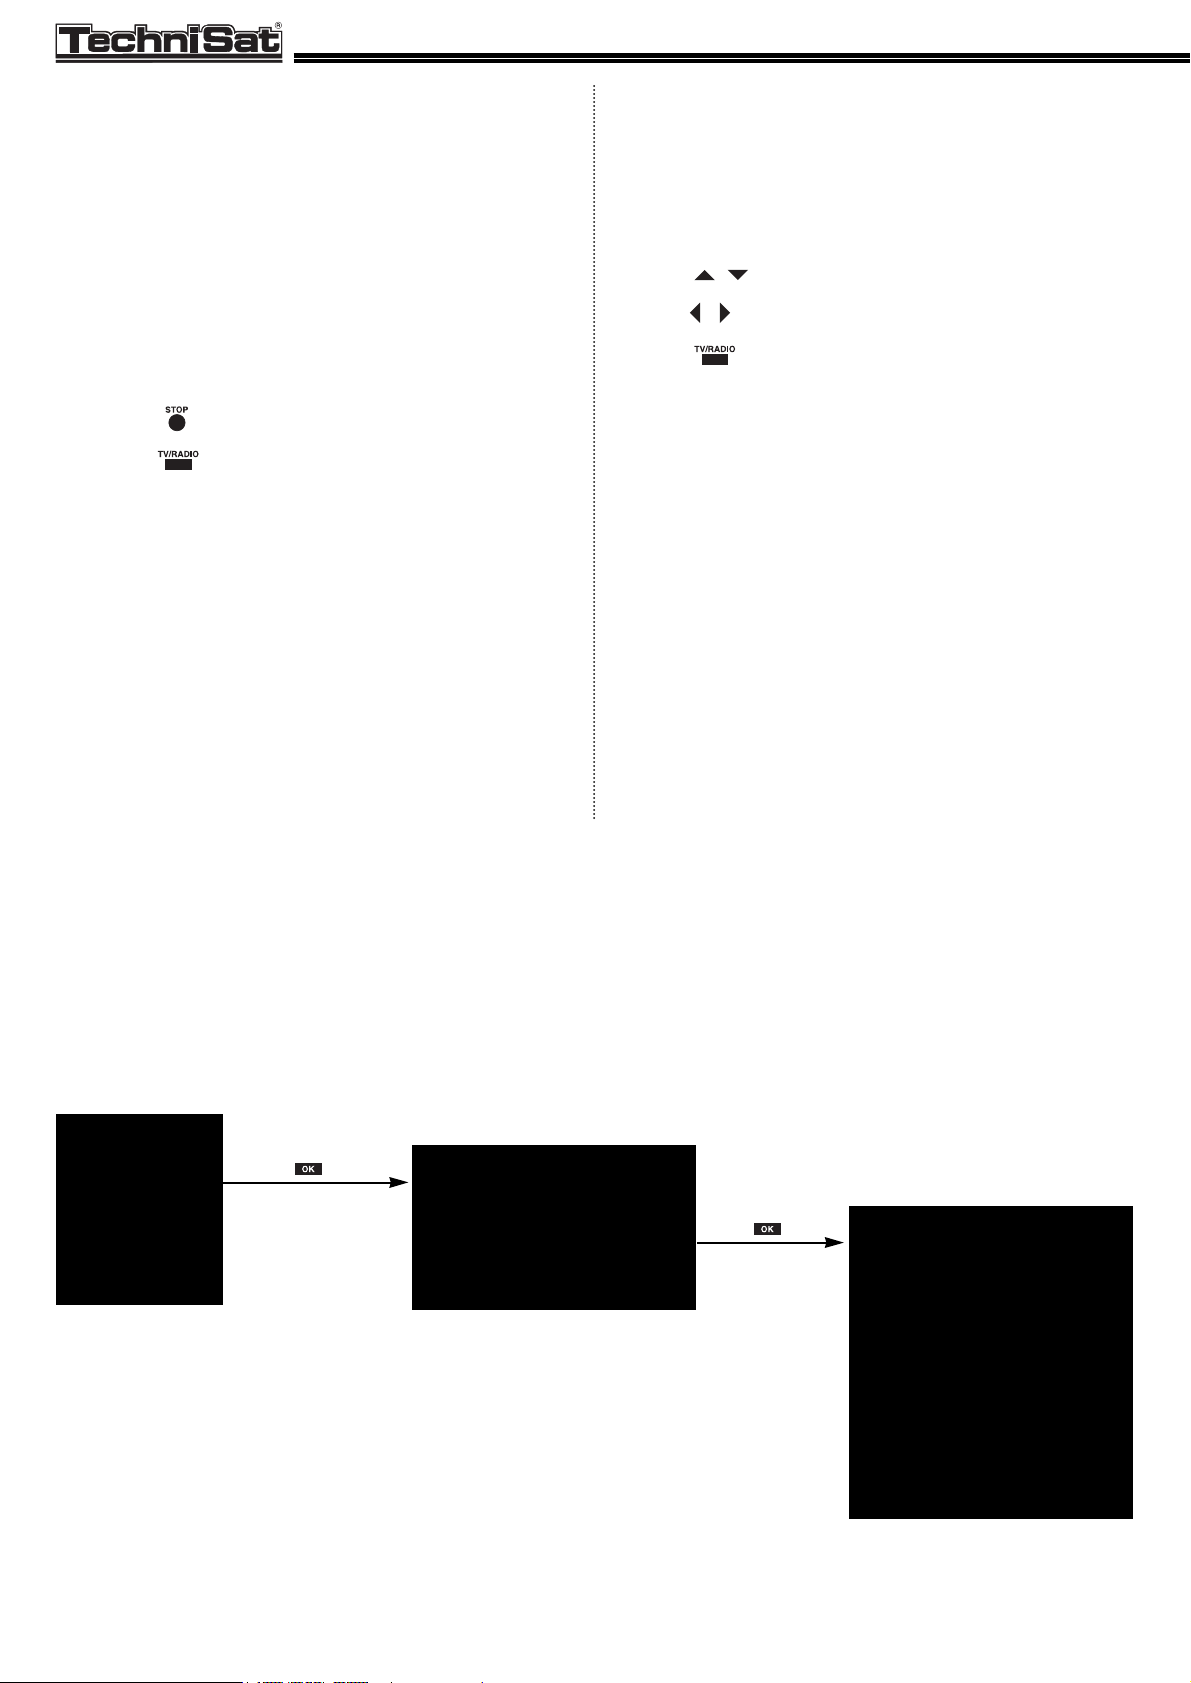
Related functions have been collected to a “MENU”. A “CURSOR”
marks the function to be controlled. This function then is displayed on a
coloured background.
Example:
3 Safety precautions
For your own protection, carefully read the safety precautions before
starting to use your new device.
The manufacturer is not liable for damage caused by improper handling
or by disregarding the safety precautions.
Take care that empty remote control batteries are not put into the
household waste but disposed off properly (return to specialist stores,
special waste).
Styrofoam packing harmful to the environment has not been used. The
packing which can be recycled adheres to the requirements of the new
packing regulations.
Never open the device. There is danger of an electric shock. Repairs
should only be carried out by qualified specialists.
Operational breaks: during a storm or when operation is interrupted for
a long time disconnect the device from mains.
In the following cases disconnect the device from mains and ask a
specialist for help:
P
the power supply cord or the connector are damaged
P
the device was exposed to humidity or a liquid has flown into the
device
P
in case of considerable malfunctions
P
in case of considerable external damage.
4
>80%
<+15°C +35°C
230V
Programme data
Set time
Set timer
Change programme name
Copy programme
Mark programme
Auto. fine tuning: on
Functions
Within the menu operation you can use the keys , , , ,
and . Use these to:
P
move the cursor,
P
start a function,
P
change values,
P
store changes and
P
quit the menus.
Page 5
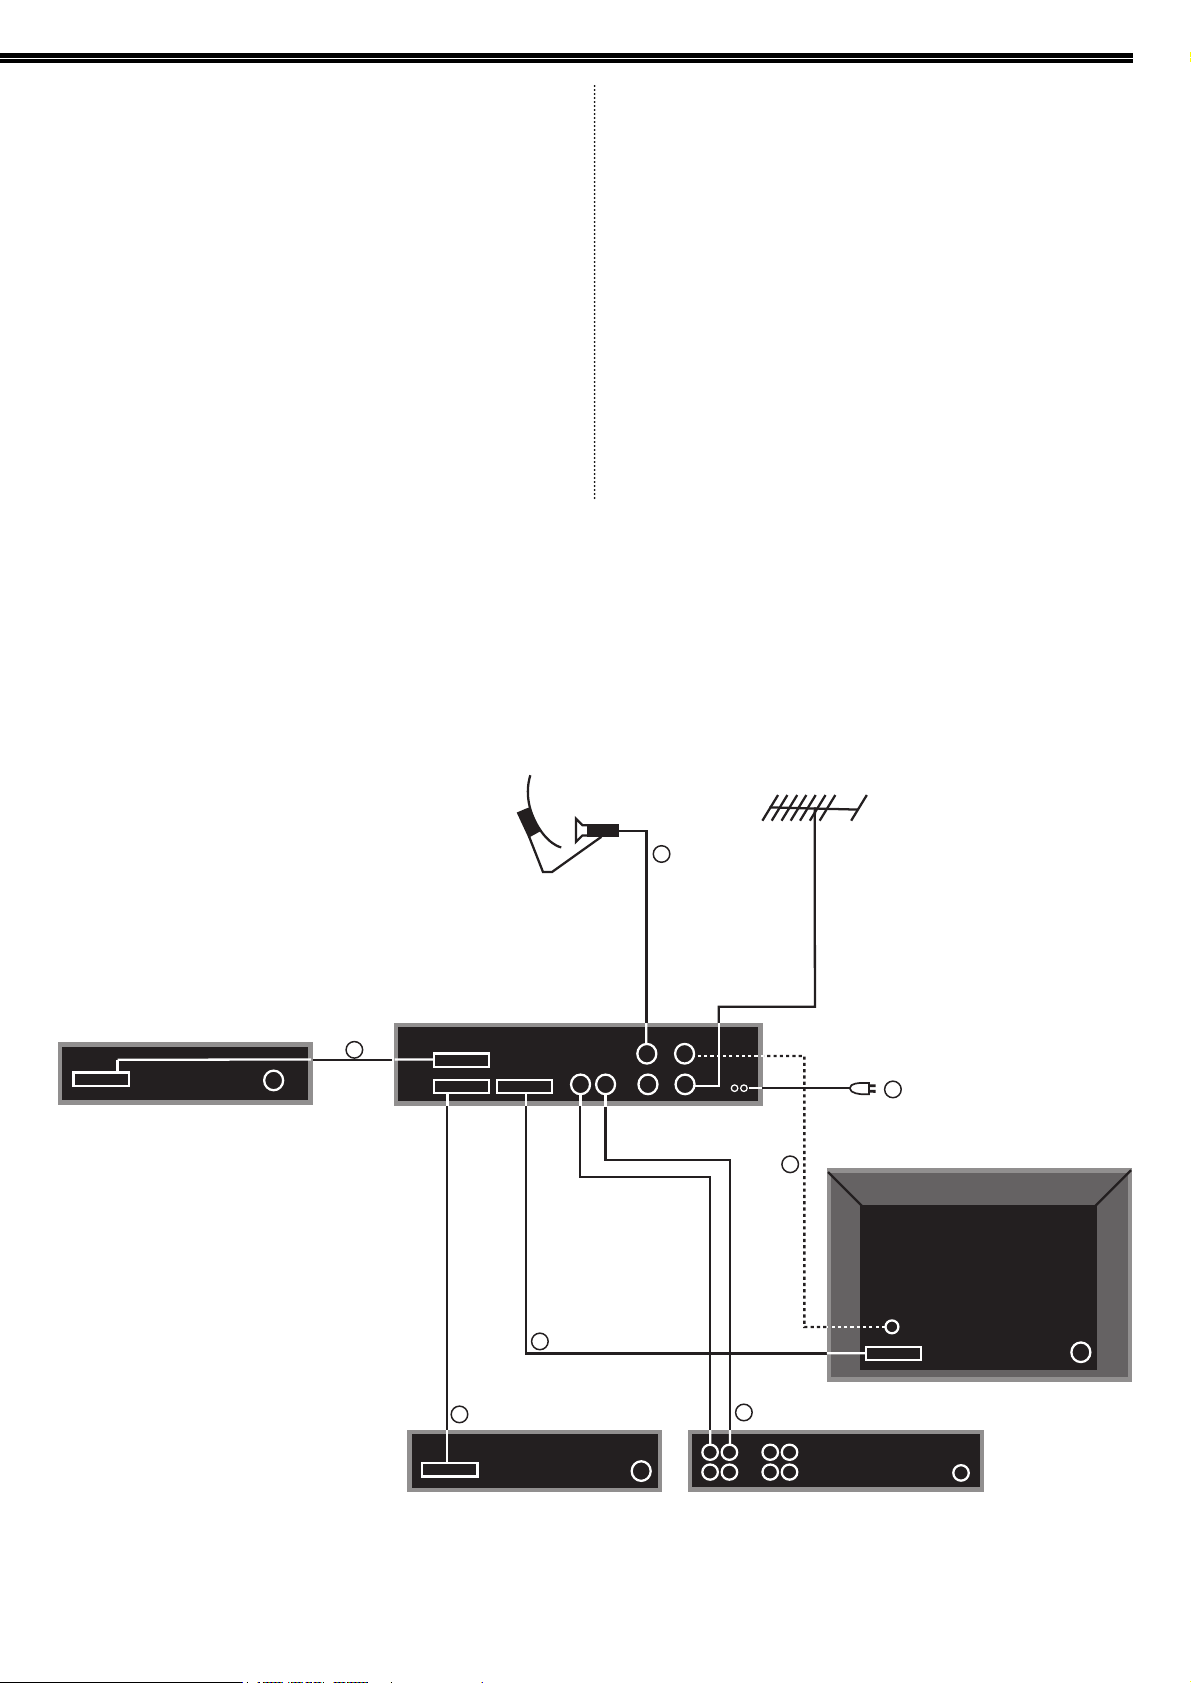
4 Connections
4.1 Outdoor unit
a) Use an appropriate coax cable to connect the receiver´s input E1
with the receiving equipment´s LNB output.You may connect a second
LNB to input E2. For further details, see chapter 5 “Installation”.
If an input is overloaded, the display shows “OuLd” for “Overload”
when the receiver has been switched on. In case of a short-circuit on
receiver input E1 or E2 the device switches off automatically. In both
cases, switch off the receiver by the mains switch and eliminate the
malfunction.
4.2 Television
b) Connect the receiver to a 230 V/50 Hz socket and switch it on by
the mains switch.
c) Use a SCART cable to connect the receiver (SCART TV) with the TV
(SCART input). If your television does not switch to AV operation
automatically, you will need to switch over manually.
d) If your television set is not equipped with a SCART socket, you can
also use an antenna cable to connect the receiver´s modulator TV output
with the antenna input. Plug the cable coming from the antenna into the
modulator input ANT.
Your television set has to be adjusted to the transmission channel of the
receiver. Select a free channel on your TV set and adjust it to channel
39.
MultyMac 6
5
Decoder
TV (seen from the back)
VCR or Decoder
HiFi-Amplifier
e
d
b
g
f
a
c
MultyMac 6
Page 6
If channel 39 is occupied by a channel that can be received via
antenna, you can adjust a different transmission channel in the range of
22 to 69.
> Select a free channel in the range of 22 to 69 (rf. to the operating
instructions of your TV set)
> Switch off the receiver by pressing
> Switch on the receiver by pressing and holding down on the
remote control
> Switch on the receiver by pressing and release
afterwards
The receiver display shows “CH” and the adjusted channel number
> Adjust the modulator channel with to the desired channel
> The receiver returns to normal operation after 4 s approx.
> Fine tuning on the TV set
4.3 Amplifier
e) In order to achieve maximum sound quality, the receiver can be
connected to a Hifi amplifier. Use an adequate amplifier input (e.g. CD
or AUX; Warning: the “phono” input is not appropriate!) to link it with
the receiver´s audio R/L cinch jacks.
4.4 V ideo Cassette Recorder (VCR)
f) Connect the video recorder to the SCART input marked “VCR”.
When playing, the video recorder gives a switching signal to the
receiver and the audio and video signals are directed to the SCART
output TV and the modulator output TV provided the receiver was not
switched off by the mains switch.
If your video recorder does not produce a switching voltage, the
receiver has to be switched to standby mode by pressing on
the remote control when the recorder is playing. When connected to
SCART, the TV set has to be switched to AV operation.
4.5 Decoder
g) Connect the decoder with the SCART input marked “DECODER”.
You can toggle between six decoder signals to adapt to different
decoder types.
I A: “flat”, audio signal of receiver (internal)
E A: “flat”, audio signal of decoder (external)
I C: video unclamped, audio signal of receiver (internal)
E C: video unclamped, audio signal of decoder (external)
I D: video, audio signal of receiver (internal)
E D: video, audio signal of decoder (external)
Consult the decoder´s user manual to find out which signal is required
and select the signal type according to the description in chapter 9.3.
5 Installation
Calling the installation menu
This menu can only be called by using the mains switch on the receiver.
This prevents important basic settings from being modified by mistake.
> Switch off the receiver by pressing
> Press and hold 0 on the remote control
> Switch on the receiver by pressing and release 0
afterwards
The installation menu is designed in such a way that initially the desired
language is adjusted. After having confirmed this language by pressing
, you can adjust the actual parameters.
5.1 Language
The OSD menu allows you to toggle between German, English, French,
Spanish and Danish.
> Call the installation menu (see above)
> Press to set the cursor to the desired language
> Store by pressing , the menu for adjustment of the parameters
appears
> Press to leave the menu without storing
5.2 Copying pre-programmation
By using the following adjustment the receiver can be reverted to the
original status, i.e. all modifications and adjustments will be cancelled.
The pre-programmation (see 10.3) is stored in the software and cannot
be modified.
> Call the installation menu (see above)
> Press to confirm the language
> Press to move cursor to “Select programme list”
> Press to re-load
It is also possible to, e.g., combine the German OSD language with the
English channel list:
> Press to move cursor to “Copy programme list”
> Press to change channel list
> Press to re-load
> Press to quit the menu
6
Page 7
MultyMac 6
7
5.3 Standard outdoor unit
The most common outdoor units (dish or flat plate antenna + LNB) are
combined in list 10.1. By selecting the corresponding letter the receiver
can easily and quickly be adapted to your outdoor unit.
Outdoor unit A (ASTRA system with 9.75 GHz LNB) is factory preprogrammed.
> Call the installation menu (rf. page 6)
> Press to confirm language
> Press to move cursor to “Outdoor unit”
> Press to switch over to the corresponding letter (list 10.1)
> Press to quit the menu
5.4 Special outdoor unit
5.4.1 Changing LNB voltage 14/18 V
When using systems with multiswitches it may happen that the standard
adjustments of LNB voltage and polarisation level (14V=vertical,
18V=horizontal) are swapped. To avoid the modification of each single
programme, the assignment can easily be swapped. Swapping has to
be adjusted separately for each satellite.
> Call the installation menu (rf. page 6)
> Press to confirm language
> Press to move cursor to “Outdoor unit”
> Press
> Press to move cursor to “LNB supply 14/18V”
> Press to switch over
> Press to move cursor to “S t o r e”
> Press
> Press to quit the menu
5.4.2 LOF setting
In order to adjust local oscillator frequencies (LOF) which are not
included in the pre-programmation or in order to level out frequency
deviations of the LNB, you can modify the LOF by pressing as
you like.
Should this result in intermediate frequencies (“1. IF”) exceeding the
receiver frequency range of 910 to 2100 MHz, question marks are
displayed instead of the intermediate frequency. Direct input of the LOF
by using the ten-key keypad is only accepted when within the receiver
frequency range.
The LOF modification is valid for all channels of the satellite displayed in
the menu; you do not have to modify every single channel.
Example: > Outdoor unit A (ASTRA with 9750 MHz LNB) is
adjusted
> Channel 3, PRO 7 of ASTRA is on display
> Your LNB has the LOF 9800 MHz
> The LOF adjustment of the receiver has to be
changed to 9800 MHz
This means:
Modification of all ASTRA channels in the 11 GHz frequency range
> Call the installation menu (rf. page 6)
> Press to confirm language
> Press to move cursor to “Outdoor unit”
> Press
> Press to move cursor to “LOF”
> Enter 9 8 0 0 with the ten-key keypad
> Press
The modified LOF is only valid for the satellite shown in line “Sat.”
5.4.3 Individual satellite
combinations (complete example)
This receiver allows you to control any combination of 8 V/H LNBs or
16 single LNBs in an easy way. There is a great variety of possible
combinations particularly for multifeed systems for the reception of
several satellites.
In addition to V/H switching voltage and 22 kHz modulation, a
separate 0/5 V output allows control of external switches.
Additional adjustment possibilities are explained in the following
example:
Up to now you have received the ASTRA satellite with a 9750 MHz
V/H LNB. This is the factory setting (letter A) and did not have to be
changed for the first installation.
Additionally you want to receive “Arte” from Kopernikus. Therefore the
outdoor unit is enlarged with a 11 GHz single LNB and a 22 kHz
switch and is programmed in the installation menu.
> Call the installation menu (rf. page 6)
> Press to confirm language
> Press to move cursor to “Outdoor unit”
> Press
> Press to move cursor to “Sat.”
> Press to switch to “Kopern LB”
(LB stands for the lower frequency range.)
> Press to move cursor to “Input”
> Press to switch to “1”
> Press to move cursor to “LOF”
> Enter 1 0 0 0 0 for the LNB LOF
> Press to move cursor to “Modulation 22 kHz”
> Press to switch to “on”
> Press to move cursor to “S t o r e”
> Press to store modified data
Page 8
Your receiver is now pre-programmed for the ASTRA satellites and the
lower range of the Kopernikus 23.5° East satellite. As no Kopernikus
channels are pre-programmed, you can programme the desired
channels on your own (rf. 9.3). When selecting a satellite with channels
already pre-programmed (e.g. Hispasat 30° West), those will
automatically appear in the channel list.
Following the description above, you can include or delete every
satellite in your channel list. Setting up new satellites of course is useful
only if they can be received with your outdoor unit. Please note that you
store every adjusted satellite immediately before turning to the next
satellite.
> Press to enter the previous menu, or
> Press to leave the menu
5.5 OSD
You can choose from the installation menu whether to have the OSD
information displayed on your TV screen in the form of video or RGB
signals. If your TV set is able to receive RGB signals, you should choose
this setting. Otherwise you should stick to the “video” setting.
> Call the installation menu (rf. page 6)
> Press to move cursor to “Video/RGB”
> Press to switch between “Video” and “RGB”
> Press to leave the menu
“Video” is set automatically when the installation menu is being called.
8
English
Deutsch
Fran•ais
Espanol
Dansk
OSD language english
Select programme list 1
Outdoor unit A
Video/RGB
Outdoor unit A
Sat. Astra
Input 1
LOF 9750 MHz
Modulation 22 kHz off
LNB supply 14/18V V/H
Pol. supply off
S t o r e
3: Pro 7
5.6 Menu over view
Page 9
6 Operation
6.1 Switching on and off
Preferably use the mains switch to tur n the receiver on and
off, thus saving energy.
For brief operational breaks use the remote control function:
> Press to turn on and to switch to standby mode or
> Use the ten-key keypad to turn on or
if you do not have the remote control available:
> Press or on the receiver front to turn on from
standby mode
6.2 Channel selection
a) Using the ten-key keypad
1 2 3
---
Channel position 123
3 2 (hold)
---
Channel position 32
6 (hold)
---
Channel position 6
When the last key is only shortly pressed in case of one- and two-digit
numbers, the new channel needs four seconds to be set as the receiver
will wait for the next number.
b) Press on the remote control or on the
receiver
c) Press
In the TV mode only TV channels, in the radio mode only radio channels
will be displayed.
> Press to move cursor to the desired channel
> Press or
> Press to return to the channel previously selected
The receiver only displays the channels which can be received with the
selected outdoor unit. Deleted channels (rf. 9.3) are not displayed.
6.3 Volume
> Press to turn down, or to turn up
> Press to tur n off completely (the receiver display shows a
spot)
6.4 TV/Radio control
The pre-programmation consists of TV and radio programmes. When
receiving a radio channel, the TV screen is turned off and displays only
the channel name on coloured background.
> Press
Press this button to change from a TV channel back to the most recently
selected radio channel, and vice versa.
The receiver display either shows “P” for TV or “Pr” for radio channels.
6.5 Displaying current channel
name
> Press
6.6 Setting the timer
You may define up to 4 different power-on and power-off times (timer).
For each timer setting, you can choose between a single or daily event.
Check if the clock has been set correctly and correct the time, if
necessary (rf. 6.7).
> Press
> Press to move cursor to “Set timer”
> Press
> Press to move cursor to e.g. “Timer 1”
> Press
> Press to move cursor to first line (e.g. “Timer 1”)
> Press
Current time and date are taken as basic values for the timer.
Example: Turn on PRO 7 on 31 December 1996 between 20.00 hrs
and 21.00 hrs.
> Press to move cursor successively to:
“Date” 3 1
“Month” 1 2
“Start” 2 0 : 0 0
“Stop” 2 1 : 0 0
> Press to move to the last line and select the desired
channel number
e.g. 3 Pro 7
> Use or the ten-key keypad to select
By pressing in the last line you can switch between the radio and
TV table of the channel to be recorded.
MultyMac 6
9
Page 10

> Press to quit the menu
This automatically turns on the timer.
> Press for standby mode
The display shows to symbolise timer mode.
Daily timer events
> Select timer menu (see above)
> Press to move cursor to “Repetition”
> Press to select “daily”
> Enter start and terminating time (see above)
> Select a channel (see above)
> Press to quit the menu
This automatically turns on the timer.
> Press for standby mode
The receiver turns on and off daily at the same time.
Cancelling the timer function
> Select timer menu (see above)
> Press to move cursor to the desired timer
> Press to turn off timer (press to turn on)
Turning off automatically (“Sleeptimer”)
> Select timer menu (see above)
> Press to move cursor to “Sleeptimer”
> Press
The current time is taken and the sleeptimer is turned on.
> Press or to skip by 15 minutes each or
> Use ten-key keypad to enter terminating time directly
(> Press to turn off sleeptimer)
> Press
The receiver switches to normal operation and switches to standby at
the terminating time entered.
The following applies to all timer functions: When the timer is active
(time between START and STOP) the TV set is automatically switched to
AV (only when connected via SCART) which may interrupt current
terrestrial reception. This interruption may be terminated by pressing
TERR/SAT. The display shows “tErr”.
Warning: Do not press to turn off the receiver while
it is in timer mode!
6.7 Setting the clock
Thanks to the integrated teletext decoder the internal receiver clock can
automatically be set with very high precision according to the teletext
time.
Time and date settings are also retained after longer operational breaks.
Note that you have to activate a channel using teletext when setting the
clock.
> Select a channel with teletext
> Press
> Press to move cursor to “Set time”
> Press
Example: Setting the clock to 21 Februar y 1996 with current time
> Press to move cursor successively to:
“Date” 21
“Month” 02
“Year” 1996
> Press or use the ten-key keypad to select
> Press to move cursor to “Restart clock”
> Press to take teletext time
> Press to return to menu or
> Press to quit the menu
6.8 Marking a channel
> Press
> Press to move cursor to “Mark programme”
> Press
Deleting a channel:
Channels which are marked accordingly cannot be re-set and no longer
appear in the channel list. If you like to watch that channel again you
have to copy it from the pre-programmation (rf. 9.1).
> Press to move cursor to “Clear this programme”
> Press to delete
10
Page 11

Childproof control feature
Channels which are marked in this way can no longer be accessed via
the or buttons on the receiver, i.e. they are no
longer accessible without remote control.
> Press to move cursor to “Parental lock”
> Press to turn on and to turn off
> Press to return to the menu or
> Press to quit the menu
MultyMac 6
11
Programme data
Set time
Set timer
Change programme name
Copy programme
Mark programme
Timer 1 off
Timer 2 off
Timer 3 off
Timer 4 off
Sleeptimer
3: Pro 7
Sat. Astra
Clear this programme
Parental lock off
1 1 : 3 8 : 4 7
Date 21
Month 2
Year 1996
Day Wednesday
Restart clock
(Videotext)
Timer 1 1 1 : 3 8 : 4 7
Repetition off
Date 21
Month 2/1996
Day Wednesday
Start 2 0 : 0 0
Stop 2 2 : 0 0
3 Pro 7 tv
6.9 Menu over view
Page 12

7. Eurocrypt reception
EUROCRYPT is an encoding method for MAC channels. For the
reception you need the decoder that is integrated in your receiver and a
valid smart card which you can obtain in special stores or directly from
the programme provider.
> Select a Eurocrypt encoded MAC channel
The message “no smart card in the slot” or “??????” is displayed on the
screen.
> Slide the valid smart card into the card slot (contacts face down, in
direction of the arrow until completely inserted)
If your card is valid for the channel and fully inserted, an uncoded
picture is displayed after a few seconds. Otherwise please observe
automatic displays in 7.4.
7.1 Calling the EC menu
When a MAC channel is selected, the On-Screen Display shows the line
“EC menu”containing all operation functions of the Eurocrypt decoder.
> Select a Eurocrypt encoded MAC channel
> Press
> Press to move cursor to “EC menu”
> Press
> Press to quit the menu
7.2 Subtitles
The Eurocrypt decoder gives you the possibility to display the subtitles
broadcast by the programme provider in the language of your choice.
However, please note that not all languages are being broadcast.
Preferential subtitles
You can enter a preference list with up to three languages. If subtitles
are broadcast in one of these languages they will be displayed on
screen automatically.
> Call the EC menu (see above)
> Press to move cursor to “language”
> Press
> Press to move cursor to first language and press “1”
> Press to move cursor to second language and press “2”
> Press to move cursor to third language and press “3”
> Press to quit the menu
Current subtitles
A further menu shows the subtitles currently available.
> Call the EC menu (see above)
- Press to move cursor to “subtitles”
> Press
If your preferential languages are supplied, the highest ranking
language is displayed in green.
> Press to select the desired language
> Press to confirm
> Press to quit the menu
A language not belonging to the preferential languages can only be
selected if none of the preferential languages is available. Languages
which are shown in brackets are currently not available but have been
selected by you.
Switching off subtitles
> Call the EC menu (see above)
> Press to move cursor to “subtitles”
> Press
> Press to move cursor to “off”
> Press
7.3 Subscription
You can obtain information on your subscription via the Eurocrypt
menus.
In Eurocrypt S the card determines the appearance of the ACCESS
menus; therefore, they may differ from the menus described.
CASS menu 1 is valid for the left card reader and CASS menu 2 for the
right one. Subscription details can only be obtained when the card is
inserted.
> Call the EC menu (see above)
> Press to move cursor to “access 1”
(card has to be inserted into the left card reader!)
> Press
> Press to move cursor to “Consultation”
> Press
A list of programme providers/issuers is displayed. You can select an
issuer, view your current subscription details and the price for a channel
to pay per view.
> Press to select an issuer
> Press
In case there is no subscription/offer, the message “no access” is
displayed in red.
The submenu for TV3 could for example look like this:
12
Page 13

Subscription:
You can subscribe certain kinds of programmes for a certain period of
time. What you have to pay is independent of what you actually watch.
In the submenu you find a table that tells you which categories you have
subscribed to, for which period of time and at which level.
Extensive lists that do not fit on the screen are divided into several
pages which can be turned over by pressing .
The following kinds of programmes (“categories”) are fixed:
> art > children´s programmes > clublife
> entertainment > movies > lifestyle
> music > news > series
> sports > special programmes > nature
> mini series > science > documentaries
> all programmes
Some programmes come with graded access levels. The issuer can bind
programme categories to bundles.
Subscription/class:
This kind of subscription works in a similar way, the only difference is
that there are “classes” represented by code numbers instead of
“programme categories”.
Booked view:
You can select and buy certain programmes with the help of a
programme preview. The price does not depend on which of the leased
programmes you actually watch.
The submenu shows a list of the programmes you have leased.
Pay per view:
The Eurocrypt card has an account that is reduced when watching TV
(similar to a telephone card). That means you only pay for the
programmes you are actually watching.
The submenu informs you of the programmes that are available and
their price. At the same time the following question is displayed:
If you answer with yes, the decoding procedure starts. Otherwise the
question is repeated in certain intervals.
At the beginning of the submenu a list shows the programmes that you
have paid for before.
The last two lines give you an overview of your pay per view credit
account with the respective provider.
7.4 Access control
> Call the EC menu (see above)
> Press to move cursor to “access 1”
(card has to be inserted into the left card reader)
> Press
> Press to move cursor to “CASS control”
> Press
With the help of this menu you can impose and remove access
restrictions.
Note: The restrictions are only effective if you enter a secret
number other than zero.
New access code
> Call the CASS CONTROL menu (see above)
> Press to move cursor to “new secret code”
> Press to confirm
Enter your access code number by pressing the numerical keys. Each
input number is echoed with a “*”. Afterwards you have to re-enter the
access code and the new code is only valid when the first and second
entries are identical. Otherwise you have to repeat the whole
procedure.
Warning!
If you forget your access code you cannot watch Eurocrypt programmes
with this card any longer and you have to consult the issuer.
CASS CONTROL
PayPerView
consult.
parental ctrl.
new secret code
Do you want to buy this programme?
Yes
No
CONSULTATION
TV3
subscription
subscript./link
prebooked PPV
impulse PPV
credit: 0
overdraft: 0
MultyMac 6
13
Page 14

A new card always has the access number zero.
You delete your access code by entering “0000”. Of course, this is only
possible if you have correctly entered your most recent access code
before.
Once you have correctly entered the access code, all functions are reenabled. They will not be disabled before you turn off the receiver
(STANDBY). After turning on the receiver, the access code is requested
again.
Disabling programme purchase
> Call the CASS CONTROL menu (see above)
> Press to move cursor to “PayPerView”
> Press to confirm
> Press to select between “lock” and “unlock”
> Press to confirm
If you select “lock”, you can only buy programmes after having entered
your access code. If the setting is “unlock” you do not need the access
code.
Disabling information
> Call the CASS CONTROL menu (see above)
> Press to move cursor to “consult.”
> Press to select between “lock” and “unlock”
> Press to confirm
If you select “lock” you can only retrieve information after having
entered your access code.
Childproof control feature
> Call the CASS CONTROL menu (see above)
> Press to move cursor to “parental ctrl.”
> Press
> Press to move cursor to the desired age group
> Press to confirm
After the selection of an age group only programmes with an adequate
identification are decoded.
7.5 Automatic On-Screen Display
If you receive a EUROCRYPT channel, troubleshooting notes or other
information may be displayed.
“Insert the card”
No card in the slot.
“Check the card”
The card is not valid, broken or inserted incorrectly.
“No access”
The card does not entitle to receive the current programme, or
the user has activated an access restriction.
“Regional reception disabled”
The current programme is not allowed to be watched for legal
reasons in the respective country.
“Overdraft”
You have no more credit.
“New RTXT page”
A customer-specific message has been received from the
broadcasting service. Switch on teletext and search for the
respective page.
“Error 2: incorrect access code”
You have entered the access code incorrectly.
“Error 3: card memory full”
The card can no longer receive certain information (for example
a new access code).
“Error 4: service memory full”
The card can no longer receive programme-specific information,
for instance the subscription for this programme cannot be
prolonged. Try to obtain a new card.
“Error 5: HASH error”
A transmission error has occurred between the broadcasting
service and your receiver. This is often caused by the
broadcaster or the transmission path. If this occurs repeatedly
you should consult the channel issuer or your local dealer.
“Write error”
The card cannot be overwritten. The card or the receiver are
deficient.
14
Page 15

7.6 Menu over view
MultyMac 6
15
Programme data
Set time
Set timer
Change programme name
Copy programme
Mark programme
Auto. fine tuning on
EC menu
MAIN MENU
access 1
access 2
subtitles
language
access 1
consult.
cass control
CASS CONTROL
PayPerView
consult.
parental ctrl.
new secret code
new secret code
enter .....
CONSULTATION
ISSUER
TV3
TV 1000
PAL ACCESS
BBC
OPTION
CONSULTATION
TV 1000
subscription
subscript./link
prebooked PPV
impulse PPV
credit: 0
overdraft: 0
PARENTAL CTRL.
U universal
PG parental gd.
12 and older
15 and older
18 and older
Page 16

8 Teletext
Your satellite receiver is able to receive teletext.
The design of the teletext is determined by the programme provider and
cannot be modified by the user.
> Select channel with teletext service
> Press
The television picture disappears and the teletext overview (p. 100) is
displayed, if the channel currently selected transmits teletext. The display
shows “tt” for teletext.
> Press to quit the teletext
8.1 Page selection
> Call teletext (see above)
> Enter a three-digit number, e.g. 2 0 0 , or
> Press to toggle the page numbers up or downor
> Press to call pages in the memory
Teletext appears after a few seconds.
Some teletext pages consist of several subpages which are displayed
automatically. The time of display is determined by the programme
provider.
> Press to hold such a subpage and to release it after wards.
8.2 Switching the background
The following choices are available for combining the teletext
background with the TV picture currently on display:
• only teletext
• teletext with background with TV picture
• teletext without background with TV picture
• only teletext headline with TV picture
> Call teletext (see above)
> Press to switch the background
8.3 Text size adjustment
> You can switch the text size with “SIZE”
Press 1 x: upper screen half, double height
Press 2 x: lower screen half, double height
Press 3 x: full screen, normal height
8.4 Hidden text information
Some teletext pages (e.g. riddle or programme previews) contain
hidden information that can be revealed separately.
> Press to display hidden teletext information
8.5 Help functions
> Press to display the additional teletext buttons
9 Changing basic
programmation
It is possible to adapt the receiver to new channels or modified satellite
programmations or to make an individual programmation with the
following adjustment functions.
9.1 Copying a channel
You can copy channels from the pre-programmation (rf. 10.3) or from
the individual programmation to a different channel position.
> Press
> Press to move cursor to “Copy programme”
> Press
> Press to move cursor to “Programme list”
> Press to switch between the current channel list, e.g. “1”
(Pre-programmation) and “P” (current list)
> Press to move cursor to line 1
> Press or use the ten-key keypad to set the channel to be
copied (source)
> Press to move cursor to line 4
> Press or use the ten-key keypad to set the target
> Press to move cursor to “Copy programme”
> Press to copy
> Press to return to menu
> Press for normal operation
16
Page 17

9.2 Changing channel name
> Press
> Press to move cursor to “Change programme name”
> Press
> Press to move cursor to “Change programme name”
> Press to set the first letter
> Press to confirm
> Press to set next letter
> Press to confirm ...
> Press to move cursor to “S t o r e”
> Press to store
or:
> Press to move cursor to “Search programme name”
> Press to go through the list
> Press to move cursor to “S t o r e”
> Press to store
> Press to return to the menu
> Press to return to normal operation
9.3 New channels
If required, you can add new channels to the pre-programmed set of
channels by using the menu “Programme data”. All adjustments are
valid for one channel position each.
Please note that the 22 kHz modulation of the LNB voltage
and the 0/5 V control signal are being determined by the
satellite to which the new channel has to be added. These
two control signals are set in the installation menu for each
satellite (rf. page 7). They are then valid for all channels
received from that satellite.
The following example explains the procedure:
The desired channel is not included in the pre-programmation. Channel
data is as follows:
Channel name: Pattern TV
Transmission frequency: 11,111 MHz
Audio: stereo on 7.02 and 7.20 MHz
Transmission standard: PAL
Polarisation: horizontal
Satellite: ASTRA
The new channel “Pattern TV” is to be set to channel position 3.
Outdoor unit: V/H LNB with LOF 9750 MHz (type A, see 10.1).
> Press to switch to TV channel
> Press
> Press to move cursor to “Programme data”
> Press
> Press to move cursor to first line
> Press or use the ten-key keypad to switch to
channel position 3
> Press to move cursor to “Sat.”
> Press to select the satellite (ASTRA in our example, see 10.1)
> Press to move cursor to “Frequency”
> Press or use the ten-key keypad to set “11111”
The intermediate frequency changes automatically.
> Press to move cursor to “MAC/PAL”
> Press to move cursor to “PAL” (switch to “MAC” for D/D2-
MAC channels)
> Press to move cursor to “Polarization”
> Press to switch to “H18”
Thus the horizontal polarisation level is being selected and the picture of
“Pattern TV” can be seen.
All necessary adjustments for the above-mentioned example have been
made.
> Press to move cursor to “S t o r e”
> Press
The channel is now stored on channel position 3.
If you do not want to overwrite a channel already pre-programmed, you
can use the copy function (see 9.1) to establish a new storage position.
You copy any channel from the pre-programmation to the desired
channel position number where you can adjust your new channel.
Other channels may require further adjustments:
Decoder signal
Switching possibility between six different signals
> Press to move cursor to “Decoder signal”
MultyMac 6
17
Page 18

> Press to switch between A, C or D (see 4.5)
(The first letter of the decoder signal indicates the sound directed
to the TV:
E: Decoder sound
I: Receiver sound)
Contrast:
for PAL channels (e.g. ARD)
> Press to move cursor to “Contrast”
> Press to select “high”(only for ASTRA channels) or “low”
for MAC channels (e.g. TV 2 Norsk)
> Press to move cursor to “Video deviation”
> Press to select “13...17” or “17...22”
Audio type:
The transmission standards PAL or MAC have different audio signals.
The necessary standards for adjustment appear in the OSD menu,
dependent on the selected channel.
for PAL channels (e.g. ARD)
Choice of 32 pre-programmed types (see 10.2, e.g. “1” for the abovementioned example) or individual adjustment
Individual adjustment:
> Press to move cursor to “Audio type”
> Press
> Make adjustments
The adjustments apply to all channels with this audio type.
> Press to move to “S t o r e”
> Store with
Attention: You can only store the modifications if you choose an audio
type between 17 and 32. The audio types 1 to 16 have a fixed preprogrammation.
> Press to return to menu “Programme data”
All adjustments except the ones described in this chapter are
permanently stored only if you select the corresponding line and
press . Otherwise the modifications will be deleted when you
change channels.
> Press to move cursor to “S t o r e”
> Press to store
> Press to return to the menu
> Press to quit the menu
MAC channel (e.g. TV2 Norsk on Intelsat 1° West):
Choice of 8 audio channels
The audio channels marked with an “N” are being transmitted in the
order planned by the programme provider. The audio channels marked
with an “F” have the following language order:
F1: German F2: English F3: French
F4: Norwegian F5: Finnish F6: Dutch
F7: Danish F8: Swedish
> Press to move cursor to “MAC Audio”
> Press to set the desired audio channel
If a sound is available in the selected language, it can be heard.
Otherwise you hear the main sound identical to N1.
MIX operation
Several programme providers mix two audio channels (e.g. stadium
sound and commentaries in a sports programme)
> Press to move cursor to “Audio mix”
> Press to switch on or off
This adjustment applies to all D/D2-MAC channels.
9.4 Automatic Frequency Control
(AFC)
The receiver is equipped with an automatic fine tuning adjusting the best
possible reception frequency. In case of very weak reception signals,
e.g. on the edge of the satellite reception area, it may be advantageous
to switch off the AFC.
> Press
> Press to move cursor to “Auto. fine tuning”
> Press or to switch off or on
> Press to quit the menu
18
Page 19

9.5 Menu over view
MultyMac 6
19
Programme data
Set time
Set timer
Change programme name
Copy programme
Mark programme
Auto. fine tuning
3: Pro 7
Sat. Astra
Frequency 11406 MHz
1. IF 1656 MHz
MAC/PAL PAL
Decoder signal E D
Contrast high
Audio type 1
Polarization V 14
S t o r e
v Ñ Ñ Ñ -
Pro 7
Change programme name
Search programme name
S t o r e
3: Pro 7
Programme list P
is copied to
10 Nord 3
Copy programme
Audio type 1
Mode stereo
Audio A 7,02 MHz
Audio B 7,20 MHz
Bandwidth 130 kHz
Deemphasis adaptive
Page 20

20
10 Pre-programmation
10.1 Types of outdoor units
A ASTRA A-D -19,2 off E1 0 9750
B ASTRA A-C -19,2 off E1 0 10000
C ASTRA A-D -19,2 off E1 0 9750
Eutelsat II-F1/Hotbird 1 -13 on E1 0 9750
D ASTRA A-D -19,2 off E1 0 9750
Eutelsat II-F1/Hotbird 1 -13 on E1 0 10000
E ASTRA A-D -19,2 off E1 0 9750
Eutelsat II-F1/Hotbird 1 -13 on E1 0 9750
Telecom 2A/2B 5°/8° off E2 0 11475 Double
11000 Focus LNB
F ASTRA A-D -19,2 off E1 0 9750
Eutelsat II-F1/Hotbird 1 -13 on E1 0 9750
Eutelsat II-F3 -16 off E2 0 9750
Eutelsat II-F2 -10 on E2 0 9750
G ASTRA A-D -19,2 off E1 0 9750
Eutelsat II-F1/Hotbird 1 -13 on E1 0 9750
Sirius/Tele X -5 off E2 1 10750
Intelsat 702 1 on E2 1 9750
TV-Sat 2/Thor 1 on E2 1 10750
Eutelsat II-F2 -10 off E2 0 9750
Eutelsat II-F3 -16 on E2 0 9750
Telecom 2B 5 off E2 1 10750
Telecom 2A 8 on E2 1 10750
TDF 19 on E2 0 10750
Hispasat 30 off E2 0 10750
H ASTRA A-C -19,2 off E1 0 10230 Isisat ABC
9650
Receivable satellites Orbit position Mod. 22 kHz Input Control signal LOF/MHz
Page 21

10.2 Audio types
Pal
Audio Subcarrier Subcarrier Bandwidth Deemphasis mono/
Mode frequency/MHz A frequency/MHz B kHz stereo
1 7.02 7.20 130 adaptive stereo
2 7.38 7.56 130 adaptive stereo
3 7.74 7.92 130 adaptive stereo
4 8.10 8.28 130 adaptive stereo
5 8.46 8.64 130 adaptive stereo
6 7.02 130 adaptive mono
7 7.20 130 adaptive mono
8 7.38 130 adaptive mono
9 7.56 130 adaptive mono
10 7.74 130 adaptive mono
11 7.92 130 adaptive mono
12 8.10 130 adaptive mono
13 8.28 130 adaptive mono
14 8.46 130 adaptive mono
15 8.64 130 adaptive mono
16 6.60 600 J 17 mono
17 6.50 280 50 µs mono
18 6.65 380 50 µs mono
19 5.80 380 J 17 mono
20 6.60 380 J 17 mono
21 6.40 280 J 17 mono
22 6.85 280 J 17 mono
23 7.25 280 J 17 mono
24 7.75 280 J 17 mono
25 8.20 280 J 17 mono
26 8.65 280 J 17 mono
27 6.85 8.20 280 J 17 stereo
28 7.25 8.20 280 J 17 stereo
29 7.75 8.65 280 J 17 stereo
30 6.60 380 50 µs mono
31 6.20 6.80 130 adaptive stereo
32 6.80 380 J 17 mono
MAC
F1: German F2: English F3: French F4: Nor wegian
F5: Finnish F6: Dutch F7: Danish F8: Swedish
MultyMac 6
21
Page 22

10.3 Channel lists
TV channels
ASTRA, 19.20° East, Television
1 ARD 11,494 1 D large H
2 ZDF 10,964 1 D large H
3 PRO 7 11,406 1 D large V
4 Kabel 1 11,332 1 D large H
5 SAT 1 11,288 1 D large V
6 RTL 11,229 1 D large V
7 DSF 11,523 1 D large H
8 3 sat 11,347 1 D large V
9 H.O.T 10,891 1 D large H
10 Nord 3 11,582 1 D large H
11 Bayern 3 11,141 1 D large H
12 S¸dwest 3 11,186 1 D large V
13 MDR 3 11,112 1 D large H
14 West 3 11,053 1 D large H
15 n-tv 11,641 1 D large H
16 RTL 2 11,214 1 D large H
17 Super RTL 11,391 1 D large H
18 Arte 10,714 1 D large H
19 VOX 11,273 1 D large H
20 Eurosport 11,259 7 D large V
21 NBC Superchannel 10,729 9 D large V
22 Sky news 11,377 1 D large V
23 CNN 11,627 1 D large V
24 Cartoon/ TNT 11,023 1 D large H
25 Galavision 11,127 1 D large V
26 Premiere 11,464 1 D large H
27 Teleclub 10,803 1 D large H
28 MTV 11,421 1 D large H
29 Sky Movies 11,436 1 C large V
30 Movie Channel 11,479 1 C large V
31 Sky Movies Gold 10,877 1 C large V
32 Sky Sports 11,509 1 C large V
33 diverse 11,171 1 C large H
34 Sky one 11,318 1 C large V
35 Nickelodeon / VH1 11,156 1 C large V
36 Bravo / Adult Ch. 11,097 1 C large V
37 Discovery 11,082 1 C large H
38 Child./Family Ch. 10,994 1 C large H
39 UK Gold 11,553 1 C large H
40 VH-1 11,538 1 C large V
41 QVC 11,038 1 C large V
42 UK Living 10,979 1 C large V
43 Disney Channel 11,597 1 C large V
44 JSTV / CMT 11,568 1 C large V
45 RTL 4 10,759 1 C* large V
46 RTL 5 10,936 1 C* large V
47 SBS 6 10,773 1 C* large H
48 RTL Veronica 10,744 1 C* large H
49 Mini Max 11,009 1 D large V
50 Cine Classics 11,068 1 D large V
51 Cinemania 11,656 1 D large V
52 Documania 11,686 1 D large V
53 FilmNet 10,921 1 C large H
54 FilmNet Plus 11,362 digital A large H
55 TV 1000 11,303 digital A large H
56 TV 3 Schweden 11,244 digital A large H
57 TV 3 Daenemark 11,612 digital A large H
58 TV 3 Norwegen 11,671 digital A large H
59 TV Asia 10,788 1 C large V
Channel Transp. Frequ. Audio Decoder Video Polarisation
No. Name MHz Mode Mode Ampl.
22
Page 23

Eutelsat II-F1, 13° East, Television
60 RTL Television 11,596 1 D small H
61 RTL-2 11,095 1 D small H
62 TM 3 Fernsehen f¸r 11,345 1 D small H
63 DW-TV Deutsche Wel 11,163 18 D small V
64 VIVA Television 11,005 1 D small H
65 VIVA 2 10,972 1 D small H
66 Onyx TV 11,146 1 D small H
67 Eurosport / Quantum 11,39 7 D small H
68 euroNEWS [deutsch] 11,575 18 D small V
69 EBN European Busin 11,265 6 D small H
70 BBC WORLD 11,617 1 D small V
71 NBC SUPER Channel 10,987 7 D small V
72 arte 11,08 20 D small V
73 TV 5 International 11,321 16 D small V
74 MCM Euromusique 11,307 1 D small H
75 RAIUNO 11,366 1 D small V
76 RAIDUE 11,446 1 D small V
77 RAI TRE 11,534 30 D small V
78 TVE internacional 11,224 30 D small H
79 Polonia 1 11,492 30 D small V
80 PolSat Polska Tele 11,431 30 D small H
81 TVP TV Polonia 11,474 1 D small H
82 TRT INT/Landscape 11,181 30 C small H
83 mbc - Middle East 11,554 1 D small H
84 EDTV UAE Radio And 11,516 30 D small H
85 MTV 11,659 1 C small V
86 Canal Horizons 11,146 1 D small V
87 Eurotica 11,638 1 D small H
88 Kabel 1 11,055 digital A small H
89 11,673 30 D small H
Eutelsat II-F3,16° East, Television
90 RTM Morocco 1 10,972 30 D small V
91 HRT Zagreb 10,987 18 D small H
92 TV Plus 11,556 digital A small H
93 Duna TV 11,596 30 D small H
94 Canal Plus Polska 11,617 30 D small V
95 TV Algerien 11,678 30 D small H
Eutelsat II-F2,10° East, Television
96 atv 10,987 18 D small H
97 Satel 11,017 18 D small H
98 TGRT 11,095 18 D small V
99 EPT-ET 1 11,596 30 D small V
100 inter STAR 11,617 18 D small V
Intelsat, 1° West, Television
101 TV Norge 11,016 30 D large H
102 TV 1000 11,054 digital A large V
103 TV 3 Norge 11,096 digital A large H
104 NRK 11,176 digital A large H
105 TV 3 Danmark 11,473 digital A large V
106 Norsk TV2 11,555 digital A large H
107 TV 3 Sverige 11,597 digital A large V
108 TV Pluss 11,679 digital A large H
TV-Sat2 /Thor, 1° West, Television
109 TV 6 Danmark 12,054 digital A large L
110 CNN Nordic 11,785 digital A large R
111 Eurosport 11,862 digital A large R
112 TV 1000 11,9 digital A large L
113 C.Channel 11,938 digital A large R
114 Z-TV Danmark 11,977 digital A large L
MultyMac 6
23
Channel Transp. Frequ. Audio Decoder Video Polarisation
No. Name MHz Mode Mode Ampl.
Page 24

115 Filmnet 12,015 digital A large R
116 MTV Europe 12,092 digital A large R
Tele X/Sirius, 5° East, Television
117 TV3 Sverige 11,785 1 D large R
118 TV6 12,015 digital A large R
119 TV4 11,938 1 D large R
120 Z-TV Stockholm 12,092 1 D large R
121 Z-TV Sverige 11,862 digital D large R
122 Femman 12,475 1 D large L
Telecom 2B, 5° West, Television
123 M 6 - MÈtropole 6 12,522 19 D small V
124 TF 1 - TÈlÈvision 12,69 19 D small V
125 France 2 12,564 19 D small V
126 arte/ La Cinquieme 12,606 19 D small V
127 RTL 9 12,544 1 C small H
128 RTL-TVi 12,627 30 C small H
129 Tele Monte Carlo 12,648 19 D small V
130 La ChaÓne Info 12,584 19 D small H
Telecom 2A, 8° West, Television
131 Canal Plus France 12,522 digital A small V
132 MCM Euromusique 12,544 1 D* small H
133 Paris PremiËre 12,564 20 D small V
134 PlanËte 12,585 20 D small H
135 Fr. Super Vision 12,606 digital A small V
136 CinÈ-CinÈfil 12,627 20 D small H
137 Canal Plus 12,648 1 D small V
138 Cine Cinemas 12,690 digital A small V
139 Eurosport 12,711 20 D small H
140 Canal J/Canal Jimmy 12,732 20 D small V
TDF 1/2, 19° West, Television
141 Canal Plus 11,804 digital A small R
142 Cine Cinemas 11,881 digital A small R
143 Canal France Intern. 12,034 digital A small R
Hispasat, 30° West, Television
144 Tele Depor te 12,149 30 D small L
145 Canal Clasico 12,226 1 D small L
146 Telesat 5 12,38 30 D small L
147 Cinemania 2 12,303 30 D small L
148 Tele5 Espana 12,631 30 D small V
149 Antena 3 12,671 30 D small H
150 Canal Plus Esp. 12,711 30 D small H
Radio
ASTRA, 19.2° East, Radio
1 Deutsche Welle [deutsch] 11,229 2 D large V
2 Deutschlandfunk 11,347 2 D large V
3 DeutschlandRadio B 11,347 3 D large V
4 WDR Eins live 11,053 3 D large H
5 WDR 2 11,053 2 D large H
6 NDR 2 11,582 2 D large H
7 NDR 4 11,582 3 D large H
8 SWF 3 11,494 2 D large H
9 MDR Sputnik 11,112 2 D large H
10 RTL - Der Oldiesender 10,759 2 D large V
11 N-joy Radio 11,464 2 D large H
24
Channel Transp. Frequ. Audio Decoder Video Polarisation
No. Name MHz Mode Mode Ampl.
Page 25

12 Antenne Bayern 11,214 2 D large H
13 ERF Evangeliumsrun 11,038 8 D large V
14 ERF 11,038 9 D large V
15 Sky Radio 100.7 FM 11,318 2 D large V
16 Virgin 1215 11,377 2 D large V
17 Sunrise Radio 11,479 8 D large V
18 BBC Radio 1 FM 10,979 2 D large V
19 BBC Radio 2 11,553 10 D large H
20 BBC Radio 3 10,979 3 D large V
21 BBC Radio 4 11,552 9 D large H
22 BBC Radio 5 Live 11,552 11 D large H
23 BBC For Europe Wor 11,552 8 D large H
24 Super Gold 11,171 8 D large H
25 ASDA FM Retail 11,171 9 D large H
26 Radio Eviva 10,803 10 D large H
27 SRI International 10,803 9 D large H
28 America 1 11,538 10 D large V
29 Irish Satellite Ne 11,538 11 D large V
30 CNN Radio News 11,627 11 D large V
31 United Christian B 11,509 9 D large V
32 World Radio Networ 11,538 8 D large V
33 RTE Radio 1 11,538 9 D large V
34 CMR Country Music 11,568 9 D large V
35 SRI International 10,803 8 D large H
36 Radio RMF - FM 11,421 3 D large H
37 Cadena Dial 11,656 2 D large V
38 Cadena SER 11,656 10 D large V
39 FM IC Radio Network 11,127 10 D large V
40 FM IC Radio Network 11,127 11 D large V
41 Hitradio Veronica 10,744 2 D large H
42 Kink FM 10,759 3 D large V
43 Radio Sweden Inter 11,597 10 D large V
44 Deutsche Welle 11,229 10 D large V
45 Deutsche Welle 11,229 11 D large V
Eutelsat II-F1, 13° East, Radio
46 Deutsche Welle 11,163 1 D small V
47 BBC 11,617 11 D small V
48 VIVA 2 Radio 11,005 2 D small H
49 BBC [englisch] 11,617 8 D small V
50 VOA Europe [englisch] 11,163 2 D small V
51 WRN 2 10,987 8 D small V
52 WRN 3 11,265 7 D small H
53 France Infos 11,321 7 D small V
54 France Inter 11,321 8 D small V
55 France Culture Europe 11,321 9 D small V
56 RTSR Radio Suisse 11,321 10 D small V
57 RAI 1 11,366 8 D small V
58 RAI 2 11,446 8 D small V
59 RAI 3 11,366 9 D small V
60 RAI Radio Roma 11,446 9 D small V
61 Rete 8 Network 11,492 1 D small H
62 Polskie Radio 1 11,474 8 D small H
63 Polskie Radio 2 11,474 9 D small H
64 Polskie Radio 3 11,474 10 D small H
65 Radio BIS 11,474 11 D small H
66 Radio Maria Polska 11,492 9 D small H
67 RNE Radio 1 11,224 8 D small H
68 TRT FM 11,181 1 D small H
69 UAE Radio Dubai 11,516 6 D small H
70 Radio mbc FM 11,554 2 D small H
MultyMac 6
25
Channel Transp. Frequ. Audio Decoder Video Polarisation
No. Name MHz Mode Mode Ampl.
Page 26

11 Troubleshooting notes
26
Error Possible cause Measures
No picture, no sound, display is off No supply voltage Check mains cable and connector
Mains switch is switched off Switch on mains switch
No picture, no sound, display is off,
receiver is “ticking” Short circuit on LNB input Eliminate shor t circuit
No picture, no sound, display shows SH C
No picture, no sound, display is on Wrong LNB input selected Select right LNB input
LNB input overloaded Observe maximum LNB power
(see 13 “Technical data”)
Defective or missing cable connection Check all cable connections
(see 4 “Connections”)
Television set is set to the wrong channel Set channel 39 on the television set
(see operating instructions of the tv set)
Wrong outdoor unit selected Select the right outdoor unit
(see 5.3 “Outdoor unit”)
Outdoor unit is adjusted incorrectly Adjust outdoor unit correctly
Selected channel cannot be received Select a different channel
with the outdoor unit (see 6.2 “Channel selection”)
All satellite channels display “wavy lines”
Receiver transmits on a channel which is used Change transmission channel on the receiver
A channel that is received via antenna
for reception via antenna (see 4.2 “Television”)
displays “wavy lines”
Picture is full of white and black points Heavy rain or snow Remove snow from the outdoor unit
(spikes)
Outdoor unit is adjusted incorrectly Adjust outdoor unit correctly
Dish is too small for place of reception Use a bigger dish
Sound ok, no picture You have selected a radio channel Switch to TV mode (see 6.4 “TV/Radio control”)
Channel is encoded Connect adequate decoder (see 4.5 “Decoder”)
Picture ok, no sound Television is set to mute mode Check volume on the TV set
Receiver is set to mute mode or volume is too low
Check volume on the receiver (see 6.3 “Volume”)
Channel picture or sound disturbed, Audio or video settings have been modified Copy channel again from pre-programmation
though working OK before (see 9.1 “Copying channels”)
Channel is encoded now Connect adequate decoder (see 4.5 “Decoder”)
Channel is no longer broadcasting No measures
Some channels cannot be selected “Childproof control feature” or “Delete Switch off corresponding function
channel” is switched on (see 6.8 “Marking a channel”)
A connected decoder does not decode Key or Smart Card not valid Check decoder operating instructions
Wrong SCART connection Check connections (see 4.5 “Decoder”)
Wrong decoder signal selected Correct the setting (see 4.5 “Decoder”
and 9.3 “New channels”)
Page 27

12 Technical terms
Antenna cable
Cable connection between the satellite receiver´s modulator and
antenna input of the television set; may be used alternatively when there
is no SCART connector attached.
Audio bandwidth
Ability to separate two subcarriers; it is determined by the broadcasting
parameters of each satellite. An excessive audio bandwidth results in an
interference between the desired subcarrier and adjacent subcarriers; a
very small bandwidth may lead to distortions.
AV
See SCART
Coax cable
Cable connection between LNB and satellite receiver which is used to
transfer the signals received and for the power supply of the LNB.
DBS
Direct Broadcasting Satellite; refers to satellites with a very high
broadcasting power in the DBS frequency range, e.g. TV-Sat.
Decoder
Individual device or electronic circuit incorporated into the satellite
receiver which is used to decode encoded channels (e.g. Premiere).
Deemphasis
Adaptation of the audio frequency waveform to the broadcast signal;
determined by the satellite´s broadcasting parameters.
Eurocrypt
Method of encoding television signals transmitted in MAC standard;
there are two variants: Eurocrypt M and Eurocrypt S.
Frequency
Physical quantity; indicates the number of vibrations per second; unit of
measurement is Hertz (Hz).
Frequency range
a) Satellite or LNB:
11 GHz range 10.7 to 11.7 GHz
DBS range 11.7 to 12.5 GHz
12.5 GHz range 12.5 to 12.75 GHz
b) Receiver: Intermediate frequency or 1st IF 950 to 2050 MHz
Hz
Frequency unit of measurement
1 Hz (Hertz) = 1 vibration per second
1 kHz (Kilohertz) = 1,000 vibrations per second
1 MHz (Megahertz) = 1,000,000 vibrations per second
1 GHz (Gigahertz) = 1,000,000,000 vibrations per second
Horizontal polarisation
See polarisation level
Intermediate frequency
The frequency range used for satellite broadcasts cannot be transported
over cabling systems; this is why the LNB converts these frequencies to
an intermediate range between 950 and 2050 MHz. This makes
frequency transfer and processing in the receiver possible.
1. IF
= intermediate frequency
LNB (Low Noise Block Converter)
Receiving unit centred in the focus of the parabolic antenna. It converts
the frequency range of the satellite into the intermediate frequency of the
receiver.
LOF
Local Oscillator Frequency; specified in MHz or GHz, depending on the
LNB and the received frequency range. Receiving frequency of the
receiver = Broadcasting frequency of the satellite LOF
Correlation between frequency range and LOF:
11 GHz range LOF 9.75 or 10 GHz
DBS range LOF 10.75 GHz
12.5 GHz range LOF 10.75 or 11.475 GHz
MAC
Abbreviation of “Multiplexed Analog Components”; method of
transmitting analog video and digital audio signals via satellite;
the following variants exist: B-, C-, D- and D2-MAC.
Mode
Determines if a channel is received in mono or stereo quality.
Modulation with 22 kHz
Additional control signal, e.g. for an external switching device used to
toggle between two LNBs.
Modulator
Electronic circuit in the satellite receiver or video recorder which is used
to connect to a television set via antenna cable.
Multyfeed
Outdoor unit consisting of a parabolic antenna and multiple LNBs for
the reception of several satellites.
Outdoor unit
Term used to describe the entire system which is mounted outdoors. It
consists of a parabolic antenna and one or more LNBs which are used
to receive the broadcasts from one or more satellites.
Parabolic antenna
Reflector of parabolic shape made from metal or coated plastic which is
used to focus the electromagnetic waves which are transmitted from a
satellite.
Polarisation level
For an efficient use of the available frequency range satellites broadcast
adjacent channels with opposite polarities (alternately horizontal and
vertical, or left-circular and right-circular). To receive both polarisation
levels, two single or one V/H LNB are necessary.
Radio channels
Apart from the television channels, satellites also broadcast radio
channels which are transported on subcarriers. In addition to the
subcarrier´s frequency further parameters have to be set: audio
bandwidth, deemphasis and mode.
Receiver
See satellite receiver
Satellite
Name and position of the satellite relative to the orbit,
e.g. name: Eutelsat position: 13° East or - 13°
Telecom 2B 5° West or +5°
Satellite receiver
The signals received and converted by the LNB cannot be used by the
television. The satellite receiver re-processes the signals so that its
outputs provide common audio and video signals (AV) that can be
transferred to the television.
SCART
Connector on television sets, video cassette recorders, satellite receivers
and other consumer electronic equipment used to produce audio and
video signals (AV).
MultyMac 6
27
Page 28

Single LNB
LNB used to receive one polarisation level.
Subcarrier
Carrier frequencies for television sound or radio channels which are
being transmitted together with the television picture; a stereo channel
requires two subcarriers, e.g. 7.38 and 7.56 MHz.
Supply voltage
LNBs are powered via the coax cable; the receiver supplying a voltage
of 14 or 18 volts.
Vertical polarisation
See polarisation level
V/H LNB
LNB which allows the reception of both polarisation levels on one or
two frequency ranges. The supply voltage of 14/18 V (18 V =
horizontal level, 14 V = vertical level) switches between polarities. In
some LNBs the 22 kHz modulation toggles between the frequency
ranges (off = 11 GHz, on = DBS range and 12.5 GHz range).
Tuner
Input frequency
1
910-2100 MHz
Input resistance 75 ½
Input level 47-77 dBµV
Input connection 2 F-sockets
LNB control DC
1
17.5 V ± 1.5 V or 1 V higher, max. 400 mA
12.7 V ± 1.2 V or 1 V higher, max. 400 mA
LNB control AC
2
22 kHz; 0.6 Vpp ± 0.2 V
Bandwidth 27 MHz
Tuning PLL frequency synthesis
Step size 1 MHz
AFC range ± 5 MHz
TV connection
Connector SCART “TV”
Video:
- Deemphasis CCIR Rec. 405-1; 625 lines
- Bandwidth 5 MHz (3 dB)
- Output level 1 V
pp
at 75 ½, 2 values adjustable
RGB:
- Bandwidth 5 MHz (3 dB)
- Output level 0.7 V
pp
at 75 ½
Audio, 2 channels:
- Reception frequency
1
5.5-8.7 MHz, individually adjustable
- Step size 10 kHz
- Bandwidths
1
130, 280, 380 and 600 kHz
- Deemphasis
1
50 µs, 75 µs, J17, Panda 1 compatible
- Frequency range NF 100 Hz...14 kHz
- Output level 0.5 VRMS at rated deviation, 1 kHz
- Distortion factor typ. 0.5%, at 0.5 VRMS
Switching voltage
- for AV operation 0/12 V (7 V for 16:9 MAC signal) at > 10 k½
- for RGB fast blanking0 / 1.4 V at 75 ½
VCR connection
Connector SCART “VCR”
Output signal
- video/audio: see TV connection
Input signal
- video: FBAS, 1 Vpp ± 2 dB at 75 ½
- audio: R, L, approx. 0.5 VRMS
Decoder connection
Connector SCART “DECODER”
Output signal
1
switchable to 3 levels
- video: base band 1 V
pp
at 75 ½ at 1.5 MHz
reference frequency
with deemphasis, filter and clamping
FBAS signal, see TV connection
- audio: R, L, 0.5 VRMS at rated deviation, 1 kHz
Input signal
- video FBAS, 1 V
pp
± 2 dB at 75 ½
- audio: R, L, approx. 0.5 VRMS
- RGB signal voltage 0.7 V at 75 ½
- RGB fast blanking 1 V at 75 ½
HF modulator
Tuning range channel 22-69
preset to channel 39
standard G
Output level 71 ± 4 dBµV
Output IEC plug
Antenna input IEC socket
Output resistance 75 ½
Timer
Programmability Minutes, hours, day, programme, on/off,
daily, sleep
Memory positions 5
Power supply
Mains voltage 230 V ±10%, 50 Hz
Power requirements < 28 W (with LNB 400 mA)
< 20 W (without LNB)
< 8 W (standby)
General information
Temperature range + 15° C...+ 35° C
Humidity < 80%
Dimensions 370 mm x 65 mm x 270 mm
Weight 1.8 kg
1
storable with each programme position 2storable with each satellite position
28
244.96
13 Technical data
 Loading...