


PT-7
Chromatic Tuner/
Recorder
This device has a serial
number located on the
bottom panel. Please record it
and retain it for your records.
Serial number:
__________________
D01088120A
OWNER’S MANUAL
2 TASCAM PT-7
IMPORTANT SAFETY INSTRUCTIONS
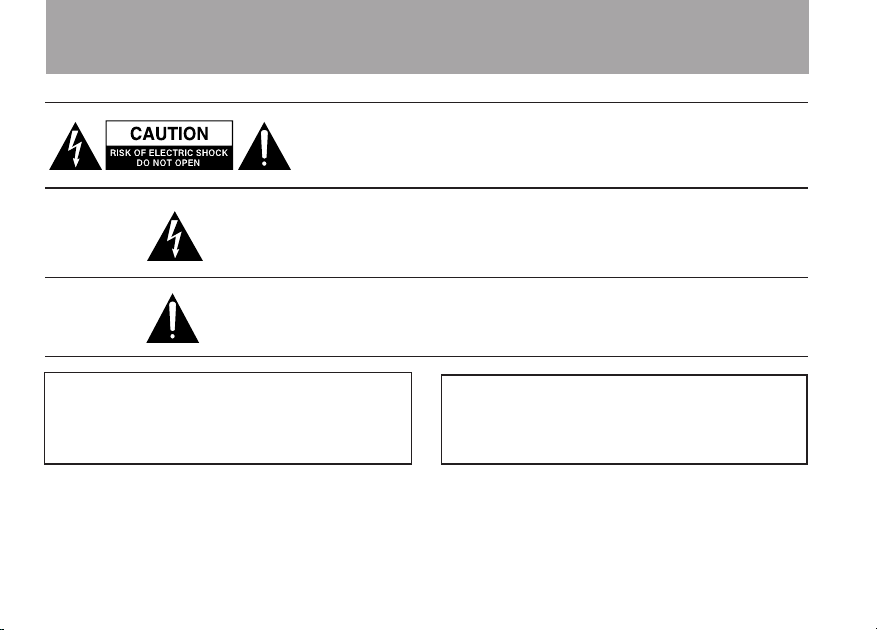
CA UTI O N : TO REDU C E THE RISK OF ELECTRI C SH OCK, DO NOT
REMOVE COVER (OR BACK ). NO USER-SERVICEABLE PARTS INSIDE.
REFER SERVICING TO QUALIFIED SERVICE PERSONNEL.
The lightning flash with arrowhead symbol, within equilateral triangle, is
intended to alert the user to the presence of uninsulated “dangerous voltage” within the product’s enclosure that may be of sufficient magnitude to
constitute a risk of electric shock to persons.
The exclamation point within an equilateral triangle is intended to alert the
user to the presence of important operating and maintenance (servicing)
instructions in the literature accompanying the appliance.
WARNING: TO PREVENT FIRE
OR SHOCK HAZARD, DO NOT
EXPOSE THIS APPLIANCE TO
RAIN OR MOISTURE.
CAUTION:
If you are experiencing problems with this product,
contact TEAC for a service referral. Do not use the
product until it has been repaired.

TASCAM PT-7 3
IMPORTANT SAFETY INSTRUCTIONS
1 Read these instructions.
2 Keep these instructions.
3 Heed all warnings.
4 Follow all instructions.
5 Do not use this apparatus near water.
6 Clean only with dry cloth.
7 Do not block any venti latio n ope nin gs . Instal l in
accordance with the manufacturer’s instructions.
8 Do not install near any heat sources such as radiators,
heat registers, stoves, or other apparatus (including
amplifiers) that produce heat.
9 Do not defeat the safety purpose of the polarized or
grounding-type plug. A polarized plug has two blades
with one wider than the other. A grounding type plug
has two blades and a third grounding prong. The wide
blade or the third prong are provided for your safety. If
the provided plug does not fit into your outlet, consult
an electrician for replacement of the obsolete outlet.
10 P ro tect the po wer cor d from being wal ked on or
pinched particularly at plugs, convenience receptacles,
and the point where they exit from the apparatus.
11 Only use attachments/accessories specified by the
manufacturer.
1 2 Use only with the cart, st an d, tripod, bra cket, or
table specified by the manufacturer, or sold with the
apparatus. When a cart is used, use caution when
moving the cart/apparatus combination to avoid injury
from tip-over.
13 Unplug this apparatus during lightning storms or when
unused for long periods of time.
14 Refer all servicing to qualified service per so nn el .
Servicing is required when the apparatus has been
damaged in any way, such as power-supply cord or
plug is damaged, liquid has been spilled or objects
have fallen into the apparatus, the apparatus has been
exposed to rain or moisture, does not operate normally,
or has been dropped.
Do not expose this apparatus to drips or splashes.
•
Do not place any objects filled with liquids, such as
•
vases, on the apparatus.
Do not install this apparatus in a confined space such
•
as a book case or similar unit.
The apparatus draws nominal non-oper ating power
•
from the AC outlet with its POWER or STANDBY/ON
switch not in the ON position.

4 TASCAM PT-7
IMPORTANT SAFETY INSTRUCTIONS
The apparatus should be located close enough to the
•
AC outlet so that you can easily grasp the power cord
plug at any time.
The main plug is used as the disconnect device, the
•
disconnect device shall remain readily operable.
If the product uses batteries (including a battery pack
•
or installed batteries), they should not be exposed to
sunshine, fire or excessive heat.
CAUTION for products that use replac eable lithium
•
batteries: there is danger of explosion if a battery is
replaced with an inc or rect type of battery. Replace
only with the same or equivalent type.
Caution sh ou ld be take n when using earphones or
•
headphones with the product because excessive
sound pressure (volume) from earphones or headphones can cause hearing loss.
Cautions about Batteries
This product uses batteries. Misuse of batteries could
cause a leak, rupture or other trouble. Always abide by
the following precautions when using batteries.
Never recharge non-rechargeable batteries. The
•
batteries could rupture or leak, causing fire or injury.
When installing batteries, pay attention to the polar-
•
ity indications (plus/minus (+/–) orientation), and
install them correctly in the battery compartment as
indicated. Putting them in backward could make the
batteries rupture or leak, causing fire, injury or stains
around them.
When you store or dispose batteries, isolate their termi-
•
nals with insulation tape or something like that to prevent
them from contacting other batteries or metallic objects.
When t hr owing us ed batter ie s away, f ol low th e
•
disposal instructions indicated on the batteries and the
local disposal laws.
Do not use batteries other than those specified. Do not
•
mix and use new and old batteries or different types of
batteries together. The batteries could rupture or leak,
causing fire, injury or stains around them.
Do not carry or store batteries together with small
•
metal objects. The batteries could short, causing leak,
rupture or other trouble.
Do not heat or disassemble batteries. Do not put them
•
in fire or water. Batteries could rupture or leak, causing
fire, injury or stains around them.
If the battery fluid leaks, wipe away any fluid on the
•
battery case before inserting new batteries. If the
batter y fluid gets in an eye , it could cause loss of
eyesight. If fluid does enter an eye, wash it out thoroughly with clean water without rubbing the eye and
then consult a doctor immediately. If the fluid gets on a
person’s body or clothing, it could cause skin injuries
or burns. If this should happen, wash it off with clean
water and then consult a doctor immediately.

TASCAM PT-7 5
IMPORTANT SAFETY INSTRUCTIONS
The un it powe r should be off when you in st all and
•
replace batteries.
Remove the batteries if you do not plan to use the unit
•
for a long time. Batteries could rupture or leak, caus-
ing fire, injur y or stains around them. If the battery fluid
leaks, wipe away any fluid on the battery compartment
before inserting new batteries.
Do not disassemble a battery. The acid inside the
•
batter y could harm skin or clothing.
THIS CLASS B DIGITAL APPARATUS COMPLIES WITH
CANADIAN ICES-003.
CET APPAREIL NUMÉRIQUE DE LA CLASSE B EST
CONFORME À LA NORME NMB-003 DU CANADA.
FOR U.S.A .
TO THE USER
This equipment has been tested and found to c omp ly
with the limits for a Class B digital device, pursuant to
Part 15 of the FC C Ru le s. The se limits are desi gn ed
to p rov ide reas ona ble prot e cti on again s t ha rmf ul
interference in a residential installation. This equipment
generates, uses, and can radiate radio frequency energy
and, if not install ed and used in acc ordance with the
instruction manual, may cause harmful interfere nce to
radio communications. However, there is no guarantee
that interference will not occur in a particular installation.
If this equipm ent does cause harmful inter ference to
radio or television reception, which can be determined
by turni ng th e equ ipmen t off an d on, the us er is
encouraged to try to correct the interference by one or
more of the following measures.
a) Reorient or relocate the receiving antenna.
b) Increase the separation between the equipment and
receiver.
c) Conne ct the equipm ent into an ou tlet on a ci rc uit
different from that to which the receiver is connected.
d) Con sult the d eal er or an exp erie nce d rad io / T V
technician for help.
CAUTION
Changes or m od if ic ations to this e quipment n ot
expressly approve d by TEAC CORPOR ATION for
compliance cou ld void the user's authorit y to operate
this equipment.
6 TASCAM PT-7
IMPORTANT SAFETY INSTRUCTIONS

TASCAM PT-7 7
Table of Contents
1 – Introduction ............................................9
Features ......................................................................9
Items included with the product ............................... 10
Conventions used in this manual ..............................10
Trademarks ...............................................................10
Precautions for placement......................................... 11
Beware of condensation ............................................ 11
Cleaning the unit....................................................... 11
2 – Names and functions of parts ............. 12
Top panel .................................................................. 12
Rear panel ............................................................... 14
Left side panel ........................................................... 15
Right side panel ........................................................16
Bottom panel ...........................................................17
Display ......................................................................18
3 – Preparation ........................................... 20
Preparing the power .................................................20
Powering the unit ................................................ 20
Using a battery .................................................... 20
Using an AC adaptor (optional) ........................... 21
Using an external microphone ..................................22
Attaching the unit to a music stand .......................... 22
4 – Using the Tuner and Pitch Trainer
functions...............................................23
Calibration ................................................................23
Auto-calibration ........................................................ 23
Scales ........................................................................ 24
Tuning an instrument ................................................25
Pitch training ............................................................ 27
Setting the speed of tuner response .......................... 28
5 – Using the metronome ..........................29
Set the tempo ........................................................... 29
Set the rhythm .......................................................... 30
Starting and stopping the metronome ......................31
Changing the metronome sound ............................... 31
6 – Using the recording and playback
functions...............................................33
Recording .................................................................. 33
Setting the input level ......................................... 33
Recording ............................................................ 34
Starting a new track while continuing to record . 34
Stopping recording .............................................. 34
Playback .................................................................... 34
Selecting a track for playback .............................34
Playing back ........................................................35

8 TASCAM PT-7
Table of Contents
Searching backward/forward ...............................35
Changing the pitch without chaning the speed
during pplayback ................................................. 36
Changing the speed without changing the pitch
during playback ................................................... 35
Loop playback ..................................................... 36
Erasing tracks ............................................................ 38
Erasing only the current track .............................38
Erasing all tracks ................................................. 38
Automatically correcting the pitch of recordings ....... 39
7 – Specifications ........................................40
Ratings ......................................................................40
Input/output ratings .................................................. 40
General .....................................................................41
Backup memory ........................................................41
Dimensional drawings ............................................... 42

TASCAM PT-7 9
1 – Introduction
Thank you very much for purchasing the
TASCAM PT-7 Chromatic Tuner/Recorder.
Please read this Owner’s Manual before using the
unit. We hope that with accurate understanding of
how to use its functions, you will enjoy using this
Chromatic Tuner/Recorder for many years.
After you have nished reading this Owner’s
Manual, please keep it in a place where you can
refer to it any time. Moreover, you can download
a digital copy from our website (http: //www.
tascam.com/).
Features
Real-time pitch detection and display
•
Built-in microphone
•
Input jack for connecting external contact mics
•
Record sound memos (for about 20 minutes
•
total)
Pitch can be corrected during playback
•
Pitch of a performance can be checked after
•
recording
During playback, pitch can be changed without
•
changing speed or speed can be changed
without changing pitch
Loop (repeat) playback possible
•
Tuner with calibration function
•
8 types of scales can be used
•
Metronome function includes, 1 - 7 beat
•
rhythms, duplets, triplets, shuffle and
quadruplets (30 - 300 BPM range)
Built-in speaker
•
Output for use with headphones
•
Hook to hang on a music stand
•
Built-in stand allows tabletop use
•
Runs on a single AA battery or using an AC
•
adaptor (optional TASCAM PS-P520)

10 TASCAM PT-7
1 – Introduction
Items included with the product
The following items are included with the product.
Main unit 1
•
AA battery 1
•
Warranty 1
•
Manual (this document) 1
•
Please contact us if any of these items are missing
or have been damaged during transportation.
Take care when opening the package not to
damage the equipment. Keep the box and
packaging materials for transportation in the
future.
Conventions used in this manual
The following conventions are used in this
manual.
Keys, jacks and other parts of this unit and
•
other equipment are indicated in a bold font
like this: MODE key.
Characters that appear on the display are shown
•
with quotation marks like this: “G#”
Additional information is provided as necessary
•
as tips, notes and cautions.
TIP
These are hints about how the unit can be used.
NOTE
These provide additional explanations and special
situations, for example.
CAUTION
These instructions should be followed to avoid injury,
damage to equipment or loss of data.
Trademarks
TASCAM is a registered trademark of TEAC
•
Corporation.
Other company names, product names and
•
logos in this document are the trademarks

TASCAM PT-7 11
1 – Introduction
or registered trademarks of their respective
owners.
Precautions for placement
The environmental temperature operation range
•
of this unit is 5–35° C (41–95° F).
Do not install in the following types of places.
•
Doing so could degrade the sound quality and/
or cause malfunctions.
Places with significant vibrations or that
•
are other wise unstable
Near windows or other places exposed to
•
direct sunlight
Near heaters or other extremely hot places
•
Extremely cold places
•
Places with bad ventilation or high humid-
•
ity
Beware of condensation
Condensation could occur if the unit is used when
the temperature changes suddenly, for example,
after being moved from a cold to a warm place or
immediately after a room is warmed.
If condensation occurs, let the unit sit for about
one or two hours and then turn the power on again.
Cleaning the unit
To clean the unit, wipe gently with a soft dry
cloth. Do not wipe with chemical cleaning cloths,
benzene, paint thinner, alcohol or other chemical
agents. Doing so could damage the surface or
cause fading.
12 TASCAM PT-7
2 – Names and functions of parts
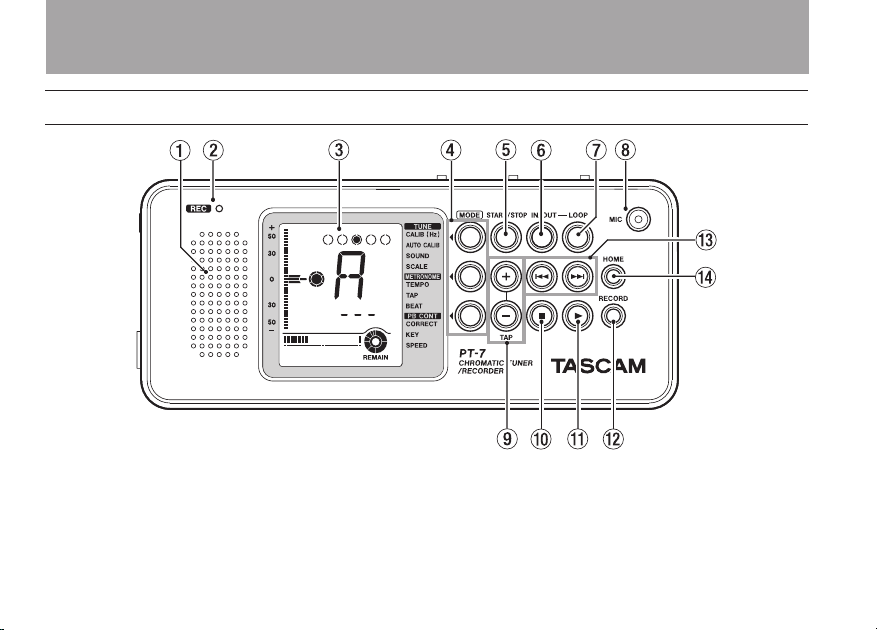
Top panel
1 Built-in speaker
This is a speaker for monitoring the sound
output from recordings, standard pitch, and
the metronome click.
Use the SPEAKER ON/OFF switch on the rear
panel to set whether or not sound is output
from this speaker.

TASCAM PT-7 13
2 – Names and functions of parts
NOTE
Due to the characteristic of the built-in speaker,
some sound might be difficult to hear even if you
turn up the volume.
2 REC indicator
This lights during recording.
3 Display
This shows various types of information.
4 MODE keys
Use these to change the TUNE (tuner),
METRONOME and PB CONT (playback
control) functions.
5 START/STOP key
Press this to start and stop the metronome.
When tuning, press it to start and stop
output of the standard pitch from the built-in
speaker.
6 IN/OUT key
When playing back a recorded track, press to
set and cancel loop playback star ting (IN) and
ending (OUT) points.
7 LOOP key
Press to enable and disable loop playback
when playing back a recorded track.
8MIC
Use this built-in monaural microphone for
recording and the pitch trainer functions.
NOTE
When a contact mic or other device is connected to
the INPUT jack, the built-in mic is disabled. When
you want to use the built-in mic, do not connect
anything to the INPUT jack.
9 TAP +/– keys
Use these to set various internal setting
parameters.
0 STOP key
Press to stop recording or stop the playback of
a recorded track.
q PLAY key
Play a recording.
w RECORD key
Press this key during playback or when
14 TASCAM PT-7
2 – Names and functions of parts
stopped to start recording.
Press this key during recording to start a
new track (file) from that point and continue
recording.
e Â/¯ keys
When stopped or when playing back a
recorded track, press these keys briefly to
skip to the previous/next track.
Press and hold these keys to search backward/
Rear panel
forward in a track while playing.
r HOME key
Press this key to exit the various setting
modes. The pameter value display area of the
LCD shows the current track (song) number.
NOTE
If there is no recorded track (file), “- - -” appears in
the parameter value display area of the LCD.

TASCAM PT-7 15
2 – Names and functions of parts
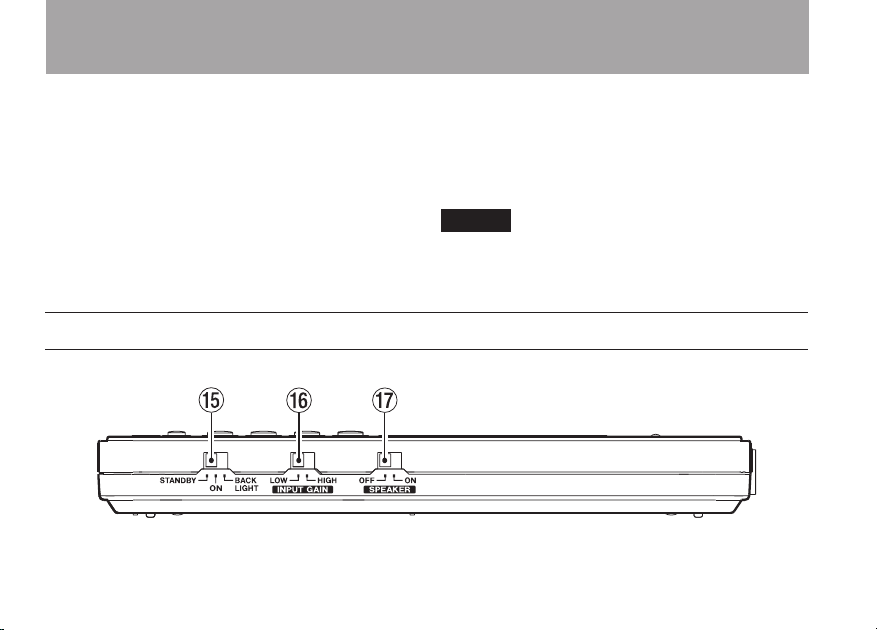
t
STANDBY switch
Use this switch to turn the trainer’s power ON
and STAN DBY.
STA NDBY: Turns the power to standby.
ON: Turns the power on without illuminating
the LCD with the backlight.
BACK LIGHT: Turns the power on and
illuminates the LCD with the backlight.
y
INPUT GAIN switch
Set this to suit the level of the signal input to
the INPUT jack.
If the input volume is quiet set this to HIGH,
and if it is loud set this to LOW.
u
SPEAKER switch
Use this to turn the built-in speaker ON and
OFF.
Left side panel
i PHONES jack
Use this to connect headphones.
o VOLUME control
Use this to adjust the volume of the
headphone and the built-in speaker output.
p INPUT jack
Connect an external contact mic, for example,
to the unit here to input sound.
NOTE
When a contact mic or the other device is •
connected to the INPUT jack, the built-in mic is
disabled. When you want to use the built-in mic,
do not connect anything to this jack.

16 TASCAM PT-7
2 – Names and functions of parts
This unit does not support the direct input of •
electric guitars, effect pedals and similar devices.
If you connect one of these directly to the unit,
recording could be distorted. If this happens, you
might be able to record without distortion if you
turn down the output of the connected device.
Right side panel
a DC IN 5V jack
Connect a specialized PS-P520 AC adaptor
(sold separately).
Do not use any other type of AC adaptor.
s Strap attachment
Use this to attach a strap.

TASCAM PT-7 17
Bottom panel
2 – Names and functions of parts
d Stands
Open these to allow the unit to stand up by
itself. You can also hang the unit on a music
stand.
f Battery compartment (AA battery)
This compartment holds one AA battery that
powers the unit. (See “Using a battery” on
page 20.)

18 TASCAM PT-7
2 – Names and functions of parts
Display
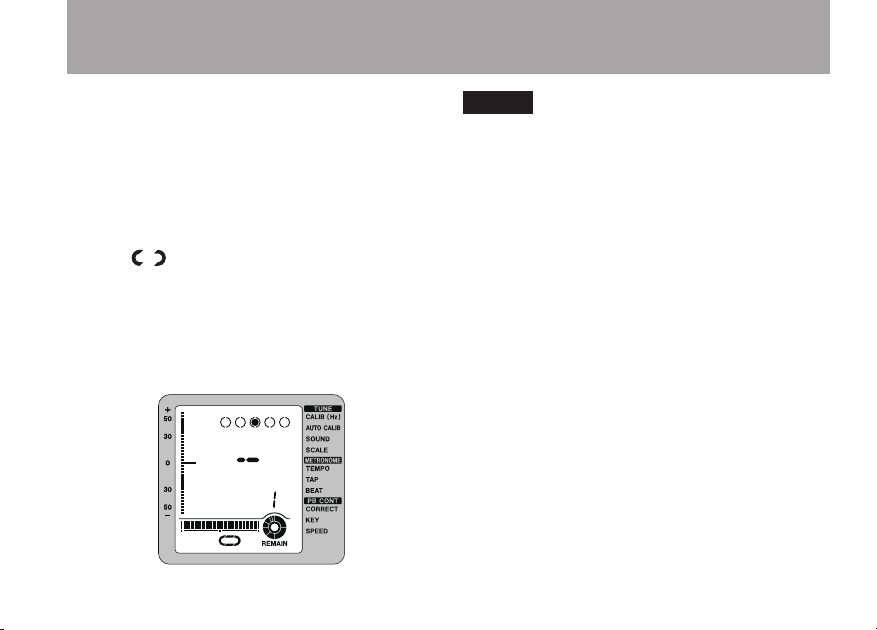
This unit’s display shows the following
information.
1 Pitch guide bars
This bar meter shows how much a pitch
differs from a standard pitch. The range
shown is ±60 cents (100 cents is one
semitone).
0 - 30 cents: 2.5-cent units
30 - 50 cents: 5-cent units
50 - 60 cents: 10-cent units
2 Pitch guide circle
When there is almost no difference between
the detected pitch and the standard pitch, the
circle in the center is shown.
When there is almost no difference in pitch,
but the pitch is not stable, the circle in the
middle appears and the ring around it turns.
When the pitch is far off, nothing is shown.
3 Beat indicator
When using the metronome, the circle moves
in time with the beat.
4 Markers
These indicate the currently set functions.

TASCAM PT-7 19
2 – Names and functions of parts
5 Pitch name display area
The pitch is shown as a letter with a # or õ as
necessary.
C C# D
E
E F F# G G# A
õ
B
õ
During calibration, the f irst place of decimal
point of the standard frequency is shown.
6 Parameter value display area
This shows setting values for each mode.
During calibration, the standard frequency is
shown.
7 Playback position bar/Rec level meter
This shows the current playback position in
5% increments with the entire track being
100%.
This functions as a recording level meter
during recording.
8 Arrow mark
This appears during playback, fast reverse
search playback and recording.
9 PLAY indicator
This appears during playback
0 Loop indicator
This appears when loop points are set. When
setting the loop IN point, the left half of the
B
indicator appears. “ ” appears when both
the loop IN and OUT points are set and loop
playback is OFF. The indicator appears to
turn during loop playback.
q Remaining memory indicator
This shows the amount of space remaining
for recordings. When all segments are shown
100% of the space is remaining. Fewer
segments indicate 75%, 50%, 38.5%, 25%,
18%, 10%, 5% and f inally 0% remaining.
w ON indicator
This appears when CORRECT mode is
active.
20 TASCAM PT-7
3 – Preparation
Preparing the power
Powering the unit
This unit can be powered by a single AA battery
or a TASCAM PS-P520 AC adapator (sold
separately). Alkaline and nickel metal hydride
batteries can be used with this unit.
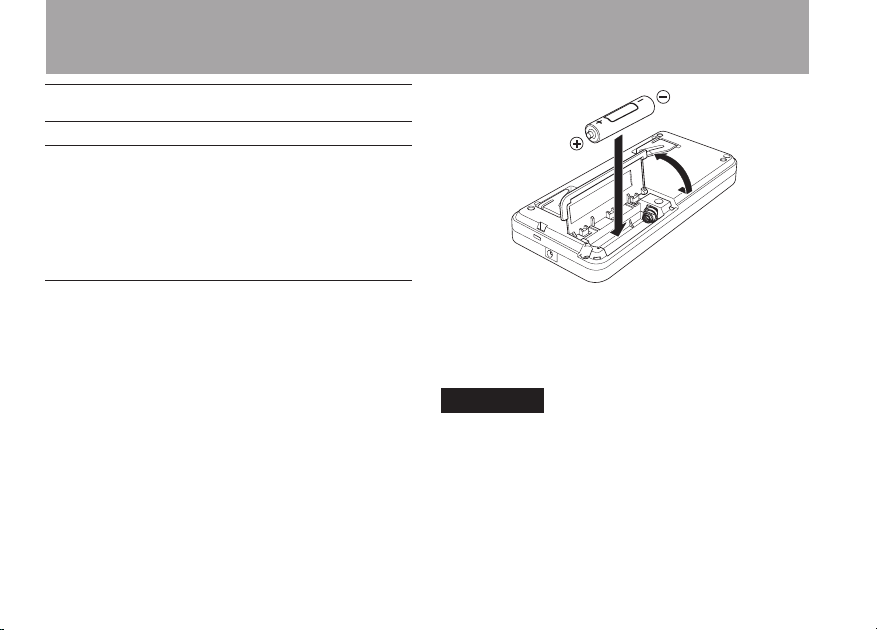
Using a battery
Open the battery compartment cover on the
bottom of the unit, and insert a battery correctly
aligned with the + and – indications shown inside
the case. Close the battery case cover.
When the battery charge becomes low, “bAt” and
“Lo” are shown alternately in the parameter value
display area. Change the batteries when you see
this warning.
CAUTION
This device does not recharge batteries. •
The included battery is for confirming the opera-•
tion of the unit. For this reason it might not last
long.

TASCAM PT-7 21
TASCAM
PS-P520
(optional)
DC plug
AC outlet
3 – Preparation
Using an AC adaptor (optional)
Connect a dedicated TASCAM PS-P520 AC
adaptor (sold separately) to the DC IN 5V jack
as shown in the illustration.
CAUTION
When using an AC adaptor, always use the specialized PS-P520 AC adaptor. Use of a different adaptor
could cause damage, fire or electrical shock.
NOTE
Before connecting an AC adaptor, turn the unit’s •
power OFF temporarily.
When both batteries are installed and the AC •
adaptor is connected, power will be supplied
from the AC adaptor.

22 TASCAM PT-7
3 – Preparation
Using an external microphone
You can connect an external mic that is attached
directly to an instrument (contact type), for
example, to the INPUT jack on the left side panel.
When performing with multiple instruments at the
same time and in other noisy surroundings that
make it difcult to adjust pitch using the built-in
mic, using an external mic makes pitch adjustment
easier.
Attaching the unit to a music stand
This unit can be attached to a music stand as
shown in the following illustration.
Open the built-in stands on the bottom panel of
the unit, and attach them by their slits to the music
stand.
CAUTION
The unit’s built-in stands are not designed to attach
securely to a music stand. Please be careful when
using this unit attached to a stand in order to
prevent it from falling off.

TASCAM PT-7 23
4 – Using the Tuner and Pitch Trainer Functions
Calibration
The standard frequency of A can be set manually
in a range of 349.0 - 499.0 Hz in 0.1 Hz
increments. The default value is 440.0 Hz.
1 Press the top MODE key repeatedly until the
marker appears on the display next to CALIB
(Hz).
2 The standard frequency appears in the
parameter value (integer part) and pitch
name (fractional part) display area. Use the
+ and – keys to set its value. Press the + and
– keys at the same time to set it to 440.0 Hz.
(This example shows “440.5 Hz”.)
3 Press the HOME key to return to the Home
Screen.
Auto-calibration
The standard frequency of A can be set to
automatically match an input sound in a range of
349.0 - 499.0 Hz in 0.1 Hz increments.
1 Press the top MODE key repeatedly until the
marker appears on the display next to AUTO
CALIB.
2 Continuously input a sound to set the
standard pitch through the built-in mic
or the INPUT jack. The input sound is
automatically measured and set as the
standard value for A. During calibration, the
play position bar moves from left to right.
When it stops at the right end, setting is
complete.

24 TASCAM PT-7
4 – Using the Tuner and Pitch Trainer Functions
Accurate calibration is not possible if the sound •
volume is too quiet or too loud. Adjust the input
level using the INPUT GAIN switch on the rear
panel.
Scales
This unit can be set to use any of the eight
following scales.
3 Press the HOME key to return to the Home
Screen.
NOTE
To change the setting after automatic calibration has
been completed, repeat steps one and two above.
CAUTION
Input a single sound during calibration. Accurate •
calibration is not possible if multiple sounds are
input.
Input a sound with a steady pitch until calibration •
completes. Accurate calibration is not possible if
the pitch is unstable.
1: 12-note equal temperament
2: Pythagorean
3: Mean Tone
4: Werckmeister III
5: Kirnberger III
6: Kellner
7: Vallotti
8: Young

TASCAM PT-7 25
4 – Using the Tuner and Pitch Trainer Functions
1 Press the top MODE key until the marker
appears next to SCALE.
2 A number between 1 and 8 appears in the
parameter value display area. The scales
that correspond to the numbers 1-8 are also
listed on the rear panel of the unit. Use the +
and – keys to select the scale. Press the + and
– keys at the same time to set it to 12-note
equal temperament.
3 Press the HOME key to return to the Home
Screen.
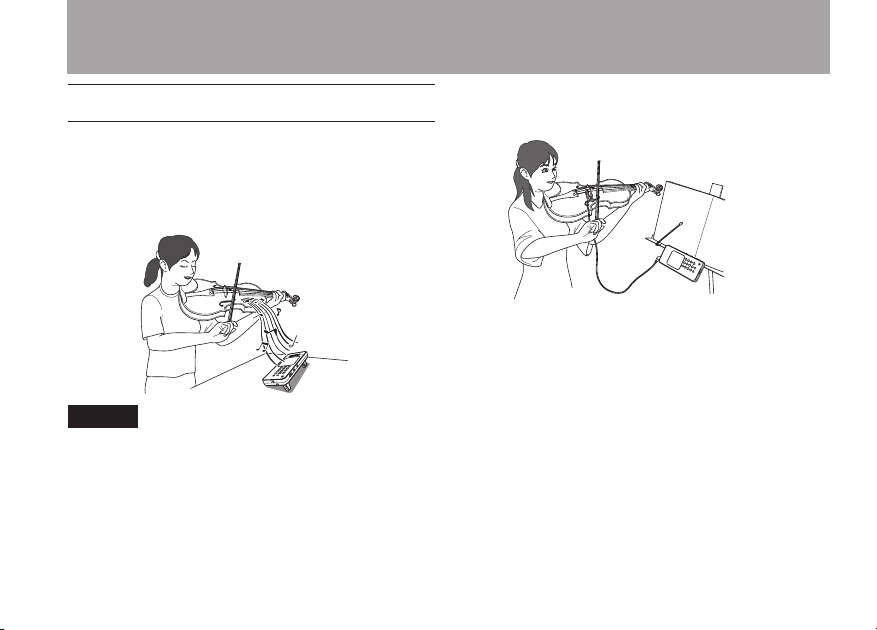
Tuning an instrument
Tuning with a microphone (built-in or •
external)
1 When using the built-in microphone for
tuning, do not connect anything to the INPUT
jack.
2 Press the HOME key
3 Play a single note on the instrument. The
nearest note name is shown in the pitch
display area, and the pitch guide bar on the
display shows how far out of tune the note is.
4 Tune the instrument until the desired pitch
name is shown, the pitch guide bar shows no
gap and the pitch guide circle appears.

26 TASCAM PT-7
4 – Using the Tuner and Pitch Trainer Functions
from C2 to C6 in semitone steps. Press both
+ and – keys at the same time to set the note
to A4.
4 Press the START/STOP key to make the unit
output the note from its speaker. Use the
VOLUME dial to adjust the output volume.
5 Play a single note on the instrument and
tune it to the note output from the unit’s
CAUTION
Play only one note at a time to prevent unrelated
pitch information from being input. Accurate tuning
is not possible if multiple notes are played.
Tuning by listening to a selected pitch •
(sound mode)
1 Set the SPEAKER switch to ON.
2 Press the top MODE key repeatedly until
the marker appears on the display next to
SOUND.
3 Use the + and – keys to select the note name
that you want to use for tuning in a range
speaker.
TASCAM PT-7 27
4 – Using the Tuner and Pitch Trainer Functions
Pitch training
When practicing alone in a quiet place, using the
built-in microphone might be convenient.
Play the instrument while facing the trainer’s
built-in mic.
NOTE
Do not connect an external mic if you want to train
using the built-in mic.
When training in a place with other performers or
that is otherwise noisy, use of an external mic is
helpful.
Attach the external mic to your instrument and
connect it to the INPUT jack on the left side of the
unit.
Press the HOME key.
When you start playing, the gap between the
standard pitch and the played pitch is shown in
real time by the unit’s pitch guide bar, the pitch
guide circle and the pitch name display area.
Watch these indications while practicing.

28 TASCAM PT-7
4 – Using the Tuner and Pitch Trainer Functions
time while pressing and holding the MODE
key, the response speed becomes 0 (default
value).
Setting the speed of tuner response
The tuner has ve response speeds:
+2 (fastest), +1, 0 (default value), –1 and –2
(slowest).
Press and hold the top MODE key and press
the + or – key to show the current response
speed. Continue pressing the MODE key,
and press the + or – key again to change the
response speed.
When you press the + and – keys at the same

TASCAM PT-7 29
Set the tempo
TEMPO mode•
You can set the tempo manually in a range of 30
- 300 BPM (beats per minute = number of quarter
notes in one minute) in 1-BPM increments. The
default setting is 120 BPM (É =120).
1 Press the second MODE key from the top
repeatedly until the marker is shown next to
TEMPO on the display.
2 The current tempo appears in the parameter
value display area. Use the + and – keys to
set it. Press the + and – keys at the same time
to set it to 120 BPM (default value).
5 – Using the metronome
3 Press the HOME key to return to the Home
Screen.
TAP mode•
You can set the tempo by tapping the + and – keys.
1 Press the second MODE key from the top
repeatedly until the marker is shown next to
TAP on the display.
2 Tap the + and/or – key repeatedly at the
desired tempo. The tempo appears in the
parameter value display area.
Press the + and – keys at the same time to set
it to 120 (default value).

30 TASCAM PT-7
5 – Using the metronome
3 Press the HOME key to return to the Home
Screen.
Set the rhythm
The following rhythms can be set with this unit.
0–0: Mute
•
1–4: No accent
•
2–4: 2/4 time
•
3–4: 3/4 time
•
4–4: 4/4 time
•
5–4: 5/4 time
•
6–4: 6/4 time
•
7–4: 7/4 time
•
8: Duplets (6/8 time)
•
12: Triplets
•
SHU: Triplets with middle beat omitted
•
(shuffle)
16: Quadruplets
•
1 Press the second MODE key until the marker
appears next to BE AT.
2 The rhythm setting is shown in the
parameter value display area. Use the + and
– keys to change the setting. Press the + and
– keys at the same time to set it to 4–4 (4/4
time).

TASCAM PT-7 31
3 Press the HOME key to return to the Home
Screen.
Starting and stopping the metronome
Press the START/STOP key to start and stop
the metronome.
Use the SPEAKER switch on the rear panel
to set whether or not the metronome sound
is output from the built-in speaker.
When the metronome is started, the
metronome sound is output from the speaker.
At the same time, the beat indicators on the
display move in time with the rhythm.
5 – Using the metronome
Use the VOLUME dial to adjust the volume.
Changing the metronome sound
This unit has two types of metronome sounds.
1: Acoustic sound
2: Electronic sound
Press and hold the second MODE key from
the top and press the + or – key to show
the current metronome sound. Continue
pressing the MODE key, and press the + or –
key again to change the metronome sound.

32 TASCAM PT-7
5 – Using the metronome

TASCAM PT-7 33
6 – Using the recording and playback functions
Using the built-in mic or an external mic, for
example, you can record approximately 20
minutes to the internal memory.
A maximum of 99 recorded tracks can be stored at
one time.
During the playback of a recorded track, you can
change the pitch while maintaining the original
speed or change the speed while maintaining the
original pitch.
Moreover, you can listen to or play along with the
same performance repeatedly using loop playback.
NOTE
This unit does not show the time. Only the track
number is shown on the Home Screen during recording and playback.
Recording
Setting the input level
This trainer has a function that sets the input level
to one or two sensitivities to suitably adjust the
input signal level to detect pitch and a recording.
Using the INPUT GAIN switch on the rear
panel, set the input level to HIGH when the
input volume is low or to LOW when the
input volume is high.
The recording level meter appears during
recording.

34 TASCAM PT-7
6 – Using the recording and playback functions
Recording
Press the RECORD key to start recording
when stopped or during playback.
NOTE
Recording will start with a new track that is •
placed numerically after the already recorded
tracks.
During recording, the REC indicator lights and •
the arrow mark on the display appears to flow to
the right.
The amount of remaining memory shown on the •
display decreases according to the recording time.
During recording only the STOP and RECORD keys •
can be used.
The pitch guide bars can also be used during •
recording.
The metronome can also be used during record-•
ing but we recommend that you use headphones
to listen to the metronome when recording with
the built-in mic.
Starting a new track while continuing to record
Press the RECORD key during recording
to start a new track from that point and
continue recording.
Stopping recording
Press the STOP key to stop recording.
Recording also stops automatically if the
internal memory capacity becomes full.
Playback
Selecting a track for playback
When stopped or during playback, press the
 and ¯ keys briefly to select a track
for playback.

TASCAM PT-7 35
6 – Using the recording and playback functions
Playing back
Press the Á key to start playback.
Use the VOLUME dial to adjust the playback
volume.
NOTE
During playback, input from the built-in microphone
or any attached external microphone is disabled.
Searching backward/forward
When stopped or during playback, press
and hold the  and ¯ keys to search
backward and forward while playing a
track.
Changing the pitch without changing the speed during playback
1 Press the bottom MODE key repeatedly until
the marker appears on the display next to
KEY.
2 Use the + and – keys to adjust the pitch in
semitones. The range of adjustment is ±6
semitones.
Press the + and – keys at the same time
to restore the original key (pitch: default
value).
3 Press the HOME key to return to the Home
Screen.

36 TASCAM PT-7
6 – Using the recording and playback functions
Changing the speed without changing the pitch during playback
1 Press the bottom MODE key repeatedly until
the marker appears next to SPEED.
2 Use the + and – keys to adjust the playback
speed. The speed can be changed in a range
from 50% (half-speed) to 150% in 10%
increments.
Press the + and – keys at the same time to
restore the original speed (100%: default
value).
3 Press the HOME key to return to the Home
Screen.
Loop playback
1 Confirm that the loop indicator is not shown.
If it is shown, press the IN/OUT key until it
disappears.
2 Press the IN/OUT key during playback to set
the loop IN point. The left side of the loop
indicator lights for the IN point underneath
the play position bar on the display.
3 Press the IN/OUT key again to set the loop
OUT point. After the loop OUT point is set,
TASCAM PT-7 37
6 – Using the recording and playback functions
loop playback starts and the loop indicator
appears to turn.
To stop loop playback, press either the LOOP
or IN/OUT key.
If you press the LOOP key, loop playback
stops, but the loop IN and OUT points are
retained.
The “ ” loop indicator appears on the
screen.
Press the LOOP key again to restart loop
playback.
If you press the IN/OUT key, the loop IN and
OUT points are discarded.
NOTE
Set the loop interval to two seconds or longer.•
Set the loop IN and OUT points in the same track.•
Set the loop OUT point after the IN point in the •
track.

38 TASCAM PT-7
6 – Using the recording and playback functions
Erasing tracks
Erasing only the current track
1 When stopped, press the RECORD key while
pressing and holding the STOP key. “dEL”
appears in the parameter value display area
of the LCD, and the playback position bar
blinks.
2 Press the PL AY key to erase the current
track.
NOTE
Press the STOP key instead of the PLAY key to cancel
erasing the track.
Erasing all tracks
1 When stopped, press the RECORD key while
pressing and holding the STOP key. “dEL”
appears in the parameter value display area
of the LCD, and the playback position bar
blinks.
2 Press the + or – key. The playback position
bar goes off and the remaining memory
indicator blinks.
TASCAM PT-7 39
6 – Using the recording and playback functions
3 Press the PL AY key to erase all tracks.
NOTE
Press the STOP key instead of the PLAY key to •
cancel erasing all tracks.
In step 2, press the + and – keys to set whether •
only the current track or all tracks are erased.
Automatically correcting the pitch of recordings
1 Press the bottom MODE key until the marker
appears next to CORRECT.
2 Use the + and – keys to turn this function
ON and OFF. When ON, the “ON” indicator
appears next to the CORRECT indicator on
the display.
3 Press the PL AY key to start playback.
4 The pitch is shown on the display during
playback.
Select OFF in step 2 above to stop using this
mode.

40 TASCAM PT-7
7 – Specifications
Ratings
Scales:
12–note equal temperament, Pythagorean,
Mean Tone, Werckmeister III, Kirnberger III,
Kellner, Vallotti, Young
Measurement range:
C2 (65.40639 Hz) – B6 (1975.533672 Hz)
Standard output tones:
C2 (65.40639 Hz) – C6 (1046.502247 Hz)
Pitch names:
C, C#, D, Eâ, E, F, F#, G, G#, A, Bâ, B
Tuning modes:
Automatic (five steps), sound
Calibration range:
349.0 to 499.0 Hz in 0.1-Hz increments
Measurement precision: 1 cent
Tempo range: 30–300 quarter notes (É)
Time signatures: 1, 2, 3, 4, 5, 6, 7
Recording time: About 20 minutes (1 Gbit)
Sampling frequency: 44.1 kHz
Quantization bit rate: 16
Number of channels: 1 (monaural)
Built-in mic: Omni directional, monaural
Input/output ratings
INPUT connector for contact mic input
Connector: 6.3-mm (1/4”) standard jack
PHONES connector:
Connector: 3.5-mm stereo mini jack
Maximum output: 15 mW + 15 mW or more
(THD + N 0.1% or less, 32Ω load)
Built-in speaker:
Output: 0.4 mW (1 kHz, THD + N 1% or less)

TASCAM PT-7 41
7 – Specifications
General
Power:
1 AA battery, or Optional AC adaptor
(PS-P520)
Battery life:
Tuner: 12 hours or more (backlight OFF with
the pitch “A” input continuously)
Recording: 8 hours or more (backlight
OFF with recordings erased when the
memory becomes full and recording then
restarted)
(When measured with alkaline batteries.
Batter y life may vary depending on the
operating conditions.)
Power consumption:
1 W (backlight on, with an optional AC
adaptor PS-P520)
Weight (without battery): 125 g/4.03 oz
Operating temperature range: 5 - 35º C/41
- 95ºF
Dimensions (WHD):
150 x 18 x 64 mm/5.91 x 0.71 x 2.52 in
(excluding the projections)
Backup memory
The following settings are saved even when this
unit’s power is turned OFF.
However, settings are saved about two seconds
after they are made, so wait at least two seconds
after making a setting before turning the power
OFF.
Calibration value
•
Sound output in sound mode
•
Scale
•
Tuner response speed
•
Metronome sound type
•
Tempo
•
Time signature
•

42 TASCAM PT-7
150 mm
18 mm
64 mm
7 – Specifications
Playback pitch
•
Playback speed
•
Loop points
•
Dimensional drawings
Illustrations and other depictions may differ in
•
•
part from the actual product
Specifications and external appearance may be
changed without notification to improve the
product.

TASCAM PT-7 43
Notes

PT-7
TEAC CORPORATION
Phone: +81-42-356-9143 www.tascam.jp
1-47 Ochiai, Tama-shi, Tokyo 20 6-8530 Japan
TEAC AMERICA, INC.
Phone: +1-323-726-0303 www.tascam.com
7733 Telegraph Road, Montebello, California 90640 U.S.A.
TEAC CANADA LTD.
Phone: +1905-890-80 08 Facsimile: +1905 -890 -9888 www.tascam.com
5939 Wallace Street, Mississauga, Ontario L4Z 1Z8, Canada
TEAC MEXICO, S.A . de C.V.
Phone: +52-55-5010-6000 www.teacmexico.net
Río Churubusco 364, Colonia Del Carmen, Delegación Coyoacán, CP 04100, México DF, México
TEAC UK LIMITED
Phone: +44-8451-302511 www.tascam.co.uk
Suites 19 & 20, Building 6, Croxley Green Business Park, Hatters Lane, Watford, Hertfordshire. WD18 8TE, U.K.
TEAC EUROPE GmbH
Phone: +49-611-71580 www.tascam.de
Bahnstrasse 12, 65205 Wiesbaden-Erbenheim, Germany
Printed in China
 Loading...